Table of Contents Introduction Quick Start Features In the Box System Requirements Safety Instructions and Precautions Hardware Connections Controls
|
|
|
- Ashley Pierce
- 6 years ago
- Views:
Transcription


1 User Manual
2 Table of Contents Introduction 4 Quick Start 4 Features 4 In the Box 5 System Requirements 6 PC 6 Mac 6 ios 6 Safety Instructions and Precautions 7 Hardware Connections 8 Front Panel 8 Rear Panel 9 Controls 10 Interactive Touch Panel Display 10 Meter Modes and Levels 10 Getting Started 11 Audio Driver Installation 11 Mac and ios devices 11 Windows systems 11 Setting Up the Interface 12 Setting the Output/Phones Level 12 Out/Phones Meter Modes 13 Setting Up Inputs 13 Assigning Input Modes 13 Input Display States 14 Setting Input Levels 14 Input Meter Modes 15 Direct Monitoring 15 How to Enable Direct Monitoring 15 Working with Direct Monitoring: Mono/Stereo Modes 15 Working with Direct Monitoring: Adjusting the Input/USB Balance 16 Additional Notes About Direct Monitoring 17 Headphone Source Selection 17 Troubleshooting 17 Reference: Audio Specifications 19
3 Digital Performance 19 Microphone Inputs 19 Line/Instrument Inputs (Balanced Input) 19 Line/Instrument Inputs (Single Ended Input) 19 Line Outputs 19 Headphone 20 Reference: Direct Monitoring States 21 Contact iconnectivity 41 Warranty 41
4 Introduction Thank you for purchasing the ConnectAUDIO 2/4 Audio/MIDI Interface.Your ConnectAUDIO 2/4 is a member of the most flexible interface line available, with unique features that make it ideal for the stage, studio, and club. Quick Start The Quick Start Guide included in your ConnectAUDIO 2/4 box is a handy primer for getting up and running with this versatile interface. You can also jump to the Getting Started section of this manual to start using the ConnectAUDIO 2/4 right away. Features Features of the ConnectAUDIO 2/4 include: High-resolution audio: up to 24-bit/96kHz AD/DA conversion Direct Monitoring capability that allows you to monitor input sources without computer latency Interactive touch panel display for touch-control of all interface functionality USB audio and MIDI class-compliant USB bus-powered Two XLR - ¼" combination mic/line/instrument analog inputs, with +48V phantom power toggle and line/instrument mode selection Two ¼" TRS balanced analog outputs ¼" stereo headphone output with independent mix control 5-pin MIDI DIN in/out +48V phantom power for condenser microphones 4

5 In the Box The ConnectAUDIO 2/4 Audio/MIDI interface (1) USB cable for connecting your ConnectAUDIO 2/4 to a Mac or PC ConnectAUDIO 2/4 Quick Start Guide 5
 free USB port Mac OSX 10.8 or higher (1) free USB port ios 6.")

6 System Requirements Visit for the most up-to-date compatibility requirements, as these are subject to change. PC Mac ios Windows 7 or higher (1) free USB port Mac OSX 10.8 or higher (1) free USB port ios 6.0 or higher Apple Lightning-to-USB 3 Camera Adaptor Mac and the Mac logo are trademarks of Apple Inc., registered in the U.S. and other countries. ConnectAUDIO 2/4 and iconnectivity are trademarks of ikingdom Corp. Features of this product are protected under patent pending. For more details, refer to: 6

7 Safety Instructions and Precautions 7

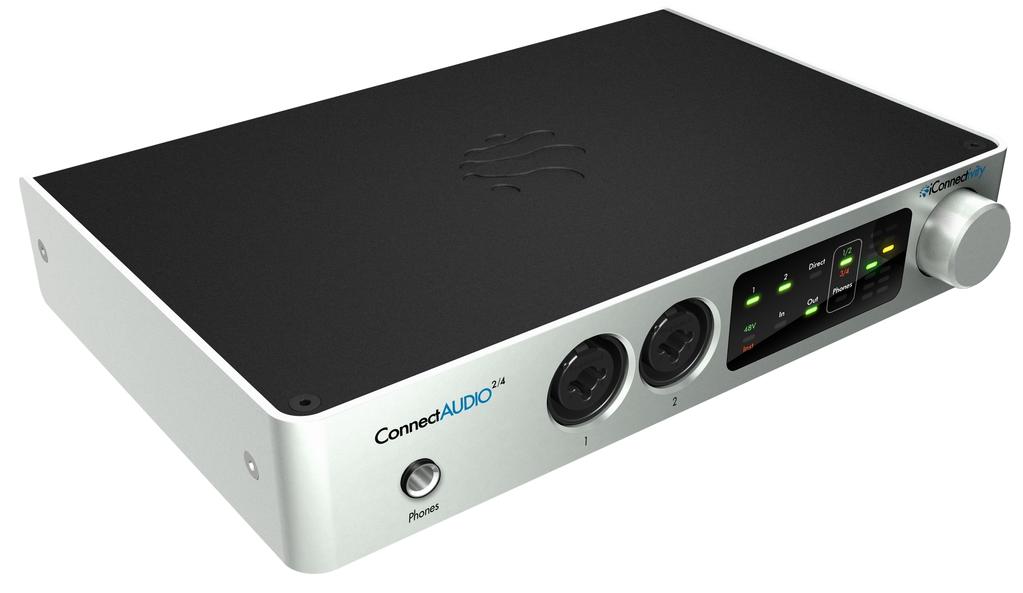
8 Hardware Connections Front Panel 1. Stereo headphone jack 2. Combination XLR and 1/4" analog inputs. Your ConnectAUDIO 2/4 accepts mic, instrument, and line-level input sources and can be configured for +48 phantom power and/or high/low impedance across one or both inputs. 3. Interactive touch panel display. The ConnectAUDIO 2/4 's touch panel makes it easy to select input modes and headphone source, adjust input/output levels, and enable and configure Direct Monitoring. 4. Rotary Control Dial for setting input/output levels/gain and adjusting the balance in Direct Monitoring mode. Learn more about the Direct Monitoring capabilities of your new ConnectAUDIO 2/4 interface. 8

9 Rear Panel 1. USB Device Port: Use the included USB cable to connect your interface to a PC or Mac device running your Digital Audio Workstation host software. An ios device can be connected using the Apple Lightning-to-USB 3 Camera Adaptor. 2. MIDI In/Out: Accepts 5-pin MIDI DIN connections for standard MIDI hardware. MIDI is transmitted at the standard MIDI rate of Kbps 3. Analog Output Jacks 1 2 : ¼" balanced TRS outputs for connecting to powered monitors or a stereo amplifier with attached speakers. Output levels are capable of reaching +12dBu. Exercise caution when setting output levels to avoid potentially overloading equipment in the downstream signal path. Note: Do not connect +48V phantom power to the analog output jacks as this could damage the output circuits. 4. Chassis Grounding Screw: Use this grounding screw if grounding issues occur when connecting multiple electronic devices. 9

10 Controls Interactive Touch Panel Display The ConnectAUDIO 2/4 s Interactive Touch Panel Display is a capacitive touch panel that provides the following features: Eight touch zones for intuitive control over viewing and adjusting Inputs and Outputs, Direct Monitoring, and enabling +48V phantom power for condenser microphones Dual 8-stage LED meters and independent metering modes for select functions A Rotary Control Dial for setting gain/levels and adjusting the balance between inputs and USB audio when in Direct Monitoring mode. The Rotary Control Dial also performs auxillary functions, such as: o o Commiting Gain Settings to Memory: While in Gain Set mode, press the dial once to commit the current settings to memory Powering down the unit: Press and hold the Rotary Control Dial until both meter columns show red and yellow LED indicators at the top of the display. Then, release the Dial to power the unit OFF. From the OFF state, press the Dial once to power the unit back ON. Note: The Rotary Control Dial is continuous and can make fine or coarse adjustments depending on how quickly you rotate the dial. Fine adjustments are recommended if there is a risk of signal overload. Meter Modes and Levels There are two primary meter display modes when selecting In, Out, or Phones on the panel. Successive touches of the In, Out, or Phones buttons toggle between: Signal Level mode, indicated by the green LED. The LED meters display VU (signal level) and will react to the input signal in real time. Gain Set mode, indicated by the red LED. The LED meters display the gain setting and respond to clockwise or counter-clockwise motion of the Rotary Control Dial. A third meter mode is activated when Direct Monitoring is selected on the panel. Refer to the Direct Monitoring section of this manual for more information. 10


11 Getting Started Audio Driver Installation Mac and ios devices An audio driver is not required for Mac and ios devices. The ConnectAUDIO 2/4 is USB class-compliant, enabling it to be recognized automatically by Mac OS X and ios systems and allowing applications to pass audio and MIDI as soon as the ConnectAUDIO 2/4 interface is connected. Windows systems Go to the iconnectivity support page and download the audio driver installer applicable to your Windows version. Then, follow these steps: 1. Double-click on the installer executable file to launch the installer. Depending on your Windows version, it may be necessary to select the installer file and open as Admin. 2. Follow the onscreen prompts to install the audio driver to the default destination folder. When the installer completes, click Finish to exit the wizard. 11
12 Setting Up the Interface 1. Connect the interface to your PC, Mac, or ios device. (Note that a separate Apple Lightning-to- USB 3 Camera Adaptor is required for ios devices) 2. Verify that the interface is powered ON: Your ConnectAUDIO 2/4 is USB bus-powered and does not require an external power supply. Once connected, the default indicator lights on the Touch Panel Display will illuminate, indicating that your ConnectAUDIO 2/4 is powered ON and ready for use. 3. Check for firmware updates: Go to the iconnectivity support page, download and install the iconfig Configuration and Control software, and open iconfig. iconfig will check the firmware version of your ConnectAUDIO 2/4 and prompt you to update your firmware if a newer version is available. iconfig also lets you view information such as the serial number and hardware version of your unit. Note: We recommend updating to the latest firmware, but you can skip this step and return to it later, if you prefer. 4. Enable the interface in your DAW: In your DAW, select the ConnectAUDIO 2/4 as the Input and Output device. Setting the Output/Phones Level Once you have hooked up the ConnectAUDIO 2/4 to your device and enabled it in your DAW host software, follow these steps to set the Ouput/Phones level: 1. Set up a track in your DAW that contains audio and route it to channels 1/2 of the ConnectAUDIO 2/4. 2. Verify that the Phones button LED is green, indicating that channels 1/2 are selected. 3. Touch Out or Phones, according to your monitoring setup; either amplifier/speakers or headphones. Touch once to enable Signal Level metering mode (green LED). Touch twice to enable Gain Set metering mode (red LED). Refer to the Out/Phones Meter Modes section below for more information about meter modes. 4. Verify that the 1 and 2 LED indicators in the upper-left section of the panel are lit. In Out/Phones Mode, these buttons represent the stereo linked output. In Out Mode you can select 1 or 2 individually and adjust each output separately, if you prefer. 12

13 5. Play the audio track in your DAW and move the Rotary Control Dial slowly until you begin to hear audio in your speakers or headphones. Continue adjusting the dial to increase or decrease the level as desired. Out/Phones Meter Modes There are two meter display modes. Pressing the Out or Phones buttons multiple times allows you to toggle between: Signal Level mode, indicated by the green LED. The LED meters display VU (signal level) and will react to the input signal in real time. Gain Set mode, indicated by the red LED. The LED meters display the gain setting and respond to clockwise or counter-clockwise motion of the Rotary Control Dial. Setting Up Inputs Assigning Input Modes With your interface connected, and your DAW open with the ConnectAUDIO 2/4 selected as the Input/Output device, follow these steps to set up an audio input source and pass the audio signal to your DAW from your ConnectAUDIO 2/4 : Dynamic Mics, Instruments or Line-Level Sources 1. Touch 48V/Inst twice, to set Inst as the Input Mode. The indicator light will display red. 2. Touch 1, 2 or both to assign the Inst Input Mode to an input. The input indicator light will turn green for inputs to which Inst mode has been assigned. Figure 1: Input Assign mode; Inst mode assigned to Input 2 13

14 Condenser Mics 1. Touch 48V/Inst once, to set +48V as the Input Mode. The LED indicator will display green. 2. Touch 1, 2 or both to assign the +48V Input Mode to an input. The LED indicator light will display green for inputs to which +48V mode has been assigned. Input Display States Figure 2: Input Assign mode; 48V mode assigned to Input 1 When you press the 48V/Inst button so that 48V is selected, inputs that display green are assigned to 48V mode. When you press the 48V/Inst button so that Inst is selected, inputs that display green are assigned to Inst mode. Note: Input audio is temporarily muted when 48V power is turned ON or OFF. Allow a few moments for the audio path to be re-enabled when engaging or dis-engaging the 48V function. Setting Input Levels With input modes assigned, follow these steps to set input levels: 1. Touch the In button once to enable Signal Level metering mode (green LED). Touch the In button again to enable Gain Set metering mode (red LED). Refer to the Input Meter Modes section below for more information about meter modes. 2. Touch 1 and/or 2 to select either or both inputs. 3. Turn the Rotary Control Dial to raise or lower the level of the selected inputs as you generate source audio. 14
15 Input Meter Modes There are two meter display modes. Pressing the In button multiple times allows you to toggle between: Signal Level mode, indicated by the green LED. The LED meters display VU (signal level) and will react to the input signal in real time. Gain Set mode, indicated by the red LED. The LED meters display the gain setting and adjust to clockwise or counter-clockwise motion of the Rotary Control Dial. The 1 and 2 LEDs will turn red to indicate clipping any time the audio signal exceeds acceptable levels. These clipping indicators will appear regardless of what mode the Touch Panel is currently operating in. Direct Monitoring Direct Monitoring (DM) is a key feature of the ConnectAUDIO 2/4. It enables you to monitor audio input directly from the ConnectAUDIO 2/4 interface without the latency introduced when monitoring the same signal through your DAW. DM offers Mono and Stereo modes and provides Rotary Dial control to balance the level between your audio input(s) and the computer output. How to Enable Direct Monitoring 1. Touch Direct on the Touch Panel. The Direct LED indicator will display green and initialize in Mono mode by default. 2. Select the inputs (1, 2, or both) to be monitored. 3. Use the Rotary Dial to adjust the balance between audio from the input(s) and USB audio. Working with Direct Monitoring: Mono/Stereo Modes When you first initialize DM, it will be enabled in Mono Mode by default. If both inputs are enabled, there will be no panning between audio sources. Toggling DM to Stereo Mode allows you to auto-pan Inputs 1 and 2 to the Left and Right sides of the stereo spectrum and enables clearer monitoring of multiple sources. 15

 and USB")
16 With Direct selected on the Touch Panel Display, Direct Monitoring can be toggled to Stereo Mode by touching the 48V/Inst button. The Direct LED indicator will change from green to red, indicating that DM is now operating in stereo. Figure 3: Toggling DM from Mono to Stereo Mode Refer to the Direct Monitoring States reference section of this manual to view all the possible DM configurations and their respective audio routing. Working with Direct Monitoring: Adjusting the Input/USB Balance With Direct Monitoring enabled, the meters on the Touch Panel Display toggle to show the respective Input (left meter column) and USB (right meter column) levels. Moving the Rotary Control Dial adjusts the balance between the two. Rotate the dial clockwise for more USB signal in the monitor mix Rotate the dial counter-clockwise for more Input signal in the monitor mix Figure 4: Adjusting the Direct Monitoring balance 16
17 Additional Notes About Direct Monitoring The Direct Monitoring LED indicator will change to orange any time you press the In or Out buttons to make adjustments. This indicates that Direct Monitoring is still enabled, but not available for editing. Headphone Source Selection Headphone Source Selection is a feature of the ConnectAUDIO 2/4 that allows you to easily switch between the computer output channels being monitored on the headphones. One touch switches the headphone source between channels 1/2 and channels 3/4. Note that channels 1/2 are always routed to the analog outputs on the back panel, regardless of the headphone source selection. To change headphone sources, press the 1/2_3/4 button on the Touch Panel. indicates that output pair 1/2 is selected indicates that ouput pair 3/4 is selected Troubleshooting I don't hear any sound from the speakers or headphones connected to the interface Make sure that you have set up output levels on the unit. Verify that the output pair over which your DAW is transmitting audio is selected on the Touch Panel. I ve turned on direct monitoring but I'm only hearing the computer output, not the analog input. Verify that you have selected one or more of the analog inputs for monitoring. If neither input is selected, you will only hear the computer output. Refer to the Direct Monitoring section for more information. 17
18 I have a device connected to the MIDI DIN connectors, but I'm not seeing it on my computer. Verify that the MIDI DIN connections are not reversed. MIDI Out on the controller should be connected to MIDI In on the interface, and vice-versa. The interface is not powering up or is turning ON and OFF again. Verify the USB cable and the USB port power. The USB port may not be providing sufficient power. The cable may be too long or of insufficient quality to support the power supply current. 18
19 Reference: Audio Specifications Digital Performance 24 bit resolution A- D Dynamic Range: 102 db (fs= 48kHz, 20Hz 20kHz, A- wt, 24 bit) D- A Dynamic Range: 104 db (fs= 44.1kHz, 20Hz 20kHz, A- wt, 24 bit) Supported sample rates: 44.1 khz, 48 khz, 88.2 khz, 96 kh Microphone Inputs Gain: 0 60 db (1dB steps) Frequency response (flatness): 20 Hz 20 khz (+/- 0.2 db) SNR: +104 db (1kHz, 1 Vrms, 22Hz - 22kHz, A- wt, lowest gain) THD+N: - 90 db (1kHz, 1 Vrms, 22Hz - 22kHz, A- wt, lowest gain) Line/Instrument Inputs (Balanced Input) Attenuator: 20 db (fixed) Impedance: 800 kohms (Hi- Z), 45 kohms (Lo- Z) SNR: +106 db (1kHz, 2 Vrms, 22Hz 22kHz, A- wt) THD+N: db (1kHz, 2 Vrms, 22Hz 22kHz, Unweighted) Maximum Input Level: 16 Vrms, 26 dbu, 24 dbv (1kHz, 22Hz- 22kHz, A- wt, 1% THD+N, SNR = +124 db) Line/Instrument Inputs (Single Ended Input) Attenuator: 20 db (fixed) Impedance: 800 kohms (Hi- Z), 45 kohms (Lo- Z) SNR: +106 db (1kHz, 2 Vrms, 22Hz 22kHz, A- wt) THD+N: - 89 db (1kHz, 2 Vrms, 22Hz 22kHz, A- wt) Maximum Input Level: 8 Vrms, 20 dbu, 18 dbv (1kHz, 22Hz- 22kHz, A- wt, 1% THD+N, SNR = +118 db) Line Outputs Maximum Output Level: 3.1 Vrms, 12 dbu, 9.8 dbv Frequency response (flatness): 20 Hz 20 khz (+/- 0.1 db) 19
20 SNR: +118 db (1kHz, 22Hz - 22kHz, A- wt) THD+N: db (1kHz, 22Hz - 22kHz, A- wt) Headphone Frequency response (flatness): 20 Hz 20 khz (+/- 0.1 db) SNR: +119 db (1kHz, 22Hz - 22kHz, A- wt) THD+N: db (1kHz, 22Hz - 22kHz, A- wt) Power into 30 Ohm channel: 34 mw per channel 20
21 Reference: Direct Monitoring States The diagrams below illustrate the signal flow for each of the ConnectAUDIO 2/4 's respective Direct Monitoring, Input, and Headphone configurations. Direct Monitoring Input Mode Inputs Selected Phones OFF Mono None 1/2 In the ConnectAUDIO 2/4 's device initialization state, Direct Monitoring is Set to OFF and configured in mono mode with no inputs selected. 21
22 Direct Monitoring Input Mode Inputs Selected Phones OFF Mono None 1/2 22
23 Direct Monitoring Input Mode Inputs Selected Phones ON Mono Input 1 1/2 23
24 Direct Monitoring Input Mode Inputs Selected Phones ON Mono Inputs 1 and 2 1/2 24
25 Direct Monitoring Input Mode Inputs Selected Phones ON Mono Input 2 1/2 25
26 Direct Monitoring Input Mode Inputs Selected Phones ON Stereo None 1/2 26
27 Direct Monitoring Input Mode Inputs Selected Phones ON Stereo Inputs 1 and 2 1/2 27
28 Direct Monitoring Input Mode Inputs Selected Phones ON Stereo Input 1 1/2 28
29 Direct Monitoring Input Mode Inputs Selected Phones ON Stereo Input 2 1/2 29
30 Direct Monitoring Input Mode Inputs Selected Phones OFF Mono None 3/4 30
31 Direct Monitoring Input Mode Inputs Selected Phones ON Mono None 3/4 31
32 Direct Monitoring Input Mode Inputs Selected Phones ON Mono Input 1 3/4 32
33 Direct Monitoring Input Mode Inputs Selected Phones ON Mono Inputs 1 and 2 3/4 33
34 Direct Monitoring Input Mode Inputs Selected Phones ON Mono Input 2 3/4 34
35 Direct Monitoring Input Mode Inputs Selected Phones ON Stereo None 3/4 35
36 Direct Monitoring Input Mode Inputs Selected Phones ON Stereo Input 1 3/4 36
37 Direct Monitoring Input Mode Inputs Selected Phones ON Stereo Inputs 1 and 2 3/4 37
38 Direct Monitoring Input Mode Inputs Selected Phones ON Stereo Input 2 3/4 38
39 Direct Monitoring Input Mode Inputs Selected Phones OFF Mono Input 1 1/2 39
40 Direct Monitoring Input Mode Inputs Selected Phones OFF Mono Input 2 1/2 40
41 Contact iconnectivity Monday to Friday 9:00 am to 5:00 pm (Mountain Time) iconnectivity #100, th Street NE Calgary, AB T2A 6K8 Canada Warranty iconnectivity warrants to the original purchaser that this unit is free of defects in materials and workmanship under normal use and maintenance for a period of one (1) year from the date of original purchase. The warranty applies only to registered iconnectivity users that register their product(s) within fourteen (14) days of time of original purchase. To register iconnectivity products, visit iconnectivity.com. If the unit qualifies for warranty service during the one (1) year period, it will be repaired, or replaced, at iconnectivity s option, at no charge, when returned prepaid to the iconnectivity Technical Service Center with proof of purchase the sales receipt may be used for this purpose. Installation labor is not covered under this warranty. All replacement parts, whether new or re-manufactured, assume as their warranty period for only the remaining time of this warranty. This warranty does not apply to damage caused by improper use, accident, abuse, improper voltage service, fire, flood, lightning, or other acts of God, or if the product was altered or repaired by anyone other than iconnectivity Technical Service Center. Consequential and incidental damages are not recoverable under this warranty. Some regions do not allow the exclusion or limitation of incidental or consequential damages, so the above limitation or exclusion may not apply. This warranty gives you specific legal rights, and you may also have other rights, which vary from state to state. No portion of this warranty may be copied or duplicated without the expressed written permission of iconnectivity. THIS WARRANTY IS NOT TRANSFERRABLE. For warranty service, please contact iconnectivity via the contact information presented in the section above. 41
Table of Contents Introduction Key Features In the Box System Requirements Hardware Connections Getting Started PlayAUDIO12 Failover Redundancy
 User Guide Table of Contents Introduction 3 Key Features 3 In the Box 4 System Requirements 5 Macintosh 5 Windows 5 ios 5 Hardware Connections 6 Front Panel 6 Rear Panel 7 Getting Started 8 Install iconfig
v.1.0 Owner s Manual
 v.1.0 Owner s Manual 2 Interference with other electrical devices Radios and televisions placed nearby may experience reception interference. Operate this unit at a suitable distance from radios and televisions.
v.1.1 Owner s Manual
 v.1.1 Owner s Manual Interference with other electrical devices Radios and televisions placed nearby may experience reception interference. Operate this unit at a suitable distance from radios and televisions.
IN 2 USB 2.0 COMPUTER AUDIO INTERFACE OWNER S MANUAL
 IN 2 USB 2.0 COMPUTER AUDIO INTERFACE OWNER S MANUAL IN2 Safety Declarations CAUTION: For protection against electric shock, do not remove the cover. No user serviceable parts inside. WARNING: This equipment
OVERVIEW SYSTEM REQUIREMENTS
 USER GUIDE OVERVIEW The AI-1 USB Audio Interface adds studio-quality Input and Output capabilities to your PC or Mac, turning your recording software into a full recording setup. With its high quality
 www.iconnectivity.com USER GUIDE WARRANTY INFORMATION iconnectivity warrants to the original purchaser that this unit is free of defects in materials and workmanship under normal use and maintenance for
 www.iconnectivity.com USER GUIDE WARRANTY INFORMATION iconnectivity warrants to the original purchaser that this unit is free of defects in materials and workmanship under normal use and maintenance for
USBMIX4. Project Series. User's Manual FOUR CHANNEL MIXER WITH USB INTERFACE
 USBMIX4 FOUR CHANNEL MIXER WITH USB INTERFACE Project Series User's Manual IMPORTANT SAFETY INSTRUCTIONS - READ FIRST This symbol, wherever it appears, alerts you to the presence of uninsulated dangerous
Version 1.1 OWNER S MANUAL
 Version 1.1 OWNER S MANUAL Version 1.1 Warranty iconnectivity warrants to the original purchaser that this unit is free of defects in materials and workmanship under normal use and maintenance for a period
INTERPRETER CONTROL UNIT MODEL PL ICU 2 2 (2 INPUTS 2 OUTPUTS) INSTRUCTION MANUAL Technical Data Warranty Information
 INSTRUCTION MANUAL Technical Data Warranty Information") INTERPRETER CONTROL UNIT MODEL PL ICU 2 2 (2 INPUTS 2 OUTPUTS) INSTRUCTION MANUAL Technical Data Warranty Information 2 INTERPRETER CONTROL UNIT - MODEL PL ICU 2 2 INSTRUCTION MANUAL Congratulations on
INTERPRETER CONTROL UNIT MODEL PL ICU 2 2 (2 INPUTS 2 OUTPUTS) INSTRUCTION MANUAL Technical Data Warranty Information 2 INTERPRETER CONTROL UNIT - MODEL PL ICU 2 2 INSTRUCTION MANUAL Congratulations on
1 Mic-In / 1 Guitar-In, 2-Out Professional vocal recording USB Interface. User manual
 1 Mic-In / 1 Guitar-In, 2-Out Professional vocal recording USB Interface User manual Important Safety Instructions 1. Read this manual thoroughly before using this unit. 2. Keep this manual for future
NOTHING LESS THAN ALL YOU NEED // DGT 450 MULTI-PURPOSE USB MICROPHONE USER MANUAL IOS // OS X // WINDOWS
 NOTHING LESS THAN ALL YOU NEED IOS // OS X // WINDOWS MULTI-PURPOSE USB MICROPHONE Made for iphone 6s, iphone 6s Plus, iphone 6, iphone 6 Plus, iphone 5, iphone 5s, iphone 5c, ipad (4th generation), ipad
HeadAmp6 PROFESSIONAL SIX CHANNEL HEADPHONE AMPLIFIER OPERATION MANUAL
 HeadAmp6 PROFESSIONAL SIX CHANNEL HEADPHONE AMPLIFIER OPERATION MANUAL 1 IMPORTANT SAFETY INSTRUCTIONS READ FIRST This symbol, wherever it appears, alerts you to the presence of uninsulated dangerous voltage
4-In / 2-Out with +48V Phantom Power Recording USB Interface. User manual
 4-In / 2-Out with +48V Phantom Power Recording USB Interface User manual Important Safety Instructions 1. Read this manual thoroughly before using this unit. 2. Keep this manual for future reference. 3.
2 Mic/1-Guitar in, 2 Line out recording USB Interface. User manual
 2 Mic/1-Guitar in, 2 Line out recording USB Interface User manual Important Safety Instructions 1. Read this manual thoroughly before using this unit. 2. Keep this manual for future reference. 3. Take
USB AUDIO INTERFACE. Steinberg Web Site C.S.G., Pro Audio Division 2012 Yamaha Corporation 209MW-A0
 USB AUDIO INTERFACE EN DE FR ES IT ZH JA Steinberg Web Site http://www.steinberg.net C.S.G., Pro Audio Division 2012 Yamaha Corporation 209MW-A0 Contents Contents Contents...2 A Message From the Development
QUICKSTART GUIDE ENGLISH ( 3 9 ) MANUAL DE INICIO RÁPIDO ESPAÑOL ( ) GUIDE D UTILISATION RAPIDE FRANÇAIS ( )
 MANUAL DE INICIO RÁPIDO ESPAÑOL ( ) GUIDE D UTILISATION RAPIDE FRANÇAIS ( )") QUICKSTART GUIDE ENGLISH ( 3 ) MANUAL DE INICIO RÁPIDO ESPAÑOL ( 11 17 ) GUIDE D UTILISATION RAPIDE FRANÇAIS ( 1 25 ) MANUALE RAPIDO DI UTILIZZAZIONE ITALIANO ( 27 33 ) KURZANLEITUNG DEUTSCH ( 35 41 )
QUICKSTART GUIDE ENGLISH ( 3 ) MANUAL DE INICIO RÁPIDO ESPAÑOL ( 11 17 ) GUIDE D UTILISATION RAPIDE FRANÇAIS ( 1 25 ) MANUALE RAPIDO DI UTILIZZAZIONE ITALIANO ( 27 33 ) KURZANLEITUNG DEUTSCH ( 35 41 )
CM-series compact mixing consoles. User Manual
 CM-series compact mixing consoles CM4-LIVE (170.800) CM4-STUDIO (170.810) CM6-LIVE (170.801) CM8-LIVE (170.802) CM8-STUDIO (170.812) CM10-LIVE (170.803) User Manual Features: 4 LIVE models with USB/SD
TVA2.1 2-Channel Digital Amplifier Installation Manual
 TVA2.1 2-Channel Digital Amplifier Installation Manual SAFETY INSTRUCTIONS WARNING: TO REDUCE THE RISK OF FIRE OR ELECTRIC SHOCK, DO NOT EXPOSE THIS APPLIANCE TO RAIN OR MOISTURE. CAUTION: TO REDUCE THE
USBPre 2. User Guide and Technical Information
 USBPre 2 User Guide and Technical Information Sound Devices, LLC 300 Wengel Drive Reedsburg, WI USA +1 (608) 524-0625 fax: +1 (608) 524-0655 Toll-Free: (800) 505-0625 www.sounddevices.com support@sounddevices.com
M-1264 M-1212E STEREO MIXERS. TOA Corporation OPERATING INSTRUCTIONS. TOA 1000 series CAUTION
 OPERATING INSTRUCTIONS STEREO MIXERS M-1264 M-1212E TOA 1000 series CAUTION TO REDUCE THE RISK OF ELECTRICAL SHOCK, DO NOT REMOVE COVER. NO USER SERVICEABLE PARTS INSIDE. REFER SERVICING TO QUALIFIED SERVICE
CM SERIES. Compact Live and Studio Mixers. Item ref: UK, UK, UK, UK, UK, UK User Manual
 CM SERIES Compact Live and Studio Mixers Item ref: 170.800UK, 170.801UK, 170.802UK, 170.803UK, 170.810UK, 170.812UK User Manual Caution: Please read this manual carefully before operating Damage caused
RemoteAmp Two. JK Audio. Stereo Headphone Amplifier. User Guide
 RemoteAmp Two Stereo Headphone Amplifier User Guide JK Audio Welcome Thank You Thank you for purchasing the JK Audio RemoteAmp Two. Please read this guide for instructions on setting up and using your
Version 1.0 OWNER S MANUAL
 Version 1.0 OWNER S MANUAL Version 1.0 Warranty iconnectivity warrants to the original purchaser that this unit is free of defects in materials and workmanship under normal use and maintenance for a period
DXA-MICRO PRO. Operating Manual
 Operating Manual DXA-MICRO PRO Compact XLR Adapter for DSLR Cameras and Camcorders This operating manual explains the adapter function settings and how to use the adapter to record audio into the camera.
Owner s Manual. TSD-RL21 2x1 Mic/Line Mixer. TSD-RL21 2x1 Mic/Line Mixer with Remote Level
 Owner s Manual with Remote Level Owner s Manual Description The versatile Atlas Sound 2x1 mic/line mixer is ideal for applications where paging, public address, and BGM music is required. Use as a standalone
Overview. Features. Technical Data Sheet 1 / 6. Mixing Console AG03
 Overview AG03 is a multi-purpose mixer with USB audio interface, especially optimized for webcasting. Rear Panel Features Input channels: 3 Line Inputs (1 mono, 1 stereo), 1 Mic Inputs with 48V phantom
Copyright 2011 Rational Acoustics, LLC. All rights reserved.
 User s Manual Copyright 2011 Rational Acoustics, LLC. All rights reserved. Overview The Smaart I-O is a 2-in, 2-out, mic preamp and USB audio interface device designed specifically for professional audio
DA-816 USER GUIDE. Version 1.2 January Park Road Chanhassen, MN
 DA-816 USER GUIDE Version 1.2 January 2017 1266 Park Road Chanhassen, MN 55317 952-401-7700 support@digitalaudio.com www.digitalaudio.com SAFETY INSTRUCTIONS TO REDUCE THE RISK OF ELECTRIC SHOCK, DO NOT
XC4100 INSTALLATION/OWNER'S MANUAL AM/FM/Cassette Receiver
 XC4100 INSTALLATION/OWNER'S MANUAL AM/FM/Cassette Receiver Preparation XC4100 INSTALLATION Please read entire manual before installation. Before You Start Disconnect negative battery terminal. Consult
PRESENTER. Microphone & laptop presentation mixer
 TM PRESENTER Microphone & laptop presentation mixer 1588 Kebet Way, Port Coquitlam BC V3C 5M5 Tel: 604-942-1001 Fax: 604-942-1010 Email: info@radialeng.com Presenter Microphone & laptop presentation mixer
MG12XU Overview Features Technical Data Sheet
 Overview MG12XU is a versatile mixer suitable for a wide range of users and applications. Rear Panel Features Input channels: 12 Line Inputs (4 mono, 4 stereo), 6 Mic Inputs with 48V phantom power and
Table of Contents Mixware, LLC. All rights reserved. Electrix is a registered trademark of Mixware, LLC.
 OWNER S MANUAL Table of Contents Introduction... 3 Box Contents... 3 Controls & Connections... 4 System Routing Diagram... 6 Minimum Requirements... 6 Windows ASIO Driver Installation... 7 MacOS Driver
SmartBoom PRO PHS-SB100-4F, PHS-SB100-5M, PHS-SB100-U, PHS-SB200-4F, PHS-SB200-5M, PHS-SB200-U. Operating Manual
 SmartBoom Operating Manual PRO PHS-SB100-4F, PHS-SB100-5M, PHS-SB100-U, PHS-SB200-4F, PHS-SB200-5M, PHS-SB200-U Thank You We at Pliant Technologies, LLC want to thank you for purchasing the SmartBoom PRO
Professional 24-bit USB Audio Interface. User s Guide
 Professional 24-bit USB Audio Interface User s Guide - Copyright 2016-2017 Revision 2, May 2017 www.esi-audio.com INDEX 1. Introduction... 4 1.1 Features... 4 2. Installation... 7 2.1 System Recommendation...
OWNERS MANUAL MAKERS OF THE ORIGINAL
 OWNERS MANUAL JACKS in the BOX MAKERS OF THE ORIGINAL HOT SPOT PERSONAL MONITOR Table of Contents Introduction...1 Uses......1 Operation... 2 Battery Installation...2 Using the Multi Mixer...2 Input Channels...3
USER GUIDE. Publication AP8509. Allen & Heath 1 XONE:K2 User Guide
 USER GUIDE Publication AP8509 Allen & Heath 1 XONE:K2 User Guide Limited One Year Manufacturer s Warranty Allen & Heath warrants the Allen & Heath - branded hardware product and accessories contained in
Marshall Electronics. AR-AM4-BG Analog Audio Monitor. Operating Instructions
 Marshall Electronics AR-AM4-BG Analog Audio Monitor Operating Instructions 1 2 This page left intentionally blank Contents Product Overview...5 Features...5 Installation and Initial Setup...5 Unpacking...
DATA SHEET DEVIO DEVIO CR-1 CONFERENCE ROOM DEVICE
 DATA SHEET DEVIO DEVIO CR-1 CONFERENCE ROOM DEVICE The Devio CR-1 is the hub that creates a desktop-like experience away from the desk, allowing you to connect to the AV technology in a meeting room simply
USBMIX6. Project Series
 USBMIX6 Six Channel Mic-Inst-Line Mixer - Computer Interface Project Series User s Manual IMPORTANT SAFETY INSTRUCTIONS - READ FIRST This symbol, wherever it appears, alerts you to the presence of uninsulated
Fast Track C600 User Guide
 Fast Track C600 User Guide Legal Notices This guide is copyrighted 2011 by Avid Technology, Inc., with all rights reserved. Under copyright laws, this guide may not be duplicated in whole or in part without
Owner s Manual. TSD-ZDC Audio Impedance Combiner/Divider. TSD-ZDC Audio Impedance Combiner/Divider
 Owner s Manual 1 Owner s Manual Description The Atlas Sound is a universal impedance divider/combiner for passively summing or splitting of mic or line level signals. Features include four balanced 10K
Reference Manual Roland Corporation 01
 Reference Manual 2017 Roland Corporation 01 Panel Descriptions Rubix22 Front Panel 1 2 3 2 1 6 7 8 When connecting a guitar or bass, use the INPUT 1L jack. The sound level will be very low if you connect
Marshall Electronics. AR-AM1 Analog Audio Monitor. Operating Instructions
 Marshall Electronics AR-AM1 Analog Audio Monitor 1 Operating Instructions 2 This page left intentionally blank Contents Product Overview...5 Features...5 Installation and Initial Setup...5 Unpacking...
Marshall Electronics. Operating Instructions. Warranty. AR-AM1 Analog Audio Monitor
 Warranty Marshall Electronics warranties to the first consumer that this AR-AM1 Audio Monitor will, under normal use, be free from defects in workmanship and materials, when received in its original container,
Overview. Features. Technical Data Sheet 1 / 6. Mixing Console AG06
 Overview AG6 is a multi-purpose mixer with USB audio interface, especially optimized for webcasting. Rear Panel Features Input channels: 6 Line Inputs (2 mono, 2 stereo), 2 Mic Inputs with 48V phantom
To avoid damage due to lightning, the power supply should be unplugged during an electrical storm.
 FootSim User Guide 2 Year Limited Warranty Sound Sculpture Musical Instrument Products (Sound Sculpture) warrants the FootSim to the original purchaser to be free of defects in material and workmanship
Wildtronics, LLC Amplified Omni Microphone Instruction Manual
 Wildtronics, LLC Amplified Omni Microphone Instruction Manual Thank you for purchasing the versatile Wildtronics Amplified Omni Microphone. This innovative microphone has built-in, adjustable preamplifiers
Marshall Electronics. Operating Instructions. Warranty. AR-AM4 Analog Audio Monitor
 Warranty Marshall Electronics warranties to the first consumer that this AR-AM4 Audio Monitor will, under normal use, be free from defects in workmanship and materials, when received in its original container,
User Guide USB-PRO USB Direct Box True to the Music
 www.radialeng.com USB-PRO USB Direct Box User Guide 1588 Kebet Way, Port Coquitlam BC V3C 5M5 tel: 604-942-1001 fax: 604-942-1010 info@radialeng.com www.radialeng.com Radial USB-PRO USB to Audio Direct
S a l e s G u i d e E-MU 0204 USB 1
 Sales Guide E-MU 0204 USB 1 E-MU 0204 USB HIGH-RESOLUTION USB POWERED AUDIO INTERFACE Retail Street Price: US = $129.99 UK = 129.99 (including new 20% VAT from Jan. 1, 2010) Euro = 129.99 (including 20%
Dual Channel Active Direct Box. Artcessories. User's Manual
 Dual Channel Active Direct Box Artcessories User's Manual IMPORTANT SAFETY INSTRUCTION READ FIRST This symbol, whenever it appears, alerts you to the presence of uninsulated dangerous voltage inside enclosure-voltage
Apogee Quartet. QuickStart Guide
 Apogee Quartet QuickStart Guide V1, September, 2012 Contents Overview! 3 Introduction! 3 Package contents! 4 Quartet panel tour! 5 Display and touchpad tour! 7 Connecting to your Mac! 8 Adjusting Input
1 Mic-In / 2-Out Professional Vocal Recording USB Interface. User manual
 1 Mic-In / 2-Out Professional Vocal Recording USB Interface User manual Important Safety Instructions 1. Read this manual thoroughly before using this unit. 2. Keep this manual for future reference. 3.
2 Mic/1-Guitar in, 2 Line out recording USB Interface with DSP effect built-in. User manual
 2 Mic/1-Guitar in, 2 Line out recording USB Interface with DSP effect built-in. User manual Important Safety Instructions 1. Read this manual thoroughly before using this unit. 2. Keep this manual for
CalArts Film/Video Sound Quick Start for Sound Devices 744T Time Code Hard Drive Field Recorder:
 CalArts Film/Video Sound Quick Start for Sound Devices 744T Time Code Hard Drive Field Recorder: Front Panel Descriptions 1) Digital Input LEDs! Indicates the presence of digital signal on the respective
Owner s Manual. TSD-ZDC Audio Impedance Combiner/Divider. TSD-ZDC Audio Impedance Combiner/Divider. AtlasIED.com
 Owner s Manual 1 AtlasIED.com Owner s Manual Description The AtlasIED is a universal impedance divider/combiner for passively summing or splitting of mic or line level signals. Features include four balanced
Compact USB Digital Speakers. Quick Start User Guide
 Compact USB Digital Speakers Quick Start User Guide Quick Start User Guide is also available on our website: www.ultralinkproducts.com/ucube This product is intended for use solely with the USB and RCA
Welcome to the New Standard in Recording Technology. Product Overview
 Welcome to the New Standard in Recording Technology Product Overview Product Overview Copyright 2010, Apogee Electronics. The information in this document is confidential and proprietary. Redistribution
Operating Manual DXA-BMD Passive Audio Adapter for the BlackMagic Cinema Camera
 Operating Manual DXA-BMD Passive Audio Adapter for the BlackMagic Cinema Camera This operating manual explains the adapter function settings and how to use the adapter to record audio into the camera.
Reference Guide 2015 ZOOM CORPORATION. Copying or reprinting this manual in part or in whole without permission is prohibited.
 Reference Guide 2015 ZOOM CORPORATION Copying or reprinting this manual in part or in whole without permission is prohibited. Introduction is a mixer application designed specifically for the. Using a
TSD-DA28 2x8 Balanced Line Distribution Amplifier
 2x8 Balanced Line Distribution Amplifier 1 Description The Atlas Sound 2x8 distribution amplifier is designed to provide clean, isolated signal distribution locally or to remote locations. The unit allows
Backtrack Stereo Backing Track Switcher User Guide True to the Music
 www.radialeng.com User Guide Backtrack Stereo Backing Track Switcher 1588 Kebet Way, Port Coquitlam British Columbia, Canada, V3C 5M5 Tel: 604-942-1001 Fax: 604-942-1010 Email: info@radialeng.com Radial
TOA ELECTRIC CO., LTD.
 Operating Instruction Manual TOA MIXING CONSOLE Model RX-31C TOA ELECTRIC CO., LTD. KOBE, JAPAN Contents General Description...2 Features...2 Front Panel...3 Rear Panel...4 Rack Mounting Instructions...5
HDACC High Def Audio Control Center
 HDACC High Def Audio Control Center Operation Manual Contact: Bob Rapoport, bob@essenceelectrostatic.com, 727-580-4393 St. Petersburg, FL USA SAFETY PRECAUTIONS Please read all instructions before attempting
Made for iphone 5, iphone 5s, iphone 5c, ipad (4th generation), ipad Air, ipad mini, ipod touch (5th generation) UNRIVALED VERSATILITY // DGT 650
, ipad Air, ipad mini, ipod touch (5th generation) UNRIVALED VERSATILITY // DGT 650") Made for iphone 5, iphone 5s, iphone 5c, ipad (4th generation), ipad Air, ipad mini, ipod touch (5th generation) UNRIVALED VERSATILITY The New Digital RECORDING Multi-Tool // DGT 650 User Manual 1 // Index
Made for iphone 5, iphone 5s, iphone 5c, ipad (4th generation), ipad Air, ipad mini, ipod touch (5th generation) UNRIVALED VERSATILITY The New Digital RECORDING Multi-Tool // DGT 650 User Manual 1 // Index
MIKE di Y gital USER GUIDE
 IKEY digital USER GUIDE UP CLOSE WITH MIKEY D. FEATURES 1 2 3 4 5 6 7 8 Recording Side Pivoting Head Sensitivity Selector Switch Sensitivity Switch Indicator Lights Connector for iphone or ipad Stereo
USB 3.0. Operation Manual 2015 ZOOM CORPORATION. Copying or reprinting this manual in part or in whole without permission is prohibited.
 USB 3.0 Operation Manual 2015 ZOOM CORPORATION Copying or reprinting this manual in part or in whole without permission is prohibited. Contents/Introduction Contents Introduction... 02 Usage and Safety
S300i. Two Channel Integrated Audio Amplifier
 User's Guide S300i e.one Two Channel Integrated Audio Amplifier Series Bel Canto Design, LTD. 212 Third Avenue North Minneapolis, MN 55401 Phone: (612) 317.4550 Fax: (612) 359.9358 www.belcantodesign.com
Quick Setup The MVi is compatible with most devices that have a USB or Lightning connector. Touch Panel Interface Controls. MVi. Overview.
 MVi Digital Audio Interface General Description The Shure MVi is a compact digital audio interface used to connect a microphone, guitar, or other instrument to a computer or mobile device. Audio and power
Operation Manual 2016 ZOOM CORPORATION. Copying or reprinting this manual in part or in whole without permission is prohibited.
 Operation Manual 2016 ZOOM CORPORATION Copying or reprinting this manual in part or in whole without permission is prohibited. Contents Introduction 2 Safety and Usage Precautions 3 Part Names 4 Connecting
MODEL 805 USER MANUAL
 MODEL 805 USER MANUAL All Rights Reserved Page 1 of 12 UNPACKING & INSPECTION Save all packing materials they are required for returns and warranty service. Inspect the 805 and packing materials for any
DS-DAC-100 DS-DAC-100m DS-DAC-10
 DS-DAC-100 DS-DAC-100m DS-DAC-10 Owner's Manual Advanced Guide Before you connect this device You must select driver settings in order to use the DS-DAC-100, DS-DAC-100m, or DS- DAC-10. To ensure that
Manual.
 EN HPA-3U Manual www.matrix-digi.com Over view HPA-3U is a biggest evolution since the M-Stage series headphone amplifier came out, the new appearance, the new circuit design and radical performance improvement
PREMIUMAUDIOVIDEOLIGHTINGANDPOWERPRODUCTS
 FACTOR ELECTRONICS PREMIUMAUDIOVIDEOLIGHTINGANDPOWERPRODUCTS V-RVC Owners Manual IMPORTANT NOTE: THIS OWNER'S MANUAL IS PROVIDED AS AN INSTALLATION AND OPERATING AID. FACTOR ELECTRONICS DOES NOT ASSUME
Overview. Features. Technical Data Sheet 1 / 6. Mixing Console MG10. MG10 is a versatile mixer suitable for a wide range of users and applications.
 Overview MG10 is a versatile mixer suitable for a wide range of users and applications. Rear Panel Features Input channels: 10 Line Inputs (4 mono, 3 stereo), 4 Mic Inputs with 48V phantom power and HPH
THE ELEMENT SUPPORT OPERATING INSTRUCTIONS AMP+DACS ONLINE BY PHONE BY MAIL
 OPERATING INSTRUCTIONS AMP+DACS THE ELEMENT SUPPORT ONLINE BY PHONE BY MAIL CONTACT@JDSLABS.COM JDSLABS.COM/SUPPORT 314-252-0936 9:30AM-6PM CST, MONDAY THROUGH FRIDAY 909 N BLUFF RD COLLINSVILLE, IL 62234
Operation Manual. You must read the Usage and Safety Precautions before use ZOOM CORPORATION
 Operation Manual You must read the Usage and Safety Precautions before use. 2018 ZOOM CORPORATION Copying or reprinting this manual in part or in whole without permission is prohibited. Product names,
PRELIMINARY DATA SHEET AM 1 AUTOMIXER SHIPS APRIL 2010
 PRELIMINARY DATA SHEET SHIPS APRIL 00 AM MIC INPUTS 4 MIC AUX AUX SOURCE PHONES AUX AUX MICS AM G OL G OL G OL LOCATE General Description The Rane AM is part gain-sharing automatic mic mixer, part manual
DXRM57BT INSTALLATION/OWNER'S MANUAL. AM/FM Receiver with Bluetooth
 DXRM57BT INSTALLATION/OWNER'S MANUAL AM/FM Receiver with Bluetooth DXRM57BT INSTALLATION Preparation Please read entire manual before installation. Before You Start Disconnect negative battery terminal.
VM-10 USB Desktop Audio Device Installation Guide
 VM-10 USB Desktop Audio Device Installation Guide THE POSSIBILITIES ARE ENDLESS. 9 Austin Drive, Marlborough, CT 06447 (860) 295-8100 www.essentialtel.com sales@essentialtel.com Table of Contents Introduction.3
Quick Guide. You must read the Usage and Safety Precautions before use.
 Quick Guide You must read the Usage and Safety Precautions before use. The Operation Manual can be downloaded from the ZOOM website (https://www.zoom.jp/docs/l-0). 018 ZOOM CORPORATION Copying or reprinting
VM SERIES Rackmount 100V mixer-amplifiers
 VM SERIES Rackmount 100V mixer-amplifiers VM60, VM120, VM240Z Caution: Please read this manual carefully before operating Damage caused by misuse is not covered by the warranty Introduction Thank you for
2 Mic/1-Guitar in, 2 Line out recording USB Interface with DSP effect built-in. User manual
 2 Mic/1-Guitar in, 2 Line out recording USB Interface with DSP effect built-in. User manual Important Safety Instructions 1. Read this manual thoroughly before using this unit. 2. Keep this manual for
B/W PAN/TILT FIXED DOME CAMERA
 B/W PAN/TILT FIXED DOME CAMERA OWNER S MANUAL INSTALLATION AND OPERATION MODEL: BEFORE INSTALLING OR OPERATING THE SYSTEM, PLEASE READ THIS MANUAL. CA1022 Important Safety Instructions Remove all packaging
Apogee Symphony I/O Mk II
 Apogee Symphony I/O Mk II User s Guide April 2017 Contents Overview... 5 Introduction... 5 Features... 5 Package Contents... 6 Register your product : apogeedigital.com/register... 6 Symphony I/O Mk II
Speaker Selectors Models SSW-L4 EX and SSW-L6 EX. User Manual. SSW-L4 EX (bottom) and SSW-L6 EX (top)
 and SSW-L6 EX (top)") Speaker Selectors Models SSW-L4 EX and SSW-L6 EX User Manual SSW-L4 EX (bottom) and SSW-L6 EX (top) Table of Contents Important Safety Precautions...2 What s Included...2 Introduction... 3 Front Panel...
Speaker Selectors Models SSW-L4 EX and SSW-L6 EX User Manual SSW-L4 EX (bottom) and SSW-L6 EX (top) Table of Contents Important Safety Precautions...2 What s Included...2 Introduction... 3 Front Panel...
AB-315. ibus Wall-Dock for A-Bus Audio Systems
 AB-315 ibus Wall-Dock for A-Bus Audio Systems TM By 10 The AB-315 is an on-wall ipod docking station for A-BUS audio systems. The dock connector slides in and out to adjust for any ipod and the non-skid
*TD * Loudspeaker Signal Processing Products User Manual SC28. Two-Input, Eight-Output System Controller for QSC Loudspeakers
 SC281675 MacArthur Blvd., Costa Mesa, CA, 92626 USA Main Number (714) 754-6175 or toll free (USA only) (800) 854-4079 Customer Service(714) 957-7150 or toll free (USA only) (800) 772-2834 Loudspeaker Signal
PS 150 SINGLE CHANNEL TELEPHONE INTERFACE. USER MANUAL August 2016
 PS 150 SINGLE CHANNEL TELEPHONE INTERFACE USER MANUAL August 2016 This product is designed and manufactured by: ASL Intercom B.V. Zonnebaan 42 3542 EG Utrecht The Netherlands Phone: +31 (0)30 2411901 Fax:
MixerFace R4. Mobile Recording Interface. User Manual
 Mobile Recording Interface MixerFace and CEntrance are trademarks or registered trademarks of CEntrance LLC, All rights reserved. Other trademarks are property of their respective holders. Rev 8.3. 2018-08-02
T L Audio INDIGO SERIES. User Manual PA-2001 VALVE PRE-AMPLIFIER. Tony Larking Professional Sales Limited, Letchworth, England.
 T L Audio INDIGO SERIES User Manual PA-2001 VALVE PRE-AMPLIFIER Tony Larking Professional Sales Limited, Letchworth, England. Tel: 01462 490600. International +44 1462 490600. Fax: 01462 490700. International
PORTABLE WIRELESS PA SYSTEM WITH LITHIUM -ION RECHARGEABLE BATTERY AWP6042 OWNER S MANUAL. Handheld Microphone Headset Transmitter
 PORTABLE WIRELESS PA SYSTEM WITH LITHIUM -ION RECHARGEABLE BATTERY AWP6042 OWNER S MANUAL X1 Headset Microphone AWX6042H VHF Wireless Headset Transmitter Handheld Microphone Headset Transmitter Thank you
Hardware Operation Manual for CLE1000 H2K CLE1000 H2V
 Variable ISI Channel CLE1000 Hardware Operation Manual for CLE1000 H2K CLE1000 H2V CLE1000 S2 CLE1000 A2 Rev 2.5 May 2015 Introduction... 2 Safety Instruction... 2 1. General... 4 Features... 4 2. Connectors
FEATURES. - COMPATIBLE WITH ALL ipod / MP3 PLAYERS / SATELLITE RADIOS. - SMALL IN OR UNDER DASH CONTROL HEAD WITH 3.5mm HEADPHONE INPUT
 R Thank you for purchasing the Maxxsonics ipod / MP3 interface module. This model allows you to connect your ipod / MP3 music source directly into your aftermarket amplifier with out having to use a radio
DI-148U. User's Manual. The way PC-based instrumentation should be. 8-Channel USB Data Acquisition Starter Kit. Manual Revision B
 The way PC-based instrumentation should be DI-148U 8-Channel USB Data Acquisition Starter Kit User's Manual Manual Revision B Copyright 2004 by DATAQ Instruments, Inc. The Information contained herein
AS-AMP1 40 Watt Digital Amplifier User Manual
 AS-AMP1 40 Watt Digital Amplifier User Manual Manual Number: 160314 Safety and Notice The AS-AMP1 has been tested for conformance to safety regulations and requirements, and has been certified for international
QUICKSTART MANUAL ENGLISH ( 3 10 ) MANUALE DE INICIO RÁPIDO ESPAÑOL ( ) GUIDE D'UTILISATION SIMPLIFIÉ FRANÇAIS ( )
 MANUALE DE INICIO RÁPIDO ESPAÑOL ( ) GUIDE D'UTILISATION SIMPLIFIÉ FRANÇAIS ( )") QUICKSTART MANUAL ENGLISH ( 3 10 ) MANUALE DE INICIO RÁPIDO ESPAÑOL ( 11 18 ) GUIDE D'UTILISATION SIMPLIFIÉ FRANÇAIS ( 19 26 ) GUIDA RAPIDA ITALIANO ( 27 34 ) KURZANLEITUNG DEUTSCH ( 35 42 ) :: Omni Control
QUICKSTART MANUAL ENGLISH ( 3 10 ) MANUALE DE INICIO RÁPIDO ESPAÑOL ( 11 18 ) GUIDE D'UTILISATION SIMPLIFIÉ FRANÇAIS ( 19 26 ) GUIDA RAPIDA ITALIANO ( 27 34 ) KURZANLEITUNG DEUTSCH ( 35 42 ) :: Omni Control
XR4116 INSTALLATION/OWNER'S MANUAL. AM/FM Receiver
 XR4116 INSTALLATION/OWNER'S MANUAL AM/FM Receiver Preparation XR4116 INSTALLATION Please read entire manual before installation. Before You Start Disconnect negative battery terminal. Consult a qualified
Xonar U Channel USB Audio Card. User Guide
 Xonar U5 5.1-Channel USB Audio Card User Guide E11117 Revised Edition v2 November 2015 Copyright 2015 ASUSTeK COMPUTER INC. All Rights Reserved. No part of this manual, including the products and software