Application Notes for Installing and Configuring Avaya Control Manager Enterprise Edition in a High Availability mode.
|
|
|
- Blaze Weaver
- 6 years ago
- Views:
Transcription

1 Application Notes for Installing and Configuring Avaya Control Manager Enterprise Edition in a High Availability mode. Abstract This Application Note describes the steps required for installing and configuring Avaya Control Manager Enterprise Edition (FP1) in HA mode in a Single Data Center 1 of 124
2 Table of Contents 1. Introduction Avaya Control Manager Interoperability Testing Reference Configuration Deployment Considerations Prerequisites ACM Databases Virtual IP Address Dedicated IP Address Avaya Control Manager Capacity and Performance Operational Conditions Implementation Constraints Database Replication Switch over and Failover Options Upgrading the Avaya Control Manager to deploy High Availability VMware Support SNMP Support Installing Avaya Control Manager for High Availability Software Validated Prerequisites to install on Microsoft Windows Installing and Configuring IIS ACM Primary SQL Server Installing Microsoft SQL Primary ACM Application Server Installation Secondary ACM Application Server Installation Configuring Replication for High Availability Configuring the ACM database replication for Bi-Directional Replication Configuring the database replication for Bi-Directional Replication Configuring the Publication Creating the Subscriber Configuring bi-directional database application for the ACM One-X database Enabling Bi-directional Replication on the Windows 2008 SQL Servers High Availability Service Configuration requirements Creating a Hard Link between the two Nav360Config.xml file HA Service Primary Server Configuration HA Service Secondary Server Configuration HA Service One-X Server Configuration ACM One-X Web Configuration ACM One-X CFG Configuration Installing License on the Avaya Control Manager system(s) Testing the ACM installation ACM Services for High Availability Testing the ACM High Availability Installation of 124
3 Rollback to the initial HA Service Configuration ACM Failover Scenarios SQL-1 Failure/SQL-2 Running SQL-1 Recovery/SQL-2 Running Manually recovery of the primary connection path ACM-1 Failure/ACM-2 Running ACM-1 Recovery/ACM-2 Running ACM-1 Running/ACM-2 Failure ACM-1 Running / ACM-2 Recovery SQL-1 Running/SQL-2 Failure SQL-1 Running/SQL-2 Recovery Service Impacts Troubleshooting Firewall unable to access ACM-2 (Using a Windows Firewall) Details on Network Load Balancer Additional References Avaya Technical Support contact information Appendix A: Product Reference Information Appendix B: Database Tables not supported in Database Replication Change History of 124
4 1. Introduction This document is intended for those responsible for architecting, designing, and/or deploying Avaya Control Manager in a High Availability (HA) configuration. It describes how to install and configure Avaya Control Manager components to create a High Availability solution. Please note this document will reference Avaya Control Manager 7.1.2, which is Feature Pack 1 that went General Availability on Important considerations for an enterprise design are its robustness and the ability for the enterprise to recover from disasters and events that disrupt normal business operations. For enterprises that have contact centers, Avaya Control Manager plays an important part by providing a centralized operational administration solution for administrators to support day-today operations. This document covers only the concepts and procedures required to install and configure a High Availability solution in a Microsoft SQL 2008 R2 (Standard/Enterprise) environment based on the following components Avaya Aura Communication Manager (CM) Avaya Control Managers (ACM) Avaya One-X This document is intended as a specific step-by-step guide that enables an installer to achieve a working Avaya Control Manager Active/Active solution. It outlines all basic configuration procedures in order to achieve this. So in order to achieve a working solution, Avaya recommends that the procedures in this document be followed. Few points to be considered regarding the setup: Primary ACM application server (ACM-1) and ACM database (SQL-1) server are installed on 2 different machines. Secondary ACM application server (ACM-2) and ACM database (SQL-2) server are installed on 2 different machines Avaya Control Manager is installed on each ACM application server 4 of 124

5 2. Avaya Control Manager Avaya Control Manager compliments the entire Avaya Contact Center suite by combining and integrating key management and administration tasks of a wide range of contact center entities. With the Avaya Control Manager system, administrators can unify, streamline, and centralize the management of Avaya Aura Contact Center operations. In addition, the administrator can track events and take necessary action to meet customer needs. The Avaya Control Manager system is for Avaya customers using different Avaya Contact Center Business Unit products and solutions. The Avaya Control Manager system integrates with a Unified Communication infrastructure based on Avaya Aura Communication Manager and Avaya Aura Session Manager. Avaya Control Manager is not intended to completely replace every single Avaya Product Admin Tool Administration task that is not what it is for. It main purpose is to provide a single user friendly simple to use - centralized administration tool to allow technical and NON technical users to administer the key day to day administration tasks across their complete Avaya Contact Center Solution. It allows for one-time definition and ongoing management of many entities and data relevant to contact centre systems including the following: User Management Agent Management Team Management Organizational structure management Avaya Communication Manager unified communication and contact center entities (please refer to the Avaya Control Manager User Guide available on support.avaya.com) Call Flows (Communication manager vectors, experience portal flows and proactive outreach manager strategies) Roles and permissions The following diagram shows a typical non-ha Avaya Control Manager 5 of 124
6 Avaya Control Manager comprises of a number of key components that work together to provide a powerful operational administration solution. The key components include the following. Component 1 Control Manager Application Server 2 Control Manager Provisioning Server 3 Control Manager Database 4 Control Manager Web Services 5 Control Manager Web Portal 6 Control Manager Connectors Description The Control Manager Application Server is the component that performs the business logic (or the programming between the end user interface and the database as well as providing the security engine for Avaya Control Manager The Control Manager Provisioning Server is responsible for provisioning components from Avaya Control Manager with the different Avaya Unified Communications and Contact Center applications. The provisioning server integrates Avaya Control Manager with the different Avaya applications through the various supported connectors allowing the provisioning of information from across the environment The Control Manager database is the main MS SQL database which stores the ACM system configuration This is a set of web services that developers use for integrating the Avaya Control Manager provisioning server to add, delete, or modify configurations from within the Avaya Environment The Control Manager Web Portal is the management interface that provides complete access to all the features of Avaya Control Manager. The Web portal can be used in a variety of scenarios ranging from product-specific managements to overall suite management Control Manager Connectors used to integrate and manage the Avaya Unified Communications and Contact Center applications 2.1. Interoperability Testing This application note is based on configuring Avaya Control Manager Enterprise Edition in a HA environment. The following Avaya software components were used during this exercise. Software Component Avaya Control Manager Enterprise Edition Avaya Aura Communication Manager 6.3 Avaya One-X 2.5 Software Version (FP1) 6 of 124
7 3. Reference Configuration 3.1. High Availability (HA) in Avaya Control Manager is a mechanism that uses two identical Avaya Control Manager systems with two identical SQL 2008 database servers. The ACM HA environment consists of 2 ACM Application Servers (ACM-1/ACM-2) and twos sets of ACM SQL 2008 Database Servers (SQL-1/SQL-2) deployed in an Active/Active mode. One of the Avaya Control Manager systems is designated as the Primary and the other as the Secondary. Both Avaya Control Manager systems are completely active and work in parallel. In a High Availability solution a service failure, hardware, network or database failure can initiate a switchover if the following conditions are met The primary and secondary Avaya Control Manager servers are in a running state The Avaya Control Manager servers have the HA Service enabled The Primary database server and Secondary database server are synchronized If the primary Avaya Control Manager Server fails and if the switchover conditions are met, a complete server switchover occurs to the secondary Avaya Control Manager server. The two mutually exclusive services (Audit Log and License Tracker) on the secondary server are started which carries the activity load during the outage Deployment Considerations supports bi-directional data replication with each Avaya Control Manager SQL 2008 Database instances within an environment eliminating the need to manually duplicate the administration of a backup system. Both the primary and secondary Avaya Control Manager Systems in a High Availability environment have identical configurations; providing full Avaya Control Manager capabilities. In this Avaya Control Manager Enterprise High Availability deployment, the primary and secondary Avaya Control Managers are located in a single Data Center (DC) Prerequisites To prevent failure in the data replication, ensure that the following prerequisites are met for deploying Avaya Control Manager in an Active/Active High Availability model The Avaya Control Manager software version must be identical on both the Primary and Secondary application servers You have designated the primary and the secondary systems Avaya Control Manager Database(s) are hosted on a SQL 2008 Servers Avaya Control Manager Application Servers work in parallel and communicates with the SQL 2008 Server(s) in an Active/Active set-up 7 of 124
8 Both the primary and secondary Avaya Control Manager Servers must have the same hardware configuration. Both systems must be connected to the same sources. For example, the secondary system must be connected to the same Communication Manager System as the primary. Both the primary and secondary systems must have SNMP alarming administered so that alarms are sent from either system. Avaya Control Manager Provisioning Server must be installed on the application server as per standard installation guidelines. Support Off-box support of the ACM Provisioning Server and any other ACM component is not supported in the HA deployment and configuration ACM Databases In a normal Avaya Control Manager installation the following Avaya Control Manager databases are installed by default ACM Databases ACCCM Database ACCCMAVP Database ACCCMONEXDB Database ACCCMSPHEREETL Database ACCCMSYNC Database Description Avaya Control Manager Database stores Avaya Control Manager system configuration ACMAVP Database stores the Avaya Voice Portal database. ACMONEXDB Database stores the Avaya one-x application database ACMSPHEREETL Database stores the Avaya Control Manager Sphere Analytics database ACMSYNC Database synchronizes database between Communication Manager and Avaya Control Manager Note: 1. For this High Availability deployment not all databases are setup or support bidirectional database replication, please refer to the corresponding section to view ACM databases that support bi-directional replication 8 of 124
 solution.")
9 3.5. Virtual IP Address Avaya Control Manager supports the Active/Active High Availability mode with a Virtual IP address. The Virtual IP address balances the users between the two Avaya Control Manager instances through an external customer supplied Network Load Balancer (NLB) solution. With this model, two instances of Avaya Control Manager are installed with one instance defined as the Primary Control Manager Server and another instance defined as a Secondary Control Manager server. A single IP address is used to connect to either of the Avaya Control Manager services. If the primary Avaya Control Manager server stops, the virtual IP address will be automatically assigned to the secondary Avaya Control Manager server. Each Avaya Control Manager instance is working with the primary Avaya Control database layer (SQL-1), which is replicated using a bi-directional replication mechanism with the secondary Avaya Control Manager database instance (SQL-2) in the environment so every change that is made on one of the Avaya Control Manager instances is synchronized with the other instance of the Control Manager within the HA environment. The following graphic shows an overview of the solution mode deployed with a Virtual IP address. As part of this deployment option, the Avaya Control Manager database must be installed on an MSSQL 2008 Standard or Enterprise Edition MSQL 2012 is not supported in this ACM HA deployment. The Avaya Control Manager Application Servers will be integrated to the supported Avaya Unified Communications and Contact Center solutions. For further 9 of 124

10 details with regard to integrating to this Avaya Unified Communication and Contact Center solutions, please refer to the corresponding Avaya Control Manager document on the support.avaya.com Dedicated IP Address Avaya Control Manager also supports the Active/Active High Availability mode with a Dedicated IP address. With this model, two instances of Avaya Control Manager are installed each with a unique IP address. Both instances are completely active and are working in parallel With this option, users can browse to a dedicated IP address for each server, allowing users to decide which instance of Avaya Control Manager to use where every instance is running a full set of Avaya Control Manager Application layer services. Each Avaya Control Manager instance is working with the primary Avaya Control database layer (SQL-1), which is replicated using a bi-directional replication mechanism with the secondary Avaya Control Manager database instance (SQL-2) in the environment so every change that is made on one of the Avaya Control Manager instances is synced between all the other instances of Control Manager within the environment. The following graphic shows an over view of the Avaya Control Manager High Availability solution mode deployed with a Dedicated IP Address. As part of this deployment option, the Avaya Control Manager database must be installed on an MSSQL 2008 Standard or Enterprise Edition - MSQL 2012 is not supported in this ACM HA deployment 10 of 124
11 3.7. Avaya Control Manager Capacity and Performance From an ACM overall configuration the total amount of configured resources can t be higher than the maximum of supported configured resources on the connected application, for example Avaya Communication Manager. The solution has been designed to allow a single ACM Application server to carry the full load of concurrent ACM administrative users. For the maximum number of concurrent users officially support by Avaya Control Manager, please refer to the Avaya Control Manager Release Notes which are available on support.avaya.com 3.8. Operational Conditions As this is an Active-Active deployment both the ACM Application Servers ACM-1 (Primary) and ACM-2 (Secondary) are both utilizing SQL-1 as their Primary SQL 2008 database must be configured only in 1+1 configuration. is available only if the servers are installed on a Microsoft SQL 2008 Standard or Enterprise Database. For a complete list of Avaya Control Manager Port assignments please refer to the following documents Document Avaya Control Manager Port Matrix Description This document describes the port usage for Avaya Control Manager 11 of 124
12 3.9. Implementation Constraints (HA) per the reference architecture identified in this document is only supported with Avaya Control Manager 7.1 FP1. Previous releases of Avaya Control Manager do not support this high availability deployment as outlined in this document. For this High Availability deployment type as outlined, the ACM components Web Server, Application Server and Provisioning Server are all installed and deployed on the same server. Separating these components out is not a supported configuration Database Replication leverages the Transactional bi-directional replication feature that is available in Microsoft SQL Server 2008 Standard and Enterprise Editions. What this means is that under normal operating conditions any change to any of the defined databases i.e. SQL-1 will be automatically pushed out to the corresponding database i.e. SQL-2. For more information on the database replication and the Avaya Control Manager tables that support the Transactional bi-directional replication please refer to chapter 4 of this document Switch over and Failover Options The primary purpose of the is to ensure an uninterrupted data stream between the Avaya Communication Server and the Avaya Control Manager servers. There are two approaches to system failover Switch Over type Manual Switchover Automatic Switchover Description Switches the role between the primary Avaya Control Manager server and the secondary Avaya Control Manager server. This switchover type is typically used for planned maintenance activities or alternatively you can manually switchover if a failure on the primary Avaya Control Manager server is not detected automatically. Automatic Switchover is a process that enables the secondary Avaya Control Manager to automatically take over the role of the primary Avaya Control Manager in the event of a failure detected on the primary Avaya Control Manager. Automatic Switchover provides uninterrupted access to the system during a failure. The implementation uses the HA Service (Heartbeat) to ensure automatic failover and does not need manual intervention 12 of 124
13 3.12. Upgrading the Avaya Control Manager to deploy High Availability To determine upgrade compatibility, please refer to the Avaya Control Manager Interoperability compatibility matrix located on the Avaya support site. This matrix contains information about specific release compatibility for the current Avaya Control Manager release. For detail procedures on upgrading Avaya Control Manager Software, upgrading the operating systems, databases reference the following document Document Upgrading Avaya Control Manager Description This document describes how to upgrade Avaya Control Manager from the earlier releases to the current release. The document includes upgrade checklists, upgrade procedures, and verification procedures for each supported upgrade path 13 of 124
14 Upgrade Scenario: In this scenario, the customer wishes to upgrade their existing Avaya Control Manager and deploy high availability. To upgrade the existing Avaya Control Manager to the current release and deploy high availability, a customer must introduce a new Avaya Control Manager system as the secondary system to the existing Avaya Control Manager deployment. This secondary system will operate in parallel to the primary in high availability as per the reference architecture. Avaya Control Manager s High Availability Service gets installed only when Avaya Control Manager is deployed in the HA Mode. So in order to upgrade an existing non-ha Avaya Control Manager System and deploy it in a High Availability environment a full custom installation is required with the HA Service selected as part of the custom installation procedure VMware Support The following VMware software versions are supported: VMware vsphere ESXi 5.x VMware vcenter Server 5.x Reference the following document(s) for further information on Deploying Avaya Control Manager in a virtualized environment Document Deploying Avaya Control Manager in an Avaya Customer Experience Virtualized Environment Description This document describes how to deploy Avaya Control Manager on a virtualized environment SNMP Support Avaya Control Manager supports SNMP Notifications about specific events that happen in an environment. SNMP support is based on the Notification server the Queue Solution that was introduced in ACM 7.1 Reference the following document(s) for further information on SNMP Support for Avaya Control Manager Document Avaya Control Manager Support for SNMP Messages. Description This document describes the SNMP notifications per the Avaya Control Manager services. 14 of 124
15 4. Installing Avaya Control Manager for High Availability Avaya Control Manager Installation set up supports two types of Avaya Control Manager Installation Modes Express and Custom. To install Avaya Control Manager in a High Availability environment the custom installation mode is used. To install Avaya Control Manager in a High Availability Active/Active mode per this reference architecture, the following operating systems and database server must be used Component Description Operating System Primary ACM Server (ACM-1) Windows 2008 R2 Secondary ACM Server (ACM-2) Windows 2008 R2 SQL Server Primary SQL Server (SQL-1) Microsoft SQL Server 2008 R2 Standard or Enterprise Secondary SQL Server (SQL-2) Microsoft SQL Server 2008 R2 Standard or Enterprise Note: 1. Microsoft SQL 2012 Standard and Enterprise is not supported per this reference architecture. 2. Microsoft Windows Microsoft SQL 2008 is not supported per this reference architecture The Avaya One-X Agent Central Administration Management (CAM) components installed by default include the following Component Avaya One-X Management Web Site Avaya One-X Agent Configuration Service Avaya One-X Agent Database Description This component is the Web administration for an Avaya One-X Agent Configuration This component is the web service for Avaya One-X Client authentication This component stores all the Avaya One-X Agent configuration data Avaya Experience Portal is not supported in Avaya Control Manager To implement Avaya Experience Portal in a High Availability with Avaya Control Manager please reference the corresponding Experience Portal documentation. Reference the following document(s) for the minimum hardware and software requirements for an Avaya Control Manager system Document Installing Avaya Control Manager Description This document describes how to install Avaya Control Manager. This document also provides information about the software and hardware requirements and installation checklist 15 of 124
 Avaya Aura Communication Manager 6.3 Avaya One-X 2.5 Note: 1.")
16 4.1. Software Validated The following software components were used to test and validate the Avaya Control Manager High Availability reference architecture. Software Component Avaya Control Manager Enterprise Edition Software Version (FP1) Avaya Aura Communication Manager 6.3 Avaya One-X 2.5 Note: 1. Customers wishing to avail of this supported High Availability deployment need to upgrade their Avaya Control Manager to the Prerequisites to install on Microsoft Windows 2008 Before installing Avaya Control Manager the following must be completed on the server(s): Install Microsoft Windows 2008 R2 SP1. Install and configure Microsoft Internet Information Services (IIS) for the Web Server component. Do not install Windows updates on the system during the Avaya Control Manager Installation process. You can either disable the Windows updates or install all the available updates before the Avaya Control Manager installation. Ensure that the client system supports the minimum resolution of 1280x1024 pixels or higher to run the web browser Installing and Configuring IIS The Avaya Control Manager Web Portal runs on IIS. Procedure 1. On the server desktop, right-click My Computer and click Manage 2. In the Server Manager dialog box, right-click Roles and select Add roles 16 of 124
. 5. Click Next 6.")

17 3. In the Add Roles Wizard screen, click Server Roles The system displays the following the screen 4. In the Server Roles wizard, perform the following steps: Select Application Server and Web Server (IIS). 5. Click Next 6. Click Add Required Features to install the missing components required for application server. After the installation is complete, the system provides the option to select the component. 7. Return to the Server Roles pane, select Web Server (IIS) 8. Click Next The system displays the Role Services dialog box for the Web Server 17 of 124
18 9. Perform the following steps for the Web Server On Common HTTP Features, select the following components: o Static Content o Default Document o Directory Browsing o HTTP Errors o HTTP Redirection On Application Development, select the following components: o ASP.NET o.net Extensibility o ASP o CGI o ISAPI Extensions o ISAPI Filters o Server Side Includes On Health and Diagnostics, select the following components: o HTTP Logging o Logging Tools o Request Monitor o Tracing On Security, select the following components: o Basic Authentication o Windows Authentication o Request Filtering On Performance, select Static Content Compression. On Management Tools, select the following components o IIS Management Console o IIS 6 Management Compatibility. Under this field select the following components: o IIS 6 Metabase Compatibility o IS 6 WMI Compatibility o IS 6 Scripting Tools o IIS Management Console 18 of 124

19 10. Click Next 11. Click Install. 12. After installation completes, click Close to close the installation wizard. 13. Restart the server. 19 of 124


20 4.3. ACM Primary SQL Server Installing Microsoft SQL 2008 Procedure 1. From the system, double-click the SQL Server installation wizard To create a new installation of SQL server, select the Installation option on the left side and then select New SQL Server stand-alone installation or add features to an existing installation 20 of 124


21 The system performs the installation test on your server. When the wizard completes the test, the system displays the following screen. Note: If one of the tests fails, you must fix the issues and restart the SQL installation 4. Click OK. 21 of 124


22 5. In the Enter the product key field and specify the SQL Server to install. Type the product key 6. Click Next. 7. Select the I accept the license terms option and click Next. 22 of 124


23 8. Click Install to start the installation of the support files upon completion of the installation of the set up files 9. Click Next The system displays the following page 23 of 124


24 10. Select the SQL Server Feature Installation option and click Next The system displays the following wizard screen 11. In the Features pane, select the features as shown in the above screen shot. 12. Click Next. : 24 of 124


25 13. Click Next. 14. In the Instance root directory field, select the directory to install SQL 15. Click Next. : 25 of 124


26 16. Click Next. 17. In the Service Accounts tab, select the account that runs SQL Server Engine and SQL Server Agent and set both accounts to startup as Automatic. Note: You must configure SQL Server and Agent to run as administrator. Note: You must run both services under the system account. 18. Click Next. 26 of 124


27 19. Select the Mixed Mode (SQL Server authentication and Widows authentication) option to set the SQL server to work in mixed mode authentication. In the Password fields, type the SA password. Remember this password for later use during the installation. 20. Click Next The following screen is displayed. Note: If you selected Analysis Services Configuration and/or Reporting Services as a feature to install, the Configuration page for these will be displayed 21. Click Next. System configuration will run some more rules that will validate your computers configuration with the SQL Server features specified 22. Click Next 27 of 124


28 . 23. Click Install to begin the SQL 2008 installation. Setup will first install the required prerequisites for the selected features followed by the feature installation The system completes the installation displays the following screen. 28 of 124

29 24. The system completes the installation and displays the following screen 25. Click Close. Repeat this set of procedure on the secondary server. 29 of 124

30 4.4. Primary ACM Application Server Installation Procedure 1. From the Avaya Control Manager installation CD, double-click the Avaya Control Manager Installation wizard. 2. The system starts the installation automatically. If the installation does not begin, you must run the Avaya Control Manager.EXE file from the CD drive. 3. The Avaya Control Manager Installation setup writes the log file with the summary of the entire installation process. You can locate the log file on the computer at c:\acccminstaller.log. 4. On the Welcome to the Avaya Control Manager 7.1 Setup Wizard screen, click Next. 5. : 6. From the Install Mode screen, select Custom 7. Click Next 30 of 124


31 8. From the Installation Type drop-down list, select New Installation and select the High Availability option. 9. Click Next 10. Perform the following steps: a. From the Server Type drop-down list, select Primary. b. From the HA Mode drop-down list, select Standard 11. Click Next 31 of 124

32 12. Clear the SQL Server 2008 Express R2 selection. 13. Click Next. : 14. Avaya Control Manager components are grouped by Database, System Services, Web Sites, Voice Portal, Prerequisites, tools, one-x Agent CAM, API and Sphere 15. Select the components that you want to install a. Ensure that the HA Service under System Services is selected as the HA service is not installed by default 16. Click Next. 17. Perform the following steps: 32 of 124

33 a. In the Server field, type the details of the Primary SQL Server you installed b. In the Port field, type the port number as c. In the Username field, type the name of the user. d. In the Password field, type the Primary SQL server SA password using during the Primary SQL installation 18. Click Next. 19. Perform the following steps on the Avaya Control Manager Database screen a. Enter the Avaya Control Manager Database name this is the Avaya Control Manager database that the system creates as part of the installation. This will be the primary Avaya Control Manager database. By default the database name is ACCM. b. Enter the name of the Avaya Control Manager Database user c. Enter the password of the database user 33 of 124
34 20. Click Next. 21. Perform the following steps on the Avaya Control Manager Sync Database screen a. Enter the name of the ACCCMSYNC database. The default sync name is ACCCMSYNC b. Enter the name of the ACCCMSYNC database user c. Enter the password of the ACCCMSYNC database user 22. Click Next 34 of 124
35 23. On the Select Installation Folder screen, select the folder to install the Avaya Control Manager Primary Server components 24. Click Next 25. On the Provisioning Server Installation screen, perform the following steps: a. In the Provisioning Server Host field, the provisioning host name should be populated automatically; this is the server name where you are running the installation wizard. If the provisioning host name is not populated automatically, then change it manually to the server host name per the reference architecture ACMHA1 b. In the Provisioning Server Port field, enter the provisioning server port number. The default port number is of 124


36 26. Click Next : 27. On the License Server Installation screen, perform the following steps: a. In the License Server Host field, the licensing server host should be populated automatically, this is the server name where you are running the installation wizard b. In the License Server Port field, enter the license server port number. The default port number is c. You can upload the Avaya Control Manager License file or you can add the License file manually at a later stage. 28. Click Next : 36 of 124
37 29. On the Importer Service Installation screen, perform the following steps: a. In the Importer Host field, enter the host name that runs the importer server. The default value is the server name where you are running the installation wizard. b. In the Importer Port field, enter the importer server port number. The default port number Click Next : 31. On the Configure Avaya Control Manager screen, perform the following steps: a. From the Communication Manager Version drop-down list, click the appropriate Avaya Aura Communication Manager version. b. The system saves this value as the default Avaya Aura Communication Manager version under the System Parameters of Avaya Control Manager. You can change this value after the installation from the Avaya Control Manager UI in the System Parameters tab. c. From the Install AACC Integration drop-down list, click the appropriate value. The default value is set to Yes. If you are not integrating Avaya Aura Contact Center in this environment, change the value to No. d. From the System Language drop-down list, click the language that you want to install for the Avaya Control Manager UI. The default system language is set to English. e. From the Central Logging drop-down list, do one of the following: i. Database: To store all system logs in the Avaya Control Manager database. ii. Files: To store all system logs on the file system. 37 of 124

38 32. Click Next : 33. On the One-X Agent Central Management configuration screen, the One-X database connection information needs to be entered a. In the one-x Database Name field, enter the name of the Avaya one-x Agent Central Management Primary database. By default, the database name is ACMONEXDB. b. In the Username field, enter the username for one-x agent user. The default the user name is ACMONEXUSER. c. In the Password field, enter the password for one-x agent user. d. In the Client Authentication Mode field, select one of the following: i. Basic: Standard username and password that are authenticated with the Avaya one-x Agent database. ii. SSO: Single Sign-on with active directory e. Specify the One-X Agent Version 34. Click Next and the Ready to Install screen is displayed 35. Click Install to start the installation. The installation takes a minimum of 1 hour, depending on the components being installed. The installer will install prerequisites, copy the application/services files to the hard drive, and execute the database package for the Control Manager database. 36. Once the Installer is complete you will be prompted to select Finish. 37. Select Finish and reboot the server 38 of 124
 for the Web Server component. Secondary Microsoft SQL 2008 server must be installed Procedure 1.")
39 4.5. Secondary ACM Application Server Installation Note: Before installing Avaya Control Manager Secondary Server the following must be completed on the server(s): Install Microsoft Windows 2008 R2 SP1. Install and configure Microsoft Internet Information Services (IIS) for the Web Server component. Secondary Microsoft SQL 2008 server must be installed Procedure 1. From the Avaya Control Manager installation CD, double-click the Avaya Control Manager Installation wizard. 2. Click Next 3. From the Install Mode screen, select Custom, 4. Click Next. : 39 of 124


40 5. From the Installation Type drop-down list, select NEWINSTALL and select the High Availability option 6. Click Next. 7. Perform the following steps: a. From the Server Type drop-down list, select Secondary Server. b. From the HA Mode drop-down list select Standard. c. In the Primary Queue Srv field, enter the host name of the primary ACM server that was previously installed d. In the Primary Application Server Name field, enter the host name of the primary ACM server that was previously installed 8. Click Next. 9. Clear the SQL Server 2008 Express R2 selection 40 of 124


41 10. Click Next 11. Avaya Control Manager components are grouped by Database, System Services, Web Sites, Voice Portal, Prerequisites, tools, one-x Agent CAM, API and Sphere 12. Select the components that you want to install ensuring that the HA Service under System Services is selected as the HA service is not installed by default 13. Click Next. 14. Perform the following steps: a. In the Server field, type the details of the Secondary SQL Server you installed b. In the Port field, type the port number as c. In the Username field, type the name of the user. 41 of 124

42 d. In the Password field, type the Primary SQL server SA password using during the Secondary SQL installation 15. Click Next. 16. Enter the connection details of the Primary SQL Server 17. Click Next 18. Click Next 42 of 124
43 19. Perform the following steps on the Avaya Control Manager Database screen a. Enter the Avaya Control Manager database name this is the Avaya Control Manager database that the system creates as part of the installation. This will be the secondary Avaya Control Manager database. By default the database name is ACCM. b. Enter the name of the Avaya Control Manager Secondary database user c. Enter the password of the Secondary database user Note: This is the SA password used during the Secondary SQL 2008 installation. 20. Click Next 21. Perform the following steps on the Avaya Control Manager Sync Database screen 43 of 124
44 a. Enter the name of the ACCCMSYNC database. The default sync name is ACCCMSYNC b. Enter the name of the ACCCMSYNC database user c. Enter the password of the ACCCMSYNC database user 22. Click Next 23. On the Provisioning Server Installation screen, perform the following steps: a. In the Provisioning Server Host field, manually change the server host name to the Avaya Control Manager Secondary server i.eacmha2 b. In the Provisioning Server Port field, enter the provisioning server port number. The default port number is Click Next 25. On the License Server Installation screen, perform the following steps: a. In the License Server Host field, the licensing server host should be populated automatically; this is the Secondary ACM server name where you are running 44 of 124
45 the installation wizard. If the provisioning host name is not populated automatically, then change it manually to the Secondary ACM server host name. b. In the License Server Port field, enter the license server port number. The default port number is c. You can upload the Avaya Control Manager License file or you can add the License file manually at a later stage. 26. Click Next 27. On the Importer Service Installation screen, perform the following steps: a. In the Importer Host field, enter the Secondary ACM Server host name that runs the importer server. The default value is the server name where you are running the installation wizard. b. In the Importer Port field, enter the importer server port number. The default port number Click Next 45 of 124
46 29. On the Configure Avaya Control Manager screen, perform the following steps: a. From the Communication Manager Version drop-down list, click the appropriate Avaya Aura Communication Manager version. b. The system saves this value as the default Avaya Aura Communication Manager version under the System Parameters of Avaya Control Manager. You can change this value after the installation from the Avaya Control Manager UI in the System Parameters tab. c. From the Install AACC Integration drop-down list, click the appropriate value. d. The default value is set to Yes. If you are not integrating Avaya Aura Contact Center in this environment, change the value to No. e. From the System Language drop-down list, click the language that you want to install for the Avaya Control Manager UI. The default system language is set to English. f. From the Central Logging drop-down list, do one of the following: i. Database: To store all system logs in the Avaya Control Manager database. ii. Files: To store all system logs on the file system 46 of 124

47 30. Click Next 31. On the One-X Agent Central Management configuration screen, the One-X secondary database connection information needs to be entered a. In the one-x Database Name field, enter the name of the Avaya one-x Agent Central Management Secondary database. By default, the database name is ACMONEXDB. b. In the Username field, enter the username for one-x agent user. The default the user name is ACMONEXUSER. c. In the Password field, enter the password for one-x agent user. d. In the Client Authentication Mode field, select one of the following: e. Basic: Standard username and password that are authenticated with the Avaya one-x Agent database. i. SSO: Single Sign-on with active directory ii. Specify the One-X Agent Version 32. Click Next and the Ready to Install screen is displayed 33. Click Install to start the installation. The installation takes a minimum of 1 hour, depending on the components being installed. The installer will install prerequisites, copy the application/services files to the hard drive, and execute the database package for the Control Manager database. 34. Once the Installer is complete you will be prompted to select Finish. 35. Select Finish and reboot the server 47 of 124
48 5. Configuring Replication for High Availability leverages the Transactional bi-directional replication feature that is available in SQL Server What this means is that under normal operating conditions any change to any of the defined databases (SQL-1) will be automatically pushed out to the corresponding database (SQL-2). The same applies to any change made on the SQL-2 databases will result in an automated update to the corresponding database i.e. SQL-1. Per the reference architecture the database primary connection path for ACM-1 and ACM-2 is to point to the same SQL-1 database server. The secondary connection path for ACM-1 is to point to SQL-2. Within an environment each Avaya Control Manager instance is each working with a dedicated database layer. The two Microsoft SQL 2008 database servers (SQL-1/SQL-2) host the following databases and are setup for bidirectional transactional database replication, which means that any change to any of these database entries gets automatically replicated to the corresponding database to keep the database content fully in sync ACM Databases ACCCM Database ACCCMONEXDB Database ACCCMSPHEREETL Database ACCCMSYNC Database Bi-Directional Transactional Replication Supported Supported Not Supported Not Supported Note: 1. Avaya Voice Portal is not supported in the current Avaya Control Manager and has not been implemented in this High Availability solution 2. Some tables within the Avaya Control Manager databases do not replicate. These tables are referenced in Appendix B of this document 48 of 124

49 5.1. Configuring the ACM database replication for Bi-Directional Replication The SQL 2008 database replication setup defines in general one side as a Publisher and the corresponding side as Subscriber. ACM Databases ACM SQL-1 (Primary) Bi-Directional Transactional Replication ACM SQL-2 (Secondary) Bi-Directional Transactional Replication ACM Publisher Subscriber ACCCMONEXDB Publisher Subscriber Configuring the database replication for Bi-Directional Replication Procedure 1. From the Avaya Control Manager system, open SQL Management Studio on the Primary SQL Server (SQL-1) and login with an SA account or as an account with similar permissions. 2. Navigate to the Replication folder, and expand this folder. 3. Right click on the "replication" folder. If you see "Configure Distribution" option at the top that means that a replication has not been configured on the server before. Choose "Configure Distribution 49 of 124


50 4. The following screen appears 5. Click Next 6. Select the first option, i.e. SQL-PRIM will act as its own Distributor 50 of 124


51 7. Click Next 8. Click Next 51 of 124


52 9. Enter the Distribution Database Name and the location where the data and the log file will reside. 10. Click Next 11. Click Next 12. Click Next 52 of 124

53 13. Click Finish and once complete a new database named distribution gets created. In order to confirm it just expand the System Database node and you shall be able to view the distribution database, please refer the screen capture below 14. Click Close 53 of 124
 and login with an")

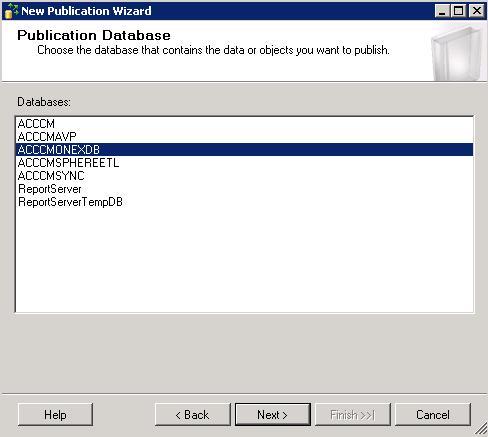
54 Configuring the Publication The following steps need to be followed while creating the publisher. Procedure 1. From the Avaya Control Manager system, open SQL Management Studio on the Primary SQL Server (SQL-1) and login with an SA account or as an account with similar permissions 2. Navigate to the Replication folder, and expand this folder 3. Right click on "Local Publication", and select "new publication 4. The following screen appears 5. Click Next 54 of 124

55 6. Select the database which is going to act as a publisher. In our case, select the ACCCM database 7. Click Next 8. On the Publication Type screen, in the Publication type section, click Transactional publication with updatable subscriptions 55 of 124


56 9. Click Next Select all the Objects that you want to publish and ensure that the following three articles are de-selected ACTIVEMQ_ACKS ACTIVEMQ_LOCK ACTIVEMQ_MSG 12. Click on the "Article Properties" drop down and choose "Set properties of all tables articles 56 of 124


57 13. Within the Properties for All Table Articles set the "copy foreign key constraints" and "copy user triggers" to "true 14. Click "ok". In order to allow the replication to function correctly in the long run, you need to set the Identity ranges for each table separately as MSSQL does not allow you to set the ranges for ALL tables together. 15. To set the identify ranges for each table right click an article and choose set properties of this table article. The system displays the corresponding screen 57 of 124


58 16. Scroll to the bottom and change the Publisher range size to Subscriber range size to Repeat this procedure for all articles. Please note that some articles will not have these settings, simply skip these tables. 18. Once finished the configuration of these settings for all ACCCM articles\tables, click on "next" and the system displays the following screen 58 of 124


59 19. Click Next 20. Click Next 21. On the Snapshot Agent screen, click the Create a snapshot immediately and keep the snapshot available to initialize subscriptions option 59 of 124


60 22. Click Next 23. On the Agent Security screen, in the Snapshot Agent section, click Security Settings 24. Click Next 25. On the Snapshot Agent Security screen, select the following options: a. Click the Run the SQL Server Agent service account option. b. In the Connect to Publisher section, click the Using the following SQL Server login option. c. Connect to the publisher using the SA user and password details 60 of 124


61 26. Click Ok 27. Click on the Queue Reader Agent security setting tap 28. Select Run under the SQL Server Agent service account 61 of 124

62 29. Click Next 30. Click Next 31. On the Wizard Actions screen, ensure that the Create the publication check box is selected 62 of 124


63 32. Click Next 33. Enter a suitable name of the ACCCM replication publisher i.e. ACCCMREP 34. Click Finish 35. Click Close and once the publisher is created the next step is to create the subscriber for it. 63 of 124
 and login with an SA account")
 4. Right click and New Subscriptions 5.")
64 Creating the Subscriber The following steps needs to be performed for creating the subscriber. Procedure 1. From the Avaya Control Manager system, open SQL Management Studio on the Primary SQL Server (SQL-1) and login with an SA account or as an account with similar permissions. 2. Navigate to the Replication folder, and expand this folder 3. Expand on "Local Publication", and locate the newly created publication (ACCCMREP) 4. Right click and New Subscriptions 5. The following page is displayed 64 of 124

65 6. Click Next 7. Click Next 8. On the Distribution Agent Location screen, in the For the subscriptions I create in the wizard section, click the Run all agents at the Distributor (push subscriptions) option 65 of 124


66 9. Click Next 10. As shown in the screen capture above, it asks for the Subscriber name as well as the subscription database. The subscriber database can be created by restoring the publisher database at the start itself or by creating a new database as shown in the screen capture below 11. Select Add SQL Server Subscriber and a new window appears which asks for the SQL Server Name as well as the Authentication needed to connect to the SQL Server, 12. Enter the SA User and Password to add SQL-2 66 of 124
67 13. Click Connect and if connection is successful the system displays the following screen 14. Click Next 67 of 124


68 15. Click on the icon specify to process account as well as the connection options for the distribution agent. 16. In the Distribution Agent Security screen, perform the following steps: Select the Run under the SQL Server Agent service account option Connect to Subscriber with the ACCCM database user that you created as part of the ACCCM installation. 17. Click "Ok" 68 of 124

69 18. Click Next 19. On the Synchronization Schedule screen, in the Agent Schedule field, click the Run Continuously option 20. Click Next 69 of 124

70 21. On the Updatable Subscriptions screen, in the Commit at Publisher field, click the Simultaneously commit changes option 22. Click Next 23. On the Login For Updatable Subscriptions screen, select the following options: a. In the When connecting to the Publisher section, click the Create a linked server that connects using SQL Server Authentication option. b. In the Login field, enter sa or another system administration account login details. c. In the Password field, enter the password for the system administrator account. d. In the Confirm password reenter the password for the system administrator account 70 of 124


71 24. Click Next 25. On the Initialize Subscriptions screen, in the Initialize When field, click the After first synchronization option 26. Click Next 71 of 124

72 27. Click Finish 28. This creates a subscriber for the corresponding publisher. Upon completion a screen will be displayed and any warning will be displayed. There is no need to do anything regarding the warning. 29. Click close and the subscriber is created. 72 of 124

73 5.2. Configuring bi-directional database application for the ACM One-X database Perform the following steps to configure the One-X bi-directional replications. Procedure 1. Open SQL Management Studio on the Primary SQL Server and log in with an SA account or an account with similar permissions. 2. Navigate to the Replication folder, expand the folder, select Local Publication, right-click the folder and select New Publication. 3. The system displays the welcome screen 73 of 124

74 4. Click Next 74 of 124


75 5. Select the database which is going to act as a publisher. In our case, ACCCMONEXDB 6. Click Next 7. On the Publication Type screen, in the Publication type section, click Transactional publication with updatable subscriptions 8. Click Next 75 of 124


76 9. Select Tables. 10. Click Article Properties and select Set Properties of All Table Articles. The system displays the following window 11. Within the Properties for All Table Articles set the "copy foreign key constraints" and "copy user triggers" to "true". 12. Click Ok 13. Click Next 76 of 124

77 14. Click Next 15. Click Next 77 of 124


78 16. Click Next 17. Click Security Settings and following page is displayed 18. On the Snapshot Agent Security screen, select the following options: a. Click the Run the SQL Server Agent service account option. b. In the Connect to Publisher section, click the Using the following SQL Server login option. c. Connect to the publisher using the SA user and password details 19. Click Ok 78 of 124


79 20. Click Security Setting The system displays the following window 21. Configure the queue reader to run under the SQL Agent account 79 of 124


80 22. Click Next 23. Click Next 24. In the Publication name field, type the publication name as ACMONEX 80 of 124


81 25. Click Finish. The system creates the publication 26. upon completing 81 of 124


82 27. Click Close. 28. Go to SQL Management Studio and the system displays the SQL Management Studio Window 29. In the Object Explorer window, located the newly created publication (i.e. ACCCMONEX), right-click the newly created publication and select New Subscriptions 30. The system displays the welcome screen 82 of 124

83 31. Click Next 32. Select ACCCMONEX 33. Click Next 83 of 124

84 34. Select Run all agents at the distributor 35. Click Next 36. Select Add SQL Server Subscriber and a new window appears which asks for the SQL Server Name as well as the Authentication needed to connect to the SQL Server 37. Enter the credentials for the SQL Server as well as the Authentication required to connect to the SQL Server. 84 of 124


85 38. Click Connect 39. In the Subscription Database drop-down list, select ACCCMONEXDB 40. Click Next 85 of 124

86 41. Click on the icon specify to process account as well as the connection options for the distribution agent. 42. In the Distribution Agent Security window, perform the following steps: a. In the SQL Server Agent Service account, select Run under the SQL Server Agent service account option b. Connect to the distributor with the ACCCMONEXDB database user that you created as part of the One-X Database installation 86 of 124
87 43. Click OK 44. Click Next 87 of 124

88 45. Click Next 46. Click Next. The system displays the following window 47. In the Login and Password fields, type the user details of the ACCCMONEX user you created as part of the ACCCONEX installation 88 of 124
89 48. Click Next 49. Click Next. The system displays the following window: 89 of 124

90 50. Click Next. The system displays the following window: 51. Click Finish. The system displays the following window: 52. This creates a subscriber for the corresponding publisher. Upon completion a screen will be displayed and any warning will be displayed. There is no need to do anything regarding the warning. 53. Click close and the subscriber is created. 54. Open SQL Studio and select File > Connection Object Explorer. 90 of 124


91 55. Connect to the secondary ACCCMONEX database that you just configured as a subscriber 56. Expand the navigation tree and right-click Local Subscription and Set Update Method The following screen is displayed 57. Select Queue Updating and click OK. 91 of 124

92 6. Enabling Bi-directional Replication on the Windows 2008 SQL Servers Before beginning the Replication of the Avaya Control Manager SQL 2008 Servers (SQL- 1/SQL-2), Avaya recommends the user view the overall health of the replication environment by using the Replication Monitor feature. Perform the following steps to launch the Replication Monitor. Procedure 1. From Microsoft SQL Server Management Studio of the primary Avaya Control Manager SQL server right click on the Replication folder of the subscription that was previously created 92 of 124


93 2. Select Launch Replication Monitor and the replication monitor screen is displayed 3. On the left pane, under My Publishers click on the Avaya Control Manager publisher node and expand to get a list of the subscriptions on the Primary ACM SQL-1 Server (as seen above on the left) 4. Select on the "Agent" tab, and the following screen is displayed 5. Right-click on Snapshot Agent and then click Start Agent. This action will update agent setting and the process can take up to 30 minutes. 6. Right after you start the snapshot agent, right click on the "queue reader agent" that has an error next to it,and click on stop agent, then right click again and click on start agent 7. Refresh the page by navigating to other tabs and the following page is displayed 93 of 124


94 8. Once the Snapshot Agent has reached 100%, close the window 9. Repeat steps 1 through 8 for the One-X database. 10. Right click on the subscription again as seen in the first step, and choose "View synchronization status 11. If you see commands starting with "Applied script ", that means that the initial action of copying over the data from the primary SQL-1 to the secondary SQL-2 is in progress. If you see a different message, try to wait 2-3 min to see if it is simply taking its time to get started. 94 of 124
 14.")

95 12. Once you reach this message "No replicated transactions are available", the initial synchronization of data between the two ACM servers has completed 13. Repeat the above procedure for the ACM OneX Database Publication (ACCCMONEX) 14. From Microsoft SQL Server Management Studio connect the secondary Avaya Control Manager server that was configured as the Subscriber 15. Right click on the Replication folder and the existing subscription and select Set Update Method 95 of 124

96 16. The following screen is displayed 17. Select Queued Updating and click ok 18. Repeat the above procedure to Set the Update method for the OneX publication 96 of 124
 Service Heartbeat.")
97 7. High Availability Service Configuration requirements The key to any environment is that the service always needs to be up with no downtime and being able to transfer from one Avaya Control Manager Server to another seamlessly. What makes this happen in Avaya Control Manager is a service called the High Availability (HA) Service Heartbeat. Both the Avaya Control Manager Application server (ACM-1 and ACM-2) have a heart beat service connection between them which is established and monitored by the Avaya Control Manager High Availability Service running on both machines. As this HA Service provides a redundant communication path between the ACM-1 and ACM-2 application servers and when the heartbeat fails to receive updates from the designated primary ACM-1 server it concludes that the system is dead or at least no longer healthy enough to provide service, this triggers a switchover from the primary ACM-1 server to the secondary ACM-2 server. As both the ACM primary and secondary servers are identical in functionality and configuration, the switchover is seamless. The ACM-1 Application server runs its primary database connection path against the SQL-1 Database server and the ACM-2 Application server also runs its primary database connection path against SQL-1, this is per the reference architecture and is a requirement to make the Avaya Control Manager failover mechanisms function properly. In addition the ACM HA service running on the individual machine is monitoring the active database connection from ACM-1 to SQL-1 as well as the connection from ACM-2 to SQL- 1 and will take appropriate action in the case the database connection been lost. 97 of 124
98 The following tables shows the mandatory database connection strings that are required to successfully implement the deployment Primary Avaya Control Manager (ACM-1) Secondary Avaya Control Manager (ACM-2) NAV360 Database SQL-1 (DB1) SQL-1 (DB1) Connection String HA Primary Database SQL-1 (DB1) SQL-2 (DB2) Connection String HA Secondary SQL-2 (DB2) SQL-2 (DB2) Database Connection String HA One-X Web SQL-1 (DB1) SQL-1 (DB1) Primary Database Connection String HA One-X Web SQL-2 (DB2) SQL-2 (DB2) Secondary Database Connection String HA One-X CFG SQL-1 (DB1) SQL-1 (DB1) Primary Database Connection String HA One-X CFG SQL-2 (DB2) SQL-2 (DB2) Secondary Database Connection String One-X CFG Web.Config SQL-1 (DB1) SQL-2 (DB2) Local DS SQL-1 (DB1) SQL-1 (DB1) Local_Pub DS One-X Web DS SQL-1 (DB1) SQL-1 (DB1) In case of a failover in the Avaya Control Manager Active/Active HA deployment, the Avaya Control Manager HA service performs the following: 1. Updates the Avaya Control Manager connection strings on both the primary and secondary application server 2. Stop the Audit Log and License Tracker services on the primary application server 3. Starts the Audit Log and License Tracker services on the secondary application server The HA service must be created on both Avaya Control Manager Primary and Secondary servers. Both these servers are in the Active/Active mode. The database connection strings used in the HA Service Configuration.xml file(s) must match the database connection strings in the NAV360config.xml file(s) 98 of 124
99 7.1. Creating a Hard Link between the two Nav360Config.xml file The ACM HA service is provided with the relevant information of which SQL database connection path is defined as the primary from the NAV360Config.XML file. This file plays a crucial part in the ACM HA configuration setup and needs to be verified in different failover scenarios. The NAV360Config.XML file always reflects the current active database connection path and to keep both of the NAV360Config.XML files on the Primary and Secondary application servers fully in sync, a Windows mklink command is run to create a Hard Link between both of the configuration files. A change to one of the configuration files will automatically get replicated to the other configuration file. Perform the following steps to create the Hard Link on both the Primary and Secondary Application servers. Procedure 1. Backup the Primary Application Server (ACM-1) Nav360Config.xml file located in the SysWoW64 folder 2. Once back up is complete, delete the Nav360Config.xml 3. To keep both Nav360Config.xml files in sync the Windows mklink command needs to be run. To run the mklink command open the command prompt and type the following to recreate the file in mklink /H c:\windows\syswow64\nav360config.xml C:\windows\system32\NAV360Config.xml 4. Check C:\Windows\SysWOW64 to confirm that the file has been created if not repeat these steps. 5. Repeat this procedure on the ACM Secondary Application server (ACM-2) 99 of 124
100 7.2. HA Service Primary Server Configuration To Configure the HA service on the primary server, first of all the HA_Service.exe.config file needs to be configured with the secondary server IP address. Perform the following steps to configure the HA_Service.exe.config file with the secondary server IP address. Note: Ensure that the Avaya Control Manager Services have started at least once. Procedure 1. Edit the HA_Service.exe.Config file located in the ACCCM HA Service folder located on Avaya Control Manager 2. C:\Program Files (x86)\avaya\avaya Control Manager 7.1.2\Services\ACCCM HA Service 3. Enter in the Secondary Application server IP address in the following area. (Example IP highlighted below), change the service name as shown below 4. <value> HA Service</value> Upon completing the configuration of the HA_Service.exe.config file with the secondary server IP address, the next step is configuring the Configuration.xml file which is located in the Avaya Control Manager HA Service folder Within the config file, the primary and secondary database connection strings must match the existing strings located in the Nav360Config.xml files 100 of 124
101 Perform the following steps to configure the Configuration.xml file Procedure 1. Locate the primary and secondary database connection strings within the config file, these connection strings need to be updated and they must match the strings located in the existing Nav360Config.xml files on both. 2. Copy these database connection strings from Nav360Config.xml file located in the c:\windows\system32 folder for both the primary and secondary server s 3. Paste these files into the required area in the configuration.xml.file as per the reference active/active architecture. Within the Avaya Control Manager primary server the primary connection string points to database 1 (DB1) and the secondary connection string points to database 2 (DB2) a. <PrimaryDbConnectionString>DataSource=ACMHASQL1;Initial Catalog=ACCCM;User ID=acccadmin;Password="qYOq1WuGBk93truWj6vrhA=="</PrimaryDbConnectio nstring> b. <SecondaryDbConnectionString>DataSource=ACMHASQL2;Initial Catalog=ACCCM;User ID=acccadmin;Password="qYOq1WuGBk93truWj6vrhA=="</Secondary DbConnectionString> 4. Locate the Service Default Role and enter primary into this service as in a. <ServiceDefaultRole>primary</ServiceDefaultRole> Note: Do not use CAPS when entering primary. All should be lower case. 5. Locate the database operational interval <DbOperationInterval> and adjust the interval that the HA service will the check the connectivity status of the Avaya Control Manager database. Avaya recommends that this be set to either 15 or 30 seconds b. <DbOperationInterval>15</DbOperationInterval> 6. Locate the heartbeat service interval <HeartBeatInterval> and adjust the interval that the HA service will try and communicate with the HA service on the secondary Avaya Control Manager server. Avaya recommends that this be set to either 15 or 30 seconds c. <HeartBeatInterval>15<HeartBeatInterval> 2. Add/Edit details on the Primary ACM server where the HA Service will be installed on a. <ServiceHost>ACMHA1</ServiceHost> ( Primary application server IP) b. <ServicePort>9011</ServicePort> (default port for HA service) c. <ServiceName>ACCCM HA Service</ServiceName> (HA service name) 3. Add/Edit details on the Secondary ACM server a. <RemoteServiceHost>ACMHA2</RemoteServiceHost> (Secondary Application server IP) b. <RemoteServicePort>9011</RemoteServicePort> (default port for the HA service) c. <RemoteServiceName>ACCCM HA Service</RemoteServiceName> (HA Service Name) 4. Database Operation Timeout Leave this as default value a. <DbOperationTimeout>1000</DbOperationTimeout> 5. Database Operation Query Leave this as default value select * from locations a. <DbOperationQuery>select * from locations</dboperationquery> 101 of 124
102 6. Primary Command lists a. <Commands retries="1" type="primary"> b. <command type="service" action="stop">acccm Audit Log Service</command> c. <command type="service" action="stop">acccm License Tracker</command> 7. Secondary Command lists: a. <Commands retries="1" type="secondary"> b. <command type="service" action="stop">acccm Audit Log Service</command> c. <command type="service" action="stop">acccm License Tracker</command> 8. Critical Command list a. <CriticalErrorCommands retries="1"> b. <command type="service" action="stop">acccm License Tracker</command> c. <command type="service" action="stop">acccm License Tracker</command> 7.3. HA Service Secondary Server Configuration Perform the following steps to configure the HA_Service.exe.config file with the primary server IP address. Procedure 1. Edit the HA_Service.exe.Config file located in the ACCCM HA Service folder 2. C:\Program Files (x86)\avaya\avaya Control Manager 7.1.2\Services\ACCCM HA Service 3. Enter in the Primary Application server IP address in the following area. (Example IP highlighted below), change the service name as shown below 4. <value> HA Service</value> Upon completing the configuration of the HA_Service.exe.config file with the secondary server IP address, the next step is configuring the Configuration.xml file which is located in the Avaya Control Manager HA Service folder Within the config file, the primary and secondary database connection strings must match the existing strings located in the Nav360Config.xml files 102 of 124
103 Perform the following steps to configure the Configuration.xml file Procedure 1. Locate the primary and secondary database connection strings within the config file, these connection strings need to be updated and they must match the strings located in the existing Nav360Config.xml files on both. 2. Copy these database connection strings from Nav360Config.xml file located in the c:\windows\system32 folder for both the primary and secondary server s 3. Paste these files into the required area in the configuration.xml.file as per the reference active/active architecture. Within the Avaya Control Manager secondary server the primary connection string points to database 1 (DB1) and the secondary connection string points to database 2 (DB2) a. <PrimaryDbConnectionString>DataSource=ACMHASQL2;Initial Catalog=ACCCM;User ID=acccadmin;Password="qYOq1WuGBk93truWj6vrhA=="</PrimaryDbConnectio nstring> b. <SecondaryDbConnectionString>DataSource=ACMHASQL2;Initial Catalog=ACCCM;User ID=acccadmin;Password="qYOq1WuGBk93truWj6vrhA=="</Secondary DbConnectionString> 4. Locate the Service Default Role and enter primary into this service as in a. <ServiceDefaultRole>secondary</ServiceDefaultRole> Note: Do not use CAPS when entering primary. All should be lower case. 5. Locate the database operational interval <DbOperationInterval> and adjust the interval that the HA service will the check the connectivity status of the Avaya Control Manager database. Avaya recommends that this be set to either 15 or 30 seconds a. <DbOperationInterval>15</DbOperationInterval> 6. Locate the heartbeat service interval <HeartBeatInterval> and adjust the interval that the HA service will try and communicate with the HA service on the secondary Avaya Control Manager server. Avaya recommends that this be set to either 15 or 30 seconds a. <HeartBeatInterval>15<HeartBeatInterval> 7. Add/Edit details on the Primary ACM server where the HA Service will be installed on a. <ServiceHost>ACMHA2</ServiceHost> ( Primary application server IP) b. <ServicePort>9011</ServicePort> (default port for HA service) c. <ServiceName>ACCCM HA Service</ServiceName> (HA service name) 8. Add/Edit details on the Secondary ACM server a. <RemoteServiceHost>ACMHA1</RemoteServiceHost>(Secondary Application server IP) b. <RemoteServicePort>9011</RemoteServicePort> (default port for the HA service) c. <RemoteServiceName>ACCCM HA Service</RemoteServiceName> (HA Service Name) 103 of 124
104 9. Database Operation Timeout Leave this as default value a. <DbOperationTimeout>1000</DbOperationTimeout> 10. Database Operation Query Leave this as default value select * from locations a. <DbOperationQuery>select * from locations</dboperationquery> 11. Primary Command lists a. <Commands retries="1" type="primary"> b. <command type="service" action="start">acccm Audit Log Service</command> c. <command type="service" action="start">acccm License Tracker</command> d. <command type= cmd action= none > notepad</command> 12. Secondary Command lists: a. <Commands retries="1" type="secondary"> b. <command type="service" action="start">acccm Audit Log Service</command> c. <command type="service" action="start">acccm License Tracker</command> d. <command type= cmd action= none > notepad</command> 13. Critical Command list a. <CriticalErrorCommands retries="1"> b. <command type="service" action="start">acccm License Tracker</command> c. <command type="service" action="start">acccm License Tracker</command> d. <command type="cmd" action="none">calc</command> 104 of 124
105 7.4. HA Service One-X Server Configuration The One-X Database of Control Manager has its own database connection strings that are separate from the Control Manager related database connection strings. Perform for the following steps to configure the One-X failover configuration ACM One-X Web Configuration This section is related to the One-X database connection string that the primary Avaya Control Manager One-X web portal uses Procedure 1. Locate the ACCCM ONEX Web file located in c:\program Files (x86)\avaya\avaya Control Manager 7.1\Web\ACCCM ONEX WEB\web.config</configFileName> 2. Edit the HA Configuration file by copying the required database connection strings from the Primary and Secondary ACM ONEX application for the ONEX Web configure file in step 1 above and copy these connection strings to the required section in the HA configuration.xml file. See example below <Application name="acccm ONEX WEB"> <configfilename>c:\program Files (x86)\avaya\avaya Control Manager 7.1.2\Web\ACCCM ONEX WEB\web.config</configFileName> <configparamname>//configuration//appsettings/add[@key='db'] </configparamname> <configparamattributename>value</configparamattributename> <primaryconnstr>data Source=ACMSQLHA1;Initial Catalog=ACCCMONEXDB;User ID=ACCCMONEXUSER;Password="BQmTDicXuGduAjHodiSfcQ=="</primaryConnStr > <secondaryconnstr>data Source=ACMSQLHA2;Initial Catalog=ACCCMONEXDB;User ID=ACCCMONEXUSER;Password="BQmTDicXuGduAjHodiSfcQ=="</secondaryConn Str> <dboperationquery> select * from csuser</dboperationquery> <dboperationtimeout>5000</dboperationtimeout></application> Notes 1. You must make sure that the connection strings entered are correct and include the correct One-x SQL user and password. 2. If you are not using One-X in your HA environment edit the HA Config file to remove the Application sections in the file. 105 of 124
106 ACM One-X CFG Configuration This section is related to the configuration of the integration folder for One-X agent. Procedure 1. Locate the ACCCM ONEX CFG file located in c:\program Files (x86)\avaya\avaya Control Manager 7.1\Web\ACCCM ONEX CFG\web.config</configFileName> 2. Edit the HA Configuration file by copying the required database connection strings from the Primary and Secondary ACM ONEX application for the ONEX CFG file in step 1 above and copy these connection strings to the required section in the HA configuration.xml file. See example below <Application name="acccm ONEX CFG"> <configfilename>c:\program Files (x86)\avaya\avaya Control Manager 7.1.2\Web\ACCCM ONEX CFG\web.config</configFileName> <configparamname>//configuration//connectionstrings/add[@name='local_pub']</config ParamName> <configparamattributename>connectionstring</configparamattributename> <primaryconnstr>data Source=ACMSQLHA1;Initial Catalog=ACCCMONEXDB;Persist Security Info=True;User ID=ACCCMONEXUSER;Password="BQmTDicXuGduAjHodiSfcQ==";MultipleActiveRe sultsets=true</primaryconnstr> <secondaryconnstr>data Source=ACMSQLHA2;Initial Catalog=ACCCMONEXDB;Persist Security Info=True;User ID=ACCCMONEXUSER;Password="BQmTDicXuGduAjHodiSfcQ==";MultipleActiveRe sultsets=true</secondaryconnstr> <dboperationquery>select * from csuser</dboperationquery> <dboperationtimeout>5000</dboperationtimeout></application> 106 of 124
107 High Availability ACM Licensing In order to install Avaya Control Manager in a high availability configuration the following license file is required. Material Code Description NPL in US ($) AVAYA CCCM 7.X HA License $10, Installing License on the Avaya Control Manager system(s) The license must be installed on the Avaya Control Manager system(s) once the installation completes. Without a valid license file, the License service will not be able to start and no user will be able to login into the Avaya Control Manager UI. In order to obtain the license, the MAC ID s of both the Avaya Control Manager Primary and Secondary Application servers are required for the License creation. To get the MAC ID s of the Avaya Control Manager Application servers follow these steps 1. Login into ACM-1 (Primary Application Server) 2. Open the command prompt 3. Run the command getmac. 4. Copy MAC ID 5. Send both MAC ID s from ACM-1 and ACM-2 to licenseadmin@avayacontrolmanager.com to get the ACM License. 6. Once the ACM license is received: a. Copy the License.Lic to the ACCCM License Server location on the ACM (Primary and Secondary) Application servers 7. Reboot both Primary and Secondary ACM Application servers after installing license file. Once both systems are up, make sure that License service is running on the both ACM servers. 107 of 124

108 7.5. Testing the ACM installation To test the installation and to start the system, start ACM License Server. The License service should be started successfully on both Primary and Secondary ACM application servers. Open the Internet Explorer browser and in the address base, enter : In the ACM log-in page, perform the following steps: 1. In the Username field, enter itnv as the user name. 2. In the Password field, enter itnv as the password. When you login for the first time, the system displays the password change page, prompting you to change the password 108 of 124
109 7.6. ACM Services for High Availability Under normal operating conditions, the two ACM application servers (ACM-1/ACM-2) will function in an Active/Active mode, meaning that both applications servers are working in parallel. The Primary Avaya Control Manager (ACM-1) Application server runs its primary database connection path against the MS SQL 2008 Database Server SQL-1 whereas the Secondary Avaya Control Manager (ACM-2) Application server also runs its primary database connection against the MS SQL 2008 Database Server SQL-1. This is an architectural requirement to make the failover mechanisms work properly The following overview outlines the relevant services that have an interconnection with the ACM HA setup and are actively monitored by the ACM HA service. Under normal operating conditions the following service status is required ACM Service ACM-1 ACM-2 Status Startup Status Startup Audit Log Running Manual Stopped Manual License Tracker Running Manual Stopped Manual HA Service Running Manual Running Manual Note: 1. The Audit Log and License Tracker Service cannot be up and running on both of the ACM Application Servers (ACM-1/ACM-2) at the same time 2. After every power restart (recovery) of the ACM Application Servers the state of these services must be checked per table above. The ACM HA service is monitoring the primary database connections from ACM-1 to SQL-1 and ACM-2 to SQL-1 and the service will take the appropriate action in the event of the a database connection failure. The database connection strings are defined in each of the NAV360Config.XML file on each ACM application server this file must always reflect the primary database connection paths on each of the ACM application servers (ACM-1/ACM-2) 109 of 124
110 7.7. Testing the ACM High Availability Installation This section layout the steps Avaya recommends for testing the HA Service and explains the different results that are expected Prerequisites 1. License tracker and Audit log Services should be started on the primary application server (ACM-1), and stopped on the secondary application server (ACM-2). 2. Set these services to Manual Start on both of the application servers. 3. Make sure that the NAV360config.xml files on the primary and secondary application servers are both pointing to the primary DB-1 server. Perform the following steps to test and validate the ACM High Availability installation 1. Start the HA service on the primary application Server (ACM-1), and right after that start the HA service on the secondary (ACM-2) Successful Installation a. Start the HA service on the primary application Server (ACM-1), and right after that start the HA service on the secondary (ACM-2) b. Check the two logs created in each of the log folders of the HA Service on both of the primary and secondary application servers ACM Application Server Primary Application Server (ACM-1) Secondary Server (ACM-2) HA Service: Error Log D:\Program Files (x86)\avaya\avaya Contact Center Control Manager SP Edition 7\Services\ACCCM HA Service\Logs\ D:\Program Files (x86)\avaya\avaya Contact Center Control Manager SP Edition 7\Services\ACCCM HA Service\Logs\ c. In case of an error log the first time, it may be a result of having to encrypt passwords entered in the configuration file. d. Continue to monitor the NAV360Config to see if the database connection string has changed and if the services on the application servers have stopped and started e. If the error log continues to get updated (check the time stamp of the file) then something is wrong. Refer to the Unsuccessful Section below 110 of 124
111 Unsuccessful Installation a. If you see an additional logs created with error or critical error in the file name stamp, stop the HA services on the application servers and check the HA configuration for any mistakes and if required reconfigure everything back to the initial setting and try again. b. In the case that port 9011 might be blocked by a firewall or not available, confirm that you can telnet from the ACM application server to the other ACM application server by starting the HA services and typing the following in the cmd prompt for each application server c. Telnet remoteappserveripaddress 9011 d. The result should be a blank screen and if you can get an error, it confirms there is a connection/port issue e. If no logs are created at all, you need to add permissions on the AVAYA installation folder. Usually this can be done by setting full (security) permissions on the folder for everyone. f. If the services won t start, you have a configuration error, usually relating to database connection strings and\or IP addresses in the configuration.xml or HA_service.exe.config file. Note: 1. You might receive an error log the first time around on account of having to encrypt passwords that you entered in the to the configuration file. In this case, continue to monitor the Nav360config.xml files to see if a database sting change has occurred and if the services have stopped\started. 2. If the error log continues to get updated (check the time stamp of the file), and if so, then something is misconfigured. 2. Stop the MSSQL Service on the Primary SQL Server to simulate a DB failure. Successful Installation a. The NAV360Config.xml files have been updated with the Secondary database connection string (SQL-2) string on Primary Application server (ACM-1) and on the Secondary Application server (ACM-2) i.e. the secondary NAV360 files were initially configured with the primary SQL connection string, in which a failover would cause the HA service on the secondary application to change the connection strings to the Secondary DB strings). b. The two Services (License Tracker and Audit Log) have Stopped on the Primary Application server and started on the Secondary Application server Note: If only one service has started on the secondary app server, wait 5-8 minutes and then check if the second service has started. 111 of 124
112 Unsuccessful Installation a. The services (License Tracker and Audit Log) did not stop on the Primary Application server this could be on account of no error logs appearing after stopping the MSSQL Service, in which you need to check all connection strings in the HA Service and Nav360config files. b. Nothing has changed on Secondary Application server which could a configuration error regarding the adjunct server on one\both of the HA server configuration files from one\both of the ACM Application servers. For example, wrong Service name was entered in the configuration.xml file or\and wrong IP addresses c. Another option is the 9011 Port is closed\blocked on both of the servers Rollback to the initial HA Service Configuration This section will show the steps required to roll back the environment to the initial HA service configuration after a failover scenario has concluded and the connection to the MSSQL Primary Server has been restored Perform the following steps rollback to the initial HA service configuration Procedure Before performing a rollback, the Primary MSSQL Service and Agent are back up and started 1. Stop both HA services on the Primary and Secondary Application Servers (ACM-1 and ACM-2). 2. Make sure that the HA services on the application servers are set to manual and not automatic\automatic Delayed start. This is to insure that the services do not start automatically during the rollback procedure. 3. Make sure to update the NAV360Config.xml file located in c:\windows\system32 back to the Primary Data base connection string a. Confirm that the same database connection string has been entered into the HA Service Configuration.xml file 4. Check that the NAV360config.xml file located in c:\windows\syswow64 was also updated from the change you made to the first file. If your Hardlink is still in place, the file should have been updated when you saved the file in System32. a. Do this on both the primary application and secondary application servers. 5. Stop the two services (Audit Log and License Tracker) on the secondary application server, and start the two services on the Primary Application server. 6. Delete the logs from the HA Services log folder on both the Primary and Secondary application servers. 7. Start the Primary HA service, followed by the Secondary HA service 8. Go through the Testing procedure as outlined in the previous section. If no errors are received\you have only 2 logs files (no error\critical error log file), you have successfully rolled back the HA service. 112 of 124

113 8. ACM Failover Scenarios Per the normal operating conditions the following service status is required as per the reference architecture. ACM Service ACM-1 ACM-2 Status Startup Status Startup Audit Log Running Manual Stopped Manual License Tracker Running Manual Stopped Manual HA Service Running Manual Running Manual 8.1. SQL-1 Failure/SQL-2 Running 1. The HA Service on ACM-2 detects a failure on SQL-1 and will switch the database connection to SQL The HA Service ACM-1 detects the failure in SQL-1 and will switch the database connection to SQL In this failure scenario on SQL-1, the following ACM services are running on the both the Avaya Control Manager Application servers ACM-1/ACM-2 ACM Service ACM-1 ACM-2 Audit Log Stopped Running License Tracker Stopped Running 113 of 124
114 4. Both of Avaya Control Manager Application Servers (ACM-1/ACM-2) continue to be fully operational in this scenario and any user requests coming in via ACM-1 or ACM-2 will be serviced as normal per the configuration details hosted on the SQL-2 database server as opposed to the SQL-1 database server. 5. Any Move, Add, Change, Delete activity will result in an update of SQL-2 and will be replicated to SQL-1 upon recovery 8.2. SQL-1 Recovery/SQL-2 Running 1. Once the SQL-1 database server has been recovered and all of the MS-SQL services are up and running, the databases configured for bi-directional replication will automatically get synchronized between SQL-2 and SQL-1 by use of the MS-SQL replication services 2. Any actions performed on SQL-2 whilst SQL-1 was unavailable will now get automatically replicated when SQL-1 is back in service. 3. To bring the Avaya Control Manager Application Servers (ACM-1/ACM-2) database connection path back to SQL-1 as the primary connection path, a manual recovery procedure is required Manually recovery of the primary connection path Avaya recommends performing this manual recovery during out of hours as the tracking and audit data may get out of sync or corrupted during the process Procedure 1. Stop the HA Service on both the Avaya Control Manager Application Servers (ACM-1 and ACM-2) 2. Reconfigure the Nav360config.xml on ACM-2 and point the database connection back to SQL Reconfigure the Nav360config.xml on ACM-1 and point the database connection back to SQL Stop the License Tracker and Audit Log Service on ACM Start the License Tracker and Audit Log Service on ACM-1 ACM Service ACM-1 ACM-2 Audit Log Running Stopped License Tracker Running Stopped 6. Start the HA Service on both ACM-1 and ACM of 124

115 8.3. ACM-1 Failure/ACM-2 Running 1. The HA Service on ACM-2 detects a loss of the heartbeat connection to ACM-1 and starts the Audit Log and License Tracker service on ACM-2 ACM Service ACM-1 ACM-2 Audit Log Not Available Running License Tracker Not Available Running 2. As the SQL-1 database is still operational ACM-2 will continue using the primary database connection path to SQL-1 3. The database replication process continues working as normal as neither of the SQL databases (SQL-1/SQL-2) have failed. 4. From an end user perspective the loss of the primary application server (ACM-1) has the effect that a new URL request from an end user to ACM-1 will result in error. Therefore a user already connected and logged into ACM-1 to perform administration work will see this error. 115 of 124
116 ACM-1 Recovery/ACM-2 Running 1. Stop the HA Service on both the Avaya Control Manager Application Servers (ACM-1 and ACM-2) 2. Reconfigure the Nav360config.xml on ACM-2 and point the database connection back to SQL Reconfigure the Nav360config.xml on ACM-1 and point the database connection back to SQL Stop the License Tracker and Audit Log Service on ACM Start the License Tracker and Audit Log Service on ACM-1 ACM Service ACM-1 ACM-2 Audit Log Running Stopped License Tracker Running Stopped 6. Start the HA Service on both ACM-1 and ACM of 124
117 8.4. ACM-1 Running/ACM-2 Failure 1. The HA Service on ACM-1 detects a loss of the heartbeat connection between ACM-1 and ACM-2 2. The Audit Log and License Tracker Service continue to run on ACM-1 ACM Service ACM-1 ACM-2 Audit Log Running Not Available License Tracker Running Not Available 3. The database replication process continues working as normal as neither of the SQL databases (SQL-1/SQL-2) have failed 4. From an end user perspective the loss of the ACM-2 application server has the effect that a new URL request from an end user to ACM-2 will result in an error ACM-1 Running / ACM-2 Recovery 1. Stop the HA Service on both the Avaya Control Manager Application Servers (ACM-1 and ACM-2) 2. Reconfigure the Nav360config.xml on ACM-2 and point the database connection back to SQL Reconfigure the Nav360config.xml on ACM-1 and point the database connection back to SQL Stop the License Tracker and Audit Log Service on ACM Start the License Tracker and Audit Log Service on ACM of 124

118 ACM Service ACM-1 ACM-2 Audit Log Running Stopped License Tracker Running Stopped 6. Start the HA Service on both ACM-1 and ACM SQL-1 Running/SQL-2 Failure 1. As ACM-1 is connected to SQL-1 as the primary DB connection path, there will be no change to any service or it configuration in the ACM-1 NAV360Web.XML ACM-1 will continue working as normal but it has lost its backup database SQL As ACM-2 is connected to SQL-1 as the primary DB connection path, there is neither change to any service nor any configuration change triggered on ACM-2 NAV360Web.XML. ACM-2 service will continue working as normal but it has lost its backup DB. 3. From the end user perspective the user get operational access either via ACM-1 or ACM of 124
REVISED 1 AUGUST REVIEWER'S GUIDE FOR VMWARE APP VOLUMES VMware App Volumes and later
 REVISED 1 AUGUST 2018 REVIEWER'S GUIDE FOR VMWARE APP VOLUMES VMware App Volumes 2.13.1 and later Table of Contents Introduction Audience What You Will Learn Navigating This Document for App Volumes Use
Configuring ApplicationHA in VMware SRM 5.1 environment
 Configuring ApplicationHA in VMware SRM 5.1 environment Windows Server 2003 and 2003 R2, Windows Server 2008 and 2008 R2 6.0 September 2013 Contents Chapter 1 About the ApplicationHA support for VMware
December P Xerox FreeFlow Core Installation Guide
 5.1.0.0 December 2017 702P06246 2017 Xerox Corporation. All rights reserved. Xerox, Xerox and Design, and FreeFlow are trademarks of Xerox Corporation in the United States and/or other countries. This
REVISED 1 AUGUST QUICK-START TUTORIAL FOR VMWARE APP VOLUMES VMware App Volumes and later
 REVISED 1 AUGUST 2018 QUICK-START TUTORIAL FOR VMWARE APP VOLUMES VMware App Volumes 2.13.1 and later Table of Contents Introduction Audience What You Will Learn Navigating This Document for App Volumes
Avaya Contact Centre Control Manager Release 7.0 Service Pack 1 (ACCCM 7.0 SP1 or ACCCM 7.0.1)
") Avaya Contact Centre Control Manager Release 7.0 Service Pack 1 (ACCCM 7.0 SP1 or ) Avaya Inc Proprietary 1 DOCUMENT VERSION : 1.0 SW : 7.0.1 ISSUE DATE : AUG 22 ND 2013 Avaya Inc Proprietary 2 RELEASE
Avaya Contact Centre Control Manager Release 7.0 Service Pack 1 (ACCCM 7.0 SP1 or ) Avaya Inc Proprietary 1 DOCUMENT VERSION : 1.0 SW : 7.0.1 ISSUE DATE : AUG 22 ND 2013 Avaya Inc Proprietary 2 RELEASE
Avaya IQ 5.2 Service Pack 2 (SP2) Release Notes Issue 1.3 Dec
 Release Notes Issue 1.3 Dec") Avaya IQ 5.2 Service Pack 2 (SP2) Issue 1.3 Dec 15 2011 TABLE OF CONTENTS 1. PURPOSE... 3 2. AVAYA IQ 5.2.2 UPDATE PREREQUISITES AND CONSIDERATIONS... 3 2.1 AVAYA IQ HOST PREREQUISITES... 3 2.1.1 Ensure
Avaya IQ 5.2 Service Pack 2 (SP2) Issue 1.3 Dec 15 2011 TABLE OF CONTENTS 1. PURPOSE... 3 2. AVAYA IQ 5.2.2 UPDATE PREREQUISITES AND CONSIDERATIONS... 3 2.1 AVAYA IQ HOST PREREQUISITES... 3 2.1.1 Ensure
Dell EMC Ready Architectures for VDI
 Dell EMC Ready Architectures for VDI Designs for VMware Horizon 7 on Dell EMC XC Family September 2018 H17387 Deployment Guide Abstract This deployment guide provides instructions for deploying VMware
Dell EMC vsan Ready Nodes for VDI
 Dell EMC vsan Ready Nodes for VDI Integration of VMware Horizon on Dell EMC vsan Ready Nodes April 2018 H17030.1 Deployment Guide Abstract This deployment guide provides instructions for deploying VMware
Dell Storage Compellent Integration Tools for VMware
 Dell Storage Compellent Integration Tools for VMware Version 4.0 Administrator s Guide Notes, Cautions, and Warnings NOTE: A NOTE indicates important information that helps you make better use of your
Data Protection Guide
 SnapCenter Software 4.0 Data Protection Guide For VMs and Datastores using the SnapCenter Plug-in for VMware vsphere March 2018 215-12931_C0 doccomments@netapp.com Table of Contents 3 Contents Deciding
Installing and Configuring vcloud Connector
 Installing and Configuring vcloud Connector vcloud Connector 2.6.0 This document supports the version of each product listed and supports all subsequent versions until the document is replaced by a new
Data Protection Guide
 SnapCenter Software 4.1 Data Protection Guide For VMs and Datastores using the SnapCenter Plug-in for VMware vsphere September 2018 215-13399_B0 doccomments@netapp.com Table of Contents 3 Contents Deciding
Workspace ONE UEM Upgrade Guide
 Workspace ONE UEM Upgrade Guide Workspace ONE UEM v9.5 Have documentation feedback? Submit a Documentation Feedback support ticket using the Support Wizard on support.air-watch.com. This product is protected
Deployment and User Guide Installing and Configuring WhatsUp Gold Failover Manager
 Deployment and User Guide Installing and Configuring WhatsUp Gold Failover Manager This guide provides information about installing and configuring WhatsUp Gold Failover Manager. Contents CHAPTER 1 Using
Dell Storage Compellent Integration Tools for VMware
 Dell Storage Compellent Integration Tools for VMware Administrator s Guide Version 3.1 Notes, Cautions, and Warnings NOTE: A NOTE indicates important information that helps you make better use of your
Storage Manager 2018 R1. Installation Guide
 Storage Manager 2018 R1 Installation Guide Notes, Cautions, and Warnings NOTE: A NOTE indicates important information that helps you make better use of your product. CAUTION: A CAUTION indicates either
Installation Guide Worksoft Analyze
 Installation Guide Worksoft Analyze Worksoft, Inc. 15851 Dallas Parkway, Suite 855 Addison, TX 75001 www.worksoft.com 866-836-1773 Worksoft Analyze Installation Guide Version 1.0.0 Copyright 2018 by Worksoft,
Quick Start Guide TABLE OF CONTENTS COMMCELL ARCHITECTURE OVERVIEW COMMCELL SOFTWARE DEPLOYMENT INSTALL THE COMMSERVE SOFTWARE
 Page 1 of 35 Quick Start Guide TABLE OF CONTENTS This Quick Start Guide is designed to help you install and use a CommCell configuration to which you can later add other components. COMMCELL ARCHITECTURE
VMware vsphere Data Protection Evaluation Guide REVISED APRIL 2015
 VMware vsphere Data Protection REVISED APRIL 2015 Table of Contents Introduction.... 3 Features and Benefits of vsphere Data Protection... 3 Requirements.... 4 Evaluation Workflow... 5 Overview.... 5 Evaluation
Microsoft Exchange Server 2007 Implementation and Maintenance
 Microsoft Exchange Server 2007 Implementation and Maintenance Chapter 1 Exchange Server 2007 Deployment 1.1 Overview, Hardware & Editions 1.2 Exchange Server, Windows & Active Directory 1.3 Administration
SAML-Based SSO Configuration
 Prerequisites, page 1 SAML SSO Configuration Task Flow, page 5 Reconfigure OpenAM SSO to SAML SSO Following an Upgrade, page 9 SAML SSO Deployment Interactions and Restrictions, page 9 Prerequisites NTP
Installation Manual. Fleet Maintenance Software. Version 6.4
 Fleet Maintenance Software Installation Manual Version 6.4 6 Terri Lane, Suite 700 Burlington, NJ 08016 (609) 747-8800 Fax (609) 747-8801 Dossier@dossiersystemsinc.com www.dossiersystemsinc.com Copyright
vrealize Orchestrator Load Balancing
 vrealize Orchestrator Load Balancing Configuration Guide Version 7.0.x T E C H N I C A L W H I T E P A P E R M A Y 2 0 1 6 V E R S I O N 1. 0 Table of Contents Introduction... 4 Load Balancing Concepts...
Bomgar Vault Server Installation Guide
 Bomgar Vault 17.2.1 Server Installation Guide 2017 Bomgar Corporation. All rights reserved worldwide. BOMGAR and the BOMGAR logo are trademarks of Bomgar Corporation; other trademarks shown are the property
Migrating vrealize Automation 6.2 to 7.2
 Migrating vrealize Automation 6.2 to 7.2 vrealize Automation 7.2 This document supports the version of each product listed and supports all subsequent versions until the document is replaced by a new edition.
ForeScout CounterACT Resiliency Solutions
 ForeScout CounterACT Resiliency Solutions User Guide CounterACT Version 7.0.0 About CounterACT Resiliency Solutions Table of Contents About CounterACT Resiliency Solutions... 5 Comparison of Resiliency
Dell Storage Integration Tools for VMware
 Dell Storage Integration Tools for VMware Version 4.1 Administrator s Guide Notes, cautions, and warnings NOTE: A NOTE indicates important information that helps you make better use of your product. CAUTION:
Installing Cisco MSE in a VMware Virtual Machine
 Installing Cisco MSE in a VMware Virtual Machine This chapter describes how to install and deploy a Cisco Mobility Services Engine (MSE) virtual appliance. Cisco MSE is a prebuilt software solution that
WhatsUp Gold 2016 Installation and Configuration Guide
 WhatsUp Gold 2016 Installation and Configuration Guide Contents Installing and Configuring WhatsUp Gold using WhatsUp Setup 1 Installation Overview 1 Overview 1 Security considerations 2 Standard WhatsUp
Version Installation Guide. 1 Bocada Installation Guide
 Version 19.4 Installation Guide 1 Bocada Installation Guide Copyright 2019 Bocada LLC. All Rights Reserved. Bocada and BackupReport are registered trademarks of Bocada LLC. Vision, Prism, vpconnect, and
Installing DPM 2012 R2
 Installing DPM 2012 R2 This document covers the installation/upgrade of System Center 2012 R2 Data Protection Manager (DPM 2012 R2, or simply DPM). While the installation and upgrade process is similar,
IntelliTrack DMS (Data Management System) v8.1 Quick Start Guide Preliminary Copy (July 2011) Copyright 2011 IntelliTrack, Inc.
 v8.1 Quick Start Guide Preliminary Copy (July 2011) Copyright 2011 IntelliTrack, Inc.") Quick Start Guide Reasonable measures have been taken to ensure that the information included in this guide is complete and accurate. However, IntelliTrack reserves the right to change any specifications
Quick Start Guide Reasonable measures have been taken to ensure that the information included in this guide is complete and accurate. However, IntelliTrack reserves the right to change any specifications
Installation Guide for Pulse on Windows Server 2012
 USER GUIDE MADCAP PULSE 4 Installation Guide for Pulse on Windows Server 2012 Copyright 2018 MadCap Software. All rights reserved. Information in this document is subject to change without notice. The
CCH ProSystem fx Engagement. Installation Guide
 CCH ProSystem fx Engagement Installation Guide 2018 2018 CCH Incorporated and its affiliates and licensors. All rights reserved. Material in this publication may not be reproduced or transmitted, in any
Installation on Windows Server 2008
 USER GUIDE MADCAP PULSE 4 Installation on Windows Server 2008 Copyright 2018 MadCap Software. All rights reserved. Information in this document is subject to change without notice. The software described
Accops HyWorks v3.0. Installation Guide
 Accops HyWorks v3.0 Installation Guide Last Update: 4/25/2017 2017 Accops Technologies Pvt. Ltd. All rights reserved. The information contained in this document represents the current view of Propalms
TECHNICAL WHITE PAPER AUGUST 2017 REVIEWER S GUIDE FOR VIEW IN VMWARE HORIZON 7: INSTALLATION AND CONFIGURATION. VMware Horizon 7 version 7.
 TECHNICAL WHITE PAPER AUGUST 2017 REVIEWER S GUIDE FOR VIEW IN VMWARE HORIZON 7: INSTALLATION AND CONFIGURATION VMware Horizon 7 version 7.x Table of Contents Introduction.... 3 JMP Next-Generation Desktop
ZENworks Service Desk 8.0 Using ZENworks with ZENworks Service Desk. November 2018
 ZENworks Service Desk 8.0 Using ZENworks with ZENworks Service Desk November 2018 Legal Notices For information about legal notices, trademarks, disclaimers, warranties, export and other use restrictions,
OpenManage Integration for VMware vcenter Quick Installation Guide for vsphere Web Client Version 3.2
 OpenManage Integration for VMware vcenter Quick Installation Guide for vsphere Web Client Version 3.2 Notes, cautions, and warnings NOTE: A NOTE indicates important information that helps you make better
Solution Integration Guide for Multimedia Communication Server 5100/WLAN/Blackberry Enterprise Server
 Solution Integration Guide for Multimedia Communication Server 5100/WLAN/Blackberry Enterprise Server NN49000-302 Document status: Standard Document version: 0101 Document date: 24 May 2007 All Rights
NETWRIX GROUP POLICY CHANGE REPORTER
 NETWRIX GROUP POLICY CHANGE REPORTER ADMINISTRATOR S GUIDE Product Version: 7.2 November 2012. Legal Notice The information in this publication is furnished for information use only, and does not constitute
Introduction Chapter 1. General Information Chapter 2. Servers Used... 9
 Chapter 1 General Information Contents Contents Introduction... 5 Chapter 1. General Information... 6 Chapter 2. Servers Used... 9 Chapter 3. Installing and Configuring Failover Cluster for MS SQL Databases...
DOWNLOAD PDF SQL SERVER 2012 STEP BY STEP
 Chapter 1 : Microsoft SQL Server Step by Step - PDF Free Download - Fox ebook Your hands-on, step-by-step guide to building applications with Microsoft SQL Server Teach yourself the programming fundamentals
Summary of Server Installation
 Summary of Server Installation In the following exercises, these are the steps that you will perform to install Offline V2 on a server: Exercise 1 Step 1. Step 2. Step 3. Verify Hardware Requirements Before
VMware AirWatch - Workspace ONE, Single Sign-on and VMware Identity Manager
 VMware AirWatch - Workspace ONE, Single Sign-on and VMware Identity Table of Contents Lab Overview - HOL-1857-03-UEM - Workspace ONE UEM with App & Access Management... 2 Lab Guidance... 3 Module 1 - Workspace
Deploying HP SIM 6.x on MSCS clusters on Windows 2008 with SQL Server 2008 SP1 White Paper
 Deploying HP SIM 6.x on MSCS clusters on Windows 2008 with SQL Server 2008 SP1 White Paper Table of Contents Abstract... 2 Introduction... 2 System infrastructure... 3 Storage configuration... 3 IP addresses...
Active Directory as a Probe and a Provider
 Active Directory (AD) is a highly secure and precise source from which to receive user identity information, including user name, IP address and domain name. The AD probe, a Passive Identity service, collects
vsphere Replication for Disaster Recovery to Cloud
 vsphere Replication for Disaster Recovery to Cloud vsphere Replication 6.0 This document supports the version of each product listed and supports all subsequent versions until the document is replaced
Cisco Unified Serviceability
 Cisco Unified Serviceability Introduction, page 1 Installation, page 5 Introduction This document uses the following abbreviations to identify administration differences for these Cisco products: Unified
SnapCenter Software 4.0 Installation and Setup Guide
 SnapCenter Software 4.0 Installation and Setup Guide March 2018 215-12926_C0 doccomments@netapp.com Table of Contents 3 Contents Deciding whether to read the SnapCenter Installation and Setup Guide...
Log & Event Manager UPGRADE GUIDE. Version Last Updated: Thursday, May 25, 2017
 UPGRADE GUIDE Log & Event Manager Version 6.3.1 Last Updated: Thursday, May 25, 2017 Retrieve the latest version from: https://support.solarwinds.com/success_center/log_event_manager_(lem)/lem_documentation
SC-T35/SC-T45/SC-T46/SC-T47 ViewSonic Device Manager User Guide
 SC-T35/SC-T45/SC-T46/SC-T47 ViewSonic Device Manager User Guide Copyright and Trademark Statements 2014 ViewSonic Computer Corp. All rights reserved. This document contains proprietary information that
Jonas Activity Management Technical Deployment Guide
 Jonas Activity Management Technical Deployment Guide [] Software for Life Jonas Activity Management Technical Deployment Guide, Jonas, Jonas Software, Software for Life, and Gary Jonas Computing are registered
NeuralStar Installation Guide
 NeuralStar Installation Guide Version 9.8 Release 3 May 2012 1st Edition Preface Software License Agreement Software is defined as the Kratos Technology & Training Solutions, Inc. computer programs with
Unified CCX Administration Web Interface
 The Unified CCX provides a multimedia (voice, data, and web) IP-enabled customer-care application environment, using VoIP technology that allows your Cisco Unified Communications network to share resources
vsphere Replication for Disaster Recovery to Cloud vsphere Replication 6.5
 vsphere Replication for Disaster Recovery to Cloud vsphere Replication 6.5 You can find the most up-to-date technical documentation on the VMware website at: https://docs.vmware.com/ If you have comments
Course 6231A: Maintaining a Microsoft SQL Server 2008 Database
 Course 6231A: Maintaining a Microsoft SQL Server 2008 Database About this Course This five-day instructor-led course provides students with the knowledge and skills to maintain a Microsoft SQL Server 2008
Accops HyWorks v3.0. Quick Start Guide. Last Update: 4/25/2017
 Accops HyWorks v3.0 Quick Start Guide Last Update: 4/25/2017 2017 Accops Technologies Pvt. Ltd. All rights reserved. The information contained in this document represents the current view of Propalms Technologies
APAR PO06620 Installation Instructions
 IBM Corporation APAR PO06620 Installation Instructions IBM Counter Fraud Management 1.5.0.5 IBM Counter Fraud Development 3-31-2017 Table of Contents 1 Fix readme... 1 2 Abstract... 1 3 Contents... 1 4
vcenter Support Assistant User's Guide
 vcenter Support Assistant 6.5 This document supports the version of each product listed and supports all subsequent versions until the document is replaced by a new edition. To check for more recent editions
EASYHA SQL SERVER V1.0
 EASYHA SQL SERVER V1.0 CONTENTS 1 Introduction... 2 2 Install SQL 2016 in Azure... 3 3 Windows Failover Cluster Feature Installation... 7 4 Windows Failover Clustering Configuration... 9 4.1 Configure
Deltek Touch Expense for Ajera. Touch 1.0 Technical Installation Guide
 Deltek Touch Expense for Ajera Touch 1.0 Technical Installation Guide June 01, 2018 While Deltek has attempted to verify that the information in this document is accurate and complete, some typographical
ForeScout CounterACT. Resiliency Solutions. CounterACT Version 8.0
 ForeScout CounterACT Resiliency Solutions CounterACT Version 8.0 Table of Contents About ForeScout Resiliency Solutions... 4 Comparison of Resiliency Solutions for Appliances... 5 Choosing the Right Solution
VMware View Upgrade Guide
 View 4.0 View Manager 4.0 View Composer 2.0 This document supports the version of each product listed and supports all subsequent versions until the document is replaced by a new edition. To check for
Deltek Costpoint Enterprise Reporting 6.1. Installation Guide for New Users
 Deltek Costpoint Enterprise Reporting 6.1 Installation Guide for New Users September 23, 2011 While Deltek has attempted to verify that the information in this document is accurate and complete, some typographical
Installation and Deployment Guide for HEAT Service Management
 Installation and Deployment Guide for HEAT Service Management Supported Deployment Configurations The section briefly describes the deployment configurations that are supported by the HEAT Service Management
Microsoft Office Groove Server Groove Manager. Domain Administrator s Guide
 Microsoft Office Groove Server 2007 Groove Manager Domain Administrator s Guide Copyright Information in this document, including URL and other Internet Web site references, is subject to change without
App Orchestration 2.0
 App Orchestration 2.0 Getting Started with Citrix App Orchestration 2.0 Prepared by: Jenny Berger Commissioning Editor: Erin Smith Version: 1.0 Last Updated: April 4, 2014 Page 1 Contents Welcome to App
Installation Guide. 3CX CRM Plugin for ConnectWise. Single Tenant Version
 Installation Guide 3CX CRM Plugin for ConnectWise Single Tenant Version "Copyright VoIPTools, LLC 2011-2016" Information in this document is subject to change without notice. No part of this document may
Veriato Recon / 360. Version 9.0.3
 Veriato Recon / 360 Version 9.0.3 1/3/2018 Upgrade Guide January 3, 2018 Table of Contents Before You Begin... 1 What's New... 1 How the System Works... 1 Upgrade Support... 6 Update Antivirus Exclusions...
Installation Guide Worksoft Certify Execution Suite
 Installation Guide Worksoft Certify Execution Suite Worksoft, Inc. 15851 Dallas Parkway, Suite 855 Addison, TX 75001 www.worksoft.com 866-836-1773 Worksoft Certify Execution Suite Installation Guide Version
Set-up Server Features and Roles Once the users are created we will move on to setting up the Internet Information Services (IIS) role on the server.
 role on the server.") HOW TO: Install and Setup System Center Configuration Manager (SCCM) 2012 SP1 on a Windows Server 2012 Part 1 - Prerequisites In the following three part guide we will be going over how to install and
HOW TO: Install and Setup System Center Configuration Manager (SCCM) 2012 SP1 on a Windows Server 2012 Part 1 - Prerequisites In the following three part guide we will be going over how to install and
VMware AirWatch Database Migration Guide A sample procedure for migrating your AirWatch database
 VMware AirWatch Database Migration Guide A sample procedure for migrating your AirWatch database For multiple versions Have documentation feedback? Submit a Documentation Feedback support ticket using
CONTENTS. p r e m i u m e d i t i o n 2008
 Install Guide CONTENTS Basics... 1 Server Install... 3 Workstation Install... 9 Workstation Offline Components Install... 11 Appendix: Installing Runtime SQL Server 2005...14 p r e m i u m e d i t i o
Application Notes for Virsae Service Management for Unified Communications with Avaya Aura Session Manager - Issue 1.0
 Avaya Solution & Interoperability Test Lab Application Notes for Virsae Service Management for Unified Communications with Avaya Aura Session Manager - Issue 1.0 Abstract These Application Notes describe
Partner Integration Portal (PIP) Installation Guide
 Installation Guide") Partner Integration Portal (PIP) Installation Guide Last Update: 12/3/13 Digital Gateway, Inc. All rights reserved Page 1 TABLE OF CONTENTS INSTALLING PARTNER INTEGRATION PORTAL (PIP)... 3 DOWNLOADING
Partner Integration Portal (PIP) Installation Guide Last Update: 12/3/13 Digital Gateway, Inc. All rights reserved Page 1 TABLE OF CONTENTS INSTALLING PARTNER INTEGRATION PORTAL (PIP)... 3 DOWNLOADING
vcenter Support Assistant User's Guide
 vcenter Support Assistant 6.0 This document supports the version of each product listed and supports all subsequent versions until the document is replaced by a new edition. To check for more recent editions
Replication. Version
 Replication Version 2018.3 Contents Before you start... 3 Principles... 4 Prerequisites... 5 Initial Steps... 6 Post Setup... 7 Supported Operating Systems... 7 Perform the Setup... 8 Read Committed Snapshot
Course CLD221x: Enabling Office 365 Clients
 Course CLD221x: Enabling Office 365 Clients Student Lab Manual Lab Design There are five exercises in this lab, each of which contains one or more tasks. For a successful outcome to the lab, the exercises
OpenManage Integration for VMware vcenter Quick Install Guide for vsphere Client, Version 2.3.1
 OpenManage Integration for VMware vcenter Quick Install Guide for vsphere Client, Version 2.3.1 Notes, Cautions, and Warnings NOTE: A NOTE indicates important information that helps you make better use
Administration GUIDE. Virtual Server idataagent (VMware) Published On: 11/19/2013 V10 Service Pack 4A Page 1 of 225
 Published On: 11/19/2013 V10 Service Pack 4A Page 1 of 225") Administration GUIDE Virtual Server idataagent (VMware) Published On: 11/19/2013 V10 Service Pack 4A Page 1 of 225 User Guide - Virtual Server idataagent (VMware) Table of Contents System Requirements
Administration GUIDE Virtual Server idataagent (VMware) Published On: 11/19/2013 V10 Service Pack 4A Page 1 of 225 User Guide - Virtual Server idataagent (VMware) Table of Contents System Requirements
HP OneView for VMware vcenter User Guide
 HP OneView for VMware vcenter User Guide Abstract This document contains detailed instructions for configuring and using HP OneView for VMware vcenter (formerly HP Insight Control for VMware vcenter Server).
PlateSpin Protect 11.2 SP1 Installation and Upgrade Guide. November 2017
 PlateSpin Protect 11.2 SP1 Installation and Upgrade Guide November 2017 Legal Notice For information about legal notices, trademarks, disclaimers, warranties, export and other use restrictions, U.S. Government
Abila MIP. Installation Guide
 This is a publication of Abila, Inc. Version 2018.1.0 2017 Abila, Inc. and its affiliated entities. All rights reserved. Abila, the Abila logos, and the Abila product and service names mentioned herein
How to Install Audatex Estimating and AudaUpdate Quick Reference Guide
 How to Install Audatex Estimating and AudaUpdate Quick Reference Guide Table of Contents Prerequisites... 2 New User / New Computer Setup... 4 2018 Audatex North America, Inc. 1 Prerequisites Important
SOA Software Intermediary for Microsoft : Install Guide
 SOA Software Intermediary for Microsoft : Install Guide SOA Software Intermediary for Microsoft Install Guide SOAIM_60 August 2013 Copyright Copyright 2013 SOA Software, Inc. All rights reserved. Trademarks
Using vrealize Operations Tenant App as a Service Provider
 Using vrealize Operations Tenant App as a Service Provider Using vrealize Operations Tenant App as a Service Provider You can find the most up-to-date technical documentation on the VMware Web site at:
USER GUIDE. CTERA Agent for Windows. June 2016 Version 5.5
 USER GUIDE CTERA Agent for Windows June 2016 Version 5.5 Copyright 2009-2016 CTERA Networks Ltd. All rights reserved. No part of this document may be reproduced in any form or by any means without written
Using ZENworks with Novell Service Desk
 www.novell.com/documentation Using ZENworks with Novell Service Desk Novell Service Desk 7.1 April 2015 Legal Notices Novell, Inc. makes no representations or warranties with respect to the contents or
Installing Cisco CMX in a VMware Virtual Machine
 Installing Cisco CMX in a VMware Virtual Machine This chapter describes how to install and deploy a Cisco Mobility Services Engine (CMX) virtual appliance. Cisco CMX is a prebuilt software solution that
Distribute Call Studio applications to Unified CVP VXML Servers.
 is one of the Cisco Unified Customer Voice Portal (CVP) components and a web-based interface using which you can configure other Unified CVP components and devices in the Unified CVP solution. Use to perform
System, Environment, & Configuration Requirements for FASTER Web 6.4
 System, Environment, & Configuration Requirements for FASTER Web 6.4 The following document provides environment and system requirements for the FASTER Web fleet management system. Different Hardware Configurations
Avaya Event Processor Release 2.2 Operations, Administration, and Maintenance Interface
 Avaya Event Processor Release 2.2 Operations, Administration, and Maintenance Interface Document ID: 13-603114 Release 2.2 July 2008 Issue No.1 2008 Avaya Inc. All Rights Reserved. Notice While reasonable
Installing SQL Server Developer Last updated 8/28/2010
 Installing SQL Server Developer Last updated 8/28/2010 1. Run Setup.Exe to start the setup of SQL Server 2008 Developer 2. On some OS installations (i.e. Windows 7) you will be prompted a reminder to install
Course 6231A: Maintaining a Microsoft SQL Server 2008 Database
 Course 6231A: Maintaining a Microsoft SQL Server 2008 Database OVERVIEW About this Course Elements of this syllabus are subject to change. This five-day instructor-led course provides students with the
Dell Storage Manager 2016 R3 Installation Guide
 Dell Storage Manager 2016 R3 Installation Guide Notes, Cautions, and Warnings NOTE: A NOTE indicates important information that helps you make better use of your product. CAUTION: A CAUTION indicates either
Setting Up Resources in VMware Identity Manager (On Premises) Modified on 30 AUG 2017 VMware AirWatch 9.1.1
 Modified on 30 AUG 2017 VMware AirWatch 9.1.1") Setting Up Resources in VMware Identity Manager (On Premises) Modified on 30 AUG 2017 VMware AirWatch 9.1.1 Setting Up Resources in VMware Identity Manager (On Premises) You can find the most up-to-date
Setting Up Resources in VMware Identity Manager (On Premises) Modified on 30 AUG 2017 VMware AirWatch 9.1.1 Setting Up Resources in VMware Identity Manager (On Premises) You can find the most up-to-date
Epicor Customer Profit Analyzer Installation Guide. New Install
 Epicor Customer Profit Analyzer Installation Guide Disclaimer This document is for informational purposes only and is subject to change without notice. This document and its contents, including the viewpoints,
IBM Spectrum Protect Plus Version Installation and User's Guide IBM
 IBM Spectrum Protect Plus Version 10.1.1 Installation and User's Guide IBM Note: Before you use this information and the product it supports, read the information in Notices on page 119. Third edition
vcenter Chargeback Manager Installation and Upgrade Guide
 vcenter Chargeback Manager Installation and Upgrade Guide vcenter Chargeback Manager 2.6.0 This document supports the version of each product listed and supports all subsequent versions until the document