Movavi Video Converter 15. User guide 2014
|
|
|
- Drusilla Anderson
- 6 years ago
- Views:
Transcription

1 Movavi Video Converter 15 User guide 2014
2 Table of Contents Quick Start Guide...3 Activating Software...6 Getting an Activation Key...7 Online Activation...8 Offline Activation...9 Overview...13 System Requirements...14 Supported Formats...15 Movavi Video Converter Interface...17 File List...19 Preview Area...21 Adding Media for Conversion...23 Converting Media Files...24 Choosing a Preset...26 Converting for Devices...28 Converting Videos for the Internet...29 Extracting Audio from Video...31 Converting Audio...33 Converting Images...35 Creating GIFs from Videos...36 Burning DVDs...37 Accelerating Conversion...39 SuperSpeed Conversion...40 Compatible Formats...41 Enabling SuperSpeed Conversion...42 Intel Hardware Acceleration...43 NVIDIA Hardware Acceleration...44 Choosing Audio Tracks...45 Choosing Subtitle Tracks...46 Editing Media Files...47 Trimming Video and Audio...48 Joining Files...49 Transforming Video...51 Cropping Video...53 Applying a Watermark...54 Video Adjustments...56 Audio Enhancements...57 Changing the Aspect Ratio...58 Reducing File Size...60 Changing the Output Path...61 Export Options...62 Settings and Preferences...64 Energy-Saving Options...68 Contacting Support...69 Glossary...70
3 Quick Start Guide Using Movavi Video Converter, you can perform any kind of format change in just a few steps the procedure will not be significantly different no matter which formats you are converting to or from. Hints and Tips: When you first launch Movavi Video Converter, you will be offered a quick walk-through with popup hints. Just follow the on-screen instructions and you'll be converting videos like a pro in no time! If you want to disable hints, please see the Program Settings section. Step 1: Add Files To start with, you will need to add some files into the program. To do that, use the buttons at the top of the window: - click this button to add video files - click this button to add audio files - click this button to add an entire DVD, complete with bonus videos. - click this button to add image files Step 2: Choose a Preset Click the drop-down arrow next to the Convert to field to open the list of presets. They are divided into format and device presets: Image formats opens a list of presets for converting images. Video and audio formats opens a list of formats such as MP4, AVI, MOV, and others, each complete with a set of various resolutions; Devices opens a list of device types and brands, which you can browse to find your particular device's model. Using one of these presets will automatically convert media with such settings that it will be playable on this device out of the box.

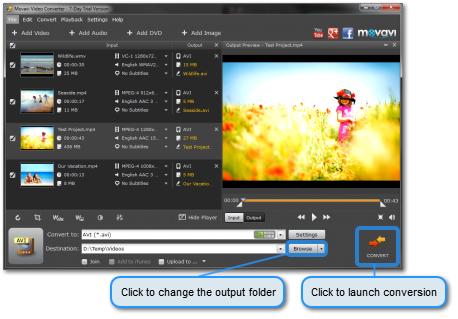
4 For example, to convert your videos for the ipad mini, you will need to click Devices at the bottom of the list, open the Apple category, and select ipad mini. You can even prepare your videos for uploading to social networks: go to Video and audio formats, open the Online Video category, and select the service and resolution that you prefer, for example, YouTube HD 720p. Or, if you just need to change the format, you can quickly access the most popular formats under Video and audio formats > General Video. Most format categories offer you a selection of resolutions, however, there will always be a Same as input option which you can select if you want to keep the same resolution for this video after conversion. Step 3: Start Converting! Now almost everything is ready to start converting your media files. All that's left is to set a destination where the program will store the new files. To do that, check the Destination field right underneath the Convert to line. By default, the files will be saved in the Movavi Library folder, located in your Videos directory. If you want to change the output folder, just click the Browse button to the right and specify the necessary folder in the dialogue window. Once you're all set, click the Convert button in the bottom right corner and the Converter will start processing your files.
5
6 Activating Software When you first install a copy of Movavi Video Converter, it will be running in trial mode, where the following limitations will apply: The Trial lasts only 7 days since installation. After that, you will be offered to activate the software or purchase an Activation Key. A watermark will be added on top of converted videos Audio files will only be converted 1/2 length When using SuperSpeed mode, files will only be converted 1/2 length. To be able to use the program to its fullest, you will need to activate it using an activation key that you can purchase from our official website or any of our partners. Please see the following sections on some of the frequently asked questions about activation: How do I get an activation key? How do I activate the program? I have a stable Internet connection. Can I activate the program if I don't have Internet access? If you have any other questions or you find that activation is not working correctly, please don't hesitate to contact our support team.
7 Getting an Activation Key 1. To purchase an activation key, open the Help menu in Movavi Video Converter and select Buy Now or just use the button below. 2. Choose a personal or business license and click the corresponding Buy Now button. If you intend to use Movavi Video Converter commercially, that is, to obtain profit of any kind or in a government organization, you need to select a business license. 3. Fill in your billing information and enter a valid address. This will be used to deliver your activation key, so make sure you have entered it correctly and that you have access to it. 4. After you've completed your payment and your request has been processed, you will receive a confirmation with your activation key, which you can use to activate Movavi Video Converter. If you haven't received your activation key: Check the Spam folder of your mailbox Contact support

8 Online Activation This section explains how to activate Movavi Video Converter using the quick online activation method if your computer is connected to the Internet. If your computer does not have a stable Internet connection, or you are having trouble with online activation, please see the Offline Activation section. Step 1: Open the Activation Wizard 1.1. Launch Movavi Video Converter Open the Help menu and select Activate Software. The Activation Wizard will open. Step 2: Enter Your Activation Key 2.1. Enter or paste your activation key into the corresponding field Click Activate to complete the activation process. If you have entered the key correctly, you should see a message confirming successful activation. Click OK to complete the activation process and restart the program. If online activation fails, try the following: Check that the activation key is entered correctly and is intended for the program you are activating. Make sure you have administrator rights on your computer. Try disabling your computer's firewall and antivirus software. Try offline activation. If you have any questions or problems while activating your Movavi software, please don't hesitate to contact our support team.
9 Offline Activation This topic explains how to activate Movavi Video Converter if you do not have a stable Internet connection or if the online activation method did not work. You will be asked to send an automatically generated to our activation server and then enter its reply into the program you purchased. Although Internet access is required for sending s, you can complete this part of the activation process using any other computer that has an Internet connection. Step 1: Open the Activation Wizard 1.1. Launch Movavi Video Converter Open the Help menu and select Activate Software. The Activation Wizard will open. Step 2: Enter Your Activation Key 2.1. Enter or paste your activation key into the corresponding field Select the Activate offline option Click Activate to proceed to the next step. Step 3: Send an with Your Activation Key You will see the following window:
10 The dialog box contains the activation key you entered and some some other information that is necessary for successful activation. To complete this step, you will need to send this information to our activation server via . You will receive an automatic response containing a registration key, which you will need to enter into to Activation Wizard's window. If your computer is not connected to the Internet, you can do this using any other computer as long as you have the message copied. 3.1 First, you will need to copy or save the information for later, when you send us the . Click Copy to copy the information to Clipboard. Save the text you copied as a text file that you can transfer to the computer you will be sending the from. 3.2 When you have Internet access, use your preferred mail client to compose an . Paste the information you copied from the Activation Wizard into the message body. Then, send the to reg@movavi.com. You should receive a reply within an hour.


11 To ensure a quick reply from our activation server, please do not alter the message subject or body Step 4: Enter Your Registration Key 4.1. When you have received your registration key, return to the Activation Wizard and enter it into the corresponding box Enter your registration name into the corresponding box Click Next to submit the information. The wizard will then inform you of successful activation. Click Finish to complete the activation and close the activation wizard.
12 If offline activation fails, try the following: Make sure you have entered the activation key and the registration key correctly and try again. Check that you are entering the activation and registration keys meant for the program you are trying to activate, and not for another version or application. Make sure you have administrator rights on your computer. Contact our support team.
13 Overview This chapter provides general information about Movavi Video Converter: System Requirements Supported Formats Program Settings Hardware Acceleration SuperSpeed Conversion If you don't know where to begin, see the Quick Start Guide section.
14 Minimum System Requirements: System Requirements Microsoft Windows XP/Vista/7/8 with up-to-date patches/service packs installed Intel or AMD or compatible processors, 1 GHz Display resolution of 1024x768, 32-bit color 256 MB RAM for Windows XP, 512 MB for Vista, 1 GB for Windows 7 and Windows 8 Minimum 250 MB free hard disk space for installation, 2 GB for ongoing operations Latest version of QuickTime Player for Windows for MOV file processing Administrator permissions are required for installation Recommended System Requirements for HD Video Conversion: Microsoft Windows XP/Vista/7/8 with up-to-date patches/service packs installed Intel or AMD or compatible processors, 1 GHz or higher Display resolution of 1280x1024 (or higher), 32-bit color 1 GB RAM for Windows XP, 2 GB for Vista, Windows 7 and Windows 8 5 GB free hard disk space for ongoing operations; conversion of HD video may require large amount of free disk space, up to several 10's of GB Conversion speed acceleration requires an Intel processor with Intel HD Graphics second generation (or higher) support or an NVIDIA CUDA -enabled graphic card Latest version of QuickTime Player for Windows for MOV file processing Administrator permissions are required for installation Sound card
15 Supported Formats Video Formats Supported Codecs 3GPP (.3gp), 3GPP2 (.3g2) Advanced Streaming Format (.asf) Audio Video Interleave (.avi) Read / Write Read Only Read / Write Read Only DivX Video (.divx) DVD Digital Video Disc Read Only Read Only H.263, H.264, MPEG-4 MPEG-4, VC-1, WMV V7 H.264, MPEG-4, MJPEG DivX, Xvid, DV, Cinepack, Fraps, TechSmith, Uncompressed DivX MPEG-1, MPEG-2 Flash (.flv) Read / Write Read Only Read / Write Write Only Read / Write FLV1, H.264 VP6, H.263, Flash Screen Video FLV1 MJPEG MPEG-2, MPEG-4, H.264, WMV V8 Read Only MPEG-2, MPEG-4, H.264, AVCHD, WMV 9, WMV 9 Advanced profile H.264, MPEG-4, MJPEG, Theora DV, Uncompressed MPEG-2, H.264 MPEG-2, H.264 Flash (.swf) HD Video (.m2ts,.mkv,.mov,.mp4,.mpg) HD Video (.m2t,.mts,.ts,.wmv) Matroska (.mkv) Read / Write Read Only Read / Write Read Only MPEG Transport Stream (.m2ts) MPEG Transport Stream (.ts,.mts,.m2t) MPEG (.mpg,.vob) Read / Write MPEG Read Only (.mpeg,.mpe,.m1v,.dat,.mod,.tod,.vro) MPEG-4 (.mp4) Read / Write Read Only MPEG-4 (.m4v) MXF Material exchange Format (.mxf) OGV Ogg Video (.ogv) MPEG-1, MPEG-2 MPEG-1, MPEG-2, H.264 MPEG-4, H.264 H.263, MJPEG, ProRes Read Only Read Only MPEG-4, H.264, H.263, MJPEG, ProRes MPEG-2, DV Read / Write Read Only Read / Write Read Only Theora MPEG-4 H.264, MPEG-4 AIC, MJPEG, ProRes, Sorenson 1/3, PNG QuickTime (.qt) Read Only RM RealMedia (.rm,.rmvb) Read Only H.264, MPEG-4, AIC, MJPEG, ProRes, Sorenson 1/3 Real Video 2/3/4, Cooker WebM (.webm) Read / Write VP8, VP9, Vorbis WMV Windows Media Video (.wmv) Read Only Read / Write Read Only VP7 WMV V8 WMV V7, WMV 9, WMV 9 Screen, WMV 9 Advanced profile, MPEG-4, WMV 9.1 Image V2 H.264, MPEG-2 QuickTime (.mov) WTV Windows Recorded TV Show (.wtv) Audio Formats AAC Advanced Audio Coding (.aac) Read Only Read / Write Supported Codecs AAC
16 AIFF Audio Interchange File Format (.aif,.aiff) APE Monkey's Audio (.ape) Read Only Uncompressed Read Only Monkey's Audio Au (.au,.snd) FLAC Free Lossless Audio Codec (.flac) MP3 MPEG-1/2 Audio Layer III (.mp3) MPEG-4 (.m4a,.m4b) Read Only Read / Write PCM FLAC Read / Write Read / Write Read Only Read / Write Read / Write MP3 AAC, ALAC AAC, PCM Vorbis PCM Read Only Read / Write Read Only AAC, MP3 WMA 9 WMA Pro, WMA Voice OGG Ogg Audio (.ogg) WAV Waveform Audio File Format (.wav) WMA Windows Media Audio (.wma) Image Formats BMP (.bmp) DPX (.dpx) GIF (.gif) JPEG (.jpg) JPEG (.jpeg,.jpg,.jp2,.jls) Netpbm formats (.pgm,.pbm,.ppm,.pam) PCX (.pcx) PNG (.png) PTX (.ptx) SGI (.sgi) TARGA (.tga) TIFF (.tiff) XBM (.xbm) XWD (.xwd) Read / Write Read Only Read / Write Read / Write Read Only Read Only Read Only Read / Write Read Only Read Only Read Only Read / Write Read Only Read Only You can view the list of supported devices here. Supported Codecs BMP DPX GIF MJPEG MJPEG, JPEG2000, JPEGLS PGM, PBM, PPM, PAM, PGMYUV PCX PNG PTX SGI TARGA TIFF XBM XWD

17 Movavi Video Converter Interface The main Movavi Video Converter window consists of the following elements: Main menu The main program menu contains various options and settings, most of which are accessible through buttons in the main interface. Add media buttons Use these buttons to add video, audio, and image files, as well as entire DVDs. File list The file list contains vital information about your files and allows you to manage some output settings. You can find a detailed run-down of the File List interface in the next section. Preview area The preview area allows you to play back the selected file. You can find out more about the elements of the preview area in the following section. Effects Use these buttons to apply quick effects and adjustments, such as rotating the video or applying a watermark. Convert to... Clicking the Convert to line will open the list of ready-made presets for a variety of formats and devices. Destination field The Destination field displays where the converted files will be saved. The default destination is your Movavi Library folder. Options
18 Checking these checkboxes prior to launching the conversion will allow you to join files together, add files to itunes, upload them to various video hosting websites using the ShareOnline module, and record a DVD using the ChiliBurner module. Preset Settings button (Advanced) Clicking this button will bring up the selected format's Settings window, where you can change the resolution, bitrate, and other parameters. Convert button Clicking this button will launch the conversion process.

19 File List This is the File List, where you can see information about added files, their output parameters, and select tracks. Input column Information about the input file will be displayed in the Input column. Output column Information about the output file, such as its name, estimated size, and selected preset will be displayed in the Output column. Select file and The checkboxes next to each file display whether that file is selected for conversion: unchecked files will be skipped when you start the conversion process, but kept in the file list for example, if you want to convert them in the next batch. You can use the uppermost checkbox to select all or no files. Remove file Clicking the X button will remove the corresponding file from the playlist. The uppermost X button will remove all the files from the list. File information This is the file you have currently selected. You can play it back in the Preview area. Output preset Here, you can see which format the file will be converted to. You can also find this information in the Convert to field in the bottom part of the Converter window. Output file size The number represents the approximate size of the output file. Clicking this number will bring up a dialogue which allows you to set the compression rate if you need a smaller file size.

20 Output file name By default, the file will be saved with the same name as the original, however you can click the filename to change it. Track selection This column displays the selected video, audio, and subtitle tracks. You can click the corresponding arrows to bring up a selection of available tracks, or to turn off the track completely. Furthermore, right-clicking a file in the file list will bring back the following context menu: Play/Pause - toggles the selected file's playback in the Preview Area. Duplicate - duplicates the selected entry in the file list. Remove - deletes the selected file from the list. Remove All - clears the File List. Rename - allows you to rename the selected output file File Information - brings up the File Information window which contains detailed information about the video and audio streams.

21 Preview Area The Preview Area is essentially a built-in player that allows you to preview your video and also trim its length using the Trim markers in the Progress bar. Unpin player Clicking this button will unpin the player into a separate window. This is especially useful if you have two monitors. You can always double-click the player window's Title Bar to bring it back. Hide player Clicking this button will hide the player. You can bring it back using the Show/Hide Player button beneath the File List or using the Playback menu. Preview video This is your video! Isn't it great? Progress bar The progress bar displays the current playback position and the file's duration. It also contains Left and Right markers which can be used to trim your video.
22 Preview mode Use these buttons to switch the preview mode: Input mode will display the original video, and Output mode will display how your output video will approximately look like in terms of size, proportions, video quality, etc. Play Clicking this button will start the selected file's playback. Previous frame Clicking this button will rewind the video by one frame backward. Next frame Clicking this button will skip one frame forward. Full screen Clicking this button will turn on the full screen preview mode. Volume Clicking this button will bring up the volume control where you can set the volume level for the preview. It will not affect the volume of the output video after conversion.

23 Adding Media for Conversion There are several ways of adding media files to the converter. Adding media files: Before converting media files, you will need to add them to the File List. You can do that using one of the following ways: Drag-and drop: Drag video or audio files from Windows Explorer onto the File List. The files will automatically be added to the list. Using the Buttons: for adding video files for adding music and other audio files for adding DVDs for adding images From the Menu: Open the File menu and select one of the menu items: Add Video - for adding video files Add Audio - for adding audio files Add DVD - for adding DVDs Add Image - for adding images Add Folder - add the contents of an entire folder at once From Windows Explorer: In Windows Explorer, right-click the necessary media file and select the Movavi Convert to... option in the context menu. * You will need to have checked the Add the "Convert to" option to the context menu during installation. Adding DVDs: 1. Click the Add DVD button in the upper left part of the converter window or open the File menu and click Add DVD. 2. The Open DVD dialog will appear. Navigate to the VIDEO_TS folder on your DVD and click Open Folder. 3. The files on your DVD will be added to the list in the correct order, with the main movies and bonus files labeled appropriately.


24 Converting Media Files 1. Add media files. Use the buttons at the top of the window to add media files: you can add video, audio, images, and entire DVDs. 2. Choose an output format. For your convenience, selecting an output format in Movavi Video Converter is done using presets. A preset is a combination of parameters such as video and/or audio codec, frame size, and bitrate that can help you convert media files with the optimal quality. These settings can be changed at any time, and you can even create any number of your own presets. Click the Convert to field to open the list of presets. If you want to convert videos, click Video and audio formats. Then, find the group with the necessary format and click to open it. Inside, select the preset with the most appropriate resolution. To convert the video without changing the resolution, select the preset marked Same as input. For faster conversion, choose presets marked with the green SuperSpeed icon: * To learn more about presets, see the Choosing a Preset section. 3. (Optional) Apply quick effects: Use the following effects on the panel under the file list to quickly adjust your video. Rotate and flip videos Crop videos and images Apply text or image watermark Adjust video Adjust audio levels 4. Choose an output folder. The Destination line shows where the files will be saved to after conversion. Click Browse to specify a different folder, or if you want to save the files along with the originals, select The output folder is the same as input from the list under the Destination field. 5. Launch the conversion. To begin converting the files, click the Convert button in the bottom right-hand corner. Your files will be ready in a few minutes, depending on the quantity and size of the files. Learn more about converting to various formats: Converting videos for devices Converting videos for the Web Extracting audio from video Converting audio
25 Converting images Creating GIFs Burning DVDs


26 Choosing a Preset In Movavi Video Converter, you can choose a preset to specify what format you want to convert your media files into. A preset is a set of specific media properties, including the format, codec, resolution, bitrate, and other parameters, that have been pre-defined to work well together. That way, you can simply select a preset instead of manually choosing the media properties every time. The presets are organized by format, usage context, or devices, so you can easily choose the preset you need, even if you're new to video conversion. To open the list of presets, click the Convert to field in the bottom part of the Movavi Video Converter window. Inside the preset list, you can either use the search bar at the bottom to quickly find the necessary preset, or browse the categories to find what you need: Video and audio formats contains a list of presets for various video and audio formats, as well as a few useful presets for changing video resolution or uploading videos to the Web. Audio formats are located at the bottom of the list. Image formats contains a list of presets for converting images Devices contains presets for converting video and audio for playing on mobile devices, TVs, media players, etc. If you open a video format group, you will see a few presets inside it. The difference between presets within a single group us usually in the resolution, as marked next to the format name: Same as input if you choose this preset, the video will retain its original resolution when converted. If you don't particularly need to change the resolution, we recommend this option to avoid losing quality. In addition, presets marked as 'Same as input' usually will convert much faster. Scale up to HD use one of these presets if you need to convert a low-resolution video to a higher resolution. Movavi Video Converter uses a special algorythm to slightly increase video quality when resizing to larger resolutions. However, please note that small resolution videos cannot be restored to true HD quality. For AVI and MP4 formats, there are also different presets for H.264 and for MPEG-4 codecs. Some presets may also have an acceleration icon next to them, meaning that if you choose one of these presets, the files will be converted much faster:
27 Converts videos up to 50x faster without quality loss if the input and output files have compatible formats Uses the video processing capabilities of your Intel processor to accelerate video conversion (Only for compatible Intel processors) Uses your GPU to accelerate video processing (Only for NVIDIA graphics cards) *For more information, see the section on Accelerating Conversion.

28 Converting for Devices You can convert video and audio for mobile devices just as easily as any other type of conversion. Movavi Video Converter includes a wide variety of device presets, each tailored especially for a particular device to ensure that your video will be played out of the box, without the need to install any additional codecs or players. To convert media for a mobile device: 1. Add video, audio files or DVD into the program. 2. Click the Convert to field in the bottom part of the converter interface to open the list of presets. 3. Click Devices. You will now see a list of presets for various device types and brands. 4. Find the group with your device's brand. Click the group to expand it and show the related devices. 5. Find your particular device model in the group you have just opened. Click that line to select it as the output preset. For example, if you want to convert a video for the Google Nexus 5 smartphone, you will need to open the Google Nexus group and select the Google Nexus 5 preset. Once you're done, you'll only need to set a folder for the output files and click Convert to start the conversion process.
29 Converting Videos for the Internet To upload a video online, whether to a personal website or to a video hosting service, you will need to do two things: convert it into a suitable format and upload it onto the web. Movavi Video Converter can help you with both of those things. Just follow the steps below. Step 1: Add the Video into the Program Click Add Video or Add DVD to add videos to the file list: Step 2: Select a Preset Click the Convert to field to open the list of presets. Then, click on Video and audio formats. You will see a number of groups. A. If you want to upload your video to a video hosting site or a social network, select a preset from the Online Video category depending on which website it is intended for and which resolution you prefer. If you're not sure which website is best for uploading videos, you can consult our comparison page.

30 B. If you want to upload the videos to your own website or blog and have some control over which formats to use, you can select one of the presets from the Web-Compatible Video group. These include MP4, FLV, SWF and WebM, considered to be the most convenient formats for uploading videos online. Step 3: Choose a Destination Folder and Convert Make sure that the Destination line shows the correct folder. If not, click Browse and specify the folder to store your videos in. Once you're ready, click Convert to start the video processing. When your videos are ready, all that's left is to either upload them to the video hosting service you prefer, or upload them to your website's server and create a link to your video.

31 Extracting Audio from Video Movavi Video Converter can help you convert not only video files into other video formats, but also convert video files to audio formats, thus extracting the soundtrack from your videos. 1. Add video files or DVDs to the program. 2. Select a video fragment that you want to extract the audio from. In the preview area, drag the markers from the beginning and the end of the progress bar so that the necessary fragment is located between them. This way, you can save only the part you need without having to cut the audio file later. 3. Select an audio preset: 3.1 Click the Convert to field to open the list of presets. 3.2 Open the Video and audio formats category and scroll to the bottom to find audio preset groups. 3.3 Click on the necessary format group (MP3, FLAC, etc.) to open it and see the available presets. Then, select the bitrate you prefer. Higher audio bitrates generally mean higher quality, however the file size will also be larger. To preserve the original quality, choose a preset labeled with Same as input. If you want to convert audio with multichannel sound, you can use WAV, OGG, or FLAC formats.
32 4. Check the Destination line to make sure you're saving your audio into the right folder and click Convert to start converting video into audio! * Please note that Movavi Video Converter is not intended for making illegal copies of copyrighted material.
33 Converting Audio Even though MP3 is still the most frequently used audio format, you may sometimes encounter audio in other formats, not always compatible with your player or device. On the other hand, if you're an avid music fan, some formats may retain quality better than others, such as FLAC for storing lossless music. Follow the instructions below to learn how to convert audio files. Step 1: Add Files To add audio files to the file list, click the convert. button at the top of the window and select the files you want to Step 2: Choose a Preset Click the Convert to field to open the list of presets and go to Video and audio formats. Scroll to the very bottom of the list to find audio format groups. Click on a format group to open it and then select the preset that best suits your needs. Here's everything you need to know about choosing an audio preset: General Audio this group contains presets for popular audio formats. These are useful if you just want to change the format without losing quality. Bitrate the bitrate reflects the amount of data in kilobits that is played back each second. Higher bitrate usually means higher audio quality as well as larger file size, as extra data needs to be stored within the file. For audio presets, the bitrate is listed next to the format. When you convert a file to lower bitrate, the extra bits of data are irretrievably lost, meaning that you cannot increase quality by converting audio to a higher bitrate, because the file no longer contains the data that can be used to restore higher quality. Therefore, it only makes sense to convert audio to lower bitrates or keep the original bitrate. You can find a file's audio bitrate in the Input column of the file list next to the video stream. To convert the audio file without changing the bitrate, choose the preset marked Same as input. Please note that some formats, such as MP3, do not support high bitrates: in that case the file will be converted with the maximum supported bitrate for that format. Step 3: Set a Destination Folder and Convert
34 The Destination line displays the file path to where the program will place the converted files. To change this folder, click Browse and select the necessary folder using the standard Windows dialogue. If you want to add the files to your itunes library after conversion, just tick the Add to itunes checkbox beneath the Destination line. Please note that you will need itunes 6.0 or higher installed on your computer. When you've set everything up, click Convert to start the audio processing. Your files will be ready in a few minutes at most.

35 Converting Images 1. Click the Add Image button and select the images you want to convert. 2. Select a format for converting the images: Click the Convert to field to open the list of conversion presets and select Image formats. Click the necessary format and select a preset. Social Networking presets allow you to convert images for uploading for popular social networks. To resize images: Click the Settings button next to the Convert to field to open the settings for the selected preset. In the Frame size list, select the necessary size, or select Custom and enter the new dimensions into the Width and Height boxes to the right. By default, the picture's proportions will be maintained when you enter a new size. If you want to change the size without keeping the proportions, click the link icon next to the Width and Height boxes: proportions. 3. To begin saving the images, click the Convert button in the bottom right corner. constrained proportions, free
36 Creating GIFs from Videos 1. Add a video to the program Click the Add Video button and select the necessary file or drag-and-drop video files onto the file list. 2. Trim the video: Select the video in the file list. Then, in the player area, drag the triangle markers to mark the beginning and the end of the fragment you want to make into a GIF. When you move a marker, you will see an orange bubble next to it, showing the exact time position of the selected marker. To set a precise position, click inside the orange bubble and type in the necessary time. *For more information, see the Trimming Video and Audio section. 3. Select a GIF preset: Click the Convert to field to open the list of presets Go to Image formats and click the GIF group to see all GIF presets. Choose the most appropriate GIF size. You can also make GIF avatars just choose one of the avatar presets with the necessary size. 4. (Advanced) If you need to change the GIF's frame rate, click the Settings button and select one from the Frame rate list. Higher frame rates will make the movements seem smoother, but will increase the GIF's file size. 5. Click the Convert button to save your GIF image.
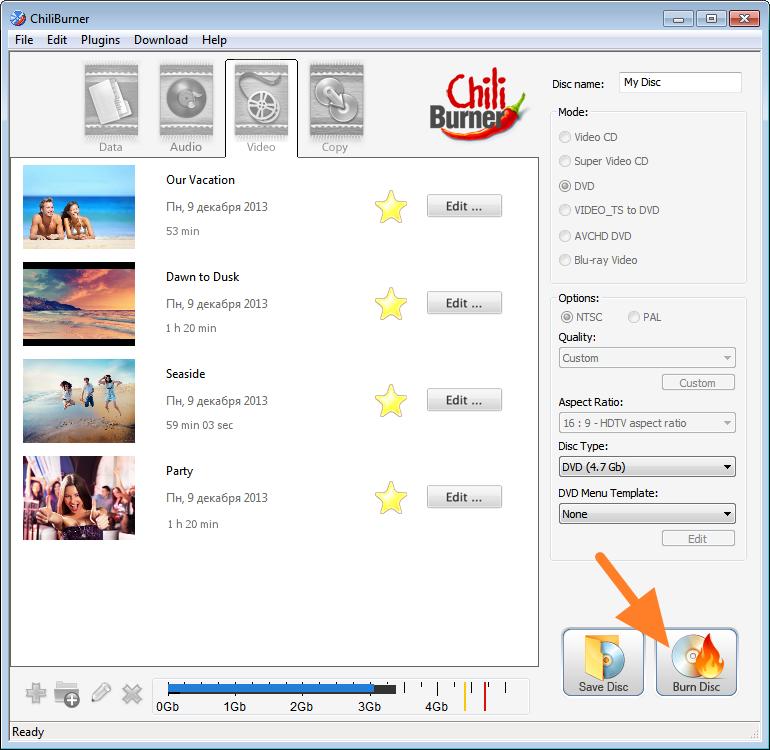
37 Burning DVDs Please note that you will need to have Movavi ChiliBurner or Movavi Video Suite installed to use the DVD burning feature. You can use Movavi Video Converter to prepare videos for burning to DVDs with Movavi ChiliBurner. 1. Add videos for conversion using the Add Video or Add DVD buttons located in the upper part of the main converter window or simply drag-and-drop files from Windows Explorer. 2. Select the necessary preset: Click anywhere within the Convert to field to open the preset list and go to Video and audio formats. There, open the DVD-Compatible Video group and select a preset depending on which TV standard (NTSC or PAL) and quality you need. The TV standard largely depends on the country you live in, or on the country where your DVD player was manufactured: NTSC is used in North and Central America, most countries of South America (excluding Argentina and Brazil), Burma, Japan, the Philippines, South Korea, Taiwan, and Vietnam. PAL is used in all countries of Africa, Europe, Oceania, and the Middle East, most Asian countries, as well as in Argentina, Brazil, Paraguay, Uruguay, and French Guiana 3. Now that you've selected a DVD-compatible preset, the Burn to DVD checkbox will appear at the bottom of the window. Select this option to burn the videos right after conversion. 4. If you will be needing the converted videos later, make sure to check where they will be saved in the Destination line, and if necessary, specify a new one by clicking the Browse button and selecting a new folder in the Explorer dialogue. 5. Click Convert to start the conversion process. 6. Once your files have been processed, the DVD burner module will open. Your files will already be added to its list. All you will need to do now is make sure there is a writable DVD inside your DVD drive and click Burn Disc.
38
39 Accelerating Conversion Movavi Video Converter supports the latest Intel and NVIDIA hardware acceleration technologies, allowing you to use your computer's full potential for converting videos without hindering performance in other programs. Furthermore, the special SuperSpeed mode allows you to save time when converting videos to formats with compatible codecs, allowing to skip the re-encoding process and convert files up to 79 times faster. Enabling acceleration: In the main window of Movavi Video Converter, open the Settings menu and select Preferences. The Preferences window will appear. Click the Acceleration button at the top to switch to the Acceleration tab. Then, simply check the corresponding checkboxes to enable SuperSpeed mode, Intel, or NVIDIA hardware acceleration and click OK to apply the changes and close the window. The following sections contain more information on each of the acceleration methods, as well as steps for troubleshooting. Learn more about SuperSpeed conversion Learn more about Intel hardware acceleration Learn more about NVIDIA hardware acceleration

40 SuperSpeed Conversion SuperSpeed conversion is an innovative technology which allows you to convert video and audio files of compatible formats up to 79 times faster than usual without quality loss. When you convert videos, most of the time is usually devoted to re-encoding the video stream from one codec to another, which often causes quality loss. With SuperSpeed mode enabled, Movavi Video Converter can skip the re-encoding process and simply copy the video stream from one format to another, effectively converting an entire video with the speed of copying and with zero quality loss. To make the most of SuperSpeed mode, select output presets that are marked with a green SuperSpeed icon ( ). This means that the videos you have added are compatible with the selected format and can be converted much faster. However, as SuperSpeed conversion does not re-encode video or audio streams, it can only accelerate conversion under the following conditions: The codec, resolution, bitrate, and other video parameters remain unchanged The video is not rotated or compressed Therefore, if you change the video resolution or any other parameters, the conversion will run as usual. Don't worry, it's still very fast! More information: Enabling SuperSpeed mode in Preferences List of formats compatible with SuperSpeed mode
41 Compatible Formats You can use the following table to check whether a particular format can be converted in SuperSpeed mode: Input formats and codecs AVI FLV Output formats M2TS MKV MOV MP4 MPG ipad3 ipad 4 Device presets* iphone 5S, Kindle Fire HDX iphone 5C, Kindle Fore iphone 4, HD 8.9" iphone 4S Kindle Fire HD 7" Kindle Fire Tablet Google Nexus 4 Google Nexus 7 Google Nexus 10 AVI (H.264) AVI (MPEG-4) FLV (H.264) M2TS (H.264) M2TS (MPEG-2) MKV (H.264) MOV (H.264) MP4 (H.264) MP4 (MPEG-4) MPG (MPEG-2) * SuperSpeed conversion to a device preset is available if the input file resolution is no higher than the device resolution: for ipad 3/4, Amazon Kindle and Google Nexus, for iphone 5/5C/5S, and for iphone 4/4S.
42 Enabling SuperSpeed Conversion 1. In the main converter window, open the Settings menu and click Preferences to open the program preferences. 2. In the Preferences window, click the Acceleration button to access various acceleration options. 3. Select the very first option: Enable SuperSpeed conversion. Click OK to save your preferences and return to the main window.
43 Intel Hardware Acceleration Movavi Video Converter is optimized for use with the latest multi-core processors. The improved conversion engine is built to effectively handle batch conversion tasks by simultaneously converting multiple files at once using the power of each core. If your computer is equipped with an Intel multi-core processor, you can significantly cut down conversion times and improve your computer's performance while converting media by enabling Intel hardware acceleration in Movavi Video Converter. Intel Core processors are equipped with a special Intel HD Graphics chip that can be used for media decoding and encoding by Movavi Video Converter. With Intel acceleration enabled, Movavi Video Converter can convert media streams up to 3.5 times faster by shifting some of the workload from the CPU, allowing for up to 400% faster conversion, while freeing up the processor for other tasks. Compatible video codecs: Intel hardware acceleration is available when converting videos to H.264 and MPEG-4 codecs. Aside from general video formats, this will also improve conversion speeds when ripping DVDs or preparing videos for Apple ipod, ipad, iphone, and other mobile devices. When you select a conversion preset, Movavi Video Converter will mark presets that support Intel acceleration with a blue Intel HD Graphics icon: Compatible processors: Intel hardware acceleration is available on Intel Core i3, i5, and i7 processor series. Troubleshooting: Can't enable Intel hardware acceleration If the Intel hardware acceleration option in Movavi Video Converter preferences is unavailable: Check that your processor is compatible with Intel hardware acceleration. To do that, open the Control Panel, go to System and Maintenance, and choose System. Find the processor information and make sure that you have an i3, i5, or i7 Intel processor. Update the Intel processor drivers. You can find the newest version at Intel's official website here. We recommend only downloading drivers and other software from trusted sources. In order for the graphics acceleration to work properly, there needs to be a monitor connected to the graphics card port. Connect the monitor and make sure it is functioning properly, then try enabling Intel hardware acceleration again. I'm having problems while converting using Intel hardware acceleration If the video conversion process is taking longer than expected, or there are defects in the output video file, try updating the processor drivers. You can find the newest version at Intel's official website here. Also, try converting the video file with one of the standard presets. If the situation does not improve, feel free to contact our support team at support@movavi.com or try our live chat to get a quicker answer.
44 NVIDIA Hardware Acceleration Many computers today not only have advanced multi-core processors, but are also equipped with cutting-edge multicore graphics cards that can process video and audio streams just as effectively as many CPUs. Enabling NVIDIA GPU acceleration will allow Movavi Video Converter to employ your NVIDIA graphics card for media processing, increasing conversion speeds. Compatible formats and codecs CUDA technology accelerates conversion to AVI, MP4, FLV, MKV, MOV, and MPEG-2 TS with the H.264 codec. Presets which support accelerated conversion for the added files will be marked with a green NVIDIA CUDA icon in the preset list:. Compatible graphics cards NVIDIA CUDA acceleration supports GeForce, GeForce Mobile, Tesla, Quadro, and Quadro Mobile graphics card series. You can find the full list of supported GPUs on NVIDIA 's official site. Troubleshooting How do I find out which GPU my computer has? 1. Right-click on your desktop and choose Display Resolution 2. In the Display Resolution window that appears, click Advanced. This will open your GPU's properties. 3. In the Adapter type section, you can see your GPU's model. The Enable NVIDIA GPU Acceleration option is unavailable If you can't enable NVIDIA acceleration, try updating your graphics card drivers: 1. Click here to go to NVIDIA's official site where you can download drivers for your GPU. Please only use drivers from your hardware manufacturer: software downloaded from other sources may contain malware. 2. On the driver download page, either enter your GPU model (see above to find out which GPU you have) and operating system, or use NVIDIA automatic scanner to pick the right driver version. You will be then offered to download and install the drivers. 3. After you've installed the drivers, restart your computer for the changes to take effect and try enabling NVIDIA GPU acceleration in Movavi Video Converter. I'm having problems while converting videos using NVIDIA GPU acceleration If the video conversion process is taking longer than expected, or there are defects in the output video file, try updating the graphics card drivers (see above for instructions). Also, try converting the video file with one of the standard presets. If the situation does not improve, feel free to contact our support team at support@movavi.com or try our live chat to get a quicker answer.

45 Choosing Audio Tracks It is not uncommon to find video files with multiple audio tracks, and you might want to keep some or all of the audio tracks when you convert the video, whether they include audio for different languages or the director's comments. Open the audio track panel Click the sound icon next to the file to open the list of available audio tracks. Select audio tracks To convert the file without audio, click the No audio button or manually deselect all tracks. This may be useful if the video file only has white noise or you do not want to keep the audio: you can slightly reduce the output file size by removing audio. Choose the necessary tracks in the list. You can choose to save all the tracks by clicking Select All. You can select as many tracks as you like, but keep in mind that not all formats support multiple audio tracks. You can consult the table below for information on each format: Format Number of audio tracks supported 3GP AVI DVD FLV, SWF MKV MOV MP4 MPEG-1, MPEG OGV WebM WMV


46 Open the Subtitle Panel Click the speech bubble icon Choosing Subtitle Tracks next to the file to open the list of available subtitles. Selecting a Subtitle Track If there is only one subtitle track present in the file, it will be selected automatically. If there are several subtitle tracks stored in the file, simply click on it in the list of subtitles to select it for conversion. To convert a video without subtitles, simply click the No Subtitles button. Adding Subtitle Tracks You can add external subtitle tracks to be stored inside the video file after conversion. Click the Add Subtitles button in the subtitle panel and browse your computer for *.srt, *.ass, and *.ssa subtitle files. Subtitle Encoding If you have subtitles written in a language other than English, they may be encoded with a different character set. By default, Movavi Video Converter will try to guess the subtitle language based on your system, but you can also manually select the language from the Subtitle encoding list so that all characters are displayed correctly, especially if you are using hieroglyphic or right-to-left language subtitles. Use the player's output mode to preview the subtitles and check that the text is displaying correctly.
47 Editing Media Files Movavi Video Converter can help you not only convert media files from one format to another, but also make quick edits to help you enhance your video, audio, and image files. Here are some of the things you can do with Movavi Video Converter: Flip and rotate videos Crop frames and change aspect ratio Join files together Enhance the video Adjust audio levels For extended video editing tools, try Movavi Video Editor a simple yet powerful program for creating your own movies.
48 Trimming Video and Audio If you have a very long and large video but only want to share a part of it with your friends, or you just want to trim some "garbage" from the beginning or the end of the video, follow these steps: 1. Add media for conversion. You can trim both video and audio files in the same way. 2. In the Preview Area, drag the triangle sliders from the beginning and the end of the progress bar so that the part of the video you want to keep is located between them. 3. That's it! Don't forget to choose a preset and set a destination path. When you click the Convert button, only the fragment you've selected will be saved in the output file. To quickly trim video and audio files without changing their format: Open the preset list and go to Video and audio formats. There, open the group with the same name as the file's format extension (such as *.mp4 or *.avi), and inside it, select the preset marked Same as input.

49 Joining Files If you have a collection of video clips that you'd like to make into a single video file, you can easily do it it Movavi Video Converter simply by selecting a checkbox. Just follow the steps below: 1. Add the media files you want to join. You can join video or audio files, as long as you do not mix them together. 2. Select the Join checkbox beneath the destination line. All the files in the list will be marked for joining, like on the image below. Your files will be shown as an indented list beneath a "Joined file" - this upper line represents the resulting file which will contain the videos you've selected. If there are files in the list that you do not want to see in the resulting video, simply uncheck them in the file list. If you change your mind later and want to convert the files separately, just uncheck the Join option. 3. To change the order in which the videos will appear in the resulting file, drag and drop the files in the list: they will be joined top to bottom in the specified order. 4. Choose a preset for converting the files. If you are joining files with different resolutions, they will all be converted into the specified preset, however, if you select a preset marked with Same as input, the files will be converted with the resolution and other parameters of the first file in the list. You may also want to go into Settings and specify a resize method that works best your videos, for example, if you want to avoid black bars. Also, please note that SuperSpeed mode is not available when joining files. Attention! If your files have multiple audio tracks, please select the same number of audio tracks for each file before joining. To learn more about managing audio tracks, see the Choosing Audio Tracks section. 5. That's it! All you need to do is click Convert to start joining your videos.
50
51 Transforming Video The Transform Video effect can help you rotate or flip a video any way you want. 1. Add videos or DVDs to the file list. 2. Select the video you want to transform in the file list. You can select multiple videos if you want to transform them in the same way. 3. Click the Transform Video panel to transform the video: button below the file list. The Transform Video panel will open. Use the buttons on the Rotate the video by 90 degrees counterclockwise. Rotate the video by 90 degrees clockwise. Flip horizontally. Flip vertically. You can preview the changes in Output mode. 4. To accept the changes, click Apply. The selected video's thumbnail will also be marked with a star icon. Right-click the star icon to see which effects have been applied to it. Here, you can also click the icon next to an effect to remove it. Now you can go on to choosing a preset and setting a destination path. Once you're done, click Convert to start the video processing.
52

53 Cropping Video 1. Add the files you want to crop. Select a file from the list. You can select more than one video if you want to crop several videos in the same way. 2. Click the Crop button frame. on the effects panel. The Crop panel will appear, and the video will be displayed with a crop 3. Adjust the size of the cropped area. In the player area (Input mode), drag the edges of the frame to define the size of the area you want to crop. You can also set precise dimensions in the Width and Height fields of the Crop panel. If the Maintain aspect ratio option is selected, the proportions of the video will be constrained to that of the original. However, you can select a different standard aspect ratio, such as 16:9 or 4:3, or deselect the Maintain aspect ratio option and freely set the new frame size. To change the position of the new cropped frame, drag the crop rectangle in the preview area to the desired position. 4. Click Apply to apply the changes to the selected videos. You can preview the cropped video in Output mode.


54 Applying a Watermark Movavi Video Converter allows you to add both text and image watermarks to videos and images. You can use them to add any kind of logos or signatures. Applying a Text Watermark 1. In the file list, select the file that you want to apply the watermark to. You can also select multiple files if you want to apply the same watermark to all of them. 2. On the effects panel, click the Text Watermark button:. The Text Watermark settings panel will open. 3. Enter the text into the box and set up the font and color. opens the font selection dialog box allows you to select the main text color allows you to select the text outline color You can also set transparency for the watermark text. 4. Place the watermark inside the video frame. Make sure that the player is in Output mode. You will see the text you've entered in the video preview. Drag the text with the mouse to place it where you want within the frame. 5. Click Apply to save the changes. Applying an Image Watermark 1. In the file list, select the file that you want to apply the watermark to. You can also select multiple files if you want to apply the same watermark to all of them. 2. On the effects panel, click the Image Watermark button:. The Image Watermark settings panel will open. 3. Click Browse to open a watermark image. If necessary, adjust the transparency if you want the image to be see-through. 4. Place the watermark inside the video frame. Make sure that the player is in Output mode. You will see the image in the video preview. Drag the image with the mouse to place it where you want within the frame. To resize the watermark image, click and drag one of its corners. 5. Click Apply to save the changes. Once you apply one of the watermark effects, the video will be marked with a star icon. You can right-click it to see a list of applied effects. Here, you can also remove an effect by clicking the icon next to it.
55 All that's left is to select an output format, specify a destination folder, and click Convert to start video processing.

56 Video Adjustments Not all videos turn out perfect: some may be slightly darker or less saturated than we want them to be. Luckily, you can adjust your videos' brightness, contrast, hue, and saturation right from the converter! 1. Add videos to the file list. 2. Select the video you want to adjust and click the Adjust will open. button underneath the file list. The Video Adjustment panel 3. Pull the sliders to set the desired adjustment levels. You can also select the automatic adjustment options on the right. The Magic Enhance option will automatically adjust the video's brightness, contrast, and white balance for you. Make sure that the player is set to Output mode so that you will be able to see the changes. 4. Click Apply when you're done. The video's thumbnail will now be marked with a star icon. You can right-click it to see a list of applied effects. Here, you can also remove an effect by clicking the icon next to it. All that's left is to select an output format, specify a destination folder, and click Convert to start video processing.

57 Audio Enhancements Movavi Video Converter can help you adjust the volume levels of any video or audio file. To adjust audio: 1. Add the files that you want to adjust. 2. Select the file or files that you would like to adjust. 3. Click the audio adjustment button on the effects panel: The Audio Adjustments panel will open. 4. Use the slider to adjust the volume relative to that of the original video. If parts of your video are louder or quieter than others, we recommend that you select the Normalize volume option to even out the volume levels throughout the video. 5. Click Apply to apply the effect to the selected files. The video's thumbnail will now be marked with a star icon. You can right-click it to see a list of applied effects. Here, you can also remove an effect by clicking the icon next to it. All that's left is to select an output format, specify a destination folder, and click Convert to start video processing.


58 What is aspect ratio? Changing the Aspect Ratio A video's aspect ratio is the ratio between its width and height. The two most commonly used aspect ratios are 4:3 and 16:9, the former used by most analog television broadcasts, while the latter, also referred to as widescreen in films, DVDs, and modern HD video. A visual comparison of two popular aspect ratios. To find out a video's aspect ratio: 1. Add the video to Movavi Video Converter. Select it in the file list. 2. Open the File menu and select File Information. A dialog box will open containing all the information about the selected file. You will find Aspect Ratio under Video stream. In this example, we have a 16:9 video. How to change a video's aspect ratio? I. Using the Crop effect. (for any aspect ratios) 1. In the file list, select the videos that you want to crop. You can select more than one video to crop them to the same format. 2. In the effects panel, click the Crop button Input mode.. The Crop panel will open, and a frame will appear over the player in 3. Find the Maintain aspect ratio option. With this option enabled, the crop frame will be constrained to the proportions of the original or of the aspect ratio selected from the list beneath the checkbox. If you need to convert the video to 16:9, 4:3 or 3:2 aspect ratio, select the necessary aspect ratio from the list under Maintain aspect ratio. If you need a different resolution, you can specify it manually. To do that, deselect the Maintain aspect ratio option and enter a new frame size II. By converting to a different resolution. (for changing 4:3 to 16:9 aspect ratio) 1. Open the list of presets, click Video and audio formats, and pick a video format. If you don't need to convert the video, select the format that matches the video's file extension.
59 2. Choose a resolution closest to the original. You will now see black 'pillars' on either side of the video. To remove the pillars, you can select a different resize method: 2.1 Click Settings. The Settings window will open. 2.2 Under Resize method, select Crop, Stretch, or Auto. You can use the sample picture in the Settings or the player's Output mode to preview the method that looks best with your video. 2.3 Click OK to accept the changes. When you have applied the necessary aspect ratio adjustments, click Convert to begin changing the files' aspect ratio. Aspect ratios and common resolutions The following table contains a list of common resolutions along with their aspect ratios. Standard Definition Resolutions (SD) 240x x x x x x x x x x540 High-Definition Resolutions (HD) 1280x x x x x x4320 4:3 4:3 3:2 16:9 4:3 (NTSC DVD) (PAL DVD) 5:3 16:9 16:9 16:9 16:10 16:9 16:9 16:9 16:9


60 Reducing File Size Movavi Video Converter can help you not only quickly change the format of video or audio files, but also save disk space by compressing your files. Many format and device presets will help you reduce the size of your output videos by using a smaller resolution, lower bitrate, or simply because some video codecs are better at compressing videos than others. However, you can further reduce video size if you're prepared to sacrifice some video quality. 1. Add media into the program. Use the buttons in the upper left corner of the converter interface to add video, audio files, and DVDs. 2. Choose an output preset: Choose a preset with smaller resolution than that of the original video. This can help significantly cut in size, as even changing the resolution from 1080p to 720p can give save up to a few gigabytes without significant loss of quality. You can find the original video's resolution in the Input column of the File List. Choose presets with the most recent video codecs, as they have been created with the latest technology in mind and can yield better video compression with smaller quality loss. For example, the H.264 codec is currently considered one of the best codecs in terms of size and quality. 3. Set the compression rate. 3.1 In the Output column of the File List, click the orange size link next to the file icon ( ). 3.2 The compression pop-up will appear. Drag the slider to the left to set a smaller output size, but be aware that this will decrease video quality. You will see the Quality and Bitrate change as you move the slider. 3.3 Click Apply to set the new compression rate. You can do this for each file individually. 4. Set the destination folder for the output files by clicking the Browse button and click Convert to start the conversion process and compress your videos.
61 Changing the Output Path The Destination line located in the bottom part of the converter interface allows you to change the folder where Movavi Video Converter will place the output files. The default destination for saving your files is your Movavi Library, located in your Videos folder. However, you can easily change it using one of the following ways: Click the Browse button and specify the necessary folder using the standard Windows dialogue. Click the text in the Destination field and type in the necessary path. Click the arrow button next to the Destination field. This will open a list which will contain the following options: Your Videos\Movavi Library folder The output folder is the same as input: selecting this option will place the output files right next to the input files. Any folder paths you have recently used. You can always quickly open the selected folder by clicking the arrow to the right of the Browse button and selecting Open output folder. This will open the folder in Windows Explorer so that you can check its contents.

62 Export Options Movavi Video Converter includes various options for sharing your videos with friends, family, or the whole world! You can add your videos to itunes or upload them to a number of social networks and video hosting sites. What is more, you can do it by simply selecting a checkbox beneath the Destination line. Adding Videos to itunes: If you want to add your files to the itunes media library after conversion for uploading it to mobile devices or storing them in your icloud, you can easily do so by checking the Add to itunes checkbox. Please note that you will need to have itunes 6.0 and higher installed on your computer before starting the conversion process. Uploading Videos to the Web: Please note that you will need to have the Share Online module installed to use the uploading feature. If Share Online is not found on your computer, you will be prompted to download and install it. Don't worry: it's completely free, and it shouldn't take more than a couple minutes! You can always manually download it from our website: Check the Upload to checkbox and then click the arrow next to it. You will then see the following pop-up: Simply put a checkmark next to the websites or services that you want to upload the videos to. Once the conversion process has finished, the Share Online module will open, and you will be able to upload your videos. If necessary, add a description, some tags, change the category and privacy settings and you're ready to go! Click Upload to start the uploading process.

63
64 Movavi Video Converter Settings and Preferences The application settings for Movavi Video Converter are accessible via the Settings Menu category in the Menu bar: Clicking the Settings Menu category will display the following options: Language this menu item expands into a list of languages: clicking one of them will change the program's interface language. More Languages this item leads to a webpage where you can download additional language packs or request support for new languages. Theme expand the list and select one of the available themes to change the visual appearance of the Converter interface. Preferences opens the Preferences window. The various preferences are organized into three tabs, which are described below. Show Player toggles the player visibility. You can also enable and disable the player using the dedicated button beneath the File List. I. General Preferences Check the Automatically check for updates box to make sure your Video Converter is always up-to-date. Send anonymous usage stats to Movavi checking this box will allow Movavi Video Converter to send usage statistics to our development team, enabling us to fix any bugs you may encounter much faster, as well as add new features that you might be missing. The data sent by Movavi Video Converter contains no personal information, will not be disclosed to third parties and will be used for software improvement purposes only. You can find more information about usage statistics on our Movavi Improvement Program page. Show hints and tips toggles whether the program will display help pop-ups. You can also check Don't show this message again on any pop-up to turn it off.

65 II. Conversion Preferences Output file name determines the course of action if the output folder already contains a file with the specified name when a new file is being placed into the folder during conversion: Overwrite existing file - the old file will be permanently replaced with the newly converted file. Automatically rename files - new files will be automatically renamed, and both files will be preserved. After conversion: Open output folder - if this option is enabled, the folder containing your newly converted files will be opened automatically as soon as the conversion process is finished. Play notification sound - if this option is enabled, the program will notify you when it has finished converting your files.
66 III. Acceleration Preferences In the Acceleration tab, you can enable or disable various acceleration options. You can find out more about each acceleration method in the Accelerating Conversion section. Enable SuperSpeed conversion: check this option to enjoy unmatched conversion speeds for compatible formats. Enable Intel hardware acceleration: this option allows you to employ your Intel multi-core processor's full potential when converting media files. Enable NVIDIA GPU acceleration: this option allows Movavi Video Converter to shift video processing to your CUDAenabled NVIDIA Graphics Card, freeing up the CPU for use by other processes.
67 Please note that Intel and NVIDIA acceleration options will be disabled if your computer is not equipped with the compatible hardware.

68 Energy-Saving Options If you are running a batch conversion for very large files, the process may take a while even on fast computers. The energy-saving options allow you to shut down or hibernate your computer after it is done converting the files. 1. Open the Convert menu 2. Go to the After Conversion section 3. Select Shut Down or Hibernate. If you change your mind, you will be able to disable shutdown or hibernation during conversion. Please note that if you use any of the energy-saving options, itunes and web uploading will be temporarily disabled. The next time you launch Movavi Video Converter, the energy-saving options will be automatically turned off.
69 Contacting Support If you have any questions or concerns regarding Movavi software, you are welcome to contact our support team. Please describe your problem in as much detail as possible; any screenshots or log files will allow us to help you faster. You can contact us using: guaranteed response in 3 business days Live Chat available 12 A.M. 6 P.M. GMT \ 4 P.M. 10 A.M. PST Our support team specialists may ask you for additional information that is required to solve your problem: these may include your license key, log files, screenshots, and files you were working with, but never personal information. We value your privacy! Have you checked the FAQ section? Your question may have already been answered!

70 General Glossary Container Format (Video Format) A container format is a file format for storing video or audio files that contains video and audio data in separate streams, as well as any other associated data, such as subtitle tracks and additional data about the file. You can think of a container format as a box that holds together all the parts that make up a video file, as illustrated below. The container format is what you usually see when you work with video files: you can judge which format your video is in by the file extension: *.mp4 corresponds to MP4 format, *.mkv to Matroska format, etc. Codec While a video file contains video and audio streams, these streams are in turn encoded using a video or audio codec that compresses the data. You can think of a codec as a language: to play a video encoded with a certain codec, your player needs to be able to 'understand' how it was encoded, so that it can decode or decipher the file. If your computer does not know how to decode a new codec, you can fix this by converting the file to a different format or by installing a codec pack. However, please keep in mind that a lot of malware programs disguise themselves as codec packs; you should only download codec packs directly from codec manufacturers or from trusted sources. Bitrate When referring to media, bitrate is the number of bits that is played back each second. The higher the bitrate, the more details that can be conveyed with each second of the video or audio stream, and therefore, the higher the quality. There are two types of bitrate: constant bitrate (CBR) and variable bitrate (VBR). Videos with constant bitrate, as you can probably guess from the name, have the same bitrate for each and every frame of the video, no matter the complexity of the frame: simple frames, for example, those completely filled with black, have the same number of bits as complex, colorful frames. This has a number of limitations, since the simple frames take up more bits than needed to convey them, while complex frames are limited in quality. With variable bitrate, however, each frame is allotted only as many bits as it needs, without limiting quality or wasting data. In most cases, we recommend that you use variable bitrate, however, you CBR is sometimes useful for streaming media. Frame Rate The frame rate, or frames per second (FPS) is the number of video frames that is contained in a second of video. At low frame rates, you may notice that the video is 'jittery', while higher frame rates produce a smooth high-quality video. Shooting videos at high frame rates (48 or 60 FPS) requires more resources and disc space, but you can easily slow down a highfps video to produce a slow-motion effect without producing visual stutter. The industry standard for cinema frame rate is 24 or 25 frames per second, which is perceived as comfortable to the human eye. Resolution (Frame Size) Resolution is the number of pixels that can fit inside the video frame. It is usually presented as "width x height" of the frame, for example, 1280x720 or 1920x1080. Sometimes, resolutions may also be referred to as "720p" or "1080p", by the number of pixels in a frame vertically. At high resolutions, each frame is conveyed using more pixels, therefore allowing for more detail and higher quality, though taking up more disc space. Whenever you convert a video to a lower resolution, you irretrievably lose some data, but if you convert a low-resolution video to HD, the quality will stay the same. If you need to do so, however, we recommend that you use Upscale SD, DVD to HD presets in Movavi Video Converter, as they use an algorythm that slightly improves video quality when converting to larger resolutions.
Movavi Video Converter 14. User guide
 Movavi Video Converter 14 User guide Table of Contents Movavi Video Converter 14... 3 Overview... 4 System Requirements... 5 Supported Formats... 6 Program Settings... 7 Hardware Acceleration... 11 Activating
Movavi Video Converter 18
 Movavi Video Converter 18 Don't know where to start? Converting videos Change the video format Read these tutorials: Converting for devices Watch videos on your phone or tablet More questions? Converting
Movavi Video Converter 8 for Mac
 Movavi Video Converter 8 for Mac Don't know where to start? Read these tutorials: Converting videos Converting for devices Converting audio Change the video format Watch videos on your Play any audio anywhere
Movavi Video Converter Premium 18
 Movavi Video Converter Premium 18 Don't know where to start? Read these tutorials: Converting videos Converting for devices Converting audio Change the video format Watch videos on your Play any audio
Movavi Screen Capture Studio. User's Manual
 Movavi Screen Capture Studio User's Manual Table of Contents Movavi Screen Capture Studio...4 Overview... 5 System Requirements... 6 Movavi Screen Capture... 7 Main Features...8 Supported Video Formats...
Gecata by Movavi 5. Recording desktop. Recording with webcam Capture videos of the games you play. Record video of your full desktop.
 Gecata by Movavi 5 Don't know where to start? Read these tutorials: Recording gameplay Recording desktop Recording with webcam Capture videos of the games you play. Record video of your full desktop. Add
Movavi PDF Editor User Guide. Quick start guide Opening files Editing documents Saving files
 Movavi PDF Editor User Guide Quick start guide Opening files Editing documents Saving files Table of Contents Quick start guide...2 Removing trial restrictions...3 Getting an activation key...4 Activating
Movavi Split Movie for Mac User manual
 Movavi Split Movie for Mac User manual Table of Contents Quick start guide...2 Activating Split Movie...4 Getting an activation key...5 Activating without Internet...5 Opening files...8 Playback...9 Cutting
Movavi Screen Capture Pro 10 for Mac
 Movavi Screen Capture Pro 10 for Mac Don't know where to start? Read these tutorials: Recording screen Recording online video Recording video from players Capture any fragment of your screen or the full
Movavi Screen Capture Pro 10
 Movavi Screen Capture Pro 10 Don't know where to start? Read these tutorials: Recording screen Recording online video Recording video from players Capture any fragment of your screen or the full desktop.
^436^Get: 'Easy FLV Video Converter for Mac' by WaveInsight Cracked Version
 ^436^Get: 'Easy FLV Video Converter for Mac' by WaveInsight Cracked Version * Whats up, should you've found this blog it is fairly most likely you have been looking on where to buy Easy FLV Video Converter
Table of Content. Nero Recode Manual
 Table of Content 1. Start Successfully... 4 1.1. About Nero Recode... 4 1.2. Versions of Nero Recode... 4 1.3. Working with Nero Recode... 5 1.4. Starting Nero Recode... 6 2. Main Screen... 8 3. Recode
 Register your product and get support at www.philips.com/welcome HMP3000 EN User manual Contents 1 Trademark notice 5 English 2 Connect and play 7 3 Control and play 11 4 Options 13 Video options 13 Audio
ImTOO MPEG Encoder Help
 Document No.: ImTOO MPEG Encoder Help Document ImTOO MPEG Encoder Help ImTOO Software Studio http://www.imtoo.com Table of Contents 1 Introduction to ImTOO MPEG Encoder...1 1.1 Welcome...1 1.2 Supported
 S4B Split Movie Soft4Boost Help S4B Split Movie www.sorentioapps.com Sorentio Systems, Ltd. All rights reserved Contact Us If you have any comments, suggestions or questions regarding S4B Split Movie or
freetunes Engelmann Media GmbH
 freetunes 3.0 Contents 3 Table of Contents Part I Introduction 6 1 System... requirements 6 2 Installation... 7 3 Program... start 7 4 Demo... 7 5 Copyright... 7 Part II Converter 10 1 Source... 10 2
User Guide for Leawo Video Converter Ultimate
 User Guide for Leawo Video Converter Ultimate - How to Use Leawo Video Converter Ultimate Here is a user guide that shows you how to properly use Leawo Video Converter Ultimate. The guide presented here
Quicktime Player Error Codec For Avi Per
 Quicktime Player Error Codec For Avi Per Oct 2, 2014. a movie and its.avi and i am getting an error post "converting" where it says. QuickTime player can't open Try another video player, such as VLC. Quicktime
OneClick Video Converter Free Version
 Document No.: OneClickSoftware OneClick Video Converter Free Version OneClick Software Inc. http://www.oneclicksoftware.com Page 1 Pages Order Introduction...Pages 3 Button Preview...Pages 4 How to...pages
Movavi Mac Cleaner. Download PDF. Not sure where to begin? Read the Quick Start Guide!
 Movavi Mac Cleaner Download PDF Not sure where to begin? Read the Quick Start Guide! Table of Contents Cleaning Your Mac...3 System Requirements...4 Installation...5 Trial and Activation...7 Getting an
Movavi Video Editor 15 Business
 Movavi Video Editor 15 Business Don't know where to start? Read these tutorials: How to remove trial restrictions Save your video without a watermark and use the program after 14 days. Make a video in
Windows Dvd Maker Won't Add Mp4 Files
 Windows Dvd Maker Won't Add Mp4 Files Windows DVD Maker Won't Burn VOB? Want to burn VOB files with Windows DVD Maker, so you can play them on a regular DVD player? One is to directly drag your local VOB
Information Literacy Instruction
 Digital Literacy Instruction Information Literacy Instruction Highland High School Library http://hhs.highland.k12.in.us/library 9135 Erie ST P: 219-922-5610 x1030 Highland, IN 46322 F: 219-922-5636 Contents
About Xlinksoft ipod Video Converter
 About Xlinksoft ipod Video Converter Xlinksoft ipod Video Converter is an outstanding ipod Video Converter that can convert videos to ipod Video and the latest ipod Nano, ipod Touch and ipod Classic. The
 AMPlayer Soft4Boost Help AMPlayer www.sorentioapps.com Sorentio Systems, Ltd. All rights reserved Contact Us If you have any comments, suggestions or questions regarding AMPlayer or if you have a new feature
HOW TO Use Microsoft Expression Encoder
 HOW TO Use Microsoft Expression Encoder Microsoft Expression Encoder is a free tool for converting video files such as MPG, MP4, and AVI files to Windows Media Video (WMV) format for use in AdQue. It can
Coupon Movavi Video Editor Business v. pc programs free ]
![Coupon Movavi Video Editor Business v. pc programs free ]](/thumbs/74/70020631.jpg "Coupon Movavi Video Editor Business v. pc programs free ]") Coupon Movavi Video Editor Business v. pc programs free ] Description: Movavi Video Editor is an effective yet easy-to-operate program for video editing and quality improvement. Key Features: 1. Separate
Coupon Movavi Video Editor Business v. pc programs free ] Description: Movavi Video Editor is an effective yet easy-to-operate program for video editing and quality improvement. Key Features: 1. Separate
My Media Hub Quick Start Guide for USB Devices. Sharing media content with the Fetch Box from a USB device
 My Media Hub Quick Start Guide for USB Devices Sharing media content with the Fetch Box from a USB device What s inside Welcome to your My Media Hub 3 Supported media file formats 4 Getting Started 5 Play
Movavi Screen Recorder 10 for Mac
 Movavi Screen Recorder 10 for Mac Don't know where to start? Read these tutorials: Recording screen Recording online video Recording video from players Capture any fragment of your screen or the full desktop.
Camtasia Studio 5.0 PART I. The Basics
 Camtasia Studio 5.0 Techsmith s Camtasia Studio software is a video screenshot creation utility that makes it easy to create video tutorials of an on screen action. This handout is designed to get you
Dimo MKV Video Converter for Mac is Mac MKV Converter to help you convert MKV files to MOV, WMV, MP4, MKV, etc. for editing,
 Introduce o Brief Introduction Convert o Convert MKV video Burn o Create ISO GIF o Make GIF Download o Download online movies Play o Play MKV Video Edit o Cut MKV video length by trimming o Get MKV video
To burn MP4 videos on Windows platform, you can use Windows DVD Maker MP4 codec. Here I would like to introduce you to an easy-to-use iskysoft DVD.
 Instructions For Use Windows Dvd Maker To Burn Mp4 Here are top 15 free MP4 to DVD converter for Mac, Windows and Linux. However, many of them provide a limited access period and for further use, the Sothink
Register your product and get support at HMP3008. EN User manual 7 ZH-CN 9
 Register your product and get support at www.philips.com/welcome HMP3008 EN User manual 7 ZH-CN 9 EN Please refer to the safety information before using the product. ZH-CN Trademark notice HDMI, the HDMI
Movavi Screen Recorder 5 for Mac
 Movavi Screen Recorder 5 for Mac Don't know where to start? Read these tutorials: Recording screen Recording online video Recording video from players Capture any fragment of your screen or the full desktop.
Free iskysoft imedia Converter Deluxe for Mac free downloads websites ]
![Free iskysoft imedia Converter Deluxe for Mac free downloads websites ]](/thumbs/75/71914968.jpg "Free iskysoft imedia Converter Deluxe for Mac free downloads websites ]") Free iskysoft imedia Converter Deluxe for Mac free downloads websites ] Description: Why Choose imedia Converter Deluxe for Mac Want an ultimate multimedia solution for your digital life on Mac? imedia
Free iskysoft imedia Converter Deluxe for Mac free downloads websites ] Description: Why Choose imedia Converter Deluxe for Mac Want an ultimate multimedia solution for your digital life on Mac? imedia
Marsis Playout. Playout Automation Software. User Manual AVMEDA.
 Playout Automation Software User Manual ABOUT US Avmeda, based in Las Vegas, Nevada developing and distributing professional and broadcast applications. Our core software modules are Standalone & Server
Movavi Video Editor 15
 Movavi Video Editor 15 Don't know where to start? Read these tutorials: How to remove trial restrictions Save your video without a watermark and use the program after 7 days. Make a Quick Video Have your
How to convert dvd pal ntsc
 How to convert dvd pal ntsc DVD Burning Xpress is an integrated tool used to convert home video DV tape to MPEG-2 and burn to DVD disc directly. It features simple user interface, with only 3 clicks, the
liquivid Easy Cinemagraph v1.1.x Installation Instructions for Windows, macos Manual
 liquivid Easy Cinemagraph v1.1.x Installation Instructions for Windows, macos Manual Installation Instructions for Windows... 3 Required Hardware & Software... 3 Installation... 3 File Saving Location...
Media Player Classic Error Codec Pack Windows 8 Mkv
 Media Player Classic Error Codec Pack Windows 8 Mkv Media Player Codec Pack supercharges your Windows Media Player by MKV, M2TS, MP4, VOB, OGM, WEBM, FLV, and NUV movie files, as well as AC3, DTS, x264,
liquivid Video Improve v2.x Installation Instructions for Windows, macos, Adobe Lightroom Manual
 liquivid Video Improve v2.x Installation Instructions for Windows, macos, Adobe Lightroom Manual Installation Instructions for Windows... 3 Required Hardware & Software... 3 Installation... 3 File Saving
MOTOROLA MEDIA LINK QuickStart Guide. Version 1
 MOTOROLA MEDIA LINK QuickStart Guide Version 1 copyright, distribution policy, and trademarks copyright Motorola Media Link Software: 2009 Nero AG User Interface graphic and specifications: 2009 Motorola
All-in-one content repurposing and delivery. Actus Digital
 All-in-one content repurposing and delivery Clip Factory is the one-stop-shop solution to content repurposing for the new media platforms of Internet and mobile. It comes as one of three alternative products:
My Media Hub Quick Start Guide for Windows or Mac
 My Media Hub Quick Start Guide for Windows or Mac What s inside Welcome to your My Media Hub Getting Started 4 Sharing media over a home network 5 Set up Windows Media Player 7 Set up a Twonky Media Server
litecam HD GUIDE For litecam HD Version 5.0 Contents
 1 litecam HD GUIDE For litecam HD Version 5.0 Contents 2 TABLE OF CONTENTS SYSTEM REQUIREMENTS 4 LITECAM HD INSTALLATION GUIDE 5 litecam HD installation Procedure... 5 - Installation... 5 - Activation...
Movavi Video Editor 14 Plus
 Movavi Video Editor 14 Plus Don't know where to start? Read these tutorials: How to remove trial restrictions Make a video in easy mode Make a video in full-feature mode Save your video without a watermark
MP60 TABLE OF CONTENTS. HD Media Player
 INSTRUCTION L MANUAL TABLE OF CONTENTS MP60 HD Media Player 1. Caution 2. Features and Specifications 3. Unit and Accessories 4. Functions of Buttons on the Remote Control 5. Media Player s Connections
VideoFlick Manual. I. Overview 1.1 Brief Introduction
 VideoFlick Manual I. Overview...1 1.1 Brief Introduction...1 1.2 Major Features...2 1.3 System Requirements...2 II. Appearance...2 III. How to Use...3 3.1 Share Online...3 3.2 Share by E-mail...4 3.3 Share
Dimo FLV Video Converter for Mac is an all-in-one Mac FLV conversion software. It can help convert FLV files to almost all video and
 Introduce o Brief Introduction Convert o Convert FLV video Burn o Create ISO GIF o Make GIF Download o Download online movies Play o Play FLV Video Edit o Cut FLV video length by trimming o Get FLV video
Ultimate Video Capture v1.8 User Manual
 Ultimate Video Capture v1.8 User Manual Minimum Requirements: Processor: Intel or AMD CPU (1.0Ghz) PC, Laptop or Tabloid PC Memory: 256 Mb of RAM HD: 100 Mb of free space for basic recording and installation
DVD Ripper Premium. Document No.: DVD Ripper Premium Help Document. MicroVideo Software Corp Page 1
 Introduction Document No.: DVD Ripper Premium Help Document DVD Ripper Premium MicroVideo Software Corp Page 1 Introduction Pages Order: Introduction...Pages 3-4 Purchase DVD Ripper Premium...Pages 5 How
User Guide for Leawo Video Converter
 User Guide for Leawo Video Converter - How to Use Leawo Video Converter Here is a user guide that shows you how to properly use Leawo Video Converter. The guide presented here is thorough enough for users
Introduce. Introduce. Download. Convert. Burn GIF. Play. Edit. Cast. > Brief Introduction. o Brief Introduction. o Download Online Video
 Introduce o Brief Introduction Download o Download Online Video Convert o Convert HD Video Burn o Make ISO GIF o Create GIF Play o Play HD Video Edit o Trim video length o Crop video size o Adjust video
Effortlessly create incredible movies
 Worldwide ADOBE PREMIERE ELEMENTS 8 Effortlessly create incredible movies The complete solution for your videos Automated moviemaking options Professional-quality effects and sound Sharing on disc, the
About Xlinksoft Video Converter
 About Xlinksoft Video Converter Welcome to use the Xlinksoft Video Converter. Xlinksoft Video Converter developed by the Xlinksoft Corporation, is a multi-media file conversion software based on the brand-new
Articulate Engage 2013 Tutorial
 How to Access Engage 1. By Launching Engage Directly o You can open Engage directly from the desktop by clicking on the green Engage Icon, which is shown in the top right corner of this manual. 2. By Launching
Always there to help you. Register your product and get support at HMP5000. Question? Contact Philips.
 Always there to help you Register your product and get support at www.philips.com/welcome Question? Contact Philips HMP5000 User manual Contents 1 Control and play 2 11 Troubleshooting 20 12 Specification
USER GUIDE. For litecam HD Version 4.8. November 5 th, 2013.
 1 USER GUIDE For litecam HD Version 4.8 November 5 th, 2013. 2 Contents TABLE OF CONTENTS SYSTEM REQUIREMENTS 4 GUIDE TIP 5 LITECAM HD INSTALLATION GUIDE 9 litecam HD installation Procedure... 9 - Installation...
The Saviour Photo Recovery 5.0 Installation Guide
 The Saviour Photo Recovery 5.0 Installation Guide 1 Overview Digital multimedia files may accidentally get deleted while deleting files, or formatting storage device. Files may also get lost due to corruption
AVS4YOU Programs Help
 AVS4YOU Help - AVS Document Converter AVS4YOU Programs Help AVS Document Converter www.avs4you.com Online Media Technologies, Ltd., UK. 2004-2012 All rights reserved AVS4YOU Programs Help Page 2 of 39
Getting started with 5KPlayer
 5KPlayer Play Video Music Airplay YouTube Download Support company Home > 5KPlayer for Windows User Guide Getting started with 5KPlayer 5KPlayer is the best free media player to play MKV, FLV, MP4, 4K
Review LeKuSoft DVD Ripper best sites for software download ]
![Review LeKuSoft DVD Ripper best sites for software download ]](/thumbs/95/124628151.jpg "Review LeKuSoft DVD Ripper best sites for software download ]") Review LeKuSoft DVD Ripper best sites for software download ] Description: The only good solution for your DVD ripping, LeKusoft DVD Ripper gives you many impressive ways to resolve your DVD formatting
Review LeKuSoft DVD Ripper best sites for software download ] Description: The only good solution for your DVD ripping, LeKusoft DVD Ripper gives you many impressive ways to resolve your DVD formatting
Free Download Wondershare Video Converter Ultimate for Mac software discounters ]
![Free Download Wondershare Video Converter Ultimate for Mac software discounters ]](/thumbs/71/65828039.jpg "Free Download Wondershare Video Converter Ultimate for Mac software discounters ]") Free Download Wondershare Video Converter Ultimate for Mac software discounters ] Description: Wondershare Video Converter Ultimate for Mac is an integrated media solution to convert video and audio files,
Free Download Wondershare Video Converter Ultimate for Mac software discounters ] Description: Wondershare Video Converter Ultimate for Mac is an integrated media solution to convert video and audio files,
WMV Studio & Studio Pro WMV Player & Player Pro User s Guide WMV Export User s Guide. Version 1.0
 WMV Studio & Studio Pro WMV Player & Player Pro User s Guide WMV Export User s Guide Version 1.0 WMV Player & Player Pro User s Guide Version 1.0 What is WMV Player? WMV Player allows you to open and play
Obtaining video clips
 Video Using video Carefully planned, well-executed video clips can make a dramatic difference in a multimedia project Use video only when all other methods (text, still images) are not enough; don t use
Screencast.com. Getting the Most from Your Screencast.com Account. July TechSmith Corporation. All rights reserved.
 Screencast.com Getting the Most from Your Screencast.com Account July 2009 2009 TechSmith Corporation. All rights reserved. Contents Contents...2 First Things First: Get Organized...3 Get Familiar with
USER GUIDE. ixpand Flash Drive. Western Digital Technologies, Inc. is the seller of record and licensee in the Americas of SanDisk products.
 USER GUIDE ixpand Flash Drive Western Digital Technologies, Inc. 951 SanDisk Drive, Milpitas, CA 95035 Western Digital Technologies, Inc. is the seller of record and licensee in the Americas of SanDisk
Compressor User Guide
 Compressor User Guide KKApple Inc. Copyright 2014 Apple Inc. All rights reserved. Your rights to the software are governed by the accompanying software license agreement. The owner or authorized user of
DVD D-5/D-9, AVI, MPEG, WMV,
 Overview ZC Blu-ray DVD Ripper is an easy-to-use blu-ray DVD movie copier, which converts blu-ray and high definition movie (m2ts, mts) to all popular movie formats, it extracts audio tracks and encodes
You can view the LoiLoScope 2 user manual from within the software.
 LoiLoScope 2 User Manual You can view the LoiLoScope 2 user manual from within the software. From the File menu at the top left of the screen, click on "Download Manual" to open the download page in your
High Definition AD Players. Universal User s Manual. L Series and PF Series
 High Definition AD Players Universal User s Manual L Series and PF Series Cautions 1. Do not install and use the unit in moisture, high temperature, outdoor, and closed environment. 2. Please turn off
Turbo.264 HD Manual Elgato Systems LLC 900 Kearny Street Suite 750 San Francisco, CA United States of America
 Turbo.264 HD Manual 2009-2011 Elgato Systems LLC 900 Kearny Street Suite 750 San Francisco, CA 94133 United States of America Elgato Systems GmbH Nymphenburgerstr. 14 80335 München Germany http://www.elgato.com
Windows Media Player Error Missing Codec Mkv Per
 Windows Media Player Error Missing Codec Mkv Per Each one of these installations is of high quality and there are no glitches in either. it is an ideal tool to play audio and video files on Windows Media
TotalRecorder On-line Help (Version 8.5)
") TotalRecorder On-line Help (Version 8.5) You can freely copy or print this manual I TotalRecorder On-line Help Table of Contents Part I Overview 1 Part II General Information 2 1 Total Recorder... Editions
TotalRecorder On-line Help (Version 8.5) You can freely copy or print this manual I TotalRecorder On-line Help Table of Contents Part I Overview 1 Part II General Information 2 1 Total Recorder... Editions
ACD Systems at the hub of digital imaging... 1
 User Guide Table of Contents ACD Systems at the hub of digital imaging... 1 Getting Started... 2 Minimum system requirements... 2 Installing and uninstalling... 3 Starting ACD VideoMagic... 3 Starting
Microcontroller Compatible Audio File Conversion
 Microcontroller Compatible Audio File Conversion Created by Mike Barela Last updated on 2018-06-07 09:10:45 PM UTC Guide Contents Guide Contents Convert Sound Files in Audacity Audacity Download Audacity
Quicktime Player Error Codec For Mac Avi
 Quicktime Player Error Codec For Mac Avi Oct 2, 2014. I donwlaoded a movie and its.avi and i am getting an error post "converting" where it says. QuickTime player can't open. Help please After reviewing
Stellar Phoenix Photo Recovery 8.0. Installation Guide
 Stellar Phoenix Photo Recovery 8.0 Installation Guide Overview Digital multimedia files may accidentally get deleted while deleting files, or formatting storage device. Files may also get lost due to the
Switch Release Notes. Switch
 Switch 3.0.1 Release Notes Switch Telestream Switch is an award-winning cross platform media player, inspector, and correction tool for professionals. Switch comes in three versions: Switch Player (free),
If you have many MXF files from Canon/Sony/Panasonic camcorders and want to convert them to video files that you can play on your
 Introduce o Brief Introduction Convert o Convert MXF video Burn o Create ISO GIF o Make GIF Download o Download online movies Edit o Cut MXF video length by trimming o Get MXF video size by cropping o
Free MacX Video Converter Pro (Personal License) buy and download software online ]
![Free MacX Video Converter Pro (Personal License) buy and download software online ]](/thumbs/95/125132660.jpg "Free MacX Video Converter Pro (Personal License) buy and download software online ]") Free MacX Video Converter Pro (Personal License) buy and download software online ] Description: Built in 420+ video/audio codecs and advanced HD video decoding engine, MacX Video Converter Pro brings
Free MacX Video Converter Pro (Personal License) buy and download software online ] Description: Built in 420+ video/audio codecs and advanced HD video decoding engine, MacX Video Converter Pro brings
Intermediate Training
 Intermediate Training The material in this handout is taken directly from the Picasa Website. It was decided to add all the information in one place so it could be viewed at one time. However, what is
ITunes. itunes works with Windows 2000, XP, Windows Server 2003, Mac OS X and it also works on a few cellular phones.
 ITunes itunes is an online digital media player application that is used for playing and organizing music and video files. itunes was launched by the Apple Computer company in 2001 and it's been going
SQUEEZE SERVER. Operation Version 2.5
 SQUEEZE SERVER Operation Version 2.5 CONTENTS Introduction to Squeeze Server...2 Features...2 Squeeze Server Components...4 How Squeeze Server Works...5 Running Squeeze Server...6 Supported File Formats...6
Cinegy Air 11 Quick Start Guide. Cinegy GmbH. Document version: a8e6e50
 Cinegy Air 11 Quick Start Guide Cinegy GmbH Document version: a8e6e50 Table of Contents Overview.......................................................................................... 1 1. Prerequisites...................................................................................
ClimaxDigital USB 2.0 Video Capture
 ClimaxDigital USB 2.0 Video Capture Model: VCAP301/VCAP302/VCAP303 Thank you for purchasing ClimaxDigital USB 2.0 Video Capture. Should you need any assistance in using this product, please do contact
Overview. Features. Please visit for more information. Copyright ZC Software. All Rights Reserved
 Overview ZC DVD Ripper Platinum is a super DVD backup and convert tool software, which is a DVD Player firstly, and it can not only record any DVDs' audio and video you can playback on your computer, but
TunePat Spotify Converter for Windows. User Manual
 TunePat Spotify Converter for Windows User Manual Overview Tutorials Introduction Choose Output Format Key Features Customize Output Path System Requirements Import Music Files Convert Music Files Purchase
Tutorial Windows Media Player 11 Codec For Xp Avi Files
 Tutorial Windows Media Player 11 Codec For Xp Avi Files Brands, Shopping, Tutorials, Other sites. Tom's Guide Last response: July 11, 2014 10:54 PM in Windows 7. Share Reason one: Windows Media Player
Copyright Notice. Trademarks
 Copyright Notice All rights reserved. No part of this publication may be reproduced, stored in a retrieval system, or transmitted in any form or by any means, electronic, mechanical, photocopying, recording,
Video. Add / edit video
 Video Videos greatly support learning in an e-earning setting. It is a rather complex topic though, due to the variety of formats, codecs, containers and combination of operating systems and browsers.
AVer MediaCenter User Manual
 AVer MediaCenter User Manual DISCLAIMER All the screen shots in this documentation are only example images. The images may vary depending on the product and software version. Information presented in this
Ultra High Brightness Professional Monitor User Manual
 Manual Version UHBA1.0 Safety Instructions Please keep the display away from any heat sources. Place the display in a stable and well-ventilated place. Please handle with care as product contains glass.
VC-HD8 Manual v2 July 2016
 VC-HD8 Manual v2 July 2016 Contents 1. What is the VC-HD8?... 4 2. Supported Media Formats... 4 3. In the Box... 5 4. Setup Instructions... 6 5. Remote Control... 8 6. Settings Options... 9 7. Additional
CAMBRIA FTC CAMBRIA FTC: TECHNICAL SPECIFICATIONS. Version.9 12/6/2017. Page 1
 Version.9 12/6/2017 Page 1 TABLE OF CONTENTS 1 PURPOSE OF THIS DOCUMENT...3 1.1Purpose of This Technical specifications document...3 2 OVERVIEW OF FUNCTIONALITY...3 2.1Key Features...3 2.1.1 General Features...3
idisk Me Contents User Manual
 idisk Me User Manual Contents System Requirements...1 Scan the QR Code to Download APP...1 The Main Interface Profile...2 Connect the idisk to the Device...3 Delete, Copy&Move...4-7 Create a New Folder...8
Get MacX iphone Video Converter trial software download ]
![Get MacX iphone Video Converter trial software download ]](/thumbs/72/67588202.jpg "Get MacX iphone Video Converter trial software download ]") Get MacX iphone Video Converter trial software download ] Description: MacX iphone Video Converter is a useful Mac iphone video converter software for Apple enthusiasts looking to get their favorite videos
Get MacX iphone Video Converter trial software download ] Description: MacX iphone Video Converter is a useful Mac iphone video converter software for Apple enthusiasts looking to get their favorite videos
Request for: 2400 bytes 2005/11/12
 Request for: Type&Name Size Last modofied time Dir. 0 bytes 2006/1/16 Dir.. 0 bytes 2006/1/16 File Using Flash Video Mx.htm 2380 bytes 2005/11/12 File About encoding video with non-square pixels.htm 3782
English Table of Contents
 Table of Contents Agama V-1325R Features 1 Set up the device 2 Setting the LED On/Off and Frequency 3 Using Instant Messenger Application 4-5 CrazyTalk CamSuite PRO 6-16 CrazyTalk CamSuite PRO with IM
MICRO 2+ USER MANUAL
 MICRO2+ USER MANUAL Wintal MICRO2+ USER MANUAL Contents BRIEF INTRODUCTION... 1 FEATURE... 1 BASIC PERFORMANCE... 1 PRODUCT DETAILS... 2 PACKING LIST... 2 FRONT VIEW... 2 BACK VIEW... 3 REMOTE CONTROL...