User Guide for Leawo Prof. Media - How to Use Leawo Prof. Media
|
|
|
- Della Bryan
- 6 years ago
- Views:
Transcription
1 User Guide for Leawo Prof. Media - How to Use Leawo Prof. Media Leawo Prof. Media is an all-in-one total video converter solution. This total media converter suite could do various things for you: convert regular videos, HD videos and Blu-ray contents to videos in various popular formats; burn regular/hd videos to DVD/Blu-ray discs, folders or ISO files; copy and backup Blu-ray movies; download and play back online videos, and create photo slideshows. Also, this total media converter suite also features other practical features, like: freely select source subtitles and audio tracks, reset output file parameters, edit videos for customization, create 3D movies, etc. This user guide for Prof. Media would show you how to use this total media converter suite. You could get a total media converter suite full guide in text and also a total media converter suite video guide on this page. 1
2 Content User Guide for Leawo Prof. Media Introduce Leawo Prof. Media Send Feedback How to Activate Leawo Prof. Media How to set Leawo Prof. Media General settings Conversion settings Copy & Burn settings Downloader settings Performance settings Connection settings Other settings How to get Help on Leawo Prof. Media How to Convert Blu-ray/DVD/Video Step 1. Import source files Step 2. Choose output profile Step 3. Edit parameters of profiles Step 4. Set output directory Step 5. Start converting How to Burn DVD/Blu-ray Section 1. Burn video to DVD/Blu-ray Step 1. Import source files Step 2. Set disc menu Step 3. Edit disc menu (optional) Step 4. Burning settings Step 5. Burn video to DVD/Blu-ray Section 2. Burn ISO file to DVD/Blu-ray disc Step 1. Import ISO file Step 2. Burn ISO to disc settings Step 3. Burn ISO to disc How to Copy Blu-ray/DVD Step 1: Load source Blu-ray/DVD
3 4.2 Step 2: Blu-ray/DVD backup settings Step 3: Copy Blu-ray/DVD content How to Download Video Step 1: Set download directory Step 2: Find target video Step 3: Download video Step 4: Manage downloaded videos How to Create and Burn Photo Slideshow Section 1: How to Create Photo Slideshow Step 1: Import source photos Step 2: Choose output profile Step 3. Edit parameters of profiles Step 4. Set output directory Step 5. Start converting Section 2: How to Burn Photos to DVD/Blu-ray Step 1: Import source photos Step 2. Set output disc menu Step 3. Edit disc menu (optional) Step 4. Burning settings Step 5. Burn photo to DVD/Blu-ray Section 3: How to Edit Photo Slideshow Edit slideshow video Edit slideshow audio How to Edit Blu-ray/DVD/Video Trim video length Add watermark Crop video size Adjust Effect D to 3D converter How to Snap Screenshots

4 1. Introduce Leawo Prof. Media Leawo Prof. Media is a total media converter suite that comprises Blu-ray Ripper, Blu-ray Copy, Blu-ray Creator, DVD Ripper, DVD Copy, DVD Creator, Video Converter and Video Downloader. On the Home interface, you could see all these media converter parts. Clicking any module would lead you to the corresponding function part. As well, at the bottom, you could share Leawo Prof. Media on Google+, Facebook, Twitter and YouTube. 4

5 1.1 Send Feedback On the top-right corner, there are 4 buttons: Feedback, Activation Center, Settings and Help Center. By clicking the Feedback button, you could send feedback to Leawo Customer Service Center. On the popup Feedback window, you need to enter your name and address and then fill the Content box to send your feedback. 5

6 1.2 How to Activate Leawo Prof. Media By clicking Activation Center button, you could enter the Activation Center panel to register and activate Leawo Prof. Media or certain function module with corresponding license. Leawo offers 2 kinds of license for each program: 1-Year license and lifetime license. Enter license into the blank box and then click the Register button to activate Leawo Prof. Media. On the Activation Center panel, you could also choose to renew a certain function module by clicking the Renew button, or purchase a certain function module by clicking the Purchase button. 6
7 1.3 How to set Leawo Prof. Media By clicking the Settings button, you could call out the program Settings panel, where you could carry out multiple settings upon Leawo Prof. Media. On each settings tab, click the Apply button to apply setting changes, click the OK button to confirm and quit Settings panel, click the Cancel button to cancel and quit Settings panel, or click Default button to restore default settings General settings After entering the Settings panel, in the General tab, you could select program interface language. Click the drop-down box to display all UI languages provided by Leawo Software, and then select the one you need Conversion settings Open the Conversion tab to enter the conversion settings panel, where you could determine whether to make use of Priority native codec, Enable streaming MP4 video, Enable DVD navigator or not. Meanwhile, you could open the Max Run drop-down box to determine how many tasks Leawo Prof. Media could process at a time. 7
8 1.3.3 Copy & Burn settings Open the Copy & Burn tab to do settings upon copy and burn modules. The Burn Engine drop-down box allows you to select burn engine from StarBurn and cdrecord. You could also choose DVD video mode from NTSC and PAL by clicking the Defaul Video Mode drop-down box, and set Blu-ray region code for burning Blu-ray content by choosing one from the options provided below Source Region Code. 8

9 1.3.4 Downloader settings Under the Downloader tab, you could do some settings for Video Downloader, including: Max download tasks, downloaded video directory ( Save video to box), what to show When Downloader starts, downloader s Home page and what to do with the Browsing history Performance settings Open the Performance tab to decide CPU Core that Leawo Prof. Media could occupy. 9
10 1.3.6 Connection settings On the Connection panel, you could do some Proxy and Automatic Update settings Other settings Open the Others tab on the Settings panel to do settings on External Subtitle and Screenshot, including File Direction, Default Encoding, screenshot saving directory (Save to) and Image Format for screenshots. 10
, check update, purchase, register and rate Leawo Prof.")
11 1.4 How to get Help on Leawo Prof. Media To get help for Leawo Prof. Media, click the Help Center button on the top-right corner of the Home interface. On the Help Center panel, you could visit Home and Tutorial pages, send bug (Bug Report), check update, purchase, register and rate Leawo Prof. Media, get support from Leawo Customer Service center and check program information (About). 11

12 2. How to Convert Blu-ray/DVD/Video As an all-inclusive total media converter suite, Leawo Prof. Media offers you effective media converter solutions upon Blu-ray, DVD, video and audio conversions. This part of Leawo Prof. Media user guide would mainly show you how to convert Blu-ray/DVD/video/audio/ISO files. 2.1 Step 1. Import source files After launching Leawo Prof. Media, click the big Convert button to enter the "Convert" module panel (or click either Video Converter, Blu-ray Ripper or DVD Ripper under the Home interface). Depending on which you want to convert, you have different options: a. To convert video or audio, click the Add Video icon. By clicking this drop-down button, you could then see drop-down menu to add either video/audio files or video/audio folders. You could then browse and add source video/audio files into this video converter; b. To convert Blu-ray/DVD content, click the click "Add Blu-ray/DVD" button to browse and import source Blu-ray/DVD files. After clicking this drop-down button, you could see 3 options on the drop-down list panel:. You can choose to add Blu-ray/DVD content from CD-ROM, folder or directly load ISO image file for converting. (Note: When you're loading Bluray/DVD content, 3 loading modes are selectable: Full Movie, Main Movie and Custom Mode. Full Movie refers to the whole source content, Main Movie refers to the longest title, while Custom Mode allows you to select which titles to load.) 12
13 After loading source video/blu-ray/dvd/audio files, you could move mouse to thumbnail of loaded file and then click to play back loaded file, click button to enter the video editing panel, hit button to select subtitle or add external subtitle, and hit button to choose audio tracks. You could also click buttons on selected title to move up, move down or remove. If you want to merge all files into one output, just click the Merge all files into one button. This button would turn to unmerge sign if you ve merged all files into one. By right clicking loaded title, you could call 13

, by clicking which you could see a drop-down box.")
14 out right-click menu for more operations, including: Send to Burn, Rename, Clear, Delte, Merge/Separate, Edit, File Location, Bug Report, Media Info, etc. 2.2 Step 2. Choose output profile Next to the "Add Photo" button, you would see a clickable box (displayed in "MP4 Video" by default), by clicking which you could see a drop-down box. On the drop-down box, 3 sub-tab includes "Edit", "Change" and "Apply to All". 14
15 Click Change button to enter the "Profile" panel, where you could select a profile as output format. On the Profile panel, you could select output profile from 4 tabs: Favorite, Custom, Format and Device. Favorite tab collects the profiles you ve added as favorite (by clicking the Add to Favorite button on profiles from Format and Device groups), Custom tab contains all profiles you ve edited (by clicking the Edit profile button on profiles from Format and Device groups) and saved as custom, while Format and Device tabs include profiles for video and devices. Under Format tab, you could choose profile from Common Video, Common Audio, HD Video, and 4K Video. The Device tab provides profiles designed for various devices including ios devices, Android devices (Sony, Samsung, HTC, etc.), Microsoft devices, and others. 2.3 Step 3. Edit parameters of profiles If you need, you could click the "Edit" option on the drop-down box, or click the Edit profile button on profiles from Format and Device groups on Profile panel to enter the Profile Settings panel, where you could edit the video and audio parameters of selected profiles. 15
16 On the Profile Settings panel, you can reset Video Codec, Quality, Resolution (choose from provided options, or manually input the resolution you desire into the box according to your devices or players), Bit Rate, Frame Rate, Aspect ratio, Audio Codec, Audio Quality, Sample rate, Channels, etc. After editing parameters, you could click the Save to Custom button to save edited profile to Custom group for future use. On the bottom right corner, click OK button to save changes and return, click Cancel button to abandon changes and return, or click Default button to restore to default settings. 2.4 Step 4. Set output directory Click the big green "Convert" button to call out a sidebar, where you need to set an output directory to save the output files. 16
17 On the popup sidebar, you could click the button to browse and set output directory, and open target folder by clicking button. 2.5 Step 5. Start converting Click the bottom "Convert" button on the output directory setting sidebar to start converting video/dvd/blu-ray/audio files. You could then view all converting progresses on the converting panel, and do after-done settings if you need. 17

18 On the converting panel, you could cancel all converting tasks by clicking the big green Cancel button, pause any converting task by clicking Pause button or resume a converting task by clicking Resume button. On the bottom right corner, you could click the When All Tasks End drop-down box to determine what Leawo Prof. Media should do after converting: Do nothing, Exit program or Shut down computer. 18
19 3. How to Burn DVD/Blu-ray Featuring Blu-ray Creator and DVD Creator, Leawo Prof. Media helps you easily convert and burn video to DVD/Blu-ray, and offers one-click operation to burn ISO image file to Bluray/DVD disc. In this Leawo Prof. Media user guide part, you will learn how to use the Burner module of Leawo Prof. Media. 3.1 Section 1. Burn video to DVD/Blu-ray Step 1. Import source files On the Home interface, directly click Blu-ray Creator or DVD Creator module, or open the "Burn" tab to enter the Burner module. Click the "Add Video" button to load source video/iso files. The Add Video drop-down panel would pop up to let you choose what to import: Add Video, Add Video Folder or Add iso file. This Leawo Prof. Media user guide section would show you 19

20 how to burn video to DVD/Blu-ray. Adding ISO image file would be talked in Section 2. You could load multiple video files or video folders as you like. After importing, the imported media files could be displayed on the left processing panel. You could choose to display loaded media files in thumbnail by clicking Thumbnail button, or in a list with details by clicking Detail button next to the big green Burn button and aspect ratio.. At the bottom, you need to set the output disc type, quality Loaded video file could be played back via clicking the button on the thumbnail, and edited by clicking the Edit button for detail display or button for thumbnail display on thumbnail. If you need, you could select a loaded video and then right click to call 20
21 out right-click menu for more operations, including: Send to Convert, Rename, Clear, Delete, Edit, File Location, Media Info and Bug Report. Also, you could directly drag loaded video files for moving up or down Step 2. Set disc menu Leawo Prof. Media allows you to select disc menu from built-in menu gallery or design disc menu yourself with the internal menu designer for output Blu-ray/DVD content. On the right sidebar, you could see various menu template themes: Standard, Business, Childhood, Education, Holiday, Nature, Sports and Wedding. (Note: Click the "No Menu" option on the top of right sidebar if you don t want to add disc menu.) 21
22 Under the Built-in menu tab, you could select any disc menu theme for output. Or, if you want more, you could open the Online tab and then download more disc menu templates from Leawo s disc menu online database. The Custom tab would collect all disc menu templates you ve customized with the internal disc menu designer. Keeping mouse on any disc menu theme template on the right sidebar would call out an eyeshape icon, by clicking which you could enter the disc menu preview panel. 22


23 On the disc menu preview interface, you could move mouse to the Play button and then click it to play back, or move mouse to the Scene button and then click it to view the disc menu displayed for scenes, as showed below: 23
 On the disc menu preview interface, click the Pencil icon editing panel.")
24 On the scene menu preview panel, you could play back scene via direct-click, click the Previous button or Next button to view more scenes, click Back button to go back to the main menu preview panel Step 3. Edit disc menu (optional) On the disc menu preview interface, click the Pencil icon editing panel. to enter the disc menu On the top of disc menu editing panel, you could see a home icon followed by several serial numbers (catalogue-button), which is a catalogue of main disc menu and scenes. You could directly click one icon to enter corresponding part for editing. Any title (including My DVD, Play and Scene, and the thumbnail of video) could be repositioned via direct drag-and-drop. You could double click titles (My DVD, Play and Scene) to change the title content. After double-clicking a title, you could then right click the title to call out the text editing panel to edit text, including: text font, size, color, type, etc. You could apply the text changes to all by clicking the Apply to All button. 24
25 At the bottom, you could click the you will see the Background Music interface as below: button to add background music. After clicking it, Slide the Background Music to green and then open the Source from box to browse and load local music as background music. You could also set the Duration and other audio effects like Fade in, Fade out and Loop Play. Also, you could add background image by clicking at the bottom. Then you will see: (background-image-setting.jpg) Slide the Background Image box to green and then load either Image File or Video File as background. After editing disc menu, click the Save template icon template into Custom group for future use Step 4. Burning settings at the bottom to save edited After setting the disc menu, click the big green "Burn" button to invoke the burning settings sidebar. On the invoked sidebar, you need to set the Burn to, Disc Label and Save to boxes. 25

26 The Burn to option allows multiple choices. If you want to burn video to DVD/Blu-ray disc, insert a blank writable disc into the disc recorder drive and then select it as target under the Burn to option. Required hard disk space is listed as well to indicate you whether your computer hard drive gets enough space to save output file Step 5. Burn video to DVD/Blu-ray After burning settings, on the burning setting panel, click the bottom right "Burn" button to start burning video to Blu-ray/DVD. 26
27 On the Burning interface, you could stop burning by clicking the Cancel button anytime, and click the When All Tasks End button for after-done settings. 3.2 Section 2. Burn ISO file to DVD/Blu-ray disc Featuring an ISO burner inside the Burner module, Leawo Prof. Media could also help you directly burn ISO image file to DVD/Blu-ray disc in one click. This section of Leawo Prof. Media user guide would show you how to burn ISO to DVD/Blu-ray disc Step 1. Import ISO file Beforehand, insert a blank writable disc into the disc drive. It s up to your ISO image file type for whether you should insert a DVD disc or Blu-ray disc (Blu-ray ISO image file could be burned to Blu-ray disc only, while DVD ISO image file could be burned to both DVD and Bluray disc). Then, launch Leawo Prof. Media. Under the "Burn" tab, click the "Add Video" button and then you could see a drop-down panel 27


28 . Click the "Add iso file" option on this drop-down list to browse and add source ISO image file from your computer into this ISO file burner Step 2. Burn ISO to disc settings After importing ISO file, the program would pop up an "Add iso file" window as below: On the Add iso file window, you need to set Copy to and Disc Label options. If Copy to option is empty, click the refresh button to refresh. If it is still empty, check whether your inserted disc is writable or not, and make sure your drive works well. If the Copy to option shows multiple options, you could click the drop-down box to select the right one Step 3. Burn ISO to disc After setting Copy to and Disc Label options, click the "Burn" button on the Add iso file window to start burning ISO file to DVD/Blu-ray disc. If your inserted disc is not blank, Leawo Prof. Media would prompt a notice to ask you whether to erase it for burning or not, showed as below: 28


29 If you click the Erase button, Leawo Prof. Media would immediately erase the inserted disc and then start burning ISO file to DVD disc. You could also do after-done settings here by clicking the at the bottom right corner. If you click Cancel button on the Warning window that shows you the inserted disc is not empty, Leawo Prof. Media would automatically eject your inserted disc and show you a warning windows that advises you to insert a writable disc and click Retry button. After burning ISO file to DVD/Blu-ray disc, Leawo Prof. Media would automatically eject burned disc for you. You can then click the Finish button at the bottom right corner of Leawo Prof. Media to return to Burn module interface. 29
30 Note: To burn NTSC or PAL DVD disc or set output Blu-ray disc region, you need to open the settings wheel icon on the top-right corner and then open the Copy & Burn tab to set Default Video Mode. 30
31 4. How to Copy Blu-ray/DVD The Copy function module inside Leawo Prof. Media allows you to copy and backup Bluray/DVD disc, folder and ISO image file to either computer hard drive or blank disc. This part of Leawo Prof. Media user guide would show you how to copy DVD/Blu-ray with Leawo Prof. Media. 4.1 Step 1: Load source Blu-ray/DVD Click "Add Blu-ray/DVD" button to load source Blu-ray/DVD files. You could then see a drop-down list as below: You are able to choose add Blu-ray/DVD content from various origins: disc, folder and ISO image file. Browse and load Blu-ray/DVD content according to your own real need (To add Blu-ray/DVD disc, you need to firstly insert source Blu-ray/DVD disc into the disc drive). 31

32 After loading Blu-ray or DVD content, you need to 1. Select a copy mode from Full Movie, Main Movie and Custom Mode options. If you choose Full Movie mode, Leawo Prof. Media would load entire source Blu-ray/DVD content. If you choose Main Movie mode, Leawo Prof. Media loads the longest title (by default, mostly the main movie) from source Blu-ray/DVD content, but allows you to decide which title is the main movie. Custom Mode is similar to Main Movie mode, but allows you to choose multiple titles for backup. 2. Open the disc type drop-down button at the bottom left corner to select output disc type (DVD-9, DVD-5, BD25 or BD50). If you choose Main Movie or Custom Mode, you could select subtitles under and audio tracks under for output as long as source Blu-ray/DVD content contains multiple subtitles and audio tracks. Also, before you determine which one to copy, you could make use of the internal Bluray/DVD player to play back the Blu-ray/DVD title you want to copy by clicking the Play button on the right player panel. If you want to remove loaded Blu-ray/DVD content and wish to load other Blu-ray/DVD content, just click the Remove button. 4.2 Step 2: Blu-ray/DVD backup settings 32

33 Then, click the big green "Copy" button to call out the Bluray/DVD copy setting panel, where you need to figure out the "Copy to", "Disc Label" and "Save to" options. Note: 1. Copy to option allows multiple choices. You could choose to create Folder, ISO File and/or disc as you like. 2. To copy Blu-ray/DVD disc to disc, you need to firstly insert a blank writable disc to the disc drive and then choose it as output under Copy to. If your inserted disc doesn t show up under Copy to, click the refresh button or check whether your inserted disc is writable or not. 3. To create folder or ISO file, make sure your computer hard drive gets enough space. Required storage is viewable. 4.3 Step 3: Copy Blu-ray/DVD content Then, click the bottom "Copy" button on the sidebar to start copying Bluray/DVD content. 33
34 On the Copying interface, you could cancel copying anytime by clicking Cancel button and set after-done arrangement by clicking When All Tasks End button. Note: 1. Leawo Prof. Media could help you copy Blu-ray/DVD content between disc and computer. If you want to copy Blu-ray/DVD disc to another blank disc but have only one disc drive, you could firstly copy Blu-ray/DVD disc to ISO image file, and then use Leawo Prof. Media to copy generated ISO image file to target blank disc, with all operations being quite similar and easy. 2. If you want to copy NTSC DVD disc to PAL disc, or vice versa, you need to open the settings wheel icon on the top-right corner and then open the Copy & Burn tab to set Default Video Mode. 34
35 5. How to Download Video Including a video downloader, Leawo Prof. Media could help you easily download videos from YouTube, Facebook, Veoh, VEVO, and other 100+ video sharing sites. Open the Download module by clicking or click the Video Downloader option on Home interface to enter the video downloader interface. And then follow this part of total media converter ultimate user guide to learn how to download online videos. 5.1 Step 1: Set download directory Click the wheel icon on the top-right corner and then open the Downloader tab to set download directory in Save videos to box, and finish other settings upon downloading here. 5.2 Step 2: Find target video Under "Download" panel, copy and paste the URL of target video you want to download into the browser address bar and then click the Enter button, or directly use the internal IE browser to browse target video. Once this online video downloader detects target video, it 35

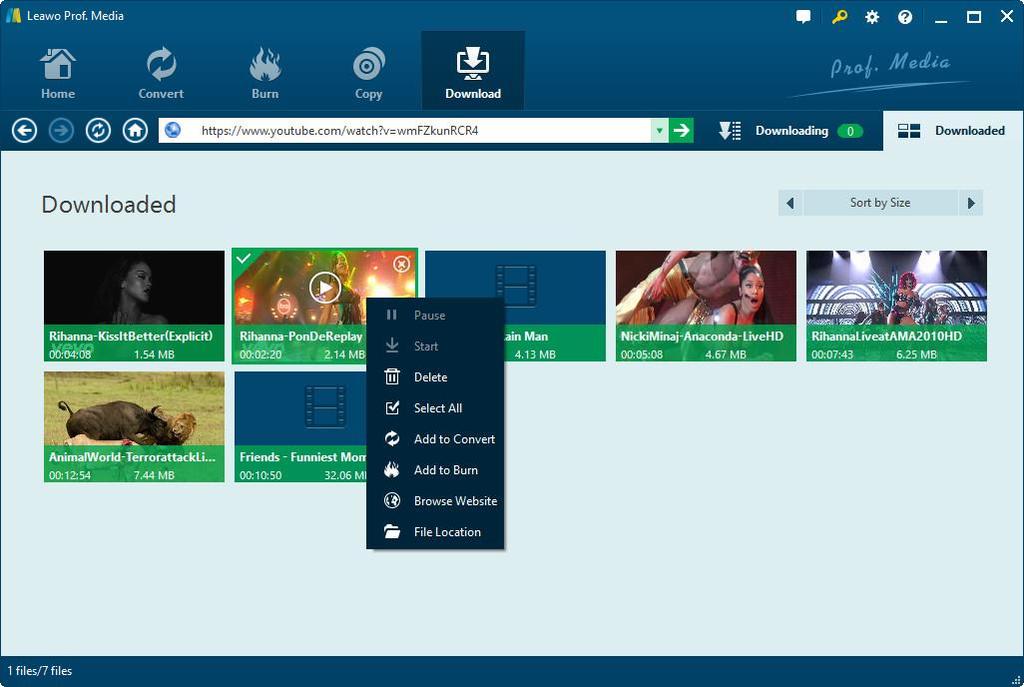
36 would list multiple options of target video at different resolutions for you to choose from on the right sidebar. You could hide or call out the sidebar as you like. 5.3 Step 3: Download video On the right sidebar, select one video with the resolution you need and then click the download icon to start downloading. The selected video would be added to the Downloading panel and downloaded immediately. By clicking the Downloading button, you will see the downloading panel and view all downloading task progress. 36

37 Under the Downloading panel, you could pause any downloading task by clicking the Pause button, or delete downloading by clicking the Remove button on downloading task thumbnail. 5.4 Step 4: Manage downloaded videos After downloading, all downloaded videos are listed under the "Downloaded" tab. You could open the Download tab to view and manage all downloaded tasks. You could sort them by name, date, size, etc. Or, right click them to do more, like Delete, Add to Convert, Add to Burn, Browse website, etc. 37
38 38

39 6. How to Create and Burn Photo Slideshow With photo slideshow maker and photo slideshow burner, Leawo Prof. Media helps you easily create photo slideshows from various photos, and burn photos to DVD/Blu-ray photo slideshow. The internal photo slideshow editor even allows you to edit photo slideshow effect like adding transitions, background music, etc. This part of Leawo Prof. Media user guide would show you how to create photo slideshow, how to burn photos to DVD/Blu-ray, and how to edit photo slideshow. 6.1 Section 1: How to Create Photo Slideshow Step 1: Import source photos Under the "Convert" module, click the "Add Photo" button to import photos. You could then choose to add either Photo or Photo Folder slideshow.. Imported photos would be automatically generated into 39
40 You could play back generated photo slideshow by clicking the play button on the thumbnail, edit photo slideshow by clicking the edit icon, merge several photo slideshows generated into one by clicking the slideshow for more options, etc Step 2: Choose output profile, or right click generated photo The generated photo slideshow could be converted into 180+ formats for multiple uses. Click the drop-down box next to the "Add Photo" button and then you could see a drop-down panel that lists 3 options: Edit, Change and Apply to All. Click "Change" option to enter the Profile panel, and then select desired profile as output format from Favorite, Custom, Format or Device group. 40

41 6.1.3 Step 3. Edit parameters of profiles If you need, you could click the "Edit" option on the drop-down box, or click the Edit profile button on profiles from Format and Device groups on Profile panel to enter the Profile Settings panel, where you could edit the video and audio parameters of selected profiles. 41
, Bit Rate, Frame Rate, Aspect ratio, Audio Codec, Audio Quality, Sample rate, Channels, etc.")
42 On the Profile Settings panel, you can reset Video Codec, Quality, Resolution (choose from provided options, or manually input the resolution you desire into the box according to your devices or players), Bit Rate, Frame Rate, Aspect ratio, Audio Codec, Audio Quality, Sample rate, Channels, etc. After editing parameters, you could click the Save to Custom button to save edited profile to Custom group for future use. On the bottom right corner, click OK button to save changes and return, click Cancel button to abandon changes and return, or click Default button to restore to default settings Step 4. Set output directory Click the big green "Convert" button to call out a sidebar, where you need to set an output directory to save the output files. 42

43 On the popup sidebar, you could click the button to browse and set output directory, and open target folder by clicking Step 5. Start converting button. Click the bottom "Convert" button on the output directory setting sidebar to start converting video/dvd/blu-ray/audio files. You could then view all converting progresses on the converting panel, and do after-done settings if you need. 43
44 On the converting panel, you could cancel converting task by clicking the big green Cancel button, pause any converting task by clicking Pause button or resume a converting task by clicking Resume button. On the bottom right corner, you could click the When All Tasks End drop-down box converting: Do nothing, Exit program or Shut down computer. to determine what Leawo Prof. Media should do after 6.2 Section 2: How to Burn Photos to DVD/Blu-ray Step 1: Import source photos Under the "Burn" module, click "Add Photo" button to import photos for slideshow creating. You can add either photo or photo folder on the drop- 44
45 down panel:. Browse source photo and add to Leawo Prof. Media. The imported photos would be generated into slideshow automatically. You could choose to display generated photo slideshow in thumbnail by clicking Thumbnail button, or in a list with details by clicking Detail button next to the big green Burn button type, quality and aspect ratio.. At the bottom, you need to set the output disc Also, generated photo slideshow could be played back via clicking the button on the thumbnail, and edited by clicking the Edit button for detail display or button for thumbnail display on thumbnail. If you need, you could right click generated photo slideshow for more options, including: Send to Convert, Rename, Clear, Delete, Edit, File Location, Media Info and Bug Report. 45


46 If you generate more than one photo slideshows, you could directly drag and drop to reorder them Step 2. Set output disc menu After loading photos, on the right sidebar, you could select a disc menu for output DVD/Bluray photo slideshow. There are various disc menu themes: Standard, Business, Childhood, Education, Holiday, Nature, Sports and Wedding. (Note: Click the "No Menu" option on the top of right sidebar if you don t want to add disc menu.) 46

47 Under the Built-in menu tab, you could select any disc menu theme for output. Or, if you want more, you could open the Online tab and then download more disc menu templates from Leawo s disc menu online database. The Custom tab would collect all disc menu templates you ve customized with the internal disc menu designer. Keeping mouse on any disc menu theme template on the right sidebar would call out an eyeshape icon, by clicking which you could enter the disc menu preview panel. On the disc menu preview interface, you could move mouse to the Play button and then click it for playback, or move mouse to the Scene button and then click it to view the disc menu displayed for scenes, as showed below: 47
48 On the scene menu preview panel, you could play back scene via direct-click, click the Previous button or Next button to view more scenes (if you ve generated multiple photo slideshows), click Back button panel Step 3. Edit disc menu (optional) to go back to the main menu preview On the disc menu preview interface, click the Pencil icon editing panel. to enter the disc menu 48
 could be repositioned via direct drag-and-drop.")

49 On the top of disc menu editing panel, you could see a home icon followed by several serial numbers, which is a catalogue of main disc menu and scenes. You could directly click one icon to enter corresponding part for editing. Any title (including My DVD, Play and Scene, and the thumbnail of video) could be repositioned via direct drag-and-drop. You could double click titles (My DVD, Play and Scene) to change the title content. After doubleclicking a title, you could then right click the title to call out the text editing panel to edit text, including: text font, size, color, type, etc. You could apply the text changes to all by clicking the Apply to All button. At the bottom, you could click the you will see the Background Music interface as below: button to add background music. After clicking it, Slide the Background Music to green and then open the Source from box to browse and load local music as background music. You could also set the Duration and other audio effects like Fade in, Fade out and Loop Play. 49

50 Also, you could add background image by clicking at the bottom. Then you will see: Slide the Background Image box to green and then load either Image File or Video File as background. After editing disc menu, click the Save template icon template into Custom group for future use Step 4. Burning settings at the bottom to save edited After setting the disc menu, click the big green "Burn" button to invoke the burning settings sidebar. On the invoked sidebar, you need to set the Burn to, Disc Label and Save to boxes. The Burn to option allows multiple choices. If you want to burn video to DVD/Blu-ray disc, insert a blank writable disc into the disc recorder drive and then select it as target under the Burn to option. Required hard disk space is listed as well to indicate you whether your computer hard drive gets enough space to save output file. 50

51 6.2.5 Step 5. Burn photo to DVD/Blu-ray After burning settings, on the burning setting panel, click the bottom right "Burn" button to start burning photo to Blu-ray/DVD. On the Burning interface, you could stop burning by clicking the Cancel button anytime, and click the When All Tasks End button for after-done settings. 6.3 Section 3: How to Edit Photo Slideshow Edit slideshow video After importing photos from hard drive, this program would automatically generate these photos into a photo slideshow. Click the "Edit" icon if you display generated photo slideshow in Detail or click the Edit icon if you display generated photo slideshow in Thumbnail to edit generated photo slideshow. 51

52 Under the "Video" tab, you could adjust photo order via direct drag-and-drop, remove existing photo by clicking the remove icon on it, rotate a photo by clicking the rotation icon on it, insert extra photos by clicking the add icon on the photo timeline, set the output video effect like Photo Duration, Transition Duration and Transition Effect, etc Edit slideshow audio Under the "Audio" tab, you could firstly click the Add Music button to add background music, and then set the output audio effect. On the music timeline, you could move mouse to loaded music and then click the button to remove loaded music, click the add icon out and Loop play. to add extra music, set the output audio effect like Fade in, Fade 52

53 Note: Leawo Prof. Media currently only accepts photos or images saved in png, jpg, jpeg or bmp format for making photo slideshow and burning to DVD/Blu-ray. 53
54 7. How to Edit Blu-ray/DVD/Video The internal video editor offers several editing features for you to edit Blu-ray/DVD/video files before you get final output. These features include: trim, watermark, crop, effect, 3D, etc. Both Convert and Burn modules offer you video editor. It s easy to enter the editing panel. Under Convert module, after loading Blu-ray/DVD/video files, click the Edit icon to enter the editing panel. Under Burn module, after loading source video files, click the Edit icon if you display loaded video in thumbnail or hit the Edit option on thumbnail if you display loaded video in detail to enter the editing panel. The Convert module and Burn module share the same editing panel. The below content would show you how to edit Blu-ray/DVD/video with Leawo Prof. Media (with pictures snapped under Convert module). 7.1 Trim video length Under Trim tab, you can dag the left limiter and the right limiter on the playbar to remove unwanted clip. You could also click the limiter buttons to determine the start place and end place, or set the Start Time and End Time values to trim video length. After trimming, you could click the Start section preview button to get a preview. 54

55 7.2 Add watermark Under Watermark tab, you could add Text watermark or Image watermark as you like. Slide the Watermark to green and then add either text or image as watermark freely. You could even customize watermark. 55

56 1. To add Text watermark, slide Text box to green and then input text into the follow-up box. Click the color button to set text color, and hit the text font button to adjust text font, style, size, etc. 2. To add Image watermark, slide the Image box to green and then click the Browse button to browse and add image as signature. After adding text or image watermark, you could adjust the watermark Transparency, Position, Size, and choose to whether to apply the watermark to all or not. You could also directly drag added watermark on the Output Preview panel to set watermark position. 7.3 Crop video size In Crop tab, you can firstly choose a Zoom style, and then drag the handlers of the frame on the left Original Preview window, or modify the parameters below for an accurate result to crop video size and remove black margins. You could also rotate video for special angle of view here: click the Horizontal flip button to rotate for horizontal view, click the Vertical flip button to rotate for vertical 56

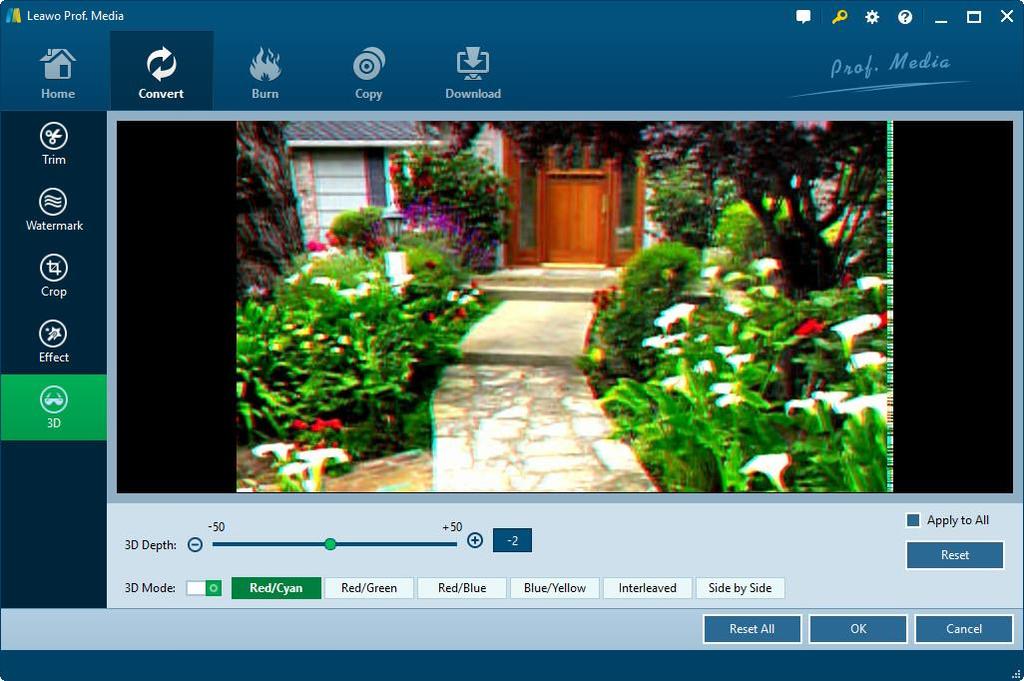
57 view, hit the right-turn button to rotate 90 degrees clockwise, or hit the left-turn button to rotate 90 degrees counterclockwise. 7.4 Adjust Effect Under Effect tab, change video effect including Brightness, Contrast, Saturation and VolumeZoom by sliding the adjuster from -100 to 100, or directly setting a value in the box followed by D to 3D converter Under 3D tab, you can slide the 3D Mode box to green and then select a 3D effect from Red/Cyan, Red/Green, Red/Blue, Blue/Yellow, Interleaved, and Side by Side to convert 2D to 3D. 3D Depth could also be adjusted from -50 to 50 for more vivid 3D movie effect. 57
58 58

59 8. How to Snap Screenshots Leawo Prof. Media also comes with a screenshot snapper that could help you snap screenshots of video/blu-ray/dvd movies. Under both Convert and Burn modules, the builtin media player offers you a screenshot snapper. You could take snapshot of loaded video/dvd/blu-ray content. After loading video/dvd/blu-ray content, move mouse to the thumbnail of loaded media and then click the Play icon to play back loaded media. On the playback interface, you could click the Edit icon to enter the editing panel, hit the Screenshot icon to take screenshot anytime you like, and open the folder icon to open screenshot folder. 59
User Guide for Leawo Video Converter Ultimate
 User Guide for Leawo Video Converter Ultimate - How to Use Leawo Video Converter Ultimate Here is a user guide that shows you how to properly use Leawo Video Converter Ultimate. The guide presented here
User Guide for Leawo Video Converter
 User Guide for Leawo Video Converter - How to Use Leawo Video Converter Here is a user guide that shows you how to properly use Leawo Video Converter. The guide presented here is thorough enough for users
Leawo Blu-ray Copy User Guide
 Leawo Blu-ray Copy User Guide 1/11 Part 1: Register... 4 1. How to register... 4 2. How to get register code... 5 Part 2: How to Back up Blu-ray/DVD disc... 6 Step 1: Open Blu-ray Copy... 6 Step 2: Add
Introduction. Part 1: Register. Part 2: How to Back up DVD disc. Part 3: Help Center
 Introduction Leawo DVD Creator is a powerful DVD backup tool for people to back up their DVD contents with ease. It s capable of backing up DVD disc, folder and ISO image files. It can remove DVD disc
User Guide for Leawo Free Blu-ray Player
 User Guide for Leawo Free Blu-ray Player 1 / 21 Content 1. Introduce Leawo Free Blu-ray Player... 3 1.1 About the main interface... 3 1.2 Leawo Free Blu-ray Player Menu... 5 File... 6 Playback... 6 1.3
Leawo Free Blu-ray Player for Mac User Guide
 Leawo Free Blu-ray Player for Mac User Guide A Detailed Introduction to Leawo Free Blu-ray Player for Mac on How to Use Leawo Free Blu-ray Player for Mac to Play Blu-ray, DVD, HD Video, Audio and ISO Files
Introduce. Introduce. Download. Convert. Burn GIF. Play. Edit. Cast. > Brief Introduction. o Brief Introduction. o Download Online Video
 Introduce o Brief Introduction Download o Download Online Video Convert o Convert HD Video Burn o Make ISO GIF o Create GIF Play o Play HD Video Edit o Trim video length o Crop video size o Adjust video
Dimo MXF Converter provides users the best solution play, edit MXF files and import MXF/P2 MXF recordings shot by camcorders to
 Introduce o Brief Introduction Download o Download Online Video Convert o Convert MXF Burn o Make ISO GIF o Create GIF Play o Play MXF Video Edit o Trim video length o Crop video size o Adjust video effect
With Dimo MTS Converter, you can convert MTS, M2TS, M2T, TS, AVCHD file from Sony, Panasonic, Canon and other AVCHD
 Introduce o Brief Introduction Download o Download Online Video Convert o Convert MTS/M2TS/AVCHD Burn o Make ISO GIF o Create GIF Play o Play MTS Video Edit o Trim video length o Crop video size o Adjust
To improve your functions exploration with Dimo Video Converter Ultimate for Mac, we design our program interface in a very
 Introduce o Brief Introduction Download o Download online movies Convert o Convert DVD/Blu-ray/Video/Audio Edit o Edit and Individualize Video Burn o Create ISO Cast o Mirror local files Introduce To improve
PHOTO DVD MAKER USER MANUAL
 Photo DVD Maker User Manual 1 PHOTO DVD MAKER USER MANUAL Version 7.04 http://www.photo-dvd-maker.com Photo DVD Maker User Manual 2 0.1 WELCOME TO PHOTO DVD MAKER...4 0.2 GETTING HELP...5 1. GETTING STARTED...6
Blu Ray Burning in MZ280 Step 1 - Set Toast up to burn a Blu-ray Video Disc.
 Blu Ray Burning in MZ280 Step 1 - Set Toast up to burn a Blu-ray Video Disc. Open Toast. On the main screen, click the Video button in the upper-left portion of the screen, and select Blu-ray Video from
Create a Photo Slideshow
 Create a Photo Slideshow The Roxio Slideshow Assistant, part of the Roxio Creator suite, makes it easy to put together professional-looking slideshows with transitions and background audio. When you re
Voilabits PhotoSlideshowMaker
 Voilabits PhotoSlideshowMaker 1 TABLE OF CONTENTS In this tutorial, you will learn the following: I. Voilabits PhotoSlideshowMaker... Pg. 3 II. Activating this App... Pg. 4 III.Getting Started... Pg. 5
Table of Content. Nero Recode Manual
 Table of Content 1. Start Successfully... 4 1.1. About Nero Recode... 4 1.2. Versions of Nero Recode... 4 1.3. Working with Nero Recode... 5 1.4. Starting Nero Recode... 6 2. Main Screen... 8 3. Recode
 S4B Split Movie Soft4Boost Help S4B Split Movie www.sorentioapps.com Sorentio Systems, Ltd. All rights reserved Contact Us If you have any comments, suggestions or questions regarding S4B Split Movie or
HyperMedia User Manual
 HyperMedia User Manual Contents V3.0 Chapter 1 : HyperMedia Software Functions... 3 1.1 HyperMedia Introduction... 3 1.2 Main Panel... 4 1.2.1 Information Window... 4 1.2.2 Keypad... 4 1.2.3 Channel Index...
Apple idvd 11 Tutorial
 Apple idvd 11 Tutorial GETTING STARTED idvd is a program that allows you to create a DVD with menus and graphics of a professionally made commercial disc to play on your home DVD player. To Begin your
GOM Cam User Guide. Please visit our website (cam.gomlab.com) regularly to check out our. latest update.
 regularly to check out our. latest update.") GOM Cam User Guide Please visit our website (cam.gomlab.com) regularly to check out our latest update. From screen recording to webcam video and gameplay recording GOM Cam allows you to record anything
GOM Cam User Guide Please visit our website (cam.gomlab.com) regularly to check out our latest update. From screen recording to webcam video and gameplay recording GOM Cam allows you to record anything
Dimo MKV Video Converter for Mac is Mac MKV Converter to help you convert MKV files to MOV, WMV, MP4, MKV, etc. for editing,
 Introduce o Brief Introduction Convert o Convert MKV video Burn o Create ISO GIF o Make GIF Download o Download online movies Play o Play MKV Video Edit o Cut MKV video length by trimming o Get MKV video
Picasa Basics Website:
 Website: http://etc.usf.edu/te/ Picasa is a free photo management program from Google that can be used to organize and manage all of the images you have stored on your computer. Picasa also allows you
iphoto 06 Basics Website:
 iphoto 06 Basics Website: http://etc.usf.edu/te/ iphoto is the photo management application included with ilife 06. In addition to letting you import, organize and share your photos, iphoto includes a
Get to Know the VideoStudio Workspace
 Get to Know the VideoStudio Workspace This written tutorial is a handy guide to understanding the various components of the VideoStudio interface. We will review the Capture, Edit and Share workspaces
GOM Mix Pro User Guide
 GOM Mix Pro User Guide Please visit our website (mix.gomlab.com) regularly to check out our latest update. `Powerful & Easy to Use Video Editor - GOM Mix Pro! GOM Mix Pro is a powerful, easy video editor
Dimo FLV Video Converter for Mac is an all-in-one Mac FLV conversion software. It can help convert FLV files to almost all video and
 Introduce o Brief Introduction Convert o Convert FLV video Burn o Create ISO GIF o Make GIF Download o Download online movies Play o Play FLV Video Edit o Cut FLV video length by trimming o Get FLV video
Welcome to imovie 08. Carmelita Bradley Coburg Elementary School
 Welcome to imovie 08 Carmelita Bradley bradley_c@4j.lane.edu Coburg Elementary School Put together video clips, photos, music and much more to create your very own movies! Project Library Lists all the
GETTING STARTED TABLE OF CONTENTS
 imovie 11 Tutorial GETTING STARTED imovie 11 is consumer-level digital video editing software for Macintosh. You can use imovie 11 to edit the footage you film with digital video cameras and HD video cameras.
Working with Windows Movie Maker
 518 442-3608 Working with Windows Movie Maker Windows Movie Maker allows you to make movies and slide shows that can be saved to your computer, put on a CD, uploaded to a Web service (such as YouTube)
for For Windows Only USER MANUAL
 for For Windows Only USER MANUAL 1 44601 Fremont Blvd., Fremont, CA 94538, USA Tel: +1.510.440.9901 Fax: +1.510.440.1270 www.arcsoft.com Copyright 2010 ArcSoft, Inc. All rights reserved. ArcSoft, the ArcSoft
You can view the LoiLoScope 2 user manual from within the software.
 LoiLoScope 2 User Manual You can view the LoiLoScope 2 user manual from within the software. From the File menu at the top left of the screen, click on "Download Manual" to open the download page in your
idvd Authoring Program
 idvd Authoring Program idvd 7.0 is the standard DVD authoring program on all PSU Macs as of Fall 2008. The interface has changed slightly from previous versions and the media browser is better integrated
Keynote 08 Basics Website:
 Website: http://etc.usf.edu/te/ Keynote is Apple's presentation application. Keynote is installed as part of the iwork suite, which also includes the word processing program Pages and the spreadsheet program
Creating Book Trailers Using Photo Story 3 Why Photo Story 3? It is a free program anyone can download.
 Creating Book Trailers Using Photo Story 3 Why Photo Story 3? It is a free program anyone can download. Before you begin using Photo Story 3 you will need to create a folder and title it Book Trailer.
PowerPoint 2016: Part 1
 PowerPoint 2016: Part 1 Updated: April 2018 Cost: $1.10 PowerPoint is a presentation tool used to create slide-by-slide lectures and visual aids. It can display a combination of text, video, audio, and
Windows Movie Maker. The Toolbar. The Toolbar
 Windows Movie Maker The Menu Bar The Menu Bar gives access to all parts of the program. On the Menu Bar, click on File. Notice the choices of Save Project As and Save Movie File o Choose Save Project As
Adobe Premiere Elements Tutorial
 Adobe Premiere Elements Tutorial Starting a New Project To import movie clips from a digital video camera, click on the Capture Video button. You will be prompted to name your project and choose a location
Table of Content. Nero Video Manual
 Video Manual Table of Content 1. Start Successfully... 6 1.1. About Nero Video... 6 1.2. Versions of Nero Video... 6 1.3. System Requirements... 7 2. Application Workflow and Interface... 8 2.1. Working
STORYTELLING-PowerPoint-Windows Movie Maker 2
 Judy Honaker Storytelling Using PowerPoint & Movie Maker 2 1 STORYTELLING-PowerPoint-Windows Movie Maker 2 By: Judy Honaker-Instructional Technology Resource Teacher Introduction This tutorial is designed
Microsoft PowerPoint Tutorial
 Microsoft PowerPoint Tutorial GETTING STARTED Microsoft PowerPoint is one of the most popular presentation programs supported by both Mac and PC platforms. Microsoft PowerPoint can be used to create interactive
imovie 08 Basics USF College of Education Laptop Initiative EDU 252, Website:
 imovie 08 Basics USF College of Education Laptop Initiative EDU 252, Email: laptoplounge@coedu.usf.edu Website: http://fcit.usf.edu/laptop/ imovie 08 is a completely redesigned version of the video editing
Camtasia Studio 5.0 PART I. The Basics
 Camtasia Studio 5.0 Techsmith s Camtasia Studio software is a video screenshot creation utility that makes it easy to create video tutorials of an on screen action. This handout is designed to get you
Nero MediaHome Manual
 Table of Content 1. Start Successfully... 5 1.1. About the Application... 5 1.2. Versions and System Requirements... 5 2. Working With the Program... 7 2.1. Header... 7 2.2. Library Management and Options...
DVD Production I: Introduction to idvd
 DVD Production I: Introduction to idvd Assemble your movies and still images Before you create your DVD, assemble your materials and check that your movies are in the correct format for idvd. All movies
If you have many MXF files from Canon/Sony/Panasonic camcorders and want to convert them to video files that you can play on your
 Introduce o Brief Introduction Convert o Convert MXF video Burn o Create ISO GIF o Make GIF Download o Download online movies Edit o Cut MXF video length by trimming o Get MXF video size by cropping o
Avigilon Control Center Player User Guide. Version 5.10
 Avigilon Control Center Player User Guide Version 5.10 2006-2016, Avigilon Corporation. All rights reserved. AVIGILON, the AVIGILON logo, AVIGILON CONTROL CENTER, ACC and HDSM, are trademarks of Avigilon
Getting to know Photostage. The software interface. The Menu bar. Step 01: Inserting images/photographs
 Installing Photostage 1. Download the application 2. Double click on the downloaded file to run it. 3. Choose the drive and folder where you want to install Photostage or accept the default "C:\Program
Quick Start Guide - Contents. Opening Word Locating Big Lottery Fund Templates The Word 2013 Screen... 3
 Quick Start Guide - Contents Opening Word... 1 Locating Big Lottery Fund Templates... 2 The Word 2013 Screen... 3 Things You Might Be Looking For... 4 What s New On The Ribbon... 5 The Quick Access Toolbar...
CyberLink. Media Deluxe. User s Guide
 CyberLink Media Deluxe User s Guide Copyright and Disclaimer All rights reserved. No part of this publication may be reproduced, stored in a retrieval system, or transmitted in any form or by any means
VSPlayer Software User Manual
 VSPlayer Software User Manual UD.6L0202D1505A01 Thank you for purchasing our product. This manual applies to VSPlayer software, please read it carefully for the better use of this software. This manual
Photo to Movie Help. LQ Graphics, Inc.
 Photo to Movie Help LQ Graphics, Inc. Table of Contents Photo to Movie... 1 Introduction... 1 Installation... 3 Purchasing... 4 Organizing Your Movie... 5 Planning Your Movie... 5 Adding photos to your
Picture & Video Importing, Editing and CD Creation Using Picasa and Movie Maker
 Picture & Video Importing, Editing and CD Creation Using Picasa and Movie Maker By John Gontowicz 609-668-0695 yourpcguide@comcast.net www.yourpcguide.com www.yourpcguide.com/photo.pdf Download Picasa
A new clients guide to: Activating a new Studio 3.0 Account Creating a Photo Album Starting a Project Submitting a Project Publishing Tips
 Getting Started With Heritage Makers A Guide to the Heritage Studio 3.0 Drag and Drop Publishing System presented by Heritage Makers A new clients guide to: Activating a new Studio 3.0 Account Creating
Getting Started with. PowerPoint 2010
 Getting Started with 13 PowerPoint 2010 You can use PowerPoint to create presentations for almost any occasion, such as a business meeting, government forum, school project or lecture, church function,
USB 2.0 Video/Audio Grabber User s Guide
 USB 2.0 Video/Audio Grabber User s Guide Contents: Chapter 1: Introduction... 1 1.1 Package Contents... 1 1.2 System Requirements... 1 Chapter 2: Getting Started... 2 2.1 Connect USB A/V Adapter... 2 2.2
2018 imovie High Sierra
 2018 imovie High Sierra 1 Create a Movie Open imovie. Select the Projects button from the top menu. Click Create New. Next, Click Movie. You will see a sidebar of libraries and events, browser window with
Microsoft Office 2007
 Microsoft Office 2007 Adding Slide Transitions Transition Sound Transitions Transition Speed Apply to All A slide transition is the way one slide changes to the next in Slide Show view. Animations Tab:
College of Pharmacy Windows 10
 College of Pharmacy Windows 10 Windows 10 is the version of Microsoft s flagship operating system that follows Windows 8; the OS was released in July 2015. Windows 10 is designed to address common criticisms
USER MANUAL. LG Simple Editor.
 USER MANUAL LG Simple Editor http://partner.lge.com 2 CONTENTS LG SIMPLE EDITOR...3 --System Requirements...3 --Install and Delete LG Simple Editor...4 Installation Deletion --Running LG Simple Editor...7
Getting started with Microsoft Photostory 3
 Getting started with Microsoft Photostory 3 This tutorial will take you through how to create a digital movie in FIVE BASIC STEPS. At each step, there are also Advanced Features available and these are
Chapter 25. Build Creations with Your Photos
 Chapter 25 Build Creations with Your Photos 2 How to Do Everything with Photoshop Elements How to Create a slide show to show off your images Post your images in web pages Build cards, calendars, and postcards
Table of Contents. iii
 Photo to Movie 4.5 Table of Contents Photo to Movie Introduction... 1 Introduction... 1 Installation... 2 Organizing Your Movie... 5 Planning your movie... 5 Adding photos to your slide show... 5 Choosing
PowerPoint Click to access Backstage View. The Ribbon. See Using the Ribbon, below. 4Designing &
 The Original Quick Reference Guides Microsoft PowerPoint 2010 PowerPoint offers a host of wide-ranging creative tools for designing, displaying and sharing presentations. New features in PowerPoint 2010
VideoFlick Manual. I. Overview 1.1 Brief Introduction
 VideoFlick Manual I. Overview...1 1.1 Brief Introduction...1 1.2 Major Features...2 1.3 System Requirements...2 II. Appearance...2 III. How to Use...3 3.1 Share Online...3 3.2 Share by E-mail...4 3.3 Share
The Photo Gallery. Adding a Photo Gallery Page. Adding a Photo Gallery App
 Adding a Photo Gallery Page The Photo Gallery Above the Summary tab, in the list of Current Pages, click on the New Page button. Choose Photo Gallery from the Available Page Types. Give the page a name.
Libraries. Multi-Touch. Aero Peek. Sema Foundation 10 Classes 2 nd Exam Review ICT Department 5/22/ Lesson - 15
 10 Classes 2 nd Exam Review Lesson - 15 Introduction Windows 7, previous version of the latest version (Windows 8.1) of Microsoft Windows, was produced for use on personal computers, including home and
GET FAMILIAR WITH WINDOWS MOVIE MAKER
 GET FAMILIAR WITH WINDOWS MOVIE MAKER TASKS SELECTION COLLECTION PALETTE PREVIEW SCREEN PRODUCTION PALETTE The production palette has two modes: storyboard and timeline. To switch between the two click
Windows Movie Maker Reinforcement Handout
 Windows Movie Maker Reinforcement Handout Windows Live Movie Maker is the fast, easy way to turn photos and videos into greatlooking movies and slide shows you can share with your class, on the Web, or
W-E
 Signage Suite V2.20 User Guide 605220-02-01-W-E-051613-02 Trademarks Windows XP, Windows Vista, Windows 7, and Microsoft are registered trademarks of Microsoft Corporation. All other trademarks are the
Any DVD Cloner Platinum Manual
 About Us DVDSmith Inc. is a multimedia software company that develops and markets DVD copy, DVD ripper, blu-ray copy and blu-ray ripper programs for both Windows and Mac platforms. DVDSmith products will
Nero Recode Manual. Nero AG
 Nero Recode Manual Nero AG Copyright and Trademark Information The Nero Recode manual and all its contents are protected by copyright and are the property of Nero AG. All rights reserved. This manual contains
Step by Step Directions on how to use Kizoa
 Step by Step Directions on how to use Kizoa What is Kizoa? Kizoa is a free slideshow maker and photo editing site. You are able to upload, organize, edit, create, show and share projects you have created
11 EDITING VIDEO. Lesson overview
 11 EDITING VIDEO Lesson overview In this lesson, you ll learn how to do the following: Create a video timeline in Photoshop. Add media to a video group in the Timeline panel. Add motion to still images.
imovie Quick Guide Learning Technologies Center Gaskill Hall
 imovie Quick Guide Learning Technologies Center Gaskill Hall Introduction Welcome to the Miami University LTC This quick guide is designed to help acquaint you with some capabilities of imovie HD and idvd
SMART Recorder. Record. Pause. Stop
 SMART Recorder The recorder is used to record actions that are done on the interactive screen. If a microphone is attached to the computer, narration can be recorded. After the recording has been created,
Windows Movie Maker / Microsoft Photo Story Digital Video
 Windows Movie Maker / Microsoft Photo Story Digital Video http://intranet/technology/index.html TRC HELP DESK X5092 April 2006 Photo Story and Movie Maker Microsoft Photo Story 3 allows you to create fantastic
How to create a Slide Show with NeroVision Express 2
 How to create a Slide Show with NeroVision Express 2 1. First to launch NeroVision Express 2: Go to Start->All Programs->Nero>NeroVision Express 2->NeroVision Express. Or you can just go to Start->NeroVision
Make Your Pictures Come to Life with Photo Story 3
 Page 1 of 6 Click Here to Install Silverlight United States Change All Microsoft Sites Search Microsoft.com Submit Windows Media Home For Home Windows Media Player Music & Video Cool Devices For Professionals
Overview. Features. Please visit for more information. Copyright ZC Software. All Rights Reserved
 Overview ZC DVD Ripper Platinum is a super DVD backup and convert tool software, which is a DVD Player firstly, and it can not only record any DVDs' audio and video you can playback on your computer, but
Date : Jun 14, Ver. 01. InterVideo InstantON. User Manual
 Ver. 01 Date : Jun 14, 2005 InterVideo InstantON User Manual 1 Content 1. Install/Repair/Remove...5 1.1. Install InterVideo InstantON...5 1.1.1. Run the InstantON Install file under Windows...5 1.1.2.
11.1 Create Speaker Notes Print a Presentation Package a Presentation PowerPoint Tips... 44
 Contents 1 Getting Started... 1 1.1 Presentations... 1 1.2 Microsoft Office Button... 1 1.3 Ribbon... 2 1.4 Mini Toolbar... 2 1.5 Navigation... 3 1.6 Slide Views... 4 2 Customize PowerPoint... 5 2.1 Popular...
Quick Guide for Photoshop CS 6 Advanced June 2012 Training:
 3. If desired, click the desired tab to see the differences. Photoshop CS 6 Advanced Changing Workspace Note: Changing Workspace will change the Panel Group appears on the screen. The default Workspace
Iconasys Advanced 360 Product View Creator. User Guide (Mac OSX)
") Iconasys Advanced 360 Product View Creator User Guide (Mac OSX) Overview 360 Product View Creator UI 1. Upload Image Area 2. Image Viewing Gallery 3. Output Format and Button Create 4. 360 Preview Window
Iconasys Advanced 360 Product View Creator User Guide (Mac OSX) Overview 360 Product View Creator UI 1. Upload Image Area 2. Image Viewing Gallery 3. Output Format and Button Create 4. 360 Preview Window
Windows 7 Basic Computer Course
 Windows 7 Basic Computer Course Windows 7 is the latest user operating system. This course covers everything you need to know about the current technology. FIRST TIME COMPUTER USERS If you have never used
Microsoft PowerPoint 2013 Beginning
 Microsoft PowerPoint 2013 Beginning PowerPoint Presentations on the Web... 2 Starting PowerPoint... 2 Opening a Presentation... 2 File Tab... 3 Quick Access Toolbar... 3 The Ribbon... 4 Keyboard Shortcuts...
Microsoft PowerPoint 2007 Tutorial
 Microsoft PowerPoint 2007 Tutorial Prepared By:- Mohammad Murtaza Khan I. T. Expert Sindh Judicial Academy Contents Getting Started... 5 Presentations... 5 Microsoft Office Button... 5 Ribbon... 6 Quick
Video Modeling & Video Self-Modeling: Research to Practice
 Video Modeling & Video Self-Modeling: Research to Practice It s Showtime with ShowBiz Presented by the Virginia Department of Education s Autism Priority Project Developed by Teresa Lyons, T-TAC/VT How
3 USING NERO BURNING ROM
 3 USING NERO BURNING ROM Nero Burning ROM gives you the maximum amount of flexibility and options for burning data to create different types of CDs and DVDs, such as bootable CDs or Super Video CDs. Until
Video Editing With NCH VideoPad
 Sun City Summerlin Computer Club Seminar Video Editing With NCH VideoPad Tom Burt Seminar Agenda Introduction Getting the Required Tools Overview of the Process VideoPad Editing Basics Project Photo Slide
SeeSnake HQ User Guide
 SeeSnake HQ User Guide SeeSnake HQ Version 1.53.85.1426 23 May 2010 About SeeSnake HQ 3 Digital Technology 3 Installation and Updates 5 Windows XP 5 Windows Vista 5 Windows 7 5 The Home Window 6 Home Toolbar
HyperMedia User Manual
 HyperMedia User Manual Contents V1.0 Chapter 1 : HyperMedia Software Functions... 3 1.1 HyperMedia Introduction... 3 1.2 Main Panel... 4 1.2.1 Information Window... 4 1.2.2 Keypad... 4 1.2.3 Channel Index...
Overview. Features. anytime.
 Overview ZC DVD to BlackBerry Converter is not noly a fast and easy-to-use DVD Ripper program, but also a DVD Player, DVD Recorder, Audio Ripper program, which can play dvd, record the DVD movie you are
Dell Mobile Sync Version 1.0. Manual
 Dell Mobile Sync Version 1.0 Manual Copyright Information and Trademark Information. This document, like the software described therein, is provided as a license and may only be used or reproduced in accordance
SDA Application Software
 SDA Application Software a viewer software for Scalar's Digital/Analog Microscope SDA-1 USERS MANUAL Table of Contents [English Manual] Chapter 1 Introduction.. 3 1-1 About This Manual 3 1-2 Operating
North & South America Ulead Systems Inc. Support:
 User Guide Ulead Systems, Inc. May 2005 English edition for Ulead CD & DVD PictureShow 4, May 2005. 1992-2005 Ulead Systems, Inc. All rights reserved. No part of this publication may be reproduced or transmitted
Corel DVD MovieFactory 7
 Corel DVD MovieFactory 7 User Guide Corel TW Corp. March 2008 Corel DVD MovieFactory 7 Copyright 2008 Corel TW Corp. All rights reserved. No part of this publication may be reproduced or transmitted in
Getting Started. Microsoft QUICK Source 7
 Microsoft QUICK Windows Source 7 Getting Started The Windows 7 Desktop u v w x u Icon links to a program, file, or folder that is stored on the desktop. v Shortcut Icon links to a program, file, or folder
Center for Faculty Development and Support Creating Powerful and Accessible Presentation
 Creating Powerful and Accessible Presentation PowerPoint 2007 Windows Tutorial Contents Create a New Document... 3 Navigate in the Normal View (default view)... 3 Input and Manipulate Text in a Slide...
Scenarist BD Professional Plus The world standard for Blu-ray Disc authoring
 Scenarist BD Professional Plus The world standard for Blu-ray Disc authoring Scenarist is a comprehensive suite of powerful Blu-ray Disc creation tools that provide your business with everything you need
imovie Basics Open imovie (Click on Purple Star Icon) Click on File Click on 2015 Select New Event
 Click on File Click on 2015 Select New Event") imovie Basics 10.0.9 Open imovie (Click on Purple Star Icon) Click on File Click on 2015 Select New Event Rename the Event [Your first initial] [Your last name] Hit Return Click on New Select Movie Select
imovie Basics 10.0.9 Open imovie (Click on Purple Star Icon) Click on File Click on 2015 Select New Event Rename the Event [Your first initial] [Your last name] Hit Return Click on New Select Movie Select
Viewing and using your catalogue in the Library module, and exporting photos once done.
 Intro to Lightroom PH2-POD2-IL Adobe Photoshop Lightroom offers a complete environment for digital photography, from raw capture to creative output. Start with the Library module where you import images