Call Center Administration
|
|
|
- Matthew Conley
- 5 years ago
- Views:
Transcription
1 Hosted VoIP Phone System Blue Platform Admin Portal Guide for Call Center Administration
2 1 Table of Contents 1 About this Guide Accessing the Hosted VoIP Phone System Administration Portal Hosted VoIP Phone System Admin Portal Interface (Enterprise Administrators) Call Center (Enterprise Level Admin) Agent Unavailable Codes for all Enterprise Call Centers Adding Agent Unavailable Codes (Enterprise) Delete or Edit an Agent Unavailable Code (Enterprise) Call Disposition Codes Adding Disposition Codes for all Enterprise Call Centers Delete or Edit Call Disposition Codes for all Enterprise Call Centers Agent Default Settings for all Enterprise Call Centers Guard Timer Setting Agent Unavailable Settings for all Enterprise Call Centers Call Center Routing Policies for all Enterprise Call Centers Call Center Enhanced Reporting Branding Call Center External Reporting Settings Hosted VoIP Phone System Admin Portal Interface (Group Administrators) Accessing Call Center Configurations (Group Admin) Navigating to the Dashboard Navigating to the Group Services Call Centers Dashboard (Group Admin Interface) Call Centers Module (Group Admin Dashboard) Call Center Status Call Center Name Call Center Number Call Center Calls Call Center Settings Group Services (Group Admin) Call Center Call Center Profile Call Center Profile Announcements Page
3 8.1.3 Call Center Profile Distinctive Ringing Call Center Dialed Number Identification Service (DNIS) Call Center Profile Queue Notifications Call Center Call Disposition Codes Call Center Calling Features Call Center My Calls Query Call Details Sort By Query Call Details Date Range Query Call Details Include Query Call Details Search By Query Call Details Create Report Query Call Details Exporting Call Center Last 20 Calls Call Center Routing Policies for Individual Call Centers Call Center Forced Forwarding Call Center Holiday Service Call Center Night Service Call Center Bounced Calls Comfort Message Bypass Overflow Call Center Stranded Calls Call Center Utilities Call Center Enterprise Directory Call Center Document Repository Call Center Registrations Call Center Features Access Codes Call Center Navigation Hosted VoIP Phone System Admin Portal Interface (User Access) Call Center Agent (User Administration) Call Center Supervisor (User Administration) Client Applications (Calling Features) P age
4 1 About this Guide Call Center Administration The Call Center Administration Guide is designed to assist administrators with the configuration of existing Call Centers from multiple levels of administration through the Hosted VoIP Phone System Administration Web Portal. Access to all of the features and settings that are outlined within this guide will vary depending on the level of administrative access you have permission to as well as the type of Call Center your organization is licensed for. Additional information regarding the Hosted VoIP Phone System Administration Web Portal can be found in the following guides: Hosted VoIP Phone System Admin Portal Guide for Enterprise Administrators Hosted VoIP Phone System Admin Portal Guide for Group Administration Hosted VoIP Phone System Admin Portal Guide for User Administration 3 P age
5 2 Accessing the Hosted VoIP Phone System Administration Portal To access the Hosted VoIP Phone System Administration (Admin) Portal, navigate to on your web browser. When presented with the login page, enter your credentials for the Username and Password and then click on the Login button. If you have forgotten your password, click on the Forgot password? link and the system will provide you with a password reset option using Completely Automated Public Turing Test to Tell Computers and Humans Apart (CAPTCHA) technology. 4 P age

6 3 Hosted VoIP Phone System Admin Portal Interface (Enterprise Administrators) Once you have logged into the portal you will be presented with the following interface: 1 Navigation Drop-down menus These drop-down menus allow you to navigate from the Enterprise to a Group or directly to an individual user and vice versa. 2 Navigation Tabs These tabs will allow you to navigate between the different sections available to you based on the navigation drop-down menu that has been selected. The tabs will change if you have selected a group or user. 3 Menus This is where you will find the menu options available based for the current tab. These menu options will change for each tab. Many of the Menu Options will contain sub-options. This is indicated by a down arrow on the menu option. Mousing over the menu will provide you with a pop-up list of sub-options. 4 Search Generates a menu to find a specific Group or User using search fields. Available fields for Group search include: Group Name and Group ID. Available fields for User search include: Phone Number, First Name, Last Name, User ID, Group ID, and Department. 5 Username/Logout Shows the Logged In Username and the link to Logout. These will display statically as you navigate through the Hosted VoIP Phone System Admin Portal. 6 Help Menus Help Menus indicates that there is a help page available for options that are displaying on the current page. 5 P age

7 4 Call Center (Enterprise Level Admin) Call Center Administration Access the Call Center Settings for Enterprise from the Call Center tab. The Call Center Settings for Enterprise allow you to configure certain settings that will apply to all Call Centers assigned with all groups of the enterprise. The Call Center settings available at the enterprise level include: Agent Unavailable Codes Call Disposition Codes Agent Default Settings Call Center Routing Policies Call Center Enhanced Reporting Branding Call Center External Reporting Settings 6 P age
8 4.1 Agent Unavailable Codes for all Enterprise Call Centers Call Center Administration Agent Unavailable Codes assigned here will be available to agents in all Call Centers assigned to groups within the enterprise through their ACD state drop-down option in the Call Center graphical user interface (GUI). From this section, you may add, edit, and delete custom unavailable codes and then assign default codes for agent actions. For example, a code B with the description of BREAK can be created and made active. This code can then be assigned as the Default Code on Do Not Disturb activation so that any time an agent in a Call Center within the enterprise activates the do not disturb feature, their ACD state will automatically become B BREAK. 7 P age

9 4.1.1 Adding Agent Unavailable Codes (Enterprise) 1. Click the Add button at the bottom of the section. 2. A pop-up box will appear with options for: Active, Code, Description. 3. Check the Active box to make the code usable. Enter the desired code and description. The code may only be 10 characters long. 4. Click the Add button Delete or Edit an Agent Unavailable Code (Enterprise) To Delete an Agent Unavailable Code: 1. Check the box immediately preceding the code(s) you want to delete. 2. Click on the Delete button. 3. A system text box will pop up stating Confirm to delete checked Unavailable Code. Click the Delete button. The page will refresh and the code(s) will no longer be available. 8 P age
10 To Edit an Agent Unavailable Code: 1. Check the box immediately preceding the code you want to edit. 2. Click the Edit button. Note: If multiple codes are selected, the Edit button will be unavailable (greyed out). 3. The Edit Unavailable Code box will appear with the same options available when adding a new code. From here you may uncheck the Active box to make the code unavailable or change the description. The actual code cannot be changed. If you want to change the actual code, you must create the desired code as a new code and add the desired description, then delete (or deactivate) the old code. 4. Click the Save to keep changes. 9 P age
11 4.2 Call Disposition Codes Call Disposition Codes can be assigned to calls during or immediately after a call through the Call Center GUI by an agent. Call Center Supervisors and group administrators may then use the Call Center reporting feature to access reports with the disposition codes in order to analyze call trends. This section allows you to display, add, edit, and remove Call Disposition Codes that can be used in any Call Center configured in you enterprise Adding Disposition Codes for all Enterprise Call Centers 1. Click the Add button at the bottom of the Call Disposition Codes section. 2. The Add Disposition Code box will appear. Check the Active box to make the code available, enter in a Code and Description. The actual code may only be 10 characters long. 3. Click Add to save the new code. 10 P age

12 4.2.2 Delete or Edit Call Disposition Codes for all Enterprise Call Centers To Delete a Call Disposition Code: 1. Place a check in the box immediately preceding the code(s) you want to delete. 2. Click on the Delete button. Call Center Administration 3. The Delete Disposition Codes confirmation window will pop-up asking you Confirm to delete Disposition Codes. Click on the Delete button. The page will refresh and the selected code(s) will no longer be available. To Edit a Call Disposition Code: 1. Place a check in the box immediately preceding the code you want to edit. 2. Click on the Edit button. Note: If multiple codes are selected, the Edit button will be unavailable (greyed out). 3. The Edit Disposition Code window will populate with the same options available when adding a new code. From here you may uncheck the Active box to make the code unavailable or change the description. The actual code cannot be changed. If you want to change the actual code, you must create the desired code as a new code and add the desired description, then delete or deactivate the old code. 4. Click Save to keep changes. 11 P age
13 4.3 Agent Default Settings for all Enterprise Call Centers The Agent Default Settings provides you with access to setting the Guard Timer Setting and Agent Unavailable Settings Guard Timer Setting The purpose of the Guard Timer is to allow a delay between calls to agents without using call wrap-up in situations where the agent uses a device such as an analogue phone that has hook status unaligned with call status or where regulatory requirements specify minimum call inter-arrival times for agents. For the Use Guard Timer Setting, select Default or Enterprise. Then select Enable guard timer and set the amount of time from the Seconds drop-down list to configure the amount of time. To save your changes, click the Save button for this section Agent Unavailable Settings for all Enterprise Call Centers Agent Unavailable Settings for Call Center allow you to force agents into an unavailable ACD state when certain criteria are met. The following options are available (administrators can select one or more options at a time): Force Agent to unavailable on Do Not Disturb activation Force Agent to unavailable on personal calls For agent to unavailable after x consecutive bounces Force Agent to unavailable on not reachable To save your changes, click the Save button for this section. 12 P age
14 4.4 Call Center Routing Policies for all Enterprise Call Centers Call Center Routing Policies allow you to determine how calls should be routed to agents when there are agents assigned to multiple Call Centers. The routing policy options available are Longest Wait Time and Priority Order. By default, this option is set to the Longest Wait Time so that the oldest call in queue is routed first. Selecting Priority Order allows you to rank the Call Centers assigned in your enterprise in order of importance (1 being the highest). Calls in the highest ranked Call Center will be distributed to agents first, then the second Call Center, and so on. 4.5 Call Center Enhanced Reporting Branding This section is used to change the branding of Call Center reports for your enterprise. It allows you to specify whether you want to use system-level or custom branding. To use system-level branding, select System or to provide custom branding, select Custom. If you selected custom branding, upload a branding file by clicking the Choose File button and then navigate to the file on your local or network drive. Save your changes by clicking on the Save button for this section. 13 P age
15 4.6 Call Center External Reporting Settings The Call Center External Reporting Settings allow you to turn external reporting on or off. These settings apply to all Call Centers in your enterprise. To turn external reporting off select Off and then click the Save button for this section. Reports will only be available through the Call Center GUI. To turn external reporting on, select Enhanced and then click on the Save button for this section. 14 P age


16 5 Hosted VoIP Phone System Admin Portal Interface (Group Administrators) To configure settings for an individual Call Center, you must enter the Group Administration for that Call Center. An enterprise level administrator may use the drop-down navigation boxes located at the left side panel of the screen. Group level administrators will have separate login credentials. Note: Group level administrators do not have the ability to access Enterprise settings previously covered in this document. Once you have logged into the Group Admin Portal, you will be presented with the following interface: P age
17 1 Username/Logout Shows the Logged In Username and the link to Logout. These will display statically as you navigate through the Hosted VoIP Phone System Admin Portal. 2 Help Menus Help Menus indicates that there is a help page available for options that are displaying on the current page. 3 Search Generates a menu to find a specific Group or User using search fields. Available fields for Group search include: Group Name and Group ID. Available fields for User search include: Phone Number, First Name, Last Name, User ID, Group ID, and Department. 4 Navigation Drop-down menus These drop-down menus allow you to navigate from the Group directly to an individual user and vice versa. 5 Navigation Tabs and Menus These tabs will allow you to navigate between the different sections available to you based on the navigation drop-down menu that has been selected. The tabs will change if you have selected user. Some tabs will also contain menu options and submenu options. Mousing over the menus will provide you with a pop-up list of sub-options. 6 Accessing Call Center Configurations (Group Admin) Group Level Call Center Administration can be accessed through the Dashboard or through Group Services tab. Although these are two separate tabs that initially provide you with different settings up front, they will both ultimately provide you with access to the Call Center s individual configuration. 6.1 Navigating to the Dashboard Once you have entered the Group Level Administration Portal you will immediately be presented with the Dashboard tab. Scroll down on this tab to locate the section labeled Call Centers. This will display a list of all Call Centers configured in your Group. Proceed to Section 7 Dashboard, to read more about using the Dashboard to configure your Call Centers. 16 P age

18 6.2 Navigating to the Group Services Call Centers Once you have entered the Group Level Administration Portal, click the Group Services tab. Depending on the services you have assigned to your Group you will be presented with Site Service settings. If you are not immediately presented with Call Center settings, click on the Site Services menu and choose Call Center from the drop-down menu. Once you are viewing the Call Center settings, you will be provided with access to creating Agent Unavailable Codes, Disposition Codes, and Routing Policies for all Call Centers in your Group. Use the drop-down box to select a specific Call Center and access an individual Call Center s settings. Proceed to Section 8.1 Call Center to read more about using the Group Services tab to configure your Call Centers. 17 P age
19 7 Dashboard (Group Admin Interface) Call Center Administration The Dashboard is the first tab presented to you when you login to the Hosted VoIP Phone System Admin Portal for Group Administration. It contains the Users, Call Centers, Group Paging, Hunt Groups, and Meet-Me Conferencing modules. There are no additional menus available in the Dashboard. 7.1 Call Centers Module (Group Admin Dashboard) The Call Centers module of the Dashboard will only be available if you have one or more Call Centers assigned to your group. The Call Centers module contains fields for: Status, Name, Number, Calls, and Settings Call Center Status The Status field within the Dashboard provides phone registration information. The Call Center Status field does not perform any action because the Call Center is not tied to one specific telephone. Clicking on it will not produce any result Call Center Name The Name field will provide you with access for changing the Name of the Call Center as well as the Calling Line ID (CLID) appearance (First Name and Last Name) for calls generated from the Call Center. Note that changes made here will only affect calls made to other Hosted VoIP Phone System users. To make changes to off net calling parties please contact Buckeye Telesystem at To make changes, type the desired names into the appropriate fields, and then click the Save button to keep your changes. Click the Cancel button to discard your changes. 18 P age
20 7.1.3 Call Center Number The Phone Number field displays the DID number and/or extension assigned to the particular Call Center. A Call Center with no phone number or extension assigned will show (none). This field is not clickable and not will produce an action Call Center Calls The Calls tab will display the last three calls logged by the system for the Call Center. If there are no recent calls it will display No Recent Calls. The call information will display the following information: Inbound or Outbound Shows for inbound calls and for outbound calls. # Shows the other party s phone number or extension. Date and Time Displays the date and time of the call record. Type Displays inbound or outbound to indicate the type of call. A link labeled View Call Details is available that will open a new browser tab or window and allow you to generate more detailed call detail reports and view more call detail records. 19 P age
21 7.1.5 Call Center Settings The Call Center Settings tab provides you with immediate access to the Group Policy, Call Center Routing Policies, Agents, and Supervisors assigned to the Call Center. 20 P age
22 A link is also available in the lower, right-hand corner of the module to access Detailed Settings for the Call Center. Clicking on this link will open a new browser window or tab that will provide you with access advanced Call Center settings. 21 P age
23 Call Center Group Policy for Call Routing The following options are available for setting the Group Policy of a Call Center: Call Center Administration Circular Regular Simultaneous Uniform Weighted Call Distribution Incoming calls hunt through agents in the order they appear on the list, starting with the agent following the last agent to receive a call. When the search reaches the end of the list, it loops back to the top and continues until it has tried all users. After it has tried all agents a forward number must be setup in the No Answer field to route calls or calls will hear ringing followed by a message indicating all circuits are busy. Incoming calls hunt through agents in the order they appear on the list, starting from the top each time. Incoming calls alert all agents at the same time. The first agent to answer handles the call. Incoming calls hunt through all agents in order, starting with the agent who has been idle the longest and ending with the agent who most recently answered a call. Incoming calls are assigned to idle agents based on percentages you assign on the Call Center s Profile Weighted Call Distribution page. The percentages for all agents must add up to 100%. Selecting Weighted Call Distribution and then clicking on the Edit link here will open the Call Center Profile page. 22 P age
24 Call Center Routing Policies The Call Center Routing Policies are available for you to determine what action the Call Center should perform when a large number of calls have been received or calls have been waiting longer than a configured threshold. Available options include: Enable overflow after calls wait x seconds Perform busy treatment Transfer to phone number Play ringing until caller hangs up By checking this box and setting the number of seconds, callers will wait in queue until an agent answers the call or the threshold is met. If the threshold in met, one of the overflow actions listed below are taken. Calls that are determined to be Overflow Calls will receive a busy signal. Selecting this option provides the option to enter a number into a text box where Overflow Calls will be forwarded to. This may be used to send callers to a backup Call Center or messaging system. Calls that are designated as Overflow Calls will receive constant ringing but the call will not be distributed to an agent. The Call Center Details page provides you with options to play an announcement before overflow processing. A default announcement can be selected or a custom announcement may be uploaded and played to callers. 23 P age
25 Call Center Agents The Agents section will allow you to assign agents to the Call Center. It contains two lists. On the left, you will see any users in your group that have an Agent License assigned to them, on the right you will see agents that are currently assigned to the selected Call Center. Add an agent to the Call Center by clicking on their name on the left in the Available Users box, and then clicking the Add button. This will move them to the Assigned Users box on the right. Remove agents by clicking on their name right in the Assigned Users box, and then clicking the Remove button. This will move them to the Available Users box on the left. Add all Available Users by clicking on the Add All button. Any user that was listed in the Available Users box will now be in the Assigned Users box. Remove all agents from the Call Center by clicking on the Remove All button. All agents that were in the Assigned Users box will now be in the Available Users box. 24 P age
26 Call Center Supervisors The Supervisors section will allow you to assign supervisors to the Call Center. It contains two lists. On the left, you will see any users in your group that have a Supervisor License assigned to them, on the right you will see supervisors that are currently assigned to the selected Call Center. Add a supervisor to the Call Center by clicking on their name on the left in the Available Supervisors box, and then clicking the Add button. This will move them to the Assigned Supervisors box on the right. Remove supervisors by clicking on their name in the Assigned Supervisors box, and then clicking the Remove button. This will move them to the Available Supervisors box on the left. Add all Available Supervisors by clicking on the Add All button. Any supervisor that was listed in the Available Supervisor box will now be in the Assigned Supervisor box. Remove all supervisors from the Call Center by clicking on the Remove All button. All supervisors that were in the Assigned Supervisor box will now be in the Available Supervisor box. Once a supervisor has been assigned to a Call Center, agents can be assigned from the user s personal profile page under the Call Control heading through the feature labeled Call Center Supervisor using the Edit option. 25 P age
27 8 Group Services (Group Admin) The Group Services tab contains the following menus: Site Services o Broadworks Anywhere o Call Center o Call Park o Call Pickup o CommPilot Call Manager o Group CLID o Group Paging o Hunt Group o Instant Call Group o Meet-Me Conferencing o Music On Hold o Virtual On Net Extensions Calling Plans o Calling Plans o Account/Auth Codes FAC (Feature Access Codes) NOTE: The Site Services that display here will vary depending on the features and licenses assigned to your group. 26 P age

28 8.1 Call Center You can access Call Center from the Site Services menu on the Group Services tab. When you initially access Call Center you will be presented with a drop-down box with all of the Call Centers configured for your group available. Choose the Call Center you would like to view or edit from the drop-down box. The page will refresh and you will be taken to the Call Center Profile page. From here you can navigate to the Profile, Calling Features, My Calls, Call Center Routing Policies, and Utilities tabs for the Call Center. 27 P age
29 8.1.1 Call Center Profile The Call Center Profile page is broken down into the following sections: Profile Settings Bandwidth and QoS Settings Call Center Settings Agent Settings Agents Supervisors It also has the following menu options available: Announcements Distinctive Ringing Call Center DNIS Queue Notifications Call Disposition Codes Call Center Administration Profile Settings The Profile Settings section of the Call Center Profile tab provides the following information: Call Center ID Phone Number Call Center Type Name Calling Line ID Department Language Time Zone Group Policy Statistics This is the identifier for the Call Center configured by an Administrator. This is the phone number for the Call Center. This will display if you have a Standard or Premium Call Center. This will be important as some features are only available in Premium Call Centers. This is the name of the Call Center. These fields can be set so that calls made through the Call Center s GUI are labeled with the Last Name and First Name set here for the called line s caller ID information. This drop-down box allows you to select a specific department that this Call Center may be assigned to. Sets the default language for the Call Center. Sets the default time zone for the Call Center. Options for Circular, Regular, Simultaneous, Uniform, and Weighted Call Distribution. For more information about the available policies see Section Call Center Routing Policies. Click on the Edit button to gain access to the Statistics pop-up. From here you can manage reporting information such as the Statistic Source, Reporting Period, and E- mail address (es) where the report will be sent. 28 P age
30 The Call Routing Policies are available in section Call Center Routing Policies Bandwidth and QoS Settings The Bandwidth and QoS (Quality of Service) settings allow you to choose the preferred announcement/music codec for external and internal calls. The options for these settings are: None G711 G726 G729 AMR 29 P age
31 Call Center Settings The Call Center Settings section of the Call Center Profile allows you to determine the following options: Queue Length Play ringing when offering call Enable Call Center External Reporting All callers to dial x to escape out of queue Reset caller statistics upon entry to queue Set the maximum number of calls that can be in the Call Center s queue. Any calls after this will be considered overflow calls (Section Error! Reference source not found. Error! Reference source not found.). Set this option if you want your callers to hear ringing when the call is presented to a Call Center agent. Enable this option to allow for group administrators to access reports using the Hosted VoIP Phone System Admin Portal without accessing the Call Center GUI. Enable this option to allow for callers who are waiting in queue to dial a specified digit to have their call redirected (different phone number or voic ). Additional features are required for this option to work. Enabling this option will treat all calls into the Call Center as a new call. If this option is disabled, then a call that was active in a different Call Center will carry with it the active call handle statistics which will automatically promote it higher in the queue to decrease that caller s wait times. This may also cause callers who were already in the queue to be repositioned Agent Settings From the Agent Settings section you may enable or disable the following options: Allow agents to join Call Centers Allow Call Waiting on agents Enable calls to agents in wrapup state Enable maximum ACD wrapup timer x seconds Automatically set agent state to after call Automatically answer calls after waiting x seconds Enabling this option will allow an agent to join or remove themselves from receiving calls from a Call Center via their agent portal settings. Enabling this option will allow an agent who has the Call Waiting feature assigned and activated to receive calls distributed by the Call Center while they are already on a call. Enabling this option will allow the Call Center to distribute calls to agents while their ACD state is set to wrap-up if no other agents are available. Enabling this option allows you to configure the maximum amount of time an agent may have their ACD state set to wrap-up. Once the time expires the agent s ACD state is automatically set to Available. Enabling this option allows you to configure the default agent state immediately after a call. The agent can manually update their ACD state after this is set. Enabling this option allows you to configure an auto answer for your agents. This is only recommended if your agents wear headsets. Without a headset this may put the caller on speakerphone. 30 P age
32 Agents The Agents section will allow you to assign agents to the Call Center. It contains two lists and a Search field. On the left, you will see any users in your group that have an Agent License assigned to them, on the right you will see agents that are currently assigned to the selected Call Center. You can also use the Search field to locate a specific user with an agent license assigned to them. To search, set the department field and search by Last Name and/or First Name and click the Search button. Add an agent to the Call Center by clicking on their name on the left in the Available Users box, and then clicking the Add button. This will move them to the Assigned Users box on the right. Remove agents by clicking on their name right in the Assigned Users box, and then clicking the Remove button. This will move them to the Available Users box on the left. Add all Available Users by clicking on the Add All button. Any user that was listed in the Available Users box will now be in the Assigned Users box. Remove all agents from the Call Center by clicking on the Remove All button. All agents that were in the Assigned Users box will now be in the Available Users box. 31 P age
33 The Assigned Users box will dictate how calls are routed to agents for some Group Policies. Modify the list using the Move Up and Move Down buttons below the Assigned Users box to determine where agents will be in the list for call routing. 32 P age
34 Call Center Supervisors The Supervisors section will allow you to assign supervisors to the Call Center. It contains two lists and a search field. On the left, you will see any users in your group that have a Supervisor License assigned to them, on the right you will see supervisors that are currently assigned to the selected Call Center. You can also use the Search field to locate a specific user with an agent license assigned to them. To search, set the department field and search by Last Name and/or First Name and click the Search button. Add a supervisor to the Call Center by clicking on their name on the left in the Available Supervisors box, and then clicking the Add button. This will move them to the Assigned Supervisors box on the right. Remove supervisors by clicking on their name right in the Assigned Supervisors box, and then clicking the Remove button. This will move them to the Available Supervisors box on the left. Add all Available Supervisors by clicking on the Add All button. Any supervisor that was listed in the Available Supervisor box will now be in the Assigned Supervisor box. Remove all supervisors from the 33 P age
35 Call Center by clicking on the Remove All button. All supervisors that were in the Assigned Supervisor box will now be in the Available Supervisor box. Once a supervisor has been assigned to a Call Center, agents can be assigned from the user s personal profile page under the Call Control heading through the feature labeled Call Center Supervisor using the Edit option. For detailed information see section Error! Reference source not found. Error! Reference source not found.. NOTE: A supervisor can be assigned as an agent as well if you want the Call Center to also distribute calls to the supervisor as an agent. The supervisor will still have the Supervisor GUI when they log into the Call Center and continue to be able to receive escalations Call Center Call Policies This section is used to modify the Call Policies for the Call Center. The Connected Line Identification Privacy on Redirected Calls option applies to redirections before and after answer including Call Forwarding, Blind Transfer, Transfer with Consultation, Sequential Ring, and Simultaneous Ring. This option does not apply to services that are not considered redirections such as Automatic Hold/Retrieve, Call Pickup, Call Park, Directed Call Pickup, Directed Call Pickup with Barge-in, all types of Recalls, and so on. For Connected Line Identification Privacy on Redirected Calls, select one of the following options: No Privacy Privacy for External Calls Privacy for All Calls When this option is selected, the redirecting party allows the Connected Line Identification Presentation (COLP) of the redirect destination to be sent to the remote party. When this option is selected, the redirecting party allows the COLP of the redirect destination to be sent to the remote party only when the remote party is in the same Group as the redirecting party. If the remote party is not in the same Group as the redirecting party (viewed as a Network subscriber), then the COLP sent to the remote party is the COLP of the redirecting party, not the COLP of the redirect destination. When this option is selected the redirecting party never allows the COLP of the redirect destination to be sent to the remote party. The COLP sent to the remote party is always the COLP of the redirecting party, not the COLP of the redirect destination. 34 P age
36 For the Send Call Being Forwarded Response on Redirected Calls setting, select one of the following options: Never Internal Calls All Calls When this option is selected and the Application Server redirects a call, the Application Server does not generate a 181 response. When this option is selected and the originating user is the same group or enterprise as the redirecting user, the Application Server proxies or generates a 181 response. If the user redirects a call, a 181 response is proxied or generated. NOTE: 181 Responses received from network users are proxied, regardless of the setting for the user, if the Application Server is configured to do so at the system level. To save changes to the settings you have modified, click on the Save button in the bottom, left corner Call Center Profile Announcements You use this menu to customize the Call Center Entrance, Estimated Wait Message, Comfort, Music On Hold, and Call Whisper messages. Navigate between the different available Announcement Messages using the drop-down box. 35 P age
37 Entrance Message The Entrance message is the message that plays to callers waiting in a queue you can configure up to four files/urls for the entrance message. All four announcements are chained and play back to the caller one after another. Steps 1. Indicate if the entrance message plays to queued callers. 2. Specify if the entrance message is mandatory. 3. Specify the audio files to be used in the message 4. Save your changes or exit without saving. Details Check or uncheck Play entrance message. Check or uncheck Entrance message is mandatory when played. The entrance message plays to completion prior to routing the call. The call cannot be transferred or re-ordered while the mandatory entrance message is played. For the Audio files, select from the following: Default URL and then enter up to four URL addresses Custom and then select up to four custom files Click Browse next to each entry and then find and select the files. Click Clear next to an entry to clear the corresponding text box. This only clears the display and does not save changes. To save your changes, click Save 36 P age
38 Estimated Wait Message You use these settings to customize the estimated wait message that plays to callers waiting in a Call Center queue. The message provides callers either with the approximate waiting time or with their position in the queue. When the waiting time or queue position of the caller exceeds the configured maximum, you may choose to play the following message to the caller: We are experiencing a high volume of calls. Please hold. Steps 1. Enable or disable estimated wait message. 2. Select and configure the message option you want to use for this Call Center. 3. Save your changes or exit without saving. Details Check or uncheck Enable estimated wait message for queued calls. To announce updated wait times to callers at specified intervals, check the Play updated wait message every [X] seconds option and enter the desired interval (in seconds) in the box. To announce their position in the queue to callers, check Announce Queue position and in the Play message for callers in queue position [X] or lower text box, enter the maximum queue position to play this announcement to. The number must be from one through 100. o To play the high volume announce to caller whose position in the queue is higher than the configured maximum, check Play high volume message. To announce their approximate waiting time to callers, check the Announce wait time and in the Play message for callers with wait time of [X] minutes or lower text box, enter the maximum waiting time (in minutes) during which the message can play. The number must be from one through 100. o o To play the high volume message to callers whose estimated waiting time is longer than the configured maximum, check Play high volume message. In the Default handling time text box, enter the estimated handling time per-call (in minutes) to use when calculating the waiting time. NOTE: The estimated waiting time = ([position in queue * average call handling time]/number of agents available or wrap-up]). The default handling time is used when the average call handling time is not available. To save your changes, click the Save button. 37 P age
39 38 P age
40 Comfort Message Use this setting to customize the Call Center comfort message that plays to callers waiting in the queue. You may configure up to four files/urls for the message. All four announcements are chained and play back to the caller one after another. Steps 1. Indicate if the comfort message plays to users. 2. Specify the time between messages. 3. Specify the audio files to play in the message 4. Save your changes or exit without saving. Details Check or uncheck Play comfort message. In the Time Between Messages: [X] seconds, enter the time to elapse before replaying the comfort message. For the Audio files, select from the following: Default URL and then enter up to four URL addresses. Custom and then select up to four custom files. o Click Browse next to each entry and then find and select the files. o Click Upload To save your changes, click Save. 39 P age
41 Music On Hold Use these settings to customize the Call Center Music On Hold message that plays to callers waiting in the queue. You can configure up to four files/urls for the message. All four announcements are chained and play back to the caller one after another. You may also specify a different message to be played to internal callers. Steps 1. Indicate if the music or video plays to callers. 2. Specify the audio and video files to play in the message 3. Save your changes or exit without saving. Details Check or uncheck Enable music on hold for queued calls. For the Audio files, select from the following: Default URL and then enter up to four URL addresses. Custom and then select up to four custom files. o Click Browse next to each entry and then find and select the files. Click Upload External Source To save your changes, click Save. 40 P age
42 Call Whisper Message Use this setting to customize the Call Center whisper message that plays to agents answering a call while the caller receives ringing. The message typically tells the agent from which Call Center the call is coming (which is especially important when using Dialed Number Identification Service [DNIS] numbers). The caller continues to hear the Call Center treatment (such as ringing or a message) while the whisper message plays to the agent. You may configure up to four files/urls for the message. All four announcements are chained and play back to the caller one after another. Steps 1. Indicate if the whisper message plays to agents 2. Specify the audio or video files to play in the message. 3. Save your changes or exit without saving. Details Check or uncheck Play call whisper message. For the Audio or Video files, select from the following: Default URL and then enter up to four URL addresses Custom and then select up to four custom files o Click Browse next to each entry and then find and select the files. o Click Upload To save your changes, click the Save button. 41 P age
43 8.1.3 Call Center Profile Distinctive Ringing The Distinctive Ringing menu allows you to configure distinctive ringing policies for calls routed to agents in the specific Call Center. Steps 1. Enable or disable distinctive ringing. 2. Specify the ring pattern for regular calls delivered to agents. 3. Specify the ring pattern for calls for-delivered to agents (Call Center Premium) 4. Save your changes or exit without saving. Details Check Enable distinctive ringing for Call Center calls to enable distinctive ringing when calls in this Call Center are offered to agents; or leave unchecked to disable distinctive ringing for this Call Center. From the Ring Pattern drop-down list, select the ring pattern. From the Ring Pattern for forced delivered Call Center calls dropdown list, select the ring pattern. To save your changes, click Save. 42 P age
44 8.1.4 Call Center Dialed Number Identification Service (DNIS) Use this menu to view and manage the Dialed Number Identification Service (DNIS) telephone numbers configured for the Call Center. The Call Center primary phone number is treated as the Call Center s primary DNIS and listed on this page, but cannot be added or removed. The primary DNIS is indicated with (Primary) next to the name. Tasks To configure queue-level DNIS settings (display and priority) for the Call Center: Steps 1. For DNS Display settings: If you want the Call Center DNIS number and DNIS name to display to agent device instead of the Call Center Calling Number and Calling Name, check: Display DNIS Number to agent when presenting call instead of Calling Number Display DNIS Name to agent when presenting call instead of Calling Name 2. For DNS Priority settings: To prevent lower priority calls from being stranded, allow lower priority calls waiting in the queue longer than the specified amount of time to be promoted to the next higher priority. Check Automatically promote calls with priority 1 to priority 0 after waiting [x] seconds and specify the waiting time in seconds. Check Automatically promote calls with priority 2 to priority 1 after waiting [x] seconds and specify the waiting 43 P age
45 To assign a DNIS to the Call Center: To view, modify, or delete a DNIS: time in seconds. Check Automatically promote calls with priority 3 to priority 2 after waiting [x] seconds and specify the waiting time in seconds. For example, if you check Automatically promote calls with priority 3 to priority 2 after waiting [x] seconds and set X to 600, calls with priority 3 waiting in the queue longer than 10 minutes are promoted to priority Click Save. Select Add New from the drop-down menu. See Add Dialed Number Identification Service below. Select a DNIS from the drop-down menu, and settings for that entry will load Adding a DNIS This section allows you to assign a DNIS telephone number to the Call Center using the drop-down box below the Edit DNIS header, choose Add New... then complete the following tasks and steps: Steps Details 1. Enter the DNIS Name In the DNIS Name box, enter the name for this DNIS number; for example, Technical Support or Reception. This is the name that displays to agents when presenting calls to them if the option to display the DNIS instead of the calling number is enabled for the Call Center. This is a required field. 2. Select the phone number. From the Phone Number drop-down list, select the number to assign to this DNIS. 3. Assign the priority to assign to calls received on this DNIS. 4. Configure the DNIS Calling Line ID attributes. From the Priority drop-down list, select the priority for this DNIS number. 0 represents the highest priority. This priority is attached to incoming calls received on this DNIS number, and calls are distributed to agents based on their priority. In the Calling Line ID box, enter the Calling Line ID (CLID) for the DNIS. To use a custom name for the DNIS Calling Line ID, check Use custom Calling Line name settings and enter the custom calling line first and last name in the Calling Line ID Last name and Calling Line ID First Name boxes. o The Use custom Calling Line name settings option determines whether the DNIS level CLID values override the Call Center level CLID name values. If the option is enabled, the DNIS Calling Line ID Last Name and the DNIS Calling Line ID First Name are used for all outgoing calls. If the option is disabled, the Call Center s CLID last and first name are used instead. 44 P age
46 5. Specify whether to use custom announcements for this DNIS. 6. Specify whether outgoing calls are allowed using this DNIS. Call Center Administration NOTE: The DNIS Calling Line ID attributes are read-only for administrators who have the Calling Line ID Access set to readonly at the administrator or group level. To use custom announcement settings, check Use Custom DNIS announcement settings. To allow outgoing calls using this DNIS number, check Allow outgoing Call Center call. 7. Save your changes. Click Save. 8. Configure custom Select the announcement to change from the drop-down menu. announcements settings. See DNIS Announcements below. 45 P age
47 DNIS Announcements Use this section to customize the messages that play to callers for calls received on this Dialed Number Identification Service (DNIS) phone number and agents staffed in the queue. When custom announcements are enabled for the DNIS, these messages play to callers instead of the Call Center message. Message options include Entrance, Estimated Wait, Comfort, Music on Hold, and Call Whisper. The options can be selected from the drop-down menu to load and configure additional settings. You can configure up to four files/urls for the DNIS message. All four announcements are chained and play back to the caller one after another DNIS Entrance Message The Entrance message is the message that plays to callers when they initially call into the queue for calls received on this DNIS phone number. When custom announcements are enabled for the DNIS, this message plays to callers instead of the Call Center message. You can configure up to four files/urls for the entrance message. All four announcements are chained and play back to the caller one after another. Steps 1. Specify if the entrance message plays to the queued callers 2. Specify if the entrance message is mandatory. 3. Specify the audio and video files to be used in the message 4. Save your changes or exit without saving. Details Check or uncheck Play entrance message. Check or uncheck Entrance message is mandatory when played. The entrance message plays to completion prior to routing the call. The call cannot be transferred or re-ordered while the mandatory entrance message is played. For the Audio or Video files, select from the following: Default URL and then enter up to four URL addresses Custom and then select up to four custom files Click Browse next to each entry and then find and select the files. Click Upload To save your changes, click Save 46 P age
48 DNIS Estimated Wait Message Use these settings to customize the estimated wait message that plays to callers waiting in a Call Center queue for calls received on this DNIS phone number. When custom announcements are enabled for the DNIS, this message plays to callers instead of the Call Center message. The message provides callers either with the approximate waiting time or with their position in the queue. When the waiting time or queue position of the caller exceeds the configured maximum, you can choose to play the following message to the caller: We are experiencing a high volume of calls. Please hold. Steps 1. Enable or disable estimated wait message. 2. Select and configure the message option you want to use for this Call Center. Details Check or uncheck Enable estimated wait message for queued calls. To announce updated wait times to callers at specified intervals, check the Play updated wait message every [X] seconds option and enter the desired interval (in seconds) in the box. To announce their position in the queue to callers, check Announce Queue position and in the Play message for callers in queue position [X] or lower text box, enter the maximum queue position to play this announcement to. The number must be from one through 100. o To play the high volume announce to caller whose position in the queue is higher than the configured maximum, check Play high volume message. 47 P age
49 To announce their approximate waiting time to callers, check the Announce wait time and in the Play message for callers with wait time of [X] minutes or lower text box, enter the maximum waiting time (in minutes) during which the message can play. The number must be from one through 100. o To play the high volume message to callers whose estimated waiting time is longer than the configured maximum, check Play high volume message. o In the Default handling time text box, enter the estimated handling time per-call (in minutes) to use when calculating the waiting time. 3. Save your changes or exit without saving. NOTE: The estimated waiting time = ([position in queue * average call handling time]/number of agents available or wrap-up]). The default handling time is used when the average call handling time is not available. To save your changes, click the Save button. 48 P age
50 DNIS Comfort Message Use this setting to customize the Call Center comfort message that plays to callers waiting in the queue, for calls received on this DNIS phone number. When custom announcements are enabled for the DNIS, this message is played to callers instead of the Call Center message. You can configure up to four files/urls for the message. All four announcements are chained and play back to the caller one after another. Steps Details 1. Indicate if the comfort message plays to Check or uncheck Play comfort message. users. 2. Specify the time between messages. In the Time Between Messages: [X] seconds, enter the time to elapse before replaying the comfort message. 3. Specify the audio files to play in the For the Audio or Video files, select from the following: message Default URL and then enter up to four URL addresses. Custom and then select up to four custom files. o Click Browse next to each entry and then find and select the files. 4. Save your changes or exit without saving. o Click Upload. To save your changes, click Save. 49 P age
51 DNIS Music On Hold Message Use these settings to customize the Call Center Music On Hold message that plays to callers when an agent has placed the caller on hold for calls received on this DNIS phone number. When custom announcements are enabled for the DNIS, this message plays to callers instead of the Call Center message. You can configure up to four files/urls for the message. All four announcements are chained and play back to the caller one after another. You can also specify a different message to be played to internal callers. Steps 1. Indicate if the music or video plays to callers. 2. Specify the audio and video files to play in the message 3. Specify the alternate source for internal messages. 4. Save your changes or exit without saving. Details Check or uncheck Enable music on hold for queued calls. For the Audio files, select from the following: Default URL and then enter up to four URL addresses. Custom and then select up to four custom files. o Click Browse next to each entry and then find and select the files. o Click Clear next to an entry to clear the corresponding text box. This only clears the display and does not save changes. External Source To play a different message to internal callers, check Use Alternate Source for Internal Calls and specify the Audio or Video files to play for internal calls. Select from the following: Default URL and then enter up to four URL addresses. Custom and then select up to four custom files. o Click Browse next to each entry and then find and select the files. o Click Upload. External Source To save your changes, click Save. 50 P age
52 DNIS Call Whisper Message Use this setting to customize the Call Whisper message that plays to agents for calls received from this DNIS phone number. When custom announcements are enabled for the DNIS, this message plays to agents answering a call from the DNIS instead of the Call Center whisper message. The message typically tells the agent from which Call Center the call is coming (which is especially important when using Dialed Number Identification Service [DNIS] numbers). The caller continues to hear the Call Center treatment (such as ringing or a message) while the whisper message plays to the agent. You can configure up to four files/urls for the message. All four announcements are chained and play back to the caller one after another. Steps 1. Indicate if the whisper message plays to agents 2. Specify the audio or video files to play in the message. 3. Save your changes or exit without saving. Details Check or uncheck Play call whisper message. For the Audio or Video files, select from the following: Default URL and then enter up to four URL addresses Custom and then select up to four custom files o Click Browse next to each entry and then find and select the files. o Click Upload. To save your changes, click the Save button. 51 P age

53 8.1.5 Call Center Profile Queue Notifications The Queue Status Notification feature provides a mechanism for sending the Call Center status to the Dashboard in the Call Center GUI. This allows users to get a visual indicator of the Call Center status and modify their call handling behavior appropriately. Use this menu to configure queue status notification settings. Steps Details 1. Enable status notification. Check Enable notification of queue status to agent device to activate the feature. 2. Configure notification If you want a notification sent to agents when a queue exceeds a thresholds. specified number of calls, check Number of calls in queue and enter the number of calls. If you want a notification sent to agents when the call waiting time for a queue exceeds a specified number of seconds, check 3. Save your changes or exit without saving. Longest waiting time and enter the time in seconds. Click Save. 52 P age
54 8.1.6 Call Center Call Disposition Codes Disposition Codes are additional attributes that agents can apply to calls. This allows agents to tag calls for marketing promotions, topics, and so on. Call Disposition Codes can be created at either the Enterprise level or Group Call Center level. You use this page to view the Call Disposition Codes for the selected Call Center, including Enterpriselevel disposition codes, activate or deactivate Call Center-level disposition codes, and specify default behavior for using disposition codes in the selected Call Center. From this menu, you can also access pages to: Create disposition codes for the selected Call Center Modify or delete Call Center-level disposition codes Tasks To set Call Center disposition calls defaults: To activate or deactivate a Call Center disposition code: To look for specific disposition codes: To create a disposition code for the Call Center: To modify or delete a Call Center disposition code: Steps 1. To enable the use of disposition codes, check the Enable call disposition codes box. 2. To use enterprise-level disposition codes in this Call Center, check Use enterprise codes in addition to Call Center codes. 3. To force the use of disposition codes, check the Force use of call disposition codes with Default code and select the code to use from the drop-down list. 4. To save your changes, click Save. 1. Select a column to edit. 2. Click Edit. 3. Check or uncheck the Active box. NOTE: Enterprise-level disposition codes are activated by enterprise administrators. Enter the search criteria and click Find. Click Add. Enter a code and description and click Add. 1. Select an entry you want to edit and click Edit. 2. Check the boxes beside the entries to delete, and click Delete. NOTE: Enterprise-level disposition codes are managed by enterprise administrators. 53 P age
55 8.1.7 Call Center Calling Features The Calling Features tab provides you with access to view and modify any call features that have been assigned at a group level for use with the Call Center such as Call Forwarding which may be used to allow a caller to dial 0 to escape from the queue Call Center My Calls The My Calls tab provides you with the ability to Query Call Details and to obtain Call Detail Records (CDRs) for the Call Center. From the Call Center level you will have the options for: Queue Call Details or Last 20 Calls. 54 P age

56 8.1.9 Query Call Details Sort By This option will allow you to select specific criteria to generate your report: Call Center Administration The following options are available when sorting: Start date/time Answer time Release date/time Call duration User phone From phone To phone Call type Call result Call category Each of these can be sorted in descending or ascending order. 55 P age

57 Query Call Details Date Range The date range allows for calendar dates to be selected for the period of time that you would like your results to include. Date range is formatted in the following format: MM/DD/YYYY. You may click the calendar icon next to each text box and select a date by clicking on it within the pop up calendar. 56 P age
58 Query Call Details Include You will have the option to indicate the types of calls you would like included in the query. The following options are available: Inbound Calls Missed Calls Outbound Calls Check or uncheck the box preceding the option as desired Query Call Details Search By You will have the option to only return results for a specific phone number or partial phone number. If you only want to see calls made to , you can type into the field labeled: Search by full or partial telephone number. NOTE: When searching for a number, do not add dashes, periods, or spaces. Just enter the 10 digits for the phone number as a string and perform the search. The output will match the search results exactly. 57 P age

59 If you want to search for calls made to the 734 area code, you can type 734 into the box labeled Search by full or partial telephone number. Be aware that anytime the string 734 shows up in your call history, it will return the result. So a search for 734 will return as well as Query Call Details Create Report The Create Report button will cause the query to run based on the criteria you have entered. The data will display at the bottom of the page in HTML format. The end result will contain the following information: Index The index will identify which row of data you are displaying. Enterprise Indicates what Enterprise within the organization the User ID is assigned to. Group Indicates what Group of the Enterprise hierarchy the User ID is assigned to. Department Indicates what Department of the Group hierarchy the User ID is assigned to. Account Code Unsupported field User ID The User ID is your phone number set as a fully qualified domain name. Example @combuckeye.com Phone Number Your phone number with the +1 prefix. For example Call Type Displays Normal Calling Number This will display the phone number party that originated the call. The format will display the same as the Phone Number field. Called Number This will display the phone number of the party that received the call. The format will display the same as the Phone Number field. Caller Name This will display the caller ID name of the party you are speaking with if that caller is part of your Enterprise Directory. 58 P age
60 Call Date Call Time Answer Date/Time Release Date/Time Call Direction Call Duration Answer Indicator Call Category Special Call Type Displays the date of the call. The date is displayed in MM/DD/YYYY format. Displays the time of the call. The time is displayed in a 12-hour format with a leading 0 for single digit hours. AM and PM is not specified. Displays the date when the call was initially answered with the time for when the call was answered. This information will only display if the receiving party actually answers the phone. Unanswered calls will not display a result. The date and time follow the same formatting as the Call Date and Call Time. This displays the time when the call was terminated. An unanswered call will display a release date and time. The date and time follow the same formatting as the Call Date and Call Time. Indicates if the call is Originating (outgoing) or Terminating (incoming) from your perspective. Displays the amount of time you participated in the call. This is shown in HH:MM:SS format. Indicates if the call was answered with a Yes or No, or if the call went to voic (Yes Post Redirection). Values such as: Interlat, Intralat, local, other, private Indicates if a call feature was used in order to handle this call. NOTE: The HTML output is only capable of displaying 500 entries. If your report criterion exceeds 500 entries it is advised that you use of the Export options available below or narrow your date range Query Call Details Exporting You have the option to export data via three methods: PDF CSV 59 P age
61 Exporting to The to: option provides a user with the ability to select report criteria and then specify an address to which the report details will be sent to. After you enter an address, click the Submit button. You will see a notification to the right of the button that the report is being generated and then a notice that will show sent. If there is a problem with the address in the to: field you will see a message that states Please provide valid . The address must follow the standard format such as: name@ .com Exporting Export to PDF Using the Export report to PDF option will allow you to set the criteria as desired and then generate the report with a PDF layout. This option is good if you are interested in a report that provides all of the included data in an easy to read PDF document. The data cannot be manipulated and the document can be shared and read by any device with a PDF reader. To export a report to PDF, set the desired report criteria and then click on the Submit button next to Export report to PDF. You will immediately see a notification that the portal is preparing the report followed by a download link and the file size. Once you click on the download link you will be presented with your browser s default download options which will determine where the file is saved to your local computer. NOTE: Additional software may be required to view the downloaded file. Please contact your system administrator for assistance. 60 P age
62 Exporting Export to CSV Using the Export to CSV option will allow you to generate a report and receive the output in a CSV (Comma Separated Value) format. The CSV format allows for users to access the data in a spreadsheet editor such as Microsoft Excel. From there, unnecessary data can be removed or additional data can be added. Users may sort the data from within the application or import the data to a database and manage it from software such as Microsoft Access. To export a report to CSV, set the desired report criteria and then click on the Submit button next to Export report to CSV. You will immediately see a notification that the admin portal is preparing the report followed by a download link and the file size. 61 P age
63 Call Center Last 20 Calls The Last 20 Calls option will automatically generate a report of the last 20 calls associated with the Call Center. The data is outputted in HTML format. You will also have the option to the data or export it to PDF or CSV. 8.2 Call Center Routing Policies for Individual Call Centers This tab allows you configure the various routing features of Call Centers. Not all features listed in this section are available for every Call Center Type. Only Premium Call Centers will have all listed features. Features available include: Forced Forwarding Holiday Service Night Service Bounced Calls Comfort Message Bypass Call Center Overflow Stranded Calls 62 P age
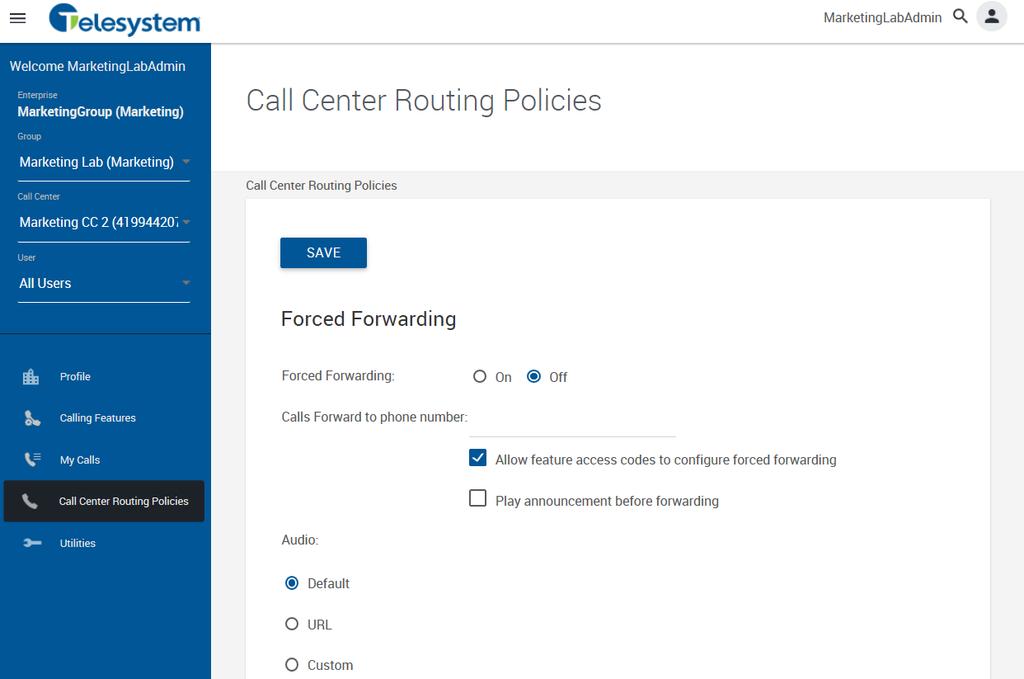
64 8.2.1 Call Center Forced Forwarding This section is used to configure the Call Center to temporarily divert new incoming calls to a different route independent of the Night Service route. Forced Forwarding does not affect calls already in the queue. This is only available for Premium Call Centers. Steps 1. Enable or disable forced forwarding. 2. Define where you would like calls forwarded. 3. Allow or forbid the use of feature access codes. 4. Define if an announcement is played before forwarding. Details Select On to enable forced forwarding or Off to disable it. In the Calls Forward to phone number/sip-uri text box, enter the number. Check or uncheck Allow feature access codes to configure forced forwarding. Check or uncheck Play announcement before forwarding. 5. Select the audio file. For the Audio file, select from the following: Default URL and then enter the address in the text box Custom and then select the custom file by clicking Browse and Click Upload. 6. Save your changes or exit without saving. To save your changes, click Save. 63 P age
65 64 P age
66 8.2.2 Call Center Holiday Service Use this section to configure the Call Center to route calls differently during the holidays. Steps Details 1. Configure the Action settings. Select from the following: None Perform busy treatment Transfer to phone number/sip-uri: and then enter the SIP-URI in the text box 2. Select the holiday schedule. From the Holiday Schedule drop-down list, select the holiday schedule. 3. Define if an announcement is Check or uncheck Play announcement before holiday service played. action. 4. Select the audio file. For the Audio files, select from the following: Default URL and then enter the address in the text box Custom and then select the custom file by clicking Browse to find a file and click Upload. 5. Save your changes or exit To save your changes, click Save. without saving. 65 P age
67 8.2.3 Call Center Night Service Use this section to configure the Call Center to route calls differently during hours when the queue is not in service. This is determined by a schedule that defiles the business hours of the queue. Night Service cannot be disabled; however, it can have a schedule that defines business hours to be 24 x 7, which means no night service is provided. Night service requires Premium Call Center Steps Details 1. Configure the Action settings. Select from the follow: None Perform busy treatment Transfer to phone number/sip-uri and then enter the SIP-URI in the text box 2. Set to force night service. For Force night service now regardless of business hours schedule, select On or Off. 3. Select business hours. From the Business hours drop-down list, select the business hours. 4. Define if feature access codes Check or uncheck All feature access codes to manually override can override the night service. night service. 5. Define if an announcement is Check or uncheck Play announcement before night service action. played. Select from the following modes for the announcement: Normal announcement 6. Select the Normal Mode Audio file. 7. Select a Manual Mode Audio file 8. Save your changes or exit without saving. Manual mode announcement For the Normal Mode Audio files, select from the following: Default URL and then enter the address in the text box Custom and then select the custom file by clicking Browse to find a file and click Upload. For the Manual Mode Audio or Video files, select from the following: Default URL and enter the address in the text box Custom and then select the custom file by clicking Browse to find a file and click Upload text box To save your changes, click Save. 66 P age
68 67 P age
69 8.2.4 Call Center Bounced Calls Configure the Call Center routing policy for calls unanswered by agents. Call Center Administration Steps Details 1. Select whether or not to bounce calls. Check or uncheck Bounce calls after [x] rings and then enter the number of rings in the text box. 2. Select whether or not to transfer the Check or uncheck Transfer to phone number/sip-uri call. and then enter the number in the text box. 3. Select whether or not to bounce calls Check or uncheck Bounce calls if agent becomes when agent is unavailable. unavailable while routing the call. 4. Save your changes or exit without To save your changes, click Save. saving. 68 P age
70 8.2.5 Comfort Message Bypass Use this section to configure the Call Center to play ringing and/or a different message instead of music and comfort messages whenever the call is expected to be answered quickly. This is only available for Premium Call Centers. Steps Details 1. Enable or disable comfort message Select On to enable Comfort Message Bypass or Off to bypass. disable it. 2. Define the wait time. For the Bypass comfort message when estimated wait time is less than [x] seconds, enter the time in seconds in the text box. 3. Define if an announcement is played Check or uncheck Play announcement after ringing for after ringing and then define the time. [x] seconds and then enter the time in the text box. 4. Select the audio file For the Audio file, select from the following: Default URL and then enter the address in the text box Custom and then select the custom file by clicking Browse to find a file and click Upload. 5. Save your changes or exit without To save your changes, click Save. saving. 69 P age
71 8.2.6 Overflow You use this section to configure the Call Center Routing Policy when a large number of calls have been received or calls have been waiting longer than the configured threshold. Steps Details 1. Configure the Action settings. Select from the following: Perform busy treatment Transfer to phone number/sip-uri and then enter the SIP-URI in the text box Play ringing until caller hangs up 2. Select the overflow time. Check or uncheck Enable overflow after calls, wait [x] seconds, and enter the number of seconds in the text box. 3. Select to play an announcement Check or uncheck Play announcement before overflow before overflow processing. processing. 4. Select an audio file. For the Audio files, select from the following: Default URL and then enter the address in the text box Custom and then select the custom file by clicking Browse to find a file and click Upload. 5. Save your changes or exit To save your changes, click Save. without saving. 70 P age
 3. Save your changes or exit without saving.")
72 8.2.7 Call Center Stranded Calls Configure the Call Center Routing Policy for calls stranded in queue when all agents have signed out. Steps 1. Configure the Action settings. 2. Select an audio or video file (Requires Premium Call Center) 3. Save your changes or exit without saving. Details Select from the following: Leave in queue Perform busy treatment Transfer to phone number/sip-uri and then enter the SIP- URI in the text box Night Service (Requires Premium Call Center) Play ringing until caller hangs up (Requires Premium Call Center) Play announcement until caller hangs up (Requires Premium Call Center) For the Audio files, select from the following: Default URL and then enter the address in the text box Custom and then select the custom file by clicking Browse to find a file and click Upload. To save your changes, click Save. 71 P age
 Email Address Department Group ID Yahoo ID You may search")
73 8.3 Call Center Utilities The Call Center Utilities tab contains the following menus: Enterprise Directory Document Repository Registrations Feature Access Codes Call Center Enterprise Directory The Enterprise Directory menu provides you with a data table of the entire Enterprise Directory. The directory displays the following information regarding each user or group where applicable: Name Number Extension Mobile (phone number) Address Department Group ID Yahoo ID You may search for a specific entry in the directory using the available search fields. Entries can be searched for by Last Name, First Name, or Phone number. Search results can be expanded or narrowed using the drop-down menu with the options: Starts With, Contains, and Equal To. From this menu, you also have links available to view the Enterprise Directory Summary as a separate web page or download it as a PDF as well as viewing the Enterprise Directory Detail as a separate web page or download it as a PDF. 72 P age
74 8.3.2 Call Center Document Repository Document repository acts as a centralized repository to keep track of help guides, templates, etc Call Center Registrations You use this page to view your static and dynamic registrations. Item Endpoint Type Line/Port Identity/Device Profile name URI Expiration Description The SIP device or virtual user endpoint at which the service is deployed. Valid types include Primary, Video Add On, and Shared Call Appearance. The line, port number or SIP address of the endpoint location. This information is dependent on the identity/device profile s type. The assigned Identity/Device Profile in the system. The Universal Resource Indicator (URI) identifying the device. Both Static and dynamic registrations are possible, depending on the device profile. The registration expiry date, for dynamic registrations Call Center Features Access Codes The Feature Access Codes menu displays touch tone codes for features that can be used in conjunction with your Call Center. 73 P age


75 8.4 Call Center Navigation Navigate between Call Centers and users with drop-down boxes available at the top of the screen: Return back to the Group Dashboard by clicking on the Group link: 74 P age


76 9 Hosted VoIP Phone System Admin Portal Interface (User Access) Once a user is assigned to a Call Center as an Agent or a Supervisor, they will have call control settings within their personal profile that they can configure specifically for Call Center. A Group or Enterprise administrator may access their User Profile for them and configure these settings. To access a user s profile from the administrator login, use the drop-down box and locate the desired user. When you click on their information it will direct you to the user s settings. When you initially log into the portal you will be presented with the following interface: Application Launch Drop-Down Box From here users may launch applications associated with their Hosted VoIP Phone System service such as Call Center or Receptionist. 2 User ID and Logout Displays the user ID associated with the user account you are logged into and a link to logout of the portal. 3 Help available This is a dynamic link to the online help portal. Mousing over this link will provide you with different help options depending on the contents of the current page. 4 Navigation Tabs These tabs allow you to navigate through the different settings and options available with the user portal. Some of the tabs may provide you with additional menus to navigate through settings. 75 P age
Group Administrators
 Hosted VoIP Phone System Blue Platform Admin Portal Guide for Group Administrators Table of Contents 1 About this Guide... 6 2 Accessing the Hosted VoIP Phone System Admin Portal... 7 3 Hosted VoIP Admin
1 P age NEXTIVA CALL CENTER. Supervisor User Guide. nextiva.com/support 2015 NEXTIVA, ALL RIGHTS RESERVED
 1 P age NEXTIVA CALL CENTER Supervisor User Guide nextiva.com/support 2015 NEXTIVA, ALL RIGHTS RESERVED 2 P age Creating Employees... 3 Creating an Employee... 3 Assigning Licenses to Employees... 7 Schedules...
Virtual Communications Express Admin Guide: Configure Call Center
 Overview Hunt Groups allow a defined group of users to handle incoming calls received by an assigned Hunt Group s phone number. Call Centers add another dimension by providing an automated answer for all
Virtual Communications Express User Guide: Call Center Supervisor
 Feature Overview Call Center Supervisor supports agent monitoring, queue management, current and historical reporting, and other features required in large call centers. Benefits of Call Center include:
Enterprise Voice SUBSCRIBER GUIDE
 Enterprise Voice SUBSCRIBER GUIDE Conterra Networks Enterprise Voice SUBSCRIBER GUIDE 3 TABLE OF CONTENTS Table of Contents Introduction... 6 Logging in... 6 Navigation Bar, Sub-Menu and Page Layout...
SmartVoice. Call Queuing User Guide
 SmartVoice Call Queuing User Guide Quick reference Contents Record your information here: My username My password My account number SmartVoice Customer Support Phone: 1-877-742-9249 Email: technicalsupport@shawbusiness.ca
Connected Office Voice. Key System Administrator Guide
 Connected Office Voice Key System Administrator Guide Connected Office Voice Key Admin Guide Table of Contents 8 Part 1: Getting Started 9 Introduction 10 Installing Your Phones 10 Box Contents 11 Attaching
Virtual Communications Express User Guide: Call Center Agent
 Feature Overview The Call Center is designed to support the needs of Call Center agents in any environment. It supports the full set of call handling functions, ACD state management, integration of multiple
Agent Tasks. Agent Automatic Call Distribution (ACD) States Your ACD state can be one of the following:
 States Your ACD state can be one of the following:") QUIICK REFERENCE GUIIDE HOSTED THIIN CALL CENTER Agent Tasks Agent Automatic Call Distribution (ACD) States Your ACD state can be one of the following: Available You are available to receive calls. Unavailable
QUIICK REFERENCE GUIIDE HOSTED THIIN CALL CENTER Agent Tasks Agent Automatic Call Distribution (ACD) States Your ACD state can be one of the following: Available You are available to receive calls. Unavailable
Quick Reference Guide: Call Center
 Agent Tasks Agent Automatic Call Distribution (ACD) States Your ACD state can be one of the following: Available You are available to receive calls. Unavailable You are not available to receive calls.
ENTERPRISE SUBSCRIBER GUIDE
 ENTERPRISE SUBSCRIBER GUIDE Enterprise Subscriber Guide 880 Montclair Road Suite 400 Birmingham, AL 353 www. TABLE OF CONTENTS Table of Contents Introduction...6 Logging In...6 Navigation Bar, Sub-Menu
TELSTRA IP TELEPHONY PREMIUM CALL CENTRE CUSTOMER ADMINISTRATOR USER GUIDE
 TELSTRA IP TELEPHONY PREMIUM CALL CENTRE CUSTOMER ADMINISTRATOR USER GUIDE WELCOME TO TELSTRA IP TELEPHONY PREMIUM CALL CENTRE Additional information on the TIPT Premium Call Centre is available on the
Agent Tasks. Select Your Outgoing Call Identity
 Agent Tasks Unavailable You are not available to receive calls. Wrap-Up You are wrapping up a call and you are temporarily unavailable to receive calls. Configure Your Post Sign-In ACD State 1. On the
ADMINISTRATOR PORTAL GUIDE
 ADMINISTRATOR PORTAL GUIDE 1504 Providence Highway, Suite 19, Norwood, MA 02062 Toll Free: 866-303-8600 www.votacall.com Table of Contents 1) Introduction... 3 a) Guide Explanation... 3 b) Access to site...
Call Centres (ACD) Manual
 Manual") Call Centres (ACD) Manual Description Use the Call Centre ACD feature if you want to allow a Site to distribute incoming calls to multiple Users from a single central phone number. TelephoneSystems.Cloud
Call Centres (ACD) Manual Description Use the Call Centre ACD feature if you want to allow a Site to distribute incoming calls to multiple Users from a single central phone number. TelephoneSystems.Cloud
managedip Hosted TDS Table of Contents Administrator User Guide
 Table of Contents Administrator Hierarchy... 2 Enterprise Set Up... 3 Group Set Up... 4 Department Set Up... 7 User Set Up... 8 Group Services... 9 Configuration of Group Services... 9 Auto Attendant...
1 Page. Digital Voice Services Business User Guide
 1 Page Digital Voice Services Business User Guide Feature Access Codes *62 Voice Portal *86 Direct Voice Mail Retrieval *77 Anonymous Call Rejection Activation *87 Anonymous Call Rejection Deactivation
My Cloud Services Portal. Admin Guide
 My Cloud Services Portal Admin Guide Momentum Telecom 2018. All Rights Reserved. 888.538.3960 www.momentumtelecom.com/support 6.29.18 2 IN THIS GUIDE WELCOME... 6 INTRODUCTION... 6 ACCESS MY CLOUD SERVICES
FusionWorks: Call Center Quick Reference Guide 01/30/2017 USER GUIDE
 FusionWorks: Call Center Quick Reference Guide 01/30/2017 USER GUIDE Contents: Agent Tasks......3 Supervisor Tasks...11 Reporting...16 Copyright 2017 Fusion, All rights reserved 2 Agent Tasks Call Center
Clearspan Hosted Thick Call Center Quick Reference Guide
 Clearspan Hosted Thick Call Center Quick Reference Guide Agent Tasks Call Center Interface The following elements are available from the Call Center interface: Menu bar Located at the top, it allows you
Clearspan Hosted Thin Call Center Quick Reference Guide
 Clearspan Hosted Thin Call Center Quick Reference Guide Agent Tasks 4. If you set Post call State to Unavailable, you may have to select a code that explains the reason for your unavailability. 5. If you
IP TELEPHONY Quick Reference Guide
 Feature Access Codes for BROADCONNECT IP TELEPHONY Quick Reference Guide 1 *34Advice of Charge Activation The Advice of Charge service is responsible for gathering and generating the advice of charge information
CALL FEATURES USER GUIDE. Houston Dallas Austin San Antonio Oklahoma City
 CALL FEATURES USER GUIDE Houston Dallas Austin San Antonio Oklahoma City Table of Contents Account / Authorization Codes.... 3 Advanced Hunting.... 4 Anonymous Call Rejection... 4 Anywhere.... 5 Auto Attendant...
Altus Call Center Agent
 Altus Call Center Agent User Guide Document Version 1.2 Table of Contents 1 About This Document... 8 1.1 Audience... 8 1.2 How This Guide is Organized... 8 1.3 Additional Resources... 8 2 Introduction
C L O U D V O I C E B U S I N E S S P O R T A L
 C L O U D V O I C E B U S I N E S S P O R T A L S I T E F E A T U R E S G U I D E V E R S I O N 2. 0 Contents Introduction... 8 Overview... 8 Audience... 8 Account Codes... 9 Description... 9 Description
votacall unity supervisor
 votacall unity supervisor quick user guide contents 1 Ini al Setup... 3 1.1 Call Center Login Details... 4 2 Unity Supervisor Interface Overview...5 2.1 ACD State Bu ons... 5 2.2 Call Control... 6 2.3
Hosted VoIP Phone System. Hosted Call Center. Supervisor User Guide
 Hosted VoIP Phone System Hosted Call Center Supervisor User Guide Contents 1 About This Document... 6 1.1 Audience... 6 1.2 How This Guide is Organized... 6 1.3 Software Requirements... 7 2 Introduction
votacall unity agent quick user guide contents 1 P a g e
 votacall unity agent quick user guide contents 1 Ini al Setup... 3 1.1 Call Center Login Details... 4 2 Unity Agent Interface Overview...5 3 Main Interface Elements...6 3.1 ACD State Bu ons... 6 3.2 Call
managedip Hosted TDS Table of Contents Call Center Supervisor User Guide
 Table of Contents Logging In... 2 Agent Tasks... 2 Supervisor Tasks... 10 Reporting... 15 Keyboard Shortcuts... 17 Additional Support... 17 167472/9-15/9072 1 Logging in 1. Open your web brower and go
Table of Contents. End_User_Portal_0617rev4.doc Page 2 of 78
 . CenturyLink End User Portal User Guide Table of Contents Portal Navigation... 4 Home Page Navigation... 4 Call Logs... 6 Exporting Call Logs... 7 Call Features... 8 Call Recording... 8 Call Settings...
Hosted VoIP Phone System. Blue Platform. Hosted Call Center. Agent User Guide
 Hosted VoIP Phone System Blue Platform Hosted Call Center Agent User Guide Contents 1 About This Document... 5 1.1 Audience... 5 1.2 How This Guide is Organized... 5 1.3 Software Requirements... 6 2 Introduction
managedip Hosted TDS Table of Contents Receptionist Enterprise User Guide
 Table of Contents Receptionist Interface... 2 Managing Calls... 3 Managing Contacts... 6 Queued Calls - Call Center Premium... 8 Keyboard Shortcuts... 9 Additional Support... 9 167478/9-15/9072 1 Receptionist
Telstra IP Telephony Call Centre Customer Group Administrator User Guide
 Telstra IP Telephony Call Centre Customer Group Administrator User Guide Telstra Corporation Limited, 2009 Table of Contents 1. Introduction... 3 2. Logging on as a Customer Group Administrator... 3 3.
IP Centrex User Guide Release 2.1
 IP Centrex User Guide Release 2.1 2014 by Cox Communications. All rights reserved. No part of this document may be reproduced or transmitted in any form or by any means, electronic, mechanical, photocopying,
BroadCloud PBX Call Center Agent
 BroadCloud PBX Call Center Agent User Guide Document Version 1.0 9737 Washingtonian Boulevard, Suite 350 Gaithersburg, MD 20878 Tel +1 301.977.9440 WWW.BROADSOFT.COM BroadWorks Guide Copyright Notice Trademarks
IP Centrex Administrator Guide Release 2.0
 IP Centrex Administrator Guide Release 2.0 2012 by Cox Communications. All rights reserved. No part of this document may be reproduced or transmitted in any form or by any means, electronic, mechanical,
ActivePBX Administrator s Guide
 ActivePBX Administrator s Guide CONTENTS Preface... v Document Conventions... v Glossary Conventions... v 1. Accessing the Admin Web Portal... 6 Logging in to the Web Portal... 7 Understanding the Admin
Altus Call Center Supervisor Client. User Guide. Document Version 1.2
 Altus Call Center Supervisor Client User Guide Document Version 1.2 5121 Maryland Way, Suite 300 Brentwood, TN 37027 Tel +1 615-465-4001 www.altusuc.com Table of Contents 1 About This Document... 8 1.1
TELSTRA IP TELEPHONY PREMIUM CALL CENTRE FOR AGENTS USER GUIDE
 TELSTRA IP TELEPHONY PREMIUM CALL CENTRE FOR AGENTS USER GUIDE WELCOME TO PREMIUM CALL CENTRE FOR AGENTS! This user guide provides step-by-step instructions and reference information for using TIPT Premium
Digital Voice Services Residential User Guide
 Digital Voice Services Residential User Guide TECH SUPPORT - 888.855.9997 734.324.7190 WYANDOTTECABLE.COM Feature Access Codes *62 Voice Portal *86 Direct Voice Mail Retrieval *77 Anonymous Call Rejection
Hosted PBX Administrator s Guide. IVR DID Management CALL QUEUES. 1 Ally Communications Hosted PBX Administrator's Guide
 Hosted PBX Administrator s Guide CALL QUEUES IVR DID Management 1 CONTENTS Preface Document Conventions Glossary Conventions 1. Accessing the Admin Web Portal Logging in to the Web Portal Understanding
Table of Contents. HostedVoIP_End_User_Portal_0816rev4.doc Page 2 of 81
 . CenturyLink Hosted VoIP End User Portal User Guide Table of Contents Portal Navigation... 4 Home Page Navigation... 4 Call Logs... 6 Exporting Call Logs... 7 Call Settings... 8 Call Waiting... 9 Auto
GTB Enterprise Contact Center Powered by Telax Included In Package Not Included in Package
 GTB Enterprise Contact Center Powered by Telax Max Calls In Queue Unlimited Unlimited Data Center Features 24x7x365 Data Center Monitoring Yes Yes Geographical Survivability Yes Yes Automatic Software
Call Center Solutions Guide Release 20
 2811 Internet Blvd Frisco, Texas 75034-1851 Tel +1 469 365 3000 Tel +1 800 468 3266 www.aastrausa.com Call Center Solutions Guide 2849-003 Release 20 2014 Clearspan is a Registered Trademark of Aastra
Manage User Features
 As an administrator for the AT&T Collaborate service, you can manage features for each user from the Users widget on the Collaborate homepage. First, you assign a feature to the user, and then turn the
Quick Reference Guide - Special Calling Features
 Flash Calls NOTE: Flash calls are available on devices with flash functionality. Call Transfer While engaged in call to be transferred: 1. Press flash hook on phone. The initial call is held. extension
Clearspan Hosted Thin Call Center Agent/Supervisor User Guide RELEASE 22
 Clearspan Hosted Thin Call Center Agent/Supervisor User Guide RELEASE 22 March 2018 NOTICE The information contained in this document is believed to be accurate in all respects but is not warranted by
First Communications Cloud IP PBX User Guide (Polycom)
") First Communications Cloud IP PBX User Guide (Polycom) 2017 Property of First Communications Contents Introduction... 3 General Phone Operations... 4 Polycom VVX 300 Series... 4 Polycom VVX 300 Series
First Communications Cloud IP PBX User Guide (Polycom) 2017 Property of First Communications Contents Introduction... 3 General Phone Operations... 4 Polycom VVX 300 Series... 4 Polycom VVX 300 Series
CPBX Receptionist. User Guide. Release 17.sp2 Document Version 1
 CPBX Receptionist User Guide Release 17.sp2 Document Version 1 9737 Washingtonian Boulevard, Suite 350 Gaithersburg, MD 20878 Tel +1 301.977.9440 WWW.BROADSOFT.COM BroadWorks Guide Copyright Notice Trademarks
Virtual PBX licensing
 Bussines user Authentication Basic Call Logs Call Forwarding Always Call Forwarding Busy Call Forwarding No Answer Call Forwarding Not Reachable Call Return Call Transfer Call Waiting Calling Line ID Delivery
TELSTRA IP TELEPHONY STANDARD CALL CENTRE FOR AGENTS USER GUIDE
 TELSTRA IP TELEPHONY STANDARD CALL CENTRE FOR AGENTS USER GUIDE WELCOME TO STANDARD CALL CENTRE FOR AGENTS! This user guide provides step-by-step instructions and reference information for using TIPT Standard
AT&T Collaborate glossary
 Common terms associated with the AT&T Collaborate SM service. A B C D E F G H I J K L M N O P Q R S T U V W X Y Z A account codes A feature that lets administrators track and manage outgoing calls to keep
votacall unity supervisor
 votacall unity supervisor help guide contents 1 About Unity Supervisor...7 1.1 Standard vs Enterprise Features... 7 1.2 Naming Conven ons for this Help... 8 1.3 System Requirements... 8 1.3.1 Windows PC
Digital Voice Services Residential User Guide
 Digital Voice Services Residential User Guide 2 P a g e * Feature Access Codes *11 Broadworks Anywhere (pulling call to alternate phone) *62 Access Voicemail *72 Call Forwarding Always Activation *73 Call
Solutions Reference Guide. IP TalkSM. Voic & Navigator Web Portal
 IP Talk SM Solutions Reference Guide IP TalkSM Voicemail & Navigator Web Portal Table of Contents Voicemail Accessing Your Voicemail................... 1 Voicemail Main Menu........................ 2
User Guide Business Hosted Voice DOCUMENT VERSION: 4.0
 User Guide Business Hosted Voice DOCUMENT VERSION: 4.0 DATE OF ISSUE: 30 NOVEMBER 2018 Welcome! We want to help your business connect. We re sure you will enjoy the benefits of these services. Plus our
Reference Guide. IP Phone/Calling Features Voice Mail Personal Assistant Toolbar. Dialing. Your Phone Calling Features.
 TelNet OfficeEdge Complete Polycom SoundPoint 550 IP Phone. Reference Guide IP Phone/Calling Features Voice Mail Personal Assistant Toolbar Dialing To dial phone number or extension Lift your handset and
Hosted PBX Administrator Guide
 Hosted PBX Administrator Guide Table of Contents 1 INTRODUCTION... 1-1 1.1 PURPOSE OF THIS GUIDE... 1-1 1.2 OTHER GUIDES... 1-1 2 COMMPORTAL BUSINESS GROUP ADMINISTRATOR (BG ADMIN)... 2-1 2.1 ACCESSING
Syntel2 by Syntel Solutions Features
 Syntel2 by Syntel Solutions Features Interested in learning how our proven software platform can revitalize your business communications? With Syntel2 by Syntel Solutions, we give you the tools and features
Optus Loop. Feature Definitions
 Optus Loop Feature Definitions Table of Contents 1 Station / User Feature Definitions... 2 1.1 Subscriber Station Features... 2 1.2 Optus Loop UC App Bundle... 7 1.3 Optus Loop Collaboration Bundle...
Cox Business VoiceManager SM User Reference Guide
 Cox Business VoiceManager SM User Reference Guide Dear Customer: Thank you for choosing Cox Business VoiceManager, SM provided by Cox Business. VoiceManager is phone service that gives you complete control
Cox Business IP Centrex Call Center Standard Agent/Supervisor User Guide
 Cox Business IP Centrex Call Center Standard Agent/Supervisor User Guide 2017 by Cox Communications. All rights reserved. No part of this document may be reproduced or transmitted in any form or by any
User Guide Get Started Manage Your Inbound Cal Features Using Schedules Find Administrators and Contacts
 Get Started...2 Log In...3 What a User Can Do in the Customer Portal...6 About Premier...7 Use Premier...8 Use the AT&T IP Flexible Reach Customer Portal...10 Search Overview...13 Glossary...16 Frequently
2811 Internet Blvd Frisco, Texas Tel Tel SERVICE GUIDE Release 20.
 2811 Internet Blvd Frisco, Texas 75034-1851 Tel +1 469 365 3000 Tel +1 800 468 3266 www.aastrausa.com SERVICE GUIDE 2824-006 Release 20.0 CS Service Guide R19.0 Aastra - 2824-006 2013 Clearspan is a Registered
Call settings administrator guide. BT One Phone
 1 Call settings administrator guide BT One Phone 2 What s in this guide 1. Welcome to the BT One Phone 3 2. An introduction to the BT One Phone portal 4 3. Getting started 5 4. Call settings overview 9
Analogue Telephone Adapter (MP 118)
") Analogue Telephone Adapter (MP 118) Analogue Telephone Adapter (ATA) Overview ou can connect traditional analogue telephones and similar customer-premise devices such as fax machines, to the Optus Loop
Analogue Telephone Adapter (MP 118) Analogue Telephone Adapter (ATA) Overview ou can connect traditional analogue telephones and similar customer-premise devices such as fax machines, to the Optus Loop
Hosted Voice End User Guide Version 1.0 April End User Guide
 Hosted Voice End User Guide Version 1.0 April 2013 End User Guide Contents 1 Introduction... 1 2 Introducing CommPortal... 2 2.1 Accessing and Logging In... 2 2.2 Using CommPortal... 2 2.3 Getting help...
COMMAND CENTRAL. Commander Smart SIP ADMINISTRATOR GUIDE
 COMMAND CENTRAL Commander Smart SIP ADMINISTRATOR GUIDE Command Central Requirements... 3 Devices... 3 Browsers... 3 How to log into your account... 4 The Command Central Dashboard... 7 Managing Enterprise
Logging Into the Web Portal
 V0610 Logging Into the Web Portal Open your Web browser application. In the address field, enter the external WebPortal address, https://lightpathvoice.com Click Go. In the Phone Number field, enter your
CommPortal. Administrator Guide
 CommPortal Administrator Guide Version 1.2 August 3, 2018 Revision History Revision Date Description Initials 1.0 10/9/17 First published version. CS 1.2 8/3/18 Revision for new release of CommPortal (EAS
Clearspan Hosted Thin Receptionist User Guide RELEASE
 Clearspan Hosted Thin Receptionist User Guide RELEASE 20.0.33 April 2015 NOTICE The information contained in this document is believed to be accurate in all respects but is not warranted by Mitel Networks
UNITY RECEPTION HELP GUIDE
 UNITY RECEPTION HELP GUIDE CONTENTS 1 About Unity Reception... 7 1.1 Unity Reception Enterprise... 8 1.2 System Requirements... 8 1.2.1 Windows PC Requirements... 8 1.2.2 Internet & Firewall... 8 1.2.3
UNITY DASHBOARD LATEST RELEASE NOTES
 UNITY DASHBOARD LATEST RELEASE NOTES CONTENTS Release 1.1.7.3... 2 Release 1.1.6.5... 3 Release 1.1.5.4... 4 Release 1.1.4.5... 5 Release 1.1.3.2... 7 Release 1.1.2.2... 8 Release 1.1.1.1... 9 Release
My Cloud Services Portal. User Guide
 My Cloud Services Portal User Guide Momentum Telecom 2018. All Rights Reserved. 888.538.3960 www.momentumtelecom.com/support 6.29.18 2 IN THIS GUIDE WELCOME... 6 INTRODUCTION... 6 MY CLOUD SERVICES PORTAL...
1. General Information
 Tenant User Manual INDEX 1. General Information...3 1.1 Introduction...3 1.2 Logging in...3 1.3 Forgot Password...4 1.4 Dashboard...6 2. Config...9 2.1 ACL List...9 2.2 Prompt List...10 2.3 Plan...11 2.4
Automatic Camp On enable/disable Table Destination for Incoming trunk call
 OVERVIEW When a call comes in from a trunk line to a station and the station is busy, Station Hunting or Call Forward is not applied and the call cannot be terminated by applying these features, the trunk
Hosted VoIP Administrator User Guide
 Hosted VoIP Administrator User Guide Table of Contents: 1. Call Continuity..... pg 1 2. Call Groups..... pg 2 3. Call Queues... pg 5 4. Caller ID... pg 9 5. Company Call Recording... pg 12 6. Conference
Residential Voice SUBSCRIBER GUIDE
 Residential Voice SUBSCRIBER GUIDE RESIDENTIAL VOICE SUBSCRIBER GUIDE TABLE OF CONTENTS Table of Contents Getting Started... 6 Requirements... 6 First Login... 6 Features Management... 0 Basic Features...
Hosted PBX > CALLING FEATURES GUIDE
 Hosted PBX > CALLING FEATURES GUIDE Get the power of Hosted PBX working for you. Keep this user guide handy for quick and easy reference to the many features available to you as a Hosted PBX customer.
Hosted VoIP Phone System. Green Platform. Integrated ACD. Call Center Agent Guide
 Hosted VoIP Phone System Green Platform Integrated ACD Call Center Agent Guide Table of Contents 1. Integrated ACD Introduction 3 1.1. Terminology 3 1.2. How Integrated ACD works 3 2. Accessing the CommPortal
Hosted PBX > CALLING FEATURES GUIDE
 Hosted PBX > CALLING FEATURES GUIDE Get the power of Hosted PBX working for you. Keep this user guide handy for quick and easy reference to the many features available to you as a Hosted PBX customer.
AT&T IP Flexible Reach User Guide
 AT&T IP Flexible Reach User Guide 1 Get Started... 4 Log In... 5 What a User Can Do in the Customer Portal... 7 About Premier... 8 Use Premier... 9 Use the AT&T IP Flexible Reach Customer Portal... 11
Unity Supervisor. Initial Access. The Interface
 Unity Supervisor Initial Access The first time Unity is started you will be prompted to login. Contact the service provider to receive your credentials, or for assistance with BroadWorks server connection
Integrated ACD User Guide
 Technology Solutions, Delivered with Care Integrated ACD User Guide Integrated Act Solution Guide Table of Contents Integrated ACD User Guide for 2 1.1 How Integrated ACD Works 2 1.1.1 Multi Line Hunt
Five9 Adapter for Velocify
 Cloud Contact Center Software Five9 Adapter for Velocify Agent s Guide November 2017 The Five9 Adapter for Velocify enables you to integrate the Five9 Cloud Contact Center with the Velocify desktop. This
Telstra IP Telephony - Telstra IP Video Phone Feature Guide
 1. The Touch screen Your phone has a touch-sensitive screen. To access features or obtain information, tap the menu items, arrow keys, soft keys (the keys along the bottom of the touch screen) and field
Call Centre Configuration Manual. Vision 1.5 September 2013
 Call Centre Configuration Manual Vision 1.5 September 2013 Document No. 012 Version No. v1.5/0913/7 Copyright SpliceCom Ltd SpliceCom Ltd The Hall Business Centre, Berry Lane Chorleywood, Herts WD3 5EX
The guide is divided into sections which describe how to configure and manage different aspects of the Hosted PBX service for your business group.
 Welcome This guide is intended to help Business Group Administrators of FairPoint Communications Hosted PBX service to perform the various tasks needed to administer the system, such as: Managing lines,
BullsEye Digital Voice Toolbar Quick Reference Guide
 This guide will help you get started using your BullsEye digital voice services, and in particular, the Digital Voice Toolbar. INTRODUCING THE DIGITAL VOICE TOOLBAR Similar to the Digital Voice Call Manager,
User Guide for DECT IP Phone Features Integrated with BroadSoft UC-One
 About This Guide i User Guide for DECT IP Phone Features Integrated with BroadSoft UC-One ii About This Guide About This Guide BroadSoft UC-One is an open Unified Communications platform that provides
Virtual Communications Express Admin Guide: Getting Started Welcome to Verizon Virtual Communications Express!
 Welcome to Verizon Virtual Communications Express! Virtual Communications Express is an easy-to-use service designed to enhance communications with your coworkers, customers, and suppliers. It can help
Digital Telephone User Guide
 Digital Telephone User Guide 1 P. O. Box 99, Conway, AR 72033 (501) 450-6000 ConwayCorp.com * Feature Access Codes *11 Broadworks Anywhere (pulling call to alternate phone) *62 Access Voicemail *72 Call
UCx Feature Guide for Nortel IP phones - with Feature Key mode disabled
 UCx Feature Guide for Nortel IP phones - with Feature Key mode disabled Date: 22 November 2016 System: UCx Release: 5.0 Phone models: Nortel IP Phones i20xx Series, 11xx Series and 12xx Series Page 2 of
OfficeSuite equeues. OfficeSuite equeues allows your business to distribute calls to your best available Agents according to rules you define.
 ADMIN TRAINING GUIDE OfficeSuite equeues OfficeSuite equeues allows your business to distribute calls to your best available Agents according to rules you define. Table of contents 3 Introduction 5 Phone-based
Grandstream Networks, Inc. UCM6xxx Series IP PBX Lightweight Call Center Guide
 Grandstream Networks, Inc. UCM6xxx Series IP PBX Lightweight Call Center Guide Table of Contents INTRODUCTION... 4 UCM CALL CENTER FEATURES LIST... 5 Call Queues... 5 Virtual Queue... 7 Position Announcement...
AUGUST CommPortal GUIDE
 AUGUST 2018 CommPortal GUIDE 2 AirePBX CommPortal Guide Table of Contents 1 Introduction...4 1.1 About This Manual...4 2 CommPortal Overview...5 2.1 Interface overview...5 2.2 Browser and Operating System
Student Guide ASPECT AGENT
 Student Guide ASPECT AGENT Last Updated: 09/29/2016 TABLE OF CONTENTS Introduction to Aspect... 1.1 What is Aspect?...1.1 Why Aspect?...1.1 Ambulatory Care Call Management Standards...1.1 Patient Experience...1.1
Customer Administration Portal User Guide
 User Guide User Guide Table of Contents Section 1: Customer Administration Portal Access... 1 1.1 Log-in...1 1.2 Edit Profile...1 Section 2: Customer Administration Portal Overview... 2 2.1 Administrator
UNITY MOBILE IPHONE USER GUIDE
 UNITY MOBILE IPHONE USER GUIDE CONTENTS 1 Introduction... 2 2 How It Works... 3 3 Getting Started... 4 3.1 Login... 4 3.2 Linking Unity to the Mobile Device... 5 3.3 Specifying the Outgoing Call Option...
votacall unity agent Help guide contents 1 P a g e
 votacall unity agent Help guide contents 1 Ini al Setup... 3 1.1 Call Center Login Details... 4 2 Unity Agent Interface Overview...5 3 Main Interface Elements...6 3.1 ACD State Bu ons... 6 3.2 Call Control...