RunClick Webinar and Video Conferencing Software. User Manual
|
|
|
- Sandra Garrett
- 6 years ago
- Views:
Transcription


1 RunClick Webinar and Video Conferencing Software User Manual Visit RunClick.com for more details 1 Page
2 Table of Contents Installation and Activation of RunClick Part 1: WordPress Fresh Installation Process Part 2: RunClick Installation on WordPress Blog Method 1: Upload RunClick via the WordPress Dashboard Method 2: Upload RunClick via FTP Part 3: Activating RunClick Plugin Settings Project Number YouTube User ID Include Attribution Link Upload Theme Affliate Link Set Cron Webinar Chat Running a Fast Start Webinar Detailed Instructions on Event setup, Live Page, Thank you Page & Replay Page Event Setup Event Details: Clock Design Page Design Header Settings Thank You Page Thank You Page Settings Sidebar Box Setting Live Page 2 Page
3 Live Event Settings Page Design Live Webinar Header Settings Replay Page Replay Settings Setting Up an Evergreen Webinar Setting A Call To Action Or Floating BUY Button On Your Webinar Integrating Autoresponders To RunClick For Lead Capture Aweber Settings for Other Autoresponders that are not included in the dropdown: Uploading the Template Packages Uploading a Template Package via the WordPress Dashboard Uploading a Template Package via CPanel (FTP) Taking a Webinar and Hangout LIVE With RunClick Using the CHAT System with RunClick Software To run Live Q and A During a Webinar Event Setting Up Interaction, Live Voting and Buy Buttons During an Event with RunClick 3 Page

 Note: Other one-step installers may be used depending on your host. IV.")
4 Installation and Activation of RunClick RunClick can be used on any domain, but it needs WordPress to run. Don t worry if your website isn t on WordPress. Regardless of the platform you re using, we recommend setting up RunClick on a fresh installation of WordPress on a subdomain or subfolder of your website. Although it s not a requirement, it s the best way to separate RunClick and its pages from your main website. Part 1: WordPress Fresh Installation Process I. Log in to Cpanel II. Scroll down to Software/Services III. Click on Softaculous (a popular WordPress one-step installer) Note: Other one-step installers may be used depending on your host. IV. Find WordPress and click Install. WordPress is often displayed as the first script on Softaculous Dashboard, but you can also find it under Blog that s listed on the left sidebar. 4 Page
 b.")
 d. Site Description Add a short description (Ex. Webinars and Video Conferences) e.")
5 V. Specify the installation settings a. Choose Domain Select the domain where you want to install RunClick (Ex. steph.hangouttheme.com) b. In Directory Set the folder name you want to use (Ex. webinar) c. Site Name Change the Site Name (Ex. Steph s RunClick Webinars) d. Site Description Add a short description (Ex. Webinars and Video Conferences) e. Admin Username f. Admin Password VI. Scroll down and click on the Install button 5 Page


6 VII. Once installation is done, click on the administrative URL and log in to your new WordPress blog using the Admin Username and Password Part 2: RunClick Installation on WordPress Blog There are two methods you can use to install RunClick. Method 1 is via the WordPress Dashboard; Method 2 is via FTP. Method 1: Upload RunClick via the WordPress Dashboard I. On your WordPress dashboard, hover your mouse on Plugins and click on Add New 6 Page


7 II. Click on Upload and then Choose File. Find your RunClick Plugin Zip File and click Open III. Click Install Now 7 Page


8 Method 2: Upload RunClick via FTP This method is for users who aren t able to install RunClick via the WordPress Dashboard due to file size limit. I. Log in to Cpanel II. Click on File Manager III. Find and open your domain folder (Ex. steph) IV. Open the directory folder you specified during Wordpress Installation (Ex. webinar) V. Open wp_content folder and double-click on plugins VI. Click the Upload button located on the header of your FTP window 8 Page


9 VII. Click on Choose File and open RunClick ZIP folder Note: This will immediately start the upload process. VIII. Once the uploading process is done, go back to the plugins directory IX. Click on the RunClick Zip Folder to highlight it and click on the Extract button Note: Refresh the folder and delete the ZIP folder of RunClick to save space. X. Go back to your WordPress Dashboard, refresh the Plugins list, find RunClick and click on Activate 9 Page


10 Part 3: Activating RunClick Plugin I. Click GRunClick on your WordPress Menu II. Enter your and activation key and click Submit III. Refresh your page or click on GRunClick on the Wordpress Menu again and you ll see that your plugin is now Activated There you go! RunClick is now ready for use! 10 Page
11 Settings After installing and activating RunClick, the second step is to configure the Settings. You need to go through each step before you can create your first ever webinar. I. Click on Webinar Settings, the fourth tab on RunClick s interface. It will open to the settings page which includes the following sections: a. Project Number b. YouTube User ID c. Upload theme d. Include Attribution Link e. Affiliate Link f. Set Cron g. Webinar Chat Project Number I. You ll need a Gmail account for this. If you don t have one yet, sign up for a Gmail account first. Click on the link that says (To get your project number, Click here) underneath Project Number 11 Page


, copy the PROJECT ID")
, tick the Terms of Services,")
12 II. The link will take you to Google Developers Console. Click on <Projects found on the upper right corner and Create Project III. Type in your PROJECT NAME (Ex. RunClick Webinars), copy the PROJECT ID generated by Google (Ex. beaming-key-657), tick the Terms of Services, and click Create. IV. Wait for a few moments until the creation process is done. 12 Page
13 V. Go back to RunClick Settings Page, paste your Project ID Note: You can choose to save settings at this time. YouTube User ID I. Click on the orange link beneath it II. It will take you to your YouTube Account Settings Page. At the Overview Section, copy your YouTube User Id and paste it to the YouTube User Id field found on your RunClick Webinar Settings page 13 Page


14 Include Attribution Link I. If you choose Yes, every time you run a webinar a tag that says, Powered by RunClick will be displayed at the bottom of your screen. Although you can choose not to show the tag, we strongly encourage you to tick YES. We will pay you for every sale you bring in through that tag. Note: Upload Theme will be discussed in a separate section. Upload Theme Note: Upload Theme will be discussed in a separate section. Affliate Link I. This is optional. If you choose to get one, click Receive Your Affiliate Link Here. It will take you to the JVZOO Affiliate Link area. IMPORTANT! You ll get 50% of every sale that you bring in if you choose to be our affiliate partner! II. Click on the green LOGIN button or the Login/Register link on the top right corner of the page. It will take you to the Login page where you ll have the option to register. 14 Page


15 III. Complete all information on the registration form and Register. Your request will be approved within 24hours. Once you have your login credentials, go back to JVZOO page, login, get you affiliate link, and paste it back to RunClick Webinar Settings page. Set Cron This section is specifically for sending out reminder s to attendees of your event or webinar. You have to options: WP-cron or External Cron. If you re using WP-Cron, you don t have to change anything. However, if you choose to use External Cron for higher accuracy in sending out s, you ll have to set it up first: I. Select External Cron. The panel will display the THREE COMMANDS you ll need to copy and paste into your Cpanel. The first one has a time interval of 5minutes the last two, 15minutes. II. Copy the FIRST command. Make sure that there s no extra character at the end. The highlighted portion should start with the w and end with the l III. Go back to Cpanel and find Cron Jobs under the Advanced section. 15 Page

16 IV. Select Every 5 Minutes for Common Settings and paste the FIRST command on the command field and click on Add New Cron Job V. Do the same for the SECOND and THIRD commands. Select Every 5 Minutes from the Common Settings dropdown menu, but this time change the value of the minute field into */15 Webinar Chat Note: Webinar Chat will be discussed in a separate section. Remember: Don t forget to hit this button every time you make changes on the Webinar Settings page. 16 Page
17 Running a Fast Start Webinar I. On the G RunClick Plugin page on WordPress Dashboard, click on Create New Webinar II. Select New Webinar, choose the Default layout, and click on Next III. Under the Events tab, type in your webinar s title, select date and time, choose the timezone, take registrations, use the default registration system, enable sending notifications and make the webinar public. 17 Page

18 IV. Choose from the three available clock designs V. Add a Headline Text (Optional) 18 Page

19 VI. Enable Social Sharing under Header Settings and click on Add Webinar Event VII. To view your registration page, click on the View icon and it will open a new tab displaying your registration page 19 Page

20 Detailed Instructions on Event setup, Live Page, Thank you Page & Replay Page Event Setup Under Event Setup, there are four panels: Event Details, Clock Design, Page Design, and Header Settings. Event Details: A. Google Webinar Event Title: This will form part of the URL. Make it specific for your attendees. B. Date & Time: Set the date and time of the webinar. C. Time Zone: Specify the time zone depending on where the webinar event is based. To quickly select the time zone, type in the city name. D. Take Registrations: By selecting Yes, attendees are required to sign up by leaving an address. This will allow the software to send them notification or reminder s for the webinar.] 20 Page


21 E. Registration System: RunClick has its own built-in registration system. Choose Default if you want to use it. However, RunClick allows the use of other autoresponders such as Aweber, InfusionSoft, Sendreach, and many more. F. Send Notifications: If you choose Yes, the system will send reminder s to all registered attendees. You can set the timing in your settings on the Dashboard. G. Turn on Chat on the Registration Page: Although this is not a common setting for the registration page, you have the option to use this and receive questions through chat before the event. H. Make Webinar Public or Private: For regular webinars that involve a huge number of attendees, make the webinar public. On the other hand, for video chats between you and a few people, you can choose to make it private and bypass registration. Clock Design A. You have three clock designs to choose from: Coloured Circles, Flip Calendar, and the Digital Timer Page Design A. Design Your Registration Page: You can input your own headline and sub-headline and specify their font style and size. You can also add images or videos to your registration page. 21 Page
22 B. Pre-Set Registration Page: You can choose to upload your own background image and set the timer s position. Header Settings A. Logo/Social Sharing: You can choose to Enable Logo and Enable Social Sharing. B. Logo Image (optional): You can upload a saved image file of your logo. C. Logo Text (optional) D. Logo Style 22 Page

23 Thank You Page The Thank You Page has three drop-down panels: Thank You Page Settings, Sidebar Box Setting, and Header Settings. Thank You Page Settings A. Title: You can change the default text, Thank you for registering. Please check your for details. B. Thank You Page Design: You can type in additional information, add an image, or embed a YouTube video. C. Turn On Chat on Thank You Page 23 Page


24 Sidebar Box Setting A. Sidebar Box Title: Add the sidebar title. B. Sidebar Heading Color: You can set a different color for your heading text. Click the orange link below, copy the color code of your choice, and paste it on the text box. C. Sidebar Heading Box Color: You can set a different color for your heading box. Click the orange link below, copy the color code of your choice, and paste it on the text box. Live Page Live Event Settings Note: This will be covered in a different section. 24 Page
25 Page Design A. Live Page Design: Choose between designing your own registration page or RunClick s Pre-set Registration Page. Live Webinar Header Settings A. Logo/Social Sharing: You can choose to enable log and social sharing. B. Logo Image (optional): Upload a logo image. C. Logo Text (optional): If you don t have a logo image, you can use a text-based logo. D. Logo Style: Format your text-based logo. IMPORTANT! Complete the design before the event goes live. That way, everything is all set and your live page looks as good as you need it to. 25 Page

26 Replay Page The Replay Page has 3 drop-down settings: Replay Settings, Page Design, and Replay Header Settings. Replay Settings A. Lock Replay: Choose Yes if you want people to opt-in before they can view the replay. If not, choose no and drop in the embed code of the replay and it will automatically show. B. Registration System: You can choose Default and use RunClick s built-in registration system. But if you want to use a different autoresponder, you can choose from the drop-down menu. C. Show Pop-Up Form On Replay Page: If you want to display a pop-up, either to gather votes or give attendees the option to Buy Now, choose Yes. If not, choose No. Note: The settings for the Pop-Up form will be discussed in a different section. 26 Page


27 Setting Up an Evergreen Webinar An Evergreen Webinar is a pre-recorded webinar that viewers can watch as if it were live. It s easy to set up and it will help you drive traffic and increase sales. I. Copy the complete YouTube URL of your webinar II. Go to RunClick Plugin in your WordPress Dashboard and make sure you re on the Webinars tab. Click on Create New Webinar 27 Page
 drop-down Panels: Event Details, Clock Design, Page Design, and Header Settings.")
28 III. Select Recorded Webinar and click on Next. You ll be taken to the Event tab. IV. Under the Events tab, there are FOUR (4) drop-down Panels: Event Details, Clock Design, Page Design, and Header Settings. Each has their own group of settings you ll need to configure. Click on Event Details. 28 Page
29 a. Event Details i. Type in the title of your Evergreen webinar ii. Paste the complete YouTube URL of your webinar iii. Select the event video size you want from the dropdown menu iv. Choose Yes if you want your attendees to have the Watch Now option. If not, select No. v. RunClick has three (3) scheduling options: 3 Day System, Calendar, and Days. It also allows you to select timeslots when the webinar would be available to your viewers. (Ex. 7AM, 3PM, and 7PM) 29 Page
30 1. 3 Day System: The webinar will be available for three consecutive days. For example, if an attendee registers on a Friday, the webinar will be available on Friday, Saturday, and Sunday. 2. Calendar: A Calendar menu will appear on the registration page and the attendee will be able to select a specific date when to watch the webinar. 3. Days: As the webinar host, you ll be able to select the day or days when your Evergreen webinar should be available, e.g. Monday, Tuesday, Wednesday, Thursday, Friday, Saturday, and Sunday. vi. Select whether you want to show pop-up on video Note: This will be covered in more detail in a separate section. vii. Take Registrations: Yes or No. We recommend enabling this option. That way you ll be able to collect the addresses of attendees. viii. You can choose Default (RunClick s Built-In Registration System) or select a different registration system and set it up. ix. If you want to send reminder s to attendees, choose Yes 30 Page


31 x. For an Evergreen webinar, select No. This option is best enabled for live webinars. b. Clock Design: Skip for Evergreen webinars c. Page Design You have two options: Design your own or use the pre-set web design. i. Using the Pre-Set Page Design is quicker. It also gives you the option to upload an image and use as a banner. You can also set the timer s position. ii. If you choose to design your registration page, you ll have to configure every element on your registration page. 31 Page
32 d. Header Settings i. Enable social sharing V. Click Add Webinar 32 Page


33 Setting A Call To Action Or Floating BUY Button On Your Webinar I. Go to the Vote and Pop Up tab and select Yes for the Show Buy Button. Three new panels will appear: Buy Button Display, Buy Button Hide, Buy Button HTML. II. Set your Buy Button Display time. This will tell RunClick when to display your Buy Now button during the webinar. For example you set it to 0 Hours, 0 Minutes, 10 Seconds. The Buy Now button will appear during the 10th second of your video. III. Set your Buy Button Hide time. This will tell RunClick when to hide your Buy Now Button during the webinar. For example you set it to 0 Hours, 0 Minutes, 20 Seconds. The Buy Now button will disappear during the 20th second of your video. IV. Upload your Buy Now image. It should be a PNG file and the image should have a transparent background. 33 Page

34 V. Link your Buy Now image to your sales page. Click the Paper Clip icon and paste your sales page URL. Click Update and then save your new RunClick settings. 34 Page

35 Aweber Integrating Autoresponders To RunClick For Lead Capture RunClick allows the integration of other autoresponders. Here s the step-by-step process in using Aweber as your registration system. Aweber I. Under the Event Details panel in RunClick s Event tab, select Aweber from the dropdown menu II. Click Setup. It will take you to Aweber s authorization page. 35 Page

36 III. IV. Enter your Login Name and password and click on Allow Access Copy the authorization code and paste it in RunClick and hit Create Connection. It will automatically configure your autoresponder settings. Settings for Other Autoresponders that are not included in the dropdown: I. Choose Other from the Registration System dropdown menu. II. Fill out the required fields: Autoresponder Name Field Name, Autoresponder Field Name, and Autoresponder HTML Code. Save settings. 36 Page


37 Uploading the Template Packages Template packages or themes are optional upgrades of RunClick. You can have as much as 10 landing page packages or themes in your RunClick System. Uploading a Template Package via the WordPress Dashboard I. In RunClick, go to Webinar Settings II. Scroll down to Upload Theme, click on Choose File, and find your template zip file. Click on Save Settings. III. Wait for the upload to finish or until you see the Successfully Updated message 37 Page


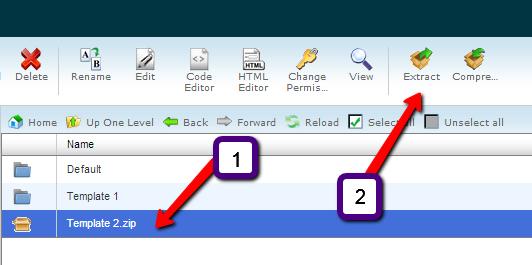
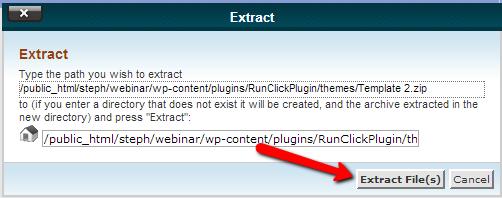
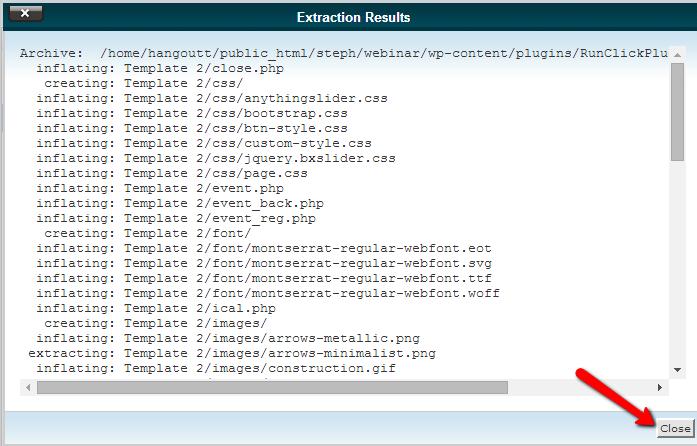
38 Uploading a Template Package via CPanel (FTP) I. Log in to Cpanel and open File Manager II. III. IV. Under the public_html, find the folder where you installed RunClick Plugin. (Ex. Steph>Webinar) Double-click the wp_content folder and go to plugins Open the RunClick Plugin and go to themes >> >> >> >> >> >> V. Once you re in the themes folder, click on Upload, then Choose File, and select the template zip folder. Once upload is done, click the link to go back to the themes folder. VI. Click the template zip folder once to highlight it and hit Extract 38 Page
39 39 Page


40 VII. Hit Reload to refresh the folder and display the unzipped folder of the template package VIII. IX. Click Up One Level to go back and scroll down to find the layout.xml file Select layout.xml and click on Edit 40 Page

41 X. Click the Edit button on the Text Editor prompt. This will open a different tab where you can edit the codes inside the xml file. XI. Add the code <item>template 2</item> and Save Changes Note: If you have more templates, keep adding this code until you have each for every template you uploaded. Always stick to the format. XII. To check if you ve successfully uploaded and installed those templates, go back to RunClick on the Wordpress Dashboard, click on Create a New Webinar, and check out if the template thumbnails appeared under the Theme Tab. 41 Page


42 Taking a Webinar and Hangout LIVE With RunClick I. Click the globe icon of your webinar. It will take you to the Live tab. II. Under the Live Event Settings panel, select the video size and set whether you want to turn on chat or not during the live webinar. Note: The Page Design and Header Settings are also under the Live tab. However, it s best to configure this settings beforehand, not when you re about to go live. III. Click on the red G+ Hangout button. It will open a Google Hangouts window and it will prompt you to Setup your Hangout On Air. IV. Enter your webinar s title and click Start Hangout on Air. Note: This will NOT automatically start the broadcast. 42 Page

43 V. WAIT FOR THE LOADING PROCESS TO REACH 100%. VI. Once it reaches 100%, the Start Broadcast button will take its place. Unless you click on, your webinar will stay offline. 43 Page


44 VII. Familiarize yourself with the Google Hangout interface and buttons VIII. Before hitting the Start Broadcast button, copy the link of the webinar and paste in a text editor or somewhere you can easily get to in case Google Hangouts drops the call unexpectedly. You can immediately use the link to go back to your webinar. 44 Page


45 IX. Click on Links found near the lower right corner of the window X. Copy the YouTube Page link. Take note that it s the XI. Paste the YouTube Page link to RunClick Plugin in WordPress and click on Update Live Webinar found at the lower right corner of RunClick XII. Click on the Live button on RunClick Plugin 45 Page

46 XIII. Go back to your Google Hangouts window, hit and click on OK when Hangouts prompts you that you re Broadcasting Publicly And now your webinar is LIVE! 46 Page

47 Using the CHAT System with RunClick Software To run Live Q and A During a Webinar Event I. Check if your Chat is turned on or not. If the light is green, it s ON. But if it s red, you ll need to activate it. II. Go to Webinar Settings and scroll down to Webinar Chat. Tick YES and the Webinar Apps Link will appear. Save settings. III. Click on the Webinar Apps Link and it will open a new Google Hangout tab or window. An invite popup will appear. Just close it and let the plugin load and install. You may now use Hangout Plugin Chat App for all your webinar events! 47 Page
48 Setting Up Interaction, Live Voting and Buy Buttons During an Event with RunClick I. Go through all the steps of creating a new webinar (New Webinar >> Event Settings >> Create New Webinar) II. Hover your mouse pointer on the view button, right-click and open in a new tab. It will open your Webinar Event Page. III. Go back to RunClick and this time click the Edit button IV. Go to the Vote and Pop Up tab and click on the Pop Up Setting panel V. Select Yes to Show the Buy Button and click on Add Media to choose or upload your Buy Button icon 48 Page

49 VI. Upload a new icon (should have a transparent background) or select from the icons you ve previously uploaded to your Media Gallery and click on Insert Post VII. Turn your image into a link by selecting the image inserted into the editor and clicking the link button VIII. Paste the destination URL you want your buy button to link to, tick Open link in a new window/tab and click on Update. Hit Save Settings. 49 Page

50 IX. Go to the Live tab and configure the Live Event Settings X. Take note of your Webinar Id Number, select your video size and turn on chat XI. To get your YouTube URL, click on the red g+ Hangout button. It will open your Google+ Hangout Window. Type in your Hangout name and click on Start Hangout on Air 50 Page


51 XII. Stop the initial loading process of the plugins XIII. Copy the YouTube URL, go back to RunClick, and paste it on the YouTube URL field 51 Page

52 XIV. Go back to your Google+ Hangout window, open Hangout Plugin Chat App and enter the domain or subdomain where you installed RunClick plugin XV. To setup the buy button, click on the gear icon and type in the Webinar ID number XVI. Go back to RunClick and take your webinar Live and refresh your webinar event page 52 Page


53 XVII. Go back to your Google Hangout window. You re now ready for broadcast. You can use the Push Buy Now Form button anytime to display and remove the Buy Now button from your webinar. XVIII. To switch from Chat to activating or removing your Buy Now button, click on these icons 53 Page

54 XIX. To add a Vote Question, go back to RunClick and click on the Vote and Pop Up tab. Type in your question and enter you vote options. When entering your vote options, type in one choice and click add. Repeat for the other choices. Choose a default answer by ticking one of the choices and save settings. 54 Page
Marketing Insider... 3 Section 1 Your List... 4 AWeber Basics... 4 Create your Account... 5 Exploring AWeber s Members Area...
 Email Marketing Insider... 3 Section 1 Your Email List... 4 AWeber Basics... 4 Create your Account... 5 Exploring AWeber s Members Area... 6 Create Your List... 7 Create Your Web Form... 8 Facebook List
Imagery International website manual
 Imagery International website manual Prepared for: Imagery International Prepared by: Jenn de la Fuente Rosebud Designs http://www.jrosebud.com/designs designs@jrosebud.com 916.538.2133 A brief introduction
FB Image Contest. Users Manual
 FB Image Contest Users Manual Table of contents Description.. 3 Step by step installation... 5 The administration interface.. 10 Creating a new contest... 13 Creating a Facebook Application.. 19 Adding
ReadyTalk for HubSpot User Guide
 ReadyTalk for HubSpot User Guide Revised March 2016 2 Contents Overview... 3 Configuring ReadyTalk & HubSpot... 4 Configure Sync for Additional Webinar Data... 6 How to Setup the Sync for Additional Webinar
CareCarma. It Starts With Family
 CareCarma It Starts With Family 3. INTRODUCTION 3. How can CareCarma Help You? 3. CareCarma Home Page 4. CareCarma CareCircle 4. CareCarma CareCircle Tools 5. Work on Different Plattforms 6. GETTING STARTED
ReadyTalk for HubSpot User Guide
 ReadyTalk for HubSpot User Guide Revised 07/29/2013 2 Table of Contents Overview... 3 Configuring ReadyTalk & HubSpot... 4 Setting Up Your Event in Conference Center... 6 Setting Up Your Event in HubSpot...
CONVERSION TRACKING PIXEL GUIDE
 Conversion Tracking Pixel Guide A Step By Step Guide to Installing a conversion tracking pixel for your next Facebook ad. Go beyond clicks, and know who s converting. PRESENTED BY JULIE LOWE OF SOCIALLY
NiCHE Website Posting Guidelines & Best Practices (updated 22 December, 2013)
") NiCHE Website Posting Guidelines & Best Practices (updated 22 December, 2013) Getting oriented Registering for an account The WordPress Dashboard Editing your profile What to do if you ve lost your password
NiCHE Website Posting Guidelines & Best Practices (updated 22 December, 2013) Getting oriented Registering for an account The WordPress Dashboard Editing your profile What to do if you ve lost your password
Pages are static content, generally linked in your navigation. They are used for things like your about page and contact page.
 North Star Marketing Client : The Guthrie Group Deliverable : Website Training +++ LOGGING IN AND OUT +++++++++ 1. Go to http://tgg.northstarmarketing.com/wp admin/. This is the address for the staging
Autoresponder Guide. David Sharpe
 David Sharpe There are two autoresponders that I personally use and recommended AWeber and Sendlane. AWeber AWeber is a great service to use if you already have a website you are using. You can easily
Lead Rocket Training Manual
 Lead Rocket Training Manual Discover the Most Incredible Bonus Gift Ever! Just go to http://undergroundmarketers.com/bonus This guide is devised into 3 parts the first section details how to install, activate
How To Set Up The Genius Store Builder Theme Step--By--Step Guide For Building Your First Profitable Affiliate Store
 How To Set Up The Genius Store Builder Theme Step--By--Step Guide For Building Your First Profitable Affiliate Store Thank you for purchasing the InstaGenus plugin. You have received our bonus Genius Store
Onboarding Instructions for Content Delivered- Automated Posting Service. 1. Check for new form submissions daily
 Onboarding Instructions for Content Delivered- Automated Posting Service Reference this document for instructions on how to onboard new Content Delivered- Automated clients by adding their accounts to
Quick Start Guide #1 Getting Started & Basic Setup WishList Products
 1 Table of Contents A. Pre-Setup... 4 1) Secure a domain name:...4 2) Secure a hosting account:...4 3) Setup DNS accordingly:...4 B. Installation... 4 1) Download/Install WordPress to recently secured
WEBSITE INSTRUCTIONS. Table of Contents
 WEBSITE INSTRUCTIONS Table of Contents 1. How to edit your website 2. Kigo Plugin 2.1. Initial Setup 2.2. Data sync 2.3. General 2.4. Property & Search Settings 2.5. Slideshow 2.6. Take me live 2.7. Advanced
Documentation of Woocommerce Login / Sign up Premium. Installation of Woocommerce Login / Sign up Premium
 Documentation of Woocommerce Login / Sign up Premium Installation of Woocommerce Login / Sign up Premium Installation Install Word Press from http://codex.wordpress.org/installing_wordpress. Upload via
WebEx. Web Conferencing Tool. Fordham IT
 WebEx Web Conferencing Tool Faculty + Staff User Guide Fordham IT Contents WebEx Faculty + Staff User Guide Schedule a Meeting Using the WebEx Meeting Site 1 WebEx Scheduling Template 2 Join a Meeting
Swiiit User Guide 09/11/2016
 Swiiit User Guide 09/11/2016 Contents Getting Started... 4 Overview of Main Tools... 5 Webpages... 6 Main pages (Sections)... 6 Rearrange Sections... 6 Subpages... 7 Change the Title of a Webpage... 8
BindTuning Installations Instructions, Setup Guide. Invent Setup Guide
 BindTuning Installations Instructions, Setup Guide Invent Setup Guide This documentation was developed by, and is property of Bind Lda, Portugal. As with any software product that constantly evolves, our
Classroom Blogging. Training wiki:
 Classroom Blogging Training wiki: http://technologyintegrationshthornt.pbworks.com/create-a-blog 1. Create a Google Account Navigate to http://www.google.com and sign up for a Google account. o Use your
WEBSITE INSTRUCTIONS
 Table of Contents WEBSITE INSTRUCTIONS 1. How to edit your website 2. Kigo Plugin 2.1. Initial Setup 2.2. Data sync 2.3. General 2.4. Property & Search Settings 2.5. Slideshow 2.6. Take me live 2.7. Advanced
Quick Online Shop Documentation
 Quick Online Shop Documentation In the following tutorial, you will get a complete step by step guide of using Quick Online Shop WordPress theme for building an amazon affiliate store site. All steps have
WHILE YOU RE GETTING ORGANIZED
 CAMPTECH.CA WHILE YOU RE GETTING ORGANIZED 1. Go to camptech.ca/wordpress and download the PDF of slides. 2. If you have to leave early, please remember to fill out the (100% anonymous) feedback form on
WPI Project Center WordPress Manual For Editors
 WPI Project Center WordPress Manual For Editors April 17, 2015 Table of Contents Who should use this manual... 3 Signing into WordPress... 3 The WordPress Dashboard and Left-Hand Navigation Menu... 4 Adding
Step-by-Step Guide to Set Up Your Challenge Opt-In Page with MailChimp and LeadPages (last updated August 6, 2017)
") Step-by-Step Guide to Set Up Your Challenge Opt-In Page with MailChimp and LeadPages (last updated August 6, 2017) MailChimp is a beginner-level marketing automation platform and an email marketing service.
Step-by-Step Guide to Set Up Your Challenge Opt-In Page with MailChimp and LeadPages (last updated August 6, 2017) MailChimp is a beginner-level marketing automation platform and an email marketing service.
Bluehost and WordPress
 Bluehost and WordPress Your Bluehost account allows you to install a self-hosted Wordpress installation. We will be doing this, and you will be customizing it for your final project. Using WordPress 1.
Blogger Frequently Asked Questions
 Blogger Frequently Asked Questions Blogger is an easy to use blogging tool, allowing you to contribute to existing blogs and create your own. Blogger requires a Google account to register. This guide will
Layout and display. STILOG IST, all rights reserved
 2 Table of Contents I. Main Window... 1 1. DEFINITION... 1 2. LIST OF WINDOW ELEMENTS... 1 Quick Access Bar... 1 Menu Bar... 1 Windows... 2 Status bar... 2 Pop-up menu... 4 II. Menu Bar... 5 1. DEFINITION...
QUICK START GUIDE. How Do I Get Started? Step #1 - Your Account Setup Wizard. Step #2 - Meet Your Back Office Homepage
 QUICK START GUIDE Here is a tool that will help you generate prospects and follow up with them using your web browser. Your Lead Capture system has Personal Sites, Contact Management, Sales Tools and a
HOW TO Google Online Fillable Forms for Kiwanis Club Websites
 KIWANIS INTERNATIONAL HOW TO Google Online Fillable Forms for Kiwanis Club Websites Publish via email, website or blog Mandy Grover User instructions for creating free online fillable forms with Google
Surface Documentation
 Surface Documentation A fully responsive magazine and blogging WordPress theme credit... Surface is a fully responsive magazine and blogging WordPress theme, built in a timeless and dynamic style. Surface
COPYRIGHTED MATERIAL. Acknowledgments...v Introduction... xxi
 Acknowledgments...v Introduction... xxi Part I: Getting Started with Joomla!.....................1 Chapter 1: Introducing the Joomla! Content Management System...3 Chapter 2: Obtaining and Installing Joomla!...15
Startup Guide. Version 2.3.7
 Startup Guide Version 2.3.7 Installation and initial setup Your welcome email included a link to download the ORBTR plugin. Save the software to your hard drive and log into the admin panel of your WordPress
Committee Chair Manual for AIA SEATTLE S ONLINE MEMBER COMMUNICATION TOOL. Questions? Contact AIA Seattle s Communications team.
 Contents Access to edit aiaseattle.org... 1 Committee Hub Pages... 2 Hub Page Editor... 2 Main Content Block... 2 Featured Image... 3 Files... 3 Events... 5 Recurring Committee Meetings... 8 Posts... 8
Build a Personal Website in WordPress
 Build a Personal Website in WordPress I. Installing WordPress Setting up a WordPress install on your own domain can be done by following these simple steps: SIGN IN TO DOMAINS 1. Go to https://domains.unf.edu
Who should use this manual. Signing into WordPress
 WordPress Manual Table of Contents Who should use this manual... 3 Signing into WordPress... 3 The WordPress Dashboard and Left-Hand Navigation Menu... 4 Pages vs. Posts... 5 Adding & Editing Your Web
New Website User Manual
 New Website User Manual General Notes 3 How To Login To Your Website And Access Admin Dashboard 4 Adding / Editing Sliders 5 Home Slider 5 School Slider (Same steps for ALL school pages) - Add a Slide
VIDEO STUDIO USER GUIDE
 VIDEO STUDIO USER GUIDE Contents 1. INSTALLING AND ACTIVATING VIDEO STUDIO... 3 1.1 Installation via WordPress dashboard... 3 1.2 Installation via cpanel (or ftp)... 3 2. SETTING UP VIDEO STUDIO... 5 2.1
Web Community Manager Release 4 (2.20)
") Blackboard Help English Administrator Web Community Manager Release 4 (2.20) Here is what is new in Release 4 (2.20). Google sign-in You can now allow users to sign-in with their Google login information.
Blackboard Help English Administrator Web Community Manager Release 4 (2.20) Here is what is new in Release 4 (2.20). Google sign-in You can now allow users to sign-in with their Google login information.
ETC WEBCHAT USER GUIDE
 ETC WEBCHAT USER GUIDE CONTENTS Overview... 2 Agent and User Experience... 2 Agent Extention Window... 3 Etc WebChat Admin Portal... 4 Agent Groups... 5 Create, Edit, Delete A Group... 5 Create, Edit,
Wordpress & Theme Installation
 Wordpress & Theme Installation At this point you have already completed all of the planning for your new website so it is time to start installing the software you need to run it. Today we will be installing
Your total guide to setup your own click funnel website.
 Your total guide to setup your own click funnel website. This ebook will give you full step by step instructions on creating a click funnel website. If you need help, anytime, email us at: contact@merchantsavenow.com
Logging in to the management system.
 Welcome to your new site! The Wordpress publishing platform is a robust tool that helps you publish your content to the web without getting too involved with the code. This guide is designed to help you
BlueJeans Events Instructions for Moderators. October 2017
 BlueJeans Events Instructions for Moderators October 2017 Scheduling Events Schedule an Event 1. Enter an Event Title 2. Provide a Description 3. Select an available Event Size (your plan will dictate
Swiiit User Guide 03/09/2015
 Swiiit User Guide 03/09/2015 Contents Getting Started... 4 Overview of Main Tools... 5 Webpages... 6 Main pages (Sections)... 6 Rearrange Sections... 6 Subpages... 7 Change the Title of a Webpage... 8
ADMIN MANUAL OF Wordpress
 ADMIN MANUAL OF Wordpress By: - Pratap Singh 8800 93 45 56 Logging In to WordPress WordPress login screen Enter your username and password. If you have forgotten this information, use the Lost Your Password?
EventCenter Training SEPTEMBER CrowdCompass 2505 SE 11 th Ave, Suite #300 Portland, OR
 EventCenter Training SEPTEMBER 2014 CrowdCompass 2505 SE 11 th Ave, Suite #300 Portland, OR www.crowdcompass.com Toll-free: +1.888.889.3069 Fax: +1.877.615.6699 Contents Familiarize Yourself... 3 Introduction...
Google Sites 101. Mrs. Wilson
 Google Sites 101 Mrs. Wilson Google Sites 101 Create a site 1. Go to http://sites.google.com/ 2. Login with your Google Account [or Google Apps account] email address and password You can create a Google
For more info on Cloud9 see their documentation:
 Intro to Wordpress Cloud 9 - http://c9.io With the free C9 account you have limited space and only 1 private project. Pay attention to your memory, cpu and disk usage meter at the top of the screen. For
Getting Started Your website uses two WordPress installations. To login to the admin interfaces, go to:
 Holden High Web Content Management Training October 14, 2008 Contents Overview... 1 Getting Started... 1 Touring the Administrative Panels... 2 Editing Content... 3 Formatting Content... 4 Parent Side
Plus Your Business - Google+ Posts, Events and Photos Google+ Posts, Events and Photos
 Google+ Posts, Events and Photos www.plusyourbusiness.com Page 1 Google+ Posts, Events and Photos Your Content and your Profile Google+ Posts Adding text to an image Other features from the Google Post
Installation & Configuration Guide Enterprise/Unlimited Edition
 Installation & Configuration Guide Enterprise/Unlimited Edition Version 2.3 Updated January 2014 Table of Contents Getting Started... 3 Introduction... 3 Requirements... 3 Support... 4 Recommended Browsers...
ALES Wordpress Editor documentation ALES Research websites
 ALES Wordpress Editor documentation ALES Research websites Contents Login... 2 Website Dashboard... 3 Editing menu order or structure... 4 Add a new page... 6 Move a page... 6 Select a page to edit...
Training Module. 1.0 Getting Started with Google+ Hangouts (Teacher)
") Training Module 1.0 Getting Started with Google+ Hangouts (Teacher) 0 Google+ Hangouts: Complete guide for Teacher Table of Content Table of Content Requirements for Hangout 1.0 Getting Started 1.1 Activate
Training Module 1.0 Getting Started with Google+ Hangouts (Teacher) 0 Google+ Hangouts: Complete guide for Teacher Table of Content Table of Content Requirements for Hangout 1.0 Getting Started 1.1 Activate
Starting Your SD41 Wordpress Blog blogs.sd41.bc.ca
 Starting Your SD41 Wordpress Blog blogs.sd41.bc.ca The web address to your blog starts with blogs.sd41.bc.ca/lastnamefirstinitial (eg. John Smith s blog is blogs.sd41.bc.ca/smithj) All work is done in
Web Community Manager 2.20 Release Notes
 New or Changed Functionality or User Experience GENERAL Sign-in with Google Login You can now allow users to sign-in with their Google TM login information. The user s Google email address must be associated
Rocket Theme. User Guide
 Rocket Theme User Guide This user guide explains all main features and tricks of multifunctional Rocket WordPress Theme. This information will make your work with the theme even easier and more effective.
The 5 Minute WordPress Setup Guide
 Module 1 The 5 Minute WordPress Setup Guide The Author Website Toolkit & The 5 Minute WordPress Setup Guide is copyright Daphne Dangerlove 2013. Worldwide rights reserved. If you have any questions about
How to Use WordPress
 How to Use WordPress Introduction... 1 When to Use WordPress... 1 WordPress vs. WordPress.com... 1 WordPress... 1 WordPress.com... 2 Getting Started... 2 WordPress.com... 2 WordPress software... 3 Logging
Training Manual and Help File
 Training Manual and Help File 30.06.2011 Update Manage Grow Welcome to your new Juniper Website Management System with CMS Introduction The Juniper Website Management System with CMS (Website Content Management
A Quick Introduction to the Genesis Framework for WordPress. How to Install the Genesis Framework (and a Child Theme)
") Table of Contents A Quick Introduction to the Genesis Framework for WordPress Introduction to the Genesis Framework... 5 1.1 What's a Framework?... 5 1.2 What's a Child Theme?... 5 1.3 Theme Files... 5
Table of Contents A Quick Introduction to the Genesis Framework for WordPress Introduction to the Genesis Framework... 5 1.1 What's a Framework?... 5 1.2 What's a Child Theme?... 5 1.3 Theme Files... 5
2018 Educare Learning Network Meeting App Instructional Guide
 2018 Educare Learning Network Meeting App Instructional Guide App Instructional Guide Adding Your Profile Photo On ios 1 Access your profile settings. After logging in, tap the hamburger icon in the top
Google Classroom User Manual
 Google Classroom User Manual Table of Contents Table of Contents 1 Google Classroom on a Computer 3 1: Making an Account 3 2: Change Your Profile Photo 5 3: Customize your Notifications 7 4: Join a Class
Social Viral Video Training Manual
 2 Welcome! We have created a detailed guide on setting up and using Social Viral Video. Please go through it and let us know if you get stuck at anything. The app creation process is relatively long, but
Creating and Managing Your Personal Mines Website on WordPress
 Creating and Managing Your Personal Mines Website on WordPress Table of Contents Creating your site... 2 Managing your site... 2 About WordPress... 2 Logging in... 2 Pages... 2 Editing an Existing Page...
Manually Using Cpanel
 How To Install Plugin Joomla 2.5 Template Manually Using Cpanel From here you can install your Templates, Plugins, Modules, Components and Simply select the template folder on your PC and upload it to
Hart House C&C Website Guide
 step-by-step Instructions Hart House C&C Website Guide > Step-by-step instructions > Guidelines Materials available Online: www.harthouse.ca/design What s included in this guide? Included in this guide:
WordPress site Import/Export Procedure
 Platform Export single site from WordPress single site (SOURCE SITE) Import to one site on VSB Blog site (DESTINATION SITE) This procedure does not require direct access to the file servers that host the
Getting Started with ShortStack
 Getting Started with ShortStack presented by SHORTSTACK Welcome to ShortStack! This guide covers our platform s five main sections: Tabs, Designer, Media, Templates, and Forms & Promos so that you can
USER MANUAL. Dynamics CRM Customer Portal for WordPress TABLE OF CONTENTS. Version: 1.2.1
 USER MANUAL TABLE OF CONTENTS Introduction... 1 Benefits of Customer Portal... 1 Prerequisites... 1 Installation... 2 Dynamics CRM Plug-in Installation... 2 WordPress Manual Plug-in installation... 5 Plug-in
Oceanica Theme Documentation
 Oceanica Theme Documentation Updated on December 29, 2017 Installation Import sample data Import sample data from xml file. Import sample data from.sql file. Set up the front page Edit front page Site
Act! Marketing Automation
 Act! Marketing Automation A Guide to Getting Started Helping your business grow with marketing automation Act! Marketing Automation Getting Started Guide 2 Contents Page Page 8 Page 10 Page 11 Page 11
SCHULICH MEDICINE & DENTISTRY Website Updates August 30, Administrative Web Editor Guide v6
 SCHULICH MEDICINE & DENTISTRY Website Updates August 30, 2012 Administrative Web Editor Guide v6 Table of Contents Chapter 1 Web Anatomy... 1 1.1 What You Need To Know First... 1 1.2 Anatomy of a Home
General Settings General Settings Settings
 Contents General Settings... 3 Payment Methods... 31 Currency Management... 35 Sales Tax... 37 Commission Settings... 40 Affiliate Commission Settings... 43 Email Templates Management... 46 Subscription
Ace Corporate Documentation
 Ace Corporate Documentation Introduction Welcome To Ace Corporate! We would like to thank you for donwloading Ace Corporate, Business WordPress theme. It is the lite version of Ace Corporate Pro. Before
Transitioning Teacher Websites
 Transitioning Teacher Websites Google sites is an online web building tool that can be accessed and updated from anywhere there is an internet connection. Here is a brief video introduction of Google sites.
Weebly Basics Tutorial: Create a Home Page. Create a Home Page
 Create a Home Page Weebly is a free online web authoring tool to help you build and publish a website. This tutorial will help you get familiar with the functions and basic skills in using weebly to create
Administrator Quick Guide
 1 Administrator Quick Guide Login Screen The first page employees will see when visiting their training site is the login screen. This is where employees must enter their username and password to access
ENABLING WEBCHAT HOSTED USER GUIDE
 ENABLING WEBCHAT HOSTED USER GUIDE CONTENTS... 1 Sign up Process... 2 Sign up Process (Continued)... 3 Logging In/ Out... 4 Admin Dashboard... 5 Creating, Edit, Delete A User... 5 Creating, Edit, Delete
WorkFlow: Provisioning Your Account
 WorkFlow: Provisioning Your Account Section 1 Account Settings Any changes you make to the Media Content Account Contact Information will also update in the imonitor module (if subscribed) and the Reporting
The Instagram Promotion Template
 The Instagram Promotion Template You ll often see Instagram posts with the caption, click the link in the bio. That s because Instagram restricts profiles to that one link. For individuals, this isn t
CITY UNIVERSITY OF NEW YORK. i. Visit:
 CITY UNIVERSITY OF NEW YORK I. ACCESSING IRB NET (New Registration) i. Visit: https://www.irbnet.org/release/index.html ii. New users: Click on New Registration in the top right corner iii. Fill-out the
eportfolio GENERAL USER
 eportfolio GENERAL USER Startup Guide [2016-17] Table of Contents Page 2: Introduction Logging in to your Digication account Page 3: Page 4: Steps to create an eportfolio from course template Steps to
WordPress Manual For Massachusetts Academy of Math and Science
 WordPress Manual For Massachusetts Academy of Math and Science September 19, 2017 Table of Contents Who should use this manual... 4 Signing into WordPress... 4 The WordPress Dashboard and Left-Hand Navigation
NWFAU Digital Badges: Sharing Your Credentials
 NWFAU Digital Badges: Sharing Your Credentials Click me! Click me! Click me! Click me! Click me! Unlike a static image that can be found on the internet, your digital badge is the total package a hyperlinked
NWIC EDITOR GUIDE August 2016
 NWIC EDITOR GUIDE August 2016 THEME NAME: CLEVERCOURSE logging in: GO TO nwic.edu/wp-login.php blogs.nwic.edu/wp-login.php foundation.nwic.edu/wp-login.php Please note that your Username is your full nwic.edu
Welcome to Innovative's Ministry Websites
 Welcome to Innovative's Ministry Websites Ministry Administration Tools You now have access to the administrative tools for your Ministry Bookstore Website. These tools are designed to help you maintain
Wordpress Training Manual
 The Dashboard... 2 If this is your first time logging in:... 2 How do I change my password or email address?... 3 Search Engine Optimization (SEO)... 4 SEO for Pages... 4 SEO for Images... 5 Managing Pages...
Membership Mastery. Easily Create Your Own Membership Site Using WishList and Wordpress EXCLUSIVE CONTENT. by: Aidan Booth & Steve Clayton
 Membership Mastery Easily Create Your Own Membership Site Using WishList and Wordpress EXCLUSIVE CONTENT by: Aidan Booth & Steve Clayton WHY MEMBERSHIP SITES? 3 OPTIMIZEPRESS WORDPRESS THEME 3 INSTALLING
The Veranda House WORDPRESS MANUAL O ROURKE HOSPITALITY MARKETING OROURKEHOSPITALITY.COM
 The Veranda House WORDPRESS MANUAL TABLE OF CONTENTS Login... 3 Editing Existing Pages... 4 Adding New Pages... 6 Editing a Room Post... 7 Editing a Packages Post... 9 Editing/Adding Text... 11 Creating
WordPress Manual First Year Experience
 WordPress Manual First Year Experience May 18, 2015 Table of Contents Who should use this manual... 3 Signing into WordPress... 3 The WordPress Dashboard and Left-Hand Navigation Menu... 4 The Home Page
Dreamweaver CS5 Lab 4: Sprys
 Dreamweaver CS5 Lab 4: Sprys 1. Create a new html web page. a. Select file->new, and then Blank Page: HTML: 2 column liquid, left sidebar, header and footer b. DocType: XHTML 1.0 Strict c. Layout CSS:
Mary Kay Social Publisher. Sales Force Tutorial
 Mary Kay Social Publisher Sales Force Tutorial Page 1 5/30/2014 What is the Mary Kay Social Publisher? The Mary Kay Social Publisher is a service that will assist you with marketing your business on social
Step 1: Upload a video (skip to Step 2 if you ve already uploaded a video directly from your ipod, Uploading to YouTube and Posting in Blackboard
 Uploading to YouTube and Posting in Blackboard This document will explain 1. How to upload videos from your computer to YouTube 2. How to obtain the URL (web link) or embed code for your video 3. How to
Drupal 7 Template. Page 1 of 27. Site Title. Navigation Tabs. Homepage Slide. Social Media. News article. Events. Links. Contact Information
 Site Title Navigation Tabs Homepage Slide News article Social Media Events Contact Information Links Page 1 of 27 Table of Contents USER ACCOUNT... 3 Edit Profile... 3 CONTENT... 5 ADD CONTENT... 5 BASIC
User Manual Version
 Next FlipBook Maker for Windows User Manual Version 2.5.10 1 Content Cover 1 Content 2 1. Import PDF fires or images 3 2. Setting, Template, Scene and Bookmark 5 3. Publish local flipbook 19 4. Publish
Documentation of Woocommerce Login / Sign up Premium. Installation of Woocommerce Login / Sign up Premium
 Documentation of Woocommerce Login / Sign up Premium Installation of Woocommerce Login / Sign up Premium Installation 1. Install Word Press from http://codex.wordpress.org/installing_wordpress. 2. Upload
Introducing Thrive - The Ultimate In WordPress Blog Design & Growth
 Introducing Thrive - The Ultimate In WordPress Blog Design & Growth Module 1: Download 2 Okay, I know. The title of this download seems super selly. I have to apologize for that, but never before have
Logging Into Your Site
 This training document is meant as a step-by-step guide to creating and delivering a UW-Madison site in the current UW-Madison theme. In this training class, you will learn how to log in to access your
1. Login to https://marketplace.singtel.com/ and enter your login ID and password.
 Web Builder User Guide Launching Web Builder Understanding the Basics Getting Started Creating Content Adding Subpages Moving a Webpage Design Templates Webpage Layout Uploading Files Inserting Files Deleting