BANNER REQUISITION USER GUIDE
|
|
|
- Anne Kennedy
- 5 years ago
- Views:
Transcription
1 NORTHWEST FLORIDA STATE COLLEGE BANNER REQUISITION USER GUIDE 2
2 Table of Contents: Chapter 1 Forms used for Banner Requisitions. 3 Chapter 2 Navigating and creating a new Requisition... 4 Requestor/ Delivery Page.. 5 Vendor Information 8 Commodity/ Accounting.. 13 Balancing and Completion 27 3
3 CHAPTER 1 Forms REQUISITION FORMS: A.) FPAREQN Creates a new Requisition 4

 Do a CRTL + Page Down to access the application (Note: you can also use the Next Block button on your tool bar to perform the action of")
4 CHAPTER 2: Navigating and creating a New Requisition At the Banner Go To: you will need to type the Banner form you want to access. To create a requisition, type FPAREQN and press ENTER. You will be redirected to the application screen to start a new requisition. At this screen, you can either key in the word NEXT or press the ENTER button (this will populate the word next in for you.) Do a CRTL + Page Down to access the application (Note: you can also use the Next Block button on your tool bar to perform the action of cntrl + page down). Next Block 5

.")
5 Requestor/ Delivery Page The Order Date & Transaction Date will automatically have a date populate for you. (Note: you do not need to make any changes with these fields. Theses fields will always be the date you started your requisition.) Next, Tab to the Delivery Date box. Delivery Date In this box, you will need to enter an estimates delivery date at which you need the products to arrive. (Note: Please allow 1 week for full process. This is to include extra time for any problems that may arise while processing). You may use the calendar to choose your date: Click on the Calendar Button, this will populate an interactive calendar box (See Below). 6


6 After you have indicated your delivery date, TAB to the Comments box. This box is not a required text field. You may use this field to either leave a note to purchasing or use it internally. (Please note that you are limited to a certain number of characters you can use in this field-36 Characters). Next, TAB to the Requestor Box. Once you have gained access to input requisitions, your TAB to the Organization box, you will need to enter the organization number to which you would like to charge the encumbrance. (Note: If you are using multiple orgs, indicate a primary org that you would like to use here.) Once you have the organization indicated, TAB to the Ship To box. Here you will want to use the Ship To code of NWFINC. 7
.")

7 Once you have the Requestor/ Delivery information page filled out, Next Block to move to the Vendor Information section. Vendor Information At the Vendor screen, you will need to perform a query to select your vendor. To do so, Click on the drop down box (see below). NWFSC has instituted the use of Smart IDs for Vendors. The Smart ID is usually the first three letters of the first two words in the company name. Example: Office Depot would be OFFDEP. This is the fastest way to search for an active vendor. If you don t find the vendor by searching for the Smart ID, try different variations of company name and wildcards in the Last Name field. If the Vendor you want to use is not listed, contact the Purchasing Department In the drop down field, you will be prompted with an Options List. Choose the Entity Name/ ID Search option. You will be moved to a new screen that will allow you to perform a Banner query search (see below.) Note: In banner, to perform a query, you must use a truncation or a wildcard sign to perform a search. The truncation/ wildcard sign in Banner is the % symbol. When performing a query or search, you will want to use the % symbol in place of area of the word you are searching for. 8
8 In the Last Name field, you will need to type a portion of the company name (i.e. %Office%.) Next, you need to execute your query. To do so, use the F8 key on your keyboard or press the Execute button on your tool bar. 9


9 Execute Once you have executed your query, a query list will appear. Select the vendor you want to use by DOUBLE Clicking on the ID Number of choice from the vendor list. This will then populate the selected vendor information back to your requisition. At the requisition page, if the vendor address has not populated in for you, you will need to query for the Address Type. To do this, Click on the drop down box. A list of available address will populate for you. To select the address you want, DOUBLE CLICK in the Address Type field. This will populate the address back to the requisition page. (Note: There are several types of address available to use. If you are creating a requisition, please use the corresponding PO 10


10 (Purchase Order) address. If no other address listed, than use the available address provided). 11

11 Once you have selected the address you need, the information should automatically populate for you at the Vendor page. If not, you may need to press your TAB key to fill in the information. ***If you have queried for a Vendor and it does not appear to be listed in Banner, contact the Purchasing Department by at purchasing@nwfsc.edu Once you have completed the Vendor section, do a Next Block to move to the Commodity/ Accounting Tab. 12

 6. Tab and the quantity 7. Tab and enter unit price 8.")
12 COMMODITY/ ACCOUNTING 1. Next Block or click to Commodity/Accounting tab. 2. Enter first item to be requested. 3. Leave commodity field blank. At this time NWFSC is not using this functionality. 4. Fill in description of merchandise/service requested. Be as specific as possible. This field is limited to 50 characters. To add additional information about an item, use the Options Menu and add Item Text Users can indicate if the Item Text is to be printed on the Purchase Order Clauses have been established as data entry shortcuts. 5. Tab and fill in Units of Measure U/M (use drop down arrow to search for valid codes) 6. Tab and the quantity 7. Tab and enter unit price 8. Tab and enter discount if applicable, and any additional amounts (i.e. shipping, setup fees). 9. Commodity Line Total will calculate automatically. Next Bock Commodity/Accounting tab Leave commodity field blank. At this time NWFSC is not using this functionality. Leave Blank 13


13 Description of merchandise/service requested: Be as specific. Field limited to 50 characters. Enter product number first; then a description of the item you wish to have ordered. dd Description Note: If you have run out of space to type your information, you can add additional Text to your commodity line by using the Item Text option. To access this, go to Options (on your Tool Bar), Click on Options, scroll down to Item Text and select. This will move you to the Item Text screen. 14

14 At this screen, Click on the line below Text and continue typing the additional information. (Note: This field is not a wrap-around field, when you have come to the end, arrow down to the next line.) Enter item text 13
.")
15 Once you have typed in your additional text, you must save your information. To do so, simply press the F10 key or click on the Floppy disk icon on your tool bar. To SAVE your information, click on the Floppy Disk symbol on your tool bar or press F10 (on your keyboard). A message will appear at the bottom of the Banner screen to signify that your message has been saved. Save 14

16 Note: After you have completed adding your text, you may also add a modify clauses to your text. With this option, you are able to add a clause or any available clauses that maybe associated with your purchase. Simply do a Roll Back (the option on your tool bar), click on the Rollback option. This will reset the page for you. 15


17 Once the page is reset, Click on the Modify Clause search box. This will take you to the Clause List. Make your selection by Double Clicking on the Clause you want to insert. Once you have selected your clause, you will be taken back to the Text Page. At this point, you will need to physically insert the clause into your text. To do, Click on Record (on your Tool Bar), then click on Insert. 16
 or Banner will automatically Save the information for")

18 This will populate the Clause information into your text. You may either have to SAVE the information (F10) or Banner will automatically Save the information for you (check your message bar). Once you have added your text information, you may exit out of the text screen by clicking on the Large Black X on the tool bar. This will take you back to the requisition page to finish your commodity accounting information. 17

 A UM list will appear, you can use an alternate UM that is provided to match your quote.")
19 TAB over to the UM (Unit of Measurement) field. This field should already provide you with an abbreviated UM. You may change the UM by Clicking on the Search Button. (Please Note: That if your quote has the products Itemized out, please itemize on your requisition.) A UM list will appear, you can use an alternate UM that is provided to match your quote. To make a change, simply select your UM and Click on the OK button. Unit of Measure: 22 choices 18

20 If you have made your selection, to continue, TAB to the Quantity field. Here you will need to Quantity: Indicate the amount of product you would like to order. 19
21 Next, TAB to the Unit Price, and indicate the price for each Unit or Item. To populate the Extended cost, again, Click on your TAB key to move to the field. Your commodity line should resemble below. 20
22 Once you have your commodity lines all filled out, Next Block to move to the bottom half of the screen. This will move you to the Accounting portion of the requisition. Discount: Add vendor discounts Additional: Add freight charges, set-up fees, etc. 21
23 Next Block to enter Accounting Information (FOAPAL Block) COA C should auto-populate. Tab to the Index field and enter the Index of budget to be charged. Search using the down arrow if necessary. When you enter the Index, the correct Fund, Org, and Program will default and cannot be changed. Users will only be able to post to Indexes for which they have been given access based on their role and profile. Tab to Account (expense classification) and enter appropriate account code. Search using down arrow if necessary. Note: Usable (data entry) account codes are 6 digits (all numbers). Users cannot enter Accounts that end in X. Searches are case sensitive, so if you don t find what you are looking for, try Capital letters or excluding the first letter in the word. Try putting % at the beginning and ending of the search word. Leave Actv and Locn and Proj blank unless given specific instructions by Financial Services. Tab to extended field and enter dollar amount in the USD field to be charged to FOAP or check the percent box and enter percentage to be charge to the FOAP. If splitting between two FOAPs, Next Record to input second Index and Account code for the item and tab to Extended and enter as necessary. 22


24 Accounting Block Your accounting information should populate for you after you moved into the area. If it does not, then press the TAB key to populate the information. (Please note the Fund, Orgn, and Prog information has filled in for you. This is the Banner information that is associated with the Organization number that you provided at the Requestor/ Delivery screen.) Always make sure that the Banner fields are correct. TAB through all the field boxes individually. Enter Account Code 23

25 Account Code Tab to Account (expense classification) and enter appropriate account code. Search using down arrow if necessary. Note: Usable (data entry) account codes are 6 digits (all numbers). Users cannot enter Accounts that end in X. Searches are case sensitive, so if you don t find what you are looking for, try Capital letters or excluding the first letter in the word. Try putting % at the beginning and ending of the search word. Leave Actv and Locn and Proj blank unless given specific instructions by Financial Services. 24


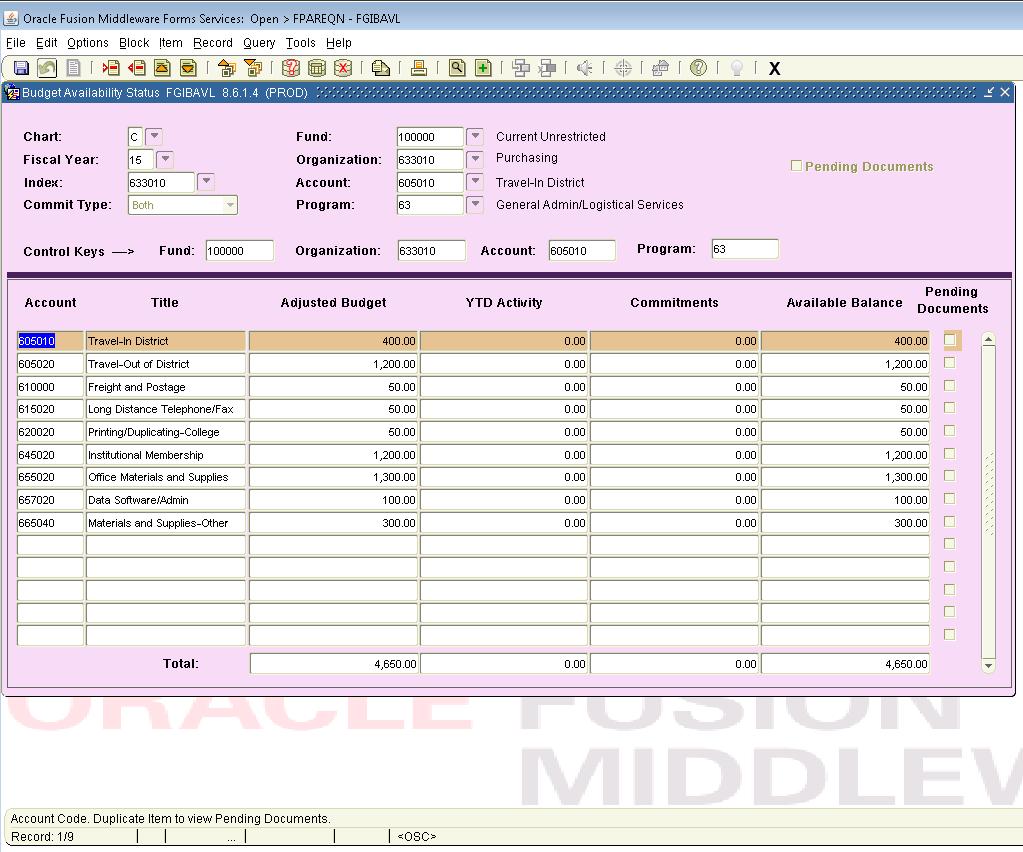
26 Budget Availability Check budget availability via the Options menu. On the FGIBAVL key block, the FOPAL should populate from the Index and account entered. To see the entire budget, rather than one account code, change the Account to beginning 600 s Account Code. Purchasing is Account Code Pending Documents hold budget but do not show in calculations. To View Budget Availability Enter Account Code Next Block Enter Account Code, then Next Block 25
27 26

28 Once you have completed the Commodity/ Accounting screen, Next Block to move to the Balancing/ Completion area. Balancing/ Completion At this page, you will be provided with a summary of your requisition. It is important to note the requisition number at the top left hand side of the Banner screen. Make sure to write this number down. The requisition number will always begin with the letter R. 27


29 You also have the option of placing your requisition into an In Process stage. This means that you will leave your requisition as a working document until you are ready to complete it later. This gives you the ability to add more information or change any information you may need. To place your requisition in the In Process stage, Click on the In Process button at the bottom of the screen. If you do not plan on changing any information and are ready to complete your requisition, simply Click on the Complete button at the bottom of the Banner page. You have now completed your requisition. You will automatically be moved to the FPAREQN screen to create a new requisition. If you are ready to print your requisition, you will need to exit out of the requisition creation form and go back to the beginning of Banner. 28
30 Click Complete to send requisition for approval. 29

31 Requisition Complete Requisition completed and forwarded to Approval process. 30
32 31
Creating Purchase Requisition
 -Type NEXT in Block then click NEXT BLOCK or leave blank and Click NEXT BLOCK icon. The system will assign the next number in the sequence. Either way is correct. Using Copy Button To copy the data from
CREATING A REQUISITION
 UPDATES 7/13/2016 Removed FOAPAL references to FOAP Page 7: Updated REQUESTOR/DELIVERY INFORMATION section 14. ATTENTION TO Page 12: Updated VENDOR INFORMATION section 2. ADDRESS TYPE Page 14: Updated
Requisition Entry Form FPAREQN
 Requisition Entry Form FPAREQN The Requisition Entry Form (FPAREQN) contains six blocks of information. The table below shows the six information blocks with the corresponding information you need to provide.
Creating a Requisition
 BANNER XE 9 (Application Manager) Navigation Information Banner Menu Banner Search After logging into Banner XE this screen will be displayed. Clicking the Banner Menu button under Banner will bring up
Arkansas State University. Internet Native Banner Initiating Requisitions
 Arkansas State University Internet Native Banner Initiating Requisitions Contents Creating a Requisition... 2 Checking the Status of My Requisition... 10 Deleting an Incomplete Requisition... 11 Denying
BANNER XE-9 Requisition Entry with Line Specific FOAPALS
 BANNER XE 9 (Application Manager) Navigation Information Banner Menu Banner Search After logging into Banner XE this screen will be displayed. Clicking the Banner Menu button under Banner will bring up
Creating a Requisition
 Creating a Requisition Option 1 Document Level Accounting (All accounting is based on the document total) 1. Access the Requisition Form (FPAREQN). Enter NEXT to have Banner generate an Invoice number.
Banner Procurement Training
 Banner Procurement Training Requisitions Self Service 7.1 Finance Module Release Date: January 1, 2007 1 Table of Contents Special Notes on Self Service Requisitions..3 Entering a Requisition..4 Adding
Banner Finance My Banner/ Navigation. Internet Native Banner 7.2
 Banner Finance Banner Finance My Banner/ Navigation Internet Native Banner 7.2 TABLE OF CONTENTS Organization and Account Hierarchy... 2 Banner Form Naming Conventions... 3 Accessing Banner... 5 Banner
CREATING A REQUISITION
 CREATING A REQUISITION FPAREQN - Requisition Form: initiates the procurement process by defining an internal request to acquire goods or services. It enables you to define departmental needs by identifying
PLEASE NOTE THAT WITH THE UPGRADE TO BANNER 6.0, THE LOOK OF THE SCREENS HAVE CHANGED SLIGHTLY.
 PLEASE NOTE THAT WITH THE UPGRADE TO BANNER 6.0, THE LOOK OF THE SCREENS HAVE CHANGED SLIGHTLY. THERE IS NO LONGER A LEFT HAND PANEL IT IS THE OPTIONS TAB AT THE TOP OF THE SCREEN THAT PROVIDES THAT INFORMATION
Banner Requisition Training (FSAREQN)
") Banner Requisition Training (FSAREQN) C:\Users\mhavnen\Downloads\warehousereq.docx Page 1 of 21 Once logged on to Banner, this is the first screen you will see the Go To Screen. The Go To screen is used
Banner Requisition Training (FSAREQN) C:\Users\mhavnen\Downloads\warehousereq.docx Page 1 of 21 Once logged on to Banner, this is the first screen you will see the Go To Screen. The Go To screen is used
SCT BANNER SYSTEM. In order to log into the system you will need a MSU Banner ID, User password and access to the Internet.
 SCT BANNER SYSTEM BANNER INTRODUCTION: Banner is a suite of products that is replacing what we know as the SCT Plus system. These products access a common database so that information can be shared across
How to Query a Purchase/Blanket/Change Order
 How to Query a Purchase/Blanket/Change Order Description: The Purchase/Blanket/Change Order Query Form is a query-only form, which consists of a main window and eleven additional windows. It displays documents
PURCHASE REQUISITION TRAINING MANUAL. The following material describes how to use the screens associated with the Banner Purchase Requisition system.
 PURCHASE REQUISITION TRAINING MANUAL The following material describes how to use the screens associated with the Banner Purchase Requisition system. To Open the Program: Double click the Banner 7 icon
How to Create a Change Order
 How to Create a Change Order Description: The Change Order Form consists of a main window and eleven additional windows. Use this form if you need to change quantity or unit price data on a completed and
Banner Requisition Training (FPAREQN)
") Banner Requisition Training (FPAREQN) 1 Once logged on to Banner, this is the first screen you will see the Go To Screen. The Go To screen is used to navigate to the many forms in Banner. For today s class,
Banner Requisition Training (FPAREQN) 1 Once logged on to Banner, this is the first screen you will see the Go To Screen. The Go To screen is used to navigate to the many forms in Banner. For today s class,
WINTHROP UNIVERSITY. Banner 9 Admin Pages PURCHASE REQUISITION TRAINING MANUAL
 WINTHROP UNIVERSITY Banner 9 Admin Pages PURCHASE REQUISITION TRAINING MANUAL TABLE OF CONTENTS Signing In/Out..3 Entering A Requisition..4 15 Requisition Screen/FPAREQN....4 Requestor/Delivery Information..5
BANNER 9 APPROVING REQUISITIONS
 1. On the Welcome screen, type FOAUAPP or any part of the form name User Approval in the smart search bar to access the user approval form. 2. Press Enter Note: Like in Banner 8, FOAUAPP can also be saved
Arkansas State University Internet Native Banner Budget and Finance Inquiry
 Arkansas State University Internet Native Banner Budget and Finance Inquiry Contents Extracting Form Data into Excel... 2 FGIBAVL Budget Availability Status... 5 FGIBDST Organization Budget Status... 6
Journal Voucher. Create a Journal Voucher Mass Entry Form (FGAJVCM) Use the Journal Voucher Mass Entry Form to create new journal vouchers.
 Use the Journal Voucher Mass Entry Form to create new journal vouchers.") Journal Voucher Create a Journal Voucher Mass Entry Form (FGAJVCM) Use the Journal Voucher Mass Entry Form to create new journal vouchers. 1 Banner Main Menu EXIT Go To... You can access a form from the
Journal Voucher Create a Journal Voucher Mass Entry Form (FGAJVCM) Use the Journal Voucher Mass Entry Form to create new journal vouchers. 1 Banner Main Menu EXIT Go To... You can access a form from the
INSTRUCTIONS FOR ENTERING AN ELECTRONIC REQUISITION IN BANNER 9. BRCC Purchasing
 INSTRUCTIONS FOR ENTERING AN ELECTRONIC REQUISITION IN BANNER 9 BRCC Purchasing 08-2017 STEPS FOR ENTERING AN ELECTRONIC REQUISTION IN BANNER 9 1. Once you have logged into Banner, the Welcome screen will
Dashboard: Create, Track, & Manage Requisitions
 Dashboard: Create, Track, & Manage Requisitions Create new Requisitions Search for and copy completed requisitions Continue work on requisitions placed in draft View the status of pending requisitions
BANNER PURCHASE ORDERS AND APPROVALS FLEX DAY JANUARY 27, 2011 PRESENTED BY; BETTY KAKIUCHI
 BANNER Log on to Banner with Username and Password GUAPMNU Customized My Banner FGIBDST FGIBAVL Either type the form name on the right side or select from the left column and arrow to the right -SAVE -Log
To create a Commodity Level Multiple Invoice/Credit Memo, you must know or have the following;
 These instructions allow you to create a payment or credit memo for a Vendor (payee) with multiple invoices or credit memos, using Commodity Level Accounting. Commodity Level accounting is the default
These instructions allow you to create a payment or credit memo for a Vendor (payee) with one invoice or credit memo, using Document Level Accounting.
 with one invoice or credit memo, using Document Level Accounting.") These instructions allow you to create a payment or credit memo for a Vendor (payee) with one invoice or credit memo, using Document Level Accounting. Document Level accounting can be used when the FOAPAL(s)
These instructions allow you to create a payment or credit memo for a Vendor (payee) with one invoice or credit memo, using Document Level Accounting. Document Level accounting can be used when the FOAPAL(s)
Banner-Requestor_Approver Training Manual
 BANNER NAVIGATION Welcome to Banner! This is a brief overview of basic navigation required to utilize the Self Service system. Accessing Banner SSB (Self Service) 1. Open a session of Internet Explorer
Online Requesting and Receiving. Training Manual
 Online Requesting and Receiving Training Manual 1 Table of Contents Introduction 3 Logging In.3 Creating a Profile...3 Modifying a Ship to Address...3 FOAPAL and Commodity Codes 3 Code Favorites...3 Understanding
mygateway Finance Channels on the Portal
 mygateway Finance Channels on the Portal Index Signing In To Mygateway... 1 Tabs and Channels... 1 Tabs... 1 Channels... 2 Content Layout... 2 Customizing Columns/Channels... 3 Removing a Channel... 3
Purchasing. Banner Buyer Handbook. Version Number 7.4 Updated 8/09/2010. South Dakota Board of Regents Human Resources/Finance Information Systems
 South Dakota Board of Regents Human Resources/Finance Information Systems Version Number 7.4 Updated 8/09/2010 Table of Contents Purchasing Page Section A: Introduction 2 Overview 2 Intended Audience 2
FINANCE SELF-SERVICE
 FINANCE SELF-SERVICE Banner Finance Self-Service Confidential Business Information This documentation is proprietary information of SunGard SCT and New Mexico State University (NMSU) and is not to be copied,
Entering a Purchase Order (Formerly DPO) - DO NOT USE SAFARI
 - DO NOT USE SAFARI") Entering a Purchase Order (Formerly DPO) - DO NOT USE SAFARI Select the Finance Tab at the top right of the screen. Select Purchase Orders from menu list on the left side of page. Select or to start a
Entering a Purchase Order (Formerly DPO) - DO NOT USE SAFARI Select the Finance Tab at the top right of the screen. Select Purchase Orders from menu list on the left side of page. Select or to start a
CUBuyplusR. Browser s Guide
 CUBuyplusR Browser s Guide This guide will review how to search for products and add them to your cart. In addition, the procedure for generating a purchase request will be outlined as well as tracking
Banner 9 Training Guide
 South Dakota Board of Regents Student Information System/Financial Aid Human Resources/Finance Information System Banner 9 Training Guide Date 9/26/2018 This training assumes that the user has completed
Munis (v 9.3) Dashboard (v 5.2)
 Dashboard (v 5.2)") Munis (v 9.3) Dashboard (v 5.2) Requisition Entry Version 1.0 Entering a New Requisition 1. Navigate to the MUNIS Dashboard Website: http://munis.sysapps.unlv.edu:55000/ 2. Enter your UNLVAD ACE account
Munis (v 9.3) Dashboard (v 5.2) Requisition Entry Version 1.0 Entering a New Requisition 1. Navigate to the MUNIS Dashboard Website: http://munis.sysapps.unlv.edu:55000/ 2. Enter your UNLVAD ACE account
Create a Journal Voucher Using the Journal Voucher Quick Entry Form (FGAJVCQ)
") Journal Voucher Create a Journal Voucher Using the Journal Voucher Quick Entry Form (FGAJVCQ) Use the Journal Voucher Quick Entry Form to create a new Journal Voucher. 1 Banner Main Menu EXIT Go To...
Journal Voucher Create a Journal Voucher Using the Journal Voucher Quick Entry Form (FGAJVCQ) Use the Journal Voucher Quick Entry Form to create a new Journal Voucher. 1 Banner Main Menu EXIT Go To...
BANNER FINANCE USER MANUAL EASTERN KENTUCKY UNIVERSITY
 BANNER FINANCE USER MANUAL EASTERN KENTUCKY UNIVERSITY 1 2 TABLE OF CONTENTS ACCESS TO BANNER PRODUCTION 3 TRAINING INFORMATION 3 SUPPORT (EKU BANNER HELP) 4 BANNER ADDRESS/LOGON/EXIT 4-6 ACCOUNTING/BUDGETING
BANNER FAAINVT Procurement Card Transaction Maintenance
 BANNER FAAINVT Procurement Card Transaction Maintenance These procedures provide: - a basic overview of Banner Finance coding - a posting and maintenance schedule - new transaction notification information
Creating Online Requisitions In Banner
 Creating Online Requisitions In Banner 1 Log into LOLA with your Username and Password. 2 Enter Self-Service by clicking on South Central Louisiana Technical College 3 Click on the Finance Tab or the Finance
Student Activities Purchase Orders (Internal Accounts) Munis > Financials > Student Activity > Activity Transactions
 Munis > Financials > Student Activity > Activity Transactions") Activity: Student Activities Purchase Orders (Internal Accounts) Enter a Purchase Order (PO) 3. Click Purchase Order 4. Input PO information a. Input general PO information i. Input Location (Cost Center)
Activity: Student Activities Purchase Orders (Internal Accounts) Enter a Purchase Order (PO) 3. Click Purchase Order 4. Input PO information a. Input general PO information i. Input Location (Cost Center)
How to Enter a Purchase Order Change Order
 Module: Purchasing Topic: Purchase Orders How to Enter Purchase Order Change Orders Munis Version 11.3 How to Enter a Purchase Order Change Order Objective This document provides step-by-step instruction
Fund Accounting Purchasing Supplement. PowerSchool. efinanceplus. Version 1.0
 Fund Accounting Purchasing Supplement PowerSchool efinanceplus Version 1.0 Table of Contents Fund Accounting Purchasing Supplement... 1 efinanceplus Login Instructions... 3 Accessing and Searching Expenditure
Requisition Entry Guide. Direct questions to Procurement & Contract Services, x5134
 Requisition Entry Guide Direct questions to Procurement & Contract Services, x5134 Requisition Entry Guide Refer to Log into PeopleSoft Financials guide for login instructions. Once logged in, click on
Falcon s Purch Guide REQUESTORS AND SHOPPERS. 1 Revised 7/16/18
 Falcon s Purch Guide REQUESTORS AND SHOPPERS 1 Table of Contents General Shopping & Requisitions... 3 Punchout, Hosted Catalogs and Non-catalog Items... 3 Splitting Between Multiple Budgets... 4 Foundation
ADVANTAGE Financial System User Guide County Manager David Hankerson
 ADVANTAGE Financial System User Guide September 2015 ADVANTAGE Financial System User Guide County Manager David Hankerson 2 *This page is fully linked. Please click the page you wish to view. Table of
Journal Voucher Mass Entry (FGAJVCM)
") Journal Voucher Mass Entry (FGAJVCM) When using the FGAJVCM form, all the regular Banner navigation features work as usual. To move between fields, you can either: Use the Tab key, and Shift+Tab to go
Journal Voucher Mass Entry (FGAJVCM) When using the FGAJVCM form, all the regular Banner navigation features work as usual. To move between fields, you can either: Use the Tab key, and Shift+Tab to go
Govs e-shop Training - Requestor 11/8/2013
 Govs e-shop Training - Requestor 1 A requestor is a person who can create and submit a cart of the needed items. The cart can be created three (3) ways. Hosted Catalog Punch-out Catalog Non-Catalog Item
1. From the Tyler Menu, go to Financials>Purchasing>Purchase Order Processing> Requisitions (i.e. click on requisitions)
") TO REQUEST A PURCHASE ORDER 1. From the Tyler Menu, go to Financials>Purchasing>Purchase Order Processing> Requisitions (i.e. click on requisitions) 2. The following screen will appear. Click New. The
TO REQUEST A PURCHASE ORDER 1. From the Tyler Menu, go to Financials>Purchasing>Purchase Order Processing> Requisitions (i.e. click on requisitions) 2. The following screen will appear. Click New. The
Banner 9 Finance Navigation and Documentation
 Banner 9 Finance Navigation and Documentation financesecurity@njit.edu Financial Systems & Innovations Fenster Hall Room 550 Newark, New Jersey 07102 1 Table of Contents 1. Introduction to Banner 9 administrative
WINGS Express Finance Step-by-Step Guide to Viewing Docs
 WINGS Express Finance Step-by-Step Guide to Viewing Docs The View Document screen allows you to view documents and see their approval history. The View Documents page is accessible from the View Document
How to Create a Blanket Order
 How to Create a Blanket Order Description: This form consists of a main window and eight additional windows, which you use to enter information to create or modify (in-process), blanket orders. You must
WELCOME TO FIS BANNER. Navigation & Document Query
 WELCOME TO FIS BANNER Navigation & Document Query FIS Banner WebSite Help FIS Launch Page FIS System Guide FIS Banner Manual Purchasing FIS Training http://fis.ucsc.edu http://financial.ucsc.edu/pages/systems_fisguide.aspx
Banner Finance Training
 Internet Native Banner (INB) is a fully integrated suite of administrative software applications used by higher education to manage business operations and offer several powerful data queries. Go to the
Table of Contents Billing Mass Data Entry Form (TSAMASS) BANNER ID/Name Search Feature...4-5
 BANNER ID/Name Search Feature...4-5") Documentation Table of Contents... 1 Billing Mass Data Entry Form (TSAMASS)...2-3 BANNER ID/Name Search Feature...4-5 Journal Voucher Entry Form (FGAJVCD) or Journal Voucher Quick Form (FGAJVCQ)...6-10
Documentation Table of Contents... 1 Billing Mass Data Entry Form (TSAMASS)...2-3 BANNER ID/Name Search Feature...4-5 Journal Voucher Entry Form (FGAJVCD) or Journal Voucher Quick Form (FGAJVCQ)...6-10
How to Receive in Banner
 How to Receive in Banner Description: Use the Receiving Goods Form to enter goods received information. You can only perform receiving transactions against completed and approved purchase orders. Form
KFS Training Manual Purchasing Basics
 KFS Training Manual Purchasing Basics Table of Contents University of Maryland Objectives... v Resources... v Kuali Financial Systems... 1 Creating a Requisition... 1 Exercise One: Create a Requisition...
eprocurement: Create a Requisition
 eprocurement: Create a Requisition A requisition in PeopleSoft is an online form for requesting items or services. 1. Otherwise click Purchasing link 2. Click the Requisitions link. 3. Click the Add/Update
Youngstown State University Banner Brain Blitz. This guide is designed to be used following attendance in the Banner 7.0 Navigation training class.
 Youngstown State University Banner Brain Blitz This guide is designed to be used following attendance in the Banner 7.0 Navigation training class. YSU ERP Solution YES Project Banner 7.0 Navigation Practice
FINANCE MANAGER. Bidding Manual Finance Manager.
 FINANCE MANAGER Bidding Manual 2009 Finance Manager Table of Contents Start Page... 5 Setup Which Files Should Be Completed First?... 7 Item Categories... 8 Unit of Measure... 11 Buildings... 13 Requestors...
Checkout Western Marketplace
 Checkout Western Marketplace Checkout Screen Layout 1 2 1. Icon area Icon availability will change depending upon the status of the order. Archive - Places order in Archives (recommend do not use) Trash
Kuali Financial System Training Guide. University of Hawaii Purchasing
 University of Hawaii Purchasing pg. 1 2/16/2012 Table of Contents Objectives... 3 Resources... 3 Searching for a Vendor... 4 Process... 4 Creating a Vendor... 7 Process... 7 Exercise 1... 24 Searching
The Express Purchase Order User Manual. The Spectrum+ System Georgia State University. PeopleSoft Financials Version 8.9
 The Express Purchase Order User Manual The Spectrum+ System Georgia State University PeopleSoft Financials Version 8.9 (Revised 1/30/2012) 1 P age Table of Contents 1. INTRODUCTION. 4 1.1 PURCHASING OVERVIEW.4
How to Cancel a Purchase Order/ Blanket Order
 How to Cancel a Purchase Order/ Blanket Order Description: This form is used to cancel an online purchase order or blanket order. The summarized document data for the purchase order or blanket order defaults
UNIVERSITY OF NEW MEXICO FIN PU-101 Purchasing Processes for Departments Lab. Participant Guide
 0 UNIVERSITY OF NEW MEXICO FIN PU-101 Purchasing Processes for Departments Lab Participant Guide Version 3.0 11/02/2010 Table of Contents Confidentiality and Sensitive Information 2 Course Pre-requisites
UConn Health Center Banner Training Manual Internet Native Banner (INB) Ledger Inquiries
 Ledger Inquiries") UConn Health Center Banner Training Manual Internet Native Banner (INB) Ledger Inquiries Banner Reporting Overview Available Banner Reporting Methodologies There are several reporting methods available
UConn Health Center Banner Training Manual Internet Native Banner (INB) Ledger Inquiries Banner Reporting Overview Available Banner Reporting Methodologies There are several reporting methods available
Creating a Requisition
 Creating a Requisition 1. To create a requisition for a company that does not have a catalog in PelliBiz, click on the Requisition Form button under the Shop bar. 2. Enter the vendor s name in the Enter
Radford University Entering Travel Purchase Orders in Self-Service Banner & Travel Reimbursement Vouchers in Cognos
 Radford University Entering Travel Purchase Orders in Self-Service Banner & Travel Reimbursement Vouchers in Cognos A Step by Step Guide This document provides step by step instructions on how to process
Quick Reference Sheet Non-Catalog Orders
 Quick Reference Sheet Non-Catalog Orders Logging In Log on to My Western. There is a link under Technology Tools (My Western) and there is a link on the Gateway to eprocurement website under Business Services.
FIN- Purchase Order Requisition Procurement Services
 FIN-Purchase Order Requisition Use this form to initiate the purchase of goods or services from sources outside the University. Goods or Services costing less than $5,000 can be purchased using the UD
eprocurement: Queries
 PROCUREMENT SERVICES eprocurement: Queries Purpose: To provide information to epro campus users. Security Access Requirement: All eprocurement users have access. Prerequisites: None. Find Help: For technical
University of North Carolina User Guide
 University of North Carolina User Guide June 2006 The software described in this document is furnished under a license agreement. The software may be used or copied only in accordance with the terms of
BUYWAYS Requisitioning Created on 9/26/2014 4:18:00 PM
 Created on 9/26/2014 4:18:00 PM Table of Contents... 1 Requisitioner Basics... 1 Creating Your Own Cart... 1 Creating Your Own Cart (Phoenix)... 4 Finding and Viewing an Assigned Cart... 9 Finding and
SUBMIT AN ADVANCE REQUEST
 SUBMIT AN ADVANCE REQUEST Step-by-Step Instructions on using the Minerva Menu options All advances must comply with the Reimbursement of Expenses Policy. Prepared by Finance Infrastructure & Support, Financial
Quick Reference Sheet Non-Catalog Orders
 Quick Reference Sheet Non-Catalog Orders Logging In Log on to My Western. There is a link under Technology Tools (My Western) and there is a link on the Gateway to eprocurement website under Business Services.
Invoice QuickStart Guide
 Invoice QuickStart Guide Table of Contents Working with Payment Requests Manually Creating a Payment Request from an Existing Vendor Creating a Recurring Payment Request Adding Distributions to a Payment
MMP QUICK REFERENCE Table of Content
 MMP QUICK REFERENCE Table of Content Glossary.. 2 Accessing MMP... 3 Personalize Your Shopping Profile.. 4 Quick Steps for Creating Shopping Carts & Adding Products Creating and Renaming a Cart.. 4 Adding
eva Purchasing & Banner Receiving Manual
 eva Purchasing & Banner Receiving Manual Compliance Employees are responsible for knowing and complying with established University and State policies and procedures when creating/approving requisitions
University of Rochester Corporate Purchasing. Extended User Training: PO Query and print
 University of Rochester Corporate Purchasing Extended User Training: PO Query and print Pathways Materials Management 1-1 PMM Desktop To Log In Locate the Pathways Materials Management folder on the Windows
FINANCE MANAGER. Accounting Manual Finance Manager.
 FINANCE MANAGER Accounting Manual 2010 Finance Manager Accounting Setup - Table of Contents Start Page... 1 Setup Which Files Should Be Completed First?... S-1 Items... S-2 Item Categories... S-7 Unit
NOTE: If the Requisition Listing Screen does not open, it was probably blocked. See pages at the end to allow pop ups for efinance.
 1. Open the Requisition listing window. 2. Main Menu Purchasing Requisition Processing Requisitions (double click on Requisitions) NOTE: If the Requisition Listing Screen does not open, it was probably
FAST Finance Reporting
 FAST Finance Reporting User Guide FAST Version 4.3+ Millennium FAST CSU FAST 4 3+ user guide v1_3.docx (FOAP = FUND ORGANISATION ACCOUNT PROGRAM) 1 BLANK If printing this user guide, please print on both
in Wincap Fiscal Year: White Red Yellow Current Fiscal Year Previous Fiscal Year Next Fiscal Year Negative Numbers will always be in Red
 in Wincap Fiscal Year: White Red Yellow Current Fiscal Year Previous Fiscal Year Next Fiscal Year Negative Numbers will always be in Red If you have negative numbers and you are not permitted to go negative
USER GUIDE. Shopping Approving Receiving Running Reports
 USER GUIDE Shopping Approving Receiving Running Reports July 5, 2017 Contents Getting Started... 1 Requesting Access to the Marketplace... 1 Office 365 eprocurement Western Marketplace Public Group...
Purchase Order Processing Step by Step. May 2016
 Purchase Order Processing Step by Step May 2016 Financial Management Procurement Purchasing Purchase Orders Click New to start a new Purchase order P.O. Entry Screen Two Sections Top is Header Bottom is
ORAA New Subawards Instructions for entering NEW Subawards into KFS: LBO Instructions
 ORAA New Subawards Instructions for entering NEW Subawards into KFS: LBO Instructions IMPORTANT: SAVE your work frequently. CLICK ONLY ONCE per command. USE TABS TO RETURN TO EARLIER SCREENS rather than
Cart & Assign. 6. Enter an optional Note to the Assignee and click the Assign button.
 Revised 11/18/13 Cart & Assign Modify The Shopping Cart You may Unassign the shopping cart only until the Requester has submitted it. 1. Click the Shop icon, hover over My Carts And Orders, and click View
buylu Purchasing Manual Published by: Finance Infrastructure February 2019 buylu Manual v
 buylu Purchasing Manual Published by: Finance Infrastructure February 2019 buylu Manual v06.07-18 1 Table of Contents I. Overview of buylu Process... 6 II. Creating and Managing Your User Profile... 6
Receiving Goods Receive All
 Receiving Goods Receive All Use the Receive All process when all of the line items were received on the same day and there are no discrepancies between the quantities received and the quantities listed
Revision Control Date By Action Pages 12/13/2011 Jonathan Hale 9.0 Process -----
 Procurement Business Process Guide Process: Create a New Express Purchase Order (EPO) Module: Purchasing High Level Description Process Module Document Type Create a New Express Purchase Order Purchasing
JOB AID FOR EMARKET REQUESTERS THIS JOB AID IS FOR THOSE INDIVIDUALS THAT HAVE THE FSU_PO_REQUESTER ROLE IN OMNI ONLY.
 JOB AID FOR EMARKET REQUESTERS THIS JOB AID IS FOR THOSE INDIVIDUALS THAT HAVE THE FSU_PO_REQUESTER ROLE IN OMNI ONLY. IF YOU DO NOT CREATE REQUISITIONS IN OMNI, THEN YOU WILL USE THE JOB AID TITLED EMARKET
Creating Purchase Order Requisitions Example: Creating a PO Requisition for Staples
 Creating Purchase Order Requisitions Example: Creating a PO Requisition for Staples This document lists the steps to create and submit a Purchase Order Requisition for Staples. Click on the desired link
AiM CPPM Capital Project
 AiM Navigation icons Budget Manager Date Manager Budget Revision screen is the main source of information on a project. is the central hub to which all other transactions will be associated. How to enter
Inquire on Account Balances
 The Inquire on Account Balances form allows the retrieval of Accounting Flexfield balances: For a Range of Accounting Periods For a selected Currency USD STAT (used to store statistical amounts that can
Procurement Card Purchasing
 Procurement Card Purchasing Some vendors listed in Mercury as either Punch out vendors or hosted vendors can be paid for using your Procurement Card when placing your order through Mercury Commerce system.
Contents Introduction Terminology Login Home Page Features Catalog Order Non-Catalog Order...
 User Guide Contents Contents... 1 Introduction... 2 Terminology... 2 Login... 3 Home Page Features... 4 Catalog Order... 5 Non-Catalog Order... 18 Approval Routing... 34 View Order Status... 34 Delete
How to Cancel a Change Order
 How to Cancel a Change Order Description: This form is used to cancel a change order that was completed and posted. The summarized document data for the change order defaults into the fields. Form Name/Direct
BuyUSI Training Manual
 BuyUSI Training Manual Team Eagle 1 Table of Contents What is BuyUSI Maximizing Site Performance Creating Orders o Overview o Login o Non-Catalog o Catalog-Hosted o Catalog-Punch out Checking Out o Converting
8.1 OVERVIEW OF THE INVENTORY MODULE ADDING NEW ITEMS...
 Chapter Module The module is used to record and track inventory and storeroom information. This Chapter describes how to use the Web Work module. Table of Contents 8.1 OVERVIEW OF THE INVENTORY MODULE...
i. Shipping Address 6
 USER GUIDE USER GUIDE Table of Contents I. Accessing the System II. System Functions 4 a. User Rolls 4 b. Profile Setup 6 i. Shipping Address 6 ii. Billing Address 9 iii. E-Mail Preferences iv. Funding
COLLEGE STATION INDEPENDENT SCHOOL DISTRICT
 Follow the steps below to save an efinance icon as a favorite Once the selected window is open Click the star with the + symbol Another window will open called Add to Favorites The Name can be changed