Administrator Portal User Guide
|
|
|
- Maurice Roberts
- 5 years ago
- Views:
Transcription


1 Administrator Portal User Guide
2 Table of Contents... 1 Portal Navigation... 4 Home Page... 4 User Administration... 8 Creating a New User... 8 Creating an ATA Device Adtran ATA/Router Devices Grandstream DP750 Devices Editing a New or Existing User Custom User Templates Bulk Load Users Modify Multiple End User Feature Assignment Modify Multiple End User Feature Settings Modify Multiple End User Feature Settings Bulk Upload Bulk 911 Registration Manage Services Anywhere Auto Attendant Configure Auto Attendant Settings Call Park Group Escape to Operator Maximum Concurrent Calls Music/Message On Hold Paging Project Account Codes Programming Non-Verified Project Codes Programming Verified Project Codes Virtual User Voice Mail Retrieval Number Call Pickup Groups Contact Center ACD (Call Queuing) Basic and Standard Add/Edit Members Contact Center Feature Settings and Alternate Numbers Contact Center Announcements Hunt Groups Configure Hunt Group Features Editing Hunt Groups Instant Group Call Common Phone List LDAP (Lightweight Directory Access Protocol) Schedules Device Management Support Contact Dial Plan Policy Group Caller ID Changing your 911 Location Scheduling a 911 Location Change Extension Dialing Policy Admin_Portal_0818rev9.doc Page 2 of 257
3 Portal Administration Call Recording Administration Call Recordings Portal Sub-Administration Link Control Center ID User Portal Access Inventory Inventory Overview Telephone Numbers Delete Telephone Numbers Add Telephone Numbers: New Add Telephone Numbers: Port Seats Add On Features SIP Trunking Sessions Order Status Reports Utilization Reports Enterprise CDR Reports Voice Mail Reports Portal Usage Reports Trunk Utilization Report Profile Profile Help Help Live Chat Did You Know? What s New? Admin_Portal_0818rev9.doc Page 3 of 257


4 Portal Navigation URL: Enter your Administrator User ID/Password to access Admin functionality within the portal. You should have received your Administrator login details via , and it would look similar to the following: Home Page The Default Group option allows you to define which Group you want as your default location. As you work in a specific Group, managing users and features, this prevents you from having to define your Group on each page as you navigate through the portal. Main Menu Sub Menu Tenant ID Default Group Setting Group/Location Selector Create New User Search for Specific Users Admin_Portal_0818rev9.doc Page 4 of 257


5 As you navigate throughout the portal, you will have several opportunities to search for specific Groups for managing Inventory, Creating or Editing Users, etc. You can enter search criteria in the Search a Group field, which will then filter which Groups are displayed, based on that search criteria. All Groups will be displayed when clicking the Select a Group drop down box Enter your search criteria in the Select a Group field The Groups displayed will be filtered based on your search criteria Define your Default Group, so a Group does not have to be selected on every page as you navigate through the portal: Click the Change Group button. In the Change Default Group window, click the arrow to search for the Group, or enter a search or partial search of the group name in the Group field to refine your search. If you do not want to set a Default Group, select No Default Group from the drop down list. Once you have selected your Group, click the Save button. As you navigate from feature to feature within the portal, your Default Group will automatically populate. A new Default Group can be redefined at any time, by following this same process, or to change Groups at any time, click the Group drop down list to select a different Group. Admin_Portal_0818rev9.doc Page 5 of 257

6 The Search End Users option will be provided throughout the portal. Depending on the page you are on, you will find a drop down list next to it that allows you to select which field you would like to search by. If you have less than 1000 users in your group, you can click the Search button without putting in any criteria and the portal will display all of your users. If you have more than 1000 users, you will be required to input something in the search field before the Search button will activate. Your User Search criteria options are First, Last, and Phone. You can then refine your search within that criteria, by entering a portion of the name or number in the that includes field. Once your Search Criteria is entered, click on the Search button. User Search The Trunk Administration option on the main menu will only be visible for customers that have SIP Trunking through CenturyLink. If you do not have SIP Trunking, the Trunk Administration feature will not be an option on your main menu. Admin_Portal_0818rev9.doc Page 6 of 257


7 For details on specific features and functionality associated to our SIP Trunking product, refer to the Hosted VoIP Trunk Administration Portal Guide, found under Help from the main menu. This user guide is updated as changes are made to our SIP Trunking production functionality. Always refer to this guide for the most recent information. Did You Know? and What s New? documentation can now be found by hovering over Help on the main menu, or from the sub-menu after clicking Help on the main menu. Admin_Portal_0818rev9.doc Page 7 of 257

8 User Administration The User Administration section of the portal allows you to Create New users, Edit existing users, create Custom User Templates, process Bulk Uploads for additions/changes to users, and modify multiple users with the Modify End User Features tool. Creating a New User 1. Click User Administration from the main menu. 2. Click Manage Users from the sub menu. 3. If your organization has only one Group (location), all users will appear and you can edit users, delete users, etc., without having to identifying the Group you want to create your user in. 4. At any time to Edit or Delete a customer, click on the Edit or Trash Can icon next to the individual you want to manage. The Gear icon allows you to access that user s End User Portal, to manage individual features such as Forwarding, Simultaneous Ring, etc. Admin_Portal_0818rev9.doc Page 8 of 257

 from the drop down list. Note: If your Tenant only has one location, this will be preselected. 10.")
9 5. Click the Create New User button. This loads a Manage User Create New User form. 6. If you have more than one Group within your Tenant, you can select that Group from the Select a Group drop down list; you will also be able to select your Group from the Create New User screen. 7. Complete the Manage Users - Create New User form. All fields denoted with an asterisk (*) are required fields and must be populated to build your user. 8. Enter the users First Name and Last Name in the appropriate fields. 9. Select the Group (location) from the drop down list. Note: If your Tenant only has one location, this will be preselected. 10. Select the Seat type from the drop down list; available options are based on your current available inventory. 11. Apply a Custom Template by selecting your option from the drop box if custom templates have been set up. 12. Click the drop down list to assign a Hosted VoIP Number; options within this drop down list will be based on telephone numbers available in your inventory across your Tenant. Note: If you have more than one Group in your Tenant, all available (unassigned numbers) will be available in the drop down list. It is suggested you use the correct number based on the Group you are building the user in, however, this does allow you to create a user in one Group with a number from another Group. The Group name appears next to each available number, so you know which Group they originate from. Example: You have an individual that was previously built in Group A and they move to Group B a new number does not have to be assigned to them from Group B, they can move and take their number with them. Admin_Portal_0818rev9.doc Page 9 of 257
 and will be prompted with an error. 14.")
10 13. The Extension field populates based on the telephone number selected. Note: This field is editable, so if you prefer that the individual s name appears on the phone label, you can change it here. Note: If you are using 3-digit internal extensions, you cannot use the following: 123, N11 (211, 311, 411, 511, 611, 711, 811, 911) and will be prompted with an error. 14. The Title, Mobile and Pager fields are optional; they do not have to be completed to proceed with building your user. 15. Click the Allow Custom Caller ID if you wish to change the 10-digit number that is sent for outbound calls; this will be described in more detail. 16. Check the Enable Directory Privacy box if you do not want others in this Group to monitor this device within Business Communicator. 17. If you do not see an option for Secure SIP, this is your indication that licenses are not available in inventory to apply this feature to a user. If inventory is available, click the Secure SIP checkbox to add this feature to that user; this does not enable the feature, just assigns a license. Note: If enabled, this user s devices will be converted to Secure SIP, which enables SIP TLS/SRTP encryption. It will ONLY be enabled for supported devices. Some devices may not support Secure SIP. This will not turn on Secure SIP for line appearances of this user on other devices assigned to different users. Future devices can be enabled per device on the Lines Settings page of the Manage Device screen. 18. A confirmation window displays devices Secure SIP will be applied to, click the Continue button. Admin_Portal_0818rev9.doc Page 10 of 257

11 19. Once a Secure SIP license is assigned to a user, click the Manage Device button. 20. On the Manage Device screen, by default, Secure SIP is disabled, to enable, click the Enable radio button. 21. Click the Save Secure SIP button. 22. Click the Reboot Device button. 23. After the reboot, you are returned to the User Settings tab. 24. The Lock icon next to the device s MAC address is your indication that a license has been assigned to this user, and that license has been enabled. Admin_Portal_0818rev9.doc Page 11 of 257
12 25. Enter the Portal User ID and select the Domain from the drop down list; this will be the user ID they will use to log into their End User portal. 26. Click the Generate Password button to assign a password for the End User portal, or manually enter and confirm a password in the appropriate fields. Passwords must be a minimum of 8 characters, a maximum of 40 characters, and must contain one capital letter, one lower case letter, one numeric and one special character. 27. Enter the user s in the Address field, this address receives a Welcome , that includes a User ID and Password to sign in to their End User portal. 28. From the Send Welcome drop down list, choose who should receive the welcome Admin Only only the primary administrator will receive the welcome User Only the user only, based on the address entered, will receive the welcome Both Admin & User both the primary admin and user will receive the welcome Do Not Send neither the primary admin or the user will receive the welcome if this option is chosen, the welcome can be sent at a later time 29. From the Time Zone drop down list, select the correct Time Zone if it is not displayed correctly or needs to be changed. Note: There is a unique Time Zone option for Arizona. Admin_Portal_0818rev9.doc Page 12 of 257
13 30. Click the Device radio button to program a Hosted VoIP seat. 31. As you select options from the drop down lists, additional lists appear based on the selection you make in each previous drop down list. 32. From the Vendor drop down list, select the maker of the device you are building. 33. From the Phone Type drop down list, select the phone model you are building. 34. From the Device Template Name drop down list, select the template you wish to assign to this device. The template you select is based on the seat type, i.e., Premium seat should be assigned a Premium_x template. _1, _2, _3 will determine the number of lines that will be built for the primary phone number of that device, i.e., 1, 2 or 3 lines. 35. Enter the 12 digit MAC address for your device in the Phone MAC Address field. 36. Use the Description field to enter a unique name for this device, but it is not required. 37. Keep the Make this End User the Primary User of this Device check box checked. 38. Enter a passcode in the Voice Mail PIN field, this will be included in the Welcome , and will be used when first logging in to voic Reconfirm that passcode by re-entering it in the Confirm Voice Mail PIN field. Passwords must be 4 to 15 numeric characters in length. Maximum greeting length for individual mailboxes is 180 seconds (3 minutes). 40. Select an option from the Escape To Operator Group drop down list, if Escape to Operator Groups have been defined; this determines where callers go if they press 0 in the user s voic Click the Activate User button to return to the Manage Users page, or click the Activate User and Continue button to continue making feature changes to your user. Admin_Portal_0818rev9.doc Page 13 of 257

 to the user, click the Manage Business Communicator button.")
14 42. To Allow Custom Call ID, click the Yes radio button. 43. Enter the number you wish to display, in the Custom Caller ID field. Note: You must agree that you are sending a valid telephone number that is owned by the Calling Party, whether the telephone number is owned by CenturyLink or another provider. The telephone number must correctly represent the physical location of the call where the call is originated. 44. Click on the Feature Assignment tab. 45. To add a Business Communicator (soft phone) to the user, click the Manage Business Communicator button. Note: The Desktop Softphone and Mobile Softphone options are being replaced by the Business Communicator. If you did not have the former version of the softphone in your inventory, you will not see buttons for those two options. 46. There are two versions of the Business Communicator, Voice/Video and Collaboration. 47. Click the radio button for the version you want to assign to your user 48. You must have licenses available to assign a Business Communicator to the user, make note of the number of licenses available in the Available column. 49. Click the Save button. Admin_Portal_0818rev9.doc Page 14 of 257

15 50. You will receive a successful notice that the license has been assigned to that user. Note: The user will be able to download the necessary software from the End User portal, under Help from the main menu, within the Downloads section. They will receive a welcome notifying them that this feature has been added, and how to access the links. User guides for desktop and mobile applications are also available in the End User portal under Help. 51. To remove a Business Communicator license, click the Manage Business Communicator button. 52. You can change the license type by selecting either Voice/Video or Collaboration. 53. To remove the license from the user, click the None radio button. 54. Click the Save button. 55. This license will be returned to your Available inventory and can be assigned to another user. Admin_Portal_0818rev9.doc Page 15 of 257

16 56. If your users should be assigned a license for the Receptionist PC Console license, click the Yes radio button. 57. Confirm that you have inventory available to assign that license. 58. If your users should be assigned a Call Recording license, confirm you have available inventory. 59. Click the Yes radio button. 60. All Features associated to that seat type are enabled by default. 61. Available features are based on the seat type, i.e., Basic, Standard or Premium. 62. To disable a Feature, uncheck the box for the Feature(s) you wish to disable. Admin_Portal_0818rev9.doc Page 16 of 257

17 63. If you are not familiar with a feature, hover over the? next to the feature, and you are presented with a description box listing the feature definition. 64. You will find this type of real time help throughout the portal. 65. Click the Yes radio button for Allow Calls From Within this Tenant if you want users to receive calls from within your company. Click the No radio button to block those calls. 66. From the Allow Calls from Outside this Tenant drop down list, select from the following: Yes user will be able to receive inbound calls from outside of your tenant Transfer Calls Only user will only be able to receive outside calls that are transferred to them No user will not be allowed to receive any inbound calls from outside of your tenant 67. For Dialing Restrictions, click the radio button associated to the calling policy required for that user. 68. Click the Save button to save all Feature setting changes. Admin_Portal_0818rev9.doc Page 17 of 257
 as they pertain to that user under Share Call Appearance by clicking the appropriate radio buttons: Alert all appearance for Click-to-Dial Allow Call Retrieve")
18 69. Click on the Feature Settings tab. 70. Next, select the appropriate feature(s) as they pertain to that user under Share Call Appearance by clicking the appropriate radio buttons: Alert all appearance for Click-to-Dial Allow Call Retrieve from another location Configuration of Multiple Call Arrangement o Allow bridging between locations o Multiple Call Arrangement Bridge Warning Tone: Allow bridging between locations o None o Barge-in only o Barge-in and repeat every 20 seconds Admin_Portal_0818rev9.doc Page 18 of 257
19 71. End User Features allows you to visually see what type of features the End User has set up in their End User portal. 72. From this screen you can make changes, or enable/disable features to assist the End Users with personal call flows. 73. For a full description of each feature and how to program them, refer to the End User Portal Guide. Admin_Portal_0818rev9.doc Page 19 of 257

20 74. To enable the Intercept feature, click the Intercept User On radio button. 75. If you choose to use a system default announcement, click the On Default Announcement radio button. 76. If you chose to customize the announcement, click the Off Default Announcement radio button. 77. Click the Browse button to search for your announcement as you would any other file. 78. Once uploaded, the file name will be noted next to Load Personal Audio Announcement. 79. Choose from the following options: Intercept All Inbound Calls rolls to voic for announcement, and has 0 option if enabled Allow Inbound Calls from System-Defined Phone Numbers Allow Inbound calls (Partial Intercept) choose partial intercept with alternate outbound blocking announcement Admin_Portal_0818rev9.doc Page 20 of 257
21 80. Choose from the following options: Route to Voice Mail caller will hear full default or custom announcement Play new Phone Number will play/announce the number that is replacing this telephone number Transfer on 0 to Phone Number caller will go to Escape to Operator destination when 0 is pressed 81. After making all Feature Setting option changes, click the Save button. 82. Click the Voice Mail Settings tab to manage voic To delete a user s voic , click the Delete Voice Mail button. 84. Click the Ok button to confirm the deletion of the mailbox. 85. Click the Cancel button to cancel the mailbox deletion. 86. Receive a notice that your action was successful and the mailbox was deleted. Admin_Portal_0818rev9.doc Page 21 of 257
22 87. To add a new mailbox, enter a PIN in the Voice Mail PIN field. 88. Confirm the PIN by entering the same PIN in the Confirm Voice Mail PIN field. 89. To assign an Escape to Operator Group to the user, click the Escape to Operator Group drop down list; this will determine where callers will go if they press 0 in this individual s voic Select from any Escape to Operator Group already built under Manage Services --> Escape to Operator. 91. Click the Save button. Note: Maximum Greeting length is 3 minutes Open and Closed; maximum Message length 3 minutes each (50,000 KB), maximum mailbox capacity is 150,000 KB. 92. Click the Reset PIN button to reset the user s voic box passcode. 93. Enter the new PIN in the New PIN field. 94. Confirm the PIN by re-entering the PIN in the Confirm PIN field. 95. The PIN can be between 4 and 15 numeric characters. 96. Click the Save button. Admin_Portal_0818rev9.doc Page 22 of 257
23 97. If you have a need for a mailbox to provide a greeting only, and not allow for messages to be left, click the Enable radio button for Announcement Only Mailbox. 98. At anytime, to again make it a fully functional mailbox that can accept messages, click the Disable radio button. 99. Click the Edit Numbers button to assign secondary numbers to this voic box This will allow you to have one mailbox for up to 20 lines associated to this mailbox. Note: When secondary numbers are associated to a mailbox, callers will hear the greeting of the main (this) user s mailbox when the call is forwarded to voic In the Secondary Numbers field, enter up to 20 numbers, separated by a comma, Click the Save button. Admin_Portal_0818rev9.doc Page 23 of 257


24 103. The numbers added as Secondary Numbers to Voic will appear At anytime to edit or add to these numbers, click the Edit Numbers button To Send All Calls to Voic , click the On radio button, click the Off radio button to disable this feature To enable or disable the Send Busy Calls to Voic and Send Unanswered Call to Voic , click the On or Off radio button From the Escape to Operator drop down list, select the location you want callers to be forwarded to if they press 0 in this individual s voic Choose the delivery speed of your s from the Prompt Speed drop down list Check or uncheck boxes, to enable or disable the following features: Automatically Play Envelope Information Play Additional Ring before Greeting Auto Play Skip PIN 110. Voice Mail Forward allows you to send copies of your voic messages, to your inbox. Admin_Portal_0818rev9.doc Page 24 of 257
25 111. From the Voice Mail Forward drop down list, select from the following: Disable voic s will not be sent to Forward & Delete voic s will be sent to , and will not be saved in your voic box Forward & Save voic s will be sent to , and a copy will be saved in your voic box (voic s will need to be deleted via the voic box, or by clicking the delete link in the envelope) Note: If Forward & Delete is the selected option for Voice Mail Forwarding, the Out Call Notification and/or Text Notification features defined in the user s End User portal will not work; notifications will not be sent if a message is NOT left in the user s mailbox In the Forward to Addresses field, enter the s address you want to receive voic s; addresses or distribution lists are comma separated If Voice Mail Transcription licenses were purchased and are available in inventory; note if inventory is available If inventory is available, click the Yes radio button for Assign Voice Mail Transcription to assign a license to that use Click the Inventory On radio button to enable transcription You can disable transcription or remove a transcription license for a user at any time, but clicking the Off and No radio buttons. Note: Transcriptions will be included at the bottom of an the user receives when a message is left. This envelope also contains a.wav file of the message; addresses to receive.wav files and transcriptions are defined in the End User portal. Transcription message maximum length is seconds, regardless of the entire message length Click the Save button. Admin_Portal_0818rev9.doc Page 25 of 257
. 120. To define distinctive rings, click the Yes radio button.")

26 118. Click the Alternate Numbers tab This feature allows you to assign up to 10 numbers to a user for inbound calls. You can also specify ring patterns for the alternate number(s) To define distinctive rings, click the Yes radio button Select the number you want to assign to this user from the Phone Number drop down list At any time if you wish to remove an Alternate Number from a user, click the Phone Number drop down list and select None. Admin_Portal_0818rev9.doc Page 26 of 257

27 123. The extension will automatically populate in the Extension field based on your extension dialing plan, but can also be edited if your extensions do not match the 10-digit phone number From the Ring Pattern drop down list, select from Silent or three unique ring pattern types Click the Save button. Admin_Portal_0818rev9.doc Page 27 of 257

28 Creating an ATA Device An ATA device provides dial tone off of an IP platform, which can then be plugged into an analog device such as a phone, fax machine, postage machine, or paging system. Creating and editing an ATA is similar to a regular user. 1. Click on User Administration from the main menu. 2. Click the Create New User button. 3. Complete the Manage Users Create New User form, as described in the previous section. 4. For Device or Trunk Group, click on Device. 5. Choose the appropriate vendor from the Vendor drop down list. 6. Select the appropriate device from the Device Type drop down list 7. Select the appropriate ATA from the Phone Type drop down list. 8. Select the SPA122Standard template in the Device Template Name drop down list. 9. Enter the devices MAC address in the Phone MAC Address field. 10. Click the Activate User or Activate User and Continue button. Admin_Portal_0818rev9.doc Page 28 of 257


29 11. Once the device is successfully built, click the Edit icon for that device on the User Administration --> Manage Users menu. 12. Scroll down and click the Manage Device button. 13. Click the Edit icon to make changes to the primary line on the ATA; this is similar to the editing capabilities on a regular phone user. 14. If you make feature changes, you will need to reboot the device by clicking the Reboot Device button. 15. Click the Device Settings tab. Admin_Portal_0818rev9.doc Page 29 of 257
30 16. This allows you to account for Day Light Savings time and program Hot Dials. 17. The Time Server field is auto populated, if you wish to use your Internal SNTP Time server, enter the IP address in the Timer Server field. 18. Enable Cisco Web GUI allows you to access Cisco Web Browser settings from your computer s web browser, however, should only be used if needed as it could pose a security risk. 19. Enable or disable Day Light Savings time but selecting the 1 or 0 radio button. 20. Use the Dial Plan FXS Port 1 and 2 fields to create hot lines or ring downs. Hover over the? for programming details. 21. Click the Save button to save your setting, then click the Reboot Device to enable those setting changes. Adtran ATA/Router Devices These devices are used with analog handset devices. Multiple handsets can be associated to one device. 1. To build an Adtran ATA or Router device, begin creating an analog seat as you would any other seat and click on the Device radio button. 2. Select Adtran from the vendor drop down list. Admin_Portal_0818rev9.doc Page 30 of 257
31 3. Select either Adtran ATA or Adtran Router from the Device Type drop down list, based on the equipment you received. 4. Select the correct device from the Phone Type drop down list, based on your equipment: Adtran 908E (ATA or Router) 8 port device Adtran 916E (ATA or Router) 16 port device Adtran 924E (ATA or Router) 24 port device 5. Select a template from the Device Template Name drop down list. 6. Enter the MAC address of the device in the Device MAC Address field. 7. Enter the serial number of the device in the Device Serial Number field. 8. Select and confirm a voic PIN if required. 9. Click the Active User or Activate User and Continue button. Admin_Portal_0818rev9.doc Page 31 of 257


32 10. To assign additional users to the remaining lines of your device, click the Manage Device button from the User Settings tab. 11. The number of ports will be based on the ATA or Router model you chose when you built the seat. 12. To add a line, click the + next to the port you want to program. Admin_Portal_0818rev9.doc Page 32 of 257


33 13. Click the Search button from the Manage Device Add Line Key window. 14. From the Find drop down list, choose to enter a search or partial search by First Name, Last Name or Phone Number. 15. Click the Search button. 16. All seats matching your search criteria will be displayed. 17. Click the Select button for the user you wish to add to your device. 18. Choose your option from the Message Waiting Indicator drop down list: Yes will light message waiting indicator on the device No will not light message waiting indicator the device 19. Click the Save button. Admin_Portal_0818rev9.doc Page 33 of 257


34 20. Your successful action is acknowledged. 21. That user will now be programmed on that port. 22. A reboot of the device is required after every change. 23. Click the Reboot Device button. 24. To move a user to another port, left click and drag the user to the new port location and release your mouse. 25. To delete a user from this device, click the Trash icon. 26. A reboot of the device will be required to activate the new port. Admin_Portal_0818rev9.doc Page 34 of 257


35 Grandstream DP750 Devices The Grandstream DP750 base device can support programming for up to 10 lines, and can be paired with 5 individual Grandstream DP720 handset devices. Each handset then can be customized to include one or all of the 10 lines programmed on the base unit, in any order on the handset device. 1. Click on User Administration from the main menu. 2. Click the Create New User button. 3. Enter a First Name and Last name in the appropriate fields. 4. Select a location from the Group drop down list. 5. Select a Cordless seat type from the Seat drop down list; options will be Basic Cordless, Standard Cordless or Premium Cordless but are controlled by available inventory. 6. Continue inputting data for the new user as you would for any other device such as Telephone Number, Portal User ID, Address, etc. Admin_Portal_0818rev9.doc Page 35 of 257
36 7. Click the Device radio button to expose additional fields, required to program the DP750 base unit. 8. Select Grandstream from the Vendor drop down list. 9. Select GrandstreamDP750 from the Phone Type drop down list. 10. Select Grandstream_DECT_Standard from the Device Template name drop down list. 11. Locate the device s MAC address on the bottom of the device, and entering it in the Device MAC Address field. 12. If the primary line should include voic , enter a PIN and confirm that PIN, in the Voice Mail PIN and Confirm Voice Mail PIN fields. 13. Click the Activate User or Activate User and Continue button complete programming. Admin_Portal_0818rev9.doc Page 36 of 257
 button and click Accept to accept the disclaimer. 16. Locate the lines you want added to the DP750 base unit from within the Available Users field.")
37 14. Initially a single line is programmed to the DP750 base device, based on the telephone number selected when the device was created. 15. To add additional lines, click the Add Line Key(s) button and click Accept to accept the disclaimer. 16. Locate the lines you want added to the DP750 base unit from within the Available Users field. 17. Drag and drop each user to the Selected Users field, or use arrows to move users between fields. 18. Click the Save button. Drag and Drop Admin_Portal_0818rev9.doc Page 37 of 257


38 19. Five lines are now programmed on the DP750 base unit, and can be programmed to appear on 1-5 cordless handset devices (DP720). 20. To add lines to individual handsets, click the Edit icon for each line programmed on the base unit. 21. Based on the following programming, Handset 1 appears with as line one, and as long 2; Handset 2 appears with as line one, and as ling two. 22. Outbound caller ID is always based on the line that is programmed as line one on the device, unless the default outbound dialing setting is changed within the menu option on the handset. 23. When programming changes are done, click the Reboot Device button which syncs all changes to any handset paired to the base unit. Admin_Portal_0818rev9.doc Page 38 of 257

39 24. While editing lines, choose from 5 Ring Designs: Specific Handset (HS1 Only, HS2Only) -- designates the inbound call to a specific handset Shared Handset -- allows all handsets assigned to the line to ring at the same time and all features to be shared from the line on all handsets Circular -- the base station notes which handset answered the last call, and the rings the next available handset in round-robin fashion Linear -- the base station distributes calls in predefined order from the lowest-numbered available handset, if no answer within ring timeout, the call is sent to next available handset in sequence; this mode is also called serial hunting Parallel -- all phones ring concurrently, if one phone answers, the remaining available phones can make outgoing calls 25. After any programming changes, always click the Reboot Design button which syncs your changes to all paired handsets. Admin_Portal_0818rev9.doc Page 39 of 257
40 26. If using parallel as a ring design, click the Yes radio button for Call Waiting Parallel Mode, if you want to allow calling waiting. 27. For security purposes, Enable WAN Web GUI should remain disabled; the Yes radio button should only be selected for troubleshooting purposes. 28. If using a Linear or Circular ring design, click an option from the Handset Hunting Ring Timer drop down list from 5-40 seconds; this determines how many times the first handset rings, before the call rolls to the next available handset, typical setting is 20 seconds. 29. Enter the internal SNTP time server IP address in the Time Server field, if necessary; typically this field remains blank. 30. Click the Save button. Admin_Portal_0818rev9.doc Page 40 of 257

41 Editing a New or Existing User After the user has been activated and Features and Settings and Phone Setting changes have been applied and saved, you can return to the user and Edit their seats to add/manage features such as Busy Lamp Fields, Shared Call Appearances, and Soft Keys. 1. To Edit a user, go to Manage Users from the sub-menu. 2. Select your Group from the Select a Group drop down list if you have more than one location. 3. Use the Search End Users feature to refine your search criteria if your Group is large. 4. Click on the Edit icon to access the features and setting for that user. 5. Most fields can be changed when editing a user. This allows you to change the name and portal domain on a seat to a new user should you have a change in staff. 6. Enter the new name in the First Name/Last Name fields. 7. If you need to change the seat type, click the drop down list next to Seat to select the new seat type based on the inventory you have available. 8. The Hosted VoIP Number cannot be changed without deleting and rebuilding the seat. Admin_Portal_0818rev9.doc Page 41 of 257
42 9. Enter a Title, Mobile and Pager number if desired, but these fields are not required. 10. To Allow Custom Caller ID, click the Yes radio button. 11. To Allow Custom Call ID, click the Yes radio button. 12. Enter the number you wish to display, in the Custom Caller ID field. Note: You must agree that you are sending a valid telephone number that is owned by the Calling Party, whether the telephone number is owned by CenturyLink or another provider. The telephone number must correctly represent the physical location of the call where the call is originated. Note: If you enter a number for Custom Caller ID that is not on you Hosted VoIP account or if you use a Toll Free number, all outbound calls will be billed as Long Distance. 13. Click the Enable Directory Privacy checkbox if you wish to enable this feature. 14. To enable Secure SIP for this user, click the Secure SIP checkbox; if you do not see this option, that would indicate that the seat you are programming does not support this feature, or you do not have available licenses within your inventory; there is a cost associated to this feature. 15. To change the portal user ID, click the Change User ID button. Admin_Portal_0818rev9.doc Page 42 of 257

43 16. A Change User ID window appears. 17. Enter the new user ID in the Portal User ID and Domain field. 18. Enter the user s correct address in the Update field. 19. Click the Save button. 20. An is sent to that providing them with their user ID and password, as well as a link to access their End User Portal. 21. To reset an existing end user s portal password or to assign a new password, click the Reset Password button. Admin_Portal_0818rev9.doc Page 43 of 257


44 22. A Reset Password window appears. 23. Click the Generate Password button for a system generated password, or enter and confirm a new password in the New Password and Confirm Password fields. 24. Click the Save button. 25. Once reset, the user receives an with their new temporary password. When they log into their portal the first time, they will be required to change their password for security purposes. Note: Resetting the password effects their ability to log into the portal, soft clients, receptionist console and other features that require a user ID and password. 26. For password rules, hover over the? next to New Password. Note: The Password must be between 8 and 40 characters and include 1 upper case letter, 1 lower case letter, 1 number and 1 special character. The password cannot contain white space. 27. To edit or change the address, enter the new address in the field. 28. If the time zone needs to be changed, click the Time Zone drop down list and select the correct time zone; remember, Arizona has its own unique option, so watch for that. Admin_Portal_0818rev9.doc Page 44 of 257
 allows this user the ability to answer and monitor another individual s line.")
45 29. From the Manage Users Edit End Users screen, click on the Manage Device button. 30. The Line Keys tab allows you to add/remove Shared Call Appearances and Busy Lamp Fields. o Shared Call Appearance (SCA) allows this user the ability to answer and monitor another individual s line. o Busy Lamp Field (BLF) allows this user the ability to answer and monitor another individual s line, in addition to using this key to dial that individual s extension. A BLF can also be used in the transfer process, instead of having to manually enter that individual s extension on the keypad in the transfer process. Note: You can only add Shared Call Appearances (SCA) for individuals within your group, you can add Busy Lamp Fields (BLF) for individuals across your Tenant. 31. The Soft Keys tab allows you to delete and add soft keys to a user s device. 32. The Device Settings tab allows you to change additional features settings at the user level. 33. Click the Add Line Key button. 34. To continue, click the Accept button on the 911 Limitations screen. Admin_Portal_0818rev9.doc Page 45 of 257
46 35. Search for users by entering a search or partial search in either search field. 36. Drag and Drop users to and from the Available Users field and Selected Users field. 37. You can also use the arrows buttons between both fields to move individuals two and from each field. 38. Display Count is the number of lines for that individual you want to appear on your phone; select the appropriate number of lines from the drop down list. 39. Choose the Ring Type from the drop down list that you you wish to; each SCA on any device can have a unique ring, which can also be unique from the primary line of that device. 40. Select if the SCA should be Private or Shared from the drop down list. IMPORTANT: Private will not show availability and you will not be able to barge or place a call on hold form one phone and pick it up on the other. Shared you will be allowed to see the line s status and place a call on hold to be picked up on the other device. 41. If Yes is selected for Message Waiting Indicator, this user s message waiting light will activate when the individual you are monitoring receives a new voic ; the standard setting for this feature is No. 42. If Yes is selected for Track Calls, any missed calls for the monitored individual will log in this user s missed call log; the standard setting for this feature is Yes. 43. If Yes is selected for Sync Call Forward, this device will visually display if the owner of the line appearance enables call forwarding; the standard setting is No. 44. If Yes is selected for Sync Do Not Disturb, this device will visually display if the owner of the line appearance enables do not disturb; the standard setting for this feature is No. 45. Click the Save button. Drag and Drop Admin_Portal_0818rev9.doc Page 46 of 257


47 46. The SCA for the monitored user will be built on the next available line key. 47. At any time you can click the Edit icon to change any of the previously selected settings. 48. At any time click the Trash Can icon to delete an SCA from a user s device. 49. You can change the order in which your SCAs appear on your device. 50. Left Click and Drag the line you want to move, and drop it into the new position. 51. When all line changes are made, you must click Reboot Device for your changes to take effect. Admin_Portal_0818rev9.doc Page 47 of 257

48 52. To delete an SCA (Shared Call Appearance), click on the Trash Can icon next to the line you wish to delete. 53. Click the OK button to confirm the deletion of that SCA. Admin_Portal_0818rev9.doc Page 48 of 257

49 54. When all SCA s are deleted, you must click the Reboot Device button for your changes to take effect. 55. To edit settings for any of your SCA keys, click the Edit icon. 56. To change the default Line Label from the extension number, enter the preferred label name in the field. 57. Select your preferred features settings from the drop down list for Display Count, Ring Type, Line Type, Message Waiting Indicator, Track Calls, Sync Calls Forward and Sync Do Not Disturb. 58. Click the Disc icon to Save your settings. 59. Click the delete X icon to exit without saving. 60. When all SCA s setting changes have been made, you must click the Reboot Device button for your changes to take effect. Admin_Portal_0818rev9.doc Page 49 of 257
")
50 61. To monitor a user with a BLF (Busy Lamp Field) key, click the Manage Busy Lamp button. 62. Select your Default Line Key Action from the drop down list. Normal allows you to initiate a call to the user when set to Normal Automata allows you to park/transfer/pickup when set to Automata (this is the preferred setting for full use of the BLF function) 63. If Call Appearance is set to Yes, a splash screen will appear when an inbound call is made to the BLF, if set to No, the splash screen will not appear. 64. If Remote Caller ID is set to Yes, the inbound caller ID will appear; if set to No, the caller ID will appear as unknown. 65. Ringer Type allows you to customize the ring tone of your BLFs. Unlike customizing ring tones for SCA s, you can only select one ring tone for all of the BLFs assigned to a device. Select the preferred ring type from the drop down list, Silent Ring is also an option. 66. Select the individuals from the Available Users field who will be monitored on this device. 67. To narrow the list of users in that field, use the Search End Users field. 68. Select your search preference from the drop down list, First Name, Last Name, or Phone Number. 69. In the that include field, enter your search criteria; you can enter a partial name or number. 70. From this list, drag and drop the user(s) for which you wish to modify feature (you can also select them while holding down the Control button on your keyboard and then click the right arrow in the middle of the columns). 71. Click the Save button when all users have been added. Drag and Drop Admin_Portal_0818rev9.doc Page 50 of 257
51 72. The BLF keys that were added will now appear and will be built on the next available keys in the order that they were placed in the Assigned Users field. 73. Adding SCA or BLF keys requires a reboot of the phone for the changes to be visible on the device. 74. If you have finished making key changes, and do not wish to make any additional changes, click the Reboot Device button. Note: If the user is on the phone when you reboot their device, the reboot will not take effect until the user disconnects from their call. 75. If you want to continue with Soft Key changes, click the Soft Keys tab, you can reboot the phone after those changes are made. Admin_Portal_0818rev9.doc Page 51 of 257
52 76. Select your Default Line Key Action from the drop down list. Normal allows you to initiate a call to the user when set to Normal Automata allows you to park/transfer/pickup when set to Automata (this is the preferred setting for full use of the BLF function) 77. If Call Appearance is set to Yes, a splash screen will appear when an inbound call is made to the BLF, if set to No, the splash screen will not appear. 78. If Remote Caller ID is set to Yes, the inbound caller ID will appear; if set to No, the caller ID will appear as unknown. 79. Ringer Type allows you to customize the ring tone of your BLFs. Unlike customizing ring tones for SCA s, you can only select one ring tone for all of the BLFs assigned to a device. Select the preferred ring type from the drop down list, Silent Ring is also an option. 80. Select the individuals from the Available Users field who will be monitored on this device. 81. To narrow the list of users in that field, use the Search End Users field. 82. Select your search preference from the drop down list, First Name, Last Name, or Phone Number. 83. In the that include field, enter your search criteria; you can enter a partial name or number. 84. From this list, drag and drop the user(s) for which you wish to modify feature (you can also select them while holding down the Control button on your keyboard and then click the right arrow in the middle of the columns). 85. Click the Save button when all users have been added. Drag and Drop Admin_Portal_0818rev9.doc Page 52 of 257

53 86. If you want to continue with Soft Key changes, click the Soft Keys tab, you can reboot the phone after those changes are made. 87. If you are not going to make Soft Key changes, click the Reboot Device button. Admin_Portal_0818rev9.doc Page 53 of 257

54 88. Callers, Pull, Retrieve and To Vmail soft keys are default keys on all devices. 89. You can clear or remove any of the default soft keys by clicking the Clear Soft Key button next to the feature you wish to delete. 90. To add a new soft key, click the Enable check box to activate a feature. 91. Click the drop down list to display the features available, select a feature such as Park. 92. The default label name will automatically populate in the Label field; this field is editable so you can relabel the key to reflect a different name that may be more familiar to your users. 93. Select when you want that key available to the user, i.e., when the phone is idle or while on an active call. o Show On Idle the key will be available when the phone is on-hook, i.e., no dial tone o o Show On Active the key will be available while the phone is on an active call Show Before Default Keys the key will be positioned before default keys such as Conference and Transfer Admin_Portal_0818rev9.doc Page 54 of 257

55 94. When all soft keys have been added, click the Save button. 95. Adding or modifying soft keys requires a reboot of the phone. 96. Click the Reboot Device button or click the Device Settings tab to continue making device changes. Admin_Portal_0818rev9.doc Page 55 of 257


56 97. If you are not familiar with a particular soft key feature, click the Column Examples button. 98. You will be presented with a brief description about each feature that can be added as a soft key. 99. Click the Reboot Device button to reboot and apply your key changes Or, click the Device Settings tab to make additional setting changes for this device. Admin_Portal_0818rev9.doc Page 56 of 257
57 101. BLF-Call Appearance determines if the screen splash occurs on incoming calls Select Normal or Automata from the BLF-Default Line Key Action drop down list Normal: used to initiate a call to that user when pressing the BLF key. Automata (preferred setting): used to Answer/Transfer/Park when pressing the BLF key BLFBLF-Remote Caller ID will provide caller ID of incoming call or unknown BLF Ringer allows you to select from a series of ring types or silent from the drop down list When Browser Home Page is configured, it enables the built in web browser on the phone. Note: The address in the Browser Home Page field should be structured in the following format ( when accessing Applications on your device, the website entered in this field will launch Call Hold Timer provides a tone as an audible reminder that a caller is on hold; the feature default setting is Disabled. Select seconds from the drop down list. The phone provides an audible ring every XX seconds until the caller is removed from hold or hangs up Click the Yes radio button, to enable Call Recording Integration (VVX only); this provides soft keys to start, pause, and resume recordings for users with call recording licenses Call Waiting Tone allows you to select the audible tone from the drop down list Caller Number First displays caller ID name above or below the number Calls Per Key indicates the number of calls or conference which may be active or held on one line Conference Type allows you to set each user to 3-Way or N-Way conference calling Contact Center allows you to enable call center stats and agent login integration; agent login integration is only available on Contact Center Standard seats. Disabled will not provide a queue stats splash screen or an agent Login button Enable All both the queue stats will splash on the screen and the device will have a Login button Enable Login Keys will provide an agent Login key only Enable Stats will provide queue stats splash screen only 113. Corporate Directory On enables the corporate directory search using LDAP. Must configure LDAP settings for this feature. Admin_Portal_0818rev9.doc Page 57 of 257
58 114. Day Light Savings Time Enable enables the Day Light Savings Time setting on the phone Use the Default Softkeys feature to add a Directory and DND soft keys to the bottom of the display. This feature is Disabled by default, so if you intend to provide soft keys for those features to your users, select Directory Key, DND or Enable All if you want both soft keys to appear Echo Cancelation controls the built in echo cancelation function Disable the Enable Inbound Call Popup feature, to turn off the popup that displays for incoming calls on VVX models; this provides the ability to transfer active calls, while new calls are ringing Enable Polycom Web GUI allows you to access your phone settings from your browser. This should only be used when needed as it could pose security issues Enable Stutter Dial Tone turns on an audible alert when the user has a voic message From the End of Dial Timer drop down list, select in seconds from 2-6, the delay before a call is sent when extension dialing and transferring. This speeds up the dialing and transfer process, when the user does not press the # key or the Send Call soft key to complete the dialing or transfer transaction When the Enterprise Directory feature is enabled, a new menu option appears under Directory on VVX300/310, VVX400/410, VVX500 and VVX600 devices. Locate individuals within this directory by using the Search option Exchange Calendar Enable turns on the calendar on select models of phones (VVX models only) Exchange Server URL input the Exchange calendar URL, must be OOF URL for Exchange (VVX models only) Flexible Expansion Modules Keys allows you to build the primary line of the phone on all of the keys on the phone itself, thereby moving Shared Call Appearances and Busy Lamp Fields to build on the expansion module The default setting for Handset Background Noise is None. Change that setting by selecting from the drop down list. As the filter increases, the far end caller may have more difficulty hearing the speaker due to the increase of noise suppression Handset SideTone is a feature that allows a user to hear their own voice in the receiver earpiece. The selected adjustment from the drop down list, increases and decreases the volume for the handset. 0 is the default setting, select from +3 to -12 from the drop down list The default setting for Headset Background Noise is None. Change that setting by selecting from the drop down list. As the filter increases, the far end caller may have more difficulty hearing the speaker due to the increase of noise suppression Headset SideTone is a feature that allows a user to hear their own voice in the headset earpiece. The selected adjustment from the drop down list, increases and decreases the volume for the headset. 0 is the default setting, select from +3 to -12 from the drop down list. Admin_Portal_0818rev9.doc Page 58 of 257
59 129. Hot Dial Enable must be turned on to use that feature Hot Dial automatically dials the predefined number when the phone goes off hook When this device is setup as a Hoteling Host and Hoteling Integration is enabled by clicking the Yes radio button, a guest login button will appear when the user enables the Hotel Host feature in their End User Portal; if the No radio button is selected, the guest login button will not appear and a guest would need to associate to that device through their End User portal, not via the phone If a phone is designated as a hotel host device, Hoteling Integration provides a soft key for the Hoteling Guest to press to sign into the device Click the Yes radio button for the Line Numbering (VVX only) feature to add a line number indicator in front of the extension or line key name, i.e., 1_1234, 2_1234, 3_1234, etc., or 1_Main, 2_Main, 3_Main, etc Screen Capture requires the Polycom Web GUI to be enabled; if you click the Yes radio button, this allows the web to see the display and button layout on your device Spoofed Call Blocking (not used when on CenturyLink access) when phones are not connected to the CenturyLink network, users may receive calls from extensions that do not exit CAUTION: If you turn this feature on when using a CenturyLink connection, the phone will not work properly Use internal SNTP time service for the Timer Server setting Transfer Type (for VVX handset models only): Blind the default transfer type will be Blind or Unsupervised, for that device Consultative (default) the default transfer type will be Consultative or Supervised, for that device 138. Video Enable turns on the Polycom Video Codec H264 for use with video enabled phones Video Quality is used to set the video quality on video enabled phones. Higher quality video utilizes more bandwidth Click the Save button Click the Reboot button; most setting changes made on this page require a reboot. Admin_Portal_0818rev9.doc Page 59 of 257
60 142. After all configuration settings have been added or modified on the Line Keys, Soft Keys and Device Settings tab Click the Reboot Device button to reboot the phone and apply all of your setting changes A Reboot Device button is available on all three settings tabs and can be rebooted at any time. REMINDER: If the device is rebooted while the user is on a call, the call will not be disconnected. When the user disconnects their call, the phone will begin the reboot process. Admin_Portal_0818rev9.doc Page 60 of 257

61 Custom User Templates Custom User Templates are used to assign a specific set of features and class of service (COS) to users during user creation. Each Custom User Template is created for a specific seat type. If you have a group of Premium seats that do not get a particular feature like Call Forward, or access to Directory Service (411), you can create a Custom User Template to assign to a group of users in your Tenant. Note: Editing a Custom User Template does not change the users that were assigned that template during user creation, it will only affect users that the template applied to when editing or creating a new user in the future. 1. Click User Administration from the main menu. 2. Click Customize User Templates from the sub menu 3. If you have Custom User Templates built, you can click on the drop down list to view all existing templates. 4. After selecting a template from the drop down list, click the Edit or Delete button to manage that template. 5. To add a new template, click the Add New button. 6. Provide a name for the template in the New Template Name field. The name should be something meaningful that you will recognize later (e.g., Premium No Call Fwd, Premium John Pickup Group). 7. Select the Seat Type from the drop down; the seat type will determine which features you are able to enable/disable. 8. Fill in the optional Template Description field by noting a feature specific description of your template. Admin_Portal_0818rev9.doc Page 61 of 257
62 9. By default, all available features for the selected seat type are Enabled. To Disable a feature, uncheck the corresponding box under the Assign column. For a brief description of any feature, hover over the?. 10. By default Enable Block On All 011+ International Calls is set; to change dialing restrictions for this template, click the radio button for the corresponding setting. 11. When all options are selected, click on the Save button. Admin_Portal_0818rev9.doc Page 62 of 257

63 12. The new Custom User Template is now available from the drop down list, and can be easily edited/modified 13. Click on the Edit button to edit the features of that template, click the Delete button to delete that custom template. Bulk Load Users The Bulk Load Users tool allows you to fill out a spreadsheet with all users and import that spreadsheet into the portal. The tool will then process and activate all of the new users. If you have existing users listed in the spreadsheet, you can input an action for each user such as Create, Delete, or Update, and the tool will perform those actions as well. In addition, you can Download Existing Users, to make changes to multiple Groups or Users. 1. Click on User Administration on the main menu. 2. Click on Bulk Load Users in the sub menu. 3. Download the Bulk Load Template File by clicking on the Template File link. 4. Fill out the file with all of the information for your users and settings. 5. For a guide on the information that is required within the Template File, click on Instructions. 6. Upload the file by clicking the Browse button to browse your computer and select the file. Admin_Portal_0818rev9.doc Page 63 of 257


64 7. Once you browse to your document, click the Validate and Process button. The tool will then process the file. 8. You will receive a confirmation window indicating that all format validations passed. 9. In the Notification Address(es) field, enter the address(es) using comma separation, that you want to receive notification that the bulk upload has completed. 10. Click the Submit button. 11. If your bulk upload spreadsheet does not pass validation, you will receive an error. 12. Review your spreadsheet for errors, by clicking on the.xls file within this notification. 13. Correct all errors and upload the corrected spreadsheet. 14. Another notification window will display indicating that your order is in process, and that an notification will be sent when the order is complete. 15. The report in process will be listed under the Transactional History window for reference and status. 16. Once the notification has been received that your order is in process, click the Refresh button to update the status of your order. Admin_Portal_0818rev9.doc Page 64 of 257

65 17. After clicking the Refresh button, your order status information is updated including a link to the spreadsheet under the Report column. 18. Click on the Report Link to open the spreadsheet it may take a few minutes to download depending on the size of the spreadsheet. 19. Transactional History Report will provide reports for all of your bulk upload orders for the past 90 days. Click on a report link at any time to review the information contained within that report. 20. To download a report for all Existing Users, click the Download Existing Users button. 21. A window will appear for notification, and will contain the address of the primary administrator. 22. Add/modify the in the Notification Address(es) field. 23. Click the Submit button. Admin_Portal_0818rev9.doc Page 65 of 257


66 24. A notification will be sent to the address(es) noted Notification field. 25. The time it takes to receive the report will vary based on the size of your company and the amount of information that needs to be downloaded. 26. Once that notification is received, click the Refresh button. 27. After clicking the Refresh button, there will be a link under the Report column. 28. Click on the link to download your report. Admin_Portal_0818rev9.doc Page 66 of 257


67 29. The report will open and can be saved or used as any other Excel document. 30. To make changes to multiple users, update the information in the appropriate fields, and follow the process to Upload the Bulk Load Spreadsheet. Note: Delete all users from this spreadsheet that you do not wish to change, before performing a new upload. Modify Multiple End User Feature Assignment The Modify Multiple End User Feature Assignment allows you to make features assignment changes to multiple users within a Group. Features are defined as Call Forward Always, Do Not Disturb, Calling Waiting, etc. 1. Click on User Administration from the main menu. 2. Click on Modify Multiple End User Feature Assignment in the sub menu. 3. Select the Group, and Seat Type from the drop down lists that you want to modify. Admin_Portal_0818rev9.doc Page 67 of 257
68 4. Once you select a Group and Seat Type, you can refine the search for your user(s) by First Name, Last Name or Phone Number. 5. Enter a sequence of letters or numbers for the user(s) you are searching for, in the that includes field, and click the Search button. If you choose not to refine the search by user name or number, all users within that Group, assigned to that Seat Type, will be displayed in the Search Results and End Users field. 6. The Search Results and End Users field will list all users in that Group, which fit the search criteria. 7. From this list, drag and drop the user(s) for which you wish to modify feature (you can also select them while holding down the Control button on your keyboard and then click the right arrow in the middle of the columns). 8. If you add a user in error, highlight the user in the Add Users To field, and drag and drop them back to the Search Results and End Users field. Drag and Drop Admin_Portal_0818rev9.doc Page 68 of 257
69 9. Once you have identified the user(s) in the Add Users To field, you can decide which Features to activate or deactivate. 10. Click the check box to activate or deactivate a Feature; you can make changes to multiple features. This is just a sample of the features you can make changes to, and you will have access to all Features and Dial Restrictions from this screen within the portal. Admin_Portal_0818rev9.doc Page 69 of 257
70 11. Once you have selected/deselected each Feature or Dialing Restriction you want to modify, click the Save button. This will modify the selected changes for every user that was moved to the Add User To field. Admin_Portal_0818rev9.doc Page 70 of 257


71 Modify Multiple End User Feature Settings The Modify Multiple End User Feature Settings allows you to make feature settings changes to multiple users within a Group at one time, or via Bulk Upload. Features are defined as Call Forward Always, Do Not Disturb, Calling Waiting, etc. 1. Click on User Administration from the main menu. 2. Click on Modify Multiple End User Feature Settings in the sub menu. 3. Previously uploaded spreadsheets will be displayed in the Transactional History field, and can be reviewed by clicking on the link. 4. To modify features settings, locate and select the Group, and Seat Type from the drop down lists that you wish to modify. 5. After options are selected, click the Get button. Admin_Portal_0818rev9.doc Page 71 of 257


72 6. All feature options for the seat type you selected are provided for editing. 7. If you chose to not send the welcome letter to the primary admin or the end user, or if the user misplaced their welcome , you can selecting choose individuals within the Group that should receive the Click the Send Welcome check box. 9. From the drop down list, choose Admin Only, User Only or Both Admin & User. Admin_Portal_0818rev9.doc Page 72 of 257

73 10. Click the Check Box next to the feature that you wish to edit for selected users in that Group, such as Call Forward Always. 11. The field for the selected feature will now be editable. Select or input the information based on the feature setting you are changing. Admin_Portal_0818rev9.doc Page 73 of 257
 for which you wish to modify this feature (you can also select them while holding down the Control button on your keyboard and then click")
74 12. Manage or change settings for Voic Scroll to the bottom of the screen to select the users within your Group. 14. Use the Search option to narrow your search criteria. 15. From the Available End Users field, drag and drop the user(s) for which you wish to modify this feature (you can also select them while holding down the Control button on your keyboard and then click the right arrow in the middle of the columns), to the Selected End Users field. 16. Click the Save button. 17. All users identified in the Selected End User field, will be immediately impacted by the feature setting change. Note: At present, a maximum of 50 users can be moved to the Selected End Users field for each bulk modification; if you have more than 50 users that need the same feature setting change, you would be required to repeat this process multiple times. Drag and Drop Admin_Portal_0818rev9.doc Page 74 of 257

75 18. Click the Download Existing Users button, to export a spreadsheet that will indicate feature settings for all of your users. 19. This spreadsheet is an easy way to ensure that feature are set appropriately for each user. Admin_Portal_0818rev9.doc Page 75 of 257


76 Modify Multiple End User Feature Settings Bulk Upload In addition to manually making changes to multiple users, you can manage multiple end user changes by performing a bulk upload, similar to the bulk upload process used to build new users. 1. Click on User Administration from the main menu. 2. Click on Modify Multiple End User Feature Settings from the sub menu. 3. Click the Template File link to download your upload template. 4. Click on the Instructions link to review and print important parameters needed to perform bulk feature changes. 5. Bulk Load Transactions will be displayed for 90 days in the Transactional History list. Click on the appropriate link to review previously processed uploads. 6. Example of Bulk Load Feature Template, save to your preferred drive and populate with the appropriate features before performing the upload. Admin_Portal_0818rev9.doc Page 76 of 257


77 7. Refer to the Bulk Upload Instructions for required fields, and instructions on completing the bulk upload spreadsheet. 8. Columns A and B are the only two required columns, the remaining are optional based on each user requirements. 9. Once the bulk upload spreadsheet is populated and saved, click the Browse button to locate and select your saved spreadsheet. 10. After the file is selected, it will be displayed next to the Browse button. 11. Click the Validate and Process button to run your bulk upload. Admin_Portal_0818rev9.doc Page 77 of 257
 field, enter the email address, or addresses, for any individuals that should receive email notification upon completion of the upload. 14.")
78 12. A successful notification will be displayed if your spreadsheet was successfully validated; if there were errors with your spreadsheet, an error message will appear. 13. In the Notification Address(es) field, enter the address, or addresses, for any individuals that should receive notification upon completion of the upload. 14. Click the Submit button. 15. You will receiving another notification, this one indicating that your upload is in progress, and an will be received upon completion. 16. At any time, click the Refresh icon, to update the status of your upload in the Transactional History list. Admin_Portal_0818rev9.doc Page 78 of 257

79 Bulk 911 Registration Use Bulk 911 Registration to change the registered 911 address for multiple users within a Group. 1. Click on User Administration from the main menu. 2. Click on Bulk 911 Registration from the sub menu. 3. If you have multiple Groups in your organization, click the Group you want to modify from the drop down list and click the Bulk 911 Registration button. 4. At the bottom of the Bulk 911 Add Location Screen, enter the Location Name, Address, City, State and Zip Code for your change. 5. Click the Next button. 6. Your address will be validated, and if successful, you will receive an address confirmation success notification. 7. Enter an Address 2 option such as floor, cube, etc., if required. 8. Click the Next button. Admin_Portal_0818rev9.doc Page 79 of 257
 for which you wish to modify this feature (you can also select them while holding down the Control button on your keyboard and")
80 9. Use the Search option to narrow your search criteria. 10. From the Search Results and End Users field, drag and drop the user(s) for which you wish to modify this feature (you can also select them while holding down the Control button on your keyboard and then click the right arrow in the middle of the columns), to the Add Users To field. 11. Click the Save button. Drag and Drop 12. To process your 911 Registration changes immediately, click the Change Now button Registration changes will happen in approximately 15 minutes to all users identified, and all users identified will receive an notification of the change. 14. To schedule your registration change, click the Schedule a Future Change button. Admin_Portal_0818rev9.doc Page 80 of 257
81 15. The Future Location address will be indicated. 16. Click on the Calendar icon to select the date you want your address registration to change. 17. From the Time drop down list, select the time you want your address registration to change. 18. From the Time Zone drop down list, select the appropriate time zone for the change. 19. Click the Save button. 20. The registered 911 address for the users identified, will occur on that date and time, and all users identified will receive an notification of the change. Admin_Portal_0818rev9.doc Page 81 of 257

82 Manage Services The Manage Services tool gives you access to Edit or Modify Group Services, Inbound Calling features, Directories, and Group Settings. 1. Click on Manage Services from the main menu. 2. This will display the first level of sub menu items under the main menu. Sub Menu 3. Hover over Manage Services from the main menu to display and access the remaining sub menu items such as Outbound Calling Features, Inbound Calling Features, Directories and Group Settings. Admin_Portal_0818rev9.doc Page 82 of 257


83 Anywhere An Anywhere pilot number can be assigned to each Tenant or Group within a Tenant. This allows users to utilize their Anywhere feature to move active calls seamlessly from their IP handset to another designated device, such as a mobile phone, or from their designated Anywhere device to their IP handset. 1. Click on Manage Services from the main menu. 2. Click on Anywhere from the sub menu. 3. If you have an Anywhere number programmed, it will be displayed including the Name and Number. 4. If you have more than one Group, click the drop down list to select the Group (location) that you want to add/review/modify. 5. Once your Group is selected, click the Get button. 6. To Add an Anywhere pilot to a specifc Group, select the correct Group from the drop down list, and click the Get button. 7. Click on the Add Anywhere Number button. Admin_Portal_0818rev9.doc Page 83 of 257
84 8. To assign a number from your available inventory, click the drop down list next to Anywhere Number. You can select any available telephone number from any Group. 9. The Anywhere Name, Calling Line ID First Name and Calling Line ID Last Name are prefilled with the telephone number you assign. 10. All of these fields are editable, so you can change the information based on what your needs are. 11. The Time Zone will preselect based on the time zone of that Group, this can be changed if needed. 12. Choose the appropriate settings for Prompt to Confirm Calling Location. and Silent Prompt Mode. Always Prompt when you dial the Anywhere pilot to make or move a call, you will always be prompted to enter your Anywhere device s 10-digit phone number. Prompt if Not Available (recommended setting) if enabled, Anywhere identifies the 10-digit number of your Anywhere device and does not require you to enter your 10-digit phone number Never Prompt if enabled, you will never be prompted to enter your 10-digit Anywhere device number. 13. Choose the appropriate setting for Silent Prompt Mode. Yes if set to Yes, you will NOT be prompted to enter your destination digits, the line will remain silent No (recommended setting) if set to No, you WILL be prompted to enter your destination digits 14. The Anywhere Number can now be used across the Tenant, instead of having to assign a unique Anywhere number to each Group. If you wish to use one number for your entire Tenant, leave the Users in Tenant radio button selected. If you want a unique Anywhere Number for each Group, click the Users in Group radio button as you define a number for each Group. 15. Click the Save button. Admin_Portal_0818rev9.doc Page 84 of 257


85 16. Once an Anywhere pilot number has been added, or if it already exists within a Group, it will be displayed as seen below. 17. Click the Delete button if you wish to delete an Anywhere pilot for that Group. 18. Click the Edit button to change any settings for a specific Anywhere pilot number. 19. Always remember to click Save after making setting changes. Note: To move a call from an Anywhere mobile device to the user s IP handset, a specific setting at the end user level needs to be confirmed as enabled for each user intending to move calls between devices. 1. Click on User Administration from the main menu. 2. Click on Manage Users from the sub menu. 3. Click the Edit icon next to the user you wish to edit. Admin_Portal_0818rev9.doc Page 85 of 257

86 4. Click the Features Settings tab. 5. Confirm or select the Allow Call Retrieve from another location radio button. 6. Click the Save button. 7. This user will now be able to move a call from their mobile Anywhere device, back to the IP handset upon return to the office. Auto Attendant The Auto Attendant feature provides customizable answering and call routing options, giving you full control over managing incoming calls. Auto Attendant answers incoming calls using a personalized greeting that you record, provides incoming callers with a menu of options, and routes the caller to a defined extension, mailbox or off site phone number. Note: The maximum greeting length for an Auto Attendant is 240 seconds (4 minutes). 1. Click Manage Services from the main menu. 2. Click Auto Attendant from the sub menu. 3. Click the Add Auto Attendant button to program your Auto Attendant. 4. Any existing Auto Attendants for your chosen Group will be displayed and can be Edited or Deleted. 5. Select the Group from the drop down list that you will be adding or editing an Auto Attendant for. 6. Click the Add Auto Attendant button. Admin_Portal_0818rev9.doc Page 86 of 257


87 1. Enter the Auto Attendant Name, letters or numbers only, no spaces or special characters. 2. From the drop down list, select a Phone Number from your inventory that you would like to assign to this Auto Attendant. Note: If there are no phone numbers available in your inventory, you will need to contact your Account Manager to have one added. 3. From the drop down list, select the Time Zone this Auto Attendant will use. 4. Enter a PIN in the Auto Attendant PIN and Confirm Auto Attendant PIN fields, they must match. 5. Click the Save button. 6. You will receive notification that you action was successful. 7. Click the Edit button to continue with your Auto Attendant configuration. 8. Click the Features Settings Tab. 9. Make various settings changes to your Auto Attendant as you can to individual user seats. 10. After all settings are made, click the Save button. Admin_Portal_0818rev9.doc Page 87 of 257


88 Configure Auto Attendant 1. Click on the Configure Auto Attendant tab. 2. Click on the Tabs or Links to access scheduling options, menu options, announcements, extensions and advanced features. 3. Help is always available throughout the entire Auto Attendant programming sequence. 4. To access Help, click the Gear drop down list, and select Help from the list. 5. This will provide you with a link that you can review for assistance and descriptions of the features within the Auto Attendant configuration pages. 6. Click on the Schedule tab or Weekly Schedule link to start your Auto Attendant configuration. Admin_Portal_0818rev9.doc Page 88 of 257

89 7. To set your Schedule, click on the An example schedule that you can customize link, this is the recommended option. 8. By setting Business and Non-Business hour Schedules, you can provide your customers with different greetings for both Business hours and Non-Business hours. Admin_Portal_0818rev9.doc Page 89 of 257

90 9. By using the recommended Schedule, standard business hours are set to 9:00 a.m. to 5:00 p.m., with lunch from 12:00 p.m. to 1:00 p.m. 10. To modify this Schedule, click on the Paint Brush under the Periods section, and click/drag the correct color based on the change you wish to make, Lunch, Weekend, Working Hours, All Other Times and Special Days. 11. To change your business hours to 8:00 a.m. to 5:00 p.m., click the Red Paint Brush, and drag it from the Monday 8:00 a.m. cell to the Friday 8:00 a.m. cell. Those cells with turn Red to indicate Working Hours. 12. To remove the lunch hour from 12:00 p.m. to 1:00 p.m. and make those working hours, repeat the same steps as above. Once you apply Working Hours from 12:00 p.m. to 1:00 p.m., those cells with also be Red. 13. To make additional changes to the schedule, click on the corresponding paint brush based on the type of hours you need to change and click Apply. 14. The default time increment is 1 hour, to change to 15 minute increments, click the Zoom In link or the magnifying glass. Click and Drag Click and Drag Admin_Portal_0818rev9.doc Page 90 of 257

91 15. You can now adjust your schedules by 15 minute increments. 16. Click the Zoom Out link or the magnifying glass to return to 1 hour increment formatting. Admin_Portal_0818rev9.doc Page 91 of 257


92 17. Name your Menu by clicking the drop down list associated to During this period, use this menu: 18. From the drop down list, select Create New Menu. 19. Enter the Name and Description of your Menu, a description is optional 20. Click the OK button. Admin_Portal_0818rev9.doc Page 92 of 257

93 21. Click the Apply button to apply your Menu Name and Description to that schedule. 22. Go through all of the Periods by clicking on each one, and apply a Menu Name. They can all have the same Menu, or have unique Menu options for different times of the day, week and holidays. 23. Once all Periods have a Menu assigned, click the Apply button. Admin_Portal_0818rev9.doc Page 93 of 257

94 24. Click on the Menus tab. 25. You will then go through the General, Keys, Timeout and Reference tabs to assign the Menu options. 26. Enter a Name for your Menu, such as Business Hours. 27. You can also enter a brief Description of the Menu. 28. From the drop down list, select a Menu Announcement. You can Create a New Announcement, or select from an existing Menu Announcement. 29. If you choose to Create a New Announcement, you will need to name the announcement, and will then record the announcement later in the setup process. 30. Click the Apply button. 31. Click on the Keys tab to continue. 32. From this screen you will determine the options that your callers will be presented with based on the key they press on their key pad. 33. Click on the drop down list next to each key pad option. Examples of menu options are: a. Transfer to phone b. Dial by Extension c. Dial by Name d. Replay Menu e. Etc. Admin_Portal_0818rev9.doc Page 94 of 257


95 34. For each option you want to program, click the drop down list and select the action you want to assign to that key. 35. If a? appears for any of your selections, click on the? for additional information. 36. The instructions will provide you with the additional information necessary to complete that action. 37. This Menu will provide callers with the following options. The announcement played for the caller should audibly reflect these options: a. To dial by name, press 1. b. To speak to John Doe, press 2. c. To replay this menu, press 3. d. To dial by extension, press Click the Apply button. Clicking the Apply button throughout the Auto Attendant programming process, will save any settings you ve selected to that point. 39. Click on the? next to options 1 and option 9 to further process this menu. Admin_Portal_0818rev9.doc Page 95 of 257


96 40. Click on the Announcement tab or the Announcements link to upload or record the Announcement for your Menu. 41. Click on the Add New Announcement button to upload an existing announcement file, or record a new file via phone. Admin_Portal_0818rev9.doc Page 96 of 257


97 42. Enter a Name for your Announcement greeting. 43. Enter a Description of the Announcement, this is optional. 44. From the Record/Play Announcement drop down list, choose how you want to record or upload your Announcement: Record/Play Announcement allows you to play/review existing announcements or record announcements from your computer Upload Announcement allows you to upload your announcements Record By Phone allows you to record your announcements by phone 45. To Record or Play an announcement, select Record/Play Announcement from the drop down list. 46. Click the Red Record button to record your announcement; you must have adequate flash settings and microphone on your computer to utilize this method. 47. Click the Blue Play button to play/review your announcement. 48. When the announcement is recorded, click the Add button. Admin_Portal_0818rev9.doc Page 97 of 257


98 49. To upload an Announcement, select Upload Announcement from the drop down list. 50. Click the Browse button to find the announcement file within your system. Note: Your recorded announcement must be G.711 (CCITT) 8 khz 8 Bit Mono u-law WAV file. 51. Once your file is applied, click the Upload button. 52. After the upload, click the Add button. 53. All Announcements are noted with an Announcement ID as well as a Name and your Description. 54. To play/review an Announcement, the Blue Play button next to the Announcement you wish to play. Admin_Portal_0818rev9.doc Page 98 of 257

99 55. Click on the Record by Phone button. 56. Enter a Name for the announcement and a description (optional). 57. Click the Add button. 58. Your Announcement will be assigned a 3-digit Announcement number. At this point, nothing has been recorded. 59. To Record by Phone (greetings): From Within the Office press the Message button you use to access voic . When the voic system answers, press the *# keys. Enter your Premium Attendant number, this is the number you assigned to your Auto Attendant, and follow the prompts. From Outside of the Office dial your Voic Retrieval Number. When the system answers, enter your Premium Attendant number, this is the number you assigned to your Auto Attendant, and follow the prompts. ** Refer to your Welcome or hover over Help on the main menu of your Administrator Portal for your Retrieval number. 60. The first time you access your Announcement, you will be prompted to set a passcode. Create a passcode that is a minimum of 4 characters. 61. To change your Auto Attendant Configuration, press To edit your Announcements, press Enter the number of the Announcement from the portal that you wish to record, followed by #. 64. Follow the prompts to record, review and save your Announcement. 65. You can review your Announcement by clicking on the Play button within the portal. Admin_Portal_0818rev9.doc Page 99 of 257


100 66. You can now assign this Announcement to your Menu by clicking the Menu tab. 67. Click the Menu Announcement drop down list and select the Announcement you just recorded. 68. Click the Apply button to apply your Announcement to that Menu. Admin_Portal_0818rev9.doc Page 100 of 257


101 69. When prompt assignments were made for Dial by Name and Dial by Extension, you were provided with a? directing you to proceed to another area within the Auto Attendant to complete programming of those features. 70. To continue with those features, click on the Extensions tab. 71. Use the Scroll Bar to find the employees you wish to add to the Dial by Name and Dial by Extension options. Note: Each user must have recorded their name for the Dial by Name prompt. If this is not done, you can record the user s first/last name via the portal, if you have a sound card and microphone, or by phone by selecting the Auto Attendant configuration option. Even though it may indicate record next to a user s name, they may have recorded their first/last which then does not require you to rerecord it. 72. Click in the Check Box next to the users that you want to add, and click the Mark As Included button. Admin_Portal_0818rev9.doc Page 101 of 257


102 73. Click on the Advanced tab, Default Keys. 74. This allows you to configure default actions for specific keys that will be available in all menus, unless they are assigned alternate options. In this example, if * is not assigned another action, all Menus will allow the caller to Return to the Previous Menu by pressing the * key. 75. If any changes are made, click the Apply button. 76. Click the Error Handling tab. 77. This allows you to change system parameters for Timeout, Call Transfer, Unknown Input and Invalid Extension. 78. Select options from the drop down lists to modify the system parameters. 79. When all changes have been made, click the Apply button. Admin_Portal_0818rev9.doc Page 102 of 257
103 80. Click the Other Settings tab. 81. Select from the drop down lists options to change configuration for dial by name and extension, and for sending callers to an Intercept Mailbox (this is a greeting only mailbox for information purposes). 82. When all changes are made, click the Apply button. 83. Once all Auto Attendant options have been made and applied, click on the Main tab from anywhere within the Auto Attendant feature. 84. Your Auto Attendant will be turned Off until all programming is completed and there are no errors in the configuration. 85. The Service Status area of the Main screen will update you if there are any errors. Errors will be indicated with Blue and Yellow warning triangles. Click on the warning sign for instructions to correct your error. 86. Click on the Warning Sign and you will be informed of what the error is. 87. Once all errors are corrected, click the Turn On button to activate your Auto Attendant. 88. Your Auto Attendant will follow the Schedule you set up, provide the Announcement that you recorded, and provide the caller with the Prompts that you selected. 89. If you wish to turn off the Auto Attendant, click the Turn Off button that will be activated once the Auto Attendant is turned on. Admin_Portal_0818rev9.doc Page 103 of 257


104 Settings Settings allows you to change the Time Zone and Password for your Auto Attendant. 1. Click the Settings tab. 2. From the Account tab, click the Personal Details Edit link. Admin_Portal_0818rev9.doc Page 104 of 257


105 3. From the Timezone drop down list, select the timezone you wish to apply to your Auto Attendant. 4. Click the Save button. 5. To change the password for your Auto Attendant, click the Change link. 6. Enter the current password in the Current Password field. 7. Enter the new password in the New Password field. 8. Re-enter the new password in the Confirm New field. Note: If you did not log into your Auto Attendant vial the Voic Retrieval number to define a current password, the default password is Note: This password will be used to access your Auto Attendant via the phone, so it should be a numeric password. Admin_Portal_0818rev9.doc Page 105 of 257

106 9. Click the Confirm button. Call Park Group Call Park Group lets you define Call Park Groups that allow users in those Groups to park calls within their Group. Calls are Parked and Retrieved using a softkey or predefined access code. 1. Click Manage Services from the main menu. 2. Click Call Park from the sub menu. 3. If you have multiple Groups, select the Group you want to add a Call Park Group to from the drop down list. 4. Click the Get button. Admin_Portal_0818rev9.doc Page 106 of 257

107 5. If any Call Park Groups currently exist for the selected Group, they will be displayed and can be Edited or Deleted by clicking the appropriate button. 6. Click the Create New Call Park Group button. 7. Enter a descriptive name in the Call Park Group Name field. 8. Enter search criteria for the users you would like to add to a Call Park Group. 9. If you have less than 1000 users, you are not required to Search for individual users. All users in the Group will be listed under Search Results and End Users. 10. Drag and drop the user(s) you would like to add to the Call Park Group from the left column to the right column (you can also select them while holding down the Control button on your keyboard and then click the right arrow in the middle of the columns). 11. Click the Save button. Admin_Portal_0818rev9.doc Page 107 of 257

108 12. The new Call Park Group will be displayed. 13. Click the Edit Group Level Settings to manage settings within a Call Park Group. 14. Please note that changing settings at this level will affect all Call Park Groups within this Group as a whole, not just one Call Park Group. Recall Timer in Seconds number of seconds the call will be on Park until it recalls to the device it was parked in if it is not picked up elsewhere. Display Timer in Seconds controls how long the server waits before releasing the parked call. 15. Make any settings changes you want to for the entire Group. 16. Click the Save button. Admin_Portal_0818rev9.doc Page 108 of 257
, each location can Escape to a different operator.")
109 Escape to Operator Escape to Operator allows you to setup phone numbers that calls can be transferred to when a caller presses 0 (zero) during the recipient s voic greeting. If you have multiple Groups (locations), each location can Escape to a different operator. Within a Group, you can have multiple groups that ring to different operators such as administrative assistants. 17. Click Manage Services from the main menu. 18. Click Escape to Operator from the sub menu. 19. If you have existing Escape to Operator Groups set up, they will be displayed below. 20. Select the Group you wish to managed from the Escape To Operator drop down list and click the Get button. 21. To add a new group, click the Add Escape to Operator Group button. 22. Enter the Escape to Operator Group Name, this should describe the destination/person callers assigned to that Group ring to. 23. Select the Escape to Operator Number you would like to assign to this group from the drop down list or, enter any valid 10-digit number in the Escape to Operator Number field. 24. Click the Save button. 25. Users can be assigned to any Escape to Operator Group within their Group. 26. To Edit, Delete or View Members of any Escape to Operator Group, click the appropriate button associated for the specific Escape to Operator Group you wish to manage. Admin_Portal_0818rev9.doc Page 109 of 257

110 27. To add a user to an existing Escape to Operator Group, access that user s settings by clicking on User Administration from the main menu. 28. Click on Manager Users from the submenu. 29. Search for the User you wish to add to an existing Escape to Operator Group. 30. Click the Voic Settings tab, click the drop down list next to Escape to Operator Group. 31. The drop down list will include any existing Escape to Operator Groups that have been set up, as well as any new Escape to Operator Groups that have been added. 32. Select the appropriate Escape to Operator Group from the drop down list; the name and phone number of the Escape to Operator Group will appear. 33. Click the Save button. 34. When a caller presses 0 from that user s voic , they will roll to that destination for further assistance. Admin_Portal_0818rev9.doc Page 110 of 257

111 35. To view members of an Escape to Operator Group, click the View Members button. 36. When a caller presses 0 from that user s voic , they will ring to that destination for assistance. 37. All members of that Escape to Operator Group will be displayed. 38. To change an Escape to Operator Group for a particular user, or to remove them from an Escape to Operator Group completely, return to User Administration to search for the user, and then modify this option. Admin_Portal_0818rev9.doc Page 111 of 257

112 Maximum Concurrent Calls Maximum Concurrent Calls (MCC) is a system setting based on the bandwidth of your circuit. The system setting is the suggested number of MCC s based on your circuit size. The number of MCC s can be changed, but understand warning messages regarding best practices when determining the MCC s, and the cause and effect of increasing the number higher than your bandwidth can support. 1. Click on Manage Services from the Main Menu. 2. Click on Maximum Concurrent Calls (MCC) from the submenu, to display current circuits and MCC settings for each. 3. Click the Yes or No radio button to enable or display the Enterprise Level MCC Enabled feature: Enabled sets the MCC value for this enterprise/tenant Disabled enterprise/tenant level MCC is not utilized 4. Enter the number of MCCs for the enterprise/tenant in the Enterprise Level MCC field; click the Auto Calculate check box to calculate this setting for you Note: This value is independent of the Group Level MCC setting; if the Enterprise/Tenant Level MCC and Group Level MCC are both enabled, the Enterprise Level MCC value must be greater than or equal to the highest Group Level setting 5. To increase or decrease MCC settings for any group, enter the total final number of MCC s in the appropriate field in New MCC column; each Group must have a minimum of 1 MCC. 6. Click the Save button. Admin_Portal_0818rev9.doc Page 112 of 257

113 Music/Message On Hold Music/Message On Hold is what your callers will hear when they are placed on Hold, Parked, or placed on Busy Camp status. The Music can be a default file, or you can upload a custom file with music or speech. 1. Click on Manage Services from the Main Menu. 2. Click on Music/Message on Hold from the submenu. 3. If you have multiple Groups, select the appropriate Group from the drop down list. Music/Message on Hold options can be the same for each Group, or they can be unique. 4. If you have multiple Groups and need to select the Group you wish to modify, click the Get button. Note: File limit size is 1mb. Admin_Portal_0818rev9.doc Page 113 of 257
114 5. Music/Message on Hold options for that Group will be displayed. 6. On the General Settings tab, click the radio buttons to turn on Music on Hold for Hold, Call Park, and Busy Camp. You can choose which features have Music on Hold, and which you prefer to not have Music on Hold. 7. Music/Message on Hold will be programmed with a default recording. If you wish to upload custom Music on Hold, click Browse to upload your file. Note: Files must be formatted as.wav or.wma. Files must be less than 10 minutes (9:59), and must meet the following requirements: For.WAV files: or khz 8 or 16 bit mono μ-law, A-law, or PCM For.WMA files: or khz 16 bit mono μ-law, A-law, or PCM The maximum audio length is 10 minutes for the Music On Hold greeting or music. 8. Once changes are made to modify your Music/Message on Hold options, click the Save button. 9. The selected default or custom Music/Message on Hold will play when you place a caller on hold. Note: If you only make setting changes to the General Settings tab, the selected options will impact both internal and external callers place on hold; if you define setting changes on the Internal Settings tab, internal callers will unique settings from external callers. Admin_Portal_0818rev9.doc Page 114 of 257
115 10. You can also choose different or customized Music/Message on Hold for internal callers. 11. Click on the Internal Settings tab. 12. If you choose to use the default Music/Message on Hold, you do not need to make any changes. 13. If you wish to have a unique recording for internal callers, click the Yes radio button. 14. Click on the Browse key to upload your internal recording. 15. The File name will be noted once the file has been uploaded. 16. When all changes are made, click the Save button. 17. Once a custom file has been uploaded for either a General or Internal Settings, click the Delete & Revert button to remove the custom file and revert to the default. 18. Click the Save button. Admin_Portal_0818rev9.doc Page 115 of 257

116 Paging Paging allows you to define up to 50 devices that can receive over the phone paging. The Page will be a one-way announcement. You can also define the individuals that are allowed to perform a Page. 1. Click on Manage Services from the Main Menu. 2. Click on Paging from the submenu. 3. Select the Group you wish to manage from the Select a Group drop down list. 4. All existing Paging Groups will appear to be Edited or Deleted. 5. To add a group, click the Add Paging Group button. 6. Enter the name of your Paging Group in the Name field. 7. Select the telephone number you with to assign to your Paging Group from the Phone Number drop down list. 8. The Extension field will auto populate based on your dialing plan, and it can be edited. Admin_Portal_0818rev9.doc Page 116 of 257

117 9. Scroll to search for the users you will allow origination of a Page. 10. Enter search criteria for the users you would like assign as originators. 11. If you have less than 1000 users, you are not required to Search for individual users. All users in the Tenant will be listed under the Available Originators field. 12. Drag and drop the user(s) you would like to add to originate paging to the Selected Originators field (you can also select them while holding down the Control button on your keyboard and then click the right arrow in the middle of the columns). 13. Click the Add and Continue button. Note: The Originators will be able to send a Page to the target devices by dialing the extension assigned to the Paging Group. Drag and Drop Admin_Portal_0818rev9.doc Page 117 of 257

118 14. Scroll to search for the users you will allow as targets for the Page. 15. Enter search criteria for the users you would like assign as originators. 16. If you have less than 1000 users, you are not required to Search for individual users. All users in the Tenant will be listed under the Available Target field. 17. Drag and drop the user(s) you would like to add to originate paging to the Selected Targets field (you can also select them while holding down the Control button on your keyboard and then click the right arrow in the middle of the columns). 18. Click the Save button. Note: The Target devices added to the Select Targets field will be the only devices to receive the one-way page from that Paging Group. Drag and Drop Admin_Portal_0818rev9.doc Page 118 of 257
 require a specific number of dialed digits.")
119 Project Account Codes Project Account Codes are used by customers for internal call tracking and accounting and/or to control the ability of the customer s employees to make certain types of telephone calls. Non-Verified Project Account Codes (PAC) require a specific number of dialed digits. Verified Project Account Codes (VPAC) require a specific number of digits and specific codes that are defined by the Administrator. 19. Click on Manage Services from the Main Menu. 20. Click on Project Account Codes from the submenu. 21. Any Group that has an existing project code can be Edited or Disconnect. 22. Click on the Order button to order a Project Account Code for any Groups that currently do not have that feature. 23. If you submit an Order for a Project Account Code, it will take approximately 30 minutes to become available for programming. 24. To disconnect a Project Account Code for any Group, click the Disconnect button. 25. A message box will appear to confirm disconnection or removal of that Project Account Code product for that Group. 26. To confirm disconnection, click the OK button. Admin_Portal_0818rev9.doc Page 119 of 257


120 27. To order Verified Project Account Codes or non-verified Project Account Codes, click on the drop down list for the Group you want to order codes for. 28. Select if those codes will be Verified or non-verified from the drop down list. 29. Click the Order button. 30. You will receive a message asking you confirm the ordering of your PAC service. 31. Click the OK button to complete and submit your order. 32. You will receive confirmation of your order, and a reminder that it will take approximately 30 minutes for your order to complete. 33. You can follow the progress of your order under Inventory Order Status. 34. Once your VPAC/PAC order has been processed and indicates Completed in the order status, you can proceed with building your indexes. Admin_Portal_0818rev9.doc Page 120 of 257

121 35. If you are Ordering a VPAC or PAC product, or Disconnecting a VPAC or PAC, product and have another order in progress, you will receive an error message stating that you will need to wait for that order to complete before you can submit your VPAC/PAC order. 36. The order number in progress is referenced in the error message 37. Follow the progress of that order under Inventory Order Status from the main menu. 38. Once that order changes to Completed status, you can resubmit your VPAC/PAC order. Admin_Portal_0818rev9.doc Page 121 of 257
122 Programming Non-Verified Project Codes A Non-Verified Project Code (PAC) looks for the user to enter a specific number of digits when dialing outside numbers. This code requirement can be associated to various call types such as All Calls, Long Distance, International, Operator Assistance, etc. Note: You can have one PAC setting per Group. If a code length of 12 is selected, anyone in that Group that is required to use a PAC for a specific call type, will need to enter a 12 digit code. You cannot have multiple code lengths in one Group. 39. Click on Manage Services from the Main Menu. 40. Click on Project Account Codes from the submenu. 41. Click the Manage button to proceed with programming. 42. A PAC code length can be from 2-12 digits. 43. Select the required number of digits in the Code Length drop down list. 44. Click the drop down list under Manage Call Types to display the various types of calls a PAC would be required for. 45. Enter search criteria for the users you would like to add to require a PAC. 46. If you have less than 1000 users, you are not required to Search for individual users. All users in the Group will be listed under Search Results and End Users. 47. Drag and drop the user(s) you would like to add to the PAC from the left column to the right column (you can also select them while holding down the Control button on your keyboard and then click the right arrow in the middle of the columns). 48. Click the Save button. Admin_Portal_0818rev9.doc Page 122 of 257
123 Drag and Drop Programming Verified Project Codes A Verified Project Code (VPAC) looks for the user to enter a specific number of digits AND specific codes when dialing outside numbers. This code requirement can be associated to various call types such as All Calls, Long Distance, International, Operator Assistance, etc. Note: You can have up to four (4) VPAC indexes per Group. Each index can have its own unique parameters and codes. A user can only be assigned to one VPAC index. 1. Click on Manage Services from the Main Menu. 2. Click on Project Account Codes from the submenu. 3. Click the Manage button. Admin_Portal_0818rev9.doc Page 123 of 257


124 4. To set up a new index, click the Reserve New VPAC Index button. 5. In the Reserve New VPAC Index box. 6. From the Code Length drop down list, select the number of digits required for that VPAC index. 7. Enter a name for the VPAC index in the VPAC Name field. 8. Click the Get New Index button. 9. You will receive a message asking you to confirm that you wish to proceed with this action. 10. Click the OK button to proceed. Admin_Portal_0818rev9.doc Page 124 of 257

125 11. A confirmation is received indicating a number has been returned for that VPAC index. 12. Click the Close button. 13. Select the VPAC index from the Verified PAC Name (Index) drop down list. 14. This will activate the Edit VPAC Codes button. 15. Click the Edit VPAC Codes button. 16. You can choose to Generate Codes, Load from File, or add Single Code values. 17. To generate codes, click the Generate Codes radio button. 18. Choose a Start Value, End Value and Step Value. o Start Value lead number of your code list o End Value ending number of your code list o Step Value number of digits between each of your codes Admin_Portal_0818rev9.doc Page 125 of 257
126 19. The Start Value is The End Value is The Step Value is When all values are entered, click the Add to List button. 23. Based on the Start, End and Step Values, the system will automatically generate your codes based on those criteria. 24. Codes will be listed under the Codes section. 25. Click Export to File to export your VPAC code list. 26. Select a code, or codes, and click the Delete Selected button to delete codes. 27. Click the Clear List button to clear the entire list of codes. 28. Click the Save button when all codes appear correctly. Admin_Portal_0818rev9.doc Page 126 of 257
127 29. To load codes from a file, select the Load from File radio button. 30. Click the Browse button to search for your file o Text or Excel file that contains a single column of VPAC codes (.txt or.xls). o The codes must not exceed the code length. o You can choose the option to pad with leading zeros. 31. Click the Add to List button. 32. The codes will upload based on the source document. 33. In this example, the source document was code 1234 to Since the Code Length is set to 5, the system automatically padded a lead 0 to each 4-digit code. 35. To Export the File, Delete Selected code or Clear List, click on the appropriate button. 36. When all codes are accurate, click the Save button. Admin_Portal_0818rev9.doc Page 127 of 257

128 37. To add single codes, click the Single Codes radio button. 38. Enter the required code in the Code field. 39. If the code you enter exceeds the Code Length for your VPAC index, you will receive an error. 40. Click the Add to List button to add your single code. 41. You code will appear in the Codes field in numeric order, regardless of how they are entered. 42. Continue with this process until all codes are added. 43. To Export the File, Delete Selected code or Clear List, click on the appropriate button. 44. Click the Save button when all codes are entered. 45. After your PAC and VPACs are programmed, return to Managed Services Project Account Codes from the main menu. 46. Click the Manage button for the appropriate PAC or VPAC. 47. Edit the codes, code length, users, etc. 48. Click the Save button to save your changes. Admin_Portal_0818rev9.doc Page 128 of 257

129 Virtual User The Virtual User allows you to define numbers outside of your network, which can be extension dialed by you users. These numbers can be 10-digit numbers or toll free. 1. Click Manage Services from the Main Menu. 2. Click Virtual Users from the submenu. 3. If you have more than one location in your Tenant, select your group from the drop down list. 4. Click the Get button. 5. Virtual Users can be added individually or in bulk. To add an individual user, click the Add User button. 6. Enter a First Name and Last Name in the designated field that would best describe each Virtual User. 7. In the Phone Number field, enter the number your users will call when dialing the virtual extension. 8. In the Extension field, enter the extension your users will dial; extensions can be 2-7 digits in length. Note: N11 and 123 are restricted for 3-digit Virtual User extensions. 9. Click the Save button. Admin_Portal_0818rev9.doc Page 129 of 257

130 10. You will receive a successful action notice that your Virtual User has been completed. 11. Click the Search button to view your Virtual Users. 12. You can edit or delete a virtual user by clicking the Edit or Delete buttons. 13. To delete multiple Virtual Users, check the check box for each entry you wish to delete, and click the Delete Selected button. 14. To add a range of Virtual Users, click the Add Range button. Admin_Portal_0818rev9.doc Page 130 of 257

131 15. Define a name for your range by entering a First Name and Last Name. 16. Enter your range of numbers in the Phone Number Range fields; the range needs to be consecutive. 17. Enter the extensions for your range in the Extension Range fields; extensions can be 2-7 digits in length. 18. Click the Save button. 19. You will receive a successful action notice that your Virtual Users have been completed. 20. Your Virtual Users will be displayed and can be Deleted or Edited as necessary. 21. End Users are now able to dial the defined 4-digit extensions to quickly reach off-net numbers. Note: N11 and 123 are restricted for 3-digit Virtual User extensions. Admin_Portal_0818rev9.doc Page 131 of 257
132 Voice Mail Retrieval Number Voic Retrieval Numbers are used to access voic from outside of the office. Users have always had the ability to dial a 10-digit or toll free number, but you also have the abillity to assign a number from your available number pool, which would be a more familiar number to your end users. This number, along with the Toll Free number, will then be referenced in the End User Portal. 1. Click Manage Services from the Main Menu. 2. Click Voice Mail Retrieval Number from the submenu. 3. Any existing custom Voice Mail Retrieval Numbers already defined, will be displayed. 4. Click the Edit button to edit existing custom retrieval numbers, or the Delete button to delete a custom retrieval number. 5. Click the Add Voice Mail Retrieval Number button to add a custom retrieval number. 6. If you have more than one Group within your Tenant, select the group you want to add a custom retrieval number to from the Select a Group drop down list. 7. Click the Hosted VoIP Number drop down list to select the number you wish to assign as the custom retrieval number. 8. Click the Yes radio button if you want the Toll Free number to display along with the custom retrieval number in the End User portal; if you do not wish to display the Toll Free number, click the No radio button. 9. Click the Save button. Admin_Portal_0818rev9.doc Page 132 of 257

133 Call Pickup Groups Call Pickup Groups allow a user to answer a call directed to another phone in their group by dialing the feature access code for Call Pickup. 1. Click on Manage Services from the Main Menu. 2. Click on Call Pickup from the submenu. 3. Select the group you want to add or edit from the drop down list and click the Get button. 4. If there are existing Call Pickup groups your selected group, they will be displayed. Admin_Portal_0818rev9.doc Page 133 of 257
134 5. Click the Add Call Pickup Group button. 6. Enter a descriptive name for the Call Pickup Group Name, such as HR Pickup Group, etc. 7. Enter search criteria for the users you would like to add to a Call Pickup Group. 8. If you have less than 1000 users, you are not required to Search for individual users. All users in the Group will be listed under Search Results and End Users. 9. Drag and drop the user(s) you would like to add to the Call Pickup Group from the left column to the right column (you can also select them while holding down the Control button on your keyboard and then click the right arrow in the middle of the columns). 10. Click the Save button. Drag and Drop Admin_Portal_0818rev9.doc Page 134 of 257
 or call queuing.")

135 Contact Center ACD (Call Queuing) Basic and Standard The Contact Center ACD Basic and Standard options allow you to Add and Edit Contact Centers, and Delete and View/Edit Members and Settings for existing Contact Centers. Contact Center functionality is also referred to as ACD (Automated Call Distribution) or call queuing. Call queuing allows you distribute incoming calls to specific individuals assigned to a Contact Center. Your Contact Center can be programmed to provide Entrance Messages, Music on Hold, and Comfort Messages for your callers while they are waiting for the next available agent. Note: Contact Center Standard will have additional options not available with Contact Center Basic. Please note in this section of the portal, when Contact Center Standard features are referenced specifically as available for use with Contact Center Standard only versus Contact Center Basic. Note: You require at least one Standard Supervisor seat to run reports for Contact Center Standard statistic, reporting is not available with Contact Center Basic. Note: You must ensure that the MCC (Maximum Concurrent Calls) setting for that site has an adequate setting to accommodate the Contact Center Group. Each concurrent call in queue and on a physical device associated with that site consumes a call path from the MCC setting. If the MCC is not set to an adequate amount, the maximum number of calls queued may not be realized. 1. Click on Manage Services from the main menu 2. Click on Contact Centers ACD from the sub menu. 3. Any Contact Centers that are already built for that Group, will appear and can be Edited, Deleted, or features can be configured by clicking the Configure Features button. 4. To add and configure a new Contact Center, click the Add Contact Center Basic button. Admin_Portal_0818rev9.doc Page 135 of 257
136 5. From the Contact Center Type drop down list, select from Contact Center Basic, or Contact Center Standard. 6. Enter a description name for that Contact Center in the Name field. 7. From the Phone Number drop down list, select the telephone number you wish to assign. 8. The extension will auto populate, but this can be edited if needed. 9. Enter the name as you want it to appear in the Calling Line ID Last Name and Calling Line ID First Name fields; this is what will display on each agents phone when a call is presented to them from the queue. 10. The Time Zone will be auto populated based on the time zone of the Group your Contact Center is programmed in, but it can be changed by clicking the drop down list. 11. From the Group Policy drop down list, select the type of call routing policy you want to assign to your Contact Center: "Circular": Incoming calls hunt through agents in the order they appear in the list, starting with the agent following the last agent to receive a call. When the search reaches the end of the list, it loops back to the top and continues until it has tried all agents. "Regular": Incoming calls hunt through agents in the order they appear in the list, starting from the top each time. "Simultaneous": Incoming calls alert all agents at the same time. The first agent to answer handles the call. "Uniform": Incoming calls hunt through all agents in order, starting with the agent who has been idle the longest and ending with the agent who most recently answered a call. Weighted. Incoming calls are dispatched to the agents randomly according to the specified percentage weight of each agent. 12. Click the Yes or No radio button to enable or disable Directory Privacy. Yes enables Privacy, when another user does a directory listing, your name and information will not appear No disables Privacy, when another user does a directory listing, your name will appear as usual 13. Click the Yes or No radio button to enable or disable Division Inhibitor: When enabled (Yes), prevents redirection services from being activated on the terminating side of an unanswered call 14. In the Default Queue Length drop down list, pick the maximum number of queued calls you want to ring to your Contact Center: Contact Center Basic maximum of 25 calls queued Contact Center Standard maximum of 50 calls queued Admin_Portal_0818rev9.doc Page 136 of 257


137 15. To program a Contact Center Standard queue, select Contact Center Standard from the Control Center Type drop down list: Note: Continue selecting options that are similar to the Contact Center Basic queue; features unique to a Contact Center Standard queue, will be outlined in this section. 16. The following features are available for Contact Center Standard only, you will not see these options as you Add or Edit a Contact Center Basic queue. 17. Enable Calls to Agents in Wrap-Up State allows you to determine whether calls roll to agents that are in a wrap-up state: Yes agents will receive calls from the queue while they are in a wrap-up state No agents will not receive calls from the queue while they are in wrap-up state 18. The Enable Maximum Wrap-Up Timer allows you to set the maximum time an agent will be in wrap-up state: No will not allow you to set a maximum time Yes will allow you to set the maximum number of minutes and seconds the agents in this queue will be in wrap-up state before receiving the next call 19. Select from the following in the After call completion, automatically set agent to drop down list: Available will take available queue calls immediately Unavailable will not take available calls until the agent logs back into the queue pressing or tapping the Available softkey on their phone Wrap-Up will place the agent in Wrap-Up State and will not receive calls until they meet the Wrap- Up Timer setting white in Wrap-Up State, the agent can make themselves available sooner by pressing or tapping the Available softkey on their phone 20. The Allow Agents to Join this Contact Center setting defines whether agents in this queue can join or leave a queue from their desktop client: Yes will allow agents to join or leave a Contact Center queue from their desk top client No will not allow agents to join or leave a Contact Center queue from their desk top client Admin_Portal_0818rev9.doc Page 137 of 257
138 21. If the Group Policy type you choose is any option other than Simultaneous, you can choose the number of rings before the call will Skip to Next Agent if an agent does not answer. Click the Yes radio button and select from 1-20 rings. 22. If you want to provide your callers with an option to leave the queue before their call is answered, click the Yes radio button for Allow Callers to Escape Out of Queue to the Final Destination. 23. From the Callers Can Press the Following to Escape Out of Queue drop down list, select the digit you want your callers to press on their key pad (0-9), to forward to the Call Forward Busy destination. Note: When your custom Entrance and Comfort Greetings are recorded, be sure it includes instructions for the caller to press x to leave the queue and be transferred to y. x is based on the digit they are to press, and y is a description of where they will be transferred to, i.e., an Answering Service, another department, a voic box, etc. 24. To enable a transfer to a Call Forward Busy location, click the On radio button and enter a 10-digit phone number in the Call Forward Busy field. 25. From the Number of Seconds box, select the number of seconds you want your callers to remain in queue before following that final destination path. You can select from seconds. 26. In the Call Forward To field, enter the 10-digit number you wish your callers to be transferred to if they hit the Final Destination timer threshold. Note: The Final Destination phone number can be any 10-digit number - internal, external, toll free, etc., this is also the destination the caller will follow if the queue has the maximum number of callers in the queue. 27. If you want the caller to hear a busy signal when the Final Destination timer is met, click the Ring Busy radio button. Admin_Portal_0818rev9.doc Page 138 of 257
139 28. If you want your callers to roll to Voic for their Final Destination, click the Voice Mail radio button. 29. In the Voice Mail PIN field, enter a numeric passcode, 4-15 characters. 30. Reenter the numeric passcode in the Confirm Voice Mail PIN field. 31. If you have an Escape To Operator Group already created, choose a group from the Escape To Operator Group drop down list; this is where callers will go if they press 0 while listening to the voic greeting. 32. Click the Save button, or click the Add Members button to continue and assign members to your queue. Add/Edit Members The Add/Edit Members feature allows you to manage and control individuals that will be members of your queue. Note: The button displayed on this screen will be Add Members if members have not been added to the queue; it will display as Edit Members once members have been added. 1. After setting up basic parameters for your Contact Center within the Contact Center Basic - Add screen, click the Add Members button at the bottom of the page (click the Edit Members button if you are editing/managing your Contact Center queue). Admin_Portal_0818rev9.doc Page 139 of 257

140 2. Enter search criteria for the users you would like to add to your Contact Center. 3. Drag and drop the users you would like to add to your Contact Center from the Search Results and End Users field to the Add Users to field (you can also select them while holding down the Control button on your keyboard and then click the right arrow in the middle of the columns). 4. In the Add Users to field, place the users in the order you would like them to receive calls by using the up and down arrows to the right to sort them appropriately, the order of your Users is only necessary when using the Regular Group Policy. 5. The only users that will be available in the Search Results and End User field, will be individuals with Contact Center Basic or Standard seats. 6. When all members have been added and are placed in the appropriate order, click the Save button. Note: To manage users in your queue, access the Edit Members option to move Contact Center Basic seat users to/from the queue; i.e., if an individual is on vacation, you can move them out of the queue by returning them to the Search Results and End Users field; upon return, they can be moved back to the Add Users to field to become a member of the queue again. Note: Contact Center Basic and Contact Center Standard seats can be added to Contact Center Basic queues; only Contact Center Standard seats can be added to Contact Center Standard queues. Drag and Drop 7. Add/Edit members for Contact Center Standard only, this section does not apply to Contact Center Basic queues. 8. Click the Edit Members button to edit members, or click Add Members button if Contact Center members have not previously been added. Admin_Portal_0818rev9.doc Page 140 of 257
141 9. Click the Agents tab. 10. Any users that are built with a Contact Center Standard seat will appear in the Search Results and End Users field. 11. Drag and Drop the users into the Add Users to field that should be included in your Contact Center queue or use the arrows between the fields to move members to/from the Add Users to field. 12. Use the Up/Down arrows next to the Add Users to field to sort your users; this will only be necessary if using the Regular Group Policy type. Drag and Drop 13. Click the Supervisors tab. 14. From the Search Results and End Users field, find the Supervisor you wish to add to your Contact Center queue. 15. Drag and Drop that Supervisor to the Add User to field, you can have more than one Supervisor/queue. Note: Adding an individual that is not a Supervisor Seat, will not provide them access to the Supervisor Client or reporting capabilities. Drag and Drop Admin_Portal_0818rev9.doc Page 141 of 257
142 16. Click the Supervised Agents tab. 17. From the Supervisor drop down list, select the Supervisor you wish to assign agents to; Supervisors will only have the ability to monitor agents assigned to them. 18. Drag and Drop those agents to the Add Users to field, or use the arrow keys to move agents to/from a Supervisor. 19. If you have more than one Supervisor, select another Supervisor from the Supervisors drop down list and assign the correct agents to that individual; a Supervisors can monitor the same agents as another Supervisor. 20. Click the Save button and click the second Save button to save all settings. Drag and Drop Admin_Portal_0818rev9.doc Page 142 of 257

143 Contact Center Feature Settings and Alternate Numbers You can easily modify and manage Feature Settings for you contact center, or assign Alternate Numbers to ring to your Contact Center number, after your Contact Center has been built. 1. Click on Manage Services from the Main Menu. 2. Click on Contact Center ACD from the submenu. 3. Click the Features Settings tab. 4. Choose to enable or disable various settings for your Hunt Group, such as Call Forward Always or Do Not Disturb. 5. To enable a feature, click the On radio button. 6. At any time to disable a feature, click the Off radio button. 7. Click the Edit button for features to assign schedules or advanced features to those feature settings. 8. Click the Save button. Admin_Portal_0818rev9.doc Page 143 of 257

144 9. Click the Alternate Numbers tab. 10. From the Phone Number drop down list, select the Alternate Number that you want to ring to the primary Hunt Group number. 11. The extension will auto populate in the Extension field, but this can be modified. 12. From the Ring Pattern drop down list, select the type of ring tone you want to be presented to the Hunt Group members when this number is called. 13. Click the Save button. Admin_Portal_0818rev9.doc Page 144 of 257

145 Contact Center Announcements The Contact Center Announcements feature allows you to manage Entrance Messages, Estimated Wait Times, Comfort Messages, and Music on Hold that your customer will experience while they are in queue waiting for the next available agent. Note: All custom files, music or messages, need to abide by the following file definitions: For.WAV files: or khz 8 or 16 bit mono μ-law, A-law, or PCM For.WMA files: or khz 16 bit mono μ-law, A-law, or PCM For both.wav and.wma files: The maximum audio length is 2 minutes for a Voice Messaging Greeting and Custom Ringback User/Group. The maximum audio length is 10 seconds for user's Voice Portal Personalized Name. The maximum audio length is 10 minutes for the Music On Hold greeting. For all other services, the maximum audio length is 5 minutes. 1. After setting up basic parameters for your Contact Center within the Contact Center Basic - Add screen, click the Announcements button at the bottom of the page. Admin_Portal_0818rev9.doc Page 145 of 257


146 2. With the Announcements tab highlighted, you can review all announcements that are available within your Tenant. 3. In the Search Announcements field, enter a search, or partial search to filter the Announcement you wish to Edit or Delete. 4. Click the Add Announcement button to add a new announcement. 5. Enter a descriptive name for your announcement in the Announcement Name field. 6. Click the Browse button to find your announcement. 7. Click the Save button. 8. This announcement will now be available for use as you continue to build your Contact Center. 9. Click the Entrance Message tab. 10. Click the Play Entrance Message Yes or No radio button to play an Entrance Message: Yes will play an Entrance Message if no agents are available No will never play an Entrance Message 11. Click the Force Entrance Message to be Played to Callers Yes or No radio : Yes will always play your Entrance Message even if agents are available No -- will only play your Entrance Message if agents are not available Admin_Portal_0818rev9.doc Page 146 of 257
147 12. If you click the No radio button for Entrance Messages, callers will not be presented with an Entrance Message. 13. If you choose to Enable the Entrance Message option, but choose to not upload a custom greeting, callers will hear a default message. 14. From the File 1 (File 2, File 3 or File 4) drop down list, select from any files you have previously uploaded. Note: If you choose to add multiple files, they will be heard consecutively; a reason to add multiple files would be as follows: File 1 is your standard Entrance Message greeting which never changes, File 2 is a greeting added to include a unique announcement for a special time of year, sale, etc. Once the special greeting from File 2, or subsequent files, are no longer needed, they can be removed. 15. Click the Save button. 16. Click the Estimated Wait Time tab. 17. Click the Yes radio button for Enable Estimated Wait Message for Queued Calls, to enable this feature. 18. If you click the No radio button, you will be unable to change any parameter settings on this page. 19. With the Enable Estimated Wait Message for Queued Calls radio button clicked as Yes, you can make the following setting changes. 20. In the Play Uploaded Wait Messages Every field, enter in seconds, how often you want the Wait Time message to be played to callers waiting in the queue; your entry must be 10 to 700 seconds, suggested setting should be no less than 90 seconds, so callers do not hear their wait time or position in queue too frequently. 21. You can choose the type of message your callers hear, between Queue Position or Estimated Wait Time. Queue Position you are the x person waiting in the queue Estimated Wait Time your call will be answered in x minutes 22. In the Play Message for Callers in Queue Position or Play Message for Callers with a Wait Time field, enter information based on the Announcement Type setting for Queue Position or Estimated Wait Time. Queue Position the number defined in this field indicates which callers in the queue hear the wait message based on their queue position; if you want all of your callers to hear this messages, it should be set to 26 or higher Estimated Wait Time the number defined in this field indicates which callers in the queue hear the wait message based on how long they have been waiting in the queue; if you want all of your callers to hear this messages, it should be set to 100 or higher, but at least higher than your Final Destination setting 23. If you want your callers to hear a message stating that there is a high level of calls, click the Yes radio button; if you do not want your callers to hear this message, click the No radio button. 24. Click the Save button. Admin_Portal_0818rev9.doc Page 147 of 257
148 25. Click the Comfort Message tab. 26. Click the Yes radio button for Play Comfort Messages, to enable this feature. 27. If you click the No radio button, you will be unable to change any parameter settings on this page. 28. In the Time between Messages field, enter in seconds, how often you want the Comfort Message to be played to callers waiting in the queue; your entry must be 10 to 600 seconds. 29. If you choose to Enable the Comfort Message option, but choose to not upload a custom greeting, callers will hear a default message. 30. From the File 1 (File 2, File 3 or File 4) drop down list, select from any files you have previously uploaded. Note: If you choose to add multiple files, they will be heard consecutively; a reason to add multiple files would be as follows: File 1 is your standard Entrance Message greeting which never changes, File 2 is a greeting added to include a unique announcement for a special time of year, sale, etc. Once the special greeting from File 2, or sequent files, is no longer needed, they can be removed. 31. Click the Save button. Admin_Portal_0818rev9.doc Page 148 of 257

149 32. Click the Music On Hold tab. 33. Click the Yes radio button for Play Music on Hold For Queued Caller, to enable this feature. 34. If you click the No radio button, you will be unable to change any parameter settings on this page. 35. If you choose to Enable the Music On Hold option, but choose to not upload a custom recording, callers will hear a default recording. 36. From the File 1 (File 2, File 3 or File 4) drop down list, select from any files you have previously uploaded. Note: If you choose to add multiple recordings, they will be played consecutively. 37. Click the Save button. Admin_Portal_0818rev9.doc Page 149 of 257

150 Hunt Groups Hunt Groups allow you to automatically process incoming calls received by a single phone number, by distributing them among a group of Hunt Group members. Members from any Group within your Tenant can be added to any Hunt Group, regardless of which Group the Hunt Group is built in. If a member(s) of a Hunt Group utilizes advanced features such as Remote Office and/or Anywhere, calls from the Hunt Group will ring to the devices assigned for that user(s). If they do not answer the call on their Remote Office or Anywhere device, the call will follow the Final Destination path that is programmed for the Hunt Group. Final Destination details will be discussed later in this section. 1. Click on Manage Services from the main menu 2. Click on Hunt Groups from the sub menu. 3. Any existing Hunt Groups for your selected Group will be displayed; you can Edit, Configure Features or Delete a Hunt Group by clicking on the appropriate button. 4. Click the Add Hunt Group button. 5. If you have multiple Groups, from the drop down list, select the Group you would like to create a Hunt Group for. 6. Once you select a Group, any existing Hunt Groups already created, will display below. You can edit or delete existing Hunt Groups at any time. 7. Click the Add Hunt Group button. Note: You will receive an error if there are no Hunt Groups available in your account inventory, you will have to contact your Account Manager to have one added. Admin_Portal_0818rev9.doc Page 150 of 257
151 8. Enter a descriptive name for the Hunt Group. ] Note: The Hunt Group name cannot contain white space, commas or semi-colons. 9. From the drop down list, select a Phone Number to assign to the Hunt Group. Note: If there are no phone numbers available in your inventory, you will need to contact your Account Manager to have one added. 10. Enter the Hunt Group's Calling Line ID Last Name and Calling Line ID First Name. This is displays on the user s phone when they receive a call from the Hunt Group number. 11. From the drop down list, select the Time Zone for this Hunt Group. 12. Select if you would like to Allow Call Waiting on Agents. This allows members to receive more than one call from the Hunt Group at a time. 13. From the drop down list, select the Group Policy for the Hunt Group. "Circular": Incoming calls hunt through agents in the order they appear in the list, starting with the agent following the last agent to receive a call. When the search reaches the end of the list, it loops back to the top and continues until it has tried all agents. "Regular": Incoming calls hunt through agents in the order they appear in the list, starting from the top each time. "Simultaneous": Incoming calls alert all agents at the same time. The first agent to answer handles the call. "Uniform": Incoming calls hunt through all agents in order, starting with the agent who has been idle the longest and ending with the agent who most recently answered a call. Weighted. Incoming calls are dispatched to the agents randomly according to the specified percentage weight of each agent. 14. Enable Directory Privacy is disabled by default; click the Yes radio button to enable. With this feature enabled your name will not appear in the directory. 15. With Diversion Inhibitor enabled, it prevents redirection services from being activated on the terminating side of an unanswered call. 16. The First/Last Calling Line ID of the Hunt Group appears on the display for incoming Hunt Group calls; if you disable Include the Hunt Group Name in the CLID feature, it prevents calling line ID from appearing on the display. Admin_Portal_0818rev9.doc Page 151 of 257
152 17. If you have the group policy set to anything other than Simultaneous, enabling the Skip to Next Agent setting allows callers to move to the next agent if the first agent cannot answer the call. 18. In the Number of Rings drop down list, select how many rings before the call moves to the next available agent. 19. The Final Destination is where you want the caller to go if no members are available to take a Hunt Group call. Click the Yes radio button to enable; in seconds from in the Number of Seconds field, enter how long a caller should wait for a member, before forwarding to the Final Destination. 20. If Final Destination is enabled, will choose between forwarding to a phone number or voic as the final destination. 21. When the Call Forward To radio button is enabled, enter any 10-digit internal or external number in the Call Forward To field. 22. If unanswered callers should roll to the Hunt Group's voic , click the Voice Mail radio button. 23. That activates the Voice Mail PIN and Confirm Voice Mail PIN fields, which should be populated accordingly. 24. If Escape to Operator groups have been defined, and you wish to enable this feature, select one of the groups from the drop down list. 25. The Not Reachable Setting is where you want caller to go if your phones are not working. This number should be input in the Call Forward To field, with the Yes radio button for Make Hunt Group Busy When All Available Agents Are Not Reachable enabled. This is also known as disaster recovery. 26. When all features of the Hunt Group are selected, click the Add Members button. Admin_Portal_0818rev9.doc Page 152 of 257
153 27. Enter search criteria for the users you would like to add to a Hunt Group in the Find field. Search for Hunt Group members by Last Name, First Name, Telephone Number or Extension. Note: If your group has less than 1000 users in it, all members of that group will be listed under Search Results and End Users. 28. Drag and drop users you would like to add to the Hunt Group from the left column to the right column (you can also select them while holding down the Control button on your keyboard and then click the right arrow in the middle of the columns). 29. Under Add Users To, place the users in the order you would like them to receive calls by using the up and down arrows to the right to sort them appropriately. 30. You can add members from locations outside of the Hunt Group location, so any individual within your Tenant can be in any Hunt Group. 31. When all members have been added and are placed in the appropriate order, click the Save button. Drag and Drop Configure Hunt Group Features You have the ability to manage and monitor features within each Hunt Group, such as Call Logs, Call Features, and Voic , if the Hunt Group has a voic associated to it. 1. Once your Hunt Group has been defined and members have been added, scroll to the bottom of the Hunt Group screen and click the Configure Features button. Admin_Portal_0818rev9.doc Page 153 of 257
154 2. Hunt Group Configure Features has its own main menu, and includes submenu options within each main menu item. 3. Click on Call Features from the main menu. 4. Click on Find Me from the sub menu. 5. Select from several Find Me options such as Call Forward Always, Call Forward Busy and Call Forward Selective. 6. To activate a feature, click the On radio button. Enter the number within the appropriate field that you wish to forward to. 7. Click the Save button to save any Find Me settings that you may have changed at this point. 8. Call Forwarding Selective allows you to forward calls to a specific location based on various rules or criteria. 9. Click on Edit next to Call Forward Selective. Admin_Portal_0818rev9.doc Page 154 of 257
155 10. Define the number you want to forward to, by inputting the 10-digit number in the appropriate field. 11. Click the Save button to forward all calls to that location, or click the Add Rule button to set specific criteria. 12. Enter a Description for your rule. 13. Choose to forward to the previously defined number, or click the radio button for Forward to another Phone Number/SIP-URI. If you choose to override the number you just defined, enter the new number in the appropriate field. 14. If you wish to apply this rule to a Time Schedule, slick the drop down list and select your schedule option. 15. If you wish to set a Holiday Schedule, click the drop down list and select the appropriate schedule. 16. Choose which incoming call type you want to assign to this rule: a. Any Phone Number all incoming calls b. Following Phone Numbers allows you to define up to 12 incoming numbers that follow this rule c. Any Private Number any number that is listed as private with their caller ID d. Any Unavailable Number any number that does not provide caller ID 17. If you choose Following Phone Number, input up to 12 phone numbers in the appropriate fields that you wish to follow this rule. 18. When all criteria is entered, click the Done with Add Rule button. Admin_Portal_0818rev9.doc Page 155 of 257

156 19. Click the Add Rule button, to define another rule, or click the Save button to save your Call Forwarding Selective options. 20. With your Call Forward Selective settings defined and saved, be sure to click the On radio button. 21. Then click the Save button to enable that feature. 22. Call Notify allows you to define addresses and distribution lists that receive an whenever a call is make to your Hunt Group. 23. Click the Edit button next to Call Notify. Admin_Portal_0818rev9.doc Page 156 of 257
157 Admin_Portal_0818rev9.doc Page 157 of 257
 listed. 26.")

158 24. In the Address field, enter the address, or common separated addresses, or distributions lists that you want to be notified when calls are received by this Hunt Group. 25. Click the Save button, and all calls to this Hunt Group will active the Call Notify feature and send to the address(es) listed. 26. To set a rule for Call Notify, click the Add Rule button. 27. Enter a Description for your Call Notify rule. 28. The rest of the options are the same as for Call Forward Selective Rules. 29. Select the remaining options as outlined in steps above for specifics on each option. 30. Click the Save button to save your rule. Admin_Portal_0818rev9.doc Page 158 of 257
159 31. Clicking Save automatically activates your Call Notify feature and any rule you ve defined. 32. To remove Call Notify, click the Edit button to delete any rules you have saved. 33. The Do Not Disturb feature, when activated, will send all callers to the Hunt Group s voic Click the On radio button. 35. Click the Save button. 36. Click on Privacy from the Call Features submenu. 37. Click the On radio button to activate Anonymous Call Rejection. Note: By activating Anonymous Call Rejection, you will restrict any call that does not provide caller ID from ringing into your Hunt Group. It is recommended that this feature be used sparingly. Admin_Portal_0818rev9.doc Page 159 of 257
, time of day, etc. 40.")
160 38. Selective Call Rejection and Selective Call Acceptance are similar features. 39. Activation and adding a rule is processed the same for both features. a. Selective Call Rejection reject calls to your Hunt Group when predefined criteria are met, phone number(s), time of day, etc. b. Selective Call Acceptance allows call to your Hunt group when predefined criteria are met; i.e., phone number(s), time of day, etc. 40. Click the Edit button next to the feature you wish to activate and create a rule for. 41. Click the Add Rule button. Admin_Portal_0818rev9.doc Page 160 of 257


161 42. Enter a name for your rule in the Description field. 43. Choose a Time Schedule from the drop down list if a schedule has been set and is required for this rule. 44. Choose a Holiday Schedule from the drop down list if a holiday schedule has been set and is required for this rule. 45. Choose which phone numbers should follow this rule, Any Phone Number, the Following Phone Numbers, Any Private Number or Any Unavailable Number. 46. If you choose the Following Phone Numbers, enter up to 12 specific phone numbers that you want to follow this rule, in the fields provided. 47. One all options have been selected for your rule, click the Done with Add Rule button. 48. Your rule will be listed, and you can return to your rule to edit or delete it at any time. 49. Click the Edit button rule to modify your rule. 50. Click the Delete button to delete your rule. 51. Click the Save button to continue. 52. The rule you added and feature that you activated is now indicated by Service is On. 53. Calls ringing to your Hunt Group will be based on the criteria in defined in your rule. 54. To modify your rule at any time, click the Edit button. Admin_Portal_0818rev9.doc Page 161 of 257
162 Admin_Portal_0818rev9.doc Page 162 of 257

163 55. Click Call Treatment Schedules from the sub menu. 56. This allows you to define schedules that can be added to your Hunt Group based on time of day, after hours, weekends, holidays, etc. 57. If any schedules have been created either for this Hunt Group, or for the entire Group, they will be listed here. 58. A Group schedule can only be added/deleted/modified by the administrator, but can be used for any Hunt Group and can also be used for advanced features by any End User within that Group. 59. Click the Add Schedule button to add a new Schedule if none of the existing personal or Group schedules fit the criteria needed for your Hunt Group s schedule. 60. Enter a name for your schedule in the Schedule Name field. 61. Choose which Days of Week you want to apply this schedule to by clicking the check boxes. 62. Choose a Start and End time by selecting the options from the drop down lists. 63. When all options for your schedule have been set, click the Save button. Admin_Portal_0818rev9.doc Page 163 of 257


164 64. Once Schedules are built at either the Group level (by the Admin) or within an individual End Users portal, schedules can be added to Rules within Advanced Features such as Selective Call Forwarding, Simultaneous Ring, Sequential Ring, Hunt Groups, etc. 65. This is an example within an advanced feature where you will see the schedules built and which can be associated to a feature. 66. Click on Add Rule, a Time Schedule drop down list will be available, and will populate with any Schedules that have been built at the Group level by the Admin or schedules built at the user level. Admin_Portal_0818rev9.doc Page 164 of 257
165 Note: A single Rule can only have a Time Schedule or Holiday Schedule assigned to it. If you want to use both, you need to set up individuals Rules - one for Time Schedule and one for Holiday Schedule. Attempting to add a Time and Holiday schedule to the same Rule, will result in the following error. Admin_Portal_0818rev9.doc Page 165 of 257


166 Editing Hunt Groups Once your Hunt Group is built, you can return to edit that group, change members, select features settings, and assign alternate numbers. 14. Click Manage Services from the main menu. 15. Click Hunt Groups from the sub menu. 16. Select the Group you wish to manage. 17. Click Edit for the Hunt Group you wish to manage. 18. To change members assigned to your Hunt Group, from the Hunt Group tab, scroll to the bottom and click the Edit Members button. 19. To change configuration settings for your Hunt Group, click the Configure Features button. 20. Modify the settings as described in the section for creating your Hunt Group. Admin_Portal_0818rev9.doc Page 166 of 257

167 21. Click the Features Settings tab. 22. Choose to enable or disable various settings for your Hunt Group, such as Call Forward Always or Do Not Disturb. 23. To enable a feature, click the On radio button. 24. At any time to disable a feature, click the Off radio button. 25. Click the Edit button for features to assign schedules or advanced features to those feature settings. 26. Click the Save button. 27. Click the Alternate Numbers tab. 28. From the Phone Number drop down list, select the Alternate Number that you want to ring to the primary Hunt Group number. 29. The extension will auto populate in the Extension field, but this can be modified. 30. From the Ring Pattern drop down list, select the type of ring tone you want to be presented to the Hunt Group members when this number is called. 31. Click the Save button. Admin_Portal_0818rev9.doc Page 167 of 257
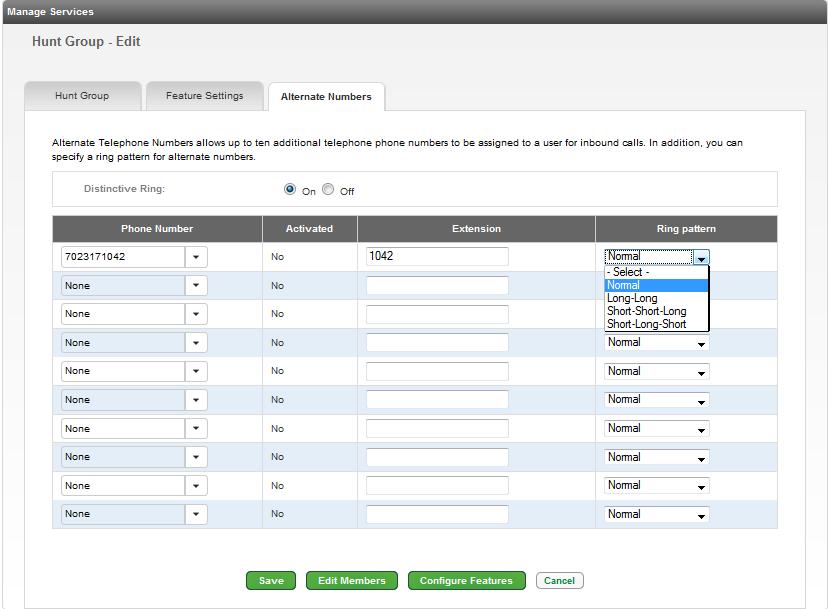
168 Admin_Portal_0818rev9.doc Page 168 of 257
169 Instant Group Call Instant Group Call allows users to call a group of users by dialing a phone number or extension associated to the Instant Group Call. The users can be part of the same group or they can be external users. 1. Click Manage Services from the main menu. 2. Click the Instant Group Call from the sub menu. 3. If you have multiple Groups, from the drop down list, select the Group you wish to add an Instant Group Call feature to. 4. If you already have Instant Group Call group set up, they will be displayed for editing purposes. 5. Click the Add Install Group Call button. 6. From the drop down list, select the Phone Number you wish to assign to this Instant Group Call. Note: If there are no phone numbers available in your inventory, you will need to contact your Account Manager to have one added. 7. Enter the Extension you want to use if it s different than the auto populated extension. 8. Enter the Name of the Instant Group Call. 9. Enter the Calling Line ID Last Name and Calling Line ID First Name for the Install Group Call. This is what will display on the user s phone when they receive a call that is being processed from this Instant Group Call number. 10. Set the Enable Max Call Timer for Unanswered Calls. If you select On, you will need to select the number of minutes you would like each user to be called from the drop down list. If this is set to No, the calls will ring for an unlimited amount of time, or until each party answers or you go to their voic If there are external numbers you would like to add to the Instant Group Call, enter the number in the Specify Phone Number field and click Add Numbers. You can have a maximum of 20 external numbers that can be added. If at any time you wish to remove an external number, click the Remove button next to that number. 12. For internal users, enter search criteria for the users you would like to find. Note: If your group has less than 1000 users in it, all members of that group will automatically be listed under the Search Results and End Users field. 13. Drag and drop the users you would like to add to your Instant Group Call from the left column to the right column (you can also select them while holding down the Control button on your keyboard and then click the right arrow in the middle of the columns). 14. When all users have been added to the Install Group Call, click the Save button. Admin_Portal_0818rev9.doc Page 169 of 257
170 Drag and Drop Admin_Portal_0818rev9.doc Page 170 of 257


171 Common Phone List Common Phone List allows you to set up frequently dialed numbers into a directory that can be used by everyone in the Enterprise from the Group Directory option on the toolbar. Contacts can be added individually or with a spreadsheet as a bulk upload. 1. Click Manage Services from the main menu. 2. Click Common Phone List from the sub menu. 3. From the drop down list, select the Group you wish to add a Common Phone List to. 4. Click on the Get button. 5. If numbers have already been added to the Common Phone List for that Group, they will be displayed below and can be Edited or Deleted. 6. Click the Add Phone List Entry button to manually enter a number to the list. Admin_Portal_0818rev9.doc Page 171 of 257


172 7. Enter a descriptive Name in the name field for each entry. 8. Enter the Phone Number to be dialed when selecting that entry. 9. Click the Save button. 10. Common Phone List entries will be embedded into the Group Directory. 11. To make it easier for your users to find Common Phone List entries, a suggestion is to place a 1,. or another special character in front of each entry s name. 12. When the user sorts the Group Directory by the Name field, those entries will appear at the top of the list and can be easily used for click-to-dial. LDAP (Lightweight Directory Access Protocol) LDAP allows users to use an external Lightweight Directory Access Protocol for click-to-dial and from the directory button on their handset device. 1. Click Manage Services from the main menu. 2. Click LDAP Settings from the sub menu. Admin_Portal_0818rev9.doc Page 172 of 257
173 Admin_Portal_0818rev9.doc Page 173 of 257
174 3. Enter an IP address for Fully Qualified Domain Name (FQDN) in the Directory Address box. 4. Enter an integer between 0 and in the Directory Port box. The default TCP port is 389, yours may be different 5. Enter the search root suffix of your directory server in the Search Base box. The root suffix should reflect the domain name of the site you are searching. 6. If your directory server requires authentication, click Yes. If it does not require authentication, keep the selection as No. These controls may speed up your searches. 7. If authentication is required, specify the DN (distinguished name), the unique identifier of the directory account to use for the authentication in the Authenticated DN field (up to 256 characters). 8. Enter the corresponding password in the Authenticated Password field. 9. Click Yes for the Always Include Search Attribute in Search Filter if you want to force the current search attribute to be included in all directory server searches, even when the user leaves the search parameter blank. 10. Choose the Reboot Type; Manual, Automated-Scheduled or Automated-Immediate. This determines the type of background processing, and the visibility of scheduling and manual controls. 11. To provide your users with notices regarding updates to the LDAP directory server, click the Send to users box. 12. Click the Save button. Admin_Portal_0818rev9.doc Page 174 of 257


175 Schedules Schedules allows you to define schedules at the group level that can be applied to Auto Attendant hours of business, Anywhere, Sequential Ring, Simultaneous Ring, etc. 1. Click Manage Services from the main menu. 2. Click Schedules from the sub menu. 3. If you have more than one location in your Tenant, select the Group you wish to create a schedule for from the drop down list. 4. Click on the Get button. 5. If there are schedules already defined for that Group, they will be listed below. 6. To add a new schedule, click the Add Schedule button. 7. To Edit or Delete an existing schedule, click the Edit or Delete button next to the schedule you wish to manage. Admin_Portal_0818rev9.doc Page 175 of 257
176 8. Enter a Schedule Name to define the schedule you are building. 9. Select if it is a Holiday or Time schedule. 10. Click the Save button. 11. Once you Save your Schedule, the Add Event button will activate. Click on Add Event to set the parameters of your Schedule. 12. Enter an Event Name for your schedule. 13. From the drop down calendar, select the Start Date for your Schedule. 14. From the drop down calendar, select an End Date for your Schedule. 15. From the drop down lists, select the Start Time and End Time for your Schedule. 16. If your Schedule is an all day event, check the All Day Event box. If you choose All Day Event, you do not need to define the Start Time and End Time. 17. From the drop down list, select Never, Daily, Weekly, Monthly and Yearly which best fits your Schedule. 18. Complete the remaining information based on your Schedule and the required parameters. 19. Click the Save button. Admin_Portal_0818rev9.doc Page 176 of 257

177 Device Management Device Management allows you to manage and change device settings at the Group level. 1. Click Manage Services from the main menu. 2. Click Device Management from the sub menu. Admin_Portal_0818rev9.doc Page 177 of 257


178 3. If you have more than one location in your Tenant, select the appropriate Group that you wish to manage from the drop down list. 4. Select the correct vendor from the Vendor drop down list. 5. Click the Get button. 6. All devices for the selected Group will be displayed including Device Name, Primary User Name, Device Description, Device Type, MAC Address and Phone Number. 7. The Phone Numbers column will display the Primary number as well as any Shared Call Appearance. 8. To delete a user, click the Trash icon. 9. Click on the Gear icon to manage a specific device, including adding additional Shared Call Appearances, Busy Lamp Fields and Soft Keys. Admin_Portal_0818rev9.doc Page 178 of 257
179 10. Click on the Bulk Change Device Settings tab to change Group level settings; changes made on this page will affect all users within that Group. 11. Change feature settings by clicking Yes or No radio buttons, selecting options from drop down lists, or enter field data. 12. To return any setting(s) to the Group-Level Value, check the corresponding box under Reset to Group-Level Value check box. Note: If you are not familiar with a feature, hover over the? for a brief description. Admin_Portal_0818rev9.doc Page 179 of 257
180 13. Making setting changes will require a reboot of each device. The reboot can be performed Manually, Automated-Scheduled or Automated-Immediate. Manual each device will need to be rebooted by unplugging the data cable, or by accessing the reboot option under Advanced Features Automated-Scheduled -- set a specific date/time, within7 days, for the devices within this Group to reboot Automated-Immediate all devices within this Group will automatically reboot 14. Click the Automated-Scheduled radio button. 15. Select the preferred reboot date by clicking the Calendar icon; reboot must be scheduled within 7 days. 16. Choose your starting time, a.m. or p.m., from the Start Time drop down lists. 17. Click the Save button and all devices will reboot at the scheduled time. Admin_Portal_0818rev9.doc Page 180 of 257

181 18. Click the Automated-Immediate radio button. 19. Click the Save button to reboot all devices in this Group immediately. 20. If you want to apply the same feature setting changes to additional Groups, click the Save to Multiple Groups button. 21. Drag and Drop Groups from the Available Groups field to the Groups to Assign Settings to field. 22. When all Groups have been assigned, click the Save button. Drag and Drop Admin_Portal_0818rev9.doc Page 181 of 257
182 23. Click on the Templates tab. 24. Click the Device Template drop down list to review default templates and custom templates that have been created. 25. Once you select a default or custom template, click the Get button to access that template; existing default or custom templates can be modified to create new custom templates. 26. Click the New button to start a new template from scratch. 27. Change feature settings by clicking Yes or No radio buttons, selecting options from drop down lists, or enter field data. Note: As always, if you are unfamiliar with a feature, hover over the? for a brief description. Admin_Portal_0818rev9.doc Page 182 of 257

183 28. If you selected to start with a default or previously created Custom Template, any soft keys built within that template will be displayed. 29. You can clear or remove any of the default soft keys by clicking the Clear Soft Key button next to the feature you wish to delete. 30. To add a new custom soft key, click the Action drop down list and select from various features. 31. The Label field will pre-fill based on the feature selected, but it is editable so the label can appear with a more familiar name for your users. 32. Check the appropriate boxes depending on where you want your soft key to appear and/or the status of the phone when you want that feature available: Show On Idle the soft key will only be available when the phone is on-hook Show on Active the soft key will only be available while on an active call Show Before Default Keys the soft key will be moved ahead of default features such as Transfer, Hold and Conference 33. Next select Device Settings that you want applied to your custom template by click the Yes or No radio buttons, by selecting options from a drop down list, or by typing information into specific fields. 34. After all settings specific to that custom template are set, click the Save As button. Admin_Portal_0818rev9.doc Page 183 of 257
184 Admin_Portal_0818rev9.doc Page 184 of 257


185 35. To save a new custom template, enter a descriptive name in the Device Template field. 36. To save as an existing template, select your template from the drop down list. 37. Click the Save button. 38. If custom templates are built prior to building users, templates can be assigned while creating users individually, or when using the Bulk Upload Spreadsheet. 39. Be sure to list the template name in your Bulk Upload Spreadsheet, exactly as it was named including upper/lower case and punctuation. Note: If you create a custom template after your users have been built, the users who require this custom template would have to be deleted and rebuilt for the feature changes to apply. Any new users added after the custom template has been built, can be assigned that template through the Create New User process. Admin_Portal_0818rev9.doc Page 185 of 257

186 40. Click the Bulk Apply Device Templates tab to assign a new template to multiple users. 41. Select the template from the Device Template drop down list. 42. Use the Search Devices option to search for specific users by First Name, Last Name, MAC Address or Device Name. 43. Click the Box in the column heading to select all users, or individual click on the box for each user which wish to update. 44. Making setting changes will require a reboot of each device. The reboot can be performed Manually, Automated-Scheduled or Automated-Immediate. Manual each device will need to be rebooted by unplugging the data cable, or by accessing the reboot option under Advanced Features Automated-Scheduled -- set a specific date/time, within7 days, for the devices within this Group to reboot Automated-Immediate all devices within this Group will automatically reboot 45. If you wish to notify each user of the impending reboot, check the Send to Users check box. 46. Click the Save button to enable the selected reboot option. 47. After all devices are rebooted, new feature settings associated to the newly assigned template, will be in implemented. Admin_Portal_0818rev9.doc Page 186 of 257
187 Admin_Portal_0818rev9.doc Page 187 of 257

188 Support Contact If you prefer that your end users contact an internal resource for support, you have the ability to customize the number within the Support Contact option that is provided to your end users if they receive a portal error. 1. Click Manage Services from the main menu. 2. Click Support Contact from the sub menu. 3. If you have more than one location in your Tenant, select the appropriate Group that you wish to manage from the drop down list. 4. Click the Get button. 5. The default support number for CenturyLink support, is selected by default and cannot be modified. 6. To customize the Support Contact number, click the Custom End User Help Desk Number radio button. 7. In the Custom End User Help Desk Number field, enter the number you want to display in the portal. Note: This number can be a toll free or 10-digit phone number. Admin_Portal_0818rev9.doc Page 188 of 257


189 Dial Plan Policy Dial Plan Policy allows you customize digit mapping including public and private dial plans simultaneously on a per-group basis. This capability allows integrated and consistent control of digit collection and external digit processing policies. It also provides the capability to allow the dial 9 to access an outside line feature common on many PBX systems. 1. Click Manage Services from the main menu. 2. Click Dial Plan Policy from the sub menu. 3. If you have multiple Groups, from the drop down list, select the Group you want to access. 4. Click the Get button. 5. Use System Default Dial Plan is the default and most commonly used. 6. This setting allows users to dial 10-digits for all external calls and does not require a 1 or a To modify this setting, click the Enable Access Code radio button. Admin_Portal_0818rev9.doc Page 189 of 257

190 8. In the Public Access Code field, enter the digit that will be needed for an outside line, such as a 9 or 8, which are most commonly used. 9. If you require this access code for all calls, click the Yes radio button. 10. In the Description field, enter a description of this dial plan policy. 11. When all policies are entered, click the Save button. Group Caller ID Group Call ID allows you to determine and manage on outbound calls, whether each individual s personal 10-digit phone number is out pulsed to the calling party, or if, as an example, your company s main number is presented to the caller. 1. Click Manage Services from the main menu. 2. Click Group Caller ID from the sub menu. 3. If you have multiple Groups, from the Group drop down list, select the Group you want to manage. 4. Click the Get button. Admin_Portal_0818rev9.doc Page 190 of 257
191 5. Group Caller ID information will be displayed for that Group. 6. From the Calling Line ID Group Number drop down list, select the number from that group that you want to send for outbound caller ID for the entire group. Note: If the number you want to change the Calling Line ID Group Number to is being ported, this field will NOT be editable until after the port is complete, 911 is registered, and all ported numbers are marked as active in our system. This could take up to 24 hours after the port, to become available. 7. For non emergency calls, select the radio button for the option you prefer, the Group Calling Line ID or User Phone Number. 8. Choose to block or not block Calling Name for External calls by selecting the Yes or No radio button. 9. If you do not want the User Name to appear for inbound caller ID for to other CenturyLink VoIP customers, click the No radio button. 10. Click the Save button. 11. The address registered for the Group Number is based on the Base Location address. 12. If the Group Number is assigned to an individual user that is mobile, the temporary address location can be registered with 911 through Manage Services, Group Caller ID. 13. Click the Update 911 Information button. Admin_Portal_0818rev9.doc Page 191 of 257


192 14. Click the Change Current Location drop down list to choose Manage My Locations, Select Location, or Add New Location. 15. Select Add New Location. 16. Enter the Location Name. 17. Enter the Address for that location. 18. Click the Save button. Admin_Portal_0818rev9.doc Page 192 of 257


193 19. Confirm that the address was input correctly. 20. Click the OK button. 21. Your new location is now an option within your My Current Location list. Changing your 911 Location Once you have added a new location to your 911 Location List, you will then want to update your location in the 911 system. 1. Click 911 Location from the Profile & Settings sub menu 2. Click Change Current Location from the first drop down list. 3. Select the location you want to change to in the My Current Location Is drop down list. 4. Click the Save button. Admin_Portal_0818rev9.doc Page 193 of 257

194 5. Your location will be submitted for registration. You will receive and that your order was placed and an when your order is completed and your address has been changed. 6. Remember, when you return to your base location, you will need to log back into the portal and register the 911 information again to reflect you Base Location. 7. Your Base and Current Location can always be reviewed on the right hand side of your portal. Scheduling a 911 Location Change You can schedule a future 911 Location change. Keep in mind that you can only schedule one change at a time, and if you try to add a schedule when one is already present, it will override the existing one. 1. Click 911 Location from the Profile & Settings sub menu. 2. Click Schedule Future Change from the first drop down list. 3. Select the location under the My Future Location Will Be drop down list. 4. Select the Date you would like the change to take effect from the Calendar. 5. Select the Time and Time Zone you would like the change to take effect. 6. Click the Save button. Admin_Portal_0818rev9.doc Page 194 of 257

195 7. Your location change has now been scheduled. 8. Your location change has now been scheduled. 9. You will receive and confirming your scheduled registration change. 10. Approximately 15 minutes prior to your requested change date/time, you will receive another stating your order has completed and that the new address has been registered. 11. Remember, when you return to your base location, you will need to log back into the portal and register the 911 information again to reflect you Base Location. 12. Or submit a Schedule Future Change to coincide with your return to your Base Location. Extension Dialing Policy Extension Dialing allows you to manage an abbreviated outbound dialing plan between multiple groups or locations within your Tenant. 1. Click Manage Services from the main menu. 2. Click Extension Dialing Policy from the sub menu. 3. To allow abbreviated extension dialing across your Tenant, click the Yes radio button next to Enable Enterprise Extension Dialing. 4. If you do not want to allow abbreviated extension dialing between all groups within your Tenant, you choose which locations have that capability. 5. Groups or locations listed in the Enterprise Extension Dialing Disabled Group field cannot perform extension dialing between groups within their Tenant. 6. Groups or locations listed in the Enterprise Extension Dialing Enabled Groups field can perform extension dialing to all groups within their Tenant. 7. Of your Tenant has several groups or locations, you can search for a specific location by using the search field; partial searches are allowed. 8. To move a group from one field to the other, click to drag and drop a group to another field. 9. Or highlight a group and use the right and left arrow keys to move between fields. 10. Click the Save button. Drag and Drop Admin_Portal_0818rev9.doc Page 195 of 257


196 Portal Administration The Portal Administration section allows delegation of management for specific Telephone Numbers and Groups by creating Sub-Administrator Groups. This will not impact your abilities as the Administrator. In this section, you also have access to Call Recording functionality. Create a link to this portal which can be then be accessed via Control Center. Storage Limits: Basic Call Recording License 1 Gig/user recordings storage for 7 days Standard Call Recording License 3 Gigs/user recordings storage for 30 days Premium Call Recording License 34 Gigs/user recordings storage for 366 days Call Recording Administration Use Call Recording Administration to define individuals who can listen to, and manage call recordings. 1. Click Portal Administration from the main menu. 2. Click Call Recording Administration from the sub menu. 3. If call recording administrators have already been assigned, they will be displayed and can be edited or deleted by clicking the appropriate action button. 4. To add a new Call Recording Administrator, click the Create New Call Recording Admin button. 5. Click the Call Recording Admin User ID drop down list. 6. From the list, scroll to find the user you would like to assign. 7. You can also enter a search or partial search in the Search Users field. 8. Once you locate the individual, click their name from the drop down list. Admin_Portal_0818rev9.doc Page 196 of 257

197 9. All users within Call Recording licenses, appear in the Available Users field. Note: Recording Admins from one Group, can manage recordings for users in other Groups as long as they are assigned a license. Note: Licenses are added to Users within the Feature Assignment tab, when editing the user. 10. Use the arrows or Drag and Drop users from the Available Users field, to the Assigned Users field. 11. This assigns users to this Call Recording Administrator, who can then listen to and manage recordings. 12. When all users are assigned to the Assigned Users field, click the Save button. 13. This process must be done for all Call Recording Administrators. Drag and Drop 14. Confirm the action was successful at the top of the page. 15. A Call Recording Admin User ID is assigned to the recording administrator. 16. Edit users, or Delete the recording admin by clicking the appropriate button. Admin_Portal_0818rev9.doc Page 197 of 257

198 17. The new administrator appears in the list of Call Recording Administrators and can be deleted or edited as needed. Call Recordings Individuals defined as Call Recording Administrators, can listen to and manage recordings for users assigned to them. Call Recording Administrators can manage recordings via the Administrator Portal (if they have Admin Portal access), or via their End User portal. 1. For detailed information on dashboard functionality and managing call recordings, refer to the Call Recording Dashboard User Guide. Admin_Portal_0818rev9.doc Page 198 of 257


199 Portal Sub-Administration Use the Portal Sub-Administration feature to provide administrative rights to individuals within your organization. You can selectively choose which Groups they have authority to administer, as well as which features within each Group that they can administer. Multiple sub administrators can now uploaded via the Bulk Upload tool. 1. Click Portal Administration from the main menu. 2. Click Portal Sub Administration from the sub menu. 3. If sub administrators have already been assigned, they will be displayed and can be edited or deleted by clicking the appropriate action button. 4. To add a new Sub Administrator, click the Create New Sub Admin button. 5. Enter information in the fields for the new Sub Administrator you are creating. The Sub-Admin User ID must be a minimum of 6 characters. The Sub-Admin Password must be a minimum of 8 characters, contain 1 Upper case, 1 number and 1 special character. 6. Select the Group(s) you want that Sub Admin to have administrative access to by dragging and dropping the appropriate Group(s) to the Add Groups to field. Drag and Drop Admin_Portal_0818rev9.doc Page 199 of 257
200 7. Under Sub-Administration Functional Grants, select the level of access you wish each Sub-Admin to have by checking or unchecking the boxes. 8. Within each category, you can choose to allow that sub admin the following rights: a. View/Edit full authority to features within that category b. View Only can view the information, but cannot administer c. Hide will not be able to view or administer d. Custom customize the authority 9. To expand or collapse categories and sub-categories, click the down ( ) and right ( ) arrows. 10. Go through each category and sub-category and define that sub-admin s level of authority, by clicking the appropriate radio button. 11. After all settings have been made, click the Save button. 12. When the sub-admin logs into their portal, they will only have access to and administrative right for the categories you selected. Admin_Portal_0818rev9.doc Page 200 of 257

201 13. Both the primary and sub administrator will receive notification that a sub admin login has been created. 14. The new sub admin will now be listed and can be edited or deleted at any time by clicking on the Edit or Delete buttons. 15. If you have several sub administrators that need to be created, use the bulk upload tool by clicking on the Bulk Load Sub Admin button. 16. Sub administrators are added by using a bulk upload spreadsheet. To download a spreadsheet, click the Template File link. Admin_Portal_0818rev9.doc Page 201 of 257

202 17. Columns Headings in Red are required fields; Column Headings in Blue are optional. 18. Column requirements are specific and CASE and White Space sensitive. 19. When performing a Bulk Upload, it is always recommended to download a new Template File, and always refer to the Instructions for field specifics. 20. Fill out the spreadsheet according to the instructions, and save the file to a directory. 21. Click the Browse button to locate and select your file. 22. Click the Validate and Process button to process your upload. 23. You will receive a message indicating your spreadsheet passed the validation. 24. In the Notification Address(es) field, change or add addresses that should receive notification that the bulk upload is complete. 25. After all addresses are entered, click the Submit button. Admin_Portal_0818rev9.doc Page 202 of 257


203 26. Wait for the notification of bulk upload completion, or click the Refresh button to update the status in the portal. 27. Once the bulk uploaded is completed, it will be listed in the Transactional History field. 28. Click on the link to review the contents of the bulk upload, or click the Back To Sub Admins button. 29. Your new sub-admin will appear in the table. 30. You can edit permissions or delete a sub admin, by clicking on the Edit or Delete buttons, or by performing a bulk upload. 31. If you need to modify multiple Sub-Admins and multiple permissions, you can also achieve that by performing a Bulk Upload. 32. Column Headings in Red remain required; and Column Headings in Blue are optional. 33. Fill out the spreadsheet with existing sub-admin information, and change all necessary fields. 34. Column A will be Update versus Create. 35. Columns H and I will contain options within the portal, that you can manage sub-admin rights. 36. Once your spreadsheet is completed, save to a file destination, and click the Validate and Process button as previously described. 37. Once the upload is completed, the changes contained in the upload will be reflected for each sub-admin affected. Admin_Portal_0818rev9.doc Page 203 of 257
204 Admin_Portal_0818rev9.doc Page 204 of 257

205 Link Control Center ID Activating your Link Control Center ID gives you the ability to access your Administrator Portal directly from Control Center. 1. Click Portal Administration from the main menu. 2. Click Link Control Center ID from the sub menu. 3. Enter your Control Center User ID and Password in the appropriate fields. 4. If you do not have a Control Center ID, please contact your Account Manager. 5. Click the Create Link button to link this portal to Control Center. Admin_Portal_0818rev9.doc Page 205 of 257


206 6. You receive a message stating that your link to Control Center was successful. 7. To unlink your portal to Control Center, click the Unlink button. 8. You receive a message confirming your intent to Unlink your Control Center user ID. 9. Click the OK button to proceed with unlinking your account. 10. Confirmation is received that your Control Center User ID has been unlinked. Admin_Portal_0818rev9.doc Page 206 of 257
207 Admin_Portal_0818rev9.doc Page 207 of 257


208 11. With your user ID linked to Control Center, you can access Control Center via the portal. 12. Click Help on the main menu. 13. Scroll to the bottom and click the Go to Control Center Portal link. 14. With your Control Center ID successfully linked, you can also access the Hosted VoIP Administrator portal from Control Center. 15. Click on VoIP within the Services menu. Admin_Portal_0818rev9.doc Page 208 of 257


209 16. Click on Hosted VoIP Administration within the VoIP option. 17. This will provide you with single sign on access to the Hosted VoIP Admin Portal. User Portal Access From within the User Portal Access feature, you can determine, at the Group level, which features and functions your end users have access to in their End User portals. 1. Click Portal Administration from the main menu. 2. Click User Portal Access from the sub menu. Admin_Portal_0818rev9.doc Page 209 of 257
210 3. Select a Group from the Select a Group drop down list, or begin typing your search criteria in the Search a Group field to narrow your search if you have several locations within your Tenant. 4. Once the Group is select, click the Get button. 5. Listed for that Group, are all of the features you can modify for your users. 6. Click the button to expand a feature grouping. View/Edit these features can be viewed and in the end user s portal View Only these features can be viewed in the end user s portal but cannot be edited or modified Hidden these features will not appear in the end user s portal Admin_Portal_0818rev9.doc Page 210 of 257

211 7. After clicking the button on any feature grouping, underlying features will be displayed. 8. Select the appropriate configuration for each feature setting. 9. Click the Save button to save the settings for that Group. 10. Click the Save to Multiple Groups button to enable those settings for additional Groups within your Tenant. Note: Expand each of the feature groupings to view the various options within each grouping, or review the end of this section for an example of each feature. 11. Select Groups from the Available Groups field and drag and drop to the Groups to Assign Settings to field. 12. You can also use the arrow buttons between the fields to move Groups to and from each field. 13. When all Groups are moved to the Groups to Assign Settings to field, click the Save button. Drag and Drop Admin_Portal_0818rev9.doc Page 211 of 257
212 Call Logs Call Features Note: There may be sub features within a feature grouping that can be expanded as well, such as Call Settings within the Call Features grouping). Admin_Portal_0818rev9.doc Page 212 of 257
213 Virtual Desk Contacts Admin_Portal_0818rev9.doc Page 213 of 257

214 Profile and Settings Inventory The Inventory option allows you to monitor your inventory of active and available seats, order additional telephone numbers and seats, monitor add on features such as desktop and mobile softphones, and monitor/review open and closed orders. Inventory Overview Access Inventory Overview gives you a view by Group of inventory In Use and inventory Available. 1. Click Inventory from the main menu. 2. Click Inventory Overview from the sub menu. Admin_Portal_0818rev9.doc Page 214 of 257

215 3. The Enterprise Overview provides a quick view of MCC inventory across your enterprise. 4. If you have multiple groups, select the Group from the drop down list you want to view. 5. Click the Get button. 6. All Inventory for that Group displays. 7. This includes total number of licenses, licenses in use, and licenses available. 8. Use arrows and page buttons to navigate to additional screens. Admin_Portal_0818rev9.doc Page 215 of 257

216 Telephone Numbers You can Delete, Add:New and Add:Ported Telephone Numbers to your inventory by Group level. 1. Click Inventory from the main menu. 2. Click Telephone Numbers from the sub menu. 3. To view the entire phone number inventory for a specific group, select the location from the Group drop down list. 4. Click the Get button. 5. This will provide you with quantity of Available TNs (telephone numbers), and a total quantity of TNs In-Use. 6. You can Delete or Add telephone numbers to your inventory, by clicking the appropriate button. 7. Click the drop down list under Search for Telephone Number Status to select a location. 8. Click the Search button. Admin_Portal_0818rev9.doc Page 216 of 257


217 9. This will display the entire list of phone number inventory for that location, including available numbers and numbers in use. 10. Any telephone number with a name in the User column is in use, if there is no name listed in the User column, the number is available. 11. The Extension column provides the assigned extension number for each telephone number, and can be useful if your extensions do not correlate to the 10-digit phone number. 12. Any column can be sorted in ascending or descending order by clicking the up or down orange arrows. 13. You can also export the entire list by clicking the Export Report button. 14. If you have a large Group and want to refine your search, enter a 10-digit number in the Phone Number field 15. Click the Search button. Admin_Portal_0818rev9.doc Page 217 of 257

218 Delete Telephone Numbers 1. To Delete one or more telephone numbers, click the Delete Telephone Numbers button. Note: If you delete a number, or a range of numbers, they will be permanently removed from your inventory and you will not be able to assign any deleted numbers to users or devices. 2. All available numbers in that location s inventory will be displayed. 3. You can Delete up to 100 numbers in one order. If more than 100 numbers will be deleted, this will need to be done in multiple orders. 4. Numbers are listed in sequential order. 5. You can use the up/down scroll bar to search for the number(s) you wish to Delete. Admin_Portal_0818rev9.doc Page 218 of 257
 in the available inventory, and click each corresponding check box. 8.")
219 6. To select and delete all of the telephone numbers in that location (if less than 100), click the Select All Available Numbers check box. 7. To Delete random numbers, locate the number(s) in the available inventory, and click each corresponding check box. 8. If you wish to Delete a range of numbers, enter the Starting and Ending number of the range, in the From and To fields. 9. Click the Submit button. Admin_Portal_0818rev9.doc Page 219 of 257

220 10. On the Deletion Confirmation screen, confirm or change any missing or incorrect information. 11. You can enter a Comment pertaining to the deletion order, but that field is not required. 12. Click the Place Order button. 13. You will need to confirm deletion of the number(s). 14. Click the Confirm button. Admin_Portal_0818rev9.doc Page 220 of 257

221 15. You will be provided with a Delete Confirmation notice, which includes an Order ID for your reference. 16. Your Delete order is complete. 17. Click the Telephone Inventory button or proceed to another area of the portal by clicking your desired location on the main or sub menu. Add Telephone Numbers: New 1. To Add Telephone Numbers to your inventory, select the appropriate group from the drop down list. 2. Click the Get button. 3. Click the Add Telephone Numbers: New or Add Telephone Numbers: Port. New new numbers will be assigned from our inventory, based on your area code and prefix, and our availability Port numbers that you own and wish to port to CenturyLink 4. Click the Add Telephone Numbers: New. 5. Click the drop down list and select the Area Code available to you based on your rate center. Admin_Portal_0818rev9.doc Page 221 of 257
222 Admin_Portal_0818rev9.doc Page 222 of 257
223 6. Click the Exchange drop down list to view prefixes available to you based on availability and your rate center. 7. Indicate how many numbers you wish to receive with this order by entering that number in the Quantity of Numbers to Add field. 8. If you want those numbers to be consecutive, click the Consecutive Numbers check box. If this box is not checked, you will receive the amount of numbers you ordered within your Area Code and Exchange, however, they may not be consecutive numbers. 9. Confirm or change any missing or incorrect information under Whom shall we contact. 10. You can enter a Comment pertaining to the number order, but that field is not required. 11. Click the Place Order button. Admin_Portal_0818rev9.doc Page 223 of 257


224 12. You will be presented with a confirmation of your order, including an Order ID number and a list of the numbers assigned to your location. 13. Click the Telephone Inventory button or proceed to another area of the portal by clicking your desired location on the main or sub menu. Add Telephone Numbers: Port 1. To Add Telephone Numbers to your inventory, select the appropriate group from the drop down list. 2. Click the Get button. 3. Click the Add Telephone Numbers: Port button. 4. Refer to the Attention notice. If you click the Cancel button, you will cancel your request to process a Port order. 5. If you wish to proceed with your order, click the Confirm button. Admin_Portal_0818rev9.doc Page 224 of 257
225 Admin_Portal_0818rev9.doc Page 225 of 257
226 6. Enter non-consecutive numbers, comma separated, in the Input Telephone Number(s) field. 7. Enter ranges of numbers in the Select a Range field. Note: You can have a combination of non-consecutive numbers, and ranges of numbers in one order. 8. Click the Portability Check button to confirm whether your numbers can be ported. Admin_Portal_0818rev9.doc Page 226 of 257

227 9. If your numbers are portable, you will receive a confirmation that you can proceed with your order submission. 10. Click the Submit button. 11. This is the error you will receive if your numbers are not available to port. Admin_Portal_0818rev9.doc Page 227 of 257
228 Admin_Portal_0818rev9.doc Page 228 of 257
229 12. An LOA is required to accompany all port orders. 13. Fill out the information in the Required LOA Information screen, as it pertains to the information on the account that the numbers are currently billed on. Note: It is suggested that you refer to your invoice, and enter the information in this screen, exactly as it appears on your invoice, including any punctuation, capitalization, abbreviations, etc., to avoid order rejection from the losing carrier. 14. Click the Place Order button. Admin_Portal_0818rev9.doc Page 229 of 257

230 15. You will receive an Add Telephone Numbers: Port - Success confirmation, which includes an Order ID number. 16. Click the Telephone Inventory button or proceed to another area of the portal by clicking your desired location on the main or sub menu. Admin_Portal_0818rev9.doc Page 230 of 257

231 Seats Manage your inventory by adding and removing Seats based on your current needs. If additional seats requiring physical devices are ordered, they will be shipped to your location. If seats are removed that were associated to a physical device, you will receive a shipping label to easily return the inventory. 1. Click Inventory from the main menu. 2. Click Seats from the sub menu. 3. If you have multiple locations, select the location you want to manage from the drop down list. 4. Click the Get button. 5. Existing inventory for that location will be displayed. 6. You can see all of the products types associated to that location. 7. How many are In Use and how many are Available by seat/product type. 8. You can Add to your inventory, or Remove existing inventory. 9. If you add seat types that have phones or devices associated to them, such as Basic, Standard and Premium, you need to indicate in the Phone Type Comments drop down list, the device type you need shipped. If you need more than one phone or devices types, multiple orders will need to be placed. 10. The appropriate device for any seat/license that you order, will populate the drop down list with the appropriate options. 11. Enter the total quantity for each product type, in the Add column. To remove inventory, enter the total quantify of any one product in the Remove column. 12. If you are removing inventory for products that have phones associated to them, such as Basic, Standard and Premium, you will be sent a shipping label to return the devices. 13. Click the Submit button. Note: If you want to Remove a seat type, but do not have any seats with Available inventory to Remove, you will need to delete users before you can remove the seats. Click the Manage Users button to delete the appropriate numbers of users for the numbers of seats you want to remove. Admin_Portal_0818rev9.doc Page 231 of 257


232 14. Confirm or change missing or incorrect information under Whom shall we contact. 15. You can enter a Comment pertaining to the seat order, but that field is not required. 16. Click the Place Order button. Admin_Portal_0818rev9.doc Page 232 of 257


233 17. You will receive an Order Confirmation which includes an Order ID number. 18. You will be able to monitor your order status under Inventory --> Order Status. 19. Click the Back to Seats button or proceed to another area of the portal by clicking your desired location on the main or sub menu. Add On Features Add On Features allows you to order additional features through the portal such as Business Communicator, call recording, and receptionist console. 1. Click Inventory from the main menu. 2. Click Add On Features from the sub menu. 3. If you have multiple groups, select the location you want to manage from the drop down list. 4. Click the Get button. Admin_Portal_0818rev9.doc Page 233 of 257

234 5. Displayed are In Use, Available and Total inventory for the products you currently have and that are available to order. 6. Click View Users, next to any product type to see who each product is assigned to. Admin_Portal_0818rev9.doc Page 234 of 257


235 7. All users having that Add On Feature assigned, will be displayed. 8. When finished reviewing the information, click the Close button. 9. You can Add or Remove inventory by feature type. 10. To add inventory, enter the number of units required in the Add Features column. 11. To remove inventory, enter the number of units you wish to remove in the Remove Features column. Note: To remove inventory, there must be available licenses to remove, if all licenses are in use, a remove order cannot be placed. 12. Click the Submit button. Admin_Portal_0818rev9.doc Page 235 of 257
236 13. Confirm prepopulated contact information is accurate, or enter the information in the fields as shown below if additional information is required for a specific product type. 14. Click the Place Order button. 15. The owner of the address in the field, receives notification that an order was placed, and receives a second once the order is fulfilled. Upon fulfillment, the new services can be put into use immediately. Admin_Portal_0818rev9.doc Page 236 of 257

237 SIP Trunking Sessions As with Trunk Administration within the Main Menu, you will only see SIP Trunking Sessions as a sub menu item, if a tenant subscribes to SIP trunking. 1. Click Inventory from the main menu. 2. Click SIP Trunking Sessions sub menu. 3. The Current Quantity column displays total number of MCCs currently available across your enterprise; to change this, enter the new total number of sessions in the Total Quantity after Change field. 4. Hit Enter on your keyboard, then click the Submit button. 5. The order for additional sessions fulfills within approximately 30 minutes. Order Status From Order Status, you can check the status of any active or completed order from within the portal. 6. Click Inventory from the main menu. 7. Click Order Status from the sub menu. Admin_Portal_0818rev9.doc Page 237 of 257

238 Admin_Portal_0818rev9.doc Page 238 of 257


239 8. All Orders for your Group will be displayed. 9. To narrow the search for a particular order, choose from the following options in the Find drop down list: a. Order Request ID b. Sales Order ID c. Customer Order Entry Date 10. To narrow the search further, enter search criteria within the that includes field. 11. Click the Search button. 12. Ticket information is displayed below, and can be sorted by any of the categories, either ascending or descending, by clicking on the up or down arrow within the column heading. 13. Click on an Order Request ID, to gain additional information about a particular order. Admin_Portal_0818rev9.doc Page 239 of 257

240 14. An Order Status Detail window will display information about that order, including the Order Status. 15. The Order Items section outlines the inventory requested on the order. 16. Click the Done button. 17. For a list of standard seat/product pricing, click Click Here in the Order Status summary page. Admin_Portal_0818rev9.doc Page 240 of 257

241 Reports Reports allow you to run and compile Utilization Reports by telephone number or groups of telephone numbers; Voice Mail Reports, Portal Usage Reports and Trunk Utilization Reports. Call data is stored for 75 days. Utilization Reports Reports are run in Summary, Bar Chart and Detail format, as well as Call Detail Reports. Call details are retained for 75 calendar days. 1. Click Reports from the main menu. 2. Click Utilization Reports from the sub menu. 3. If your enterprise has multiple groups, select the group you want to run your report for from the Group drop down list; if your Tenant only has one location, that field is static. 4. After your Group has been selected, click the Get Phone Numbers button. 5. From the Report Type drop down list, choose your report type. These are the data aggregation levels for each report. Hourly Summary 5-minute Daily Summary Hour Weekly Summary Day Monthly Summary Month Busy Hour Summary 5-minute 6. The Title field populates based on the report type selected, this field is editable and can be changed. 7. In the Comments field, enter pertinent comments regarding your report. 8. Click the Calendar buttons to select a Start Date and End Date. 9. Click the drop down lists to select your Start Time and End Time. To avoid lengthy response time to generate your report, the system limits the time frame. Admin_Portal_0818rev9.doc Page 241 of 257
242 10. Your Telephone Numbers will appear in the Available field, depending on which report you are running and the Group you selected. 11. Drag and drop the Telephone Numbers from the Available field to the Selected field that you want to include in your report. 12. You can also use the arrows between the columns to move Trunks or Numbers to and from each field. 13. The Selected Columns field contains all of the columns that can be included in your report, all are selected by default. 14. To customize your report, drag and drop columns you do not require in your report to the Available Columns field. 15. You can also use the arrow keys to move Columns between each field. 16. To rearrange the Selected Columns to appear in a different order on your report, click a Column Name and drag it to the desired location, or use the up and down arrows to rearrange them. 17. Click the View Report or Export Report button to process your report. Drag and Drop Drag and Drop Admin_Portal_0818rev9.doc Page 242 of 257


243 18. If you click the View Report button, your report will process based on the criteria you set in the report parameters. 19. The Summary tab will display all of your call usage information. 20. If your report is large, scroll bars will be provided to scroll up and down. 21. The report can be sorted by clicking on the up/down arrows in the column you want to sort records by. 22. Click the View Report as Bar Chart tab to see your report results in that format. 23. A legend based on your column names will be provided. 24. For more details on your usage and call records, click the Details tab. 25. Depending on the report parameters you set, you may receive a warning message stating that your report may take longer to process depending on those parameters. 26. Click the Proceed button. Admin_Portal_0818rev9.doc Page 243 of 257


244 27. Once the report is generated, review the following call detail: Calling Telephone Number Called Telephone Number Start/Release Time Call Duration Answer Indicator 28. Use the scroll bars to scroll up/down through your report. 29. Or use the page buttons < << >> > to navigate as well. 30. To export your report, from the Summary, View Report as Bar Chart or Details tab, scroll to the bottom of the report window. 31. Click the Export Report button to export your report details to an Excel spreadsheet. Note: Each report format option, Summary, Bar Chart or Details, can be exported based on the type of information you require. 32. Calls can be sorted and filtered using standard Excel feature and formatting options. 33. Information contained in the report will be based on the report type, Summary, Bar Chart or Detail. Admin_Portal_0818rev9.doc Page 244 of 257
245 Enterprise CDR Reports Enterprise CDR Reports allow you to schedule call activity reports across your entire enterprise. Reports can be scheduled for daily, weekly or monthly output. Report data purges automatically based on the report type. Report Run Times Daily Report runs every day Eastern Time 11:00 p.m. Central Time 12:00 a.m. Mountain Time 1:00 a.m. Pacific Time 2:00 a.m. Weekly Report runs every Monday Eastern Time 11:30 p.m. Central Time 12:30 a.m. Mountain Time 1:30 a.m. Pacific Time 2:30 a.m. Monthly Report run the first day of every month Eastern Time 11:45 p.m. Central Time 12:45 a.m. Mountain Time 1:45 a.m. Pacific Time 2:450 a.m. Report Clean Up Daily Reports older than 30 days Weekly Reports older than 90 days Monthly Reports older than 190 days Admin_Portal_0818rev9.doc Page 245 of 257

246 1. Click Reports from the main menu. 2. Click Enterprise CDR Reports from the sub menu. 3. Select frequency of your report from the Frequency Type drop down list. Daily Weekly Monthly 4. Choose the time zone by clicking the Time Zone drop down list CT Central Time ET Eastern Time MT Mountain Time PT Pacific Time 5. In the Notification Address(es) field, enter an address(es) or distribution list(s); edit or enter additional addresses by using comma separation. 6. Click the Submit button. Admin_Portal_0818rev9.doc Page 246 of 257


247 7. After the report runs, an notification is directed to all addresses and distribution lists entered in the Notification Address(es) field; report run times are outlined at the beginning of this section. 8. Click the appropriate link in the Report section to launch or save a report, or click the link within the notification to launch or save the report. 9. Use Page Buttons and Arrows at the top and bottom of the report section to locate your report based on the report run date. 10. After clicking a report link, Open or Save the report based on the parameters of your operating system. 11. Reports purge from this list on their expiry date, based on the report type: Report Clean Up Daily Reports older than 30 days Weekly Reports older than 90 days Monthly Reports older than 190 days Admin_Portal_0818rev9.doc Page 247 of 257


248 12. Report output is formatted with Excel; allowing you to use all features within Excel to format and sort your report data. 13. To change report type, time zone or notification recipients, click drop down lists and edit addresses accordingly. 14. Click the Delete button to stop recurring reports. Admin_Portal_0818rev9.doc Page 248 of 257


249 Voice Mail Reports This report option allows you to review and export a report that indicates whether voic has been configured, and which mailboxes have been set up by the user. As a reminder, callers are unable to leave messages for users that do not set up their voic Click Reports from the main menu. 16. Click Voice Mail Reports from the sub menu. 17. To change groups, select from the Select a Group drop down list and click the Get button. 18. All users for that Group will be displayed, including user First/Last Name, Telephone Number, Extension, Voice Mail Configured and Voice Mail Setup. 19. Review the Voice Mail Configured column to identify users that have a voic box configured. 20. The Voice Mail Setup column indicates which mailboxes have been set up by the user. 21. To export a report to Excel, click the Export Report icon. Admin_Portal_0818rev9.doc Page 249 of 257


250 Portal Usage Reports The Portal Usage Report allows you to monitor usage, by end user, for portal access. If the End User portal and all of the features and functions contained within the portal was introduced to your users, this report can be used to determine usability of the End User portal. 1. Click Reports from the main menu. 2. Click Portal Usage Reports from the sub menu. 3. To change groups, select from the Select a Group drop down list and click the Get button. 4. All users for that Group will be displayed, including user First/Last Name, Telephone Number, Extension, Seat Type and Last Logged In Date/Time. 5. The Last Logged In Date/Time column indicates if a user has Never accessed their End User portal, or the last Date/Time the user logged into their portal. 6. To export a report to Excel, click the Export Report icon. Admin_Portal_0818rev9.doc Page 250 of 257

251 Trunk Utilization Report The Trunk Utilization Report displays total number of active sessions, by trunk group, in meter format. A session is equal to an active call. 1. Click Reports from the main menu. 2. Click Trunk Utilization Report from the sub menu. 3. Trunk groups for the default group are displayed; if you have multiple groups within your enterprise, change the displayed group by clicking the Change Group button selecting the appropriate group from the drop down list. 4. Click the Refresh button to update Number of Active Sessions; 1 session is equal to 1 call. 5. Click the Export to Excel icon to download data to Excel. Admin_Portal_0818rev9.doc Page 251 of 257
252 Profile In Profile, you can edit your First Name, Last Name, Password used to access the admin portal, and address you receive portal notifications at. When users are added, the registered in this portal will receive notification via . Profile 1. Click Profile from the main menu. 2. The administrator is set up based on the information gathered during the implementation process. 3. This information can be changed/modified by the primary administrator at anytime, including changing the password and address. 4. Complete the information accordingly in the applicable fields. 5. Click the Save button. Admin_Portal_0818rev9.doc Page 252 of 257
253 Help In Help, you have access to various training tools and documents such as User Guides, quick reference guides, training videos, live chat, and more. Help 1. Click Help from the main menu. 2. Within the Help page, you will be able to find items such as Training Documentation and User Guides. 3. Click the desired link to launch self-help documentation. 4. This feature will be continually updated as new features become available. Admin_Portal_0818rev9.doc Page 253 of 257


254 Live Chat 1. Click Help from the main menu. 2. Click the Live Help button from the sub menu. 3. Live Chat hours are Monday through Friday, 7:00 a.m. to 8:00 p.m. Eastern Time. 4. During Live Chat hours, click on the Click to Chat button to start your chat. 5. Click the Close button if you choose to not open a chat. 6. During non-live Chat hours, click on the Chat is Offline button to submit an with your inquiry. 7. You will receive a response during the following business day. 8. Click the Close button if you choose to not continue. Admin_Portal_0818rev9.doc Page 254 of 257

255 Did You Know? 9. Click Help from the main menu. 10. Click Did You Know? from the sub menu. 11. A document will be provided that provides you with useful tips on portal features and functionality. 12. Did You Know? content is changed every 3-4 weeks. Admin_Portal_0818rev9.doc Page 255 of 257
256 What s New? 1. Click Help from the main menu. 2. Click What s New? from the sub menu. Admin_Portal_0818rev9.doc Page 256 of 257

257 3. A document will be provided that provides you with useful tips on portal features and functionality. 4. What s New? content is changed as features and functionality of the portal are changed to provide you with a snap shot of each feature covered in the portal release. 5. Always refer to the Hosted VoIP Administrator Portal Guide for full details and descriptions of all features and functionality. Admin_Portal_0818rev9.doc Page 257 of 257
Table of Contents. HostedVoIP_End_User_Portal_0816rev4.doc Page 2 of 81
 . CenturyLink Hosted VoIP End User Portal User Guide Table of Contents Portal Navigation... 4 Home Page Navigation... 4 Call Logs... 6 Exporting Call Logs... 7 Call Settings... 8 Call Waiting... 9 Auto
Table of Contents. End_User_Portal_0617rev4.doc Page 2 of 78
 . CenturyLink End User Portal User Guide Table of Contents Portal Navigation... 4 Home Page Navigation... 4 Call Logs... 6 Exporting Call Logs... 7 Call Features... 8 Call Recording... 8 Call Settings...
Table of Contents. IQSIP_Admin_Portal_ManageTrunks_0216rev2.doc Page 2 of 36
 CenturyLink IQ SIP Administrator Portal User Guide Table of Contents About This User Guide... 3 Trunk Administration... 4 Manage Trunks... 4 Manage Trunk Features... 11 Manage Trunk Users... 14 Group 911...
O1 Communications, Inc.
 O1 Communications, Inc. VoiceStream Service Installation Overview Welcome to your VoiceStream Service!...2 Service Installation Overview.2 VoiceStream Portals the key to configuring and managing your service...
A Guide to Voice Edge s Most Popular Features
 A Guide to Voice Edge s Most Popular Features Page 1 10/31/2017 Table of Contents GETTING STARTED... 4 WELCOME LETTERS... 4 VOICEMAIL... 4 SETTING UP VOICEMAIL... 4 RECORDING THE GREETING... 5 CHECKING
User Guide Business Hosted Voice DOCUMENT VERSION: 4.0
 User Guide Business Hosted Voice DOCUMENT VERSION: 4.0 DATE OF ISSUE: 30 NOVEMBER 2018 Welcome! We want to help your business connect. We re sure you will enjoy the benefits of these services. Plus our
1 Page. Digital Voice Services Business User Guide
 1 Page Digital Voice Services Business User Guide Feature Access Codes *62 Voice Portal *86 Direct Voice Mail Retrieval *77 Anonymous Call Rejection Activation *87 Anonymous Call Rejection Deactivation
Enterprise Voice SUBSCRIBER GUIDE
 Enterprise Voice SUBSCRIBER GUIDE Conterra Networks Enterprise Voice SUBSCRIBER GUIDE 3 TABLE OF CONTENTS Table of Contents Introduction... 6 Logging in... 6 Navigation Bar, Sub-Menu and Page Layout...
Service Installation OVERVIEW
 Service Installation OVERVIEW Table of Contents Welcome to your DOTVOX Service!... 3 Service Installation Overview... 3 DOTVOX Portals the Key to Configuring and...3 Managing Your Service Four Steps to
Reference Guide. IP Phone/Calling Features Voic . Dialing. Your Phone Calling Features. Phone Views. To dial phone number or extension.
 TelNet OfficeEdge Complete Polycom VVX400 Series IP Phone. Reference Guide. IP Phone/Calling Features Voicemail Dialing Your Phone Calling Features To dial phone number or extension Lift your handset and
Reference Guide. IP Phone/Calling Features Voice Mail Personal Assistant Toolbar. Dialing. Your Phone Calling Features.
 TelNet OfficeEdge Complete Polycom SoundPoint 550 IP Phone. Reference Guide IP Phone/Calling Features Voice Mail Personal Assistant Toolbar Dialing To dial phone number or extension Lift your handset and
Reference Guide. IP Phone/Calling Features Voic Dialing. Your Phone Calling Features. Phone Views. To dial phone number or extension.
 TelNet OfficeEdge Complete Polycom VVX300 / 310 IP Phone. Reference Guide. IP Phone/Calling Features Voicemail Dialing Your Phone Calling Features To dial phone number or extension Lift your handset and
Group Administrators
 Hosted VoIP Phone System Blue Platform Admin Portal Guide for Group Administrators Table of Contents 1 About this Guide... 6 2 Accessing the Hosted VoIP Phone System Admin Portal... 7 3 Hosted VoIP Admin
Manage User Features
 As an administrator for the AT&T Collaborate service, you can manage features for each user from the Users widget on the Collaborate homepage. First, you assign a feature to the user, and then turn the
CALL FEATURES USER GUIDE. Houston Dallas Austin San Antonio Oklahoma City
 CALL FEATURES USER GUIDE Houston Dallas Austin San Antonio Oklahoma City Table of Contents Account / Authorization Codes.... 3 Advanced Hunting.... 4 Anonymous Call Rejection... 4 Anywhere.... 5 Auto Attendant...
AT&T Collaborate glossary
 Common terms associated with the AT&T Collaborate SM service. A B C D E F G H I J K L M N O P Q R S T U V W X Y Z A account codes A feature that lets administrators track and manage outgoing calls to keep
Logging Into the Web Portal
 V0610 Logging Into the Web Portal Open your Web browser application. In the address field, enter the external WebPortal address, https://lightpathvoice.com Click Go. In the Phone Number field, enter your
ActivePBX Administrator s Guide
 ActivePBX Administrator s Guide CONTENTS Preface... v Document Conventions... v Glossary Conventions... v 1. Accessing the Admin Web Portal... 6 Logging in to the Web Portal... 7 Understanding the Admin
Polycom VVX500 Series IP Phone Reference Guide Dialing Your Phone Calling Features To dial phone number or extension Phone Views Speakerphone
 TelNet OfficeEdge Complete Polycom VVX500 Series IP Phone. Reference Guide IP Phone/Calling Features Voicemail. Dialing Your Phone Calling Features To dial phone number or extension Lift handset and dial
First Communications Cloud IP PBX User Guide (Polycom)
") First Communications Cloud IP PBX User Guide (Polycom) 2017 Property of First Communications Contents Introduction... 3 General Phone Operations... 4 Polycom VVX 300 Series... 4 Polycom VVX 300 Series
First Communications Cloud IP PBX User Guide (Polycom) 2017 Property of First Communications Contents Introduction... 3 General Phone Operations... 4 Polycom VVX 300 Series... 4 Polycom VVX 300 Series
Managing your PBX- Administrator
 Managing your PBX- Administrator ACCESSING YOUR PBX ACCOUNT Navigate to https://voip.ancero.com/ and log in to the Ancero Utility VoIP portal account. If you would like your web browser to keep you logged
Hosted VoIP Administrator User Guide
 Hosted VoIP Administrator User Guide Table of Contents: 1. Call Continuity..... pg 1 2. Call Groups..... pg 2 3. Call Queues... pg 5 4. Caller ID... pg 9 5. Company Call Recording... pg 12 6. Conference
Solutions Reference Guide. IP TalkSM. Voic & Navigator Web Portal
 IP Talk SM Solutions Reference Guide IP TalkSM Voicemail & Navigator Web Portal Table of Contents Voicemail Accessing Your Voicemail................... 1 Voicemail Main Menu........................ 2
Hosted PBX Administrator s Guide. IVR DID Management CALL QUEUES. 1 Ally Communications Hosted PBX Administrator's Guide
 Hosted PBX Administrator s Guide CALL QUEUES IVR DID Management 1 CONTENTS Preface Document Conventions Glossary Conventions 1. Accessing the Admin Web Portal Logging in to the Web Portal Understanding
Customer Administration Portal User Guide
 User Guide User Guide Table of Contents Section 1: Customer Administration Portal Access... 1 1.1 Log-in...1 1.2 Edit Profile...1 Section 2: Customer Administration Portal Overview... 2 2.1 Administrator
Quick Reference Guide.
 TelNet OfficeEdge Complete Cisco SPA500 series phone. Quick Reference Guide. IP Phone/Calling Features VoiceMail Personal Assistant Toolbar Dialing Your Phone Calling Features To dial phone number or extension
End User Guide Cloud PBX
 End User Guide Entrust ICT(EICT) reserves the right to change product specifications, functions, or features, at any time, without notice. Please refer to your EICT representatives for further details.
USER GUIDE. Dynamic IP & Virtual PBX User Guide
 USER GUIDE Dynamic IP & Virtual PBX User Guide Table of contents 3 Windstream Online 5 Enhanced VoIP Interface 27 Primary VoIP Interface DYIP & VIRTUAL PBX USER GUIDE WINDSTREAM 2 Windstream Online The
The guide is divided into sections which describe how to configure and manage different aspects of the Hosted PBX service for your business group.
 Welcome This guide is intended to help Business Group Administrators of FairPoint Communications Hosted PBX service to perform the various tasks needed to administer the system, such as: Managing lines,
IP Centrex User Guide Release 2.1
 IP Centrex User Guide Release 2.1 2014 by Cox Communications. All rights reserved. No part of this document may be reproduced or transmitted in any form or by any means, electronic, mechanical, photocopying,
ENTERPRISE SUBSCRIBER GUIDE
 ENTERPRISE SUBSCRIBER GUIDE Enterprise Subscriber Guide 880 Montclair Road Suite 400 Birmingham, AL 353 www. TABLE OF CONTENTS Table of Contents Introduction...6 Logging In...6 Navigation Bar, Sub-Menu
UCx Feature Guide for Infinity phones
 UCx Feature Guide for Infinity phones Date: 23 August 2018 Version: 1.4 System: UCx Release: 6.0 Phone models: E-MetroTel will provide support for the following Infinity IP phones, as long as the phones
managedip Hosted TDS Table of Contents Administrator User Guide
 Table of Contents Administrator Hierarchy... 2 Enterprise Set Up... 3 Group Set Up... 4 Department Set Up... 7 User Set Up... 8 Group Services... 9 Configuration of Group Services... 9 Auto Attendant...
C L O U D V O I C E B U S I N E S S P O R T A L
 C L O U D V O I C E B U S I N E S S P O R T A L S I T E F E A T U R E S G U I D E V E R S I O N 2. 0 Contents Introduction... 8 Overview... 8 Audience... 8 Account Codes... 9 Description... 9 Description
BUSINESS LINE COMMPORTAL GUIDE
 wowforbusiness.com BUSINESS LINE COMMPORTAL GUIDE WOW! Business BCSE.U.1505.O Business Line CommPortal Guide Table of Contents Getting Started...3 Dashboard...4 Messages and Calls...5 Messages...5 Missed
Digital Voice Services Residential User Guide
 Digital Voice Services Residential User Guide TECH SUPPORT - 888.855.9997 734.324.7190 WYANDOTTECABLE.COM Feature Access Codes *62 Voice Portal *86 Direct Voice Mail Retrieval *77 Anonymous Call Rejection
Product Release Notice Synapse 3.0 Software
 Product Release Notice Synapse 3.0 Software Release Date: September 17 th, 2012 This document contains the release notes for AT&T Synapse version 3.0. This is a major release with many new features. Users
Call Centres (ACD) Manual
 Manual") Call Centres (ACD) Manual Description Use the Call Centre ACD feature if you want to allow a Site to distribute incoming calls to multiple Users from a single central phone number. TelephoneSystems.Cloud
Call Centres (ACD) Manual Description Use the Call Centre ACD feature if you want to allow a Site to distribute incoming calls to multiple Users from a single central phone number. TelephoneSystems.Cloud
ADMINISTRATOR PORTAL GUIDE
 ADMINISTRATOR PORTAL GUIDE 1504 Providence Highway, Suite 19, Norwood, MA 02062 Toll Free: 866-303-8600 www.votacall.com Table of Contents 1) Introduction... 3 a) Guide Explanation... 3 b) Access to site...
CenturyLink Business Communicator for Desktop
 CenturyLink Business Communicator for Desktop User Guide Release 2.0 Document Version 4 BusinessCommunicator_Guide_0517_v4 1 CenturyLink Business Communicator Guide Table of Contents 1 About CenturyLink
End User Guide. FastFind Links. Using Your Desk Phone. Using the User Web Portal. Voic . Answering Rules and Time Frames. Contacts.
 End User Guide Using Your Desk Phone FastFind Links Using the User Web Portal Voicemail Answering Rules and Time Frames Contacts Phones Music On Hold Call History Profile CONTENTS Contents... ii Introduction...
IP Centrex Administrator Guide Release 2.0
 IP Centrex Administrator Guide Release 2.0 2012 by Cox Communications. All rights reserved. No part of this document may be reproduced or transmitted in any form or by any means, electronic, mechanical,
Setting up Polycom VVX phones on the Cloud PBX
 Setting up Polycom VVX phones on the Cloud PBX This document outlines the set-up and use of Polycom VVX termninals on the Cloud PBX Contents List of Polycom phones that are auto provisioned and tightly
Digital Telephone User Guide
 Digital Telephone User Guide 1 P. O. Box 99, Conway, AR 72033 (501) 450-6000 ConwayCorp.com * Feature Access Codes *11 Broadworks Anywhere (pulling call to alternate phone) *62 Access Voicemail *72 Call
Digital Voice Services Residential User Guide
 Digital Voice Services Residential User Guide 2 P a g e * Feature Access Codes *11 Broadworks Anywhere (pulling call to alternate phone) *62 Access Voicemail *72 Call Forwarding Always Activation *73 Call
East-Central Vermont Community Fiber-Optic Network
 East-Central Vermont Community Fiber-Optic Network www.ecfiber.net support@ecfiber.net TELEPHONE SERVICE USER GUIDE Your ECFiber telephone service is an advanced Voice Over Internet Protocol (VOIP) system
3CX Phone System User Guide
 3CX Phone System User Guide 31 Gloster Court, Dartmouth, NS B3B 1X9 Canada Toll free: 1-800-675-4025 Tel: 902-468-2252 Fax: 902-468-2557 cabcosales@cabco.ca 1 cabco.ca Contents Page Quick Start Guide 3
Residential Voice SUBSCRIBER GUIDE
 Residential Voice SUBSCRIBER GUIDE RESIDENTIAL VOICE SUBSCRIBER GUIDE TABLE OF CONTENTS Table of Contents Getting Started... 6 Requirements... 6 First Login... 6 Features Management... 0 Basic Features...
Hosted PBX Administrator Guide
 Hosted PBX Administrator Guide Table of Contents 1 INTRODUCTION... 1-1 1.1 PURPOSE OF THIS GUIDE... 1-1 1.2 OTHER GUIDES... 1-1 2 COMMPORTAL BUSINESS GROUP ADMINISTRATOR (BG ADMIN)... 2-1 2.1 ACCESSING
User Guide for DECT IP Phone Features Integrated with BroadSoft UC-One
 About This Guide i User Guide for DECT IP Phone Features Integrated with BroadSoft UC-One ii About This Guide About This Guide BroadSoft UC-One is an open Unified Communications platform that provides
Hosted IP Phone System Administrator Portal Reference Manual (Polycom)
") Hosted IP Phone System Administrator Portal Reference Manual (Polycom) POPP.com, Inc. All rights reserved. Service 24x7 @ 763-797-7900 or 1-800-234-POPP Page 1 of 50 9/27/18 Table of Contents 1 Introduction
Hosted IP Phone System Administrator Portal Reference Manual (Polycom) POPP.com, Inc. All rights reserved. Service 24x7 @ 763-797-7900 or 1-800-234-POPP Page 1 of 50 9/27/18 Table of Contents 1 Introduction
Harvard Phone Account USER GUIDE
 Harvard Phone Account USER GUIDE INTRODUCTION Welcome Welcome to managing your phone and going mobile. This guide describes how to use your Self Service interface to: View basic telephone information such
Windows, Windows 95 and Windows NT are trademarks of Microsoft Corporation.
 PhoneMaster Desktop Call Control User s Guide Version 2.4 Information furnished by NetPhone, Inc. is believed to be accurate and reliable. However, no responsibility is assumed by NetPhone, Inc. for its
Virtual Communications Express User Guide: Call Center Agent
 Feature Overview The Call Center is designed to support the needs of Call Center agents in any environment. It supports the full set of call handling functions, ACD state management, integration of multiple
End User Guide - Commportal
 End User Guide - Commportal Table of contents Table of contents 3 1 Introducing CommPortal 6 1.1 Accessing 6 1.2 Logging In 6 1.3 Using CommPortal 7 1.4 Getting Help 9 1.5 Refreshing a Page 9 1.6 Logging
Call Center Administration
 Hosted VoIP Phone System Blue Platform Admin Portal Guide for Call Center Administration 1 Table of Contents 1 About this Guide... 3 2 Accessing the Hosted VoIP Phone System Administration Portal... 4
UCx Feature Guide for Nortel IP phones - with Feature Key mode disabled
 UCx Feature Guide for Nortel IP phones - with Feature Key mode disabled Date: 22 November 2016 System: UCx Release: 5.0 Phone models: Nortel IP Phones i20xx Series, 11xx Series and 12xx Series Page 2 of
Zultys Mobile Communicator for iphone 4.0
 December 14 Zultys Mobile Communicator for iphone 4.0 Author: Zultys Technical Support Department This document covers basic use of the Zultys Mobile Communicator for iphone application. The Zultys Mobile
Telstra VVX410 Phone Guide
 Select Save Config to Save the Config Your phone will automatically reboot Note 1: Restarting the phone may take a few minutes Note 2: If your phone has been preconfigured the QSetup soft key will not
Telstra IP Telephony - Telstra IP Video Phone Feature Guide
 1. The Touch screen Your phone has a touch-sensitive screen. To access features or obtain information, tap the menu items, arrow keys, soft keys (the keys along the bottom of the touch screen) and field
AT&T IP Flexible Reach Group Administrator Guide
 AT&T IP Flexible Reach Group Administrator Guide 1 Get Started... 7 Log In... 8 What a Group Administrator Can Do... 10 About Premier... 13 Use Premier... 14 Use the AT&T IP Flexible Reach Customer Portal...
1 P age NEXTIVA CALL CENTER. Supervisor User Guide. nextiva.com/support 2015 NEXTIVA, ALL RIGHTS RESERVED
 1 P age NEXTIVA CALL CENTER Supervisor User Guide nextiva.com/support 2015 NEXTIVA, ALL RIGHTS RESERVED 2 P age Creating Employees... 3 Creating an Employee... 3 Assigning Licenses to Employees... 7 Schedules...
Cloud Unified Communication Platform User Guide
 Cloud Unified Communication Platform User Guide ITS - Integrated Telemanagement Services, Inc. 4100 Guardian Street #110 Simi Valley, CA 93063 o 805.520.7020 tf 800.876.4487 f 805.520.7030 www.itstelecom.com
Voic Guide. Access internally Access your mailbox by pressing the Messages/Msgs/MSG key or by dialing Enter your password.
 Voicemail Guide Access internally Access your mailbox by pressing the Messages/Msgs/MSG key or by dialing 1000. Enter your password. Access externally (if configured on your system) i.e. An option on your
VoiceAccess Users Guide
 Users Guide Table of Contents GETTING STARTED...1 Device Configuration...1 Connecting to a PBX...2 Plus Features...2 VoiceMail...2 Call Forwarding...2 Caller ID...3 MANAGING CALLING FEATURES FROM THE PHONE...4
Hosted Voice End User Guide Version 1.0 April End User Guide
 Hosted Voice End User Guide Version 1.0 April 2013 End User Guide Contents 1 Introduction... 1 2 Introducing CommPortal... 2 2.1 Accessing and Logging In... 2 2.2 Using CommPortal... 2 2.3 Getting help...
Virtual Communications Express Admin Guide: Getting Started Welcome to Verizon Virtual Communications Express!
 Welcome to Verizon Virtual Communications Express! Virtual Communications Express is an easy-to-use service designed to enhance communications with your coworkers, customers, and suppliers. It can help
Virtual Communications Express User Guide: Call Center Supervisor
 Feature Overview Call Center Supervisor supports agent monitoring, queue management, current and historical reporting, and other features required in large call centers. Benefits of Call Center include:
Virtual Office Phone Service Setup Guide
 Setup Guide A guide for the Phone System Administrator Version 6.0, November 2010 Table of Contents Welcome to 8x8 Virtual Office!...3 8x8 Virtual Office Softphone...3 Activate Your 8x8 IP Phones...3 The
Getting Started 3. Using this Guide 3 Connecting Your Phone 4
 Table of Contents Getting Started 3 Using this Guide 3 Connecting Your Phone 4 Adjusting the Footstand / Handset Rest 5 Signing In to Your Phone 5 Choosing the Proper Headset 5 An Overview of Your Phone
Today we ll be demonstrating Clarity's web portal where you can access all the features of Clarity s Phone System.
 Title: Introduction to Clarity Voice Phone Service Portal Hello and welcome to Clarity s Support Portal training. At Clarity Voice, we want to help you use your phones to make more sales and improve your
SIP Communicator Spitfire S300 User Guide
 SIP Communicator Spitfire S300 User Guide 1 TABLE OF CONTENTS Handset Description Page 3 Keypad Lock Page 6 Directory Page 6 Adding an Entry. Page 6 Edit or Delete an Entry Page 7 Black List Page 7 Dialing
Cisco Unified IP Phone User Guide for Cisco Unified Communications Manager 8.5 (SCCP and SIP)
") Cisco Unified IP Phone User Guide for Cisco Unified Communications Manager 8.5 (SCCP and SIP) For Cisco Unified IP Phone 8941 and 8945 Americas Headquarters Cisco Systems, Inc. 170 West Tasman Drive San
Cisco Unified IP Phone User Guide for Cisco Unified Communications Manager 8.5 (SCCP and SIP) For Cisco Unified IP Phone 8941 and 8945 Americas Headquarters Cisco Systems, Inc. 170 West Tasman Drive San
SNOM 360 USER GUIDE TABLE OF CONTENTS
 SNOM 360 USER GUIDE TABLE OF CONTENTS Keypad 2 &3 Dialling a phone number 4 Incoming calls 4 Accepting a call 4 Denying/ Blocking a call 5 Hold and Resume 5 Transfer: 6 Direct Transfer 6 Transfer to voicemail
WCS Hosted PBX Admin Portal Release 6.0 Administration Reference Guide Final January 2013
 WCS Hosted PBX Admin Portal Release 6.0 Administration Reference Guide Final January 2013 www.wcs.com Table of Contents About this Document... 1 Typographical Conventions... 1 Introduction... 3 What's
COMMAND CENTRAL. Commander Smart SIP ADMINISTRATOR GUIDE
 COMMAND CENTRAL Commander Smart SIP ADMINISTRATOR GUIDE Command Central Requirements... 3 Devices... 3 Browsers... 3 How to log into your account... 4 The Command Central Dashboard... 7 Managing Enterprise
Cisco 504G, 514G, 508G, and 303G Initial Setup
 Cisco 504G, 514G, 508G, and 303G Initial Setup 1 Handset 2 Message Waiting Indicator 3 LCD Screen 4 Line keys 5 Softkey buttons 6 Navigation button 7 Messages button 8 Hold button 9 Setup button 10 Mute
Portal User Guide. Portal Release 3.13
 Portal User Guide Portal Release 3.13 https://portal.3starsnet.com Page 1 01-08-2018 Contents 1 Introduction 4 2 Accessing Messages on the Web Interface 4 2.1 Searching for Messages 4 2.2 Sorting Messages
Hosted VOIP CommPortal
 Business Services Hosted VOIP CommPortal User Guide wowforbusiness.com CommPortal Guide Table of Contents Getting Started... 4 Dashboard... 5 Messages and Calls... 6 Messages... 6 Missed Calls... 6 Dialed
Allworx Call Assistant 2.4 Quick Reference Guide
 Allworx Call Assistant 2.4 Quick Reference Guide No part of this publication may be reproduced, stored in a retrieval system, or transmitted, in any form or by any means, electronic, mechanical, photocopy,
What you will learn today..
 What you will learn today.. Getting Started Dial Plan Phone and Calling Features Unified Communications 2 Getting Started Phone Navigation Note: SoundPoint IP 335 pictured. Appearance might vary slightly
Dashboard User Guide For assistance, please call
 Dashboard User Guide For assistance, please call 1-866-399-8647. With these instructions, you will: PAGE 1. Login to the Clarity site, Configure 911, and Change your Password... 2 2. Set up Mobile Connect
Quick Start Guide. Intermedia Hosted PBX Yealink W52 Wireless DECT Phone
 Quick Start Guide Intermedia Hosted PBX Yealink W52 Wireless DECT Phone 2 Welcome to your Hosted PBX Service. What s in the box? Yealink W52 Wireless DECT Phone W52 Base Parts A. 1 Base Station B. 1 Power
User Guide. Business Hosted Voice
 User Guide Business Hosted Voice Welcome! We want to help your business connect. We re sure you will enjoy the benefits of these services. Plus our plans will save you money. One call. One bill. One company.
What you will learn today..
 What you will learn today.. Getting Started Dial Plan Phone and Calling Features Unified Communications 2 Getting Started Phone Navigation Message Waiting Indicator Line Keys Navigation Keys Soft Keys
Configuring the Grandstream UCM6202 for use with TopView Voice Notification Updated August 2018
 Configuring the Grandstream UCM6202 for use with TopView Voice Notification Updated August 2018 Contents Introduction... 2 Voice Notification in TopView... 2 Options for using VOIP in TopView... 2 How
AVAYA 9601 SIP DESKPHONE INSTRUCTIONS
 AVAYA 9601 SIP DESKPHONE INSTRUCTIONS The following table provides button/feature descriptions for the 9601 deskphone. Name Description 1 Message Waiting Indicator An illuminated red light in the upper
Connected Office Voice. Key System Administrator Guide
 Connected Office Voice Key System Administrator Guide Connected Office Voice Key Admin Guide Table of Contents 8 Part 1: Getting Started 9 Introduction 10 Installing Your Phones 10 Box Contents 11 Attaching
Cox Business VoiceManager SM User Reference Guide
 Cox Business VoiceManager SM User Reference Guide Dear Customer: Thank you for choosing Cox Business VoiceManager, SM provided by Cox Business. VoiceManager is phone service that gives you complete control
HOSTED VOICE. Group Administrator User Guide. Technology working for you. Easy to get. Easy to use. 1 GETTING STARTED
 Group Administrator User Guide Technology working for you. Welcome to the Hosted Voice Group Administrator User Guide. While Hosted Voice is a fully managed service, there are many tasks you can perform
Panasonic User Guide (Panasonic KX-DT 333/343 Series Phones)
") Panasonic User Guide (Panasonic KX-DT 333/343 Series Phones) DISPLAY FEATURES: (4 soft keys) 573-874-0101 PROG Used to program keys RING Volume of the Ring Tone INFO Date/Time/Day of Week MENU Personal/System/
Panasonic User Guide (Panasonic KX-DT 333/343 Series Phones) DISPLAY FEATURES: (4 soft keys) 573-874-0101 PROG Used to program keys RING Volume of the Ring Tone INFO Date/Time/Day of Week MENU Personal/System/
Virtual Office Phone Service Setup Guide
 Setup Guide A guide for the Phone System Administrator Version 4.0, July 2010 Table of Contents Welcome to 8x8 Virtual Office!...3 Activate Your 8x8 IP Phones...3 The 8x8 Self Service Portal...4 Set Up
SASKTEL INTEGRATED BUSINESS COMMUNICATIONS (IBC)
") SASKTEL INTEGRATED BUSINESS COMMUNICATIONS (IBC) DESKTOP CLIENT USER GUIDE Version 4 January 2018 TABLE OF CONTENTS About the SaskTel IBC Desktop Client...3 Requirements...3 How to download and install
SASKTEL INTEGRATED BUSINESS COMMUNICATIONS (IBC) DESKTOP CLIENT USER GUIDE Version 4 January 2018 TABLE OF CONTENTS About the SaskTel IBC Desktop Client...3 Requirements...3 How to download and install
PREMIUM ATTENDANT GUIDE
 wowforbusiness.com PREMIUM ATTENDANT GUIDE WOW! Business PAGM.U.1408.O Premium Attendant Table of Contents Product Overview...3 CommPortal Login Screen...4 Main Page...5 Schedule...6 Special Days...8 Menus
User Guide. Business Hosted Voice
 User Guide Business Hosted Voice 1 This User Guide explains how you can benefit from this service. If you have questions about your service, call our customer service team 24 hours a day 7 days a week
MiVoice Office User Guide. MiVoice Office User Guide JANUARY 2019 DOCUMENT RELEASE USER GUIDE. Page 1
 MiVoice Office 250-6900 User Guide MiVoice Office 250 6900 User Guide JANUARY 2019 DOCUMENT RELEASE 5.1 6900 USER GUIDE Page 1 MiVoice Office 250-6900 s NOTICE The information contained in this document
Vox Centrex Yealink T29 UserGuide
 Vox Centrex Yealink T29 UserGuide Monique Verto Supreme November 2015 TABLE OF CONTENTS Handset Description Page 2 Keypad Lock Page 5 Directory Page 5 Adding an Entry. Page 5 Edit or Delete an Entry..
Analogue Telephone Adapter (MP 118)
") Analogue Telephone Adapter (MP 118) Analogue Telephone Adapter (ATA) Overview ou can connect traditional analogue telephones and similar customer-premise devices such as fax machines, to the Optus Loop
Analogue Telephone Adapter (MP 118) Analogue Telephone Adapter (ATA) Overview ou can connect traditional analogue telephones and similar customer-premise devices such as fax machines, to the Optus Loop
Installing the 3CX Client for Windows
 Introduction Installing the 3CX Client for Windows The 3CX Client for Windows allows you to manage and oversee telephone calls directly from your computer and subsequently allows you to work remotely from
Cisco 8811 Dial Plan. Place a Call. Answer a Call. Put a Call on Hold. Feature and Session Buttons. Your Phone
 Cisco 8811 Dial Plan Internal Calls: Dial 5-digit extension External Calls: Site-to Site 5-digit number Domestic: 9+1+ Area Code + Number Int l: 9+011+Country Code + Number Emergency External: 9+911 or