Using SymPrint to Make Overlays, Templates & More...
|
|
|
- Dennis Lindsey
- 5 years ago
- Views:
Transcription


1 Welcome to SymPrint SymPrint is an easy-to-use tool for creating communication overlays, worksheets, classroom activities and more using a modern toolbar and common-sense interface modeled after the programs you already use. SymPrint comes with more than 100 built-in templates and the ability to create your own new templates for commonly replicated activities. Using SymPrint to Make Overlays, Templates & More... Creating overlays for today's most popular picture communicators is a breeze with SymPrint's easy toolbar and built in Symbolstix symbols. Simply select the template for your device and search by keyword to drag and drop symbols into your grid. We are constantly creating new templates for devices as they are released and are happy to help you create your own specialty templates upon request. Using the built in templates it is possible to quickly load the layout for your specific device and begin to add text and images from your own libraries or from the built-in symbols

2 databank. When you've got it laid out the way you want it save your work and choose to print to printer or export as a.pdf or.png file. Of course you also have the option to create your own templates using the wizard or from scratch, or to begin cart blanche from a blank document. Starting with a blank document it is possible to make anything you want from homework, calendars, flash cards, worksheets, signs and more! To learn more on how to get started please go to the Getting Started section. Examples of SymPrint Projects Flashcards Classroom Calendar Matching Worksheet
 Create new document from template Create new template using wizard Create new document from blank page Open saved file Uncheck Show this window on startup if you do not want to view these options")
3 Getting Started When you first launch SymPrint the following four choices are shown: (Click on each link for more information.) Create new document from template Create new template using wizard Create new document from blank page Open saved file Uncheck Show this window on startup if you do not want to view these options when SymPrint is launched. Instead an untitled blank document will load.

4 Creating a New Document Using Templates After selecting 'Create new document from template' on the Quickstart menu, SymPrint will load a selection of available templates for you to choose from. Templates are listed alphabetically the first time you run the program but after you begin use it will begin to show the most recently used templates at the top of the list instead. Select a template from this list by highlighting and choosing 'OK' to load it. Alternatively, if the template you need is not in the list you can click 'Browse' to search for the.sypt file yourself. By default, the Device/Project Templates window will show only those templates saved to the Library > Documents > SymPrint > Templates folder. Once the template has been selected, it will load in SymPrint ready to be populated with text and images. See the Customizing Documents section on how to customize the document with images, text and color.
5

6 Creating New Templates Using the Template Wizard After selecting 'Create new template using wizard' on the Quickstart menu, the template wizard will ask you for basic measurements and configuration patterns that will create the base arrangement for your new template. After answering these questions and clicking Create! you will have the opportunity to add more objects, resize existing objects, insert default text or images and more. Setting up the Wizard The template wizard is designed to create symmetrical grids of symbol holders. The space between rows and columns will be identical and the cutting guide will be centered around the grid boxes. You can specify default settings such as shape and text placement which will apply to all objects on the page except for the cutting guide. The cutting guide by default will be a solid line but this and all other default settings can be changed on the fly, after completing the wizard. Page margins will align the cutting guide as specified from only the top and left sides of the paper. Other margins will be defaulted to space left available on the specified paper size. Below we have outlined each of the wizard settings one by one:
7 Template Setup Rows: number of rows of shapes. Columns: number of columns of shapes. Width: the width of each shape. Height: the height of each shape. Row Gap: the measurement of the gap between each row. Column Gap: the measurement of the gap between each column. Text Placement: how the image and text should be positioned in each shape. The three options are: o Image Only: the shape can be filled completely with an image (no text). o Text Below Image: the image will display in the top of the shape and the text underneath. o Text Above Image: the image will display in the bottom of the shape and the text above. o Text Only: the shape can be filled with text only. Shape: the shape to use for each shape created by the wizard. Cutting Guide Use Cutting Guide: check this box to create a cut out guide for the template. Width: the width of the cutting guide. Height: the height of the cutting guide. Page Setup Orientation: whether the page is portrait or landscape. Paper Size: the size of the paper. Page Margins o Top Margin: the gap between the top edge of the paper and the start of the template. o Left Margin: the gap between the left edge of the paper and the start of the template. Next Steps Once the measurements are complete, SymPrint will open your new template for verification and further manipulation. See the Customizing Documents section for more information on customizing your documents and templates. And of course, once you are satisfied be sure to save your work!
8
9 Creating a New Document From a Blank Page When you select 'Create new document from blank page' on the Quickstart menu, SymPrint will open a blank page so you can unleash you inner designer to create overlays, worksheets, activities, charts and more. The only limit is the limit of your own imagination. See the Customizing Documents section to learn how to customize the document by drawing and editing shapes, lines, images and text. Examples of SymPrint Projects Flashcards Classroom Calendar Matching Worksheet

10 Opening a Saved File You can open an existing document by selecting 'Open saved files' on the Quickstart menu. SymPrint will open a file menu allowing you to browse to your document through the standard windows interface. To open a document from within SymPrint's regular environment, click on the program button and select Open.
11
12 Customizing Your Templates & SymPrint Documents There are many ways to customize your document in SymPrint. These include: Adding and editing shapes Adding images to shapes Adding and editing lines Altering the page layout

13 Using Shapes in SymPrint SymPrint shapes can be stand alone objects or can contain symbols and/or text as you desire. Simply drag and drop symbols from the search panel or double click to enter text. On this page we will outline many of the ways to create and customize shapes in SymPrint. Drawing Shapes To draw a new shape, first select the type of shape you need from the shapes section of the ribbon toolbar. Hold down the left mouse button over a blank space in your document and drag the mouse until the shape is the correct size, releasing the mouse button will complete drawing the shape. For information about adding images to the shape, see the Images page. Selecting Shapes To select a shape, left click on it. Once selected, you can move it by dragging it and resize it by dragging the square side & corner handles. Shapes created by the template wizard cannot be rotated but shapes drawn using the shape tools on the ribbon toolbar will have a circular handle above them when selected. When you hover your mouse over these circles it will change to an arched arrow and you can rotate the shape by left clicking and dragging the image to the rotation you would like. To select more than one shape you can either hold down Ctrl and select each shape individually, hold down Ctrl and use the left mouse button to drag a box around the objects you'd like to select. Alternatively, you can also hold down and drag the right mouse button to draw a selection box around the objects you wish to select. To quickly move from one selected shape to the next press the down or right arrow key. To move to the previous, press the up or left arrow key.


14 Editing Shape Text To edit the text in a shape double click with the left mouse button, select the shape and press F2 or right click and select Edit Text. If you are editing the text in a shape and want to quickly move to edit the text in the next shape, press the Tab key. To move back to editing the previous shape's text press Shift + Tab. When you have finished editing the text, press Enter. To insert a line break, press Shift + Enter. Altering Shapes Shape options can be customized using the Home tab in SymPrint. To edit an existing shape outline, first select the shape to be updated and click on the relevant Shapes button. To draw a new shape with different layout settings, ensure no exiting shape is selected within your document and then click on the relevant Shapes buttons, then draw your new shape. Clipboard The usual clipboard operations: cut, copy, paste and delete can be performed on selected shapes using the buttons in this group. Font Common font operations can be performed on selected shapes in this group. Shapes In the Shapes group you can format your shapes in the following ways: Shapes: choose the outline of your shapes e.g. rectangle, circle, triangle, etc.

15 Text o o Text Alignment: choose where to align the text in the shape. If the shape's text placement is set to Image Only there will be no text alignment options. If the shape's text placement is Text Above Image or Text Below Image, only 3 text alignment options will be visible: left, center & right. If the text placement is set to Text Only, 9 text alignment options will be visible: top, middle & bottom vertical alignment combinations with left, center & right horizontal combinations. Text Placement: choose where the text should be placed in relation to the image: Image Only will stretch the image to fill the shape. Text Above Image will place any text in the top of the shape and the image below it. Text Below Image will place any text in the bottom of the shape and the image above it. Text Only will only allow text in the shape. Image: Choose whether to remove the current image, fit the image to the current shape (retaining the aspect ratio of the image), or stretch the image to the current shape (discarding the aspect ratio of the image).


16 Fill: Choose the fill color of the shape. If the shape is a line, this color will be applied to the inside of its middle and end shapes (arrowheads and pointers). Border o Line Color: Choose the color of the shape border. o Line Width: Choose the thickness of the shape border. o Line Style: Choose the style of the shape border. Select from solid, dashed or dotted.
17 Right Clicking on Shapes Right clicking on a shape brings up the following options for that shape: Cut: Cut the selected shape to the clipboard. Copy: Copy the selected shape to the clipboard. Paste: Paste the clipboard contents. If a shape is on the clipboard, this will be pasted. If text or an image is on the clipboard, this will be pasted into the selected shape. Delete: Delete the selected shape. Select All: Select all the shapes. Edit Text: Edit the shape's text. Remove Image: Remove the shape's image. Bring to Front: Brings the selected shape to the front. This is useful if you have shapes which overlap and want the current shape to sit on top of another shape. Send to Back: Sends the selected shape to the back. This is useful if you have shapes which overlap and want the current shape to sit behind another shape.

18 Customizing: Images The Images panel is displayed by default to the left of the SymPrint document. Searching & Selecting Images To search for an image in the installed image bank, type your search term in the search box and press return or click the Search button. The images whose name or keyword matches the search term will be displayed.

19 Image Browse To view images within a folder on your computer, click on the Browse a Folder button and select the folder. Once selected, any images within that folder will be loaded into the Images panel. Adding Images to Shapes To add an image to a shape, either click and drag the image from the Images panel to the shape, or select the shape and double click on the image in the Images panel. Alternatively, you can create a new, borderless shape which contains the image and any text by simply clicking and dragging the image into an empty area of your document.


20 Editing Images To edit an image's name or keywords, right click on the image and click Edit. In the edit image window it is possible to change the name of the image by clicking on the Change default text button. To add a keyword, type the word into the box under the keywords list and press return or click on the Add button. To remove a keyword, select the word in the keywords list and click the Remove button. When editing is complete, click the OK button to save the changes. Click Cancel to discard the changes. New Images Use the add new image button from your clipboard. to select and add images from files on your computer or To add an image using the clipboard (an image form the web as an example), right click on the image & select Copy, then in SymPrint click clipboard. and select From To add an image from a file on your computer, click and select From file. An open file dialog box will ask you to select the image file.

21 The Add Image window will appear, enabling you to change the default text and add keywords. Once the details are complete, click OK to save the image details. Next time you search for an image, this new image will be included. Images Panel Settings View Settings Choose the display size of the search result images in this setting, either small or large icons. Text Transfer Settings Choose what text should be inserted into the shape along with the image, either no text, the image's name or the search term. Search Settings


22 Choose whether the search term should match the image's whole text (either default text or keyword), the beginning of the image's text or anywhere in the image's text. Choose whether the search feature should match image's keywords. Switching this off will give you fewer but more accurate results. Choose whether or not to use instant search. Instant search is a search feature which automatically searches as you type (over 3 characters). If you are searching for a word under 4 characters you will still need to press the Enter key or click on the Search button to view the results. Images Panel Display To show or hide the Images panel you can check or uncheck the Images check box in the View tab in the ribbon along the top. An easy access show/hide button can also be found half way down the window. This button allows you to quickly show or hide the Images panel.

23 Customizing: Lines Using the Shapes section of the ribbon toolbar, you can select the line shape and draw lines in your document. To alter the look of the line, simply click to select it and the following options will appear in the toolbar to the right of the default tool sections: These new options allow you to format your line in the following ways: Style Choose the style of the line. Select from straight, curved or stepped. Middle Choose the line's middle shape and size.

24 End Choose the line's end shape and size.


25 Customizing: Page Layout To customize the page layout, use the Page Layout tab. From this tab you can alter the following: Orientation Choose from portrait or landscape page orientation. Page Size Choose from a range of paper sizes or enter custom values.


26 Measurement Units Choose the units which the ruler will display, either inches or millimeters. Page Color Choose the background color (or image) of the document.

27
28 View Options Using the View tab you can: Show or hide panels and features Set the document's zoom level


29 Show/Hide Use the Show/Hide option group of the view tab to select what is shown in the document and in the left and right panels. Alternatively, click on the X button in the top right of each panel to hide them. Ruler Checking this option shows the document's ruler. Gridlines Checking this option shows gridlines in your document to help you align the shapes. Images Checking this option shows the Images panel to the left of the document. Search and view images in this panel.
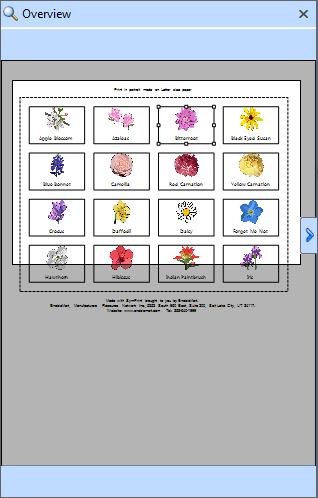
30 Overview Checking this option shows the Overview panel to the right of the document. This overview is useful if you are zoomed in quite closely to your document or the page size is quite large. Click and drag the viewing lens to move around your document quickly.
31
32 Zoom & Zoom Group Use the Zoom group to view the document at different zoom levels. Zoom This button will open a Zoom window allowing you to customize the zoom level of the document. 100% This button will set the zoom level to 100% One Page This button will set the zoom level so that the whole document fits in the available document area. Page Width This button will set the zoom level so that the width of the document fits in the available document area. Page Height This button will set the zoom level so that the height of the document fits in the available document area. Zoom Toolbar You can also zoom in and out of your document using the options at the bottom right of the SymPrint window. For manual adjustments you can use the slider bar to change the magnification level to the required setting between 10% (smallest) and 400% (largest). A small line on the slider bar shows the position of 100%.
33 Saving, Printing and Exporting When your document is complete, you can do the following: Save as a document or template Print and use print preview Export to image file (.png) or PDF

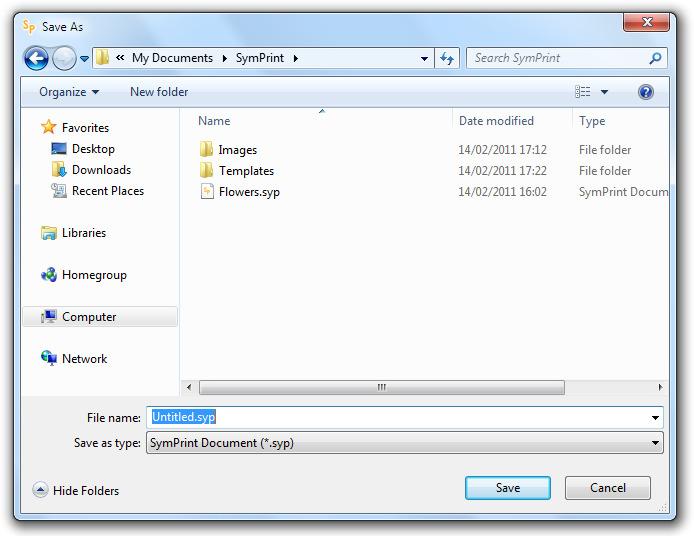
34 Save Document or Template Always remember to save your work regularly. To save your document use the Save menu item on the File menu. You can create a copy of your document, or change its name by using the Save As menu item on the File menu. Then you have the option to save as a SymPrint document (.syp) or SymPrint template (.sypt).

35 Next, you will be given the option to choose a new name and location for your document. When you are ready click on the Save button. NOTE: Only SymPrint template files (.sypt) saved to the SymPrint > Templates folder will appear in the Quickstart templates selection window.
36
37 Printing and Print Preview To print your document, select the Print menu item on the File menu. You will be given the option to select your printer, the number of copies you require and other options before printing. Note: If your document orientation is landscape, be sure to check your printer properties to ensure the printer is set to print the document in landscape mode.

38 Print Preview Before you print your document you have the option to preview the final outcome before sending it to the printer. You can use the Print Preview menu item on the File menu to do this. The Print Preview window has its own toolbar that you can use to change the way your document will print. Use the Print button to print your document on your default printer or use the dropdown list of printers to choose an alternative printer. Use the drop-down list on the Zoom button to change how large your document is displayed in the Print Preview window. This does not change how large the document will be printed. For that, use the Resize button.
39 You can quickly change how many pages are displayed in the Print Preview window by clicking on one of One Page, Two Pages, Three Pages, Four Pages or Six Pages. When a document spans multiple pages you can move between the pages using the First Page, Previous Page, Next Page and Last Page buttons. The number in the centre of these buttons displays the page number of the currently displayed page. To change how large the document will be printed you can use the Resize button. The options are: Fit To Page: resizes your document so that if fits onto a single printed page. Original Scale: sets your document to be the size you created it. Double Scale: increases the scale to double that which is currently set in the Print Preview window. Half Scale: decreases the scale to half that which is currently set in the Print Preview window. Increase Scale: increases the scale from how it is currently set in the Print Preview window. Decrease Scale: decreases the scale from how it is currently set in the Print Preview window. You can use the Double Scale, Half Scale, Increase Scale and Decrease Scale menu items repeatedly to fine tune the size that your document will print. The Landscape/Portrait button switches between these two printing modes.
40 Export To Image or PDF SymPrint offers an export feature to quickly and easily convert your work into images (.png) & PDF's (Portable Document Format). When you chose to export to a PDF file or a.png file, SymPrint will first prompt you to select a file name and location for your new file. Once you click Save, the file will be created and opened for you to review right away.
41 Keyboard Shortcuts Many of the standard Windows keyboard shortcuts can be used in SymPrint. Some of the more common key combinations are listed below along with some new shortcuts specific to working within SymPrint. Function Shortcut New Ctrl + N Open Ctrl + O Save Ctrl + S Save As Ctrl + Shift + S Print Ctrl + P Undo Ctrl + Z Redo Ctrl + Y Cut Ctrl + X Copy Ctrl + C Paste Ctrl + V Delete shape Del Bold Ctrl + B Italics Ctrl + I Underline Ctrl + U Edit shape text Select shape + F2 Select all shapes Ctrl + A Show Ribbon shortcuts Alt Go to previous shape Up/left arrow (or Shift + Tab if editing text) Go to next shape Down/right arrow (or Tab if editing text)
42 Contact The EnableMart team is very please to bring you this software program and hope that you will enjoy using it as much as we have enjoyed dreaming it into reality. Should you have any issues or need support on any project or device template please contact us using the information below. We also welcome your feedback and review of this product and invite you to leave comments on our website using the reviews tab of the SymPrint product description page EnableMart Customer Support Phone: Fax: In addition to these methods you may also chat live with us online. Or use our convenient online submission form to request a return contact from one of our customer service professionals. For more information on Alternative Augmentative Communication (AAC) devices and symbolized communication tools please visit EnableMart South 960 East, Suite Salt Lake City, UT 84117
With ClaroIdeas you can quickly and easily create idea maps using a combination of words, symbols and pictures.
 Welcome to ClaroIdeas ClaroIdeas is a fresh tool to support the creation and editing of concept maps or idea maps using visual and audio components. It has been specifically developed to support people
Designer Reference 1
 Designer Reference 1 Table of Contents USE OF THE DESIGNER...4 KEYBOARD SHORTCUTS...5 Shortcuts...5 Keyboard Hints...5 MENUS...7 File Menu...7 Edit Menu...8 Favorites Menu...9 Document Menu...10 Item Menu...12
Contents. Launching Word
 Using Microsoft Office 2007 Introduction to Word Handout INFORMATION TECHNOLOGY SERVICES California State University, Los Angeles Version 1.0 Winter 2009 Contents Launching Word 2007... 3 Working with
VHSE - COMPUTERISED OFFICE MANAGEMENT MODULE III - Communication and Publishing Art - PageMaker
 INTRODUCTION : It is one Adobe PageMaker 7.0 software is the ideal page layout program for business, education, and small- and home-office professionals who want to create high-quality publications such
DOING MORE WITH WORD: MICROSOFT OFFICE 2007
 DOING MORE WITH WORD: MICROSOFT OFFICE 2007 GETTING STARTED PAGE 02 Prerequisites What You Will Learn USING MICROSOFT WORD PAGE 03 Viewing Toolbars Adding and Removing Buttons MORE TASKS IN MICROSOFT WORD
PowerPoint 2016 Building a Presentation
 PowerPoint 2016 Building a Presentation What is PowerPoint? PowerPoint is presentation software that helps users quickly and efficiently create dynamic, professional-looking presentations through the use
Sending image(s) to report Click Send Snapshot on any screen in Dolphin3D and choose the Send to Report option
 to report Click Send Snapshot on any screen in Dolphin3D and choose the Send to Report option") Dolphin 3D Reports Sending image(s) to report Click Send Snapshot on any screen in Dolphin3D and choose the Send to Report option Creating a report step by step 1. Generate the desired images in Dolphin3D
Dolphin 3D Reports Sending image(s) to report Click Send Snapshot on any screen in Dolphin3D and choose the Send to Report option Creating a report step by step 1. Generate the desired images in Dolphin3D
DOING MORE WITH WORD: MICROSOFT OFFICE 2010
 DOING MORE WITH WORD: MICROSOFT OFFICE 2010 GETTING STARTED PAGE 02 Prerequisites What You Will Learn USING MICROSOFT WORD PAGE 03 Viewing Toolbars Adding and Removing Buttons MORE TASKS IN MICROSOFT WORD
DOING MORE WITH WORD: MICROSOFT OFFICE 2013
 DOING MORE WITH WORD: MICROSOFT OFFICE 2013 GETTING STARTED PAGE 02 Prerequisites What You Will Learn USING MICROSOFT WORD PAGE 03 Viewing Toolbars Adding and Removing Buttons MORE TASKS IN MICROSOFT WORD
Microsoft Word Tutorial
 Microsoft Word Tutorial 1 GETTING STARTED Microsoft Word is one of the most popular word processing programs supported by both Mac and PC platforms. Microsoft Word can be used to create documents, brochures,
Microsoft Office. Microsoft Office
 is an office suite of interrelated desktop applications, servers and services for the Microsoft Windows. It is a horizontal market software that is used in a wide range of industries. was introduced by
Excel Select a template category in the Office.com Templates section. 5. Click the Download button.
 Microsoft QUICK Excel 2010 Source Getting Started The Excel Window u v w z Creating a New Blank Workbook 2. Select New in the left pane. 3. Select the Blank workbook template in the Available Templates
Microsoft Word 2007 on Windows
 1 Microsoft Word 2007 on Windows Word is a very popular text formatting and editing program. It is the standard for writing papers and other documents. This tutorial and quick start guide will help you
Microsoft Excel 2010 Part 2: Intermediate Excel
 CALIFORNIA STATE UNIVERSITY, LOS ANGELES INFORMATION TECHNOLOGY SERVICES Microsoft Excel 2010 Part 2: Intermediate Excel Spring 2014, Version 1.0 Table of Contents Introduction...3 Working with Rows and
MS Office Word Tabs & Tables Manual. Catraining.co.uk Tel:
 MS Office 2010 Word Tabs & Tables Manual Catraining.co.uk Tel: 020 7920 9500 Table of Contents TABS... 1 BASIC TABS WITH ALIGNMENT... 1 DEFAULT TAB STOP... 1 SET MANUAL TAB STOPS WITH RULER... 2 SET MANUAL
Microsoft Word 2011 Tutorial
 Microsoft Word 2011 Tutorial GETTING STARTED Microsoft Word is one of the most popular word processing programs supported by both Mac and PC platforms. Microsoft Word can be used to create documents, brochures,
Introduction to MS Office Somy Kuriakose Principal Scientist, FRAD, CMFRI
 Introduction to MS Office Somy Kuriakose Principal Scientist, FRAD, CMFRI Email: somycmfri@gmail.com 29 Word, Excel and Power Point Microsoft Office is a productivity suite which integrates office tools
Microsoft Word 2010 Basics
 1 Starting Word 2010 with XP Click the Start Button, All Programs, Microsoft Office, Microsoft Word 2010 Starting Word 2010 with 07 Click the Microsoft Office Button with the Windows flag logo Start Button,
Word 2013 Quick Start Guide
 Getting Started File Tab: Click to access actions like Print, Save As, and Word Options. Ribbon: Logically organize actions onto Tabs, Groups, and Buttons to facilitate finding commands. Active Document
Window Designer. Opening Screen: When you start Window Designer, you will see the Opening Screen. Here you will be choosing from 4 options:
 Window Designer Opening Screen: When you start Window Designer, you will see the Opening Screen. Here you will be choosing from 4 options: New Design: Use this option when no pre-built templates are available
MICROSOFT WORD 2010 BASICS
 MICROSOFT WORD 2010 BASICS Word 2010 is a word processing program that allows you to create various types of documents such as letters, papers, flyers, and faxes. The Ribbon contains all of the commands
Microsoft PowerPoint 2007 Beginning
 Microsoft PowerPoint 2007 Beginning Educational Technology Center PowerPoint Presentations on the Web... 2 Starting PowerPoint... 2 Opening a Presentation... 2 Microsoft Office Button... 3 Quick Access
CPM-200 User Guide For Lighthouse for MAX
 CPM-200 User Guide For Lighthouse for MAX Contents Page Number Opening the software 2 Altering the page size & Orientation 3-4 Inserting Text 5 Editing Text 6 Inserting Graphics 7-8 Changing the Colour
MS Word Professional Document Alignment
 MS Word Professional Document Alignment Table of Contents CHARACTER VS. PARAGRAPH FORMATTING...5 Character formatting...5 Paragraph Formatting...5 USING SHOW/HIDE TO REVEAL NON-PRINTING CHARACTERS...5
Microsoft Visio 2016 Foundation. Microsoft Visio 2016 Foundation Level North American Edition SAMPLE
 Microsoft Visio 2016 Foundation Microsoft Visio 2016 Foundation Level North American Edition Visio 2016 Foundation - Page 2 2015 Cheltenham Group Pty. Ltd. All trademarks acknowledged. E&OE. No part of
Quick Start Guide - Contents. Opening Word Locating Big Lottery Fund Templates The Word 2013 Screen... 3
 Quick Start Guide - Contents Opening Word... 1 Locating Big Lottery Fund Templates... 2 The Word 2013 Screen... 3 Things You Might Be Looking For... 4 What s New On The Ribbon... 5 The Quick Access Toolbar...
WEEK NO. 12 MICROSOFT EXCEL 2007
 WEEK NO. 12 MICROSOFT EXCEL 2007 LESSONS OVERVIEW: GOODBYE CALCULATORS, HELLO SPREADSHEET! 1. The Excel Environment 2. Starting A Workbook 3. Modifying Columns, Rows, & Cells 4. Working with Worksheets
ECDL Module 6 REFERENCE MANUAL
 ECDL Module 6 REFERENCE MANUAL Presentation Microsoft PowerPoint XP Edition for ECDL Syllabus Four PAGE 2 - ECDL MODULE 6 (USING POWERPOINT XP) - MANUAL 6.1 GETTING STARTED... 4 6.1.1 FIRST STEPS WITH
Microsoft Word 2010 Tutorial
 1 Microsoft Word 2010 Tutorial Microsoft Word 2010 is a word-processing program, designed to help you create professional-quality documents. With the finest documentformatting tools, Word helps you organize
Excel 2003 Tutorial II
 This tutorial was adapted from a tutorial by see its complete version at http://www.fgcu.edu/support/office2000/excel/index.html Excel 2003 Tutorial II Charts Chart Wizard Chart toolbar Resizing a chart
Understanding Word Processing
 Understanding Word Processing 3.0 Introduction In this chapter you are going to learn how to create a simple memo or note or a complex and complicated multi column business document using word processing
Excel 2013 Intermediate
 Excel 2013 Intermediate Quick Access Toolbar... 1 Customizing Excel... 2 Keyboard Shortcuts... 2 Navigating the Spreadsheet... 2 Status Bar... 3 Worksheets... 3 Group Column/Row Adjusments... 4 Hiding
Introducing Gupta Report Builder
 Business Reporting Chapter 1 Introducing Gupta Report Builder You can use Report Builder to design reports. This chapter describes: Our approach to building reports. Some of the reports you can build.
Guide to WB Annotations
 Guide to WB Annotations 04 May 2016 Annotations are a powerful new feature added to Workbench v1.2.0 (Released May 2016) for placing text and symbols within wb_view tabs and windows. They enable generation
Excel Main Screen. Fundamental Concepts. General Keyboard Shortcuts Open a workbook Create New Save Preview and Print Close a Workbook
 Excel 2016 Main Screen Fundamental Concepts General Keyboard Shortcuts Open a workbook Create New Save Preview and Print Close a Ctrl + O Ctrl + N Ctrl + S Ctrl + P Ctrl + W Help Run Spell Check Calculate
button Double-click any tab on the Ribbon to minimize it. To expand, click the Expand the Ribbon button
 PROCEDURES LESSON 1: CREATING WD DOCUMENTS WITH HEADERS AND FOOTERS Starting Word 1 Click the Start button 2 Click All Programs 3 Click the Microsoft Office folder icon 4 Click Microsoft Word 2010 1 Click
Microsoft How to Series
 Microsoft How to Series Getting Started with EXCEL 2007 A B C D E F Tabs Introduction to the Excel 2007 Interface The Excel 2007 Interface is comprised of several elements, with four main parts: Office
EXCEL TUTORIAL.
 EXCEL TUTORIAL Excel is software that lets you create tables, and calculate and analyze data. This type of software is called spreadsheet software. Excel lets you create tables that automatically calculate
Week 5 Creating a Calendar. About Tables. Making a Calendar From a Table Template. Week 5 Word 2010
 Week 5 Creating a Calendar About Tables Tables are a good way to organize information. They can consist of only a few cells, or many cells that cover several pages. You can arrange boxes or cells vertically
W-E
 Signage Suite V2.20 User Guide 605220-02-01-W-E-051613-02 Trademarks Windows XP, Windows Vista, Windows 7, and Microsoft are registered trademarks of Microsoft Corporation. All other trademarks are the
Microsoft Excel 2010 Tutorial
 1 Microsoft Excel 2010 Tutorial Excel is a spreadsheet program in the Microsoft Office system. You can use Excel to create and format workbooks (a collection of spreadsheets) in order to analyze data and
MS Publisher County of Henrico Public Libraries
 MS Publisher 2013 I. About Publisher A. What is it? Publisher is a desktop publishing program that assists you in designing and producing professional documents that combine text, graphics, illustrations,
POWERPOINT BASICS: MICROSOFT OFFICE 2010
 POWERPOINT BASICS: MICROSOFT OFFICE 2010 GETTING STARTED PAGE 02 Prerequisites What You Will Learn USING MICROSOFT POWERPOINT PAGE 03 Microsoft PowerPoint Components SIMPLE TASKS IN MICROSOFT POWERPOINT
SETTINGS AND WORKSPACE
 ADOBE ILLUSTRATOR Adobe Illustrator is a program used to create vector illustrations / graphics (.ai/.eps/.svg). These graphics will then be used for logos, banners, infographics, flyers... in print and
Lesson 4 - Creating a Text Document Using WordPad
 Lesson 4 - Creating a Text Document Using WordPad OBJECTIVES: To learn the basics of word processing programs and to create a document in WordPad from Microsoft Windows. A word processing program is the
Word Getting Started The Word Window u vw. Microsoft QUICK Source. Creating a New Blank Document. Creating a New Document from a Template
 Microsoft QUICK Source Word 2007 Getting Started The Word Window u vw x y z u Quick Access Toolbar contains shortcuts for the most commonly used tools. v Microsoft Office Button contains common file and
MS Word 2010 An Introduction
 MS Word 2010 An Introduction Table of Contents The MS Word 2010 Environment... 1 The Word Window Frame... 1 The File Tab... 1 The Quick Access Toolbar... 4 To Customize the Quick Access Toolbar:... 4
MS Word Basics. Groups within Tabs
 MS Word Basics Instructor: Bev Alderman L e t s G e t S t a r t e d! Open and close MS Word Open Word from the desktop of your computer by Clicking on the Start>All programs>microsoft Office >Word 2010
Basic Microsoft Word 2013
 Basic Microsoft Word 2013 1 Basic Microsoft Word 2013 General Notes: In Office 2013, tabs exist at the top; these are referred to as ribbons. The commands on each tab are organized into groups. The commands
Word 3 Microsoft Word 2013
 Word 3 Microsoft Word 2013 Mercer County Library System Brian M. Hughes, County Executive Action Technique 1. Insert a Text Box 1. Click the Insert tab on the Ribbon. 2. Then click on Text Box in the Text
WORD 2010 TIP SHEET GLOSSARY
 GLOSSARY Clipart this term refers to art that is actually a part of the Word package. Clipart does not usually refer to photographs. It is thematic graphic content that is used to spice up Word documents
User Manual Version 1.1 January 2015
 User Manual Version 1.1 January 2015 - 2 / 112 - V1.1 Variegator... 7 Variegator Features... 7 1. Variable elements... 7 2. Static elements... 7 3. Element Manipulation... 7 4. Document Formats... 7 5.
Microsoft Excel 2007
 Learning computers is Show ezy Microsoft Excel 2007 301 Excel screen, toolbars, views, sheets, and uses for Excel 2005-8 Steve Slisar 2005-8 COPYRIGHT: The copyright for this publication is owned by Steve
MICROSOFT WORD 2010 Quick Reference Guide
 MICROSOFT WORD 2010 Quick Reference Guide Word Processing What is Word Processing? How is Word 2010 different from previous versions? Using a computer program, such as Microsoft Word, to create and edit
PowerPoint 2010 Level 1 Computer Training Solutions Student Guide Version Revision Date Course Length
 Level 1 Computer Training Solutions Version 1.2 Revision Date Course Length 2012-Feb-16 6 hours Table of Contents Quick Reference... 3 Frequently Used Commands... 3 Manitoba ehealth Learning Management
Introduction to Microsoft Word 2010
 Introduction to Microsoft Word 2010 THE BASICS PAGE 02! What is Microsoft Word?! Opening Microsoft Word! The Title Bar! Page View and Zoom MENUS...PAGE 03! Quick Access Toolbar! The Ribbon! File Tab! Home
User Guide. DrawAnywhere.com: User Guide
 DrawAnywhere.com: User Guide DrawAnywhere.com is an online diagramming & flow charting application with the look & feel of a desktop application! User Guide http://www.drawanywhere.com August, 2007 Table
Microsoft Word 2007 Essential Skills
 The "Anatomy" of the Word Window The typical program window will look similar to that shown below. It is possible to customize your own display, but that is a topic for discussion later on. OFFICE BUTTON
Application of Skills: Microsoft Excel 2013 Tutorial
 Application of Skills: Microsoft Excel 2013 Tutorial Throughout this module, you will progress through a series of steps to create a spreadsheet for sales of a club or organization. You will continue to
New York City College of Technology. Microsoft Word Contact Information:
 New York City College of Technology Microsoft Word 2016 Contact Information: 718-254-8565 ITEC@citytech.cuny.edu Opening Word 2016 Begin by clicking on the bottom left corner icon on the desktop. From
EXCEL 2013 FDLRS SUNRISE
 EXCEL 2013 FDLRS SUNRISE Goal: Participants will create a spreadsheet and graph to document student progress. Objectives: Participants will create a spreadsheet which includes basic formulas. Participants
Microsoft PowerPoint 2013 Beginning
 Microsoft PowerPoint 2013 Beginning PowerPoint Presentations on the Web... 2 Starting PowerPoint... 2 Opening a Presentation... 2 File Tab... 3 Quick Access Toolbar... 3 The Ribbon... 4 Keyboard Shortcuts...
Microsoft Excel Keyboard Shortcuts
 Microsoft Excel Keyboard Shortcuts Here is a complete list of keyboard shortcuts for Microsoft Excel. Most of the shortcuts will work on all Excel versions on Windows based computer. Data Processing Shortcuts
Artistic Text. Basics 1
 Basics 1 In this tutorial, we ll show you how to: Work with artistic text. Create, edit, and format text. Apply shadows, reflections, and other text effects. Create shaped text (or text-on-a-path). 2 Basics
Spreadsheets Microsoft Office Button Ribbon
 Getting started with Excel 2007 you will notice that there are many similar features to previous versions. You will also notice that there are many new features that you ll be able to utilize. There are
Reference Services Division Presents. Microsoft Word 2
 Reference Services Division Presents Microsoft Word 2 This handout covers the latest Microsoft Word 2010. This handout includes instructions for the tasks we will be covering in class. Basic Tasks Review
Introduction to Microsoft Excel 2010
 Introduction to Microsoft Excel 2010 THE BASICS PAGE 02! What is Microsoft Excel?! Important Microsoft Excel Terms! Opening Microsoft Excel 2010! The Title Bar! Page View, Zoom, and Sheets MENUS...PAGE
Using Microsoft Word. Working With Objects
 Using Microsoft Word Many Word documents will require elements that were created in programs other than Word, such as the picture to the right. Nontext elements in a document are referred to as Objects
Microsoft Excel 2007
 Microsoft Excel 2007 1 Excel is Microsoft s Spreadsheet program. Spreadsheets are often used as a method of displaying and manipulating groups of data in an effective manner. It was originally created
Word Select New in the left pane. 3. Select Blank document in the Available Templates pane. 4. Click the Create button.
 Microsoft QUICK Word 2010 Source Getting Started The Word Window u v w x z Opening a Document 2. Select Open in the left pane. 3. In the Open dialog box, locate and select the file you want to open. 4.
Getting Started with. PowerPoint 2010
 Getting Started with 13 PowerPoint 2010 You can use PowerPoint to create presentations for almost any occasion, such as a business meeting, government forum, school project or lecture, church function,
Drawing Tools. Drawing a Rectangle
 Chapter Microsoft Word provides extensive DRAWING TOOLS that allow you to enhance the appearance of your documents. You can use these tools to assist in the creation of detailed publications, newsletters,
What can Word 2013 do?
 Mary Ann Wallner What can Word 2013 do? Provide the right tool for: Every aspect of document creation Desktop publishing Web publishing 2 Windows 7: Click Start Choose Microsoft Office > Microsoft Word
A Step-by-step guide to creating a Professional PowerPoint Presentation
 Quick introduction to Microsoft PowerPoint A Step-by-step guide to creating a Professional PowerPoint Presentation Created by Cruse Control creative services Tel +44 (0) 1923 842 295 training@crusecontrol.com
StitchGraph User Guide V1.8
 StitchGraph User Guide V1.8 Thanks for buying StitchGraph: the easy way to create stitch layouts for hardanger and other complex embroidery stitch types. StitchGraph is intended to allow you to create
11.1 Create Speaker Notes Print a Presentation Package a Presentation PowerPoint Tips... 44
 Contents 1 Getting Started... 1 1.1 Presentations... 1 1.2 Microsoft Office Button... 1 1.3 Ribbon... 2 1.4 Mini Toolbar... 2 1.5 Navigation... 3 1.6 Slide Views... 4 2 Customize PowerPoint... 5 2.1 Popular...
TABLE OF CONTENTS TABLE OF CONTENTS... 1 INTRODUCTION... 2 USING WORD S MENUS... 3 USING WORD S TOOLBARS... 5 TASK PANE... 9
 TABLE OF CONTENTS TABLE OF CONTENTS... 1 INTRODUCTION... 2 USING WORD S MENUS... 3 DEFINITIONS... 3 WHY WOULD YOU USE THIS?... 3 STEP BY STEP... 3 USING WORD S TOOLBARS... 5 DEFINITIONS... 5 WHY WOULD
Using Reports. Access 2013 Unit D. Property of Cengage Learning. Unit Objectives. Files You Will Need
 Unit D CASE Samantha Hooper, a tour developer at Quest Specialty Travel, asks you to produce some reports to help her share and analyze data. A report is an Access object that creates a professional looking
Excel 2010 Level 1: The Excel Environment
 Excel 2010 Level 1: The Excel Environment Table of Contents The Excel 2010 Environment... 1 The Excel Window... 1 File Tab... 1 The Quick Access Toolbar... 4 Access the Customize the Quick Access Toolbar
Introduction to Microsoft Publisher
 Introduction to Microsoft Publisher Day One Agenda: Introduction Templates Layout Inserting and Formatting Text Inserting and Formatting Pictures Practice, Questions Day Two Agenda: Review Day One Tables
DYMO ID User Guide BC
 DYMO ID User Guide BC Copyright 2015 Sanford, L.P. All rights reserved. Revised: 4/28/2015 No part of this document or the software may be reproduced or transmitted in any form or by any means or translated
Introduction to Microsoft Word 2010
 Introduction to Microsoft Word 2010 Microsoft Word is a word processing program you can use to write letters, resumes, reports, and more. Anything you can create with a typewriter, you can create with
Microsoft Office Training Skills 2010
 Microsoft Office Training Skills 2010 Lesson 5 Working with pages, Tables, Shapes and Securing Documents Adding Page color Add color to the background of one or several pages in the document. 1. Click
Word - Basics. Course Description. Getting Started. Objectives. Editing a Document. Proofing a Document. Formatting Characters. Formatting Paragraphs
 Course Description Word - Basics Word is a powerful word processing software package that will increase the productivity of any individual or corporation. It is ranked as one of the best word processors.
Introduction to Microsoft Word 2010
 CDU Short Courses Introduction to Microsoft Word 2010 A 2 day course delivered by Charles Darwin University. COURSE INFORMATION This course focuses on basic document production using Microsoft Word 2010
PowerPoint 2010 Foundation PowerPoint 2010 Foundation Page 1 SAMPLE
 PowerPoint 2010 Foundation PowerPoint 2010 Foundation Page 1 PowerPoint 2010 Foundation 2010 Cheltenham Courseware Pty. Ltd. www.cheltenhamcourseware.com.au PowerPoint 2010 Foundation Page 2 2010 Cheltenham
Microsoft PowerPoint 2010 Beginning
 Microsoft PowerPoint 2010 Beginning PowerPoint Presentations on the Web... 2 Starting PowerPoint... 2 Opening a Presentation... 2 File Tab... 3 Quick Access Toolbar... 3 The Ribbon... 4 Keyboard Shortcuts...
San Pedro Junior College. WORD PROCESSING (Microsoft Word 2016) Week 4-7
 Week 4-7") WORD PROCESSING (Microsoft Word 2016) Week 4-7 Creating a New Document In Word, there are several ways to create new document, open existing documents, and save documents: Click the File menu tab and then
WORD PROCESSING (Microsoft Word 2016) Week 4-7 Creating a New Document In Word, there are several ways to create new document, open existing documents, and save documents: Click the File menu tab and then
Microsoft Excel 2010 Basic
 Microsoft Excel 2010 Basic Introduction to MS Excel 2010 Microsoft Excel 2010 is a spreadsheet software in the new Microsoft 2010 Office Suite. Excel allows you to store, manipulate and analyze data in
Introduction to Microsoft Office PowerPoint 2010
 Introduction to Microsoft Office PowerPoint 2010 TABLE OF CONTENTS Open PowerPoint 2010... 1 About the Editing Screen... 1 Create a Title Slide... 6 Save Your Presentation... 6 Create a New Slide... 7
MICROSOFT WORD. Table of Contents. What is MSWord? Features LINC FIVE
 Table of Contents What is MSWord? MSWord is a word-processing program that allows users to insert, edit, and enhance text in a variety of formats. Word is a powerful word processor with sophisticated editing
Mi c r o s o f t Wo r d Qu i c k Re f e r e n c e Ca r d
 Tech Talk # 5 Mi c r o s o f t Wo r d Qu i c k Re f e r e n c e Ca r d Introduction by Renae Schmidt Hello! Welcome to Tech Talk #5. This week we are sharing a Microsoft Word 2010 Quick Reference Card.
StickFont Editor v1.01 User Manual. Copyright 2012 NCPlot Software LLC
 StickFont Editor v1.01 User Manual Copyright 2012 NCPlot Software LLC StickFont Editor Manual Table of Contents Welcome... 1 Registering StickFont Editor... 3 Getting Started... 5 Getting Started...
To learn more about the Milestones window choose: Help Help Topics Select the Index tab and type in the feature. For Example toolbox.
 To learn more about the Milestones window choose: Help Help Topics Select the Index tab and type in the feature. For Example toolbox. 1 of 12 CHOOSE THE DATES TAB TO: 1. Set the schedule s Date Range.
Anleitungen für Word 2016 als Word-Dokument zum Ausdrucken und fürs Intranet
 Anleitungen für Word 2016 als Word-Dokument zum Ausdrucken und fürs Intranet 19 Text and Tabs Tabs (tab stops) help you to write a list, for example, for an order or invoice. Larger spaces should not be
Formatting, Saving and Printing in Word 2013
 Revision 3 (--04) Computer Basics Formatting, Saving and Printing in Word 03 MICROSOFT WORD 03: This program allows you to create new documents, make easy changes, insert media, and effectively save and
Status Bar: Right click on the Status Bar to add or remove features.
 Excel 2013 Quick Start Guide The Excel Window File Tab: Click to access actions like Print, Save As, etc. Also to set Excel options. Ribbon: Logically organizes actions onto Tabs, Groups, and Buttons to
Changing Worksheet Views
 PROCEDURES LESSON 1: TOURING EXCEL Starting Excel 1 Click the Start button 2 Click All Programs 3 Click the Microsoft Office folder icon 4 Click Microsoft Excel 2010 Naming and Saving (Ctrl+S) a Workbook
Microsoft Word Basic Editing. Lesson , John Wiley & Sons, Inc. Microsoft Official Academic Course, Microsoft Word
 Microsoft Word 2013 Lesson 2 Basic Editing 2014, John Wiley & Sons, Inc. Microsoft Official Academic Course, Microsoft Word 2013 1 Objectives 2014, John Wiley & Sons, Inc. Microsoft Official Academic Course,
Nauticom NetEditor: A How-to Guide
 Nauticom NetEditor: A How-to Guide Table of Contents 1. Getting Started 2. The Editor Full Screen Preview Search Check Spelling Clipboard: Cut, Copy, and Paste Undo / Redo Foreground Color Background Color