WHCC Sports and Events
|
|
|
- Anna Phillips
- 6 years ago
- Views:
Transcription

1
2 WHCC Sports and Events We re using ROES Events as our ordering software for Sports and Events. This is a special version of ROES, written specifically for high volume events. There are two primary differences to the Sports and Events ROES. The first difference is the ability to customize products with graphics. For the graphics you have the choice of utilizing one of 10 different template themes we have pre-built into ROES or you can design your own graphics and integrate them into the software. The second main difference is the ability to create custom packages for your clients. You determine what products you d like to group together for your packages. There is no limit to the number of packages you create or the combination of products you choose. WHCC Sports and Events is a separate catalog and application because of the varied nature of sports and event photography. While this version of ROES is separate from our traditional line, you can expect the same great quality, same great service and free shipping you ve become accustomed to at WHCC. Placing an order with WHCC Events is a two step process. 1. Create the package sets you ll be using for the event. 2. Creating the order. Creating your package sets for each event can be done in a few ways. You have the ability to save custom products and packages in ROES. This means that once you ve configured a product or package set, those products and packages are available for any order from that point forward, without any additional work on your part. You can group package sets in any fashion you d like. This allows you to have different packages and configurations for the different Events, Schools or Leagues you photograph. Orders can be created using various methods (Manually and Automatically) depending on the amount of variable data/text you d like to incorporate into your event. Many of the products can have text nodes or multiple images associated with them. ROES Events allows you to automatically populate image and text nodes, eliminating the need to do the graphic composition in Photoshop. To automatically populate image and text nodes ROES requires data. You can use the ROES application to enter data into the subject info fields or you can use a.csv file created with a spreadsheet program to populate the nodes. The.csv method is your best choice if your order is large and contains variable text for the products. By the same token, if you prefer to do all of your graphic creation in Photoshop or your packages consist purely of image files, ROES Events allows you to easily populate the products with the standard drag and drop method. Table of Contents Page 3 Page 4 Page 6 Page 9 Page 11 Page 12 Page 19 Ordering in ROES + Product Category Overview Configuring Preset Theme Products in ROES Customizing the Images and Text on Memory Mates Setting up Your Packages in ROES Manually Creating an Order Automatically Creating an Order Creating a.csv file for Automatic Order Creation

3 Ordering in ROES + Product Category Overview ROES Event products are segregated into four categories. The categories are shown in the upper left of ROES in separate tabs. Prints Standard photographic prints are available in sizes from wallets up to a 30x45. All photo products can be ordered on any of our 3 paper surfaces options of lustre, glossy or metallic. Select prints can also be mounted or coated if you choose. Image Only Add ons These are specialty products that do not have a graphic theme associated with them. These are typically full image products. Items include key chains, buttons, bag tags, plaques, cubes, banners and wall clings. Many of these products are double sided, allowing you to use different images on either side. Preset Themes This section contains the 10 different WHCC pre-designed themes. Each graphic theme contains a variety of options depending on what theme you select. Most options offer a wide selection of pre-selected background colors or the ability to use an eye dropper, selecting your own color from an image or color picker tool. Each theme is carried throughout all the product sets in this tab. For example, Memory mates share the same abilities and theme options as the buttons, bag tags, magnets, etc. Design your own This is self-explanatory. These products allow for you to add as many text or image nodes to the products as you would like. You can place the nodes anywhere on the product. Once you ve configured the product, it can be saved as a favorite and used multiple times on any subsequent orders. Items include 11x14, 8x10 and 5x7 photo prints, magnets, bag tags, trader cards, etc. 3

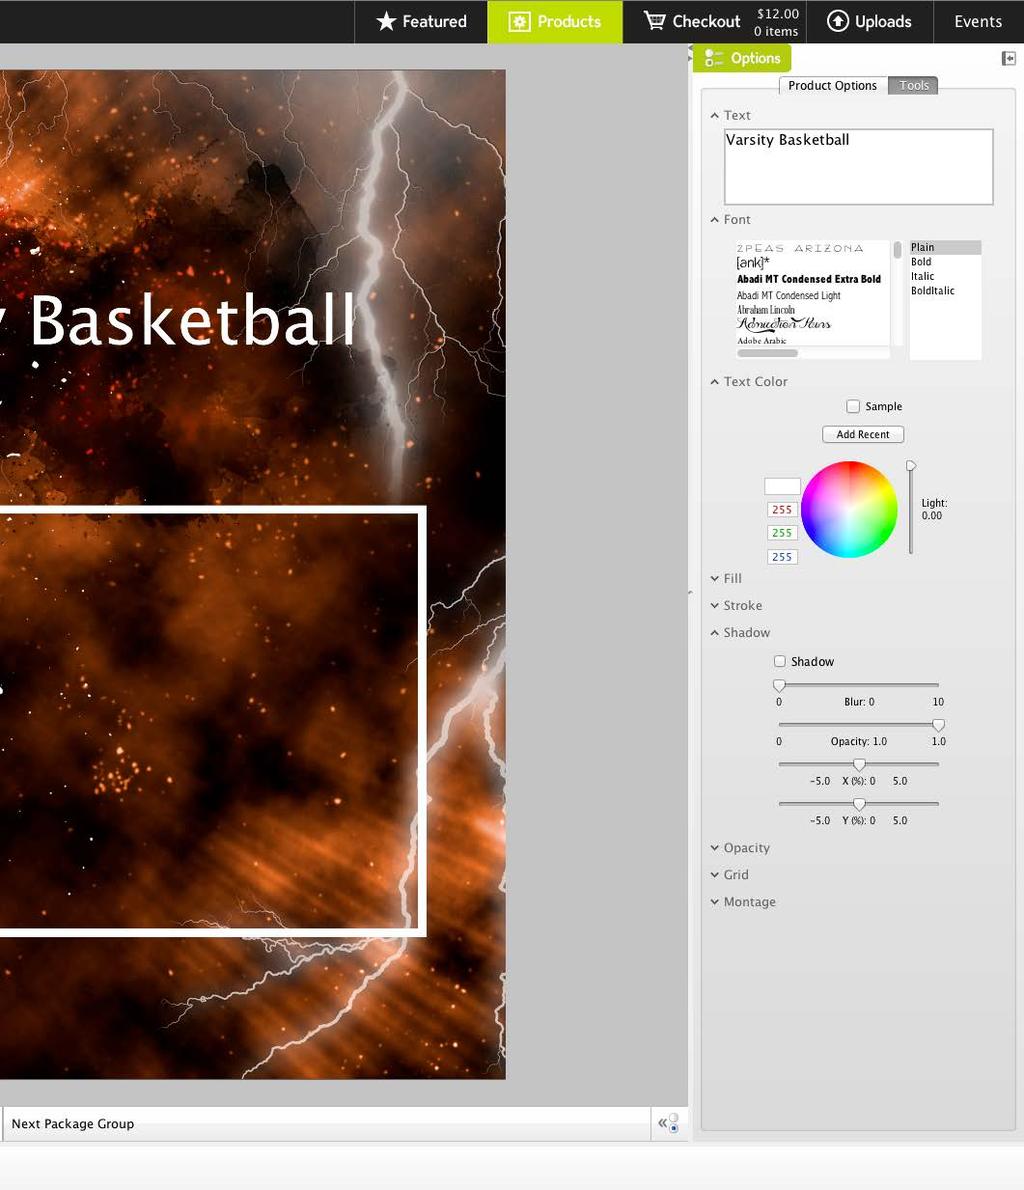
4 Configuring Preset Themed Products in Roes Once a product is chosen it loads into the center workspace. At that point whatever options are available are enabled on the right pane. Most products have the ability to change the background color, frame options and event icons by simply selecting any of the options under the Product Options tab. Some products such as Memory Mates allow you to choose different text node configurations. The preset configurations have the font style, color and locations preset. The font is fixed within ROES. The actual font used in production will not appear on your computer, unless you by chance have one of the preset fonts installed. We cannot distribute the fonts through ROES, due to licensing and distribution limitations. ROES will use system default to represent the text on screen. Examples of the actual fonts can be seen on the info graphic within each theme. Each Memory Mate also has a custom font option. This option allows you to use a font that is installed on our computer. This option allows you to select and choose any font you have loaded on your machine. You can modify text color and position, as well as, add drop shadows etc. Information icon containing additional information and preview text for each preset theme. Each Memory Mate also has a custom font option. This option allows you to use a font that is installed on our computer. When you select the Custom Font option, the preset nodes are replaced with a single text node. You can select that node to modify the size, location and contents. By clicking the tool tab on the top left side pane of ROES, you can choose any font you have loaded on your machine. You also have the ability to modify the text color and to add drop shadows if desired. The toolset located just to the left of the product (in the middle workspace) allows you to modify the text nodes. Edit Tool - Allows you to grab the text node, resize it and move to a new location. Draw Text Tool - Allows you to add a new text node to the product. 4
5 5

6 Customizing the Images and Text on Memory Mates The preset theme memory mate designs offer a number of different options for both image and text locations. Most memory mate designs offer 3 different image and 3 different text layout options. You can select the layout you like best by using the dials located under the Product Options tab. The preset options are fixed in their location and you are not able to change the size of the image or text. If you have need for a different configuration for either the images or text you can use the fully customizable option. With the fully customizable option you can move and re-size the existing placeholders. We refer to these locations as nodes. A node is a rectangle that can accept either an image or text entry depending on how the node is created. To gain access to the tools that allow you to modify the nodes, choose None as your Image Node Frame Style. This will remove the frame from around the image nodes. The screen shot below shows the tools once none has been selected. To move the nodes, you will want to select the tool just below the hand tool, located in the upper left of the product window. When you select this tool and mouse over a node, you ll notice that cyan circles appear around the outside of the rectangle and two in the center. These are handles that you are able to click on to reshape and move the node. The handles around the outside allow you to drag the node to a new size and shape. The handle in the center is the move handle, allowing you to move the entire rectangle anywhere on the page. The handle above the center is the rotation handle, allowing you to rotate the node. You are able to grab the handles and move the node around the page. The screen show below shows how the same variations can be done with your text nodes. By selecting Custom Font, you are able to move and resize a text node along with selecting any font you have loaded on your computer. Once you have selected your font, then expand the Text Color option and use the color picker to select the color of your text. 6

7 If you are wanting additional text boxes, you can simply right click on an existing text node and duplicate the node. This quickly adds text nodes of the same font/color and places them in as needed on the design. You can also select the tool that is a cross hair with a T in the upper left window. This also allows you to draw in additional text nodes. If you would like to add additional image nodes you can also select the tools in the upper left window. The cross hair without the T allows you to draw new image nodes on the template. Once you ve configured your template just how you want it, you can save it as a favorite and use on any future order. When saving, be sure to save it as a package and not as a single product. 7

8 exact locations You have the ability to place text and image nodes in an exact location of the template based on the physical dimensions if you choose. The coordinates of any node are displayed in the lower right corner of the product window. When you select a node, the coordinates for that node will appear in the lower right corner of the product window. When you mouse over the coordinates, the mouse pointer will change to a cursor, allowing you to key in the exact dimensions. See example below. 8

9 Setting up your packages in ROES Packages can consist of any combination of products, from a single add on item to a package containing several different products. Packages are saved as Favorites in ROES and can be organized by groups. Creating groups allows you to have different preset package options for different events. This allows you to quickly access all the packages you created and selected for any event you are placing. To create packages, you need to put ROES into Package Mode. This is done by clicking the icon that appears like a stack of papers, located in the lower left workspace of ROES. Once this is selected you can start creating a package. Start by clicking on the various products you want to add (under any product tab) and drag each product into the middle workspace. It s best to add the most complex products first. Typically, a memory mate or other Preset Theme products requiring the Option tool. This tool allows you to modify any designs background color, frames, text nodes, etc. Once your options are complete you can add each additional product to the package by clicking on the product and dragging it into the middle workspace. Click, hold and drag the product. The workspace will resize as needed as you continue to add products to a package, allowing for a display of each individual product. As you continue adding products to the package, you will see a blue handle that appears in the center of each product. This handle allows you to move the products around the workspace to avoid products being on top of one another. You ll also notice a blue link in the upper right corner of the primary image node for each product. When the link is blue, the image will be shared across all products containing the blue link. If you have a product in your package that you would like the option to populate with a separate image, say a team or group picture, click on the link for that product and it will turn it from blue to gray This will allow you to drag a unique image into that product. 9

10 Once you are done adding products to your package and it is complete you will want to save it to your Favorites in ROES (located on the bottom left bar of ROES). Favorites will display any packages or favorite groups that you have created. Clicking on the Favorites button changes the product categories to a favorite category. Initially you will only see one packaged called favorites. You can add additional tabs by clicking the favorites plus sign and naming the tab. When saving your packages, you have the option to save it to a select group that you have already saved or to create a new favorite where you wish to save the particular package. Once you have chosen a group, click on the Red Heart with the Plus and hit return. This will allow you to name your package. While there is no restriction on what you name your package, we recommend using a one or two-digit scheme to simplify data entry. Favorites tool Allows you to save packages or groups for use at any time Plus tool Allows you to add and name packages. When saving and creating packages, always choose to save as package when prompted. You will want to save as a package even if the package is an add on item and only contains one product. ROES will ask if you want to save it as a package or as a single item, always choose package. The Gray Heart with the green arrow allows you to update or override a chosen package. The Gear icon in the far lower left corner of the favorite s category pane allows you to delete, rename or copy favorites and groups. Changes/Override tool - Update or override a package Gear tool - Allows you to delete, rename or copy a favorites and groups. 10

11 Creating an Order Manually in ROES Manual created orders are best for smaller orders or orders without a lot of text entry for products. A manual order is created in much the same way as a traditional WHCC ROES order. Using ROES, you will drag and drop images into products, crop as needed, add to the shopping cart and submit. Some sport/event products contain background options and text nodes that will require customization. With the manual order entry method, themed products requiring text will need the text entered individually for each product added to the shopping cart. To submit an order manually, start by selecting the packages you previously created in your Favorites tab or simply select the products that you wish to order for your client. Drag and drop the appropriate images into the corresponding products. Click on any text node you wish to populate and type the necessary text. If you do not wish to use all the text nodes available, simply delete sample text in the node. When you ve finished customizing your product you selected add the package or product to the shopping cart, Add to Order. When placing your order, be sure to order any items (packages and add ons) for the same client sequentially to allow for individual packaging if you desire. To have your items individually packaged you must select the Next Package Group button at the beginning of each client s product selection. This will ensure that all items for any given client are packaged properly. Each time you begin ordering for the next client, be sure to select the Next Package Group button again. Once you ve added your last product to the shopping cart, click on the check out and verify the order. You can edit any quantities as needed and finalize the order. 11
12 Creating an Event Order Automatically Automatically created orders are best used when placing larger orders and orders with individual text and data entry on specialty items, such as Memory Mates and Trading cards. The automatic method utilizes a small data file to specify which items get what text information and images you designate. ROES can automatically populate each package with the appropriate images and text while still allowing you to verify and review the final order before submitting for print. Automatic event orders utilize a data set to organize your individual client orders into one large order. If you want orders to be individually packaged for delivery, it s necessary to submit a table of information that guides us in fulfilling the orders and packages properly. Creating and ordering an event requires three basic steps. 1. Create and modify your package sets in ROES (see pages 5 & 6). 2. Create the data set that will be used for your order. 3. Link the images, packages and data to complete the order. You have two different options available while creating your data set for your order. One option is to populate the required fields using the actual ROES application. ROES can create a blank/empty data set that you can then use to populate and create the order. The second and recommended method is to use a spreadsheet program. With this method you will enter the data into a spreadsheet while saving it as a.csv file for uploading to the ROES program. This is the quickest and easiest method. The minimum required data involves four columns: CustID, IndivImage, GroupIMG and Packages. These four fields are the minimum amount of data required to fulfill an order whether you are using the.csv file example or using ROES to create the data. CustID is the value we will use for individual packaging. This can be your clients name or a number. Any products in an order containing the same CustID will be packaged together in the windowed envelope. IndivImage and GroupIMG contain the file names for both the individual and group images. Packages is where you will enter the data for the various packages and add ons that a client has ordered. The package names should correspond with the names of packages you have already created in your Favorites in ROES. The sample.csv file, that we provide, is quite extensive and contains more columns of data than most users will need to take advantage of. The added columns are there so that someone who is using a great deal of variable data for items like trader cards, has adequate columns for inputting the data available for that product. If you are using the example file we provide, you will simply disregard any of the columns that you are not interested in. Once you are set with your corresponding data you can create the actual event order in ROES. Start by clicking on the Events tab located in the very top right bar of the ROES window. This screen will allow you to add a new event. Select the plus sign on the bottom left of ROES and name your event with something that makes sense to you. Next, select the Subject Info arrow located in the bottom lower right of ROES. This will bring up a window that allows you to choose how your data will be associated with your event order. You will then select to import the.csv file you created or you can create the file using ROES by selecting create an empty table with preset fields. 12

13 Below is an example walking through ROES while creating an event without a csv data file (not recommended). Select the bottom option, Create an empty table with preset fields. From the pull down, select 4 fields and enter the number of subjects (client orders) that you ll have for this entire event. 13
14 Next, select the package set you ll be using for this event from the drop down box. Then, select your images. If your images are ready, select Yes and browse to the folder on your computer containing the images. If the images are not ready but you want to continue to create your event, you can select No and add them at a later time. 14
15 Selecting No will bring up an empty spreadsheet with the four minimum headings requirements. You can now use the ROES interface to enter the Customer ID and Package data using the keyboard. Click on the field and enter the data. For entering the image data, you have two choices. You can either enter the file names into the appropriate fields or you can simply drag and drop the thumbnails into the appropriate selection to populate the fields. To browse for your images, click on the add folder icon and navigate to the folder containing your images. 15


16 Once a folder is selected, the image thumbnails will populate into the lower part of the ROES window. Once the thumbnails are displayed you can click and drag each image into the proper position in the spreadsheet. Once your images are in the proper areas, you will need to tell ROES what image goes into which product or image node on a product. This is called field association. This only needs to be done the first time you use a package set. Once completed, field association is saved for any future orders. To field associate you will click on Associate Fields tabs in the lower right corner of ROES. 16

17 This will bring up a window that will walk you through each of the packages from your Favorites that you ve chosen for the event. At the bottom of the window you ll see the four headings from the data set, CustID, IndivImage, GroupIMG, and Packages. You will use these headings to determine what images goes where in the package. In this simple example, we re only populating images, there is no text data to field associate. Locate the image headings (IndivImage and GroupIMG), click on IndivImage and drag that label into each node that requires that image. In the case of wallet products, you only need to populate the node labeled 1, the others will copy automatically. If you have names and other text data you wanted to auto populate on your products, you d do the association the same way. Clicking and dragging the heading with the text data you wish to use on any product. Once the first package is complete, continue with the remaining packages. Continue to walk through each package making sure you ve assigned the appropriate image to each image node. Once you ve associated the fields in all packages, you re ready to let ROES create the order. Click on the Back to Events tab in the far lower left of ROES to load the order overview window. Click on the Review Order button in the lower right corner. 17
18 The first client s package will show in the workspace, each image node should be populated with the appropriate image. Verify that the image is correct and the crop is correct. At this point you can adjust the crop of any item if you d like. Once the first package is complete you re ready to step to the next client s package. You ll notice play buttons at the bottom of the workspace with options to step back, play (step forward), fast forward and stop. You can step through each package individually with the play button. However, if you use the fast forward button, ROES will step through the entire order automatically, populating each package and product as needed. Roes will stop each time it encounters a package for the first time. This allows you to verify crop, orientation and text entry. Once you ve verified a package once, ROES will remember the crop/orientation changes you ve made and automatically apply those same changes to that package every time it s ordered. It will stop whenever it encounters a package or product for the first time, so you can make any adjustments. Once you ve addressed a product or package once, it will remember the adjustments and apply them automatically. Once ROES has reached the end of an order it will ask you if you would like to add the items to the order. Answer yes, and each item will be added to the order and you ll be taken to the shopping cart. 18
19 The shopping cart is the last place you will verify the order contents and modify any individual items. If you want to change an option or crop, click on the Pencil in the line item you are wanting to modify. The product will open up in the workspace and allow you to make any modifications necessary. You will want to save the final changes to the cart and continue reviewing the order. Once complete upload the order as usual by selecting Complete Order. Pencil tool Allows you to make last minute changes to items in your shopping cart Create an Event from a.csv data file. Creating a.csv file To automatically create an Event order, ROES uses a data files saved as.csv. A CSV is a comma separated values file, which allows data to be saved in a table structured format. CSV s look like a garden-variety spreadsheet but with a.csv extension. Traditionally they take the form of a text file containing information separated by commas. The xls file that we distribute is the standard file. It contains 30 columns of data. You are not required to populate all 30 columns. Only populate the columns you wish to use for your Event. The minimum four columns are: CustID, IndivImage, GroupIMG and Package. CustID is the value we will use for individual packaging. This can be your clients name or a number. Any products with the same CustID will be packaged together in our windowed envelope. IndivImage and GroupIMG contain the file names for both the individual and group images. 19
20 Packages is where you will enter the data for the various packages and add ons that a client has ordered. Package data can be entered in one of two formats. Both the examples below show one how you d enter package data for a single package A. Package dash quantity or Package only. Examples: Package-Quantity or Package A-1 A If a client orders multiple packages, the packages must be separated with a separator symbol. You can choose the separator you use. Typically it s either a semi colon ; or apostrophe, Examples: A-1, B-2 or A,B,B Both examples are one package A and two Package B The remaining 26 columns are open to population as you see fit. The column headings should remain as is but the data in each cell can be varied. In other words, even though a column is labeled League for example, you don t have to put a league name in that cell, you can use Jersey number or whatever you d like. Once the data is entered for the order, save the file as a.csv. Creating the Event To create an Event in ROES, click on the Events tab in the far upper right of ROES. This will bring up a screen where you can add a new event. Click on the Plus sign in the bottom left to add a line item above. Give the event a name, if you close and reopen the Events tab you ll be able to tell what line is what event by the name you ve designated for it. Next, click on Subject info in the lower right. This will bring up a window that allows you to choose how your data will be associated. Click on import data from a csv file and click Next. 20
21 This will bring up a browse dialog. Find the location where you saved the.csv file on your device and click on the event and select open. The data file you selected will open in a preview window as shown below. 21

22 Select the box First Row Has Field Names. This will tell ROES that the first row of data in the file you created is not data for the order but labels instead. The Field Name row will turn gray, indicating its header data. When the row has turned grey, click Next button in the lower right. From the pull down labeled Package Group, select the package set you wish to use for this event from the list of groups you ve saved previously and click next. 22

23 Select Yes, let me select the images now. Click next and browse to the folder on your computer containing your image files. Click on one of the images and select open. The event images will load into ROES, showing the data file at the top of the screen and image thumbnails at the bottom. 23

24 ROES will automatically associate and load the images into the event. Click on the row label that contains the IndivImage, the row will highlight blue. Next, click on the images pull down button located on the bottom of ROES and select match images from the pull down menu. The IndivImage thumbnails will load into the appropriate fields. Next do the same for GroupIMG for it to populate. Next, you need to highlight the row that contains your package data (the packages that each person ordered). Packages can be entered in one of two formats. P-Q or P alone. These options are set up in the events settings pages. Click on the gear located on the bottom right corner of ROES, between the event data and image thumbnails. 24


25 P-Q is the default method for package entry. P-Q is used to signify a Package ID followed by Quantity of that package with having multiple entries separated by a semicolon ; Example: 1 package A and 2 package B s would be entered as: A-1;B-2 P only is used if you don t want to use a quantity. Multiple entries are separated by a semicolon ; Example: 1 package A and 2 package B s would be entered as: A;B;B You must tell ROES which row of data contains your package information for that package. Click on the Package row, and then select Use As Packages. 25

26 The Package row should turn Green if everything is loaded correctly. Red cells will indicate an invalid package or an error. Either you mistyped the package, in which case, you simply click on the cell and correct that data. If you didn t mistype anything, then you forgot to make the requested package. In this case you will want to cancel out of the event and create/save the requested package in your Favorites that you are trying to order. You can then go back into the event and verify that all the red cells have turned green. Once you have the images associated and the package data selected the next step is to field associate. Field association tells ROES what nodes in your products get what data or images. To do this you simply select the Associate Fields button. Field Association only has to be done the very first time you use a package set. Once field association is completed, that information is saved for any future order. When you click Associate Fields, the program will bring up the first package in your selected set. All image and text nodes are numbered. To tell the program what goes where, you simply click on the Field Label you wish to use and drag it into the appropriate node in the package. IndivImage for example would go into any photo print ordered as well as individual image location on a memory mate. In the case of Wallet units, you only need to drag the label into the number 1 node, the other nodes will populate automatically when you create the order. Drag any heading into the appropriate text node to populate text data. You are not required to populate all the text nodes, just leave any blank nodes blank and no information will be used. Once the first package is complete, continue with the remaining packages. Stepping through each package, making sure you ve assigned the appropriate image to each image node. Once you ve associated your fields you re ready to review the order. Click on the Back to Subject info button on the lower left of ROES to load the order overview window. Select Start Review in the lower right. 26

27 The first client s package will show in the workspace. Each image node should be populated with the appropriate image. Verify that the image is correct and the crop is correct. At this point you can adjust the crop of any item if you d like. Once the first package is complete you re ready to step to the next client s package. You ll notice play buttons at the bottom of the workspace with options to step back, play (step forward), fast forward and stop. You can step through each package individually with the play button. However, if you use the fast forward button, ROES will step through the entire order automatically, populating each package and product as needed. Roes will stop each time it encounters a package for the first time. This allows you to verify crop, orientation and text entry. Once you ve verified a package once, ROES will remember the crop/orientation changes you ve made and automatically apply those same changes to that package every time it s ordered. It will stop whenever it encounters a package or product for the first time, so you can make any adjustments. Once you ve addressed a product or package once, it will remember the adjustments and apply them automatically. Once ROES has reached the end of an order it will ask you if you would like to add the items to the order. Answer yes, and each item will be added to the order and you ll be taken to the shopping cart. 27

28 Once it s completed the order you select add items to the order. Each package will be added to the order and you ll be taken to the shopping cart. The shopping cart is the last place you will verify the order contents and modify any individual items. If you want to change an option or crop, click on the Pencil in the line item you are wanting to modify. The product will open up in the workspace and allow you to make any modifications necessary. You will want to save the final changes to the cart and continue reviewing the order. Once complete upload the order as usual by selecting Complete Order. Pencil tool Allows you to make last minute changes to items in your shopping cart 28
ROES EVENTS SYSTEM TUTORIAL
 table of contents 3 Introduction to ROES Events 4 Preparing your Data File 6 Recommended Order of Operations 6 Build Packages 9 Import Data & Images 10 Match Images & Identify Packages 11 Review Order
A new clients guide to: Activating a new Studio 3.0 Account Creating a Photo Album Starting a Project Submitting a Project Publishing Tips
 Getting Started With Heritage Makers A Guide to the Heritage Studio 3.0 Drag and Drop Publishing System presented by Heritage Makers A new clients guide to: Activating a new Studio 3.0 Account Creating
Microsoft Office 2016 Mail Merge
 Microsoft Office 2016 Mail Merge Mail Merge Components In order to understand how mail merge works you need to examine the elements involved in the process. In any mail merge, you'll deal with three different
PlicElements Quick Start Guide
 PlicElements is a high-speed-low-drag web application used by Professional Photographers and/or Studios to upload and prepare class/school composites to participating labs for processing. Simply upload
Learn more about Pages, Keynote & Numbers
 Learn more about Pages, Keynote & Numbers HCPS Instructional Technology May 2012 Adapted from Apple Help Guides CHAPTER ONE: PAGES Part 1: Get to Know Pages Opening and Creating Documents Opening a Pages
Introduction to Microsoft Office PowerPoint 2010
 Introduction to Microsoft Office PowerPoint 2010 TABLE OF CONTENTS Open PowerPoint 2010... 1 About the Editing Screen... 1 Create a Title Slide... 6 Save Your Presentation... 6 Create a New Slide... 7
Set yourself above the competition
 Set yourself above the competition Today s fast-paced, internet-focused consumer has a lot of options when it comes to where to spend their money. We re working hard to give you options for both products
PowerPoint 2007 Cheat Sheet
 ellen@ellenfinkelstein.com 515-989-1832 PowerPoint 2007 Cheat Sheet Contents Templates and Themes... 2 Apply a corporate template or theme... 2 Format the slide master... 2 Work with layouts... 3 Edit
Importing in Offertory Donations from Spreadsheets into Connect Now
 Importing in Offertory Donations from Spreadsheets into Connect Now When you have an excel spreadsheet that has donations in it, if you have a key identifier, such as an envelope number, then the spreadsheet
Word 2013 Quick Start Guide
 Getting Started File Tab: Click to access actions like Print, Save As, and Word Options. Ribbon: Logically organize actions onto Tabs, Groups, and Buttons to facilitate finding commands. Active Document
Designing in the FastTrack
 Designing in the FastTrack The Fast Track is best used with templates that have already been customized as desired. For more information on the differences between the FastTrack and the Advanced Designer,
Chapter 25. Build Creations with Your Photos
 Chapter 25 Build Creations with Your Photos 2 How to Do Everything with Photoshop Elements How to Create a slide show to show off your images Post your images in web pages Build cards, calendars, and postcards
Option 1: Syllabus home page
 Working with the Template We designed the template to be useful, attractive and responsive on mobile devices. Use all the parts that you want and delete the parts you don t. The template gives you three
On the Web sun.com/aboutsun/comm_invest STAROFFICE 8 DRAW
 STAROFFICE 8 DRAW Graphics They say a picture is worth a thousand words. Pictures are often used along with our words for good reason. They help communicate our thoughts. They give extra information that
ekaizen Lessons Table of Contents 1. ebook Basics 1 2. Create a new ebook Make Changes to the ebook Populate the ebook 41
 Table of Contents 1. ebook Basics 1 2. Create a new ebook 20 3. Make Changes to the ebook 31 4. Populate the ebook 41 5. Share the ebook 63 ekaizen 1 2 1 1 3 4 2 2 5 The ebook is a tabbed electronic book
PowerPoint 2016 Building a Presentation
 PowerPoint 2016 Building a Presentation What is PowerPoint? PowerPoint is presentation software that helps users quickly and efficiently create dynamic, professional-looking presentations through the use
Creating a Presentation
 Creating a Presentation 1.1 Double Click the PowerPoint icon on the desktop Or Click on the start menu Type PowerPoint into the search box Click on the PowerPoint icon 1.2 Click Blank Presentation 1 How
Microsoft Word 2010 Tutorial
 1 Microsoft Word 2010 Tutorial Microsoft Word 2010 is a word-processing program, designed to help you create professional-quality documents. With the finest documentformatting tools, Word helps you organize
Excel 2013 Intermediate
 Excel 2013 Intermediate Quick Access Toolbar... 1 Customizing Excel... 2 Keyboard Shortcuts... 2 Navigating the Spreadsheet... 2 Status Bar... 3 Worksheets... 3 Group Column/Row Adjusments... 4 Hiding
hdalbum User Designer Guide Collect Create Share Designer V 1.2
 hdalbum User Designer Guide 2017 Collect Create Share Designer V 1.2 Table of Contents Contents Welcome to the hdalbum Designer... 2 Features... 2 System Requirements... 3 Supported File Types... 3 Installing
Creating a Website with Publisher 2016
 Creating a Website with Publisher 2016 Getting Started University Information Technology Services Learning Technologies, Training & Audiovisual Outreach Copyright 2017 KSU Division of University Information
FLIR Tools+ and Report Studio
 Creating and Processing Word Templates http://www.infraredtraining.com 09-20-2017 2017, Infrared Training Center. 1 FLIR Report Studio Overview Report Studio is a Microsoft Word Reporting module that is
Microsoft PowerPoint 2016 Part 2: Notes, Links, & Graphics. Choosing a Design. Format Background
 Microsoft PowerPoint 2016 Part 2: Notes, Links, & Graphics Choosing a Design Open PowerPoint. Click on Blank Presentation. Click on the Design tab. Click on the design tab of your choice. In part one we
BASIC MICROSOFT POWERPOINT
 BASIC MICROSOFT POWERPOINT PART ONE PHONE: 504-838-1144 IT Training Team Jefferson Parish Library EMAIL: jpltrain@jplibrary.net In this class you will learn to: Launch, close, and interact with Microsoft
What is Publisher, anyway?
 What is Publisher, anyway? Microsoft Publisher designed for users who need to create and personalize publications such as marketing materials, business stationery, signage, newsletters and other items
Microsoft PowerPoint 2016 Basics Unit 9 Final Review - Student Notes Directions: Fill in the blanks.
 Directions: Fill in the blanks. 1. PowerPoint Window Layout 2. File Tab When clicked, opens - automatically opens the Info option by default Holds the following options: - Info - New - Open - Save - Save
Keynote 08 Basics Website:
 Website: http://etc.usf.edu/te/ Keynote is Apple's presentation application. Keynote is installed as part of the iwork suite, which also includes the word processing program Pages and the spreadsheet program
1. Open PowerPoint and you will see the introductory screen that contains different themes and templates. From the selection displayed, choose Slice.
 PowerPoint Assessment ***Remember! This is a test and you cannot ask for help. This must be done completely on your own. If you have forgotten a skill, please go to my Tutorials page on my website and
Computer learning Center at Ewing. Course Notes - Using Picasa
 1st January 2014 Computer learning Center at Ewing Course Notes - Using Picasa These course notes describe the content of the Using Picasa course. The course notes are based on Picasa 3. This course material
InDesign Tools Overview
 InDesign Tools Overview REFERENCE If your palettes aren t visible you can activate them by selecting: Window > Tools Transform Color Tool Box A Use the selection tool to select, move, and resize objects.
Numbers Basics Website:
 Website: http://etc.usf.edu/te/ Numbers is Apple's new spreadsheet application. It is installed as part of the iwork suite, which also includes the word processing program Pages and the presentation program
Table of Contents. Page 2 of 72. High Impact 4.0 User Manual
 Table of Contents Introduction 5 Installing High Impact email 6 Installation Location 6 Select Mail Client 6 Create a ReadyShare Account 6 Create a Default Profile 6 Outlook Configuration Message 6 Complete
Photoshop tutorial: Final Product in Photoshop:
 Disclaimer: There are many, many ways to approach web design. This tutorial is neither the most cutting-edge nor most efficient. Instead, this tutorial is set-up to show you as many functions in Photoshop
Sedao Ltd. QuickChange PROject. User Manual for QuickChange PROject version 2.1.5
 Sedao Ltd QuickChange PROject User Manual for QuickChange PROject version 2.1.5 Contents What is QuickChange PROject?... 2 Simple Artwork Creation... 5 Creating a project... 7 QuickChange PROject Template
WORD Creating Objects: Tables, Charts and More
 WORD 2007 Creating Objects: Tables, Charts and More Microsoft Office 2007 TABLE OF CONTENTS TABLES... 1 TABLE LAYOUT... 1 TABLE DESIGN... 2 CHARTS... 4 PICTURES AND DRAWINGS... 8 USING DRAWINGS... 8 Drawing
When you first start OneNote, it creates a sample notebook for you. You can use this notebook or quickly create your own.
 Basic tasks in Microsoft OneNote 2013 OneNote is a digital notebook that provides a single place for all of your notes and information everything you need to remember and manage in your life at home, at
Microsoft Office Publisher
 Microsoft Office 2007- Publisher Opening Microsoft Publisher Using the Start Menu, click on All Programs and navigate to the Microsoft Office folder. Click on Microsoft Office Publisher 2007. Choosing
Create a Contact Sheet of Your Images Design a Picture Package Customize Your Picture Package Layout Resample Your Image...
 72 71 Create a Contact Sheet of Your Images................... 158 Design a Picture Package............ 160 73 Customize Your Picture Package Layout.... 162 74 Resample Your Image.................... 164
Intro to Excel. To start a new workbook, click on the Blank workbook icon in the middle of the screen.
 Excel is a spreadsheet application that allows for the storing, organizing and manipulation of data that is entered into it. Excel has variety of built in tools that allow users to perform both simple
FrontPage 98 Quick Guide. Copyright 2000 Peter Pappas. edteck press All rights reserved.
 Master web design skills with Microsoft FrontPage 98. This step-by-step guide uses over 40 full color close-up screen shots to clearly explain the fast and easy way to design a web site. Use edteck s QuickGuide
PowerPoint 2016 Basics for Mac
 1 PowerPoint 2016 Basics for Mac PowerPoint 2016 Basics for Mac Training Objective To learn the tools and features to get started using PowerPoint more efficiently and effectively. What you can expect
A Student s Guide to Taking Notes Using Microsoft Word 2013
 A Student s Guide to Taking Notes Using Microsoft Word 2013 Erin Moreira UMass Amherst 2015 A Student s Guide to Taking Notes Using Microsoft Word 2013 Acknowledgements I would like to thank Professor
InDesign Part II. Create a Library by selecting File, New, Library. Save the library with a unique file name.
 InDesign Part II Library A library is a file and holds a collection of commonly used objects. A library is a file (extension.indl) and it is stored on disk. A library file can be open at any time while
FACULTY AND STAFF COMPUTER FOOTHILL-DE ANZA. Office Graphics
 FACULTY AND STAFF COMPUTER TRAINING @ FOOTHILL-DE ANZA Office 2001 Graphics Microsoft Clip Art Introduction Office 2001 wants to be the application that does everything, including Windows! When it comes
Chapter 10 Working with Graphs and Charts
 Chapter 10: Working with Graphs and Charts 163 Chapter 10 Working with Graphs and Charts Most people understand information better when presented as a graph or chart than when they look at the raw data.
Introduction to Microsoft Publisher
 Class Description This is an introduction to Microsoft Publisher, with a focus on choosing a template and modifying it to meet your needs. Class Length One and one half (1½) hours Introduction to Microsoft
SchoolDesk University
 SchoolDesk University Forms, Surveys, and Polls Module 101 Guided Walk-through for the basic fields, terminology, and location of tools. What is the NEW SD7 Forms Module? The NEW SchoolDesk Forms Module,
Lab 2. Task 1 : Learning basic tasks with PowerPoint. Estimated time
 Lab 2 Task 1 : Learning basic tasks with PowerPoint Objective : To familiarize with basic tasks in PowerPoint : 1. Create a presentation 2. Find and apply a template 3. Insert a new slide 4. Format text
PowerPoint 2016: Part 1
 PowerPoint 2016: Part 1 Updated: April 2018 Cost: $1.10 PowerPoint is a presentation tool used to create slide-by-slide lectures and visual aids. It can display a combination of text, video, audio, and
Artistic Text. Basics 1
 Basics 1 In this tutorial, we ll show you how to: Work with artistic text. Create, edit, and format text. Apply shadows, reflections, and other text effects. Create shaped text (or text-on-a-path). 2 Basics
Yearbook Edition Software
 Yearbook Edition Software End User Guide Pixami, Inc. www.pixami.com Table of Contents 1 Introduction... 4 1.1 Configuration and Preparation... 4 1.2 Software System Requirements... 4 1.3 The Basic Steps...
Downloaded from
 Chapter 4 Advance features of MS PowerPoint Inside this chapter : Inserting different objects (i.e. images, Word Arts, audio & video etc.), Transitions in slide, Custom Animation with text. PowerPoint
Exercise 1: Introduction to MapInfo
 Geog 578 Exercise 1: Introduction to MapInfo Page: 1/22 Geog 578: GIS Applications Exercise 1: Introduction to MapInfo Assigned on January 25 th, 2006 Due on February 1 st, 2006 Total Points: 10 0. Convention
Intermediate Microsoft Word 2010
 Intermediate Microsoft Word 2010 USING PICTURES... PAGE 02! Inserting Pictures/The Insert Tab! Picture Tools/Format Tab! Resizing Images! Using the Arrange Tools! Positioning! Wrapping Text! Using the
Designer Reference 1
 Designer Reference 1 Table of Contents USE OF THE DESIGNER...4 KEYBOARD SHORTCUTS...5 Shortcuts...5 Keyboard Hints...5 MENUS...7 File Menu...7 Edit Menu...8 Favorites Menu...9 Document Menu...10 Item Menu...12
PagePlus X7. Quick Start Guide. Simple steps for creating great-looking publications.
 PagePlus X7 Quick Start Guide Simple steps for creating great-looking publications. In this guide, we will refer to specific tools, toolbars, tabs, or menus. Use this visual reference to help locate them
User Manual. perfectionlearning.com/technical-support
 User Manual perfectionlearning.com/technical-support 1 User Manual Accessing Math X... 3 Login... 3 Forgotten Password... 3 Navigation Menu... 4 Logout... 4 Admin... 5 Creating Classes and Students...
infogr.am -- getting started
 Infogr.am Basics What is infogr.am? It s a great resource for when you need to visualize data - make simple infographics or make individual charts (bar graphs, pie charts, tables, pictoral charts, etc.).
To learn how to use Focus in Pix:
 Welcome To learn how to use Focus in Pix: Step-by-step guide Visit www.focusinpix.com/quick-guide for a quick overview of Focus in Pix software. You will also find many tips and tutorials on our site.
Kona ALL ABOUT FILES
 Kona ALL ABOUT FILES February 20, 2014 Contents Overview... 4 Add a File/Link... 5 Add a file via the Files tab... 5 Add a file via a conversation, task, or event... 6 Add a file via a comment... 7 Add
Useful Google Apps for Teaching and Learning
 Useful Google Apps for Teaching and Learning Centre for Development of Teaching and Learning (CDTL) National University of Singapore email: edtech@groups.nus.edu.sg Table of Contents About the Workshop...
Google Slides Handout. Carol LaRow
 Google Slides Handout Create Presentations Online Carol LaRow Create presentations that users view in browser windows. Collaborate in real time, or work when it s convenient, inside a WEB browser window.
Interface. 2. Interface Adobe InDesign CS2 H O T
 2. Interface Adobe InDesign CS2 H O T 2 Interface The Welcome Screen Interface Overview The Toolbox Toolbox Fly-Out Menus InDesign Palettes Collapsing and Grouping Palettes Moving and Resizing Docked or
Shopping Cart: Queries, Personalizations, Filters, and Settings
 Shopping Cart: Queries, Personalizations, Filters, and Settings on the Shopping Cart Home Page Use this Job Aid to: Learn how to organize the Shopping Cart home page so that it is easier to use. BEFORE
ADOBE DREAMWEAVER CS4 BASICS
 ADOBE DREAMWEAVER CS4 BASICS Dreamweaver CS4 2 This tutorial focuses on the basic steps involved in creating an attractive, functional website. In using this tutorial you will learn to design a site layout,
SETTING UP A. chapter
 1-4283-1960-3_03_Rev2.qxd 5/18/07 8:24 PM Page 1 chapter 3 SETTING UP A DOCUMENT 1. Create a new document. 2. Create master pages. 3. Apply master pages to document pages. 4. Place text and thread text.
Table Basics. The structure of an table
 TABLE -FRAMESET Table Basics A table is a grid of rows and columns that intersect to form cells. Two different types of cells exist: Table cell that contains data, is created with the A cell that
MICROSOFT POWERPOINT BASIC WORKBOOK. Empower and invest in yourself
 MICROSOFT POWERPOINT BASIC WORKBOOK Empower and invest in yourself 2 Workbook Microsoft PowerPoint Basic onlineacademy.co.za MODULE 01 GETTING STARTED WITH POWERPOINT 1. Launch a blank PowerPoint presentation.
InDesign ACA Certification Test 50 terms hollymsmith TEACHER
 InDesign ACA Certification Test 50 terms hollymsmith TEACHER reccommended use: matching, test, etc You cannot rotate the graphic around its upper-left corner with the Free Transform tool. The content is
Creating Visually Appealing Documents. Word Module 2. Diocese of St. Petersburg Office of Training
 Creating Visually Appealing Documents Word 2010 Module 2 Diocese of St. Petersburg Office of Training Training@dosp.org Diocese of St. Petersburg 0 9/5/2014 This Page Left Intentionally Blank Diocese of
Quick Start Guide - Contents. Opening Word Locating Big Lottery Fund Templates The Word 2013 Screen... 3
 Quick Start Guide - Contents Opening Word... 1 Locating Big Lottery Fund Templates... 2 The Word 2013 Screen... 3 Things You Might Be Looking For... 4 What s New On The Ribbon... 5 The Quick Access Toolbar...
An introduction to Microsoft PowerPoint 2016
 An introduction to Microsoft PowerPoint 2016 STM Training Program By: Emilio Macas What is Microsoft PowerPoint? Microsoft PowerPoint is a world-wide software that gives you the facility to create stunning
How To Capture Screen Shots
 What Is FastStone Capture? FastStone Capture is a program that can be used to capture screen images that you want to place in a document, a brochure, an e-mail message, a slide show and for lots of other
L E S S O N 2 Background
 Flight, Naperville Central High School, Naperville, Ill. No hard hat needed in the InDesign work area Once you learn the concepts of good page design, and you learn how to use InDesign, you are limited
InDesign Basics. Adobe
 Adobe InDesign Basics Craig Polanowski 1. Begin by creating a new document. Chances are pretty good that you will want to turn off the facing pages setting and create single pages instead of spreads. One
How to Edit Your Website
 How to Edit Your Website A guide to using your Content Management System Overview 2 Accessing the CMS 2 Choosing Your Language 2 Resetting Your Password 3 Sites 4 Favorites 4 Pages 5 Creating Pages 5 Managing
Interface. 2. Interface Photoshop CS/ImageReady CS for the Web H O T
 2. Interface Photoshop CS/ImageReady CS for the Web H O T 2. Interface The Welcome Screen Interface Overview Using the Toolbox Using Palettes Using the Options Bar Creating a Tool Preset Resetting Tools
DOING MORE WITH WORD: MICROSOFT OFFICE 2010
 DOING MORE WITH WORD: MICROSOFT OFFICE 2010 GETTING STARTED PAGE 02 Prerequisites What You Will Learn USING MICROSOFT WORD PAGE 03 Viewing Toolbars Adding and Removing Buttons MORE TASKS IN MICROSOFT WORD
Transforming Selections In Photoshop
 Transforming Selections In Photoshop Written by Steve Patterson. In previous tutorials, we learned how to draw simple shape-based selections with Photoshop s Rectangular and Elliptical Marquee Tools. Using
The original image. Let s get started! The final result.
 Vertical Photo Panels Effect In this Photoshop tutorial, we ll learn how to create the illusion that a single photo is being displayed as a series of vertical panels. It may look complicated, but as we
KODAK Software User s Guide
 KODAK Create@Home Software User s Guide Table of Contents 1 Welcome to KODAK Create@Home Software Features... 1-1 Supported File Formats... 1-1 System Requirements... 1-1 Software Updates...1-2 Automatic
You can also search online templates which can be picked based on background themes or based on content needs. Page eleven will explain more.
 Microsoft PowerPoint 2016 Part 1: The Basics Opening PowerPoint Double click on the PowerPoint icon on the desktop. When you first open PowerPoint you will see a list of new presentation themes. You can
Microsoft Publisher 2010 Handout
 Microsoft Publisher 2010 Handout Publisher 2010 is desktop publishing software to design and produce professional publications allowing you to combine text, graphics, illustrations, and photographs. You
Templates and Forms A Complete Overview for Connect Users
 Templates and Forms A Complete Overview for Connect Users Chapter 1: Introduction... 3 Chapter 2: Microsoft Online Templates... 3 Word Templates... 3 Template Details... 4 Create a Template... 4 Update
PowerPoint 2010: Basic Skills
 PowerPoint 2010: Basic Skills Application Support and Training Office of Information Technology, West Virginia University OIT Help Desk (304) 293-4444, oithelp@mail.wvu.edu oit.wvu.edu/training/classmat/ppt/
Note: For more information on creating labels in CDS, watch Volume 22 of the Fast Class Update: Label Creation.
 Information used to create labels the Client Data System (CDS) can be exported out of CDS and used to create labels in Microsoft Word. In Word, you can make changes to the style, size, and color of fonts
Boise State University. Getting To Know FrontPage 2000: A Tutorial
 Boise State University Getting To Know FrontPage 2000: A Tutorial Writers: Kevin Gibb, Megan Laub, and Gayle Sieckert December 19, 2001 Table of Contents Table of Contents...2 Getting To Know FrontPage
Microsoft FrontPage. An Introduction to. Lecture No.1. Date: April Instructor: Mr. Mustafa Babagil. Prepared By: Nima Hashemian
 An Introduction to Microsoft FrontPage Lecture No.1 Date: April 20. 2007 Instructor: Mr. Mustafa Babagil Prepared By: Nima Hashemian 2006 An Introduction to FrontPage Mathematics Department Eastern Mediterranean
The Fundamentals. Document Basics
 3 The Fundamentals Opening a Program... 3 Similarities in All Programs... 3 It's On Now What?...4 Making things easier to see.. 4 Adjusting Text Size.....4 My Computer. 4 Control Panel... 5 Accessibility
DOING MORE WITH WORD: MICROSOFT OFFICE 2013
 DOING MORE WITH WORD: MICROSOFT OFFICE 2013 GETTING STARTED PAGE 02 Prerequisites What You Will Learn USING MICROSOFT WORD PAGE 03 Viewing Toolbars Adding and Removing Buttons MORE TASKS IN MICROSOFT WORD
Outlook Web Access. In the next step, enter your address and password to gain access to your Outlook Web Access account.
 Outlook Web Access To access your mail, open Internet Explorer and type in the address http://www.scs.sk.ca/exchange as seen below. (Other browsers will work but there is some loss of functionality) In
A Quick and Easy Guide To Using Canva
 A Quick and Easy Guide To Using Canva Canva is easy to use and has great tools that allow you to design images that grab anyone s eye. These images can be used on your personal website, Pinterest, and
11.1 Create Speaker Notes Print a Presentation Package a Presentation PowerPoint Tips... 44
 Contents 1 Getting Started... 1 1.1 Presentations... 1 1.2 Microsoft Office Button... 1 1.3 Ribbon... 2 1.4 Mini Toolbar... 2 1.5 Navigation... 3 1.6 Slide Views... 4 2 Customize PowerPoint... 5 2.1 Popular...
Keynote Basics Website:
 Keynote Basics Website: http://etc.usf.edu/te/ Keynote is Apple's presentation application. Keynote is installed as part of the iwork suite, which also includes the word processing program Pages. If you
AGENT123. Full Q&A and Tutorials Table of Contents. Website IDX Agent Gallery Step-by-Step Tutorials
 AGENT123 Full Q&A and Tutorials Table of Contents Website IDX Agent Gallery Step-by-Step Tutorials WEBSITE General 1. How do I log into my website? 2. How do I change the Meta Tags on my website? 3. How
In Depth: Writer. The word processor is arguably the most popular element within any office suite. That. Formatting Text CHAPTER 23
 CHAPTER 23 In Depth: Writer The word processor is arguably the most popular element within any office suite. That said, you ll be happy to know that OpenOffice.org s Writer component doesn t skimp on features.
NVTI s POWERPOINT 101
 NVTI s POWERPOINT 101 1) Click on START on bottom left of screen 2) Go to PROGRAMS 3) Go to MICROSOFT POWERPOINT, click. 4) When it opens, it s on Blank Presentation Hit OK 5) Choose a Layout (click on
Word 3 Microsoft Word 2013
 Word 3 Microsoft Word 2013 Mercer County Library System Brian M. Hughes, County Executive Action Technique 1. Insert a Text Box 1. Click the Insert tab on the Ribbon. 2. Then click on Text Box in the Text
Microsoft PowerPoint 2010
 Microsoft PowerPoint 2010 Lesson 6: Working with Layout and Graphics Created by Felicia Hudson, Riverside High School--Durham Public Schools On completion of this lesson, students will be able to do the
TABLE OF CONTENTS TABLE OF CONTENTS... 1 INTRODUCTION... 3 BREAK... 4 DEFINITIONS... 4 STEP BY STEP- SECTION BREAK... 6 PAGE NUMBERS...
 TABLE OF CONTENTS TABLE OF CONTENTS... 1 INTRODUCTION... 3 BREAK... 4 DEFINITIONS... 4 WHY WOULD YOU USE THIS?... 4 STEP BY STEP- PAGE BREAK... 4 ALTERNATIVE METHODS... 5 STEP BY STEP- SECTION BREAK...