Expedient User Manual Getting Started
|
|
|
- Mary Small
- 5 years ago
- Views:
Transcription
1 Volume 1 Expedient User Manual Getting Started Gavin Millman & Associates Pty Ltd 281 Buckley Street Essendon VIC 3040 Phone Web
2 Table of Contents Logging In... 3 Main Menu... 5 Description... 7 Sample... 7 Bookmarks... 8 Access Check for Updates Releases User Manuals Font Size Multiple Sessions Screen Layout Finding a Record Exiting a Screen Buttons and Shortcuts Accessing Toolbars/Buttons Using the Mouse Using the Keyboard Adding/Updating a Record Header Screen Header / Detail Screen Field Navigation Browsing Records Sort Mode Browse Output to CSV Printing Documents ing Documents Attachments and Preview Auto Save


3 INTRODUCTION E Xpedient software supports the Customs, Forwarding, Logistics industry. This document aims to assist new users navigate through the system. Various Icons, Symbols which are prevalent throughout the system will be highlighted in this document with an explanation of what each performs. Please Note: GMA Recommends using Adobe PDF Reader. To get the best results in viewing Expedient User Manuals, turn the Bookmarks Navigation on to see the Bookmarks for each topic Heading. See below: Once this is set, then click on the below: See below: Logging In On your desktop will be an Icon which looks this: Double click on this icon. This will then open up the Expedient Application at a log in prompt: 3

4 To login, type in the user name and password that you were given by your manager or IT Staff Member. To Sign In: 1. Enter your User Name and Password and press OK. Do not share your username and password with others 2. The Save Password option is disabled by default. Forget your Username and/or Password? Remember to store your password somewhere safe in the event that you forget it. Your manager or a user with Super User Permissions will be the only person that can reset your password. This is performed in the Users Masterfile and is described in the Administrator User Manual 4

5 Main Menu Once you have successfully logged in you will be presented with the Expedient Main Menu and Dashboard. This screen will vary based on the Modules your company has subscribed to. The screen is divided into five sections, Menu Bookmarks Releases User Manuals Communication Banner Menu Bookmarks Releases User Manuals Font Size 5

6 Menu The menu structure is based off the windows tree view. Each Menu item with a folder icon can be collapsed to view the sub menus within each menu function. See below: Icons This symbol represents a folder that contains sub folders/programs that has not been opened. This symbol represents a folder that contains sub folders/programs that has been opened. This symbol represents an input screen, for data entry This symbol represents a print function, e.g.: a report or a document print. This symbol represents a posting/prepare function, e.g.: posting monies to the general ledger. This symbol represents a function, e.g.: check to see if all items have been posted. This symbol collapses all Main Menu Items on one click. 6

, see below: Description")
7 Menu Descriptions/Samples Most Screens and Reports that appear on the menu contain a short description of what that function performs, and a sample (if applicable), see below: Description Sample 7

8 Bookmarks This is a list of quick links to screens and reports that you use most often. The list also includes links to 3 rd party websites and process statuses. As a new user you will see a generic list of bookmarks. This list is customisable by clicking on the button in the toolbar. Edit Bookmarks The edit mode displays the full Menu structure on the left with a second tab of Processes. The menu and processes listed will be dependent on the modules your site subscribes to and your user access level. 8
9 Menu items Menu items that can be added to the short cuts list include screens, document printing, report printing, posting and preparation functions. Processes Processes that can be added to the short cuts list include scheduled processes like backups, communications with 3 rd parties, monitoring options such as user limit and system load, some screens highlighting where urgent action is required and links to useful contacts e.g. Customs and Expedient Support Tracker The icons used as are follows: - links to screens - external internet link The status of scheduled processes will be indicated with a traffic light system and a short text description to alert you to any issues. In the edit mode there are a number of ways you can add, remove and reorder items in the Bookmarks list. Drag and drop Use the mouse to pick up and drag a menu or process item and place into the shortcut list. Point the cursor where you want to place the item in the list and release the mouse. You can also remove items from the Bookmarks list with drag and drop. Items already in the list can be dragged and dropped within the list to change the order. Add/Remove buttons Click on a Menu or Process item and click the the bottom of the short cuts list. button to add the item to Click on the Menu or Process item in the short cuts list and click the to remove the item from the short cuts list. button The icons can be resized to your preference using the sliding scale. 9

10 The button will reset your short cut list to the screens you access most often. The list will be followed by the ACS-RSS Updates website, if you are based in Australia, which provides easy access to Customs alerts. This link is a permanent item on your Bookmarks list. To save and exit the Edit Bookmarks mode click the or button. Any changes will be saved automatically. Access The access button allows all users to view what Menus / Programs users have access to: Clicking on the Access Button when the Customer Masterfile Menu is highlighted shows the below: Check for Updates This button allows users to update their Expedient Software Application is up to date. Please Note: this is only the look and feel of the application, not the actual functionality is affected. For functionality updates see the Releases Tab on the Main Menu 10

11 Releases This tab displays the most recent Release Notes detailing any recent changes to Expedient. We recommend these are read regularly so you are notified of any changes. The information is arranged in Notes on each topic. The title of each Note includes the date the change has been made available in Expedient, the area of Expedient affected and a brief description of the change e.g. Release Date 15/07/15 NZ Import Forwarding Documents Screen pop up. This is followed by text with a more expansive description of the change. Click on the Release Note title to view the full Release Note. The most recently published Release Notes will be shown at the top of the Release Notes list. Any changes available in the next release will be shown at the top of the list for easy reference for coming changes. After viewing the Release Note click on the Release button at the top of the Release Notes tab to return to the list of Release Notes Search Release Notes by entering the text to search for and click. Expedient will look for the text in all published Release Notes and show the most relevant search at the top of the results. Use the View in Browser button to open a view of all the published Release Notes in a separate Browser window. 11

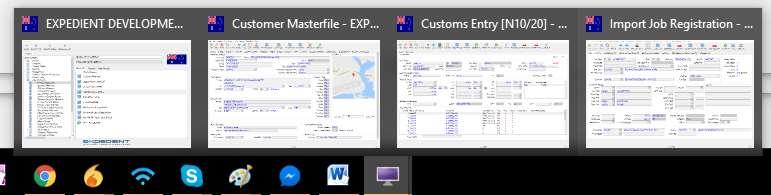
12 User Manuals This tab displays the User Manuals for Expedient. The manuals are also available from the screens they relate to. The information displayed is as follows Icon This will open the User Manual in your internet window Manual Name This is the name of the manual. This column can be sorted Description This is a short introduction to the manual Date last updated This is the date the Manual was last updated. This column can be sorted Font Size This area of the dashboard allows you to set the size of the text in Expedient screens. Slide the arrow along the range to find a font size that best suits you for the screen you are using. Open an Expedient screen to check the results. Close the dashboard, and log in to Expedient again to refresh the dashboard to the new font size setting. Multiple Sessions Each user has the ability to utilise multiple screens under the single logon. For example a user can open the Import Job Registration Screen and search for a job. If they then need to search for a customer in the Customer Masterfile they can remain in the Import Job Registration Screen and return to the Main Menu and go into the Customer Masterfile and perform a search. The below screen shot displays three Expedient Windows, the Main Menu, the Job Registration Screen and the Customer Masterfile. A user can click on each window to return to that function. 12
13 13

14 Screen Layout All screens have a consistent look and feel. The toolbars, symbols and shortcut buttons are all consistent on each screen ensuring users gain an understanding and confidence of the system in a short period of time. See the below screen for an explanation of the layout. The below 7 buttons are standard across all input screens. See below for keyboard shortcuts. 14
15 Finding a Record The Expedient System allows users to search any field within an input screen that has a white background. Fields with grey backgrounds are for display purposes only and cannot be searched. The below table outlines the various use of key strokes that assist users in searching. Character Description Example > Greater than or after a specific date OR < Less than or before OR (pipe) Used to search two or more variables. Will search for any record with 3 or 6 Packages : Used between two or more variables to specify a range. Will search for records with No.Pkgs between 10 and 15 * Used before, after or between a variable to designate a wildcard. Will search for records where customer code starts with SAMP? Used before, after or between a variable to designate a single character wildcard = Used to find an empty field. Searches records where No.Pkgs is null!= Used to exclude a variable. Searches records the Consol No is not null!= Used to exclude a variable. Searches records where No.Pkgs does not equal 15 >= Greater than or equal to <= Less than or equal to Save - Clicking on this button will begin a search of the records for the data you have input. Cancel - Clicking on this button will exit search mode Enter Esc 15
16 Exiting a Screen When exiting a screen you can either click on the the screen, or select File Exit from the Menu. X Button in the top right section of Please note: when clicking on the X button, you must be in the first tab of the screen. In the example below, the user can use the X button as he/she is in the Job Details tab, this being the first tab. 16
17 Buttons and Shortcuts The Expedient System allows users to utilise 2 forms of screen navigation, the use of the mouse through buttons, and the use of keyboard via shortcut keys. Button shortcuts use the First Letter of the button where possible. The below icons highlight each action and shortcut within an input screen. Icon Description Shortcut Key Clicking on this button will place users in the input screen in Add Mode. This will allow them to add a new record. i.e.: New Job A Clicking on this button will place users in the screen in Update Mode. This will allow the user to update the current record. This button will only be displayed if a record is displayed on the screen. Clicking on this button will Delete the current record displayed on the screen. This button will only be displayed if a record is displayed AND you have the authority to delete records. Clicking on this button will Find a record. Users can search for a record by entering data in any field within the screen that is not grey. Clicking on this button will Browse the selected records. This allows the user a quick view of the selected records. This button will only be displayed if a record is displayed on the screen. Clicking on this button will take the user to the previous record. This is only applicable when there is more than one record displayed in the record counter. Clicking on this button will take the user to the next record. This is only applicable when there is more than one record displayed in the record counter. Clicking on this button will save the record when updating or adding a record. This will also execute a find command. Clicking on this button will take the user out of input, find or update mode without saving or search the record. Clicking on this button will take the user to a Masterfile Look Up Screen. Clicking on this button will allows users to perform a new Search U D F B P N Enter Esc CTRL + Z F5 17
18 Icon Description Shortcut Key Clicking on this button will allows to insert a new record within a table (i.e.: Supplier s Invoice or Debtors Invoice Screen) Clicking on this button will allows to delete a record within a table (i.e.: Supplier s Invoice or Debtors Invoice Screen) F3 F2 Icon Action Description Shortcut Key N/A Move to next field To navigate to the next input field, the user can click on the field they wish OR use the tab key on the keyboard. Move to Next Screen Tab Clicking on the Screen Tabs will change screens Tab Ctrl +Tab (left to right) Pull down Menus Date Edit These fields allow you to select from a list of options. Clicking on this button will bring up a calendar so the user can select a date Detail only Ctrl + Shift + Tab (right to left) Alt + Down Arrow N/A Insert Line Allows the User to insert a line where the cursor is currently positioned N/A Delete Line Allows the User to delete the current line on which the cursor is currently positioned N/A Move Lines Down Allows the User (whilst in the DETAIL section) to move the cursor down to the next block of entries N/A Move Lines Up Allows the User (whilst in the DETAIL section) to move the cursor up to the next block of entries F2 F3 F4 18

19 Accessing Toolbars/Buttons The toolbars are located on the top of each screen. An example of a toolbar can be seen below: To access these toolbars you have two choices: Using the Mouse Simply click on the Toolbar and the options will drop down. Using the Keyboard Expedient allows Shortcut Keys using Alt and the underlined letter on the toolbar. This will open the pull down menu. Continue to hold down Alt and press the underlined letter to go to the required option. Within the pull down menus capital letter indicate the Command Keys that will open screens. These are related to the toolbar buttons within the screen. For example, within the Import Job Registration screen pressing s will open the Supplier s Invoice screen if you are viewing a Job. Pressing t in the Import Job Registration when you are viewing a Job will open the Customs Entry screen. Similar Command Keys are found in all screens in Expedient. View the pull down menus to find out which Command Keys open screens. 19
 they will be taken in to Input Mode on the screen. See the below header screen.")
20 Adding/Updating a Record The Expedient System allows users to input data using either the keyboard or mouse to navigate. When a user clicks on Add/Update (A/U on the keyboard) they will be taken in to Input Mode on the screen. See the below header screen. Header Screen Yellow Background Current Field Red Background Mandatory Field 20

 Adjust Size (this ensures each field fits the relevant line data) Reset to")
21 Header / Detail Screen Right Clicking on the column headings will allow users to perform the following: Choose the Columns to Display (some screens enforce some fields to always display) Reset the Sort Order (double clicking on some column heading will sort the data by that column) Adjust Size (this ensures each field fits the relevant line data) Reset to Defaults 21
22 Field Navigation The following icons that appear on input/report screens are explained below. Icon Action Description Shortcut Key N/A Move to next field Lookup Move to Next Screen Tab To navigate to the next input field, the user can click on the field they wish OR use the tab key on the keyboard. Clicking on this button will bring up the relative master file screen in which you can search. For example, if you are not sure what the client code is for a particular customer is, you can perform a lookup and search for the business name. Clicking on the Screen Tabs will change screens Tab Ctrl-Z Ctrl-Tab Date Edit Clicking on this button will bring up a calendar so the user can select a date N/A Save Clicking on this button will save the current record Enter Cancel Clicking on this button will exit input mode for the current record and not save any changes Detail only Esc N/A Insert Line Allows the User to insert a line where the cursor is currently positioned N/A Delete Line Allows the User to delete the current line on which the cursor is currently positioned N/A Move Lines Allows the User (whilst in the DETAIL Down section) to move the cursor down to the next block of entries N/A Move Lines Up Allows the User (whilst in the DETAIL section) to move the cursor up to the next block of entries F1 F2 F3 F4 22


23 Browsing Records Once users have searched for records within a screen, Expedient provides the ability to browse those records in a summary list format, using the Browse Button. Users have the ability to set which fields they want to see each time they use that particular screen. Right click on the headings to select which columns you wish to see. You can also amend the order of the columns by click and dragging a column heading to a new position. See below: Sort Mode Click on the button in the Browse screen to enter Sort Mode. The Sort Mode button now becomes the Browse Mode button Click on the sliding pointer to adjust the number of records you want to view in the Browse screen. Click on OK. You may get a warning message if you want to view a large number of records Click on Yes or No to remove the warning message. Click on OK to adjust the number of records to match your request. You will now be able to sort the data by clicking on the column headings in the Browse window. 23


24 One click on the column header sorts A to Z or numbers ascending. Two clicks on the column header sort Z to A or numbers descending. For example, to sort all the consols by Registration Date with the most recent at the top click twice on the column heading D.O.R. Browse Output to CSV You can download the sorted data to a.csv file which you can further manipulate in Excel. Click on to download the.csv file. Printing Documents The Expedient System allows users (not available via Cloud Solution) to print and documents from a Print Menu. The left hand side of the screen displays the available printers. The last printer you used will be defaulted unless you are printing a document which requires a specific printer. Click on printers at your branch. If you want to print to another branch click in from all available printers in your company to view the list of available to view and select Adjust the number of copies by select a number from the Copies pull down list, select up to 10 copies.. You can 24


25 Use button to send the document to the selected printer. ing Documents The Expedient System allows users to documents from the Printer Menu. The details are on the right hand side of the Print screen. If you are producing a document that goes to external contacts and you have set up contacts to receive that document already you may see addresses in the distribution list. Please refer to the Administration manual for guidance on Documentation Distribution Groups. Add addresses by clicking in the first cell of the next blank row in the Recipients table. This provides a pull down list so you can select how the is sent. Click in the next cell for Cust Code. Use to search for a customer or enter a customer code. In the next column, Name, use contacts for the Customer. to find all available active Double click on the name you want to select. If you need to change the address or any other details for the contact use to access the Personnel Contact screen. Multiple contacts can be selected from this screen by holding down the Ctrl key while you are selecting contacts, as shown in the screen shot above. On clicking OK all names selected will be inserted in the Recipient List. Manually type in an address by clicking in a blank row in the Address column. Untick the Send? box if you do not want the contact included in the distribution. 25

26 Your name will be automatically inserted at the top of the list in blind copy. Enter the Subject line for the . If you are producing a document that goes to external contacts the Subject line will show the title of the document and some references for the job or client. Covering text for the document can be entered in the Body section of the screen. This text can be formatted by hovering the mouse over the word Body until a formatting toolbar appears. A default signature can be added to your User Masterfile so that the same signature automatically appears in every . Attachments and Preview The Attachments section shows the documents that will be sent with the . Highlight the document and use to view the document before sending. Further documents can be added to the by using buttons. If the Job is linked to a Consol the button is available. The button opens a screen or listing documents attached to the Job. The document attached to the Consol. button opens a screen listing Select the document you want to attach from the list. The selected document will be added to the Attachments list. 26


27 Use to prevent the unwanted attachment going out with the . Auto Save Set the document to save to a shared folder for the job or consol to allow other users to access the document. Select to save the document to folder accessed only by your company or to share the documents in the web portal with your customer. Based on the type of document Expedient will save the document to the appropriate Docs folder. When the details are completed use to produce a hard copy as well as an . to send the with attachments or use An example of the sent is shown below If the was generated from either an Import Job Registration or Export Job Registration screen then the will be logged in the Events Table. To view the events users will need to enter this screen via Options in the Job Registration Screen. The below screen will display: 27

28 To find out the further information on who was sent the and the Subject of what the document was then click on the Details button. The below screen will appear: 28
Log into your portal and then select the Banner 9 badge. Application Navigator: How to access Banner forms (now called pages.)
") Navigation Banner 9 Log into your portal and then select the Banner 9 badge. This will bring you to the Application Navigator. Application Navigator: How to access Banner forms (now called pages.) Menu
Navigation Banner 9 Log into your portal and then select the Banner 9 badge. This will bring you to the Application Navigator. Application Navigator: How to access Banner forms (now called pages.) Menu
Please note that this process must be repeated if a new PC is used.
 Appendix 2 - Using Smart Client This section of the user guide is relevant to first-time users of Agresso. There are some areas of the Agresso package that initially need to be configured by the individual
Calendar & Buttons Dashboard Menu Features My Profile My Favorites Watch List Adding a New Request...
 remitview User Guide 1 TABLE OF CONTENTS INTRODUCTION... 3 Calendar & Buttons... 3 GETTING STARTED.... 5 Dashboard.... 7 Menu Features... 8 PROFILE.... 10 My Profile... 10 My Favorites... 12 Watch List...
I. Overview... 2 A. Users and User Roles... 2 B. System Information... 2 C. Help Menu... 3 D. Changing Your Password... 3 E. Logging In... 3 F.
 I. Overview... 2 A. Users and User Roles... 2 B. System Information... 2 C. Help Menu... 3 D. Changing Your Password... 3 E. Logging In... 3 F. Logging Off... 4 G. Navigation Bar... 4 II. Search Menu...
Sage Getting Started Guide. September 2017
 Sage 100 2018 Getting Started Guide September 2017 2017 The Sage Group plc or its licensors. All rights reserved. Sage, Sage logos, and Sage product and service names mentioned herein are the trademarks
New Finance Officer & Staff Training
 New Finance Officer & Staff Training Overview MUNIS includes many programs and tools to allow for the management of the District financials. As newer finance officers and staff, you are charged with understanding,
Version Operator Orientation. TIMMS Client. A guide to using the TIMMS System. Training & Navigation Notes
 Version 7.2.4 Operator Orientation TIMMS Client A guide to using the TIMMS System Training & Navigation Notes Disprax Pty Ltd 2015 WHAT IS TIMMS? TIMMS Stands for: Total Industry Management and Marketing
Chapter 2: Clients, charts of accounts, and bank accounts
 Chapter 2: Clients, charts of accounts, and bank accounts Most operations in BankLink Practice are client specific. These include all work on coding transactions, reporting, and maintaining chart of accounts
Word 2016 Advanced. North American Edition SAMPLE
 Word 2016 Advanced Word 2016 Advanced North American Edition WORD 2016 ADVANCED Page 2 2015 Cheltenham Group Pty. Ltd. All trademarks acknowledged. E&OE. No part of this document may be copied without
Banner 9. Navigation Guide Revised for Ithaca College Fall The URL for Banner 9 is
 Banner 9 Navigation Guide Revised for Ithaca College Fall 2018 The URL for Banner 9 is http://banner.ithaca.edu/ Login with Netpass Credentials Recommended Browsers Firefox Safari Edge Chrome (no Java
BANNER 9 QUICK NAVIGATION GUIDE
 Application Navigator Application Navigator provides a single interface to navigate the Banner 9 JAVA pages. It is a tool that allows you to go back and forth between the current Banner forms and the new
This guide provides information to help you learn about navigating your way through the itrent Human Resources Management and Payroll system.
 1 Introduction The software system that holds and maintains employment and payroll information for staff at the University of Cambridge is called itrent. The project to bring about changes regarding access
In the fourth unit you will learn how to upload and add images and PDF files.
 Introduction Here at SUNY New Paltz, we use the Terminal Four (T4) web content management system (CMS). This puts the power of editing content on our college s webpage in the hands of our authorized users.
IBM Notes Client V9.0.1 Reference Guide
 IBM Notes Client V9.0.1 Reference Guide Revised 05/20/2016 1 Accessing the IBM Notes Client IBM Notes Client V9.0.1 Reference Guide From your desktop, double-click the IBM Notes icon. Logging in to the
Introduction to Personal Computers Using Windows 10 and Microsoft Office 2016
 Watsonia Publishing 47 Greenaway Street Bulleen VIC 3105 Australia www.watsoniapublishing.com info@watsoniapublishing.com Introduction to Personal Computers Using Windows 10 and Microsoft Office 2016 Quick
Using Munis. Version 9.1. Navigation documentation for the Munis ERP System. Fairbanks North Star Borough School District.
 Fairbanks North Star Borough School District Using Munis Navigation documentation for the Munis ERP System Prepared by: Accounting Services Department Version 9.1 Contents CHAPTER 1 - USING MUNIS... 1
IRA Basic Running Financial Reports
 IRA Basic Running Financial Reports Updated 6-7-2013 1 Training Index Part I Introduction to the IRA Reporting Tool IRA Resources (3) Logging onto the system (4) Navigating the Dashboard (5-9) Running
Login: Quick Guide for Qualtrics May 2018 Training:
 Qualtrics Basics Creating a New Qualtrics Account Note: Anyone with a Purdue career account can create a Qualtrics account. 1. In a Web browser, navigate to purdue.qualtrics.com. 2. Enter your Purdue Career
Eastern Kentucky University. Banner 9 Navigation Guide
 Eastern Kentucky University Banner 9 Navigation Guide Stephanie King Systems Specialist Phone: (859)622-1079 Email: stephanie.king@eku.edu Page 1 Banner 9 landing page There are 9 areas of the landing
New User Orientation PARTICIPANT WORKBOOK
 New User Orientation PARTICIPANT WORKBOOK INTEGRATED SOFTWARE SERIES New User Orientation PARTICIPANT WORKBOOK Version 2.0 Copyright 2005 2009. Interactive Financial Solutions, Inc. All Rights Reserved.
TRACS Enterprise Manual
 TRACS Enterprise Manual Table of Contents Welcome to NAPA TRACS... 1 What's New in NAPA TRACS... 1 Registering your NAPA TRACS Application... 2 Backing Up NAPA TRACS... 2 Online Updates... 2 Chapter 1
PowerLink CRM User Guide
 PowerLink CRM User Guide Last Updated: February 2009 Version: 2.06000 Contents Contents... 2 Introduction... 4 Quick Start... 5 Using CRM... 6 Searching for Customers... 6 Maintaining Customer Records...
Table of Contents ADMIN PAGES QUICK REFERENCE GUIDE
 Admin Pages brings an all new look and feel to Banner. It delivers a fresh user experience, all new tools, and significantly improved capabilities. Admin Pages replaces underlying Banner 8 INB technology
BANNER 9 QUICK NAVIGATION GUIDE
 B Contents Application Navigator... 3 Key terminology changes... 4 Shortcut Key changes... 4 Basic Navigation... 5 Page Header... 5 Key Block... 6 Sections... 7 Bottom Section Navigation... 7 Error Message
MultiSite Suite: Accounts Payable
 MultiSite Suite: Accounts Payable User s Manual version 6 Copyright & Trademarks Copyright Notice and Trademarks 2010 MultiSite Systems, All rights reserved. Microsoft, Windows, Excel, and Outlook are
MultiSite Suite: General Ledger
 MultiSite Suite: General Ledger User s Manual version 2.2.97 Copyright & Trademarks Copyright Notice and Trademarks 2003 by Brent Lawrence, LLC. All rights reserved. Reprinted and edited by MultiSite Systems,
Service Minder Plus Features/Helpful Hints
 Service Minder Plus Features/Helpful Hints This manual covers helpful hints and use of features. Note: These items will be addressed during the training sessions. This document is meant to be used as an
Getting Started The Outlook Web Access Window
 QUICK Source Microsoft Outlook Web Access in Exchange Server 2003 Getting Started The Outlook Web Access Window ❶ ❷ ❸ ❹ ❺ ❻ ❼ ❽ Using the Reading Pane The Reading Pane allows you to view your e-mail messages
BANNER 9 ADMIN GENERAL NAVIGATION USER'S GUIDE
 BANNER 9 ADMIN GENERAL NAVIGATION USER'S GUIDE Computing and Telecommunications Services Banner 9 Admin General Navigation - User's Guide 0 WRIGHT STATE UNIVERSITY Contents Banner 9 Admin General Modules...
Outlook Quick Start Guide
 Getting Started Outlook 2013 Quick Start Guide File Tab: Click to access actions like Print, Save As, etc. Also to set Outlook Options. Quick Access Toolbar: Add your mostused tool buttons to this customizable
CHRIS Introduction Guide
 1 Introduction... 3 1.1 The Login screen... 3 1.2 The itrent Home page... 5 1.2.1 Out of Office... 8 1.2.2 Default User Preferences... 9 1.2.3 Bookmarks... 10 1.3 The itrent Screen... 11 The Control Bar...
Sage Getting Started Guide
 Sage 100 2016 Getting Started Guide This is a publication of Sage Software, Inc. Version 2016 Copyright 2015 Sage Software, Inc. All rights reserved. Sage, the Sage logos, and the Sage product and service
KYOCERA Net Viewer User Guide
 KYOCERA Net Viewer User Guide Legal Notes Unauthorized reproduction of all or part of this guide is prohibited. The information in this guide is subject to change without notice. We cannot be held liable
Frequently Asked Questions: SmartForms and Reader DC
 Frequently Asked Questions: SmartForms and Reader DC Initial Check Browsers - Google Chrome - Other browsers Form functions - List of additional buttons and their function Field functions - Choosing a
User Guide. Rev Dot Origin Ltd.
 User Guide Introduction to the EasyTac File Explorer...1 Using EasyTac to read drivers' cards with a card reader...2 Using EasyTac to read VU files from a download device...3 Using EasyTac to download
BANNER 9 QUICK NAVIGATION GUIDE
 MARCH 2017 Application Navigator Application Navigator provides a single interface to seamlessly navigate between Banner 9 JAVA pages and Banner 8 Oracle forms. It is a tool that allows you to go back
User Guide Ahmad Bilal [Type the company name] 1/1/2009
![User Guide Ahmad Bilal [Type the company name] 1/1/2009](/thumbs/92/109182878.jpg "User Guide Ahmad Bilal [Type the company name] 1/1/2009") User Guide Ahmad Bilal [Type the company name] 1/1/2009 Contents 1 LOGGING IN... 1 1.1 REMEMBER ME... 1 1.2 FORGOT PASSWORD... 2 2 HOME PAGE... 3 2.1 CABINETS... 4 2.2 SEARCH HISTORY... 5 2.2.1 Recent
User Guide Ahmad Bilal [Type the company name] 1/1/2009 Contents 1 LOGGING IN... 1 1.1 REMEMBER ME... 1 1.2 FORGOT PASSWORD... 2 2 HOME PAGE... 3 2.1 CABINETS... 4 2.2 SEARCH HISTORY... 5 2.2.1 Recent
Introduction to INTERFACExpress and Data Entry
 Introduction to INTERFACExpress and Data Entry Welcome to INTERFACExpress, the new MLS system brought to you by RealtyServer. This system accesses a central database of listings using an Internet connection
User Guide. Avery Dennison Web Ordering Solution for Steinmart
 User Guide Avery Dennison Web Ordering Solution for Steinmart March 2012 Copyright 2012 A very Dennison The information in this document is subject to change without notice and should not be construed
IP4 - Running reports
 To assist with tracking and monitoring HRIS recruitment and personnel, reports can be run from Discoverer Plus. This guide covers the following process steps: Logging in... 2 What s changed? Changed reference
BANNER 9 ADMINISTRATIVE PAGES (BAP) USER'S GUIDE. Computing and Telecommunications Services. Banner 9 Administrative Pages - User's Guide 0
 USER'S GUIDE. Computing and Telecommunications Services. Banner 9 Administrative Pages - User's Guide 0") BANNER 9 ADMINISTRATIVE PAGES (BAP) USER'S GUIDE Computing and Telecommunications Services Banner 9 Administrative Pages - User's Guide 0 Contents Obtaining Banner 9 Administrative Pages Access... 3 Logging
BANNER 9 ADMINISTRATIVE PAGES (BAP) USER'S GUIDE Computing and Telecommunications Services Banner 9 Administrative Pages - User's Guide 0 Contents Obtaining Banner 9 Administrative Pages Access... 3 Logging
Secure Transfer Site (STS) User Manual
 User Manual") Secure Transfer Site (STS) User Manual (Revised 3/1/12) Table of Contents Basic System Display Information... 3 Command Buttons with Text... 3 Data Entry Boxes Required / Enabled... 3 Connecting to the
Secure Transfer Site (STS) User Manual (Revised 3/1/12) Table of Contents Basic System Display Information... 3 Command Buttons with Text... 3 Data Entry Boxes Required / Enabled... 3 Connecting to the
User Guide. Product: GreenFolders. Version: 3.8
 User Guide Product: GreenFolders Version: 3.8 Release Date: October 2014 GreenFolders 3.8 User Guide Introduction Table of Contents 1 Introduction... 6 2 General Information... 7 2.1 Login Procedure...
KEYBOARD SHORTCUTS AND HOT KEYS
 KEYBOARD SHORTCUTS AND HOT KEYS Page 1 This document is devoted to using the keyboard instead of the mouse to perform tasks within applications. This list is by no means the "be all and end all". There
Result Point v3 User Manual, Revision Accelerated Technology Laboratories, Inc. All rights reserved.
 User Manual Result Point v3 User Manual, Revision 2 Result Point User Manual Table of Contents WELCOME...1 LOGGING IN...1 RETRIEVING YOUR PASSWORD... 1 CHANGING YOUR PASSWORD... 1 CLIENT INTERFACE...2
Getting Started with Solar Eclipse. Release 8.6.5
 Getting Started with Solar Eclipse Release 8.6.5 Legal Notices 2009 Activant Solutions Inc. All rights reserved. Unauthorized reproduction is a violation of applicable laws. Activant and the Activant logo
Veco User Guides. Grids, Views, and Grid Reports
 Veco User Guides Grids, Views, and Grid Reports Introduction A Grid is defined as being a list of data records presented to the user. A grid is shown generally when an option is selected from the Tree
KYOCERA Net Viewer 5.3 User Guide
 KYOCERA Net Viewer. User Guide Legal Notes Unauthorized reproduction of all or part of this guide is prohibited. The information in this guide is subject to change without notice. We cannot be held liable
BASIC NAVIGATION & VIEWS...
 Content Overview VISUAL TOUR... 5 NEW FEATURES IN OUTLOOK 2010... 6 BASIC NAVIGATION & VIEWS... 7 SETTING PREFERENCES... 7 Creating an Outlook Shortcut... 7 Choosing a Startup View... 7 CUSTOMIZING INBOX
User Guide. Web Intelligence Rich Client. Business Objects 4.1
 User Guide Web Intelligence Rich Client Business Objects 4.1 2 P a g e Web Intelligence 4.1 User Guide Web Intelligence 4.1 User Guide Contents Getting Started in Web Intelligence 4.1... 5 Log into EDDIE...
GENERAL NAVIGATION REFERENCE GUIDE FOR BANNER 7.X
 GENERAL NAVIGATION REFERENCE GUIDE FOR BANNER 7.X Table of Contents I. Banner Basics A. Launching Banner...1 B. Main or General Menu...2 C. Setting Personal Preferences...3 D. My Links Customization of
Creating Interactive PDF Forms
 Creating Interactive PDF Forms Using Adobe Acrobat X Pro for the Mac University Information Technology Services Training, Outreach, Learning Technologies and Video Production Copyright 2012 KSU Department
Outlook - an Introduction to Version 2003 Table of Contents
 Outlook - an Introduction to E-mail Version 2003 Table of Contents What is Outlook Starting Outlook The Navigation Pane Getting Help Creating and Sending a Message Using the College Exchange Directory
Banner 9 Navigation Guide
 Banner 9 Navigation Guide North Orange County Community College District Information Services Table of Contents Introduction... 3 Login Procedure... 3 Banner 9 Dashboard (Home Page)... 4 Toggle Menu Descriptions...
NYLearns Curriculum Administration:
 NYLearns Curriculum Administration: Creating a Curriculum Map May 2014 2 This page left intentionally blank 3 Contents Signing in to NYLearns... 4 Curriculum Mapping... 6 Creating Curriculum Maps... 7
RONA e-billing User Guide
 RONA e-billing Contractor Self-Service Portal User Guide RONA e-billing User Guide 2015-03-10 Table of Contents Welcome to RONA e-billing What is RONA e-billing?... i RONA e-billing system requirements...
Navigation Reference Guide
 FISCAL AFFAIRS FINANCIAL MANAGEMENT SYSTEM (FMS) Navigation Reference Guide June 2004 Table of Contents Introduction to Financial Management System... ii Navigation Reference Guide... ii Overview...ii
Site Owners: Cascade Basics. May 2017
 Site Owners: Cascade Basics May 2017 Page 2 Logging In & Your Site Logging In Open a browser and enter the following URL (or click this link): http://mordac.itcs.northwestern.edu/ OR http://www.northwestern.edu/cms/
OUTLOOK WEB ACCESS UOW USER GUIDE INDEX
 OUTLOOK WEB ACCESS UOW USER GUIDE INDEX ACCESSING MAIL... 2 SETTING UP... 2 OPTIONS... 3 VIEWING... 4 ARRANGE MESSAGES... 4 CREATING/SENDING A NEW MESSAGE... 5 REPLYING TO MESSAGES... 5 FORWARDING MESSAGES...
Perceptive Data Transfer
 Perceptive Data Transfer User Guide Version: 6.5.x Written by: Product Knowledge, R&D Date: September 2016 2015 Lexmark International Technology, S.A. All rights reserved. Lexmark is a trademark of Lexmark
IRA Basic Running Financial Reports
 IRA Basic Running Financial Reports Dartmouth College maintains a data warehouse of institutional finances, student data, advancement giving and other important measures. Institutional Reporting and Analysis
USING PERFORMANCE PRO An Appraiser s Quickstart Guide. Hrperformancesolutions.net 9/2015 v. 3.4
 USING PERFORMANCE PRO An Appraiser s Quickstart Guide Hrperformancesolutions.net 9/2015 v. 3.4 Appraiser Quickstart Guide Employee appraisals can be completed easily and quickly. The steps outlined below
Banner 9 Navigation Quick Guide
 Banner 9 Navigation Quick Guide CONTENTS Contents... Error! Bookmark not defined. Application Navigator... 2 Navigating Banner Main Menu... 3 Banner Terminology/Short Cuts... 3 Basic Navigation... 4 Page
Status Bar: Right click on the Status Bar to add or remove features.
 Outlook 2010 Quick Start Guide Getting Started File Tab: Click to access actions like Print, Save As, etc. Also to set Outlook options. Ribbon: Logically organizes Command Buttons onto Tabs and Groups
Guide to User Interface 4.3
 Datatel Colleague Guide to User Interface 4.3 Release 18 June 24, 2011 For corrections and clarifications to this manual, see AnswerNet page 1926.37. Guide to User Interface 4.3 All Rights Reserved The
Legal Notes. Regarding Trademarks KYOCERA MITA Corporation
 Legal Notes Unauthorized reproduction of all or part of this guide is prohibited. The information in this guide is subject to change without notice. We cannot be held liable for any problems arising from
NETWORK PRINT MONITOR User Guide
 NETWORK PRINT MONITOR User Guide Legal Notes Unauthorized reproduction of all or part of this guide is prohibited. The information in this guide is subject to change for improvement without notice. We
Bell Total Connect receptionist app. Quick reference guide
 Bell Total Connect receptionist app Quick reference guide What s in this guide Welcome to the Bell Total Connect receptionist app... 1 1 Getting started... 1 1.1 Minimum system requirements... 1 1.2 Logging
SOU Banner 9 Navigation Guide
 SOU Banner 9 Navigation Guide Draft 11.29.2018 Contents Introduction.... 2 Application Navigator.... 2 Basic Navigation.... 3 Page Header.... 4 Key Block... 4 Sections... 5 Bottom Section Navigation...
DB Browser UI Specs Anu Page 1 of 15 30/06/2004
 DB Browser UI Specs Anu Page 1 of 15 30/06/2004 Contents Topic Page Introduction 3 UI Model 3 Main Window 4 Column properties tab 5 SQL Tab 6 View Record window 7 Connection Information window 9 Setting
Introduction to SAP. Navigation Module
 Introduction to SAP Navigation Module October 2009 Contents 1 Introduction to SAP... 3 1.1 Log On... 3 1.2 Navigation Through SAP... 5 1.3 The Menu Bar... 5 1.4 The Short Cut Toolbar... 6 1.5 Display Technical
Sage 100 ERP. Getting Started Guide. This version of the software has been retired
 Sage 100 ERP Getting Started Guide This version of the software has been retired 2012 Sage Software, Inc. All rights reserved. Sage, the Sage logos, and the Sage product and service names mentioned herein
QUICKBOOKS PRO 2008 AN INTRODUCTION TO QUICKBOOKS PRO
 QUICKBOOKS PRO 2008 AN INTRODUCTION TO QUICKBOOKS PRO Opening a Company Database 1. To change the open company in QuickBooks, click File on the main menu and select Open or Restore Company. When the next
Astra Scheduling Grids
 Astra Scheduling Grids To access the grids, click on the Scheduling Grids option from the Calendars tab. A default grid will be displayed as defined by the calendar permission within your role. Choosing
ILM Assessment Portal. Customer Guide
 ILM Assessment Portal Customer Guide 1 ILM Assessment Portal Customer Guide V1.1 This is a reference guide for the ILM Assessment Portal ( Portal ), ILM s online tool for Centre customers who use the ILM
You will need the unique URL for your site and your username and password to login to Data- Director.
 Getting Started Step 1: Login to the DataDirector website: You will need the unique URL for your site and your username and password to login to Data- Director. You may change your password after you login.
ADVANCED GroupWise 7.0
 ADVANCED GroupWise 7.0 Distributed by the Administrative Technology User Support Department under the Direction of Dr. Russell Clukey, Executive Director, Support Services. Feel free to contact the AT
Steps: 1. Log in to the Dmitri application through the following website URL, as appropriate:
 Dmitri Suite Getting Started Logging In and Logging Out Logging In Use the following steps to log in to the Dmitri application. Steps: 1. Log in to the Dmitri application through the following website
Ministry of Education
 Ministry of Education EFIS 2.0 - User Version 2.0 June 2015 Table of Contents 1 Document History... 4 2 Logon to EFIS 2.0... 5 2.1 Logon through Go Secure... 5 2.2 Bookmarking the Link... 6 3 Planning
NEOMIN Webmail Instructions
 NEOMIN Webmail Instructions Lisa Collins Created: Nov 10 th, 2009 Revised: Jan 25 th, 2010 1 Table of Contents Logging In 3 Viewing your Inbox/Emails 4-5 Printing & Deleting Emails 5 Replying & Forwarding
A Guide to Quark Author Web Edition 2015
 A Guide to Quark Author Web Edition 2015 CONTENTS Contents Getting Started...4 About Quark Author - Web Edition...4 Smart documents...4 Introduction to the Quark Author - Web Edition User Guide...4 Quark
Munis. Using Munis Version For more information, visit
 Munis Using Munis Version 11.2 For more information, visit www.tylertech.com. TABLE OF CONTENTS Using Munis... 3 Favorites... 5 Munis Permissions and Security... 7 Munis Menus... 7 Standard Screen Features...
SmartView. User Guide - Analysis. Version 2.0
 SmartView User Guide - Analysis Version 2.0 Table of Contents Page i Table of Contents Table Of Contents I Introduction 1 Dashboard Layouts 2 Dashboard Mode 2 Story Mode 3 Dashboard Controls 4 Dashboards
EFIS User Guide Family Support Programs User
 Ministry of Education EFIS 2.0 - User Guide Family Support Programs User Version 2.0 June 2015 Table of Contents 1 Document History... 1 2 Logon to EFIS 2.0... 2 2.1 Logon through Go Secure... 2 2.2 Bookmarking
Microsoft Word: Steps To Success (The Bare Essentials)
") Microsoft Word: Steps To Success (The Bare Essentials) Workbook by Joyce Kirst 2005 Microsoft Word: Step to Success (The Bare Essentials) Page Contents 1 Starting Word 2 Save 3 Exit 5 Toolbars, Alignment,
Microsoft Word: Steps To Success (The Bare Essentials) Workbook by Joyce Kirst 2005 Microsoft Word: Step to Success (The Bare Essentials) Page Contents 1 Starting Word 2 Save 3 Exit 5 Toolbars, Alignment,
Teacher Connect Progress Report User Guide v
 Teacher Connect Progress Report User Guide v. 4.4.1 Copyright 2002-2015 eschooldata, LLC All rights reserved. TABLE OF CONTENTS Overview... 3 Accessing Teacher Connect Progress Report... 3 Navigation Row...
PM4 + Partners Knowledge Articles
 PM4 + Partners Knowledge Articles Customizing your PM4+ user experience r 1 November 30, 2108 PM4+ Partners Workspace - customize your experience Page 2 Contents Customizing Your Workspace... 1 Customizing
esd Portal: Parent View User Guide v
 esd Portal: Parent View User Guide v. 5.0.0 Copyright 2002-2016 eschooldata, LLC All rights reserved. TABLE OF CONTENTS Overview... 3 Parent Portal Registration... 3 Logging In... 5 Getting Help... 7 Navigating
Pepkor webcom Quick Reference Guide. Version Date: 2013/12 Version Number: 1.3
 Pepkor webcom Quick Reference Guide Version Date: 2013/12 Version Number: 1.3 Table of Contents 1 INTRODUCTION... 4 2 LOGGING IN... 4 3 NAVIGATE INSIDE WEBCOM... 5 3.1 MAIN SECTION 5 3.1.1 Home... 5 3.1.2
NiceForm User Guide. English Edition. Rev Euro Plus d.o.o. & Niceware International LLC All rights reserved.
 www.nicelabel.com, info@nicelabel.com English Edition Rev-0910 2009 Euro Plus d.o.o. & Niceware International LLC All rights reserved. www.nicelabel.com Head Office Euro Plus d.o.o. Ulica Lojzeta Hrovata
Guide for Researchers: Online Human Ethics Application Form
 Guide for Researchers: Online Human Ethics Application Form What is Quest Quest is our comprehensive research management system used to administer and support research activity at Victoria University.
KMnet Viewer. User Guide
 KMnet Viewer User Guide Legal Notes Unauthorized reproduction of all or part of this guide is prohibited. The information in this guide is subject to change for improvement without notice. We cannot be
SECTION 5 USING STUDENT
 SECTION 5 USING STUDENT EMAIL 5. USING STUDENT EMAIL On enrolling at the University all students automatically have an email account created. Account creation depends on a student successfully enrolling
Contents. Batch & Import Guide. Batch Overview 2. Import 157. Batch and Import: The Big Picture 2 Batch Configuration 11 Batch Entry 131
 Batch & Import Guide Last Updated: 08/10/2016 for ResearchPoint 4.91 Contents Batch Overview 2 Batch and Import: The Big Picture 2 Batch Configuration 11 Batch Entry 131 Import 157 Configure Import File
TYPO3 Editing Guide Contents
 TYPO3 Editing Guide Contents Introduction... 2 Logging in... 2 Selecting your Workspace for editing... 2 Working with Content Elements... 3 Working in the Editing Window... 4 Pasting content from MS Word
Depending on the modules that have been implemented by your company, you may have access to the following information:
 Employee Self Service (ESS) User Quick Reference Guide Introduction to ESS The Employee Self Service (ESS) Application is a web-based application that gives you access to information from your employee
ACTIVE Net Insights user guide. (v5.4)
") ACTIVE Net Insights user guide (v5.4) Version Date 5.4 January 23, 2018 5.3 November 28, 2017 5.2 October 24, 2017 5.1 September 26, 2017 ACTIVE Network, LLC 2017 Active Network, LLC, and/or its affiliates
ACTIVE Net Insights user guide (v5.4) Version Date 5.4 January 23, 2018 5.3 November 28, 2017 5.2 October 24, 2017 5.1 September 26, 2017 ACTIVE Network, LLC 2017 Active Network, LLC, and/or its affiliates
Quick Guide FAST HR. For more resources, including a guide on FAST HR codes, visit # Instructions Screenshot
 Tips & tricks This quick guide describes basic navigation within the FAST HR reporting tool, including how to use filter options, format columns and export reports. For more resources, including a guide
Numbers Basics Website:
 Website: http://etc.usf.edu/te/ Numbers is Apple's new spreadsheet application. It is installed as part of the iwork suite, which also includes the word processing program Pages and the presentation program
Parish . User Manual
 Parish Email User Manual Table of Contents LOGGING IN TO PARISH EMAIL... 3 GETTING STARTED... 3 GENERAL OVERVIEW OF THE USER INTERFACE... 3 TERMINATE THE SESSION... 4 EMAIL... 4 MESSAGES LIST... 4 Open