Vandal-resistant entrance panel. Installer manual RA00054AA_I_EN01PC-12W16
|
|
|
- Cuthbert Stokes
- 5 years ago
- Views:
Transcription

1 Vandal-resistant entrance panel Installer manual RA00054AA_I_EN01PC-12W16
2 2
3 Contents Vandal-resistant entrance panel 1 Introduction Warnings and recommendations What s in your box 4 2 Description Front view Back view 6 3 Installation General rules for installation Technical features Dimensional data Flush mounted installation Wall mounted installation Phisical configuration Connections Volume adjustment Completing the installation Installing the accessories Camera lens and display glass replacement 14 4 Configuration using the keypad Access to the configuration menu If the password is forgotten Language Panel settings Address book Phonic module settings FW versions Access control settings 27 5 Configuration using the software TiMonoblockEntrancePanel configuration software Connection to the PC 28 6 Using the entrance panel Calling residents Call to the switchboard (only in multifamily configuration) Call the only resident (Only in single family configuration) Door lock release using a numerical code Changing the lock code 33 Installer manual 3
4 1.1 Warnings and recommendations 1 Introduction Before proceeding with the installation we recommend that you read the content of this manual very carefully. The warranty will automatically become void in case of negligence, improper use, or tampering by unauthorised personnel. 1.2 What s in your box In your box you will find: Vandal-resistant entrance panel CD containing the Installer manual, as well as the configuration software with its user manual. 4
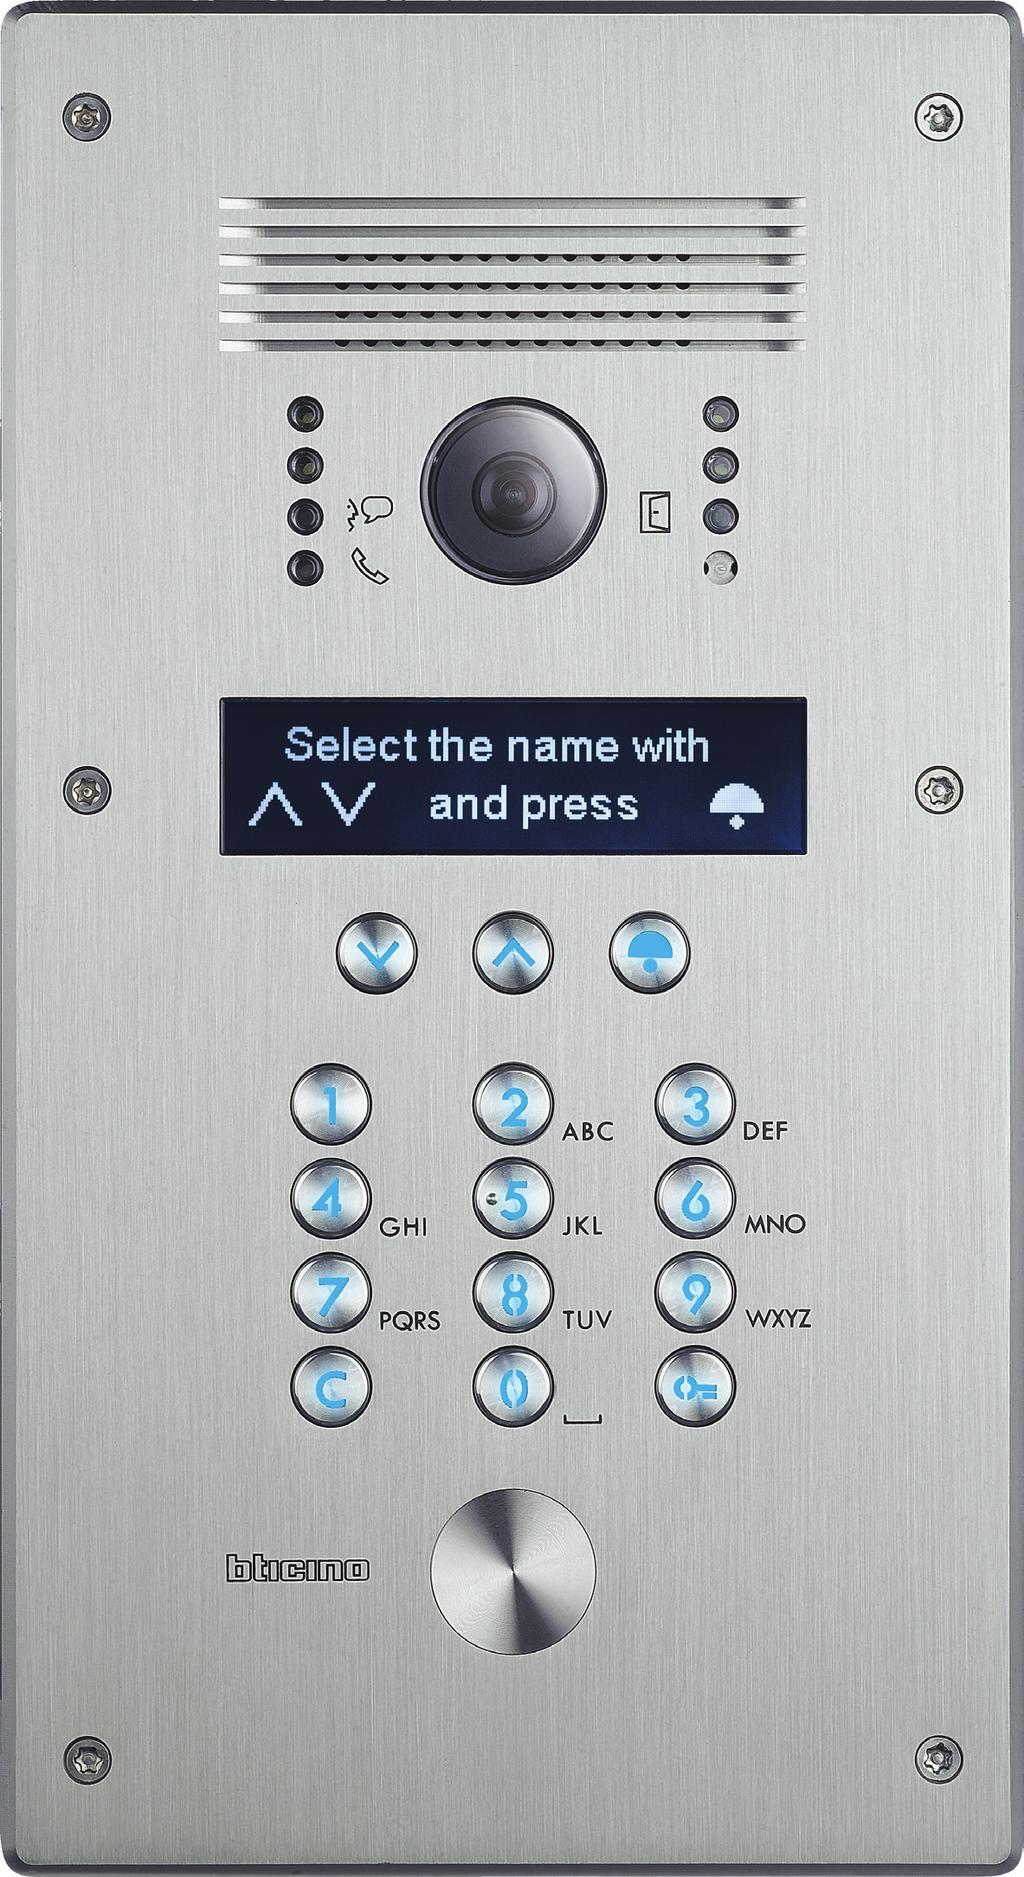
5 2 Description 2.1 Front view Vandal-resistant entrance panel Installer manual Loudspeaker 2 - Green LED: door open notification 3 - Microphone 4 - Display 5 - Key used to send the call to the selected resident, or to the switchboard 6 - Door lock release key 7 - Preset for VIGIK reader, or key lock release 8 - Delete key 9 - Alphanumeric keypad 10 - Resident search keys 11 - Green LED: call forwarded Red LED: system busy 12 - Green LED: communication active 13-4 x lighting LED 14 - Camera 5
6 2 Descrizione 2.2 Back view Loudspeaker volume adjustment 2 - Jumpers (see table in the Programming section). 3 - SCS/BUS connection 4 - Connection of the door lock and door lock release pushbutton 5 - Additional power supply 6 - Configurator socket 7 - MiniUSB connector for the connection to the PC 8 - Microphone volume adjustment 6
7 3 Installation 3.1 General rules for installation Vandal-resistant entrance panel Installer manual The camera must not be installed facing strong light sources, or in locations where the area being shot is strongly backlit. In order to resolve these problems, we recommend that the camera is installed at a height of 180 cm, instead of the usual cm, with the lens pointing down. This will improve image quality. In low light situations, the colour rendition of the image displayed by the colour camera may decrease. This is to ensure that the person being displayed can be better recognised. To ensure optimum vision in low lit rooms, the installation of an additional light source is recommended cm cm Typical installation heights 3.2 Technical features 1/4 sensor lens F: 2,1 mm; f: 1,0 mm Power supply Vdc Absorption: 105 ma (stand-by) 340 ma (max in operation) Interlaced 2:1 400 lines resolution(horizontal centered) Night lighting by the white LEDs Automatic brightness adjustment Operating temperature (-25) (+70) C Angle of vision: horizontal 124 vertical 100 Protection index: IP54 Protection index against mechanical impact: IK07 7
8 3 Installazione 3.3 Dimensional data Flush mounted installation ,2 35, ,6 Wall mounted installation
9 3.4 Flush mounted installation Vandal-resistant entrance panel Installer manual Wall mounted installation
10 3 Installation 3.6 Phisical configuration P N T S Entrance panel number Call number (Not used) Door lock time delay Type of call signal J1 J2 J3 J1 - J2 Jumper connected to J1 (default) = control speech synthesis enabled; sound notification disabled Jumper connected to J2 = control speech synthesis disabled; sound notification enabled J3 Remove in case of additional power supply 10
11 2 1 BUS PL S+ S 3.7 Connections Vandal-resistant entrance panel Installer manual 2 1 BUS PL S+ S S+S- = 18 V - 4 A impulsive 250 ma holding current (30Ω max) BUS Relay door lock BUS PL S+ S A S- S+ C NC NO BUS PL S+ S A S- S+ C NC NO NO NC C 8A cosφ = 1 24 Vac 4A cosφ = Vac 3A cosφ = Vdc 24 Vac 3.8 Volume adjustment In case of high pitch noise (Larsen effect), first try reducing the power of the microphone using a screwdriver on the corresponding potentiometer, until an acceptable level is reached. If the problem continues, adjust the potentiometer of the loudspeaker to eliminate the problem. If the volume is too low, increase first the volume of the loudspeaker and then if necessary also the volume of the microphone, remembering that the best solution is a clear transmission, without disturbance, at the limit just below the occurring of the Larsen effect. NO NC C + 11
12 3 Installation 3.9 Completing the installation Before securing the entrance panel to the wall fit the protection caps in their housings, ensuring that they are positioned correctly When switched on for the first time, the entrance panel will ask the user to select the linguage; once this has been done, it will be possible to access the menus LANGUAGE English Français * EXIT 12
13 3.10 Installing the accessories VIGIK transponder reader Vandal-resistant entrance panel Installer manual 2 1 CCT75NM key switch
14 3.11 Camera lens and display glass replacement To protect from acts vandalism, for the most delicate parts of the device we have included item This item makes it possible to replace the camera lens and the display glass in one operation art
15 4.1 Access to the configuration menu Vandal-resistant entrance panel 4 Configuration using the keypad Installer manual Welcome Press and hold down simultaneously keys for more than 10 seconds PASSWORD + > 10 s Enter the access code (default 12345) PASSWORD CONFIGURATION Language Panel settings Address book If the correct code has been entered, direct access to the configuration menu will be granted CONFIGURATION Phonic module settings FW versions EXIT To exit the configuration menu, or to return to the previous menu, select EXIT and press 15
16 4.2 If the password is forgotten If the password has been forgotten it s possible to reset it in this way: OFF ON Shut down the power supply OFF + + ON Keeping pushed the keys and turn on again the power supply The display shows the current password PASSWORD Press bell key to continue Press to continue 4.3 Language CONFIGURATION Language Panel settings Address book Press LANGUAGE Castellano English * Français Select the desired language Confirm The set language will be marked by an asterisk 16
17 4.4 Panel settings CONFIGURATION Language Panel settings Address book PANEL SETTINGS Device settings Password Home page Device settings DEVICE SETTINGS Brightness Contrast Keyboard light ON Vandal-resistant entrance panel Select the menu Confirm Installer manual The DEVICE SETTINGS submenu can be used to set the following functions: Brightness Display brightness adjustment Contrast Contrast adjustment Keyboard light Keyboard light setting: ON = keyboard always on (default setting) ECO = the keyboard light comes on when in use OFF = the keyboard light is always off Password setup PASSWORD SETUP Password EXIT To change the access password: Press Enter the new password PASSWORD SETUP Password EXIT Confirm 17
18 4 Configuration using the keypad Home page The home page can be used to enter a customised welcome message, or any other message; the message can use a maximum of three rows of text of 15 characters (Template); to switch from upper case to lower case and vice versa use the arrow keys. The length of time the message is displayed on the screen (5, 10, or 15 sec.) (Timeout). Entering the text HOME PAGE Template 1 line Timeout 5 Text > Press HOME PAGE TEXT Line 1 > Line 2 > EXIT Select the row where to enter the new text, or change the existing text and confirm Line 1 EXIT HOME PAGE TEXT Welcome Press to select the text field Line 1 EXIT HOME PAGE TEXT MY TEXT Enter the text using the alphanumeric keypad, in the same way as you would write an SMS message on your mobile phone Confirm MY TEXT The new message will appear continuously on the home page for the period set a Timeout 18
19 4.4.4 Acoustic signalling ACOUSTIC SIGNALLING Key sound Lock code change beep Voice msgs: volume ON ON Vandal-resistant entrance panel Installer manual The ACOUSTIC SIGNALLING submenu can be used to enable/disable the following functions: Key sound Lock code change beep Voice msgs: volume Audible signal emitted when the keys are pressed Audible signal emitted when the door lock code is being changed: ON = short BEEP if the code entered is correct long BEEP if the code is incorrect OFF = Audible signal disabled Volume adjustment for voice messages broadcasted by the device The other menu items represent voice messages relating to events (e.g. Call in progress, End of call, etc.). They may be enabled/disabled individually with the following procedure. ACOUSTIC SIGNALLING Voice msgs: volume Call in progress End of call ON ON Select an item from the menu Press ACOUSTIC SIGNALLING Voice msgs: volume Call in progress End of call OFF ON Set as required Confirm Voice messages are only active when jumper J1 is connected (see Physical configuration). 19
20 4 Configuration using the keypad Restore default settings PANEL SETTINGS Home page Acuostic signalling Restore default settings Select the function RESTORE DEFAULT SETTINGS Confirm EXIT The request to confirm the restore appears Press Default parameter values restored The settings of the entrance panel revert to the factory settings. This function does not delete the data contained in the residents address book. 20
21 4.5 Address book Vandal-resistant entrance panel Installer manual This menu can be used to enter residents data, including call codes and door lock release codes, as well as for performing any other functions described in the following paragraphs. CONFIGURATION Panel settings Address book Phonic module settings Building type ADDRESS BOOK Building type * Calling mode Sorting of the list Press BUILDING TYPE Multifamily Single family EXIT Calling mode - List of names CALLING MODE List of names OFF Type of code > Function of bell button > For systems with several apartments use Multifamily mode (default). In Single Family mode, the call is activated directly by pressing,without the need for selecting the extension. Press This setting determines how the names of the residents are displayed; if enabled, the display will show the following message: Select the name with and press To search the desired name use the indicated key, or enter the surname using the alphanumeric keypad. 21
22 4 Configuration using the keypad Calling mode - Type of code CALLING MODE List of names ON Type of code > Function of bell button > Enter the type of code to use when calling the residents CODE TYPE Apart address * Call code EXIT Apart address Call code SCS address of the handset Numerical code assigned to the resident Calling mode - Function of bell button CALLING MODE List of names ON Type of code > Function of bell button > To call the concierge press the button The key can be enabled for direct call to the switchboard. In multifamily: enable/disable the bell button for calling the switchboard In single family: set the address which will be called by the bell button (i.e. the address of the internal units, usually set to 0) Display in Switchboard mode To call press the button Display in Single Family mode Calling mode - Recall CALLING MODE Type of code > Function of bell button > Recall OFF When this function is enabled, the entrance panel will automatically repeat the call every 10 seconds for up to 4 times. 22
23 4.5.6 Sorting of the list ADDRESS BOOK Building type Calling mode Sorting of the list Vandal-resistant entrance panel The names can be sorted alphabetically by surname or by identification code number. Installer manual SORTING LIST By surname * By ID number EXIT The sorting order set is marked by an asterisk Contact setting ADDRESS BOOK Contact setting New contact Modify contact The call codes and the door lock release codes can be set with a length of 1 to 8 digits for the Call code and 4 to 9 digits for the Lock code. CONTACT SETTING Call code digits 4 Lock code digits 5 EXIT Modifiy contact Call code digits Lock code digits Length of the codes for calling residents (default 4 digits) Length of the door lock release codes (default 9 digits) ADDRESS BOOK Contact setting New contact Modify contact This function gives the possibility of changing the contact selected Aaaa Aaaa Bbbb Bbbb Cccc Cccc Select the contact to change Confirm 23
24 4 Configuration using the keypad New contact ADDRESS BOOK Contact setting New contact Modify contact This function can be used to enter new residents in the address book For each resident it will be possible to set the following data: ID number (use if the desired order of the list is different from the alphabetical order) Surname (Text 1*) Name (Text 2*) Public Apartment address Call code Lock code Identification number; the entrance panel assigns a progressive number to each resident. This function gives the possibility of changing this ID with a 4 digits number defined by the installer. Surname of resident Name of the resident YES = The name and the surname of the resident appear on the display during the selection for call NO = The name and the surname of the resident are hidden, the call is possible by entering the Call code. Enter the handset SCS address Numerical call code Door lock release numerical code (*) If Sorting of the list is set to By ID number. In installations including an access control central unit, when a badge is placed near the central unit the contact Surname, Name and Apart address are automatically added to the address book. 24
25 Delete contact ADDRESS BOOK New contact Modify contact Delete contact Vandal-resistant entrance panel This function gives the possibility of deleting the contact selected Installer manual Aaaa Aaaa Bbbb Bbbb Cccc Cccc Select the contact to change Press DELETE THIS CONTACT? Confirm Aaaa EXIT Aaaa The request to confirm the elimination of the contact appears press Delete address book ADDRESS BOOK Delete contact Delete address book EXIT This function gives the possibility of deleting all the contacts of the entrance panel address book Press DELETE THE ADDRESS BOOK? Confirm The address book EXIT will be deleted 25
26 4 Configuration using the keypad 4.6 Phonic module settings The configurations of this menu are only possible if the phonic (speaker) module is not configured physically SCS SETTINGS P -Panel number 00 T -Lock time 1 S -Call tone 0 P - panel number T - Lock time S - Call tone Switchboard Riser (M) Entrance panel SCS address Door lock time delay Type of call signal SCS address of the switchboard Riser address the EP is part of (M address of interface of the riser; set to None if the EP is installed on the backbone) Note: do not confuse this configurator with the other M referred to the operating mode 4.7 FW versions This menu shows the versions of the firmware installed on the device. FW VERSIONS LCD Module : Phonic Module : QUIT 26
27 4.8 Access control settings Vandal-resistant entrance panel The configurations of this menu are only possible if the phonic (speaker) module is not configured physically Installer manual ACCESS CONTROL SETTINGS Central address A/B) 00 Reader address (C) 1 Operating mode (M) 0 Central address (A/B) Reader address (C) Operating mode (M) Local management Address of the access control central unit that manages the reader (keypad built in the entrance panel). Reader address (keypad built in the entrance panel) in the ACC system. Operating mode: M=0 - The address book, the calling code and the door lock codes are managed by the entrance panel and can be modified locally from the menu or from the configuration software. M=2 - The address book, the calling code and the door lock codes are managed by the access control system and must not be modified locally. Note: Do not confuse this configurator with the other M referred to the address of the riser column. Full: The settings and the address book can be almost fully modified, with the following exceptions: - If the address book is not empty, the call code digits and the lock code digits cannot be changed. - If M = 2, lock codes cannot be changed Limited: a) The following options can be only remotely changed by the access control central: - Password - Language - Number of call code digits - Number of lock code digits - Riser base address b) The following menu options are not allowed in the installer menu because the acccess control central takes care of the address boook: - New contact - Modify contact - Delete contact - Delete address book 27

28 5 Configuration using the software 5.1 TiMonoblockEntrancePanel configuration software The TiMonoblockEntrancePanel software supplied with the device gives the possibility of configuring the entrance panel for use with video door entry systems only; In this case it will be possible to manage also the residents address book using the software. In order to use the entrance panel in systems with access control, the configuration must be completed using the device menu, while the residents address book will be managed by access control. 5.2 Connection to the PC To connect the entrance panel to the PC use an USB-mini USB cable USB - miniusb 28
29 6.1 Calling residents Residents may be called in three different ways: Vandal-resistant entrance panel 6 Using the entrance panel Installer manual Searching using the arrow keys Select the name with and press Press one of the arrow keys to access the address book Aaaa Aaaa Use the arrow keys to scroll through the names until the name of the desired resident appears; for fast scrolling press and hold the key Dddd Dddd Press to send the call Through surname search Select the name with and press Press one of the arrow keys to access the address book Aaaa Aaaa Dd Dddd Dddd Use the keypad in the same way as a mobile phone keypad to enter the surname, or even just the initial, of the contact to call Press to send the call 29
30 6 Using the entrance panel Using the numerical code Select the name with and press If the resident s call code is known, simply enter it on the keypad 1 2 Insert the code Enter the resident s code and press Press to send the call 6.2 Call to the switchboard (only in multifamily configuration) To call the switchboard press the button To call the switchboard directly press this key The switchboard called is the one configured in Phonic module settings Switchboard Switchboard 30
31 Vandal-resistant entrance panel 6.3 Call the only resident (Only in single family configuration) Installer manual To call press the button To call the only resident press this key Calling 31
32 6 Using the entrance panel 6.4 Door lock release using a numerical code The procedure to follow for releasing the door lock associated to the entrance panel using the lock code changes depending on the length of the codes assigned to the residents, which can be up to the maximum length set. Select the name with and press Press the key * * * * * * Enter your own Lock code Door open If the length of the code is the same as the maximum length set the door lock is released If the code is shorter than the maximum length set * * * * Press the key Door open 32
33 6.5 Changing the lock code Vandal-resistant entrance panel Each resident can change their lock code at any time using the following procedure. This procedure is not valid if the entrance panel is part of an access control system, and the operating mode is M=2. Installer manual Select the name with and press Press this key for at least three seconds LOCK CODE CHANGE Enter present code ****** Enter the current lock code Press the key LOCK CODE CHANGE Enter new code ****** Enter the new lock code Press the key LOCK CODE CHANGE Enter new code ****** Re-enter the new lock code Repeat new code ****** LOCK CODE CHANGE Press the key Note: - if M = 0: every resident has a unique lock code - if M = 2: the lock codes are managed by the access control central, and several residents can share the lock code If the new code already exists, an error message will be displayed. 33
34 BTicino SpA Viale Borri, Varese - Italy BTicino SpA reserves at any time the right to modify the contents of this booklet and to communicate, in any form and modality, the changes brought to the same.
Vandal-resistant entrance panel
 308040 LE05231AC-01PC-17W41 www.bticino.com Contents Vandal-resistant entrance panel Introduction 5 Warnings and recommendations 5 What s in your box 5 Description 6 Front view 6 Back view 7 Installation
Sfera Display Module. Installer manual 05/16-01 PC
 352500 Sfera Display Module Installer manual 05/16-01 PC 2 Contents Sfera Display Module Installer manual 1 Introduction 4 1.1 Warnings and recommendations 4 2 Description 5 2.1 Front view 5 2.2 Back view
D45 System. Digital colour entrance panel with addresses list
 D45 System Digital colour entrance panel Description Front view D45 System entrance panel with colour camera and backlighted alphanumeric keyboard equipped with pushbutton to direct calls to the porter
2 WIRE Video Door Entry system
 WIRE Video Door Entry system Description LINEA 300, vandal-resistant WIRE digital call video pushbutton panel (in stainless steel), flush mounted or wall mounted installation (with specific box item 30806
05/16-01 PC Monobloc Audio Digital Entrance Panel. Installer manual
 05/16-01 PC 343100 Monobloc Audio Digital Entrance Panel Installer manual 2 Contents Monobloc Audio Digital Entrance Panel 1 Introduction 4 1.1 Warnings and recommendations 4 2 Description 5 2.1 Main functions
TiMonoblocEntrancePanel
 TiMonoblocEntrancePanel Instructions for use 04/14-01 PC 2 TiMonoblockEntrancePanel Instructions for use Index 1. Hardware and Software Requirements 4 1.1 Hardware Requirements 4 1.2 Software Requirements
Lens of the access control (Optional) Camera: pick up the image. PP NN TS : configurator. ISP: entrance panel software upgrade connector
 Camera: pick up the image. PP NN TS : configurator. ISP: entrance panel software upgrade connector") 322011 LE06448AA01CN-13W17 Description 12 1 11 10 9 23 13 14 2 22 15 16 8 21 17 7 3 20 6 4 5 19 18 1. Compensation Lamp 10. Lens of the access control (Optional) 18. Targe BUS use CAT5 table connect to
322011 LE06448AA01CN-13W17 Description 12 1 11 10 9 23 13 14 2 22 15 16 8 21 17 7 3 20 6 4 5 19 18 1. Compensation Lamp 10. Lens of the access control (Optional) 18. Targe BUS use CAT5 table connect to
Sfera Keypad Module. Installer manual 07/12-01 PC
 353000 Sfera Keypad Module Installer manual 07/12-01 PC 2 Contents Sfera Keypad Module Installer manual 1 Introduction 4 1.1 Warnings and recommendations 4 2 Description 5 2.1 Main functions 5 2.2 Front
TiSferaDesign. Instructions for use.
 www.homesystems-legrandgroup.com Contents Software update 4 Fundamental concepts 4 Start screen and pushbuttons/menus for the selection of the functions 5 Connecting the devices to the PC 6 Update the
Video Display Eteris. Installation manual 01GF-28W10
 349340 Video Display Eteris Installation manual 01GF-28W10 2 Video Display Eteris Contents 1 Introduction 4 1.1 Warnings and tips 4 1.2 Package content 4 Installation manual 2 Description 5 2.1 Main functions
item Instruction sheet PART. T6101D - 05/05-01 PC
 item 342630 Instruction sheet PART. T6101D - 05/05-01 PC CONTENTS Sommario INTRODUCTION 4 Warnings and tips 4 General description 4 Graphic display 5 Pushbuttons and their functions 5 Factory configuration
D45 System. 3.5 Colour handsfree internal unit. Front view
 D45 System Description D45 System entry level colour handsfree internal unit with 3.5 LCD backlit display. Complete door entry functions. Direct call to switchboard function. 12 ring tones selectable for
VIDEO DOOR ENTRY SYSTEM OFFER
 VIDEO DOOR ENTRY SYSTEM OFFER CA 2 Index Offer overview Different solutions for different applications 4 Basic kits Basic kit catalogue 8 4 wire kits overview 10 Expandable kits Expandable kit catalogue
2 WIRE video door entry system
 CLASSE 00 AM Audio handset with additional keys WIRE video door entry system 7 Description WIRE audio handset for wall mounted or table-top installation (with specific support to be purchased separately).
CLASSE 300 THE CONNECTED VIDEO INTERNAL UNIT
 THE CONNECTED VIDEO INTERNAL UNIT The X13E video internal unit allows you to transform every home into a connected home, which can be easily controlled in the home and at a distance using a smartphone.
D45 System. 7 touch screen handsfree internal unit. Front & side views
 D45 System Description Front & side views 10 D45 System 7 touch screen video internal unit. Complete door entry functions with alarm managements. International standard SOS pushbutton, intercom function,
PUSH BUTTON PANEL. SECTION 3A (Rev. B) SECTION CONTENTS. Download from Technical Manuals area. sec.3a
 SECTION CONTENTS. Download from Technical Manuals area. sec.3a") SECTION 3A (Rev. B) Download from www.urmet.com Technical Manuals area. SINTHESI 2 CAMERA MODULE AND DOOR UNIT WITH 2 BUTTONS...2 Features...2 Structure...2 Terminals pins description...3 Technical characteristics...3
SECTION 3A (Rev. B) Download from www.urmet.com Technical Manuals area. SINTHESI 2 CAMERA MODULE AND DOOR UNIT WITH 2 BUTTONS...2 Features...2 Structure...2 Terminals pins description...3 Technical characteristics...3
Video Display Eteris User guide 01GF-28W10
 349340 Video Display Eteris User guide 01GF-28W10 2 Contents 1 Introduction and basic functions 5 1.1 General information 6 1.2 Your Video Display: use it now! 6 1.2.1 Video door entry function keys 7
CATALOGUE D45 High performance door entry system
 CATALOGUE 2011 D45 High performance door entry system 2 INDEX General features 4 Devices 10 Software 18-19 Solution for multi-storey buildings 20 Solution for a building complex 21-22 Compatibility with
D45. High performance door entry system CATALOGUE A Group Brand
 D45 CATALOGUE 2011 High performance door entry system A Group Brand 2 INDEX General features 4 Devices 10 Software 18-19 Solution for multi-storey buildings 20 Solution for a building complex 21-22 Compatibility
NEW. Bticino modular entrance panels. Sfera. CHOOSE YOUR FINISH Replace the dots in the Cat. No. with either 1, 2, or 3 to select the desired finish
 Bticino modular entrance panels Sfera NEW Dimensions p. 33 FINISHES INSTALLATION TYPE FLUSH MOUNTING BOXES RAINSHIELDS (OPTIONAL) 1, 2 FRAMES / PLATES (2) CHOOSE YOUR FINISH Replace the dots in the Cat.
VIDEO DOOR ENTRY SYSTEM OFFER
 VIDEO DOOR ENTRY SYSTEM OFFER CATALOGUE 2013 BTICINO Specialists in Video Door Entry Systems BTicino, introduces a complete range of products and systems capable of meeting all application and building
Front view. Internal view. Legend
 SWING audio handset 7 Description WIRE audio handset for wall mounted installation. It s fitted with keys for: door lock release, and programmable keys (---), which operating mode is set through the configuration.
Temperature control unit
 Temperature control unit 5739 18/19 Installation manual Part. U3582A - 12/08-01 PC Contents 1 - Introduction 5 1.1 - Warnings and tips 5 1.2 - Contents of package 5 2 - Description of the Control unit
F Installation manual.
 F459 003549 Installation manual www.homesystems-legrandgroup.com Index General information 4 Warnings and recommendations 4 Main functions 4 Description 4 Connections 5 Driver manager 6 Authentication
Video Display. User guide 03/11-01 PC
 Video Display User guide 5739 50 5739 51 03/11-01 PC Indice 1 Introduction and basic functions 5 General information 6 Your Video Display: use it now! 6 Video door entry function keys 7 Navigation keys
8-wire Digital. Audio/Video Intercom Systems. Catalogue
 8-wire Digital Audio/Video Intercom Systems Catalogue Quality Certification BTicino has always been aware of and attentive to the highest standards for production and management systems. BTicino has formalised
EN TECHNICAL MANUAL. Mini door entry monitor with handset Art / Passion.Technology.Design.
 EN TECHNICAL MANUAL Mini door entry monitor with handset Art. 6701 / 6700 Passion.Technology.Design. Table of contents Warning Monitor description... 3 Soft-touch keys description...4 Indicator LED description...4
ACTentry A5 Kit. ACTentry A5 Entry Panel. Audio Door Entry with Access Control. Audio Door Entry & Access Control Kit Features
 Audio Door Entry with Access Control ACTentry A5 Kit Audio Door Entry & Access Control Kit Each kit comprises a door entry panel intercom power supply unit ACTEntryA5ICOM-K ACTentry A5 Entry Panel Audio
HOMETOUCH HOMETOUCH flush mounted box Additional power supply. Rear view
 Description Front view 7 Touch Screen for the management of all MyHOME_Up functions, that can be integrated with the video door entry system, to be used as connected internal unit. To use the home automation
EN TECHNICAL MANUAL. ViP Mini hands-free monitor art. 6721W. Passion.Technology.Design.
 EN TECHNICAL MANUAL ViP Mini hands-free monitor art. 6721W Passion.Technology.Design. Table of contents Warning Monitor description... 3 Soft-touch key description...4 Indicator LED description...4 Technical
EN TECHNICAL MANUAL. Icona door entry monitor Art. 6601W - Art. 6601W/BM. Passion.Technology.Design.
 EN TECHNICAL MANUAL Icona door entry monitor Art. 660W - Art. 660W/BM Passion.Technology.Design. Table of contents Warning Table of contents... Monitor description... 3 Soft-touch key activation...4 Soft-touch
MH201. Software Manual.
 www.homesystems-legrandgroup.com Contents Start Interaction with the device Device configuration Send the configuration 8 Receive the configuration 9 Firmware update 0 Request device info 0 Home page
Classe 300. a STYLISH choice
 a STYLISH choice Elegant design and modern technology CLASSE 300 is the new video internal units range featured with WIDE 7 TOUCH SCREEN DISPLAY enhanced by the glossy finish glass effect. The main functions
TiSecurityPolyx user manual
 Version 1.0 06/08 - CT TiSecurityPolyx user manual Software for the configuration of the 3485 Burglar Alarm Unit CONTENTS 1. Hardware and Software requirements 4 2. Installation 4 3. Basic concepts 8
1/6 SINGLE-FAMILY KIT WITH QUADRA AND MAXI. SB SYSTEM AWARDS KIT VIDEO QUADRA DOOR ENTRY SYSTEMS OVERVIEW HFX-9000M
 1/6 OVERVIEW The HFX9000M brings innovative technology and modern elegance to your home or business. The system is convenient and easy to use providing your home or office the perfect solution for video
New Kit Quadra ViP New Quadra ViP with Mini Audio Handsfree Wi-Fi
 New Kit Quadra ViP New Quadra ViP with Mini Audio Handsfree Wi-Fi Passion.Technology.Design. Minimal form is combined with cutting-edge Comelit technology, which can now benefit from all the advantages
WALL MOUNTED PANEL. SECTION 2G (Rev.E) SECTION CONTENTS. Download from Technical Manuals area. sec.2g SMYLE WALL-MOUNTED PANEL 2
 SECTION CONTENTS. Download from Technical Manuals area. sec.2g SMYLE WALL-MOUNTED PANEL 2") SECTION G (Rev.E) 8 WALL MOUNTED PANEL 8 Download from www.urmet.com Technical Manuals area. SMYLE WALL-MOUNTED PANEL SECTION CONTENTS SPECIAL MODULES...8 TECHNICAL FEATURES... DOOR UNITS... Door phone
SECTION G (Rev.E) 8 WALL MOUNTED PANEL 8 Download from www.urmet.com Technical Manuals area. SMYLE WALL-MOUNTED PANEL SECTION CONTENTS SPECIAL MODULES...8 TECHNICAL FEATURES... DOOR UNITS... Door phone
1/6 STAINLESS STEEL SBC DIG. 316 SENSE AUDIO ENT.PAN. 3ONE6 DOOR ENTRY SYSTEMS OVERVIEW 3451AS
 1/6 OVERVIEW Flush-mounted entrance panel (fitted level with the wall) and 3 mm thick stainless steel plate. Certified as IK08. Complete with 128x64 dot LCD graphic display and 15 buttons integrated into
FB00084-EN PROGRAMMING MANUAL DDVC/08 VR - DDC/08 VR
 FB00084-EN DDVC/08 VR DDC/08 VR PROGRMMING MNUL DDVC/08 VR - DDC/08 VR General precautions Read the instructions carefully before beginning the installation and carry out the actions as specified by the
L4561N Stereo Control. Installation manual.
 L4561N Stereo Control www.legrand.com Stereo Control Contents Stereo Control 1 Introduction 4 1.1 Warnings and tips 4 1.2 General description 4 2 Installation 5 2.1 Wiring diagram 5 3 Configuration 7 3.1
Video kit with 1 hands-free internal unit, surface-mounting. Video kit with 2 hands-free internal units, surface-mounting
 Access control 7 7.01-1 Access control Kits Video kit with 1 hands-free internal unit, surface-mounting This video kit contains: one surface-mounting compact aluminium external video unit with one bell
EN TECHNICAL MANUAL. Handsfree door entry phone Mini 6750W, Mini 6751W. Passion.Technology.Design.
 EN TECHNICA MANUA Handsfree door entry phone Mini 6750W, Mini 6751W Passion.Technology.Design. Table of contents Warning Description... 3 Art. 6750W...3 Art. 6751W...4 Technical characteristics... 5 Wall-mounted...
AUDIO AND VIDEO DOOR ENTRY SYSTEM WITH NEXA CODED PANEL
 AUDIO AND VIDEO DOOR ENTRY SYSTEM WITH NEXA CODED PANEL 2 INTRODUCTION First and foremost we would like to thank you for purchasing this product. Our commitment to satisfying our customers can be seen
Mini ViP and WIRES THE MINI SERIES IS COMPLETED WITH THE NEW IP VERSIONS
 Mini ViP and WIRES THE MINI SERIES IS COMPLETED WITH THE NEW IP VERSIONS Mini V I P MINI Handset and Handsfree. Essential design at its most refined. In addition to the features shared with 2-wire versions,
Configuring a Net2 Entry Panel
 Configuring a Net2 Entry Panel Net2 Overview The Net2 Entry panel is a robust external panel for use with Paxton s door entry system and is used to remotely communicate with visitors. It is powered using
F Basic gateway. Installation Manual.
 F455-0 035 94 Basic gateway www.homesystems-legrandgroup.com Contents Description 4 Warnings and recommendations 4 Main functions 4 Legend 4 Connection 5 Wiring diagrams 5 Configuration 6 Procedure with
User Manual. PCKeypad Wireless Keypad
 User Manual PCKeypad Wireless Keypad Description The PCKeypad is a wireless keypad with a PentaCODE transmitter built-in. It works with all of Elsema s PCR series receivers. The installer has the option
EntraGuard Bronze. Quick Start Guide. Telephone Entry. 1.0 Specifications. 2.0 Unit Installation
 The EntraGuard Bronze is a residential telephone keypad entry system which allows a homeowner to communicate directly with visitors and provide access by using any phone extension in the home. Because
Call Origination: Speaker/Mic: Camera: Mounting: Construction: Directory: Camera Aperture: Dimensions: Architects and Engineers Specification
 Engineering Data 100/1F5 SERIES STAINLESS STEEL ENTY PANESL The Elvox Galileo Series Panels are designed to be durable and aesthetically pleasing. The 100 + 1F5 allows for pushbutton operation in a digital
INTERQUARTZ. Doorphone ID 201 Doorphone ID 202 Doorphone ID 204. User manual
 INTERQUARTZ Doorphone ID 201 Doorphone ID 202 Doorphone ID 204 User manual Contents 1 BASIC DESCRIPTION... 3 1.1 FEATURES... 3 1.2 SLIMDOORPHONE MODELS... 4 2 INSTALLATION... 4 2.1 OPENING, WIRING, WALL
Configuring a Net2 Touch Entry Panel
 Configuring a Net2 Touch Entry Panel Overview The Net2 Entry Touch panel is a Premium touch screen panel for use with Paxton s door entry system and is used to remotely communicate with visitors. It is
New one-family and two-family kits.
 New one-family and two-family kits. 7 LCD touchscreen One-family and two-family video entryphone kits. For the needs of simple video entryphone systems, new one-family and two-family kits are now available
D1265. Installation Guide. Touchscreen Keypad
 D1265 EN Installation Guide Touchscreen Keypad D1265 Installation Guide 1.0 Introduction Contents 1.0 Introduction...3 1.1 Overview...3 1.2 Graphical Buttons...3 1.3 Audible Tones...4 1.4 Supervision...4
1/5 ICONA MONITOR, SBTOP AWARDS ICONA DOOR ENTRY SYSTEMS OVERVIEW 6601W
 1/5 OVERVIEW Flush-mounted (in box Art. 6117) or wall-mounted (with bracket Art. 6620) colour monitor with 4.3" 16/9 screen, Full-Duplex hands-free audio and touch-sensitive controls. Allows adjustment
CLASSE 300 THE CONNECTED VIDEO INTERNAL UNIT
 CLASSE 300 THE CONNECTED VIDEO INTERNAL UNIT P O W E R E D B Y S P E C I A L I S T S The new Classe 300X video internal unit allows you to transform every home into a connected home which can be easily
K44 Code lock. Technical manual
 K44 Code lock GB Technical manual Copyright 2002 Bewator AB, Solna, Sweden. Material from the K44 Technical manual may only be copied with the consent in writing of Bewator. Bewator reserves the right
EN TECHNICAL MANUAL. Door-entry phone art. 2738W
 EN TECHNICA MANUA Door-entry phone art. 78W Warning Intended use This Comelit product was designed for use in the creation of audio and video communication systems in residential, commercial or industrial
DIGITAL 2 WIRE SYSTEM
 DIGITAL 2 WIRE SYSTEM NEW PRODUCTS 2 WIRE SYSTEM EXTENSIONS The apartment interface allows the extension and personalisation of the installation from within the dwelling The installation expansion module
DOOR ENTRY SYSTEM. ABB-Welcome Order catalogue
 DOOR ENTRY SYSTEM ABB-Welcome Order catalogue Contents 01 Overview 3 02 Welcome home kits 8 03 Outdoor station (OS) 11 04 Indoor station (IS) 24 05 System devices (SD) 30 2 ABB-Welcome ABB-Welcome 3 Customize
TiLocalDisplayNew. Software Manual 07/12-01 PC
 TiLocalDisplayNew Software Manual 07/12-01 PC 2 TiLocalDisplayNew Software Manual Contents 1. Hardware and Software requirements 4 2. Software update 4 3. Fundamental concepts 4 3.1 Function menus and
AGATA C200 UK A/200N TARGHA 200. Installation Manual AGATAKIT C 200 UK
 TARGHA 200 A/200N AGATA C200 UK Installation Manual AGATAKIT C 200 UK 24806770/28-05-2013 AGK200C03UK HPC/1 AGATA C200 UK AG2K200C03UK HPC/2 HA/200 HBP AG3K200C03UK HPC/3 A/200N AGK200C03HNA HPC/1+HNA
791/793 Easy Entry Keypads
 791/793 Easy Entry Keypads Description The DMP 791 and 793 Easy Entry LCD Keypads are the industry s first burglary/fire keypads with integrated access control capability. Each keypad provides three 2-button
Instructions manual. Software EVCom
 Instructions manual Software EVCom Vimar user license contract VIMAR SpA with head offices in Marostica VI, Viale Vicenza n. 14, sole proprietor of the software denominated EVCom, with the present contract
1/5 MINI HANDSFREE MONITOR, SBTOP AWARDS MINI HANDSFREE VIDEO DOOR ENTRY SYSTEMS & KITS OVERVIEW 6721W
 1/5 OVERVIEW Wall-mounted hands-free monitor with full-duplex audio and 4.3" / 16:9 colour screen. Allows brightness control, plus adjustment of the ringtone volume, which can be customised by choosing
EN TECHNICAL MANUAL. Audio module Art and Art. 1622L
 EN TECHNICAL MANUAL Audio module Art. 1622 and Art. 1622L Warning Install the equipment by carefully following the instructions given by the manufacturer and in compliance with the standards in force.
1/5 MINI HANDSFREE MONITOR, SBTOP AWARDS MINI HANDSFREE DOOR ENTRY SYSTEMS OVERVIEW 6721W
 1/5 OVERVIEW Wall-mounted hands-free monitor with full-duplex audio and 4.3" / 16:9 colour screen. Allows brightness control, plus adjustment of the ringtone volume, which can be customised by choosing
Smarther X8000-X8000W
 X8000-X8000W www.bticino.com Contents Your Smarther, use it now! 4 Heat your home immediately (Boost) 4 Set the temperature 5 Manage several houses and several Smarther 6 General information 7 Symbols
1/5 MINI BLACK/WHITE MONITOR, SBTOP AWARDS OVERVIEW 6700W
 1/5 OVERVIEW Wall-mounted monitor with 4.3" 16/9 B/W screen and handset. Allows brightness and contrast control, plus adjustment of the volume of the ringtone, which can be customised with a choice of
PROJECT CREATE YOUR DESIGNS WITH
 26 PROJECT CREATE YOUR DESIGNS WITH SKYLINE consists of 8 different-sized frames where different modules can easily be fitted. Modules come in 2 sizes. Designated V and W (W is twice the size of V). The
CM-110SK Standalone Keypad Installation Instructions
 CM-0SK Standalone Keypad Installation Instructions. Packing List Qty Name Remarks 2 2 Keypad User manual Screwdriver Wall plugs Self-tapping screws Torx screw 0.8 x 2.4 Φ(20 mm 60 mm) 0.24 x.2 Φ (6 mm
VIVO KIT. KIT VIDEO VIVO Code 97738EI V03_14. Page 2
 CONGRATULATIONS ON PURCHASING A QUALITY PRODUCT! Fermax electronics develops and manufactures renown systems that meet the highest design and technology standards. Your FERMAX video door entry system will
D45 System - District generator
 D45 System - Description D45 System hub device which can be connected with 4 riser shunt districts, one entrance panel, one switchboard and one system power supply. Device allows realization of big system
Product Information. DCM Standard indoor stations TK IS A 514 A.. TK IS A 514 AD.. (Design)
") Product Information DCM Standard indoor stations TK IS A 514 A.. TK IS A 514 AD.. (Design) ALBRECHT JUNG GMBH & CO. KG Volmestraße 1 58579 Schalksmühle Phone +49.2355.806-0 Fax +49.2355.806-189 E-Mail:
Product Information DCM Standard indoor stations TK IS A 514 A.. TK IS A 514 AD.. (Design) ALBRECHT JUNG GMBH & CO. KG Volmestraße 1 58579 Schalksmühle Phone +49.2355.806-0 Fax +49.2355.806-189 E-Mail:
CLASSE 300. Connected Video. Door Entry Systems
 Connected Video Door Entry Systems The new X13E video internal unit allows you to transform every home into a connected home, which can be easily controlled in the home or remotely using a smartphone.
1 by Multi Video Intercom System Installation Guide
 1 1 by Multi Video Intercom System Installation Guide 2 Table of Contents - 1 1. Specifications 1-1 Comparison P.5 1-2 System Overview P.6 1-3 Product Line-up P.7 1-4 Module Line-up P.8 1-5 Lobby Station-1
Installation Manual & User Instructions. MultiCom 500
 Installation Manual & User Instructions For MultiCom 500 Multi resident GSM Intercom System Contents Section Description Page 1 Introduction 3 2 Getting started 3 3 SIM card 3 4 Wiring 4 5 Keypad / onscreen
Flatwall. Aesthetic value and functional integration for home automation
 Flatwall Aesthetic value and functional integration for home automation 2 MyHOME FLATWALL Index 2-13 General features 14-33 General rules for installation 34-39 Catalogue MyHOME FLATWALL 240-270 2 MyHOME
EN TECHNICAL MANUAL. Mini Hands-free door entry monitor Art. 6741W - Art. 6741W/BM. Passion.Technology.Design.
 EN TECHNICA MANUA Mini Hands-free door entry monitor Art. 6741W - Art. 6741W/BM Passion.Technology.Design. Table of contents Warning Description... 3 Technical characteristics... 4 Installation... 5 Removing
Digital Keypad Introduction
 K2 Digital Keypad Introduction The K02 uses the latest microprocessor technology to operate door strikes and security systems that require a momentary (timed) or latching dry contact closure. All programming
LE09268AA. Classe 300X. Door Entry Quick App support Guide manual.
 LE09268AA Door Entry Quick App support Guide manual www.legrand.co.uk www.bticino.com General information 8 9 10 11 12 10:36 Tuesday, 22 April Download the Door Entry App Private camera Answering machine
Main menu. Camera/Door. Intercom. Playback. Do not disturb USER MANUAL VESTA2 GB2 MONITOR
 Camera/Door Playback USER MANUAL VESTA2 GB2 MITOR https://alphacommunications.com AWD211 Rev 07/2018 VESTA2 GB2 MITOR 2 INTRODUCTI First and foremost we would like to thank you for purchasing this product.
INSTALLATION SHEET 791 and 793 Easy Entry Keypads
 INSTALLATION SHEET 791 and 793 Easy Entry Keypads Description The DMP 791 and 793 Easy Entry LCD Keypads are the industry s first burglary/fire keypads with integrated access control capability. Each keypad
AlphaStatus Room Status System Installation and Use Instructions for the RSS400 Series Room Stations and Optional Master Station(s)
") AlphaStatus Room Status System Installation and Use Instructions for the RSS400 Series Room Stations and Optional Master Station(s) APPLICATION The AlphaStatus system allows one or more RSS402, RSS403,
AlphaStatus Room Status System Installation and Use Instructions for the RSS400 Series Room Stations and Optional Master Station(s) APPLICATION The AlphaStatus system allows one or more RSS402, RSS403,
180 Series Keypad. Handbook. Revision 2.1
 180 Series Keypad Handbook Revision 2.1 Revision History Revision 1.0 Initial release Revision 2.0 Major update with addition of 180-40 Added 180-40 to document and various headings Note regarding unique
DK KIT. Quick Guide
 2 WIRE INTERCOM SYSTEM DK1711-22 KIT Quick Guide RF CARD RF CARD Please read this manual carefully before using the product you purchase, and keep it well for future use.we reserve the right to modify
CV-110SPK Standalone Keypad/Prox Access Control Installation Instructions
 CV-110SPK Standalone Keypad/Prox Access Control Installation Instructions 1. Packing List Qty Name Remarks 1 1 1 2 2 1 Keypad User manual Screwdriver Wall plugs Self-tapping screws Torx screw 0.8 x 2.4
Access Control for Houses 2 Wires Connection Doorline DR-200-SET Surface Mount Doorline DR-200-AV-SET Flush Mount
 Installation Guide Access Control for Houses 2 Wires Connection Doorline DR-200-SET Surface Mount Doorline DR-200-AV-SET Flush Mount Tador Technologies LTD Amagshimim 18, Qiriat Matalon Petach Tikva, 49170
Nortel IP Phone 1120E/1140E User Guide (CICM).
.") Nortel IP Phone 1120E/1140E User Guide (CICM). Overview Nortel IP Phone 1120E/1140E brings voice and data to the desktop by connecting directly to a Local Area Network (LAN) through an Ethernet connection.
Nortel IP Phone 1120E/1140E User Guide (CICM). Overview Nortel IP Phone 1120E/1140E brings voice and data to the desktop by connecting directly to a Local Area Network (LAN) through an Ethernet connection.
VIDEOKIT IPVK/6296 SERIES IPVKC/6296 SERIES IP one way, two way videokit
 VIDEOKIT IPVK/6296 SERIES IPVKC/6296 SERIES IP one way, two way videokit Installation handbook We recommend This equipment is installed by a Competent Electrician, Security or Communications Engineer.
New IP video door entry systems. A cutting edge welcome, always connected.
 New IP video door entry systems. A cutting edge welcome, always connected. IP video door entry: open the door to the future. From listening to market needs come new products using forward-thinking technologies,
SHIED IP Camera RSCM-13601B/W
 Getting to know your RSCM-13601B/W 1 2 7 12 3 6 4 5 8 9 10 11 1. Infrared LEDs: Active while encountering conditions such as lower lights, generating black and white image even in entire darkness. 2. Illumination
ACCESS CONTROL SYSTEM
 ACCESS CONTROL SYSTEM System versions Standalone controllers series based on integrated models KZ-400, 500, 600, 700, KZC-300,800, 900 KaDe Lite system based on integrated controllers KZ-1000 KaDe Premium
D O O R S T A T I O N W I T H P R O X I M I T Y R E A D E R
 D O O R S T A T I O N W I T H P R O X I M I T Y R E A D E R Table of contents Planning and installing the Enterview VX............................ 3 Wiring Diagram.....................................................
SL2000E. Status Output. Electronic Code Lock. Features. Input. Exit Button Input. Introduction. Door Contact Input. Functional Description.
 SL2000E Electronic Code Lock Features Door Relay output Status transistor output Aux transistor output Door Contact input Exit Button input INSTALLER code for programming MASTER code for arming/disarming
Audio GSM module for modular plate
 Audio GSM module for modular plate FB00758-EN PROGRAMMING MANUAL MTMA/GSM A General precautions Read the instructions carefully before beginning the installation and carry out the actions as specified
WELCOME. For customer support or any inquiries, please visit our web site at or contact us at
 WELCOME Congratulations on purchasing the GBF Smart Four Wire Intercom System. Our factory engineers were the first to enable multiple security cameras being monitored through a smart mobile device and
Access control panel U-Prox IC E (Elevator control)
") 1.003 Access control panel U-Prox IC E (Elevator control) Installation and programming manual About this document http://u-prox.com This manual covers installation, adjustment and use of U-Prox IC E (hereinafter
1.003 Access control panel U-Prox IC E (Elevator control) Installation and programming manual About this document http://u-prox.com This manual covers installation, adjustment and use of U-Prox IC E (hereinafter
BMSO1001. Virtual Configurator. User guide 01/10-01 PC
 BMSO1001 Virtual Configurator User guide 01/10-01 PC 2 Virtual Configurator User guide Content 1. Hardware and Software requirements 4 1.1 Hardware requirements 4 1.2 Software requirements 4 2. Fundamental
Installation Manual & User Instructions
 Installation Manual & User Instructions For BFT Americas. Inc. 6100 Broken Sound Parkway N.W. Suite 14, Boca Raton, FL 33487 Toll Free: 877-995-8155 Office: 561-995-8155 Fax: 561-995-8160 1 P a g e M u