OPERATION MANUAL KA700 RADIO MP3 - MENU CHA MIC NOAA ALERT. Bluetooth , R
|
|
|
- Arnold Griffin
- 5 years ago
- Views:
Transcription

1 , R EQ OPERATION MANUAL KA 700 Multi-Band Radio with AM/FM/ Weather NOAA Band Bluetooth Connected Speaker Audio Recorder and Time Scheduled Recorder MP3 Music Player with Micro-SD Card Reader KA700 CHA MIC NOAA ALERT WB AM FM RADIO MP3 M M Bluetooth - MENU
2 INTRODUCTION Thank You: Thank you for purchasing the KA700 multi-band radio receiver. Please read the manual thoroughly before operating and keep this book in a safe place for future reference. With proper care, you will receive many years of trouble-free service from your new radio. ACCESSORIES Lithium Battery USB Cable Operating Manual Quick operating guide
3 KEY FEATURES World Band Receiver FM: MHz or MHz AM: KHz Or K Hz WB: MHz, with the Alert function Direct tuning / Manual tuning / Auto-tuning MP3 Music Play Supports WAV, MP3, WMA, Recorded file Format: WAV Dial number to select music file, max. number is 9999 Micro SD(TF) card music play / Bluetooth music play Lyrics display Random / Repeat music play EQ function Recorder Recording function (MIC recording, radio recording) E-book / Calendar Power interrupt memory and continuous function Key lock function Sleep timer function ( minutes) Radio Station recording timer function Alarm clock function Aux-in function Electronic reading light / Flashlight / SOS light function DC adapter charging (5V/1000mA), USB 2.0 jack (charge by PC) Solar power supply / Crank power supply Lithium battery: 2000MAH / 3.7V Voltage output: 5V USB to charge device including phones Lamps: 5 LED Reading lamp, 1 LED Flashlight and SOS light
4 INDEX LOCATION OF CONTROLS... 1 DEFINITION OF KEY OPERATIONS... 5 LOCK / UNLOCK KEYS... 5 LITHIUM BATTERY POWER SUPPLY... 6 INSTALLING THE BATTERY... 6 BATTERY CONSUMPTION INDICATOR... 6 CHARGING THE LITHIUM BATTERY... 7 CHARGED BY PC... 8 CRANK POWER... 8 SOLAR POWER... 9 POWER ON / OFF... 9 MAIN MENU... 9 HOW TO PLAY THE RADIO CHOOSE BANDS SELECT FM FREQUENCY RANGE FM STEREO / MONO SELECTION K/10K AM TUNING STEPS VOLUME / MUTE TUNING IN STATIONS Using telescopic antenna: Using built-in antenna: Manual tuning: Auto tuning: Jog tuning: Auto search (ATS): Direct frequency entry: Memory recall: STORING STATIONS MANUALLY BLUETOOTH HOW TO RECORD ON THE RADIO... MANAGE THE RECORDED FILES
5 INDEX MIC RECORDING CALENDAR PLAYING MUSIC PLAY AND PAUSE SELECT MUSIC FILES A-B REPEAT REPEAT MODE SELECTION EQUALIZER SELECTION LYRICS DISPLAY DELETE MUSIC FILES TEXT BROWSER SYSTEM SETTINGS...25 DATE AND TIME SET SLEEP TIMER BACKLIGHT TIMER LANGUAGE SELECTION CONTRAST SET TURN ON / OFF KEY TONE FIRMWARE VERSION ALARM SET Alarm Off Alarm Time Alarm Cycle Alarm Mode ESC RESET...29 USE AS AN ACTIVE LOUDSPEAKER (LINE-IN) CARE AND MAINTENCE BATTERY SAFETY INFORMATION TROUBLESHOOTING SPECIFICATIONS... 34

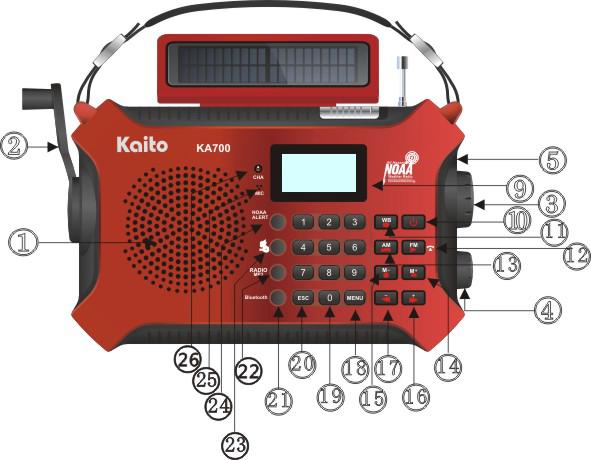
6 LOCATION OF CONTROLS LOCATION OF CONTROLS FRONT TOP 1

7 LOCATION OF CONTROLS REAR 1. Speaker 2. Crank power 3. Tuning knob: Rotate to tune or select 4. Volume knob: Rotate to tune V+ / V- 5. Flashlight / SOS light 6. 5-LED reading lights 7. Flash / SOS / LED light switch push button 8. MICRO SD / TF card slot 9. Display 10. Power button 2
8 LOCATION OF CONTROLS 11. In radio mode: WB button In music mode: Choose play cycle mode 12. In radio mode: FM button, press to select FM stereo / mono In music mode: Play / Pause In recording mode: Pause / Continue In Bluetooth mode:link with mobile device, short press can answer and hung up 13. In radio mode: AM button In music mode: A-B repeat 14. In radio mode: M+ In music mode: Press to select and play EQ 15. In radio mode: M-, long press to record radio In other mode: Long press to enter MIC recording 16. In radio mode: Frequency+ In music mode: Next song / Fast forward 17. In radio mode: Frequency- In music mode: Preview song / Fast backward 18. Menu button: Press to enter menu / sub-menu or confirm In time set mode: Press to move cursor 19. NO. Buttons: 0~9 3
9 LOCATION OF CONTROLS 20. Escape button : Press to exit In main menu : Press to display time In recording mode: Press to end recording and Auto store the recorded file into the memory 21. Bluetooth 22. Radio / MP3 mode selection 23. Mute button Long press to lock / unlock keys 24. NOAA Weather Alert 25. Built-in MIC 26. Charge lamp USB port (DC 5V Out) Micro USB Port (link with computer / charge) Earphone jack AUX-in jack 28. Battery compartment 29. Telescopic antenna 30. Hand Strap 31. Solar panel 4
10 DEFINITION OF KEY OPERATIONS DEFINITION OF KEY OPERATIONS There are 3 operation ways of pressing the keys: short press, long press and Continuous Hold. Stated all the operations are short press. Short press: Press the key once, and the function starts to work. Long press: Press and hold for more than 2 seconds and the function starts to work, and works only one time. Continuous Hold: Press the key and hold continuously until function is completed. The function works several times in a certain frequency, such as fast forward / backward LOCK / UNLOCK KEYS KA700 is equipped with a key lock and unlock function, which you can manually turn on and off. When the radio is on, this will prevent you from accidentally pressing the buttons and changing the station Lock: Long press, and then display shown up symbol, which complete lock. Unlock: After key locked, long press, and then symbol disappears, which completes unlock. 5
11 LITHIUM BATTERY POWER SUPPLY LITHIUM BATTERY POWER SUPPLY Please use only the Kaito lithium battery supplied with the radio to power this product. Use of any other battery may cause problems such as fire or explosion. INSTALL THE BATTERY 1. Turn off the radio and open the battery cover. 2. Install the provided lithium battery according to the battery polarity. 3. Close the battery cover. BATTERY CONSUMPTION INDICATOR 6
12 LITHIUM BATTERY SUPPLY CHARGING THE LITHIUM BATTERY External Adapter (not included) Please use a compatible adapter (5V DC/500mA, USB port) to charge the radio. 1. Install the lithium battery. 2. To charge the battery connect the Micro-USB cable to the radio and the other end to a USB power adapter 3. While charging, the battery symbol shown on the display moves from right to left, and stops when the battery is fully charged. Then disconnect the radio and the power adapter. NOTE: When charging, press to turn on / off the radio. Alternating current can interfere with the radio signal, so it is not recommended to use the radio when charging. Do not use AC adapter or computer to power the radio to play music or listen to the radio when the battery is unloaded. Please remove the battery or fully charge it once in 3 months if the radio is not used for a long time. 7
13 LITHIUM BATTERY SUPPLY CHARGED BY PC 1. Connect the radio and the computer with the provided USB cable. 2. While charging, the battery symbol shown on the Display moves from right to left. 3. The battery symbol stops moving when the battery Is full charged. NOTE: When charged by PC, a USB symbol shown on the radio s display. When Micro SD/TF card or USB drive in inserted, press twice and select Music Mode to play the music. CRANK POWER When the CHA battery level indicator is RED, the rechargeable battery is low. Crank the handle for 1-2 minutes until the CHA LED red light disappear. NOTE: Set the power selector to OFF when crank charging the battery. This mode will charge the battery most efficiently. 8
14 LITHIUM BATTERY SUPPLY SOLAR POWER Solar panel is designed to run the radio under sunlight; it can also charge the battery pack at a very slow rate. So theoretically it will charge the battery, but it is better to crank it to charge the battery. Put the radio under the strong sunlight, and set the power at OFF, the sunlight will charge the battery, but you may not note it because it is a very slow charge. The Indoor light may not charge or run the radio at all. POWER ON / OFF Press the button to turn on / off the radio. Auto turn off : The radio will turn off automatically in 3 minutes without any operation in Main Menu mode. MAIN MENU In any mode, press <ESC> can go back to Main Menu. In Main Menu, press or to select either of the below functions and press <MENU> to enter. 9
15 POWER ON / OFF - Radio: FM / AM / WB Radio - Music: MP3 music play mode - Ebook: Text reading mode - System Settings - Calendar NOTE: Press <ESC> in Main Menu to display the time.when the time is displayed, press <MENU> to go to Main Menu. HOW TO PLAY THE RADIO In Main Menu, select Radio and press <MENU> to listen to FM, the frequency shows on the display. Repeatedly pressing <RADIO/MP3> to enter either Radio or Music Mode. l NOTE: Due to current interference, it is not recommended to use AM radio when the radio is connected to an external power adapter or a computer. 10
16 FM FREQUENCY RANGE CHOOSE BANDS In Radio Mode, press, or to select your desired band. The display will show the band symbol that you are listening to. When listening to WB, press to change <m> bands. SELECT FM FREQUENCY RANGE When listening to FM, press <MENU> to enter the below sub-menu: - Save: Store the station into memory manually - Delete: Delete single memory - Delete all: Delete all stored memories - Auto search: Auto tuning storage - Standard FM band: MHz - Campus radio: MHz - Japanese FM: MHz - ESC FM STEREO / MONO SELECTION When listening to FM, press to select stereo / mono 11
17 9K/10K AM TUNING STEPS listening. If press symbol shows in the display, stereo listening is selected, again to change mono listening and the mono will show. You can not hear stereo sound when the radio signal you are receiving is mono. Suggestion: 1. Stereo listening is for strong signal broadcasts and music programs. 2. For weak signal broadcasts or voice programs, please choose mono.(because stereo decoding may produce noises.) 9K/10K AM TUNING STEPS When listening to AM, press <MENU> to enter the below sub-menu: - Save: Store the station into memory manually - Delete: Delete signal memory - Delete all: Delete all stored memories - Auto search: Auto tuning storage - Step switch: When 522 appears in the display, it indicates 9K steps is selected; When it shows 520,it indicates 10K steps is selected. Repeatedly pressing <MENU> to change be between 9K and 10K. - ESC 12
18 TUNING IN STATIONS VOLUME / MUTE To increase volume, press <VOL+>; To decrease volume, press <VOL->, the volume adjustment will be shown inn the display. Press to mute, press again to restore the sound. TUNING IN STATIONS When attempting to tune in stations, stay away from electrical equipment and AC power disturbances.optimal use of the antenna improves the signal reception. Suggestion: When tuning indoors, stay near the window for a better reception. AC current can interfere with the radio reception, please use the internal lithium battery to power the radio while tuning. It is not recommended to use the radio when charging the battery. Using telescopic antenna: It only works when listening to FM and WB. When listening to FM or WB, change the length of the telescopic antenna according to the signal intensity to get better reception. 13
19 TUNING IN STATIONS Using built-in antenna: The built-in internal ferrite rod antenna works for the AM band only. Rotate the radio position to get the best reception. So the radio location affects the AM reception, the good direction of the radio can get you a much better reception on AM. Six tuning methods: Manual tuning, Auto tuning, Jog tuning, Direct frequency entry, Auto search (ATS) and memory recall. Manual tuning: 1. Turn on the radio and select [Radio] in Main Menu. 2. Adjust the volume to an appropriate level and choose your desired band. 3. Press or to tune into a station, frequency will change a step with each pressing, stop pressing when you get a satisfactory station. Auto tuning: 1. Turn on the radio and select [Radio] in Main Menu. 2. Adjust the volume to an appropriate level and choose your desired band. 3. Pressing and hold or for about 2 seconds, 14
20 TUNING IN STATIONS then release to auto tune into the next available station. If the auto-tuned station frequency is inaccurate, please use manual tuning to find the accurate frequency point. Jog tuning: 1. Turn on the radio and select [Radio] in Main Menu. 2. Adjust the volume to an appropriate level and choose your desired band. 3. Rotate <Tuning knob> and notice the frequency changing in the display, stop rotating when the radio receives a satisfactory station. Auto search (ATS): 1. Turn on the radio and select [Radio] in Main Menu. 2. Adjust the volume to an appropriate level and choose Your desired band. 3. Press <MENU> to open the sub-menu and select [Auto search], press <MENU> again to start auto tuning and store all the available stations into memory. Memory locations: FM: M001 - M440 AM: M001 - M132 15
21 TUNING IN STATIONS Direct frequency entry: 1. Turn on the radio and select [Radio] in Main Menu. 2. Adjust the volume to an appropriate level and choose your desired band. 3. Input the frequency numbers that corresponds to a station s frequency by using the key board,and then press the band button to enter the station you need. Memory recall: 1. Turn on the radio and select [Radio] in Main Menu. 2. Press <M+/EQ> or to select a station that stored within the memory. STORING STATIONS MANUALLY Select your desired station, press <MENU> to open the sub-menu and select [Save], press <MENU> again to confirm. The stored station s memory location will be stored into the memory by the order of the frequency from low to high. NOTE: After storing stations into memory, you can use Memory Recall to find the stored station quickly. All the stations that stored manually will be replaced when using Auto Search (ATS). 16
22 RADIO RECORDING BLUETOOTH 1. Press <Bluetooth> to enter the Bluetooth function. 2. Open the mobile devices Bluetooth to search radio Bluetooth <Kaito> and click it to connect. 3. After the connection is successful, on one hand, you can play the music of mobile devices; On the other hand, when mobile device are called, you can short press to answer or hang up. Finally, press <ESC> to exit this function. HOW TO RECORD ON THE RADIO You may do 3 types of recording: 1. Radio station immediate recording When you are listening to a radio station, AM/FM/WB, if you want to record what is on, just press the button, the LCD will show the recording time and how many minutes you can record on the micro-sd card. When you want the recording to stop just press <ESC>, the station will mute for a second, then it gets back to the radio station. The recorded file will be stored in the JLREC folder. Refer to page 19 to understand how to browser and play these files. 17
23 RADIO RECORDING 2. Radio Scheduled time recording You can record a radio station at a scheduled time when the Micro- SD card is inserted with space on it. To set up the recording time, it is the same as the setup of the alarm clock, when the alarm clock is set to recording, the pre-selected station will be turned on and recorded on the micro-sd card. Here are the steps to setup the time schedule recording: 1 Press <ESC> to enter the time display mode, then press <MENU > button or turn the main knob to enter main Menu. Turn the main knob to select <System Settings >. 2 Press <MENU> to enter tools sub menu, under the tools sub-menu, select alarm by press < MENU>. In the Alarm menu, select <Alarm On>, set up alarm time (The radio will be turned on by the time you set up here). In the Alarm Cycle, select [Ring Once (Or others)], in the Alarm Mode, select [Radio Recording]. 3 Select <ECS> and press <MENU>button to exit the Radio Schedule Time Recording Setup. Refer to page 19 to understand how to browse and play these files. 18
24 RADIO RECORDING 3.Voice Recording In the MP3 player mode, any time when you are listing to music, press the button on the radio, it will start to record the sound outside the radio, your voice or anything the Mic can pick up. Refer to Page 19 to understand how to browse and play these files. NOTE: While recording, some keys will be disabled. MANAGE THE RECORDED FILES In order to find out what you recorded, please follow the steps below to play it back. The MP3 music files and recorded voice files are stored in the SD card in different folders. The MP3 and WAV music are sorted and displayed under different folders when they were created. The recorded files are stored in [JLREC] folder where you can locate them by browsing it from the LCD. Go to MP3 mode, press to pause the music, press <MENU> button, you will see 3 selections: 19
25 MIC RECORDING Browse/Delete File/Delete All, select [Browse File] by turning the main knob, press <MENU> button to select it, you will see folders and single music on the page, if you can not see [JLREC] folder name here, it means it is in the upper level of the menu, so select to to go to upper level, where you see folders here. You will see the folder name [JLREC], select it and press <MENU> button to enter it, you will see all the recorded files here. Select the one you just recorded and play it by pressing Menu button. NOTE: If you want to delete a single music, you can delete it by select <YES> in the LCD and press <MENU> button to confirm it. You may <Delete One> single file or all files on SD card selecting <Delete All>. MIC RECORDING In any mode except for radio mode, you can activate the MIC recording function by long pressing,while recording, please get the audio source close to the built-in MIC. Before recording, please make sure a micro SD card is inserted correctly, the recording file will be saved in the card in.mp3 format. Do not pull out or insert card when recording is in the progress to avoid damage. 20
26 PLAYING MUSIC CALENDAR Select [Calendar] in Main Menu, press <MENU> to Display the date, time and day of the week. You can use <Tuning knob> or, to adjust the year, month and day to see the corresponding day of the week. When adjusting the date, press <MENU> to move the cursor PLAYING MUSIC With the radio off, insert a micro SD card with MP3 / WMA / WAV format music files to the slot on the radio. Then turn on the radio and select [Music] in Main Menu, the LCD shows the information of the song. In Radio mode, press <Radio/MP3> to directly switch to Music mode. 21
27 PLAYING MUSIC NOTE: Please insert or remove the Micro-SD card only when radio is powered off. Do not remove the Micro-SD card when the music is playing.if Music mode can not be entered, please check if the Micro-SD card inserted correctly. PLAY AND PAUSE When the music is playing, press to pause, the pause symbol will show on the display. Press again to resume playing and the play symbol appears. SELECT MUSIC FILES 1. Press or to select music files, press and hold them to fast rewind or fast forward. 2. When paused, press <MENU> to open the sub-menu and select [File browser], press <MENU> to enter the folder and find the particular file by pressing or. 3. Directly input the Number of the music file and press to confirm and the radio will play the selected file. 22
28 PLAYING MUSIC A-B REPEAT When the music is playing, press once to set the start point A, shows on the display and B starts flashing. When the playing process reaches your desired location, press again to set the ending point B. Now the radio will repeat playing from A to B. While repeating, press to cancel the repeating and go on playing the file as normal. REPEAT MODE SELECTION When the music is playing, press to select repeat mode from the below: - Repeat all - Repeat folder - Repeat one - Random EQUALIZER SELECTION When the music is playing, press <M+/EQ> to select equalizer from the below: - Normal - Pop - Classic - Rock - Jazz - Bass 23
29 PLAYING MUSIC LYRICS DISPLAY Support both Chinese and English display. The lyrics must be in.irc format, use the same name as the song and location in the same folder. Due to many Chinese versions on the market, you may have some characters that are unreadable. DELETE MUSIC FILES When paused, press <MENU> to enter the following settings: - File browser: Select music file - Delete file: Delete a single music file - Delete all: Delete all music files To operate the above settings, press <MENU> to enter or confirm, press or for selection. TEXT BROWSER Insert the music SD card that with.txt format text file, then you can read the file with the radio. Select [Text browser] in Main Menu, press <MENU> to enter and select your desired file. Then press <MENU> to start reading, press or to turn pages. 24
30 PLAYING MUSIC When reading, press <MENU> to enter below settings: - File selection: Select a particular file - Play set: Manual or Auto play selection - Playback speed - Enter main: Enter Main Menu - ESC SYSTEM SETTINGS Select [System settings] in Main Menu, press <MENU> to enter below settings: - System time - Backlight - Language - Tools - Contrast - Firmware version - Restore factory settings - ESC DATE AND TIME SET Select [System time] in System settings, press <MENU> to enter date and time. Press <MENU> to move the cursor and press or to adjust. Press <ESC> to save and exit when settings finishes. 25
31 SLEEP TIMER NOTE: Operate time for each step is about 5 seconds. Press <ESC> in Main Menu can play the time on the display. SLEEP TIMER In System Settings, select [Tools] - [Sleep timer], press <MENU> to enter, Press or to adjust the auto turn off timer from 00-90, select 00 to turn off the sleep timer. Press <MENU> to confirm and exit. The radio will turn off automatically when reaches the present time. After setting the sleep timer, will show on the display when the time is displayed. BACKLIGHT TIMER Select [Backlight] in System Settings, press <MENU> to enter. Press or to adjust the backlight timer from (seconds), press <MENU> to confirm and exit. 26
32 CONTRAST SET LANGUAGE SELECTION Select [Language] in System Settings, press <MENU> to enter language selection mode, press or to select your desired language. CONTRAST SET Select [Contrast] in System Settings, press <MENU> to enter. Press or to adjust from 00-16, press <MENU> to confirm and exit. TURN ON / OFF KEY TONE In System Settings, select [Tools] - [Touch-tune(off)]. Press <MENU> to turn on the key tone, and [Keypad tones(on)] shows on the display. While [Keypad tones(on)] displays, select it and press <MENU> to turn off the key tone. FIRMWARE VERSION Select [Firmware version] in System Settings, press <MENU> to display the firmware version information. 27
33 ALARM SET ALARM SET In System settings, select [Tools] - [Alarm]. Press <MENU> to enter the below settings: - Alarm Off Repeatedly pressing <MENU> to turn on or off the alarm. [Alarm off] indicates the alarm is off, [Alarm on] indicates is activated. - Alarm Time Press or to adjust the Hour and the Minute, press <MENU> to move the cursor, and press <ESC> to save and exit. - Alarm Cycle You can select from [Ring Once], [Ring Daily] or [Ring multi-day]. Ring Once: Press or to adjust the Year, Month and day, press <MENU> to move the cursor, and press <ESC> to save and exit. Ring Daily: The alarm is effective every day. Ring Multi-day: Select from Monday to Sunday, press <MENU> to select and a tick will show. Press <ESC> to save and exit. - Alarm Mode Ring Embedded: Auto turn on the radio with a ringtone. 28
34 RESET RADIO: Auto turn on the radio with the last radio station listened to. Auto turn on the radio with the music file in the micro SD card that selected. ESC - ESC When the alarm is active, appears on the display, the radio will alarm with the selected mode when reaching the present time. If the selected mode is [Ring Embedded], you can press any button to turn off the ringtone when the alarm goes off. RESET Select [Restore factory settings] in System Settings, press <MENU> and notice [Restore factory sett, NO] shows on the display. Press or to make [NO] or [YES] shows alternately. Select [YES] and press <MENU> to confirm reset. 29
35 LINE - IN USE AS AN ACTIVE LOUDSPEAKER (LINE-IN) The radio has a line-in function, so it can be used as an active loudspeaker by connecting it to other media devices such as a laptop, voice recorder or other MP3 players with the line-in cable. Plug one end of the line-in cable to the earphone jack of the media device, and the other end into <AUX> jack on the side of the radio. [ ] will show on the display, then play the audio in the media device. The radio can also be used as a speaker for your computer. Use a USB cable to connect the radio and a computer. Then all the audio from the computer will be played via the speaker. To turn off this function, press to turn off the radio. 30
36 CARE AND MAINTENANCE CARE AND MAINTENANCE 1. Keep it dry. Rain, humidity and other types of liquids or moisture can contain minerals that may cause corrosion to components. If the radio does accidentally get wet, remove the battery and wait for the radio to dry completely before placing it back. 2. Do not use or store in dusty or dirty areas. This may damage the moving parts and electronic components. 3. Do not store the radio in over heated areas. High temperatures can shorten the life span of certain components. 4. Do not place the radio in cold environment. Otherwise, when the surrounding temperature rises to room temperature, internal moisture may develop and damage the circuit board. 5. Do not drop, hit or smash the radio. 6. Do not use harsh chemicals, cleaning solvents, or strong detergent to wash the radio. Use a clean and dry soft cloth to clean the screen. 31
37 BATTERY SAFETY INFORMATION BATTERY SAFETY INFORMATION 1. Use the battery under normal conditions, temperature: (0-35 ), relative humidity: 65±20%. Under normal circumstances, the battery can be charged and discharged about 300 times. 2. Do not expose the battery to heat or high pressure, do not drop the battery, and prevent children from playing with the battery. 3. Do not short-circuit the battery, do not open or amend, do not expose to damp environments. 4. If not using for an extended period of time, remove the battery and store in a safe manner. Please use a nonconductive material to wrap the battery in order to avoid direct contact with metal. You can avoid damages by keeping the battery in a cool dry place. 5. Dispose of the battery properly, do not put into fire or water. 6. Do not use the battery under strong sunlight, to avoid over heat, deformation or smoldering. This will reduce the performance and life span of the battery. 32
38 TROUBLESHOOTING TROUBLESHOOTING 1. Can not turn on the radio. Possibly the battery drained, please charge the battery. 2. Can not be connected to a computer. Please do the connection in radio off mode. The USB cable maybe damaged, please try another one. 3. Speaker does not sound. Check if the volume level is too low, turn it up. 4. Can not play audio from the Micro SD/TF card Check if the micro-sd card has poor compatibility, try another card or USB drive. The file is damaged or with incorrect format, delete the file and try again. 5. Can not charge the radio. Check if the external adapter or the USB cable was connected correctly. Check if the adapter or USB cable is damaged. 6. How to reset the radio? Misuse may lead to errors in the firmware, remove the battery for a few minutes and reload. 33
39 SPECIFICATIONS Memory Supports micro-sd card 64M-32G Music format MP3 WMA WAV Access rate MP3: Kbps WMA: 8-384Kbps Frequency range FM: MHz MHz AM: KHz WB: MHz Earphone output 10mW*2 Communication standard USB 2.0(high speed) Max. output(speaker) About 600mW Max. Current consumption About 300mA Power source Lithium battery 3.7V External adapter 5V mA+ Lithium battery consumption MP3: About 10 Hours (Volume is 22 level) Radio: About 10 Hours Charging time 5-8H Speaker D66mm Earphone D3.5mm 34
40 KA700 Multi-Band Radio with AM/FM/ Weather NOAA Band Bluetooth Connected Speaker Audio Recorder and Time Scheduled Recorder MP3 Music Player with Micro-SD Card Reader V
CY-1. FM/MW/SW Digital Radio/ Bluetooth/MP3/Recorder TECSUN RADIOS AUSTRALIA OPERATION MANUAL.
 OPERATION MANUAL CY-1 FM/MW/SW Digital Radio/ Bluetooth/MP3/Recorder V V SW M M MW RADIO MODE MENU ESC AUTO FM TECSUN RADIOS AUSTRALIA 24/9 Powells Road, Brookvale, 2100 NSW, Australia +61 2 8078 2241
OPERATION MANUAL DE1129 FM STEREO AM SW DSP RECEIVER MP3 PLAYER DIGITAL RECORDER REPEAT LOUDSPEAKER : 30 : 22 Radio/MP3/Recorder ESC
 OPERATION MANUAL STEREO AM SW DSP RECEIVER MP3 PLAYER DIGITAL RECORDER REPEAT LOUDSPEAKER 2011-08-15 15 : 30 : 22 DE 1129A-RDS Radio/MP3/Recorder ESC MUTE M MIC AM SW REC M V V AM SW RADIO/MP3/RECORDER
InstaBox i90 User s Manual
 InstaBox i90 User s Manual Package Includes: I90 x 1 Remote x 1 USB Cable x 1 Audio Cable x 1 User s Manual x 1 Specifications Output power: RMS 4W (THD + N = 10%, f0 = 1KHZ) Signal to noise ratio: 70dBA
DT-500W. GB Version 1
 DT-500W Version 1 Control 1 Key lock: The key lock function is used to prevent unintentional operation of the radio. Slide the lock switch to the lock position (left), the symbol will appear on the display.
Voyager V2. User s Manual. Package Informations. Voyager V2 Emergency Radio *1 *1 *1 *1 *1. User s Manual
 Package Informations Emergency Radio Porduct Registration Form Mini-USB Charge Cable Wrist Strap AM FM SW NOAA Weather Band Emergency Radio 207 Kaito. Kaito and other Kaito marks are owned by Kaito Electronics,
User Manual. Declaration of Conformity for this device under: (in bottom bar Konformitätserkärung )
") MusicMan MA Display User Manual Declaration of Conformity for this device under: www.technaxx.de (in bottom bar Konformitätserkärung ) Mobile stereo wide range speaker system with display for MP3/4, CD/DVD,
MusicMan MA Display User Manual Declaration of Conformity for this device under: www.technaxx.de (in bottom bar Konformitätserkärung ) Mobile stereo wide range speaker system with display for MP3/4, CD/DVD,
Features. Warnings and Precautions READ BEFORE OPERATING EQUIPMENT SAVE THESE INSTRUCTIONS
 SENTA Warnings and Precautions READ BEFORE OPERATING EQUIPMENT SAVE THESE INSTRUCTIONS To prevent damage to your radio or possible injury to you or others, read these safety precautions and instructions
DAB/DAB+ Radio User Manual
 DAB/DAB+ Radio User Manual Quick Start Guide Press and hold the Power Button for more than 3 seconds to turn on the radio. The green power indicator will flash and then stay illuminates and start-up screen
KA600L OPERATION MANUAL
 VOICE SIREN ZZZ COUNTY ALL SINGLE MULTIPLE ENABLE ISABLE KA600L /AM/SW/LW/WEATHER MULTI-BAN RECEIVER YNAMO & SOLAR POWER SUPPLY WITH FLASHLIGHT & REAING LIGHT MPERATURE AN HUMIITY INICATOR OPERATION MANUAL
AC OPERATION BATTERY OPERATION RADIO OPERATION Note : FM STEREO INDICATOR ANTENNAS BASS BOOST AUXILIARY (AUX) MODE
 MODE") 1. FUNCTION SWITCH AUX/CD/TAPE (OFF)/RADIO 2. BAND SWITCH 3. FM ANTENNA 4. CD DOOR 5. TUNING KNOB 6. BASS BOOST BUTTON 7. CD SKIP/SEARCH FORWARD BUTTON 8. CD SKIP/SEARCH BACKWARD BUTTON 9. CD PROGRAM BUTTON
1. FUNCTION SWITCH AUX/CD/TAPE (OFF)/RADIO 2. BAND SWITCH 3. FM ANTENNA 4. CD DOOR 5. TUNING KNOB 6. BASS BOOST BUTTON 7. CD SKIP/SEARCH FORWARD BUTTON 8. CD SKIP/SEARCH BACKWARD BUTTON 9. CD PROGRAM BUTTON
FRX3 Hand Turbine AM/FM/Weather Alert Radio with USB Smartphone Charger
 FRX3 Hand Turbine AM/FM/Weather Alert Radio with USB Smartphone Charger Owner s manual NEED HELP? CONTACT US. Etón Corporation, 1015 Corporation Way, Palo Alto, CA Earthtech Products, Inc. 94303, USA.
AXESS Products Corp. All rights reserved 2012 AXESS Products Corp. All rights reserved
 1 2 3 4 1 6 7 8 9 26 10 12 14 11 13 15 16 18 17 20 22 24 19 21 23 25 27 28 29 5 LOCATION OF CONTROLS 1. SPEAKERS 2. USB PORT 3. LCD DISPLAY 4. SD/MMC CARD SLOT 5. AC SOCKET 6. AUX IN JACK 7. FM TELESCOPIC
XEMIO-950 MP5 PLAYER / 4GB MEMORY / TOUCH SCREEN. For information and support,
 XEMIO-950 MP5 PLAYER / 4GB MEMORY / TOUCH SCREEN For information and support, www.lenco.eu To the customer: Thank you for purchasing this MP5 player. When opening the box for the first time, please check
Game Mode...29 Settings Mode...30 Using the AVI Converter Software...36 Troubleshooting...40
 Contents Important Notice...3 Safety Instructions...4 Product feature...5 Front view...7 Minimum System Requirements...8 Connect USB...8 Get Started...9 Power ON / Power OFF...9 Set Key Lock...9 Music
Kanguru Micro MP3 Player User Manual
 Kanguru Micro MP3 Player User Manual Copyright 2008, All Rights Reserved. Before first Use Before First Use Copyright 2008, Kanguru Solutions. All rights reserved. DOS, Windows 95, Windows 98, Windows
AZATOM Multiplex D1 Digital Radio. DAB+/DAB/FM Radio with Bluetooth. User Manual. This manual is available to download online at
 AZATOM Multiplex D1 Digital Radio DAB+/DAB/FM Radio with Bluetooth User Manual This manual is available to download online at www.azatom.com Thank you for shopping with AZATOM Please read this manual carefully
USB/SD/MMC/MICRO SD CARD READER SX-4451USD
 PORTABLE USB/SD/MMC/MICRO SD CARD READER SX-4451USD In order to achieve the best performance of your product, please read this instruction manual carefully before using, and keep it for future reference.
Controller LED ADT MP3-20
 Manual Controller LED ADT MP3-20 Table of contents 1. Safety instructions... 3 1.1. For safe and efficient operation... 3 2. Introduction... 4 3. Key functions... 4 4. Technical data... 5 5. Dimensions...
FRX3 Hand Turbine AM/FM/Weather Alert Radio with USB Smartphone Charger
 FRX3 Hand Turbine AM/FM/Weather Alert Radio with USB Smartphone Charger Owner s manual NEED HELP? CONTACT US. Etón Corporation, 1015 Corporation Way, Palo Alto, CA 94303, USA. 1-800-872-2228 (U.S.); 1-800-637-1648
CAUTION Use of controls or adjustment or performance of procedures other than those specified herein may result in hazardous radiation exposure.
 IMPORTANT NOTES INTRODUCTION Thank you for buying this product. Please read through these operating instructions, so you will know to operate your equipment properly. After you finished reading the instructions
 Content 1 Welcome 37 Safety 38 Hearing safety 38 3 Your Voice Tracer digital recorder 39 What s in the box? 39 Overview 39 4 Start To Use 41 Power On/Off 41 Recharge 42 Key Lock (HOLD Function) 43 PC Connection
TABLE OF CONTENTS Chapter 1 Helpful Tips 3 Features 3 PC Requirements 4 Accessories 6 Basic Functions 7 Basic Operation 9
 User s Manual 1 TABLE OF CONTENTS Chapter 1 Helpful Tips 3 Features 3 PC Requirements 4 Accessories 6 Basic Functions 7 Basic Operation 9 Chapter 2 Music Mode 10 Movie Mode 15 Record Mode 17 Converting
EXCLUSIVELY FROM. User guide DAB211PT. Portable DAB radio
 EXCLUSIVELY FROM User guide DAB211PT Portable DAB radio INDEX Safety information... 2 Introduction... 3 Unpacking... 4 Key to controls... 5 DAB station display... 6 FM station display... 7 Status display...
Bluetooth Wireless Stereo Headphones
 Operational Manual Model: MS02 Bluetooth Wireless Stereo Headphones Operational Manual 1. Important Notes 2. Charging & Start 3. About MS02 Bluetooth Headphones 4. Bluetooth Mode 5. Micro SD Card Player
CD BOOMBOX USER MANUAL MODEL: GPS05BLK/PNK PROG. ECO PWR POWER MODE ST.
 CD BOOMBOX PROG. L: BLK/PNK USER MANUAL 1 Welcome 2 Your CD Boombox 2.1 In The Box 2.2 Front View 2.3 Rear View 3 Quick Setup 3.1 Power On/Off and Function Selection 3.2 Standby & Auto Standby 3.3 Adjusting
Portable Robust Easy to use. CD / MP3 player with 6 built-in headphone sockets USER GUIDE. Primary ICT Ltd -
 TM CD / MP3 player with 6 built-in headphone sockets Portable Robust Easy to use USER GUIDE Contents Important Information...3 Easi-Listener Features...4 CD operation...6 Playing a Compact Disc...6 Play/Pause
1GB/2GB/4GB MP3 Player. Instruction Manual L1GMP309 L2GMP309 L4GBMP310
 1/2/4 MP3 Player Instruction Manual L1GMP309 L2GMP309 L4MP310 Congratulations on the purchase of your new Logik MP3 Player. It has many exciting features to make your listening to music experience more
AZATOM Pocket Go. Portable DAB+ / DAB / FM Radio Alarm Clock. User Manual. This manual is available to download online at
 AZATOM Pocket Go Portable DAB+ / DAB / FM Radio Alarm Clock User Manual This manual is available to download online at www.azatom.com Thank you for shopping with AZATOM Please read this manual carefully
DPR-34+ GB Revision 2
 DPR-34+ GB Revision 2 1. 2. 3. 4. 5. 6. 7. 8. 9. Important Safety Instructions Read these instructions. Keep these instructions. Heed all warnings. Follow all instructions. Do not use this apparatus near
BUSKER Portable PA Units
 BUSKER Portable PA Units Order ref: BUSKER-12 (178.866UK) BUSKER-15 (178.868UK) User Manual VERSION 2.0 Introduction Caution: Please read this manual carefully before operating Damage caused by misuse
Soundance Bluetooth Speaker User Manual Model SDY019
 Soundance Bluetooth Speaker User Manual Model SDY019 Thank you for purchasing Soundance Bluetooth speaker. Please read this manual carefully and keep it for future reference. Features of the speaker 1.
H202 中文 GB Version 1
 H202 GB Version 1 Features 1. Built-in AM/FM antenna for best reception 2. 10 presets (5 each wave band) GB 3. Water resistant up to JIS7 standard 4. Auto seek stations 5. Large and easy to read LCD display
Line_In (Audio) Recording...
 Recording...") Contents Features... Warning... Introduction... Active Matrix OLED Display Screen... How to Use with PC System... Charging the MP3 Player... Files, Upload and Download... Formatting... Software Installation...
Contents Features... Warning... Introduction... Active Matrix OLED Display Screen... How to Use with PC System... Charging the MP3 Player... Files, Upload and Download... Formatting... Software Installation...
User Manual. GSM Fixed Wireless Phone (Model: GSM-938) Introduction
 Introduction") User Manual Introduction The latest style desktop wireless telecommunication products. It can send wireless SMS and voice at anytime, anywhere, suitable remote countries or mountains. Please take care
User Manual Introduction The latest style desktop wireless telecommunication products. It can send wireless SMS and voice at anytime, anywhere, suitable remote countries or mountains. Please take care
User s Manual MPK1066UKAB MPK2066UKAB MPK4066UKAB
 User s Manual MPK1066UKAB MPK2066UKAB MPK4066UKAB TABLE OF CONTENTS Introduction...1 Important Safety Precautions...2 Features...3 Location of Controls...4 Connecting with Computer...5 System requirements...5
INSTRUCTION MANUAL DRAWINGS AND SPECIFICATIONS ARE SUBJECT TO CHANGE WITHOUT NOTICE
 OK OAP 3040-8 INSTRUCTION MANUAL DRAWINGS AND SPECIFICATIONS ARE SUBJECT TO CHANGE WITHOUT NOTICE 1 Table of Contents Features... 3 Precautions... 3 Warning... 3 Buttons & Controls... 4 Main menu... 5
QUEST Portable PA Units
 QUEST Portable PA Units Order ref: QUEST-12 (178.886UK) QUEST-15 (178.888UK) User Manual VERSION 1.0 Introduction Caution: Please read this manual carefully before operating Damage caused by misuse is
DEUTSCH ENGLISH NEDERLANDS FRANÇAIS NORSK ITALANIO ČEŠTINA Hersteller DAB650SI
 DEUTSCH NEDERLANDS NORSK ČEŠTINA ENGLISH FRANÇAIS ITALANIO Hersteller Wörlein GmbH Tel.: +49 9103/71670 Gewerbestrasse 12 Fax.: +49 9103/716712 D 90556 Cadolzburg Email. info@woerlein.com GERMANY Web:
CONTENTS CHAPTER I: BEFORE USE I. BEFORE USE
 I. BEFORE USE Foreword 1. Features 2. Accessories 3. Product Safety Information 4. Illustrations and Functions II. FAST OPERATION 1. Startup 2. Shutdown 3. Lock 4. Reset 5. Pause 6. Music File Select 7.
TABLE OF CONTENTS Introduction... 1 Important Safety Precautions... 2 Features... 3 Location of Controls... 4 Connecting with the Computer...
 TABLE OF CONTENTS Introduction... 1 Important Safety Precautions... 2 Features... 3 Location of Controls... 4 Connecting with the Computer... 5 System requirements... 5 Installing the drive for windows
Owner s Manual AWM910 JENSEN AWM910 COMPACT DISC PLAYER RADIO CD COMPACT MUSIC SYSTEM MUTE AUX BAND AUX IN PUSH PUSH PWR VOL ALARM T/F AUD SPK A SPK B
 AWM910 Owner s Manual COMPACT DISC PLAYER PUSH 1 2 3 4 5 6 RPT SCAN RDM H M PUSH PWR VOL ALARM SET ON/OFF EQ T/F AUD RADIO CD COMPACT MUSIC SYSTEM MUTE AUX BAND CD AUX IN A B A+B JENSEN AWM910 Thank You!
WATCH MP4 PLAYER USER MANUAL. Ref.: WATCH04 BTH + WATCH04 BASIC FUNCTION PREPARATIONS BEFORE USE 1. KEY DEFINITION
 WATCH MP4 PLAYER Ref.: WATCH04 BTH + WATCH04 USER MANUAL BASIC FUNCTION 1 Display: 1.5 inch capacitive touch TFT, 128x128 resolution 2 Audio Format: MP3, WMA, AAC, OGG, FLAC, APE 3 Voice record format:
DAB / FM personal digital radio with loudspeaker
 DAB / FM personal digital radio with loudspeaker Please read this manual before use Contents Controls... 3-4 Using the AC adaptor... 5-6 Keylock function... 7-8 Navigation... 9-10 Display icons... 11-12
BOOM DAB DAB/DAB+/FM RADIO + WIRELESS
 kitsound.co.uk Your product and batteries must be recycled or disposed of properly. Please contact your local recycling centre for more information on proper disposal. All trademarks are acknowledged as
BOOM DAB. DAB/DAB+/fm RADIO + BLUETOOTH. User Manual. kitsound.co.uk
 kitsound.co.uk BOOM DAB DAB/DAB+/fm RADIO + BLUETOOTH Your product and batteries must be recycled or disposed of properly. Please contact your local recycling centre for more information on proper disposal.
Woodlands DAB Portable Radio. User Manual. This manual is available to download online at
 Woodlands DAB Portable Radio User Manual This manual is available to download online at www.azatom.com Contents Section: Page: Controls & Interface... 1 Remote Control Button Functions... 3 Specification...
Quickstart Guide (English)
") Quickstart Guide (English) Introduction 1. Make sure all items listed in the Box Contents are included in the box. Look in the box under the foam sheet for the speaker stand rubber feet, speaker stand
Quickstart Guide (English) Introduction 1. Make sure all items listed in the Box Contents are included in the box. Look in the box under the foam sheet for the speaker stand rubber feet, speaker stand
User Guide BT AVIATOR 10M
 User Guide BT AVIATOR 10M Welcome to your BT Aviator 10M DAB radio Listen to superior quality DAB digital audio broadcast radio stations Use Replay to hear up to the last 10 minutes received by your DAB
 Content 1 Welcome 24 1.1 Product features 24 2 Important 25 2.1 Safety 25 2.2 Hearing protection 25 3 Your recorder 26 3.1 What s in the box? 26 3.2 Overview 26 4 Start to use 27 4.1 Power on/off 27 4.2
Controls. Preset recall button Memo button Alarm 2 button
 RCR-9 GB Version 1 Content Controls... 2-4 Using the clock radio for the first time... 5-6 Operating your radio - Search tuning FM / AM... 7-8 Manual tuning - FM / AM... 9 Setting up the tuning step increment...
MP3/WMA PLAYER USER MANUAL
 MP3/WMA PLAYER USER MANUAL General Description of Functions USB2.0 transmission speed. Supporting multiple audio formats MP1, MP2, MP3, WMA, WAV. FM stereo radio (optional) Having powerful function of
BRS 2001 Portable Audio System
 Samson Electronics Inc. 3400 E. Slauson Ave. Maywood, CA 90270 Ph: 323.585.6393 Fax: 323.585.6202 Web: http://www.blackmoremobile.com Introduction: BRS 2001 Portable Audio System FCC ID: 2AHR7 BRS 2000
CD DAB+ RADIO WITH BLUETOOTH MUSIC SYSTEM BT-9000
 CD DAB+ RADIO WITH BLUETOOTH MUSIC SYSTEM BT-9000 Instruction Manual For information and support www.lenco.eu Important Safety Instructions When used in the directed manner, this unit has been designed
Bluetooth Speaker Instruction Manual
 Bluetooth Speaker Instruction Manual Know your speaker Bottom View Side View A: Power On/Off B: 3.5mm AUX line in C: Micro USB charging port (DC 5V) D: Power/ Charging/ Pairing indictor light E: Volume
INSTRUCTION MANUAL RM AM/FM Digital Alarm Clock Radio
 INSTRUCTION MANUAL RM-5090 AM/FM Digital Alarm Clock Radio PRECAUTIONS CAUTION: THE APPARATUS SHALL NOT BE EXPOSED TO DRIPPING OR SPLASHING. NO OB- JECTS FILLED WITH LIQUIDS, SUCH AS VASES, SHALL BE PLACED
FMT600BT Transmitter
 Technaxx FMT600BT Transmitter User Manual Transfer of music and calls directly from your Bluetooth device to your car radio This device complies with the requirements of the standards referred to the Directive
KH-955 MP4 PLAYER / TOUCH SCREEN
 KH-955 MP4 PLAYER / TOUCH SCREEN User manual English For information and support, www.lenco.eu Table of Content Box content... 2 Warnings... 3 Basic controls and interfaces of the player... 4 Internal
USB CASSETTE PLAYER MODEL NO. : GE USER MANUAL -
 USB CASSETTE PLAYER MODEL NO. : GE4140 - USER MANUAL - CAUTION RISK OF ELECTRIC SHOCK DO NOT OPEN CAUTION : TO REDUCE THE RISK OF ELECTRIC SHOCK, DO NOT REMOVE COVER ( OR BACK ). NO USER SERVICEABLE PARTS
MEGAMOUTH MK3 Portable PA System
 MEGAMOUTH MK3 Portable PA System Introduction Thank you for choosing the Megamouth portable PA unit. This product has been designed to provide convenient sound reinforcement for teaching, demonstrations
Always there to help you. Register your product and get support at SBM130. Question? Contact Philips.
 Always there to help you Register your product and get support at www.philips.com/welcome Question? Contact Philips SBM130 User Manual Contents 1 Important 3 2 Your Portable Speaker 4 Introduction 4 What's
PARTS PRODUCT OVERVIEW. Power cord. Portable CD Boombox with Stereo Radio. 1 REPEAT indicator 2 POWER indicator 3 LED display 4 FM ST.
 CD BOOMBOX USER MANUAL TABLE OF CONTENTS IMPORTANT SAFEGUARDS BATTERY SAFETY PARTS PRODUCT OVERVIEW CONNECTING POWER HEADPHONES USING THE RADIO CD OPERATION AUX IN CARE AND MAINTENANCE STORAGE TROUBLE
Instruction Manual BOOM BARREL MINI MODEL: S29
 MODEL: S29 BOOM BARREL MINI Instruction Manual Due to ongoing product improvements, specifications and accessories may change without notice. Actual product may differ slightly to that depicted. WARNING
Helpline No. UK/Northern Ireland Rep. Ireland Web Support Model Number 82069
 Introduction 1 Congratulations on choosing to buy a Tevion product. By doing so you now have the assurance and peace of mind that comes with purchasing a product made by one of Europe s leading manufacturers.
BlueNote USER S GUIDE
 BlueNote USER S GUIDE SAFETY PRECAUTIONS SAFETY PRECAUTIONS To prevent injury and/or damage, take the following precautions: 1 Make sure you keep the antenna away from the mains or high voltage electricity
User s Manual BeamPod User Manual
 User s Manual BeamPod General Safety Information 1. Keep the device and packaging materials out of reach of infants and children. 2. Keep the power adapter and other contacts from water, Dry your hands
SPK User Manual. 900MHz Wireless Stereo Headphones INTRODUCTION FEATURES IMPORTANT SAFETY INFORMATION
 INTRODUCTION Thank you for purchasing our 900Mhz compact cordless stereo headphone system that takes advantage of the very latest advances in wireless transmission technology so you SPK-9100 900MHz Wireless
USER MANUAL. MOVEit Bluetooth
 USER MANUAL MOVEit Bluetooth CONTENTS THANK YOU! Thank you for choosing the MOVEit Bluetooth speaker from SACKit. Please read this user manual carefully before using your new speaker. We are not responsible
Please read and retain these instructions for future reference
 This Touch Phone is 2G only. Power Details: AC Charger Input voltage: 100-240V; 50/60Hz; 0.18A AC Charger Output voltage: DC5V, 1.0A Accessories: Power adapter, USB cable, Earphone, Instruction manual
MP3 Player MP122. Thank you for your purchase. Please read this manual carefully. before using the new player
 MP3 Player MP122 Thank you for your purchase. Please read this manual carefully before using the new player Contents CONTENTS... 1 UPDATE HISTORY... 3 ANNOUNCEMENT... 3 NOTES... 4 BASIC FUNCTIONS... 5
WALLMOUNT Entertainment System
 Wiring Diagram AV IN AV OUT SUBWOOFER OUT HDMI JACK R R R L L L IR REMOTE JACK AUDIO IN ANTENNA WIRING CONNECTING SOCKET Specification GENERAL Supply Voltage Current Consumption Power Output Number of
Party Blaster Boombox User Manual PBMSPG80
 Party Blaster Boombox User Manual PBMSPG80 LOCATION OF CONTROLS 1 Main Unit 1. BASS CONTROL 2. CD DOOR 3. CD DOOR KNOB 4. VOLUME+/- 5. STANDBY/ON 6. FOLDER- 7. LIGHT 8. EQ 9. FOLDER+ 10. FUCTION 11. REPEAT
Please be aware of the following points before using the Kanguru Micro MP3.
 USER MANUAL 1 Please be aware of the following points before using the Kanguru Micro MP3. Copyright 2007, Kanguru Solutions. All rights reserved. DOS, Windows 95, Windows 98, Windows NT, Windows 2000,
CD CD Boombox. Instruction Manual Model Ref: CD82 / Cat Number: MM338
 CD82 07042017 CD Boombox 1 Instruction Manual Model Ref: CD82 / Cat Number: MM338 Introduction Thank you for choosing this CD Boombox. This product is manufactured to the highest standards of performance
DAB RADIO WITH BLUETOOTH
 DAB RADIO WITH BLUETOOTH MODEL: USER MANUAL 1 Welcome 2 Your DAB Radio System 2.1 In The Box 2.2 Main Unit - Front View 2.3 Main Unit - Back View 3 Quick Setup 3.1 Power On (Using Mains) 3.2 Power On (Using
LOCATION OF CONTROLS. English - 1
 LOCATION OF CONTROLS 1. Power Button 2. Function Switch (CD,MP3 / TAPE /RADIO) 3. Band Switch 4. Bass Boost Button 5. Volume Control Knob 6. Tuning Knob 7. CD/MP3 LED Display 8. Dial Pointer 9. CD/MP3
MODEL GE4138 DIGITAL CD/MP3/USB/SD ENCODING WITH PLL AM/FM ALARM CLOCK STEREO RADIO - USER MANUAL -
 MODEL GE4138 DIGITAL CD/MP3/USB/SD ENCODING WITH PLL AM/FM ALARM CLOCK STEREO RADIO - USER MANUAL - CAUTION RISK OF ELECTRIC SHOCK DO NOT OPEN CAUTION: TO REDUCE THE RISK OF ELECTRIC SHOCK, DO NOT REMOVE
Bluetooth CD tower speaker
 Bluetooth CD tower speaker TCD600BT INSTRUCTION MANUAL Contents 2 Safety instructions 3 Description of parts 4 Remote control & Installation 5 General operation 6 Bluetooth / NFC/ USB operation 7 Audio/
CD BOOMBOX USER MANUAL MODEL: GPSBT01 POWER FM ST.
 CD BOOMBOX MODEL: GPS01 USER MANUAL 1 Welcome 2 Your CD Boombox 2.1 In The Box 2.2 Front View 2.3 Control Panel 2.4 Rear View 2.5 Right Side 2.6 Left Side 3 Quick Setup 3.1 Power On/Off and Function Selection
Mp3 Player with Speaker. Instruction Manual FOR MODEL NO FIESTA2. Please read this instruction carefully before the operation
 Mp3 Player with Speaker FOR MODEL NO FIESTA2 Instruction Manual Please read this instruction carefully before the operation EN User Manual KEY DEFINITIONS 9 1 3 2 5 6 4 8 7 Power ON/OFF Play: Play/Pause
User Manu User Manual
 Outdoor Waterproof Portable Bluetooth Speaker User Manu User Manual Model#: BX-600 Thank you for choosing DBPOWER Products External functions: Please follow the Instructions in this user manual carefully.
CD328BT Super Bass Boombox. Instruction Manual Model Ref: CD328BT / Cat Number: MM339
 CD328BT 07042017 Super Bass Boombox 1 Instruction Manual Model Ref: CD328BT / Cat Number: MM339 Introduction Thank you for choosing this Super Bass Boombox. This product is manufactured to the highest
Portable Bluetooth Speaker
 F5 Portable Bluetooth Speaker LIGHT YOUR FIRE USER MANUAL www.mifalife.net LISTEN.MIFA THE MUSIC POWER TO YOUR DEEP HEART! JUST ENJOY 01 Warnings English Please use and store this product at room temperature
igadgitz Stereo Bluetooth Travel Speaker (AJ65C) User Guide
 User Guide") igadgitz Stereo Bluetooth Travel Speaker (AJ65C) User Guide For more instructions in English please visit: Eine Anleitung in Deutsch nden Sie unter: Para obtener instrucciones en Español por favor visite:
igadgitz Stereo Bluetooth Travel Speaker (AJ65C) User Guide For more instructions in English please visit: Eine Anleitung in Deutsch nden Sie unter: Para obtener instrucciones en Español por favor visite:
EVOBOOK 2. User s Manual.
 EVOBOOK 2 User s Manual www.evolio.ro 0 User s Manual Content Page Introduction.... 2 Parts and Controls.... 3 Getting Started...... 6 Turning On/Off EvoBook2. 6 Charging EvoBook2... 6 Inserting SD card....
Digital Voice Recorder & Digital Audio Player
 Model NO. : VT-50 User Manual Digital Voice Recorder & Digital Audio Player www. denpa. com. tw Contents Features Parts identification and keys 2 3 English Main menu display 4 Installing battery 5 Keys
MP4 PLAYER Ref.: MP16 BTH
 MP4 PLAYER Ref.: MP16 BTH User Manual Thanks so much for purchase our MP4 player. Please read this manual carefully before you using this unit. We will not contact individuals with any changes of this
Fixed Wireless Phone. User Manual
 Fixed Wireless Phone User Manual V1.0 Content 1. Introduction... 1 2. Important Information... 2 3. Dos & Don ts... 2 4. Views... 4 5 Key board Introduction... 4 6. Installation... 5 6.1 SIM card installation...
Pyle Vintage - Classic Style Turntable Systems Layout & Controls: Precautions for use - Installation Connection
 Layout & Controls: 1) Dust cover 2) Dial pointer 3) Left speaker 4) Play/Pause/Stop button 5) Skip down button 6) Source button 7) Record button 8) Power off / Functions selector 9) Volume knob 10) 3.5
PR-D14USB / PR-D14. Version 1
 PR-D14USB / PR-D14 中文 GB Version 1 Table of contents Important safety instructions... 2-4 Controls... 5-6 Using the radio for the first time... 7 Operating your radio Searching tuning AM / FM... 7 Setting
Overview 1. Foreword 2. Warnings
 Overview 1. Foreword Thank you for choosing our product. Please read this manual carefully before using the product. Specifications and software updates may be subject to change without notice. Some pictures
Instruction Manual. Portable CD Player with Stereo Radio Cassette Recorder NPB-241
 Instruction Manual Portable CD Player with Stereo Radio Cassette Recorder NPB-241 IMPORTANT NOTES INTRODUCTION Thank you for buying our product. Please read through these operating instructions, so you
Innovating the art of listening
 Innovating the art of listening Phone: 1-201-443-4626 Email: customerservice@hifiman.com Address: 143 Rickey Blvd, Bear, DE, 19701 US Web: hifiman.com HM-700 Owner s Guide HIFIMAN 2013 - EN V1.0 Welcome
Jaton irok Digital MP3 Player User Manual Version 5 Firmware Ver Table of Contents
 Jaton irok Digital MP3 Player User Manual Version 5 Firmware Ver.2.611.101 Table of Contents 1. FEATURES SUMMARY --------------------------------------PG 2 2. SPECIFICATIONS ---------------------------------------------PG
USER MANUAL (Model MFT1202)
") USER MANUAL (Model MFT1202) Features: Detachable Car FM transmitters, transmit range: 87.5 to 108.0MHz; Built-in rechargeable battery, host part can be used as MP3 player, with FM radio; Built-in Flash
USER MANUAL (Model MFT1202) Features: Detachable Car FM transmitters, transmit range: 87.5 to 108.0MHz; Built-in rechargeable battery, host part can be used as MP3 player, with FM radio; Built-in Flash
CONTROL KEYS. M_BCD480 / English Instruction Manual
 CONTROL KEYS 1. VOLUME- 2. VOLUME + 3. PLAY/PAUSE 4. STOP 5. POWER 6. FUNCTION 7. TUNE- 8. TUNE + 9. LCD DISPLAY 10. MODE/RPT/RND 11. TIME/SET 12. SNOOZE/SLEEP 13. ALARM 1 14. ALARM 2 15. FOLDER/MEMORY
AX1300BT SPECIFICATIONS: MECHLESS AM/FM MULTIMEDIA PLAYER RECEIVER BLUETOOTH w BUILT-IN SPEAKERS DESIGNED FOR AUSTRALASIAN CONDITIONS
 MECHLESS AM/FM MULTIMEDIA PLAYER RECEIVER BLUETOOTH w BUILT-IN SPEAKERS SPECIFICATIONS: GENERAL: Mechless Fixed Face Panel Ultra Memory Power Backup Built-In Speakers ISO DIN Mounting ISO Wiring harness
INSTRUCTION MANUAL. MP3/CD Bass Reflex Boombox & PA System with Bluetooth MODEL: NPB-262
 INSTRUCTION MANUAL MP3/CD Bass Reflex Boombox & PA System with Bluetooth MODEL: NPB-262 IMPORTANT: Please read before using and keep for future reference. INTRODUCTION Thank you for buying this product.
ENVIRONMENTAL PROTECTION
 ENVIRONMENTAL PROTECTION Do not dispose of this product with the normal household waste at the end of its life cycle. Return it to a collection point for the recycling of electrical and electronic devices.
BLUETOOTH SPEAKER WITH LED LIGHTS
 BLUETOOTH SPEAKER WITH LED LIGHTS Model No.: BTB-410 Read this booklet thoroughly before using and save it for future reference Unit must be fully charged before use Guide to the Appliance 1 4. 5. 6. 7.
Battery Installation. Time setting
 DT-160 Version 1 Controls 1 Earphone jack 2 Memory button 1/Time setting button 3 Memory button 2/STEP button 4 Memory button 3 5 Memory button 4/Mono/Stereo button 6 Memory button 5/DBB button 7 POWER/BAND