Model: TM-1 / TM1-N. 1 Time Clock Series
|
|
|
- Bertina Hood
- 5 years ago
- Views:
Transcription

1 Model: TM-1 / TM1-N
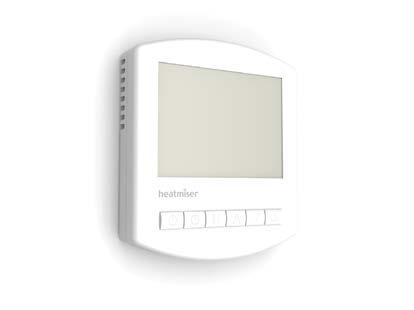
2 Model: TM-1 / TM1-N 1 Time Clock Series
3 Table of Contents Product Image Table of Contents Installation Procedure LCD Display Operating Modes Setting the Operating Mode Setting the Clock Setting the Communication Number (TM1-N ONLY) Locking the Time Clock Programming 5/2 Day Time Clock Mode Programming 7 Day Time Clock Mode Setting Countdown Mode Time Clock Override Holiday Programming Factory Reset Wiring Diagrams Model: TM-1 / TM1-N 2
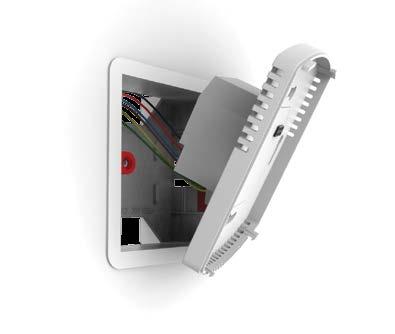
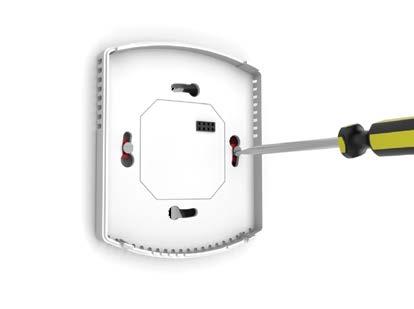
4 Installation Procedure Do Mount the time clock at eye level. Read the instructions fully so you get the best from our product. Don t Do not push hard on the LCD screen as this may cause irreparable damage. This time clock is designed to be flush mounted and requires a back box of 35mm (minimum depth) to be sunk into the wall prior to installation. Step 1 Carefully separate the front half of the time clock from the back plate by placing a small flat head terminal driver into the slots on the bottom face of the time clock. Step 2 Place the time clock front somewhere safe. Terminate the time clock as shown in the diagrams on pages of this booklet. Step 3 Screw the time clock back plate securely into the back box. Step 4 Clip the front of the time clock back onto the time clock back plate. 3 Time Clock Series


5 Model: TM-1 / TM1-N 4

6 Time Clock Series
7 LCD Display 1. Day Indicator - Displays the current day. 2. Holiday Indicator - Displayed when the programmer is in holiday mode. 3. Program Cycle Indicator - Displayed during programming only to show which period is being altered. 4. Keypad Lock Indicator - Displayed when the keypad is locked. 5. Timer Status - Displays the current status of the timed output. 6. Clock - Digital clock display in 24h format. Model: TM-1 / TM1-N 6
8 Operating Modes The time clock has three main operating modes. MODE DESCRIPTION 5/2 Day Time Clock In this mode, you can program 4 switching times for the weekdays and 4 different switching times for the weekend. 7 Day Time Clock In this mode, you can program 4 switching times for each day of the week. Countdown Timer In this mode, the TM1 will activate the output during the countdown period. The time clock can be used to control various electrical devices in and around your home e.g. lighting, electric towel rails, hot tubs, sauna s etc. Refer to the manufacturer instructions for wiring to these devices. Common time clock wiring requirements are shown in the diagrams on pages Time Clock Series

9 Setting the Operating Mode To select the mode, follow these steps. Press and hold the Power button to turn the time clock OFF... Press and hold the Clock button until the display appears as shown below... Press the Clock button again until you see a small number 02 on screen... Use the Up/Down buttons to select the mode you require... Press A to confirm settings... Press the Power button once to turn the time clock back ON... Feature Mode Model: TM-1 / TM1-N 8

10 Setting the Clock To set the clock, follow these steps. In Countdown mode, press the Clock button once... In either 5/2 or 7 Day mode, press the Clock button twice... Use the Up/Down buttons to set the hours... Press H to confirm settings... Use the Up/Down buttons to set the minutes... Press H to confirm settings... Use the Up/Down buttons to set the day of the week... Press A to confirm settings and return to the main display... Day Hours Minutes 9 Time Clock Series
11 Communication Setting (TM1-N Only) To set the communications number, follow these steps. Press and hold the Power button to turn the time clock OFF... Press and hold the Clock button until the display appears... The display will appear as shown below showing feature number 01 Use the Up/Down buttons to set a unique communication address... Press A to confirm settings... Press the Power button once to turn the time clock back ON... Feature Communication Address (01-32) Model: TM-1 / TM1-N 10
12 Locking the Time Clock The time clock has a keypad lock facility. To activate the lock follow these steps. Press and hold the A and Down buttons together for 10 seconds... You will see the lock symbol appear on screen... To unlock, repeat the steps above until the lock symbol disappears. Keypad Lock Indicator The keypad lock indicator is only visible when the lock is active. 11 Time Clock Series
13 5/2 Day Time Clock Mode To program the switching times, follow these steps. Press the Clock button once... You will see Mon Tue Wed Thu Fri displayed on screen. Use the Up/Down buttons to select the TIMER ON for the WAKE switching period... Press H to confirm settings... Use the Up/Down buttons to select the TIMER OFF for the WAKE switching period... Press H to confirm settings... Repeat these steps for LEAVE, RETURN and SLEEP levels. For unused periods set the time to -- : -- and the time clock will ignore the setting. You will now see Sat Sun displayed on screen and can repeat for the weekend. Press A to confirm settings and return to main display... Model: TM-1 / TM1-N 12
14 7 Day Time Clock Mode To program the switching times, follow these steps. Press the Clock button once, you will see Mon displayed... Use the Up/Down buttons to scroll to the day you want to program... Press A to select... Use the Up/Down buttons to set the TIMER ON time for the WAKE switching period... Press H to confirm settings... Use the Up/Down buttons to set the TIMER OFF time for the WAKE switching period... Press H to accept display values and confirm settings... Use the Up/Down buttons to set the ON time for the LEAVE period... Press H to confirm settings... Use the Up/Down buttons to set the OFF time for the LEAVE period... Press H to accept display values and confirm settings... Repeat these steps for the RETURN and SLEEP levels. 13 Time Clock Series
15 For unused periods set the time to -- : -- When WAKE, LEAVE, RETURN & SLEEP periods have been programmed, use the Up/Down keys to select the next day to program... Press A to accept and repeat the programming steps... Press A to confirm settings and return to main display... Program Day Timer On Time Program Level Model: TM-1 / TM1-N 14
16 Countdown Mode Use the Up/Down buttons to set the countdown duration... Press A to confirm settings... Hold For will appear showing the time left. When Hold For is displayed on screen, the output will be active. Hold For Icon Hold Time Remaining Timer Status To cancel a countdown period, reduce time to 00: Time Clock Series
17 Timer Override The time clock is able to override its current timer status. If the TM1 is in the Timer ON mode pressing A will switch it to Timer OFF... (TIMER OFF will flash to inform you the programmed output has been overridden) The TM1 will return to the program at the next programmed time. Time Timer Status (Flashes in Override) Model: TM-1 / TM1-N 16
18 Holiday The holiday function allows you to quickly enter a holiday setting. During a holiday, the time clock will maintain TIMER OFF. At the end of your holiday, the time clock will revert back to the programmed setting. Press H once (you will see the suitcase displayed on screen)... Use the Up/Down buttons to enter the number of days holiday... Press A to confirm settings... The display will show a suitcase indicating the time clock is in holiday mode. Note: A holiday period does not start until 00:00 the next day. For example, if you set a holiday period on Friday for 2 days, Saturday will be counted as the first day and the time clock will revert back to the programmed schedule at 00:00 on Monday. Holiday Days Holiday ON Indicator To cancel, follow the same steps but reduce the holiday duration to 00 days. 17 Time Clock Series
19 Factory Reset The time clock has a reset function to restore all settings to their factory defaults. To perform a factory reset, follow these steps. Press and hold the Power button to turn the thermostat OFF... Press and hold the Power and Up buttons together until the LCD powers up. All of the icons will be displayed on screen... When the icons have disappeared from the screen, the thermostat has been successfully reset. Press the Power button once to turn the time clock back ON... All icons displayed simultaneously. Factory reset is complete. Model: TM-1 / TM1-N 18
20 Wiring Diagram - TM1 Switched Live Output Model: TM1 230VAC A2 A1 N L MAINS SUPPLY FROM FUSED SPUR 230V SWITCHED LIVE OUTPUT - 3 AMPS 19 Time Clock Series
21 Wiring Diagram - TM1 Switched Output Voltfree Model: TM1 230VAC A2 A1 N L MAINS SUPPLY FROM FUSED SPUR SWITCHED OUTPUT VOLTFREE RATED 230V AC - 3 AMPS Model: TM-1 / TM1-N 20
22 Wiring Diagram - TM1-N to UH8-N TM1-N 12VDC Network Y B - CH A2 A1 + Connecting TM1-N to the UH8-N The UH8-N allows connection of up to eight 12 volt network thermostats/timers. When connecting network devices to the UH8-N use CAT5-FTP or BELDEN Connect the screen to S (Earth) at the UH8-N + A1 A2 - Y B + A1 A2 - UH8-N Y B 21 Time Clock Series
23 Notes The time clock can be used to control various devices in and around your home e.g. lighting or towel rails. Refer to the manufacturers instructions for wiring to these devices. Common time clock wiring requirements are shown in the diagrams on pages Model: TM-1 / TM1-N 22
1254 669090 Or view")

24 Want More Information? Call our support team on: +44 (0) Or view technical specifications directly on our website: PDF FAQ Facebook: facebook.com/thermostats Rev. 2.1
Table of Contents. Model: -hw. -hw. Series. Available in : Sapphire Black and Glacier White. Product Image. 16 Table of Contents
 -hw -hw 1 Model: -hw Available in : Sapphire Black and Glacier White Table of Contents Product Image 1 Optional features explained 16 Table of Contents 2 Optional settings features table 16 Installation
Model: Touchpad (TFT) Model: TFT
 Model: TFT") Model: Touchpad (TFT) Model: TFT 1 Model: Touchpad TFT Table of Contents Set-Up Product Image Table of Contents Installation Procedure Initial Setup Setting the Clock LCD Display My System Locking the
Model: Touchpad (TFT) Model: TFT 1 Model: Touchpad TFT Table of Contents Set-Up Product Image Table of Contents Installation Procedure Initial Setup Setting the Clock LCD Display My System Locking the
Model: Available in : Sapphire Black and Glacier White
 1 Model: Available in : Sapphire Black and Glacier White 1 Table of Contents Product Image 1 Locking/Unlocking the SmartStat 20 23 Table of Contents 2 Standby/Away Mode Mode 21 24 What is a Programmable
Model: Available in : Sapphire Black and Glacier White
 Model: Available in : Sapphire Black and Glacier White 1 Table of Contents Product Image 1 Locking/Unlocking the SmartStat 20 Table of Contents 2 Standby/Away Mode 21 What is a Programmable Room Thermostat?
BUP2 5/2 12/4/07 12:49 AM Page 1. Introduction
 BUP2 5/2 12/4/07 12:49 AM Page 1 Introduction This booklet will give you easy to follow instructions to allow you to set your BUP2 Programmer to the Weekday/Weekend, (same times Monday - Friday, different
7 Day Digital Programmer 2 Channel Surface Mount
 7 Day Digital Programmer 2 Channel Surface Mount Model: TRT036N Installation & Operating Instructions 1. General Information These instructions should be read carefully and retained for further reference
BUT2 7day 11/4/07 11:07 PM Page 1. Introduction
 BUT2 7day 11/4/07 11:07 PM Page 1 Introduction This booklet will give you easy to follow instructions to allow you to set your BUT2 Timeswitch to the 7 Day, (different times every day) program. Contents
7 Day Digital Programmer 1 Channel Surface Mount
 7 Day Digital Programmer 1 Channel Surface Mount Model: TRT034N Installation & Operating Instructions 1. General Information These instructions should be read carefully and retained for further reference
Model: EP210. Dual channel programmable controller. Installation Manual
 Model: EP210 Dual channel programmable controller Installation Manual Contents Introduction... 3 Product Compliance... 4 Safety Information... 4 Box content... 4 Features... 5 Installation... 5 Button
RWB29 Programmer. Daily Programming
 RWB29 Programmer Daily Programming RWB29 Controls ON WHEN LIT EXTEND ADVANCE RESET MENU/SELECT UP & DOWN BACK/EXIT Introduction This booklet gives you easy to follow instructions allowing you to set your
Simplified Operating Instructions T105-C / T108-C / T106-C / T17B-C DISPLAYS DAY OR DAY BLOCK PROG 00:0000 PROG PROG ALWAYS OFF
 Button Operations Simplified Operating Instructions T105-C / T108-C / T106-C / T17B-C R - Reset (with pen or other pointed instrument). Y - Enters function setup. +/- Buttons to scroll through icons. Y
Select 107 XLS User Instructions
 Select 107 XLS User Instructions A timeswitch allows you to set On and Off time periods. The timeswitch will allow you to set the On and Off time periods for either Hot water or Central heating to suit
The world s smartest heating system. Programmable Touch Screen Thermostat
 The world s smartest heating system Programmable Touch Screen Thermostat Visit www.discreteheat.com/thermiser for more information Using the TherMiser TME 3E Instructions on how to set and use your newly
REMOTE CONTROL INSTALLATION & OPERATING INSTRUCTIONS
 North American Version REMOTE CONTROL INSTALLATION & OPERATING INSTRUCTIONS Copyright 2009, FPI Fireplace Products International Ltd. All rights reserved. 918-290e 09/22/09 The FireGenie TM Remote Control
S-Series Digital Thermostat
 Salus ST620 Manual 140x140 Finish:Layout 1 29/4/10 13:11 Page 1 S-Series Digital Thermostat Model No ST620 Instruction Manual Salus ST620 Manual 140x140 Finish:Layout 1 29/4/10 13:11 Page 2 2 Salus ST620
U-FLASH Setup Guide U-FLASH.
 U-FLASH Setup Guide Thank you for purchasing the U-FLASH. This guide will assist you in the setup of the system. You can call for FREE technical support to get help anytime at 757-258-0910. Please note,
Installing Keypad and Backplate
 Installing Keypad and Backplate Fig.1 Positioning of Fixing Holes and Cable Outlet Cable Outlet, Drill Diameter 10mm for Cable Access Remove the back plate, which is fitted to rear of the keypad, using
Heatmiser MC Operating Instructions
 Heatmiser MC Operating Instructions Contents Setting Up the MC Contents 1 Pre setup Routine 2 Setup Routine 2 Clock setup 3 Code setup 3 Stat setup 4 Thermostat RUN Mode Information screen 5 Info button
Smart Touch Thermostat Colour Touchscreen Thermostat
 OBSMART Smart Touch Thermostat Colour Touchscreen Thermostat INTRODUCTION Orbry Smart Touch Thermostat The Orbry Smart Touch Thermostat is a digital thermostat, which is designed for electric underfloor
Model P4470 Save A Watt Operation Manual
 Model P4470 Save A Watt Operation Manual Thank you for purchasing the P4470 Save A Watt. This operating manual will provide an overview of the product, safety instructions, a quick guide to operation,
Ambiflex MF820 OPERATOR S MANUAL
 Ambiflex MF820 OPERATOR S MANUAL January 2000 CONTENTS Page No MAKING PROGRAMME CHANGES 3 USING THE KEYPAD 3 UNLOCKING AND LOCKING THE MF820 4 To Unlock 4 Low Level Unlock 4 Mid Level Unlock Locking the
BLDA-1 & 2 Water Leak Detection Manual. CMR Electrical Ltd Bolton House Five Chimneys Lane Hadlow Down East Sussex TN22 4DX Tel:
 BLDA-1 & 2 Water Leak Detection Manual CMR Electrical Ltd Bolton House Five Chimneys Lane Hadlow Down East Sussex TN22 4DX Tel: 01825 733600 Contents 1) System Overview 2) Installation 3) Wiring 4) Water
FP735Si Electronic 3-Channel Full Programmer for Heating and Hot Water with Service Interval Timer. Installation Guide MAKING MODERN LIVING POSSIBLE
 MAKING MODERN LIVING POSSIBLE FP735Si Electronic 3-Channel Full Programmer for Heating and Hot Water with Service Interval Timer Danfoss Heating Installation Guide For a large print version of these instructions
ADVANCED REMOTE CONTROL
 ADVANCED REMOTE CONTROL (SUITS IP28) INSTALLATION & OPERATING INSTRUCTIONS 918-962 12/07/10 The Advanced Remote Control is tested safe when installed in accordance with this installation manual. It is
Model FP700 Owner s Instructions
 The benefits of owning a Freedom Advantage Thermostat Large easy to read backlit display Selectable programming modes: 5-2, 5-1-1 or 7 day Manufactured by the makers of ACCUSTAT controls ServiceWatch for
Digital Room Thermostat for Underfloor Heating Applications
 ERT50 230v Digital Room Thermostat for Underfloor Heating Applications Instruction Manual Model No ERT50 230v PRODUCT COMPLIANCE This product complies with the essential requirements of the following EC
Air-Saver. Version: 0403 INDEX
 Air-Saver Version: 0403 INDEX Page 1 Page 2 Page 3 Page 4 Page 5 Page 6 Page 7 General safety instructions Installation instructions Programming instructions Programming instructions and specifications
MC4181LV SERIES MASTER CLOCKS
 FN:4181LV.DOC MC4181LV SERIES MASTER CLOCKS TABLE OF CONTENTS INTRODUCTION 2 SPECIFICATIONS 3 INSTALLATION 4 FRONT PANEL DESCRIPTION 4 OPERATION Filling out the Program Record Sheet and Auto-Prompt Display
Smart Series. Wall Heater Operations Manual. Save This Manual
 Smart Series Wall Heater Operations Manual Models: HT2024SS FSSWH2004 HT1502SS FSSWH1502 240V, 2000W 240V, 2000W 120V, 1500W 120V, 1500W Save This Manual Index Features that are functional... pg. 3 Thermostat
Digital Room Thermostat
 Salus RT500 Manual 002:89 23/11/10 11:06 Page 1 Digital Room Thermostat Instruction Manual Model No RT500 2 Salus RT500 Manual 002:89 23/11/10 11:06 Page 2 PRODUCT COMPLIANCE This product complies with
PA2000 SERIES. USER MANUAL Rev. P CELL PHONE ENTRY SYSTEM. Platinum Access Systems Inc.
 PA2000 SERIES CELL PHONE ENTRY SYSTEM USER MANUAL Rev. P Platinum Access Systems Inc. PRODUCT LINE PA2020 --- Cell Phone Entry System PA2022 --- Cell Phone Entry System (Flush Mount) PA2120 --- Cell Phone
7 Day Programmable Room Thermostat
 7 Day Programmable Room Thermostat Model: TRT035N Installation & Operating Instructions 1. General Information These instructions should be read carefully and retained for further reference and maintenance.
Installation, Start-up and Operating Instructions
 Installation, Start-up and Operating Instructions EVOLUTION SMART SENSOR FOR ZONING Cancels: NEW II ZONESMS-0-1 7-04 NOTE: Read the entire instruction manual before starting the installation. This symbol
Controls. Preset recall button Memo button Alarm 2 button
 RCR-9 GB Version 1 Content Controls... 2-4 Using the clock radio for the first time... 5-6 Operating your radio - Search tuning FM / AM... 7-8 Manual tuning - FM / AM... 9 Setting up the tuning step increment...
SRT-P50 Series Programmable Touchscreen Thermostats
 Product sheet TH6.200 Type SRT-P50 SRT-P50 Series Programmable Touchscreen Thermostats The SRT-P50 series programmable thermostats offer a modern flush mounted slim design look for the heating and cooling
S-Series Digital Thermostat
 S-Series Digital Thermostat Instruction Manual Model No ST620/ST620PB 2 PRODUCT COMPLIANCE This product complies with the essential requirements of the following EC Directives: Electro-Magnetic Compatibility
ERT50T Triac Noiseless Digital Room Thermostat for Underfloor Heating Applications
 ERT50T Triac Noiseless Digital Room Thermostat for Underfloor Heating Applications Instruction Manual Model No ERT50T Triac 2 PRODUCT COMPLIANCE This product complies with the essential requirements of
16 Amp 1 Channel Multi Purpose Programmer User Instructions
 ES1247B16A 16 Amp 1 Channel Multi Purpose Programmer User Instructions Thank you for choosing ESi Controls. All our products are tested in the UK so we are confident this product will reach you in perfect
User Guide. Need help? Economy 7 Pay As You Go. Visit our online Help Centre
 Need help? Visit our online Help Centre www.utilita.co.uk/help Call our Customer Care Team 03303 337 442 Emergency Line If you have lost supply please call 03452 068 999 Opening Hours 8:00am - 8:00pm Mon
TO AVOID FIRE, SHOCK, OR DEATH; SHUT OFF POWER SUPPLY AT THE CIRCUIT BREAKER OR FUSE AND TEST THAT THE POWER IS OFF BEFORE WIRING.
 OWNER S MANUAL Congratulations on your purchase of a UPM timer. Please take the time to read and understand this manual so you can begin to enjoy the security and energy saving benefits this product has
ScottishPower Connect. User Guide
 ScottishPower Connect User Guide Downloading and using the ScottishPower energy app The ScottishPower app lets you control Connect whenever you re out and about. If you re a ScottishPower Gas & Electricity
Operation 6035 ENGLISH PROG MENU
 Operation 6035 PROG MENU ENGLISH Operation 6035 Program button Time of day Day Time Slot Current Room Temperature Target Temperature Menu button PROG MENU FAN AUTO ON COOL OFF HEAT Fan Switch Touch Screen
Installation & User Manual V1.0
 Other products from GSD standalone products GSD also offers fully functional standalone door controls for less complex door management. This attractive design, with modern aesthestics, will complement
Quick Start Installation and User Manual
 1 Quick Start Installation and User Manual Contents 1. Overview 2. Technical Specifications 3. Installation Mounting Electrical Installation Clamp Installation Wiring Diagrams 4. Installation Settings
P4472 Save A Watt HD Operation Manual
 P4472 Save A Watt HD Operation Manual Thank you for purchasing the P4472 Save A Watt HD. This operating manual will provide an overview of the product, safety instructions, a quick guide to operation,
SOLARIMMERSION IV Advanced Installation Manual v1.9
 SOLARIMMERSION IV Advanced Installation Manual v1.9 1 Contents 1. Overview 2. Technical Specifications 3. Installation Mounting Electrical Installation Clamp Installation Wiring Diagrams 4. Installation
Thank you for purchasing this
 ENGLISH Thank you for purchasing this product. Please read these instructions carefully before using your TDC Timer. TDC Timer User Manual Document Version TDC-VSA01-3.3 INTRODUCTION The TDC Timer has
Application Guide. BACnet Scheduling Tips. Overview. General Principles. For KMC BACnet Controllers
 BACnet Scheduling Tips For KMC BACnet Controllers Application Guide Overview...1 General Principles...1 Sample Flowchart...2 FlexStat...2 BAC-A1616BC Building Controller...3 More Information...6 Overview
ACT 5e prox Operating and Installation Instructions ACT Product Code: ACT 5e prox
 standalone ACT 5e prox Operating and Installation Instructions ACT Product Code: ACT 5e prox ACT 5e prox 2R.indd 1 19/02/2016 17:05:06 ACTstandalone Robust and Reliable. 1 ACT 5e prox 2R.indd 2 19/02/2016
STC7D. Digital Time Clock for TRC500 & TRC800. Installation, Operation, and Maintenance Manual
 STC7D Digital Time Clock for TRC500 & TRC800 Installation, Operation, and Maintenance Manual READ AND SAVE THESE INSTRUCTIONS The purpose of this manual is to aid in the proper installation and operation
Digital Keypad Introduction
 K2 Digital Keypad Introduction The K02 uses the latest microprocessor technology to operate door strikes and security systems that require a momentary (timed) or latching dry contact closure. All programming
HN1000/HN2000 Product Manual
 HN1000/HN2000 Product Manual TABLE OF CONTENTS 1.0 Introduction...1 2.0 Mounting the HN1000/HN2000... 2 3.0 Setting Up Your Optional upunch Account... 4 3.1 Creating Your Account...4 3.2 Adding Departments
P.O. Box 2596 Flagstaff, AZ Tel
 P.O. Box 2596 Flagstaff, AZ 86003 Tel. 928.699.4041 www.tminusproductions.com 7 DAY PROGRAMMABLE DIGITAL TIMER MANUAL DIGITAL TIMER INSTRUCTIONS INSTALLING THE BATTERY 1. The battery can ONLY be installed
SCM030. MPPT Solar System Controller With. DC to DC Booster Input. Installation & Operating Instructions
 SCM030 MPPT Solar System Controller With DC to DC Booster Input Installation & Operating Instructions ABOUT THIS MANUAL These operating instructions come with the product and should be kept with it as
Additional Function Manual
 Disklavier Control Unit DKC-850 Additional Function Manual (Version 3.10) Table of Contents Introduction...2 New Features for Version 3.10... 2 Advanced Song Playback...3 Using the Timer Play... 3 Enhancing
OPERATION MANUAL. Room thermostat EKRTW
 OPERATION MANUAL 1 1 2 3 1 2 4 1 2 1 2 3 4 5 6 7 8 11 12 13 14 9 10 15 16 17 18 19 20 21 22 23 2 WARNINGS Never let the thermostat get wet, this may cause an electric shock or fire. Never press the buttons
User Guide. Need help? Electricity Pay As You Go. Visit our online Help Centre
 Need help? Visit our online Help Centre www.utilita.co.uk/help Call our Customer Care Team 03303 337 442 Emergency Line If you have lost supply please call 03452 068 999 Opening Hours 8:00am - 8:00pm Mon
TS InteliSwitch Digital Time Switch 24VDC/VAC
 SPECIFICATIONS InteliSwitch Digital Time Switch 24VDC/VAC Voltages... 24VAC, 24VDC, VAC Half Rectified Current Consumption............................ Max. 15mA DC........................................
FS-21.doc Status Filter Control FS-21. EasyRange
 Filter Control FS-21 EasyRange 1/27 1/28 Index 1 General Information...4 1.1 Equipment...4 2 Installation...5 2.1 Mechanical Installation...5 2.2 Electrical Installation...5 2.2.1 Connection Diagram...6
Electronic Tap timer Owners Manual
 Electronic Tap timer Owners Manual Pope Electronic Tap Timer This booklet contains all you need to know to install and program your Pope Electronic Tap Timer. It s easy if you follow the steps but take
EVERSAN. MODEL 9769 BASKETBALL, VOLLEYBALL, WRESTLING SCOREBOARD. Instruction Manual
 MODEL 9769 BASKETBALL, VOLLEYBALL, WRESTLING SCOREBOARD Instruction Manual Address: 34 Main Street, Whitesboro, NY 13492 Phone: 315-736-3967 Toll Free: 800-383-6060 Fax: 315-736-4058 SCOREBOARDS TIMERS
Click Save to return to the main Setup screen.
 ON-SITE Setup Guide Thank you for purchasing the ON-SITE. This guide will assist you in the setup of the system. You can call for FREE technical support to get help anytime at 757-258-0910. Please note,
Operating instructions for RAMSES 811 top2_812 top2 and RAMSES 831 top2_832 top2
 Operating instructions for RAMSES 811 top2_812 top2 and RAMSES 831 top2_832 top2 Dear client, if you have the newer device, please use page 1 to 33 RAMSES RAMSES 811 top2 RAMSES 831 top2 8119132 8319132
SSR 303 One Channel 3 Amp Switch (Rx Only) - Z-Wave. User and Installation Instructions
 - Z-Wave. User and Installation Instructions") SSR 303 One Channel 3 Amp Switch (Rx Only) - Z-Wave User and Installation Instructions 1 2 The Secure SSR 303 receiver is a single channel receiver originally designed for the control of central heating
SSR 303 One Channel 3 Amp Switch (Rx Only) - Z-Wave User and Installation Instructions 1 2 The Secure SSR 303 receiver is a single channel receiver originally designed for the control of central heating
BIOMETRIC FINGERPRINT TECHNOLOGY
 BIOMETRIC FINGERPRINT TECHNOLOGY Installation Guide timeqplus Biometric TM Installation Guide Thank you for purchasing the timeqplus Biometric Time and Attendance System. This installation guide will
8-channel pushbutton module. Velbus team
 8-channel pushbutton module VMB8PBU Extended manual that explain how to use all possibilities of this 8- channel pushbutton module and how you can connect up to 8 pushbuttons from any brand to your Velbus
UCA, INC. ACCESS CONTROL SOLUTION ETERNITY USER GUIDE. Version 2.1
 UCA, INC. ACCESS CONTROL SOLUTION ETERNITY USER GUIDE Version 2.1 Table of Contents Eternity User Guide Chapter 1 System Information 1.1 Installation Diagram 1.2 Important Information Model Spec Manufacture
MiG2 CONTROLLERS. 2 & 4 Stage General Purpose Controllers, with Air-conditioning Facilities
 MiG2 CONTROLLERS 2 & 4 Stage General Purpose Controllers, with Air-conditioning Facilities The MiG2 controllers incorporate: 2 Inputs (Configurable as Resistive, 0 10V, 0 20mA or 4 20mA) 2 or 4 Relay Outputs
Wireless 7 Day Programmable Room Thermostat
 Wireless 7 Day Programmable Room Thermostat Model: TRT037N Installation & Operating Instructions 1. General Information These instructions should be read carefully and retained for further reference and
 05/11/2012 Ins-30202 Net2 Entry - Monitor Paxton Technical Support 01273 811011 support@paxton.co.uk Technical help is available: Monday - Friday from 07:00-19:00 (GMT) Saturday from 09:00-13:00 (GMT)
Intelligent Security & Fire Ltd
 05/11/2012 Ins-30202 Net2 Entry - Monitor Technical Support 01273 811011 support@paxton.co.uk Technical help is available: Monday - Friday from 07:00-19:00 (GMT) Saturday from 09:00-13:00 (GMT) Documentation
INSTALLATION INSTRUCTIONS Model 935 EntryCheck
 SECURITY DOOR CONTROLS 3580 Willow Lane, Westlake Village, CA 91361-4921 (805) 494-0622 Fax: (805) 494-8861 www.sdcsecurity.com E-mail: service@sdcsecurity.com INSTALLATION INSTRUCTIONS Model 935 EntryCheck
WavePRO Wireless Programmable T2500 Thermostat & R2500 Receiver OPERATING MANUAL. Model K
 WavePRO Wireless Programmable T2500 Thermostat & R2500 Receiver OPERATING MANUAL Model K2500-001 1 THE PECO WAVEPRO WIRELESS SYSTEM Thank you for choosing the PECO WavePRO TM Wireless System (Model K2500-001).
 1373-1-8645 23.09.2014 Operating Instructions Comfort timer control element for blind, light, and relay control 6455-101-500 6455-101-509 1 Safety... 4 2 Intended use... 4 3 Environment... 4 4 Setup and
Installation Instructions
 SPECIFICATIONS InteliSwitch Digital Time Switch 24VDC/VAC Voltages...... 24VDC, 24VAC, 24VAC Half Wave Rectified Current Consumption...................Max. 15mA DC.................................Max.
Measure & Control Temperature & CO2 levels with analog & digital I/O
 MADE IN OZ HTC-DIGITAL-LCD PROGRAMMABLE TEMPERATURE CONTROLLER c/w YEARLY PROGRAMMABLE TIME SWITCH COMPATIBLE WITH A WIDE RANGE OF SENSORS ROOM O/A WALL DUCT PIPE Use Features Measure & Control Temperature
Home Manager System Model TS40B Wall Display Operating Instructions
 4700 Lang Avenue McClellan, CA 95652 1.800.BEUTLER www.beutler.com Home Manager System Provides control for Heating and Air Conditioning Zoning Option SmartVent Option Security System Interface Option
AP41 / AP81 SERIES TIME SWITCHES
 FN:AP41_81M1.DOC AP41 / AP81 SERIES TIME SWITCHES AP41 AP81 TABLE OF CONTENTS INTRODUCTION 2 SPECIFICATIONS 2 INSTALLATION 5 FRONT PANEL DESCRIPTION 7 OPERATION 8 Filling out the Program Record Sheet 8
INSTALLATION INSTRUCTIONS
 TT-22 /97 INSTALLATION INSTRUCTIONS Original Issue Date: 7/96 Model: ATS Market: Industrial Subject: Exercise Timer Kits PA-46650 to PA-46669, PA-46650-SD to PA-46669-SD, PA-46674 to PA-46678, PA-46674-SD
MAXIMA+ Series Rotary Level Indicator
 MAXIMA+ Series Rotary Level Indicator BinMaster: Division of Garner Industries 7201 N. 98th St., Lincoln, NE 68507 402-434-9102 email: info@binmaster.com www.binmaster.com OPERATING INSTRUCTIONS PLEASE
RAMSES D GB F NL. Installation and operating instructions Room thermostat. RAMSES 832 top2
 309 358 04 RAMSES RAMSES 811 top2 RAMSES 831 top2 811 9 132 831 9 132 RAMSES 812 top2 RAMSES 832 top2 812 0 132 832 0 132 GB Installation and operating instructions Room thermostat D GB F E I NL RAMSES
Ropot YOUR HOME OR OFFICE WORRY FREE WATERING SOLUTION. Ropot Self-watering planter User Manual WATERING SYSTEMS LLC
 WATERING SYSTEMS LLC Ropot Self-watering planter User Manual Watering Systems LLC Southlake, TX 76092 sales@ropot.me i A. OUT OF THE BOX CONTENT: 1. Ropot automated self-watering planter 2. 2 x 9V battery
Working day Non-working day Private holiday
 OVERVIEW This feature changes the destination of an incoming call or the system operating conditions, such as call originating restrictions, based on the day of the week and the time of day (time zone).
MAXIMA + Series ROTARY LEVEL CONTROL
 Price $5.00 MAXIMA + Series ROTARY LEVEL CONTROL OPERATING INSTRUCTIONS PLEASE READ CAREFULLY Division of Garner Industries 7201 North 98th Street Lincoln, NE 68507-9741 (402) 434-9102 925-0268 TABLE OF
Microprocessor based Temperature / CO2 Controller c/w 365 Day Time Switch & Modbus Communication.
 HTC-DIGITAL-LCD Microprocessor based Temperature / CO2 Controller c/w 365 Day Time Switch & Modbus Communication. Features Use Australian Made and designed LCD 2 X 16 Character Backlit Display Five Programmable
G75 Irrigation Window Controller
 BACCARA G75 Irrigation Window Controller WINDOW USERS GUIDE START ON ON ON ON END OFF 10:00 OFF OFF OFF 14:00 TABLE OF CONTENTS Getting Started FEATURES PARTS IDENTIFICATION BASIC CONTROLLER FUNCTIONS
MAXIMA + Series ROTARY LEVEL CONTROL
 Price $5.00 MAXIMA + Series ROTARY LEVEL CONTROL OPERATING INSTRUCTIONS PLEASE READ CAREFULLY Division of Garner Industries 7201 North 98th Street Lincoln, NE 68507-9741 (402) 434-9102 925-0268 Rev. A
Programmable Room Thermostat. User Guide UFHPROGB & UFHPROGRFB
 Programmable Room Thermostat User Guide UFHPROGB & UFHPROGRFB Overview The Programmable Room Thermostats Range (UFHPROGB & UFHPROGRFB) provides time and temperature control for a space of up to 40m 2.
SA-027WQ. Manual. 7-Day Timer. Lighting Systems Access Controls Security Systems Environmental Controls. Automate the following:
 SA-027WQ 7-Day Timer Manual Automate the following: Lighting Systems Access Controls Security Systems Environmental Controls 12~24 VAC/VDC Program up to 60 flexible events Holiday function (up to 99 days)
IQ PROX. Programming Guide. Series. For use with IQ KP* only
 IQ PROX Series Programming Guide For use with IQ KP* only Congratulations, you have just purchased the IQ KP*series lockset by Marks USA, the most advanced stand-alone door lock and access control system
Model N47KB Energy Monitor with Built-in Timer
 Model N47KB Energy Monitor with Built-in Timer Thank you for purchasing the N47KB Energy Monitor with Built-in Timer. This operating manual will provide an overview of the product, safety instructions,
AMBIFLEX MF626 - USER GUIDE
 AMBIFLEX MF626 - USER GUIDE CONTENTS Page No Product Overview 2 Features 3 Standby Display 4 User Facilities 5 Status Display Mode 6 Measured Temperatures 6 Time Channel Information 7 What is happening
Programmable(5+1+1)Touch Screen LCD Wired Thermostat. General. Features. Operating Algorithm
Touch Screen LCD Wired Thermostat. General. Features. Operating Algorithm") Programmable(5+1+1)Touch Screen LCD Wired Thermoat General Front View Back View HTW-91-410 series ermoat is widely used in ese environment like Homes, Residential buildings, Schools, Offices and etc. to
Programmable(5+1+1)Touch Screen LCD Wired Thermoat General Front View Back View HTW-91-410 series ermoat is widely used in ese environment like Homes, Residential buildings, Schools, Offices and etc. to
2 Zone Time Clock. User Guide UFHTIME2B
 2 Zone Time Clock User Guide UFHTIME2B Overview The 2 Zone Time Clock is designed to work with the Dial Thermostat (UFHDIALB) to provide time control per manifold. Time clock also has 1 other zone which
The Old Brewery Works, Lr Ellacombe Church Rd, Torquay. UK. TQ1 1JH Tel: Fax:
 : The Old rewery Works, Lr Ellacombe Church Rd, Torquay. UK. TQ1 1JH Tel: 01803 295430 Fax: 01803 212819 email: sales@stephenpwales.co.uk TIM30 MANUAL FOR SETTINGS AND CONFIGURATION Issue 1.0 For Meter
ROBERTS RD-41. Sound for Generations. DAB / FM RDS / MP3 / WMA / EPG digital radio with timed recording and. Please read this manual before use
 ROBERTS Sound for Generations RD-4 DAB / FM RDS / MP3 / WMA / EPG digital radio with timed recording and Please read this manual before use Contents Controls... 2-3 Digital radio features... 4 Battery
Trail Camera User s Manual (for S378) V1.0
 V1.0") Trail Camera User s Manual (for S378) V1.0 PLEASE READ CAREFULLY BEFORE USING CAMERA Package Contents Mounting Strap 1 Trail Camera 1 Antenna(wireless camera only) 1 USB Cable 1 User s Manual 1 Camera
Trail Camera User s Manual (for S378) V1.0 PLEASE READ CAREFULLY BEFORE USING CAMERA Package Contents Mounting Strap 1 Trail Camera 1 Antenna(wireless camera only) 1 USB Cable 1 User s Manual 1 Camera
AR-727HB-RAY AR-716E-RAY EAR-727HB-RAY Series of Controllers
 AR-727HB-RAY AR-716E-RAY EAR-727HB-RAY Series of Controllers Installation and Programming Guide AR-716E-RAY EAR-727HB-RAY AR-727HB-RAY 10th August 2011 Version 1.00 Southern Office: Raytel House Brook
Installation Instructions
 SPECIFICATIONS TS-400 InteliSwitch Digital Time Switch 20/277VAC Voltages... 20/277VAC, 50/60Hz Requirements @ 20VAC... 0-800W ballast @ 277VAC... 0-200W ballast @ 25VAC.../6 hp Time-Out Adjustment...
ZONETOUCH DAMPER CONTROL SYSTEM Operation Manual
 ZONETOUCH DAMPER CONTROL SYSTEM Operation Manual www.zonemaster.com.au www.polyaire.com.au 2012 Polyaire Pty Ltd TABLE OF CONTENTS 1) Features 2 2) Wall Controller Layout (Touchpad) 2 3) Manual On/Off