PRECAUTIONS How to Handle Discs Precautions & Warnings Lithium Battery Cell Warnings Drives and connections Others Warnings
|
|
|
- Allan McDonald
- 5 years ago
- Views:
Transcription
1
2 CONTENTS Precautions...1 How to Handle Discs...1 Precautions & Warnings...1 Lithium Battery Cell Warnings...1 Drivers and Connections...1 Other Warnings...1 Installation...2 Installation Procedures...2 Important...2 To Install the Car Radio Wiring Connections...3 Removal of the Main Unit...3 Control Panel Button Locations...4 General Operation...5 Turn Unit On/Off...5 Adjust Volume (VOL)...5 Adjust Menu Options (SEL) Set the Clock (CLK)...6 Change the Source (SRC)...6 Mute on/off...6 USB Port...6 Built-in Microphone...6 AUX input Connector...6 Reset System (RESET)...6 Radio Operation...7 Change Bands (BAND)...7 Manual Tuning ( / )...7 Auto Seek Tuning ( / )...7 To Store/Recall Preset Stations (1-6)...7 Automatic Store / Preset scan (AMS)...7 Stereo/Mono...7 Using the PTY search function...7 Disc/USB/Micro SD Card Operation...8 To Insert Disc/USB/Micro SD Card...8 Eject Disc/USB/Micro SD Card...8 Play/Pause...8 Next/Previous Track...8 Fast Forward/Backward...8 Introduction Scan...8 Repeating the same track...8 Playing All Tracks in Random...8 Track/Folder Navigation...8 Select the track or file for playback in MP3 format...9 Auxiliary Input operation...9 Bluetooth Operation...10 Pair and Connect...10 Make a Call...10 Redial Last Dialed Number...10 Answer a Call / Reject a Call / End a Call...10 Switch Audio Between Car and Phone...10 Adjust Talk Volume...10 Audio Streaming (A2DP)...10 Remote Control...11 Specifications...12 Troubleshooting...13
3 PRECAUTIONS How to Handle Discs Handle a disc by its edges. Do not touch the playing side Before inserting a disc, wipe the disc outward from the disc center with a clean, soft, dry and lint-free cloth. Do not use solvents or thinners such a petrol/benzene or cleaners. After removing a disc from the disc slot, place the disc in a sleeve or case to keep it clean and prevent scratches. Do not stick paper or tape on the disc surface. If there is glue (or adhesive) on the disc surface, remove it before using the disc. Precautions & Warnings To reduce the risk of fire, electric shock, and interfer-ence, do not attempt to repair this unit yourself. Refer all service to a qualified technician. Some MP3/WMA files may not be playable. Keep the volume at a reasonable level to avoid distracted driving. High volume levels may make it difficult to concentrate on traffic and road conditions while driving. If the car has been in direct sunlight for an extended period, you may need to reduce the temperature inside the car before turning on and using the unit. If the battery is disconnected, discharged, or changed, the preset memory of the unit will be lost and require reprogramming. The unit is designed to be installed in a level,horizontal position. For optimal performance, avoid installing the unit at an angle. Never use excessive force when removing or attaching the faceplate. Do not tightly grip the display and buttons to avoid damage. Lithium Battery Cell Warnings Cell leakage may cause damage to the remote control Do not throw cells into as this may cause an explosion. Keep battery cells out of reach of children. Drives and connections Never place any foreign objects into the openings of the car radio (disc compartment, USB jack, card slot, AUX IN connection). Otherwise you might damage the slots and connections. Others Warnings Do not switch on the car radio for long periods of time when the motor is switched off. This could cause the car battery to discharge and the vehicle can no longer be started. 1
4 INSTALLATION Installation Procedures First complete the electrical connections and then check for correctness. Installation Opening This unit can be installed in any dashboard Having an opening as shown the right figure. 182 mm 53 mm Important: Remove the transport CD deck screws before use. To Install the Car Radio Be sure you test all connections first, and then follow these steps to install this unit. 1. Make sure the ignition is turned off, and then disconnect the cable from the vehicle battery s negative (-) terminal. 2. Disconnect the wire harness and the antenna. 3. Lift the left or right top corner of the plastic outer trim ring then pull it out to remove it. 4. Insert the two bracket keys into the left and right side of the chassis, as shown the below figure to separate the chassis from the housing. Bracket key Bracket key Plastic outer trim ring 5. Insert mounting sleeve into the dashboard and bend the mounting tabs out with a screwdriver. Make sure that the lock lever is flush with the mounting sleeve and is not projecting beyond. 6. Insert car radio into the mounting sleeve. 7. Use a metal strap to secure the rear part of the chassis using the hardware indicated. 8. Make wiring connections, as illustrated in the Wiring Diagram. 9. Install the plastic outer trim ring. 2
5 INSTALLATION(CONT.) INSTALLATION DIAGRAM - Only use speakers with 4 ohms impedance. - Do not attach the control panel to the chassis before wiring is complete. - The maximum current of the auto antenna is 200mA. Wiring Connections WIRING DIAGRAM CAUTION +12V DC NEGATIVE GROUND Removal of the Main Unit 1. Remove the metal strap from the main unit. 2. Remove the plastic trim out from the main unit. 3. Insert a bracket key into the left and right side of the main unit and draw the unit out of the mounting sleeve. 3
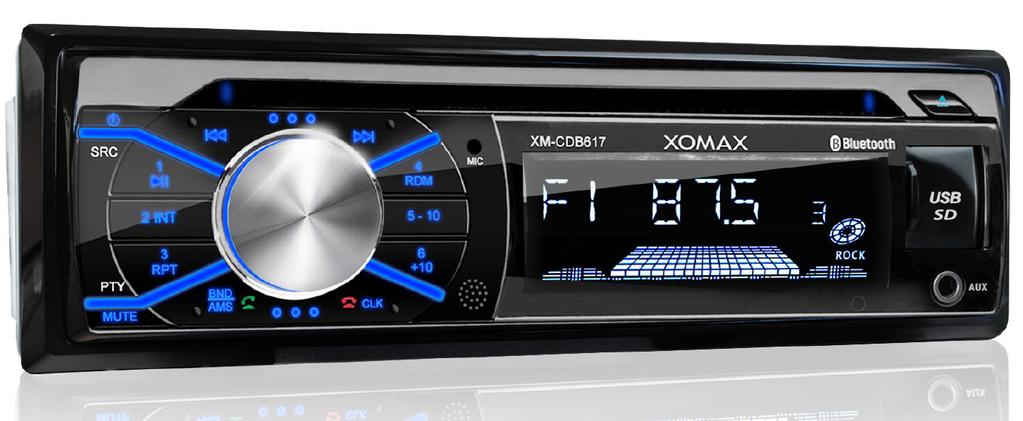
6 CONTROL PANEL BUTTON LOCATIONS 19 B Bluetooth (power)/src (source) button 2. SEL (select/menu) button and VOL (volume) knob 3. BND(band) button, AMS (automatic music search) button, button 4. (pause/play), Preset station1 button 5. INT (intro), Preset station 2 button 6. RPT (repeat), Preset station 3 button 7. RDM (random), Preset station 4 button (previous 10 tracks), Preset station 5 button (next 10 tracks), Preset station 6 button 10. CLK (clock setting) button, button 11. (tune down, seek down,track down, fast reverse) button 12. (tune up, seek up, track up, fast forward)button 13. MUTE button, PTY (Program Type) button 14. (eject) button 15. Disc slot 16. IR remote control sensor 17. LCD Display 18. USB port & Micro SD Card Slot 19. MIC hole(built-in Microphone) 20. AUX IN (auxiliary input) jack 21. RESET button 4
7 GENERAL OPERATION Turn Unit On/Off Press the power ( ) /SRC button on the front panel to turn on the unit, and long press it again to turn off the unit. Press the power ( ) button on the remote control to turn the unit on or off. Adjust Volume (VOL) Rotate the VOL knob on the front panel or press the VOL+ / VOL- button on the remote control to increase or decrease the volume level. Adjust Menu Options (SEL) Press the SEL button on the front panel or press the SELECT button on the remote control repeatedly to cycle through the following adjustable audio functions: BASS, TREBLE, BALANCE, FADER, EQ FLAT/POP/ROCK/CLASS/OFF, LOUD ON/OFF, LED AUTO / COLOR 1(Red) / COLOR 2 (Green) / COLOR 3 (Blue), DX, STEREO and VOLUME. Rotate the VOL knob on the front panel or press the VOL+ / VOL- button on the remote control to adjust the selected item. - BASS/TREBLE:-07,-06, ~, -01,00,+01,~, +06,+07 - BALANCE:L07,L06,~, L01, 00, R01,~,R06,R07 - FADER:R07,R06~,R01,00,F01,~,F06,F07 - EQ(Equalizer) Setting:OFF, FLAT, POP, ROCK, CLASS - Loudness: LOUD ON/OFF - LED AUTO / COLOR 1(Red) / COLOR 2 (Green) / COLOR 3 (Blue): This unit is equipped Red, Green and Blue 3 colors illumination. You can preset color 1 (Red), color 2 (Green), color 3 (Blue) or LED auto illumination. When you select the LED AUTO, the red, green and blue color illumination will be automatically switched in sequence every 3 seconds. - DX/LOCAL: Enables or disables the local broadcast mode (LOCAL). - Stereo/Mono: Switches between MONO and STEREO reception mode for radio frequencies. - Volume level:00,01,~,40 Press and hold the SEL button on the front panel or press the SELECT button on the remote control to access these additional functions:vol(las/adj), CLOCK 24/12, BEEP ON/OFF, AF ON/OFF, TA ON/OFF, TA VOL, REG ON/OFF, EON ON/OFF. - VOL(LAS/ADJ) :This option allows you to preset a volume level as the power-on memory volume level. - VOL LAST: In this mode,the unit switches on at the actual volume it had when it was last switched off. - VOL ADJ: In this mode, the unit power on at the actual volume that you preseted a constant switch-on volume level. Press the SEL button to enter the constant switch-on volume adjusting mode and the A-VOL XX will be shown on the LCD display. Then you can adjust a constant switch-on volume level by rotating the VOL knob. - CLOCK 24/12: This unit is equipped with two types of clock display formats, 24 and 12 hours. Rotate the volume knob to choose 24 hours format or 12 hours format. - BEEP ON/OFF:Enables or disables the BEEP signal to confirm use. - AF ON/OFF: Enables or disables the alternative frequency search mode (AF). 5
8 GENERAL OPERATION (CONT.) This function is used for maintaining a program being listened to during a trip if its frequency changes. - TA ON/OFF: Enables or disables the TA function (traffic information). When this function is enabled, the tuner will periodically scan received frequencies and play any traffic information message that may be broadcast. - TA VOL (traffic announcement volume): This function allows you to define the minimum volume for the traffic announcements. The adjustable range is 0~43. The defaulted value is 26. Rotate the VOL knob to adjust the volume of the traffic announcements. - REG ON/OFF: Enables or disables the region mode. Some broadcasting stations change their program from normal broadcasting to regional broadcasting for a certain time period. When region is on, the current listening program remains unchanged. When region is off, it allows the reception moved to the regional station. - EON ON/OFF: Enables or disables the EON (Enhanced other network). Rotate the VOL knob on the front panel or press the VOL+ / VOL- button on the remote control to adjust the selected item. Set the Clock (CLK) 1. To display clock time, press the CLK button. 2. To set clock time, press and hold the CLK button and the hour will flash. 3. Press the or button on the front panel or on the remote control to adjust the hour. 4. Press the CLK button and the minutes will flash. 5. Press the or button on the front panel or on the remote control to adjust the minute. 6. Note: During Bluetooth mode, the clock can not be adjusted. Change the Source (SRC) Press the SRC button to switch between RADIO, BT(Bluetooth), DISC(with a CD/MP3 disc inside the disc slot), USB(with USB device inserted), CARD(with Micro SD card inserted) and AUX-IN(auxiliary input) modes. Mute on/off In power on mode, briefly press the MUTE button to toggle mute on or off. will be also released when the volume knob is used. The muted state USB port The USB port of this car radio is designed for media playback from flash memory devices. Note: This USB port is not designed to charge high-power devices. Built-in Microphone To receive your voice when you calling by using this bluetooth handsfree system. Aux input connector The 3.5mm auxiliary input stereo connection is designed for deiveces with 3.5mm line-out or headphone output. Reset System (RESET) The RESET button is used to reset all parameters to factory default settings. This function may be used when the LCD does not display normally or sound is distorted, or when any of the controls are disabled. To reset your system, use a thin object with a pointed end to press the RESET button. 6
9 RADIO OPERATION Change Bands (BAND) Press the BAND button to switch between the FM1, FM2 and FM3 band. Each band stores up to six preset stations. Manual Tuning ( / ) Press and hold the or button on the front panel or on the remote control to enter manual tuning mode. In manual tuning mode, press the or button to move the radio frequency number up or down one step. Auto Seek Tuning ( / ) In standby mode or while not in manual tuning mode, quickly press the or button to move to the next/previous available station automatically. To Store / Recall Preset Stations The radio can be stored 6 preset stations for each band (FM1, FM2, FM3) for a total of 18 preset stations. To memorize a station: - Turn the radio on and select the desired band and station. - Select a station by or button. - Press and hold the desired preset button (numbered 1-6 on the face of the radio) for more than 2 seconds to save the station to that preset number. - To recall a preset station: - Select the desired band. - Briefly press a preset button (numbered 1-6) to recall the corresponding preset station. Automatic Store / Preset scan (AMS) Press and hold the AMS button for more than 2 seconds to select six strong stations and store them in the current band. The radio will automatically scan the current frequency and enter the six strongest stations into the preset memory positions for that band. Briefly press the AMS button on the remote control to scan each preset station that saved in the memories in each band. STEREO/MONO FM station is received in stereo mode. However, if the signal is weak or reception is not as good as you would like, switching to MONO mode usually improves the overall sound quality. Press the ST button on the remote control to choose FM STEREO or MONO audio effect. Using the PTY seach function The PTY function allows you to search for a particular program type. Press and hold the PTY/ MUTE button on panel or press the PTY button on the remote control can switch between PTY speech group and PTY music group. NEWS (speech) or POP M (music) will appear on the LCD display. When PTY group is on, pressing one of 6 numbered (1~6) buttons can select one of typed program. When you select the speech/ music pty group, the numbered (1~6) buttons are shared as follows RDS station programs: Numeric key Speech PTY Group 1 NEWS, AFFAIRS, INFO 2 SPORT, EDUCATE, DRAMA 3 CULTURE, SCIENCE, VARIED 4 WEATHER, FINANCE, CHILDREN 5 SOCIAL, RELIGION, PHONE IN 6 TRAVEL,LEISURE, DOCUMENT Music PTY Group POP M, ROCK M EASY M, LIGHT M CLASSICS, OTHER M JAZZ, COUNTRY NATION(national), OLDIES FOLK M When you select a program type, the tuner will search for a station broadcasting this type of program. The tuner will stop searching if it finds the relevant program type. If the radio does not find a station broadcasting the type of program selected, the text NO PTY be shown on the LCD displaty and return back to the previous station. 7
10 DISC / USB / MICRO SD CARD OPERATION To insert DISC / USB / Micro SD CARD To play files on a disc, insert a disc with the label surface facing upward into the disc slot. Playback will begin automatically. To play files in a USB device or a Micro SD card, open the USB port cover and insert the USB storage device into the USB port or a Micro SD card into the Micro SD card slot. Playback will begin automatically. Label surface up XM-CDB617 B Bluetooth Eject Disc/USB/SD To eject a disc, press the button to stop playback. Press the (eject) button to eject the disc and then remove it To eject a USB device, press the button to stop playback, then remove the USB device. To eject a micro SD card, press the button to stop playback, and press the micro SD card, to eject the micro SD card then remove the SD card from the micro SD card slot. Play/Pause Press the (play/pause) button to pause or resume playback. Next/Previous Track To play the next track, press the button. To play the previous track, press the button. Fast Forward/Backward To fast forward, press and hold the To fast backward, press and hold the button. button. Introduction Scan Press the INT button to play the first 10 seconds of each track, press again to stop the introduction scan, and play the current track. Repeating the same track Press the RPT button to repeat the current track, press again to stop repeat plaback and resume normal playback. Playing all tracks in random Press the RDM button to play all tracks in random order, press again to cancel this function. Track/Folder Navigation During a disc, USB or SD card mode, press the 5/-10 button to go backward 10 tracks. Press the 6/+10 button to jump forward 10 tracks. During a MP3 disc, USB or SD card mode, press and hold the 5/-10 button to go back the previous folder. Press and hold the 6/+10 button to go to the next folder. You can repeat this function depending on the number and level of folders. These buttons have no this function if the USB device or SD card has no folders. 8
11 DISC / USB / CARD OPERATION (CONT.) Select the track or file for playback in MP3 format Press the AMS button repeatedly to select one of the following 3 search modes: NUM SCH (Searching by track or file serial number) DIR SCH (Searching by folder serial number) FILE SCH (Searching by track or file name) Searching by track or file serial number: a) In playback of files with MP3 format, press the AMS button once to access the track or file number searching mode which allow you to quickly find a specific MP3 track or file by its serial number, and the NUM SCH and NUM *** will appear on the LCD display in sequence, and the first symbol * will blink. b) Rotate the VOL knob to select the serial number of your favorite file with high speed. c) Finally press the SEL button to confirm and play the selected file. Searching by folder serial number: The folder search mode allows you to quickly find an MP3 track or file under a specific group folder. a) In playback of files with MP3 format, press the AMS button twice, the DIR SCH will be shown on the LCD display. b) Rotate the VOL knob to select a desired folder.if there are no root Folder in the MP3 disc, USB or SD card, the LCD will display ROOT ) c) Press the SEL button to play the first track or file of the selected folder. Searching by track or file name: This track or file name search function requires only the first few character as search keyword, it will allow you to quickly find an MP3 title by its name. a) Press the AMS button three times, the FILE SCH and * will be shown on the LCD display in sequence, and the first character * will blink. b) Rotate the VOL knob to change the first character (*). The character will be changed from A to Z, 0 to 9 and _, -,, +, space. Press the SEL button to confirm the character entered and the next character will blink for setting. Press the AMS button to delete the incorrect character. c) When mached files was found, press the SEL button to start play the searched file. If the file was not found, NO FOUND message will be visible on the display. AUXILIARY INPUT OPERATION This car radio has an external auxiliary input jack, it is compatible with audio output from an MP3 music player. So you can listen to sounds and music from external devices, if you have plugged such a player into the AUX IN jack with a audio cable. Press the SRC/MODE button to switch to the AUX input mode on or off. B Bluetooth 9
12 BLUETOOTH OPERATION Pair and Connect Prior to using the Bluetooth device as a handsfree system for a Bluetooth-enabled mobile phone for the first time, you must pair and connect the two devices as follows: 1. In any mode, prior to pairing and connecting, the BT logo in the LCD indicating that no device is connected. To begin pairing, enable BT mode on your mobile phone. 2. When the phone the car audio system,the XOMAX XM-CDB617 name will be displayed. 3. Choose the XOMAX XM-CDB617 from the device list to pair and connect with the car audio system. Upon confirming, the BT logo will stop flashing. 4. When pairing is complete, the mobile phone audio will automatically transfer to the car audio system whenever a call is made or received, or when the mobile phone plays music. Make a Call To make a call, dial the call directly from the paired mobile phone. To make a call with this bluetooth handsfree system: a) When linking up the Bluetooth-enabled mobile phone to this bluetooth handsfree system, press the button to access the dial telephone number mode, then press the 0~9, * and # button on remote control to input the telephone number, and the entered number will be shown on the LCD. b) If a number has been incorrectly inputted, press the DEL button or button to delete it. c) Press the button to make outgoing call. Redial Last Dialed Number Press and hold the button on the control panel to redial the last dialed phone number. Answer a Call When the mobile phone is called, the incoming telephone number displays in the LCD. To receive the call, press the button on the control panel. Reject a Call To reject the call, press the End a Call To end an active call, press the button on the control panel. button. Switch Audio Between Car and Phone During a call, press the VOL knob/button to switch the audio source from the car audio system back to your mobile phone. Adjust Talk Volume During a call, use VOL knob or VOL+ / VOL- button to adjust the volume level. Use the MUTE button to mute sound. Audio Streaming (A2DP) 1. Press the / SRC button to enter BT mode and display media in the LCD. 2. When a mobile device is paired, music played through that device will automatically be heard through the car audio system. 3. Press the or button to play the next or previous on the mobile phone. 4. Press the button to pause or resume music playback. 10
13 REMOTE CONTROL Remove Insulating Sheet The remote control comes with an insulating sheet attached to the underside of the remote control, as illustrated on the right. The remote control will not work until the insulating sheet is removed. Replace Lithium Battery Cell 1. When the lithium cell battery becomes weak, replace it as illustrated on the right. 2. Press and hold the movable block in the direction indicated by arrow 1. At the same time, pull the cell holder out of the remote control in the direction indicated by arrow Replace the old cell with a new one, making sure the (+) polarity is facing upward. 4. Re-insert the cell holder into the remote control. - Cell leakage may cause damage to the remote control. - Do not throw cells into as this may cause an explosion. - Keep battery cells out of reach of children. Remote Control Operation Position the emitting window of the remote control toward the sensor window of the unit. The operation angle for front panel remote control reception is about 30 degrees. The distance between the emitting window of the remote control and the sensor window of the unit should remain less 5 meters. Button Names and Locations 1. (Power on/off) button 2. VOL+/VOL-(volume increase/decrease) button 3. Band button, button 4. Tune down, seek down; Track down, fast reverse SEL(selection) button 5 6. button:tune up, seek up; Track up, fast forward Mute button, DEL(Delete) button 8. CLK(clock setting) button, button 9. button, preset station 1 button, keypad INT(intro) button, preset station 2 button,keypad RPT(repeat) button, preset station 3 button, keypad RDM (random), preset station 4 button, keypad (previous 10 tracks), preset station 5 button, keypad (next 10 tracks), preset station 6 button, keypad ST (stereo) button, keypad MODE button, keypad AMS (automatic music search) button, keypad AF(list of alternative frequency) button, keypad 19. PTY(program type) button, keypad TA (traffic announcement) button, keypad # Note: When using the remote control for the first time, you must pull out the portective plastic tab from the battery compartment found on the back of the remote control. 11
14 SPECIFICATIONS General Chassis Dimensions...178(W) x 160(D) x 50(H) mm Power Supply Requirement...DC 12V Current Consumption...10A MAXMaximum Power Output... W x 4CH Radio FM Frequency Range MHz (50KHz/Step) Usable Sensitivity...30 dbu I.F. Frequency MHz CD/USB/Card Usable Audio Formats...CD/MP3/WMA Pre-amp Output...Front and Rear Frequency Response...20 Hz - 20 KHz S/N Ratio...60dB BT BT Profile supports...a2dp, AVRCP,HSP, HFP Range of frequency...2.4ghz spectrum 12
15 TROUBLESHOOTING 13
PRECAUTIONS How to Handle Discs Precautions & Warnings Lithium Battery Cell Warnings Drives and connections Others Warnings
 CONTENTS Precautions...1 How to Handle Discs...1 Precautions & Warnings...1 Lithium Battery Cell Warnings...1 Drivers and Connections...1 Other Warnings...1 Installation...2 Installation Procedures...2
PRECAUTIONS. How to Handle Discs. Lithium Battery Cell Warnings
 CONTENTS Precautions... 1 How to Handle Discs... 1 Lithium Battery Cell Warnings... 1 Installation... 2 Prepare Radio... 2 Mount Radio... 2 Wiring Connections... 3 Uninstall the Main Unit... 4 Control
PRECAUTIONS. How to Handle Discs. Lithium Battery Cell Warnings
 CONTENTS Precautions... 1 How to Handle Discs... 1 Lithium Battery Cell Warnings... 1 Installation... 2 Prepare Radio... 2 Mount Radio... 2-3 Wiring Connections... 3 Removal of the Main Unit... 4 Control
PRECAUTIONS. How to Handle Discs. Lithium Battery Cell Warnings
 CONTENTS Precautions... 1 How to Handle Discs... 1 Lithium Battery Cell Warnings... 1 Installation... 2 Prepare Radio... 2 Mount Radio... 2-3 Wiring Connections... 3 Removal of the Main Unit...3 Control
PRECAUTIONS. How to Handle Discs. Lithium Battery Cell Warnings
 PRECAUTIONS How to Handle Discs Handle a disc by its edges. Do not touch the playing side. Before inserting a disc, wipe the disc outward from the disc center with a clean, soft, dry and lint-free cloth.
PRECAUTIONS. How to Handle Discs. Lithium Battery Cell Warnings
 CONTENTS Precautions... 1 How to Handle Discs... 1 Lithium Battery Cell Warnings... 1 Installation... 2 Prepare Radio... 2 Mount Radio... 2-3 Wiring Connections... 3 Removal of the Main Unit...3 Control
In-Dash AM/FM Receiver with MP3 Playback & USB/SD/AUX Inputs. Receiver Models: PLMRB29W/PLMRB29B MIC USER S MANUAL
 In-Dash AM/FM Receiver with MP3 Playback & USB/SD/AUX Inputs Receiver Models: PLMRB29W/PLMRB29B MIC USER S MANUAL COTENTS COTENTS... 1 PRECAUTIONS... 2 Precautions & Warnings... 2 Lithium Battery Cell
PRECAUTIONS. Lithium Battery Cell Warnings. Use cautions
 PRECAUTIONS Lithium Battery Cell Warnings Cell leakage may cause damage to the remote control. Do not throw cells into as this may cause an explosion. Keep battery cells out of reach of children. Use cautions
USER'S MANUAL 850BRGB BLUETOOTH I MP3-COMPATIBLE CD AM/FM RECEIVER. 0 Bluetoothe BO S AUDIO SYSTEMS
 USER'S MANUAL 850BRGB BLUETOOTH I MP3-COMPATIBLE CD AM/FM RECEIVER - 0 Bluetoothe BO S AUDIO SYSTEMS CONTENTS Precautions...1 How to Handle Discs...1 Precautions & Warnings...1 Lithium Battery Cell Warnings...1
CONTENTS. Fast Forward/Backward... Change Bands (BAND) Automatic Music Search (AMS)... 6 Track Search... Mute... 6
 Automatic Music Search (AMS)... 6 Track Search... Mute... 6") CONTENTS Precautions... 1 Lithium Battery Cell Warnings... 1 Use Cautions...1 Installation... 2 Installation Procedures... 2 Installation Opening... 2 Wiring Connections... 3 Uninstall the Main Unit...
CONTENTS Precautions... 1 Lithium Battery Cell Warnings... 1 Use Cautions...1 Installation... 2 Installation Procedures... 2 Installation Opening... 2 Wiring Connections... 3 Uninstall the Main Unit...
2 Din Car RDS/FM Radio, MP3 Player with USB/SD Card Inputs. Model No.:XM-2RSU420 USER S MANUAL
 2 Din Car RDS/FM Radio, MP3 Player with USB/SD Card Inputs Model No.:XM-2RSU420 USER S MANUAL CONTENTS Precautions...1 Precautions & Warnings...1 Lithium Battery Cell Warnings...1 Drivers and Connections...1
PRECAUTIONS. How to Handle Discs. Lithium Battery Cell Warnings
 CONTENTS Precautions... 1 How to Handle Discs... 1 Lithium Battery Cell Warnings... 1 Installation... 2 Prepare Radio... 2 Mount Radio... 2-3 Wiring Connections... 3 Removal of the Main Unit...3 Control
PRECAUTIONS How to Handle Discs Precautions & Warnings Lithium Battery Cell Warnings Drives and connections Others Warnings
 CONTENTS Precautions...1 How to Handle Discs...1 Precautions & Warnings...1 Lithium Battery Cell Warnings...1 Drivers and Connections...1 Other Warnings...1 Installation...2-3 Prepare Installation...2
CONTENTS. Store/Recall Preset Stations (1-6) Next/Previous Track...
 Next/Previous Track...") CONTENTS Precautions... 1 Lithium Battery Cell Warnings... 1 Use Cautions...1 Installation... 2 Installation Precedures... 2 Installation Opening... 2 Wiring Connections... 3 Remove of the Main Unit...4
CONTENTS Precautions... 1 Lithium Battery Cell Warnings... 1 Use Cautions...1 Installation... 2 Installation Precedures... 2 Installation Opening... 2 Wiring Connections... 3 Remove of the Main Unit...4
Car In-dash AM/FM MPX Receiver with CD, CD-R/RW, MP3 Playback & USB/SD/ AUX Inputs PLCD43BTM USER S MANUAL - 0 -
 Car In-dash AM/FM MPX Receiver with CD, CD-R/RW, MP3 Playback & USB/SD/ AUX Inputs PLCD43BTM USER S MANUAL - 0 - COTENTS COTENTS... 1 PRECAUTIONS... 2 How to Handle Discs... 2 Precautions & Warnings...
Precautions... 1 Lithium Battery Cell Warnings... 1 Take Precaution...1 Installation Installation Procedures... 2 Installation Opening...
 CONTENTS Precautions... 1 Lithium Battery Cell Warnings... 1 Take Precaution...1 Installation...2-3 Installation Procedures... 2 Installation Opening... 2 Wiring Connections... 3 Remove of the Main Unit...
2 Din Car RDS/FM/AM Radio, MP3 Player with USB Inputs. Model No.:XM-2R421 USER S MANUAL
 2 Din Car RDS/FM/AM Radio, MP3 Player with USB Inputs Model No.:XM-2R421 USER S MANUAL CONTENTS Precautions...1 Precautions & Warnings...1 Lithium Battery Cell Warnings...1 Drivers and Connections...1
Marine Grade In-Dash AM/FM Receiver with MP3 Playback & USB/SD/AUX Inputs USER S MANUAL
 Marine Grade In-Dash AM/FM Receiver with MP3 Playback & USB/SD/AUX Inputs USER S MANUAL Receiver Models: PLRMR23BTW, PLRMR27BTB, PLMRKT36WT, PLMRKT46BK, PLMRKT38W, PLMRKT48BK - 0 - COTENTS COTENTS... 1
PRECAUTIONS Precautions & Warnings Lithium Battery Cell Warnings Drives and connections Others Warnings
 CONTENTS Precautions...1 Precautions & Warnings...1 Lithium Battery Cell Warnings...1 Drivers and Connections...1 Other Warnings...1 Installation...2 Installation Opening...2 To Install the Car Radio...2
PRECAUTIONS How to Handle Discs Precautions & Warnings Lithium Battery Cell Warnings Drives and connections Others Warnings
 CONTENTS Precautions...1 How to Handle Discs...1 Precautions &Warnings...1 Lithium Battery Cell Warnings...1 Drivers and Connections...1 Other Warnings...1 Installation...2-3 Prepare Installation...2 To
PRECAUTIONS. Lithium Battery Cell Warnings. Use cautions. Cell leakage may cause damage to the remote control. Do not throw cells into
 CONTENTS Precautions... 1 Lithium Battery Cell Warnings... 1 Use Cautions...1 Installation... 2 Installation Precedures... 2 Installation Opening... 2 Wiring Connections... 3 Uninstall the Main Unit...
CONTENTS. Store/Recall Preset Stations (1-6) Next/Previous Track...
 Next/Previous Track...") CONTENTS Precautions... 1 Lithium Battery Cell Warnings... 1 Use Cautions...1 Installation...2 Installation Procedures...2 Installation Opening... 2 Wiring Connections... 3 Remove of the Main Unit... 3
CONTENTS Precautions... 1 Lithium Battery Cell Warnings... 1 Use Cautions...1 Installation...2 Installation Procedures...2 Installation Opening... 2 Wiring Connections... 3 Remove of the Main Unit... 3
Precautions... 1 Take Precaution...1 Installation Installation Procedures... 2 Installation Opening...
 CONTENTS Precautions... 1 Take Precaution...1 Installation... 2-3 Installation Procedures... 2 Installation Opening... 2 Wiring Connections... 3 Remove of the Main Unit...3 Control Panel Button Locations...
6 Track/Folder Navigation... 6 Mute... 6
 CONTENTS Precautions... 1 Lithium Battery Cell Warnings... 1 Use Cautions...1 Installation... 2 Installation Procedures... 2 Installation Opening... 2 Wiring Connections... 3 Uninstall the Main Unit...
CONTENTS. Store/Recall Preset Stations (1-6)... 5 Next/Previous Track...
... 5 Next/Previous Track...") CONTENTS Precautions... 1 Lithium Battery Cell Warnings... 1 Use Cautions...1 Installation... 2 Installation Procedures... 2 Installation Opening... 2 Wiring Connections... 3 Uninstall the Main Unit...4
CONTENTS Precautions... 1 Lithium Battery Cell Warnings... 1 Use Cautions...1 Installation... 2 Installation Procedures... 2 Installation Opening... 2 Wiring Connections... 3 Uninstall the Main Unit...4
CONTENTS. Next/Previous Track... 4 Fast Forward/Backward... 4 Set the Clock (CLK)... 4 Insert SD Card... 4
... 4 Insert SD Card... 4") CONTENTS Precautions... 1 Lithium Battery Cell Warnings... 1 Take Precaution...1 Installation...2-3 Installation Procedures... 2 Installation Opening... 2 Wiring Connections... 3 Remove of the Main Unit...3
CONTENTS Precautions... 1 Lithium Battery Cell Warnings... 1 Take Precaution...1 Installation...2-3 Installation Procedures... 2 Installation Opening... 2 Wiring Connections... 3 Remove of the Main Unit...3
CONTENTS. Fast Forward/Backward... 5 Change Bands (BAND)... 6 Automatic Music Search (AMS)...6 Track Search... 6 Mute... 6
... 6 Automatic Music Search (AMS)...6 Track Search... 6 Mute... 6") CONTENTS Precautions... 1 Lithium Battery Cell Warnings... 1 Use Cautions...1 Installation... 2 Installation Procedures... 2 Installation Opening... 2 Wiring Connections... 3 Uninstall the Main Unit...3
CONTENTS Precautions... 1 Lithium Battery Cell Warnings... 1 Use Cautions...1 Installation... 2 Installation Procedures... 2 Installation Opening... 2 Wiring Connections... 3 Uninstall the Main Unit...3
PRECAUTIONS Precautions & Warnings Lithium Battery Cell Warnings Drives and connections Others Warnings
 CONTENTS Precautions...1 Precautions & Warnings...1 Lithium Battery Cell Warnings...1 Drivers and Connections...1 Other Warnings...1 Installation...2 Installation Opening...2 To Install the Car Radio...2
Precautions...1 Lithium Battery Cell Warnings... 1 Take Precaution...1 Installation Installation Procedures... 2 Installation Opening...
 CONTENTS Precautions...1 Lithium Battery Cell Warnings... 1 Take Precaution...1 Installation...2-3 Installation Procedures... 2 Installation Opening... 2 Wiring Connections...3 Removal of the Main Unit...3
PRECAUTIONS. Lithium Battery Cell Warnings. Take Precaution. Cell leakage may cause damage to the remote control. Do not throw cells into
 PRECAUTIONS Lithium Battery Cell Warnings Cell leakage may cause damage to the remote control. Do not throw cells into as this may cause an explosion. Keep battery cells out of reach of children. Take
Precautions... 1 Take Precaution...1 Installation Installation Procedures... 2 Installation Opening...
 CONTENTS Precautions... 1 Take Precaution...1 Installation...2-3 Installation Procedures... 2 Installation Opening... 2 Wiring Connections...3 Removal of the Main Unit... 3 Overview of the Components...
USER'S MANUAL 610UA MP3-COMPATIBLE DIGITAL MEDIA AM/FM RECEIVER BO S AUDIO SYSTEMS
 USER'S MANUAL 610UA MP3-COMPATIBLE DIGITAL MEDIA AM/FM RECEIVER BOS AUDIO SYSTEMS CONTENTS Precautions... 1 Lithium Battery Cell Warnings... 1 Take Precaution...1 Installation...2 3 Installation Procedures...
AM/FM/USB CD/MP3 PLAYER WITH BLUETOOTH
 INSTALLATION NOTES AM/FM/USB CD/MP3 PLAYER WITH BLUETOOTH 1. Please read these installation and operation instructions before installation. 2. Make sure to connect all other wires before power connection.
Locations and Names of the Controls
 Locations and Names of the Controls 1 2 3 4 5 6 20 19 18 7 8 9 10 11 12 13 14 15 16 17 1. NFC DETECTION AREA 2. IR REMOTE CONTROL SENSOR 3. 1/2/3 BUTTON 1 TEL /REDIAL BUTTON 2 HANG UP BUTTON 4. ZONE 1/2
INSTRUCTION MANUAL. AM/FM Digital Tuning Radio W/ USB/SD/MP3 & Hands-Free Bluetooth + SEL 5 * 9 0 # T-M TEL CLEAR LOUD PTY TA AF RPT RDM EON TP POWER
 BND MOD AP INSTRUCTION MANUAL MIC LOUD PTY TA AF RPT RDM EON TP POWER A.P SCN DN MODE BND TOP 1 5 * MUTE + SEL CLK INT RPT 2 3 6 7 8 9 0 # T-M TEL CLEAR CAR AUDIO REMOTECONTR OLLER UP ST LOC LOUD RDM 4
PLMR7BTW OWNER S MANUAL. Mobile Audio System
 PLMR7BTW OWNER S MANUAL Mobile Audio System PLL Synthesizer Stereo Radio Automatic Memory Storing USB Interface SD Interface 3.5mm Input Jack Bluetooth Function 1 CONTENTS Installation... 3 Take out screw
MR100 INSTALLATION/OWNER'S MANUAL Digital Media Marine Receiver
 MR100 INSTALLATION/OWNER'S MANUAL Digital Media Marine Receiver Preparation MR100 INSTALLATION Please read entire manual before installation. Before You Start Disconnect negative battery terminal. Consult
AX1300BT SPECIFICATIONS: MECHLESS AM/FM MULTIMEDIA PLAYER RECEIVER BLUETOOTH w BUILT-IN SPEAKERS DESIGNED FOR AUSTRALASIAN CONDITIONS
 MECHLESS AM/FM MULTIMEDIA PLAYER RECEIVER BLUETOOTH w BUILT-IN SPEAKERS SPECIFICATIONS: GENERAL: Mechless Fixed Face Panel Ultra Memory Power Backup Built-In Speakers ISO DIN Mounting ISO Wiring harness
INSTALLATION METHOD. Press the RPT button twice to play the current folder repeatedly, and the. RPT ONE will be visible on the LCD.
 INSTALLATION METHOD This is an anti-theft installation method. The main unit wears a METAL MOUNTING SLEEVE. Please connect the wiring, eg, the Power supply, the Speakers and the Antenna according to the
 6. To transfer the audio of a file played by Mobile Phone to the Car Audio Player If the mobile phone supports A2DP and could play audio or video files, when the Mobile Phone plays an audio (For some Mobile
INSTRUCTION MANUAL DECKLESS CAR AUDIO PLAYER CA-2787SU. Please read the instruction manual before used.
 INSTRUCTION MANUAL DECKLESS CAR AUDIO PLAYER CA-2787SU Please read the instruction manual before used. Key Function: 1. Mode Button Press to switch between RADIO/USB/SD-MMC/Aux-In Card mode. The unit preset
DESCRIPTION OF CONTROLS ON THE FRONT CONTROL PANEL
 DESCRIPTION OF CONTROLS ON THE FRONT CONTROL PANEL Front Control Panel Front Cabinet after removing Front Control Panel 1. RELEASE button 2. SEL & VOL knob 3. POWER & MUTE button 4. LCD 5&6. >> And
INSTRUCTION MANUAL CAR RADIO RECEIVER / MP3 PLAYER WITH BULETOOTH HAND FREE SYSTEM TUNING / SEEK UP / DOWN NEXT/ BACK BUTTON LCD DISPLAY RANDOM
 INSTRUCTION MANUAL CAR RADIO RECEIVER / MP3 PLAYER WITH BULETOOTH HAND FREE SYSTEM TUNING / SEEK UP / DOWN NEXT/ BACK LCD DISPLAY AUX TALK CANCEL/ SRC ENCODER VOLUME KNOB MENU PLAY/ PAUSE INTRO REPEAT
DESCRIPTION OF BUTTONS ON REMOTE CONTROL
 DESCRIPTION OF BUTTONS ON REMOTE CONTROL 1. POWER button 2. A.P button 3. SCN(SCAN) button 4. CLK button 5. SRC button 6. BND(BAND) button 7. Number(0~9) buttons 8. * button 9. MUTE button 10. T-M button
DESCRIPTION OF BUTTONS ON REMOTE CONTROL
 DESCRIPTION OF BUTTONS ON REMOTE CONTROL 1. POWER button 2. A.P button 3. SCN(SCAN) button 4. CLK button 5. MODE button 6. BND(BAND) button 7. Number(0~9) buttons 8. * button 9. MUTE button 10. T-M button
Specifications. General and Radio Controls
 General and Radio Controls 2 7 6 4 AUX IN BAND LOUDNESS Specifications Supply voltage : 12V DC(11V-15V) Current consumption : Less than 10A Audio Signal Output : 2ch line out Characteristics : (1) Frequency
INSTRUCTION MANUAL K101R
 INSTRUCTION MANUAL K101R MP3/USB/AUX/BLUETOOTH/iPod CD PLAYER WITH AM/FM RADIO BEFORE USE Before operating the unit, please read this manual thoroughly and retain it for future reference 1. OPERATING INSTRUCTIONS
INSTRUCTION MANUAL CD MP3 WMA USB AUX-IN
 NA99i Car Audio System Player INSTRUCTION MANUAL CD MP3 WMA USB AUX-IN ipod/iphone Safety WARNING Stop the car before operating the unit. Important to know... To prevent a short circuit, never put or leave
PLMR18 OWNER S MANUAL. Mobile Audio System.
 PLMR18 OWNER S MANUAL Mobile Audio System PLL Synthesizer Stereo Radio Automatic Memory Storing Preset Equalization USB/ SD Interface 3.5mm Jack input www.pyleaudio.com 1 CONTENTS Installation... 3 Take
INSTRUCTION MANUAL LTC CDD SUPPORT USB/SD INTERFACE AND FRONT AUX ipod/iphone FULL CONTROL RDS MP3/WMA PLAYER/RECEIVER
 INSTRUCTION MANUAL LTC CDD-080 SUPPORT USB/SD INTERFACE AND FRONT AUX ipod/iphone FULL CONTROL RDS MP/WMA PLAYER/RECEIVER MODE MUTE LOCAL EQ ESC XBS INFO ipod CTR AUDIO MENU . INSTALLATION. CONNECTING
WALLMOUNT Entertainment System
 Wiring Diagram AV IN AV OUT SUBWOOFER OUT HDMI JACK R R R L L L IR REMOTE JACK AUDIO IN ANTENNA WIRING CONNECTING SOCKET Specification GENERAL Supply Voltage Current Consumption Power Output Number of
Please check and confirm the accessories in the package before using this unit.
 CONTENTS Precautions...1 Safe Notes...1 Accessories...1 How To Handle Discs...1 Lithium Battery Cell Warnings...1 Installation...2-3 Prepare Radio...2 Mount Radio...2 Wiring Connections...3 Removal Of
Model No.: MIL-MR70BT
 Model No.: MIL-MR70BT This product is sold and serviced exclusively by Prospec Electronic Inc. and must be returned to Prospec for in and out of warranty repairs. It can not be serviced under warranty
KDC-BT61U KDC-6051U INSTRUCTION MANUAL Kenwood Corporation All Rights Reserved. CD-RECEIVER
 KDC-BT61U KDC-6051U CD-RECEIVER INSTRUCTION MANUAL Before reading this manual, click the button below to check the latest edition and the modified pages. 2010 Kenwood Corporation All Rights Reserved. 11FLIP_IM329_Ref_E_en_00
Owner s Manual AWM910 JENSEN AWM910 COMPACT DISC PLAYER RADIO CD COMPACT MUSIC SYSTEM MUTE AUX BAND AUX IN PUSH PUSH PWR VOL ALARM T/F AUD SPK A SPK B
 AWM910 Owner s Manual COMPACT DISC PLAYER PUSH 1 2 3 4 5 6 RPT SCAN RDM H M PUSH PWR VOL ALARM SET ON/OFF EQ T/F AUD RADIO CD COMPACT MUSIC SYSTEM MUTE AUX BAND CD AUX IN A B A+B JENSEN AWM910 Thank You!
PLRDD19UB OWNER S MANUAL. Mobile Audio System
 PLRDD19UB OWNER S MANUAL Mobile Audio System PLL Synthesizer Stereo Radio MP3/WMA Player Automatic Memory Storing Preset Equalization USB/SD card Interface 1 CONTENTS Installation... 3 Wiring Connection...
OWNER'S MANUAL MODEL: PLCDUSB78MP3
 OWNER'S MANUAL MOTORIZED SLIDE DOWN DETACHABLE PANEL FM/AM BAND RADIO RECEIVER ELECTRONIC ANTI-SHOCK CD / MP3 PLAYER CD CHANGER / AUXILIARY INPUT CONTROL USB HOST DRIVE ON FRONT PANEL ENCODER AUDIO CONTROL
MARINE. Operation Manual. Model No.: MBB-3. Effective from 31 / May / x210mm
 MARINE Operation Manual Model No.: MBB-3 Effective from 31 / May / 07 145x210mm Mounting the Black Box 1. Precautions Choose the mounting location carefully so that the unit will not interfere with the
MDM300 INSTALLATION/OWNER'S MANUAL. CD Marine Receiver
 MDM300 INSTALLATION/OWNER'S MANUAL CD Marine Receiver Preparation MDM300 INSTALLATION Please read entire manual before installation. Before You Start Disconnect negative battery terminal. Consult a qualified
Instruction Manual Please read carefully before use and keep for future reference.
 In-Dash MP3 Player and Receiver with Bluetooth and Flip-Down Faceplate NCA-615 Instruction Manual Please read carefully before use and keep for future reference. Important Safety Information READ THIS
LOCATION OF PARTS AND CONTROLS
 LOCATION OF PARTS AND CONTROLS 3 1 15 9 5 11 14 16 6 6 RCD 66 4x 75WATT 7 8 13 10 19 0 1 3 4 7 1 5 4 (1-6) 1. POWER ON/OFF ( ). FUNCTION ECT BUTTON: BASS/TREBLE/BALANCE/FADER / SEEK/PI SOUND/ RETUNE/MASK
CAD-473 INSTRUCTION MANUAL PTY BD/ENT
 CAD-473 DISP PTY BD/ENT A/PS LD MD AF TA SCN/REC 5 6 1 PAU 2 RPT 3 INT 4 RDM MUTE INSTRUCTION MANUAL Car Stereo CD/CDR/CDRW/MP3/WMA Player with PLL FM Stereo Radio RDS USB / MMC / SD Card Input Bluetooth
648UA. User s Manual IN-DASH SINGLE-DIN MP3-COMPATIBLE CD AM/FM RECEIVER WITH USB AND SD MEMORY CARD PORTS AND FRONT PANEL AUX INPUT
 User s Manual 648UA IN-DASH SINGLE-DIN MP3-COMPATIBLE CD AM/FM RECEIVER WITH USB AND SD MEMORY CARD PORTS AND FRONT PANEL AUX INPUT Boss Audio Systems is not affiliated with Apple, Inc. LOCATION AND FUNCTION
MT2108. Operating and Installation Guide SUB PWR BAND MD REL TUNE/ TRACK AF 1 PAU 2 INT 3 RPT 4 RDM 5 6 COMPACT DIGITAL AUDIO
 MT08 SUB PWR BAND MD REL COMPACT DIGITAL AUDIO TUNE/ TRACK SCN A/PS DISP PTY TA AF PAU INT 3 RPT 4 RDM 5 6 Operating and Installation Guide LOCATIONS OF CONTROLS 0 9 3 4 5 SUB PWR BAND MD REL COMPACT DIGITAL
Entertainment System. Specification GENERAL SCREW SCREW PLASTIC FRAME OF THE FRONT PANEL. Current Consumption FM SECTION
 SCREW Specification GENERAL Supply Voltage Current Consumption Power Output Number of channels Unit Dimensions FM SECTION Frequency range Effective sensitivity I.F Frequency DC 12V Max.5A 2x 20W RMS 2
MOBILE AUDIO SYSTEM PLCDBT95MRB USER MANUAL. PLL Synthesizer Stereo Radio CD/MP3/WMA Player Automatic Memory Storing Fixed Panel
 MOBILE AUDIO SYSTEM PLCDBT95MRB USER MANUAL PLL Synthesizer Stereo Radio CD/MP3/WMA Player Automatic Memory Storing Fixed Panel Bluetooth function Preset Equalization Electronic Shockproof (ESP) Function
OWNER S MANUAL. Marine Audio System SEA9526 AM/FM/MPX WITH SINGLE CD PLAYER RCA LINE OUT. HIGH POWER 4 X 35 Watts Max.
 SEA9526, OWNER S MANUAL Marine Audio System PWR VOL- VOL+ MUT OPEN DIRECT-IN PLAY POWER LOADING TOP/REPEAT/RANDOM/ 3-BEAMLASER TRACKING SYSTEM DUAL 1-BIT D/A CONVERTERS 24AM/FMPRESETSTATIONS SEEK UP/DOWN
INSTRUCTION 1 MANUAL
 MA1801 WATERTIGHT MARINE AM/FM RADIO BLUETOOTH MULTIMEDIA SYSTEM SPECIFICATIONS GENERAL - USB Input (Rear) - 2ch Aux Inputs (Rear) - LCD Display - Clock - IP66 Watertight - Water & Salt Protection PCB
CAD-471 INSTRUCTION MANUAL
 CAD-471 INSTRUCTION MANUAL Car Stereo CD/CDR/CDRW/MP3 Player with PLL FM Stereo Radio RDS USB / MMC / SD Card Input Bluetooth Function in Mobile Phone Flip Down and Detachable Front Panel System LOCATION
OWNER S MANUAL G4-RM55OO
 OWNER S MANUAL G4-RM55OO INSTALLATION... 3-4 WIRING CONNECTION... 5 OPERATION... 6 LOCATION OF THE KEYS... 6 POWER ON/OFF THE UNIT... 7 MAIN MENU... 7 SETUP... 7 RESET FUNCTION... 9 SLIGHTFOG AFTER OPERATION...9
European frequency range USA frequency range. European frequency range USA frequency range 2 CHANNEL VIDEO OUT kHz kHz
 e1 European frequency range USA frequency range 522-1620kHz 530-1710kHz European frequency range USA frequency range 87.5-107.9MHz 2 CHANNEL VIDEO OUT 19 WIRING DIAGRAM This player is equipped with ISO
GSMR20 OWNER S MANUAL
 GSMR20 OWNER S MANUAL Version 1.0 FEATURES AM/FM/Radio/Preset 180 Watts Max Power Pre-Amplifier Outputs Splash Proof LCD Display Bluetooth Audio Streaming (Bluetooth 3.0) A2DP Audio Streaming USB/AUX Input
MOBILE AUDIO SYSTEM PATVR14 USER MANUAL
 MOBILE AUDIO SYSTEM PATVR14 USER MANUAL CONTENTS Installation... 3 Mounting... 4 Wiring Connection... 5 Operation... 6 Location of the keys... 6 Power on/off the unit... 7 Main menu... 7 Setup... 7 Reset
IF ADDITIONAL INSTALLATION COMPONENTS ARE NECESSARY, CONTACT YOUR REI SALES REP FOR:
 50W X 4 R-9 05 Thank you for purchasing this AM/FM/CD/MP3 Weather Band Receiver from REI. This product is designed and tested to withstand temperature and vibration extremes. Please read the owner's manual
CAD-391 INSTRUCTION MANUAL
 CAD-9 PTY AF INSTRUCTION MANUAL CAR STEREO CD/CDR/CDRW/MP/WMA PLAYER WITH PLL FM STEREO RADIO RDS BLUETOOTH FUNCTION IN MOBILE PHONE WIRELESS BLUETOOTH HEADSET FLIP DOWN/DECHABLE FRONT PANEL LOCATION OF
DPX504U DPX404U DPX304
 DPX504U DPX404U DPX304 DUAL DIN SIZED CD RECEIVER INSTRUCTION MANUAL Before reading this manual, click the button below to check the latest edition and the modified pages. 2010 Kenwood Corporation All
JRV4100 Owner s Manual
 JRV4100 Owner s Manual Content Button Description.02 Remote Control..03 Main Menu...04 Radio Operation.04 USB /SD Operation..06 Settings Operation..06 Bluetooth Operation..08 Aux-In Operation 09 Troubleshooting..11
INSTRUCTIONS Please read all instructions carefully before using
 INSTRUCTIONS Please read all instructions carefully before using CONTENTS 1.Basic Operation Panel Introduction 02 Remote control function 04 Turn the Unit On/Off 06 Access main interface 06 U Disc/SD Card
CD / SD / USB / MP3 / AM / FM / BLUETOOTH RECEIVER QA30BT CD / SD / USB / MP3 / AM / FM / BLUETOOTH RECEIVER MP3 / WMA CALLS & MUSIC STREAMING
 TM CD / SD / USB / MP3 / AM / FM / BLUETOOTH RECEIVER MODE SD USB AMS RST QA30BT MUTE BND CLK 1/ 2/INT 3/RPT 4/RDM 5 6 AUX QA30BT CD / SD / USB / MP3 / AM / FM / BLUETOOTH RECEIVER Bluetooth MP3 / WMA
OWNER S MANUAL M3-TFT DAB+
 OWNER S MANUAL M3-TFT DAB+ INSTALLATION... 3-4 WIRING CONNECTION... 5 OPERATION... 6 LOCATION OF THE KEYS... 6 POWER ON/OFF THE UNIT... 7 MAIN MENU... 7 SETUP... 7 RESET FUNCTION... 9 SLIGHTFOG AFTER OPERATION...
Thank you for choosing Boss Audio Systems! This unit will bring you years of enjoyment.
 Thank you for choosing Boss Audio Systems! This unit will bring you years of enjoyment. CONTENTS Safety Precautions...2-3 Installation...4-6 Wiring Connections...7 Basic Operation...8 Radio Operation...9
1. INSTALLATION. Trim Plate. Bend the appropriate tabs to hold the sleeve firmly in place.
 0 R - 0 0896 . INSTALLATION The following illustration shows a typical installation. If you have any questions or require information regarding installation kits, consult your customer car audio dealer
WIRES CONNECTION SPECIFICATION GENERAL. Preface
 WIRES CONNECTION Preface RED R WHITE L RCA LINE OUT Thank you for purchasing this car audio product. Please read this manual carefully before operating this car audio product. Please keep this manual for
INSTRUCTION MANUAL CAR RADIO RECEIVER / MP3 PLAYER WITH BULETOOTH HAND FREE SYSTEM DSP LOUD LOC TUNING / SEEK UP/DOWN NEXT/BACK PLAY/ PAUSE BUTTON
 DSP INSTRUCTION MANUAL CAR RADIO RECEIVER / MP3 PLAYER WITH BULETOOTH HAND FREE SYSTEM BAND MUTE LCD DISPLAY DSP C LOUD LOC CANCEL/ MENU AMS SRC INFO POWER EQ AUDIO TUNING / SEEK UP/DOWN NEXT/BACK PLAY/
OPERATION MANUAL MM1C25 DIGITAL AUDIO PLAYER AM/FM STEREO USB BLUETOOTH CAPABLE HEADPHONE OUTPUT
 OPERATION MANUAL MM1C25 DIGITAL AUDIO PLAYER AM/FM STEREO USB BLUETOOTH CAPABLE HEADPHONE OUTPUT CONTENTS CONTENTS. 1 CONTROL PANEL ILLUSTRATION 2 WIRE DIAGRAM 3 INSTALLATION.. 4 BASIC OPERATION... 5 RADIO
CAR AUDIO CD, MEDIA(USB-MP3/AUX), BT(Handfree), RADIO
, BT(Handfree), RADIO") KCB-8700 CAR AUDIO CD, MEDIA(USB-MP3/AUX), BT(Handfree), RADIO (FM1, FM2, AM BAND) KCB - 8700 3 4 8 10 12 16 18 22 24 29 30 34 36 37 2 KCB-8700 Car Audio MP3/WMACD, CD, USB, BT, AUX, RADIO (CD, MP3CD)
KCB-8700 CAR AUDIO CD, MEDIA(USB-MP3/AUX), BT(Handfree), RADIO (FM1, FM2, AM BAND) KCB - 8700 3 4 8 10 12 16 18 22 24 29 30 34 36 37 2 KCB-8700 Car Audio MP3/WMACD, CD, USB, BT, AUX, RADIO (CD, MP3CD)
Disconnect the battery to ensure there will be no shorted wires during the installation procedure.
 The round-style headunit receiver radio features Bluetooth technology allowing music to wirelessly stream from your compatible Bluetooth-enabled device. Control the audio from a distance -- all from your
XD1215 INSTALLATION/OWNER'S MANUAL AM/FM/CD Receiver with Detach Face
 XD1215 INSTALLATION/OWNER'S MANUAL AM/FM/CD Receiver with Detach Face XD1215 INSTALLATION Preparation Please read entire manual before installation. Before You Start Disconnect negative battery terminal.
PLRRR18U OWNER S MANUAL. Mobile Audio System
 PLRRR18U OWNER S MANUAL Mobile Audio System PLL Synthesizer Stereo Radio MP3/WMA Player Automatic Memory Storing Preset Equalization USB/MICRO SD Interface 1 CONTENTS Installation... 3 Wiring Connection...
AX1201 MP3 CD MULTIMEDIA RECEIVER USB / SD-MMC INPUT - FRONT PANEL AUX-IN SPECIFICATIONS: DESIGNED FOR AUSTRALASIAN CONDITIONS
 MP3 CD MULTIMEDIA RECEIVER USB / SD-MMC INPUT - FRONT PANEL AUX-IN SPECIFICATIONS: GENERAL: Detachable Face Panel Ultra Memory Power Circuit LCD Display Illuminated Controls (Blue) ISO DIN Mounting ISO
XRM46BT INSTALLATION/OWNER'S MANUAL. AM/FM Receiver with Bluetooth
 XRM46BT INSTALLATION/OWNER'S MANUAL AM/FM Receiver with Bluetooth Preparation XRM46BT INSTALLATION Please read entire manual before installation. Before You Start Disconnect negative battery terminal.
INSTRUCTION MANUAL MODEL: NCA-692
 MODEL: NCA-692 INSTRUCTION MANUAL IMPORTANT INFORMATION REQUIRED BY THE FCC This device complies with Part 15 of the FCC Rules. Operation is subject to the following two conditions: (1)this device may
User / Installation Manual Marine CD/MP3 Receiver MS-CD80
 User / Installation Manual Marine CD/MP3 Receiver MS-CD80 Specifications and design are subject to change without notice. Contents Installation 1 Button Description 4 General Operation 5 Menu Selection
MEGAMOUTH MK3 Portable PA System
 MEGAMOUTH MK3 Portable PA System Introduction Thank you for choosing the Megamouth portable PA unit. This product has been designed to provide convenient sound reinforcement for teaching, demonstrations
INSTRUCTION MANUAL RFX9900
 INSTRUCTION MANUAL RFX9900 l Capacitive Touch Control Panel l 7-line Dot Matrix Display l SiriusXM-Ready TM l FM/AM Stereo Radio l HDMI Output l CD-DVD Changer l USB SD Audio/Video Play l DMD Digital Music
INSTRUCTION MANUAL CD MP3 WMA USB SD AUX-IN BT
 NA350iBTR Car Audio System Player INSTRUCTION MANUAL CD MP3 WMA USB SD AUX-IN BT ipod/iphone Safety WARNING Stop the car before operating the unit. Important to know... To prevent a short circuit, never
Quickstart Guide (English)
") Quickstart Guide (English) Introduction 1. Make sure all items listed in the Box Contents are included in the box. Look in the box under the foam sheet for the speaker stand rubber feet, speaker stand
Quickstart Guide (English) Introduction 1. Make sure all items listed in the Box Contents are included in the box. Look in the box under the foam sheet for the speaker stand rubber feet, speaker stand
OWNER S MANUAL VBD 1600 PLL SYNTHESIZER STEREO RADIO WITH COMPACT DISC PLAYER DIGITAL
 OWNER S MANUAL VBD 1600 PLL SYNTHESIZER STEREO RADIO WITH COMPACT DISC PLAYER DIGITAL INSTALLATION Notes: Choose the mounting location where the unit will not interfere with the normal driving function
AC OPERATION BATTERY OPERATION RADIO OPERATION Note : FM STEREO INDICATOR ANTENNAS BASS BOOST AUXILIARY (AUX) MODE
 MODE") 1. FUNCTION SWITCH AUX/CD/TAPE (OFF)/RADIO 2. BAND SWITCH 3. FM ANTENNA 4. CD DOOR 5. TUNING KNOB 6. BASS BOOST BUTTON 7. CD SKIP/SEARCH FORWARD BUTTON 8. CD SKIP/SEARCH BACKWARD BUTTON 9. CD PROGRAM BUTTON
1. FUNCTION SWITCH AUX/CD/TAPE (OFF)/RADIO 2. BAND SWITCH 3. FM ANTENNA 4. CD DOOR 5. TUNING KNOB 6. BASS BOOST BUTTON 7. CD SKIP/SEARCH FORWARD BUTTON 8. CD SKIP/SEARCH BACKWARD BUTTON 9. CD PROGRAM BUTTON
1. INSTALLATION. Dashboard. Sleeve (Not supplied with this unit) Plate. Panel. Bend the appropriate tabs to hold the sleeve firmly in place.
 Plate. Panel. Bend the appropriate tabs to hold the sleeve firmly in place.") . INSTALLATION The following illustration shows a typical installation. If you have any questions or require information regarding installation kits, consult your customer car audio dealer or a company
. INSTALLATION The following illustration shows a typical installation. If you have any questions or require information regarding installation kits, consult your customer car audio dealer or a company