Dialogic PowerMedia Media Resource Broker (MRB)
|
|
|
- Barbara Goodwin
- 5 years ago
- Views:
Transcription

1 Dialogic PowerMedia Media Resource Broker (MRB) Installation and Configuration Guide September 2016 Rev 1.3
2 Copyright and Legal Notice Copyright Dialogic Corporation. All Rights Reserved. You may not reproduce this document in whole or in part without permission in writing from Dialogic Corporation at the address provided below. All contents of this document are furnished for informational use only and are subject to change without notice and do not represent a commitment on the part of Dialogic Corporation and its affiliates or subsidiaries ("Dialogic"). Reasonable effort is made to ensure the accuracy of the information contained in the document. However, Dialogic does not warrant the accuracy of this information and cannot accept responsibility for errors, inaccuracies or omissions that may be contained in this document. INFORMATION IN THIS DOCUMENT IS PROVIDED IN CONNECTION WITH DIALOGIC PRODUCTS. NO LICENSE, EXPRESS OR IMPLIED, BY ESTOPPEL OR OTHERWISE, TO ANY INTELLECTUAL PROPERTY RIGHTS IS GRANTED BY THIS DOCUMENT. EXCEPT AS PROVIDED IN A SIGNED AGREEMENT BETWEEN YOU AND DIALOGIC, DIALOGIC ASSUMES NO LIABILITY WHATSOEVER, AND DIALOGIC DISCLAIMS ANY EXPRESS OR IMPLIED WARRANTY, RELATING TO SALE AND/OR USE OF DIALOGIC PRODUCTS INCLUDING LIABILITY OR WARRANTIES RELATING TO FITNESS FOR A PARTICULAR PURPOSE, MERCHANTABILITY, OR INFRINGEMENT OF ANY INTELLECTUAL PROPERTY RIGHT OF A THIRD PARTY. Dialogic products are not intended for use in certain safety-affecting situations. Please see for more details. Due to differing national regulations and approval requirements, certain Dialogic products may be suitable for use only in specific countries, and thus may not function properly in other countries. You are responsible for ensuring that your use of such products occurs only in the countries where such use is suitable. For information on specific products, contact Dialogic Corporation at the address indicated below or on the web at It is possible that the use or implementation of any one of the concepts, applications, or ideas described in this document, in marketing collateral produced by or on web pages maintained by Dialogic may infringe one or more patents or other intellectual property rights owned by third parties. Dialogic does not provide any intellectual property licenses with the sale of Dialogic products other than a license to use such product in accordance with intellectual property owned or validly licensed by Dialogic and no such licenses are provided except pursuant to a signed agreement with Dialogic. More detailed information about such intellectual property is available from Dialogic's legal department at 6700 Cote-de-Liesse Road, Suite 100, Borough of Saint-Laurent, Montreal, Quebec, Canada H4T 2B5. Dialogic encourages all users of its products to procure all necessary intellectual property licenses required to implement any concepts or applications and does not condone or encourage any intellectual property infringement and disclaims any responsibility related thereto. These intellectual property licenses may differ from country to country and it is the responsibility of those who develop the concepts or applications to be aware of and comply with different national license requirements. Dialogic, Dialogic Pro, Dialogic Blue, Veraz, Brooktrout, Diva, BorderNet, PowerMedia, PowerVille, PowerNova, MSaaS, ControlSwitch, I-Gate, Mobile Experience Matters, Network Fuel, Video is the New Voice, Making Innovation Thrive, Diastar, Cantata, TruFax, SwitchKit, Eiconcard, NMS Communications, SIPcontrol, Exnet, EXS, Vision, incloud9, NaturalAccess and Shiva, among others as well as related logos, are either registered trademarks or trademarks of Dialogic Corporation and its affiliates or subsidiaries. Dialogic's trademarks may be used publicly only with permission from Dialogic. Such permission may only be granted by Dialogic's legal department at 6700 Cote-de-Liesse Road, Suite 100, Borough of Saint-Laurent, Montreal, Quebec, Canada H4T 2B5. Any authorized use of Dialogic's trademarks will be subject to full respect of the trademark guidelines published by Dialogic from time to time and any use of Dialogic's trademarks requires proper acknowledgement. The names of actual companies and products mentioned herein are the trademarks of their respective owners. This document discusses one or more open source products, systems and/or releases. Dialogic is not responsible for your decision to use open source in connection with Dialogic products (including without limitation those referred to herein), nor is Dialogic responsible for any present or future effects such usage might have, including without limitation effects on your products, your business, or your intellectual property rights.
3 Table of Contents 1. Welcome... 5 Related Information PowerMedia MRB Installation... 6 System Requirements... 6 Processor Requirements... 6 Disable SELinux... 7 Software Installation... 7 Software Updates and Uninstallation... 9 MRB Adaptor Updates PowerMedia MRB Configuration MRB Login Dashboard Media Servers Media Server Details Port Usage Manage Conferences Manage Media Servers Add a Media Server Manage a Media Server Resource Summary MS HA Statistics Locations User Administration Add a User Change a User User Roles User Policies MRB Configuration Manage Conferences Manage MRB Cluster Networking Configuration VIP Status SNMP Configuration SNMP Notifications Selection Algorithms Unaware Mode Security Profiles Add a Trusted Certificate Add a Server Certificate Logging Appendix A: Enabling HTTPS with Jetty Appendix B: Configure the Firewall CentOS 7.x CentOS 6.x Appendix C: Resolve the Hostname Appendix D: Add a Customized Security Profile
4 Revision History Revision Release Date Notes 1.3 September 2016 Media Servers: Added a note requiring media servers to be configured to accept SIP on both UDP and TCP. 1.2 August 2016 PowerMedia MRB Configuration: Added limitations to the cascading conferences feature in the MRB Configuration section. Appendix C: Resolve the Hostname: Updated the section. 1.1 January 2016 System Requirements: Updated the operating system and software requirements. Software Installation: Updated the section. Software Updates and Uninstallation: Added the section. PowerMedia MRB Configuration: Updated the Add a Trusted Certificate to change the name from "Client" to "Trusted." MRB Adaptor Updates: Updated the section. Appendix A: Enabling HTTPS with Jetty: Relocated the section. Appendix B: Configure the Firewall: Added the section. Appendix C: Resolve the Hostname: Added the section. Appendix D: Add a Customized Security Profile: Added the section. 1.0 October 2015 Initial release of this document. Last modified: September 2016 Refer to for product updates and for information about support policies, warranty information, and service offerings. 4
5 1. Welcome This Installation and Configuration Guide provides information about installing and configuring the Dialogic PowerMedia Media Resource Broker (also referred to herein as "PowerMedia MRB" or "MRB"). Refer to the Dialogic PowerMedia XMS Installation and Configuration Guide for information about installing, configuring, administering, and maintaining Dialogic PowerMedia Extended Media Server (also referred to herein as "PowerMedia XMS" or "XMS"). Related Information See the following for additional information: Dialogic PowerMedia MRB Quick Start Guide and PowerMedia XMS 3.0 documentation at Media Resource Brokering at Media Server Control Markup Language (MSCML) and Protocol at Media Server Markup Language (MSML) at Basic Network Media Services with SIP at An Interactive Voice Response (IVR) Control Package for the Media Control Channel Framework at A Mixer Control Package for the Media Control Channel Framework at Media Control Channel Framework at 5
6 2. PowerMedia MRB Installation System Requirements The system requirements are as follows. Component Requirement Operating Systems Community ENTerprise Operating System (CentOS) 7.x and 6.4 (or later Red Hat Enterprise Linux (RHEL) 7.x and 6.4 (or later) Note: When installing the MRB on CentOS 7.x, the CentOS net-tools package must be installed. Software Memory The MRB requires Java Runtime Environment (JRE) version 1.7.0_80 (or higher). The latest update should be installed on the target machine. By default, the JRE is installed within the /opt directory (unpack tar.gz). The latest Oracle JRE 1.7 update can be found at the following location: downloads/server-jre7-downloads html. Note: The JRE is not required if the Java Development Kit (JDK) version 1.7.0_80 (or higher) is installed. MRB and MRB adaptor require 2 GB RAM each Processor Requirements The MRB processor requirements are dependent on the number of XMS it will support, and the calls per second it is required to process. Configuration Low Density (1-7 XMS Clusters) High Density (8-15 XMS Clusters) Max Calls Per Second (CPS) Up to 250 CPS Up to 500 CPS Processor *Intel Xeon E3-1220v2 uni-processor (3.10 GHz, 4 cores) or better *Intel Xeon E5-2609v2 dual-processor (2.50 GHz, 4 cores/socket) or better *Comparable systems can be used based on capacity requirements. For more demanding workloads, such as complex IVR systems or voic applications that result in a large amount of SIP traffic or demand fast response times, a more robust system may be required. 6
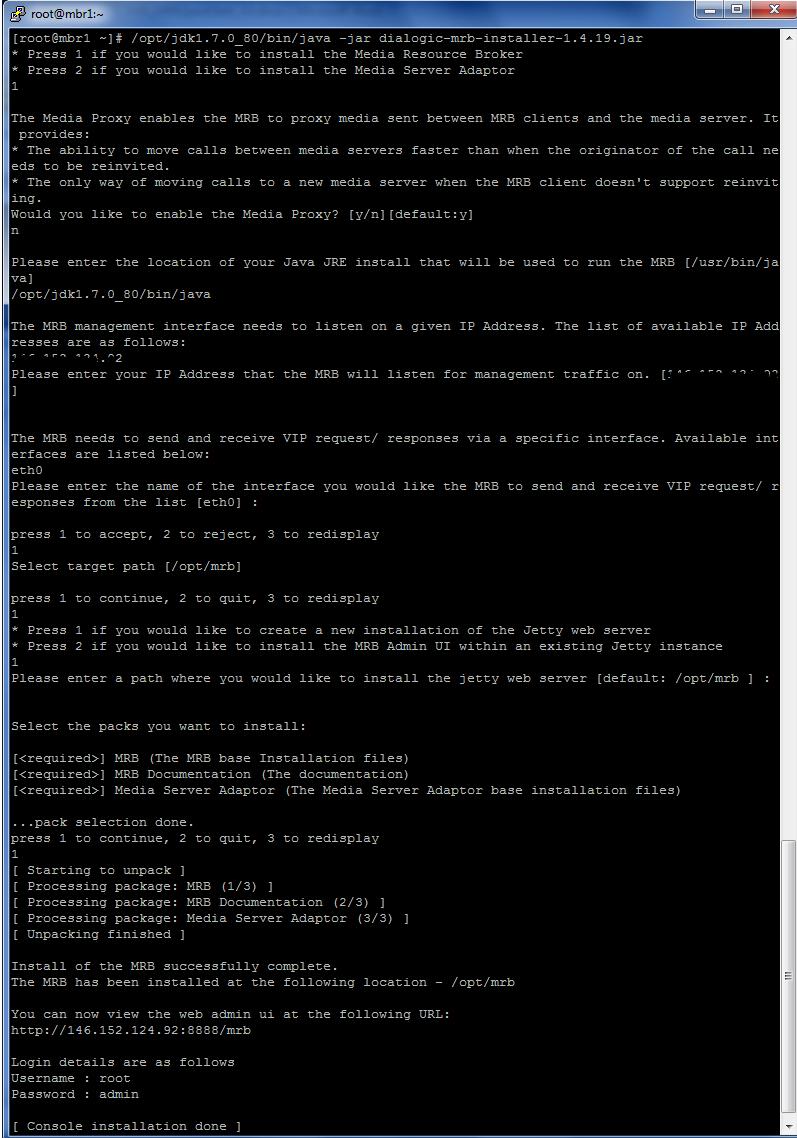
7 Disable SELinux SELinux is not currently supported and must be disabled. To disable SELinux, proceed as follows: 1. Edit the /etc/selinux/config file as a root user. 2. Find the line with the key SELINUX= and replace the value after the equals sign with disabled. 3. Save the file and reboot the operating system. Software Installation To install the MRB, proceed as follows. Refer to the image after the procedure for details. 1. Run the following command to execute the installer file: java -jar dialogic-mrb-installer-<version>.jar Note: Alter the command line as necessary to match the version and path of your Java executable. The installer will commence. Depending on the graphical environment available, the installer will run on either a user interface version or a command line version. 2. Press 1 and then Enter to install the MRB. 3. Disable the media proxy [n] and press Enter. By default, it is enabled [y]. 4. Enter the location of the Java install (JRE or JDK) that will be used to run the MRB and press Enter. 5. Enter the management interface IP address and the VIP request/response interface, or press Enter to use the default values, and press Select the target path. Change the path, or press Enter to use the default path, and then press Press 1 or 2 to set your Jetty web server preference, and then press Enter: Press 1 to create a new installation of the Jetty web server. Select this option if you do not use a Jetty instance on your server already. Press 2 to install the MRB Admin UI within an existing Jetty instance. Select this option if you use a Jetty instance on your server already. 8. Follow the on-screen instructions until the installation process is complete. 7
8 8
9 Software Updates and Uninstallation To update the MRB software, the existing MRB software must be uninstalled and the new MRB software must be installed following the Software Installation procedure. The location of the MRB uninstall script is as follows: /opt/mrb/uninstall-mrb.sh If the MRB console WAR file is installed on an existing Jetty instance (as opposed to being installed on the Jetty that is part of the MRB installation), the uninstall script will not remove the MRB console WAR file from the existing Jetty install. MRB Adaptor Updates Note: PowerMedia XMS versions 3.0 and higher automatically update the MRB adaptor at the same time as the other XMS components. This procedure is not normally required. Using the following procedure, update the MRB adaptor on PowerMedia XMS if there is a version mismatch or a recommended update: 1. Log in to the XMS machine that the MRB adaptor is installed on. 2. Stop the MRB adaptor using the service adaptor stop command. 3. Copy the MRB installer to the XMS machine. 4. Run the installer using the following command: java -jar dialogic-mrb-installer-<version>.jar Note: Alter the command line as necessary to match the version and path of your Java executable. 5. On the installer product selection screen, select Media Server Adaptor. 6. Select the defaults for the Select Java and Management JMX IP Address options. 7. When prompted to select the target path, accept the default location -/opt/adaptor. 8. When prompted to overwrite existing files in the target install directory, select Yes and continue with the installation. 9

10 3. PowerMedia MRB Configuration The PowerMedia MRB console (also referred to herein as "MRB console") is a web-based user interface used to manage PowerMedia MRB. PowerMedia MRB configuration is done through the MRB console. HTTPS is not enabled by default on the administrator user interface. For details on setting up HTTPS, refer to Appendix A: Enabling HTTPS with Jetty. For details on configuring the firewall, refer to Appendix B: Configure the Firewall. MRB Login Proceed as follows to log in to the MRB console. 1. Launch the MRB Login page in a web browser using one of the following URLs: or Note: If the error message "Lost connection to MRB on localhost:5100" is displayed when attempting to log in, refer to Appendix C: Resolve the Hostname. 2. When logging in to the MRB console for the first time, enter root in the Username field and admin in the Password field. Once logged in to the MRB console, you can add different users by going to the User Administration page if desired. 3. Click Login. The MRB console opens and the Dashboard page appears. Refer to Dashboard for more information. The side-bar menu of the console contains hyperlinks to each of the configuration pages. They are as follows: Dashboard Media Servers Manage Media Servers Resource Summary MS HA Statistics Locations User Administration User Roles User Policies MRB Configuration Manage Conferences Manage MRB Cluster 10
11 Networking Configuration VIP Status SNMP Configuration SNMP Notifications Selection Algorithms Unaware Mode Security Profiles Logging Dashboard When you log in to the MRB console, the Dashboard page is displayed. On this page, PowerMedia MRB operation can be verified. 11

12 Media Servers The Media Servers page provides a summary of the configured media server resources that are being managed by the MRB application. Note: The media servers must be configured to accept SIP on both UDP and TCP when working with the MRB. The following information is provided. Item Status Media Server Detail Host Port Listen On TLS TLS Port Location Description A traffic light system that illustrates the current status of a media server. Green signals that the media server is online and in service. Red signals that the media server is offline and not in service. Yellow signals that the media server has been taken offline manually by the system administrator. If the traffic light has a warning symbol in front of it, there is a version mismatch between the MRB and the MRB adaptor running on the particular media server. In this scenario, the MRB and MRB adaptor versions can be viewed as a tooltip by hovering over the traffic light. A hyperlink that allows specific media server information to be viewed on a separate page. Refer to Media Server Details for more information. The hostname/ipv4 of the media server being managed. The port that the MRB adaptor is listening on. Whether or not the media server has been set up to communicate over a Transport Layer Security (TLS) channel. The port that the media server is using to receive encrypted SIP signaling requests via TLS. The primary location of the media server. This information is entered when adding the media server. 12

13 Item Response Time (ms) Port Usage Conferences Description The responsiveness of the media server based on keep-alive probes. A hyperlink to view specific port usage information for the media server. More information is provided in the Port Usage section. A hyperlink to view and manage conferences that are currently active on the MRB. Refer to Manage Conferences for more information. The Media Servers page provides hyperlinks for additional configuration options: Media Server Details Port Usage Manage Conferences Media Server Details To access the Media Server Details page from the Media Servers page, click on the name of the media server in the "Media Server Detail" column. The Media Server Detail page displays information for a specific media resource instance. 13
14 The following information is provided. Item Status Name Identifier Version Up Time Time Zone CPU Load Memory Supported Audio Codecs Supported Video Codecs Running Status Description Traffic light illustration of the current connection status between the MRB and the media resource instance. The name provided by the media resource for display purposes. The unique IP address and port combination for the media resource. The media resource version currently running. The reported up time of the media resource. The reported time zone of the media resource. The details of the recent average CPU load levels. Total and used memory values of the media resource. A reported list of audio codecs supported on the media resource. A reported list of video codecs supported on the media resource. The reported running status of the media resource. A table is included to convey the status of individual services running on the media resource instance. This table is only available for selected media servers (e.g., Dialogic PowerMedia XMS). To perform direct actions on the media resource, select one of the following buttons. Item Restart Machine Restart Services Start Services Stop Services Graceful Shutdown Description The media resource restarts. The services running on the media resource restart. The services on the media resource start. The services running on the media resource stop. The media resource does not accept any new traffic and stops service when the active calls are completed. 14

15 The MRB does not need licensing because it obtains licensing information from the XMS that it is provisioned with. To upload and apply a Media Server License file to the media server, proceed as follows: 1. Click the Choose File button and select the desired Media Server License file. 2. Click Apply to save the changes or click Cancel to abort the operation. Port Usage To access the Port Usage page from the Media Servers page, click on a media server's View Port Usage hyperlink. The Port Usage page provides information on an MRBmanaged media server. 15

16 Port usage information is split into IVR ports and Mixer ports. The following information is provided for both categories. Item Codec Available IVR/Mixer Ports Used IVR/Mixer Ports Total IVR/Mixer Ports Description The codec used for the reported figures. The reported number of available IVR/Mixer ports on a media resource. The reported number of IVR/Mixer ports currently in use on a media resource. The reported total number of IVR/Mixer ports supported on a media resource. Manage Conferences To access the Manage Conferences page from the Media Servers page, click on a media server's Manage Conferences hyperlink. The Manages Conferences page provides a list of conferences that are active on the media resource. The following information is provided. Item Conference ID Conference Name Number of Calls Priority End Calls Description The unique identifier for the conference instance being hosted on the media resource. An optional text tag to provide a more meaningful reference to a conference instance. The number of active calls currently participating in a conference instance. The priority associated with a conference instance. Priority is taken into account when moving conference instances across media resources. The default value is 100. End a specific conference instance by clicking the link. 16


17 Manage Media Servers The Manage Media Servers page allows new and existing media servers to be configured. Add a Media Server To add a media server, proceed as follows: 1. Click the Add Media Server button on the Manage Media Servers page. The Add Media Server page appears. 2. Enter the host address and the port number. 3. Select Listen on TLS if the media server is set up to use TLS communications. The TLS Port field reflects the SIP port being used by the MRB adaptor for the media server. 4. Select the location of the media server. 5. Click Add to finish adding a new media server. The new media server will appear on the Manage Media Servers page. Click Cancel to abort the operation. 17

18 Manage a Media Server To manage a media server, proceed as follows: 1. Click the Manage hyperlink of the media server that needs to be configured. The Media Server page appears. 2. Click one of the following buttons: Cancel navigates back to the Manage Media Servers page. Take offline takes the media server offline and allows further administration tasks to occur. End all conferences on MS allows the user to terminate all conference instances that are currently being hosted on the selected media server. To make and apply changes, the Take offline button must be selected to take the media server out of service. The traffic light turns yellow. When the Take offline button is clicked, the following buttons appear: Cancel navigates back to the Manage Media Servers page. Save saves the media server configuration changes. Bring online returns the media server to active service. Click this after changes have been made to apply them. Delete removes the media server from the MRB pool. Move calls to another MS moves all active conference calls from the selected media server to an alternative media server (if available). An algorithm is used to select a new media server, and if an appropriate match is found, the calls are relocated. 3. Make changes to the configuration of the media server as necessary. 4. Click Bring online to apply the changes. 5. Click Save to save the changes and return to the Manage Media Servers page. 18
.")
19 Resource Summary The Resource Summary page provides an aggregated view of media server resources available within the MRB cluster. The total number of active media servers is shown at the top of the page. Aggregated port usage information is provided for each codec (audio and video). Other totals are also displayed on this page (e.g., XMS Resource Meters). 19

20 MS HA Statistics The MS HA Statistics page provides information that enables an administrator to view the outcome of when conference calls are moved between media servers following media server failures. The following information is provided. Item Time/Date Failed MS Type (Manual/Automatic) Total Calls Successful Moves Failed Moves Description The time and date that the move call operation occurred. The identity of the source media server where calls are moved from. The type of move call operation that took place: either a Manual Move (as a result of user intervention) or an Automatic Move (as a result of media server failure). The total number of calls that were attempted to be moved. The number of successful calls that were moved as part of a move call operation. The number of calls that were moved unsuccessfully as part of a move call operation. Locations The Locations page provides a list of valid locations that media server resources can reside within the MRB managed pool and accompanying statistics. Groups of media servers that are labeled with the same location can be provided with certain functionalities. In addition, messages can be steered to a preferred location. An administrator can create additional locations by clicking the Add Location button. An existing location can be edited using the Edit hyperlink and deleted using the Delete hyperlink. 20


21 User Administration The User Administration page allows users of the MRB to be provisioned and managed. An administrator can create additional users by clicking the Add User button. An existing user can be deleted clicking the Delete hyperlink and edited using the Change hyperlink. Add a User The Add User page allows users of the MRB to be provisioned and the user role to be set. To successfully create a user, all of the fields must be populated. The administrator must then click the Add user button. Clicking the Cancel button aborts the addition of a new user to the MRB. Change a User The Change User page provides identical user manipulation options as provided by the Add User page. Click Update when the changes have been made. 21


22 User Roles The User Roles page allows you to adjust the user settings. An administrator can create additional user roles by clicking the Add Role button, adjusting the settings, and clicking the Save hyperlink. An existing user can edited by clicking the Edit hyperlink, making the changes, and then clicking the Save hyperlink. An existing user can be deleted using the Delete hyperlink. User Policies The User Policies page allows user policies of the MRB to be edited. To change the User idle time before logout and the Minimum password length fields, click Update, make the changes, and click Save to save the changes. MRB Configuration The MRB Configuration page allows for MRB-specific information to be provisioned. 22
23 The following configuration options are available. Item Push Route Adaptor Poll Period Enable Detailed Logging Stack Logging SIP Message Logging Enable MS Allocation Buffer MS Allocation Buffer Size Cascade Conferences HTTP Call Description Enables the MRB to insert a specified preloaded SIP Route header in all outgoing SIP INVITE requests, thus forcing the next hop destination. For example, if "sip:s-cscf@dialogic.com" is specified, the following SIP Route header would be inserted in all outgoing initial SIP INVITE requests: Route: <sip:s-cscf@dialogic.com;lr> Because it can be a requirement that all requests traverse the Serving Call Session Control Function (S-CSCF) as part of the onward journey, preloaded SIP Route headers can be pushed for all outgoing initial SIP INVITE requests when deploying in an IP Multimedia Susbsystem (IMS) architecture. The value in seconds for the statistics retrieval period from the media servers being managed by the MRB. Allows a user to turn on and off detailed logging. This option does NOT require a restart. Allows a user to turn on and off full logging output to the log files. This option does NOT require a restart. This option should only be enabled under the guidance of Dialogic support. Allows a user to turn on and off SIP message logging output to the log files. This option does NOT require a restart. Enables the administrator to intentionally skew the media server selection algorithm such that batches of requests arrive at a single instance with a specified period of time as determined by the MS Allocation Buffer Size. This feature is useful in call flows such as transcoding. The number of calls to be batched to a specific media server if the MS allocation buffer is enabled. Overflow facility that will use ports on an alternative media resource for a conference instance if none are available to join new participants. This is achieved by cascading mixes across two media resources. Note: If using this feature, refer to the following limitations: Active speaker notifications from the XMS for that conference will not be correct. Video conference cascading is not supported. Only audio conferences can be cascaded. Configures the port to be used when accessing the HTTP Call Control 23
24 Item Control API REST Port SIP RTP Proxy Description REST API. Refer to the Dialogic PowerMedia XMS RESTful API User's Guide at When enabled, SIP media traffic utilizes the RTP proxy and does not re-invite clients on MRF failure. Click Save to save the configuration, Cancel to abort the operation, Restart to restart the MRB, and Shutdown to turn off the MRB. Manage Conferences The Manage Conferences page provides configuration options related specifically to conferencing. The following configuration options are available. Item Conference Clean Up Enable Mix HA RTP Failure Detection Detection Period SIP Re-invite on RTP Failure Description Enabling this feature results in all conferences being cleaned up when the MRB connects. The MRB will attempt to preserve conference calls on detection of failure of a media server. The MRB creates a single RTP stream to each provisioned media server for monitoring. The MRB will look for breaks in RTP as an indicator of media server failure. The period in milliseconds that the MRB looks for break in RTP in conjunction with the RTP Failure Detection feature. On detecting an RTP failure, the MRB will send an additional re- INVITE to check the media server's health if this feature is provisioned. 24


25 Click Save to save configuration settings or click Cancel to return to the previous page. Manage MRB Cluster The Manage MRB Cluster page is used to configure a Highly Available (HA) pair of MRB nodes. The Manage MRB Cluster page provides a status overview of an MRB cluster deployment and the currently configured nodes. It provides two main options: Manage, which allows manipulation of an existing MRB node in a cluster, and Add MRB Node, which allows the addition of a new MRB node in a cluster. Both navigate to the same page. The following configuration options are available. Item Name SIP Hostname and port Listen on TLS TLS Port Description Supplies the name of the MRB node in a cluster. Supplies the SIP hostname/address and port being used by the MRB node. Whether or not this MRB node is set up to communicate over a TLS channel. If Listen on TLS is selected, this is the port used for TLS data. 25

26 Item Security Profile JMX Hostname and port Paired MRB node ID Management mode MRB/MLF Description If Listen on TLS is selected, this is the security profile to be used to provide the MRB node's certificate/key. Note: Refer to Appendix D: Add a Customized Security Profile for guidelines on adding customized security profiles. Supplies the Java Management Technology (JMX) hostname and port being used by the MRB node. Allows two MRB nodes (active and standby) to be linked in an HA pair. Displays the current management mode of the MRB node (active or standby). Reserved for future use. Click Back to return to the Manage MRB Cluster page. Click Save to save configuration settings. Click Delete to remove the MRB node. Networking Configuration The Networking Configuration page is used to manage listening and communication interfaces. The following configuration options are available. Item VIP Manager Listening Port External Load Balancer Traffic VIP Address Description The port on which the MRB communicates with the VIP Manager process. Specifies if the MRB is being deployed with an external Load Balancer. Checking this option means the MRB will not configure the traffic VIP directly, since traffic will be routed through the load balancer, which will control the VIP. MRB Virtual IP address for call traffic (i.e., SIP/HTTP). 26


27 Traffic VIP Port Traffic VIP Interface The accompanying port for the traffic VIP address. The interface name for the SIP VIP. Click Save to save the configuration settings and click Cancel to return to the previous page. VIP Status The VIP Status page provides the current state of the VIP Manager process. The page also contains up-to-date information regarding the VIPs managed by the MRB cluster. The page lists each VIP and the IP address of the node currently serving the VIP. SNMP Configuration The SNMP Configuration page allows for SNMP-related provisioning. The following configuration options are available. Item Enabled Destination hostname Destination port Additional Destination hostname Additional Destination port Description A check box that enables or disables MRB notifications. The host to send MRB SNMP traps. The port to send MRB SNMP traps. An additional location that can optionally be provisioned to send MRB SNMP traps. An additional port associated with the Additional Destination hostname field to send MRB SNMP traps. 27

28 SNMP Community Name Java class name for notifications The community name for SNMP notifications. Allows custom notifications to be sent. The field contains the Java class name to be used instead of the default SNMP traps. Click Save to save the configuration settings. Click Cancel to return to the previous page. SNMP Notifications The SNMP Notifications page provides a list of events that can appear in the MRB log files and also raise SNMP traps. Click Save to save the configuration settings. Selection Algorithms Reserved for future use. Unaware Mode The Unaware Mode page provides default properties for an incoming call if the call's values cannot be determined from other mechanisms such as the SIP P-MRB header. 28

29 The same settings are available for the Conferencing and IVR sections. The following configuration options are as follows. Item Location Audio Video Description Set the default location for a request, which is used for appropriate media server selection. Select from a drop-down list of valid locations that have been provisioned for the MRB. If the value No specific location is selected from the dropdown list, no explicit default location is set for request processing. Therefore, the MRB location routing is not applied to newly received requests and all media server instances are considered as part of the selection process regardless of location. Number of Ports: Specify the number of audio ports required in association with the request. Default Codec: Specify the default audio codec in association with the request. Number of Ports: Specify the number of video ports required in association with the request. Default Codec: Specify the default video codec in association with the request. Click Make Default to make Conferencing or IVR the default for unaware mode. Click Save to save the configuration settings. Click Cancel to return to the previous page. 29


30 Security Profiles The Security Profiles page enables the MRB to be configured for secure protocol communication, such as Transport Layer Security (TLS), over transports such as SIP. Security profiles are only relevant to TLS connections. Note: Refer to Appendix D: Add a Customized Security Profile for guidelines on adding customized security profiles. This page displays the current set of security profiles that are configured for the MRB. To remove a security profile, click Remove. To edit a security profile, click Edit. To add a security profile, click Add. The Add button allows a new security profile to be created. When the Add button is clicked, the Security Profile page appears. The Security Profile page allows both client and server certificates to be added to the profile. Note that a security profile requires exactly one server certificate entry but can have 0 to n trusted certificates configured. The existing certificates that have been assigned to the security profile are listed under the column headers "Trusted Certificate" and "Server Certificate." 30


31 The following configuration options are available. Item Remove Add Certificate Description The Remove button causes the appropriate certificate to be deleted from the profile. The Add Certificate button causes the appropriate certificate to be added to the profile. Refer to the Add a Trusted Certificate and Add a Server Certificate sections that follow for more information. When you are finished making changes to the Security Profiles page, click Save to save the configuration settings. If invalid data is provided, an error message appears. If this occurs, validate the data and click Save again. Click Cancel to return to the previous page without saving pending changes. Add a Trusted Certificate To add a trusted certificate, click the Add Certificate button and enter a valid alias on the Add Trusted Certificate page. Click Browse to find and select the appropriate certificate file (locally stored). This is the SSL certificate file (X.509) for a secure connection to any nodes (required for SSL re-encryption mode). When the alias and certificate file have been added, click Add to add the certificate or Cancel to return to the previous page. Add a Server Certificate To add a server certificate, click the Add Certificate button and enter a valid alias on the Add Server Certificate page. Click Browse to find and select the appropriate certificate file (stored locally). This is the signed certificate containing the public key, which is sent to the client when a SSL connection is made. Click Browse to find and select the appropriate private key file (stored locally). This is the complementary private key used for encryption when an SSL connection is made. This must be a DER file in PKCS8 format. When the alias and certificate file have been added, click Add to add the certificate or Cancel to return to the previous page. 31

32 Logging The Logging page displays the log and allows different search settings to be applied to the log. To apply search settings, click Update. 32
33 4. Appendix A: Enabling HTTPS with Jetty Proceed as follows to configure Jetty to enable a secure connection. If an existing private key or company certificate is being used, skip steps 1 and 2 as necessary. 1. Create a private key using the following command and entering a pass phrase in the output. $ openssl genrsa -des3 -out mycompany.key Sample Output Generating RSA private key, 2048 bit long modulus e is (0x10001) Enter pass phrase for mycompany.key: [pwjetty123] Verifying - Enter pass phrase for mycompany.key: [pwjetty123] This creates the private key file mycompany.key. Verify the private key using the following command. $ openssl rsa -in mycompany.key -check Sample Output Enter pass phrase for mycompany.key: [pwjetty123] RSA key ok writing RSA key -----BEGIN RSA PRIVATE KEY----- MIIEogIBAAKCAQEAr653O+uwL0Ohoq8OQFadub9MMi1qak2tDhI9k25N5iZgElkL : : R1dsDTpOMqikPFbT1aw98mNTcSMFiOiUcg07AEswqYfuuc8iR44= -----END RSA PRIVATE KEY Create a certificate using the private key that was just created and enter the applicable information. $ openssl req -new -x509 -key mycompany.key -out mycompany.crt Sample Output Enter pass phrase for mycompany.key: [pwjetty123] You are about to be asked to enter information that will be incorporated into your certificate request. What you are about to enter is what is called a Distinguished Name or a DN. There are quite a few fields but you can leave some blank For some fields there will be a default value, If you enter '.', the field will be left blank Country Name (2 letter code) [AU]:UK State or Province Name (full name) [Some-State]:myState Locality Name (eg, city) []:mytown Organization Name (eg, company) [Internet Widgits Pty Ltd]:myCompany Organizational Unit Name (eg, section) []:Engineering Common Name (e.g. server FQDN or YOUR name) []:myserver.com 33
34 Address This creates the certificate file mycompany.crt. Verify the certificate using the following command. $ openssl x509 -in mycompany.crt -text -noout Sample Output Certificate: Data: Version: 3 (0x2) Serial Number: (0xf4ccf7b0ff67713b) Signature Algorithm: sha256withrsaencryption Issuer: C=UK, ST=myState, L=myTown, O=myCompany, OU=Engineering, CN=myServer.com/ Address=me@company.com Validity Not Before: Sep 2 07:18: GMT Not After : Oct 2 07:18: GMT Subject: C=UK, ST=myState, L=myTown, O=myCompany, OU=Engineering, CN=myServer.com/ Address=me@company.com Subject Public Key Info: Public Key Algorithm: rsaencryption Public-Key: (2048 bit) Modulus: 00:af:ae:77:3b:eb:b0:2f:43:a1:a2:af:0e:40:56: : : 57:38:3a:84:c4:0d:24:3b:2c:8f:e1:c3:b5:56:0a: fe:23 Exponent: (0x10001) X509v3 extensions: X509v3 Subject Key Identifier: 39:09:70:E1:9A:99:A6:DE:90:CB:AF:70:6E:D4:A9:74:68:71:11:C1 X509v3 Authority Key Identifier: keyid:39:09:70:e1:9a:99:a6:de:90:cb:af:70:6e:d4:a9:74:68:71:11:c1 X509v3 Basic Constraints: CA:TRUE Signature Algorithm: sha256withrsaencryption 7a:d9:c5:c4:3a:93:77:35:b9:de:57:96:c5:36:fa:26:ab:63: : : 6b:b4:de:06:1a:65:c8:36:9a:85:7a:83:79:04:ee:9f:f3:89: c9:83:23:e0 3. Add the certificate to the keystore using the following command and enter the applicable information. $ keytool -keystore mycompany-jetty.jks -import -alias mycompany -file mycompany.crt - trustcacerts Sample Output Enter keystore password: [pwjetty123] Re-enter new password: [pwjetty123] Owner: ADDRESS=me@company.com, CN=myServer.com, OU=Engineering, O=myCompany, L=myTown, ST=myState, C=UK 34
35 Issuer: CN=myServer.com, OU=Engineering, O=myCompany, L=myTown, ST=myState, C=UK Serial number: f4ccf7b0ff67713b Valid from: Wed Sep 02 08:18:47 BST 2015 until: Fri Oct 02 08:18:47 BST 2015 Certificate fingerprints: MD5: 66:D1:81:98:12:05:CC:7C:7C:9B:1E:2F:44:1F:9D:29 SHA1: CF:E8:39:E0:E7:7F:B0:96:CE:80:72:7E:4B:C0:4A:2B:D2:DB:94:DA SHA256: A0:34:77:FA:67:0D:54:AC:14:6D:EF:98:6C:A7:AB:1C:01:7A:99:6D:08:85:B1:3E:8D:02:6E:28:65:39 :74:31 Signature algorithm name: SHA256withRSA Version: 3 Extensions: #1: ObjectId: Criticality=false AuthorityKeyIdentifier [ KeyIdentifier [ 0000: E1 9A 99 A6 DE 90 CB AF 70 6E D4 A p...pn..t 0010: C1 hq.. ] ] #2: ObjectId: Criticality=false BasicConstraints:[ CA:true PathLen: ] #3: ObjectId: Criticality=false SubjectKeyIdentifier [ KeyIdentifier [ 0000: E1 9A 99 A6 DE 90 CB AF 70 6E D4 A p...pn..t 0010: C1 hq.. ] ] Trust this certificate? [no]: yes Certificate was added to keystore This creates the keystore file mycompany-jetty.jks. Verify the keystore contents using the following command. $ keytool -list -keystore mycompany-jetty.jks Sample Output Enter keystore password: [pwjetty123] Keystore type: JKS Keystore provider: SUN Your keystore contains 1 entry mycompany, 02-Sep-2015, trustedcertentry, Certificate fingerprint (SHA1): CF:E8:39:E0:E7:7F:B0:96:CE:80:72:7E:4B:C0:4A:2B:D2:DB:94:DA 35
36 4. Create a Certificate Signing Request (CSR) using the following command and enter the applicable information. $ openssl req -new -key mycompany.key -out mycompany.csr Sample Output Enter pass phrase for mycompany.key: [pwjetty123] You are about to be asked to enter information that will be incorporated into your certificate request. What you are about to enter is what is called a Distinguished Name or a DN. There are quite a few fields but you can leave some blank For some fields there will be a default value, If you enter '.', the field will be left blank Country Name (2 letter code) [AU]:UK State or Province Name (full name) [Some-State]:myState Locality Name (eg, city) []:mytown Organization Name (eg, company) [Internet Widgits Pty Ltd]:myCompany Organizational Unit Name (eg, section) []:Engineering Common Name (e.g. server FQDN or YOUR name) []:myserver.com Address []:me@company.com Please enter the following 'extra' attributes to be sent with your certificate request A challenge password []:pwjetty123 An optional company name []: This creates the CSR file mycompany.csr. Verify the contents of the CSR using the following command. $ openssl req -text -noout -verify -in mycompany.csr Sample Output verify OK Certificate Request: Data: Version: 0 (0x0) Subject: C=UK, ST=myState, L=myTown, O=myCompany, OU=Engineering, CN=myServer.com/ Address=me@company.com Subject Public Key Info: Public Key Algorithm: rsaencryption Public-Key: (2048 bit) Modulus: 00:af:ae:77:3b:eb:b0:2f:43:a1:a2:af:0e:40:56: : : 57:38:3a:84:c4:0d:24:3b:2c:8f:e1:c3:b5:56:0a: fe:23 Exponent: (0x10001) Attributes: challengepassword :unable to print attribute Signature Algorithm: sha256withrsaencryption 8f:65:04:17:24:b4:3f:32:0c:87:75:22:8b:21:a8:ca:98:62: 36
37 : : 55:21:82:5a:8c:e9:18:8e:b7:98:53:32:7a:7f:77:5e:55:08: 7f:76:96:e2 5. Create a PKCS12 bundle containing the private key and its x509 certificate using the following command and enter the applicable information. $ openssl pkcs12 -inkey mycompany.key -in mycompany.crt -export -out mycompany.p12 Sample Output Enter pass phrase for mycompany.key: [pwjetty123] Enter Export Password: [pwjetty123] Verifying - Enter Export Password: [pwjetty123] This creates the PKCS12 bundle file mycompany.p12. Verify the contents of the PKCS12 bundle using the following command. $ openssl pkcs12 -info -in mycompany.p12 Sample Output Enter Import Password: [pwjetty123] MAC Iteration 2048 MAC verified OK PKCS7 Encrypted data: pbewithsha1and40bitrc2-cbc, Iteration 2048 Certificate bag Bag Attributes localkeyid: CF E8 39 E0 E7 7F B0 96 CE E 4B C0 4A 2B D2 DB 94 DA subject=/c=uk/st=mystate/l=mytown/o=mycompany/ou=engineering/cn=myserver.com/ address =me@company.com issuer=/c=uk/st=mystate/l=mytown/o=mycompany/ou=engineering/cn=myserver.com/ address= me@company.com -----BEGIN CERTIFICATE----- MIID9zCCAt+gAwIBAgIJAPTM97D/Z3E7MA0GCSqGSIb3DQEBCwUAMIGRMQswCQYD : : CTgULXcnl6Zyxm9E1P1XjWXpmCBtSTMUOoNR1YBV8LmLCo+LsGu03gYaZcg2moV6 g3ke7p/zicmdi+a= -----END CERTIFICATE----- PKCS7 Data Shrouded Keybag: pbewithsha1and3-keytripledes-cbc, Iteration 2048 Bag Attributes localkeyid: CF E8 39 E0 E7 7F B0 96 CE E 4B C0 4A 2B D2 DB 94 DA Key Attributes: <No Attributes> Enter PEM pass phrase: [pwjetty123] Verifying - Enter PEM pass phrase: [pwjetty123] -----BEGIN ENCRYPTED PRIVATE KEY----- MIIFDjBABgkqhkiG9w0BBQ0wMzAbBgkqhkiG9w0BBQwwDgQI4W6snmuYS6ICAggA : : Ks7khnExAVuwu5/kbxBH90rf/cFFMQ/QOOFOY1ITVchhbBjRgYcnEVp7dUPSEWum a5e= -----END ENCRYPTED PRIVATE KEY
38 6. Insert the PKCS12 bundle in the keystore using the following command and enter the applicable information. $ keytool -importkeystore -srckeystore mycompany.p12 -srcstoretype PKCS12 -destkeystore mycompany-jetty.jks Sample Output Enter destination keystore password: [pwjetty123] Enter source keystore password: [pwjetty123] Entry for alias 1 successfully imported. Import command completed: 1 entries successfully imported, 0 entries failed or cancelled This updates keystore file mycompany-jetty.jks. Verify the contents of the updated keystore using the following command. $ keytool -list -keystore mycompany-jetty.jks Sample Output Enter keystore password: [pwjetty123] Keystore type: JKS Keystore provider: SUN Your keystore contains 2 entries mycompany, 02-Sep-2015, trustedcertentry, Certificate fingerprint (SHA1): CF:E8:39:E0:E7:7F:B0:96:CE:80:72:7E:4B:C0:4A:2B:D2:DB:94:DA 1, 02-Sep-2015, PrivateKeyEntry, Certificate fingerprint (SHA1): CF:E8:39:E0:E7:7F:B0:96:CE:80:72:7E:4B:C0:4A:2B:D2:DB:94:DA 7. Copy the updated keystore to an area that can be used by the Jetty installation. $ cp mycompany-jetty.jks <jetty-install-dir>/etc/ 8. Update the Jetty SSL config file to use the new keystore as follows: a. Locate the sslcontextfactory block in <jetty-install-dir>/etc/jettyssl.xml. <New id="sslcontextfactory" class="org.eclipse.jetty.http.ssl.sslcontextfactory"> <Set name="keystore"><property name="jetty.home" default="." />/etc/keystore</set> <Set name="keystorepassword">obf:1vny1zlo1x8e1vnw1vn61x8g1zlu1vn4</set> <Set name="keymanagerpassword">obf:1u2u1wml1z7s1z7a1wnl1u2g</set> <Set name="truststore"><property name="jetty.home" default="." />/etc/keystore</set> <Set name="truststorepassword">obf:1vny1zlo1x8e1vnw1vn61x8g1zlu1vn4</set> </New> Note: The passwords are listed in obfuscated form. Jetty provides a utility within the installation to generate obfuscated passwords. b. In the Jetty install directory, run the following command using the passwords created in the previous steps. Note the value of the obfuscated (OBF) version of the password. $ java -cp lib/jetty-util v jar org.eclipse.jetty.util.security.password pwjetty123 38
39 Sample Output pwjetty123 OBF:1lfg1mmc1di01x0r1z0f1z0f1x1v1dgm1mii1lc2 MD5:c0e1ec92ed0dc1b26daa291604cd0d69 c. Update the sslcontextfactory configuration accordingly. Note that the password and keystore locations have been updated. <New id="sslcontextfactory" class="org.eclipse.jetty.http.ssl.sslcontextfactory"> <Set name="keystore"><property name="jetty.home" default="." />/etc/mycompany- Jetty.jks</Set> <Set name="keystorepassword">obf:1lfg1mmc1di01x0r1z0f1z0f1x1v1dgm1mii1lc2</set> <Set name="keymanagerpassword">obf:1lfg1mmc1di01x0r1z0f1z0f1x1v1dgm1mii1lc2</set> <Set name="truststore"><property name="jetty.home" default="." />/etc/mycompany- Jetty.jks</Set> <Set name="truststorepassword">obf:1lfg1mmc1di01x0r1z0f1z0f1x1v1dgm1mii1lc2</set> </New> d. In the Jetty startup file (<jetty-install-dir>/start.ini), look for the following line: # etc/jetty-ssl.xml. Uncomment and save. 9. Validate the changes. Take note of the Jetty ports (i.e., 8888 is the standard Jetty port for MRB/LB UI and 8443 is the standard default HTTPS port). $ netstat -nlp grep -E ' ' If 8443 is not an appropriate secure port, change it using the following procedure: a. Restart Jetty to apply the changes using the following command. $ service jetty restart b. Verify that Jetty is listening on its secure port using the following command. $ netstat -nlp grep -E ' ' c. Using a web browser, navigate to the new secure port: IP>:8443/. The default Jetty landing page should appear. After validating the changes, you can change the secure port by updating the Port value in the <jetty-install-dir>/etc/jetty-ssl.xml SslSelectChannelConnector class element. Follow step 9 to validate and restart Jetty after changing the secure port. 39
40 5. Appendix B: Configure the Firewall Configure the firewall to allow HTTP, HTTPS, FTP, etc. It is easier to disable the firewall for testing. The procedure differs between CentOS 7.x and CentOS 6.x. Refer to the applicable procedure to configure the firewall. CentOS 7.x Note: CentOS 7 installs and enables the "firewalld" service by default. systemctl stop firewalld.service systemctl disable firewalld.service rm '/etc/systemd/system/basic.target.wants/firewalld.service' rm '/etc/systemd/system/dbusorg.fedoraproject.firewalld1.service' To configure the firewall, the following ports need to be opened for MRB: 8888/tcp (for HTTP), 8443/tcp (for HTTPS), 5070/tcp, 5070/udp, 5100/tcp, 5111/tcp, /tcp, 5060/tcp, 5060/udp, 1081/tcp, 8081/tcp, and 8000/tcp. The firewall is configured with the "firewall-cmd" command in Centos 7.x (see Red Hat 7 firewall configuration). To view the current state of the firewall, use the following command: firewall-cmd --state running To find the current default "zone" that is in use, use the following command: firewall-cmd --get-default-zone public To list the configuration for the default zone the interface uses, use the following command: firewall-cmd --zone=public --list-all public (default, active) interfaces: ens32 sources: services: dhcpv6-client ssh ports: masquerade: no forward-ports: icmp-blocks: rich rules: To add rules, use the following commands. Note: Each "add-port" command shown below should return "success". firewall-cmd --zone=public --add-port=8888/tcp --permanent firewall-cmd --zone=public --add-port=8443/tcp --permanent firewall-cmd --zone=public --add-port=5070/tcp --permanent firewall-cmd --zone=public --add-port=5070/udp --permanent firewall-cmd --zone=public --add-port=5060/tcp --permanent firewall-cmd --zone=public --add-port=5060/udp --permanent firewall-cmd --zone=public --add-port=5100/tcp --permanent firewall-cmd --zone=public --add-port=5111/tcp --permanent firewall-cmd --zone=public --add-port=1081/tcp --permanent firewall-cmd --zone=public --add-port=8081/tcp --permanent firewall-cmd --zone=public --add-port=8000/tcp --permanent firewall-cmd --zone=public --add-port= /tcp --permanent firewall-cmd --reload To allow communication between the MRB nodes in an HA pair, add a "Rich Rule." This allows certain MRB nodes to access to all ephemeral ports. On each MRB node in an HA pair, the following rule must be entered and the IP address of the paired node on each MRB machine must be provided: 40
41 firewall-cmd --zone=public --permanent --add-rich-rule='rule family="ipv4" source address="[paired_mrb_node_ip_address]" accept' firewall-cmd --reload Check the service: systemctl status firewalld.service firewalld.service - firewalld - dynamic firewall daemon Loaded: loaded (/usr/lib/systemd/system/firewalld.service; enabled) Active: active (running) since Thu :31:33 GMT; 39min ago Main PID: 6891 (firewalld) CGroup: /system.slice/firewalld.service ââ6891 /usr/bin/python -Es /usr/sbin/firewalld --nofork --nopid Nov 12 10:31:32 mc-mrb.lonlab.dialogic.com systemd[1]: Starting firewalld - dynamic firewall daemon... Nov 12 10:31:33 mc-mrb.lonlab.dialogic.com systemd[1]: Started firewalld - dynamic firewall daemon. The final configuration is as follows: firewall-cmd --zone=public --list-all public (default, active) interfaces: ens32 sources: services: dhcpv6-client ssh ports: 5060/tcp /tcp 5070/tcp 8888/tcp 5070/udp 8081/tcp 8443/tcp 5100/tcp 8000/tcp 12000/tcp 12001/tcp 5100/udp 5060/udp 5111/tcp 1081/tcp masquerade: no forward-ports: icmp-blocks: rich rules: CentOS 6.x To allow access to the loopback interface for VIP interaction, use the following rule: iptables -I INPUT -i lo -j ACCEPT On each MRB node in an HA install, the following command must be entered to allow communication between the MRB nodes in an HA pair. The IP address of the paired node on each MRB machine must be provided: iptables -I INPUT -p tcp -s [paired_mrb_node] -j ACCEPT Before configuring the firewall ports, the following iptables rule must be applied to allow already-established connections on the MRB machine: iptables -I INPUT -p tcp -m state --state ESTABLISHED -j ACCEPT To open specific MRB ports, use the following iptables ACCEPT rules: iptables -I INPUT -i eth0 -p tcp --dport m state --state NEW,ESTABLISHED -j ACCEPT iptables -I INPUT -i eth0 -p tcp --dport m state --state NEW,ESTABLISHED -j ACCEPT iptables -I INPUT -i eth0 -p tcp --dport m state --state NEW,ESTABLISHED -j ACCEPT iptables -I INPUT -i eth0 -p udp --dport m state --state NEW,ESTABLISHED -j ACCEPT iptables -I INPUT -i eth0 -p udp --dport m state --state NEW,ESTABLISHED -j ACCEPT iptables -I INPUT -i eth0 -p tcp --dport m state --state NEW,ESTABLISHED -j ACCEPT iptables -I INPUT -i eth0 -p tcp --dport m state --state NEW,ESTABLISHED -j ACCEPT iptables -I INPUT -i eth0 -p tcp --dport m state --state NEW,ESTABLISHED -j ACCEPT iptables -I INPUT -i eth0 -p tcp --dport m state --state NEW,ESTABLISHED -j ACCEPT iptables -I INPUT -i eth0 -p tcp --dport m state --state NEW,ESTABLISHED -j ACCEPT iptables -I INPUT -i eth0 -p tcp --dport m state --state NEW,ESTABLISHED -j ACCEPT iptables -I INPUT -i eth0 -p tcp --dport 12000: m state --state ESTABLISHED -j ACCEPT To list the firewall rules and opened ports, the following commands are used: iptables -L -v -n and iptables -t nat -L -v -n 41

42 6. Appendix C: Resolve the Hostname The PowerVille LB software needs to be able to resolve the hostname otherwise the error "Lost connection to LB on localhost:5101" is displayed in the LB console when attempting to log in and an error is displayed in opt/nst-loadbalancer/nst-vip-manager.out every few seconds. This is an example of the error message in opt/nst-loadbalancer/nst-vip-manager.out when "mc-lb" is the hostname and "mc-lb3.lonlab.dialogic.com" is the FQDN. Error: Exception thrown by the agent : java.net.malformedurlexception: Local host name unknown: java.net.unknownhostexception: mc-lb3.lonlab.dialogic.com: mc-lb3.lonlab.dialogic.com: Name or service not known To resolve the hostname, edit the /etc/hosts file so that the hostname and FQDN are included. This is an example of an incorrect /etc/hosts file when "mc-lb" is the hostname and "mc-lb3.lonlab.dialogic.com" is the FQDN. The hostname and FQDN are not in the file localhost localhost.localdomain localhost4 localhost4.localdomain4::1 localhost localhost.localdomain localhost6 localhost6.localdomain6 This is an example of a correct /etc/hosts file when "mc-lb" is the hostname and "mc-lb3.lonlab.dialogic.com" is the FQDN. The hostname and FQDN have been added to the file mc-lb mc-lb3.lonlab.dialogic.com localhost localhost.localdomain localhost4 localhost4.localdomain4::1 mc-lb mc-lb3.lonlab.dialogic.com localhost localhost.localdomain localhost6 localhost6.localdomain6 42

43 7. Appendix D: Add a Customized Security Profile This section provides guidelines on adding a customized security profile. 1. Unzip the certificate bundle and locate the CRT file. The MRB does not accept CSR files to create a security profile. The MRB requires a PEM Certificate to be provided. 2. Obtain the private key as a DER file in PKCS8 format. If the private key is already a DER file, proceed to step 3. If the private key must be converted to a DER file, use the following command where "msaasmrb01.key" is an example of a file that needs to be converted to a DER file and "msaasmrb.der" is an example of the converted DER file: $ openssl pkcs8 -topk8 -nocrypt -in msaasmrb01.key -outform der -out msaasmrb.der 3. In the MRB console, create an MRB security profile: a. On the Security Profiles page, click Add. b. In the Profile Name field, enter a name for the security profile. c. In the Server Certificates section, click Add Certificate. d. Enter a valid alias. e. In the Certificate File field, browse for the CRT file obtained in step 1 and select it. f. In the Private Key field, browse for the DER file obtained in step 2 and select it. g. Click Add, and then click Save. The new security profile should now be on the listed on the Security Profiles page. 43
Dialogic PowerVille LB Load Balancer for Real-Time Communications
 Dialogic PowerVille LB Load Balancer for Real-Time Communications Technology Guide June 2016 1.0 www.dialogic.com Copyright and Legal Notice Copyright 2016 Dialogic Corporation. All Rights Reserved. You
Dialogic PowerVille LB Load Balancer for Real-Time Communications
 Dialogic PowerVille LB Load Balancer for Real-Time Communications Installation and Operations Guide December 2016 Rev 2.1 www.dialogic.com Copyright and Legal Notice Copyright 2016 Dialogic Corporation.
Dialogic PowerVille LB Load Balancer for Real-Time Communications
 Dialogic PowerVille LB Load Balancer for Real-Time Communications Quick Start Guide July 2016 Rev 1.3 www.dialogic.com Copyright and Legal Notice Copyright 2016 Dialogic Corporation. All Rights Reserved.
Dialogic PowerMedia XMS WebRTC
 Dialogic PowerMedia XMS WebRTC Demo Guide September 2015 05-2718-008 www.dialogic.com Copyright and Legal Notice Copyright 2013-2015 Dialogic Corporation. All Rights Reserved. You may not reproduce this
Using Two Ethernet Network Interface Cards with Dialogic PowerMedia Extended Media Server (XMS) Tech Note
 Tech Note") Using Two Ethernet Network Interface Cards with Dialogic PowerMedia Extended Media Server (XMS) Introduction While Dialogic PowerMedia Extended Media Server s (PowerMedia XMS) default configuration is
Using Two Ethernet Network Interface Cards with Dialogic PowerMedia Extended Media Server (XMS) Introduction While Dialogic PowerMedia Extended Media Server s (PowerMedia XMS) default configuration is
Deploying a Dialogic 4000 Media Gateway as a Survivable Branch Appliance for Microsoft Lync Server 2010
 Deploying a Dialogic 4000 Media Gateway as a Survivable Branch Appliance for Microsoft Lync Server 2010 February 2011 64-1146-01 www.dialogic.com Copyright and Legal Notice Copyright and Legal Notice Copyright
Dialogic PowerMedia XMS and Amazon Web Services (AWS)
") Dialogic PowerMedia XMS and Amazon Web Services (AWS) Using PowerMedia XMS with a J2EE Application Server and Dialogic JSR 309 Introduction This is the third tech note in the series Dialogic PowerMedia
Dialogic PowerMedia XMS and Amazon Web Services (AWS) Using PowerMedia XMS with a J2EE Application Server and Dialogic JSR 309 Introduction This is the third tech note in the series Dialogic PowerMedia
Dialogic Brooktrout Fax Service Provider Software
 Dialogic Brooktrout Fax Service Provider Software Installation and Configuration Guide for the Microsoft Fax Server September 2016 931-121-04 www.dialogic.com Copyright and Legal Notice Copyright 1998-2016
Dialogic PowerMedia Media Resource Broker (MRB)
") Dialogic PowerMedia Media Resource Broker (MRB) Technology Guide September 2017 Rev 2.0 www.dialogic.com Copyright and Legal Notice Copyright 2016-2017 Dialogic Corporation. All Rights Reserved. You may
Dialogic PowerMedia Media Resource Broker (MRB) Technology Guide September 2017 Rev 2.0 www.dialogic.com Copyright and Legal Notice Copyright 2016-2017 Dialogic Corporation. All Rights Reserved. You may
Dialogic Brooktrout SR140 Fax Software with babytel SIP Trunking Service
 Dialogic Brooktrout SR140 Fax Software with babytel SIP Trunking Service March 2011 64-0600-27 www.dialogic.com Copyright and Legal Notice Copyright 2011 Dialogic Inc. All Rights Reserved. You may not
Using ISE 2.2 Internal Certificate Authority (CA) to Deploy Certificates to Cisco Platform Exchange Grid (pxgrid) Clients
 to Deploy Certificates to Cisco Platform Exchange Grid (pxgrid) Clients") Using ISE 2.2 Internal Certificate Authority (CA) to Deploy Certificates to Cisco Platform Exchange Grid (pxgrid) Clients Author: John Eppich Table of Contents About this Document... 4 Using ISE 2.2 Internal
Using ISE 2.2 Internal Certificate Authority (CA) to Deploy Certificates to Cisco Platform Exchange Grid (pxgrid) Clients Author: John Eppich Table of Contents About this Document... 4 Using ISE 2.2 Internal
IMPORTANT NOTE. Dialogic Brooktrout SR140 Fax Software with Broadvox SIP Trunking Service. Installation and Configuration Integration Note
 Dialogic Brooktrout SR140 Fax Software with Broadvox SIP Trunking Service IMPORTANT NOTE This document is not to be shared with or disseminated to other third parties, in whole or in part, without prior
IMPORTANT NOTE. Dialogic Brooktrout SR140 Fax Software with Alcatel-Lucent OmniPCX Enterprise. Installation and Configuration Integration Note
 Dialogic Brooktrout SR140 Fax Software with Alcatel-Lucent OmniPCX Enterprise IMPORTANT NOTE This document is not to be shared with or disseminated to other third parties, in whole or in part, without
Dialogic Brooktrout SR140 Fax Software with Microsoft Exchange Server 2010
 Dialogic Brooktrout SR140 Fax Software with Microsoft Exchange Server 2010 June 2010 64-0600-20 www.dialogic.com Copyright and Legal Notice Copyright 2010 Dialogic Corporation. All Rights Reserved. You
Dialogic 1000 Media Gateway Series
 August 2010 05-2685-002 www.dialogic.com Copyright and Legal Notice Copyright 2009-2010 Dialogic Corporation. All Rights Reserved. You may not reproduce this document in whole or in part without permission
Dialogic Media Gateway Installation and Configuration Integration Note
 Dialogic Media Gateway Installation and Configuration Integration Note This document is intended to detail a typical installation and configuration of the Dialogic 2000 Media Gateway Series (DMG2000) when
Installing Dialogic NaturalAccess SS7 Monitor Software 3.0
 Installing Dialogic NaturalAccess SS7 Monitor Software 3.0 August 2009 64-0465-01 www.dialogic.com Copyright and legal notices Copyright 2004-2009 Dialogic Corporation. All Rights Reserved. You may not
Dialogic PowerMedia Media Resource Broker (MRB)
") Dialogic PowerMedia Media Resource Broker (MRB) The PowerMedia Media Resource Broker (MRB), a standardscompliant, software-based Media Resource Broker that allows application developers, service providers
Dialogic PowerMedia Media Resource Broker (MRB) The PowerMedia Media Resource Broker (MRB), a standardscompliant, software-based Media Resource Broker that allows application developers, service providers
Dialogic TX Series SS7 Boards
 Dialogic TX Series SS7 Boards Loader Library Developer s Reference Manual July 2009 64-0457-01 www.dialogic.com Loader Library Developer's Reference Manual Copyright and legal notices Copyright 1998-2009
Dialogic PowerMedia XMS
 Dialogic PowerMedia XMS Quick Start Guide April 2016 05-2701-007 www.dialogic.com Copyright and Legal Notice Copyright 2012-2016 Dialogic Inc. All Rights Reserved. You may not reproduce this document in
Dialogic PowerMedia XMS
 Dialogic PowerMedia XMS Quick Start Guide March 2013 05-2701-005 www.dialogic.com Copyright and Legal Notice Copyright 2012-2013 Dialogic Inc. All Rights Reserved. You may not reproduce this document in
Dialogic PowerMedia XMS
 Dialogic PowerMedia XMS Quick Start Guide April 2016 05-2701-010 www.dialogic.com Copyright and Legal Notice Copyright 2012-2016 Dialogic Corporation. All Rights Reserved. You may not reproduce this document
Dialogic DSI Protocol Stacks
 Dialogic DSI Protocol Stacks User Guide: Running DSI User Parts Over Dialogic TX Series SS7 Boards February 2010 U03DPK02 www.dialogic.com Copyright and Legal Notice Copyright 2009-2010 Dialogic Corporation.
Dialogic Continuous Speech Processing API
 Dialogic Continuous Speech Processing API Demo Guide May 2008 05-2084-005 Copyright 2005-2008. All rights reserved. You may not reproduce this document in whole or in part without permission in writing
Dialogic PowerMedia Media Resource Broker (MRB)
") Dialogic PowerMedia Media Resource Broker (MRB) The PowerMedia Media Resource Broker (MRB) is a standardscompliant, software-based Media Resource Broker that allows application developers, service providers
Dialogic PowerMedia Media Resource Broker (MRB) The PowerMedia Media Resource Broker (MRB) is a standardscompliant, software-based Media Resource Broker that allows application developers, service providers
Dialogic Media Gateway Installation Site Survey
 Dialogic Media Gateway Installation Site Survey 1. Scope This document is provided by Dialogic for you to use if implementing Microsoft Office Communications Server 2007 or Microsoft Exchange Server 2007
SSL Configuration: an example. July 2016
 SSL Configuration: an example July 2016 This document details a walkthrough example of SSL configuration in an EM managed mongodb environment. SSL certificates are used to enforce certificate based security
White Paper Subcategory. Overview of XML Communication Technologies
 Subcategory Overview of XML Communication Technologies Executive Summary A significant shift has occurred in the communications infrastructures deployed today. This shift is the result of the acceptance
IMPORTANT NOTE. Dialogic Brooktrout SR140 Fax Software with T.38Fax.com SIP Trunking Service. Installation and Configuration Integration Note
 Dialogic Brooktrout SR140 Fax Software with T.38Fax.com SIP Trunking Service IMPORTANT NOTE This document is not to be shared with or disseminated to other third parties, in whole or in part, without prior
IMPORTANT NOTE. Dialogic Brooktrout SR140 Fax Software with Cisco Unified Communications Manager 7.0. Installation and Configuration Integration Note
 Dialogic Brooktrout SR140 Fax Software with Cisco Unified Communications Manager 7.0 IMPORTANT NOTE This document is not to be shared with or disseminated to other third parties, in whole or in part, without
FieldView. Management Suite
 FieldView The FieldView Management Suite (FMS) system allows administrators to view the status of remote FieldView System endpoints, create and apply system configurations, and manage and apply remote
Dialogic PowerMedia Extended Media Server (XMS) Installation and Configuration Guide
 Installation and Configuration Guide") Dialogic PowerMedia Extended Media Server (XMS) Installation and Configuration Guide March 2012 05-2704-001 www.dialogic.com Copyright and Legal Notice Copyright 2012 Dialogic Inc. All Rights Reserved.
Dialogic PowerMedia Extended Media Server (XMS) Installation and Configuration Guide March 2012 05-2704-001 www.dialogic.com Copyright and Legal Notice Copyright 2012 Dialogic Inc. All Rights Reserved.
SSL Configuration Oracle Banking Liquidity Management Release [April] [2017]
![SSL Configuration Oracle Banking Liquidity Management Release [April] [2017]](/thumbs/74/70574223.jpg "SSL Configuration Oracle Banking Liquidity Management Release [April] [2017]") SSL Configuration Oracle Banking Liquidity Management Release 12.4.0.0.0 [April] [2017] Table of Contents 1. CONFIGURING SSL ON ORACLE WEBLOGIC... 1-1 1.1 INTRODUCTION... 1-1 1.2 SETTING UP SSL ON ORACLE
SSL Configuration Oracle Banking Liquidity Management Release 12.4.0.0.0 [April] [2017] Table of Contents 1. CONFIGURING SSL ON ORACLE WEBLOGIC... 1-1 1.1 INTRODUCTION... 1-1 1.2 SETTING UP SSL ON ORACLE
eroaming platform Secure Connection Guide
 eroaming platform Secure Connection Guide Contents 1. Revisions overview... 3 2. Abbrevations... 4 3. Preconditions... 5 3.1. OpenSSL... 5 3.2. Requirements for your PKCS10 CSR... 5 3.3. Java Keytool...
Configuring IBM Rational Synergy to use HTTPS Protocol
 Technical Note Configuring IBM Rational Synergy to use HTTPS Protocol November 20, 2013 This edition applies to IBM Rational Synergy version 7.1, and to all subsequent releases and modifications until
Installing and Configuring VMware Identity Manager Connector (Windows) OCT 2018 VMware Identity Manager VMware Identity Manager 3.
 OCT 2018 VMware Identity Manager VMware Identity Manager 3.") Installing and Configuring VMware Identity Manager Connector 2018.8.1.0 (Windows) OCT 2018 VMware Identity Manager VMware Identity Manager 3.3 You can find the most up-to-date technical documentation on
Installing and Configuring VMware Identity Manager Connector 2018.8.1.0 (Windows) OCT 2018 VMware Identity Manager VMware Identity Manager 3.3 You can find the most up-to-date technical documentation on
NetXplorer. Installation Guide. Centralized NetEnforcer Management Software P/N D R3
 NetXplorer Centralized NetEnforcer Management Software Installation Guide P/N D357006 R3 Important Notice Important Notice Allot Communications Ltd. ("Allot") is not a party to the purchase agreement
Dialogic Media Toolkit API
 Dialogic Media Toolkit API Library Reference February 2008 05-2603-002 Copyright 2008,. All rights reserved. You may not reproduce this document in whole or in part without permission in writing from at
Configure Cisco DNA Assurance
 Basic Workflow for Configuring Cisco DNA Assurance, on page 1 Assurance and Cisco ISE Integration, on page 2 Assurance Application, on page 6 Basic Workflow for Configuring Cisco DNA Assurance Before you
Cisco has more than 200 offices worldwide. Addresses, phone numbers, and fax numbers are listed on the Cisco website at
 Document Date: May 16, 2017 THE SPECIFICATIONS AND INFORMATION REGARDING THE PRODUCTS IN THIS MANUAL ARE SUBJECT TO CHANGE WITHOUT NOTICE. ALL STATEMENTS, INFORMATION, AND RECOMMENDATIONS IN THIS MANUAL
Dialogic PowerMedia HMP for Windows Release 3.0
 Dialogic PowerMedia HMP for Windows Release 3.0 Release Update March 27, 2018 05-2508-110 Copyright and Legal Notice Copyright 2006-2018 Dialogic Corporation. All Rights Reserved. You may not reproduce
IMPORTANT NOTE. Dialogic Brooktrout SR140 Fax Software with NEC Philips SOPHO is3000. Installation and Configuration Integration Note
 Dialogic Brooktrout SR140 Fax Software with NEC Philips SOPHO is3000 IMPORTANT NOTE This document is not to be shared with or disseminated to other third parties, in whole or in part, without prior written
Dialogic PowerMedia XMS
 Dialogic PowerMedia XMS Quick Start Guide May 2016 05-2701-013 www.dialogic.com Copyright and Legal Notice Copyright 2012-2016 Dialogic Corporation. All Rights Reserved. You may not reproduce this document
CloudLink SecureVM. Administration Guide. Version 4.0 P/N REV 01
 CloudLink SecureVM Version 4.0 Administration Guide P/N 302-002-056 REV 01 Copyright 2015 EMC Corporation. All rights reserved. Published June 2015 EMC believes the information in this publication is accurate
IMPORTANT NOTE. Dialogic Brooktrout SR140 Fax Software with ShoreTel Release 12.1 Gateway. Installation and Configuration Integration Note
 Dialogic Brooktrout SR140 Fax Software with ShoreTel Release 12.1 Gateway IMPORTANT NOTE This document is not to be shared with or disseminated to other third parties, in whole or in part, without prior
RealPresence Access Director System Administrator s Guide
 [Type the document title] Polycom RealPresence Access Director System Administrator s Guide 2.1.0 March 2013 3725-78703-001A Polycom Document Title 1 Trademark Information POLYCOM and the names and marks
Creating and Installing SSL Certificates (for Stealthwatch System v6.10)
") Creating and Installing SSL Certificates (for Stealthwatch System v6.10) Copyrights and Trademarks 2017 Cisco Systems, Inc. All rights reserved. NOTICE THE SPECIFICATIONS AND INFORMATION REGARDING THE
Creating and Installing SSL Certificates (for Stealthwatch System v6.10) Copyrights and Trademarks 2017 Cisco Systems, Inc. All rights reserved. NOTICE THE SPECIFICATIONS AND INFORMATION REGARDING THE
Dialogic I-Gate 4000 Session Bandwidth Optimizer Mobile Backhaul Application Topologies
 Session Bandwidth Optimizer Application Topologies Mobile operator backhaul segment designs are each unique and based on several factors such as geography (urban versus rural), population density, terrain,
Cisco TelePresence Conductor with Cisco Unified Communications Manager
 Cisco TelePresence Conductor with Cisco Unified Communications Manager Deployment Guide TelePresence Conductor XC4.0 Unified CM 10.5(2) January 2016 Contents Introduction 6 About this document 6 Related
Intel Small Business Extended Access. Deployment Guide
 Intel Small Business Extended Access Deployment Legal Notices and Disclaimers Disclaimers INTEL CORPORATION MAKES NO WARRANTY OF ANY KIND WITH REGARD TO THIS MATERIAL, INCLUDING, BUT NOT LIMITED TO, THE
Listed below are the specific details of the PBX and gateways used in the testing to construct the following documentation.
 Dialogic Media Gateway Installation and Configuration Integration Note 1. Scope This document is intended to detail a typical installation and configuration of Dialogic 2000 Media Gateway Series (DMG2000)
Blue Coat ProxySG First Steps Solution for Controlling HTTPS SGOS 6.7
 Blue Coat ProxySG First Steps Solution for Controlling HTTPS SGOS 6.7 Legal Notice Copyright 2018 Symantec Corp. All rights reserved. Symantec, the Symantec Logo, the Checkmark Logo, Blue Coat, and the
Best Practices for Security Certificates w/ Connect
 Application Note AN17038 MT AppNote 17038 (AN 17038) September 2017 Best Practices for Security Certificates w/ Connect Description: This Application Note describes the process and best practices for using
8 Digital Station Lines
 Dialogic Media Gateway Installation and Configuration Integration Note 1. Scope This document is intended to detail a typical installation and configuration of a Dialogic Media Gateway when used to interface
Configure DNA Center Assurance for Cisco ISE Integration
 Configure DNA Center Assurance for Cisco ISE Integration If your network uses Cisco ISE for user authentication, you can configure DNA Center Assurance for Cisco ISE integration. This will allow you to
Dialogic System Release 6.0 PCI for Windows
 Dialogic System Release 6.0 PCI for Windows Release Update September 28, 2017 05-2221-108 Copyright and Legal Notice Copyright 2004-2017 Dialogic Corporation. All Rights Reserved. You may not reproduce
DEPLOYMENT GUIDE. SSL Insight Certificate Installation Guide
 DEPLOYMENT GUIDE SSL Insight Certificate Installation Guide Table of Contents Introduction...3 Generating CA Certificates for SSL Insight...3 Importing a CA Certificate and Certificate Chain onto the A10
Secure IIS Web Server with SSL
 Publication Date: May 24, 2017 Abstract The purpose of this document is to help users to Install and configure Secure Socket Layer (SSL) Secure the IIS Web server with SSL It is supported for all EventTracker
UCON-IP-NEO Operation Web Interface
 UCON-IP-NEO Operation Web Interface copyright G&D 25/01/2012 Web Interface version 2.30 Subject to possible errors and technical modifications License notes G&D license Copyright G&D GmbH 2003-2012: All
Cloud Access Manager How to Configure for SSO to SAP NetWeaver using SAML 2.0
 Cloud Access Manager 8.1.3 How to Configure for SSO to SAP Copyright 2017 One Identity LLC. ALL RIGHTS RESERVED. This guide contains proprietary information protected by copyright. The software described
Dialogic Host Media Processing Software Release 3.1LIN
 Dialogic Host Media Processing Software Release 3.1LIN Software Installation Guide January 2009 05-2598-002 Copyright and Legal Notice Copyright 2007-2009,. All Rights Reserved. You may not reproduce this
Blue Coat Security First Steps Solution for Controlling HTTPS
 Solution for Controlling HTTPS SGOS 6.5 Legal Notice Copyright 2017 Symantec Corp. All rights reserved. Symantec, the Symantec Logo, the Checkmark Logo, Blue Coat, and the Blue Coat logo are trademarks
Dialogic PowerMedia IP Media Server Release 3.1.0
 Dialogic PowerMedia IP Media Server Release 3.1.0 Application Developer s Guide February 2011 64-0531-02 www.dialogic.com Copyright and Legal Notice Copyright 2000-2011 Dialogic Inc. All Rights Reserved.
Dialogic Multimedia API
 Dialogic Multimedia API Library Reference March 2008 05-2454-001_D Copyright 2005-2008. All rights reserved. You may not reproduce this document in whole or in part without permission in writing from.
Listed below are the specific details of the PBX and gateways used in the testing to construct the following documentation.
 Dialogic Media Gateway Installation and Configuration Integration Note 1. Scope This document is intended to detail a typical installation and configuration of Dialogic 2000 Media Gateway Series (DMG2000)
Cisco Expressway with Jabber Guest
 Cisco Expressway with Jabber Guest Deployment Guide First Published: Decemeber 2016 Cisco Expressway X8.9 Cisco Jabber Guest Server 10.6.9 (or later) Cisco Systems, Inc. www.cisco.com Contents Preface
Cisco TelePresence Conductor with Cisco Unified Communications Manager
 Cisco TelePresence Conductor with Cisco Unified Communications Manager Deployment Guide XC2.2 Unified CM 8.6.2 and 9.x D14998.09 Revised March 2014 Contents Introduction 4 About this document 4 Further
Polycom RealPresence Access Director System
 Release Notes Polycom RealPresence Access Director System 4.0 June 2014 3725-78700-001D Polycom announces the release of the Polycom RealPresence Access Director system, version 4.0. This document provides
Connectware Manager Getting Started Guide
 Connectware Manager Getting Started Guide 90000699_B 2004, 2005 Digi International Inc. Digi, Digi International, the Digi logo, the Digi Connectware log, the Making Device Networking Easy logo, Digi
Dialogic Multimedia API
 Dialogic Multimedia API Library Reference August 2007 05-2454-002 Copyright 2005-2007, Dialogic Corporation. All rights reserved. You may not reproduce this document in whole or in part without permission
VIRTUAL GPU LICENSE SERVER VERSION , , AND 5.1.0
 VIRTUAL GPU LICENSE SERVER VERSION 2018.10, 2018.06, AND 5.1.0 DU-07754-001 _v7.0 through 7.2 March 2019 User Guide TABLE OF CONTENTS Chapter 1. Introduction to the NVIDIA vgpu Software License Server...
VMware AirWatch Content Gateway Guide for Linux For Linux
 VMware AirWatch Content Gateway Guide for Linux For Linux Workspace ONE UEM v9.7 Have documentation feedback? Submit a Documentation Feedback support ticket using the Support Wizard on support.air-watch.com.
Contents Overview... 5 Upgrading Primavera Gateway... 7 Using Gateway Configuration Utilities... 9
 Gateway Upgrade Guide for On-Premises Version 17 August 2017 Contents Overview... 5 Downloading Primavera Gateway... 5 Upgrading Primavera Gateway... 7 Prerequisites... 7 Upgrading Existing Gateway Database...
Cisco TelePresence Conductor with Unified CM
 Cisco TelePresence Conductor with Unified CM Deployment Guide TelePresence Conductor XC3.0 Unified CM 10.x Revised February 2015 Contents Introduction 5 About this document 5 Related documentation 5 About
Installation Guide. EventTracker Enterprise. Install Guide Centre Park Drive Publication Date: Aug 03, U.S. Toll Free:
 EventTracker Enterprise Install Guide 8815 Centre Park Drive Publication Date: Aug 03, 2010 Columbia MD 21045 U.S. Toll Free: 877.333.1433 Abstract The purpose of this document is to help users install
Rapid Recovery License Portal Version User Guide
 Rapid Recovery License Portal Version 6.1.0 User Guide 2017 Quest Software Inc. ALL RIGHTS RESERVED. This guide contains proprietary information protected by copyright. The software described in this guide
MARWATCH INSTALLATION AND UPGRADE GUIDE
 MARWATCH INSTALLATION AND UPGRADE GUIDE For Service Providers RELEASE 5.0 Introduction Notice The information contained in this document is believed to be accurate in all respects but is not warranted
LifeSize Control Installation Guide
 LifeSize Control Installation Guide January 2009 Copyright Notice 2005-2009 LifeSize Communications Inc, and its licensors. All rights reserved. LifeSize Communications has made every effort to ensure
1.0. Quest Enterprise Reporter Discovery Manager USER GUIDE
 1.0 Quest Enterprise Reporter Discovery Manager USER GUIDE 2012 Quest Software. ALL RIGHTS RESERVED. This guide contains proprietary information protected by copyright. The software described in this guide
Copyright. Trademarks. Warranty. Copyright 2018 YEALINK (XIAMEN) NETWORK TECHNOLOGY
 NETWORK TECHNOLOGY") Copyright Copyright 2018 YEALINK (XIAMEN) NETWORK TECHNOLOGY Copyright 2018 Yealink (Xiamen) Network Technology CO., LTD. All rights reserved. No parts of this publication may be reproduced or transmitted
Copyright Copyright 2018 YEALINK (XIAMEN) NETWORK TECHNOLOGY Copyright 2018 Yealink (Xiamen) Network Technology CO., LTD. All rights reserved. No parts of this publication may be reproduced or transmitted
Version Installation Guide. 1 Bocada Installation Guide
 Version 19.4 Installation Guide 1 Bocada Installation Guide Copyright 2019 Bocada LLC. All Rights Reserved. Bocada and BackupReport are registered trademarks of Bocada LLC. Vision, Prism, vpconnect, and
271 Waverley Oaks Rd. Telephone: Suite 206 Waltham, MA USA
 Contacting Leostream Leostream Corporation http://www.leostream.com 271 Waverley Oaks Rd. Telephone: +1 781 890 2019 Suite 206 Waltham, MA 02452 USA To submit an enhancement request, email features@leostream.com.
Pexip Infinity and Google Cloud Platform Deployment Guide
 Pexip Infinity and Google Cloud Platform Deployment Guide Contents Introduction 1 Deployment guidelines 2 Configuring your Google VPC network 4 Obtaining and preparing disk images for GCE Virtual Machines
Oracle Insurance Rules Palette
 Oracle Insurance Rules Palette Security Guide Version 10.2.0.0 Document Part Number: E62439-01 August, 2015 Copyright 2009, 2015, Oracle and/or its affiliates. All rights reserved. Trademark Notice Oracle
Veritas Desktop and Laptop Option Mac Getting Started Guide
 Veritas Desktop and Laptop Option 9.3.1 Mac Getting Started Guide 20-Nov-18 The software described in this document is furnished under a license agreement and may be used only in accordance with the terms
IMPORTANT NOTE. Dialogic Brooktrout SR140 Fax Software with ShoreTel Gateway. Installation and Configuration Integration Note
 Dialogic Brooktrout SR140 Fax Software with ShoreTel Gateway IMPORTANT NOTE This document is not to be shared with or disseminated to other third parties, in whole or in part, without prior written permission
MSE System and Appliance Hardening Guidelines
 MSE System and Appliance Hardening Guidelines This appendix describes the hardening of MSE, which requires some services and processes to be exposed to function properly. This is referred to as MSE Appliance
Setting up Quest QoreStor as an RDA Backup Target for NetVault Backup. Technical White Paper
 Setting up Quest QoreStor as an RDA Backup Target for NetVault Backup Technical White Paper Quest Engineering June 2018 2018 Quest Software Inc. ALL RIGHTS RESERVED. THIS WHITE PAPER IS FOR INFORMATIONAL
Dialogic PowerMedia IP Media Server
 The Dialogic PowerMedia IP Media Server is a robust softwarebased multimedia server that allows service providers to rapidly deliver cost-effective video solutions with a high-quality user experience over
Quest VROOM Quick Setup Guide for Quest Rapid Recovery for Windows and Quest Foglight vapp Installers
 Quest VROOM Quick Setup Guide for Quest Rapid Recovery for Windows and Quest Foglight vapp Installers INTRODUCTION Setup of Quest VROOM requires installation of Rapid Recovery and Foglight for Virtualization
Getting Started with the VQE Startup Configuration Utility
 CHAPTER 2 Getting Started with the VQE Startup Configuration Utility This chapter explains how to use the Cisco VQE Startup Configuration Utility to perform the initial configuration tasks needed to get
Veritas Deployment Manager User's Guide
 Veritas Deployment Manager User's Guide Last updated: 2017-10-03 Legal Notice Copyright 2017 Veritas Technologies LLC. All rights reserved. Veritas and the Veritas Logo are trademarks or registered trademarks
Scopia XT Desktop Server
 Scopia XT Desktop Server Deployment Guide Version 8.2.1 For Solution 8.2 8.2.1 2000-2013 RADVISION Ltd. All intellectual property rights in this publication are owned by RADVISION Ltd and are protected
 Trend Micro Incorporated reserves the right to make changes to this document and to the products described herein without notice. Before installing and using the product, please review the readme files,
akkadian Global Directory 3.0 System Administration Guide
 akkadian Global Directory 3.0 System Administration Guide Updated July 19 th, 2016 Copyright and Trademarks: I. Copyright: This website and its content is copyright 2014 Akkadian Labs. All rights reserved.
Brochure. Dialogic BorderNet Session Border Controller Solutions
 Dialogic BorderNet Session Border Controller Solutions Dialogic BorderNet Solutions Supercharge Connections between Networks, Services and Subscribers with Ease and Scale The BorderNet family of session
IMPORTANT NOTE. Dialogic Brooktrout SR140 Fax Software with 3Com VCX V7000 IP PBX Platform. Installation and Configuration Integration Note
 Dialogic Brooktrout SR140 Fax Software with 3Com VCX V7000 IP PBX Platform IMPORTANT NOTE This document is not to be shared with or disseminated to other third parties, in whole or in part, without prior
VMware Horizon View Deployment
 VMware Horizon View provides end users with access to their machines and applications through a unified workspace across multiple devices, locations, and connections. The Horizon View Connection Server
Configuring SSL. SSL Overview CHAPTER
 7 CHAPTER This topic describes the steps required to configure your ACE appliance as a virtual Secure Sockets Layer (SSL) server for SSL initiation or termination. The topics included in this section are:
Oracle Cloud Using the Evernote Adapter. Release 17.3
 Oracle Cloud Using the Evernote Adapter Release 17.3 E69234-07 September 2017 Oracle Cloud Using the Evernote Adapter, Release 17.3 E69234-07 Copyright 2016, 2017, Oracle and/or its affiliates. All rights