P a g e 0. CIDRZ Website Manual.
|
|
|
- Vanessa Whitehead
- 5 years ago
- Views:
Transcription
1 P a g e CIDRZ Website Manual
2 Manual Contents 1. Overview... 2 Getting Started... 2 The Frontend... 2 The Backend Managing the website... 4 Adding & editing pages... 4 Changing home page elements... 9 Adding & editing leadership and board members Adding & editing Publications Showing publications on the website Changing Website Title and other Website Settings Changing the Logo and Website Colors Adding & editing sidebars Changing number of displayed Publications, News and Blog items Changing footer address and contact information Adding & editing news Changing home page slideshow pictures and text Changing your password and passwords of other users Adding Contributors & Moderating Contributed Publications and Articles Adding Subscribers & Editors Resizing images for website use Technical and programming information Plugins Google Analytics Theme CSS customizations More help P a g e
 and you will see the following: The Frontend Fig 1.")
3 1. Overview The CIDRZ website is developed using WordPress Thus making changes and additions to the website is relatively easy and you don t need to have any technical skills. Getting Started Browse to the site address ( and you will see the following: The Frontend Fig 1.1 Home page The site displayed above is what all visitors to the site see and is called the front end. The Backend If you however need to change something on the site like adding a publication, an additional page or news article, you need to login to the backend, an area which only administrators can see. The backend is password protected to prevent illegal changes to the website. To access the backend for the website, go to you will see the familiar WordPress login page: 2 P a g e

4 Fig 1.2 Login Screen Please use the password and username provided to you by ICT. Once logged in, you will see the following, which is the WordPress backend. You will spend most of your time here when making changes and additions to the website. 3 P a g e

5 Fig 1.3 Backend 2.0 Managing the website To manage the website, go to the backend of the site. You will need to provide your password and username. Adding & editing pages Pages are a very important part of the website. To add and edit pages, select the Pages tab in the Dash Board. 4 P a g e

6 Fig 1.4 Pages To add a new page, simply click on Add New on top of the pages list. To edit an already existing page, simply click on its name. When editing or adding a page, you will see the following: 5 P a g e
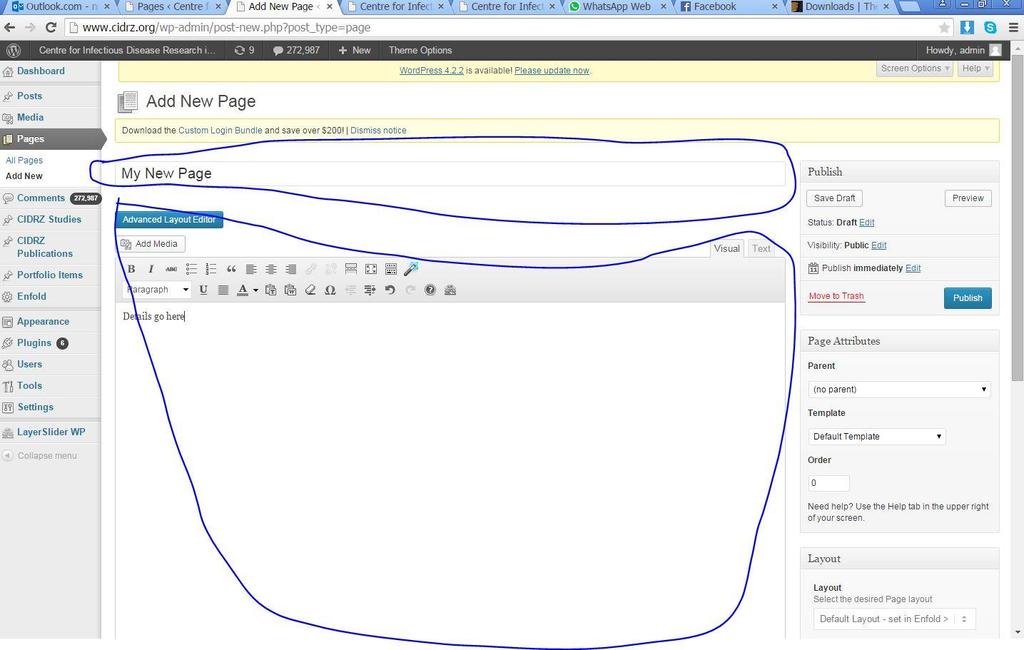
7 6 P a g e

8 Fig 1.5 Adding and Editing Pages You can type all your page content in the editor above. You can even format your text and add images to the content by clicking on Add Media. Formatting the content can sometimes be difficult thus you are advised to simply write your content in Word and then use the Paste From Word button to paste the contents. The contents will look just like the way it looks in Word. On LAYOUT, you can choose if the page will have left side bar, right side bar, both or no sidebar at all. If you choose a sidebar for the page, you must select a sidebar which will be displayed. Important Do not try to set font colors or styles manually, when editing a page or a post. Simply select some text and select what type of item it is like below: For a paragraph, select the text and choose paragraph 7 P a g e

9 For headings, choose H1, H2, H3, H4 or H5 8 P a g e

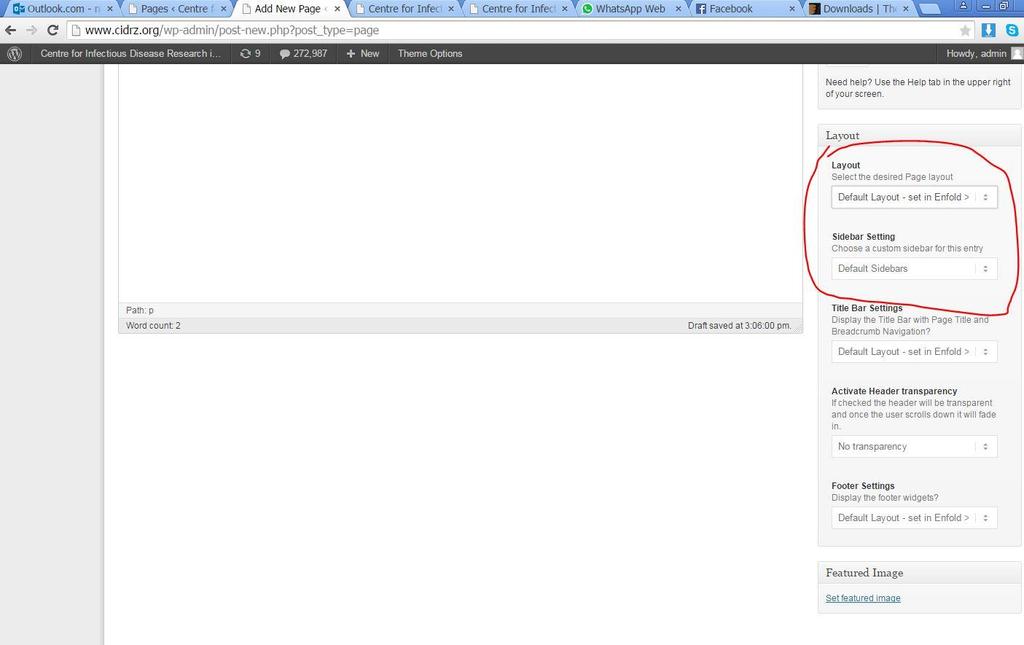
10 This is very important for consistency on the website and maintenance of the site. The appearance of things like paragraphs and headings is defined in one place in Cascading Style Sheets. Using this method allows you to instantly change the look of the entire site easily. If you manually set colors and fonts on each page, you have to edit all the pages on the site if you decide to change the colors or font which is both difficult and impractical. Changing home page elements The home page for the website is as follows: The highlighted section is a promo box, you edit this section by editing the home page. In the backend, the home page looks as follows: 9 P a g e

11 Click in the highlighted region and the following window will popup 10 P a g e
12 You type in the contents in the highlighted section. See the adding pages section for more details on editing content in the provided editor. Once you provide the contents, you have to specify options for this promo box as shown below: You can specify whether to show the button and set a link for this button. When done click Save. The Icon Boxes are displayed just below the promo box as shown: 11 P a g e

13 Similar to the promo box, you can edit the contents in each of the icon box for simply clicking on it. 12 P a g e


14 Scroll down for more options: Make the required changes and when done click Save. 13 P a g e
15 You can also edit the sections highlighted above by simply clicking on them. For the YouTube video, the process is similar but a bit different Clicking the video will play it instead of allowing you to change it so click on the location shown below: 14 P a g e

16 When the small window opens, click on Text to view the code behind the video. From here you can change the URL of the video to something else. Please just edit the URL, do not change the other parts of that text. 15 P a g e

17 Adding & editing leadership and board members The leadership team and board members pages show the photo, position and name of all members in the leadership team and board respectively as shown below This page is very similar to the page for board members and they are created the same way. 16 P a g e

18 In the backend the leadership team page appears as follows You can remove a person by clicking on the X (highlighted in blue). When adding a new person, the recommended action is to duplicate an existing person by clicking on the clone button 17 P a g e
19 (highlighted in red) so that you don t have to specify all the settings and formatting. This also helps keep the website consistent. You can move people around by simply dragging to the required position. To edit a person, click on their photo. The following window will open You can specify their photo and position and also select an image for their portrait. The portrait must have a resolution of 250 X 300. Lastly you need to specify the page that will be opened when someone clicks on this persons portrait. The page is normally a profile for this person. Yu therefore need to create the page for the profile first before coming to this section. The profile page looks like the following: 18 P a g e


20 In the backend, it appears as follows: 19 P a g e
21 As with other sections of the website, always duplicate an existing item when creating a new one. Thus to create a new profile, open an existing profile and copy all its contents then edit as required. This helps keep the website consistent. To specify a profile page, scroll down to the highlighted section below: Click to open the following window 20 P a g e

22 Change the URL to the profile page of the person. When done click save on all the windows you opened. To make changes active on the website, you must also click update to finally submit the changes to the website. Adding & editing Publications To add or manage the publications on the site, go to CIDRZ Publications 21 P a g e

23 From here you can add, delete update all the publications on the site. To add a new publication, click Add New Publication. To edit an existing one, click its title to open it. 22 P a g e

24 Provide all the details for the publication. 23 P a g e


25 You can enter the abstract above. When you set Featured to Yes, the publication will appear on the home page of the website as shown below: 24 P a g e

26 The website only shows two publications on the home page which have been recently published so the publication will eventually fall off as more are published and marked featured. You can change how many are displayed by going to widgets After you have provided all the required details for the publication, you have to click Publish. This will add the publication to the website. If it s featured, it will show on the home page as well. You can see publications here: 25 P a g e

27 Showing publications on the website See the relevant sections on how to add pages and articles. On any page or article you can type a certain code to display publications. This code is called a shortcode and is as follows: [cidrzpublications year='2015'] This will display all the publications in the year You can change the year to whatever you like. If you open the page for 2015 publications, you will see the following on the site: 26 P a g e


28 However in the backend this page appears like this: 27 P a g e

29 Changing Website Title and other Website Settings To change the title of the website and other settings, go to Settings Click Save Changes when done. 28 P a g e

30 Changing the Logo and Website Colors The website uses a customized premium theme called Enfold which allows you to change the logo and some website colors without any programming. Please note that the layout and appearance of the Enfold theme used on the CIDRZ website has been heavily modified through porgramming to fit CIDRZ s corpoarte image and brand and changing colors here is not recommended as it may yield unexpected results which damage the layout of the website. To change the logo, click Upload as highlighted above. The following window will open which allows you to easily upload an image from your computer using drag and drop. 29 P a g e

31 For good results, the image you upload must have a resolution of 200 X 100. The logo will blend in nicely with the website if it has a transparent background. Only PNG and GIF files support transparent backgrounds. Adding & editing sidebars To create a sidebar, you have to go to Appearance > Widgets. Under Enfold Custom Widget Area Type in the sidebar name, then click Add Widget Area. 30 P a g e
: 1.")
32 To add items to this sidebar, simply expand the sidebar you created and drag and drop items onto it. The items you add to the sidebar is what will be displayed when this sidebar is assigned to a page. Changing number of displayed Publications, News and Blog items For the home page sidebar, we created it follows (see the previous section for details on creating a side bar): 1. Drag the Text widget, don t give it any title, then simply put in a link to the news section of the site. The code for this is <a href=" <strong>more News ></strong></a> 2. Drag the Enfold Latest News widget, give it a title of News, set it to show the Latest News and Announcements categories and a maximum of 4 items See below image for guidance: 31 P a g e


33 Once you are done with your side bar, you choose it when you are creating a page. See the Adding Pages section for more details. 32 P a g e

34 Therefore to change how many news and announcement items are displayed, you have to come here again and simply change the entries to another number. For publications and blog, they are displayed as follows on the site 33 P a g e

35 You change how many are displayed for both items on the same widgets page. Expand the ShortCodes sidebar and change the numbers accordingly as shown below: 34 P a g e


36 Changing footer address and contact information The contact information is displayed in the footer of the website as shown below: 35 P a g e

37 You can edit this information by expanding the footer columns in the widget section. The footer sections are in the columns 1 to 4 as shown below: Simply expand them and you will have access to the text and you can edit them accordingly. Please note that the text may contain some programming codes such <strong>cidrz Head Office</strong>. Simply edit the text parts such as CIDRZ Head Office. Do not change the programming codes or remove them unless you are familiar with HTML/CSS. 36 P a g e

38 Adding & editing news Posts represent all the articles on the website. The News section on the site is simply a group of posts. To manage your news articles and blog, g to Posts 37 P a g e


39 From here you delete by simply resting your mouse over it and clicking Trash To add a post, click Add New and fill in your contents. To edit, simply click on the Post The editor is similar to what you see when adding a page. 38 P a g e


40 To set a preview picture for the article, simply select the featured image and that will be the thumbnail image for the post. This will open the Set Featured Image dialog shown below: 39 P a g e

41 From here you can select an image from your library or upload new ones. When done select the image and click Set featured image. Any images you upload will be available to you in future and you don t need to upload them again. The category you select for a post is very important. This how the website knows whether the post you are adding is a blog, an announcement or a news item. You select categories by simply selecting the corresponding check box as shown below. You can select more than one category. Changing home page slideshow pictures and text The slideshow on the home page is simply a group of images that fade into one other. To add or edit the images or captions, Go to LayerSlider WP. 40 P a g e

42 If you want to add a new slideshow. You can remove or add new slideshows here. Adding a new slideshow can be technical as there are many settings you need to understand and change. The easier option is to duplicate an existing slide and simply edit it. This way you don t have to provide any of the settings. To show a slideshow on a page, simply type its shortcode on a page or post where you want the slideshow to appear. For example the shortcode for the Home Slider is [layerslider id="1"]. If you simply want to edit the existing slideshow on your site Click on Enfold - most beautiful theme ever (highlighted above), you see the following: 41 P a g e

43 You can select the background image for the image above. The image must have a resolution 1600 x 470 Slide delay means how much time in milliseconds this slide will be displayed. 1 second = 1000 milliseconds so if you wanted the slide to display for 9 seconds, put The slideshow has three components you would want to change. You access these under Layers for each slide. The heading 42 P a g e

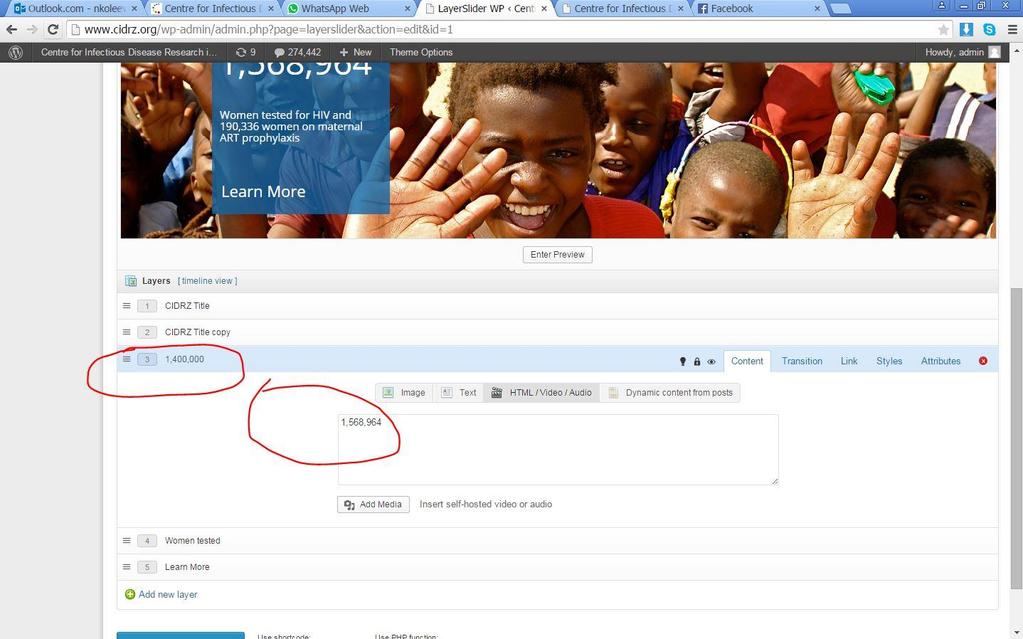
44 The number 43 P a g e

45 The text The text has programming components (such as <h3>, <br/>, etc.) and these must not be removed. Just edit the text parts. The <br/> programming component is used to force text to go to a new line so that it doesn t go outside the blue section on the slide. You can use it too simply write <br/>. The Learn More text 44 P a g e

46 If you are adding a new slide. Adding a slide can also be technical in that on the website the slides look and behave the same when they are not connected in any way. This has been achieved by making items have the same locations, dimensions and animations. Therefore you should always duplicate an existing slide then change its background image and text components as shown above. Styling of the various components on the slides and their animations and timing is beyond the scope of this manual. Changing your password and passwords of other users To update your password or passwords of other users, go to Users 45 P a g e


47 From here you can select an account to update its password. You can also delete and create accounts and change their account role which limits what they can do on the site. To change the password, click on an account. 46 P a g e

48 From the above page, you can update the password and other details of the account. When done click Update Profile Adding Contributors & Moderating Contributed Publications and Articles To add a user who can submit publications and articles, create a user account for them. Make sure that their role is set to Contributor as shown below. The roles are as follows: 1. Administrator This is only for admins. A person with this account can change anything on the site 2. Editor This person can create and approve publications or news submitted by contributors and authors. 3. Author This person can submit publications and articles but they can t edit those of other users. 4. Contributor - This person can submit publications and articles on the site but an Editor or Administrator needs to approve them before they show on the site. 5. Subscriber This person can only receive updates when you add publications and articles, they cannot create anything. Adding Subscribers & Editors Please see the previous section for more details on this. 47 P a g e

49 Resizing images for website use Most images you will be uploading to the website will probably come from a digital camera or the internet. You might be tempted to upload high resolution pictures to the website however you should note that these pictures not only make the website load very slowly but also make it incompatible with users who may be using phones and other smaller devices to access your website. Therefore uploading images to the website, do the following 1. Inspect the pictures properties on your computer 2. From the above you can see that this image is approximately 7MB and has a resolution of 4752 x 3168 pixels. This is not suitable for websites; images you upload should be at most 300KB. If possible less than120kb is even much better. For resolution, the recommended dimensions is 640 x 480 which provides good quality pictures at reasonable file sizes which won t take ages to load. 3. How would you resize the resolution and file size? You just need to reduce the resolution and the file size will automatically reduce. If your image is already close to the recommended file size and resolution then you don t need to edit it. You can upload it as is. 4. If you have Microsoft Office installed on your computer follow these steps 48 P a g e


50 5. Right click the image and choose Open With > Microsoft Office 6. Microsoft Office Picture Tools will open 49 P a g e

51 7. Click on Edit Pictures 8. Photo editing tools will show up, click Resize 9. If you have predefined sizes choose Web Large (640 x 480). If you don t then manually enter 640 X 480. If your picture appears stretched either vertically or horizontally then it might have a different aspect ratio, in this case use the Percentage of original width x height option, keep changing the percentage until the new width is close to P a g e


52 10. When done click OK, make sure you use the Save As option so that you don t overwrite the original image. 11. Observe our new image now 12. This file size and resolution is now suitable for use on a website. You can proceed and upload this image to the website now. 13. There are many tools you can use in the program abobe, you can adjust brightness, crop images and do so much more 51 P a g e

53 4. Technical and programming information Plugins The website only uses one custom plugin which is the plugin for publications. Disabling or removing the plugin will disable all the publications on the site. Should you have problems with publications make sure the plugin is activated The rest of the publications are third party and details about them can be found on their respective website. Google Analytics The code for Google Analytics is specified on the page for the website theme: Enfold. You can change it to something else if you intend on using a different account with the website. 52 P a g e

54 Theme CSS customizations The files which have been modified to customize the theme can be found in /wp-content/themes/enfold/css Please use the inspect element feature found in most recent browsers today such as Google Chrome when attempting to customize the CSS for the website as shown below: 53 P a g e

55 This will help you know which CSS file contains the CSS markup you want to update. Some files such as Enfold.css are dynamic CSS files which are created on the fly. To edit the CSS produced by such files, edit the PHP version of the file such as Enfold.css.php. Always make backups of CSS and PHP files before editing them as these can damage the website if not edited correctly. 5. More help If you have any problems with the site and need help, do not hesitate to contact ICT Help Desk The site uses several third party components like Enfold theme, LayerSlider, etc. If you want more information about how to use third party components, please consult their respective websites. For more detailed information about how to upload images, change your password; change the website name, etc. Please visit the WordPress official site at: The version of WordPress used on the website is Please don t hesitate to ask for help and clarification concerning the website, its features or this user manual. 54 P a g e
56 User Manual prepared by Nkole Evans 55 P a g e
WordPress Manual For Massachusetts Academy of Math and Science
 WordPress Manual For Massachusetts Academy of Math and Science September 19, 2017 Table of Contents Who should use this manual... 4 Signing into WordPress... 4 The WordPress Dashboard and Left-Hand Navigation
Doing More with WordPress
 Doing More with WordPress This document gives an overview of the different ways you can improve the appearance and functionality of your website using features built-in to WordPress as well as the plugins
WPI Project Center WordPress Manual For Editors
 WPI Project Center WordPress Manual For Editors April 17, 2015 Table of Contents Who should use this manual... 3 Signing into WordPress... 3 The WordPress Dashboard and Left-Hand Navigation Menu... 4 Adding
Installation and Activation of Foody pro theme
 Installation and Activation of Foody pro theme Installation 1. Install Word Press from http://codex.wordpress.org/installing_wordpress. 2. Upload via Word press Admin: - Go to your WordPress admin panel,
ifeature Pro Documentation for ifeature v1.1.2 (last updated 5/04/2011)
") 1 ifeature Pro Documentation for ifeature v1.1.2 (last updated 5/04/2011) TABLE OF CONTENTS: if Topic Page(s) Installing ifeature Pro 2 Updating ifeature Pro 3 Using the Menu 4 ifeature Pro Layout Templates
1 ifeature Pro Documentation for ifeature v1.1.2 (last updated 5/04/2011) TABLE OF CONTENTS: if Topic Page(s) Installing ifeature Pro 2 Updating ifeature Pro 3 Using the Menu 4 ifeature Pro Layout Templates
HostPress.ca. User manual. July Version 1.0. Written by: Todd Munro. 1 P age
 HostPress.ca User manual For your new WordPress website July 2010 Version 1.0 Written by: Todd Munro 1 P age Table of Contents Introduction page 3 Getting Ready page 3 Media, Pages & Posts page 3 7 Live
Kinetika. Help Guide
 Kinetika Help Guide 1 Hope you enjoy Kinetika theme! 3 Table of Contents Important Links 6 Theme Options - Setting Up Logo 26 Cover Photos 44 Applying Revolution Slider Slides 71 Important Notes 7 Logo
Wordpress Training Manual
 The Dashboard... 2 If this is your first time logging in:... 2 How do I change my password or email address?... 3 Search Engine Optimization (SEO)... 4 SEO for Pages... 4 SEO for Images... 5 Managing Pages...
LizardThemes.com Free & Premium WordPress Themes. LizardThemes. User Guide. First Edition
 LizardThemes.com Free & Premium WordPress Themes LizardThemes User Guide First Edition Online version: http://lizardthemes.com/documentation/ 2013 Contents Chapter 1 How to start... 3 Chapter 2 Theme Settings...
Web Site User Manual
 www.dktinternational.org Web Site User Manual Last edited 12/18/2011 ACCESS TO EDIT WEB SITE CONTENT Logging in The access URL to edit pages is: http://www.dktinternational.org/wp-admin All userid information
Classroom Blogging. Training wiki:
 Classroom Blogging Training wiki: http://technologyintegrationshthornt.pbworks.com/create-a-blog 1. Create a Google Account Navigate to http://www.google.com and sign up for a Google account. o Use your
CUPA-HR Chapters: WordPress Reference Guide
 CUPA-HR Chapters: WordPress Reference Guide Table of Contents How to Log In to WordPress... 1 How to Create a Page in WordPress... 2 Editing a Page in WordPress... 5 Adding Links in WordPress... 6 Adding
While editing a page, a menu bar will appear at the top with the following options:
 Page Editor ===> Page Editor How Can I Use the Page Editor? The Page Editor will be your primary way of editing your website. Page Editor Basics While editing a page, you will see that hovering your mouse
Surface Documentation
 Surface Documentation A fully responsive magazine and blogging WordPress theme credit... Surface is a fully responsive magazine and blogging WordPress theme, built in a timeless and dynamic style. Surface
To upgrade to ifeature Pro visit:
 1 ifeature Free Documentation for ifeature v1.0.7 (last updated 4/26/2011) TABLE OF CONTENTS: Topic Page(s) Installing ifeature 2 Templates and Widgets 3 imenu 4 ifeature Settings 5 General Settings 6
How to use WordPress to create a website STEP-BY-STEP INSTRUCTIONS
 How to use WordPress to create a website STEP-BY-STEP INSTRUCTIONS STEP 1:Preparing your WordPress site Go to the Dashboard for your new site Select Appearance > Themes. Make sure you have Activated the
Logging Into Your Site
 This training document is meant as a step-by-step guide to creating and delivering a UW-Madison site in the current UW-Madison theme. In this training class, you will learn how to log in to access your
The Veranda House WORDPRESS MANUAL O ROURKE HOSPITALITY MARKETING OROURKEHOSPITALITY.COM
 The Veranda House WORDPRESS MANUAL TABLE OF CONTENTS Login... 3 Editing Existing Pages... 4 Adding New Pages... 6 Editing a Room Post... 7 Editing a Packages Post... 9 Editing/Adding Text... 11 Creating
New Website User Manual
 New Website User Manual General Notes 3 How To Login To Your Website And Access Admin Dashboard 4 Adding / Editing Sliders 5 Home Slider 5 School Slider (Same steps for ALL school pages) - Add a Slide
Theme System: It allows modifying the site view and functionality. It includes images, stylesheet, template files and custom pages.
 WORDPRESS BASICS Contents WordPress - Overview... 2 WordPress - Dashboard... 4 WordPress - Categories... 6 WordPress - Posts... 7 WordPress - Media Library... 8 WordPress - Links... 9 Master Slider...
Setting up your WordPress blog CS4031
 1. Sign up for a wordpress.com (not a wordpress.org) account. 2. Please use your real name (or a derivative of it), or your brand identity. Your blog address will be name.wordpress.com For example, mine
Creating a Website with Wordpress
 Creating a Website with Wordpress Wordpress Fundamentals Version 1.6 Fayette County Public Schools June 28, 2013 Sow-Foong Hedman Technology Web Team Contents What is Wordpress?... 4 Overview... 4 Key
Starting Your SD41 Wordpress Blog blogs.sd41.bc.ca
 Starting Your SD41 Wordpress Blog blogs.sd41.bc.ca The web address to your blog starts with blogs.sd41.bc.ca/lastnamefirstinitial (eg. John Smith s blog is blogs.sd41.bc.ca/smithj) All work is done in
BindTuning Installations Instructions, Setup Guide. Invent Setup Guide
 BindTuning Installations Instructions, Setup Guide Invent Setup Guide This documentation was developed by, and is property of Bind Lda, Portugal. As with any software product that constantly evolves, our
WordPress How to Create a Simple Image Slider with the New RoyalSlider
 WordPress How to Create a Simple Image Slider with the New RoyalSlider Last update: 2/20/2013 WARNING: DO NOT USE INTERNET EXPLORER you can use Firefox, Chrome, or Safari but the editing screens do not
A Guide to Using WordPress + RAVEN5. v 1.4 Updated May 25, 2018
 + v 1.4 Updated May 25, 2018 Table of Contents 1. Introduction...................................................................................3 2. Logging In.....................................................................................4
UIS Office of Web Services Documentation. WordPress User Guide. WordPress User Guide 8/31/17 Page 1 of 13
 UIS Office of Web Services WordPress User Guide WordPress User Guide 8/31/17 Page 1 of 13 UIS Office of Web Services WordPress User Guide Prepared by Ralph Shank Table of Contents About WordPress 3 Getting
Links Menu (Blogroll) Contents: Links Widget
 Contents: Links Widget") 45 Links Menu (Blogroll) Contents: Links Widget As bloggers we link to our friends, interesting stories, and popular web sites. Links make the Internet what it is. Without them it would be very hard to
45 Links Menu (Blogroll) Contents: Links Widget As bloggers we link to our friends, interesting stories, and popular web sites. Links make the Internet what it is. Without them it would be very hard to
UIS Office of Web Services Documentation. WordPress User Guide. WordPress User Guide 4/17/18 Page 1 of 12
 WordPress User Guide WordPress User Guide WordPress User Guide 4/17/18 Page 1 of 12 Prepared by Ralph Shank Table of Contents About WordPress... 3 Getting Connected to Your Website... 3 Editing and Publishing
gaalliance.org and bap.gaalliance.org Users Guide
 IDENTITY PRINT PUBLISHING WEB Visible Logic, Inc. 142 High Street Suite 615 Portland, ME 04101 207.761.4230 visiblelogic.com gaalliance.org and bap.gaalliance.org Users Guide CONTENTS Introduction 2 Site
School Website WordPress User Guide
 School Website WordPress User Guide version 3.3 Olathe Public Schools USD # 233 2012 Table of Contents Introduction 0 Log into WordPress... 1 Dashboard View... 1 Dashboard Menu Bar.. 2 Pages. 4 New Page
DOCUMENTATION OLAM WORDPRESS THEME
 DOCUMENTATION OLAM WORDPRESS THEME INDEX Theme installation 2 Setting up website 3 Sidebars & widgets 5 Working with EDD 8 Working with Unyson 8 Content Elements 9 Media elements 9 Olam elements 10 Creating
LearnWP 2-day Intensive WordPress Workshop. Dawn Comber, Digital Dialogues Ruth Maude, Dandelion Web Design
 LearnWP 2-day Intensive WordPress Workshop Dawn Comber, Digital Dialogues Ruth Maude, Dandelion Web Design How do I login? Point your browser to your website URL adding wpadmin to the end of the address
User s Guide to MiParque.org
 User s Guide to MiParque.org Columbia College IAM Team 2012 12/9/2012 TABLE OF CONTENTS 1. Logging In / Dashboard 2. Appearance 3. Plugins 4. Users 5. Tools 6. Settings 7. MiIdea (Disqus) 8. Pages 9. Polls
Index. alt, 38, 57 class, 86, 88, 101, 107 href, 24, 51, 57 id, 86 88, 98 overview, 37. src, 37, 57. backend, WordPress, 146, 148
 Index Numbers & Symbols (angle brackets), in HTML, 47 : (colon), in CSS, 96 {} (curly brackets), in CSS, 75, 96. (dot), in CSS, 89, 102 # (hash mark), in CSS, 87 88, 99 % (percent) font size, in CSS,
Bluehost and WordPress
 Bluehost and WordPress Your Bluehost account allows you to install a self-hosted Wordpress installation. We will be doing this, and you will be customizing it for your final project. Using WordPress 1.
Getting Started with ShortStack
 Getting Started with ShortStack presented by SHORTSTACK Welcome to ShortStack! This guide covers our platform s five main sections: Tabs, Designer, Media, Templates, and Forms & Promos so that you can
WordPress Tutorial for Beginners with Step by Step PDF by Stratosphere Digital
 WordPress Tutorial for Beginners with Step by Step PDF by Stratosphere Digital This WordPress tutorial for beginners (find the PDF at the bottom of this post) will quickly introduce you to every core WordPress
Rocket Theme. User Guide
 Rocket Theme User Guide This user guide explains all main features and tricks of multifunctional Rocket WordPress Theme. This information will make your work with the theme even easier and more effective.
How To Add/Modify Your Website Content
 How To Add/Modify Your Website Content Table of Contents Log In to your Website & Admin Area... 1 WordPress Dashboard... 2 WordPress Posts & Pages... 3 Add a Post or Page... 4 Edit a Post or Page... 5
NWIC EDITOR GUIDE August 2016
 NWIC EDITOR GUIDE August 2016 THEME NAME: CLEVERCOURSE logging in: GO TO nwic.edu/wp-login.php blogs.nwic.edu/wp-login.php foundation.nwic.edu/wp-login.php Please note that your Username is your full nwic.edu
1.0 Overview For content management, Joomla divides into some basic components: the Article
 Joomla! 3.4.x Training Manual Joomla is an online content management system that keeps track of all content on your website including text, images, links, and documents. This manual includes several tutorials
Portwalk Place WORDPRESS MANUAL O ROURKE HOSPITALITY MARKETING OROURKEHOSPITALITY.COM
 Portwalk Place WORDPRESS MANUAL TABLE OF CONTENTS Login... 3 Editing Existing Pages... 4 Adding New Pages... 7 Editing/Adding Text... 9 Creating a Link... 10 Linking to a PDF... 11 Making a Link a Button...
Drupal Cloud Getting Started Guide Creating a Lab site with the MIT DLC Theme
 Introduction Drupal Cloud Getting Started Guide Creating a Lab site with the MIT DLC Theme In this Getting Started Guide, you can follow along as a website is built using the MIT DLC Theme. Whether you
SharePoint Cheat Sheet
 SharePoint Cheat Sheet Website https://extension.tennessee.edu/countyname User Login utk\netid and password Set Permissions Click Site Actions Site Permissions Click County Owners to see a list of users
Reviewer Plugin. Ultimate Reviews & User Ratings. Version Author: Michele Ivani Reviewer Plugin v. 3.6.
 Reviewer Plugin Ultimate Reviews & User Ratings Version 3.6.0 Author: Michele Ivani Twitter: @Michele_Ivani Reviewer Plugin v. 3.6.0 1 di 15 Index # Getting started 3 Install the plugin 3 Installation
Emmet Next Theme Documentation
 Emmet Next Theme Documentation Updated on May 24, 2018 Quick Start Guide Installation Import sample data Insert API keys Front Page Setup Front Page Customization WordPress Customizer Settings Site identity
Contact at Once Widget..5. Contact Us Widget...5 Contact Info Widget. 6 Dealership Contacts Widget. 6
 Table of Contents Flexible Design Overview. 3 Selecting the Flex Design. 3 Widget Overview. 4 Configuring Widgets..5 Contact at Once Widget..5 Contact Us Widget...5 Contact Info Widget. 6 Dealership Contacts
Drupal User Guide for Authors
 0 Drupal User Guide for Authors SSU WEB CONTENT EDITING Information Technology Services SALEM STATE UNIVERSITY ITS-TRAINING@SALEMSTATE.EDU Author User Guide DRAFT version 2 Author User Guide DRAFT version
USER MANUAL. WeConnect
 USER MANUAL WeConnect Welcome to WeConnect, a user-friendly website builder for your church or organization. WeConnect lets anyone easily create a beautiful, professional website with no programming experience
LUXWINE theme documentation
 LUXWINE theme documentation Introduction Thank you for purchasing my theme. If you have any questions that are beyond the scope of this help file, please feel free to email via my user page contact form
Website/Blog Admin Using WordPress
 Website/Blog Admin Using WordPress Table of Contents How to login... 2 How to get support... 2 About the WordPress dashboard... 3 WordPress pages vs posts... 3 How to add a new blog post... 5 How to edit
Joomla! 2.5.x Training Manual
 Joomla! 2.5.x Training Manual 1 Joomla is an online content management system that keeps track of all content on your website including text, images, links, and documents. This manual includes several
Who should use this manual. Signing into WordPress
 WordPress Manual Table of Contents Who should use this manual... 3 Signing into WordPress... 3 The WordPress Dashboard and Left-Hand Navigation Menu... 4 Pages vs. Posts... 5 Adding & Editing Your Web
NETZONE CMS User Guide Copyright Tomahawk
 NETZONE CMS User Guide Copyright 2015. Tomahawk 1 Phone: + 64 9 522 2333 Email: getintouch@tomahawk.co.nz Tomahawk 2015 www.tomahawk.co.nz 2 NETZONE CMS USER GUIDE WHAT YOU LL FIND INSIDE LOGGING IN 4
Crux. Getting Started. Theme Features. Setting up your store. Setting up the Page templates. Using background images. Working with Sidebars
 Crux Table of Contents Getting Started Installing WordPress Installing the theme Installing the Required Plugins Theme Features Custom Menus Theme Options Serving Retina Images Child Theme Support Setting
Create & Use Your Own Teaching Website BJORN CANDEL FUJAIRAH MEN S COLLEGE
 Create & Use Your Own Teaching Website BJORN CANDEL FUJAIRAH MEN S COLLEGE 2 Go to www.kahoot.it 3 Here are some different ways to communicate with your students and deliver your classes 28 February 2018
User Guide and Theme Setup
 Thank you for purchasing my theme. If you have any questions that are beyond the scope of this help file, please feel free ask any questions on the online Support Forum, located at: http://themewich.com/forum.
UW Oshkosh WordPress Training Manual. June 2015 Integrated Marketing Communications *Updated January 2016
 UW Oshkosh WordPress Training Manual June 2015 Integrated Marketing Communications *Updated January 2016 Table of Contents What is WordPress...3 WordPress Resources...3 Website Best Practices...4 How to
VEGA Version /27/2017
 Version 2.2.1 01/27/2017 Vega Pro Check out the pro version at https://www.lyrathemes.com/vega-pro INSTALLING WORDPRESS INSTALLING THE THEME Using the Administration Panel Using cpanel Manually Using FTP
introduction what you'll learn
 introduction Jetpack is a plugin made by the same people that made Wordpress. By installing Jetpack you add a variety of useful modules to your Wordpress website. To use Jetpack on your website you need
DELIZIOSO RESTAURANT WORDPRESS THEME
 DELIZIOSO RESTAURANT WORDPRESS THEME Created: 06/08/2013 Last Update: 25/10/2013 By: Alexandr Sochirca Author Profile: http://themeforest.net/user/crik0va Contact Email: alexandr.sochirca@gmail.com v.
Imagery International website manual
 Imagery International website manual Prepared for: Imagery International Prepared by: Jenn de la Fuente Rosebud Designs http://www.jrosebud.com/designs designs@jrosebud.com 916.538.2133 A brief introduction
Blogs.mcgill.ca guide
 Blogs.mcgill.ca guide A step-by-step document to blogging at McGill McGill University Table of Contents BLOGGING AT MCGILL...3 BLOGGING IN TEACHING AND LEARNING...3 LOGGING IN TO BLOGS.MCGILL.CA...4 USING
EDUSOCIAL BLOGGING HELP GUIDE. An EduTech Workshop
 EDUSOCIAL BLOGGING HELP GUIDE An EduTech Workshop Copyright EduTech, 2010 All rights reserved. This document may not be reproduced or redistributed by any method, including electronically or by photocopying
Jobmonster Document. by NooTheme
 Jobmonster Document by NooTheme Jobmonster Document GENERAL... 6 Jobmonster Instruction... 6 WordPress Information... 6 Download Theme Package... 6 Requirement For Jobmonster... 7 INSTALLATION... 7 Install
Center for Advanced Research in Drying WordPress Manual
 Center for Advanced Research in Drying WordPress Manual Table of Contents Who should use this manual... 3 Signing into WordPress... 3 Setting up the Home Page... 4 Editing the Home Page Widgets... 5 Sidebar
WEBSITE INSTRUCTIONS. Table of Contents
 WEBSITE INSTRUCTIONS Table of Contents 1. How to edit your website 2. Kigo Plugin 2.1. Initial Setup 2.2. Data sync 2.3. General 2.4. Property & Search Settings 2.5. Slideshow 2.6. Take me live 2.7. Advanced
FrontPage 2000 Tutorial -- Advanced
 FrontPage 2000 Tutorial -- Advanced Shared Borders Shared Borders are parts of the web page that share content with the other pages in the web. They are located at the top, bottom, left side, or right
Using New Google Sites
 Using New Google Sites With the New Google Sites, building websites is easy. Just drag content where you need it. Create a onestop destination for all important information, including videos, images, calendars,
Managing your Website s Content in WordPress
 Managing your Website s Content in WordPress Prepared for Westmont Aged Care Services Ltd 1 December 2016 For further support please contact: Annie O Shea M: 0412 169 664 E: annie@webstrategies.net.au
Cropping an Image for the Web
 Cropping an Image for the Web This guide covers how to use the Paint software included with Microsoft Windows to crop images for use on a web page. Opening Microsoft Paint (In Windows Accessories) On your
INTRODUCTION & BASIC STRUCTURE... 2 PAGES... 3 EDITING A PAGE... 3 BLOG ENTRIES (POSTS)... 5 CREATING A BLOG ENTRY (POST)... 6
... 5 CREATING A BLOG ENTRY (POST)... 6") Contents INTRODUCTION & BASIC STRUCTURE... 2 PAGES... 3 EDITING A PAGE... 3 CREATING A NEW PAGE... 4 PASTING TEXT... 4 EXTERNAL LINKS... 4 LINKING THE PAGE TO A MENU... 5 BLOG ENTRIES (POSTS)... 5 CREATING
Contents INTRODUCTION & BASIC STRUCTURE... 2 PAGES... 3 EDITING A PAGE... 3 CREATING A NEW PAGE... 4 PASTING TEXT... 4 EXTERNAL LINKS... 4 LINKING THE PAGE TO A MENU... 5 BLOG ENTRIES (POSTS)... 5 CREATING
WordPress Quick Reference Guide
 Log In A log In link is available in the global footer at the bottom of all UF Health webpages. You can bookmark this link, as well: http://ahc-webservices.sites.medinfo.ufl.edu/wp-login.php Pages Create:
Documentation English v1
 Documentation English v1 Getting started Navigation menu Theme settings General Features Background Typography Banners Contact details Social Unique selling points Image Sizes Frequently asked questions
MARKET RESPONSIVE PRESTASHOP THEME USER GUIDE
 MARKET RESPONSIVE PRESTASHOP THEME USER GUIDE Version 1.0 Created by: arenathemes Page 1 Contents I. REQUIREMENTS & COMPATIBILITY... 3 II. INSTALLATION... 3 III. CONFIG AFTER INSTALLATION - THEME PACKAGE...
Center for Academic Excellence engaging faculty inspiring learning. WordPress Quick-Reference Manual
 Center for Academic Excellence engaging faculty inspiring learning WordPress Quick-Reference Manual Contents Signing up for a WordPress account... 2 Adding a new blog... 2 Changing the theme of your blog...
GeekLove. An Elegant WordPress Wedding Theme. Thanks for purchasing a theme from Codestag, you re awesome!
 GeekLove An Elegant WordPress Wedding Theme Thanks for purchasing a theme from Codestag, you re awesome! In this document we will cover the installation and use of this theme. If you have any questions
A Quick and Easy Guide To Using Canva
 A Quick and Easy Guide To Using Canva Canva is easy to use and has great tools that allow you to design images that grab anyone s eye. These images can be used on your personal website, Pinterest, and
Joomla Website User Guide
 Joomla Website User Guide www.ardengemcsu.nhs.uk Table of Contents Introduction... 3 Editing pages... 4 Styling content... 5 Hyperlinks... 6 Inserting an image... 7 DOCman... 11 Glossary of terms... 14
JSN UniForm User Manual. Introduction. A simple contact form created by JSN UniForm. JSN UniForm is a Joomla form extension which helps you create
 JSN UniForm User Manual Introduction A simple contact form created by JSN UniForm JSN UniForm is a Joomla form extension which helps you create forms quickly and easily - from normal forms to complex forms.
In this extension to Build and Publish a website we will look at additional/optional features available in Wordpress, and some more Plug-ins.
 Advance your website creation skills using Word Press and take your skills further with this fast paced workshop. Refine current Word Press websites, add additional features and drive more traffic to your
NiCHE Website Posting Guidelines & Best Practices (updated 22 December, 2013)
") NiCHE Website Posting Guidelines & Best Practices (updated 22 December, 2013) Getting oriented Registering for an account The WordPress Dashboard Editing your profile What to do if you ve lost your password
NiCHE Website Posting Guidelines & Best Practices (updated 22 December, 2013) Getting oriented Registering for an account The WordPress Dashboard Editing your profile What to do if you ve lost your password
Creating a Website Using Weebly.com (June 26, 2017 Update)
") Creating a Website Using Weebly.com (June 26, 2017 Update) Weebly.com is a website where anyone with basic word processing skills can create a website at no cost. No special software is required and there
Creating a Website Using Weebly.com (June 26, 2017 Update) Weebly.com is a website where anyone with basic word processing skills can create a website at no cost. No special software is required and there
Basic Content Management Introduction
 Basic Content Management Introduction Logging into the editing process To begin editing your website you use your username and password to access your website's backend. The backend of your website can
Lab 6: WordPress Content Control
 Lab 6: WordPress Content Control () CONTENTS 1 Background... 1 2 In-Lab Work... 1 2.1 files you need... 1 2.2 Setting up... 1 2.3 Widgets... 3 2.4 Plugins to control site function and design... 9 2.5 Adding
SmartTheme Manual 1 Last update: 2017/07/29 OptimizePress
 SmartTheme Manual 1 Last update: 2017/07/29 OptimizePress Copyright 2017 OptimizePress Table of Contents 1. SmartTheme... 1 2. Initial Setup... 2 2.1. Installing The Theme... 3 2.2. Installing & Activating
CreateASite Beginner s Guide
 Contents Getting Started... 3 Access the CreateASite Control Panel... 3 Select a Category/Subcategory... 4 Select a Template... 6 Change the Site Template... 10 Change Colours... 12 Change Fonts... 13
Documentation. Visit the Documentation Online at:
 Documentation Install Plugin Overview Settings How to add and edit entries From Administration Panel Front-end Form How to display them Shortcodes & PHP Function Layout Generator Front-end Form Generator
1 Introduction. Table of Contents. Manual for
 Manual for www.lornasixsmith.com Table of Contents 1Introduction...1 2Log in...2 3Users...2 4What is the difference between pages and posts?...2 5Adding Images to the Media Library...2 6Adding Text to
CAIMS website user guide
 CAIMS website user guide!1 Adding content Posts versus pages The CAIMS site is based on content management system (CMS). CMSs manage the back-end tasks of populating a site with user content from site
DRESSSHOP RESPONSIVE PRESTASHOP THEME USER GUIDE
 DRESSSHOP RESPONSIVE PRESTASHOP THEME USER GUIDE Version 1.0 Created by: arenathemes Page 1 Contents I. REQUIREMENTS & COMPATIBILITY... 3 II. INSTALLATION... 3 III. CONFIG AFTER INSTALLATION - THEME PACKAGE...
Creating an Image Gallery Asset in OU Campus 4/23/15
 Creating an Image Gallery Asset in OU Campus 4/23/15 IMPORTANT: To create a new image gallery, you must first crop all of your images to the same dimensions and save them to a folder on your computer.
WEB 2.0 FOR T&L : SOCIAL MEDIA & BLOG. Wordpress manual. Norah Md Noor Noor Dayana Halim
 WEB 2.0 FOR T&L : SOCIAL MEDIA & BLOG Wordpress manual Norah Md Noor Noor Dayana Halim Word Press Table of Contents Word Press... 1 Getting Started... 1 Viewing the Webpage... 2 Changing the Password...
Creating and Managing Your Personal Mines Website on WordPress
 Creating and Managing Your Personal Mines Website on WordPress Table of Contents Creating your site... 2 Managing your site... 2 About WordPress... 2 Logging in... 2 Pages... 2 Editing an Existing Page...
Piktochart 101 Create your first infographic in 15 minutes
 Piktochart 101 Create your first infographic in 15 minutes TABLE OF CONTENTS 01 Getting Started 5 Steps to Creating Your First Infographic in 15 Minutes 1.1 Pick a Template 1.2 Click Create and Start Adding
SOCIAL MEDIA IMAGE & VIDEO SIZES 2018
 SOCIAL MEDIA IMAGE & VIDEO SIZES 2018 Profile Image: 180 x 180 px Cover Photo: 820 x 310 px - Must be at least 180 x 180 pixels. - Photo will Appears/will appear on page as 160 x 160 pixels. - Photo thumbnail
Vetstreet Web Builder Editor Tool User Guide v2.1. Web Builder. User Guide v2.1
 Web Builder User Guide v2.1 Contact your Account Manager at (888) 799-8387 or email support@vetstreet.com with questions. Page 1 Index... 1 The Editor Tool... 7 Forgot Your Username or Password?... 7 How
File Cabinet Manager
 Tool Box File Cabinet Manager Java File Cabinet Manager Password Protection Website Statistics Image Tool Image Tool - Resize Image Tool - Crop Image Tool - Transparent Form Processor Manager Form Processor
ScholarBlogs Basics (WordPress)
") Emory Center for Digital Scholarship Library and Information Technology Services ScholarBlogs Basics (WordPress) Table of Contents (click on the headings below to go directly to the section) Use of ScholarBlogs
Emory Center for Digital Scholarship Library and Information Technology Services ScholarBlogs Basics (WordPress) Table of Contents (click on the headings below to go directly to the section) Use of ScholarBlogs