Provider Secure Portal User Manual
|
|
|
- Berenice Berry
- 6 years ago
- Views:
Transcription
1 Provider Secure Portal User Manual Copyright 2011 Centene Corporation. All rights reserved.
2 Operational Training 2 August 2011
3 Table of Contents Provider Secure Portal... 5 Registration... 6 Provider - Self Support Contact Us Login Grant Access Approve Access Deny Access Verification Approved Registrations Creating New Users Manage Users Audit Users Support a User Eligibility Search Member Eligibility Details Patient List Patient List Search Patient List Results Patient List Downloads Search Saved Authorizations Check Auth Status Create Professional Claim Create Professional Claim Select Member Create Professional Claim - Enter Patient Details Create Professional Claim - Enter Diagnosis and Service Details Create Professional Claim - Enter Diagnosis and Service Details Create Professional Claim - Enter Provider Details Create Professional Claim - Review Create Institutional Claim Copy Claim Function Check Claim Status Search Check Claim Status Results View Web Claims Unsubmitted Claims Incomplete Claims Claims Ready to be Submitted Submitted Claims Batch Claims Submission Batch Claims Reports Accessing Batch Claims Report Payment History Operational Training 3 August 2011
4 Operational Training 4 August 2011

5 Provider Secure Portal From the landing page, you are able to perform various functions including: New Provider Registration Provider Self Support Contact Us Login to the Secure Portal Provider Secure Portal Landing Page Operational Training 5 August 2011

6 Registration A user account is required to access the Provider Secure area. If you do not have a user account, click New Provider Registration to complete the 4-step registration process below. New Provider Registration Operational Training 6 August 2011
7 Provider Registration Step 1 Operational Training 7 August 2011
8 Provider Registration Enter Physician/Group Name. Enter Tax ID. Enter NPI (Optional). Enter First Name. Enter Last Name. Enter Phone Number. Enter Fax Number (Optional). Enter Address. Enter Confirm Address. Enter User Name (At least five characters). Enter Password (At least six characters with a number). Enter Confirm Password. Select Password Reminder Question. Enter Password Reminder Answer. Select Password Reminder Question 2 and Password Reminder Answer. Select Password Reminder Question 3 and Password Reminder Answer. Click the Continue button. Operational Training 8 August 2011
9 Provider Registration Step 2 If you are the Administrator/Manager, Click the I am the Administrator/Manager checkbox. This will auto populate the contact information and allow you to skip that section. Note: If you are not the Administrator/Manager, complete the contact section with your administrator s/manager s information. Operational Training 9 August 2011
10 Provider Registration Enter Contact First Name. Enter Contact Last Name. Enter Phone Number. Enter Fax Number (Optional). Enter Address. Click the Continue button. Back: Click the Back button to return to Provider Registration Step 1 screen. Cancel: Click the Cancel button to return to the Provider Secure Login screen. Operational Training 10 August 2011


11 Provider Registration Step 3 Read the web site Terms and Conditions Agreement and click the I Agree checkbox. Click the Continue button. Back: Click the Back button to return to Provider Registration Step 1 screen. Cancel: Click the Cancel button to return to the Provider Secure Login screen. Operational Training 11 August 2011
12 Provider Registration Step 4 Click the Finish button. Operational Training 12 August 2011


13 Provider - Self Support Forgot Password/Unlock Acct Hyperlink If you have lost or forgot your password or your account is locked, click the Forgot Password/Unlock Account hyperlink. User Name Entry Enter your User Name. Click the Continue button. Operational Training 13 August 2011


14 Verification Question Enter the Verification Answer to the security question you created at registration. Click the Continue button. Password Entry and Verification Enter and verify the New Password. Click the Continue button. Operational Training 14 August 2011
15 Completion of Password Update Click the Finished button. You may login (using your new password) at your convenience. Operational Training 15 August 2011
16 Contact Us Contact Us Hyperlink To access our contact information and other helpful numbers, click the Contact Us hyperlink. Operational Training 16 August 2011
17 Contact Us Form Not Logged Into Portal Enter all the required information (red asterisk) and click the Submit button. Note: The Contact Us link can be accessed with and without logging in to the Secure Portal. The screen above shows the Contact Us Form when the Provider is not logged in. The screen below shows the Contact Us Form when the Provider is logged in. The same fields are offered, to capture the same information regardless of the way it is accessed. Operational Training 17 August 2011
18 Contact Us Form Logged Into Portal Operational Training 18 August 2011

19 Login A user account is required to access the Provider Secure Portal. If you do not have a user account, click New Provider Registration to obtain one. If you have an established user account, do the following to log in: Login Window Enter your User Name. Enter your Password. Click the Login button. Operational Training 19 August 2011

20 Grant Access This section outlines the functions that Provider Service Representatives and Office Managers can perform. Please refer to your health plan s P&P for operational specifics. Note: Only Providers who are Par on the Network should be granted access to the Secure Portal. This benefit is provided only to the Network Providers. Registration Admin Main Screen Check the user list page daily for new requests for access or simply log into the Provider Portal. Select New from the Status drop down field. Click the Search button. Operational Training 20 August 2011

21 Grant Access New Account Results After locating all NEW accounts Click on the User ID link for each new user and review their information and access request. The health plan and/or Office Manager will review access requests and either approve or deny the requests. Note: Please refer to your health plan s P&Ps for the proper way to validate a provider. Operational Training 21 August 2011
22 Approve / Deny / Update Requests Access Request Management Once provider is proven valid, be sure to check (or uncheck) any role access that matches (or does not match) their job function. From here you can Approve, Deny, or Update requests by clicking on the appropriate button. Cancel Button Click the Cancel button to exit the registration request. Operational Training 22 August 2011
23 Approve Access To approve access to the portal for a Provider Registration Admin Click the User ID link to open the provider access request. Review the provider access request. Operational Training 23 August 2011
24 Note: Only Providers who are Par on the Network should have Approved Access to the Secure Portal. If a Par Provider leaves the Network for any reason, their access to the portal should be immediately terminated. In the Comments field, enter your Initials and the Date Approved. Click the Approve button. Registration Admin Confirmation You receive a confirmation that the provider has been approved. Click OK. Operational Training 24 August 2011
25 Deny Access To deny access to a Provider Registration Admin Click the User ID to open and review the provider access request. In the Comments field, enter your Initials and the Date Denied. Click the Deny button to deny the request. Access Denial Verification You are asked to confirm the inactivation of the user by clicking Yes or No. Click Yes. Operational Training 25 August 2011

26 Verification Once the registration request has been approved, denied, or updated, the user will receive an providing additional information / instructions. Verification Note: In the approved account verification there is a Verification Code for the provider to use upon their initial login attempt. Operational Training 26 August 2011

27 Approved Registrations The Provider receives the verification and returns to the portal to login. Login Window Enter the User Name and Password created. Click the Login button. Verification Code Field Enter their Verification Code. Click the Submit button. Operational Training 27 August 2011

28 Provider Home Page The Provider home page appears allowing access to the Navigation bar on the left side of the screen. Operational Training 28 August 2011

29 Creating New Users As a Member/Provider Service Representative, you have the ability to register providers/office managers on their behalf. This includes ability to add one user or multiple users at one time. Registration Admin To add providers / office managers as new users, click the Create New User button. Operational Training 29 August 2011
30 Creating New Users Create New User Screen You must enter the required information for each user you are creating. You need to create a unique user name for each user. User Names are shared across all health plans within Centene. Populate the user s First Name, Last Name, Address, Phone Number, and TIN. Specify their Role Access by clicking the corresponding checkbox (see Role Access Options below) Once you have completed the Create New User Page click the Submit button. Note: This screen allows you to enter up to 10 providers / managers at one time. Operational Training 30 August 2011
31 Role Access Options Eligibility: View Member Details View and Print PCP Panel (Patient List) Claims Search and View Claims Check Claims status View Payment History Submit Claims Submit Claims Adjustments (if applicable) Authorizations Search and View Authorizations Submit Authorizations Office Manager Manage accounts within group practice that belongs to the Tax Identification Number (TIN) Note: An office manager cannot grant office manager privileges to another office manager. Each office manager must go through the registration process accepting the terms and conditions. Reminder: Please refer to your health plan s P&P for granting providers/office managers access. Remember if you approve an office manager you must provide them with training and set expectations around managing accounts including auditing. You will provide the User Name for all providers/office managers you have created via a separate process. The new provider and /or office manager will receive an containing their temporary password. Operational Training 31 August 2011
32 Manage Users (Unlock/Update/Reset Password/Disable/Enable) Registration Admin Screen Operational Training 32 August 2011
33 Reset Password A user s password can be reset by clicking the Reset Password button from the Registration Admin screen. A confirmation is sent to the Provider letting them know that their password has been reset. Disable A user s account can be disabled by clicking the Disable button from the Registration Admin screen. A prompt asked you to confirm the disablement by clicking Yes or No. Click Yes to disable. Update Information A user s account information can be updated. Enter any appropriate updates to Phone Numbers, Fax Numbers, Address, etc. Click the Update button to save your work. Operational Training 33 August 2011
34 Important Reminders Changes to the Providers demographic information on this screen WILL NOT update Amisys or Portico. This will only update the registration information on the user. Providers will be required to re-agree to the Terms and Agreement the next time they log in after you made any demographic updates. You have the ability to change passwords, and role access. You also have the ability to select unlock, activate, reset, disable and enable users as needed. Note: If you enable an office manager after they have already had an account, they will be prompted to agree to the Office Manager Terms and Agreements before they will be allowed to log in. User Management Tips A user s account will lock after five incorrect login attempts. The user will retain the ability to reset their password from their login page or they may contact you requesting assistance. If the user has not accessed the portal site for ninety days, their account will automatically move into inactive status. Refer to your Health Plans P&Ps for additional guidance. Inactive or disabled accounts can be enabled. The user will not have to re-register. Operational Training 34 August 2011

35 Audit Users Providers/Office Managers can audit all users associated with their TIN. They can also generate reports for these users. This is an important feature for providers/office managers as they are responsible for auditing their staff records to ensure accuracy and guarantee HIPPA compliance. Download to Excel Hyperlink To create a report, click on the Download To Excel hyperlink. Operational Training 35 August 2011


36 File Download Window To open the document in Excel, click the Open button. Your Excel file opens. Excel Document Operational Training 36 August 2011
37 Support a User Support a User is functionality meant for a Support Role at the health plan to assist providers with questions, additional training opportunities (i.e., how to submit / review claims, authorizations, payment history). This functionality also gives the user the ability to access provider s information for screen captures needed when reporting issues to the Service Desk. Support A User From the Administration drop-down list, select Support A User. Enter either the Provider s User Name or TIN #. Click the Submit button to activate Support A User functionality. If you search by User Name, you can access the information associated with that Provider TIN. Depending on the access permissions you have, you will be able to see the SAME things that the Provider can see. Operational Training 37 August 2011
38 Menu Options My Account (Not All Health Plans) Account Home Update Account Change Password Eligibility: Eligibility Search Patient List Patient List Downloads Authorizations Create Authorizations Search Saved Check Auth Status Claims Check Claim Status View Web Claims Create Professional Claim Create Institutional Claim Batch Claims Submission Payment History Downloads Claim Auditing Tools Online Forms Member Search Reports Patient Cost Reports Contact Us Operational Training 38 August 2011
.")

39 Eligibility Search The Eligibility Search functionality allows you to instantly verify a patient s Eligibility Status and view his or her Eligibility Details for a specified Date of Service (DOS). Navigation Menu From the Navigation Menu at the left on the Home Page, select the drop-down arrow next to Eligibility, and select Eligibility Search. The Eligibility Search screen appears. Eligibility Search Screen Operational Training 39 August 2011
40 In the Eligibility Search screen, you must search by Date of Birth, Medicaid ID/Member ID or Last Name, First Name, and Date of Service as they are required fields. Search by Date of Birth, Medicaid ID, and Date of Service Enter Date of Birth and Enter the Medicaid ID and Enter the Date of Service. You need to click in the field and populate the date using the calendar provided. Click the Search button. Operational Training 40 August 2011
41 To search by Last Name, First Name Search by Last Name, First Name Enter Date of Birth and Enter the Last Name, First Name and Enter the Date of Service. You need to click in the field and populate the date using the calendar provided. Click the Search button. Note: When you search by Last Name, First Name you must enter it exactly how it is listed in the portal. Operational Training 41 August 2011

42 The results of your eligibility search lists all patients that meet the criteria you entered. Eligibility Search Results Click on the Member Name hyperlink to access their record. Operational Training 42 August 2011
43 Member Eligibility Details The Member Eligibility Details displays various details about the Member s PCP, COB, and History. Member Eligibility Details Operational Training 43 August 2011
44 Member Eligibility Details Member Details Member Eligibility Details contains the following information: Specific Date of Service (providers can confirm eligibility prior to seeing member) Health Plan / Program information Member s full name Date of Birth Medicaid ID Member Demographics (phone, address, city state and zip) Gender Eligibility Details Member ID numbers Operational Training 44 August 2011
45 Primary Care Provider (PCP) Primary Care Provider Info From this hyperlink you can access the following information regarding the current PCP: PCP s name PCP s address PCP s phone number Provider ID # (Amisys provider number) History span of PCP assignment (or member s eligibility history) Operational Training 45 August 2011
46 Coordination of Benefits (COB) COB History The Coordination of Benefit (COB) information displays if the member had other insurance. It would display the following: Name of other insurance carrier(s) or health plan(s) Effective dates of coverage for other insurance carrier(s) or health plan(s) Eligibility History Eligibility History The History information displays the following: Effective Date Term Date Program Class Operational Training 46 August 2011

47 Download to PDF Download to PDF hyperlink A copy of a member s Eligibility Details can be downloaded and printed in its entirety by clicking the Download to PDF hyperlink. File Download Window At the prompt to open or save the file, click Open. Operational Training 47 August 2011

48 Member Eligibility Details PDF The PDF opens allowing you to Print or Save. Operational Training 48 August 2011

49 To Print the Member Eligibility Details Print Option Select File on the Menu bar. Select Print from the list of options. The Member Eligibility Details page prints. To return to the Eligibility Search screen Use the Back Browser button on the Internet Explorer toolbar. Operational Training 49 August 2011
50 Patient List The Patient List feature allows you to view a roster of patients that have selected you as their primary care provider (PCP). You can access patient lists by providing your NPI, Provider Medicaid ID, Member s Last Name (must be exact match), Programs, and Alert Types. Patient List Search Screen From the Navigation menu, click the drop down arrow next to Eligibility, and select Patient List. Operational Training 50 August 2011

51 The Patient List screen displays two sections: Patient List Search fields, and Patient List Results. Patient List The Patient List Results is a complete listing of patients who have selected you as their PCP. Note: For groups with multiple providers associated with a single Tax ID you will receive a Patient List of all patients who have chosen the providers linked to your Tax ID as their PCP. You have the ability to Search the listing by individual NPI or sort the listing by Provider Name. You can navigate the list of matching transactions using the following controls: Download to PDF enables you to download patient list to a PDF file. Download to Excel enables you to download patient list to Excel file. Page Number displays the corresponding page of results (10 transactions per page). Next displays the page of results immediately following the currently displayed page. Last displays the last page of the results listing. Operational Training 51 August 2011
.")
52 Patient List Search The Patient List feature allows you to search for patients by the following search criteria: NPI, Member ID, and/or Patient Last Name. Patient List Search by Member Last Name Limit the Patient List Results by entering any combination of the designated search criteria (i.e. NPI, Provider Medicaid ID, Member s Last Name, Programs and/or Alert Types). When searching by Alert Types select the drop down arrow and choose the appropriate Alert Type. Alert Types Options Click Search button to access Search Results. Operational Training 52 August 2011
53 Patient List Results The result of your search lists all patients that meet the criteria entered. Patient List Results Click Member Name hyperlink to access the Member Eligibility Details page. Refer to Page 43 for information on Member Eligibility Details. Download to PDF To download the patient list results into a PDF document, click the Download to PDF hyperlink. Download to Excel To download the patient list results into an Excel spreadsheet, click the Download to Excel hyperlink. Operational Training 53 August 2011

54 Patient List Downloads The Patient List Downloads feature allows you to download a file of Members. The file is available through this link for seven days, after which the link no longer displays. Patient List Before you access the Patient List Downloads, you must select Eligibility, Patient List. Perform a Patient List Search, and retrieve your results. The results appear at the bottom of the screen. Click the Download to Excel hyperlink. Message A message appears providing instructions as to retrieve your file or check the status of your download request. Operational Training 54 August 2011
55 Patient List Downloads Select Eligibility from the Navigation menu, and then Patient List Downloads. To download the Patient List, click the download hyperlink. Operational Training 55 August 2011

56 Submit Authorizations The Submit Authorizations feature allows you to create and submit a medical authorization request for anticipated outpatient services or hospital admissions that will occur on a future date online. Urgent and/or emergent requests must be submitted by phone or fax. Authorization requests can only be submitted via the web portal on patients who are currently eligible and for services that have not yet been rendered. The turn around time for web submitted requests can take up to fourteen (14) days, but progress of the requests can be viewed in the portal within 1 to 2 days of submission. Create Authorization From the Navigation menu, select Authorization, Create Authorization. Operational Training 56 August 2011
57 Submit Authorizations Create Authorization-Select Member 1. In order to select a patient, you must check the Permission Box stating you have been authorized to act on his/her behalf. Once this box is checked the fields for entering the Member ID will be activated. 2. Enter the Medicaid ID or Member ID for the patient for which you are requesting services. Patients who are not eligible on the day of the request, or requests for services already rendered, cannot be submitted via the web portal. You will need to contact the health plan via the toll free authorization line and speak with a Medical Management representative. 3. Enter the member s Birth Date. 4. Enter the date you are requesting the service to begin. For admissions, this would be the proposed admission date. For outpatient services, this is the day the services are to begin. This date must be a future date. For services beginning on the current or past date, you must call the toll free Medical Management phone number. 5. Click the Continue button. Operational Training 57 August 2011
58 Submit Authorizations Create Authorization-Select Service 6. Validate the correct Member Name, DOB and effective coverage for reference. 7. Enter the Contact Information for the Authorization. 8. Select the Service Type of Inpatient or Outpatient. *Only Outpatient authorizations are able to be submitted via the secure web portal for behavioral health Note: The Service Type selected for Outpatient Authorization requests will result in the appropriate behavioral health options to appear in the drop down menu. Operational Training 58 August 2011
59 Submit Authorizations Create Authorization-Service Detail Operational Training 59 August 2011
60 Submit Authorizations 9. Next complete the diagnosis information. Enter the Primary ICD-9 Code. If you are uncertain of the code, a lookup library is provided. You can use a partial ICD-9 code to find the correct code. You will need to look up a valid code using the lookup table. The diagnosis box populates with the numeric and text description of the code. Select the appropriate diagnosis code. Check the Primary Diagnosis code box once the code as been entered. 10. Enter the Additional Clinical Information, such as Actual Admission Date, Place of Service, Symptoms, Medication, etc. 11. Complete the Procedure (if applicable), and Provider Information sections. 12. You can add attachments to support you authorization requests. Select Browse to search for you file attachment. Next, select Upload to attach it to this page. You can select the Delete button to remove an attached document. 13. Click Continue. Operational Training 60 August 2011

61 Create Authorization Buttons Add Click Add to add new authorization information. Remove Click Remove to clear authorization information from the screen. Save Click Save to save entered information. This will allow you to exit the Create Authorization screen and return at a later time. Continue Click Continue to progress to the next step of the create authorizations process. Operational Training 61 August 2011
62 Create Authorization- Review 14. Verify the authorization information (e.g., member information, service type and contact information). 15. Click Submit button to complete process. Operational Training 62 August 2011

63 Submit Authorizations Create Authorization-Reference Number Note: After submitting your request, a reference number is generated. The reference number is not the same as the authorization number. It is a confirmation of a successful transaction via the web. The request is now under review by the health plan medical management department. It can take up to fourteen (14) days but the progress of the requests can be viewed in the portal within 1 to 2 days of submission. Successfully submitted authorization requests will produce the following information: Time stamped submission notice (i.e., :58:10.848) Confirmation of successful submission Option to print confirmation notice Confirmation of service type requested Web Reference Number (also referred to as Web Control #) Status report Review reason Create New Authorization Same Member Select Same Member button to submit a new authorization for this member. New Member Select New Member button to submit a new authorization for a different member. Operational Training 63 August 2011

64 Search Saved Authorizations Search Saved Authorizations From the Navigation menu, select Authorization, Search Saved. Operational Training 64 August 2011
. Select Search button.")
65 Search Saved Criteria Note: Create Status defaults to Submitted. You can change Create Status search options by selecting the drop down menu for this field. The Create Status field can be Submitted, Complete or Incomplete. Enter the appropriate search criteria (i.e., Create Status, Medicaid ID, and Web Reference #). Select Search button. The Search Results provide the Member Name(s), Medicaid ID, Submission Date and Web Reference #(s) applicable to the Saved Search performed. Click on the Member Name to access the complete, incomplete, submitted authorization request. Operational Training 65 August 2011

66 Check Auth Status Check Auth Status From the Navigation menu select Authorization, Check Auth Status. Operational Training 66 August 2011

67 Check Auth Status Web Reference Number Search Enter the Web Control #/ Web Reference #. Select Search button. Web Reference Number Search Results Select the Web Reference # to check Authorization Status. Operational Training 67 August 2011
 Operational Training 68")
68 Example for Approved Authorization (functionality) Operational Training 68 August 2011
 Operational Training 69")
69 Example of Denied Authorization (functionality) Operational Training 69 August 2011

70 Create Professional Claim The Create Professional Claim process allows you to create and submit a professional Medicaid claim online. Create Professional Claim From the Navigation menu, select Claims, Create Professional Claim. Operational Training 70 August 2011
71 Create Professional Claim Select Member Create Prof Claim-Select Member In order to select a member, you have to click the check box to verify you are submitting a new Professional claim. Once this box is checked, the Member s ID field and Continue button are activated. Enter the Member s Medicaid ID. Click the Continue button. You will only be able to submit online claims for members who have current coverage with the State s health plan. You can verify member eligibility by utilizing the Eligibility Search option located under the Eligibility menu item. Operational Training 71 August 2011
72 Create Professional Claim - Enter Patient Details Create Prof Claim-Enter Patient Details Enter Patient s Account Number (required). Enter any optional information that would apply in the Patient Status and Patient s condition related to sections. Click the Next Step button. Your work will be saved automatically each time you click the Next Step button or press Enter on the keyboard to continue to the next step. In addition, you may click the Save Draft button at any time to save your work. Saved claims will be moved to the View Claims, Unsubmitted Claims list (see below). Click Save Draft & Start New Claim to save your work and return to Step 1 to begin another claim. While in the Create Professional Claim process, the Member s Name, Member ID and Date of Birth (DOB) are displayed at the top of each page. Instructions and error messages are displayed just below this area. Operational Training 72 August 2011
73 Create Professional Claim - Enter Diagnosis and Service Details Create Prof Claim-Enter Diagnosis and Service Details Enter any optional physician or supplier information (e.g., Date of current illness or injury or pregnancy, Date of similar illness, etc.) In the Diagnosis Codes section, enter Diagnosis Code 1 (required). The diagnosis code may be in any of the following formats: 100 or or A description of the diagnosis code will appear when you move the cursor from the field. Enter additional diagnosis codes in Diagnosis Code 2, Diagnosis Code 3 and Diagnosis Code 4 as needed. Please remember to include decimal points in all monetary fields (e.g. Outside lab charges and Charges within the Service Line details). Operational Training 73 August 2011


74 Show Member s Eligibility Hyperlink To view the Member s Eligibility spans, click Show Member s Eligibility. Hide Member s Eligibility hides the eligibility span information. In the Service Line #1 section, enter all of the required information. Note: Use the Diagnosis Pointer checkboxes to associate the previously entered Diagnosis Code 1, 2, 3 & 4 with the Service Line as needed. Add Supplemental Information Hyperlink To add notes to the Service Line, click Add Supplemental Information. Enter up to 60 characters. You may then hide the notes by clicking Hide Supplemental Information. Hiding the notes will not delete them. Operational Training 74 August 2011

75 Add another Service Line Hyperlink To add another Service Line, click Add another Service Line. A new, blank Service Line section will appear. Enter all required information. The claim may include a total of six Service Lines. Operational Training 75 August 2011


76 Create Professional Claim - Enter Diagnosis and Service Details Enter Diagnosis and Service Details When you are finished completing all required fields, click Next Step. Operational Training 76 August 2011


77 Create Professional Claim - Enter Provider Details Enter Provider Details Operational Training 77 August 2011
78 In the Referring Provider section, enter information as needed. In the Rendering Provider section, enter the required NPI number and select the Provider from the drop-down list. In the Billing Provider section, enter required information. In the Service Facility Location section, enter information as needed. Click Same as Billing Provider to automatically copy the billing provider information into the service facility fields. Click the Next Step button. Operational Training 78 August 2011
79 Create Professional Claim - Review Create Prof Claim-Review Operational Training 79 August 2011
80 This Review Screen displays all of the information entered during the previous steps. Review it to ensure that all information is correct. If information is incorrect, click the Edit hyperlink to change the information within a section. For example, to change a Diagnosis Code, click Edit in the Service section. The Step 3 page displays. When finished modifying information, click the Next Step button or press Enter on the keyboard to continue to the next step. Continue to click Next Step on each step until returning to Step 5 of 5. Click Save & Start a New Claim to save the claim and begin a new claim with the Step 1 of 5 page. The saved claim will be available in the Claims Ready to Be Submitted list (see Unsubmitted Claims in the View Web Claims section below). If all information is correct, click Submit and the claim will be transmitted. A Claim Submitted confirmation displays. Operational Training 80 August 2011

81 Create Prof Claim-Successful Submission Take note of the Web Reference Number, which may be used to identify the claim while using the View Web Claim feature. The Web Reference Number may also be useful in discussing a claim with your Provider Relations Representative. Click the Start New Claim hyperlink if you have other claims to submit. Operational Training 81 August 2011

82 Create Institutional Claim The Create Institutional Claim process allows you to create and submit an institutional Medicaid claim online. Navigation Menu From the Navigation menu select Claims, Create Institutional Claim. Operational Training 82 August 2011
83 Create Institutional Claim - Select a Member Create Institutional Claim-Select Member In order to select a member, you have to click the check box to verify you are submitting a new Institutional claim. Once this box is checked, the Members ID field will be activated. Enter the Member s Medicaid ID. Click the Continue button. You will only be able to submit online claims for members who have current coverage with the State s plan. You can verify member eligibility by utilizing the Eligibility Search option located under the Eligibility menu item. Operational Training 83 August 2011
84 Create Institutional Claim - Enter Patient Details Create Institutional Claim-Enter Patient Details Patient Details Section: Enter Patient Control Number (required). Enter Medical Record # (optional). Select Type of Bill from the drop down menu (required). Once the type of bill information is selected, the Admission and Discharge Information section appears on the screen. Enter Statement Covers Period From and To (required). Operational Training 84 August 2011
85 Admission and Discharge Information Section: Enter Admission Date (required). Enter Admission Hour from the drop down menu (required). Select Admission Type from the drop down menu (required). Select Admission Source from drop down menu (required). Select Discharge Hour from drop down menu (required). Select Discharge Status from drop down menu (required). Click Next Step to continue, or you can click Save Draft & Start New Claim, or Save Draft. Your work will be saved automatically each time you click the Next Step button to continue to the next step. In addition, you may click the Save Draft link at any time to save your work. Saved claims will be moved to the View Claims, Unsubmitted Claims list. Click Save Draft & Start New Claim to save your work and return to Step 1 to begin another claim. Click Previous Step button to go back to the previous screen. While in the Create Institutional Claim process, the Member s Name, Member ID and Date of Birth (DOB) are displayed at the top of each page. Instructions are displayed just below this area. Operational Training 85 August 2011
86 Create Institutional Claim - Enter Billing Information Create Institutional Claim-Enter Billing Information Operational Training 86 August 2011
87 Enter NPI of the Billing Provider, and then select the Billing Provider Information from the box that appears (required). Enter the Taxonomy Code (optional). If the displayed Billing Provider information is incorrect, click Clear Selected Provider link. Then enter the correct NPI of the Billing Provider. Click the Same as Billing Provider link, billing provider information will be populated to the Pay-To-Provider Information section. Enter data into the Pay-To-Provider Information section if it is different from the Billing Provider. Be sure to populate all required fields. Enter Attending Provider or Operating Provider information (e.g., NPI, Taxonomy Code, etc.) These are optional fields. Click the Next Step button. You arrive at the Enter Claim Codes screen. Operational Training 87 August 2011

88 Create Institutional Claim - Enter Claim Codes Create Institutional Claim-Enter Claim Codes Enter the Admitting and Principal Diagnosis Codes (required). Once Diagnosis Codes have been entered, its associated diagnosis descriptions will be displayed next to the Diagnosis Codes. When you have completed adding Diagnosis Codes, click the link titled I m done adding Diagnosis Codes. Operational Training 88 August 2011
89 Create Institutional Claim-Enter Claim Codes Screen Operational Training 89 August 2011


90 Enter Occurrence Codes Section Click the link marked Add Additional Span Codes to enter data for this section (optional). Enter Additional Span Codes Section Enter the Span Code, From Date, and Through Date. Click the link marked Add Additional Occurrence Codes to enter data for this section (optional). Enter Additional Occurrence Codes Section Enter the Occurrence Code, and Date. When you have completed adding Occurrence Codes, click the link marked I m done adding Occurrence Codes. Operational Training 90 August 2011

91 Enter Additional Visit Codes Section Click the link marked Add Additional Visit Codes. (optional) Enter Visit Code Section Enter the Visit Code. When you have completed adding Visit Code, click the link marked I m done adding Visit Codes. Enter Additional Condition Codes Section Click the link marked Add Additional Condition Codes to enter data for this section. (optional) Enter Condition Code Section Enter Condition Code. When you have completed adding Condition Codes, click the link marked I m done adding Condition Codes. Operational Training 91 August 2011


92 Enter Value Codes Section Enter the Value Code and Amount. When you have completed adding the Value Codes, click the link marked I m done adding Value Codes. Enter Procedure Codes Section Enter the Principle Procedure Code and Date. When you have completed adding Principle Procedure Codes, click the link marked I m done adding Procedure Codes. Enter Other Procedure Codes Section Enter the Other Procedure Codes and Date. When you have completed adding Other Procedure Codes, click the link marked I m done adding Other Procedure Codes. Operational Training 92 August 2011
93 Enter Remaining Options Enter the fields listed above (optional). When you have completed adding the optional fields, click the Next Step button. It will take you to the Enter Service Details screen. Operational Training 93 August 2011
. Click Add button to add Revenue Codes and Charges. Once you click the Add button, the Revenue Code will be validated.")
94 Create Institutional Claim - Enter Service Details Create Institutional Claim - Enter Service Details Enter the Revenue Code, Service Date, Service Units, and Charge Amount (required). Enter HCPCS/Rate/HIPPS Code and Non-Covered Charges (optional). Click Add button to add Revenue Codes and Charges. Once you click the Add button, the Revenue Code will be validated. Operational Training 94 August 2011

95 Revenue Codes and Charges When you have completed adding Other Revenue Codes and Charges, click the link marked I m done adding Revenue Codes and Charges. Operational Training 95 August 2011

96 Added Revenue Codes and Charge When you have completed adding Revenue Codes and Charges, click Next Step. It will take you to Review Claim and Submit screen. Operational Training 96 August 2011
97 Create Institutional Claim - Review Claim and Submit Review Claim and Submit Operational Training 97 August 2011

98 Please review to ensure that all information is correct. If information is incorrect, click Edit to change the information within a section. For example, to change a Diagnosis Code, click Edit in the Codes section. It will take you to the Step 4 of 6 Enter Claim Codes screen. When you are finished modifying information, click the Next Step button to continue to the next step. Continue to click Next Step on each step until returning to Step 6 of 6. Web Reference Number If all information is correct, click Submit Claim and the claim will be transmitted. A Claim Submitted confirmation appears. Operational Training 98 August 2011

99 Copy Claim Function Navigation Menu From the Navigation menu, select Claims, View Web Claim. Rather than starting a new, blank claim, it may be easier to start with a copy of a previously submitted claim. This function is helpful when creating a new claim that varies only slightly from a previously submitted claim. Operational Training 99 August 2011

100 Copy Hyperlink Click the Unsubmitted Claims tab, the option to copy a claim that is ready to be submitted by clicking the Copy hyperlink. Operational Training 100 August 2011

101 View Web Claims Copy Hyperlink Click Submitted Claims tab, the option to copy a claim that has been previously Submitted by clicking the Copy hyperlink. Operational Training 101 August 2011
102 Step 2: Enter Patient Details after Copy Selected The Copy link will take you directly to the Professional or Institutional Claim starting with Step 2 to create a new Claim with the copied information already populated. Operational Training 102 August 2011

103 Check Claim Status The Check Claim Status feature allows you to check the status and to view detailed information of your submitted claims. The status can be checked on claims which have been submitted via the portal, clearinghouse, or paper. Claims submitted via the portal will indicate any front end rejections. Navigation Menu From the Navigation menu, select Claims, Check Claim Status. Operational Training 103 August 2011
104 Check Claim Status Search The Check Claim Status feature allows you to search for claims using a variety of different search criteria. You can search for claims within a specific three-month span based on the Date of Service (DOS). In addition, you can search for claims by certain member, claim and/or provider information. Check Claim Status Search Enter Date of Service (DOS) range. Enter at least one other Search Criteria (i.e. Member Information, Claim Information, and/or Provider Information). Click Search to access the Search Results. Operational Training 104 August 2011
 fields.")
105 Clear Form Click the Clear Form button to reset the Date of Service (DOS) range to the current date and two months prior and to clear any information entered in the Member Information, Claim Information and/or Provider Information sections. Use the convenient calendar function to set the Date of Service (DOS) fields. Check Claim Status Results The result of your search displays claims that meet your search criteria. You can sort results by clicking on any of the headers in this view. Check Claim Status Results You can navigate the list of claims using the following controls: Page Number displays the corresponding page of results (10 claims per page) Next displays the next page of the results listing. Last displays the last page of the results listing. Click Claim Number hyperlink to access the corresponding claim s detailed information.
106 Check Claim Status Details This view provides claim data and adjudication details for the selected claim number. Claim Status Details Adjust Claim: To adjust claim, click on the Adjust Claim hyperlink to access the five-step claims adjustment wizard. Be sure to complete all required fields. Return to Search Results: To return to Check Claim Status Results page, click the Return to Search Results button. Search Again: To check the status of another claim/s, click the Search Again button. This will return you to the Check Claim Status Search page. Print Claim Detail: To print the claim status details, click the Print Claim Detail button. Operational Training 106 August 2011


107 View Web Claims The View Web Claims feature allows you to re-open and continue working on saved, unsubmitted claims. It also allows you to track the status of claims submitted using the Portal. Navigation Menu From the Navigation menu, select Claims, View Web Claims. The View Web Claims page includes two tabs: Unsubmitted Claims and Submitted Claims. Tabs: Unsubmitted Claims & Submitted Claims Unsubmitted Claims The Unsubmitted Claims tab is selected by default. If it is not selected, simply click Unsubmitted Claims tab. Unsubmitted Claims displays two lists of claims: Incomplete Claims, and below it, Claims Ready to be Submitted. Operational Training 107 August 2011

108 Incomplete Claims Incomplete Claims List Claims listed here are unsubmitted and are missing information or contain errors. You can re-sort the list by any column by clicking on the columns title. To reverse the order of the sort, click the column title again. Edit: Click the claim s Edit link to complete claim submission information or to fix its errors. The claim will be displayed, starting with the last visited page of the Professional/Institutional Claim submission wizard. To finish and submit the claim, navigate throughout the wizard (Institutional or Professional claims) and click the Submit Claim button at the bottom of the page. If you choose not to submit the claim at this time, click the Save Draft button at the bottom of the page. If the claim is now complete and contains no errors, it will be moved the Claims Ready to Be Submitted list (see below). You may access saved claims at any time by returning to the View Claims page. Delete: To permanently delete an Incomplete Claim, click the claim s Delete link. Operational Training 108 August 2011

109 Claims Ready to be Submitted Claims Ready to be Submitted List Claims listed here are complete, contain no errors, and are ready to be submitted. This section is broken down into two lists of claims: Professional and Institutional. Submitting Ready to be Submitted Claims: Click check boxes to select one or more claims for submission. Click the Submit Selected Professional/Institutional Claim(s) button at the bottom of the page. A Claim(s) Submitted confirmation will be displayed. A record of the submission, including the status of each claim that was part of the submission, will be displayed in the Submitted Claims list. Operational Training 109 August 2011
110 Edit: Click the claim s Edit link to modify a claim s information. The claim summary screen will be displayed on the summary screen (Step 5 for Professional and Step 6 for Institutional). To finish and submit the claim, click the Submit This Claim button at the bottom of the page. If you choose not to submit the claim at this time, click Save near the top-right of the page. If the claim is now complete and contains no errors, it will be moved the Claims Ready to Be Submitted list. You may access saved claims at any time by returning to the View Claims page. Copy: Rather than starting with a new, blank claim it may be easier to start with a copy of a completed claim. This can be helpful when creating multiple claims that vary only slightly (e.g., the claims are identical except for their dates of service). Click the claim s Copy link. Step 1 of the newly copied claim will be displayed. Complete the claim as described in Create Professional/Institutional Claim. Delete: To permanently delete a Ready to Be Submitted claim, click the claim s Delete link. Operational Training 110 August 2011
111 Submitted Claims Submitted Claims Tab Submitted Claims displays a list of web claim submissions made during the past seven days. You can change your Submitted Claims list by entering new search criteria (i.e. Date Submitted, Web Ref #, and Status) and clicking the Search button. Clear: Click the Clear hyperlink to clear the search criteria entered. Copy: Rather than starting with a new, blank claim (see Create Professional/Institutional Claim above), it may be easier to start with a copy of a previously submitted claim. This can be helpful when creating a new claim that varies only slightly from a previously submitted claim. Click the claim s Copy link. Step1 of the newly copied claim will be displayed. Complete the claim as described in Create Professional/Institutional Claim. Operational Training 111 August 2011
112 Status: The status of a submitted claim may be displayed as: In Progress: The claim has been submitted for processing. Rejected: The claim has been rejected and not entered into the adjudication system. Hover the mouse cursor over the icon to view reasons for the rejection. Currently, rejected claims cannot be adjusted online. You may choose to make a copy of the rejected claim (see Copy above), fix it, and submit it. Accepted: The claim has been received and entered into the adjudication system. Operational Training 112 August 2011
113 Adjust Claim The Adjust Claim feature is accessible from Check Claim Status. Adjust Claim The Adjust Claim feature allows you to submit adjustments for previously submitted professional and institutional claims online. In order to adjust claims, they must have passed through the adjudication process and be in a Paid or Denied status. In addition: Claims can only be adjusted online once a day. Claims can not be adjusted if an adjustment has already been created but not yet submitted. Claims can not be adjusted if an adjustment has already been submitted but not yet processed. Operational Training 113 August 2011
114 Check Claim Status Check Claim Status Operational Training 114 August 2011


115 Headers to Sort Click headers to sort results above. Select a claim number. Adjust Claim Click Adjust Claim hyperlink. Operational Training 115 August 2011
116 Adjust Claim-Enter Patient Details The Adjust Professional Claim feature functions in a similar manner to the Create Professional Claim process. The only difference is that upon selecting a professional claim to adjust, you will be taken to Step 2 of 5 within the Adjust Professional Claim process instead of Step 1. Note that you will not be able to access changing a member (Step 1) while adjusting professional claims. To change the member requires that a new professional claim be generated. Operational Training 116 August 2011


117 Enter Diagnosis and Service Details From this screen, you can make all your necessary adjustments as you proceed through the remaining steps of the Adjust Professional Claim process to you get to Step 5 of 5. Operational Training 117 August 2011


118 Enter Provider Details Operational Training 118 August 2011

119 If all information is correct, click Submit and the claim will be transmitted. A Claim Submitted confirmation will be displayed. Operational Training 119 August 2011

120 Adjust Claim Submission Claim submitted successfully. Note the Web Reference Number. Note: Once you receive the web reference number you can not go back to the claim and make any changes on the same day. Operational Training 120 August 2011

121 Batch Claims Submission Navigation Menu From the Navigation menu, select Claims, Batch Claims Submission. Operational Training 121 August 2011
122 Batch Claims Submission Screen Blank EDI (Electronic Data Interchange) Documentation Companion Guides: Standard guides on the 837i, 837p, 997, etc. The link directs you to EDI page of health plan site. Batch Claims FAQs: Standard documents for all health plans created by EDI and EDI support staff. Header Section This section provides details regarding submission guidelines and parameters needed before submitting a batch claim. 1. HIPAA level edits by health plan 2. Acceptable file formats 3. File max size 4. Required submitter ID (standard across all health plans) 5. Receiver ID (health plan specific) Note: Be sure to direct all 837 and other batch claim specific questions to EDI support (800) ext The hours of operation are Monday thru Friday, 8am - 5pm CST. Operational Training 122 August 2011
123 Batch Claims Submission Screen Submitting a Batch Claim: Step 1: Select File Type. 837i Institutional claims 837p Professional claims Step 2: Upload a file. Step 3: Click Submit button. Operational Training 123 August 2011

124 Batch Claims Submission Batch Claims Status A Submission receipt will be provided after submitting the Batch Claim. This is only confirmation of successful upload. To submit another claim: Click on the Submit another Batch Claim button. Repeat Steps1-3 on the previous page on Submitting a Batch Claims. To check the status of a submitted file: Click on the Status tab. Note: The Web Reference # can be used for tracking the submission until a claim number is provided. Operational Training 124 August 2011
125 Contact Us Link to EDI Support Search criteria can be used to track specific submissions. File postings are listed and responses are posted as applicable. Operational Training 125 August 2011
126 Reminder: Data spans for searches are limited to a three month period, and batch claim data is available for the last eighteen months. Special Note: Provider will need a Practice Management System to read the 997, TA1 and Audit files. Operational Training 126 August 2011

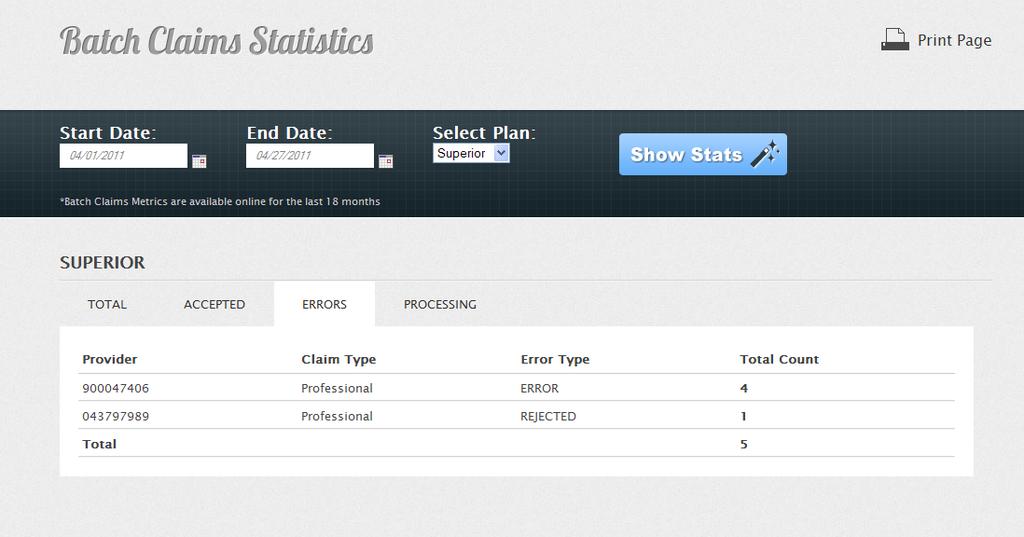
127 Batch Claims Reports Batch claim reports are mainly for managers, provider relation specialists, claims and EDI support staff to access. This report can be accessed by clicking on the appropriate link. These reports display usage and functionality of this system. Note: This link will be provided once it is available in production. Accessing Batch Claims Report Navigate to (this is the only test link). Choose Start Date. Choose End Date. Select Health Plan. Click the Show Stats button. To See TIN level reporting, select that report: Accepted Reports, Errors & Processing. Operational Training 127 August 2011

128 Operational Training 128 August 2011


129 Payment History The Payment History feature allows providers to view online explanation of payment information. Navigation Menu From the Navigation menu, select Claims, Payment History. You are directed to the Payment History page. Click on the appropriate check date hyperlink. Operational Training 129 August 2011

130 Explanation of Payment (EOP) Details EOP Details Back Click on appropriate check date hyperlink to return to payment history transaction page Download (Excel Format) Click on Download button to request EOP in excel format. Go to Payment History downloads to retrieve file or check request status. Request EOP Click Request EOP button to request a hard copy of the Explanation of Payment. Please allow 24 hours to process request. A reference number will be provided. Request ERA Click Request ERA button to request a hard copy of the Explanation of Payment. Please allow 24 hours to process request. A reference number will be provided. Operational Training 130 August 2011
Provider User Guides
 Provider User Guides Table of Contents What's New... 1 Overview of Changes:... 1 User Interface Changes... 2 Data Model Changes... 2 First Time Logging In... 5 SmartCare Basics... 9 Open a Client... 13
Colorado Access Provider Portal Guide
 Colorado Access Provider Portal Guide coaccess.com 1 CONTENTS INTRODUCTION... 3 SYSTEM REQUIREMENTS... 3 NEW PROVIDER REGISTRATION... 4 Provider Information... 4 New Provider Registration... 4 New Registration...
Secure Provider Website. Instructional Guide
 Secure Provider Website Instructional Guide Operational Training 1 March 2017 Introduction The Secure Provider Web is a secure website developed to allow Providers across Centene health plans to perform
Provider TouCHPoint Training Guide
 Provider TouCHPoint Training Guide Feb 1, 2018 Contents Registration 3 Registration 3 Adding additional users 7 Eligibility 9 Locating a StarKids Service Coordinator 12 Claims/Code Lookup 13 Claims 13
icare s Provider Portal Guide
 icare s Provider Portal Guide 2 CONTENTS New Provider Registration... 4 New Registration...5 Login Page 9 Sign In 9 Forget Your Password...10 Provider Home Page 12 Track Request 12 Contact Us.. 14 Provider
Provider Portal User Guide
 Provider Portal User Guide Updated: January 1, 2019 Table of Contents Introduction... 1 How to Register for the Provider Portal... 3 Manage Your Profile... 5 User Administration... 8 Authorizations & Referrals...
Trading Partner Account (TPA) User Guide. for. State of Idaho MMIS
 User Guide. for. State of Idaho MMIS") Trading Partner Account (TPA) User Guide for State of Idaho MMIS Date of Publication: 3/8/2018 Document Number: RF019 Version: 4.0 This document and information contains proprietary information and copyrighted
Trading Partner Account (TPA) User Guide for State of Idaho MMIS Date of Publication: 3/8/2018 Document Number: RF019 Version: 4.0 This document and information contains proprietary information and copyrighted
Affinity Provider Portal - PRISM. User Guide
 Affinity Provider Portal - PRISM User Guide Affinity Medical Group 1221 Broadway, Suite 300 Oakland, California 94612 Affinity Provider Portal - PRISM User Guide Page ii Contents Accessing the Affinity
Provider Portal User Guide
 November 2, 2017 Table of Contents 1 Login to Provider Portal...6 1.1 Login Page... 6 1.1.1 "Click here to register" link... 7 1.1.1.1 "Providers click here" button (Provider Self-Registration)... 8 1.1.2
Link 1500 / Online Claims Entry User Guide
 Link 1500 / Online Claims Entry User Guide ABILITY Network Inc Copyright and Trademark Copyright Copyright 2016 ABILITY Network Inc. All Rights Reserved. All text, images, and graphics, and other materials
Health Services provider user guide
 Health Services provider user guide online claims submission... convenient service, delivered through an easy-to-use secure web site http://provider.ab.bluecross.ca/health... convenient service, delivered
Table of Contents. Page 2 of 49
 Web Portal Quick Reference Guide www.dc-medicaid.com Revised: 12/11/2017 Table of Contents Accessing the Web Portal... 3 Web Account Registration... 4 Inquiry Options... 6 Searching for Ordering/Referring
Part B. NGSConnex User Guide. https:/www.ngsconnex.com. Visit our YouTube Channel to view all of our videos! https://www.youtube.com/user/ngsmedicare
 NGSConnex User Guide Part B This guide provides information for our Part B providers on the different options available within our self-service portal, NGSConnex. https:/www.ngsconnex.com Visit our YouTube
PROVIDER PORTAL. Inpatient Authorization Module
 PROVIDER PORTAL Inpatient Authorization Module AUTHORIZATIONS A Dean Health Plan (DHP) authorization should be completed in full by a Primary Care Practitioner (PCP) or a DHP Specialty Provider. The authorization
Provider Portal 3.0 Manual. Health Axis 3.0 Provider Portal User Guide
 Provider Portal 3.0 Manual Health Axis 3.0 Provider Portal User Guide Table of Contents Provider Portal 3.0... 4 How to Access the Provider Portal... 4 Login credentials:... 4 How to Request Access to
Maine ASO Provider Portal Atrezzo End User Guide
 Maine ASO Provider Portal Atrezzo End User Guide October 2018 CONTENTS INTRODUCTION... 4 The KEPRO/Maine s Atrezzo Portal Guide... 4 SETUP AND ACCESS ATREZZO... 5 A. New Provider Registration/ Register
Provider Portal Claim Features Training MHO
 Provider Portal Claim Features Training MHO-2585 0119 MOLINA HEALTHCARE S PROVIDER PORTAL The Provider Portal is secure and available 24 hours a day, seven days a week. Register for access to our Provider
Provider Portal User Guide. For the Provider Portal External Use
 Provider Portal User Guide For the Provider Portal External Use IT Department Issued January 2017 mynexus 2017. All rights reserved. Version 1.4 Revised 07122017 Contents Getting Started with the Portal...
NHPNet User Guide Updated August 2017
 NHPNet User Guide Updated August 2017 Table of Contents Introduction... 3 How to Register for NHPNet... 6 Your Profile... 16 User Administration... 22 Authorizations & Referrals... 33 Provider Enrollment
HealthKeepers, Inc. Website User Guide: Precertification Requests
 HealthKeepers, Inc. Website User Guide: Precertification Requests Services, Emergent Admissions and Maternity/OB Use our provider website to determine whether a service requires precertification and to
QuickClaim Guide Group Health Cooperative of Eau Claire GHC13009
 QuickClaim Guide Administered by: Group Health Cooperative of Eau Claire 2503 North Hillcrest Parkway Altoona, WI 54720 715.552.4300 or 888.203.7770 group-health.com 2013 Group Health Cooperative of Eau
MillinPro+ USER GUIDE. A Complete Web-Based Platform for Managing Medical Bills and Insurance Claims
 MillinPro+ A Complete Web-Based Platform for Managing Medical Bills and Insurance Claims MILLIN ASSOCIATES, LLC USER GUIDE 2010-2012 Copyrights Reserved Millin Associates, LLC Document Change History Version
NEW AUTHORIZATION REQUEST USER GUIDE. For Premera Blue Cross Medicare Advantage Plans providers using Clear Coverage
 NEW AUTHORIZATION REQUEST USER GUIDE For Premera Blue Cross Medicare Advantage Plans providers using Clear Coverage 1 CLEAR COVERAGE NEW AUTHORIZATION REQUEST USER GUIDE 1. Log into One Health Port (OHP)
PROVIDER WEBSITE SITE ADMINISTRATOR GUIDE » PATIENT INQUIRY» CLAIM CENTER» FIND A DOCTOR» CLAIMS EDITING SYSTEM (CES)
") PROVIDER WEBSITE SITE ADMINISTRATOR GUIDE» PATIENT INQUIRY» CLAIM CENTER» FIND A DOCTOR» CLAIMS EDITING SYSTEM (CES) 2018 WPS Health Plan, Inc. 1 All rights reserved. JO7048 28898-085-1801 ADMINISTRATIVE
PROVIDER WEBSITE SITE ADMINISTRATOR GUIDE» PATIENT INQUIRY» CLAIM CENTER» FIND A DOCTOR» CLAIMS EDITING SYSTEM (CES) 2018 WPS Health Plan, Inc. 1 All rights reserved. JO7048 28898-085-1801 ADMINISTRATIVE
Idaho Medicaid: Utilization Review Program. Orientation and System Training August 9, 2016
 Idaho Medicaid: Utilization Review Program Orientation and System Training August 9, 2016 Welcome Earlier this year a competitive RFP was issued to award a contract to an organization to provide Utilization
Aerial iexchange Users Guide
 Aerial iexchange Users Guide 2014.1 How to Run the Util\\\ \user Disclaimer How to reach us Copyright Information contained in this document is subject to change without notice and does not present a commitment
Helping Government Serve the People
 Helping Government Serve the People Maryland - IRO Portal Provider Job Aid v. 1.2 (12/4/2014) These instructional materials provided by the MAXIMUS Instructional Design Team based in Pittsford, NY. Contents
Massage therapy user guide
 Massage therapy user guide online claims submission... convenient service, delivered through an easy-to-use secure web site http://provider.ab.bluecross.ca/health September 2013 Massage therapy provider
Health Axis Provider Portal Training
 Health Axis Provider Portal Training August 2017 Important Notes Our new system is called Health Axis. The system will be effective on January 1 st, 2017. Our new Health Axis system should only be accessed
Your NetCare Provider Website
 Your NetCare Provider Website Your NetCare Provider Website The NetCare Provider Website offers Providers a user-friendly web experience, including account information and various other tools in a secure
Plan Central Employer Portal Learning Guide
 Plan Central Employer Portal Learning Guide Contents Introduction... 2 Enhancements to the New Plan Central... 2 User Roles... 3 Printer Friendly... 3 Accessing Plan Central... 3 Plan Central Welcome Page...
User Guide. Version 3.0. Revision Date: 11-Feb Esoterix, Inc., All Rights Reserved
 User Guide Version 3.0 Revision Date: 11-Feb-04 2004 Esoterix, Inc., All Rights Reserved Contact Us Contact us if you have any questions or comments. Client Services and Technical Support Phone Fax (800)
EZClaim Advanced Quick Start Guide
 EZClaim Advanced Quick Start Guide May 2016 TriZetto Clearinghouse Documents If submitting your claims through the clearinghouse TriZetto, click here for the TriZetto User Guide and TriZetto Payer List
A handy reference for the S.C. Medicaid Web-based Claims Submission Tool: Lists (pg.1) History (pg. 3) Claims Entry (pg. 2)
 History (pg. 3) Claims Entry (pg. 2)") A handy reference for the S.C. Medicaid Web-based Claims Submission Tool: Lists (pg.1) History (pg. 3) Claims Entry (pg. 2) Eligibility (pg. 5) Claim Submission (pg.3) e-remits (pg.6) Status (pg. 4) Lists
A handy reference for the S.C. Medicaid Web-based Claims Submission Tool: Lists (pg.1) History (pg. 3) Claims Entry (pg. 2) Eligibility (pg. 5) Claim Submission (pg.3) e-remits (pg.6) Status (pg. 4) Lists
Provider Portal User Guide
 Provider Portal User Guide May 2018 1 TABLE OF CONTENTS SECTION 1 WELCOME TO THE PROVIDER PORTAL SECTION 2 ACCESS THE PROVIDER PORTAL SECTION 3 HOME PAGE SECTION 4 ELIGIBILITY - BENEFITS Section 5 CLAIM
Change Healthcare Provider Portal
 MED3000, a wholly owned subsidiary of Change Healthcare Change Healthcare Provider Portal Overview The provider portal provides secure, web-enabled, role-based access. You will be able to perform the following
SECURE PROVIDER WEB PORTAL AND ELECTRONIC CLAIMS SUBMISSION SERVICE
 SECURE PROVIDER WEB PORTAL AND ELECTRONIC CLAIMS SUBMISSION SERVICE SECURE PROVIDER WEB PORTAL AND ELECTRONIC CLAIMS SUBMISSION SERVICE INTRODUCTION...3 COMPUTER AND INTERNET REQUIREMENTS...4 REGISTERING
Reference Services Web Portal
 User Guide What is the Reference Services Web Portal? T he Reference Services Web Portal is a way for all of the Marshfield Labs Reference clients to access and maintain their client information remotely
Medication precertification requests
 Medication precertification requests Medication precertification requests Use our provider self-service website to submit precertification requests for members who need medications considered to be: General
TransUnion Healthcare Solutions Portal User Guide
 TransUnion Healthcare Solutions Portal User Guide HSP.transunion.com February 16, 2018 Version 2.30 2017 TransUnion LLC All Rights Reserved No part of this publication may be reproduced or distributed
ProviderConnect Registered Services Autism Service Provider User Manual ASD Behavioral Assessment, Treatment Plan and Program Book Development
 ProviderConnect Registered Services Autism Service Provider User Manual ASD Behavioral Assessment, Treatment Plan and Program Book Development Created 9/1/17 Table of Contents Introduction... 3 Accessing
Precertification/Notification Requests: Services, Emergent Admissions and Maternity/OB
 Precertification/Notification Requests: Services, Emergent Admissions and Maternity/OB Use our provider self-service website to determine whether a service requires precertification or notification and
Meritain Connect User Manual. for Employees. 1 Meritain Connect User Guide for Employees
 Meritain Connect User Manual for Employees 1 Meritain Connect User Guide for Employees Contents Introduction... 4 Accessing Meritain Connect... 5 Logging In... 5 Forgot Password... 6 Registration Process...
Trading Partner Account (TPA) Registration and Maintenance User Guide. for. State of Idaho MMIS
 Registration and Maintenance User Guide. for. State of Idaho MMIS") Trading Partner Account (TPA) Registration and Maintenance User Guide for State of Idaho MMIS Date of Publication: 3/8/2018 Document Number: RF019 Version: 5.0 This document and information contains proprietary
Trading Partner Account (TPA) Registration and Maintenance User Guide for State of Idaho MMIS Date of Publication: 3/8/2018 Document Number: RF019 Version: 5.0 This document and information contains proprietary
TexMedConnect Acute Care Manual
 TexMedConnect Acute Care Manual v2016_0513 Contents 1.0 Overview.......................................... 1 2.0 TexMedConnect Internet Requirements.......................... 2 3.0 Getting Support......................................
Plan Central Member Portal Learning Guide
 Plan Central Member Portal Learning Guide Plan Central Member Guide, April 2015 Table of Contents Introduction... 2 Accessing Plan Central... 3 Plan Central Welcome Page... 3 New to Plan Central... 4 Member
Medication Precertification Requests
 Medication Precertification Requests Use our provider self-service website to submit precertification requests for members who need medications considered to be: General pharmacy dispensed directly to
Clean Claim Edits UB04
 Provider s name, address and telephone number Clean Claim Edits UB04 1 Yes Reject Reject if blank or if address is not a physical address (PO BOX, Lock BOX, etc is not valid). 9 Digit billing provider
HPHConnect for Employers User s Guide
 HPHConnect for Employers User s Guide Copyright 2017 Harvard Pilgrim Health Care, Inc. All rights reserved. Harvard Pilgrim Health Care and the Harvard Pilgrim Health Care logo are trademarks of Harvard
Covisint DocSite Enterprise
 Covisint DocSite Enterprise June 2013 Site Administrator User Guide Covisint DocSite Enterprise Site Administrator Guide Compuware-Covisint All rights reserved 2013 SiteAdminGuideDocSite-2013.5-061113
Health Services Advisory Group, Inc. Hawaii epasrr Frequently Asked Questions
 Health Services Advisory Group, Inc. Hawaii epasrr Frequently Asked Questions January 2018 Table of Contents How do I obtain a user account for the epasrr system?... 1 What do I do if I am unable to log
Quick Start for Premier Billing
 Quick Start for Premier Billing This Quick Start will take you through the basics of the program and guide you through entering your first claim. NOTE: Refer to the full online manual for information on
Commonwealth of Kentucky KY Medicaid KyHealth Net Long Term Care (LTC) Companion Guide
 Companion Guide") Commonwealth of Kentucky KY Medicaid KyHealth Net Long Term Care (LTC) Companion Guide Version 3.2 March 21, 2017 Revision History Document Version Date Name Comments 1.0 04/27/2010 EDI Created. 1.1 06/8/2010
Commonwealth of Kentucky KY Medicaid KyHealth Net Long Term Care (LTC) Companion Guide Version 3.2 March 21, 2017 Revision History Document Version Date Name Comments 1.0 04/27/2010 EDI Created. 1.1 06/8/2010
EZClaim Premier ANSI 837P TriZetto Clearinghouse Manual
 EZClaim Premier ANSI 837P 5010 TriZetto Clearinghouse Manual EZClaim Medical Billing Software November 2016 TriZetto Site ID# TriZetto SFTP Password Trizetto Website login Password Enrollment Process for
Patient Registration
 Patient Registration Adding a Patient Adding a new patient through SequelMed can be accomplished through just a few steps: Defining the Patient Attaching a Plan (optional) Attaching Documents (optional)
ONLINE EMPLOYER CENTER GUIDE
 ONLINE EMPLOYER CENTER GUIDE 2019 Table of Contents: Login Screen... 2 My Account... 3 Admin... 5 Add Administrator User Accounts... 6 View Users... 7 Eligibility Maintenance... 8 Add Subscriber/Family...
Authorization Submission and Inquiry Guide
 Authorization Submission and Inquiry Guide January 2018 Independence Blue Cross offers products through its subsidiaries Independence Hospital Indemnity Plan, Keystone Health Plan East, and QCC Insurance
PSYCH ADMISSION REVIEW REQUEST eqsuite User Guide 2014
 PSYCH ADMISSION REVIEW REQUEST eqsuite User Guide 2014 Introduction This user guide is intended to provide guidance for submitting PSYCH admission review requests through our Web-based system, eqsuite.
Dental Connect Payers
 Dental Connect Payers User Guide 2.1 10/11/2017 Preface Preface Contents of the Change Healthcare documentation and software is copyrighted as a collective work under the laws of United States and other
Employer Resource Center Training Guide
 Employer Resource Center Training Guide Version 3 July, 2013 Page 1 07/2013 Overview Purpose The purpose of this Training Guide is to provide you with some basic information how to use the Blue Cross and
Blue Care Network s New e-referral Tool Frequently Asked Questions
 Blue Care Network s New e-referral Tool Frequently Asked Questions September 2014 Overview Blue Care Network is introducing a new e-referral system for managing referral and authorization requests. This
TexMedConnect Acute Care Manual
 TexMedConnect Acute Care Manual v2017_0427 Contents 1.0 Overview.......................................... 1 2.0 Accessing TexMedConnect and Internet Requirements.................. 2 2.1 Logon and Logoff....................................
Sourcing. Supplier Maintenance and Company Administration Buyer User Guide
 Sourcing Supplier Maintenance and Company Administration Buyer User Guide Version 6.1 Ion Wave Technologies, Inc. 2002-2008 Table of Contents Table of Contents...2 Welcome to Supplier Maintenance and Company
CERECONS. Provider Training
 CERECONS Provider Training February 2012 Table of Contents 1. Physician Dashboard 2 Eligibility Highlights 2 Clinical Alerts 3 Referral Alerts and Stats 4 Group Information 5 2. Edit Profile 6 3. Eligibility
LONG TERM CARE HOSPITAL ASSESSMENT SUBMISSION ENTRY & REPORTING TOOL (LASER) USER GUIDE IN SUPPORT OF VERSION (APRIL 2017)
 USER GUIDE IN SUPPORT OF VERSION (APRIL 2017)") LONG TERM CARE HOSPITAL ASSESSMENT SUBMISSION ENTRY & REPORTING TOOL (LASER) USER GUIDE IN SUPPORT OF VERSION 1.3.0 (APRIL 2017) Updated 3/2017 TABLE OF CONTENT INTRODUCTION... 4 INSTALLATION... 4 Installers
LONG TERM CARE HOSPITAL ASSESSMENT SUBMISSION ENTRY & REPORTING TOOL (LASER) USER GUIDE IN SUPPORT OF VERSION 1.3.0 (APRIL 2017) Updated 3/2017 TABLE OF CONTENT INTRODUCTION... 4 INSTALLATION... 4 Installers
2017 NURSING FACILITY
 2017 NURSING FACILITY Reference Guide All Cigna products and services are provided exclusively by or through operating subsidiaries of Cigna Corporation, including HealthSpring Life & Health Insurance
Office - Claims EMDEON OFFICE USER GUIDE - CLAIMS
 Office - Claims EMDEON OFFICE USER GUIDE - CLAIMS September, 2014 CONTENTS 1 INTRODUCTION... 9 1.1 OVERVIEW... 9 1.2 IMPORT... 9 1.3 CREATE... 9 1.4 LIST... 9 1.5 SUPPLEMENT... 10 1.6 REPORTING & ANALYTICS...
HealthConnect User Guide
 HealthConnect User Guide What is HealthConnect?... 2 Benefits of HealthConnect... 4 HealthConnect Homepage Initial Setup... 5 Tack Down the Menu Bar... 7 Setting Default Home Page... 7 Add HealthConnect
Using the Payor Agreement Library
 Using the Payor Agreement Library Introduction The purpose of this chapter is to provide instruction to users of the Payor Agreement Library. Application Prerequisites Each RelayHealth customer must designate
Electronic Appraisal Delivery (EAD) Portal. FHA EAD General User Guide
 Portal. FHA EAD General User Guide") Electronic Appraisal Delivery (EAD) Portal FHA EAD General User Guide Last Updated: October 2015 FHA EAD General User Guide Page 2 of 87 Version 1.3.1 TABLE OF CONTENTS INTRODUCTION... 6 WHAT IS THE ELECTRONIC
Electronic Appraisal Delivery (EAD) Portal FHA EAD General User Guide Last Updated: October 2015 FHA EAD General User Guide Page 2 of 87 Version 1.3.1 TABLE OF CONTENTS INTRODUCTION... 6 WHAT IS THE ELECTRONIC
CYBER Overview. Updated 10/3/17 #00895
 CYBER Overview Updated 10/3/17 #00895 What does CYBER stand for? Children and Youth Behavioral Health Electronic Record 2 What is CYBER? A fully functional Electronic Medical Records system, that is a
MyCare Ohio Provider Portal User Guide May, 2014
 MyCare Ohio Provider Portal User Guide May, 2014 MYCARE OHIO PROVIDER PORTAL TABLE OF CONTENTS MyCare Ohio Provider Portal... 4 Log In... 4 Log Out... 4 Registration... 4 Manage Users... 7 Current User
Arkansas Medicaid Provider Electronic Solutions (PES) Handbook. A user guide for HP Provider Electronic Solutions Software. v. 2.
 Handbook. A user guide for HP Provider Electronic Solutions Software. v. 2.") Arkansas Medicaid Provider Electronic Solutions (PES) Handbook A user guide for HP Provider Electronic Solutions Software v. 2.15 April 19, 2012 (Revised) HP Arkansas Title XIX Account 500 President Clinton
Arkansas Medicaid Provider Electronic Solutions (PES) Handbook A user guide for HP Provider Electronic Solutions Software v. 2.15 April 19, 2012 (Revised) HP Arkansas Title XIX Account 500 President Clinton
Provider Portal Guide
 Provider Portal Guide TOTAL HEALTH CARE Updated 4.17.2019 Quick Reference Registration 1-5 EOPS 6 Eligibility 7-10 Referrals 11-20 Claim Status 21 Remittance Advice 22-24 Member Roster 25-26 Adding Users
Odyssey File & Serve. Review Queue User Guide Release 3.11
 Odyssey File & Serve Review Queue User Guide Release 3.11 OFS-FS 200 3375 v.1 June 2015 COPYRIGHT AND CONFIDENTIALITY Copyright 2015 Tyler Technologies, Inc. All rights reserved. All documentation, source
Rabo Supplier Finance User Manual - Suppliers -
 Rabo Supplier Finance User Manual - Suppliers - Page 2 of 33 Table of Contents 1 About This Document... 3 1.1 Objectives of This Document... 3 1.2 Inside This Document... 3 2 Rabo Supplier Finance platform...
ONLINE PRE-CERTIFCATION PORTAL ONLINE PRE-CERTIFCATION PORTAL
 ONLINE PRE-CERTIFCATION PORTAL 2016 Overview For troubleshooting, questions, or login issues, please call 740-455-5199 or email info@qualitycarepartners.com The On-line Pre-Certification Portal, also referred
Web Portal User Guide
 Web Portal User Guide Table of Contents I. Introduction 2 II. User Account 3 III. Accessing Web Portal 5 IV. Eligibility 6 V. Authorization 1. Create Authorization 2. View Authorization 9 20 VI. Claim
IDRP Portal User Guide for Providers and Plans
 IDRP Portal User Guide for Providers and Plans Version 1.0, September 2017 Controlled electronic version prevails over printed copy of this document. Provided by MAXIMUS Federal Services, Folsom, CA. Work
Provider Portal Administration Guide
 Provider Portal Administration Guide Revision Date: 7/22/2011 Table of Contents Table of Contents Introduction... 3 User Accounts Overview... 3 Tier Structure... 3 Security Roles... 4 Guide Conventions...
For New Users. Activating Your KP Online Affiliate Account
 For New Users Activating Your KP Online Affiliate Account Although signing up for your affiliate account involves only five steps (in three phases), activating it may take time as approvals and communications
CAQH Solutions TM EnrollHub TM Provider User Guide Chapter 3 - Create & Manage Enrollments. Table of Contents
 CAQH Solutions TM EnrollHub TM Provider User Guide Chapter 3 - Create & Manage Enrollments Table of Contents 3 CREATE & MANAGE EFT ENROLLMENTS 2 3.1 OVERVIEW OF THE EFT ENROLLMENT PROCESS 3 3.2 ADD PROVIDER
OrderSmart. April 21, Passport Health Communications, Inc. All Rights Reserved
 OrderSmart P hysician Office userguide April 21, 2014 2014 Passport Health Communications, Inc. All Rights Reserved Table of Contents 1.0 General Information... 7 1.1 Product Overview... 7 1.2 Authorized
Covisint MIPS Quick Start User Guide
 Covisint MIPS Quick Start User Guide The Quick Start instructions explain the MIPS registration process, collecting and entering patient data online, and the submission process. Updated December 2017 Table
Behavioral Health e referral User Guide. Confidence comes with every card.
 Behavioral Health e referral User Guide Confidence comes with every card. September 2017 Dear Blue Cross Blue Shield of Michigan and Blue Care Network health care provider: Welcome to e-referral (also
New York Medicaid Provider Resource Guide
 New York Medicaid Provider Resource Guide Thank you for being a star member of our provider team. WellCare Health Plans, Inc., (WellCare) understands that having access to the right tools can help you
Provider Healthcare Portal
 INDIANA HEALTH COVERAGE PROGRAMS PROVIDER REFERENCE M ODULE Provider Healthcare Portal L I B R A R Y R E F E R E N C E N U M B E R : P R O M O D 0 0 0 5 9 P U B L I S H E D : F E B R U A R Y 1 6, 2 0 1
Helpful Hints: Request an Initial Authorization
 Helpful Hints: Request an Initial Authorization Select Location Select Location Window Patient Selection Referral Source Type Patient Last Name Patient First Name Patient DOB Insurance Name Subscriber
Online Authorizations Application - CareAffiliate Training Manual Inpatient Authorizations
 November 2017 1 Table of Contents Training... 3 Logout - do not X out... 3 Admissions and Transfer Team Hours... 3 Important Phone Numbers... 3 When not to use CareAffiliate... 4 Time Saving Tips!... 4
HIE Clinical Portal Non-Provider Manual 1 Last update: 2016/08/30 Alaska ehealth Network
 HIE Clinical Portal Non-Provider Manual 1 Last update: 2016/08/30 Alaska ehealth Network Table of Contents Overview... 2 Patient Privacy Policy & Access... 3 User Levels... 5 User Homepage... 7 Common...
West Virginia Trading Partner Account Claim Submission User Guide. Date of Publication: 04/03/2017 Document Version: 1.8
 West Virginia Trading Partner Account Claim Submission User Guide Date of Publication: 04/03/2017 Document Version: 1.8 Privacy and Security Rules Trading Partner Account Claims Submission User Guide The
Patient Portal User Guide The Patient s Guide to Using the Portal
 2014 Patient Portal User Guide The Patient s Guide to Using the Portal Table of Contents: What is the Patient Portal?...3 Enrolling in the Patient Portal.......... 4-19 A. Enrollment Option #1: First-Time
Provider Portal Guide TOTAL HEALTH CARE
 Provider Portal Guide TOTAL HEALTH CARE Quick Reference Registration 1-5 EOPS 6 Eligibility 7-10 Referrals 11-19 Claim Status 20 Remittance Advice 21-23 Member Roster 24-25 Adding Users 26-29 Registration
What is New in MyChart? My Medical Record Health Preferences Settings Appointments and Visits Visits Schedule an Appointment Update Information
 What is New in MyChart? On August 26th, we will be upgrading and changing the look and feel to our MyChart patient portal site. We would like to make you aware of a few differences that you will see, when
HOSPICE ABSTRACTION REPORTING TOOL (HART) USER GUIDE
 USER GUIDE") HOSPICE ABSTRACTION REPORTING TOOL (HART) USER GUIDE IN SUPPORT OF VERSION 1.5.0 (APRIL 2019) Page 1 of 60 TABLE OF CONTENT TABLE OF CONTENT... 2 INTRODUCTION... 4 INSTALLATION... 4 Installers Access Rights...
HOSPICE ABSTRACTION REPORTING TOOL (HART) USER GUIDE IN SUPPORT OF VERSION 1.5.0 (APRIL 2019) Page 1 of 60 TABLE OF CONTENT TABLE OF CONTENT... 2 INTRODUCTION... 4 INSTALLATION... 4 Installers Access Rights...
LONG TERM CARE HOSPITAL ASSESSMENT SUBMISSION ENTRY & REPORTING TOOL (LASER) USER GUIDE. IN SUPPORT OF VERSION (July 2018)
 USER GUIDE. IN SUPPORT OF VERSION (July 2018)") LONG TERM CARE HOSPITAL ASSESSMENT SUBMISSION ENTRY & REPORTING TOOL (LASER) USER GUIDE IN SUPPORT OF VERSION 1.4.0 (July 2018) 1 TABLE OF CONTENT INTRODUCTION... 5 INSTALLATION... 5 INSTALLERS ACCESS
LONG TERM CARE HOSPITAL ASSESSMENT SUBMISSION ENTRY & REPORTING TOOL (LASER) USER GUIDE IN SUPPORT OF VERSION 1.4.0 (July 2018) 1 TABLE OF CONTENT INTRODUCTION... 5 INSTALLATION... 5 INSTALLERS ACCESS
DXC Technology Provider Electronic Solutions Handbook
 Arkansas Medicaid Enterprise DXC Technology Provider Electronic Solutions Handbook A user guide for Provider Electronic Solutions (PES) Software Version 2.25 October 2017 Table of contents 1 What is PES?...
Desktop Charge Capture
 Version 4.2 Quick Start Guide for Healthcare Providers Desktop Charge Capture Physician Information System Contents Logging Into Desktop Charge Capture... 1 Introduction to Desktop Charge Capture... 3
Provider Information Management System (PIMS) User Guide
 User Guide") Provider Information Management System (PIMS) User Guide v2018_0807 Overview The Provider Information Management System (PIMS) application is used to manage and maintain provider accounts. It is accessed
Provider Information Management System (PIMS) User Guide v2018_0807 Overview The Provider Information Management System (PIMS) application is used to manage and maintain provider accounts. It is accessed
Insurer User Manual Chapter 5: Common Functionality
 Insurer User Manual Chapter 5: Common Functionality 2018 HCAI Communications Table of Contents Search... 2 Advanced Search... 3 Search Results... 4 Navigating in an OCF plan or invoice... 5 Description