MOODLE MANUAL TABLE OF CONTENTS
|
|
|
- Bethanie Hunter
- 6 years ago
- Views:
Transcription
1 1
2 MOODLE MANUAL TABLE OF CONTENTS Introduction to Moodle...1 Logging In... 2 Moodle Icons...6 Course Layout and Blocks...8 Changing Your Profile...10 Create new Course...12 Editing Your Course...15 Adding Resources...19 Insert a Label...20 Insert an Image Compose a Web Page...26 Upload a File...27 Link to a URL...29 Upload a EBook...32 Adding Activities...36 Creating Assignments...37 Creating a Quiz Create Quiz Questions...48 Quiz Question Bank...53 Adding Question to the Quiz...55 Preview Quiz 56 Creating a Wiki...57 Creating Forums...69 Posting to Forums...70 Editing and Replying to a Post...72 Creating a Glossary...73 Grades...91 Quick grading Student Enrollment.96 References
3 Introduction to Moodle Moodle is a learning management system that is designed to help instructors create an online classroom setting with opportunities for rich interaction and collaboration. Moodle contains various design aspects that allow instructors and students to interact, collaborate, and experience online learning in multiple ways. Moodle can be used to supplement on ground courses or can be used to host completely online courses. This Faculty Moodle Tutorial is designed to provide you with information on how to log in to Moodle, the basic features of Moodle, how to design and facilitate your course, and how to backup and restore your course. A typical online course will require: Reading assignments Papers and projects Discussion of course concepts Tests Additional learning opportunities This guide will provide you with the basic tools that you will need to navigate, design and facilitate a course in Moodle. 3

4 Logging In Visit the Shivaji University Kolhapur website at and click on the icon of moodle services on scrolling tag located at center. Click on a tab to Moodle. Also you can visit for moodle services. Our Moodle site should be displayed and will look something like the screen shot shown below: 4

5 The process for logging in is the same for both Faculty and students. In the top right corner of the screen it should say You are not logged in. Click on (Log in) and you will be taken to the login screen shown below. 5
6 6

7 Once you have logged in to Moodle, you will see Home Page of moodle services, or the page that lists all the courses uploaded by all teaching faculty. To access a particular course, click on the course name under the My courses section block on the left or click on the course name list of courses section in the center 7
8 Moodle Icons Moodle utilizes icons to distinguish certain functions. You will see the following icons within your course. These icons indicate different activities and resources: A forum. In the banner section of the course, this icon will also indicate the News Forum that houses course announcements Text-only documents. Microsoft Word documents. Link to an external website or file. Folders containing other files. Assignments that students turn in. A chat. These tools allow communication with the instructor or classmates in real time. A quiz, test, or exam in Moodle. A glossary. Access to the grade book. A lesson. Wiki Book 8
9 A Lesson 9

10 Course Layout and Blocks The image below is an example of a basic course layout in Moodle. Instructors may design their course to suit their own teaching style and course content. The sample provided below shows a basic course structure. A. This series of links is called a breadcrumb trail. Click on a link in the breadcrumb trail to navigate through the course and to visit specific points in the course. B. Use the Search Forums block to search for specific forum posts or keywords. C. The Participants block allows you to access a list of all users for the course. This is a quick method for checking attendance or for sending a message to a student. D. This banner area is common to every course in Moodle. Use this space to post important documents and items, like your course syllabus, the News Forum, an Ask a Question forum, a course banner image, and other course information. 10
11 E. The Administration Block contains important tools to facilitate the course. Use the Administration block to change course settings, access the grade book for the course, and to backup and restore your course. F. The Latest News block indicates any announcements made to the News Forum. G. Upcoming Events indicates upcoming assignment due dates and any updates or changes made to the course calendar. H. Recent Activities allows you to know who has been in the site and when. I. A blank course is formatted by weeks. Each week receives a separate block, designated by the dates for that week. This format and the number of weeks can be changed (see the Course Settings section for more details). J. This is an Activities block within Moodle. There are sometimes multiple Activities blocks available. Use this block as a shortcut to access different activity areas in the course. 11

12 Changing Your Profile In Moodle you have the option of setting up and maintaining your faculty profile. Your profile allows students to communicate with you and to get to know you within Moodle. Click on the My Profile Settings link located in the Administration block A: My Profile Settings This block contains the options regarding profile settings. B: Edit Profile Click on this link for editing the profile. C: Change Password Click on this link for changing the Password. Click on Edit profile to update your profile within Moodle. 12
13 A. View your first and last name in these boxes. B. Make sure you do not change your . If you change this, Moodle will not recognize you as a participant in Moodle site, and will remove your ability to access Moodle. C. You have a choice to hide your or allow everyone in Moodle to see your D. Insert your city/town and country. E. Leave the Timezone as the server s local time. F. Set preferred language to English. G. In the description section you can offer a summary about yourself. H. You can upload a picture of yourself in the Picture area. I. Click on Update profile to save your information. 13
14 Creation of New course To create a new course click on Site Administration in the Administration block at left side bottom. Select Courses and click on the Manage courses and Categories. Select the course category where you want to create the new course. 14

15 Select Categories in which you want to create a new course for e.g. If you want to create new course in science category then click on it.you will see screen as shown below. Click on the Create new course circled in the above picture. 15

16 Fill the all details of Course Like Course full name, Course short name, course summary. You can add summary files by drag and drop method. You can choose format for your course like weekly format or Topic format. By default it is in topic format. The next page has all the options and settings for the new course that you are creating. Remember, you can always alter these settings at all. After clicking on Save changes button course created. 16

17 Editing Your Course Before you can start designing your course, you have to Turn Editing On. To do this, click the Turn editing on button at the top right, or the link in the Administration block. Once you turn editing on, you are presented with a series of icons and options throughout the course. Notice that icons have appeared on the different blocks in the course. Each icon indicates a different editing function you can use to design your course: The arrow icon indicates that you can indent the item or move it horizontally on the page. The X icon indicates that you can delete the item. 17
18 The open eye icon indicates that you can choose to hide the item from student view. If you click the eye, the item becomes hidden from students, and a closed eye appears. The person icon indicates that you can choose to set up student groups to use the item. You might use this option if you have a discussion forum or assignment that is limited to one or more This icon indicates the move resource to desired location. This icon indicates the role assign role to students. This icon indicates the Duplicate. This icon indicates the Edit title. This icon indicates the Highlight the particular topic as current topic. The last editing function you should be aware of before you design your course is that you can choose to view the course from a student s perspective. To see what the course would look like to a student, choose the Student option from the Switch role to in Administration Block. 18

19 To view the course from a Teacher s view, click Return to my normal role at the top right corner in the window. 19
20 20

21 Adding Resources There are two basic categories for items that you can use to design your Moodle course: resources and activities. Resources are non-interactive items that you can use to distribute information to your students. Commonly used resources include Book, File, Folder, IMS content package, Labels, web pages, and links to files or websites. 21


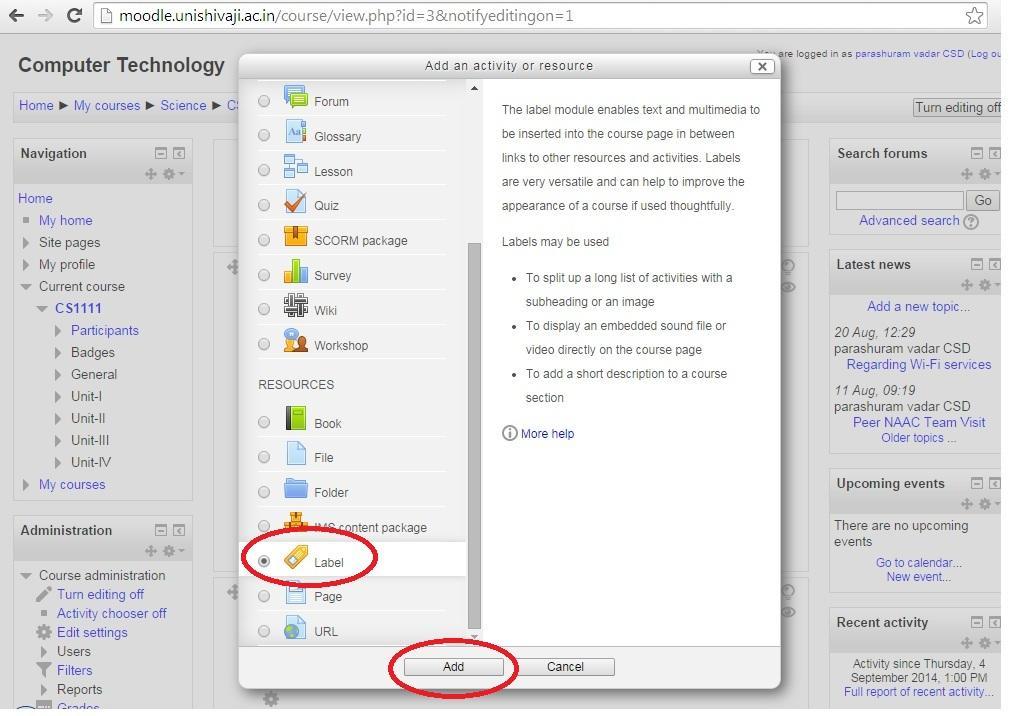
22 Insert a Label Labels are text or images are embedded in your main course page. Use labels to direct students to information and to organize the layout of your course. To insert a label, Turn Editing On by clicking the Turn Editing On button. Scroll to where you want to insert a label and click on add an activity or resource select a Label from the Resources. Click on add button. 22
23 23
24 If you would like to insert a text label, type the text for the label in the Label text box and click Save and return to course. If you would like to insert an image label, select the image icon in the toolbar. 24
25 25

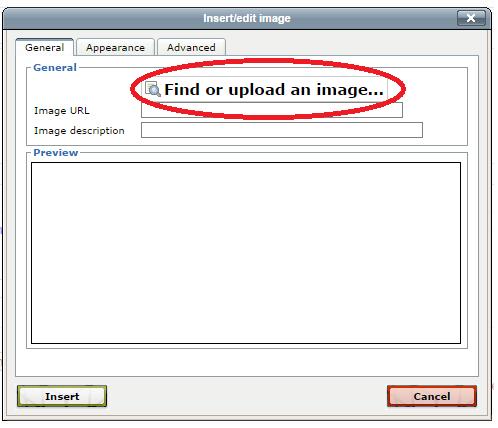
26 An Insert Image popup box will appear. Click the Find or upload an image button at the top of the box and locate the image you would like to upload to your label. The image must be saved on your computer hard drive. Once you ve selected the file, click Upload. 26

27 Click the link to the image you ve uploaded, and the image will appear in the text box. Enter an Alternate text in the text field, and click OK. The alternate text is required, in case the image becomes unavailable or the link becomes broken. Click Save and return to course. 27
28 Compose a Web Page Web pages are pages that can be created and linked from your main course page. Use web pages to provide detailed information to students. Using web pages prevents your course from being wordy or over-textual in appearance. To compose a web page, Turn Editing On by clicking the Turn Editing On button. Select where you want to add a web page and select page from the Add a resource appears after clicking on Add an activity or resource link. Type in the name of your web page, write a short summary of what the page will entail, and compose the web page. Then click Save and return to course. 28
29 Upload a File You can upload external files like Microsoft Word, Excel, or PowerPoint documents or other format files in your Moodle course. Use external to direct students course content or to supplement your course with material. To upload a file, Turn Editing On by clicking the Turn Editing On button. Select where you want to upload a file and select File from the Add a resource appears after clicking on Add an activity or resource link. If you would like to upload a file, type the name of the file, write a short summary of what the file is, and click Chose a file to browse and upload the file.. 29

30 You can also add a file by the drag and drop method from a particular location. 30
31 Link to a URL To link to a URL, Turn Editing On by clicking the Turn Editing On button. Select where you want the link or a file to appear and select URL from the Add a resource appears after clicking on Add an activity or resource link. 31
32 If you would like to link to a URL, type the name of the link, write a short summary of where the link will take students, and type URL address in box directly or You can choose a link. 32

33 Then click Save and return to course. 33

34 Upload a EBook The Book module enables a teacher to create a multi-page resource in a book like format, with chapters and subchapters. Book can contain media files as well as text and are useful for displaying lengthy passages of information which can be broken into sections. To write a book, Turn Editing On by clicking the Turn Editing On button. Select where you want to write a book and select Book from the Add a resource appears after clicking on Add an activity or resource link. If you would like to write an EBook, type the name of the Book, write a short summary of what the Book is, Click on Save and return to course at the bottom of the screen when you are finished 34
35 . After saving the details of adding new Book, the book icon appear like in following picture. To add chapters and content click that link highlighted in picture. 35

36 After clicking You need to fill related content. 36
37 37

38 Adding Activities Activities are the second basic category that you can use to add elements to your Moodle course. Activities are interactive or graded items. Commonly used activities include Assignments, Chats, Choice, External Tool, Database, Forum, Glossary, Lesson, Quiz, SCROM package, Survey, Wiki, Workshop. 38

39 Creating Assignments To create assignment, Turn Editing On by clicking the Turn Editing On button. Select section where you want the the assignment to appear and select Assignment from Add an activity or resource. A. Type the name of the assignment. B. Write a description of the assignment. C. Set the Availability time for assignment. 39
40 D. Set the Submission Type E. Set the Feedback Type F. Set the Submission G. Set the Notification H. Set the Grade for assignment Then click Save and return to course. 40
41 41
42 42
43 Creating a Quiz Moodle offers the option of creating a quiz that can either be scored and calculated to your gradebook automatically or manually graded. Creating a quiz in Moodle is a two step process; first, you create the body of the quiz; second, you create the questions. First Turn editing on. If you would like the test to appear click on the Add an activity. Click on Quiz. 43

44 quiz. When the screen refreshes you will be asked to enter information about the set up of the 44
45 45
46 A. General 1. Enter the Name of the quiz. 2. In the space provided for the Description provide the instructions for the quiz. B. Timing 1. Set the release dates for the quiz. By clicking the Disable box at the end the quiz is left available. 2. By clicking the Enable box you can determine set the amount of time students will have to take the quiz. 3. If Quiz time expires make related setting. 46
47 C. Grades 1. This is regarding grade category. 2. Set how many attempts students will have. 3. This sets the amount of decimal points displayed for students after their grade. D Layout 1. Set the question order for the quiz 47
48 2. Sets the number of questions appear on new page E. Question Behavior 1. Set the shuffling of question. 2. Set question behave after submission of answer. F. Review Options This setting determines the type and when responses are given during and after a quiz. You will be able to set feedback for specific questions when you create the questions; overall feedback for the quiz is set under the Overall feedback section. Checking the options provided will provide students with information: 1 Provide responses during the question attempt. 2. Immediately after they ve attempted a question. 3. Provide responses after the questions, while the quiz is still open. 4. Provide responses once the quiz is closed. G. Display 1. Set User picture to show 2.Set decimal places in grades. 48
49 H. Overall Feedback The overall feedback is shown to a student after they have completed the quiz. 1. Setting the grade boundary determines the score needed for that particular response. 2. Information provided here will appear to the students after the quiz and if their score matches up with the corresponding grade boundary. 3. Clicking Add 3 more feedback fields will provide more fields to set grade boundaries and feedback. Click Save and return to course at the bottom of the screen. Note: You can always come back and adjust the quiz settings up to the point a student takes the quiz. 49
50 Creating Quiz Questions A. In the section titled Quiz Administration click on Question Bank. B. Click on the Question. C. Choose the name of category Begin to add questions to this category by clicking on Create new question under the Question bank section. This is an illustration for a multiple choice question. Click on Multiple Choice from the drop down menu. 50

51 When you the screen refreshes you are able to develop the question. General 1. Type the name of the question. Choose a name that you will be able to associate with for future classes. 2. Enter the question as you need it to appear to students. Below the text box are more options. 51

52 1. Default question grade sets the amount of points each question is worth for the quiz. 2.General feedback will be sent to all students once they ve completed the question. 3. One or multiple answers allows for more than one correct answer for a question. 4. If you check the box for Shuffle choices the order of choices will be different for each student. 5. Number the choices determines how the sequence of choices will display for students. Choice In the Choice section you will provide the possible answers, determine the point value, and possible feedback. 52


53 1. In the column for Answer provide a possible choice. 2. Grade determines the point value of this answer. Typically if it is the correct answer choose 100% and if it is the incorrect answer choose None. 3. If you fill in Feedback it will only display to the student if this is the answer they choose. You can fill in as many choices as you wish. For instance, if you only want to then fill in two choice and Save changes at the bottom of the screen. If you need more choices than Moodle originally provides scroll down under Choice 5 and click Blanks for 3 More Choices. Combined Feedback Filling in the text boxes for combined feedback will appear every student depending on their how they answer. Your choices are For any correct response, For any partially correct response, and For any incorrect response. 53
54 Providing feedback is an important aspect for students. Use these options to clarify, explain and illustrate what the correct response should or could have been. Also, when student perform well it is important to enforce that as well. Use the feedback option to compliment their work. When you are finished click Save changes at the bottom of the screen. 54

55 Quiz Question Bank Next you will need to add the question(s) to the quiz. Go back to the Editing Quiz view. Your question will now appear under the Question bank section Note: Remember, the question will appear as long as you have the correct Category chosen 55

56 Check the box Click Add to quiz. Now question appear in the questions 56
57 57

58 Preview Quiz: To preview the quiz Click on Preview in Quiz administration. After attempting all question the following window will appear. 58
59 Creating a Wiki A wiki is a collection of collaboratively authored web pages. You will begin the wiki with an initial front page and add pages through links. Depending on the setting you choose, students will be able to create original work, edit and collaborate over activities and view what has been done. Wikis will track the history of users, making it easier for instructors to determine who has been contributing. Turn editing on. Click the Add an activity menu. 59

60 Then click Wiki. Name your wiki. Note: The name you give your wiki is not something that can be altered later. Make sure to consider this when naming your wiki. 60

 a Collaborative wiki 2) an Individual wiki.")
61 Provide a Description for your wiki. The Description section is where you will want to describe the content that outlines the wiki s purpose and any specific directions students will need for the wiki activity. Choose your wiki Mode. There are Two types of wiki Mode 1) a Collaborative wiki 2) an Individual wiki. The wiki mode determines whether everyone can edit the wiki - a collaborative wiki - or whether everyone has their own wiki which only they can edit - an individual wiki. First page name Title of the first page of the wiki Format 61
62 This setting determines the default format used when editing wiki pages. 1) HTML - The HTML editor is available 2) Creole - A common wiki markup language for which a small edit toolbar is available 3) Nwiki - Mediawiki-like markup language used in the contributed Nwiki module Click Save and return to course at the bottom of the page. You are then taken back to your course s initial interface. The wiki and its name will appear; you will see the name you have given it next to Moodle s wiki icon ( ). Adding Content Begin adding content to your wiki by clicking on its title from the course s interface. This is how the initial wiki interface appears: 62
63 Below is a breakdown of the main functions within the wiki s interface. 63
64 A. This is the Summary section for your wiki. This will remain at the top of each page created within a wiki. When you are finished, click on Save. B. These are tabs within the wiki that assist with its creation, navigation, and layout. View: By clicking on View you will be able to see how the wiki appears. Every page is displayed in view mode. Edit: Clicking on Edit allows you to create, add, or edit content in the text box provided. You will know you are in edit mode because you will have a toolbar across the top of the text box. 64
65 Comment: Clicking on the Comments you can write comments about Wiki in text box pointed by arrow and save it by clicking save changes tab History: The History tab gives you access to the version history of the page. Whenever anyone clicks the Save tab they create a new version of the wiki page. Moodle tracks all these versions until you clear them out. 65
66 Map: The Map tab at the top or link in the navigation block allows users to view areas of the wiki such as a list of pages (as in the following screenshot), updated or orphaned pages etc. (Orphaned pages are pages not linked to anywhere.) To select what you want to see, click the Map menu dropdown box. 66
67 Click on Files Click on Edit wiki files 67
68 Choose file. Find the file you wish to upload and double click on it, or click Open once it appears in the horizontal space provided. 68

69 The name of the file will appear. Click File upload. 69
70 Administration The Administration tab at the top or link in the navigation block is available to editing teachers in the course so they can delete page versions or selected pages. Clicking the "list all" button will list available pages to delete. The first page of the wiki cannot be deleted. 70

71 Creating Forums Discussion boards in Moodle are called forums. You can use forums to discuss topics related to the course content. In every Moodle course, there is a specialized forum called the News Forum. The News Forum essentially acts as an Announcements area, where you can make class announcements. The News forum will always appear in the top section of your course. block. When a new post is made to the News forum an update appears in the Latest News 71
72 Posting to Forums To post to a forum, access the forum you would like to post to. Click the Add a new topic button to add your post. A. Enter the subject of your post. B. Compose your message. C. The attachment box allows you to upload necessary documents. D. Click on Post to forum to post your message. If your post was successfully added, an information page will appear: 72
73 post. Click the Continue link. You are returned to the Forum page where you will see your 73

74 Editing or Replying to a Post To edit a post, click on your post in the discussion column. Note: your post link is also the subject title you gave it when you prepared your post. When the screen refreshes click Edit to edit your post. A. Edit the post you have made. B. If you are reading someone else s post you can reply to the post 74
75 Creating a Glossary Glossaries are a way to build and maintain course specific terminologies and meanings. There is a main glossary that only the instructor can edit, but you can create secondary glossaries to allow students to comment, enter new terms, and auto-link. Turn editing on. Under Add an activity click on Glossary. 75
. Next, provide a description of the Glossary.")
76 When the screen refreshes provide a name (keep in mind this name is what will appear in the course). Next, provide a description of the Glossary. 76

77 Name Give your new glossary a descriptive name. Description Describe the purpose of the glossary and provide instructions or background information, links etc. Click the icon top left to expand the toolbars, and drag the bottom right of the text box out to expand it. Display description on course page If this box is ticked, the description will appear on the course page just below the name of the glossary. Glossary type For Glossary type your options are Main glossary and Secondary glossary. 1. Main glossary is only edited by the instructor; keep in mind you can always export entries from a Secondary glossary to a Main glossary. 2. Secondary glossary is a glossary that students and course users can add, edit, and develop content for. 77
78 Entries Approved by default If set to "yes" then new entries appear automatically. If not, then the teacher must approve each one first. Always allow editing If set to "yes", students can edit their entries at any time. If not, then they can only edit for a certain period. Duplicate entries allowed This allows the entry of more than one definition for a given word. Allow comments on entries Students and teachers can leave comments on glossary definitions. The comments are available through a link at the bottom of the definition. Automatically link glossary entries Automatically link glossary entries will highlight any word added to the glossary, no matter where it appears in the course. Users in the course are able to click on the highlighted word and are linked back to the glossary and the definition. 78
 Encyclopedia: Like 'Full with author' but attached images are shown inline 3) Entry list: This lists the concepts as links. 4) FAQ: Useful for displaying lists of Frequently Asked Questions.")
 Full without author: A forum-like display that does not show the author's data. Attachments are shown as links.")
79 Appearance Display format provides seven options: 1) Continuous without author: Shows the entries one after other without any kind of separation but the editing icons. 2) Encyclopedia: Like 'Full with author' but attached images are shown inline 3) Entry list: This lists the concepts as links. 4) FAQ: Useful for displaying lists of Frequently Asked Questions. It automatically appends the words QUESTION and ANSWER in the concept and definition respectively. 5) Full with author: A forum-like display showing the author's data. Attachments are shown as links. 6) Full without author: A forum-like display that does not show the author's data. Attachments are shown as links. 7) Simple, dictionary style: Looks like a conventional dictionary with separate entries. No authors are displayed and attachments are shown as links. Approval display format 79
80 It is possible to set an alternative display format for when entries are approved that can differ from the display format on the course page. This could be useful for instance if a tutor wants to see who made a particular glossary entry before approving it but doesn't want the students' name to be displayed for others on the course page. Entries shown per page Decide here how many entries to show per page. Show alphabet links Show alphabet will display the alphabet for easier browsing within the glossary. Show 'ALL' link Show All link will allow the students to see all the glossary entries at once. Show 'Special' link Show Special link allows users when they browse the glossary to select the first character of a word from a list. This will also display special characters such *, #, etc Allow print view 80
81 This provides a printer-friendly version link for students. (Teachers are always provided with a printer-friendly version link.) Grade Next is the Grade section. This setting controls the category in which this activity's grades are placed in the gradebook. Ratings Roles with permissions to rate Glossary entries can be rated using a scale. By default, only teachers can rate glossary entries, though students can be given permission to do so if desired from Administration>Glossary administration. This is a useful tool for giving students participation grades. Any ratings given are recorded in the gradebook. 81
 Visible: Choose whether to Show or Hide the glossary.")
82 Restrict ratings to entries with dates in this range If you click on the box behind the phrase Restrict ratings to entries with dates in this range: you can determine specific date ranges that entries are graded. Clicking the box will cause the date and time option to become available. Common module settings 1) Visible: Choose whether to Show or Hide the glossary. 2) Id number: Setting an ID number provides a way of identifying the activity for grade calculation purposes. If the activity is not included in any grade calculation then the ID number field may be left blank. The ID number can also be set in the gradebook, though it can only be edited on the activity settings page. When finished click on Save and return to course at the bottom of the screen. Your glossary will appear with its title next to this icon: 82
83 Add a Glossary Entry Once you have created a glossary and set up its functionality you can begin entering terms. Remember: Depending on whether or not you set the glossary as Main or Secondary will determine if students are able to add entries. Click on the glossary link on your course s interface. The main view of the glossary offers options on how you search or sort through entries. Keep in mind some of the options available will depend on how you configure the setting options when creating the glossary. 83
84 The description you provide for the Glossary is located at the top. Typing a word into the search box provided at the top will search all entries and display the ones with that word in them. Type the word into the space provided directly behind the Search tab, then either click enter or the Search tab. Entries will appear below. Click Add a new entry to enter a new word and its definition. 84
85 Add the new term next to Concept. In the space provided under Definition enter the term s meaning. Each entry in the glossary can have an associated list of Keywords (or aliases). Enter each alias on a new line (not separated by commas). The aliased words and phrases can be used as alternative ways to refer to the entry. 85

86 If you wish, you can attach a file by clicking on add icon. Click on Choose File Next, locate the file you wish to upload on your computer. 86


87 Then click on the file you wish to upload. Once its name appears in the rectangle next to File name: click on Open. Once you click on Update this file at the bottom the file will be attached. 87
88 Choose the Auto-linking settings next (if this was enabled in the Glossary settings in the initial setup). 1. Clicking on the box behind This entry should be automatically linked enables that whenever the concept s words and/or phrases appear throughout the rest of the same course users are able to link to the glossary. The auto-linking will happen whenever the words or phrases are used in a forum, assignment, web or text page, and a description field. Once a user clicks on the word a new window with the glossary entry will pop up. Note: The other two options for Auto-linking will be made available if you have selected This entry should be automatically linked. 2. Checking the box behind This entry is case sensitive specifies whether matching exact upper and lower case is necessary when performing automatic linking to these entries. 3. If automatic linking is enabled, then turning on Match whole words by clicking on the box behind the phrase will force only whole words to be linked. For example, a glossary entry named "demo" will not create a link inside the word "demonstration". When finished click Save changes at the bottom. 88
89 When the screen refreshes the entry will be shown. If you have attached a document it will be found on the right hand side of the entry. Keywords will be located in the drop down menu in the middle of the entry. You are able to delete the entry by clicking on the X in the bottom right corner of the entry. You are able to edit the entry by clicking on the edit icon in the bottom right corner of the entry. Add Categories Categories can assist with organizing glossary terms. If you have enabled auto-linking, category names can be linked along with individual entries. Create a category by clicking on the Browse by category tab in the main page of the glossary. 89
90 Click the Edit categories tab on the left side of the page Click the Add Category button. 90

91 Give the category a name. You can specify if you want the category to be automatically linked or not. Note: Categories are linked based on case sensitivity or whole match. Then click Save changes. You will be taken back to the Add Category option to repeat the process; when you are finished click on Back. To check the entries of the categories you have created click on the drop down menu titled All Categories on the right hand side. The name(s) of the categories you have created will appear. Click on the name of the category you wish to access and the page will refresh, taking you to that category s entry(s). 91
92 92

93 Grades This section will discuss the various options you have to grade an assignment once it has been submitted through Moodle. Access the gradebook by clicking on Grades in the Administration Block. To grade an assignment click on the assignment s name. To grade a submitted assignment click on Grade. 93
94 You will know if an assignment has been submitted if under Last Modified (Student) there is a document with the date and time for when it was submitted. 94
95 After you click on Grade a pop-up window appears 95
96 A. Drop down the grade scale to choose which grade to assign. B. In this box you can type in feedback for students. C. Any edits or updates made you will need to click Save Changes to keep them. D. Clicking Save and show next will save any edits or changes made to that student and automatically move you to the next student in the gradebook. E. Clicking on Next will take you to the next student in your gradebook. Once you have Save changes made the pop-up window will close. Moodle will now show the Grades.Status as Update instead of Grade and Last modified (Teacher) will have the date you made changes. Grade will show the points you assigned Final Grade will display the final total for that assignment. If you wrote comments they will appear under Comment (you can write as long of a response as you would like. Students will be able to view and read lengthy comments). 96
97 Quick Grading With quick grading allowed you will be able to add comments and grade directly from the Submissions screen. Check the box to Allow quick grading. When the screen refreshes you will be able to type in the Comment section and assign Grade. 97
98 Student Enrolment Enrolment, or 'enrollment', is the process of marking users as participants in the course, that includes both students and teachers. At the same time users are usually give a role in the course which specifies what they are allowed to do. Note:- When you start enrolling after creation of new course you must enrol yourself first because if you enrol another user first then that person become course creator. For Enrolment of Students, you can set different methods for it. There are Two methods available. 1) Manual Enrolment 2) Self Enrolment. 1) Manual Enrolment The manual enrolments plugin allows users to be enrolled manually via a link in the course administration settings. Checking you have manual enrolment in your course In a course, go to Administration > Course administration > Users > Enrolment methods Make sure Manual enrolments has its "eye" opened. 98
99 Editing manual enrolment settings: Managers (and any other users with the capability enrol/manual:config) can edit the manual enrolment method in the course and set the default enrolment period and default role in Administration > Course administration > Users > Enrolment methods>manual enrolements. 99
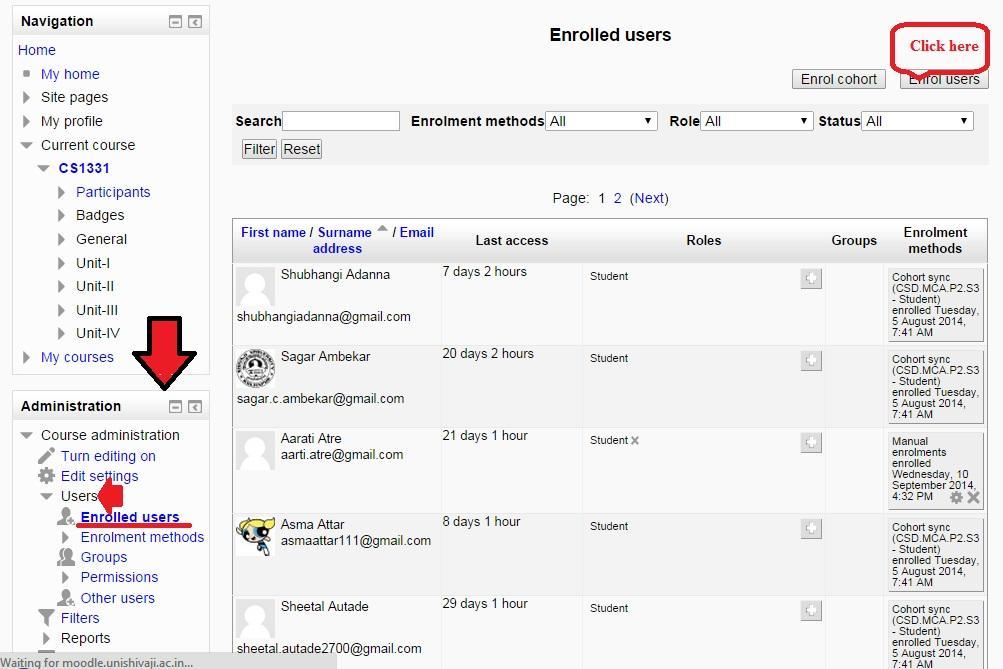
100 It is possible also for students and/or teachers to be notified when enrolments expire by selecting either "Enroller only" or "Enroller and enrolled user" from the dropdown "Notify before enrolment expires" and a time in "Notification threshold". Enrolling users Method 1 1. Go to Administration > Course administration > Users > Enrolled users 2. Click the 'Enrol users' button at the top right or bottom right of the page 100
101 101

102 3. Use the 'Assign roles' dropdown if you wish to change the role 4. Select enrolment options as appropriate 5. Browse or search for the user 6. Click the Enrol button opposite the user. The user will indent in the list and the enrol button will disappear, indicating that the user is enrolled. 7. When you have finished, click the 'Finish enrolling users' button (or simply close the enrol users box) The user will then appear in the list of enrolled users. 102

103 Method 2 1. Go to Administration > Course administration > Users > Enrolled users 2. Click the 'Enrol cohort' button at the top right or bottom right of the page 103
 The cohort member will then appear in the list of enrolled users.")
104 1. Use the 'Assign roles' dropdown if you wish to change the role 2. Browse or search for the user 3. Click the Enrol cohort button opposite the name of cohort. 4. When you have finished, click the 'Finish enrolling users' button (or simply close the enrol users box) The cohort member will then appear in the list of enrolled users. 2) Self Enrolment Self enrolment is the method whereby users can choose to enrol themselves into a course, either immediately by clicking "enrol me in this course" or by typing in an enrolment key they have been given. 104
105 Course settings for self enrolment Checking self enrolment is enabled In a course, go to Administration > Course administration > Users > Enrolment methods and ensure the "eye" is opened for self enrolment. 105
106 Adding an enrolment key to a course If you wish only a certain group of users to self enrol (and not anyone) then you can set an enrolment key which you then tell them to use when they access the self-enrolment screen. In the course administration block, click Users>Enrolment methods Make sure self enrolment is enabled (has its eye open) and then click the edit icon on the right 106
107 Add your enrolment key in the box provided. (Click Unmask to see what you are typing.) Click Save changes 107
108 Setting a group enrolment key It is possible also to enrol students into the course and also directly into groups by use of a group enrolment key. To do this, you first need to add the course enrolment key as in the section above. o If you do not set a master course enrolment key for the course, then anyone can enrol without a key and users will not be put into groups. o Users in groups do not need to know the master course enrolment key, only their own group enrolment key. o Users not in a group can use the master course enrolment key as usual Change the setting Use group enrolment keys to Yes Save the changes and then in the Course administration settings, click Groups>Create groups Add an enrolment key to the group. This will be the key they type in to access the course. (The course enrolment key is simply there to keep others out) 108
109 References:
Moodle Morsels from Sandy & Inkie. b. Click (Log in) on the upper right c. You will use your stpsb login, which is how you login to a computer
 on the upper right c. You will use your stpsb login, which is how you login to a computer") 1. To login to Moodle: a. https://moodle.stpsb.org Moodle Morsels from Sandy & Inkie b. Click (Log in) on the upper right c. You will use your stpsb login, which is how you login to a computer 2. Moodle
1. To login to Moodle: a. https://moodle.stpsb.org Moodle Morsels from Sandy & Inkie b. Click (Log in) on the upper right c. You will use your stpsb login, which is how you login to a computer 2. Moodle
CONTENTS. What is Moodle? Logging in to Moodle Introducing the Workspace Customising the Workspace... 8
 Moodle Training March 2012 Material produced by the VLE Group (Monash University) and elearning Services (Faculty of Medicine, Nursing and Health Sciences, Monash University) vle.monash.edu/supporttraining/learnbytech/moodle/
Chat Activity. Moodle: Collaborative Activities & Blocks. Creating Chats
 Chat Activity The Moodle chat tool allows communication between instructors and students in real time. Unlike in discussion forums, which are a means for asynchronous communication, online chat sessions
Table of Contents Tutorials for Faculty... 3 Creating a News Item... 3 Syllabus... 3 Uploading Your Syllabus... 3 Update Your Syllabus
 Table of Contents Tutorials for Faculty... 3 Creating a News Item... 3 Syllabus... 3 Uploading Your Syllabus... 3 Update Your Syllabus... 3 Email... 4 Send an Email to the Entire Class... 4 Send Email
STUDENT GUIDE TO MOODLE
 STUDENT GUIDE TO MOODLE Education Editing your Student Profile... 2 Engaging with Moodle Resources/ Activities... 3 Moodle books... 4 Composing... 5 Reading & Replying... 6 Editing a Post... 7 Displaying
1. To access the Course settings page, click Edit settings in the Administration block.
 Course Management Managing Course Design Configuring Course Settings The course setting page contains all of the important options for your course such as making the course available to students, and enabling
Table of Contents. 11:34:59 AM]
![Table of Contents. 11:34:59 AM]](/thumbs/83/87886816.jpg "Table of Contents. 11:34:59 AM]") Glossary Table of Contents GLOSSARY About this Tutorial Creating a Glossary General Grade Common module settings Glosary Main Page To update settings Adding Entries to the Glossary Creating Categories
Glossary Table of Contents GLOSSARY About this Tutorial Creating a Glossary General Grade Common module settings Glosary Main Page To update settings Adding Entries to the Glossary Creating Categories
Rutgers. A How-To Guide for Instructors
 Moodle @ Rutgers A How-To Guide for Instructors 7/30/2012 Prepared by the Department of Instructional Technology & elearning Solutions (ITeS) CA/NJDS, Room B725 Page 2 Table of Contents Required Software...
Introduction to Moodle
 Introduction to Moodle Preparing for a Moodle Staff Development Session... 2 Logging in to Moodle... 2 Adding an image to your profile... 4 Navigate to and within a course... 6 Content of the basic template
After entering a course, edit by clicking the Turn editing on button in the upper-right corner.
 Getting Started with Moodle After entering a course, edit by clicking the Turn editing on button in the upper-right corner. Editing icons: Hand with pencil icon: Edit X: Delete content Eyeball: Hide content
A Student Guide to using Moodle
 A Student Guide to using Moodle Version 1: September 2007 Table of Contents Introduction...3 What is Moodle?...3 How do I access Moodle?...4 What will I find in Moodle?...5 Accessing a course...5 The main
How to Build Your Course in Moodle
 How to Build Your Course in Moodle This tutorial will show you the basic functions of how to add and edit content to build your course in Moodle. To add or alter activities or resources, you will need
ACADEMIC TECHNOLOGY SUPPORT
 ACADEMIC TECHNOLOGY SUPPORT D2L : Introduction A Guide for Instructors ats@etsu.edu 439-8611 www.etsu.edu/ats Table of Contents Introduction...1 Objectives... 1 Logging In to D2L...1 My Home... 2 The Minibar...
Faculty Training. Blackboard I Workshop Bobbi Dubins
 Faculty Training Blackboard I Workshop Bobbi Dubins Table of Contents Introduction... 2 blackboard.allegany.edu... 2 Overview of Features:... 2 Using Blackboard... 3 Changing Your Password... 3 How to
1. Go to https://online.national.edu/ 2. Click the link at the bottom that says Please click here for a System Check before you log in.
 Desire 2 Learn User Guide Desire 2 Learn User Guide Using the System Check Quick Link You can use the quick link on the entry page of the online classroom for a general test of your computer s preparedness
Goucher College Online Course Sites: Basic Navigation in Canvas
 Goucher College Online Course Sites: Basic Navigation in Canvas Find Your Course Material Edit a Topic Section Upload a File Drag and Drop Method to Upload a File Create a Content Page Create a Wiki Page
Introduction. Paradigm Publishing. SNAP for Microsoft Office SNAP for Our Digital World. System Requirements
 Introduction Paradigm Publishing Paradigm understands the needs of today s educators and exceeds the demand by offering the latest technological advancements for coursework settings. With the success of
BLACKBOARD CE6 Guide. Workshop Handout
 BLACKBOARD CE6 Guide Workshop Handout Table of Contents Why Blackboard...1 What s New in Blackboard...1 What Happened to my Course in WebCT... 2 How Do I Request a New Course Shell... 2 How Do I Log Onto
Student Guide INTRODUCTION TO ONLINE RESOURCES
 Student Guide INTRODUCTION TO ONLINE RESOURCES Date: 08. June. 2017 By: Technical Support Team STUDENT GUIDE southwales.unicaf.org 1)Introduction...4 2)Student Panel (SIS)...4 2.1)Student Panel (SIS) Login...4
PBWORKS - Student User Guide
 PBWORKS - Student User Guide Fall 2009 PBworks - Student Users Guide This guide provides the basic information you need to get started with PBworks. If you don t find the help you need in this guide, please
Introduction. Paradigm Publishing. SNAP for Microsoft Office SNAP for Our Digital World
 Introduction Paradigm Publishing Paradigm understands the needs of today s educators and exceeds the demand by offering the latest technological advancements for coursework settings. With the success of
OpenSpace provides some important benefits to you. These include:
 Cengage Education A member of Open Colleges Welcome to OpenSpace OpenSpace is our virtual campus. It is our online space for students, tutors and staff to interact. It provides you with a secure, interactive
Coastal Office of Online Learning
 Moodle Enhancements This resource guide highlights new features that are now available in the upgraded Moodle 3.1. It also addresses changes to existing features. Coastal Office of Online Learning Keep
Moodle Documentation for Students (v.3.4)
") Moodle Documentation for Students (v.3.4) Moodle Documentation for Students (v.3.4) GSC STAFF Moodle Documentation for Students (v.3.4) by GSC Staff is licensed under a Creative Commons Attribution-ShareAlike
Moodle Documentation for Students (v.3.4) Moodle Documentation for Students (v.3.4) GSC STAFF Moodle Documentation for Students (v.3.4) by GSC Staff is licensed under a Creative Commons Attribution-ShareAlike
CompClass User Guide for Students Rules for Writers, Sixth Edition. Hacker
 CompClass User Guide for Students Rules for Writers, Sixth Edition Hacker Getting Started with CompClass for Rules for Writers, Sixth Edition Table of Contents Overview... 1 Getting Help... 1 System Requirements...
Blackboard 1: Course Sites
 Blackboard 1: Course Sites This handout outlines the material covered in the first of four workshops on teaching with Blackboard. It will help you begin building your Blackboard course site. You will learn
A Student s Guide To Using
 A Student s Guide To Using The wording of this guide is targeted to students however the content applies to all users of Moodle. Table of Contents What is Moodle?... 3 How do I access my Moodle classes?...
Instructor User Guide for BioPortal Molecular Biology
 Instructor User Guide for BioPortal Molecular Biology Cox, Doudna, and O Donnel Getting Started with BioPortal for Cox, Doudna, and O Donnel, Molecular Biology Table of Contents Overview... 1 Online Help...
D2L Fundamentals Faculty Support Guide
 D2L Fundamentals Faculty Support Guide D2L Services West Chester University of Pennsylvania www.wcupa.edu/d2l 610-436-3350, option 2 Anderson Hall, room 2 d2l@wcupa.edu v10.5 July 2015 Contents NAVIGATING
This handbook contains directions on using tools and resources in WebAccess at CSM.
 WebAccess Handbook This handbook contains directions on using tools and resources in WebAccess at CSM. Contents Logging in to WebAccess... 2 Setting up your Shell... 3 Docking Blocks or Menus... 3 Course
Creating a Community or Class in elibrary PRO
 Creating a Community or Class in elibrary PRO Whether you are an instructor hoping to create a virtual gathering place for your students or a group of professionals looking for a home for your new ideas
Lasell College s Moodle 3 Student User Guide. Access to Moodle
 Access to Moodle The first session of this document will show you how to access your Lasell Moodle course, how to login, and how to logout. 1. The homepage of Lasell Learning Management System Moodle is
Contents. The Anatomy of a Moodle Classroom. Course Description:
 The Anatomy of a Moodle Classroom The Community College of Vermont (CCV) uses Moodle for its learning management system. Course Description: This document is a brief orientation to the requirements and
Wattle Guide for Lecturers
 Wattle Guide for Lecturers Moodle 3.3 Updated: January 2018 Wattle Introduction Guide for Lecturers [January 2018] Page 1 Table of Contents Wattle Guide for Lecturers... 1 Table of Contents... 2 Wattle
Buzz Student Guide BUZZ STUDENT GUIDE
 BUZZ STUDENT GUIDE 1 Buzz Student Guide The purpose of this guide is to enhance your understanding of the student navigation and functionality of Buzz, the Learning Management System used by Lincoln Learning
Getting Started with Moodle 2.0
 Getting Started with Moodle 2.0 Note: Please use Mozilla Firefox if you are working on a Mac 1. Login to Moodle 2. How to Access a Course 3 Edit your Profile Information 4. Add a Personal photo 5. Disable
Student Guide INTRODUCTION TO ONLINE RESOURCES
 Student Guide INTRODUCTION TO ONLINE RESOURCES Date: 12. March. 2018 By: Technical Support Team Table of Contents 1) Introduction 3 2) Student Panel (SIS) 3 2.1) Student Panel (SIS) Login 3 2.1.1) Definitions
Tutor Handbook for WebCT
 Tutor Handbook for WebCT Contents Introduction...4 Getting started...5 Getting a course set up...5 Logging onto WebCT...5 The Homepage...6 Formatting and designing the Homepage...8 Changing text on the
Canvas Instructor Quickstart Guide
 Canvas Instructor Quickstart Guide Canvas Instructor Quickstart Guide 1 Canvas Instructor Quickstart Guide 1.1 1.2 1.3 1.4 1.5 1.6 1.7 1.8 1.9 1.10 1.11 1.12 1.13 1.14 1.15 1.16 1.17 1.18 1.19 1.20 1.21
Student Guide. By UNICAF University
 vnhgfj Student Guide By UNICAF University 1 2 Table of Contents 1) Introduction... 5 2) Student Panel (SIS)... 5 2.1) Student Panel (SIS) Login... 5 2.1.1) Definitions... 5 2.1.2) Registration Email...
Student User Guide for StatsPortal Introduction to the Practice of Statistics, Sixth Edition
 Student User Guide for StatsPortal Introduction to the Practice of Statistics, Sixth Edition Moore Getting Started with StatsPortal for Moore, Introduction to the Practice of Statistics, 6e Table of Contents
Parent Student Portal User Guide. Version 3.1,
 Parent Student Portal User Guide Version 3.1, 3.21.14 Version 3.1, 3.21.14 Table of Contents 4 The Login Page Students Authorized Users Password Reset 5 The PSP Display Icons Header Side Navigation Panel
Instructor User Guide for PsychPortal Psychology, Eighth Edition in Modules
 Instructor User Guide for PsychPortal Psychology, Eighth Edition in Modules Myers Getting Started with PsychPortal for Myers, Psychology, Eighth Edition in Modules Table of Contents Overview... 1 Online
EXPLORING COURSE TOOLS
 EXPLORING COURSE TOOLS Now that we have covered the My Blackboard screen, let s explore the different tools that you might find within your course. NOTE: Your instructor controls which tools are available.
CENTRE FOR TEACHING AND LEARNING/STUDENT MOODLE HANDBOOK April 2018
 CENTRE FOR TEACHING AND LEARNING/STUDENT MOODLE HANDBOOK April 2018 Logging in to Moodle: Welcome to the College of New Caledonia! Logging in to Moodle is simple and easy! First, determine if your instructor
CompClass User Guide for Students The Bedford Handbook, Seventh Edition. Hacker
 CompClass User Guide for Students The Bedford Handbook, Seventh Edition Hacker Getting Started with CompClass for The Bedford Handbook, Seventh Edition Table of Contents Overview... 1 Getting Help... 1
Introduction to Moodle: Lesson 1 Setting Up a Course Homepage
 Introduction to Moodle: Lesson 1 Setting Up a Course Homepage Browser Choice: PC: Firefox or Internet Explorer Mac: Firefox. Do not use Safari, because some screens do not display correctly You will have
SpeechClass User Guide for Students A Speaker s Guidebook, Fourth Edition
 SpeechClass User Guide for Students A Speaker s Guidebook, Fourth Edition Getting Started with SpeechClass for A Speaker s Guidebook, Fourth Edition Table of Contents Overview... 1 Getting Help... 1 System
Instructor User Guide for EnviroPortal Environmental Science: Foundations and Applications Friedland, Relyea, & Courard-Hauri
 Instructor User Guide for EnviroPortal Environmental Science: Foundations and Applications Friedland, Relyea, & Courard-Hauri Getting Started with EnviroPortal for Friedland, Relyea, & Courard-Hauri Environmental
Canvas: Interface & Modules
 Canvas: Interface & Modules Contents View Dashboard... 2 Course Navigation Menu... 3 The Syllabus Tool... 4 View Syllabus Table... 5 Editing/Uploading the Syllabus... 6 Editing an Event or Assignment in
LearnMate 7 Student s Quick Start Guide November 2015 Catalog # Rev B
 Student s Quick Start Guide November 2015 Catalog # 200068 Rev B Contents 1. ENTERING LEARNMATE... 3 2. JOINING A COURSE... 5 3. THE LEARNMATE INTERFACE... 6 4. NAVIGATING IN LEARNMATE... 7 5. LEARNMATE
PBWORKS - Student User Guide
 PBWORKS - Student User Guide Spring and Fall 2011 PBworks - Student Users Guide This guide provides the basic information you need to get started with PBworks. If you don t find the help you need in this
QUICK GUIDE FOR USING BLACKBOARD LEARN 9.1 GETTING STARTED
 This quick reference guide will get you started using Blackboard Learn 9.1. The guide includes: Getting Started page 1 Users and Groups page 4 Communicating with Students page 4 Using the Virtual Collaboration
CompClass Solo User Guide for Instructors
 CompClass Solo User Guide for Instructors CompClass Solo User Guide for Instructors Table of Contents Overview... 1 Online Help... 1 System Requirements... 2 Adopting CompClass... 2 Student Access to CompClass...
Canvas Instructor Quickstart Guide
 Canvas Instructor Quickstart Guide Canvas Instructor Quickstart Guide 1 Canvas Instructor Quickstart Guide 1.1 1.2 1.3 1.4 1.5 1.6 1.7 1.8 1.9 1.10 1.11 1.12 1.13 1.14 1.15 1.16 1.17 1.18 1.19 1.20 1.21
An overview of Moodle blocks
 An overview of Moodle blocks Academic Advisers When you click on the link in the Academic Advisers block it will display information about the students enrolled on your current Moodle course. You can change
CANVAS STUDENT QUICKSTART GUIDE
 CANVAS STUDENT QUICKSTART GUIDE Table of Contents Get Started with Canvas...3 How do I log in to Canvas?...4 What is the Dashboard?...6 How do I view my courses?...10 How do I navigate a Canvas course?...12
CONTENT MIGRATION ANGEL TO BLACKBOARD CONTENTS
 Introduction CONTENT MIGRATION ANGEL TO BLACKBOARD Content that has been migrated from ANGEL into Blackboard Learn is preserved, but there will be differences in the functionality and layout of the migrated
Introduction... 4 I-Learn Introduction (Video)... 5 A Successful Start in Pathway (Video)... 6
... 5 A Successful Start in Pathway (Video)... 6") STUDENT GUIDES Table of Contents Introduction... 4 I-Learn Introduction (Video)... 5 A Successful Start in Pathway (Video)... 6 Student Communication... 7 How Do I Set My Time Zone?... 8 How Do I Exclude
STUDENT GUIDES Table of Contents Introduction... 4 I-Learn Introduction (Video)... 5 A Successful Start in Pathway (Video)... 6 Student Communication... 7 How Do I Set My Time Zone?... 8 How Do I Exclude
Visual Guide to Online Campus
 Contents Course Navigation... 2 Avatars..3 Text Editor... 4 Accessing Assignments... 6 Accessing Assessments... 9 Accessing and Participating in Discussions... 12 Discussion Forums and Threads... 14 Creating
Moodle Basics for Faculty. Skyline College Distance Education
 Moodle Basics for Faculty Skyline College Distance Education Rev. 8/8/2011 Table of Contents Getting Started with Moodle... 1 Browser Requirements... 1 Logging into Moodle... 1 Getting Help with Moodle...
Scholar for Research, Collaboration and Administration. Contents
 Scholar for Research, Collaboration and Administration Contents 1 What is Scholar?... 1 The Scholar Layout... 2 Creating a Scholar Project Site... 4 Site Info Area... 5 Resources Area... 6 Forums... 11
BLACKBOARD TRAINING PHASE 1 CONTENT MANAGEMENT. Popular Topics Part 2 Content Management, page 8-17
 BLACKBOARD TRAINING PHASE 1 CONTENT MANAGEMENT Popular Topics Part 2 Content Management, page 8-17 Table of Content Learning Outcomes:... 3 PART 1 Get started: Introduction to Blackboard Virtual Learning
CANVAS STUDENT QUICKSTART GUIDE
 CANVAS STUDENT QUICKSTART GUIDE Table of Contents Get Started with Canvas...3 How do I log in to Canvas?...4 What is the Dashboard?...6 How do I view my courses?...10 How do I navigate a Canvas course?...12
Blackboard 5 Level One Student Manual
 Blackboard 5 Level One Student Manual Blackboard, Inc. 1899 L Street NW 5 th Floor Washington DC 20036 Copyright 2000 by Blackboard Inc. All rights reserved. No part of the contents of this manual may
BYU-Idaho Online Knowledgebase
 STUDENT GUIDES Table of Contents Introduction...4 I-Learn Introduction (Video)...5 A Successful Start in Pathway (Video)...6 Student Communication...7 How Do I Set My Time Zone?...8 How Do I Exclude Some
To access your TITANium courses, login to your University portal and click on the TITANium tab.
 Below is a list of seven very basic skills to get your course open. 1. Access your TITANium courses. FDC TITANium Guides Seven Basic Skills to Get Your Course Open To access your TITANium courses, login
Table of Contents. How do I log into Moodle?...2. How do I find my course?...2. I found my course, now what do I do?...3
 Table of Contents How do I log into Moodle?...2 How do I find my course?...2 I found my course, now what do I do?...3 How do I turn in my work?...7 How do I post in a Discussion Forum?...8 How do I turn
OBJECTIVES. Introduction to mycourses
 OBJECTIVES Identify elements of mycourses from the instructor, designer and student perspective. Integrate content into a course in a variety of file formats. Learn to use the Communication Tools: Chat,
Confluence User Training Guide
 Confluence User Training Guide Below is a short overview of wikis and Confluence and a basic user training guide for completing common tasks in Confluence. This document outlines the basic features that
Blackboard Student Quick Reference Guide
 Blackboard Student Quick Reference Guide Welcome to Blackboard, UTT s E-Learning System! This Quick Reference Guide is designed to help get you started using Blackboard Release 9.1.120113.0. Page 1 of
Blackboard 1: Building a Course Site
 Blackboard 1: Building a Course Site This QuickStart outlines the material covered in the first of four workshops on teaching with Blackboard. It will help you to begin creating your Blackboard course
Blackboard Learn: Basics
 Blackboard Learn: Basics This document includes the following topics: 1. Log in Page 2 2. Find Your Courses Page 2 3. View Course Content Page 3 4. Add a Folder Page 3 5. Add a File Page 5 6. Add a Web
Blackboard Essentials
 Blackboard Essentials Who Can Help? Assistance via email: bbadmin@gvsu.edu Assistance via telephone: 616-331-9751 days Blackboard Help Documents on the web: http://www.gvsu.edu/elearn/help You will find
Instructor User Guide for EconPortal Macroeconomics, Third Edition
 Instructor User Guide for EconPortal Macroeconomics, Third Edition Krugman/Wells Getting Started with EconPortal for Krugman/Wells Macroeconomics, 3e Table of Contents Overview... 1 Online Help... 1 System
Welcome to our Moodle site! What is Moodle?
 Welcome to our Moodle site! We are excited to introduce the use of this online e-learning platform in our "Get SMART FAST" Training Program! We believe the use of this virtual classroom and training format
User Guide for Students
 User Guide for Students 2017-2018 About this Guide This guide was prepared by the Department of Distance Education & Instructional Technology at Black River Technical College in order to provide students
Introduction to Blackboard
 Blackboard 9.1: Student Guide Introduction to Blackboard Logging into Blackboard Blackboard Blackboard is an integrated set of web-based tools for course management and delivery. Requirements For web-based
Instructor Guide for Blackboard-Learn
 Instructor Guide for Blackboard-Learn Prepared by Vice-Dean of E-Learning Dr. Ahmed Youssef Khedr Deanship of IT and E-Learning Contents How to Log In to... 4 Explore Home Tab... 4 My Blackboard Tools...
Vanier Moodle Basics 2 Statement of Competencies and Competency Elements. Statement of the Competencies
 Vanier Moodle Basics 2 Statement of Competencies and Competency Elements Workshop Description This workshop will introduce you to the basic elements of Vanier s DecClic Moodle. It will teach you how to
Blackboard 5. Instructor Manual Level One Release 5.5
 Bringing Education Online Blackboard 5 Instructor Manual Level One Release 5.5 Copyright 2001 by Blackboard Inc. All rights reserved. No part of the contents of this manual may be reproduced or transmitted
BLACKBOARD: Course Management
 BLACKBOARD: Course Management LOGGING IN Note: you will use your Babson username and password to access Blackboard. TO LOGIN TO BLACKBOARD: 1. Open a web browser and type http://blackboard.babson.edu.
Student User Guide for StatsPortal Essential Statistics, Second Edition
 Student User Guide for StatsPortal Essential Statistics, Second Edition Moore Getting Started with StatsPortal for Moore Essential Statistics, 2e Table of Contents Overview... 1 Getting Help... 1 System
Introduction to Dropbox Management Add a Category Add a Folder Set Availability for Dropbox Folders Add Special Access...
 Dropbox Introduction to Dropbox Management... 2 Add a Category... 3 Add a Folder... 4 Set Availability for Dropbox Folders... 8 Add Special Access... 10 Reorder Folders and Categories... 12 Delete a Folder...
HistoryClass User Guide for Students America s History, Sixth Edition. Henretta, Brody, and Dumenil
 HistoryClass User Guide for Students America s History, Sixth Edition Henretta, Brody, and Dumenil Getting Started with HistoryClass for America s History, Sixth Edition Table of Contents Overview...1
Canvas Student Guide. The Office of Online Learning Massasoit Community College
 Canvas Student Guide The Office of Online Learning Massasoit Community College www.massasoit.edu TABLE OF CONTENTS What is Canvas?... 1 Computer and Browser Requirements... 1 Mobile Support... 1 Accessing
JBCOURSEMANAGER Powered by Moodle USER S GUIDE
 JBCOURSEMANAGER Powered by Moodle USER S GUIDE The learning management system (LMS) you are about to use has many features to help you succeed. This guide will help you to understand how to use, navigate,
Introduction to Canvas
 Introduction to Canvas Logging Into Canvas https://login.canvas.ucdavis.edu/ Canvas Global Navigation The Global Navigation Menu is located on the left side of every page in Canvas. Global Navigation links
Getting Started with Moodle Virtual Learning Environment. Student User Guide
 Started with Moodle Virtual Learning Environment Student User Guide Belgrade, 2016 Contents 1. GENERAL INFORMATION ABOUT MOODLE... 3 2. THE FACULTY S MOODLE ACCESS AND LOGGING IN... 4 2.1. User profile
User Manual for Student. Moodle Administrator
 User Manual for Student Moodle Administrator 1.Introduction About this document This document is part of a Moodle Learning Management System(LMS) documentation Start Guides for Students. What is Moodle?
An Introduction to Blackboard
 An Introduction to Blackboard This document provides instructions on navigating Blackboard and utilizing its features. Check out http://www.uis.edu/colrs/students/blackboard/blackboardtutorial.html for
In this tutorial, you will learn how to perform basic tasks for setting up a course site in Moodle.
 Curriculum and Instructional Materials Center 1-800-654-4502 www.okcimc.com 1: INTRO TO MOODLE WELCOME TO THE INTRO TO MOODLE TRAINING ACTIVITY! In this tutorial, you will learn how to perform basic tasks
Instructor Manual Contents
 Instructor Manual Contents Welcome to egrade Plus...1 The Roles Within egrade Plus...1 Master Course Instructor...1 Class Section Instructor...2 Navigating egrade Plus...2 Using the Universal Navigation
CompClass User Guide for Instructors A Writer s Reference, Sixth Edition
 CompClass User Guide for Instructors A Writer s Reference, Sixth Edition Hacker Getting Started with CompClass for A Writer s Reference, Sixth Edition Table of Contents Overview... 1 Online Help... 1 System
Moodle The Basics of Editing a Content Management Course
 Logging In Moodle The Basics of Editing a Content Management Course 1. Using Firefox or Internet Explorer, navigate to: http://learn.district196.org 2. Click on the Login link in the upper right corner
ReggieNet: Communication Workshop
 ReggieNet: Communication Workshop Facilitators: Mayuko Nakamura (mnakamu), Charles Bristow (cebrist), Linda Summer (lsummer) & Steve Travers (sttrave) Forums Before you start FORUM: A Forum is a collection
User Documentation. Studywiz Learning Environment. Student's Guide
 User Documentation Studywiz Learning Environment Student's Guide Studywiz Learning Environment Student's Guide Contents 1 Introduction 4 1.1 Studywiz 4 1.2 The Studywiz Student s Guide 4 2 What s New
STUDENT HELP & WALKTHROUGH
 STUDENT HELP & WALKTHROUGH 2015 Jones & Bartlett Learning, LLC, An Ascend Learning Company Contents What are the browser and system requirements for running Navigate 2? 3 Why does Navigate 2 run a System
Mastering the Environment WVU ecampus
 Mastering the Environment WVU ecampus Information Technology Services, West Virginia University Service Desk (304) 293-4444, ITShelp@mail.wvu.edu Mastering the Environment of WVU ecampus 1 Table of Contents
Organizing Course Content and Information
 Organizing Course Content and Information This document includes general overviews for using course organization tools in Canvas. Each tool includes information on reasons to use the tool, instructions