Microsoft FrontPage Practical Session
|
|
|
- Roland Perkins
- 6 years ago
- Views:
Transcription
1 Ministry of manpower Higher college of technology Department of Information Technology QA Umbrella Workshop 30 th August- 3 rd September 2008 IT Skills Microsoft FrontPage Practical Session Copyright of the material reserved to Presented by Mrs.Fatema Al-Yazeedi 1
2 Table of Contents Title Page Number A. Create and name a folder on the desktop 3 B. Open FrontPage and create a new blank page 4 C. Rename the webpage and save it in a folder on the desktop 5 D. Choosing the background of the page and view in a browser 7 E. Inserting and modifying a table 9 F. Modifying cells 13 G. Modifying font 16 H. Inserting and modifying graphics 18 I. Creating hyperlinks 22 J. Themes K. Navigation Bars L. Banners M. Buttons N. Headings O. Frames
3 A. Create and name a folder on the desktop In this step you will use the right mouse button to create a new folder on your Desktop and you will then rename the folder to reflect the project on which you are working. 1. Right click anywhere on the Desktop to open the menu 2. Go to 'New' > 'Folder' to create a new folder on the desktop and click on it 3. Right click on the folder and rename the folder 'biography' to reflect the project on which you are working 4. From this point on, save everything you create for this project in this folder 3

4 B. Open FrontPage and create a new blank page In this step you will use the 'Start' button to open FrontPage and create a new blank page. 1. Click on the 'Start' button in the lower left of your computer screen 2. Go to 'All Programs' > 'Microsoft Office' > 'Microsoft Office FrontPage 2003' and click 3. Once FrontPage opens, click on the 'New Page' icon to create a new page in FrontPage 4. The new page should have a tab that has the heading 'new_page_1.htm' 4


5 C. Rename the webpage and save it in a folder on the desktop In this step you will rename the new blank page you created in FrontPage and save it in the folder you have created on the Desktop. 1. Go to 'File' > 'Save As...' and click to open the window 2. Use the pull down menu to navigate to your 'biography' folder on your Desktop and click on it 5
 Click on the 'File")
6 3. When the window pops up, select the 'Change title...' button and title your page whatever you want (I titled mine 'Sabrina's Autobiography Page') Click on the 'File name:' window and name your page 'bio.htm' Click on the 'Save' button 6

7 D. Choosing the background of the page and view in a browser In this step you will choose the background of your page and then view the page in a browser window. 1. Right click anywhere on the 'bio.htm' page to pull up the menu 2. Go to 'Page Properties...' and click 3. From the 'Page Properties' menu, navigate to the 'Formatting' tab and click 4. Click on the pull down menu on 'Background' and then click on a color you want for the background Then click on 'OK' 7


8 5. The entire 'bio.htm' page changes to that color 6. Go to 'File' > 'Save' to save the changes to your folder automatically 7. Click the 'Preview in Browser' icon on the toolbar to open a new window 8. This will allow you to view what your page will look like on the Internet Use this option often to check your progress as you build your site 8


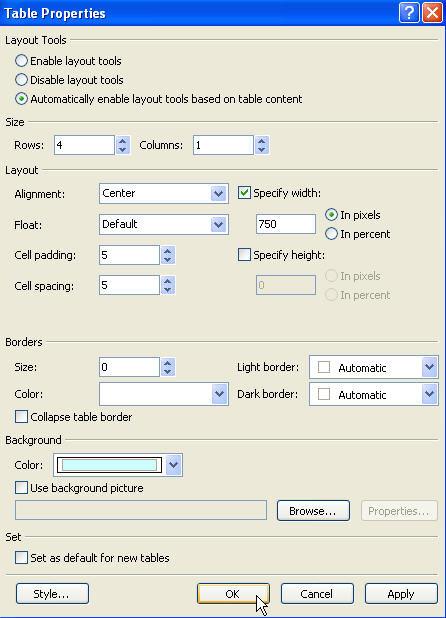
9 E. Inserting and modifying a table In this step you will choose a table size and modify the properties of the table. 1. Click on the 'Insert Table' icon in the toolbar 2. Highlight the number of cells you want to appear in your table and click 9


10 3. Right click on your new table to open the menu and click on 'Table Properties' 4. The 'Table Properties' window allows you to change the size, alignment, width, cell spacing, border size and color, and background color of the table. Experiment to get the look you want by clicking 'OK'. Some things to note: keep width of your table below 800 pixels to avoid horizontal scrolling on a monitor with 800 x 600 resolution 'Cell padding' and 'Cell spacing' refer to the distance (in pixels) text and images will appear from the border cell padding/spacing of one... cell padding/spacing of five... a border of zero will show a dashed line on the 'Split' view but no border on the 'Preview' view 10

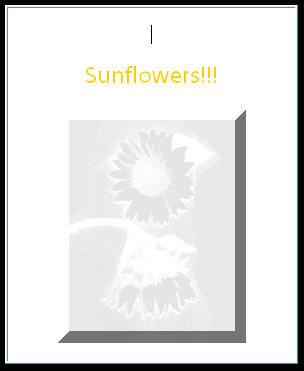
11 border of zero... border of one... border of five... Here is a sample layout... 11
12 12

13 F. Modifying cells In this step, you will learn how to modify individual cells in your table. 1. Right click on the cell you want to modify and on the menu click on 'Cell Properties' 2. The 'Cell Properties' window allows you to modify many parts of individual cells. Use the pull down menus to experiment with the look of the cells A thing to note... 'Alignment' determines where in the cell font and graphics will appear Here is an example of a layout... 13


14 3. You may also merge the cell by highlighting the cells you want to merge into one Right click to bring up the 'Merge Cells' command and select it 4. Or split an individual cell into rows and columns by right clicking on the cell to bring up the menu Select 'Split Cells...' 14


15 and then choose whether you want 'rows' or 'columns' and the number 15

16 G. Modifying font In this step you will learn how to modify the font. 1. Highlight the font you want to change 2. Use any combination of the characteristics below a. Change the font type by clicking on the pull down arrow next to the font type b. Change the font size by either clicking on the pull down arrow to select a number or clicking on the 'A' icons on the toolbar to make the font larger or smaller 16


17 c. Change the font color by clicking on the 'Font Color' selector icon and choosing your color 17
18 H. Inserting and modifying graphics In this step you will insert and modify graphics you find on Google. Warning: Many sites on the Internet contain copyrighted graphics, so try to choose your images from sites that are copyright free. 1. Right click on the image you want to insert into your document to pull up the menu Click 'Save Picture As...' 2. Save the picture in your 'biography' folder on your desktop 18


19 3. Click on the location you want the graphic on your page Go to 'Insert' > 'Picture' > 'From File...' 4. Navigate to your picture and select it Click 'Insert' 19

20 5. An example of the finished result 6. You may modify the picture by clicking on it and using the various tools on the 'Picture Toolbar' 7. An example of the finished result 20
21 21
 1.")
22 I. Creating hyperlinks In this step you will create hyperlinks. There are three types of hyperlinks: links to outside websites links to other pages in your website links to places within the same document To link to an outside website (opens in a new window) 1. Highlight the text or graphic you want to link to an outside site 2. Click on the 'Hyperlink' icon on the toolbar to open the 'Insert Hyperlink' window 3. Select the 'Target Frame...' button Select 'New Window' Click 'OK' 3. In the 'Insert Hyperlink' window, make sure 'Existing File or Web Page' is selected Type in the full URL of the outside site in the 'Address' window Click 'OK' 22


23 4. The word is now linked Link to other pages in your website 1. Go to 'File' > 'New...' and select 'Blank page' from the menu that appears 2. Use the steps outlined in Step 3 to name and save the page 3. Highlight the text you want to link to the new page 4. Click on the 'Hyperlink' icon on the toolbar 5. Make sure you select the 'Existing File or Web Page' icon in the 'Hyperlink' window Navigate to your 'biography' folder on the desktop and select the proper.htm page 23

24 Do not select 'Target Frame...' > 'New Window' as you did in the previous example Click 'OK' 6. The word is now linked Linking to a place within the same document 1. Click the cursor to the place in your document to which you want to navigate 2. Go to 'Insert' > 'Bookmark' and click 24


25 3. A 'Bookmark' window will appear, name your bookmark (In this case, I want to navigate from the bottom to the top of my page, so I named mine 'top') Click 'OK' 4. A tiny 'flag' appears, representing a bookmark (This flag will not appear when viewed in the browser) 25

26 5. Highlight the text or image in your page from which you wish to navigate (In this case, I highlighted 'top' since I am wanting to navigate from bottom to top) 6. Click on the 'Hyperlink' icon and choose 'Place in This Document' and the name of the bookmark Click 'OK' 7. The area you highlighted is now linked to the bookmark You may now 'jump' from one area to another within the same page 26

27 J. Themes Themes allow the web designer to co-ordinate and standardize colors, buttons, banners, backgrounds, etc. throughout the entire website with just 'one-click'. 1.Click on 'Format' and then 'Theme'. 2. Choose the theme you are going to use for your site: Note: You may also choose here to apply a theme to just one page of your site rather than the entire web site. Themes can be restrictive, so you may not want to format your entire web site at once. K. Navigation Bars Navigation bars create links to your other pages using the theme you choose. These are particularly useful if you move pages to other folders or areas FrontPage relinks them to the selected page. You must first link your pages together using the Navigation tool in the Views Toolbar. 1. First, click on 'View', then 'Navigation': 27
 as an icon in the right side.")

28 2. You will see a list of files in your web inside the left hand side of your screen and your index.htm (it may say the title of your page, such as 'Welcome') as an icon in the right side. To link your pages together, simply click and HOLD the file in the left hand frame and drag it over to the right frame until a dotted line appears linking it to your index page. Do this for all your other pages: 28


29 3. To insert a navigation bar, click 'Insert', 'Navigation', and then 'Bar based on navigation structure': A menu will appear that asks you to choose if you want to use the theme: : Choose the orientation of your Navigation bar and 'Finish': 29


30 At this point you choose what level of pages you want to have in the navigation bar: Note: o You may also want to click on 'Home page' to include a home button if you plan on putting your navigation bar into a shared border. 30

31 o Navigation Bars may be centered as if they were text. L. Banners 1.To put a banner on your theme page, click 'Insert' and 'Page Banner'. Select whether you would like the banner to be a picture or text and type in the name or title you wish: Note: o o Choosing 'Picture' will give you a banner that uses the theme colors and style. Banners may be centered as if they were text. M. Buttons When you are using a theme, buttons are placed on your page when you create a Navigation Bar. When you are choosing a theme, samples are given: N. Headings Headings are simply text that is set to assume specific attributes of a theme. 1. Type you text. 2. Highlight the text, and on your formatting toolbar, set the 'Style' for 'Heading': 31


32 O.Frames Note: o Your frames page must be your home or index page. Content from a previously created 'normal' pages may be copied and pasted for transfer over. 1. Click on the drop down arrow beside the 'new page' icon on your Standard Toolbar (see Toolbar Commands for further ideas) 2.Click on the 'Frames' tab and choose the frames page you wish to have: 32
 displays the pages you choose from the left content menu.")
33 Note: o The format chose above is commonly used to create a menu or 'content' list on the left, a school name at the top ('banner'), and the 'main' frame (initially a welcome page) displays the pages you choose from the left content menu. Because it is a framed page, the left and top frames will stay constant: 33

34 3. You will see that each section of the frames page is ready to be created as its own web page. Click new page to create that frame's content. Remember to treat each section as its own page...for instance, to change a background colour, you would need to go to page properties for each section. Notes: o o You may insert previously created pages into a frame by clicking on 'Set Initial Page' and browsing for it. Or you may simply copy and paste content (such as hyperlinks) from other pages. If you are using a theme on your site you may want to remove it from part or all of your framed page to prevent a cluttered look. Click on the page or section you wish to remove it from, go to 'Format' and 'Theme', choose 'No Theme' and apply it to the 'Selected pages': 34


35 4. Save your work. You will see how each section is saved independently: Notes: o Be sure to save the final whole page as 'index': 35

36 36
A Frontpage Tutorial. Contents Page
 A Frontpage Tutorial Contents Page Page 1-2 Things to do and know before we start Page 3.How to save your web pages Page 4.Opening an existing web page Page 5..Creating more web pages Page 6-8.Adding tables
Information Systems Center. FrontPage 2003 Reference Guide for COMM 321 & 421
 Information Systems Center FrontPage 2003 Reference Guide for COMM 321 & 421 September 2008 Table of Contents Portfolio Web Sites & Web Pages... 1 Open Your Portfolio Web Site in FrontPage for Editing...
This Tutorial is for Word 2007 but 2003 instructions are included in [brackets] after of each step.
![This Tutorial is for Word 2007 but 2003 instructions are included in [brackets] after of each step.](/thumbs/89/98497436.jpg "This Tutorial is for Word 2007 but 2003 instructions are included in [brackets] after of each step.") This Tutorial is for Word 2007 but 2003 instructions are included in [brackets] after of each step. Table of Contents Get Organized... 1 Create the Home Page... 1 Save the Home Page as a Word Document...
This Tutorial is for Word 2007 but 2003 instructions are included in [brackets] after of each step. Table of Contents Get Organized... 1 Create the Home Page... 1 Save the Home Page as a Word Document...
NVU Web Authoring System
 NVU Web Authoring System http://www.nvu.com/index.php Table of Contents Using Nvu as Your Web Page Authoring System: Getting Started Opening a page, saving, and previewing your work...3 Formatting the
Microsoft FrontPage. An Introduction to. Lecture No.1. Date: April Instructor: Mr. Mustafa Babagil. Prepared By: Nima Hashemian
 An Introduction to Microsoft FrontPage Lecture No.1 Date: April 20. 2007 Instructor: Mr. Mustafa Babagil Prepared By: Nima Hashemian 2006 An Introduction to FrontPage Mathematics Department Eastern Mediterranean
This Tutorial is for Word 2007 but 2003 instructions are included in [brackets] after of each step.
![This Tutorial is for Word 2007 but 2003 instructions are included in [brackets] after of each step.](/thumbs/72/67280806.jpg "This Tutorial is for Word 2007 but 2003 instructions are included in [brackets] after of each step.") This Tutorial is for Word 2007 but 2003 instructions are included in [brackets] after of each step. Table of Contents Just so you know: Things You Can t Do with Word... 1 Get Organized... 1 Create the
This Tutorial is for Word 2007 but 2003 instructions are included in [brackets] after of each step. Table of Contents Just so you know: Things You Can t Do with Word... 1 Get Organized... 1 Create the
FrontPage 98 Quick Guide. Copyright 2000 Peter Pappas. edteck press All rights reserved.
 Master web design skills with Microsoft FrontPage 98. This step-by-step guide uses over 40 full color close-up screen shots to clearly explain the fast and easy way to design a web site. Use edteck s QuickGuide
Dreamweaver Basics Outline
 Dreamweaver Basics Outline The Interface Toolbar Status Bar Property Inspector Insert Toolbar Right Palette Modify Page Properties File Structure Define Site Building Our Webpage Working with Tables Working
A Dreamweaver Tutorial. Contents Page
 A Dreamweaver Tutorial Contents Page Page 1-2 Things to do and know before we start Page 3-4 - Setting up the website Page 5 How to save your web pages Page 6 - Opening an existing web page Page 7 - Creating
Unit 8. Lesson 8.1. Microsoft FrontPage. Introduction. Microsoft FrontPage-1. Microsoft FrontPage
 Microsoft FrontPage Unit 8 Microsoft FrontPage Introduction Lesson 8.1 Microsoft FrontPage-1 A number of Software Packages are available in market for creating a website. Among popular software s are Dreamweaver,
Dazzle the Web with Dynamic Dreamweaver, Part II
 Dazzle the Web with Dynamic Dreamweaver, Part II In the second Dreamweaver workshop we will learn the following skills: 1. Adding hyperlinks to our home page 2. Adding images to our home page 3. Creating
Creating a Simple Webpage using Microsoft FrontPage 2003
 Creating a Simple Webpage using Microsoft FrontPage 2003 Professor Carrie Damschroder ENGL 317: Technical Communication October 27, 2009 Brandi Goodman Heather Stanfield Dylan Thompson Nikki Truong Page
Handout created by Cheryl Tice, Instructional Support for Technology, GST BOCES
 Handout created by Cheryl Tice, Instructional Support for Technology, GST BOCES Intro to FrontPage OVERVIEW: This handout provides a general overview of Microsoft FrontPage. AUDIENCE: All Instructional
ADOBE DREAMWEAVER CS4 BASICS
 ADOBE DREAMWEAVER CS4 BASICS Dreamweaver CS4 2 This tutorial focuses on the basic steps involved in creating an attractive, functional website. In using this tutorial you will learn to design a site layout,
Microsoft FrontPage 2003 The Basics
 Microsoft FrontPage 2003 The Basics This tutorial attempts to explain how to access your website and create the basic elements which will enable you to have a lovely working website in no time. Opening
ekaizen Lessons Table of Contents 1. ebook Basics 1 2. Create a new ebook Make Changes to the ebook Populate the ebook 41
 Table of Contents 1. ebook Basics 1 2. Create a new ebook 20 3. Make Changes to the ebook 31 4. Populate the ebook 41 5. Share the ebook 63 ekaizen 1 2 1 1 3 4 2 2 5 The ebook is a tabbed electronic book
Web design and content management from Microsoft FrontPage allows you to create, design, modify, and update your own website without learning any
 Web design and content management from Microsoft FrontPage allows you to create, design, modify, and update your own website without learning any complex languages or codes. www.microsoft.com/frontpage
Chapter 11: Going All Out with FrontPage
 Chapter 11: Going All Out with FrontPage Creating a Product Page Easy Web Design project, Chapter 11 Most store sites need at least one product page. On the Notebooks Web site, the Products page is divided
Creating Accessible Word Documents
 Creating Accessible Word Documents 1 of 11 Creating Accessible Word Documents Contents 1. General principles... 1 2. Styles/ Headings... 2 3. Table of Contents... 3 Updating a Table of Contents... 5 4.
Beginners Guide to Snippet Master PRO
 Beginners Guide to Snippet Master PRO This document assumes that Snippet Master has been installed on your site. If not please contact the Bakas IT web team at webreg@bakasit.com.au. Initial Login Screen...
Designing a Web Page Using MS SharePoint Designer Reference Manual
 Designing a Web Page Using MS SharePoint Designer 2007 Reference Manual SHAREPOINT DESIGNER 2007 BASICS 1. Opening SharePoint Designer 2007 application - Click start>all Programs>Microsoft Office>Microsoft
Nauticom NetEditor: A How-to Guide
 Nauticom NetEditor: A How-to Guide Table of Contents 1. Getting Started 2. The Editor Full Screen Preview Search Check Spelling Clipboard: Cut, Copy, and Paste Undo / Redo Foreground Color Background Color
FrontPage 2000 Tutorial -- Advanced
 FrontPage 2000 Tutorial -- Advanced Shared Borders Shared Borders are parts of the web page that share content with the other pages in the web. They are located at the top, bottom, left side, or right
FrontPage. Directions & Reference
 FrontPage Directions & Reference August 2006 Table of Contents Page No. Open, Create, Save WebPages Open Webpage... 1 Create and Save a New Page... 1-2 Change the Background Color of Your Web Page...
There are six main steps in creating web pages in FrontPage98:
 This guide will show you how to create a basic web page using FrontPage98 software. These instructions are written for IBM (Windows) computers only. However, FrontPage is available for Macintosh users
Electronic Portfolios in the Classroom
 Electronic Portfolios in the Classroom What are portfolios? Electronic Portfolios are a creative means of organizing, summarizing, and sharing artifacts, information, and ideas about teaching and/or learning,
Netscape Composer: Working with Tables
 Why tables? Netscape Composer: Working with Tables Tables on the Web can be divided into two categories: data display and page layout. Although the method for making both kinds of tables is the same, it
Adobe Dreamweaver CS5 Tutorial
 Adobe Dreamweaver CS5 Tutorial GETTING STARTED This tutorial focuses on the basic steps involved in creating an attractive, functional website. In using this tutorial you will learn to design a site layout,
Enterprise Portal Train the Trainer User Manual WEB PARTS
 Enterprise Portal Train the Trainer User Manual WEB PARTS Version 1.2.1 Date: January 31, 2012 Table of Contents Table of Contents... 2 1 I Need To... 3 2 Media Web Part... 10 3 Content Editor... 15 4
The Dreamweaver Interface
 The Dreamweaver Interface Let s take a moment to discuss the different areas of the Dreamweaver screen. The Document Window The Document Window shows you the current document. This is where you are going
Table of Contents. Overview... 4 Advanced Content Items... 4 Accessibility... 4 iframe Textpoppers Math Characters and Equations...
 Dallas County Community College District Table of Contents Overview... 4 Advanced Content Items... 4 Accessibility... 4 iframe... 4 Insert a Web Page... 4 Insert a PDF... 6 Textpoppers... 8 Insert a Text
Website Management with the CMS
 Website Management with the CMS In Class Step-by-Step Guidebook Updated 12/22/2010 Quick Reference Links CMS Login http://staging.montgomerycollege.edu/cmslogin.aspx Sample Department Site URLs (staging
CROMWELLSTUDIOS. Content Management System Instruction Manual V1. Content Management System. V1
 Content Management System Instruction Manual V1 www.cromwellstudios.co.uk Cromwell Studios Web Services Content Management System Manual Part 1 Content Management is the system by which you can change
Creating a Website in Schoolwires
 Creating a Website in Schoolwires Overview and Terminology... 2 Logging into Schoolwires... 2 Changing a password... 2 Navigating to an assigned section... 2 Accessing Site Manager... 2 Section Workspace
PBwiki Basics Website:
 Website: http://etc.usf.edu/te/ A wiki is a website that allows visitors to edit or add their own content to the pages on the site. The word wiki is Hawaiian for fast and this refers to how easy it is
Quick Access Toolbar. You click on it to see these options: New, Open, Save, Save As, Print, Prepare, Send, Publish and Close.
 Opening Microsoft Word 2007 in the practical room UNIT-III 1 KNREDDY 1. Nyelvi beállítások az Office 2007-hez (Language settings for Office 2007 (not 2003)) English. 2. Double click on the Word 2007 icon
WEEK NO. 12 MICROSOFT EXCEL 2007
 WEEK NO. 12 MICROSOFT EXCEL 2007 LESSONS OVERVIEW: GOODBYE CALCULATORS, HELLO SPREADSHEET! 1. The Excel Environment 2. Starting A Workbook 3. Modifying Columns, Rows, & Cells 4. Working with Worksheets
Week 5 Creating a Calendar. About Tables. Making a Calendar From a Table Template. Week 5 Word 2010
 Week 5 Creating a Calendar About Tables Tables are a good way to organize information. They can consist of only a few cells, or many cells that cover several pages. You can arrange boxes or cells vertically
Project 1: Creating a Web Site from Scratch. Skills and Tools: Use Expression Web tools to create a Web site
 E00EW3.qxp 4/14/2007 3:17 PM Page 1 Workshops w Introduction The Workshop is all about being creative and thinking outside of the box. These workshops will help your right-brain soar, while making your
Using Dreamweaver. 4 Creating a Template. Logo. Page Heading. Home About Us Gallery Ordering Contact Us Links. Page content in this area
 4 Creating a Template Now that the main page of our website is complete, we need to create the rest of the pages. Each of them will have a layout that follows the plan that is shown below. Logo Page Heading
Adobe Dreamweaver CC 17 Tutorial
 Adobe Dreamweaver CC 17 Tutorial GETTING STARTED This tutorial focuses on the basic steps involved in creating an attractive, functional website. In using this tutorial you will learn to design a site
-Using Excel- *The columns are marked by letters, the rows by numbers. For example, A1 designates row A, column 1.
 -Using Excel- Note: The version of Excel that you are using might vary slightly from this handout. This is for Office 2004 (Mac). If you are using a different version, while things may look slightly different,
San Pedro Junior College. WORD PROCESSING (Microsoft Word 2016) Week 4-7
 Week 4-7") WORD PROCESSING (Microsoft Word 2016) Week 4-7 Creating a New Document In Word, there are several ways to create new document, open existing documents, and save documents: Click the File menu tab and then
WORD PROCESSING (Microsoft Word 2016) Week 4-7 Creating a New Document In Word, there are several ways to create new document, open existing documents, and save documents: Click the File menu tab and then
ORB Education Quality Teaching Resources
 These basic resources aim to keep things simple and avoid HTML and CSS completely, whilst helping familiarise students with what can be a daunting interface. The final websites will not demonstrate best
Creating Forms. Starting the Page. another way of applying a template to a page.
 Creating Forms Chapter 9 Forms allow information to be obtained from users of a web site. The ability for someone to purchase items over the internet or receive information from internet users has become
Display Systems International Software Demo Instructions
 Display Systems International Software Demo Instructions This demo guide has been re-written to better reflect the common features that people learning to use the DSI software are concerned with. This
Step 5: Figures and Tables
 Steps and directions are adapted from the UCF College of Graduate Studies Microsoft Word Formatting Modules. Step 5: Figures and Tables This PDF explains Step 5 of the step-by-step instructions that will
Table Basics. The structure of an table
 TABLE -FRAMESET Table Basics A table is a grid of rows and columns that intersect to form cells. Two different types of cells exist: Table cell that contains data, is created with the A cell that
Developing a Home Page
 FrontPage Developing a Home Page Opening Front Page Select Start on the bottom menu and then Programs, Microsoft Office, and Microsoft FrontPage. When FrontPage opens you will see a menu and toolbars similar
Dreamweaver CS 5.5. University Information Technology Services. Training, Outreach, Learning Technologies, and Video Production
 Dreamweaver CS 5.5 Creating Web Pages with a Template University Information Technology Services Training, Outreach, Learning Technologies, and Video Production Copyright 2012 KSU Department of Information
Dreamweaver MX Overview. Maintaining a Web Site
 Dreamweaver MX Overview Maintaining a Web Site... 1 The Process... 1 Filenames... 1 Starting Dreamweaver... 2 Uploading and Downloading Files... 6 Check In and Check Out Files... 6 Editing Pages in Dreamweaver...
QRG: Using the WYSIWYG Editor
 WYSIWYG Editor QRG: Using the WYSIWYG Editor WYSIWYG stands for What You See Is What You Get. The WYSIWYG Editor is the reason you don t need to be an IT Programmer to write content for your web page.
MAKING TABLES WITH WORD BASIC INSTRUCTIONS. Setting the Page Orientation. Inserting the Basic Table. Daily Schedule
 MAKING TABLES WITH WORD BASIC INSTRUCTIONS Setting the Page Orientation Once in word, decide if you want your paper to print vertically (the normal way, called portrait) or horizontally (called landscape)
Center for Faculty Development and Support Making Documents Accessible
 Center for Faculty Development and Support Making Documents Accessible in Word 2007 Tutorial CONTENTS Create a New Document and Set Up a Document Map... 3 Apply Styles... 4 Modify Styles... 5 Use Table
Rich Text Editor Quick Reference
 Rich Text Editor Quick Reference Introduction Using the rich text editor is similar to using a word processing application such as Microsoft Word. After data is typed into the editing area it can be formatted
Lesson 1 New Presentation
 Powerpoint Lesson 1 New Presentation 1. When PowerPoint first opens, there are four choices on how to create a new presentation. You can select AutoContent wizard, Template, Blank presentation or Open
Working with Images 1 / 12
 V2 APRIL 2017 1 / 12 To brighten up your website it is often nice to have images inserted onto various pages of your website. We have an easy option to size these photos on your page, as well as aligning
Building TPS Web Pages with Dreamweaver
 Building TPS Web Pages with Dreamweaver Title Pages 1. Folder Management 7 2. Defining Your Site 8-11 3. Overview of Design Features 12-22 4. Working with Templates 23-25 5. Publishing Your Site to the
Microsoft Excel 2010 Basic
 Microsoft Excel 2010 Basic Introduction to MS Excel 2010 Microsoft Excel 2010 is a spreadsheet software in the new Microsoft 2010 Office Suite. Excel allows you to store, manipulate and analyze data in
Introduction to FrontPage 2002
 Introduction to FrontPage 2002 Academic Computing Support Information Technology Services Tennessee Technological University August 2003 1. Introduction FrontPage 2002 is a program to help you build a
Introduction to Microsoft FrontPage
 Platform Windows PC Ref no: ins069 Date: 2006 Version: 1 Authors: S. Coates Introduction to Microsoft FrontPage What is Microsoft FrontPage? Microsoft FrontPage is an web authoring tool that can be used
Using Adobe Contribute 4 A guide for new website authors
 Using Adobe Contribute 4 A guide for new website authors Adobe Contribute allows you to easily update websites without any knowledge of HTML. This handout will provide an introduction to Adobe Contribute
LESSON ONE AND TWO TOPIC: HOW TO USE MICROSOFT WORD. : Putu Putra Astawa, S.Kom.,M.Kom
 LESSON ONE AND TWO TOPIC: HOW TO USE MICROSOFT WORD Author : Putu Putra Astawa, S.Kom.,M.Kom Date : June 09, 2014 and June 16, 2014 Time : 08.30-10.45 Am. Materials Needed : Computer, Work Sheet Overview
Ektron Advanced. Learning Objectives. Getting Started
 Ektron Advanced 1 Learning Objectives This workshop introduces you beyond the basics of Ektron, the USF web content management system that is being used to modify department web pages. This workshop focuses
Using Windows 7 Explorer By Len Nasman, Bristol Village Computer Club
 By Len Nasman, Bristol Village Computer Club Understanding Windows 7 Explorer is key to taking control of your computer. If you have ever created a file and later had a hard time finding it, or if you
Creating a Website with Dreamweaver 4
 Creating a Website with Dreamweaver 4 What is Dreamweaver (DW)? DW is a visual web page editor that allows you to create and manage Websites and pages without having to learn HTML (Hyper Text Markup Language).
How to lay out a web page with CSS
 How to lay out a web page with CSS You can use table design features in Adobe Dreamweaver CS3 to create a simple page layout. However, a more powerful technique is to use Cascading Style Sheets (CSS).
FRONTPAGE STEP BY STEP GUIDE
 IGCSE ICT SECTION 15 WEB AUTHORING FRONTPAGE STEP BY STEP GUIDE Mark Nicholls ICT lounge P a g e 1 Contents Introduction to this unit.... Page 4 How to open FrontPage..... Page 4 The FrontPage Menu Bar...Page
Links to Activities ACTIVITY 1.1. Links to Activities Links to Activities
 EXCEL Analyzing Data Using Excel Section 1 Skills Start Excel and identify features in the Excel window Enter labels and values Use the fill handle to enter a series Enter formulas Create a formula using
An Introduction to Google Chrome
 An Introduction to Google Chrome Box is an online file sharing and cloud content management service and it provides features such as: Getting Google Chrome 1. To get started with Google Chrome, you have
Dreamweaver MX Technical Support Services. Office of Information Technology, West Virginia University. OIT Help Desk ext.
 Dreamweaver MX 2004 Technical Support Services Office of Information Technology, West Virginia University OIT Help Desk - 293.4444 ext.1 http://oit.wvu.edu/support/training/classmat/ Instructors: Rick
In so many ways summary
 In so many ways summary Many of Word s functions can be activated in a variety of different ways. Often you can use the menu, a tool on the toolbar or a shortcut key to achieve the same result. Rather
Section 6: Dreamweaver
 Section 6: Dreamweaver 1 Building TPS Web Pages with Dreamweaver Title Pages 1. Dreamweaver Storyboard Pages 3 2. Folder Management 4 3. Defining Your Site 5-8 4. Overview of Design Features 9-19 5. Working
How to Locate and Start PowerPoint 2007? Click on Start Click on All Programs Click on Microsoft Office Folder
 How to Locate and Start PowerPoint 2007? Click on Start Click on All Programs Click on Microsoft Office Folder Click on Microsoft Office PowerPoint 2007 Menu Bar Office Button How to Save a PowerPoint
Microsoft PowerPoint and Digital Photos
 Microsoft PowerPoint and Digital Photos This exercise will give you a basic understanding of Microsoft PowerPoint presentation software. You will create a 3-slide document by following the instructions
PAGES, NUMBERS, AND KEYNOTE BASICS
 PAGES, NUMBERS, AND KEYNOTE BASICS Pages, Numbers, and Keynote are applications developed by Apple that are comparable to Microsoft Office and Google Docs. Pages, Numbers, and Keynote comes free with your
Boise State University. Getting To Know FrontPage 2000: A Tutorial
 Boise State University Getting To Know FrontPage 2000: A Tutorial Writers: Kevin Gibb, Megan Laub, and Gayle Sieckert December 19, 2001 Table of Contents Table of Contents...2 Getting To Know FrontPage
UTAS CMS. Easy Edit Suite Workshop V3 UNIVERSITY OF TASMANIA. Web Services Service Delivery & Support
 Web Services Service Delivery & Support UNIVERSITY OF TASMANIA UTAS CMS Easy Edit Suite Workshop V3 Web Service, Service Delivery & Support UWCMS Easy Edit Suite Workshop: v3 Contents What is Easy Edit
Creating Interactive PDF Forms
 Creating Interactive PDF Forms Using Adobe Acrobat X Pro for the Mac University Information Technology Services Training, Outreach, Learning Technologies and Video Production Copyright 2012 KSU Department
MS Office Word Tabs & Tables Manual. Catraining.co.uk Tel:
 MS Office 2010 Word Tabs & Tables Manual Catraining.co.uk Tel: 020 7920 9500 Table of Contents TABS... 1 BASIC TABS WITH ALIGNMENT... 1 DEFAULT TAB STOP... 1 SET MANUAL TAB STOPS WITH RULER... 2 SET MANUAL
Swiiit User Guide 03/09/2015
 Swiiit User Guide 03/09/2015 Contents Getting Started... 4 Overview of Main Tools... 5 Webpages... 6 Main pages (Sections)... 6 Rearrange Sections... 6 Subpages... 7 Change the Title of a Webpage... 8
1. AUTO CORRECT. To auto correct a text in MS Word the text manipulation includes following step.
 1. AUTO CORRECT - To auto correct a text in MS Word the text manipulation includes following step. - STEP 1: Click on office button STEP 2:- Select the word option button in the list. STEP 3:- In the word
Word 3 Microsoft Word 2013
 Word 3 Microsoft Word 2013 Mercer County Library System Brian M. Hughes, County Executive Action Technique 1. Insert a Text Box 1. Click the Insert tab on the Ribbon. 2. Then click on Text Box in the Text
Microsoft Excel Chapter 1. Creating a Worksheet and a Chart
 Microsoft Excel 2013 Chapter 1 Creating a Worksheet and a Chart Objectives Describe the Excel worksheet Enter text and numbers Use the Sum button to sum a range of cells Enter a simple function Copy the
About Freeway. Freeway s Tools and Palettes
 About Freeway The most important thing to appreciate before you start a site in Freeway is how the process works, especially if you have tried other Web publishing software before. Freeway is not an HTML
CS Multimedia and Communications. Lab 06: Webpage Tables and Image Links (Website Design part 3 of 3)
") CS 1033 Multimedia and Communications Lab 06: Webpage Tables and Image Links (Website Design part 3 of 3) REMEMBER TO BRING YOUR MEMORY STICK TO EVERY LAB! Table Properties Reference Guide The Property
CS 1033 Multimedia and Communications Lab 06: Webpage Tables and Image Links (Website Design part 3 of 3) REMEMBER TO BRING YOUR MEMORY STICK TO EVERY LAB! Table Properties Reference Guide The Property
Independence Community College Independence, Kansas
 Independence Community College Independence, Kansas C O N T E N T S Unit 1: Creating, Modifying, and Enhancing FrontPage Webs and Pages 1 Chapter 1 Investigating FrontPage 2002 3 Exploring World Wide Web
Dreamweaver 101. Here s the desktop icon for Dreamweaver CS5: Click it open. From the top menu options, choose Site and New Site
 Dreamweaver 101 First step: For your first time out, create a folder on your desktop to contain all of your DW pages and assets (images, audio files, etc.). Name it. For demonstration, I ll name mine dw_magic.
Chapter 5. Inserting Objects. Highlights
 Chapter 5 Inserting Objects Highlights 5. Inserting AutoShapes, WordArts and ClipArts 5. Changing Object Position, Size and Colour 5. Drawing Lines 5.4 Inserting Pictures and Text Boxes 5.5 Inserting Movies
The HOME Tab: Cut Copy Vertical Alignments
 The HOME Tab: Cut Copy Vertical Alignments Text Direction Wrap Text Paste Format Painter Borders Cell Color Text Color Horizontal Alignments Merge and Center Highlighting a cell, a column, a row, or the
Centricity 2.0 Section Editor Help Card
 Centricity 2.0 Section Editor Help Card Accessing Section Workspace In order to edit your section, you must first be assigned Section Editor privileges. This is done by the Director of your Site, Subsite,
Enhancing your Page. Text Effects. Paragraph Effects. Headings
 Enhancing your Page You can make your pages more visually appealing and organize page content by using text effects, paragraph effects, macros, images, tables, etc. To begin, select the "Edit" button for
Zeppelin Website Content Manager User Manual
 Zeppelin Website Content Manager User Manual 1. Introduction Zeppelin Website Content Manager is made for maintaining and editing the content of the website easily. Most of the contents inside the website
Creating a Presentation
 Creating a Presentation 1.1 Double Click the PowerPoint icon on the desktop Or Click on the start menu Type PowerPoint into the search box Click on the PowerPoint icon 1.2 Click Blank Presentation 1 How
Table of Contents Welcome to Menu.Applet... 2 Why Java -based menus?... 2 Basic terminology... 2 Getting to know Menu.Applet... 4 Creating a new menu
 Table of Contents Welcome to Menu.Applet... 2 Why Java -based menus?... 2 Basic terminology... 2 Getting to know Menu.Applet... 4 Creating a new menu applet... 5 Applet Properties Panel: General Tab...
How to lay out a web page with CSS
 Activity 2.6 guide How to lay out a web page with CSS You can use table design features in Adobe Dreamweaver CS4 to create a simple page layout. However, a more powerful technique is to use Cascading Style
Creating a Website in Schoolwires Technology Integration Center
 Creating a Website in Schoolwires Technology Integration Center Overview and Terminology... 2 Logging into Schoolwires... 2 Changing a password... 2 Accessing Site Manager... 2 Section Workspace Overview...
Eng 110, Spring Week 03 Lab02- Dreamwaver Session
 Eng 110, Spring 2008 Week 03 Lab02- Dreamwaver Session Assignment Recreate the 3-page website you did last week by using Dreamweaver. You should use tables to control your layout. You should modify fonts,
How to Request a Site
 Contribute Outline: How to request a site Connection Key Browse to page Edit Page View in Browser Formatting (text, photos ) Undo Insert horizontal line Publish, Save for Later, Cancel Rollback to Previous
Joomla! 2.5.x Training Manual
 Joomla! 2.5.x Training Manual 1 Joomla is an online content management system that keeps track of all content on your website including text, images, links, and documents. This manual includes several