BLACKBOARD CE6 Guide. Workshop Handout
|
|
|
- Joella Ferguson
- 5 years ago
- Views:
Transcription
1 BLACKBOARD CE6 Guide Workshop Handout
2 Table of Contents Why Blackboard...1 What s New in Blackboard...1 What Happened to my Course in WebCT... 2 How Do I Request a New Course Shell... 2 How Do I Log Onto Blackboard... 3 My Blackboard... 3 The Blackboard Interface... 4 Customizing My Blackboard... 5 My Settings... 5 Course Interface... 6 The Tab Structure... 7 Course Menu... 7 Course Tools... 8 Course Content Map... 9 Announcements Create Announcements Edit, Preview, Delete, Announcements Assessments Edit Assessment Properties Assessment Settings Save Properties What about Respondus Assignments...22 i
3 Creating an Assignment...23 Collaboration Options...28 Editing Assignments...29 Grading Assignments...30 Calendar...32 Add Calendar Entries...32 Chat/Whiteboard...35 Viewing Chat Room Logs...37 Creating Chat Rooms...38 Facilitating Chat Sessions...40 Discussion Board Creating Discussion Topics...42 Discussion Grading...43 New Discussion Management...44 Discussion Navigation...45 Learning Modules...47 Creating Learning Modules...48 Adding Content to Learning Modules...49 Organizing Learning Modules...50 Mail...52 How to Access Mail...52 Mail Interface...53 Create Messages...54 Read Messages...55 Syllabus...56 ii
4 Create a Syllabus...56 Import a Syllabus...58 Web Links...59 Creating Web Links...59 Editing Web Links Designer Tools/Instructor Tools/My Tools...62 Gradebook...63 Accessing the GradeBook...63 Enrolling Students, TA and Designers...64 Creating Columns...65 Adding Columns...66 Grade Book Tabs...69 Group Manager Create a Custom Group...72 Create Multiple Groups...74 Create Sign-Up Sheets...76 Sending Mail to Groups...77 Creating Group Activities...77 File Manager...79 Accessing the File Manager...79 File Manager Interface...80 Upload Files From Your Computer...80 Appendix... app1 iii
5 Why Blackboard? The Blackboard and WebCT companies completed a merger in February, 2006 and Blackboard dropped the WebCT name. You can read more about the merger at Mercer has decided to upgrade the current WebCT software with Blackboard CE (Campus Edition) 6. Blackboard will also be hosting our courses on their server. What is new in Blackboard CE6? CE6 has a whole host of new features including things such as distinct designer and instructor roles, a true student view of the course, an announcement tool, discussion grading, group management tool, enhanced file management tools and a Who s Online tool. To see a list and explanation of the features in CE6, visit the following link. You will also encounter some new terminology in CE6. Known as in WebCT 4.1 Add Page or Tool Content Module Organizer Page URL Manage Files Manage Students Quiz/Survey/Self-test Known as in Blackboard CE6 Add Content Link Learning Module Content Folder Web Link File Manager Grade Book Assessment 1
6 Upper Text block Lower Text block Single Page Glossary, Image Database, Audio and Video Assignments, Student Homepages and Presentations Header Footer Content File Media Library Collections Assignments What Happened to My Courses in WebCT? Courses that were in WebCT for Summer 2007, Fall 2007 and those in the Special Purpose category were migrated to CE6. When you go into your migrated course, you will see a link on the Course Content Home screen to a file which will describe where your course content appears after it is imported. A sample of this report is in the Appendix. Mail and Discussion messages and calendar entries do not migrate. The Index entries from the Index Tool do not migrate. Single pages migrate as files in the File Manager s tool. How Do I Request a New Course Shell? The procedure for requesting a new course shell has not changed. You can go to the Mercer page and click WebCT Course Request Form under Faculty Help. The link for this page is You can go directly to the Course Request Form with the link. How Do I Log Onto Blackboard CE6? To get to Blackboard CE6, go to the following link 2
7 In the Log In box, enter your Mercer ID number as the User Name and your birth date in the format YYYYMM as the default Password. When you first log in, you will see the MyMercerBlackboard screen. My Blackboard My Blackboard provides a single point of access to your courses, It also allows you to: Access other tools like Calendar, Mail, File Manager, and Who s Online. Create personal to do list. Create personal bookmarks, access campus bookmarks, and read campus announcements. 3

8 The My Blackboard Interface The My Blackboard is similar for designers, instructors, and students. The screen: Logo Bar Course List Channel Tool Bar Content Channels Logo Bar reflects the school s colors and logo. It is always present and contains links to Help and Log Out. Toolbar Contains icons for Mail, Calendar, and File manager. Course List Channel Provides access to the courses in which the user is enrolled. Notification of new announcements, calendar entries, mail, discussions, assessments, and assignments for each course will appear here. Content Channel Each channel contains a category of content, such as My Grades. To Do List, Personal Bookmarks, and External Courses. 4
9 Customizing My Blackboard You can customize the look and feel of the My Blackboard page to suit your individual preferences by using the Channels, Color, and Layout links in the toolbar. Channels allow you to hide and reveal channels. All channels can be hidden with the exception of the Course List Channel. Color customizes background and table colors. Layout changes the order and location of the channels. My Settings My Settings allows the user to access their personal user information. My Profile allows you to manage elements of your personal profile, which displays in the class Roster. You can also update your password from My Profile. My Tool Options allows you to specify default settings for certain tools. For example, you can select whether you want the default Calendar view to be daily, weekly, or monthly. My Roles identifies your role in each course you are enrolled in. 5
10 Course Interface Upon entering the course, you will notice that the interface is organized into three tabs: Build, Teach and Student View. Related tasks are grouped under each tab. Build Tab You can create, manage, and organize course content from this tab. You can change the way your course looks, add tools and create content items such as Assessments, or Discussion topics. Teach Tab You can review student work, manage grades, and or interact with students from the Teach tab. Access to instructor tools such as Assessment Manager, Assignment Dropbox, Grade Book, and Group Manager are found within this tab only. Student View Tab You can experience the course as a student, including assessment and assignment submission from this tab. If all three tabs are visible in your course, you are enrolled as a designer, an instructor and as a Student. This is a combined role. Users can be enrolled in single roles. Users enrolled as designer see only the Build tab and the Student View tab. Users enrolled as instructors see only the Teach tab and the Student View tab. 6
11 The Tab Structure All three tab contain these elements: Logo Bar Course Home Page Course Menu From any tab, you can access a link on the Home Page by clicking it. The view of the link and the privileges you have will vary depending on the tab from which you clicked the item. For example, if you click the Syllabus icon from the Build tab, you can both edit and preview the syllabus; from the Student View, you can only view the Syllabus. The Course Menu The Course Menu is accessible from anywhere in the course. It contains: Course Tools Designer/Instructor/My Tools Course Content Map 7
 appear.")
12 Course Tools Course Tools includes only the tools that have been added to the course by the designer. If a tool has not been added it is not accessible by any user. In the Student View, only tools that are available (not hidden) appear. Access a tool by clicking it 8


13 The Course Content Map The Course Content Map presents content items in outline form. Links to all content itms in the course are provided. Folders can be expanded to reveal links to their content as well. To view the Course Map, click the double down arrows next to the Course Content. Click to view the Course Content Map Once the Course Map is expanded it will look like this: 9

14 Announcements The Announcements tool is a new feature in Blackboard CE6 that allows course wide notices and announcements to be sent. You can create announcements that can be accessed from the course menu or as a pop-up message. How to Create Announcements Announcements can be created, previewed, edited and deleted from the Build Tab or the Teach Tab. You can manage when the announcements will be delivered, who will receive the announcements and if you want the announcement to be delivered as a pop-up. Create Announcements 1. In the Build tab or Teach tab select Announcements from the Course Tools. 2. Click the Create Announcement button. Click to create Announcements 10
15 3. In the title bar create an appropriate title for your announcement 4. Create your message in the Message text area. You can click the Use HTML box and select the Enable HTML Creator button to use the HTML editor. 5. In the Recipients section select who will receive the announcement by clicking the check box next to roles of whom you want to send the announcement. You can click the Select All Roles box to send to everyone in the course. The instructor and designer and selected by default. 11
16 6. Choose the Delivery Dates section to assign the start and stop date and time of when you want to deliver the announcement. You can click on the calendar icon to assign a date or type the date in the text box. Click calendar icon for calendar view to set Announcement date 7. If you want to send the message as a Pop-Up, click the checkbox next to the Also deliver as a pop-up message tool. Click the check box to deliver as a Pop-Up 8. Click the Send button to send out your announcement Announcements that are sent with a date later than the date sent will be delivered at the date and time scheduled. 12


17 Edit, Preview, Delete and read Announcements Announcements are either delivered as Pop-ups when logging on to the course or by the announcements tool in the Course Tools. Pop-ups will only be shown once after logging in. The Announcement will still be available to view in the Course Tools. A green asterisk will appear indicating Announcements 1. Click the Announcements button in the Course Tools to read Announcements 2. Click the Hyperlink for the Announcement to read announcements Announcements Action links allow you to edit, preview or delete announcements. Note: Edits can only be performed to announcements that have not been sent. Action Links allow you to Edit, Preview & Delete Announcements 13

18 Assessments All quizzes and surveys that were in your course on WebCT 4.1 were migrated and can be found by clicking on Assessments under either the Build Tab or the Teach tab. Edit Assessment Properties 1. To access the Assessment Properties, click Assessments under the Course Tools. 2. Click the Action Link next to the quiz you are working on. Action Link 3. Click on the Edit Properties action item. The Edit Assessment Properties screen will appear. The properties define how a quiz will be delivered to students and how the results will be released to them. Properties are grouped into a. Settings b. Dates Available c. Results Properties d. Submission Properties e. Security Properties f. Custom Instructions 14
19 Settings 1. Under settings, you can a. edit the Title, Description, Item Visibility and Grade Book Column name. b. specify how questions should be delivered to the student. c. choose how the assessment is to be displayed, and specify the duration of the assessment. d. update the Attempts information if multiple attempts are allowed. e. specify how scrores are to be released to students and if statistics are to be released to students. f. click on the arrows to access the other properties. 15


20 Dates Available 1. To access the dates available, click on the arrow icons under More Options at the bottom of the Edit Assessment Properties screen. 2. Enter the start and end time for the assessment. Click on the calendar icon to choose the date and 16


21 the clock icon to choose the time. 3. If you would like to have an event put on the calendar for the assessment, click the check box. 4. To collapse the Dates Available, click the arrow. Results Properties 1. To access the results properties, click on the arrow icons under More Options at the bottom of the Edit Assessment Properties screen. 2. Edit the way results are displayed to a student. 3. You can have a copy of student s results sent to your external address by entering your address. 4. To collapse the Results Properties, click the arrow. Submission Properties 1. To access the submission properties, click on the arrow icons under More Options at the bottom of the Edit Assessment Properties screen. 2. You may enter a message to be displayed to the student when they submit their assessment. 3. Enter your address if you would like to receive a copy of each student s submission. 4. To collapse the Submissions Properties, click the arrow. 17

22 Security Properties 1. To access the security properties, click on the arrow icons under More Options at the bottom of the Edit Assessment Properties screen. 2. If you want to require students to enter a password to take the assessment, enter the password in the Proctor password field. 3. If you want students to complete the assessment using specific computers, you can enter the IP address of the computer or an IP address mask. 4. To collapse the Security Properties, click the arrow. Custom Instructions 1. To access the custom instructions, click on the arrow icons under More Options at the bottom of the Edit Assessment Properties screen. 2. Enter the instructions that you would like to have appear at the top of the assessment. 3. If you want to display the custom instructions on every question when they are delivered one at a time, check the box 4. To collapse the Custom Instructions, click the arrow. 18


23 Save Properties 1. When you have finished making changes to the properties, click Save at the bottom of the Edit Assessment Properties screen Don t forget to Save What about Respondus? There are just a few changes that you will need to make to Respondus to use it with CE6. 1. On the Start page, click the drop down box for Current Personality and choose WebCT6/Vista 4. 19


24 2. If you open a file that was created with the previous WebCT personality, you will receive a message to this effect. Click OK to continue. 3. When you are ready to publish for the first time with the new personality, click Publish Wizard and in Step 2 on the Publish Wizard screen, click the drop down box and choose add new server-. 4. When the Add New Server Settings screen appears, keep the Yes, check for preconfigured server settings button selected and click Next. 5. On the Auto Server Settings Wizard screen, enter a name to describe the server. (This can be any name you want.) Enter your username and password information and check if you want 20


25 the username and password saved. Make sure the Run Connection Test button is selected and click Next. 6. The status window for the connection test will appear. If the test completes successfully, click Next. 7. All other activities in Respondus remain the same. 21
26 The Assignments Tool The Assignments Tool allows you to create and distribute course assignments to your students, and download, evaluates, and assign a grade to the completed work. Assignments can include attachments that the students can then download, modify, and then upload for submission. When an assignment is created, a new column appears in the Manage Students section of the course and when the assignment is graded, that grade is automatically entered into the correct cell. Adding this tool to your Home Page In the Build tab, go down to Designer Tools and click Manage Course Click on the Tools option at the top of the list of icons Under Student Learning Activities select Assignments Click Save at the bottom of the page You will now see this tool and icon on your Course Content menu 22

27 Creating An Assignment There are two types of assignments that you can add. Text with attachments: A Text with attachments assignment requires students to submit their assignment by entering text in the Assignments tool by attaching files. Web site: A Web site assignment requires students to submit a ZIP file containing linked HTML files that create a web site. Students specify an entry point for their web site and use relative links to link all pages. EXAMPLE For an English Literature course in which you want students to submit an essay on a novel covered in class, you could create a text-with-attachments assignment. In the instructions, you could 23

28 inform students of the length of the essay and any other requirements. Students would then upload their essays and attach them to their submissions EXAMPLE For a Web Design course, you could create a website assignment called Learning HTML. In the instructions, you could outline the requirements of the assignment, such as the HTML tags you want students to use, and provide an attached HTML file as an example. Students would then upload a zipped collection of their HTML files and attach them to their submissions. Click on the Assignments icon under the Course Content menu, click Create Assignment and the following screen appears 24

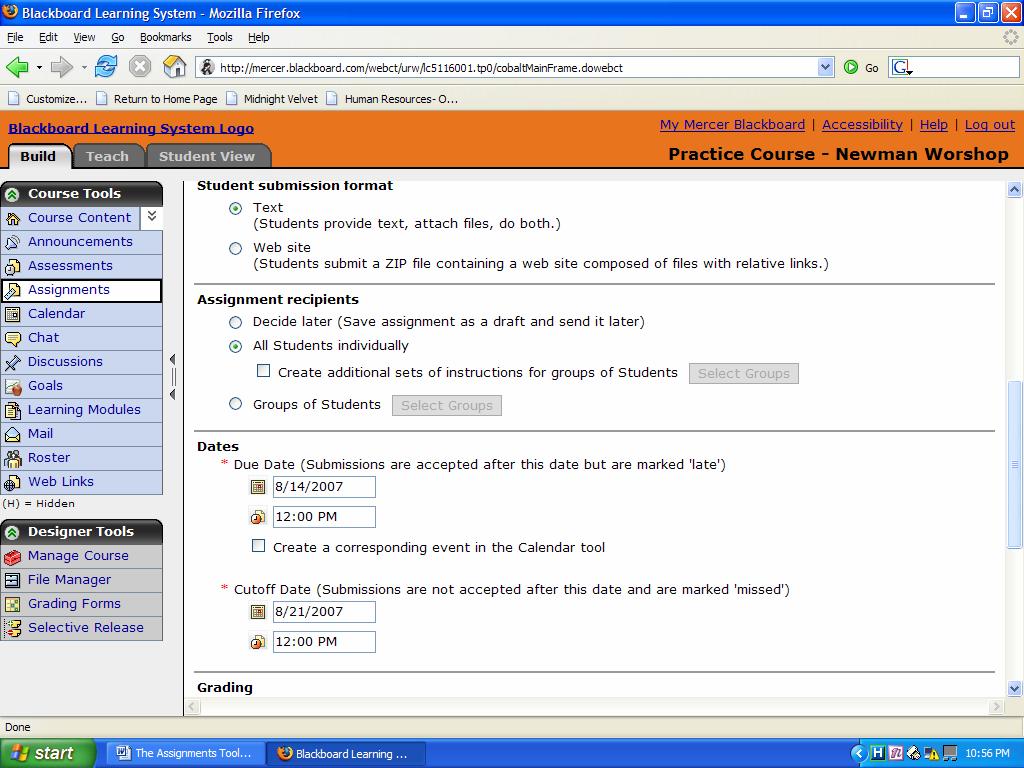
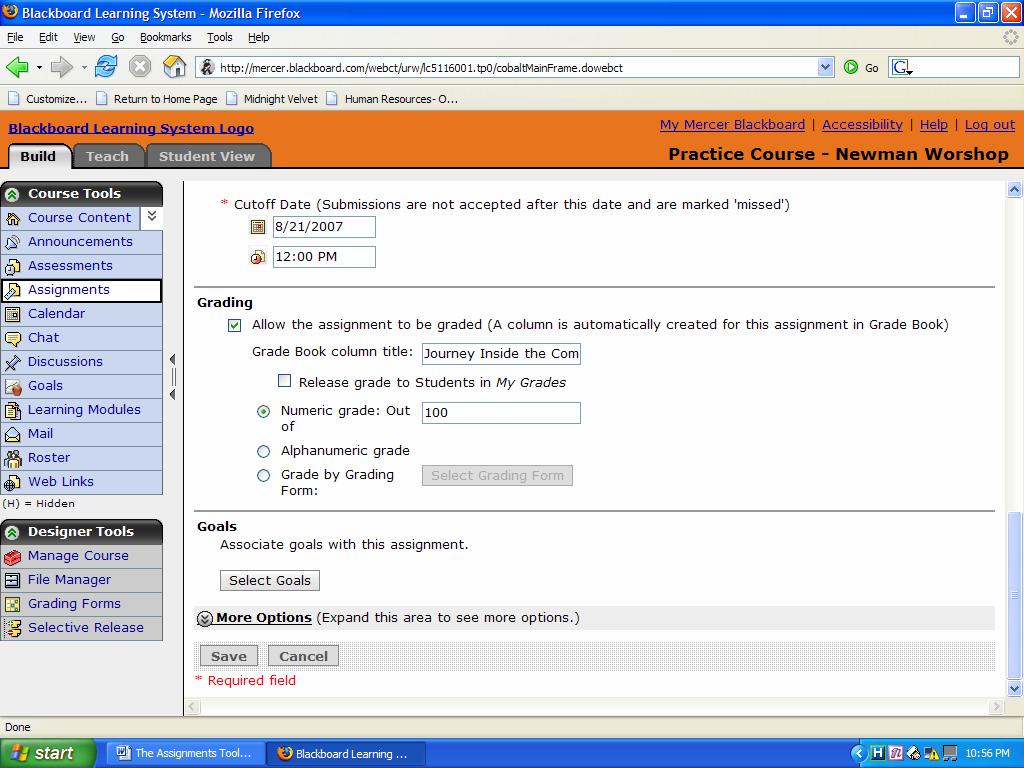
29 Enter the assignment s Title and Description and select whether you want to Show or Hide the assignment. Enter the Instructions. If you want to attach a file with additional instructions, click Add Attachment, and locate and select your file. Under Student submissions If you want the assignment due date to appear in students calendars, select Create a corresponding event in the Calendar tool. Under Grading, select Allow the assignment to be graded and select whether you want the assignment to have a Numeric grade, an Alphanumeric grade, or to be graded based on a Grading Form. For numeric grades, enter the maximum grade. 25
30 26
31 27
32 Collaboration Options Assignments can be used for individuals or groups. Select an option based on your goals for the assignment. If you want select this option Example students to work and be graded individually all students to receive the same instructions students to work and be graded individually groups of students to receive different sets of instructions students to work in groups and be graded as a group groups to receive the same instructions or receive additional customized instructions All Students individually All Students Individually with Create additional sets of instructions for groups of Students selected Groups of Students For an Education course, create a gradable text-with-attachment assignment instructing students to submit a lesson plan based on a favorite children s book. All students receive the same instructions and submit individual lesson plans for grading. For a Biology course, you create a textwith-attachments assignment for a research paper on one of five different topics. Students can sign up for the group that is based on the topic that they are most interested in, but students work individually, submit their own research papers, and receive their own grades. For an Art History course, create a website assignment called Artists of the Renaissance and assign it to groups of students. In the assignment instructions, outline the basic requirements, such as the amount and type of information. Assign each group a different artist and give each group unique instruction. Each group submits one website, and all students within one group receive the same grade. 28

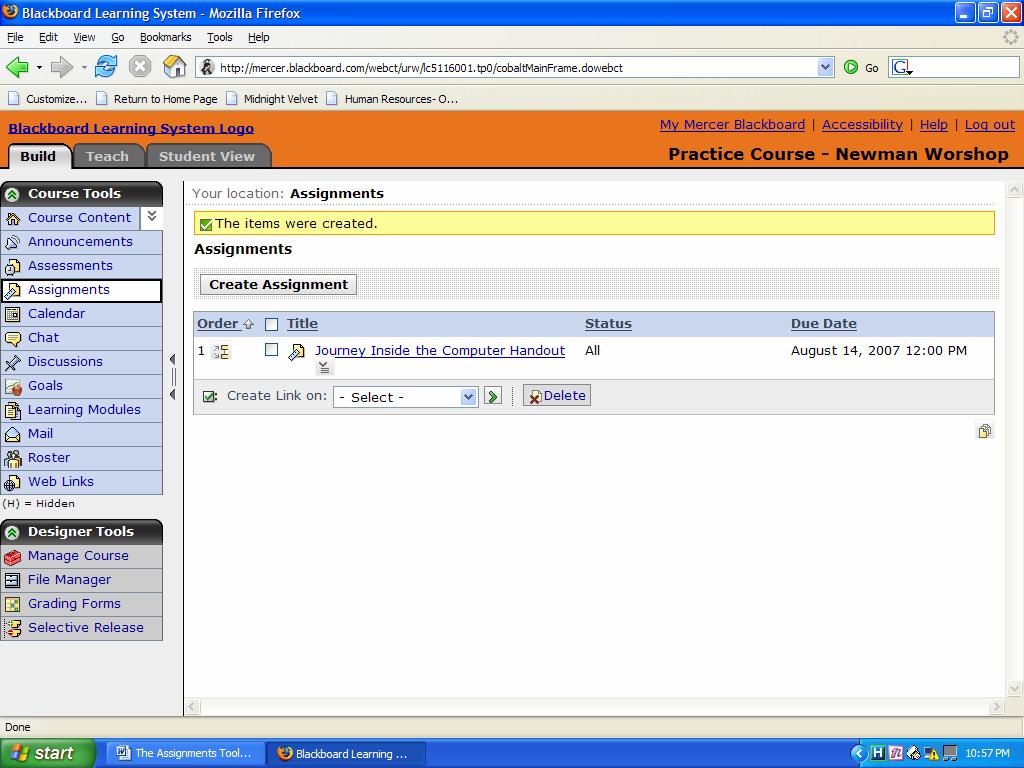
33 Editing Assignments You can edit assignments from either the Build tab or the Teach tab. If the assignment has not yet been viewed by students, you can edit all the assignment properties, including title, description, type, and grading. If the assignment has been viewed, you cannot edit the assignment type (text-with-attachments or web site). Change the students assigned to it To edit assignments In the Assignments screen, locate the assignment that you want to edit and click the linked title. The Edit Assignment screen appears. 29

34 Edit the assignment and click Save. The Assignments screen appears and the assignment is saved. Grading Assignments You can view, grade, and publish assignments from the Assignment Dropbox in the Teach tab. The Assignment Dropbox provides five tabs that follow the progress of an assignment 30
35 This tab displays Submitted assignments that have been submitted by students. You can grade or publish the assignments. Not Submitted assignments that have been assigned to students and not yet returned to you, or that have been submitted and that you have returned back to the student. Graded assignments that have been graded. Non-graded assignments can also be marked as completed. Published any assignment that has been published to the entire class, either by you or the student. All all assignments regardless of the submission status. The list can also be viewed by individual assignments. To grade an assignment From the Teach tab, under Instructor tools, click Assignment Dropbox. The Assignment Dropbox screen appears. Click the Submitted tab. The list of submitted assignments appear 31

36 Calendar The course calendar allows Designers and Teachers the ability to create calendar notices of important dates including assignment due dates, tests and changes to regular class schedules. The calendar also allows users to view monthly, weekly and daily schedules. Click the Calendar button in the Course Tools to view Calendar Add Entries The Build and Teach tabs allow entries to be made. 1. Click the Add Entry button Add Entry button 2. Enter the title and description 32

37 HTML can be used by clicking the Enable HTML Creator 3. Select activity start and end date Click on the icon for calendar view 4. Select the Entry Type Choose who you want to view the calendar posting. If you select Course all students and designers will be able to view or you can make Personal calendar postings only viewable by you. 5. More Options 33
38 By clicking the More Options button you will be able to create links to course files or Internet links. You can also choose the recurrence of the calendar event postings. 6. Click the Save button to save calendar entry You can view the calendar in the Monthly view, Weekly view or Daily view. Calendars can be printed by clicking the Printable view button. You can also choose the calendar view by selecting the View dropdown menu including course, personal, institutional and custom view. Printable view Delete All entries View options 34

39 Chat Tool (and Whiteboard) Chat allows members to communicate and collaborate with each other in real time by sending text messages, creating drawings, and sharing images. Chat rooms can contain both chat and whiteboard functions or be limited to just one or the other. You can use the Chat tool to hold online office hours, exam reviews, and study groups. You can also use the whiteboard to display images, draw, and present slide shows. 35
 Type your message in the white message box at the bottom of the window; then press the Enter key. Notice that the sender s name appears at the beginning of each message.")
40 From the Build or Teach Tab, next to the chat room link, click on the Action links icon. Go to Chat Room (If you click it from the student tab, you will enter as a demo student.) Type your message in the white message box at the bottom of the window; then press the Enter key. Notice that the sender s name appears at the beginning of each message. To send a private message, double-click on the name of the person (in the Participant List), a popup chat will appear to enter the message and press the Enter Key. To use the Whiteboard, select from the tools at the top right. Click into the Whiteboard and begin to use that tool. All of your actions will be seen by everyone in the chat as you are doing them. If you would like to save the whiteboard, click Save. The 36


41 file will be saved in your My Files Chat_Whiteboard_Folder. You can add this file to a page in your course. Viewing Chat Room Logs Next to the chat room link, click on the Action links icon, then View Log 37
42 You also have an option to clear the log if you press the Clear Log button. Chat Terms Room type The Chat tool has three room types: Chat and Whiteboard displays features for both chatting and drawing Chat only displays features for chatting only Whiteboard only displays drawing features only Chat Room Log You can maintain a text file that logs chat room conversations Alias Lobby You can allow members to use an alias while chatting to conceal their identities The Chat home page is referred to as the lobby Creating Chat Rooms To create a chat or whiteboard room: Under Course Tools, click Chat. The Chat screen appears Click Create Chat or Whiteboard Room Enter the Title and Description and select whether to Show or Hide the room Select the room type: Chat and Whiteboard, Chat only, or Whiteboard only. Enter the Maximum users tat you wish to access the room at one time 38

43 Expand More Options. Select the settings and click Save 39
44 Facilitating Chat Sessions Monitoring chat rooms ensures good information flow. The following features facilitate chat sessions: Use to: Chime Preferences play a sound, flash the screen, or both as an entry chime to notify members that another participant has entered the room. This helps maintain group awareness. Handraise Mode require students to raise their hand. You must call on them before they can contribute to the chat conversation. Pass the Microphone Mute allow only the student who has raised their hand to speak prevent a member from contributing to the conversation Deny Access remove a member from a room. You can allow them to join again later Enable Private Messages allow members in the same room to exchange messages among themselves without others seeing the messages or being aware that they have been sent Enable Logging record conversations in a text file which can be reviewed 40
45 The Discussion Board in CE6 Discussion Types The three types of discussions used to interact with students are: threaded, blog, and journal. The type you select depends on the nature of the assignment and the desired result. Threaded: Traditional online discussion Blob: Collaborative chronological entries; add comments to any entry Journal: Place for student s own writing; private between student and instructor or shared with class Threaded discussions are more traditional and what we are most familiar with in the previous version of WebCT. They encourage reflective thought as it permits deeper consideration of the ideas under discussion. Class participants post and reply to messages at their leisure time. For example, a student may prefer posting in the evening, where someone else may want to reply or post in the morning hours. To select the type of discussion used in your course, do the following: From the Build or Teach tab, select Discussions in the Course Tools panel Click on the Create Discussion Topic. The screen below will be displayed Select the type of topic you want to use in your course 41


46 Creating the Discussion Topic Type the title of the Subject and the Message as shown below Click the Post button after you have completed the Message 42
47 Discussion Grading CE6 adds a central grading area to the Discussions tool. Instructors can assemble and review a student s posted messages, review total participation versus the class average, and assign a grade to each student that is automatically recorded to the Grade Book. This saves instructors time and lets them efficiently evaluate participation in class discussions. This option is set up when the topic is created, or can be changed at any time using the Edit Preferences menu from the ActionLink menu for the topic. Entering the grades must be done using the Instructor role, i.e. using the Teach tab for the course. When in that mode, click on the ActionLink menu for the topic and choose Grade Topic. In the Grading Section, click on the Numeric grade button (Indicate the number of points given for this particular Discussion Choose to release the grade in the Grade Book Another way to grade a Discussion topic: Click on the Discussion Tool Click the ActionLink drop-down for the particular topic Select Grade Topic 43

48 New Discussion Management CE6 includes new discussion management options, including the ability to add instructions for each discussion topic, edit postings, and re-order discussion topics and categories. This is the view that instructor or designers see. Students do not see the options for creating or deleting topics or categories. To see the actual discussion messages, click on the topic. 44

49 Easier Discussion Navigation Discussions are easier to navigate than ever before, making it simple for students and faculty alike to communicate and find the information they are looking for. Users have the ability to sort any discussion topic by message subject, author, or date and can expand all to view all posts within a topic. Once a user makes a post, the list of discussion postings is automatically updated. 45
50 46
51 Learning Modules A learning module is a collection of content items and files, arranged sequentially and organized by a Table of Contents. It includes built-in navigation links and optional interactive tools. Because they are linear in nature learning modules can be compared to an online book or the chapter in a book. It is important to remember that learning modules can bring together many different types of learning items and present them in a cohesive unit. You can include the following types of items in a learning module: assessments assignments chat and whiteboard rooms content files discussion categories and topics media library collections The Learning Module Tool by Tab From the Build tab you can: create and add content to learning modules. Edit learning modules. Customize the Action Menu. You cannot build or edit learning modules from the Teach tab. 47
52 Creating Learning Modules Create an organized environment for students by building learning modules to organize and deliver course content. You first create a learning module, access it, and then add content to it. To create a learning Module: 1. From the Build tab, under Course Tools, click Learning Modules. From the right frame, click Create Learning Module. The Create Learning Module screen appears. 2. Enter the required title and optionally, a description. 3. Next to the Item visibility, select whether to show or hide the item. 4. Complete the Table of Contents section: a. From the Numbering drop-down list, select whether to display the table of contents in a separate pane on the left. b. Under Display Table of Contents, select whether to display the table of contents in a separate pane on the left. 5. Under First page of the Learning Module should be. Select whether to display the table of contents as the first page of the Learning module. 6. To associate the learning module with a goal, click Select Goals and select one or more goals from the list. Click Add Selected 7. Click Save or Save and Create Another. 48
53 Adding Content to the Learning Module After creating the framework of the learning module, you access it, and then add content items and files to the Table of Contents. To add a content link: 1. From the Learning Module screen, click a learning module link to access it. 2. Click Add Content Link. A menu appears 3. Select the tool for the type of content you want to add. For example, to add a quiz, select Assessments. The menu option expands. 4. Select an item from the inventory and click Add Selected. The item is added to the end of the table of contents. Note: You can also create new content items and add them to the learning module at this point. For example, from the Assessments option in the context menu, click Create Assessment. To add a file: 1. From the learning module to which you want to add a file, click Add file. A drop-down menu appears. 2. Select one of the following: To create a content file, select Create File. To add an existing file, select Browse for Files. You may select a file from: My Files personal files you have already uploaded Class Files files that already exist in the class 49
54 My Computer files that exist locally on your computer that you can browse for, upload, and select 3. To associate the file with a goal, click Select Goals and select one or more goals from the list. Click Add Selected. Tip: You can add multiple files or content items of the same type simultaneously. Hold the Ctrl key (Windows users) or the Command key (Mac users) while selecting the items. Organizing Learning Modules You can organize your table of contents by creating headings and grouping items under headings by indenting them. You can easily re-arrange items in the table of contents. To create a heading: 1. Access the learning module you want to add content to and click Create Heading. 2. Enter the title for the heading and click Save. The heading is added to the end of the table of contents. You now need to indent or outdent items and move them under this heading. To indent or outdent headings: 1. From the learning module that you are organizing, select the content items you want to indent or outdent. 2. Select the items you want to indent or outdent and do one of the following: To decrease or increase the selected items by one level, click Indent or Outdent. The selected items are indented or outdented and renumbered accordingly. 50
55 To move the selected items to the first level, click Outdent All. The selected items appear at the highest level and are renumbered accordingly. To change the order of items in a learning module: 1. From the learning module that you are organizing, select the heading or content item you want to move. 2. Do one of the following: To move the selected items anywhere except the end of the learning module, locate the item above which you want to insert the item. In the Move column on the left, click Move Selected Items Above. To move the selected items to the end of the learning module, click Move Selected Items to Bottom of List. Tip: To move content items under a new heading, select the items and move them to the bottom of the list. 51

56 Mail Mail provides faculty and students a way to communicate within the Blackboard CE6 environment. You will need to be logged in to your course to read, send and receive mail. How to access Your Blackboard Mail My Blackboard allows you to access mail for all of your courses from the My Blackboard main interface. 1. Click the Mail icon in the toolbar to access mail for all of your courses. Mail icon 2. Click on the hyperlink of a course to view mail. The Mail toolbar will indicate messages and unread mail that you have received. 52


57 You can also access your Mail for each course while logged into a course. Mail can be selected from the course tools in the Build Tab, Teach Tab or the Student Tab Blackboard Mail Interface The Mail interface allows users to create messages, read messages and create folders to store messages. How to Create a Folder 1. Click on the Create Folder button 2. Name the folder 3. Click Create 53

58 Create a Message Messages can be sent to faculty and students who are enrolled into the course. Mail cannot send messages outside of the Blackboard environment such as to a student@mercer.edu mail account. The Browse for Recipients button allows you to view faculty and students in the course. The message can be created in HTML by checking the Use HTML box. You can write the code or you can use the HTML editor by clicking the Enable HTML Creator button. 54


59 Read Messages The Inbox folder indicates the number of messages you have. The total messages in your inbox are in the parenthesis. To read your mail click the Inbox folder if it is not already open and click on the message hyperlink or the Action Link to view or delete messages. Inbox Folder Message Hyperlink Message Action Link Messages can be organized in folders. 1. The Inbox, Sent Mail, Drafts and Deleted Mail folders are created automatically. 2. Click the Create Folder button to create a new folder. 3. You can move messages to a new folder by selecting the checkbox next to the message then click the dropdown menu in the Move to: menu and the click the folder where you want to store the message. Create New Folder 55 Move to Drop down menu

60 Syllabus The Syllabus allows faculty and designers to: 1. List contact information 2. Office hours 3. Class goals and objectives 4. Textbook information 5. Outline and class schedule 6. Class and University policies The syllabus tool can be selected from the Course Tools in the Build Tab or the Teach tab to be created or modified. You can view syllabus in the Student View. Syllabus Interface Syllabus tool Create a Syllabus You can choose Use built-in syllabus or Use File from the Select Syllabus Type radio button. Or choose Use File to import a syllabus. Syllabus Type Radio Buttons Add Syllabus Item Using the Built-in Syllabus Tool 56

61 1. Select the Use built in syllabus radio button 2. Click the Add Syllabus Item button 3. Select item type Syllabus Item Action Link 4. Create heading and content. Select the Use HTML checkbox to format in HTML. 5. Click the Save button Save Item Syllabus Items can be moved, edited or deleted. You can also hide a syllabus item if you are still working on the item. 57
 4.")
62 To move an item select the text box and the select where you want to move the item by selecting the move button Click Item s Action Link to Edit, Hide or Delete Item Import Syllabus 1. Select the Use File radio button 2. Click the Select button 3. Click the Browse button (Files can be selected from My Files, Class Files or from My Computer) 4. Select the file radio button and click OK Browse for Syllabus File 58

63 Web Links Web Links allow you to create links to external websites. This allows your students the ability to view websites within the Blackboard environment. In order to create Web Links you will need to be in the Build Tab. Create Web Link button Web Links in Course Tools Creating Web Links 1. Click the Web Links in the Build Tab Course Tools 2. Click the Create Web Link button 3. Give web link a title and a description 4. Choose to make link visible by using the Item Visibility buttons (designers may want to create web links and hide them until a later date. Note: You will have to edit the properties to Show Item to make visible.) 5. Include the URL Web Address with the protocol i.e If you have created categories you can Select a Category 7. Click the Save button 59

64 Create a Title and Description For the Web Link Show or Hide Item URL of linked web address Click the check box to open in a new browser window Click Save button to save web link Adding Web Links as a content link in a Learning Module by clicking the Add Content Link and selecting Web Link and follow the steps for Creating Web Links Click to Add a Web Link 60


65 Editing Web Links You can edit web link properties, hide items, view and delete Web Links using the Web Link Action Link. 1. Click the selected web link action link 2. Select the action and make corrections Action Link Moving Web Links 1. Select the web link checkbox 2. Click the move link to move the hierarchy of the links Move Tool You can also create a category and the click the Select drop down menu to place the web link in the selected category. Select Checkbox to move Select Category 61


66 Designer Tools/Instructor Tools/My Tools The content of the lower section of the Course Menu is dependent upon the current tab. Build tab contains Designer Tools, Teach tab contains Instructor Tools, and the Student View tab has My Tools. The Build tab contains Designer Tools. Designer Tools help you to manage and create the course by adding and removing tools and changing course settings. You can also access File Manager, Selective Release, and Grading Forms from the Designer Tools The Teach tab contains Instructor Tools. Instructor Tools provide you with the utilities needed to view and grade assignments, manage grades, and handle other instructional tasks The Student View tab contains My Tools. My tools provide students with access to My Grades, My files, My Progress, and Notes tools. The course Designer controls the availability of these tools. 62
67 The Gradebook in CE6 Instructors can access the Grade Book with a single click from anywhere in a course. The Grade Book provides spreadsheet-style ease for organizing and managing information. For example, students first and last names are frozen into place as an instructor scrolls through the Grade Book, making it easier to locate and view specific grades. Instructors also have easy access to key statistics for each column in the Grade Book (including average, median, maximum, minimum, and standard deviation), which offers a quick snapshot of class performance on a particular item. Instructors can override any grade recorded in the Grade Book, including quiz grades. When a grade is changed, it is automatically marked as such, creating an audit history of grade changes. Instructors can also add notes or comments to explain grade changes as necessary Accessing the Grade Book You access the grade book by clicking on the TEACH tab. It is located under the Instructor Tools at the bottom of the left-hand menu. Click on the Grade Book icon. The following screen appears 63
, select the role and click Enroll.")
68 Enrolling Students, TAs and Designers Click on Enroll Members at the top of the screen. The following window appears: In User Name, type the (MUID), select the role and click Enroll. You can keep doing that if you have more than one person to ad. Then click on Save. 64

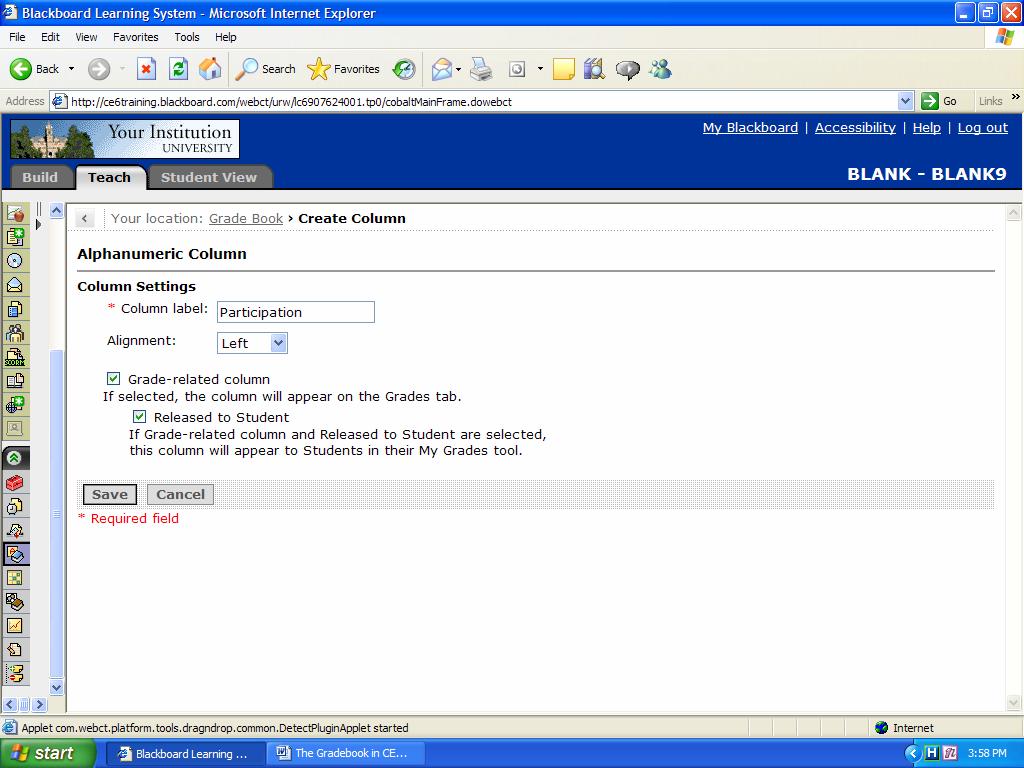
69 Creating Columns These columns are system-created: user-related: Last Name, First Name, User Name, and Role. These columns pull their information From the member s user/enrollment record and cannot be modified in Grade Book. See your Administrator to make edits to values in these columns grade-related: Midterm and Final. These columns cannot be deleted and are used to calculate a Student s midterm and final grade. These two columns are, by default, calculated columns, but you can change the column type to something else. 65
70 quiz, assignment, and discussion topic columns: if there are any quizzes, assignments, or gradable discussion topics created in the course, a corresponding grade-related column will be automatically created in the Grade Book. Creation of a survey also creates a column in the Grade Book, contents indicating whether the survey has been completed or not You can create columns of the following types: text columns: allow you to enter text only (You could use a text column to add comments about each member or to track member data.) numeric columns: allow you to enter numbers only (You could use a numeric column to insert grades for an offline assignment and other interim grades.) calculated columns: allow you to specify a formula (that can include other numeric columns) to come up with a numeric value (You could use a calculated column to calculate an interim grade.) selection list columns: allow you to specify one or more text values that can then be selected (You could use a selection list column to describe a Student s overall term effort (fair, good, excellent). letter grade columns: to calculate a letter grade based on the numeric values of another column Adding Columns To create a column, click the ActionLink for Create Column at the top of the page. From the list, select the type of column you want to create. The Column Settings window will then open for that specific column type, allowing you to choose which settings you want. Click Save when you are done. A column will now be added to the end. If you wish to add columns in a 66
71 particular order, first select the box above the column you wish it to go before and then click the ActionLink for Create Column. 67
72 68
73 The Grade Book Tabs The Grade Book contains five tabs: Grades Members View All Custom View SCORM GRADES Each tab has different groups of data columns and provides a different view of information about members, including designers, instructors, teaching assistants, students, and auditors. 69
74 This Grade Book tab Grades displays: the default columns (Last Name, First Name, and User ID) and any grade-related columns. This tab is used to view, enter, or override grade-related information. Members all default columns (except quiz and assignment columns), and any non graderelated columns. This view is meant to hold any descriptive information that you want to store about students and auditors. View All all columns, grade-related or not. Custom View all columns initially. You delete and recorder columns to create your own view of member information. 70


75 Group Manager With this tool, you can: Individually choose or randomly assign students to groups. Allow students to sign up for groups or projects. Send messages to members of one or more groups. Create discussion topics and chat rooms for groups To Access the Group Manager From the Teach tab, click Group Manager in the Instructor Tools. 2. The Group Manager screen appears. Click Create Groups to proceed. Teach Tab Instructor Tools Group Manger 71
76 To Create a Custom Group Use custom groups when you want to specify the name of a group and control who is assigned to the group. 1. From the Create Groups screen, select Create custom group and click Continue. 2. The Create Custom Group screen appears. 3. Enter the Group Name (this is the only required field) and if desired a description of the group. Click Add Members if you want to add members to the group at this time. If you want to add members at a later time, click Save. 72


77 4. To add members, click the check box by the names of the members that you want to add to the group. Click Add Selected when finished. 5. You will return to the Create Custom Group screen. Click Save to save the information and exit or Save and Create Another Group to save the information and setup another group. 73
78 To Create Multiple Groups Use multiple groups when you want to create more than one group and you can individually choose group members or have members assigned randomly. 1. From the Create Groups screen, select Create multiple groups and click Continue. 2. The Create Multiple Groups screen appears. You will give the group a name and a sequential number will be added to the name for each of the groups. You may optionally enter a description for the group. 74
79 3. You can create empty groups and add the members later by choosing that option and specifying how many groups you want created and click Continue. 4. If you want to create multiple groups with randomly selected students, choose that option and specify whether you want to include the demo student in a group, the number of groups or the number of students in a group and what to do with extra members that do not fit into randomly generated groups. Click Continue. 5. The Confirm Created Groups screen appears. If you want to change the group assignments, click Shuffle Members and click Save. 75
80 To Create Sign-Up Sheets Sign-up sheets allow students to add themselves to groups. You can control the maximum size of the group and whether students can see who has signed up. 1. From the Create Groups screen, select Create Groups with Sign-Up Sheets and click Continue. 2. The Create Groups with Sign-Up Sheets screen appears. Under Group Settings, enter the number of groups, a word or phrase for the beginning of the groups names, and the maximum number of students in the group. You may optionally enter a default description of the group. Choose whether you are going to allow students to see who has already signed up for the group prior to signing up. 76

81 3. Under the Sign-Up Sheet Settings of the Create Groups with Sign-Up Sheets screen, enter the title for the sheet, instructions for the sign-up sheets and where to place the link to the sign-up sheet. Click Continue. 4. The Confirm Created Groups screen appears. Click Save to complete the process. Sending Mail to Groups and Creating Group Activities 1. The Group Manager Create Groups screen appears when you complete creating a group. You can also get to this screen by clicking Group Manager in the Instructor s Tools under the Teach tab. 6. To send a mail message Go a. Select the group(s) by clicking in the box to the right of the group name. b. Click Send Mail. The Create Message screen will appear with the group members name in the To field. Complete the and click Send. 77
82 7. To create a group activity (Group discussion tops and/or group chat and whiteboard rooms. a. Select the group(s) by clicking in the box to the right of the group name. b. Click the Create Group Activity drop down list and choose either Create Discussion Topic or Create Chat Room and click the Go button. c. Create the activity and click Save. The Group Manager screen will appear with a message confirming the activity was created. d. If you selected multiple groups, you will have an option to create a single room for all the groups or separate rooms for each group. 78

83 File Manager The File Manager is used to: Locate and view files and folders Create and edit files and folders Copy, move, download, compress (zip), and delete files and folders Upload/download files between your computer and Blackboard How to access the File Manager The File Manager is more concerned with building a course than teaching a course section, so it is found under the Build tab in the Designer Tools. Build tab Designer Tools File Manager File locations Files can be accessed in three locations: My Files: a private area on Blackboard where you can store any personal files, to be used at any time, for any course section. No other users can access this private area. 79


84 Class Files: an area on Blackboard where you store files for the course section you re logged in to. Other instructors and designers for the course section can access these files. My Computer: this is a link/icon that allows you to upload files from your local computer to Blackboard. My Files (on Blackboard, private to you alone) Class Files (on Blackboard, available to course instructors and designers) My Computer (on your local The File Manager interface The File Manager has a pane where you can navigate through folders and select the folder you want to work in. But first you must select either your Class Files or My Files. Select Class Files or My Files on this bar Files in selected folder are shown here Folders in selected files area are shown here 80
.")

85 Uploading files from your computer To upload files from your computer, first select whether you want to upload them into your Class Files or My Files area by selecting the appropriate one (see earlier instructions). Then, click the Get Files button. Select destination area for uploaded Get Files button In the resulting window, select My Computer, browse to the file(s) you want to upload, then click OK. Browse your local computer to find file to upload 81

86 ActionLinks for file operations Objects in Blackboard typically have an ActionLink icon that provide a menu for appropriate operations for that object. Note that for a file, ActionLink operations include Rename, Copy, Move, Download, and Delete. an ActionLink ActionLink for a file ActionLink menu for a file Advanced File Manager features There are many other File Manager features not covered in this guide, including advanced features like dragging-and-dropping files between your computer and Blackboard. Consult a more complete Blackboard reference for details. 82
Blackboard Portfolio System Owner and Designer Reference
 Blackboard Learning System Blackboard Portfolio System Owner and Designer Reference Application Pack 2 for Blackboard Learning System CE Enterprise License (Release 6) Application Pack 2 for Blackboard
EXPLORING COURSE TOOLS
 EXPLORING COURSE TOOLS Now that we have covered the My Blackboard screen, let s explore the different tools that you might find within your course. NOTE: Your instructor controls which tools are available.
MOODLE MANUAL TABLE OF CONTENTS
 1 MOODLE MANUAL TABLE OF CONTENTS Introduction to Moodle...1 Logging In... 2 Moodle Icons...6 Course Layout and Blocks...8 Changing Your Profile...10 Create new Course...12 Editing Your Course...15 Adding
Coastal Bend College Learn Blackboard 9.1 Faculty Instructional Handbook
 Coastal Bend College Learn Blackboard 9.1 Faculty Instructional Handbook Distance Education Table of Contents LOGGING IN TO BLACKBOARD... 1 EXPLORING MY BLACKBOARD... 2 EXPLORING COURSE TOOLS... 5 ANNOUNCEMENTS...
Visual Guide to Online Campus
 Contents Course Navigation... 2 Avatars..3 Text Editor... 4 Accessing Assignments... 6 Accessing Assessments... 9 Accessing and Participating in Discussions... 12 Discussion Forums and Threads... 14 Creating
D2L Fundamentals Faculty Support Guide
 D2L Fundamentals Faculty Support Guide D2L Services West Chester University of Pennsylvania www.wcupa.edu/d2l 610-436-3350, option 2 Anderson Hall, room 2 d2l@wcupa.edu v10.5 July 2015 Contents NAVIGATING
Blackboard 5 Level One Student Manual
 Blackboard 5 Level One Student Manual Blackboard, Inc. 1899 L Street NW 5 th Floor Washington DC 20036 Copyright 2000 by Blackboard Inc. All rights reserved. No part of the contents of this manual may
Blackboard 5. Instructor Manual Level One Release 5.5
 Bringing Education Online Blackboard 5 Instructor Manual Level One Release 5.5 Copyright 2001 by Blackboard Inc. All rights reserved. No part of the contents of this manual may be reproduced or transmitted
CONTENTS. What is Moodle? Logging in to Moodle Introducing the Workspace Customising the Workspace... 8
 Moodle Training March 2012 Material produced by the VLE Group (Monash University) and elearning Services (Faculty of Medicine, Nursing and Health Sciences, Monash University) vle.monash.edu/supporttraining/learnbytech/moodle/
CE 4.1 (MP) to Vista Enterprise Migration Guide for Designers and Instructors
 to Vista Enterprise Migration Guide for Designers and Instructors") Blackboard Learning System CE 4.1 (MP) to Vista Enterprise Migration Guide for Designers and Instructors Application Pack 1 for Blackboard Learning System Vista Enterprise License (Release 4), Service
Blackboard Learning System CE 4.1 (MP) to Vista Enterprise Migration Guide for Designers and Instructors Application Pack 1 for Blackboard Learning System Vista Enterprise License (Release 4), Service
How will you design your course and organize your material? Consider
 Blackboard TM 9.1 Tools How will you design your course and organize your material? Consider Content Areas: add your syllabus, course documents such as handout, related Websites, assignments, and other
Getting Started in Your Blackboard 5 Course
 Getting Started in Your Blackboard 5 Course Course Name: Course ID: Instructor: URL: http://hofstra.blackboard.com Username: Password: This course will be using Web-based software, which integrates course
Tutor Handbook for WebCT
 Tutor Handbook for WebCT Contents Introduction...4 Getting started...5 Getting a course set up...5 Logging onto WebCT...5 The Homepage...6 Formatting and designing the Homepage...8 Changing text on the
An Introduction to Blackboard
 An Introduction to Blackboard This document provides instructions on navigating Blackboard and utilizing its features. Check out http://www.uis.edu/colrs/students/blackboard/blackboardtutorial.html for
Table of Contents Tutorials for Faculty... 3 Creating a News Item... 3 Syllabus... 3 Uploading Your Syllabus... 3 Update Your Syllabus
 Table of Contents Tutorials for Faculty... 3 Creating a News Item... 3 Syllabus... 3 Uploading Your Syllabus... 3 Update Your Syllabus... 3 Email... 4 Send an Email to the Entire Class... 4 Send Email
BLACKBOARD: Course Management
 BLACKBOARD: Course Management LOGGING IN Note: you will use your Babson username and password to access Blackboard. TO LOGIN TO BLACKBOARD: 1. Open a web browser and type http://blackboard.babson.edu.
Introduction to Blackboard
 Blackboard 9.1: Student Guide Introduction to Blackboard Logging into Blackboard Blackboard Blackboard is an integrated set of web-based tools for course management and delivery. Requirements For web-based
Canvas Student Guide. The Office of Online Learning Massasoit Community College
 Canvas Student Guide The Office of Online Learning Massasoit Community College www.massasoit.edu TABLE OF CONTENTS What is Canvas?... 1 Computer and Browser Requirements... 1 Mobile Support... 1 Accessing
Rutgers. A How-To Guide for Instructors
 Moodle @ Rutgers A How-To Guide for Instructors 7/30/2012 Prepared by the Department of Instructional Technology & elearning Solutions (ITeS) CA/NJDS, Room B725 Page 2 Table of Contents Required Software...
Introduction to Canvas
 Introduction to Canvas Logging Into Canvas https://login.canvas.ucdavis.edu/ Canvas Global Navigation The Global Navigation Menu is located on the left side of every page in Canvas. Global Navigation links
GeorgiaVIEW Vista Student Guide. The Vista Learning System by Blackboard, Inc. A Project of the University System of Georgia
 Information Technology Services Kennesaw State University GeorgiaVIEW Vista Student Guide The Vista Learning System by Blackboard, Inc. A Project of the University System of Georgia Copyright 2009 Information
Goucher College Online Course Sites: Basic Navigation in Canvas
 Goucher College Online Course Sites: Basic Navigation in Canvas Find Your Course Material Edit a Topic Section Upload a File Drag and Drop Method to Upload a File Create a Content Page Create a Wiki Page
Faculty Training. Blackboard I Workshop Bobbi Dubins
 Faculty Training Blackboard I Workshop Bobbi Dubins Table of Contents Introduction... 2 blackboard.allegany.edu... 2 Overview of Features:... 2 Using Blackboard... 3 Changing Your Password... 3 How to
Chat Activity. Moodle: Collaborative Activities & Blocks. Creating Chats
 Chat Activity The Moodle chat tool allows communication between instructors and students in real time. Unlike in discussion forums, which are a means for asynchronous communication, online chat sessions
Canvas Instructor Quickstart Guide
 Canvas Instructor Quickstart Guide Canvas Instructor Quickstart Guide 1 Canvas Instructor Quickstart Guide 1.1 1.2 1.3 1.4 1.5 1.6 1.7 1.8 1.9 1.10 1.11 1.12 1.13 1.14 1.15 1.16 1.17 1.18 1.19 1.20 1.21
Introduction to the Learning Environment v8.3.0
 Introduction to the Learning Environment v8.3.0 User Guide March, 008 Contents My Home Accessing your courses Navigating inside a course Lists Actions Entering Dates Showing and hiding advanced options
SpeechClass User Guide for Students A Speaker s Guidebook, Fourth Edition
 SpeechClass User Guide for Students A Speaker s Guidebook, Fourth Edition Getting Started with SpeechClass for A Speaker s Guidebook, Fourth Edition Table of Contents Overview... 1 Getting Help... 1 System
OBJECTIVES. Introduction to mycourses
 OBJECTIVES Identify elements of mycourses from the instructor, designer and student perspective. Integrate content into a course in a variety of file formats. Learn to use the Communication Tools: Chat,
Canvas Instructor Quickstart Guide
 Canvas Instructor Quickstart Guide Canvas Instructor Quickstart Guide 1 Canvas Instructor Quickstart Guide 1.1 1.2 1.3 1.4 1.5 1.6 1.7 1.8 1.9 1.10 1.11 1.12 1.13 1.14 1.15 1.16 1.17 1.18 1.19 1.20 1.21
Student Guide INTRODUCTION TO ONLINE RESOURCES
 Student Guide INTRODUCTION TO ONLINE RESOURCES Date: 08. June. 2017 By: Technical Support Team STUDENT GUIDE southwales.unicaf.org 1)Introduction...4 2)Student Panel (SIS)...4 2.1)Student Panel (SIS) Login...4
Blackboard Essentials
 Blackboard Essentials Who Can Help? Assistance via email: bbadmin@gvsu.edu Assistance via telephone: 616-331-9751 days Blackboard Help Documents on the web: http://www.gvsu.edu/elearn/help You will find
Blackboard 9.1
 Blackboard 9.1 http://mybb.gvsu.edu Logging into Blackboard... 2 User Management... 2 Course Site Overview... 2 Edit Mode On/OFF... 3 ****Activate your class site... 4 Announcements... 4 File Names...
Blackboard Student Quick Reference Guide
 Blackboard Student Quick Reference Guide Welcome to Blackboard, UTT s E-Learning System! This Quick Reference Guide is designed to help get you started using Blackboard Release 9.1.120113.0. Page 1 of
Blackboard Learn: Basics
 Blackboard Learn: Basics This document includes the following topics: 1. Log in Page 2 2. Find Your Courses Page 2 3. View Course Content Page 3 4. Add a Folder Page 3 5. Add a File Page 5 6. Add a Web
BRIGHTSPACE (D2L) STUDENT GUIDE
 STUDENT GUIDE") BRIGHTSPACE (D2L) STUDENT GUIDE Brightspace (Desire2Learn) is a way to deliver online courses as well as course components over the web at Atlanta Metropolitan State College. It provides students with
BRIGHTSPACE (D2L) STUDENT GUIDE Brightspace (Desire2Learn) is a way to deliver online courses as well as course components over the web at Atlanta Metropolitan State College. It provides students with
Faculty Guide to Blackboard
 Faculty Guide to Blackboard August 2012 1 Table of Contents Description of Blackboard... 3 Uses of Blackboard... 3 Hardware Configurations and Web Browsers... 3 Logging Into Blackboard... 3 Customizing
INSTRUCTOR SELF SERVICE USER GUIDE
 INSTRUCTOR SELF SERVICE USER GUIDE Page 1 of 38 Instructor Self Service Table of Contents Introduction... 3 Overview... 3 Access... 3 Sign in to Bear Tracks... 4 General Navigation... 6 Menu Navigation...
Dropbox-Faculty Full Text
 Dropbox-Faculty Full Text This tool provides a central location where students can submit and retrieve assignments and graded activities. It is possible for an instructor to retrieve submitted assignments
QUICK GUIDE FOR USING BLACKBOARD LEARN 9.1 GETTING STARTED
 This quick reference guide will get you started using Blackboard Learn 9.1. The guide includes: Getting Started page 1 Users and Groups page 4 Communicating with Students page 4 Using the Virtual Collaboration
OpenSpace provides some important benefits to you. These include:
 Cengage Education A member of Open Colleges Welcome to OpenSpace OpenSpace is our virtual campus. It is our online space for students, tutors and staff to interact. It provides you with a secure, interactive
This handbook contains directions on using tools and resources in WebAccess at CSM.
 WebAccess Handbook This handbook contains directions on using tools and resources in WebAccess at CSM. Contents Logging in to WebAccess... 2 Setting up your Shell... 3 Docking Blocks or Menus... 3 Course
A Student Guide to using Moodle
 A Student Guide to using Moodle Version 1: September 2007 Table of Contents Introduction...3 What is Moodle?...3 How do I access Moodle?...4 What will I find in Moodle?...5 Accessing a course...5 The main
CANVAS BY INSTRUCTURE IOS GUIDE
 CANVAS BY INSTRUCTURE IOS GUIDE This work is licensed under a Creative Commons Attribution-NonCommercial-ShareAlike License Table of Contents All Users...5 What do Canvas text (SMS) message notifications
ReggieNet: Communication Workshop
 ReggieNet: Communication Workshop Facilitators: Mayuko Nakamura (mnakamu), Charles Bristow (cebrist), Linda Summer (lsummer) & Steve Travers (sttrave) Forums Before you start FORUM: A Forum is a collection
Instructor User Guide for BioPortal Molecular Biology
 Instructor User Guide for BioPortal Molecular Biology Cox, Doudna, and O Donnel Getting Started with BioPortal for Cox, Doudna, and O Donnel, Molecular Biology Table of Contents Overview... 1 Online Help...
Mastering the Grade Book
 Mastering the Grade Book Blackboard Learning System - Vista Enterprise and CE Licenses 2008 Blackboard Inc. 2008 Blackboard Inc. 2 Mastering the Grade Book All rights reserved. The content of this manual
CONTENT MIGRATION ANGEL TO BLACKBOARD CONTENTS
 Introduction CONTENT MIGRATION ANGEL TO BLACKBOARD Content that has been migrated from ANGEL into Blackboard Learn is preserved, but there will be differences in the functionality and layout of the migrated
Student Guide. By UNICAF University
 vnhgfj Student Guide By UNICAF University 1 2 Table of Contents 1) Introduction... 5 2) Student Panel (SIS)... 5 2.1) Student Panel (SIS) Login... 5 2.1.1) Definitions... 5 2.1.2) Registration Email...
What Every Student Should Know About D2L
 How do I log in to D2L? What Every Student Should Know About D2L -There are two ways. For each, your login is your S# and password. Option 1 of 2: Log in Via Dashboard 1. Click on the My Schedule Dashboard
Faculty Guide to Grade Center in Blackboard 9.1
 Faculty Guide to Grade Center in Blackboard 9.1 Grade Center, formally known as Gradebook, is a central repository for assessment data, student information, and instructor notes. Although it includes items
esd Portal: Parent View User Guide v
 esd Portal: Parent View User Guide v. 5.0.0 Copyright 2002-2016 eschooldata, LLC All rights reserved. TABLE OF CONTENTS Overview... 3 Parent Portal Registration... 3 Logging In... 5 Getting Help... 7 Navigating
Instructor User Guide for EnviroPortal Environmental Science: Foundations and Applications Friedland, Relyea, & Courard-Hauri
 Instructor User Guide for EnviroPortal Environmental Science: Foundations and Applications Friedland, Relyea, & Courard-Hauri Getting Started with EnviroPortal for Friedland, Relyea, & Courard-Hauri Environmental
Instructor User Guide for EconPortal Macroeconomics, Third Edition
 Instructor User Guide for EconPortal Macroeconomics, Third Edition Krugman/Wells Getting Started with EconPortal for Krugman/Wells Macroeconomics, 3e Table of Contents Overview... 1 Online Help... 1 System
Blackboard 3: Grade Center
 Blackboard 3: Grade Center Whether you are using integrated Blackboard assignments or looking for a place to record grades on work submitted outside of Blackboard, the Grade Center gives you a secure online
Welcome to our Moodle site! What is Moodle?
 Welcome to our Moodle site! We are excited to introduce the use of this online e-learning platform in our "Get SMART FAST" Training Program! We believe the use of this virtual classroom and training format
Adrian College Blackboard Quick Start Guide for Instructors
 Adrian College Blackboard Quick Start Guide for Instructors Table of Contents Logging into Blackboard... 1 User Management Enrolling Students... 1 Enrolling a Guest, T.A. or Grader.... 1 Course Site Overview...
ACADEMIC TECHNOLOGY SUPPORT
 ACADEMIC TECHNOLOGY SUPPORT D2L : Introduction A Guide for Instructors ats@etsu.edu 439-8611 www.etsu.edu/ats Table of Contents Introduction...1 Objectives... 1 Logging In to D2L...1 My Home... 2 The Minibar...
Student Guide INTRODUCTION TO ONLINE RESOURCES
 Student Guide INTRODUCTION TO ONLINE RESOURCES Date: 12. March. 2018 By: Technical Support Team Table of Contents 1) Introduction 3 2) Student Panel (SIS) 3 2.1) Student Panel (SIS) Login 3 2.1.1) Definitions
Faculty Quick Guide to Blackboard. Blackboard Version 9.1. Christine Paige Educational Technology Specialist.
 Faculty Quick Guide to Blackboard Blackboard Version 9.1 Christine Paige Educational Technology Specialist paigec@strose.edu (518) 337-4912 July 2010 Table of Contents Description of Blackboard... 3 Uses
Gather separately and upload. Course files and documents Web and media links
 Export/Import Blackboard/Canvas While Blackboard and Canvas are similar in functionality, they operate differently. Because of the differences, some types of Blackboard content import into Canvas perfectly,
PARENT PORTAL VIEW LEARNING GUIDE
 PARENT PORTAL VIEW LEARNING GUIDE Central Susquehanna Intermediate Unit, USA TABLE OF CONTENTS Overview... 3 Account Registration... 3 Logging In... 5 Getting Help... 7 Navigating the Portal... 8 Messages...
CompClass User Guide for Students Rules for Writers, Sixth Edition. Hacker
 CompClass User Guide for Students Rules for Writers, Sixth Edition Hacker Getting Started with CompClass for Rules for Writers, Sixth Edition Table of Contents Overview... 1 Getting Help... 1 System Requirements...
Student Guide Version /26/10
 Version 2.5.3.13 2/26/10 Key Concepts: General Information Logging in My Workspace How to Use Common Site Tools Announcements Assignments Calendar Drop Box Gradebook Syllabus Resources Chat Assessments
LearnMate 7 Student s Quick Start Guide November 2015 Catalog # Rev B
 Student s Quick Start Guide November 2015 Catalog # 200068 Rev B Contents 1. ENTERING LEARNMATE... 3 2. JOINING A COURSE... 5 3. THE LEARNMATE INTERFACE... 6 4. NAVIGATING IN LEARNMATE... 7 5. LEARNMATE
HistoryClass User Guide for Students America s History, Sixth Edition. Henretta, Brody, and Dumenil
 HistoryClass User Guide for Students America s History, Sixth Edition Henretta, Brody, and Dumenil Getting Started with HistoryClass for America s History, Sixth Edition Table of Contents Overview...1
Canvas by Instructure Student User Guide
 Canvas by Instructure Student User Guide Contents Login to Canvas... 2 Interface Canvas... 3 Dashboard Canvas... 3 Sidebar... 3 Calendar... 4 Notifications... 4 Submit Assignment... 5 Turnitin... 6 Take
GradeConnect.com. User Manual
 GradeConnect.com User Manual Version 2.0 2003-2006, GradeConnect, Inc. Written by Bernie Salvaggio Edited by Charles Gallagher & Beth Giuliano Contents Teachers...5 Account Basics... 5 Register Your School
An Introduction to Blackboard for Students
 An Introduction to Blackboard for Students This document provides instructions on navigating Blackboard and utilizing its features. Check out http://www.uis.edu/colrs/students/blackboard/blackboardtutorial.html
Introduction to the Learning Environment 8.3 to 8.4.x
 Introduction to the Learning Environment 8.3 to 8.4.x User Guide Second edition, November 30, 2009 Contents My Home Accessing your courses Searching for courses Navigating inside a course Lists Actions
Buzz Student Guide BUZZ STUDENT GUIDE
 BUZZ STUDENT GUIDE 1 Buzz Student Guide The purpose of this guide is to enhance your understanding of the student navigation and functionality of Buzz, the Learning Management System used by Lincoln Learning
Introduction to the D2L Learning Environment
 1 Introduction to the D2L Learning Environment When you first log into D2L/Brightspace, the My Home page is displayed. The My Home page is your starting point within the D2L/Brightspace Learning Environment
Student User Guide for StatsPortal Introduction to the Practice of Statistics, Sixth Edition
 Student User Guide for StatsPortal Introduction to the Practice of Statistics, Sixth Edition Moore Getting Started with StatsPortal for Moore, Introduction to the Practice of Statistics, 6e Table of Contents
STUDENT HELP & WALKTHROUGH
 STUDENT HELP & WALKTHROUGH 2015 Jones & Bartlett Learning, LLC, An Ascend Learning Company Contents What are the browser and system requirements for running Navigate 2? 3 Why does Navigate 2 run a System
User Documentation. Studywiz Learning Environment. Student's Guide
 User Documentation Studywiz Learning Environment Student's Guide Studywiz Learning Environment Student's Guide Contents 1 Introduction 4 1.1 Studywiz 4 1.2 The Studywiz Student s Guide 4 2 What s New
Student User Guide for StatsPortal Essential Statistics, Second Edition
 Student User Guide for StatsPortal Essential Statistics, Second Edition Moore Getting Started with StatsPortal for Moore Essential Statistics, 2e Table of Contents Overview... 1 Getting Help... 1 System
Module 4: Communication
 Module : Communication Calendar: Adding An Event I Calendar: Adding An Event II Calendar: Editing An Event Host a Real-Time Conference I Host a Real-Time Conference II Host a Real-Time Conference III Make
SAKAI.WFU.EDU. What is Sakai?
 SAKAI.WFU.EDU What is Sakai? Sakai is a free and open source online Collaboration and Learning Environment. Many users of Sakai deploy it to support teaching and learning, ad hoc group collaboration, support
Introduction to Moodle
 Introduction to Moodle Preparing for a Moodle Staff Development Session... 2 Logging in to Moodle... 2 Adding an image to your profile... 4 Navigate to and within a course... 6 Content of the basic template
CANVAS OBSERVER GUIDE
 CANVAS OBSERVER GUIDE This work is licensed under a Creative Commons Attribution-NonCommercial-ShareAlike License Table of Contents Introduction...3 What is the Observer role?...4 How can I use Canvas
Polytechnic e-learning: LMS Manual - LECTURER
 Polytechnic e-learning: LMS Manual - LECTURER JPP & USTM 2014 TABLE OF CONTENTS 1. ACCESSING LMS... 1 2. LOG IN... 1 3. MANAGE STUDENT SELF-ENROLMENT... 1 4. MANAGE COURSE LANDING PAGE... 1 5. MANAGE COURSE
Moodle Morsels from Sandy & Inkie. b. Click (Log in) on the upper right c. You will use your stpsb login, which is how you login to a computer
 on the upper right c. You will use your stpsb login, which is how you login to a computer") 1. To login to Moodle: a. https://moodle.stpsb.org Moodle Morsels from Sandy & Inkie b. Click (Log in) on the upper right c. You will use your stpsb login, which is how you login to a computer 2. Moodle
1. To login to Moodle: a. https://moodle.stpsb.org Moodle Morsels from Sandy & Inkie b. Click (Log in) on the upper right c. You will use your stpsb login, which is how you login to a computer 2. Moodle
Getting Started with Blackboard
 @ Getting Started with Blackboard Information Technology Services The College of Saint Rose Table of Contents What is Blackboard?... 2 Why do professors want to use Blackboard?... 2 Web browsers and hardware
CompClass Solo User Guide for Instructors
 CompClass Solo User Guide for Instructors CompClass Solo User Guide for Instructors Table of Contents Overview... 1 Online Help... 1 System Requirements... 2 Adopting CompClass... 2 Student Access to CompClass...
Instructor Guide for Blackboard-Learn
 Instructor Guide for Blackboard-Learn Prepared by Vice-Dean of E-Learning Dr. Ahmed Youssef Khedr Deanship of IT and E-Learning Contents How to Log In to... 4 Explore Home Tab... 4 My Blackboard Tools...
CompClass User Guide for Students The Bedford Handbook, Seventh Edition. Hacker
 CompClass User Guide for Students The Bedford Handbook, Seventh Edition Hacker Getting Started with CompClass for The Bedford Handbook, Seventh Edition Table of Contents Overview... 1 Getting Help... 1
ReggieNet: Content Organization Workshop. Facilitators: Mayuko Nakamura (mnakamu), Charles Bristow (cebrist) & Linda Summers (lsummer)
, Charles Bristow (cebrist) & Linda Summers (lsummer)") ReggieNet: Content Organization Workshop Facilitators: Mayuko Nakamura (mnakamu), Charles Bristow (cebrist) & Linda Summers (lsummer) Content Organization Overview There are many ways to organize content
ReggieNet: Content Organization Workshop Facilitators: Mayuko Nakamura (mnakamu), Charles Bristow (cebrist) & Linda Summers (lsummer) Content Organization Overview There are many ways to organize content
Basic Instructor Manual Blackboard 9.1
 Basic Instructor Manual Blackboard 9.1 Instructor manual July 2017 Applications management Blackboard, Student and Educational Affairs (SEA), Leiden University Introduction... 2 1. Blackboard Navigation...
COURSE FILES. BLACKBOARD TUTORIAL for INSTRUCTORS
 OVERVIEW: Course Files provides file storage on the Blackboard server for a single course. Course Files within each course displays content for that specific course, not for other courses you teach. You
STUDENT GUIDE TO MOODLE
 STUDENT GUIDE TO MOODLE Education Editing your Student Profile... 2 Engaging with Moodle Resources/ Activities... 3 Moodle books... 4 Composing... 5 Reading & Replying... 6 Editing a Post... 7 Displaying
esd Portal: Parent View User Guide v
 esd Portal: Parent View User Guide v. 5.9.0 Copyright 2002-2018 eschooldata, LLC All rights reserved. TABLE OF CONTENTS Overview... 3 Parent Portal Login Page... 3 Online Registration...4 Parent Portal
Useful Google Apps for Teaching and Learning
 Useful Google Apps for Teaching and Learning Centre for Development of Teaching and Learning (CDTL) National University of Singapore email: edtech@groups.nus.edu.sg Table of Contents About the Workshop...
CompClass User Guide for Instructors A Writer s Reference, Sixth Edition
 CompClass User Guide for Instructors A Writer s Reference, Sixth Edition Hacker Getting Started with CompClass for A Writer s Reference, Sixth Edition Table of Contents Overview... 1 Online Help... 1 System
Introduction. Paradigm Publishing. SNAP for Microsoft Office SNAP for Our Digital World. System Requirements
 Introduction Paradigm Publishing Paradigm understands the needs of today s educators and exceeds the demand by offering the latest technological advancements for coursework settings. With the success of
1. To access the Course settings page, click Edit settings in the Administration block.
 Course Management Managing Course Design Configuring Course Settings The course setting page contains all of the important options for your course such as making the course available to students, and enabling
CITS. mycourses Grade Book & Grading Forms
 CITS Computing & Information Technology Services mycourses Grade Book & Grading Forms What This Workshop Will Cover: Adding grade book columns Entering grades Editing grade book columns Create a formula
Creating Content in a Course Area
 Creating Content in a Course Area After creating a course area, such as a Content Area, Learning Module, Lesson Plan, or folder, you create content in it by pointing to its Action Bar to reveal menus for
JBCOURSEMANAGER Powered by Moodle USER S GUIDE
 JBCOURSEMANAGER Powered by Moodle USER S GUIDE The learning management system (LMS) you are about to use has many features to help you succeed. This guide will help you to understand how to use, navigate,
User Services. WebCT 4.x Content Modules OBJECTIVES
 User Services Spring 2005 OBJECTIVES List the advantages of using Content Modules. List the steps in creating and presenting content within Content Modules. Create Content Modules. Add html and non html
Wimba Pronto. Version 2.0. User Guide
 Wimba Pronto Version 2.0 User Guide Wimba Pronto 2.0 User Guide Welcome to Wimba Pronto 1 What's New in Wimba Pronto 2.0 2 Getting Started 3 Wimba Pronto System Requirements 3 Creating a New Wimba Pronto
After entering a course, edit by clicking the Turn editing on button in the upper-right corner.
 Getting Started with Moodle After entering a course, edit by clicking the Turn editing on button in the upper-right corner. Editing icons: Hand with pencil icon: Edit X: Delete content Eyeball: Hide content