File Cabinet Manager
|
|
|
- Lambert Logan Harrison
- 5 years ago
- Views:
Transcription
1 Tool Box File Cabinet Manager Java File Cabinet Manager Password Protection Website Statistics Image Tool Image Tool - Resize Image Tool - Crop Image Tool - Transparent Form Processor Manager Form Processor Browser Rebuild Search Engine Website Permissions Create A New User Account Chat Room Admin Website Promotion Website Analyzer Contact Manager Calendar Manager

2 File Cabinet Manager Related Links: Java File Cabinet Manager Overview Manage Directories Manage Files Overview The File Cabinet Manager allows you to manage your Web site storage space. You can upload files, create folders, rename and delete files and folders, copy and view files, and move files from folder to folder. From the Administration home page, click on the blue text of your sitename. Click on the secondary navigation menu link "Tool Box". Click on the link "File Cabinet Manager". The left side of the File Cabinet Manager relates to directories..


3 ..while the right side of the File Cabinet Manager relates to your files. The top-left section of the File Cabinet Manager has tools for directories.. and the top-right section has tools for files.
4 The bottom section of the File Cabinet Manager informs you of the current action that the File Cabinet Manager is processing as well as the disk usage and available storage space. Back to the Top of the Page Manage Directories: Any directory with a "*" at the end of the filename is protected by the File Cabinet Manager. Such directories cannot be deleted, renamed, or moved. The current directory you are in is displayed by the File Cabinet Manager with bolded text. When you load the File Cabinet Manager, the "Root" directory is selected by default. To create a directory (or folder), click on the directory name (the directory that will become the parent of the directory that you are creating) that you want to create your own directory. Then click on the link "Create" in the top left corner of the File Cabinet Manager.


5 When the File Cabinet Manager asks for the directory name, enter in the name you want for your directory. Please keep in mind that only letters or numbers may be used for the directory name. After you have selected a name, click on the button "OK" to add the directory. To rename a directory, click on the directory name and then click on the link "Rename". When the File Cabinet Manager asks for the name that you would like to rename the directory to, enter in a name for the directory. Please keep in mind that only letters or numbers may be used for the directory name. After you have selected a name, click on the button "OK" to rename the directory. To delete a directory, click on the directory name that you would like to delete and then click on the link "Delete". When the File Cabinet Manager asks you to confirm the deletion of the directory and all of its contents, click on the button "OK" to continue. Please keep in mind that this process is irreversible and any files or folders deleted in this manner cannot be restored.

6 Back to the Top of the Page Manage Files: Any file with a "*" at the end of the filename is protected by the File Cabinet Manager. Such files cannot be deleted, renamed, or moved. To manage files, click on the filenames to select the files that you will be working with. If you click once on the filename, the file will be selected. If you click on the filename again, the file will be unselected. Multiple files can be selected by clicking on your desired filenames. To select all of the files, click on the link "select All".


7 To view the file itself, select a filename and click on the link "View". A new window will be opened by the File Cabinet Manager to display the file. Only one selected file can be viewed; if you have multiple files selected, you must unselect files in order to view them individually.

8 If you select a file and click on the link "Copy", the File Cabinet Manager will open a new window. You can select multiple files by clicking on them. In the new window, select the directory that you would like to copy the file to by using the drop-down menu next to the button "Copy Files". If you want to overwrite existing files with the file that you are copying, click on the checkbox next to the text "Overwrite Files". When you are done specifying the directory, click on the button "Copy Files" to copy the selected files.

9 To delete a file, click on the file name that you would like to delete and then click on the link "Delete". You may delete multiple selected files.


10 When the File Cabinet Manager asks you to confirm the deletion of file, click on the button "OK" to continue. The second confirmation informs you that this process is irreversible and any files deleted in this manner cannot be restored. If you wish to continue to delete the selected file(s), click on the button "OK".


11 To rename a file, click on the filename and then click on the link "Rename". Only one file may be renamed at a time. When the File Cabinet Manager asks for the name that you would like to rename the file to, enter in the name that you would like to designate for the file. Please keep in mind that only letters or numbers may be used for the file name and that the file must contain the file extension. For example, if the file was called "myimage.jpg", you could not rename this file to "someimage" or "some image.gif". After you have selected a name, click on the button "OK" to rename the file.
 that you would like to move. You can select multiple files by clicking on them. The File Cabinet Manager will open a new window.")

12 If you select the exact same name that you originally had, the File Cabinet Manager will inform you that you will overwrite the file. To move files, click on the filename(s) that you would like to move. You can select multiple files by clicking on them. The File Cabinet Manager will open a new window. In the new window, select the directory that you would like to move the file(s) to by using the drop-down menu next to the button "Move File". If you want to overwrite existing files with the file that you are moving, click on the checkbox next to the text "Overwrite Files". When you are done specifying the directory, click on the button "Move File" to move the selected file(s). To upload files, click on the link "Upload Files".


13 When the File Manager asks you for the number of files to upload, choose the maximum number of files that you will be uploading during this session. Then click on the button "Continue". Choose the destination directory by selecting the directory in the drop-down menu next to the text "Destination". If you want to automatically overwrite the files in the destination directory with the files you will be uploading, checkmark the box next to the text "Overwrite Files:". Click on the button "Browse" to locate the file on your computer and to select the file you want to upload. When the dialog box opens up, locate and select the file you want to upload, then click on the button "Open". When you are done selecting your files, click on the button "Upload Files" to upload the files to the specified directory.


14 Once the system File Upload Tool reports that the files have been uploaded successfully, close the window if you are done or click on the button "Upload More Files" to upload additional files. Back to the Top of the Page
15 Java File Cabinet Manager Related Links: File Cabinet Manager Overview Upload and Download Files Creating Folders Deleting Files and Folders Renaming Files and Folders Refreshing the View Overview The Java File Cabinet Manager allows you to manage your Web site storage space. You can upload files, download files, create folders, rename and delete files and folders, copy and view files, and move files from folder to folder. From the Administration home page, click on the blue text of your sitename. Click on the secondary navigation menu link "Tool Box". Click on the link "File Cabinet Manager (Java)". If you do not have the latest Java plug-in, you may get it here. If you do have the latest Java plug-in, after it finishes loading it will load the Java File Cabinet Manager:


16 The left side of the Java File Cabinet Manager displays the files and folders on your computer. The right side of the Java File Cabinet Manager displays the files and folders of your Web site.


17 The top-left side gives you options to Refresh, Trash, New and Rename. The top-right side informs you how much total storage space your Web site has, how much storage space you are using, and how much storage space you have left.


18 In the center of the Java File Cabinet Manager, you have two buttons with arrows pointing to the left and right. The button pointing to the right will upload files from your computer to your Web site. The button pointing to the left will download files from your Web site and to your computer. Back to the Top of the Page Upload and Download Files To upload files, navigate through the folders on your computer to find the files that you wish to upload. Click on the filenames. To select more than one file, hold down the "Ctrl" key on your keyboard and continue to click on other filenames. Once you have files selected, click on the folder in your Web site that you would like to upload your selected files to. Once that is done, click on the button with the arrow pointing to the right to upload your files to the Web site. The time that it takes to upload your files depends on the number of files, size of files, and your internet connection. To download files, navigate through the folders on your Web site to find the files that you wish to download. Click on the filenames. To select more than one file, hold down the "Ctrl" key on your keyboard and continue to click on other filenames. Once you have files selected, click on the folder on your computer that you would like to download your selected files to. Once that is done, click on the button with the arrow pointing to the left to download your files to yoru computer. The time that it takes to download your files depends on the number of files, size of files, and your internet connection. Once done, you may click on the button "Refresh" to refresh the view of the Java File Cabinet Manager. Back to the Top of the Page

19 Creating Folders To create a folder on your computer or in your Web site, click on the folder that you would like to create a new folder in. Click on the button "New" in the top-left side of the Java File Cabinet Manager. A new folder will appear in the folder that you selected. Type in a name for your new folder (which is labelled "NewFolder" by default), then press the "Enter" key on your keyboard. Please keep in mind that the folder names cannot have spaces or illegal characters. For instance, "JOHN Doe" and "my #5 photo album!" are not valid. Back to the Top of the Page Deleting Files or Folders To delete files on your computer or in your Web site, click on the fielnames that you would like to delete. To select more than one file, hold down the "Ctrl" key on your keyboard and continue to click on other filenames. Click on the button "Trash" in the top-left side of the Java File Cabinet Manager. The Java File Cabinet Manager will then ask you to confirm the deletion of the files. Click on the button "Yes" to continue to delete the file. To delete folders, click on the foldername that you would like to delete. Then click on the button "Trash" to delete the folder. The Java File Cabinet Manager will bring up a dialog box asking you to confirm the deletion of the folder, so click on the button "Yes" if you want to continue to delete the folder. Please be aware that you cannot delete files and folders on your Web site that are designated as protected files. To see which files and folders are protected, use the File Cabinet Manager. Back to the Top of the Page Renaming Files and Folders Click on the file or folder that you want to rename. Then click on the button "Rename". Type in the new name for your file or folder. Press "Enter" when done. Please keep in mind that the filenames and folder names cannot have spaces or illegal characters. For instance, "JOHN Doe.jpg" and "my #5 photo album!" are not valid. Also, please be aware that you cannot rename files and folders on your Web site that are designated as protected files. To see which files and folders are protected, use the File Cabinet Manager. Back to the Top of the Page
20 Refreshing the View After a deletion, rename, upload, or download, you may want to refresh the Java File Cabinet Manager to verify that you are looking at the same thing that the system is. Click on the button "Refresh" in the top-left side of the Java File Cabinet Manager. Back to the Top of the Page Back to the Top of the Page


21 Password Protection Overview Add a User Delete a User Change the Password for a User Overview The Password Protection Tool allows you to apply password protection to directories. From the Administration home page, click on the blue text of your sitename. Click on the secondary navigation menu link "Tool Box". Click on the link "Password Protection". Select a directory to apply password protection to in the drop-down box at the top of the new window. When the directory has been selected, click on the button "Activate Password Protection".

22 The Password Protection Tool will then reload the page. It will also inform you that the directory you are working with has password protection enabled. To disable password protection for the currently selected directory, click on the button "Disable Password Protection".
23 Specify the message that you would like to display to visitors to the password protected directory in the text field in the section "Authentication Message". When done specifying your message, click on the button "Set Message". Your current Authentication Message is also displayed.
24 To add a new user for the password protected directory, enter in a username and password in the section "New User". Please keep in mind that the username and password can only consist of letters and numbers. When done, click on the button "Add User" to add your new user.
25 Once the Password Protection Tool detects that you have at least one user, you will have additional sections of "Delete Users" and "Change Password" below the section "New User". To delete a user, select the username that you would like to delete, and then click on the "Delete User" button.

26 To change the password for a user, select the username in the drop-down menu, enter in a new password, then click on the button "Change Password".
27 Please keep in mind that if you set up a password protected directory, a file in this directory must be linked to directly. For example, let's say you create a folder called "mynewfolder" and you move (or copy) a file to that folder called "testfile.txt". If your domain name is "mydomainname.com", then the link to that file would be You would not be able to just link to " as this will give you an error since the listing of the entire contents of the directory is not permitted. Back to the Top of the Page

28 Statistics What are Statistics used for? How do I use it? Report Examples What are Statistics used for? Your Web site's Statistics function allows you to request statistical reports regarding visits to your Web site. While it isn't possible to view addresses, gender, age or other personal information about visitors, you can use the reports to view how many visits your site has received, which parts of your site are being visited, how visitors found your site, etc. This information can be used to improve the navigation of your site, to fine tune submission to search engines, and to otherwise make your site more effective. Request a Report From the Administration home page, click on the blue text of your sitename. In the secondary navigation menu, click on "Tool Box". Click on "Website Statistics". To request a report, select the report to generate under "Action". The "Action" option asks what type of statistical report to generate.


29 Select the pages that the report will be requested for under "Pages". The "Pages" option allows you to specify the pages for the statistical report. To select multiple pages, hold down the CTRL key on the keyboard while clicking on other pages. If "all" is selected with other pages, the Site Administration will request the statistical reports on all pages. The "The number of most recent visitors to display" option is linked with the "Most Recent Visitors" report. When the "Show All" or "Most Recent Visitors" statistical reports are requested, enter in the number of most recent visitors that you want the report to display. The default setting is the last 10 visitors. Select the date range that you want to request the report on under "Date Range". This option allows you to specify the time period of the statistical reports. If the "Start Date" is left blank, the Site Administration will begin the statistical reports from the beginning of your recorded statistics. If the "End Date" is left blank, the Site Administration will end the statistical reports to the current day. Statistical data for the current day will not be available until the next day. When done configuring your options, click on "Submit Request" to request the statistical reports. Back to the Top of the Page Reports The reports available via this function include:
 for the selected time period.")
30 Show Page Hits Most Recent Visitors Show Hits per Day Hits per Day in a Week Hits in Last 30 Days (from End Date) Show All Page Hits You can also an option to delete some or all of your site's statistical data. This option cannot be reversed. "Show Page Hits" will display the number of hits per selected page(s) for the selected time period. Back to the Reports Back to the Top of the Page "Most Recent Visitors" will display, by default, the last 10 visitors to the selected page(s) for the selected time period.
31 Back to the Reports Back to the Top of the Page "Show Hits Per Day" will display the number of hits per day for the selected page(s) for the selected time period.
 for the selected time")
32 Back to the Reports Back to the Top of the Page "Hits Per Day In a Week" will display the number of hits per day for a week for the selected page(s) for the selected time period.
.")
33 Back to the Reports Back to the Top of the Page "Hits In Last 30 Days (from End Date)" will display the number of hits per day from 30 days before the End Date for the selected page(s).
\" for the selected page(s) for the selected time period.")
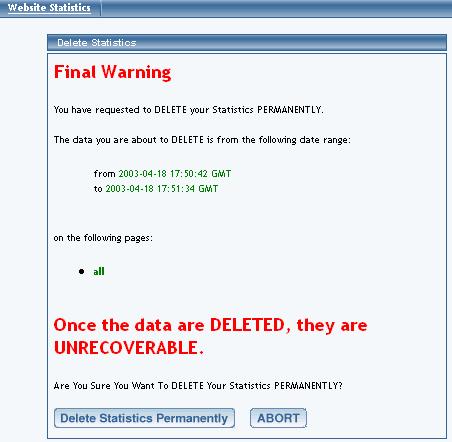
34 Back to the Reports Back to the Top of the Page "Show All" will display the statistical reports for "Show Page Hits", "Most Recent Visitors", "Show Hits Per Day", "Hits Per Day In a Week", and "Hits In Last 30 Days (from End Date)" for the selected page(s) for the selected time period. Back to the Reports Back to the Top of the Page "Delete Statistics (*Unrecoverable*)" will delete all statistics for the selected pages for the selected time period this option is irreversible and unrecoverable. When this action is performed, the Site Administration will ask repeatedly whether the deleting of statistics has been confirmed. Please keep in mind that removing statistics will help to speed up statistical reporting but there is no way to recover the data.
35
36
37


38 Back to the Top of the Page
39 Image Tool Related Links: Image Tool - Resize Image Tool - Crop Image Tool - Transparent Overview Edit Image Logo Maker Overview The Image Tool allows you to modify existing images and to create your own logo. Edit An Existing Image Click on the blue text "No Image" to select an image file to edit.


40 A new window will open up that will allow you to select an image from your Web site, select an image from our image library, select an image from a website, or to upload your own image file. Please keep in mind that using the Image Tool to modify your images requires you to have the latest Java plug-in for your Internet browser. Once you have found an image to edit, click on the button "Use" next to a preview of the image. Once your image has been selected, click on the button "Edit Image" to modify your image file.

41 Close Session - this option will close the current editing session with your selected image. The Image Tool intelligently remembers whether you opened an image and did not finish editing. Save - this option will save the work you have done to the image to the same filename. Save As - this option will save the work you have done to the image as a different filename. Undo - this option will only be available if the Image Tool recognizes that you have performed an action. You will be able to undo all of your actions as long as the editing session remains open. Resize - this action allows you to resize the image. Crop - this action allows you to specify a rectangular section of the image as your new image. Transparent - this action allows you to make certain colors of an image transparent. You may only apply transparency on gif image files. The Back button will return you to the main menu of the Image Tool. Back to the Top of the Page Logo Maker The Logo Maker allows you to create a text logo for your Web site. From the Administration home page, click on the blue text of your sitename to get to the Web site Editor home page. Click on the secondary navigation menu link "Tool Box". Click on the blue text "Image Tool". Click on the button "Create Image" to create your own text logo.


42 You will then see the following screen:
43 Click on one of the sample images that shows the best style that you would like to have for your text logo.

44 Depending on which logo style that you have chosen, you will have a different set of options. For example, if you click on Crystal Logo, you will get the following: Filename - specify the filename of the image. Text for Logo - specify the text that will appear as your logo. Please be advised that the amount of text that you may put in will be limited by the Font Size that you have specified. Font Size (in pixels) - specify the size of the text that will appear as your logo in pixel dimensions. Font Face - specify the font face for the text that will appear as your logo. Font Color - specify the font color for the text that will appear as your logo. Background Color - specify the background color of the logo. other options - depending on which style that you choose, you will have other options that will pertain to that style choice.
45 When done specifying your options for your logo, click on the button "Create Logo" to continue creating your logo. To cancel, click on the button "Back". After you click on the button "Create Logo", the Image Tool will report to you: "Your logo has been queued up for creation It will be put into your images directory" After a couple of minutes, the image will be placed in to your images directory. Once the file has been placed there, you can add the logo to a page as an image component. Back to the Top of the Page

46 Image Tool Resize Related Links: Image Tool Overview Logo Maker You will see the following screen when the Administration first loads the Image Tool's Resize options: If you check the "Maintain Ratio" box before you change the height or width, then you only need to change one of the dimensions as the Image Editor will then automatically maintain the correct

47 proportions by adjusting the other dimension to match. Please keep in mind that the maximum size that you can save your image as is 1200 x 1200 dots per inch (or dpi). When you are done adjusting the image dimensions, click on the button "Resize" to store your changes. To the left and above your image, the gray text will inform you of the current size of the image. If this is correct, click on the button "OK". If the resized image dimensions is not correct, click on the button "Undo" to return the image to the previous size. If you are done resizing the image, click on the link "Save Image As" to save your image.

48 If you want continue to work on the image, click on another option to apply to your image. After you click on the link "Save Image As", enter in the filename that you want to save the image as,
49 then click on the button "Save". Back to the Top of the Page Back to Image Tool Overview Back to the Previous Page

50 Image Tool Crop Related Links: Image Tool Overview Logo Maker You will see the following screen when the Administration first loads the Image Tool's Crop options: To crop the image, click-and-drag on the image to draw a rectangle around the portion of the image that you want to crop around.

51 When you let go of the mouse button, a dialog box will appear asking if you wish to crop the selected region. If the region is correct, click on the button "OK".

52 Once the image has been cropped, click on the button "Ok". If the cropped region is incorrect, click on the button "Undo" to return the image to its previous state.

53 After you click on the link "Save Image As", enter in the filename that you want to save the image as, then click on "Save".

54 Back to the Top of the Page Back to Image Tool Overview Back to the Previous Page
55 Image Tool Transparent Related Links: Image Tool Overview Logo Maker Transparent You will see the following screen when the Administration first loads the Image Tool's Crop options: With the mouse cursor, click on the color that you want to make transparent.


56 The Image Editor will then display the selected color in the rectangle to the right of the text "Selected Color". You may alter the "Tolerance" slider to designate similar colors that will also be made transparent. If the Tolerance is moved to the right, more similar colors will be made transparent. When you have achieved the level of transparency that you desire, click on the button "OK".
57 After you click on the link "Save Image As", enter in the filename that you want to save the image as, then click on "Save". Back to the Top of the Page Back to Image Tool Overview Back to the Previous Page
58 Form Processor Manager Overview Create Form Processor Modify Form Processor Overview The Form Processor Manager allows you to control how your Web site's forms will be processed. When a Web site visitor uses a form on your Web site (created using a form component on a Web page), the form processor can redirect the information in the forms to a loctaion that you designate. When visitors fill out the information on the form, you can view them by using the Form Processor Browser. From the Administration home page, click on the blue text of your sitename. In the secondary navigation menu, click on the link "Tool Box". Click on the blue text "Form Processor Manager". Back to the Top of the Page Create Form Processor If you want to designate your own handling of forms, you would create a form processor. In the Form Processor Manager, enter in your form processor name in the text field provided. When finished, click on the button "Create Form Processor". You must then edit the form to specify your settings for the form processor. Back to the Top of the Page Modify Form Processor In the Form Processor Manager, if you have already created form processors, you will see a list of them. Next to the name of every form processor, there will be links to delete, empty, and edit the form processor.


59 Back to the Top of the Page Delete To delete a form processor, click on the blue text "Delete" to the right of the form processor name. If you want to continue with the deletion of the form processor, click on the button "OK". Empty To empty the form processor, click on the blue text "Empty" to the right of the form processor name. This will empty all of the form information that the form processor handled - or, in other words, all of the form information that you would see in the Form Processor Browser would be removed from the Administration. Edit To edit the form processor's settings, click on the blue text "Edit" to the right of the form processor name. The Form Processor Manager will reload the window with the settings for your form processor. When done specifying your settings, click on the button "Update" to save and

60 apply your changes to the form procesor. If you do not want to make any changes, click on the blue text "Return To Main Form Page" to return to the Form Processor Manager main page. Form Name - you can change the name of the form processor in this text field. - specify the address that will be notified every time a Web site visitor fills out the form on the Web site that is using this form processor. If you would like to send to multiple recipients, enter the other addresses separated with commas only (no spaces). For example, if you wanted forms to send to johndoe@yahoo.com and janedoe@hotmail.com, you would enter in "johndoe@yahoo.com,janedoe@hotmail.com" in this field. Populate Contact Manager - if the form processor will be used by a form component to input information in to the Contact Manager, this needs to be checked. Click here for more information. Subject Line - specify the subject of the that will be sent to address listed above. Redirect Link - if you want the form processor to send the Web site visitor to another Web page after they complete the form, you would specify the Web address of the page here.
61 Back to the Top of the Page
62 Form Processor Browser Overview The Form Processor Browser allows you to view all of the forms that Web site visitors fill out from your website if the forms are using a form processor that you have created. When the Form Processor Browser loads, select a form processor in the drop-down menu next to the text "Select Form Processor". Then, select the date from which you want to view all submitted forms for that date. The results of the form will look similar to the that will be sent out to the address specified for the Form Processor Manager for that form processor:
63 When you are done viewing all of the form results, you may close the window. Back to the Top of the Page

64 Rebuild Search Engine The Rebuild Search Engine Tool allows you to create a database for the Search Component for your Web site. The Search Component, in conjunction with a Search Result Component, will allow your customers to be able to search your Web site for a particular page. Specify the URL that you want the Rebuild Search Engine Tool to index. This will allow customers using that Web address to use the Search Component to search your Web site. For the "Description Weight", "Keywords Weight", "Title Weight", and "Body Weight", specify numbers in each of the fields. The numbers will assign the order in which the Rebuild Search Engine Tool will look for the searching term. The higher the number, the higher the importance. So for example, if you wanted Web site visitors to search your Web site based on the information in the Body of the pages, then the "Body Weight" field would have the highest number. When you are done assigning the precedence for your search parameters, click on "Submit" to have the Rebuild Search Engine Tool create a database of your Web site. After you click on "Submit", the following screen will appear:


65 Depending on the complexity and number of pages, the system will take approximately 2 minutes to index your Web site. If you return back to the Rebuild Search Engine Tool and see the following screen, the Search Engine server is not finished with indexing your site: The Rebuild Search Engine tool will also report when the last time your Web site was indexed:
66 Please keep in mind that if you add new pages or modifying existing components, the Rebuild Search Engine Tool must be run again in order to allow your customer to search the new or modified information. After the Web site has been indexed by the Rebuild Search Engine Tool, you must Publish the Web site so that your Web site visitors will be able to search the latest information. Back to the Top of the Page

67 Website Permissions Overview The Website Permissions Tool allows you to authorize an existing username to modify your Web site. To create new usernames, use the Create New User Account tool. From the Administration home page, click on the blue text of your sitename. Click on the secondary navigation menu link "Tool Box". Click on the link "Website Permissions". When the Website Permissions Tool reloads the page, enter in the username for the person you want to provide access to modify your Web site. The username you enter must match the username of the person exactly. If the person you wish to give permission to access your site does not have a username, you will need to register that person as a new user by clicking on the link "Register A New User"; click here for more information on creating new usernames. Enter in the name of the existing username and then click on the button "Add User". The Website Permissions Tool will then inform you: For each username, you can permit the ability to manage calendars, manage chat rooms, manage your contacts, manage E-commerce, edit forms, edit a Web site, use the HTML File Cabinet and the Java File Cabinet Manager, use the Image Tool, Publish the Web site, Index the Search Engine, view forms, analyze your website, website promotion, website statistics, and manage password protection. Checkmark the functions that you would like to allow for the username. When done, click on the button "Update" to apply your permissions.

68 The Website Permissions Tool will inform: If you want to remove a username, click on the button "Remove" to the right of the username.

69 The Website Permissions Tool will report that the user has been removed: When done adding or modifying users, you must click on the button "Update" to save your changes. To apply your changes to your Web site, you must Publish the website. Back to the Top of the Page

70 Create New User Account The Create New User Account tool allows you to create a username. This username will be able to access the 3.0 Administration. You will be able to assign permissions to your website with the tool Website Permissions. From the main menu of the Website Editor, click on the secondary navigation menu link "Toolbox". Click on the blue text of "Create New User Account". The system will then display the following: All of the bolded fields are required. When finished entering in all of the information for the username, click on the button "Create".
71 Back to the Top of the Page Back to the Previous Page
72 Chat Room Admin What is it used for? How do I use it? Definitions Related links What is it used for? Chat Administration allows you to add one or more chat rooms to your site and control access to your rooms. You can add public, restricted and protected chat rooms. You can also set up a list of protected users and grant them permission to enter certain protected room(s). Examples would be to offer memberships in an online club or to sell access to special online chat events. Instructions and a URL (Web address) are provided for each room that your create, so that you can link to the room from any page of your Web site. Existing rooms of each type, if any, are listed on the main Chat Administration page for your convenience. In the following example, there are several rooms of each type already created:

73 Back to the Top of the Page How do I use it?
74 You use the links on the main Chat Administration page to access room management and other chat settings for your Web site. From the main administration page, you can: Add public chat room Add restricted chat room Add protected chat room Edit, view or delete public chat room Edit, view or delete restricted chat room Edit, view or delete protected chat room Manage your protected chat user list Set chat preferences To view information about, edit or delete a room, first select the type of room that you wish to manage. All existing rooms of that type will be listed along with instructions and a URL (Web address) that you can use on your Web site pages to link to it. Links are provided to the right of each room to edit or delete it. Here is an example of the information that is displayed when you click the "Public Rooms" on the main Chat Administration page:
75 Back to How Do I Use It Back to the Top of the Page Add Public (Direct Access) Chat Room: To add a new public chat room, you assign it two names. In the "Direct Access Room Details" section, use the "Room Name" text box to enter the name that will appear while the visitor is in the room. In the "Public User Chat Room Details" section, use the "Room Name" text box to enter the name that will appear in the list of your Web site's chat rooms. Click the "Create" button to create the room, or click the "Cancel" button to abort the creation of the room. Back to How Do I Use It Back to the Top of the Page Add Restricted Direct Access Chat Room: To add a new restricted chat room, you assign it two names plus a password that all visitors must use to enter the room. In the "Direct Access Room Details" section, use the "Room Name" text box to enter the name that will appear while the visitor is in the room. Enter a password for the restricted room in the "Restricted Password" box, and enter it again in the "Confirm Restricted Password" box. In the "Public User Chat Room Details" section, use the "Room Name text box to enter the name that will appear in the list of your Web site's chat rooms. Click the "Create" button to create the room, or click the "Cancel"

76 button to abort the creation of the room. Back to How Do I Use It Back to the Top of the Page Add Protected Direct Access Chat Room: To add a new protected chat room, you assign it two names. (After it has been created, you will need to edit the protected room to set its list of users permitted to enter it.) In the "Direct Access Room Details" section, use the "Room Name" text box to enter the name that will appear while the visitor is in the room. In the "Public User Chat Room Details" section, use the "Room Name text box to enter the name that will appear in the list of your Web site's chat rooms. Click the "Create" button to create the room, or click the "Cancel" button to abort the creation of the room.
77 Back to How Do I Use It Back to the Top of the Page Edit, View or Delete a Public (Direct Access) Chat Room: To manage one of your existing public chat rooms, first click the "Public Rooms" link on the Chat Administration main page. A page such as the following will appear:

78 To set up a link to a room in the list, highlight the URL that is displayed for it, copy to clipboard, go to Site Administration, go to Site Modifier, select the page containing the text or image element that will serve as the link, edit that element, and paste the chat room's URL into the element's link option box. Optionally, set the link's Target to "_blank" if you wish to have the chat page open in a new window. Remember to click the button to submit or apply the changes and then update your site. You may also add a new public chat room from the Public Rooms main page, by scrolling to the bottom of the page and clicking the "Click here to create new public direct access room" link. To delete the room, simply click the "Delete" link to its right, then click the button to confirm the deletion. To edit the room, click the "Edit" link to the right of its name. The following edit page will appear:

79 In the "Public User Chat Room Details" area, use the "Room Name" text box to enter the new name that will appear in the list of your Web site's chat rooms. Click the "Confirm Changes" button to update the room with the new information that you entered, or click the "Cancel" button to exit the edit page without saving your changes. (You may also delete the room from this page, by clicking the "Delete DA Room" button and then clicking the button to confirm the deletion.) Back to How Do I Use It Back to the Top of the Page Edit, View or Delete a Restricted Direct Access Chat Room: To manage one of your existing restricted chat rooms, first click the "Restricted Rooms" link on the Chat Administration main page. A page such as the following will appear:
80 To set up a link to a room in the list, highlight the URL that is displayed for it, copy to clipboard, go to Site Administration, go to Site Modifier, select the page containing the text or image element that will serve as the link, edit that element, and paste the chat room's URL into the element's link option box. Optionally, set the link's Target to "_blank" if you wish to have the chat page open in a new window. Remember to click the button to submit or apply the changes and then update your site. You may also add a new restricted chat room from the "Restricted Rooms" main page, by scrolling to the bottom of the page and clicking the "Click here to create new restricted direct access room" link. To delete the room, simply click the "Delete" link to its right, then click the button to confirm the deletion. To edit the room, click the "Edit" link to the right of its name. The following edit page will appear:

81 In the "Direct Access Room Details" section, use the "Room Name" text box to enter the new name that will appear while the visitor is in the room. To change the room's password, click the checkbox labeled "Change Password", enter the new password in the "New Restricted Password" box, and enter it again in the "Confirm New Password" box. Click the "Confirm Changes" button to update the room with the new information that you entered, or click the "Cancel" button to exit the edit page without saving your changes. (You may also delete the room from this page, by clicking the "Delete DA Room" button and then clicking the button to confirm the deletion.) Back to How Do I Use It Back to the Top of the Page Edit, View or Delete a Protected Direct Access Chat Room: To manage one of your existing protected chat rooms or to change its list of permitted users, first click the "Protected Rooms" link on the Chat Administration main page. A page such as the following will appear:

82 To set up a link to a room in the list, highlight the URL that is displayed for it, copy to clipboard, go to Site Administration, go to Site Modifier, select the page containing the text or image element that will serve as the link, edit that element, and paste the chat room's URL into the element's link option box. Optionally, set the link's Target to "_blank" if you wish to have the chat page open in a new window. Remember to click the button to submit or apply the changes and then update your site. You may also add a new protected chat room from the "Protected Rooms" main page, by scrolling to the bottom of the page and clicking the "Click here to create new protected direct access room" link. To delete the room, simply click the "Delete" link to its right, then click the button to confirm the deletion. To edit the room's list of permitted users, click the "Permissions" link to its right. How to edit permissions To edit the room, click the "Edit" link to the right of its name. The following edit page will appear:

83 In the "Direct Access Room Details" section, use the "Room Name" text box to enter the new name that will appear while the visitor is in the room. Click the "Confirm Changes" button to update the room with the new information that you entered, or click the "Cancel" button to exit the edit page without saving your changes. To delete the room, click the "Delete DA Room" button and then click the button to confirm the deletion. You can edit the room's permission list from this page, by clicking the "Click here to edit user permissions for this room" link. You use the Edit Permissions page to control who is permitted to enter the protected chat room. All of your protected users are listed according to their current status for that room, "permitted" or "not permitted":

84 To change a user from "not permitted" to "permitted", highlight the user's name in the box on the left and click the arrow that points to the box on the right. To change a user from "permitted" to "not permitted", highlight the user's name in the box on the right and click the arrow that points to the box on the left. You may set an ending date for the permissions, by clicking the checkbox labeled "Set expiration date". Adjust the date as needed by using the Month, Day and Year dropdown menus to select the desired values. Click the "Update" button to confirm your changes, or click "Cancel" to exit the Edit Permissions page without saving your changes. (You may also assign room permissions to a particular user while adding or editing that user.)

85 Back to How Do I Use It Back to the Top of the Page Add or Edit Protected Chat Users: To manage site's list of "protected chat users", first click the "Protected User Management" link on the Chat Administration main page. The following page will appear: To add a new protected user, click "Create New Protected User". The following page will appear:

86 Enter the new user's name, age and password. You must enter the password twice to confirm that you have typed it as intended. If you wish, change the new user's status from "Active" to "Inactive". Click the checkbox to the left of each protected room which the new user will have permission to enter. If you wish, specify an end date for the permission. To edit, deactivate or remove a protected user from your site list, click "Edit Existing Protected User". The following page will appear:

87 Enter all or part of the username or address, indicate if you want to search by username or address, and then click "Search". A page such as the following page will appear:

88 Find the user you wish to modify in the search result's dropdown menu, then click "Select". The following page will appear:
89 Change the user's name, age and password as necessary. Note that you must click the checkbox to indicate that you are changing the password. Enter the new password twice to confirm that you have typed it as intended. You may change the new user's status via the "Status" dropdown menu. To change the user's protected room permissions, click the checkbox to the left of each protected room so that it is checked or unchecked, to permit or not permit the user to enter that room. If you wish, specify an end date for each permission via the Month, Day and Year dropdown menus; click the "Set expiration" checkbox. Click the "Confirm Changes" button to update the user with the new information that you entered, or click the "Cancel" button to exit the edit page without saving your changes. To delete the user, click the "Delete User" button and click as required to confirm the deletion. Back to How Do I Use It Back to the Top of the Page

90 Set Chat Preferences: To set your site's chat preferences, click the "Edit Preferences" link on the Chat Administration main page. The following page will appear: If the checkbox labeled "Use Strong Restriction" is unchecked, protected users will be allowed to enter restricted chat rooms by using their own login information. To require them to use the restricted room's password like normal (non-protected) chat users, click the checkbox so that it is checked. To save your new preference, click the "Update" button; to exit the preferences page without saving your changes, click the "Cancel" button. Back to How Do I Use It Back to the Top of the Page Definitions
91 Public chat rooms do not require use of a password to enter the room. As for all types of rooms, the visitor's chat name and age are required to enter. Your Web site's chat rooms are automatically restricted to visitors 18 years of age or older. The chat name can by anything the visitor chooses, as long as it is not in use currently. You can change the name of the room at any time by editing the public chat room. Back to Definitions Back to the Top of the Page Restricted chat rooms require use of a password to enter, as well as chat name and age. You assign a password to each of your restricted chat rooms, change the name of the room, and change the room's password at any time, by editing the restricted chat room. Back to Definitions Back to the Top of the Page Unlike restricted rooms which have their own passwords, protected chat rooms are accessible only to certain "protected users" whom you have given permission to enter. You can change a protected room's permission list of users, rename the name of the room, etc. by editing the protected room. Back to Definitions Back to the Top of the Page Protected chat users are those individuals whom you have identified as authorized to enter the protected room(s) to which you assign them. You assign each user in your protected user list a username and a password which that user will use to enter. You can add and delete protected users from your Web site's protected user list or change a user's username and password via Protected User Management. Back to Definitions Back to the Top of the Page Related links Chat Administration Overview Chat Administration Definitions How to use Chat Administration Back to the Top of the Page
92 Website Promotion Related links: Website Statistics Website Analyzer Tool What is it used for? Site Promotion Tips How Do I Submit My Website? Directory Title Keywords Description Steps to Promote Your Web site to Search Engines What is the site promotion tool used for? The Site Promotion function makes submitting your Web site to search engines easier by organizing the tools for search engine submission. Site Promotion Tips Before submitting your Web site to the search engines please make sure to read these Site Promotion Tips. Before you submit your site to the search engines, your Web site should be "optimized". This includes providing good content for the search engines to read (particularly Google); adding "meta tags" to each page for the search engines to review when they visit the site; performing Website Analyzer to detect any broken images or links; fixing any such errors; and removing any "under construction" wording. Many directories will reject sites that have "under construction" wording. When optimizing, start with your home page, since this is the page submitted by the Website Promotion tool. Optionally, set up meta tags in the other pages too -- but make sure that the meta tags reflect the actual content of the page. A page about stoves shouldn't have keywords about automobiles. You set up meta tags on a page by editing its Page Properties. Description Meta Tag Your description should reflect the actual content of the page, and shouldn't be longer than 150 characters (about 25 to 30 words). Omit promotional or trivial words. Do not capitalize every word. Do capitalize proper nouns and the first word of a sentence. Use correct grammar. Do not include your company name. Use as few commas as possible.
93 Keywords Meta Tag Avoid words that do not appear within the actual content of the page. Your list can be up to 1024 characters long, but not all search engines will read that far. Start your list with the most important words, then the next most important, etc. Separate your keywords with a comma followed by a space. You can have several words before the next comma ("keyphrase", for example "sugar free candy"). Include plurals and other variations, including common typos. Separate very similar keywords or keyphrases with dissimilar ones. Try to avoid repeating the same word more than 3 times in the list, not counting its variations such as plural versus singular.
94 Back to the Top of the Page How Do I Submit To Search Engines? From the Administration home page, click on the blue text of your sitename. Click on "Tool Box" from the secondary navigation menu links. Click on "Website Promotion" at the bottom of the page. The Site Promotion function can submit your Web site to google.com, hotbot.com, and scrubtheweb.com.


95 Also listed are links to search engines that require payment or manual submission. The links will take you directly to the page that will instruct you on how to submit your Web site to that search engine. Under "URLs to submit", select which Web address that you want to submit to the search engines. Due to new search engine rules, please select only one Web address to submit.


96 Back to the Top of the Page Directory Title For "Directory Title", this is the same company name as it appears on your home page, and it will be verified by the search engine companies. Back to the Top of the Page Keywords For "Keywords", enter in keywords that will describe your Web site to visitors on the Web. The keywords should be as unique as possible while still describing your business and your Web site. The keywords should be separated by commas and should not have any HTML.

.")
97 Back to the Top of the Page Description For "Description", use 25 words or less describing who you are and what you provide. The description must be full sentences and should make sense (rather than listed whole bunch of keywords with commas). The User Information (first name, last name, address) area are required fields so that the search
98 engine companies can record who is submitting a Web site to them. When you are done configuring all of the options, click on the button "Submit Your Site to Search Engines" to submit your Web site to google.com, hotbot.com, and scrubtheweb.com. Back to the Top of the Page Promote your Website For submitting your site to Search Engines, there are three main parts. One, you need to think of approximately 25 to 30 keywords for your site. Write it out in a basic text editor program, such as Microsoft Notepad or Apple TextEditor. You will also need a 2 to 3 sentence description about who you are, where you are located, and what you provide. Also write this description in the same text document. Save this text document to a location on your computer that you can easily remember. Some notable keywords to use include your Domain Name and your location (city, zipcode, or state). If your pages contain different content (which they usually do), your keywords and description should be different for each of the pages. Second, the keywords and description need to be inputted here to all of your pages for best results. Keywords and description should be different and related to each of your pages. For best results as well, input your main key phrases (5 to 6 words) in to the titles. All you will be doing is copy-pasting from the text document to the other pages, so this helps you out so you won't have to type things out repeatedly. After parts one and two are completed, then you only need to do part three once a month. Part three is submitting your site to search engines by using the Website Promotion Tool. Here, you also copy-paste the keywords and description from the text document to here, then you submit your site. Please keep in mind that being listed on Search Engine companies can take anywhere from 1 day to 4 months. The tips listed above should shorten that time and greatly improve your rankings. Also, the Web site should be submitted to as many search engine companies as you can find. Most search engines companies have the ability to submit your Web site to them for free. The Website Promotion tool provides courtesy links to the exact page that you would need to go to learn more on how to submit your
99 site to that search engine. Back to Promote Your Website Back to the Top of the Page

100 Website Analyzer What is it used for? How do I use it? Broken Link Report Download Time Report Images in Use Report What is it used for? The Website Analyzer Tool will allow you to analyze your entire site. It will detect broken links, broken images and the amount of time each page on your site will take to be downloaded on a 28.8kbs modem. Please use this tool in conjunction with the Website Promotion Tool. Doing this will increase and expedite your chances of inclusion and rankings for all of the major search engines and will prevent possible problems when the search engines visit your site. How do I use it? From the Administration, home page, click on blue text of your sitename. From the secondary menu navigation links, click on "Tool Box". Click on "Website Analyzer". When the Website Analyzer Tool is run for the very first time, click on the link "Generate New Report". Your Web site will then be processed by the Website Analyzer server. The Website Analyzer Tool will report "Please come back and check the status of the report generation at a later time. Thank you for your patience."


101 The Website Analyzer report will be generated and will take approximately 2 to 5 minutes to be completed. When it is done, you will see the following screen: You can then click on the blue text "View Finished Report" to view the Website Analysis report. The picture below will show you what the report will look like when completed.
. Below is a sample results page that displays what the Website Analyzer report will specify as broken links.")
102 Back to the Top of the Page Broken Link report If you have any broken links, click on the number that specifies how many broken links exists on your Web site (if you have no broken links, the number "0" will not be a link). Below is a sample results page that displays what the Website Analyzer report will specify as broken links.

103 Back to the Top of the Page Download Time report To find out approximately how long your pages will take to download on a 28.8k modem, click on the button "Download Time". Below is the report that you will see specifying the size of your pages as well as the approximate download time on a 28.8k modem.
104 Back to the Top of the Page Images in Use report To find out which images you are currently using, click on the button "Images In Use". Below is the Website Analyzer report valid images that are in use on the Web site.
105 Back to the Top of the Page
.")
106 Contact Manager Overview Contacts Mail Lists Send To-do List Overview The Contact Manager allows you to manage your contacts, create mailing lists, and send . Please be advised that the Contact Manager must NOT be used to send unsolicited bulk (or spam). To get to the Contact Manager from the Administration home page, click on the blue text of your sitename. In the secondary navigation menu, click on "Tool Box". Click on "Contact Manager". Back to the Top of the Page Contacts The "Contacts" tab of the Contact Manager allows you to see a list of your contacts (if any), search for contacts, assign and remove contacts on Mailing Lists, and manage contacts (edit, remove, and add). If you just started the Contact Manager, you will not have any contacts in the contact list - you will have the red text "No contacts found" on the screen. You will see the following screen: Add Contacts You can add contacts to the Contact Manager by going to the "Add Contact" link. Input all of the information for your contact, and then click on the button "add" to add that contact to your contact list.

107 The only required information is that the contact must have an address or a first name in order to be added as a contact. After you click on the button "Add", the system will report to you that the contact has been added: If you want a form to import directly to the Contact Manager, please click here for detailed information on the process. This is the only other method to add contacts to the Contact Manager. If you have a list of your contacts in a spreadsheet program, you have the ability to upload to and download from the Contact Manager. Upload Contacts From the Contact Manager, click on the link "Upload Contacts". You will see the following screen:


108 To download an example of how to format your list of contacts in the spreadsheet, click on "click here" next to the text "To download a sample file,". The system will then refresh the screen to show:

109 Checkmark all the optional fields that you need. If you bring the file in to a spreadsheet program, you will see something like the following: When done editing your spreadsheet with all the contacts, save the file as a tab-delimited text file to your computer [ Macintosh users, save the file as "Text (Windows)" ]. Once you have a tab-delimited text file of your contacts, click on the button "Browse" to find the file on your computer. Once you have selected the file on your computer, click on the button "Upload Contacts" to upload your contacts to the Contact Manager.

110 Download Contacts From the Contact Manager, click on the link "Download Contacts". You will see the following screen: Checkmark all of the optional fields that you want to download, then click on the button "Download". This will save a tab-delimited text file to your computer with a list of all of the contacts in the Contact Manager. Back to the Top of the Page Manage Contacts Once you have contacts to manage, you will be able to use the other functions of the Contacts section. You can search for a particular contact by typing in the search text in the provided text field.


111 Click on the squares next to the text " ", "First", or "Last" to search by , first name, or last name, respectively. When you are done, click on the button "Search" to have the Contact Manager display the search results. The list of contacts can also be sorted using the drop-down menu under the text "Order By:". You can sort by the address, first name, last name, or the creation date. If you want to reverse the sort order, click on the square under the text "Reverse". In the drop-down menu under the text "Per Page", select the number of contacts that you would like ot have displayed on the page. To apply your search sorting, click on the button "Search". Back to the Top of the Page Delete Contacts To delete contacts, click on the empty square to the left of the contact name for every contact that you wish to remove. When done selecting all of the contacts you wish to delete, click on the blue text "Delete". Please be advised that deleting a contact is an irreversible process. Back to the Top of the Page Add Contacts to Mail List Once you have created at least one Mail List, you can assign contacts to that mail list. The Contacts section will have a new section if you have at least one mail list: If you select a mail list in the drop down menu, the contact Manager will checkmark and highlight all of the contacts in the mail list:


112 Click on the squares to the left of the contact so that the contacts you want for the mail list are all selected (to remove a contact from the mail list, simply un-check the contact). Once you have them all selected, click on the blue text "Set Mailing List" to designate all of the selected contacts to the specified mail list. Back to the Top of the Page Mail Lists Mail Lists give you the ability to create an group. You can then assign contacts to this group by using the "Contacts" tab or the Upload/Download Mail List links. Mail Lists allow you to send an to the whole mailing list without remembering every single address or having to input all of the addresses manually. To create a mail list, input a name for your mail list in the provided text field. Your mail list's name can only consist of letters, numbers, or spaces. When you are done entering in the mail list name, click on the button "Create" to create your mail list. You may also create/modify Mail Lists quickly using the "Upload Mail Lists" and the "Download Mail Lists" links. The system will then inform you that the mail list has been created.

113 After the mail list has been created, below the "Create New Mail List" section, you will see the name of your mail list and blue text links to "Delete" and "Rename" that allow you to delete the mail list and to rename the mail list, respectively. Click on the link "Download Mail Lists" to download a tab-delimited text file that will contain all of your Mail Lists. Click on the link "Upload Mail Lists" to upload your tab-delimited text file with your contacts. To quickly assign contacts to your existing Mail Lists, you would use the "Upload Mail List Contacts" link. To see an example of the format to use for the tab-delimited text file, use the link "Download Mail List Contacts". Back to the Top of the Page Send The Send option of the Contact Manager allows you to send within the 3.0 software. You may send to any of your mailing lists that you have added, and/or to - addresses that you specify. The form allows you to specify a subject for your and a message. All recipients will be identified as "blind carbons" to protect their privacy (basically, none of the receipients will see the addresses of the other recipients).


114 Fill out the address that will be designated as the "From" address. Fill out the subject and message of the in the fields "Subject" and "Message". To send the message to your mail list, click on the mail list name. If you have multiple mail lists set up, hold down the CTRL key on your keyboard and then click on multiple mail list names. If you want to designate individual addresses, fill in those addresses in the field "To". If you have multiple addresses to send in the "To" field, separate each of them with a comma (,). When you want to send the message, click on the

. Create a To-do appointment by clicking on the button \"Add\".")
115 button "Submit". Please be advised that the Contact Manager must NOT be used to send spam (unsolicited bulk ) or for any other unethical marketing practice. Such usage will result in termination of services without notice, as per the Terms of Service. Back to the Top of the Page To-do List The To-do List option of the Contact Manager allows you to create, manage, and delete "To-do" appointments. When you click on the To-do List option, you will see a list of all of your "To-do" appointments (if any). Create a To-do appointment by clicking on the button "Add". The Contact Manager will reload with options to add a To-do appointment: Click on a date that you would like to set your To-do appointment for...


116 ...and the date will change. If you are setting a To-do appointment for a month (or year) other than the month displayed, select your month and year from the drop-down menu and then click on the blue text "Go to month". The Contact Manager will reload and display the appropriate month to add a To-do appointment.

.")

117 Click on a day to choose that day to add a To-do appointment. Fill out all of the other options for your To-do appointment, then click on the button "Add" to add the To-do appointment. Once a To-do appointment has already been created, click on the blue text of the To-do appointment to edit (you will be able to click on the date, priority, status, or description of the To-do appointment to modify it). You will be able to update the To-do appointment with more information, as well as change the status, the notes, or the day for the To-do appointment. When done with your changes, click on the button "Update to save your changes to the To-do appointment. To delete a To-do appointment, click on the red text "Delete" to the right of the To-do appointment.

118 Back to the Top of the Page Back to the Previous Page

119 Calendar Manager Overview Create Calendar Calendar Properties Jump to a Specific Date How to Add an Event Adding an Event Editing an Event Overview The calendar feature allows you to add one or more interactive calendars to your site. Here are just a few possible applications: Online Bookings of concerts, plays, events Online Team Sign-ups Interactive Scheduling of Contractors Class Enrollments The Calendar Manager allows you to create, delete and edit calendars. You may edit a calendar's color scheme, modify its daily schedules of events, specify blackout times, and control how much access your site visitors will have to event information and scheduling. To add the calendar to a Web page, you would need to add a calendar component. Create Calendar To create a calendar from the Calendar Manager, go to the Administration home page. Click on the blue text of your sitename to go in to the Website Editor. Click on "Tool Box" in the secondary navigation menu. Click on "Calendar Manager". When the Calendar Manager page first loads, you will see the following screen Enter in a name for your new calendar, then click on the button "Create". You will see the following screen: Choose your calendar in the drop-down menu to the right of the text "Calendar". Click on the button "Edit" to edit the calendar. Click on the button "Delete" to delete the calendar. When you edit the calendar, you will see the following screen:


120 Back to the Top of the Page Calendar Properties To get to the properties section of the calendar, open up the Calendar Manager. Select a calendar to edit, then click on the button "Edit". Below the small picture of the current month, click on the blue text "Properties".


121 The following screen will load: Calendar Name - If you want to change the name of the calendar, you would do so here. The name of the calendar is for your use only, to assist you in identifying which calendar is which. Timezone - Setting this option will display that timezone for your calendar in the Calendar Manager. Those who visit the Web page that has the calendar will be able to define which timezone that they want the calendar to display as. Simultaneous - Enter in the number of events that you want to allow to be scheduled for the same period of time. If you want the system to accept an unlimited number of events for a specific time frame, enter "0" (zero). Allow Adding - If you want to allow Web site visitors to add events to the calendar, this option would be checked. Show Details - If you have full-view enabled for the calendar component, you may check this option to display the event details in the

122 full-view view of the calendar. If you do not have full-view enabled for the calendar component, you may check this option to display the event details only when a customer clicks on the event name. Notify - If the Web site visitor is able to add an event to the calendar, the customer will be able to request an reminder to themselves if this option is checked. The will be sent from the address that is listed in the field " " text field. Other Information - This field specifies the address that will receive notification that an event has been added (as well as all the event details), assuming of course that "Allow Adding" has been enabled. This field also specifies the address that will be sent from if a Web site visitor requests an notification of an event, assuming of course that "Notify" has also been enabled. Ask for 1 - By default, this field has been filled in with " Address". If you want customers to be notified (and you have "Notify" enabled) with a reminder that an event's scheduled time is arriving, this field must remain untouched in order for the system to inform the customer. If you do not want to inform customers of events at all, then you may remove this field or use different text. Whatever is in this field will appear when an event is added. When an event is added, a text field will allow a Web site visitor to input their own information. If something is filled out, it will be ed to the address listed in the field " ". Ask for 2 - By default, this field has been filled in with "First Name". Whatever is in this field will appear when an event is added. When an event is added, a text field will allow a Web site visitor to input their own information. If something is filled out, it will be ed to the address listed in the field " ". Ask for 3 - By default, this field has been filled in with "Last Name". Whatever is in this field will appear when an event is added. When an event is added, a text field will allow a Web site visitor to input their own information. If something is filled out, it will be ed to the address listed in the field " ". Event Types - By default, this field has been filled in with "General". The event types that appear when adding an event are designated here. Click in the blue text area. Type out your event types and hit "Enter" on your keyboard to separate different event types from each other. When you are done specifying properties for the calendar, click on the button "Update" to save and apply your changes. Back to the Top of the Page Jump to a Specific Date To jump to another month or year, select the month or year in the drop down menu, then click on the blue text "Go". The monthly calendar will reload with information on the selected month and year. To manually move through month to month, click on the blue << to move to the previous month or the blue >> to move to the next month. After you click on the << or the >>, the monthly calendar will reload with information on the selected month.

123 If the system is already displaying the month in which you want to select, you may click on the day that you wish to work with. The day that is underlined shows you the current day. The day that has a dark grey background is the day that you are currently viewing. Once you click on a day, the daily schedule will load on the right side. Back to the Top of the Page How to Add an Event To add a one-time event, you may click on the blue text "One Time Event" above the daily schedule or you may click on the time that the event will start. To add a weekly event, you may click on the blue text "Weekly Event" above the daily schedule or you may click on the "W" for the time that the event will start. To add a monthly event, you may click on the blue text "Monthly Event" above the daily schedule or you may click on the "M" for the time that the event will start.


124 Back to the Top of the Page Adding an Event One Time Event Date - The field shows you the currently selected date. To change the date, click on the blue text "Choose Date". A new window will appear that has the monthly shcedule on it to allow you to choose another day. Starts At - Choose the time that event will begin at. This time will be using the timezone you specified under the calendar properties. Specify the hour, minutes, and the morning/night indicator (AM/PM) using the drop-down menus. Duration - Specify how long the event will last by using the drop-down menus to specify the length in days, hours, and minutes. Blackout - If this event is actually a blackout to prevent your Web site visitors from adding appointments, check mark this box. Of course, "Allow Adding" must be enabled under the calendar properties. Description - Specify the event type for the event. This drop-down menu lists all of the event types that you specified in the calendar properties. Details - Specify details for the event. These details may or may not show up on the Web site, depending on whether "Show Details" is enabled under calendar properties.

125 When done specifying your options, click on the button "Add" to add the event to your calendar. Weekly Event Begin Date - The field shows you the currently selected date that the event will start on. To change the date, click on the blue text "Choose Date". A new window will appear that has the monthly shcedule on it to allow you to choose another day. End Date - The field shows you the current end date for the event. To change the date, click on the blue text "Choose Date". A new window will appear that has the monthly shcedule on it to allow you to choose another day. If you do not want to specify an end date for your event, click on the blue text "No End Date". Starts At - Choose the time that event will begin at. This time will be using the timezone you specified under the calendar properties. Specify the hour, minutes, and the morning/night indicator (AM/PM) using the drop-down menus. Duration - Specify how long the event will last by using the drop-down menus to specify the length in days, hours, and minutes. Repeat - If you want the weekly event to repeat, select how often that event will repeat between the "Begin Date" and the "End Date". You choose to have the event repeat every week, every 2 weeks, every 3 weeks, every 4 weeks, every 5 weeks, every 6 weeks, every 7 weeks, every 8 weeks, every 9 weeks, or every 10 weeks. Blackout - If this event is actually a blackout to prevent your Web site visitors from adding appointments, check mark this box. Of course, "Allow Adding" must be enabled under the calendar properties. Description - Specify the event type for the event. This drop-down menu lists all of the event types that you specified in the calendar properties. Details - Specify details for the event. These details may or may not show up on the Web site, depending on whether "Show Details" is enabled under calendar properties. When done specifying your options, click on the button "Add" to add the event to your calendar.
126 Monthly Event Begin Date - The field shows you the currently selected date that the event will start on. To change the date, click on the blue text "Choose Date". A new window will appear that has the monthly shcedule on it to allow you to choose another day. End Date - The field shows you the current end date for the event. To change the date, click on the blue text "Choose Date". A new window will appear that has the monthly shcedule on it to allow you to choose another day. If you do not want to specify an end date for your event, click on the blue text "No End Date". Starts At - Choose the time that event will begin at. This time will be using the timezone you specified under the calendar properties. Specify the hour, minutes, and the morning/night indicator (AM/PM) using the drop-down menus. Duration - Specify how long the event will last by using the drop-down menus to specify the length in days, hours, and minutes. Repeat - Specify the period in which the monthly event will repeat. If you want the monthly event to fall on a specific day of the week, select the first radio button and choose the occurence and the day of the week from the drop-down menu. If you want the monthly event to fall on the same date listed in "Begin Date", select the second radio button and choose the occurence from the drop-down menu. Blackout - If this event is actually a blackout to prevent your Web site visitors from adding appointments, check mark this box. Of course, "Allow Adding" must be enabled under the calendar properties. Description - Specify the event type for the event. This drop-down menu lists all of the event types that you specified in the calendar properties. Details - Specify details for the event. These details may or may not show up on the Web site, depending on whether "Show Details" is enabled under calendar properties. When done specifying your options, click on the button "Add" to add the event to your calendar.


127 Back to the Top of the Page Editing an Event The events in the daily schedule are color coded based on the event time - light gray for one-time events, pink for monthly events, and light green for weekly events. If you hover your mouse pointer over the event type, you will see the event details in a small window section. You may click on the blue text "Edit" to edit the event or the blue text "Delete" to delete the event. When you edit an event, the window will be identical to the window when you added the event with the exception of the button "add" now replaced with the button "Update". Back to the Top of the Page Back to the Previous Page
Beginner Workshop Activity Guide 2012 User Conference
 Beginner Workshop Activity Guide 2012 User Conference TUESDAY, MARCH 6 2:00PM 5:00 PM Beginner Training Workshop Attendees will learn the end user functions of OU Campus TM. They will learn how to log
Lava New Media s CMS. Documentation Page 1
 Lava New Media s CMS Documentation 5.12.2010 Page 1 Table of Contents Logging On to the Content Management System 3 Introduction to the CMS 3 What is the page tree? 4 Editing Web Pages 5 How to use the
OU EDUCATE TRAINING MANUAL
 OU EDUCATE TRAINING MANUAL OmniUpdate Web Content Management System El Camino College Staff Development 310-660-3868 Course Topics: Section 1: OU Educate Overview and Login Section 2: The OmniUpdate Interface
HOW TO USE THE CONTENT MANAGEMENT SYSTEM (CMS) TABLE OF CONTENTS
 TABLE OF CONTENTS") HOW TO USE THE CONTENT MANAGEMENT SYSTEM (CMS) TABLE OF CONTENTS GETTING STARTED (LOGIN) 2 SITE MAP (ORGANIZE WEBPAGES) 2 CREATE NEW PAGE 3 REMOVE PAGE 6 SORT PAGES IN CHANNEL 7 MOVE PAGE 8 PAGE PROPERTIES
HOW TO USE THE CONTENT MANAGEMENT SYSTEM (CMS) TABLE OF CONTENTS GETTING STARTED (LOGIN) 2 SITE MAP (ORGANIZE WEBPAGES) 2 CREATE NEW PAGE 3 REMOVE PAGE 6 SORT PAGES IN CHANNEL 7 MOVE PAGE 8 PAGE PROPERTIES
page 1 OU Campus User Guide
 page 1 OU Campus User Guide Logging Into OU Campus page page 2 1. Navigate to a page on your site that you wish to edit. 2. Scroll down to the footer and click the symbol. 3. Enter your OU Campus username
Joomla! 2.5.x Training Manual
 Joomla! 2.5.x Training Manual 1 Joomla is an online content management system that keeps track of all content on your website including text, images, links, and documents. This manual includes several
Page Gentics Software GmbH Enterprise Portals and Content Management Systems
 1. 2012 Gentics Software GmbH Page 2 Table of Contents 1. Table of Contents... 3 2. Foreword Infoportal and Support... 6 3. First steps... 6 3.1 Login and logout... 6 3.2 Password change... 7 3.3 User
Contents. Protus Messaging Services User Guide Web Fax Merge
 Contents Protus Messaging Services User Guide Getting Started... 1 Setting up an account... 1 Requirements... 1 Logging In... 1 Sending a New... 2 Who are you sending your fax to?... 2 Sample Merge List...
While editing a page, a menu bar will appear at the top with the following options:
 Page Editor ===> Page Editor How Can I Use the Page Editor? The Page Editor will be your primary way of editing your website. Page Editor Basics While editing a page, you will see that hovering your mouse
Drupal 7 guide CONTENTS. p. 2 Logging In
 Drupal 7 guide Drupal is a widely used, open-source, free platform that has an easy-to-use content management system for updating websites. This guide was created by the Health Communication Core (www.healthcommcore.org)
1.0 Overview For content management, Joomla divides into some basic components: the Article
 Joomla! 3.4.x Training Manual Joomla is an online content management system that keeps track of all content on your website including text, images, links, and documents. This manual includes several tutorials
Administrative Training Mura CMS Version 5.6
 Administrative Training Mura CMS Version 5.6 Published: March 9, 2012 Table of Contents Mura CMS Overview! 6 Dashboard!... 6 Site Manager!... 6 Drafts!... 6 Components!... 6 Categories!... 6 Content Collections:
Cropping an Image for the Web
 Cropping an Image for the Web This guide covers how to use the Paint software included with Microsoft Windows to crop images for use on a web page. Opening Microsoft Paint (In Windows Accessories) On your
Function. Description
 Function Check In Get / Checkout Description Checking in a file uploads the file from the user s hard drive into the vault and creates a new file version with any changes to the file that have been saved.
CROMWELLSTUDIOS. Content Management System Instruction Manual V1. Content Management System. V1
 Content Management System Instruction Manual V1 www.cromwellstudios.co.uk Cromwell Studios Web Services Content Management System Manual Part 1 Content Management is the system by which you can change
OU Campus VERSION 10
 OU Campus VERSION 10 End User Manual Last Update: 9/8/2015 Contact Tish Sailer with comments or questions regarding this Manual. Contents INTRODUCTION...3 HELP DOCUMENTS AND SUPPORT... 3 ACCESSING PAGES
Site Owners: Cascade Basics. May 2017
 Site Owners: Cascade Basics May 2017 Page 2 Logging In & Your Site Logging In Open a browser and enter the following URL (or click this link): http://mordac.itcs.northwestern.edu/ OR http://www.northwestern.edu/cms/
GROUPWISE INSTRUCTIONS
 Viewing the GroupWise Home Desktop From the Folder List on the left-hand side of the screen, [Click] on the yourname HOME FOLDER The Home view provides panels of shortcut views which can be customized.
Cascade User Guide. Introduction. Key System Features. User Interface
 Cascade User Guide Introduction Key System Features User Interface Menus and Moving Through the System Files and Pages Working with Existing Pages File Action Menu Version Control Deleting files Restoring
Cascade V8.4 Website Content Management for the Site Manager UMSL
 Cascade V8.4 Website Content Management for the Site Manager UMSL Contents Purpose & How to Use This Guide... 5 Getting Started and Logging In... 5 Login... 5 Dashboard... 5 Notifications... 5 Setting
FrontPage 2000 Tutorial -- Advanced
 FrontPage 2000 Tutorial -- Advanced Shared Borders Shared Borders are parts of the web page that share content with the other pages in the web. They are located at the top, bottom, left side, or right
Restoring data from a backup
 Restoring data from a backup The following topics explain how to find a backup to restore and then perform a restore: Finding a backup to restore on page 98 Restoring to the original location on page 101
All textures produced with Texture Maker. Not Applicable. Beginner.
 Tutorial for Texture Maker 2.8 or above. Note:- Texture Maker is a texture creation tool by Tobias Reichert. For further product information please visit the official site at http://www.texturemaker.com
Hostopia WebMail Help
 Hostopia WebMail Help Table of Contents GETTING STARTED WITH WEBMAIL...5 Version History...6 Introduction to WebMail...6 Cookies and WebMail...6 Logging in to your account...6 Connection time limit...7
Beginners Guide to Snippet Master PRO
 Beginners Guide to Snippet Master PRO This document assumes that Snippet Master has been installed on your site. If not please contact the Bakas IT web team at webreg@bakasit.com.au. Initial Login Screen...
Do It Yourself Website Editing Training Guide
 Do It Yourself Website Editing Training Guide Version 3.0 Copyright 2000-2011 Sesame Communications. All Rights Reserved. Table of Contents DIY Overview 3 What pages are editable using the DIY Editing
User Guide. Chapter 6. Teacher Pages
 User Guide Chapter 6 s Table of Contents Introduction... 5 Tips for s... 6 Pitfalls... 7 Key Information... 8 I. How to add a... 8 II. How to Edit... 10 SharpSchool s WYSIWYG Editor... 11 Publish a...
User s Manual. Beacon Technologies, Inc. 164-B Thatcher Rd. Greensboro, NC beacontechnologies.com
 Beacon Technologies, Inc. 164-B Thatcher Rd. Greensboro, NC 27409 User s Manual beacontechnologies.com Grossmont-Cuyamaca Community College District Version 1.4 January 26, 2015 Table of Contents 1. THE
Working with Pages... 9 Edit a Page... 9 Add a Page... 9 Delete a Page Approve a Page... 10
 Land Information Access Association Community Center Software Community Center Editor Manual May 10, 2007 - DRAFT This document describes a series of procedures that you will typically use as an Editor
Web Ad Image Portal. User Manual
 Web Ad Image Portal User Manual Rev 06232008 Web Ad Image Portal User Manual Rev 06232008 Login and Home Page Access the portal via http://images.autobase.net Login with your dealer.autobase.net account
EXCEL BASICS: MICROSOFT OFFICE 2007
 EXCEL BASICS: MICROSOFT OFFICE 2007 GETTING STARTED PAGE 02 Prerequisites What You Will Learn USING MICROSOFT EXCEL PAGE 03 Opening Microsoft Excel Microsoft Excel Features Keyboard Review Pointer Shapes
DaDaDocs for Dynamics 365. A Guidebook for the DaDaDocs Integration for Dynamics 365
 DaDaDocs for Dynamics 365 A Guidebook for the DaDaDocs Integration for Dynamics 365 DaDaDocs for Dynamics 365 2 Table of Contents Getting Started Mini Toolbar Hyperlink Tool Text Checkmarks Signing Documents
EXCEL BASICS: MICROSOFT OFFICE 2010
 EXCEL BASICS: MICROSOFT OFFICE 2010 GETTING STARTED PAGE 02 Prerequisites What You Will Learn USING MICROSOFT EXCEL PAGE 03 Opening Microsoft Excel Microsoft Excel Features Keyboard Review Pointer Shapes
As a first-time user, when you log in you won t have any files in your directory yet.
 Welcome to Xythos WFS. This program allows you to share files with others over the Internet. When you store a file within your WFS account, you can make it selectively available to be viewed, edited, deleted,
OU Campus VERSION 10
 OU Campus VERSION 10 End User Manual Last Update: 8/15/2017 Contact Tish Sailer with comments or questions regarding this Manual. Contents INTRODUCTION...3 HELP DOCUMENTS AND SUPPORT... 3 ACCESSING PAGES
Creating a Website with Publisher 2016
 Creating a Website with Publisher 2016 Getting Started University Information Technology Services Learning Technologies, Training & Audiovisual Outreach Copyright 2017 KSU Division of University Information
How to Edit Your Website
 How to Edit Your Website A guide to using your Content Management System Overview 2 Accessing the CMS 2 Choosing Your Language 2 Resetting Your Password 3 Sites 4 Favorites 4 Pages 5 Creating Pages 5 Managing
Vetstreet Web Builder Editor Tool User Guide v2.1. Web Builder. User Guide v2.1
 Web Builder User Guide v2.1 Contact your Account Manager at (888) 799-8387 or email support@vetstreet.com with questions. Page 1 Index... 1 The Editor Tool... 7 Forgot Your Username or Password?... 7 How
MindView Online - Quick Start Guide
 MindView Online - Quick Start Guide Overview MindView Online is an online concept mapping program that allows users to organize their thoughts visually to create, share, and export mind maps to Microsoft
Managing Your Website with Convert Community. My MU Health and My MU Health Nursing
 Managing Your Website with Convert Community My MU Health and My MU Health Nursing Managing Your Website with Convert Community LOGGING IN... 4 LOG IN TO CONVERT COMMUNITY... 4 LOG OFF CORRECTLY... 4 GETTING
Collage II Tips and Tricks
 Collage II Tips and Tricks Peter Mosinskis, Supervisor of Web Services, CSUCI Table of Contents Introduction... 1 Copy and Paste from Word... 2 Option 1. Word Notepad Collage... 2 Option 2. Word Dreamweaver
Mediasation Content Management System 4.0 Users Guide & Training Manual
 Mediasation Content Management System 4.0 Users Guide & Training Manual 2008 Mediasation Web Solutions, Inc. All rights reserved. Mediasation, Inc. CMS 4.0 Users Guide Version: October 2008 Editor: Jaimee
About Freeway. Freeway s Tools and Palettes
 About Freeway The most important thing to appreciate before you start a site in Freeway is how the process works, especially if you have tried other Web publishing software before. Freeway is not an HTML
How to Use the Web Folio Builder to Design an eportfolio
 Contents: A. Accessing the Web Folio Builder How to Use the Web Folio Builder to Design an eportfolio B. Basics: Modifying the Web Folio template a) Selecting a Layout and Color Scheme for the Web Folio,
Q u i c k S ta r t G u i d e
 Quick Start Guide GETTING STARTED The first time you run Trust ID, you will be presented with an option to enable security accounts. Enabling this feature will require knowledge of the username and password
WEBUS Web Updating System Client User s Guide
 WEBUS Web Updating System Version 2.3 TelVue Virtual Television Networks 16000 Horizon Way, Suite 500 Mt. Laurel, NJ 08054 Phone (800) 885-8886 (TVTN) Fax (856) 886-7411 www.tvtn.tv Table of Contents WEBUS...
How to Edit Your Website
 How to Edit Your Website A guide to using SimpleCMS Overview 2 Accessing the CMS 2 Resetting Your Password 2 Pages 3 Managing Files 3 Shortcuts 4 Uploading 4 Page Options 4 Relabel 4 Duplicate 4 Google
Lucid CMS User Guide
 "We create exceptional business solutions for cash-pay healthcare professionals that enable them to realize their full potential." Lucid CMS User Guide Version 1.2 3/13/2012 1 Table of Contents Table of
In the fourth unit you will learn how to upload and add images and PDF files.
 Introduction Here at SUNY New Paltz, we use the Terminal Four (T4) web content management system (CMS). This puts the power of editing content on our college s webpage in the hands of our authorized users.
EKTRON 101: THE BASICS
 EKTRON 101: THE BASICS Table of Contents INTRODUCTION... 2 TERMINOLOGY... 2 WHY DO SOME PAGES LOOK DIFFERENT THAN OTHERS?... 5 LOGGING IN... 8 Choosing an edit mode... 10 Edit in context mode (easy editing)...
Navigating Your Profile
 Part 1: Profile Login Navigating Your Profile 1. Start at the Greater Kansas City Community Foundation s home page, www.growyourgiving.org. Select Nonprofit Search. 2. This is the Nonprofit Search home
User Guide. Web Intelligence Rich Client. Business Objects 4.1
 User Guide Web Intelligence Rich Client Business Objects 4.1 2 P a g e Web Intelligence 4.1 User Guide Web Intelligence 4.1 User Guide Contents Getting Started in Web Intelligence 4.1... 5 Log into EDDIE...
Working with PDF s. To open a recent file on the Start screen, double click on the file name.
 Working with PDF s Acrobat DC Start Screen (Home Tab) When Acrobat opens, the Acrobat Start screen (Home Tab) populates displaying a list of recently opened files. The search feature on the top of the
1 FuneralTech CMS Manual. CMS Manual Funeral Technology Partners
 1 FuneralTech CMS Manual CMS Manual 2 FuneralTech CMS Manual Table of Contents Part 1: General Set-Up... 1.1 Accessing the Content Management System... 1.2 Setting your Admin Username and Password... 1.3
Ektron Advanced. Learning Objectives. Getting Started
 Ektron Advanced 1 Learning Objectives This workshop introduces you beyond the basics of Ektron, the USF web content management system that is being used to modify department web pages. This workshop focuses
Forms Builder Module v Create, administer, and complete electronic forms in the Passageways portal.
 Forms Builder Module v4.11.1 Create, administer, and complete electronic forms in the Passageways portal. Contents Section 1. Overview... 1 Section 2. Module Properties... 1 Section 3. The Form Building
Opening Screen When you first enter Slick!, a blank opening screen will appear as shown below.
 Quick Start This will provide you an overview on how to:?? select and view a file?? zoom in an out of the graphics window?? panning around the graphics window?? zoom to the extents of graphics window??
Site Manager. To edit a page already in place, click on the name of the page.
 Web Page Editing Navigate to the SFHS website. The address is http://www.forsyth.k12.ga.us/sfhs/site/default.asp. (Use that link, or copy/paste it into a browser. You can also pull up Internet Explorer,
Image Management Guideline Managing Your Site Images
 Managing Your Site Images Topics Covered Contents = Go to Topic 1. Free Resize/Image Editing Tools 2. Resize Images Using Picresize.com 3. Uploading Images Quick Guide 4. Image Gallery Management 5. Replacing
New Website User Manual
 New Website User Manual General Notes 3 How To Login To Your Website And Access Admin Dashboard 4 Adding / Editing Sliders 5 Home Slider 5 School Slider (Same steps for ALL school pages) - Add a Slide
Advanced Marketing Techniques: Zach Stone, Molly McCormick, Dave Frees, Connie Gray, Karen Martin, and Mischelle Davis
 Advanced Marketing Techniques: Zach Stone, Molly McCormick, Dave Frees, Connie Gray, Karen Martin, and Mischelle Davis You have access to some incredible tools, and Zach, Connie, Molly, Karen, Dave, and
Creating a Website in Schoolwires Technology Integration Center
 Creating a Website in Schoolwires Technology Integration Center Overview and Terminology... 2 Logging into Schoolwires... 2 Changing a password... 2 Accessing Site Manager... 2 Section Workspace Overview...
User s guide to using the ForeTees TinyMCE online editor. Getting started with TinyMCE and basic things you need to know!
 User s guide to using the ForeTees TinyMCE online editor TinyMCE is a WYSIWYG (what you see is what you get) editor that allows users a familiar word-processing interface to use when editing the announcement
Client Portal Training Manual
 Nexsure Training Manual Client Portal Training Manual Version 2.1.3 Page Nexsure Training Manual 2011 XDimensional Technologies, Inc. All rights reserved. No part of this documentation shall be reproduced,
Web Manager 2.0 User s Manual Table of Contents
 Web Manager 2.0 User s Manual Table of Contents Table of Contents... 1 Web Manager 2.0 Introduction... 2 Rights and Permissions... 2 User Access Levels... 2 Normal Access... 2 Publisher Access... 2 WM2
Sedao Ltd. QuickChange PROject. User Manual for QuickChange PROject version 2.1.5
 Sedao Ltd QuickChange PROject User Manual for QuickChange PROject version 2.1.5 Contents What is QuickChange PROject?... 2 Simple Artwork Creation... 5 Creating a project... 7 QuickChange PROject Template
Creating a Website in Schoolwires
 Creating a Website in Schoolwires Overview and Terminology... 2 Logging into Schoolwires... 2 Changing a password... 2 Navigating to an assigned section... 2 Accessing Site Manager... 2 Section Workspace
TYPO3 Editing Guide Contents
 TYPO3 Editing Guide Contents Introduction... 2 Logging in... 2 Selecting your Workspace for editing... 2 Working with Content Elements... 3 Working in the Editing Window... 4 Pasting content from MS Word
Website Management with the CMS
 Website Management with the CMS In Class Step-by-Step Guidebook Updated 12/22/2010 Quick Reference Links CMS Login http://staging.montgomerycollege.edu/cmslogin.aspx Sample Department Site URLs (staging
Wordpress Training Manual
 The Dashboard... 2 If this is your first time logging in:... 2 How do I change my password or email address?... 3 Search Engine Optimization (SEO)... 4 SEO for Pages... 4 SEO for Images... 5 Managing Pages...
Editing Drupal 7 Sites. Basic page editing. June To begin editing, log in by clicking Login at the bottom of the homepage. Username.
 Editing Drupal 7 Sites June 2013 Basic page editing To begin editing, log in by clicking Login at the bottom of the homepage Username Password Navigate to the page you want to edit Click the Edit tab at
Parish . User Manual
 Parish Email User Manual Table of Contents LOGGING IN TO PARISH EMAIL... 3 GETTING STARTED... 3 GENERAL OVERVIEW OF THE USER INTERFACE... 3 TERMINATE THE SESSION... 4 EMAIL... 4 MESSAGES LIST... 4 Open
SCHULICH MEDICINE & DENTISTRY Website Updates August 30, Administrative Web Editor Guide v6
 SCHULICH MEDICINE & DENTISTRY Website Updates August 30, 2012 Administrative Web Editor Guide v6 Table of Contents Chapter 1 Web Anatomy... 1 1.1 What You Need To Know First... 1 1.2 Anatomy of a Home
AGENT123. Full Q&A and Tutorials Table of Contents. Website IDX Agent Gallery Step-by-Step Tutorials
 AGENT123 Full Q&A and Tutorials Table of Contents Website IDX Agent Gallery Step-by-Step Tutorials WEBSITE General 1. How do I log into my website? 2. How do I change the Meta Tags on my website? 3. How
User Guide Product Design Version 1.7
 User Guide Product Design Version 1.7 1 INTRODUCTION 3 Guide 3 USING THE SYSTEM 4 Accessing the System 5 Logging In Using an Access Email 5 Normal Login 6 Resetting a Password 6 Logging Off 6 Home Page
Overview NOTE: Listing Overview. User Profile. Language Selection. Asset(s) View. Asset(s) Details. Editing Mode
 View. Asset(s) Details. Editing Mode") Overview Listing Overview User Profile Language Selection Asset(s) View Asset(s) Details Editing Mode NOTE: Some functions may not be available to all users depending on permissions granted. Some of the
Overview Listing Overview User Profile Language Selection Asset(s) View Asset(s) Details Editing Mode NOTE: Some functions may not be available to all users depending on permissions granted. Some of the
Creating an Image Gallery Asset in OU Campus 4/23/15
 Creating an Image Gallery Asset in OU Campus 4/23/15 IMPORTANT: To create a new image gallery, you must first crop all of your images to the same dimensions and save them to a folder on your computer.
Nauticom NetEditor: A How-to Guide
 Nauticom NetEditor: A How-to Guide Table of Contents 1. Getting Started 2. The Editor Full Screen Preview Search Check Spelling Clipboard: Cut, Copy, and Paste Undo / Redo Foreground Color Background Color
DOCUMENTUM D2. User Guide
 DOCUMENTUM D2 User Guide Contents 1. Groups... 6 2. Introduction to D2... 7 Access D2... 7 Recommended browsers... 7 Login... 7 First-time login... 7 Installing the Content Transfer Extension... 8 Logout...
PBWORKS - Student User Guide
 PBWORKS - Student User Guide Fall 2009 PBworks - Student Users Guide This guide provides the basic information you need to get started with PBworks. If you don t find the help you need in this guide, please
CMS Training Reference Guide
 CMS Training Reference Guide Your training session may have been conducted on one of your sites Dev or Staging or Live To login, type your web address domain into a web browser and add (/admin) o Example:
Creating Pages with the CivicPlus System
 Creating Pages with the CivicPlus System Getting Started...2 Logging into the Administration Side...2 Icon Glossary...3 Mouse Over Menus...4 Description of Menu Options...4 Creating a Page...5 Menu Item
JobSite OnLine User s Guide Table of Contents
 JobSite OnLine User s Guide Table of Contents For the Beginner: 2 Preparing and Logging In to Run JobSite OnLine...2 How Drawings and Specs are Organized - Ease of Use...3 Searching for Files or Containers...4
Secure Guard Central Management System
 Speco Technologies, Inc. Secure Guard Central Management System Usage Information Contents 1 Overview... 7 2 Installation... 7 2.1 System Requirements... 7 2.2 System Installation... 7 2.3 Command Line
Optimizing ImmuNet. In this chapter: Optimizing Browser Performance Running Reports with Adobe Acrobat Reader Efficient Screen Navigation
 Optimizing ImmuNet In this chapter: Optimizing Browser Performance Running Reports with Adobe Acrobat Reader Efficient Screen Navigation Optimizing Browser Performance Unless instructed to do otherwise,
Introduction to SeaGreen
 Introduction to SeaGreen Quick and Simple Form Creation SeaGreen lets you create web-based forms that allow you to collect and use data from visitors to a website. SeaGreen is a WYSIWYG application (an
BCI.com Sitecore Publishing Guide. November 2017
 BCI.com Sitecore Publishing Guide November 2017 Table of contents 3 Introduction 63 Search 4 Sitecore terms 66 Change your personal settings 5 Publishing basics 5 Log in to Sitecore Editing 69 BCI.com
Yearbook Edition Software
 Yearbook Edition Software End User Guide Pixami, Inc. www.pixami.com Table of Contents 1 Introduction... 4 1.1 Configuration and Preparation... 4 1.2 Software System Requirements... 4 1.3 The Basic Steps...
Webaloo Manual. A Guide to Editing your Website.
 Webaloo Manual A Guide to Editing your Website. ~ 1 ~ WEBALOO MANUAL The following manual is designed to familiarize new users with the Webaloo Content Management System (CMS) and to provide extra knowledge
Configuring Personnel and Badges
 CHAPTER 10 This chapter describes how to create the personnel records and badges used to access doors in the Cisco Physical Access Control system. Note For instructions to synchronize Cisco PAM with personnel
Grapevine web hosting user manual. 12 August 2005
 Grapevine web hosting user manual 12 August 2005 Grapevine web hosting user manual 2 Contents Contents... 2 Introduction... 4 System features... 4 How it looks... 5 Main navigation... 5 Reports... 6 Web
PBWORKS - Student User Guide
 PBWORKS - Student User Guide Spring and Fall 2011 PBworks - Student Users Guide This guide provides the basic information you need to get started with PBworks. If you don t find the help you need in this
EQUELLA. Moodle User Guide. Version 6.2
 EQUELLA Moodle User Guide Version 6.2 Document History Document No. Reviewed Finalised Published 1 12/12/2013 13/12/2013 13/12/2013 December 2013 edition. Information in this document may change without
SECTION 5 USING STUDENT
 SECTION 5 USING STUDENT EMAIL 5. USING STUDENT EMAIL On enrolling at the University all students automatically have an email account created. Account creation depends on a student successfully enrolling
NiceForm User Guide. English Edition. Rev Euro Plus d.o.o. & Niceware International LLC All rights reserved.
 www.nicelabel.com, info@nicelabel.com English Edition Rev-0910 2009 Euro Plus d.o.o. & Niceware International LLC All rights reserved. www.nicelabel.com Head Office Euro Plus d.o.o. Ulica Lojzeta Hrovata
NZ Online Forms for Research Software Manual
 NZ Online Forms for Research Software Manual Version 1.5 Released May 2016 2 P a g e N Z O n l i n e F o r m s f o r R e s e a r c h 1 INTRODUCTION... 6 2 GETTING STARTED... 6 2.1 Creating an Account...
Website Creating Content
 CREATING WEBSITE CONTENT As an administrator, you will need to know how to create content pages within your website. This document will help you learn how to: Create Custom Pages Edit Content Areas Creating
Table of Contents. Yearbook Pro End User Guide 2
 Yearbook Pro End User Guide 2 Table of Contents 1 Introduction...5 1.1 What s new for the 2016-17 School Year?...5 1.2 Configuration and Preparation...6 1.3 Software and System Requirements...6 1.4 The
Optimizing GRITS. In this chapter:
 Optimizing GRITS In this chapter: Creating Favorites and Shortcuts Optimizing Browser Performance Running Reports with Acrobat Reader Efficient Screen Navigation Creating Favorites and Shortcuts To access
Creating Web Pages with SeaMonkey Composer
 1 of 26 6/13/2011 11:26 PM Creating Web Pages with SeaMonkey Composer SeaMonkey Composer lets you create your own web pages and publish them on the web. You don't have to know HTML to use Composer; it