Joomla! 2.5.x Training Manual
|
|
|
- John Montgomery
- 5 years ago
- Views:
Transcription

1 Joomla! 2.5.x Training Manual 1
2 Joomla is an online content management system that keeps track of all content on your website including text, images, links, and documents. This manual includes several tutorials to teach you some basic content management skills on Joomla, including updating text, uploading images, building menus, and creating links. Please note that Joomla is an extensive system and this document only covers basic operation. To learn more about Joomla s advanced functionality, please visit the documentation section of Overview For content management, Joomla divides into two basic components: the Article Manager and the Menu Manager. The Article Manager is the place you will make changes to each individual page on your site. Here you can change the text on your pages, upload images, or add links. It is important to remember that all content changes will take place in the Article Manager. The Menu Manager is where you make changes to the navigation menus of the website. All your menus can be edited here. It is important to remember that all navigation changes will take place in the Menu Manager. 2.0 Logging in to Joomla In order to make changes to your website using the Joomla Content Management System, you must access the administrative portion of the website. The administrative section is where all site maintenance and development takes place. In order to access this portion of your site, you need to type a special web address into the address bar of your browser: 2
3 1. Type the address into your web browser ( yoursitesname should be replaced by the name of the website you are editing). 3

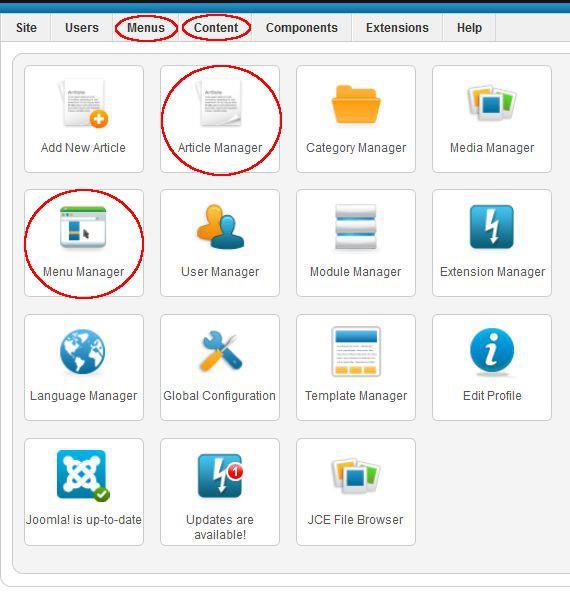
4 2. Since the administrative portion of the website is where important and irreversible changes take place, you need a user name and password to access it. Enter your user name and password when prompted to do so. Note, only users with Administrative Access can access this section. Once you successfully login to the administrative section of your website, you will see the Administrator Control Panel. From this page, you will access the Article Manager and Menu Manager to make your content changes. 4
5 5

6 Notice that you can access the Article Manager and the Menu Manager from the large icons on this screen. You can also always find the Article and Menu Managers in the top bar under the headings Menus and Content. Article Manager 1. Overview The Article Manager is the place to make changes to the content on each individual web page. Each content page is called an Article, and you will have a separate Article for each page on your site. From here, you can add text, links, images, and whatever else you might want to the content portion of your web site. On the top bar menu, drag your mouse over Content. When the drop down menu appears, click on the Article Manager. 6

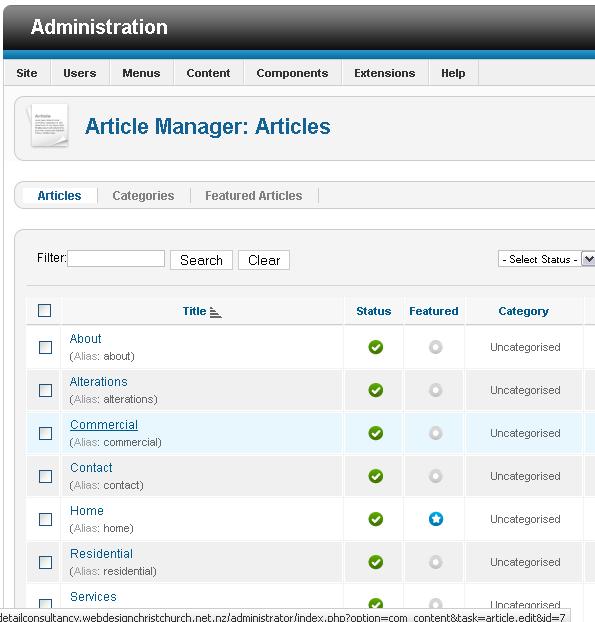
7 The Article Manager has two areas to be concerned with, the Article Manager Menu and the List of Articles. In the Article Manager 7
8 Menu, there are several buttons that are essential to understand, and some that are not. 1. New: Creates a brand new article item. 2. Edit: Opens a selected article for content editing (note: Articles can also be edited by clicking directly on their name in the Article List). 3. Publish/Unpublish: Makes the selected article visible (published) or not visible (unpublished) on the front end web site. Featured: Sets an article as a homepage. Not necessary to understand for basic use. 4. Unarchive/Archive: Not necessary to understand for basic use. 5. Check In: Unlocks articles that have a padlock icon next to them which occurs if someone else is editing them or where the article screen hasn t been closed properly. 6. Trash: Deletes a selected article. To delete an article, first select it by checking the box next to the article title in the List of Articles, then click delete on the Article Manager Menu. 7. Options: Not necessary to understand for basic use. 8. Help: Click for on line help regarding the Article Manager. Can t find your article? If the menu is confusing, look at the box Selection and choose Category. This will bring up different levels of headings. Creating a New Article 8

9 9
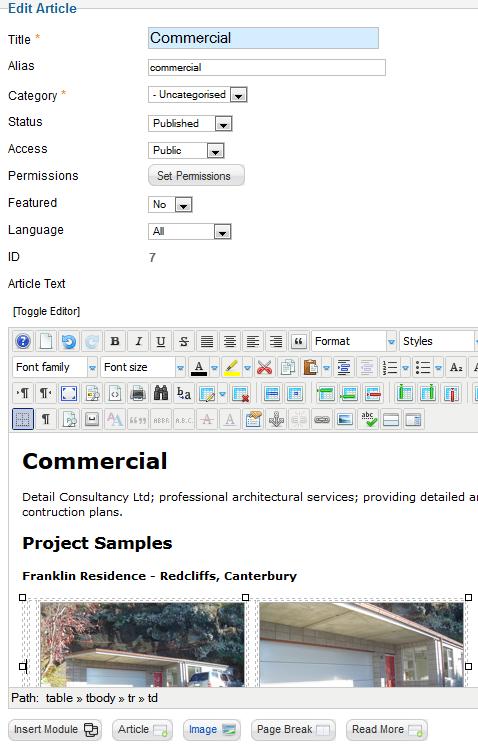
10 1. On the Article Manager Menu, click the New button. 2. Before you do anything else, you must give your article a title, an alias, and a section. a. In the title box, give your article a good name such as Home Page. b. Your article also needs an alias. We recommend using the same name as your title. c. Set the article s section to Uncategorized. d. Make sure the article is set to Published and the category is set to Uncategorized. e. If the article is going to appear on the main front page of the site, set Front Page to Yes. Otherwise, leave it at No. f. Click the Save button located on the top menu. g. Open the webpage in a browser and click refresh to see the changes reflected on the live site. When you want to go back to where you were, click Close (this looks similar to the Cancel button) Editing an Existing Article In this tutorial the basic functions of the Content Management System (CMS) Editor will be outlined. The CMS Editor is the tool you will use to edit the content of your articles including text, images, and links. 1. In the Article Manager, click on the title of an article that you would like to edit. On the next screen, you should see a large text area box with this tool bar at the top: 10

 otherwise you will end up with hieroglyphics everywhere.")
11 This tool bar contains a number of ways you can manipulate the content of your article. Some of them should look familiar to you, such as the bold, italic, underline and justification buttons at the top left of the tool bar. DO NOT COPY straight from Word. Word and html are like oil and water. Paste your word copy into Notepad or Wordpad (Programs, Accessories, Notepad/Wordpad) otherwise you will end up with hieroglyphics everywhere. Other tools will require an explanation: Format Drop Down Menu - This drop-down menu is for making headings on your article. To make text appear as a main heading, set this box to Heading 1. To make the text appear as a secondary heading, set this box to Heading 2. 11

12 Font Family Drop Down Menu This menu is used to choose the font family. We have already styled your site so you don t need to play with this menu. Change Font Color This button allows you to specify a font color for your text. Insert/Edit Image Button - This button will allow you to insert & edit images. (See 1.5 Images) Add / Remove Hyperlink These buttons are used to add, edit, and remove hyperlinks. Please see the Hyperlinks in an Article section for more information on the use of these buttons. Bullets / Numbering Button These buttons allow you to put bulleted points or numbered lists on your article. Undo / Redo If you make a mistake that you do not like, click the Undo button to return to the previous state, canceling the changes that were made. Click in the field located below the tool bar and type something. Whatever you type in here will appear on your web page. 12
13 Use tables to optimize your page layout For an inner page with photos and text, you can insert a table so the page looks nice and tidy. To put your text and photos under 3 columns, you would use a table like the following one: Insert a new table This button allows to create a new table on your article. Once using it, you will be able to set up your table properties: set up the number of rows and columns. For a table like the one above: 5 Cols and 3 Rows. 13


14 You will get a small table, you need to fill it with your content prior to setting the cells properties. Make sure to leave one empty column or row free between two full cells so their content is not too close. Table cell properties This button allows you to set up one cell properties. Click on one cell and set up the alignment (center, left or right) and the vertical alignment (top, center or bottom). Set up the width to make the content cells identical and the empty cells identical. Use percentage: for the example table, put 30% for the 3 cells in a row that are filled with content and 5% for the 2 empty cells which make the gaps between content. Adjust the % according to the number of columns you want in your table and how you want your table to look. If you want the cell properties to apply to all the cells in a row or in the table, choose Update all cells in row or Update all cells in table on Update button. 14

15 It is also possible to set up some borders and a background color for your table. Do a right click on a cell and choose Table properties. Go to the Advanced tab and click on the Browse icon on for either Border color or Background color. Choose the color you like in the Picker pop up. Once your table is finished, do not forget to click on the Save button at the top of the article to save the changes you have made on your article. 15

16 Hyperlinks in an Article Creating a Hyperlink - In Joomla, inserting hyperlinks into your web content is easy. Follow these steps: Before you start, open your web site in a different tab and find the page you want to link to. Copy the URL address from the browser. 1. Highlight the text that you wish to make into a link by clicking and dragging: 16
 or find the website article by browsing through Contacts, Content, Menu or Weblinks.")
17 2. Click on the Add/Edit Hyperlink button on the CMS Tool bar. 3. In the URL field, type the full web address of the page you want to link to: Example: (Note: is REQUIRED for the link to work properly) or find the website article by browsing through Contacts, Content, Menu or Weblinks. If you want to link to a file, click on the button to the right of the URL field and find the file on the server. 4. In the Target drop down, choose behaviour of the link. We recommend links to other websites always open up in a new window. If it is within your own site, it can replace the current window. Or you can set it to be a pop up box. 5. In the Title box, type the title of the web site you are linking to. 6. Press Insert. 17
18 18
19 Uploading and Displaying Images Illustrating your articles with images is a good way to make them more attractive and informative at the same time. In order to place images on the web in your article, there are two steps that must be completed. First, the image must be uploaded to the web. This is followed by actually placing the image in your article. Both of these functions are completed with the CMS Editor in the Article Manager. Note about image file sizes: It is important that you check the file size of the image and make sure it is not too large before uploading. Often times the images taken directly from digital cameras are too large for web display, so be sure to adjust the file size to no more than 100 KB (this is a large pic) using photo editing software. PC s don t really come with a good photo editor. We recommend Irfanview, a free download that allows you to resize images easily. It is not easy to work out in Internet Explorer what size to set your image to. An easy way is to download the browser Firefox. Open up the site in Firefox, right click on the image, select properties and it will tell you the size. Note about image pixel sizes: Your image will always display best by resizing it to the size you want BEFORE uploading it. Taking a large image and resizing it once it is in the browser will often cause it to look grainy or distorted. Always use an image editor before uploading to make sure your image is the right size and quality (this is not outlined in the manual). Uploading Images 1. Ensure that you have your image saved somewhere locally. 2. Log into the Joomla Administrator area and click on Article Manager. Scroll through [or apply a filter to] the list of pages (articles) and select the one that you will be adding an image to. 19

20 Joomla main dashboard. Select Article Manager 20
21 21

22 Find the relevant article that you would like to add the image to. 3. Click within the body of the article editor and position the cursor where you would like to insert the image. Click on the Image button that is underneath the editing screen (shown at the very bottom of the below screenshot) to upload the image to the server. 22
23 23

24 4. A window will open where you are able to select the image from your local computer. Click browse and locate the image. Make sure the upload path is correct in the preview panel and, if it is not, select the folder that the image is to be uploaded into. Click Start Upload. 24

25 A successful upload will yield the following message: 25
.")
26 5. Ensuring that the cursor is still positioned where you would like to place the image, click on the Insert Image button in the editor s toolbar. This button resembles a landscape picture. A window will come up which shows the file structure on the server (shown on next page). 26

27 6. Locate where you have uploaded the file and select it by clicking on the filename that will appear in the middle column. Some properties will populate themselves based on the file information in the upper frame of the window. 27
28 Note that the Alternative Text field is where any image alt tags are entered (for keywording/ search engine optimisation). Dimensions gives you control over how large the image will appear. You can use these fields to make small pixel adjustments to size say changing a picture from 200 pixels to 100 pixels in width. You would not use this field to change an image from 1800 pixels wide to 200 pixels because this will not crop an image to make it smaller in filesize (affecting the space that it takes up on the server and also page loading time) but rather visually reduces the appearance. Having the Proportional box ticked means that if you change the width, then the height will adjust to keep the same height/width ratio. The Alignment option will allow you to position the image. This is especially important when working with tables so that you can place the image at the justification which best suits the table cell layout. Margin allows you to control how much spacing appears at top, right, bottom and left. Uncheck Equal Values to have varying spaces. Often, you will left-align a picture and then allow a 10px Margin at Right so that the text does not run right up against the edge of the image. Borders are seldom used but give you the option to frame an image. 7. Click insert and the image will appear on the page. From the very top right of the Joomla screen, click Save and the adjustments will be reflected on the live site. 1. Overview Search Engine Optimisation Under Article Manager, there are several things you can do to give the search engines clues about the key words you want your site to be found on. This is very important for attracting traffic to your site and appearing on page one for searches. Select the Article page you wish to modify. On the right hand side of the Article Manager when you have selected an article, you will see a heading Metadata Options. Click on this arrow. The Meta description is the paragraph that is normally shown when someone does a search for something. It needs your keywords. Keywords can be a list, with commas of the phrases you want that page to be found on. You should also insert your keywords in Alt Tags. This was mentioned in the section on uploading images. It is not so much for visitors to see, but for robots to help repetition of that keyword throughout the page so the robots know what to index that page on. 28

29 Adding Meta Title (Page Title) Content 1. To add meta title information, firstly find the page you want to change in the menu. 29
30 Hover over the link Menu in the top left hand corner of the administration area and click on the relevant menu (the menu that the page you want to edit is in). 2. Click on the menu item that you wish to edit. Then expand the box on the right hand side of the page that Page Display Options. 30

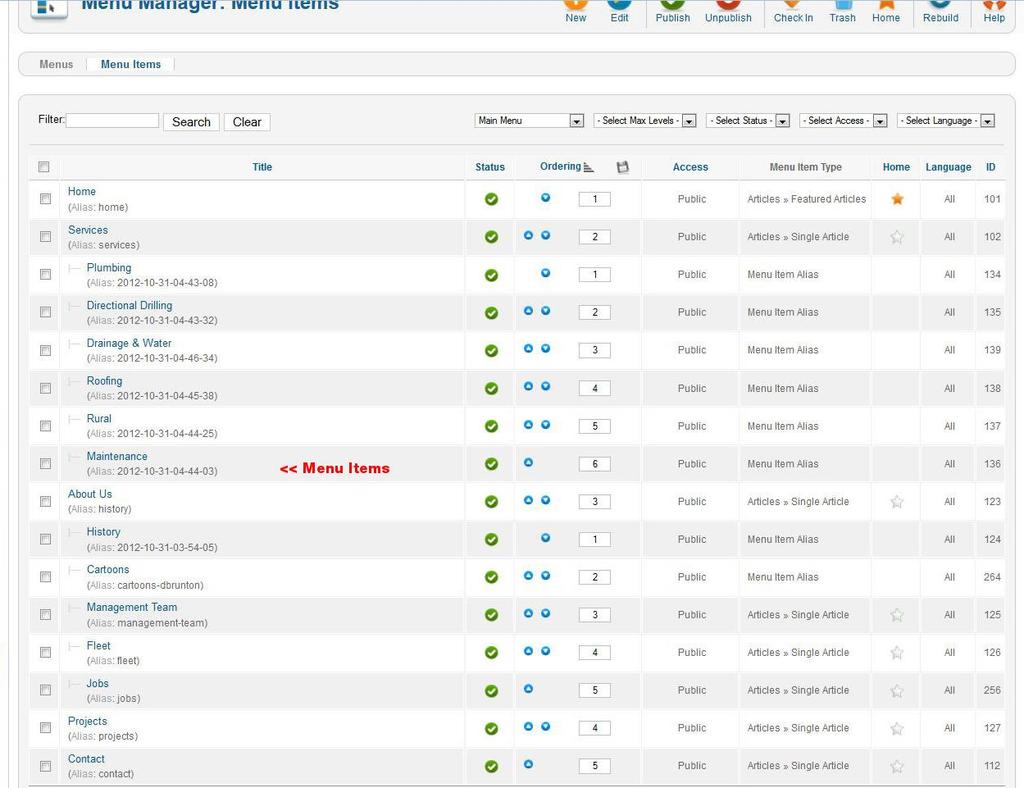
31 3. Add the optimised page title into the Browser Page Title Field and make sure that Show Page Heading has No selected. Do not modify the other settings unless you know what you re doing. Simply click save. Menu Manager Overview The Menu Manager is where the navigation for the website is built. The navigation is the system of menus on the top and left hand side of the page that will let the user navigate through all the different Articles. The Menu Manager is grouped by individual menus e.g. top menu, left hand menu, and in each one of these groups there is a list of Menu Items, or the individual links that will appear on the navigation. 31
32 Hover over the link Menu in the top left hand corner of the administration area and click on the relevant menu (the menu that the page you want to edit is in). 2. Click on the menu item that you wish to edit. Then expand the box on the right hand side of the page that says MENU item meta data. 3. Add the meta information that you want to add and click save. 32
33 33
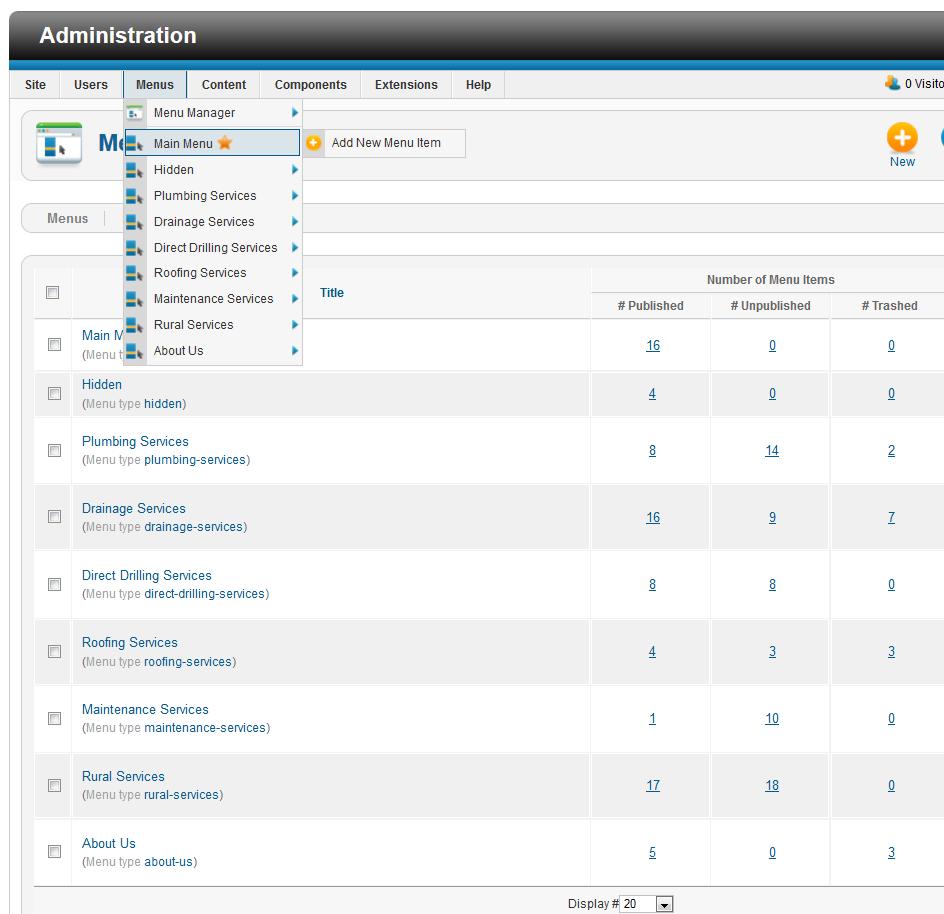
34 1a. Drag your mouse pointer over the Menus label on the top bar navigation as pictured. In the drop down menu, you can see each separate menu grouping on the site. Clicking on one will produce a list of each individual menu item located on the menu. Click on Main Menu. 34
35 35
36 2. Creating a Menu Item Before you can create a menu item, you have to have already created the Article it will link to, in Article Manager. In order to make menus for your website, you have to decide what pages (Articles) the menus should link to. Each one of the links is called a Menu Item. For this tutorial, make sure you are in the Main Menu group of the Menu Manager. 2a. Click the New button at the top right of the Menu Manager. 36
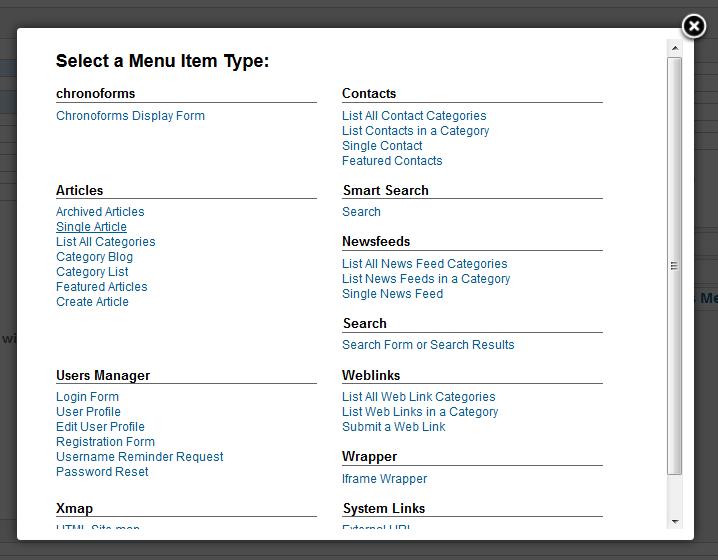
37 2b. Next, you must select what your Menu Item will be linking to. Click the Select button to the right of Menu Item Type and then choose Single Article. This will always be the proper choice to select as long as you are linking to one of your Articles. 37
38 38
39 From the right hand side of the screen, you can select the Article to which the menu will point to. Click the Select/Change button and browse through the articles (or apply a search filter in the search field at the top) until you find the appropriate one for the menu. 39

40 2c. Give your Menu Item a name in the Menu Title field and an alias in the Alias field (the alias is the suffix e.g. if you want your page to be called the alias will be /careers. Once this is completed, click Save. If you take a look on your public website, you should see the new menu item on the Main Menu of the site, linking to your content item. 3. Editing an Existing Menu Item It is possible to edit all the attributes of existing Menu Items as well. This is done by simply clicking on the name of the Menu Item in 40
41 the Menu Manager. The same interface appears as explained when creating a new Menu Item There are several options for editing and customizing Menu Items: 3a. Menu Location This drop down menu specifies which Menu the Menu Item will be displayed in. 3b. Parent Item The Parent Item box will specify any sub-menus that exist. It is possible to create a Menu Item as a sub-heading under another Menu Item. This can create a nice, multi-tiered navigation structure. 3c. Published This specifies whether or not the Menu Item will be visible on the front-end page. The other options in this window are not necessary to be familiar with for basic use. 41

42 V. FTP with FileZilla 1. Overview A tool that is needed for linking your site to content such as PDF and Office documents is called File Transfer Protocol (FTP) 42
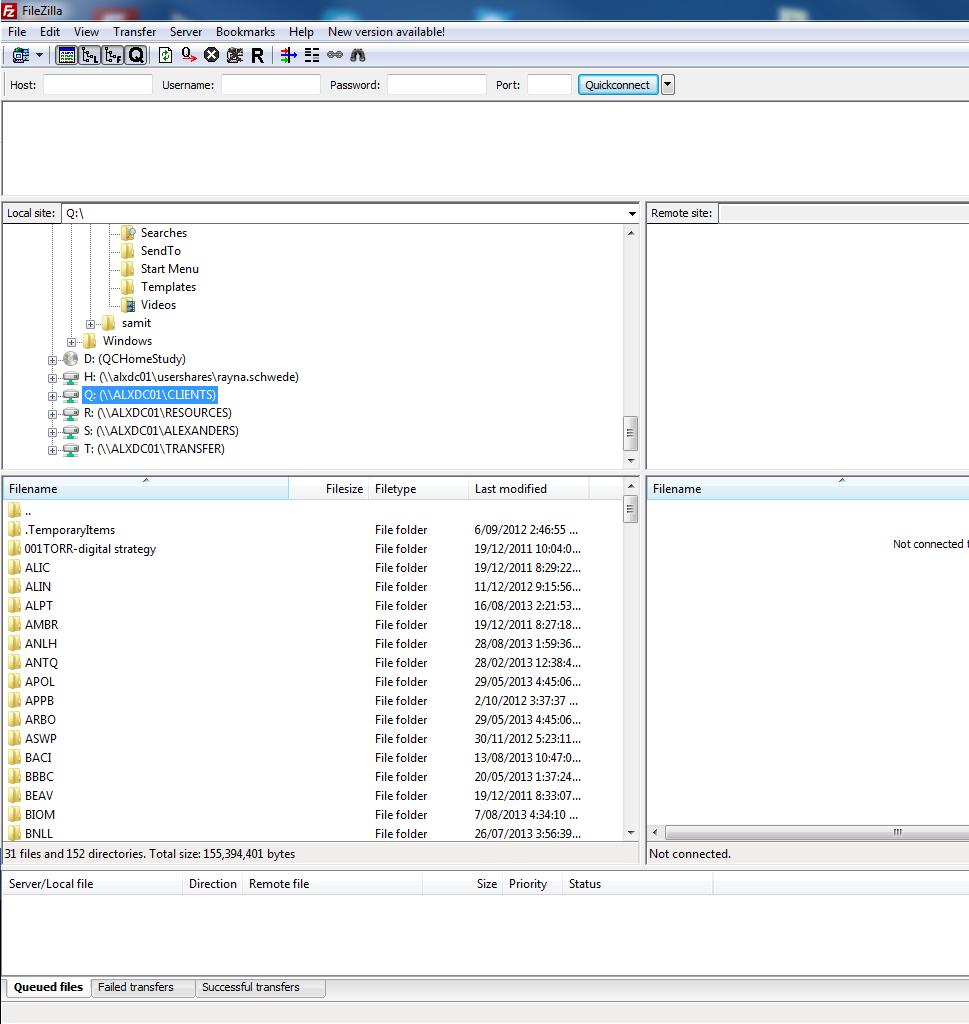
43 software. FTP software is very useful for both uploading documents and files to your web server and downloading files from it to your desktop. The FTP program that is recommended is called FileZilla and can be found free for download at Here is what the FileZilla interface looks like: 43
44 44
45 As you can see, the screen is divided into several boxes. The boxes on the left are used to navigate through the files on your desktop. The boxes on the right are used to navigate your site. It is important to understand this distinction, and the rest is quite easy. 2. Using FileZilla to transfer files Before you can begin transferring files back and forth to your website with FileZilla, you must first connect to the site s server. 1. At the top-left corner of the FileZilla box, click on the Site Manager icon. 2. Click New Site from the left hand panel and give your site a name - e.g. mydomain.co.nz. In the 'Host' field, type in the IP address of your hosting server. This will have been issued to you by Alexanders. Select 'Normal' from Logon Type and then enter in your FTP username and password in the relevant fields. This is all you need enter. Click OK to save the information. Click on Site Manager once more and select your site's profile from the left hand panel. Click Connect. 3. Remember that the left boxes are your computer and the right boxes are the web server. On the right, click on the folder that says public_html. Next click on the folder that says images. This is the directory that you will save all media in. 4. To upload a file, you must locate it on your computer (the left box) by navigating through the folders to the one you saved the file in. 5. Double click on the file you want to upload, and it will appear in the right box, right in the images folder you have selected. 3. Note about File Paths To link your website to a certain file that you have uploaded, you must know the location, or path of the file. Then, you can create a link to the file in your content item just as if you were linking to another page or site. For example, let us say that you want to hyper link to a file called abc.pdf, and the file is uploaded into the images folder on the server. 1. Go to the Article Manager and edit the article that you want to link to the PDF. 45

46 2. Create a link just as if you were linking to another web page. 3. Instead of linking to another page, we will link directly to this PDF file: 4. In the URL box, type where yoursite equals yourweb sites address, and abc.pdf equals the name of the file you are linking to. Note: Remember to always include a proper suffix (.pdf,.xls,.mp3, etc.) at the end of your file name when linking to your file. Additional Note: Also, remember to begin your file path with as in 46
47 Manual compiled with love by Alexanders Digital Marketing 47
1.0 Overview For content management, Joomla divides into some basic components: the Article
 Joomla! 3.4.x Training Manual Joomla is an online content management system that keeps track of all content on your website including text, images, links, and documents. This manual includes several tutorials
Beginners Guide to Snippet Master PRO
 Beginners Guide to Snippet Master PRO This document assumes that Snippet Master has been installed on your site. If not please contact the Bakas IT web team at webreg@bakasit.com.au. Initial Login Screen...
CROMWELLSTUDIOS. Content Management System Instruction Manual V1. Content Management System. V1
 Content Management System Instruction Manual V1 www.cromwellstudios.co.uk Cromwell Studios Web Services Content Management System Manual Part 1 Content Management is the system by which you can change
Do It Yourself Website Editing Training Guide
 Do It Yourself Website Editing Training Guide Version 3.0 Copyright 2000-2011 Sesame Communications. All Rights Reserved. Table of Contents DIY Overview 3 What pages are editable using the DIY Editing
Introduction to the MODx Manager
 Introduction to the MODx Manager To login to your site's Manager: Go to your school s website, then add /manager/ ex. http://alamosa.k12.co.us/school/manager/ Enter your username and password, then click
Lava New Media s CMS. Documentation Page 1
 Lava New Media s CMS Documentation 5.12.2010 Page 1 Table of Contents Logging On to the Content Management System 3 Introduction to the CMS 3 What is the page tree? 4 Editing Web Pages 5 How to use the
ADOBE DREAMWEAVER CS4 BASICS
 ADOBE DREAMWEAVER CS4 BASICS Dreamweaver CS4 2 This tutorial focuses on the basic steps involved in creating an attractive, functional website. In using this tutorial you will learn to design a site layout,
Nauticom NetEditor: A How-to Guide
 Nauticom NetEditor: A How-to Guide Table of Contents 1. Getting Started 2. The Editor Full Screen Preview Search Check Spelling Clipboard: Cut, Copy, and Paste Undo / Redo Foreground Color Background Color
Joomla Website User Guide
 Joomla Website User Guide www.ardengemcsu.nhs.uk Table of Contents Introduction... 3 Editing pages... 4 Styling content... 5 Hyperlinks... 6 Inserting an image... 7 DOCman... 11 Glossary of terms... 14
UIS Office of Web Services Documentation. WordPress User Guide. WordPress User Guide 8/31/17 Page 1 of 13
 UIS Office of Web Services WordPress User Guide WordPress User Guide 8/31/17 Page 1 of 13 UIS Office of Web Services WordPress User Guide Prepared by Ralph Shank Table of Contents About WordPress 3 Getting
UIS Office of Web Services Documentation. WordPress User Guide. WordPress User Guide 4/17/18 Page 1 of 12
 WordPress User Guide WordPress User Guide WordPress User Guide 4/17/18 Page 1 of 12 Prepared by Ralph Shank Table of Contents About WordPress... 3 Getting Connected to Your Website... 3 Editing and Publishing
NYLearns Curriculum Administration:
 NYLearns Curriculum Administration: Creating a Curriculum Map May 2014 2 This page left intentionally blank 3 Contents Signing in to NYLearns... 4 Curriculum Mapping... 6 Creating Curriculum Maps... 7
FrontPage 98 Quick Guide. Copyright 2000 Peter Pappas. edteck press All rights reserved.
 Master web design skills with Microsoft FrontPage 98. This step-by-step guide uses over 40 full color close-up screen shots to clearly explain the fast and easy way to design a web site. Use edteck s QuickGuide
Dreamweaver Basics Outline
 Dreamweaver Basics Outline The Interface Toolbar Status Bar Property Inspector Insert Toolbar Right Palette Modify Page Properties File Structure Define Site Building Our Webpage Working with Tables Working
Author/Editor s View Adding Text & Modifying Text on an Existing Page (Article)
") Author/Editor s View Adding Text & Modifying Text on an Existing Page (Article) Assumed Preliminaries: (1) You ve registered with a username and password you selected and that you still remember. (2) Lloyd
Author/Editor s View Adding Text & Modifying Text on an Existing Page (Article) Assumed Preliminaries: (1) You ve registered with a username and password you selected and that you still remember. (2) Lloyd
BHM Website Teacher User Guide
 BHM Website Teacher User Guide How to Login 1. Go to HUhttp://bhmschools.org/userUH 2. Enter your username and password and click Log in How to Change Your Password 1. Go to My Account in your Nav bar
UTAS CMS. Easy Edit Suite Workshop V3 UNIVERSITY OF TASMANIA. Web Services Service Delivery & Support
 Web Services Service Delivery & Support UNIVERSITY OF TASMANIA UTAS CMS Easy Edit Suite Workshop V3 Web Service, Service Delivery & Support UWCMS Easy Edit Suite Workshop: v3 Contents What is Easy Edit
The Gardens Trust WordPress Manual. thegardenstrust.org. Page: 1
 The Gardens Trust WordPress Manual thegardenstrust.org Page: 1 Login Before you can make any changes to the site, you will need to log in. The login of the site is found at the following URL - http://thegardenstrust.org/wp-admin.
Comp. Manual for U.N.
 Comp. Manual for U.N. This Manual drafted : 27/06/2014 Text editing * Archiving articles * Uploading pdfs * Using Adobe Photoshop * Calendar * You Tube Videos 1 To Login for simple Front end editing (publisher)
Adobe Dreamweaver CS5 Tutorial
 Adobe Dreamweaver CS5 Tutorial GETTING STARTED This tutorial focuses on the basic steps involved in creating an attractive, functional website. In using this tutorial you will learn to design a site layout,
Using Adobe Contribute 4 A guide for new website authors
 Using Adobe Contribute 4 A guide for new website authors Adobe Contribute allows you to easily update websites without any knowledge of HTML. This handout will provide an introduction to Adobe Contribute
Creating and updating content on your WordPress content management system (CMS)
") Creating and updating content on your WordPress content management system (CMS) Posts vs pages WordPress comes with two content types: Posts and pages. Posts are content entries listed in reverse chronological
Creating and updating content on your WordPress content management system (CMS) Posts vs pages WordPress comes with two content types: Posts and pages. Posts are content entries listed in reverse chronological
How to Edit Your Website
 How to Edit Your Website A guide to using your Content Management System Overview 2 Accessing the CMS 2 Choosing Your Language 2 Resetting Your Password 3 Sites 4 Favorites 4 Pages 5 Creating Pages 5 Managing
Adobe Dreamweaver CC 17 Tutorial
 Adobe Dreamweaver CC 17 Tutorial GETTING STARTED This tutorial focuses on the basic steps involved in creating an attractive, functional website. In using this tutorial you will learn to design a site
Zeppelin Website Content Manager User Manual
 Zeppelin Website Content Manager User Manual 1. Introduction Zeppelin Website Content Manager is made for maintaining and editing the content of the website easily. Most of the contents inside the website
QRG: Using the WYSIWYG Editor
 WYSIWYG Editor QRG: Using the WYSIWYG Editor WYSIWYG stands for What You See Is What You Get. The WYSIWYG Editor is the reason you don t need to be an IT Programmer to write content for your web page.
MN Studio Website - User Guide
 MN Studio Website - User Guide Version 1.1 MN Studio Website Program 1. Introduction Welcome to the new website program! The MN Studio Website program allows you to create your own website with customized
How to Edit Your Website
 How to Edit Your Website A guide to using your Content Management System Overview 2 Accessing the CMS 2 Choosing Your Language 2 Resetting Your Password 3 Sites 4 Favorites 4 Pages 5 Creating Pages 5 Managing
In the fourth unit you will learn how to upload and add images and PDF files.
 Introduction Here at SUNY New Paltz, we use the Terminal Four (T4) web content management system (CMS). This puts the power of editing content on our college s webpage in the hands of our authorized users.
FRONTPAGE STEP BY STEP GUIDE
 IGCSE ICT SECTION 15 WEB AUTHORING FRONTPAGE STEP BY STEP GUIDE Mark Nicholls ICT lounge P a g e 1 Contents Introduction to this unit.... Page 4 How to open FrontPage..... Page 4 The FrontPage Menu Bar...Page
Guidelines for work on the Genebank KB site
 Guidelines for work on the Genebank KB site (By Geert Claessens. For extra information email to geert.jef.claessens@gmail.com) These guidelines are written for users of the Crop Genebank Knowledge Base
GoLive will first ask you if your new site will be for one individual or a work group; select for a Single User, and click Next.
 Getting Started From the Start menu, located the Adobe folder which should contain the Adobe GoLive 6.0 folder. Inside this folder, click Adobe GoLive 6.0. GoLive will open to its initial project selection
HOW TO USE THE CONTENT MANAGEMENT SYSTEM (CMS) TABLE OF CONTENTS
 TABLE OF CONTENTS") HOW TO USE THE CONTENT MANAGEMENT SYSTEM (CMS) TABLE OF CONTENTS GETTING STARTED (LOGIN) 2 SITE MAP (ORGANIZE WEBPAGES) 2 CREATE NEW PAGE 3 REMOVE PAGE 6 SORT PAGES IN CHANNEL 7 MOVE PAGE 8 PAGE PROPERTIES
HOW TO USE THE CONTENT MANAGEMENT SYSTEM (CMS) TABLE OF CONTENTS GETTING STARTED (LOGIN) 2 SITE MAP (ORGANIZE WEBPAGES) 2 CREATE NEW PAGE 3 REMOVE PAGE 6 SORT PAGES IN CHANNEL 7 MOVE PAGE 8 PAGE PROPERTIES
page 1 OU Campus User Guide
 page 1 OU Campus User Guide Logging Into OU Campus page page 2 1. Navigate to a page on your site that you wish to edit. 2. Scroll down to the footer and click the symbol. 3. Enter your OU Campus username
Web Authoring Guide. Last updated 22 February Contents
 Web Authoring Guide Last updated 22 February 2016 Contents Log in................................ 2 Write a new post...3 Edit text...4 Publish a post...5 Create a link...6 Prepare photographs...7 Insert
USING JOOMLA LEVEL 3 (BACK END) OVERVIEW AUDIENCE LEVEL 3 USERS
 OVERVIEW AUDIENCE LEVEL 3 USERS") USING JOOMLA LEVEL 3 (BACK END) OVERVIEW This document is designed to provide guidance and training for incorporating your department s content into to the Joomla Content Management System (CMS). Each
USING JOOMLA LEVEL 3 (BACK END) OVERVIEW This document is designed to provide guidance and training for incorporating your department s content into to the Joomla Content Management System (CMS). Each
Wordpress Training Manual
 The Dashboard... 2 If this is your first time logging in:... 2 How do I change my password or email address?... 3 Search Engine Optimization (SEO)... 4 SEO for Pages... 4 SEO for Images... 5 Managing Pages...
OU EDUCATE TRAINING MANUAL
 OU EDUCATE TRAINING MANUAL OmniUpdate Web Content Management System El Camino College Staff Development 310-660-3868 Course Topics: Section 1: OU Educate Overview and Login Section 2: The OmniUpdate Interface
Website Reference Guide
 Website Reference Guide MU LTIMEDIA B Contents Login 04 Dashboard 05 Toolbar 08 Posts and Pages 09 Adding Content 12 Visual Editor 14 Adding images and other media 18 Adding HTML links 26 Saving and Publishing
User s guide to using the ForeTees TinyMCE online editor. Getting started with TinyMCE and basic things you need to know!
 User s guide to using the ForeTees TinyMCE online editor TinyMCE is a WYSIWYG (what you see is what you get) editor that allows users a familiar word-processing interface to use when editing the announcement
Joomla! Frontend Editing
 Joomla! Frontend Editing Instructor for this Workshop Web Development School of Arts and Sciences TABLE OF CONTENTS Welcome... 3 What is Joomla?... 3 Joomla Overview Login... 4 How is Joomla! Organized?...
Basic CMS User Guide
 "We create exceptional business solutions for cash-pay healthcare professionals that enable them to realize their full potential." Basic CMS User Guide Version 1.2 3/28/2012 1 Table of Contents Table of
Course Exercises for the Content Management System. Grazyna Whalley, Laurence Cornford June 2014 AP-CMS2.0. University of Sheffield
 Course Exercises for the Content Management System. Grazyna Whalley, Laurence Cornford June 2014 AP-CMS2.0 University of Sheffield PART 1 1.1 Getting Started 1. Log on to the computer with your usual username
Creating Teacher Webpages on the New APS WordPress Site
 Creating Teacher Webpages on the New APS WordPress Site TABLE OF CONTENTS INTRODUCTION 3 THE EDITING DASHBOARD 4 CREATING A NEW PAGE 5 EDITING YOUR PAGE 6 1. Page Title 7 2. Toolbar/ toolbar icons 7 3.
Portwalk Place WORDPRESS MANUAL O ROURKE HOSPITALITY MARKETING OROURKEHOSPITALITY.COM
 Portwalk Place WORDPRESS MANUAL TABLE OF CONTENTS Login... 3 Editing Existing Pages... 4 Adding New Pages... 7 Editing/Adding Text... 9 Creating a Link... 10 Linking to a PDF... 11 Making a Link a Button...
JSN PageBuilder 3 Configuration Manual Introduction
 JSN PageBuilder 3 Configuration Manual Introduction About JSN PageBuilder 3 JSN PageBuilder 3 is the latest innovation of Joomla! PageBuilder with great improvements in the interface, features, and user
CMS (Content Managed System) Training Manual
 Training Manual") CMS (Content Managed System) Training Manual 1 Contents Document History... 3 Introduction... 4 Login... 4 Control panel... 4 User manager... 5 Global Configuration... 7 Site Settings... 8 Metadata Settings...
CMS (Content Managed System) Training Manual 1 Contents Document History... 3 Introduction... 4 Login... 4 Control panel... 4 User manager... 5 Global Configuration... 7 Site Settings... 8 Metadata Settings...
Introduction to Cascade Server (web content management system) Logging in to Cascade Server Remember me Messages Dashboard Home
 Logging in to Cascade Server Remember me Messages Dashboard Home") Introduction to Cascade Server (web content management system) Last Updated on Jul 14th, 2010 The College of Charleston's web site is being produced using a Content Management System (CMS) called Cascade
Introduction to Cascade Server (web content management system) Last Updated on Jul 14th, 2010 The College of Charleston's web site is being produced using a Content Management System (CMS) called Cascade
FirmSite Control. Tutorial
 FirmSite Control Tutorial 1 Last Updated June 26, 2007 by Melinda France Contents A. Logging on to the Administrative Control Center... 3 Using the Editor Overview:... 3 Inserting an Image... 7 Inserting
Dreamweaver CS 5.5. University Information Technology Services. Training, Outreach, Learning Technologies, and Video Production
 Dreamweaver CS 5.5 Creating Web Pages with a Template University Information Technology Services Training, Outreach, Learning Technologies, and Video Production Copyright 2012 KSU Department of Information
PRESENCE. RadEditor Guide. SchoolMessenger 100 Enterprise Way, Suite A-300 Scotts Valley, CA
 PRESENCE RadEditor Guide SchoolMessenger 100 Enterprise Way, Suite A-300 Scotts Valley, CA 95066 800-920-3897 www.schoolmessenger.com Contents Contents... 2 Introduction... 3 What is RadEditor?... 3 RadEditor
Working with Images 1 / 12
 V2 APRIL 2017 1 / 12 To brighten up your website it is often nice to have images inserted onto various pages of your website. We have an easy option to size these photos on your page, as well as aligning
PBwiki Basics Website:
 Website: http://etc.usf.edu/te/ A wiki is a website that allows visitors to edit or add their own content to the pages on the site. The word wiki is Hawaiian for fast and this refers to how easy it is
WYSIWYG Editor: Users Manual
 WYSIWYG Editor: Users Manual Table of Contents WYSIWYG Editor Overview.... 3 Adding Text... 4 Inserting an Image.... 7 Inserting a File.... 15 Embedding Media.... 21 Inserting an Email Link.... 25 Captiva
Drupal Cloud Getting Started Guide Creating a Lab site with the MIT DLC Theme
 Introduction Drupal Cloud Getting Started Guide Creating a Lab site with the MIT DLC Theme In this Getting Started Guide, you can follow along as a website is built using the MIT DLC Theme. Whether you
Step 1 Download and Install KompoZer Step by step instructions to build your first web page using KompoZer web editor.
 All Creative Designs HTML Web Tutorial for PC Using KompoZer New version 2012 now available at: http://www.allcreativedesigns.com.au/pages/tutorials.html Step 1 Download and Install KompoZer Step by step
Cascade User Guide. Introduction. Key System Features. User Interface
 Cascade User Guide Introduction Key System Features User Interface Menus and Moving Through the System Files and Pages Working with Existing Pages File Action Menu Version Control Deleting files Restoring
Microsoft Word 2011 Tutorial
 Microsoft Word 2011 Tutorial GETTING STARTED Microsoft Word is one of the most popular word processing programs supported by both Mac and PC platforms. Microsoft Word can be used to create documents, brochures,
Mihaylo College Website Content Editing Guide
 Mihaylo College Website Content Editing Guide The following guide will take you through the steps necessary to update website content for https://business.fullerton.edu through the OmniUpdate (OUCampus)
File Cabinet Manager
 Tool Box File Cabinet Manager Java File Cabinet Manager Password Protection Website Statistics Image Tool Image Tool - Resize Image Tool - Crop Image Tool - Transparent Form Processor Manager Form Processor
AGENT123. Full Q&A and Tutorials Table of Contents. Website IDX Agent Gallery Step-by-Step Tutorials
 AGENT123 Full Q&A and Tutorials Table of Contents Website IDX Agent Gallery Step-by-Step Tutorials WEBSITE General 1. How do I log into my website? 2. How do I change the Meta Tags on my website? 3. How
FCKEditor v1.0 Basic Formatting Create Links Insert Tables
 FCKEditor v1.0 This document goes over the functionality and features of FCKEditor. This editor allows you to easily create XHTML compliant code for your web pages in Site Builder Toolkit v2.3 and higher.
Joomla! Beginner s Guide. Summer 2012 Edition Compiled by Danconia Media
 Joomla! Beginner s Guide Summer 2012 Edition Compiled by Danconia Media Logging Into Joomla! Go to www.yoursite.com/administrator Type in your username and password. Adding a New Page Press the Add New
Table of Contents. Look for more information at
 OmniUpd ate @ De Anza Qui ck Guide Table of Contents Login... 2 Logout... 2 OmniUpdate Help Center... 2 Editing and Saving a Page... 3 Publishing... 5 View and Revert to Previously Published Page... 5
Site Owners: Cascade Basics. May 2017
 Site Owners: Cascade Basics May 2017 Page 2 Logging In & Your Site Logging In Open a browser and enter the following URL (or click this link): http://mordac.itcs.northwestern.edu/ OR http://www.northwestern.edu/cms/
Rich Text Editor Quick Reference
 Rich Text Editor Quick Reference Introduction Using the rich text editor is similar to using a word processing application such as Microsoft Word. After data is typed into the editing area it can be formatted
Monarch Services Website Quick Guide
 January 2016 Monarch Services Website Quick Guide www.monarchscc.org Credentials Wordpress Login URL: http://www.monarchscc.org/wp-login Login name :Nancya Password: wcs9na! Hosting Login at dreamhost.com
Creating a Website in Schoolwires Technology Integration Center
 Creating a Website in Schoolwires Technology Integration Center Overview and Terminology... 2 Logging into Schoolwires... 2 Changing a password... 2 Accessing Site Manager... 2 Section Workspace Overview...
New Website User Manual
 New Website User Manual General Notes 3 How To Login To Your Website And Access Admin Dashboard 4 Adding / Editing Sliders 5 Home Slider 5 School Slider (Same steps for ALL school pages) - Add a Slide
How to use WordPress to create a website STEP-BY-STEP INSTRUCTIONS
 How to use WordPress to create a website STEP-BY-STEP INSTRUCTIONS STEP 1:Preparing your WordPress site Go to the Dashboard for your new site Select Appearance > Themes. Make sure you have Activated the
Microsoft Word Tutorial
 Microsoft Word Tutorial 1 GETTING STARTED Microsoft Word is one of the most popular word processing programs supported by both Mac and PC platforms. Microsoft Word can be used to create documents, brochures,
Microsoft Word: Steps To Success (The Bare Essentials)
") Microsoft Word: Steps To Success (The Bare Essentials) Workbook by Joyce Kirst 2005 Microsoft Word: Step to Success (The Bare Essentials) Page Contents 1 Starting Word 2 Save 3 Exit 5 Toolbars, Alignment,
Microsoft Word: Steps To Success (The Bare Essentials) Workbook by Joyce Kirst 2005 Microsoft Word: Step to Success (The Bare Essentials) Page Contents 1 Starting Word 2 Save 3 Exit 5 Toolbars, Alignment,
EKTRON 101: THE BASICS
 EKTRON 101: THE BASICS Table of Contents INTRODUCTION... 2 TERMINOLOGY... 2 WHY DO SOME PAGES LOOK DIFFERENT THAN OTHERS?... 5 LOGGING IN... 8 Choosing an edit mode... 10 Edit in context mode (easy editing)...
The major change in Word is the ribbon toolbar. The File menu has been replaced with a button.
 Word 2007 There are a lot of new changes to Office 2007. This handout will provide a few examples on how to do basic formatting. If at any point you get stuck, remember that Office has a feature that allows
Dreamweaver MX Overview. Maintaining a Web Site
 Dreamweaver MX Overview Maintaining a Web Site... 1 The Process... 1 Filenames... 1 Starting Dreamweaver... 2 Uploading and Downloading Files... 6 Check In and Check Out Files... 6 Editing Pages in Dreamweaver...
Login: https://authoring.ipfw.edu/c. Quick Guide for dotcms & Accessibility April 2016 Training:
 dotcms & Accessibility Note: The recommended browser for dotcms is Mozilla Firefox. at 0). d. Show on Menu Check the box if the folder should be shown on the menu. Logging In 1. Open Mozilla Firefox and
Working with the website editor...5. Editing page properties Creating a new page Adding and editing content records...
 About this guide...3 About the structure of web pages in typo3...4 The outer template...4 The page record...4 Page content records...4 Access to editing and publishing records...4 Working with the website
The Etomite Manual for website editors.
 The Etomite Manual for website editors. (Version: 1.1) Etomite is a web tool that allows your website to be user-editable. This means that you can add, edit, and delete pages and whole website sections
Adding Text and Images. IMCOM Enterprise Web CMS Tutorial 1 Version 2
 Adding Text and Images IMCOM Enterprise Web CMS Tutorial 1 Version 2 Contents and general instructions PAGE: 3. First steps: Open a page and a block to edit 4. Edit text / The menu bar 5. Link to sites,
HostPress.ca. User manual. July Version 1.0. Written by: Todd Munro. 1 P age
 HostPress.ca User manual For your new WordPress website July 2010 Version 1.0 Written by: Todd Munro 1 P age Table of Contents Introduction page 3 Getting Ready page 3 Media, Pages & Posts page 3 7 Live
Website Administration Manual, Part One
 Website Administration Manual, Part One A Guide to the CMS & Widgets Curry School of Education Website http://curry.virginia.edu The Curry Website Administrators Manual - Part One 2 The CMS The content
New website Training:
 New website Training: Table of Contents 1. Logging in and out of the new site. 2. Edit Content a. How to edit content b. Paragraph types c. Adding links d. Adding an image e. Adding a document f. Saving
Editing Drupal 7 Sites. Basic page editing. June To begin editing, log in by clicking Login at the bottom of the homepage. Username.
 Editing Drupal 7 Sites June 2013 Basic page editing To begin editing, log in by clicking Login at the bottom of the homepage Username Password Navigate to the page you want to edit Click the Edit tab at
CREATING ANNOUNCEMENTS. A guide to submitting announcements in the UAFS Content Management System
 CREATING ANNOUNCEMENTS A guide to submitting announcements in the UAFS Content Management System Fall 2017 GETTING STARTED 1 First, go to news.uafs.edu. 2 Next, click Admin at the bottom of the page. NOTE:
CS Multimedia and Communications. Lab 06: Webpage Tables and Image Links (Website Design part 3 of 3)
") CS 1033 Multimedia and Communications Lab 06: Webpage Tables and Image Links (Website Design part 3 of 3) REMEMBER TO BRING YOUR MEMORY STICK TO EVERY LAB! Table Properties Reference Guide The Property
CS 1033 Multimedia and Communications Lab 06: Webpage Tables and Image Links (Website Design part 3 of 3) REMEMBER TO BRING YOUR MEMORY STICK TO EVERY LAB! Table Properties Reference Guide The Property
WCCUSD Website. Centricity 2 Tutorial Guide. Site Manager Workspace.
 WCCUSD Website Centricity 2 Tutorial Guide Site Manager Workspace webmaster@wccusd.net Contents To Sign onto the WCCUSD website:... 2 Site Workspace Home Page Editors... 4 Site Workspace Sub Site Director/Individual
There are six main steps in creating web pages in FrontPage98:
 This guide will show you how to create a basic web page using FrontPage98 software. These instructions are written for IBM (Windows) computers only. However, FrontPage is available for Macintosh users
DRAFT. Table of Contents About this manual... ix About CuteSITE Builder... ix. Getting Started... 1
 DRAFT Table of Contents About this manual... ix About CuteSITE Builder... ix Getting Started... 1 Setting up... 1 System Requirements... 1 To install CuteSITE Builder... 1 To register CuteSITE Builder...
This Tutorial is for Word 2007 but 2003 instructions are included in [brackets] after of each step.
![This Tutorial is for Word 2007 but 2003 instructions are included in [brackets] after of each step.](/thumbs/72/67280806.jpg "This Tutorial is for Word 2007 but 2003 instructions are included in [brackets] after of each step.") This Tutorial is for Word 2007 but 2003 instructions are included in [brackets] after of each step. Table of Contents Just so you know: Things You Can t Do with Word... 1 Get Organized... 1 Create the
This Tutorial is for Word 2007 but 2003 instructions are included in [brackets] after of each step. Table of Contents Just so you know: Things You Can t Do with Word... 1 Get Organized... 1 Create the
Editing the Home Page
 Editing the Home Page Logging on to Your Web site 1. Go to https://extension.usu.edu/admin/ 2. Enter your Login and Password. 3. Click Submit. If you do not have a login and password you can request one
NVU Web Authoring System
 NVU Web Authoring System http://www.nvu.com/index.php Table of Contents Using Nvu as Your Web Page Authoring System: Getting Started Opening a page, saving, and previewing your work...3 Formatting the
Creating a Website with Wordpress
 Creating a Website with Wordpress Wordpress Fundamentals Version 1.6 Fayette County Public Schools June 28, 2013 Sow-Foong Hedman Technology Web Team Contents What is Wordpress?... 4 Overview... 4 Key
Administrative Training Mura CMS Version 5.6
 Administrative Training Mura CMS Version 5.6 Published: March 9, 2012 Table of Contents Mura CMS Overview! 6 Dashboard!... 6 Site Manager!... 6 Drafts!... 6 Components!... 6 Categories!... 6 Content Collections:
Dreamweaver Handout. University of Connecticut Prof. Kent Golden
 Dreamweaver Handout University of Connecticut Prof. Kent Golden Kent@GoldenMultimedia.com www.goldenmultimedia.com Main goal of this handout: To give you the steps needed to create a basic personal website
ORB Education Quality Teaching Resources
 These basic resources aim to keep things simple and avoid HTML and CSS completely, whilst helping familiarise students with what can be a daunting interface. The final websites will not demonstrate best
Beginner Workshop Activity Guide 2012 User Conference
 Beginner Workshop Activity Guide 2012 User Conference TUESDAY, MARCH 6 2:00PM 5:00 PM Beginner Training Workshop Attendees will learn the end user functions of OU Campus TM. They will learn how to log
University of Pittsburgh Communications Services. Basic Training Manual Drupal 7
 University of Pittsburgh Communications Services Basic Training Manual www.shrs.pitt.edu Drupal 7 Table of Contents Users... 3 Log In... 3 Log Out... 3 What is a Content Management System?... 4 What are
Website Creating Content
 CREATING WEBSITE CONTENT As an administrator, you will need to know how to create content pages within your website. This document will help you learn how to: Create Custom Pages Edit Content Areas Creating
Google Chrome 4.0. AccuCMS
 Google Chrome 4.0 AccuCMS Outline Contents Google Chrome 4.0... 4 Thank you for choosing Blue Archer... 4 As an AccuCMS user you can:... 4 Getting Started... 4 AccuCMS allows you to:... 4 Logging in to
Training Manual and Help File
 Training Manual and Help File 30.06.2011 Update Manage Grow Welcome to your new Juniper Website Management System with CMS Introduction The Juniper Website Management System with CMS (Website Content Management