Sears Integration for Magento 2-User Guide 0.0.1
|
|
|
- Garry Stephens
- 5 years ago
- Views:
Transcription
1 by CedCommerce Docs - Products User Guides 1 / 36
2 1. Overview Sears Magento 2 Integration Extension Installation Sears Configuration Settings Manage Profiles Add a New Profile Edit the Existing Profile Delete the Profiles Enable OR Disable Profiles Manage Products Synchronize Sears Products Status View and Edit the Product Information Upload Single Product View Product Validation Details Submit Bulk Actions Manage Products Feeds Manage Products Feeds Manage Sears Logs Knowledge Base Manage Sears Attributes Manage Sears Categories / 36

3 1. Overview Sears is an American chain of online retail stores. It is currently the fifth-largest American department store company by, sales as of October Every month millions of visitors browse the Sears Web site to make a purchase of the required products. Thus, to grow the business and increase the sale through selling the products on the Sears marketplace, the Magento 2 store owner can connect their store to the Sears marketplace. CedCommerce Sears Magento 2 Integration extension provides the facility to integrate the Magento 2 store with the Sears marketplace. This extension automates the ordering process and establishes a synchronization of products, orders and refunds with the help of Sears API. The CRONs implemented in this extension help to automate the process thereby keeping it up to date. This extension interacts with the Sears Marketplace to integrate the synchronized product listing between the Magento 2 and the Sears retailers. After installing the extension, merchant can create the Sears Categories and the dependent attributes on the Magento 2 store. The process enables merchant to configure the desired product category into Magento 2 for automatic submission of the selected product to the same Category on Sears. Key Features are as follows: Profile based product Upload: Admin can create a profile and map the Sears category and attributes to the Magento 2 category and attributes, and then after assigning the products to the profile can easily upload products to the Sears Web site. Synchronized Inventory and Profile Based Pricing: Inventory Synchronization at regular intervals. product Listing is established between Magento 2 and Sears. Profile based price increase or decrease. Synchronized Product Editing: Besides adding the products, any product information changes made on the Magento 2 store reflects on the Sears. Automated Inventory Updates: No manual updating is required. Automatic inventory updates are available for the better management. Creation of Magento 2 Orders: The newly placed orders on the Sears Web site are automatically created in the Magento 2 store with all the required details as it is on the Sears Web site. Product Category Mapping: Follows many-to-one category mapping philosophy. Admin can map many categories of the Magento 2 store to the single category of Sears. Updates Information: Changes made in the Magento 2 store reflects on the Sears Web site. Bulk Upload System: The merchant has the flexibility to upload any number of products on the Sears Web site using bulk product upload feature. Crons: Cron job automates the process for Inventory, Price and Order management. Caution: Extension is heavily dependent on Crons for running various automated processes. So, make sure that Cron Job is properly configured and working on the server. 3 / 36

4 2. Sears Magento 2 Integration Extension Installation To install the extension 1. Log in the ftp, and then go to Magento 2 root folder (generally present under the public_html folder). 2. Create a new folder named code under the app folder; under code folder, create a folder named Ced. a. Drag and Drop app/code/ced/sears directory. b. After successfully uploading the directory, the extension will be installed/upgraded. c. Now run the following upgrade command in cmd php bin/magento setup:upgrade 3. Sears Configuration Settings Once the extension is successfully installed on the Magento 2 store, the Sears menu appears in the Magento 2 Admin Panel. The merchant has to fill out the API credentials on the Sears Configuration page of the admin panel. The user has to log in the Sears Seller account to obtain the following API credentials: Seller ID API Authorization Key Fulfillment Locations After obtaining the details, the merchant has to copy all of them one by one from the Sears Seller account and paste it one by one to the Sears Configuration page of the admin panel of the merchant. To follow the process of copying and pasting of the Id, key and fulfillment location details, open the Sears Seller account and the Magento Admin Panel in two different tabs or windows of the browser. Thus, copy the details from the Sears Seller account and paste them one by one to the Magento Admin Panel. 4 / 36


5 To copy the Id, key and fulfillment location details from the Seller panel 1. Go to the Sears Seller panel. 2. In the right upper corner, click the Arrow icon next to the account holder s name. The menu appears as shown in the following figure: 3. Copy the Seller ID value, and then paste it in the Seller ID box appearing on the Sears Configuration page of the Magento Admin panel. 4. Click the Account Info link, and then scroll down to find the API Authorization Key section. 5. Click the Generate New Key button. The key is generated. 6. Copy the generated key and then paste it in the Authorization Key box appearing on the Sears Configuration page of the Magento Admin panel. 7. Click the Fulfillment Locations link. The page appears as shown in the following figure: 8. Copy the Fulfillment Locations value and then paste it in the Fulfillment Locations Id box appearing on 5 / 36

6 the Sears Configuration page of the Magento Admin panel. To set up the configuration settings in the Magento 2 Admin panel 1. Go to the Magento 2 Admin panel. 2. On the left navigation bar, click the SEARS menu. The menu appears as shown in the following figure: 3. Click Configuration. The Configuration page appears. 4. In the left navigation panel, click the Sears Configuration menu. The corresponding Configuration Settings tabs appear in the right panel as shown in the following figure: 6 / 36
7 5. Click the Sears Api Settings tab. The corresponding fields appear as shown in the following figure: 6. Under Sears Api Settings, do the following steps: a. In the Enabled list, select Yes. Note: Selecting the No option disables the Sears Integration extension. b. In the Mode list, select Sandbox or Production as per the requirement. Note: Sandbox environment is used for the testing purpose; Production is to make it live. c. In the API Url box, enter d. In the Seller Id box, paste the corresponding Id copied from the Sears Seller account. e. In the Seller box, enter the id of the seller account. f. In the API Authorization Key box, paste the corresponding key copied from the Sears Seller 7 / 36
8 account. g. In the Debug Log list, select Yes to enable Sears Debug Mode for logging. 7. Scroll down to the Sears Global Settings tab, and then click the tab. The corresponding fields appear as shown in the following figure: 8. Under Sears Global Settings, do the following steps: a. In the Select Store list, select the single store. b. In the Sears Order Id Prefix box, enter the prefix for Sears Order Id. 9. Scroll down to the Sears Inventory Settings tab, and then click the tab. The corresponding fields appear as shown in the following figure: 10. Under Sears Inventory Settings, do the following steps: a. In the Location Id box, paste the Fulfillment Locations value copied from the Sears Seller account. b. In the Low Inventory Threshold box, enter the required numeric value to maintain the minimum Inventory threshold. Note: Threshold Inventory is the minimum count of an item that the store owner wants to keep in stock. c. In the Pickup Now Eligible list, select Yes to enable the Store pickup for all the customers. 11. Scroll down to the Sears Price Settings tab, and then click the tab. The corresponding fields appear as shown in the following figure: 8 / 36
9 12. Under Sears Price Settings, enter the values in the corresponding fields. Sears Product Price: This is to set a different price for all the products as shown in the Sears Price Setting figure: The user can set the price on the following basis: Increase by Fixed Price: If selected, then the Modify by Fixed Price field appears. Increase by Fixed Percentage: If selected, then the Modify by Percentage Price field appears. Enter the numeric value to increase the price of the sears product price by the entered value % of Magento price For Example, Magento price + 5% of Magento price. Magento Price = 100 Select Increase By Fixed Percentage option Enter Percentage = % of 100 = = 105 Thus, Sears Product Price = 105 Decrease by Fixed Price: If selected, then the Modify by Fixed Price field appears. Decrease by Fixed Percentage: If selected, then the Modify by Percentage Price field appears. Enter the numeric value to decrease the price of the sears product price by the entered value % of Magento price For Example, Magento price 5% of Magento price. Magento Price = 100 Select Decrease By Fixed Percentage option Enter Percentage = % of 100 = = 95 Thus, Sears Product Price = Scroll down to the Sears Cron Settings tab, and then click the tab. The corresponding fields appear as shown in the following figure: 9 / 36
10 Admin can enable or disable the cron settings for the price and the inventory synchronization. 14. Under Sears Cron Settings, do the following steps: a. In the Sears Price Cron list, select the required option. b. In the Sears Inventory Cron list, select the required option. 15. Click the Save Config button. 4. Manage Profiles Admin can create a new profile and assign the required products to the profile. While creating and editing the profile, admin can map the Magento attributes to the Sears attributes. These attributes are applicable to all the products that are assigned to the profile. Admin can do the following tasks: Add new profile( Edit the existing profile( Delete the profiles( Enable or Disable the selected Profiles( Add a New Profile To add a new profile 1. Go to the Magento 2 Admin panel. 2. On the left navigation bar, click the SEARS menu, and then click Manage Profiles. The Manage Profiles page appears as shown in the following figure: 10 / 36
11 3. Click the Add New Profile button. The Add Sears Profile page appears as shown in the following figure: 4. In the right panel, under Profile Information, do the following steps: a. In the Profile Code box, enter a profile code. Note: It is only for the internal use. Use the unique profile code with no spaces. Start with small letters. b. In the Profile Name box, enter the name of the profile. Note: Use the unique name to identify the profile. c. In the Status list, select Active to enable the profile. Note: The Inactive option disables the profile. 5. Click the Save and Continue Edit button. 6. In the left navigation panel, click the Mappings menu. The corresponding fields appear in the right panel as shown in the following figure: 11 / 36
12 12 / 36
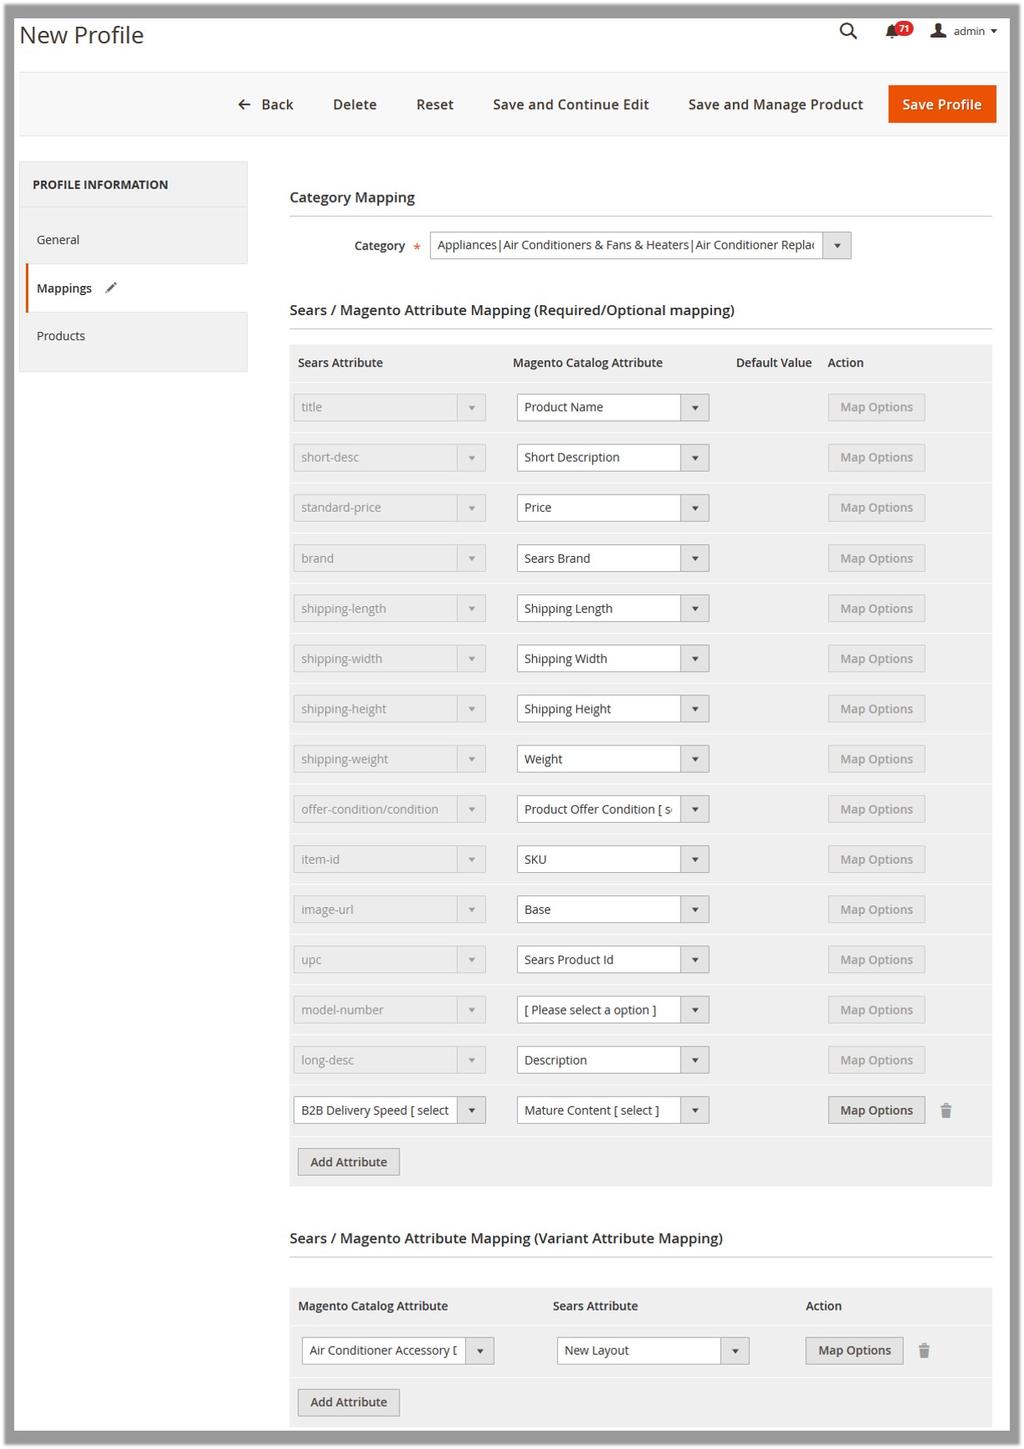
 section, if exist. 8.")
13 7. Under Category Mapping, do the following step: In the Category list, select the required Sears category to map. Based on the selected category, the Sears and the Magento attributes appear under the Sears / Magento Attribute Mapping (Required/ Optional mapping) section, if exist. 8. Under Sears / Magento Attribute Mapping (Required/Optional mapping), do the following steps: a. In the Magento Catalog Attribute column, select the required Magento attribute to map it with the corresponding Sears attribute. b. Repeat the mapping of all the required or optional Magento attributes listed with the corresponding Sears attributes. Note: In the Magento Catalog Attribute column if the attribute with the Select option is selected to map with the Sears attribute, then the corresponding Map Options button is activated and then the admin has to map the Sears attribute options to the Magento attribute options. c. To map the Sears attribute options to the Magento attribute options, do the following steps: i. Click the corresponding Map Options button. The dialog box appears as shown in the following figure: ii. In the Sears Attribute Option column, select the option to map it with the corresponding option in Magento Attribute Option. iii. Click the Save button. d. Click the Add Attribute button to add more attributes if required. 9. Under Sears / Magento Attribute Mapping (Variant Attribute Mapping), do the following steps: a. Click the Add Attribute button to add attributes if required. b. In the Magento Catalog Attribute column, select the required Magento attribute. c. In the Sears Attribute column, select the required Sears attribute to map it with the corresponding Magento attribute. 10. Click the Save and Continue Edit button. 11. In the left navigation panel, click the Products menu. The corresponding fields appear in the right panel as shown in the following figure: 13 / 36


14 Since no products are assigned to the profile, there are no products listed in the table. 12. Click the Reset Filter link. All the products are listed in the table as shown in the following figure: 13. Select the check boxes associated with the required products to assign them to the new profile. Note: Admin can assign the product to only one profile. 14. Click the Save Profile button. The created profile is saved and listed on the Manage Profiles page. Or Click the Save and Manage Product button to save the profile and move to the Manage Products page Edit the Existing Profile To edit the existing profile 14 / 36
15 1. Go to the Magento 2 Admin panel. 2. On the left navigation bar, click the SEARS menu, and then click Manage Profiles. The Manage Profiles page appears as shown in the following figure: On this page all the available profiles are listed. 3. Click the row of the required profile to edit. OR In the Action column, click the Select link, and then click Edit. The editing profile page appears as shown in the following figure: 4. Make the changes as per the requirement. 5. Click the Save button. The edited profile is saved and listed on the Manage Profiles page. Or Click the Save and Continue Edit button to save the created profile and continue editing, if required. Or Click the Save and Manage Product button to save the profile and move to the Manage Products page Delete the Profiles To delete the current profile 15 / 36
16 1. Go to the Magento 2 Admin panel. 2. On the left navigation bar, click the SEARS menu, and then click Manage Profiles. The Manage Profiles page appears as shown in the following figure: On this page all the available profiles are listed. 3. Click the row of the profile that is no more required. OR In the Action column, click the Select link, and then click Edit. The editing profile page appears as shown in the following figure: 4. Click the Delete button. A confirmation dialog box appears. 5. Click the OK button. The profile is deleted. To delete the selected profiles through Bulk Action 1. Go to the Magento 2 Admin panel. 2. On the left navigation bar, click the SEARS menu, and then click Manage Profiles. The Manage Profiles page appears as shown in the following figure: 16 / 36
17 On this page all the available profiles are listed. 3. Select the check boxes associated with the Profiles those are no more required. 4. In the Actions list, click Delete. A confirmation dialog box appears. 5. Click the OK button. The selected profiles are deleted Enable OR Disable Profiles To enable the selected profiles through Bulk Action 1. Go to the Magento 2 Admin panel. 2. On the left navigation bar, click the SEARS menu, and then click Manage Profiles. The Manage Profiles page appears as shown in the following figure: On this page, all the available profiles are listed. 3. Select the check boxes associated with the disabled Profiles those are no more required. 4. In the Actions list, click Enable. The selected profiles are enabled and the corresponding Status column is updated with the Enabled status. To disable the selected profiles through Bulk Action 1. Go to the Magento 2 Admin panel. 2. On the left navigation bar, click the SEARS menu, and then click Manage Profiles. The Manage Profiles page appears as shown in the following figure: 17 / 36
18 On this page all the available profiles are listed. 3. Select the check boxes associated with the enabled Profiles to disable them if required. 4. In the Actions list, click Disable. The seleted profiles are disabled and the corresponding Status column is updated with the Disabled status. 5. Manage Products On the Manage Products page, the admin can perform the following tasks: Synchronize Sears Products Status( View and edit the product information( Upload a single product( View the Product Validation details Error log or Validation Details( to-2/sears-magento-2-integration-guide-0-0-1?section=view-product-validation-details) Submit certain required actions on the selected products( There are two ways to open or go to the Manage Products page: Option 1: Through the Manage Profiles menu: 1. On the left navigation bar, click the SEARS menu, and then click the Manage Profiles. The Manage Profiles page appears as shown in the following figure: 18 / 36
19 On this page, all the available profiles are listed. 2. Scroll down to the required profile. 3. In the Action column, click the Arrow button, and then click Manage Products. The Manage Products page appears as shown in the following figure: 19 / 36
20 The products assigned to the specific profile are listed. Option 2: Through the Manage Products menu: 1. On the left navigation bar, click the SEARS menu, and then click the Manage Products. The Manage Products page appears as shown in the following figure: 20 / 36
21 All the available products assigned to any profile are listed Synchronize Sears Products Status Admin can use this feature to get the request from Walmart to update the status of the products on the Magento store. It helps the user to view the status of the product, unpublished, transmit, data fix, system error, or so on. To synchronize Sears products status 1. Go to the Manage Products page. The page appears as shown in the following figure: 21 / 36
22 2. Click the Arrow button next to the Sync button, and then click Status. The process of products synchronization starts and the responses appear as shown in the following figure: 22 / 36

23 5.2. View and Edit the Product Information To view and edit the product information 1. Go to the Manage Products page. The Manage Products page appears as shown in the following figure: 23 / 36
24 2. Scroll down to the required product. 3. In the Action column, click the Select link, and then click Edit. The selected product information page appears as shown in the following figure: 24 / 36
25 4. Make the required changes. 5. Click the Save button. A success message appears. 6. To upload the current product, do the following: Click the Sears button. Or Click the arrow button next to the Sears button, and then click Upload Product. The product is uploaded on Sears or synchronized with Sears and a success message appears. 7. To validate the current product, do the following: Click the arrow button next to the Sears button, and then click Validate Product. The product is validated and a success message appears Upload Single Product To upload single product 1. Go to the Manage Products page. The Manage Products page appears as shown in the following figure: 25 / 36
26 All the available products assigned to any profile are listed. 2. Scroll down to the required product. 3. In the Action column, click the Select link, and then click Upload. The product is uploaded and a success message appears. If there is an error, then the error message appears on the top of the page View Product Validation Details To view the Sears product validation details 1. Go to the Manage Products page. The Manage Products page appears as shown in the following figure: 26 / 36

27 2. Scroll down to the required product. 3. In the Validation column, click the VALID button. The relevant validation details appear as shown in the figure. 27 / 36


28 4. In the Validation column, click the INVALID button. The relevant error message appears as shown in the figure: 5.5. Submit Bulk Actions The admin can perform the following actions on the selected products available on the Manage Products page: Validate Products: Validates the product before uploading it to the Sears website. It displays the corresponding validation error, if any. If there is no error, it confirms that the product is ready to upload. Upload Products: Uploads all the validated products on Sears at same time in a bulk. It means, the user can upload all the validated products with a single click. Deactivate Products: Deactivates the selected products on Sears. Delete Products: Deletes the selected products. Update Inventory: Updates the inventory of the product on Sears. This action completes all the job related to the product inventory and also it manages the quantity related issues. Update Price: Updates the price of the product on Sears. For example, if the user has changed the product price on the Magento store and also wants to change the price on Sears then this action is applicable. The price is updated when the user submits this action for the selected product. Actions on the Manage Products page 28 / 36
29 To submit the certain action on the selected products 1. Go to the Manage Products page. 2. Select the check boxes associated with the required products to perform the selected action upon. 3. In the Actions list, click the required Action. A confirmation dialog box appears. 4. Click the OK button. The selected action is triggered. If the action is validated and error free, then the corresponding success message appears. If the error occurs, then the relevant error message appears. 6. Manage Products Feeds A product feed or product data feed is a file consisting of a list of products and their attributes so that admin can display, advertise, or compare each product in a distinctive manner. A product feed generally comprises of a product image, title, product identifier, marketing copy, and product attributes. This extension provides the following features: View Products Feeds( View Sears Logs( Manage Products Feeds After uploading the product on Sears or after updating the product inventory or the product price, the user can check the status of the feed and sync the selected feeds or all the feeds on the Manage Feeds page. Admin can perform the following tasks: Synchronize Feeds(#synchronize) Delete Feeds(#deletefeeds) View Feed Errors(#feederrors) To synchronize the products feeds between Sears and Magento 2 store 1. Go to the Magento 2 Admin panel. 2. On the left navigation bar, click the SEARS menu, and then click View Feeds. The Manage Feeds page appears as shown in the following figure: 29 / 36


30 3. Click the Sync Feeds button. The product feeds synchronized successfully and the success message appears. To delete the feeds 1. Go to the Manage Feeds page. 2. Click the Delete Feeds button. A confirmation dialog box appears. 3. Click the OK button. The product feeds are deleted and a success message appears. To view the feed errors 1. Go to the Manage Feeds page. 2. Scroll down to the required feed. 3. In the Feed Errors column, click the corresponding DETAILS button. A dialog box appears such as shown in the following figure: 30 / 36

31 6.2. Manage Sears Logs To view the Sears logs 1. Go to the Magento 2 Admin panel. 2. On the left navigation bar, click the SEARS menu, and then click View Logs. The Sears Logs page appears as shown in the following figure: All the log details appear on the page. To Truncate or delete the Sears logs 1. Go to the Magento 2 Admin panel. 2. On the left navigation bar, click the SEARS menu, and then click View Logs. The Sears Logs page appears. 3. To delete all the log details, click the Truncate button. 4. To delete the selected log details, do the following steps: a. Select the check boxes associated with the log details to delete. b. In the Actions list, select the Delete option. A confirmation dialog box appears. c. Click the OK button. All the selected log details are deleted. 7. Knowledge Base The Sears Knowledge Base page displays a knowledge base link to view and understand the working of the extension properly and get the clarifications on Sears Magento 2 Integration. To view the Walmart Knowledge Base 1. Go to Magento 2 Admin Panel. 31 / 36
32 2. On the left navigation bar, click the SEARS menu, and then click Knowledge Base. The Sears Knowledge Base page appears such as shown in the following figure: 7.1. Manage Sears Attributes Admin can view the attributes and the corresponding attributes options details. Also, admin can synchronize all the attributes or the selected attributes with the Sears.com. To View the Attributes and the corresponding options associated with the categories 1. Go to the Magento 2 Admin panel. 2. On the left navigation bar, click the SEARS menu, and then click Sears Attributes. The Manage Attributes page appears as shown in the following figure: 32 / 36


33 All the available attributes details appear on the page. 3. To view the corresponding attribute option, do the following steps: a. Scroll down to the row of the required attributes to view its options details. b. In the Options column, click the corresponding View button. The Attributes Options page appears such as shown in the following figure: All the corresponding details appear. To Synchronize the Attributes associated with the categories 1. Go to the Magento 2 Admin panel. 2. On the left navigation bar, click the SEARS menu, and then click Sears Attributes. The Manage Attributes page appears such as shown in the following figure: 33 / 36
34 3. To synchronize all the attributes between Magento and Sears, click the Sync button. A success message appears. 4. To synchronize the selected attributes between Magento and Sears, do the following steps: a. Select the check boxes associated with the required attributes. b. In the Actions list, click the Sync option. All the selected attributes are synchronized with the Sears and a success message appears Manage Sears Categories Admin can view the Categories and the corresponding attributes details. Also, admin can synchronize all the categories or the selected categories with the Sears.com. To View the Categories and the corresponding attributes associated with the categories 1. Go to the Magento 2 Admin panel. 2. On the left navigation bar, click the SEARS menu, and then click Sears Categories. The Manage Categories page appears as shown in the following figure: 34 / 36


35 All the available categories details appear on the page. 3. To view the corresponding attributes, do the following steps: a. Scroll down to the row of the required categories to view its attributes details. b. In the Sears Attributes column, click the corresponding View button. The Sears Attributes page appears such as shown in the following figure: All the corresponding details appear. To Synchronize the categories 1. Go to the Magento 2 Admin panel. 2. On the left navigation bar, click the SEARS menu, and then click Sears Categories. The Manage Categories page appears such as shown in the following figure: 35 / 36

36 3. To synchronize all the categories between Magento and Sears, click the Sync button. A success message appears. 4. To synchronize the selected categories between Magento and Sears, do the following steps: a. Select the check boxes associated with the required categories. b. In the Actions list, click Sync Categories. All the selected categories are synchronized with the Sears and a success message appears. 36 / 36 Powered by TCPDF (
Sears-Magento Integration Guide 0.0.1
 by CedCommerce Docs - Products User Guides 1 / 34 1. Overview... 3 2. Sears Integration Extension Installation... 4 3. Sears Configuration Settings... 4 4. Manage Sears Profiles... 9 4.1. Add New Profile...
Ebay Integration User Guide 0.0.1
 by CedCommerce Products User Guides 1 / 34 1. Ebay Integration for Magento 2 store Overview... 3 2. Ebay Integration for Magento 2 store extension Installation... 4 3. ebay Configuration Settings... 4
Ebay Integration User Guide 0.0.1
 by CedCommerce Products User Guides 1 / 39 1. Ebay Integration for Magento 2 store Overview... 3 2. Ebay Integration for Magento 2 store extension Installation... 4 3. ebay Configuration Settings... 4
Catch Integration - User Guide
 by CedCommerce Products Documentation 1 / 50 1. Overview... 3 2. Catch Magento 2 Store Integration Extension Installation... 3 3. Retrieve API Credentials from the Catch Seller Account... 4 4. Catch Configuration
Cdiscount Integration - User Guide
 by CedCommerce Docs - Products User Guides 1 / 45 1. Overview... 3 2. Cdiscount Integration for Magento Extension Installation... 3 3. Cdiscount Configuration Settings... 4 4. Manage Cdiscount Profiles...
Bonanza Integration - User Guide
 by CedCommerce Products Documentation 1 / 53 1. Overview... 3 2. Bonanza Integration for Magento 2 Extension Installation... 3 3. Retrieve API Credentials from the Bonanza Seller Account... 4 4. Bonanza
Jet-Magento Integration Guide
 Jet-Magento Integration Guide by CedCommerce Technical Publications 1 / 47 1. Overview... 3 2. Jet Integration Extension Installation... 3 3. Jet Configuration Settings... 4 4. Manage Profile... 13 4.1.
Newegg-Magento. Integration Guide. Abstract. CedCommerce Version CedCommerce. All Rights Reserved.
 Newegg-Magento Integration Guide Version 1.9.1 CedCommerce. All Rights Reserved. Abstract Newegg Integration, an extension by CedCommerce, is a one-stop integration, which establishes synchronization of
MercadoLibre Integration for Magento Guide
 by CedCommerce Products Documentation 1 / 33 1. Overview... 3 2. Configuration... 3 3. Profile Management... 10 3.1. Adding a Profile... 10 3.2. Editing a Profile... 15 3.3. Change the Status of Profile...
Cdiscount Integration for Magento User Guide
 by CedCommerce Docs - Products User Guides 1 / 26 1. Overview... 3 2. Cdiscount Integration Extension Installation... 3 3. Cdiscount Configuration Settings... 6 4. Manage Cdiscount Profiles... 7 4.1. Add
Facebook Store Integration - User Guide
 by CedCommerce Docs - Products User Guides 1 / 12 1. Overview... 3 2. Facebook Configuration Settings... 3 3. Manage Product Listing... 7 2 / 12 1. Overview Facebook has around 1,550 million active users.
Magento 2 Customer Reward Management - Admin Guide
 ento 2 Customer Reward Management - Admin Guide by CedCommerce Docs - Products User Guides 1 / 25 1. Overview... 3 2. Reward System Configuration Settings... 3 3. Catalog Rule... 6 3.1. Set Up the Product
ebay Affiliate Extension - User Guide
 by CedCommerce Docs - Products User Guides 1 / 9 1. Overview... 3 2. ebay Affilate Configuration Settings... 3 3. ebay Affiliate Products Import... 5 3.1. Import the Products through Keywords... 5 3.2.
Walmart Marketplace Integration with Magento Version: 1.0
 User Guide for Walmart Marketplace Integration with Magento Version: 1.0 OVERVIEW Walmart Integration, helps to integrate your Magento store with Walmart by establishing a synchronization of products,
Jet Marketplace Integration with Magento Version: 1.0
 User Guide for Jet Marketplace Integration with Magento Version: 1.0 OVERVIEW Jet Integration, helps to integrate your Magento store with Jet by establishing a synchronization of products, orders and refunds
ebay Affiliate Extension for Magento 1-User Guide
 ebay Affiliate Extension for Magento 1-User Guide by CedCommerce Products Documentation 1 / 8 1. Overview... 3 2. ebay Affiliate Configuration Settings... 3 3. ebay Affiliate Product Import... 5 3.1. Import
Amazon Affiliate Program-Magento 1
 by CedCommerce Products Documentation 1 / 18 1. Overview... 3 2. Get Amazon Product Affiliate API Key, Tag Key and Secret Key... 3 3. Amazon Affiliate Configuration Settings... 8 4. Search and Import Products
Pincode Checker - Admin Guide
 Pincode Checker - Admin Guide by CedCommerce Technical Publications 1 / 13 1. Overview... 3 2. Pincode Checker Configuration Settings... 3 3. Manage Pincodes... 4 3.1. Actions... 9 4. Front-end View...
Walmart Integration for Magento
 Walmart Integration for Magento User Manual/Installation Manual v1.0.0 1.0 Introduction Today, marketplaces are playing a vital role in the growth of the e-commerce. Amazon, ebay, Etsy, Jet.com, Walmart,
Magento 2 Vendor Group Addon - Admin Guide
 Magento 2 Vendor Group Addon - Admin Guide by CedCommerce Docs - Products User Guides 1 / 16 1. Overview... 3 2. Vendor Group Configuration... 3 3. Manage Vendor Groups... 4 3.1. Add a New Vendor Group...
Magento 2 Vendor Split Cart Addon - User Guide
 by CedCommerce Docs - Products User Guides 1 / 11 1. Overview... 3 2. Vendor Split Cart Configuration... 3 3. Front-End View... 4 2 / 11 1. Overview Vendor Split Cart Addon is an add-on of CedCommerce
Appointment Booking System - Admin Guide
 by demo_doc 1 / 20 1. Overview... 3 2. Manage Booking Location... 3 2.1. Add a New Location... 4 2.2. Edit the Location... 5 2.3. Delete the Location... 6 3. Manage Appointment Booking Products... 7 3.1.
Fyndiq Magento Extension
 Fyndiq Magento Extension User guide. Version 3.0 Introduction 2 Fyndiq Merchant Support 2 Prerequisites 2 Seller account 3 Create the account 3 Your company 4 Contact information 4 Your webshop on Fyndiq
cdiscount version BoostMyShop
 cdiscount version BoostMyShop December 07, 2017 Contents cdiscount 1 1. Overview 1 2. Installation 1 Installation steps 1 Requirements 1 Product #1 1 Product #2 2 3. Configuration 2 1. Account activation
WooCommerce izettle Documentation
 WooCommerce izettle Documentation Installation 2 System requirements 2 Downloading and installing the plugin 2 Getting a license key 3 Connecting to izettle 3 Getting started 4 The plugin settings page
Gift Card Manager Extension
 Ph: +91-120-4243310 Gift Card Manager Extension User Manual v1.0.0 Prepared by E-mail: support@knowband.com E-23, Sector-63, Noida. Phone: +91-120-4243310 1 Ph: +91-120-4243310 Contents 1.0 Introduction
Import Export Products Attributes
 Import Export Products Attributes Extension for Magento2 Installation Guide https://www.magebees.com/magento2-import-export-products-attributesextension.html Import Export Products Attributes By Our Websites
Easily communicate with customers using up-to-date, customized templates. Allow customers to return products as an existing customer or guest.
 .0 USER GUIDE Version 1.0 support@exto.io http://exto.io/rma-for-magento-2.html Keep your staff informed with RMA s power Admin interface. Easily communicate with customers using up-to-date, customized
Stockbase Extension Magento 2.0
 Stockbase Extension Magento 2.0 21 SEPTEMBER 2016 V. 1.0.0 STOCKBASE EXTENSION FOR MAGENTO 2.X WEBSHOP Introduction This module integrates your Stockbase service with your Magento (version 1.x+) shop for
USER MANUAL. Language Translator TABLE OF CONTENTS. Version: 1.0.4
 USER MANUAL TABLE OF CONTENTS Introduction... 2 Benefits of Language Translator... 2 Pre requisite... 2 Installation... 3 Installation Steps... 3 Extension Activation... 8 Configuration... 9 FAQ... 24
Admin Product Grid Category Filter
 Admin Product Grid Category Filter User/Installation Guide Version 2.2.0 www.magevision.com Copyright 2017 MageVision. All rights reserved. 1 1. Overview The Admin Product Grid Category Filter extension
1. Installation Instructions
 Table of Contents 1. Extension Installation Instructions 2. Accessing the Extension Main Settings 3. Product Custom Option Templates 4. Individual Product Custom Options 5. Front-End View 6. User Agreement
Call For Price extension User Manual
 extension User Manual Magento 2 Call for Price extension helps hiding product price and Add to Cart and replace it with button to encourage visitors to contact you for quote. Table of Content 1. Extension
USER MANUAL. MageMob Admin TABLE OF CONTENTS. Version: 1.0.0
 USER MANUAL TABLE OF CONTENTS Introduction... 1 Benefits of MageMob Admin... 1 Installation & Activation... 2 Pre-requisite... 2 Installation Steps... 2 Installation via Composer... 4 Extension Activation...
Mobile Login extension User Manual
 extension User Manual Magento 2 allows your customers convenience and security of login through mobile number and OTP. Table of Content 1. Extension Installation Guide 2. Configuration 3. API Settings
Fyndiq Prestashop Module
 Fyndiq Prestashop Module User guide. Version 2.0 Introduction 2 Fyndiq Merchant Support 2 Prerequisites 2 Seller account 3 Create the account 4 Your company 4 Contact information 4 Your webshop on Fyndiq
Guide PHPro Stock Monitor Module
 Guide PHPro Stock Monitor Module www.phpro.be more info: pieter.caluwaerts@phpro.be Date document: 12/05/2013 Version: 2.2 Owner: PHPro Business Park King Square Veldkant 33A B- 2550 Kontich Author: Pieter
Facebook Pixel for Remarketing for Magento 2
 Facebook Pixel for Remarketing for Magento 2 Facebook Pixel for Remarketing can be configured in few simple steps. We will guide through each step in this document. Installation Instructions Manual Installation
Wholesale Add To Cart Grid. User manual
 Wholesale Add To Cart Grid User manual Table of contents 1. Overview 1.1 General information 1.2 Key features 1.3 About this manual 2. Installation 2.1 Installation requirements 2.2 Installation instructions
SIMICART USER GUIDE SERIES. SimiCart Install SimiConnector
 SIMICART USER GUIDE SERIES Install SimiConnector TABLE OF CONTENTS I. INSTALL SIMICONNECTOR 3 II. CHECK CONNECTOR AFTER INSTALL 12 I. INSTALL SIMICONNECTOR 1) Download SimiConnector: https://github.com/simicart/simicart-magento2.x
WebEasy Getting Started with OsCommerce Guide
 WebEasy Getting Started with OsCommerce Guide Copyright WebEasy Getting Started with OsCommerce Guide Copyright 2003 2010 Avanquest North America Inc. All Rights Reserved. Web Easy is a registered trademark
Web Push Notification
 Web Push Notification webkul.com/blog/web-push-notification-for-magento2/ On - January 13, 2017 This impressive module allows you to send push notification messages directly to the web browser. The biggest
Quickbooks Connector Quick Start Guide
 Quickbooks Connector Quick Start Guide Installation (from a Zip file) Configuration & Setup Customer Synchronization Customer Grid Customer Detail Page Product Synchronization Product Grid Product Detail
FREE AJAX SUITE. User Guide FOR MAGENTO 2. Version: Release Date: Product Page: Ajax Suite. Support:
 FREE AJAX SUITE FOR MAGENTO 2 User Guide Version: 1.2.0 Release Date: 19.09.2017 Product Page: Ajax Suite Support: info@tigren.com C O P Y R I G H T 2017 TABLE OF CONTENTS Installation. 1 Ajax Suite....2
User manual. Massive CSV / XML Updater via URL / FTP compatible with scheduled tasks (cronjobs)
") User manual Massive CSV / XML Updater via URL / FTP compatible with scheduled tasks (cronjobs) Massive CSV / XML Updater via URL / FTP installation instructions Prestashop module developed by OBSolutions
User manual Massive CSV / XML Updater via URL / FTP compatible with scheduled tasks (cronjobs) Massive CSV / XML Updater via URL / FTP installation instructions Prestashop module developed by OBSolutions
Magento 2 Extension. ( Version ) STORE.DCKAP.COM
 STORE.DCKAP.COM") Magento 2 Extension ( Version 1.0.0 ) Table of Contents Introduction to Advanced Sample Orders 3 Features 3 Version & Compatibility Support 4 How to Install This Module? 4 General Configuration 6 Price
Magento 2 Extension ( Version 1.0.0 ) Table of Contents Introduction to Advanced Sample Orders 3 Features 3 Version & Compatibility Support 4 How to Install This Module? 4 General Configuration 6 Price
This guide will show you how to install and configure Fastly CDN extension for Magento 2.
 INSTALLATION.md Installation guide This guide will show you how to install and configure Fastly CDN extension for Magento 2. You may choose between three installation methods composer installation, installation
USER MANUAL. Star Track Shipping TABLE OF CONTENTS. Version: 2.0.0
 USER MANUAL TABLE OF CONTENTS Introduction... 2 Benefits of Star Track Shipping... 2 Pre-requisites... 2 Installation... 3 Installation Steps... 3 Extension Activation... 7 Configuration... 8 Contact Us...14
EMARSYS FOR MAGENTO 2
 EMARSYS FOR MAGENTO 2 Integration Manual July 2017 Important Note: This PDF was uploaded in July, 2017 and will not be maintained. For the latest version of this manual, please visit our online help portal:
Stock Notification Magento2 Extension
 Stock Notification Magento2 Extension Table of Contents Stock Notification - Overview... 3 Version & Compatibility Support... 3 Features... 4 How to Install This Module?... 4 General Configuration... 5
Magento 2 Extension. ( Version ) STORE.DCKAP.COM
 STORE.DCKAP.COM") Magento 2 Extension ( Version 1.0.0 ) Table of Contents Introduction to Stock Notification 3 Version & Compatibility Support 3 Features 4 How to Install This Module? 4 General Configuration 6 Low Stock
Magento 2 Extension ( Version 1.0.0 ) Table of Contents Introduction to Stock Notification 3 Version & Compatibility Support 3 Features 4 How to Install This Module? 4 General Configuration 6 Low Stock
MageNative Apps User Guide Series
 MageNative Apps User Guide Series App Submission on Google Play Store Version 1.0 CedCommerce. All Rights Reserved. CedCommerce support@cedcommerce.com Abstract The App Submission on Google Play Store
User Manual for Market Place. Version 2.0 & above
 User Manual for Market Place Version 2.0 & above Multi Vendor Medma Marketplace Magento 2 Extension Magento 2 marketplace extension coverts you ecommerce Magento store into a complete online multi vendor
CedCommerce. All rights reserved.
 CedCommerce. All rights reserved. SUPPORT@CEDCOMMERCE.COM 1 Module Installation Guide Version 2.0 2 Installation Here we are explaining different steps to install the CedCommerce Modules or Extensions.
SLI Learning Search Connect For Magento 2
 SLI Learning Search Connect For Magento 2 User Guide v1.2.2 The Learning Search Connect module integrates with SLI Systems Search and provides an outstanding level of search customizability. Contents 1.
USER MANUAL. Fooman Connect: Xero - Magento 2. Quick Links. Leave a Review Reviews help to build a trusted Magento community.
 USER MANUAL Fooman Connect: Xero - Magento 2 Quick Links This document is structured in the following sections: 1. 2. 3. 4. Installation Set up in Xero and Magento Using Fooman Connect Troubleshooting
1. Installation Instructions
 Table of Contents 1. Extension Installation 2. Custom Options Templates 3. Dependent Custom Options 4. Stock Management 5. Custom Options Inventory 6. Options Inventory Report 7. Individual Product Custom
Indian GST extension User Manual
 extension User Manual Magento 2 extension helps creating and calculating tax rates and rules to make your Magento 2 stores GST ready. Table of Content 1. Extension Installation Guide 2. Configuration 3.
Magento 2 Integration Manual (Version /10/2017)
") Magento 2 Integration Manual (Version 1.1.0-13/10/2017) Copyright Notice The software that this user documentation manual refers to, contains proprietary content of Megaventory Inc. and Magento (an ebay
Magento 2 Integration Manual (Version 1.1.0-13/10/2017) Copyright Notice The software that this user documentation manual refers to, contains proprietary content of Megaventory Inc. and Magento (an ebay
Twitter & Facebook Login v2.x Extension Installation for Magento 2 From Plumrocket Documentation
 Twitter & Facebook Login v2.x Extension Installation for Magento 2 From Plumrocket Documentation Contents 1. Installation 2. Uploading Magento 2 extension files 2.1. SSH Installation (requires SSH access
Improved Sorting for Magento 2
 2017/06/13 16:59 1/11 Improved Sorting for Magento 2 For more details see the Amasty Improved Sorting for Magento 2 extension page. Improved Sorting for Magento 2 An effective tool for customer care. Improve
USER MANUAL LANGUAGE TRANSLATOR TABLE OF CONTENTS. Version: 1.1.6
 USER MANUAL TABLE OF CONTENTS Introduction... 1 Benefits of Language Translator... 1 Installation... 2 Installation Steps... 2 Extension Activation... 3 Configuration... 4 FAQ... 16 General FAQs... 16
Preorder Payment Gateway Extension
 Preorder Payment Gateway Extension Magento Extension User Guide Page 1 1. How to Install Table of contents: 1. How to Install....3 2. General Settings...6 3. Use as Payment option.....9 4. Preorder Installment
Rewards Points for Magento 2.0
 Rewards Points for Magento 2.0 USER GUIDE Version 1.0 support@exto.io https://exto.io/rewards-points-for-magento-2.html Magento 2 Reward Points extension provides you with effective rewards program, customizable
PayPalPlus Magento 2 User's Guide
 PayPalPlus Magento 2 User's Guide The PayPalPlus module for Magento 2 replaces the complete selection of payment methods in Magento. The PayPalPlus module supports other, proprietary payment methods that
Advanced Dashboard. Table of Contents. Page 1 of 11
 Page 1 of 11 Advanced Dashboard Table of Contents Installation... 2 Upload Acx Advance Dashboard Extension... 2 Install Extension... 3 Filtering Options of Advance Dashboard... 3 Reports of Advance Dashboard
Magento Integration Manual (Version /15/2017)
") Magento Integration Manual (Version 2.1.1-05/15/2017) Copyright Notice The software that this user documentation manual refers to, contains proprietary content of Megaventory Inc. and Magento (an ebay
Magento Integration Manual (Version 2.1.1-05/15/2017) Copyright Notice The software that this user documentation manual refers to, contains proprietary content of Megaventory Inc. and Magento (an ebay
Magento 2 User Guide March 11, 2018
 Magento 2 User Guide March 11, 2018 Getting Started Logging in to your Magento 2 Admin Panel Once your account has been set up, you can access the Plugin through your Internet browser. To log in: 1. Use
FedEx Office Print Online Corporate
 Quick Reference Guide DocStore Catalog Log in to FedEx Office Print Online Corporate 1. Open your browser and navigate to: https://printonline.fedex.com/nextgen/wu 2. Input User ID and Password and click
Product Manager Toolkit
 Last update: 2017/10/20 09:32 magento_1:product_manager_toolkit https://amasty.com/docs/doku.php?id=magento_1:product_manager_toolkit For more details see the Product Manager Toolkit extension page. Product
Trellis Magento 2 Salsify Connector
 Trellis Magento 2 Salsify Connector Version 0.x 09/01/2018 Table of Contents Introduction 3 Overview 3 Purpose of The Magento 2 Salsify Connector 3 Compatibility 4 Installation & Configuration 5 Magento
OpenCart. E-commerce platform Prepared by: Abeer AlDayel and Nouf AlRomaih
 OpenCart E-commerce platform Prepared by: Abeer AlDayel and Nouf AlRomaih Introduction OpenCart is free open source ecommerce platform for online merchants. It is a module based system which allows users
An Introduction to Box.com
 An Introduction to Box.com Box is an online file sharing and cloud content management service and it provides features such as: Security controls Space Mobility Online collaboration Mobile access Version
USER MANUAL. MageMob App Builder TABLE OF CONTENTS. Version: 2.0.0
 USER MANUAL TABLE OF CONTENTS Introduction... 1 Benefits of MageMob App Builder... 1 Installation & Activation... 2 Installation Steps... 2 Extension Activation... 3 How it Works?... 4 Back End Configuration:...
All-In-One-Designer Promotion Handbook. Promotion
 All-In-One-Designer Promotion Handbook Promotion Introduction Promotions have been a stable sales strategy in retail since, well the beginning of time. Some say that it started with the Mesopotamian tribes
User Guide. Order Attachments. Extension Version User Guide Version Magento Editions Compatibility
 User Guide Order Attachments Extension Version - 1.0.0 User Guide Version - 1.0.0 Magento Editions Compatibility Community - 2.0.0 to 2.0.12, 2.1.0 to 2.1.4 Enterprise - 2.0.0 to 2.0.12, 2.1.0 to 2.1.4
USER MANUAL. SalesPort Salesforce Customer Portal for WordPress (Lightning Mode) TABLE OF CONTENTS. Version: 3.1.0
 TABLE OF CONTENTS. Version: 3.1.0") USER MANUAL TABLE OF CONTENTS Introduction...1 Benefits of Customer Portal...1 Prerequisites...1 Installation...2 Salesforce App Installation... 2 Salesforce Lightning... 2 WordPress Manual Plug-in installation...
USER MANUAL TABLE OF CONTENTS Introduction...1 Benefits of Customer Portal...1 Prerequisites...1 Installation...2 Salesforce App Installation... 2 Salesforce Lightning... 2 WordPress Manual Plug-in installation...
Vantiv ecommerce for Magento 1 User Guide. Version 1.0.7
 Vantiv ecommerce for Magento 1 User Guide Version 1.0.7 Vantiv ecommerce for Magento 1... 1 User Guide... 1 1. Project... 3 2. Onboarding... 3 3. Installation... 3 4. Configuration... 5 5. Nuances for
Best Practice / Home Extension Installation/Upgrade. Help & Support
 Best Practice / Home Extension Installation/Upgrade To start using M2E Pro Extension in your Magento, it should be installed first. However, M2E Pro Extension is being improved on a constant basis, so
Getting Started: Setting up Your ecommerce Site
 West Virginia University Information Technology Services ecommerce Getting Started Getting Started: Setting up Your ecommerce Site Table of Contents Introduction... 3 Access Your Site... 4 Logging In...
1
 www.mageants.com support@mageants.com 1 Table Of Contents Preface... 3 Installation Guide... 5 Store Pickup Configuration... 8 Back-end Example... 8 Front-end Example 16 www.mageants.com support@mageants.com
Your Cart User Manual v3.6
 Your Cart User Manual v3.6 2 Your Cart User Manual v3.6 Table of Contents Foreword 0 7 Part I Getting Started Overview 11 Part II Categories & Products 1 Manage Categories... Overview 11 Add a New... Category
ON!Track User Manual. Mobile Release Manual Version 1.1
 ON!Track User Manual Mobile Release 2.3.1 Manual Version 1.1 Table of Content What is ON!Track?... 2 How to download ON!Track from the App Store?... 3 How to navigate in ON!Track Mobile App?... 8 How to
Rakuten.com Merchant Manual
 Rakuten.com Merchant Manual 1 Table of Contents Signing into your Account..3-4 Manage Shipping Settings 5 Adding Header & Footer.6-9 List/Create a Product..10-17 o Create listing.11 o Create New Product...12
Table of Contents. Introduction Technical Support Getting Started Data Synchronization General Website Settings...
 E-Commerce Table of Contents Introduction... 1 Technical Support... 1 Introduction... 1 Getting Started... 2 Data Synchronization... 2 General Website Settings... 3 Customer Groups Settings... 4 New Accounts
USER MANUAL. SEO Hub TABLE OF CONTENTS. Version: 0.1.1
 USER MANUAL TABLE OF CONTENTS Introduction... 1 Benefits of SEO Hub... 1 Installation& Activation... 2 Installation Steps... 2 Extension Activation... 4 How it Works?... 5 Back End Configuration... 5 Points
Aitoc. Product Reviews and Ratings User Manual for Magento 2
 Aitoc Product Reviews and Ratings User Manual for Magento 2 Table of Contents 1. Installing Product Reviews and Ratings in Magento 2 2. Config settings 3. Email Templates 4. Events page 5. Managing single
STORE LOCATOR PLUGIN USER GUIDE
 support@simicart.com Support: +84.3127.1357 STORE LOCATOR PLUGIN USER GUIDE Table of Contents 1. INTRODUCTION... 3 2. HOW TO INSTALL... 4 3. HOW TO CONFIGURE... 5 4. HOW TO USE ON APP... 13 SimiCart Store
How to Migrate from Drupal Commerce to Magento
 How to Migrate from Drupal Commerce to Magento The essence of LitExtension products focuses on their friendliness to users, which means that every shopping cart owners, even who has little knowledge of
i95dev SAP Connect User Manual
 Table of Contents i95dev SAP Connect User Manual Version 1.0 www.i95dev.com USA Australia India Copyright 2016 i95dev. All Rights Reserved 1 Table of Contents 1. Introduction... 3 1.1. About this guide...
FedEx Office Print Online Corporate
 Quick Reference Guide Getting Started Log in to FedEx Office Print Online Corporate 1. Open your browser and navigate to: https://printonline.fedex.com/nextgen/abbott-amo 2. Input User ID and Password
In this tutorial, we will show you how to easily add your store to your Facebook fan/business page, just in two simple steps.
 MexBS Facebook Store v1.0.0 User Guide Thank you for purchasing the Facebook Store extension and welcome to the MexBS family! In this document, we will guide you through the installation steps, and will
skype ID: store.belvg US phone number:
 1 Table of Contents Table of Contents: 1. Introduction to Products Sorting... 3 2. How to Install... 4 3. How to Configure... 5 3.1. How to create sorting attributes... 5 3.2. How to manage sorting attributes...
Automatic Customer Group Switching Magento 2 Extension
 Automatic Customer Group Switching Magento 2 Extension User Manual This is the user manual of Magento 2 Automatic Customer Group Switching v100.1.2 and was last updated on 14-11-2017. To see what this
Printed Documentation
 Printed Documentation Table of Contents Getting Started... 1 Technical Support... 1 Introduction... 1 Getting Started... 3 Payment Option:... 3 Data Synchronization... 4 General Website settings... 5
Merchant Portal User Guide
 Merchant Portal User Guide TABLE OF CONTENTS Accessing the Click Merchant Portal... 3 Virtual Terminal... 4 Single Entry (Merchant Enters Card Details)... 5 Payment Using Collected Card Details... 5 Payment
Authorize.Net Magento 2.x Payment Module
 Authorize.Net Magento 2.x Payment Module User Guide Revision 1.0.1 September 17, 2018 Sep 17 2018 Authorize.Net Global Payment Management for Magento 2.x 1 Contents Document History... 4 1. Introduction...
Magento Pinterest Extension User Guide
 Magento Pinterest Extension User Guide Welcome to the Pinterest extension for Magento User Guide. Thank you for choosing our product. This user guide describes the functionality of Pinterest extension
Pinnacle Cart User Manual v3.6.3
 Pinnacle Cart User Manual v3.6.3 2 Pinnacle Cart User Manual v3.6.3 Table of Contents Foreword 0 Part I Getting Started Overview 7 Part II Categories & Products 11 1 Manage... Categories Overview 11 Add
Newegg Elite Seller Program Guide
 Newegg Elite Seller Program Guide Newegg Elite Seller Program offers three types of membership for different business model of sellers: Standard, Professional, and Enterprise. This guide will help you