Taking Fireworks Template and Applying it to Dreamweaver
|
|
|
- Marylou Atkinson
- 5 years ago
- Views:
Transcription
 on your computer (where you will actually work on your")
1 Taking Fireworks Template and Applying it to Dreamweaver Part 1: Define a New Site in Dreamweaver The first step to creating a site in Dreamweaver CS4 is to Define a New Site. The object is to recreate the environment of your remote server (where you will ultimately host or make your site live for the world to see) on your computer (where you will actually work on your site). To define a site in Dreamweaver CS4: Open Dreamweaver CS4 Click on Dreamweaver Site under the Create New Section of the screen that is displayed.

2 In the Site Definition screen that shows up, give your site a name. In this case I have given it the name BusinessSite. Click the Next button.


3 Select that you do not want to use any server technology. Click Next. Select that you want to edit local copies on your machine and upload to server when ready. Select (or create and select) the folder where you want to save your files. Click Next.


4 Select None from the How do you connect to the remote server drop down. Click Next. Review your site definition settings. Click Done. You will see the new site defined in the Files Panel. All the files you create will be stored here and can be easily accessed from here. Also all links to pages and images etc. will be relative to the folder defined in the site.

5 Part 2: Create a Template in Dreamweaver Creating a template in Dreamweaver CS4 will form the basis of your website. It will give your site a consistent look and make it easy to manage. Using the layout you designed in Fireworks as a basis we will recreate it in Dreamweaver as html files. From the Dreamweaver Menu select File > New Select Blank Template > Template Type: HTML Template > Layout: none You will get a blank document. Save it [ File> Save].


6 You will get a message that the template does not have any editable regions. This is ok. Give it a name. I have given it the name template. If you look in your Files panel you will see that your template has been saved as template.dwt within a new folder entitled Templates


7 Part 3: Design your Template in Dreamweaver We will now design the template in Dreamweaver CS4. The layout we designed in Fireworks CS4 is shown below: We will need to recreate this layout in Dreamweaver. Some portions will need to remain images e.g. gradient backgrounds, rounded edges, special fonts like those used in the menu and the logo. These images have already been created, sliced and exported from Fireworks as web optimized images and are available for use within the images folder. To design the layout within the template file: Select Insert > Layout Objects > Div Tag

8 In the screen that opens up type the name header against ID. We are creating the header area with the gradient background and the logo. Click the New CSS Rule button.

9 In the New CSS Rule screen that appears, #header will already be typed in. Select the New Style Sheet File from the Rule Definition drop down menu. Click OK.

10 Give the stylesheet name styles. Click Save.

11 Part 4: Design the CSS Style Sheet Now it is time to specify the styles for your header div tag. In the screen that opens. Select Background. Browse the header background image.


12 Select Box. For the Width, type 100 and select % from the drop down. For the Height type 94 and select px from the drop down. Click ok. You will come back to the Insert Div tag screen. Click OK. In your template page you will see the header div displayed with the background image and the height/width specified in the css style sheet.

13 You will see that there is a white margin around the header div. This is because html pages have a default margin/ padding. To remove this we will give new properties to the body tag within the css stylesheet. To do this: Bring up the CSS Styles panel [Window > CSS Styles] Click the New CSS Rule icon at the bottom. Choose the following: - Selector type: Tag - Selector Name: body - Rule Definition: styles.css
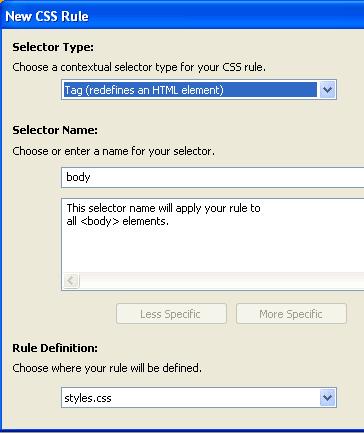
14 Click OK

15 In the CSS Rule Definition screen that opens, select Box and type 0 for both Padding and Margin. Click OK. You will see that the header is now sticking to the top, left and right of the screen in template.dwt. The default margin and padding has been removed.


16 Part 5: Insert Images Now it is time to insert the logo image into the header div using Dreamweaver CS4. Select and delete the default text that is inserted by Dreamweaver when creating a div Content for id header Goes Here. Insert > Image > browse and select the logo image. In the screen that appears, enter alternate text describing the image. e.g. BusinessSite Logo. Click OK. You will see the logo image appearing within the header div. We have now completed the header portion of the template.


17 Part 6: Creating the Menu Let us now work on the menu area. To do this, let us create a new div called menu with the accompanying css rule. We first need to point the cursor immediately after the header div. We can do this in 2 ways: 1. The first way is in the design view: Select the header div by clicking anywhere inside the header area and clicking on the div#header tag that appears at the bottom of the screen. The header tag area will get highlighted. Click the right arrow key of your keyboard to move the cursor immediately after the header div. 2. The second way is in the Code View: Click on the Code View button. Find the code for the header div and place your cursor right after the closing div </div> tag. Once you have place your cursor in the right spot, insert a div named menu. Insert Layout Objects > Div Tag ID: menu

18 o o o o o Click New CSS Rule button Selector Type: ID Selector Name: #menu Rule Definition: styles.css Click OK. In the CSS Rule Definition for #menu screen give the following properties: Background> Background- image: images/menu-bg.jpg o Box > Width: 100% o o Box > Height: 32px Click OK Insert Div Tag screen > Click OK. You will see the menu area with the background image and width/ height specified appearing in template.dwt. Delete the default content inserted within the menu div and insert the 4 menu images Home, About Us, Services, Contact Us. The menu div is now complete. We will link the menu images later after we create all the required html pages.
19 Part 7: Content Now let us create the content area and a space for the submenu area on the left. We will create a div for these 2 areas combined called middle and then individual divs for the submenu area called submenu and the content area called content within the larger middle div. The middle div: Place the cursor after the menu div Insert > Layout objects > Div Tag > ID: middle Click the New CSS Rule button > Click OK CSS Rule Definition for # middle: o Box > Width: 100% o Click OK Insert Div Tag screen > Click OK The submenu div: Delete the default text in the middle div Content for id middle Goes Here Make sure your cursor is still within the middle div tag. Insert a div called submenu In the Rule definition for #submenu specify the following: o Box > Width: 25% o Box > Float: left The content div Position the cursor after the submenu div. Make sure your cursor is still within the middle div tag. Insert a div called content In the Rule definition for #content specify the following: o Box > Width: 75% o Box > Float: left


20 The submenu and content divs will appear side by side. We will work on the submenu area later. The content in the content area will differ from page to page so we will make this a Dreamweaver Editable Region in the next step. You will notice that the default font used is Times New Roman which does not look very nice on the web. We can change this default font by editing the redefined body tag within our styles.css stylesheet. Open the CSS Panel [Window > CSS Styles] Select the body style and right click > Select Edit


21 In the CSS Rule Definition for body screen select Type and specify the font-family Arial, Helvetica, sans serif and the font-size 14 px. Click OK. You will see that the fonts change for all the text on th page. The footer div

22 Now let us complete the basic layout by creating the footer area as well. Make sure your cursor is right after the middle div Create a new div called footer Give the #footer style rule the following properties: o Box > Width: 100% o o o o o o Box > Height: 33 px Box > Clear: both Block > Text align: Right Background> Background-image: footer-bg.jpg Type > Color: #FFF Click OK In the document window you will see the footer area with the background image and other properties specified in the stylesheet. Replace the default footer div text Content for id footer Goes Here with 2009 Company Name. All Rights Reserved. Your basic layout template is ready. Save your template and styles.css stylesheet. [File > Save All]

23 Part 8: Insert Editable Regions Now it is time to insert editable regions into the Dreamweaver template. Since the content area will differ from page to page we will make this area an editable region. Select and delete Content for id content Goes Here from within the content div. While the cursor is still within the content div: Insert > Template Objects > Editable Region


24 Give the New Editable Region a name like content The editable region will be hightlighted within the template


25 Part 9: Template Based Web Pages Now that our Dreamweaver template is ready in we can create the pages of our website easily. Let us begin with the Home Page. The home page file is usually named index.html. Your remote hosting server will recognize this file as the home page and display it when your domain name is called up. To create a page from the template: File > New Page From Template > BusinessSite > template Click the Create button Save the file, naming it index.html

26 Type in your home page content into the content editable region. Replace the default text Untitled Document in the title area with appropriate text for your page title e.g. BusinessSite Home Page. This is what will appear in the top blue bar of your browser.

27 Once you are done, you can view how your page will look in a browser. To do this go to File> Preview in Browser > Choose the browser you want.

28 Part 10: Formatting Headings Next we will need to format the headings and subheadings within the content. To do this, go back into the Dreamweaver document window and select the heading text. Apply the Heading 1 tag to it by selecting Format > Paragraph format > Heading 1. Similarly for the subheadings, select the subheading text and apply the Heading 2 tag to it [Format > Paragraph format > Heading 2].


29 Styling our Headings and Subheadings Now let us style the Heading 1 and Heading 2 tags to match the look we created in our layout. To do this we will need to create a new style rule for the tags H1 and H2 in our styles.css file. We can do this from the Properties Panel as well by clicking on the Edit Rule button. In the New CSS Rule Screen that opens up select the follwing: Selector Type: Tag Selector Name: h1

30 Rule Definition: styles.css Click OK In the CSS Rule Definition for h1 screen give the following properties: Type > Font-size: 18 px Type > Color: #D6130A Click OK

31 Similarly define the style for the H2 tag. Your page will look like this:

32


33 Part 11: Formatting Images Now we need to insert the image into the content. To align it as designed in our layout follow these steps: Click at the beginning of the 2nd paragraph Insert > Image > browse and select picture.jpg The picture will get inserted at the beginning of the 2nd paragraph. Select the picture and select Right from the Align drop down in the Properties Panel The picture will now align to the right and all the text will wrap around it neatly. If we don t want the text to touch the image we can give some horizontal spacing. To do this, select the image and enter the value 10 next to H Space in the Properties Panel.

34 Preview the page in the browser and save all the files. We have now completed creating our home page.

35 Part 12: Linking Pages Now create the remaining 3 pages and link them up in Dreamweaver CS4. Create the following pages: about-us.html, services.html and contact-us.html the same way you created the index.html page. Insert the appropriate content, images, title tag, headings and subheadings for each. You will see all your pages in your Files Panel [Window > Files]. Linking the pages: When we click on the menu buttons at the top of the page we want the appropriate page to be displayed. Since the menu is in all the pages we have kept this in the template and when we update it here all the pages will be updated. To link the pages from the menu: Open the template file (template.dwt). You can open it from the Files panel you will find it in the Templates folder. To link the Home menu button, select the Home image and link it to index.html within the Properties Panel. Click on the folder icon next to Link, then browse and select index.html. Enter the value 0 into the Border field.


36 Similarly link the About Us, Services and Contact Us menu buttons to the appropriate pages. When you are done, save the template. You will get a message asking if you want to update the template files. Click the Update button. Save your pages in case they we open while the template was updated. Now when you preview your pages (e.g. index.html) in your browser and click on the menu buttons the appropriate pages will open up.

37 Part 13: Forms Let us create a form in the contact us page. To do this: Open contact-us.html Insert > Form > Form You will see a red outline within your page. This is the form tag. All your form fields must be placed within this tag. Insert Form > Text field In the screen that opens up type Name in the label field. Click OK Similarly create a field for as well. Also create a field for Message. This will need to be a text area [Insert > Form > Text Area].
![Finally create a button [Insert > Form > Button] With this you have created the HTML required for the form.](/docs-images/87/96476552/images/38-0.jpg "However, to make the form work and send you an email you will need to use a php or asp script depending on your web")
38 Finally create a button [Insert > Form > Button] With this you have created the HTML required for the form. However, to make the form work and send you an you will need to use a php or asp script depending on your web server.

39 Part 14: Form Validation In this Dreamweaver CS4 Form Validation Tutorial we will learn how to validate a form in Dreamweaver CS4. The form we will validate is shown below: Step 1: Select the form tag You can do this by clicking anywhere in the form and selecting the <form> tag when it shows at the bottom of the document window. The entire form will grey out to show that it is selected. Step 2: Open the Behavior Inspector Open the Behavior Inspector (Window > Behaviors)
 and select Validate")
40 Step 3: Add the Validate Form Behavior Click the Add Behavior icon (+ icon) and select Validate Form

41 Step 4: Specify the validation requirements for each form field In the Validate Form Panel that opens select each field and specify the validation required.

42 In the example below I have given the following validation requirements: name Required, Anything Required, Address phone Required, Number Step 5: Click OK and check in the browser

43 Click OK when you are done with the validations. Save your page and preview in the browser. Test by trying to submit the form without the required values. You should get an error message like the one shown below:

44 Part 15: Tables (Again ) Another way of designing layouts in Dreamweaver CS4 is by using tables. We will use this method to create the submenu area within the template. Open template.dwt Delete Content for id submenu Goes Here from the submenu div With the cursor still within the submenu div insert a table [Insert > Table] with 3 Rows, 1 Column, Width of 201 pixels, border thickness 0, Cell padding 0 and Cell Spacing -0. Click OK. You will see a table appear in the submenu div. Select the table [Right click within the table > Select Table] and align it Center in the Properties Panel. Click within the top row of the table and insert the image submenu-top-bg.jpg Click within the bottom row of the table and insert the image submenu-btm-bg.jpg To give the background image to the middle: Click within the middle row

45 From the Properties panel, select <New CSS Rule> and click the Edit Rule button Create a class style called.sub-bg within styles.css

46 In the CSS Rule Definition screen choose submenu-bg.jpg as the background image and select repeat-y from the Background-repeat options.

47 We also don t want the submenu text within the middle row to stick to the edges so let s give a padding of 10 pixels within the same style. Click OK.

48 Type in the submenu items You can create new pages and create links to them from this submenu area or you can but textual content that will display on all the pages here. Save the template and update all the pages. Preview your pages in the browser and test all the links.

49 Part 16: Testing the Website Now that you have completed the site, thoroughly check it in the browser. Use File > Preview in Browser and select the various browsers. Check the site in at least Internet Explorer and Mozilla Firefox. Sometimes it will look a bit different in different browsers. Check to make sure everything is working fine. Test the menu links to see if the right pages are being called up. You might also decide to make some layout improvements. In this case, the submenu and content area is sticking to the menu area as this does not look good. Also the content is touching the footer area. Let us add some space between the menu and middle div. To do this: Open the CSS styles panel [Window > CSS Styles] Select the #menu style Right click and select Edit style Box > Margin > Bottom : 20 px Similarly edit the #footer style and add a Top margin of 20 px [Box > Margin > Top: 20 px] Save all files to make sure your styles.css file is saved and check your site in the browser. The added space makes it look much better. You might also find that the content is touching the edge of the browser on the right. We can add some space by reducing the width of the middle div to 95% from 100%. Edit the #middle style and change the width to 95%

50 Check your site again in the browser to make sure everything is working fine. We have now completed the site.

51


52 Part 17: Upload your site using Dreamweaver Now you are ready to use Dreamweaver CS4 to upload your site and make it live to the world. Use our itismath.com sites. Click on the Expand to show local and remote sites icon in the Files panel. A new screen will open with your files on the left site. These are the files stored on your local computer. Now click on the Connects to remote host icon.

53 Select FTP from the options


54 Enter your FTP details and click the Test Connection button You will get the message that Dreamweaver connected to your Web server successfully. Click Next

. A copy of all the files will be seen on the right panel. When complete check your domain name from your browser e.g www.sitename.")
55 Select No, do not enable check in and check out Review your details on the final screen and click Done. You will be taken back to the Expanded Files Panel again. Click the Connects to Remote host icon again. This time Dreamweaver will connect to the remote host and display any files that are on the remote host on the left. To copy the files from your local computer to the remote host, simply select them in the right panel and click the Put Files icon Put all the files on the remote server (you don t need to put the template file). A copy of all the files will be seen on the right panel. When complete check your domain name from your browser e.g Your site will be live to the world Congratulations!


56 Part 18: Validate Contact Form If you are wondering how to validate your contact PHP form in dreamweaver, follow the simple steps below: Open your contacts.html in Dreamweaver CS4, while you see the contact form as below: Click on the Name box as seen above, now look out for Windows in the main menu of your dreamweaver and under that you will find Behaviors, click on that as shown below: Once you click on the Behaviors sub menu, you will be able to see the Behaviors table on the right side of your screen as shown below: Now click on the + sign as circled in red in the above image. Once you click on the + sign you will see a drop down menu, now click on Validate form as shown below:

57 Once you click on Validate Form, you will find a Validate Form screen flashing in the center of your screen as shown below:

58 Here you can define each field, by either checking the required value, for Name you can check the Anything checkbox, for , you can click the address checkbox and for Phone you can click the Number checkbox and if you want all the information compulsorily, you can check the required value check box for all etc., Click the OK button, you re done! That s it, you now know how to validate your contact PHP form in Dreamweaver CS4.
How to lay out a web page with CSS
 Activity 2.6 guide How to lay out a web page with CSS You can use table design features in Adobe Dreamweaver CS4 to create a simple page layout. However, a more powerful technique is to use Cascading Style
Creating Forms. Starting the Page. another way of applying a template to a page.
 Creating Forms Chapter 9 Forms allow information to be obtained from users of a web site. The ability for someone to purchase items over the internet or receive information from internet users has become
CS Multimedia and Communications. Lab 06: Webpage Tables and Image Links (Website Design part 3 of 3)
") CS 1033 Multimedia and Communications Lab 06: Webpage Tables and Image Links (Website Design part 3 of 3) REMEMBER TO BRING YOUR MEMORY STICK TO EVERY LAB! Table Properties Reference Guide The Property
CS 1033 Multimedia and Communications Lab 06: Webpage Tables and Image Links (Website Design part 3 of 3) REMEMBER TO BRING YOUR MEMORY STICK TO EVERY LAB! Table Properties Reference Guide The Property
Layout with Layers and CSS
 Layout with Layers and CSS Today we're going to make a Web site layout. Preparatory Step 1. Inside your folder create a new folder and name it layout. 2. Inside the layout folder create a new folder and
How to lay out a web page with CSS
 How to lay out a web page with CSS You can use table design features in Adobe Dreamweaver CS3 to create a simple page layout. However, a more powerful technique is to use Cascading Style Sheets (CSS).
To illustrate how to set TAG styles the <body> and <h1> tags (for the BODY and the HEADING 1 styles) will be adjusted.
 will be adjusted.") Chapter The formatting of CSS pages is carried out by setting the required styles. There are four different types of styles: Class which are custom styles that you create. You did this in Chapter 12. Tag
Chapter The formatting of CSS pages is carried out by setting the required styles. There are four different types of styles: Class which are custom styles that you create. You did this in Chapter 12. Tag
Dreamweaver 8. Project 5. Templates and Style Sheets
 Dreamweaver 8 Project 5 Templates and Style Sheets Starting Dreamweaver and Opening the Colorado Parks Web Site Click the Start button on the Windows taskbar Point to All Programs on the Start menu, point
CSS worksheet. JMC 105 Drake University
 CSS worksheet JMC 105 Drake University 1. Download the css-site.zip file from the class blog and expand the files. You ll notice that you have an images folder with three images inside and an index.html
ICT IGCSE Practical Revision Presentation Web Authoring
 21.1 Web Development Layers 21.2 Create a Web Page Chapter 21: 21.3 Use Stylesheets 21.4 Test and Publish a Website Web Development Layers Presentation Layer Content layer: Behaviour layer Chapter 21:
ORB Education Quality Teaching Resources
 These basic resources aim to keep things simple and avoid HTML and CSS completely, whilst helping familiarise students with what can be a daunting interface. The final websites will not demonstrate best
Using Dreamweaver CC. Logo. 4 Creating a Template. Page Heading. Page content in this area. About Us Gallery Ordering Contact Us Links
 Using Dreamweaver CC 4 Creating a Template Now that the main page of our website is complete, we need to create the rest of the pages. Each of them will have a layout that follows the plan shown below.
Introduction to Dreamweaver CS3
 TUTORIAL 2 Introduction to Dreamweaver CS3 In Tutorial 2 you will create a sample site while you practice the following skills with Adobe Dreamweaver CS3: Creating pages based on a built-in CSS page layout
ICT IGCSE Practical Revision Presentation Web Authoring
 21.1 Web Development Layers 21.2 Create a Web Page Chapter 21: 21.3 Use Stylesheets 21.4 Test and Publish a Website Web Development Layers Presentation Layer Content layer: Behaviour layer Chapter 21:
Dreamweaver Basics Outline
 Dreamweaver Basics Outline The Interface Toolbar Status Bar Property Inspector Insert Toolbar Right Palette Modify Page Properties File Structure Define Site Building Our Webpage Working with Tables Working
Table Basics. The structure of an table
 TABLE -FRAMESET Table Basics A table is a grid of rows and columns that intersect to form cells. Two different types of cells exist: Table cell that contains data, is created with the A cell that
Microsoft Expression Web Quickstart Guide
 Microsoft Expression Web Quickstart Guide MS-Expression Web Quickstart Guide Page 1 of 24 Expression Web Quickstart Guide (20-Minute Training) Welcome to Expression Web. When you first launch the program,
Dear Candidate, Thank you, Adobe Education
 Dear Candidate, In preparation for the Web Communication certification exam, we ve put together a set of practice materials and example exam items for you to review. What you ll find in this packet are:
How to lay out a web page with CSS
 How to lay out a web page with CSS A CSS page layout uses the Cascading Style Sheets format, rather than traditional HTML tables or frames, to organize the content on a web page. The basic building block
Using Dreamweaver CS6
 Using Dreamweaver CS6 4 Creating a Template Now that the main page of our website is complete, we need to create the rest of the pages. Each of them will have a layout that follows the plan shown below.
How to set up a local root folder and site structure
 Activity 2.1 guide How to set up a local root folder and site structure The first thing to do when creating a new website with Adobe Dreamweaver CS3 is to define a site and identify a root folder where
ADOBE DREAMWEAVER CS4 BASICS
 ADOBE DREAMWEAVER CS4 BASICS Dreamweaver CS4 2 This tutorial focuses on the basic steps involved in creating an attractive, functional website. In using this tutorial you will learn to design a site layout,
Introducing Cascading Style Sheets. Cascading Style Sheet Basics Creating Styles Using Styles Manipulating Styles Text Formatting with CSS
 Introducing Cascading Style Sheets Cascading Style Sheet Basics Creating Styles Using Styles Manipulating Styles Text Formatting with CSS Cascading Style Sheet Basics CSS has many benefits: The pages look
Dreamweaver CS4: Layout Guide. Převzato z
 Dreamweaver CS4: Layout Guide Převzato z www.bewebmaster.com Intro This tutorial will help you: 1. Define a new Dreamweaver web site 2. Create a new HTML file 3. Create a new CSS file and attach it to
Project 1: Creating a Web Site from Scratch. Skills and Tools: Use Expression Web tools to create a Web site
 E00EW3.qxp 4/14/2007 3:17 PM Page 1 Workshops w Introduction The Workshop is all about being creative and thinking outside of the box. These workshops will help your right-brain soar, while making your
Getting Started with CSS Sculptor 3
 Getting Started with CSS Sculptor 3 With CSS Sculptor, you can quickly create a cross-browser compatible layout with custom widths, margins, padding, background images and more. Additionally, you can use
Designing the Home Page and Creating Additional Pages
 Designing the Home Page and Creating Additional Pages Creating a Webpage Template In Notepad++, create a basic HTML webpage with html documentation, head, title, and body starting and ending tags. From
USING STYLESHEETS TO DESIGN A WEB SITE IN DREAMWEAVER MX 2004
 USING STYLESHEETS TO DESIGN A WEB SITE IN DREAMWEAVER MX 2004 Introduction This document assumes that you are familiar with the use of a computer keyboard and mouse, have a working knowledge of Microsoft
Create a Web Page with Spry Navigation Bar. March 30, 2010
 Create a Web Page with Spry Navigation Bar March 30, 2010 Open a new web page by selecting File on the Menu bar, and pick Open. Select HTML as the page type and none from the layout list. Finally, we press
Client Interview. Interview Topics. Goals and Target Audience. Activity 3.1 Worksheet. Client Name:
 Activity 3.1 Worksheet Client Interview Team Name: Date: Client Name: Interview Topics Goals and target audience Content Design requirements Delivery requirements Goals and Target Audience Identify three
Chapter 1 Introduction to Dreamweaver CS3 1. About Dreamweaver CS3 Interface...4. Creating New Webpages...10
 CONTENTS Chapter 1 Introduction to Dreamweaver CS3 1 About Dreamweaver CS3 Interface...4 Title Bar... 4 Menu Bar... 4 Insert Bar... 5 Document Toolbar... 5 Coding Toolbar... 6 Document Window... 7 Properties
Web Publishing Basics II
 Web Publishing Basics II Jeff Pankin Information Services and Technology Table of Contents Course Objectives... 2 Create a Site Definition... 3 The Dreamweaver CS4 Interface... 4 Panels are groups of icons
Using Dreamweaver CS6
 6 So far we have used CSS to arrange the elements on our web page. We have also used CSS for some limited formatting. In this section we will take full advantage of using CSS to format our web site. Just
COMSC-031 Web Site Development- Part 2
 COMSC-031 Web Site Development- Part 2 Part-Time Instructor: Joenil Mistal December 5, 2013 Chapter 13 13 Designing a Web Site with CSS In addition to creating styles for text, you can use CSS to create
Creating your first website Part 4: Formatting your page with CSS
 Adobe - Developer Center : Creating your first website Part 4: Formatting your page... Page 1 of 23 Dreamweaver Article Creating your first website Part 4: Formatting your page with CSS Jon Varese Adobe
Figure 1 Properties panel, HTML mode
 How to add text Adding text to a document To add text to a Dreamweaver document, you can type text directly in the Document window, or you can cut and paste text. You modify text by using the Properties
Page Layout Using Tables
 This section describes various options for page layout using tables. Page Layout Using Tables Introduction HTML was originally designed to layout basic office documents such as memos and business reports,
P3e REPORT WRITER CREATING A BLANK REPORT
 P3e REPORT WRITER CREATING A BLANK REPORT 1. On the Reports window, select a report, then click Copy. 2. Click Paste. 3. Click Modify. 4. Click the New Report icon. The report will look like the following
Dreamweaver CS6. Table of Contents. Setting up a site in Dreamweaver! 2. Templates! 3. Using a Template! 3. Save the template! 4. Views!
 Dreamweaver CS6 Table of Contents Setting up a site in Dreamweaver! 2 Templates! 3 Using a Template! 3 Save the template! 4 Views! 5 Properties! 5 Editable Regions! 6 Creating an Editable Region! 6 Modifying
Dreamweaver Basics. Planning your website Organize site structure Plan site design & navigation Gather your assets
 Dreamweaver Basics Planning your website Organize site structure Plan site design & navigation Gather your assets Creating your website Dreamweaver workspace Define a site Create a web page Linking Manually
Dreamweaver CS3 Lab 2
 Dreamweaver CS3 Lab 2 Using an External Style Sheet in Dreamweaver Creating the site definition First, we'll set up the site and define it so that Dreamweaver understands the site structure for your project.
Title and Modify Page Properties
 Dreamweaver After cropping out all of the pieces from Photoshop we are ready to begin putting the pieces back together in Dreamweaver. If we were to layout all of the pieces on a table we would have graphics
The Dreamweaver Interface
 The Dreamweaver Interface Let s take a moment to discuss the different areas of the Dreamweaver screen. The Document Window The Document Window shows you the current document. This is where you are going
Flash Image Enhancer Manual DMXzone.com Flash Image Enhancer Manual
 Flash Image Enhancer Manual Copyright 2009 All Rights Reserved Page 1 of 62 Index Flash Image Enhancer Manual... 1 Index... 2 About Flash Image Enhancer... 3 Features in Detail... 3 Before you begin...
Getting Started with Eric Meyer's CSS Sculptor 1.0
 Getting Started with Eric Meyer's CSS Sculptor 1.0 Eric Meyer s CSS Sculptor is a flexible, powerful tool for generating highly customized Web standards based CSS layouts. With CSS Sculptor, you can quickly
How to create and edit a CSS rule
 Adobe Dreamweaver CS6 Project 3 guide How to create and edit a CSS rule You can create and edit a CSS rule in two locations: the Properties panel and the CSS Styles panel. When you apply CSS styles to
The figure below shows the Dreamweaver Interface.
 Dreamweaver Interface Dreamweaver Interface In this section you will learn about the interface of Dreamweaver. You will also learn about the various panels and properties of Dreamweaver. The Macromedia
Adobe Dreamweaver CS5 Tutorial
 Adobe Dreamweaver CS5 Tutorial GETTING STARTED This tutorial focuses on the basic steps involved in creating an attractive, functional website. In using this tutorial you will learn to design a site layout,
ICT IGCSE Practical Revision Presentation Word Processing
 Page Layout Header & Footer Font Styles Image wrapping List Styles Indentation & Spacing Find & Replace Create/Format Table Common Mistakes Orphan & Widows Completed Example Mail Merge Page Layout (Size
Microsoft FrontPage. An Introduction to. Lecture No.1. Date: April Instructor: Mr. Mustafa Babagil. Prepared By: Nima Hashemian
 An Introduction to Microsoft FrontPage Lecture No.1 Date: April 20. 2007 Instructor: Mr. Mustafa Babagil Prepared By: Nima Hashemian 2006 An Introduction to FrontPage Mathematics Department Eastern Mediterranean
Editing your SiteAssist Professional Template
 Editing your SiteAssist Professional Template This Solution Recipe shows you how you can edit your SiteAssist Professional created templates to suit your needs. SiteAssist Professional creates your entire
Dreamweaver CS 5.5. University Information Technology Services. Training, Outreach, Learning Technologies, and Video Production
 Dreamweaver CS 5.5 Creating Web Pages with a Template University Information Technology Services Training, Outreach, Learning Technologies, and Video Production Copyright 2012 KSU Department of Information
Dreamweaver: Web Forms
 Dreamweaver: Web Forms Introduction Web forms allow your users to type information into form fields on a web page and send it to you. Dreamweaver makes it easy to create them. This workshop is a follow-up
FrontPage 2000 Tutorial -- Advanced
 FrontPage 2000 Tutorial -- Advanced Shared Borders Shared Borders are parts of the web page that share content with the other pages in the web. They are located at the top, bottom, left side, or right
Create a three column layout using CSS, divs and floating
 GRC 275 A6 Create a three column layout using CSS, divs and floating Tasks: 1. Create a 3 column style layout 2. Must be encoded using HTML5 and use the HTML5 semantic tags 3. Must se an internal CSS 4.
EDITOR GUIDE. Button Functions:...2 Inserting Text...4 Inserting Pictures...4 Inserting Tables...8 Inserting Styles...9
 EDITOR GUIDE Button Functions:...2 Inserting Text...4 Inserting Pictures...4 Inserting Tables...8 Inserting Styles...9 1 Button Functions: Button Function Display the page content as HTML. Save Preview
Dreamweaver CS3 Concepts and Techniques
 Dreamweaver CS3 Concepts and Techniques Chapter 3 Tables and Page Layout Part 1 Other pages will be inserted in the website Hierarchical structure shown in page DW206 Chapter 3: Tables and Page Layout
Using Dreamweaver CC. 6 Styles in Websites. Exercise 1 Linked Styles vs Embedded Styles
 Using Dreamweaver CC 6 So far we have used CSS to arrange the elements on our web page. We have also used CSS for some limited formatting. In this section we will take full advantage of using CSS to format
Creating a Navigation Bar with a Rollover Effect
 Creating a Navigation Bar with a Rollover Effect These instructions will teach you how to create your own navigation bar with a roll over effect for your personal website using Adobe Dreamweaver CS4. Your
Step 1 Download and Install KompoZer Step by step instructions to build your first web page using KompoZer web editor.
 All Creative Designs HTML Web Tutorial for PC Using KompoZer New version 2012 now available at: http://www.allcreativedesigns.com.au/pages/tutorials.html Step 1 Download and Install KompoZer Step by step
Handout created by Cheryl Tice, Instructional Support for Technology, GST BOCES
 Handout created by Cheryl Tice, Instructional Support for Technology, GST BOCES Intro to FrontPage OVERVIEW: This handout provides a general overview of Microsoft FrontPage. AUDIENCE: All Instructional
Before you begin, make sure you have the images for these exercises saved in the location where you intend to create the Nuklear Family Website.
 9 Now it s time to challenge the serious web developers among you. In this section we will create a website that will bring together skills learned in all of the previous exercises. In many sections, rather
Dreamweaver Template Tutorial - How to create a website from a template
 Dreamweaver Template Tutorial - How to create a website from a template In this tutorial you will create a website using Dreamweaver s premade templates. You are going to learn how to style them using
Fish Eye Menu DMXzone.com Fish Eye Menu Manual
 Fish Eye Menu Manual Page 1 of 33 Index Fish Eye Menu Manual... 1 Index... 2 About Fish Eye Menu... 3 Features in Detail... 4 Integrated in Dreamweaver... 6 Before you begin... 7 Installing the extension...
Dreamweaver Tutorial #2
 Dreamweaver Tutorial #2 My web page II In this tutorial you will learn: how to use more advanced features for your web pages in Dreamweaver what Cascading Style Sheets (CSS) are and how to use these in
Dreamweaver 101. Here s the desktop icon for Dreamweaver CS5: Click it open. From the top menu options, choose Site and New Site
 Dreamweaver 101 First step: For your first time out, create a folder on your desktop to contain all of your DW pages and assets (images, audio files, etc.). Name it. For demonstration, I ll name mine dw_magic.
Eng 110, Spring Week 03 Lab02- Dreamwaver Session
 Eng 110, Spring 2008 Week 03 Lab02- Dreamwaver Session Assignment Recreate the 3-page website you did last week by using Dreamweaver. You should use tables to control your layout. You should modify fonts,
Adobe Dreamweaver. Essentials of Adobe Dreamweaver. Classroom Course Manual
 Adobe Dreamweaver Essentials of Adobe Dreamweaver Classroom Course Manual Written, designed, and produced by: DoIT Software Training for Students Last Updated //07 About Software Training for Students
Rich Text Editor Quick Reference
 Rich Text Editor Quick Reference Introduction Using the rich text editor is similar to using a word processing application such as Microsoft Word. After data is typed into the editing area it can be formatted
Using Dreamweaver CS6
 Using Dreamweaver CS6 7 Dynamic HTML Dynamic HTML (DHTML) is a term that refers to website that use a combination of HTML, scripting such as JavaScript, CSS and the Document Object Model (DOM). HTML and
Dazzle the Web with Dynamic Dreamweaver, Part II
 Dazzle the Web with Dynamic Dreamweaver, Part II In the second Dreamweaver workshop we will learn the following skills: 1. Adding hyperlinks to our home page 2. Adding images to our home page 3. Creating
Introduction to CSS. 2 Sep 13. Derek Peacock. An introduction to defining CSS style rules using tags, classes and ids.
 An introduction to defining CSS style rules using tags, classes and ids. 1 The HTML file contains the raw content of a web page, and the css style sheet should control all the design and look of a web
Dreamweaver CS5 Lab 2
 Dreamweaver CS5 Lab 2 Using an External Style Sheet in Dreamweaver Creating the site definition First, we'll set up the site and define it so that Dreamweaver understands the site structure for your project.
The Newsletter will contain a Title for the newsletter, a regular border, columns, Page numbers, Header and Footer and two images.
 Creating the Newsletter Overview: You will be creating a cover page and a newsletter. The Cover page will include Your Name, Your Teacher's Name, the Title of the Newsletter, the Date, Period Number, an
Adobe Dreamweaver CS6 Digital Classroom
 Adobe Dreamweaver CS6 Digital Classroom Osborn, J ISBN-13: 9781118124093 Table of Contents Starting Up About Dreamweaver Digital Classroom 1 Prerequisites 1 System requirements 1 Starting Adobe Dreamweaver
Reference Services Division Presents. Microsoft Word 2
 Reference Services Division Presents Microsoft Word 2 This handout covers the latest Microsoft Word 2010. This handout includes instructions for the tasks we will be covering in class. Basic Tasks Review
Dreamweaver MX Overview. Maintaining a Web Site
 Dreamweaver MX Overview Maintaining a Web Site... 1 The Process... 1 Filenames... 1 Starting Dreamweaver... 2 Uploading and Downloading Files... 6 Check In and Check Out Files... 6 Editing Pages in Dreamweaver...
< building websites with dreamweaver mx >
 < building websites with dreamweaver mx > < plano isd instructional technology department > < copyright = 2002 > < building websites with dreamweaver mx > Dreamweaver MX is a powerful Web authoring tool.
ITSE 1401 Web Design Tools Lab Project 4 (Expression Web 4 - Units M, N, O, P) Last revised: 1/9/14
 Last revised: 1/9/14") (Expression Web 4 - Units M, N, O, P) Last revised: 1/9/14 Directions: Perform the tasks below on your personal computer or a lab computer. Professor Smith shows the score points for each activity in parentheses.
(Expression Web 4 - Units M, N, O, P) Last revised: 1/9/14 Directions: Perform the tasks below on your personal computer or a lab computer. Professor Smith shows the score points for each activity in parentheses.
Introduction to WEB PROGRAMMING
 Introduction to WEB PROGRAMMING Web Languages: Overview HTML CSS JavaScript content structure look & feel transitions/animation s (CSS3) interaction animation server communication Full-Stack Web Frameworks
CSS Design and Layout Basic Exercise instructions. Today's exercises. Part 1: Arrange Page into Sections. Part 1, details (screenshot below)
") CSS Design and Layout Basic Exercise instructions You may want to bring your textbook to Exercises to look up syntax and examples. Have a question? Ask for help, or look at the book or lecture slides.
CSS Design and Layout Basic Exercise instructions You may want to bring your textbook to Exercises to look up syntax and examples. Have a question? Ask for help, or look at the book or lecture slides.
Surveyor Getting Started Guide
 Surveyor Getting Started Guide This Getting Started Guide shows you how you can get the most out of Surveyor from start to finish. Surveyor can accomplish a number of tasks that will be extremely beneficial
ADOBE 9A Adobe Dreamweaver CS4 ACE.
 ADOBE 9A0-090 Adobe Dreamweaver CS4 ACE http://killexams.com/exam-detail/9a0-090 ,D QUESTION: 74 You use an image throughout your Web site. You want to be able to add this image to various Web pages without
Dreamweaver Tutorials Working with Tables
 Dreamweaver Tutorials This tutorial will explain how to use tables to organize your Web page content. By default, text and other content in a Web page flow continuously from top to bottom in one large
Sign in and join ADC Newsletters Feedback. Creating your first website Part 2: Creating the page layout
 1 of 14 2/14/2008 2:31 PM Adobe Dreamweaver Article Adobe Developer Connection Sign in and join ADC Newsletters Feedback RSS Creating your first website Part 2: Creating the page layout Jon Varese Adobe
CS Multimedia and Communications REMEMBER TO BRING YOUR MEMORY STICK TO EVERY LAB!
 CS 1033 Multimedia and Communications REMEMBER TO BRING YOUR MEMORY STICK TO EVERY LAB! Lab 06: Introduction to KompoZer (Website Design - Part 3 of 3) Lab 6 Tutorial 1 In this lab we are going to learn
Lab 1: Introducing HTML5 and CSS3
 CS220 Human- Computer Interaction Spring 2015 Lab 1: Introducing HTML5 and CSS3 In this lab we will cover some basic HTML5 and CSS, as well as ways to make your web app look and feel like a native app.
Learning Adobe DreamWeaver CC. Module 1 Contents. Chapter 1: Introduction to DreamWeaver CC
 Module 1 Contents Chapter 1: Introduction to DreamWeaver CC Design Considerations...1-1 Types of Graphics...1-2 Backgrounds and Text...1-2 Planning the Navigation...1-2 The DreamWeaver Screen...1-3 Workspaces...
Lesson 1 using Dreamweaver CS3. To get started on your web page select the link below and copy (Save Picture As) the images to your image folder.
 the images to your image folder.") Lesson 1 using Dreamweaver CS3 To get started on your web page select the link below and copy (Save Picture As) the images to your image folder. Click here to get images for your web page project. (Note:
Lesson 1 using Dreamweaver CS3 To get started on your web page select the link below and copy (Save Picture As) the images to your image folder. Click here to get images for your web page project. (Note:
Hands On: Dreamweaver CS3 NEW SPRY Widgets
 What is a Spry Widget? Spry widgets provide access to dynamic and interactive elements you might like to have on your Web page. These Spry elements include: Menu Bars Tabbed Panels Accordion Effects Collapsible
CSS Exercises. Create a basic CSS layout Use BlueFish to open layout.html Create a layout using <div> tags Use a browser (Firefox) to view your page
 to view your page") CSS Exercises Exercise 1: Create a basic CSS layout Use BlueFish to open layout.html Create a layout using tags Use a browser (Firefox) to view your page Task 1 Open layout.html in BlueFish a blank
CSS Exercises Exercise 1: Create a basic CSS layout Use BlueFish to open layout.html Create a layout using tags Use a browser (Firefox) to view your page Task 1 Open layout.html in BlueFish a blank
Instructions for Formatting MLA Style Papers in Microsoft Word 2010
 Instructions for Formatting MLA Style Papers in Microsoft Word 2010 To begin a Microsoft Word 2010 project, click on the Start bar in the lower left corner of the screen. Select All Programs and then find
Adobe Dreamweaver CC 17 Tutorial
 Adobe Dreamweaver CC 17 Tutorial GETTING STARTED This tutorial focuses on the basic steps involved in creating an attractive, functional website. In using this tutorial you will learn to design a site
Using Adobe Contribute 4 A guide for new website authors
 Using Adobe Contribute 4 A guide for new website authors Adobe Contribute allows you to easily update websites without any knowledge of HTML. This handout will provide an introduction to Adobe Contribute
Dreamweaver CS5 Lab 4: Sprys
 Dreamweaver CS5 Lab 4: Sprys 1. Create a new html web page. a. Select file->new, and then Blank Page: HTML: 2 column liquid, left sidebar, header and footer b. DocType: XHTML 1.0 Strict c. Layout CSS:
Unit 8. Lesson 8.1. Microsoft FrontPage. Introduction. Microsoft FrontPage-1. Microsoft FrontPage
 Microsoft FrontPage Unit 8 Microsoft FrontPage Introduction Lesson 8.1 Microsoft FrontPage-1 A number of Software Packages are available in market for creating a website. Among popular software s are Dreamweaver,
Using Dreamweaver. 4 Creating a Template. Logo. Page Heading. Home About Us Gallery Ordering Contact Us Links. Page content in this area
 4 Creating a Template Now that the main page of our website is complete, we need to create the rest of the pages. Each of them will have a layout that follows the plan that is shown below. Logo Page Heading
Title and Modify Page Properties
 Dreamweaver After cropping out all of the pieces from Photoshop we are ready to begin putting the pieces back together in Dreamweaver. If we were to layout all of the pieces on a table we would have graphics
Index. alt, 38, 57 class, 86, 88, 101, 107 href, 24, 51, 57 id, 86 88, 98 overview, 37. src, 37, 57. backend, WordPress, 146, 148
 Index Numbers & Symbols (angle brackets), in HTML, 47 : (colon), in CSS, 96 {} (curly brackets), in CSS, 75, 96. (dot), in CSS, 89, 102 # (hash mark), in CSS, 87 88, 99 % (percent) font size, in CSS,
Advanced Dreamweaver CS6
 Advanced Dreamweaver CS6 Overview This advanced Dreamweaver CS6 training class teaches you to become more efficient with Dreamweaver by taking advantage of Dreamweaver's more advanced features. After this
AGENDA :: MULTIMEDIA TOOLS :: (1382) :: CLASS NOTES
 :: CLASS NOTES") CLASS :: 13 12.01 2014 AGENDA SIMPLE CSS MENU W/ HOVER EFFECTS :: The Nav Element :: Styling the Nav :: UL, LI, and Anchor Elements :: Styling the UL and LI Elements TEMPLATE CREATION :: Why Templates?
CLASS :: 13 12.01 2014 AGENDA SIMPLE CSS MENU W/ HOVER EFFECTS :: The Nav Element :: Styling the Nav :: UL, LI, and Anchor Elements :: Styling the UL and LI Elements TEMPLATE CREATION :: Why Templates?