Copyright 2013 Horizon Business Services, Inc. Caterease Software Version 12.5 User s Guide
|
|
|
- Ralph Gallagher
- 5 years ago
- Views:
Transcription
1 Copyright 2013 Horizon Business Services, Inc. Caterease Software Version 12.5 User s Guide
2
3 Table of Contents UNIT 1: EVENT MANAGER EVENT MANAGER INTRODUCTION EVENT MANAGER SUB-EVENT DISPLAY UNIT 2: NAVIGATION TOOLS NAVIGATION BAR EVENT FINDER USING THE GO TO TOOL UNIT 3: BOOKING A NEW EVENT IN EVENT MANAGER BOOKING A NEW EVENT FOR AN EXISTING CUSTOMER FROM EVENT MANAGER SEARCHING FOR ACCOUNTS ENTERING EVENT INFORMATION FILLING IN EVENT INFORMATION: ADDING CONTACTS EVENT DATE EVENT MANAGER MISCELLANEOUS TAB ADDING A SUB-EVENT TIME WIZARD SELECTING A NEW ROOM ROOM SELECTION WIZARD COPYING SETUP NOTES FROM THE SCRATCH PAD WORKING WITH SITE LOCATION AND DIRECTIONS SELECTING FOOD/SERVICE MENUS GENERATING A PRINT ING A PRINT (SEE IMAGE ON NEXT PAGE) UNIT 4: EVENT SCHEDULER EVENT SCHEDULER INTRODUCTION CHANGING SCHEDULER VIEWS GROUPING THE CALENDAR ADDING NOTES TO THE SCHEDULER UNIT 5: ADVANCED MENU FEATURES USING THE INSERT MODE WHEN RETRIEVING MENU ITEMS RETRIEVING MENU PACKAGES INTO AN EVENT ADDING AND MODIFYING MENU ITEM DESCRIPTIONS ADDING A NEW FOOD/SERVICE ITEM CUSTOMIZING THE FOOD/SERVICE TAB COPYING MENUS FROM ORDER TO ORDER GENERATING AN INGREDIENTS LIST GENERATING A REQUIRED ITEM LIST UNIT 6: SHIFTS, STAFFING, AND COMMENTS ADDING STAFFING TO AN EVENT ADDING SHIFTS TO AN EVENT COPYING EVENT COMMENTS FROM THE SCRATCH PAD UNIT 7: BOOKING A NEW EVENT USING THE EVENT WIZARD THE EVENT WIZARD SCREEN STEP ONE: SELECTING AN ACCOUNT STEP TWO: ENTERING BASIC DETAILS TIME WIZARD ENTERING ROOM DETAILS ROOM SELECTION WIZARD STEP THREE: RETRIEVING MENU ITEMS SAVING THE EVENT UNIT 8: BOOKING A NEW EVENT FROM THE SCHEDULER
4 VIEWING THE SUB-EVENTS SCHEDULER MODIFYING EVENT INFORMATION ACCESSING EVENT WIZARD FROM THE SUB-EVENT CALENDAR UNIT 9: BOOKING A NEW EVENT FROM ACCOUNT MANAGER ACCOUNT MANAGER SCREEN ADDING EVENTS FROM ACCOUNT MANAGER UNIT 10: ADDING A NEW ACCOUNT IN ACCOUNT MANAGER FILLING OUT THE MISCELLANEOUS TAB ADDING CONTACTS TO AN ACCOUNT UNIT 11: ADDING AN ACCOUNT IN EVENT WIZARD ADDING AN ACCOUNT IN EVENT WIZARD ADDING A CONTACT PERSON UNIT 12: ADDING A NEW ACCOUNT IN OTHER WAYS ADDING A NEW ACCOUNT IN EVENT MANAGER ADDING A NEW CUSTOMER WHO IS NOT A COMPANY UNIT 13: ADVANCED ACCOUNT MANAGEMENT DELETING A CURRENT ACCOUNT VIEWING OR EDITING CONTACT DETAILS VIEWING OR EDITING EVENTS GENERATING A BILLING STATEMENT GENERATING REPORTS FROM ACCOUNT MANAGER POSTING PAYMENTS TO AN ACCOUNT COMBINING DUPLICATE ACCOUNTS CREATING A DEFAULT SITE LOCATION UNIT 14: CUSTOMIZING THE SCREEN DISPLAY CUSTOMIZING FIELDS IN ACCOUNT MANAGER CUSTOMIZING THE SCREEN DISPLAY IN EVENT MANAGER USING THE SPLIT SCREEN IN EVENT MANAGER ACCESSING THE FULL-EXPAND MODE CUSTOMIZING THE SUB-EVENT SCREEN DISPLAY IN EVENT MANAGER CUSTOMIZING THE SUB-EVENT SCREEN LAYOUT CREATING A CUSTOM LAYOUT UNIT 15: EVENT MANAGER TOOLS THE EVENT MANAGER TOOLBAR USING THE EVENT CHECKLIST USING THE EVENT TIMELINE DISPLAYING EVENT TAX/SERVICE CHARGE RATES GETTING DRIVING DIRECTIONS CLICK TO GET DIRECTIONSPOSTING PAYMENTS TO AN EVENT SCHEDULING FUTURE DEPOSITS FOR AN EVENT ADDING SCHEDULED DEPOSITS TO AN EVENT CHECKING EVENT STATUS HISTORY VIEWING RELATED EVENTS USING REQUIRED ITEMS USING EVENT-RELATED FILES APPLYING EVENT DISCOUNT RATES MANAGING MULTIPLE EVENTS SIMULTANEOUSLY COPYING AN EVENT UNIT 16: TRACKING CURRENT EVENTS RUNNING A CURRENT EVENTS QUERY CUSTOMIZING THE GRID SORTING AND GROUPING GRID DATA SAVING THE GRID VIEW CREATING THE GRID FILTER
5 SAVING THE GRID FILTER PRINTING/EXPORTING GRID DATA MULTIPLE/BATCH PRINTING ING IN A BATCH USING THE EZ CHART VIEW VIEWING GRID RESULTS IN LAYOUT VIEW GENERATING THE CLIENT CONTACTS QUERY GENERATING THE ACCOUNTS RECEIVABLE QUERY RUNNING THE ACCOUNTS RECEIVABLE REPORT UNIT 17: USING THE EVENTS QUERY QUERYING EVENTS SAVING CUSTOM QUERIES EDITING AN EVENTS QUERY IN A BATCH UNIT 18: ACTIVITY QUERIES VS. REPORTS FOOD SERVICE ACTIVITY QUERY FOOD SERVICE ACTIVITY QUERY RESULTS SCREEN TRACKING FOOD/SERVICE ITEMS IN EXPRESS AND STANDARD VERSIONS RUNNING THE PAYMENTS ACTIVITY QUERY VIEWING THE RESULTS OF A PAYMENT ACTIVITY QUERY TRACKING PAYMENTS ITEMS IN EXPRESS AND STANDARD VERSIONS UNIT 19: PROSPECT MANAGER USING THE PROSPECT MANAGER TOOL ESTABLISHING A FILTER SAVING A FILTER UNIT 20: CONTACT MANAGER THE CONTACT MANAGER MODULE ADDING REMINDERS THROUGH EVENT MANAGER ADDING CONTACT HISTORY THROUGH EVENT MANAGER CONTACT HISTORY: AUTO-SAVE CREATING AUTO-REMINDERS INSERTING MERGE FIELDS INTO AN AUTO-REMINDER MESSAGE MANAGING CURRENT REMINDERS VIEWING REMINDERS IN A CALENDAR UNIT 21: MARKETING TOOLS USING MARKETING TOOLS INSERTING IMAGES INTO MERGE DOCUMENTS INSERTING TABLES INTO MERGE DOCUMENTS INSERTING DYNAMIC MERGE TABLES UNIT 22: USING THE PRINT DESIGNER USING THE PRINT DESIGNER CUSTOMIZING TEXT BLOCKS IN A PRINT FORMATTING FOOD/SERVICE ITEMS IN A PRINT ADVANCED PRINT SETTINGS USING THE MISCELLANEOUS PRINTS DESIGNER UNIT 23: ADDING MENUS AND MENU ITEMS ADDING NEW MENUS ADDING MENU ITEMS CREATING MENU PACKAGES (SEE IMAGE ON FOLLOWING PAGE) UNIT 24: ESTABLISHING SYSTEM SECURITY SETTING UP SECURITY ADDING USERS AND PASSWORDS ESTABLISHING INDIVIDUAL ACCESS RIGHTS CREATING USER GROUPS
6 UNIT 25: GENERAL PROGRAM SETUP ADDING ITEMS TO THE QUICKPICK LISTS CUSTOMIZING NAME FIELDS CREATING REQUIRED FIELDS CREATING USER-DEFINED FIELDS INPUTTING USER-DEFINED FIELDS CREATING NEW BOOKING DEFAULTS SETTING TAX/SERVICE CHARGE DEFAULTS USING A DEFAULT DEPOSIT SCHEDULE CREATING A DEFAULT EVENT TIMELINE ACCESSING THE GLOBAL SETTINGS MANAGERS TAB GLOBAL SETTINGS: FIELDS TAB SETTING UP THE SCRATCH PAD USING THE SITE LOCATION DATABASE ADDING BANQUET ROOMS AND AVAILABLE SETUP STYLES ASSIGNING SETUP STYLES AND CAPACITIES BANQUET ROOM BLOCKING UNIT 26: THE BACKSTAGE TAB USING THE BACKSTAGE TAB UNIT 27: BACKING UP DATA AND MANAGING DELETED EVENTS PERFORMING A BACKUP BACKING UP YOUR BACKUP ARCHIVING YOUR EVENTS TRACKING DELETED EVENTS PRINTS & REPORTS GENERAL WINDOW EVENT ACTIVITY FORECASTING FINANCIALS MANAGEMENT GRAPHS ACCOUNTS CONTACT MANAGER MENU MANAGER GUESTROOMS MANAGER
7 SECTION 1: Events Unit 1: Event Manager Topics covered in this unit include: Introducing the Event Manager Exploring the Event Display Exploring the Sub-Event Display
8
9 Event and Sub-Event Displays Detail Grid Tools Event Manager Toolbar Event Manager Introduction The Event Manager is the heart of the Caterease program. This is the place to go when you want to review an existing event in detail, modify an existing event, or add a new event. You can also generate numerous prints from Event Manager, including the Contract, Invoice, or Banquet Event Order (BEO) for a particular event. Even if you choose to add a new event using the Event Wizard (discussed later in this guide), the process will ultimately lead you to the Event Manager screen. The Event Manager has two main displays: Event and Sub-Event. The Event display allows you to view or edit any general event information, such as party name, theme, guest count, event date, etc. The Sub-Event display allows you to enter more specific event details, such as event times, event venue, food and service items, staffing, etc. As with the other Managers in the program, the Event Manager makes use of the main Caterease toolbars at the top of the screen. Buttons on these toolbars allow you to add or delete events, search for a particular event, navigate quickly from one event to another, and perform a host of other powerful tasks. You can even generate a print of the Manager screen you are viewing or access the program s on-board Help menu for assistance
10 Sub-events are listed in this panel Sub-Event Tabs Sub-Event Food/Service Items Event Manager Sub-Event Display Every event has at least one sub-event, which contains the specifics (times, menu, function, space) of that event. In other cases, a sub-event is just what it sounds like: a small part of a larger event. For example, you might have an all-day function that is made up of, say, three sub-events: a breakfast, a lunch, and a dinner. Or, you may have a single function that takes place over multiple days, and each day could be an individual sub-event. Since you can rename the term Sub-Event, as it appears in Caterease, as anything you want, you might also use this feature to create multiple proposals for an event
11 Unit 2: Navigation Tools Topics covered in this unit include: Introducing the Navigation Bar Using the Event Finder Tool Using the Go-To Tool
12 - 12 -

13 Navigation Bar What is the purpose of the Navigation bar? The navigation buttons help you move through the Event Manager database. By default, your Event Manager screen displays the current event or, if no event is scheduled for today, the closest event to today. From Event Manager, follow the guidelines below to locate an event: 1. Click the Next arrow to move forward to the next event. 2. Click the Prior arrow to move to the previous event. 3. Click the Next Page arrow to move forward to the bottom of the Detail Grid view. Note: The records in Event Manager are based on a table of records which display chronologically in a grid. Next Page refers to the last record on that page. See Unit 14 for additional information about Grid Views. 4. Click the Prior Page arrow to move back to the previous page of the Detail Grid view. 5. Click the Last arrow to move to the last customer located in the Detail Grid view. 6. Click the First arrow to move to the first customer in the Detail Grid view

14 Event Finder What is the Event Finder? The Event Finder is a powerful tool to locate existing events in your program. You can search by various criteria, search in a backward or forward direction from your current position, and even display a list of all records that matched your search. Finding an Event 1. Click the Find button, located on the Home ribbon tab at the top of your Caterease screen. 2. In the Search By Fields area, type the text you would like to search for. Note: You may search by more than one field. 3. In the Search Rules field, select the appropriate rule. 4. [Optional] Click the radio button next to And or Or, within the Multiple Field Operator section, if you are searching by multiple search criteria. 5. [Optional] Click the Include Prefixes checkbox and then type the prefix (a, an, the) into the Search Prefixes section to include prefixes in your search. 6. Click the Find Records button. Note: If the first match is not the record you are seeking, you can click Find Records again. 7. Once your record is located, click Close. Type what you want to search for Displays all matches for your search Click here to find your records Establish your search criteria
15 Using the Go To Tool Can I search for an event by its event date? Caterease has a special tool for searching for records based on date. It s called the Go To tool, and you will find it in the toolbar at top right-hand side of your Event Manager screen. Finding an Event by Date 1. Open Event Manager. 2. Click the Go To button at the top right-hand side of your screen. 3. Choose to go to the first event taking place today, this month, next month, last month, or next fiscal quarter, or use the special calendar tool to the right of the Go To button to go to the first event on any date. Tip: When you use the Go To tool, Caterease automatically re-sorts your events by Event Date. Thus, if the first record on a given day is not the one you want, simply use the navigation buttons at the top of your Caterease screen to scroll to the desired record. Click Go To at top of the screen or pick a date and go to first event on that day
16 - 16 -
17 Unit 3: Booking a New Event in Event Manager Topics covered in this unit include: Selecting a Customer Entering General Event Information Adding Contact People Creating a Sub-Event Entering Off-Premise Site Location Details Adding Menu Items Generating a Print ing a Print
18 - 18 -

19 Booking a New Event for an Existing Customer from Event Manager How does an existing customer differ from a new one? If you wish to add a new event for a new customer, that means you have never done any business with that customer before; that company s information has not yet been entered into Caterease. If, however, your new event is for an existing customer, that company s information is already in the program; you need only retrieve it. Once the details of a particular client have been entered into Caterease, you never have to type them a second time. Note: This topic discusses adding a new event manually from within Event Manager. As an option, see the chapter on using the Event Wizard. Adding a New Event 1. Access the Event Manager by clicking Event Manager from the Main Caterease sidebar. 2. Click the Add Record button, located at the top of your Caterease screen. Result: A confirmation prompt appears. 3. Click Yes to confirm your choice. Selecting an Existing Account 1. Scroll to find the existing client you wish to work with or begin typing the Client/Organization name into the Search For field. 2. Optionally select a contact person. 3. Click OK. Search for an existing account Add a new account to your system Account Details Optionally select a contact person

20 Searching For Accounts What is the Account Finder? The Account Finder is a powerful Caterease search tool. You can search for accounts by various criteria, search in a backward or forward direction from your current position, and even display a list of all records that matched your search. Finding an Event 1. To use the Search Tool, click the Search Records button, located at the top of the Select Account window. 2. In the Search By Fields area, type the text you would like to search for. Note: You may search by more than one field. 3. In the Search Rules field, select the appropriate rule. 4. [Optional] Click the radio button next to And or Or, within the Multiple Field Operator section, if you are searching by multiple search criteria. 5. [Optional] Click the Include Prefixes checkbox and then type the prefix (a, an, the) into the Search Prefixes section to include prefixes in your search. 6. Click the Find Records button. Note: If the first match is not the record you are seeking, you can click Find Records again. 7. Once your record is located, click Close. Don t forget to choose the correct field or fields to search by Very flexible search rules options
21 Entering Event Information What is meant by event information? In the middle of your Event Manager form, you will notice two tabs: General and Miscellaneous. Each of these tabs has various fields, and that is the information discussed here. You can rearrange the fields on either of these tabs, and you can also determine which fields appear or do not appear on those tabs. Note: This topic discusses adding a new event manually from within Event Manager. As an option, see the chapter on using the Event Wizard. Entering Information 1. Click into the first field on the General tab. 2. Edit each field using the following guidelines, pressing the [Enter] or [Tab] key to move from one field to the next: For fields such as Party Name or guest number fields, simply click in the field and type. For fields with associated drop-down lists (Sales Rep, Theme, Category, etc.), click the down arrow at the right of each field to view the list, then just click a selection from the list. For date fields, type a date into the field or click the down arrow at the right of the field to access the drop-down calendar. For financial fields (such as Cancellation Charge), simply type a dollar amount into the field or click the down arrow at the right of the field to access the calculator tool. Note: Cancellation Charge is not displayed by default, but may be added via the Customization tools, explained later in this guide. To retrieve a contact person you have already entered into Caterease, click the down arrow at the right of Booking or Site Contact, then click the Select Contact From File button, located at the upper right-hand corner of that screen. If you are adding a new contact, press the Add Contact to File button after you have entered the new contact information. Client Information defaults from Account Manager Use drop-downs (quick-pick lists) for General Information

22 Filling in Event Information: Adding Contacts I thought I already chose the contact person? It s very important to remember one thing as you use Caterease: You should never have to type the same thing more than once. You have already learned how to choose a contact person for an account. So, in this case, as you book an event for this account, you can simply retrieve that contact information rather than type it all again. Note: This topic discusses adding a new event manually from within Event Manager. As an option, see the chapter on using the Event Wizard. Adding a Contact to an Event 1. Click the down arrow next to the Booking Contact or Site Contact field to open that screen for editing. 2. If you have already entered a contact person for this account, you don t have to re-type that information. (Click the Select Contact From File button to retrieve the contact person you already entered.) 3. Select the Booking contact person you want for the event. 4. If you want this person to also be the site contact for the event, click the checkbox next to Site & Booking Contacts. 5. Click OK to insert the contact person. 6. Repeat the process for the Site Contact. 7. If the contact person does not appear for this account, fill in Booking Contact information (Name, Salutation, etc.), and click the Add Contact to File button to add to your default contacts. Select Contact button Add Contact to File button Select Contact from List
23 Event Date What s so special about entering a date? Caterease gives you many useful tools to assist you with data entry. In date fields such as Date, you can take advantage of the program s drop-down calendar to pick the exact date for your event. You can also use the advanced Smart Date Editing feature to have Caterease interpret dates for you. Note: This topic discusses adding a new event manually from within Event Manager. As an option, see the chapter on using the Event Wizard. Entering a Date 1. Click the down arrow to the right of the Date field. 2. Select a month by using the navigation arrows or holding your left mouse button down on the name of the calendar month and dragging either down or up. 3. Click a date to select it. Using Smart Date Editing (available in the Professional version only) With Smart Date Editing, you can enter such things as the following into any date field: today returns the current date Wednesday returns the date of the next coming Wednesday (or any other weekday) eom returns the date at the end of the current month eom+1 returns the first date of the next month

24 Event Manager Miscellaneous Tab What kind of information do I store on the Miscellaneous tab? The Miscellaneous tab of the Event Manager offers fields to store other important event data, such as payment method, cancellation charge, and even user-defined fields (fields that you can make up and use as needed). Filling out the Miscellaneous Tab 1. Click the Miscellaneous tab in Event Manager. 2. Enter a Business Type, Operation, Reference, and Pay Method by typing into the field provided or clicking the down arrow and selecting from the corresponding drop-down (quick-pick) lists. Note: Quick-pick lists are created by you. See the section on Setup for more information. 3. [Optional] Fill in the optional billing information, if desired. These fields might be used if someone else is paying for the event other than the person who is listed on the account. 4. [Optional] Fill in any Event-Specific Dates. Booked and Revised dates automatically default (on the General tab), Definite and Closed dates will default (on the Miscellaneous tab); print dates (Contract, Invoice, BEO) can optionally default if you choose to do so in the program s Global Settings. Click the Miscellaneous tab for more data-entry tools

25 Adding a Sub-Event How many sub-events can an order have? You can make as many sub-events as you want for each event. Perhaps an event is set to take place over several days, and each day might be a separate sub-event. Perhaps you want to make some menu adjustments, without losing your current menu choices. You can do this by treating sub-events as proposals, opting to use only the one your customer chooses. Every event must have at least one sub-event, since this is the place where you enter such data as event times and location. Note: This topic discusses adding a new event manually from within Event Manager. As an option, see the chapter on using the Event Wizard. How to Add a Sub-Event 1. Click the Sub-Event button, located next to the Event button on the left-hand side of the screen. 2. Click the Add A New Sub-Event button, located on the sub-event panel, which is the icon just below and to the right of the Sub-Event tab. 3. Note: The following pages describe entering data in the New Sub-Event window, shown below. You can optionally hold your [Shift] key down as you click the Add A New Sub-Event button to prevent the New Sub-Event Details window from appearing, then edit fields in the blue sub-event grid on the left-hand side of your Event Manager screen. 4. Click the down arrow to the right of the Description field and select a description for the sub-event. 5. Fill out the remaining general information using the following guidelines: For fields with associated quick-pick lists (Description, Type), click the down arrow (at the right of each field) to view the list, then just click a selection from the list. (If no quick-pick list exists, see the section on Setting up Quick-pick lists.) For guest fields (Planned, Actual, etc.), simply click into the field and type. 6. If you do not wish to include this sub-event on the contract for this event (for example, if it was created as an optional proposal) remove the check mark from the Included checkbox at the bottom left of the subevent window. Fill out General Information
26 Time Wizard What is a Time Wizard? The Time Wizard is a shortcut way to enter times for a sub-event using your mouse rather than the number keys on your keyboard. Using the Time Wizard 1. At the top right of the Sub-Event details form, click the Time Wizard button. 2. Click one of the time setting arrows, hold your left mouse button down, and drag to the left or right. 3. Release the mouse button when a time is set as you want it. 4. Remove a time by clicking the time-setting arrow with your right mouse button. 5. Click OK when finished. 6. To remove one of the times from the Sub-Event details screen, click on it with your right mouse button, or simply highlight the text on the Sub-Event tab of Event Manager and press your [Delete] key. Drag-and-drop time bars Right-click to remove time Sample

27 Selecting a New Room What is meant by on premise versus off premise? You would consider an event on-premise if it were being held on your property, such as in a banquet room. An event is off-premise if you are delivering food and supplies to another location. Entering room information for on-premise events allows Caterease to both block that room space and check for any conflicts. Entering site location information is helpful for those events that are off-premise. Both sets of information can be entered in the Sub-event form. Adding Banquet Rooms 1. In the Event Manager, click the Sub-Event button, next to the Event button on the left-hand side. Select a subevent from the Sub-Event list on the left-hand column of the screen. 2. Click the View/Edit Current Sub-Event button, located just to the right, in the list of icons. 3. Click the Venue tab. 4. Click the arrow to the right of the Setup Style field and select a setup style from the corresponding quick-pick list. 5. Click the down arrow located at the right of the Room field and select a room from the corresponding quickpick list. Note: The number next to each room name indicates the maximum capacity of guests in that room for the selected setup style. NA indicates that the selected setup style is not recognized for that room. 6. [Optional] Click in the Room Category field and select a room category from the corresponding drop-down list. 7. [Optional] Click in the Setup Person field and select the person responsible for the setup, from the drop-down list. 8. [Optional] Click in the Room Charge field and enter an optional room charge, or simply accept the default. 9. Press your [Enter] key. 10. Enter the amount of time needed to set up the room. Press [Enter] again. 11. Enter the amount of time needed to Setup and Tear Down the room, if needed. Note: These fields can be set up to default to a certain amount of time. 12. Click in the Setup Notes text box and type any necessary setup notes, or retrieve existing notes from your Scratch Pad (discussed later). You can format this text by clicking your right mouse button and selecting Font

28 Room Selection Wizard Can t the program just pick a room for me? Well, that would be magic, wouldn't it? Try the Room Selection Wizard (available in the Professional version only). This powerful tool will consider the date, time, setup style, and guest count of the party you are booking, and will automatically choose the best matching room for the designated criteria. It will even show all other rooms and whether or not they are available. Accessing the Room Selection Wizard 1. In Event Manager, retrieve or add an event. 2. Click the Sub-Event button, located next to the Event button. 3. Add or retrieve a sub-event. 4. Fill out date, guest count, and time information. 5. Click the Venue tab. 6. Click the Room Selection Wizard (ellipse) button next to the Room drop-down. The best matching room for your sub-event will be highlighted in green. Using the Room Selection Wizard Below are some suggestions for using the Room Selection Wizard: Click OK to accept the selected room, or simply double-click the room name. Select another room, setup style, or both, if desired, and click OK. Click the View Conflicts button to view the reasons certain rooms are unavailable (highlighted in red). Click the View menu to optionally display room notes and picture or associated breakout rooms and setup styles. Click the Settings button for other options for the Wizard, such as allowing the selection of unavailable rooms, automatically showing the recommended room, or showing grid lines. Click Settings > Conflict Settings to optionally have the Wizard track booking conflicts or capacity conflicts. Click the Refresh button to refresh the Wizard screen after optional settings have been changed. Click the Quick Column Customizing button in order to add or remove other columns of information to the Wizard display, including room charge, default diagram, location, etc

29 Copying Setup Notes from the Scratch Pad What are Setup Notes? The Setup Notes in Event Manager is a place for you to enter the special setup requests of your customers. These notes will print on your Contract and BEO, but can be suppressed, if desired. Copying from Scratch Pad 1. Click into the Setup Notes area, located on the Venue tab. 2. Click the Scratch Pad button, located at the top of the Sub-Event window. 3. Highlight the text you want to copy and press the Insert Text button. 4. Format the text by highlighting it, clicking your right mouse button, and selecting Font. Highlight desired text Click the Insert Text button to insert the highlighted text

30 Working with Site Location and Directions Where do I enter site location information? If a function is held off-premise, that site location information is added at the sub-event level. Adding a Site Location 1. In Event Manager, click the Sub-Event button, located next to the Event button on the left-hand side of the screen. 2. Select a sub-event from the sub-event list on the left-hand column of the screen. 3. Click the View/Edit Current Sub-Event button, located just to the right. 4. Click the Site tab at the top of the Sub-Event detail form. 5. Click into the Name field. 6. Type the name and address of the site and then click the Save Site Location button or click the Select Site Location button to retrieve an existing site location. Note: You may also click the Tools button and select Site Location > Copy From Client to copy the site location from the Client address. 7. [Optional] Click into the Category field and type a category or select an option from the drop-down list. 8. [Optional] Enter the website address into the Website field. 9. Type in the Directions text box as desired. Format this text by clicking your right mouse button and selecting Font. 10. When finished, click the OK button to add the site location and directions to the Site Locations Database

31 Selecting Food/Service Menus Where do I add menu items? Menu items are added to a function at the sub-event level, on the Food/Service tab. Retrieving Food/Service Items 1. Click the Display Menus button, located to the right of Item Name on the Sub-Event display, and the Select Menu Items window will open. 2. Drop items from your menus into the sub-event using the following guidelines: double-click a single item in the menu window to insert that item and leave the Menu window open hold your left mouse button down and drag over several items to select more than one item at a time hold down the [Ctrl] key on your keyboard and click several items to select non-contiguous items click OK to insert the currently selected items and close the menu window click and hold your mouse button down on an item or the last item in a group to drag those items from your menu onto your Food/Service tab click Select Items to insert the currently selected items and leave the menu window open 3. Rearrange items on your Food/Service tab in any order you want by dragging and dropping them. 4. Add or modify descriptions by clicking the Descriptions button. Note: Descriptions can also be included in prints. Select the desired menu Insert Mode lets you add items anywhere on the Food/Service tab Retrieve the desired items
 2. Select General, Event Contracts/Invoices or Event Subprints. 3. Click the desired print. 4.")
32 Generating a Print Printing a Print 1. While in Event Manager, click the Home ribbon tab, and click the bottom half of the Prints button. Note: The Prints button is a split button. (Click the top half to select prints from a floating window.) 2. Select General, Event Contracts/Invoices or Event Subprints. 3. Click the desired print. 4. On the Print Preview screen that opens, click the Print button. Select any desired print from the Print menu Contracts, Invoices, etc., can be printed for this event Selecting Multiple Prints allows you to print more than one print at a time
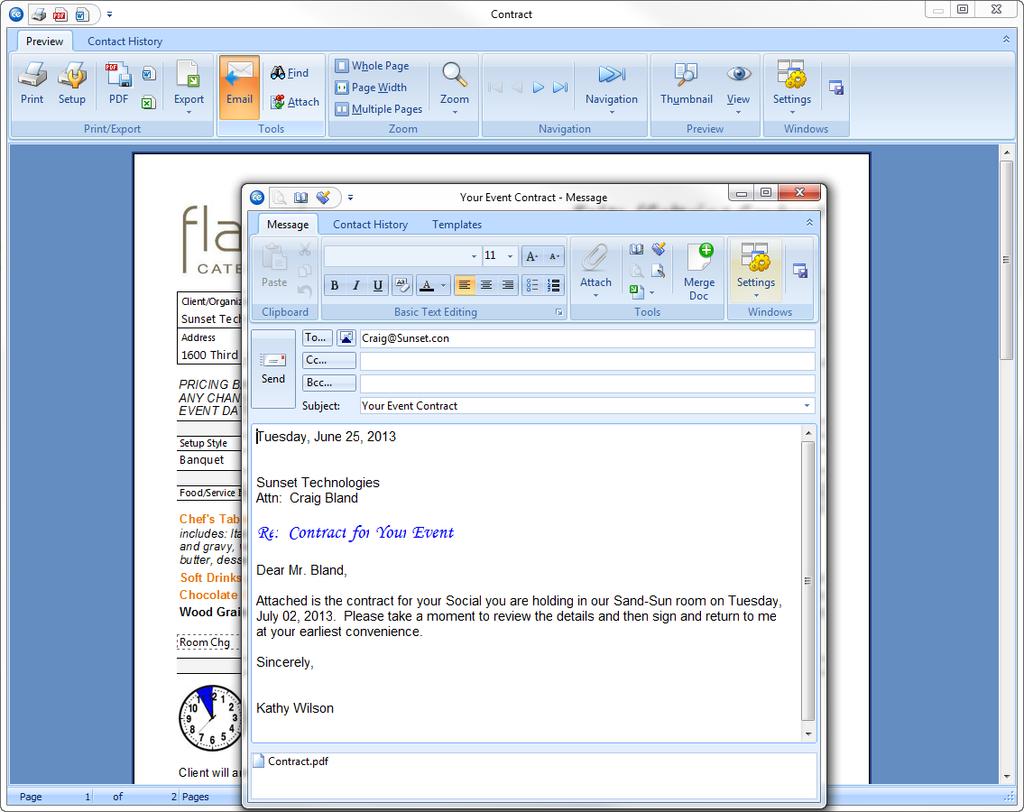
33 ing a Print (See image on next page) Can I a print directly from Caterease? More easily than you can even dream possible! Plus, if you own the Marketing Tools add-in to the program, you can use one of your custom merge letters as the body of the outgoing ! ing a Print 1. Click the button at the top of the Print Preview screen. Note: Notice that the print is automatically attached as a.pdf at the bottom of the window. You can change the format of this attachment by clicking it with your right mouse button and selecting Change Type To and choosing a different type. 2. Type the recipient s address in the To field, or click the word To or the Address Book button at the top of the window to access the Caterease address book. Note: The Caterease address book automatically lists all contact people for the current customers who have corresponding addresses on file, as well as staff scheduled to work the event and a custom personal list of addresses. 3. [Optional] Enter additional addresses in the Cc and Bcc fields, separating each address by semicolons. 4. Type a subject for the in the Subject field, or click the down arrow at the right of the field to access the customizable quick-pick list. 5. Click in the large white text block of the window and type the body of your , or optionally insert a custom merge letter (see below). 6. [Optional] Format the body of the by using the formatting tools at the top of the screen. Alternatively, highlight any text within the body of the , click your right mouse button, and choose Font. 7. When finished, click Send at the top left-hand side of the window to send the . Tip: from Caterease is automatically sent via your regular Outbox. Therefore, all return correspondence will be sent to your normal work address. Using a Merge Letter as the Body of an (See image on next page) 1. Click the Use Merge Document button, located at the top of the window. Note: You must own the Marketing Tools add-in to the program to use this feature. 2. Select a merge letter to use as the body of the Click OK. Result: The letter that you ve chosen becomes the body of your current , and all merge fields merge in appropriate information from this event. Note: As an alternative, you can double-click the title of the letter to insert it
34 - 34 -
35 Unit 4: Event Scheduler Topics covered in this unit include: Opening the Scheduler Changing Scheduler Views Grouping the Scheduler Adding Notes to the Scheduler Retrieving Events from the Scheduler
36 - 36 -

37 Month View The Event Scheduler Screen Current day is highlighted Use the Quick Column Customizing button to customize the grid The grid shows the current day s events Event Scheduler Introduction The Event Scheduler is a graphic calendar tool designed to give you an instant indication of the goings-on at your facility. The Scheduler can be optionally displayed in a year-at-a-glance view, month-at-a-glance view, a week-ata-glance view, a day-at-a-glance view, or a custom work-week-at-a-glance view. The bars on the Scheduler screen can be color-coded based on an event s Status, Event Category, Sales Representative, or Business Type. In addition, you can have additional data (guest count, theme, financial information, etc.), display in the bars on the Event Scheduler screen when in Day view or Work Week view. As with any grid in Caterease, the grid at the bottom of the Scheduler can be customized to suit your needs. Details of any highlighted day or days will be displayed in this grid. Using your left mouse button, drag your mouse pointer over several days to highlight them and show their details in the grid. Grid columns can be customized, data can be sorted or grouped, and custom grids can be exported or printed as custom reports

38 Changing Scheduler Views What types of views does the Scheduler offer? You can choose to look at events in your Scheduler in Month view, Week view, Day view, or even a Year view. In addition, you can choose whether you are looking at only event details, sub-event details, and whether Staffing or Reminders are shown on the display. Using the Month View 1. Click the Month button at the top of the Scheduler, if it is not already selected. 2. Change months by clicking the right or left arrows on the top of the Date Navigator (the small monthly calendar located to the right of the Scheduler screen). Note: As an alternative, click a specific date in the Navigator, and then click the Month button to view that entire month. For example, click October 20 in the Navigator and then click the Month button to view the entire month of October. Using the Day View 1. Click the Day button at the top of the Scheduler screen. Note: Optionally display event details by right-clicking any bar on the Scheduler screen (with an event) and selecting Set Display Fields. 2. Change days by clicking on any date in the Date Navigator. 3. Optionally display multiple dates simultaneously by holding your [Ctrl] key down as you click multiple dates. Using the Week View 1. Click the Week button at the top of the Scheduler screen. Note: To customize your week, click Show As > Work Week (or) Full Week > Options. Note: No matter which day you click on in the Date Navigator, the Scheduler will automatically display the corresponding day when it is set in Work Week view. Also, see note on Set Display Fields, above. Choose from among Day, Week, Month, or Year views Right-click to add event details to the display

39 Grouping the Calendar Can I separate groups of events into different calendars? Believe it or not, you can! The powerful grouping option in the Scheduler lets you create separate calendars of events based on a variety of general event details. Customizing the Calendar 1. If you haven t already, click the Scheduler button on the Main sidebar group to open the Scheduler tool. 2. Click the down arrow to the right of the Group By option at the top center of the ribbon area. 3. Select any detail from the list to separate your events into groups. Choose from among Status; Theme; Sales Rep; Category; Business Type; Operation, or accept None as the default. 4. [Optional] Click the Day, Week, Work Week, Month, or Year button to view your groups in that display. 5. [Optional] Use the plus and minus sign buttons in the navigation bar at the lower left-hand corner of the calendar to add or remove calendars, respectively, from your current view. Month View Click the down arrow to group the calendar Use the plus and minus sign to view more or fewer themes Click in the checkbox to show Holidays or Notes

40 Adding Notes to the Scheduler What if I need to make a quick note on at date on the calendar? The Notes feature in the Caterease Scheduler lets you more or less add a yellow sticky on a particular date for any reason whatsoever. For example, perhaps a customer is seriously considering a date but has not booked an event with you. However, you nonetheless want to make a quick note for everyone to see. A Scheduler note is the perfect solution! 1. Confirm that the Notes checkbox is selected in the Include In View pane on the right-hand side of the Scheduler screen. Note: New notes cannot be added if notes are not currently being viewed (i.e., if there is not a check in the Notes checkbox). 2. Click your right mouse button on any date on the calendar and select New Note. Note: If you want your note to be specific to a certain group or time, you can modify your view as described above. 3. Type in a Caption for the note, or select one from the custom drop-down list. Note: This caption will appear on the calendar display to identify the note. 4. [Optional] Edit the Start and End dates or leave the defaults. 5. [Optional] Enter a Category for the note, or select one from the custom quick-pick list. 6. [Optional] Edit the User responsible for the note s action item, or accept the default. 7. Enter the details of the note in the large text block, and optionally modify the text as desired by using the formatting tools located at the top of the text block. 8. [Optional] Change the background color for the note by clicking the ellipse button at the bottom of the Note window. Note: If you select a new background color, that will serve as the default background color for all notes created in the future but obviously you can change it again as desired. Formatting Tools Right-click on a particular date to add a new note, then select New Note
41 Unit 5: Advanced Menu Features Topics covered in this unit include: Using the Insert Mode when Retrieving Menu Items Retrieving Menu Packages Adding/Modifying Menu Item Descriptions Adding Menu Items by Hand Customizing the Food/Service Tab Copying Menus from Event to Event
42 - 42 -

43 Using the Insert Mode when Retrieving Menu Items Retrieving menu items Menu items can be retrieved into an event from your pre-existing menus or unique items can be added to an event by hand. The Insert Mode tool allows you to place an item anywhere at all on the Food/Service tab. Retrieving items 1. Select a menu title on the left-hand side of the Select Menu Items window. 2. Select a single menu item or multiple items using the following guidelines: Click an item to select it. Hold your left mouse button down and drag your cursor over multiple items. Click one item, hold the [Ctrl] button down on your keyboard and click other items. 3. Drop items from your menus onto your Food/Service tab using the following guidelines: Double-click a single item in the Select Menu Items window. Hold your mouse button down on one individual item (without moving) for a half-second and drag that item from the Select Menu Items window onto your Food/Service tab. Hold your left mouse button down on a group of selected items and drag and drop them onto the Food/Service tab. Click the Select Items button. Click OK. Click the Insert Mode button to retrieve menu items in specific positions on the Food/Service tab of your event. Result: This tool causes the selected menu items to be automatically placed above the currently highlighted item on the Food/Service tab (rather than always at the bottom); when dragging and dropping, the Insert Mode allows placement anywhere at all on the Food/Service tab. 4. Click in the Qty column on the Food/Service tab and enter a quantity for each menu item. Click the Insert Mode button to place items above other items
 allow you to select multiple menu items from multiple menus at one time.")
44 Retrieving Menu Packages into an Event What is a menu package? Menu packages (available in the Standard and Professional versions) allow you to select multiple menu items from multiple menus at one time. For example, let's say you have a "Lunch Buffet" menu, and it has an item called Supreme Buffet. This buffet consists of the Deli Sandwich Platter, found in your Platters menu, Iced Tea, found in your Bar menu, and Cheesecake, found in your Desserts menu. Three different items, three different menus. Yet, you can create a single item called Supreme Buffet" and link all three of these items to it. That way, when you retrieve "Supreme Buffet" into an event, it can optionally come with all of its included dishes automatically. Selecting Menu Packages 1. In Event Manager, click the Sub-Event button, located on the left-hand side of the screen. 2. Click the Food/Service tab at the bottom of the screen, if it is not already selected. 3. Click the Display Menus button, located on the right-hand side of the Food/Service tab. 4. Click Packages, from the left-hand side of the Select Menu Items window. 5. Click the Menu Packaging button, found at the top of the Select Menu Items window. 6. Double-click any menu package item. Note: Menu packages are indicated by a small plus sign to the left of the item name. You can click this plus sign to view "sub-items" within the package, and even optionally de-select various sub-items by holding your [Ctrl] key down and clicking them. Click to enable Menu Package selection All Sub-Items are selected automatically

45 Adding and Modifying Menu Item Descriptions What is a menu item description? The Description of a menu item allows you to write flowing, wrapping text about a menu item and format the text any way you'd like. This description is retrieved into an event order with a menu item, or can be added on-the-fly. Adding a Description 1. In Event Manager, select a sub-event to modify its menu. 2. Click the Food/Service tab at the bottom of the screen, if it is not already selected. 3. Select a menu item to edit, or click the Add a New Food/Service Item button on the right-hand side of the screen to add a new one. 4. Click the Show/Hide Item Details button. A white text box appears at the bottom of the Food/Service tab. 5. Click in the description text box at the bottom of the Food/Service tab and type as desired. Modifying a Description 1. Select any menu item on the Food/Service tab. 2. Click the Show/Hide Item Details button. 3. Right-click into the text block and choose Modify Description. 4. Format the text using the Format toolbar at the top of the screen, or right-click and select Font. Tip: If you want to return the description to the original, right-click, then choose Reset Description. Click the Show/Hide Item Details icon to see the menu item description
46 Adding a New Food/Service Item Where do I add menu items that are not already in Menu Manager? Menu items are added to a function at the sub-event level, on the Food/Service tab. Adding Food/Service Items 1. In Event Manager, click the Sub-Event button, located next to the Event button, on the left-hand side of the screen. 2. Select a sub-event from the Sub-Event list on the left-hand side of the screen. 3. Click the Add A New Food/Service Item button, located on the right-hand side of the Food/Service tab. 4. Type a name for the menu item and press your [Enter] key. 5. Type a price for the item, or click the down arrow at the right of the Price field to access the calculator. 6. Press your [Enter] key and type the appropriate quantity for the menu item into the Qty field. 7. Press [Enter] again and fill in other fields as desired. 8. With your new menu item still highlighted, click the down arrow next to Type (right-hand side of the Food/Service tab) and choose an appropriate Type for the new item. 9. Rearrange items on your Food/Service tab in any order you want by dragging and dropping them. Tip: As an option, you can right-click any new menu item (or modified existing item) and choose Special Editing > Copy to Menu Manager to copy this item back to your default menus (Professional version). Click Insert A New Food/Service Item to add a menu item in between existing items When adding a new menu item, notice that new item defaults to the TYPE settings of the Item you were on previously. Therefore, always choose/change to the correct Type

47 Customizing the Food/Service Tab Is there any other information I can display on the Food/Service tab? Don t forget that the Food/Service tab is a grid. As such, it offers you total control over what details are displayed. Quick Column Customizing Button 1. Click the Quick Column Customizing button, located at the top left-hand side of the detail grid (to the left of the first column heading), to drop down a list of optional columns. Note: If this button does not appear, you must enable the feature in your program's preferences area (Administration > Settings > Preferences). 2. Click the checkbox next to any optional field name to display that field in the grid. Customizing Columns Using the Field Chooser (Optional) 1. Click the Field Chooser button, located on the lower right-hand side of the screen. 2. Hold your left mouse button down on a column heading in the small Customization window. 3. Drag your mouse pointer and drop the heading in line with other heading in the Food/Service tab grid. 4. Repeat to display other columns. 5. Optionally remove columns by dragging them into the small Customization window. 6. Close the Customization window when finished. 7. Click the Save Current Window Settings button to save your new view. Use Quick Column Customizing button or the Field Chooser button

48 Copying Menus from Order to Order What if one client wants the same menu another client had? It's a Caterease motto: You should never have to type the same thing more than once. In this case, you can copy an entire menu from one order directly into another. Here's how: Copying a Menu 1. Find the order in Event Manager with the menu you want to copy. 2. Click the Sub-Event button. 3. Click your right mouse button anywhere on the Food/Service tab. 4. Select Special Editing - Copy (All Items) or Copy (Selected Items). 5. Retrieve the order you want to paste the menu into. 6. Click your right mouse button anywhere on the Food/Service tab. 7. Select Special Editing - Paste (All Copied Items). 8. Indicate whether you want to replace any existing items with the items you are pasting, or whether you want to simply add to them (if applicable). Click your right mouse button on the Food/Service tab grid to see the list
49 Generating an Ingredients List Is there a way to generate an Ingredients List and a Required Item List for my chef? Yes! You can generate a variety of prints directly from Event Manager, and you can customize the prints using the Miscellaneous Print Designer Tool (discussed in detail in Unit 21). 1. Access Event Manager by clicking the Main button on the sidebar, then clicking the Event Manager button. 2. Use the Search tools to find an existing event for which you want to print an ingredients list. 3. Click Prints at the top of the Caterease screen. 4. Select Event Subprints > Ingredients > Ingredients List. Note: You also have the option of printing an ingredients list by type or by category. 5. Click the Print button, located at the upper left-hand side of the window. 6. [Optional] Edit the print by clicking the Edit in Word button or the Edit in Excel button. 7. [Optional] Click the button to a copy of the print. 8. [Optional] Click the Export button to export the print. -49-

50 Generating a Required Item List 1. Access Event Manager by clicking the Main button on the sidebar, then clicking the Event Manager button. 2. Use the Search tools to find an existing event for which you want to print an ingredients list. 3. Click Prints at the top of the Caterease screen. 4. Select Event Subprints > Ingredients > Required Item List Note: You also have the option of printing an ingredients list by type or by category. 5. Click the Print button, located at the upper left-hand side of the window. 6. [Optional] Edit the print by clicking the Edit in Word button or the Edit in Excel button. 7. [Optional] Click the button to a copy of the print. 8. [Optional] Click the Export button to export the print
51 Unit 6: Shifts, Staffing, and Comments Topics covered in this unit include: Adding Staffing to an Event Adding Shifts to an Event Copying Special Requests/Comments from the Scratch Pad
52

53 Adding Staffing to an Event Can I add waiters, waitresses, bartenders, etc. to an event? Absolutely, you can staff an event quickly and easily using the Staffing tab on the Sub-Event display of Event Manager. Caterease will even dynamically tell you which employees are available to work the event and which employees have conflicts, such as being on vacation or working another event. Selecting Employees for an Event 1. In Event Manager, click the Sub-Event button located next to the Event button on the left-hand side of the screen. 2. Select the sub-event (if there is more than one) to which to add staffing. 3. Click the Staffing tab at the bottom of the screen. 4. Click the Select Staff button located at the upper right-hand side of the Staffing tab. 5. Select any available employees (drag your mouse or use your [Ctrl] key to select more than one at a time). 6. Click OK, drag and drop the selected employees onto the screen, or simply click the Select Staff button. Selecting Unavailable Employees 1. Click the Settings button at the top right of the Select Staffing form. 2. Click Staff Selection. 3. Click Allow Selection Of Unavailable Employees. 4. Click on any unavailable employee, indicated by red text. 5. Optionally click the View Staffing Conflicts button to see why the employee is unavailable. 6. Retrieve the employee onto the Staffing tab, as described above. Click to view shift rules Click to view conflicts Click to retrieve staff
54 Adding Shifts to an Event Can I keep track of how many waiters, bartenders, bus people, etc., I need to work a party? In Caterease, you can choose to specifically identify which employees are going to work a particular event or simply determine how many shifts it will take to fully staff the event. This page discusses the latter. Adding Shifts to an Event 1. In Event Manager, click the Sub-Event button. 2. Click the Staffing tab at the bottom of the window. 3. Click the Select Staff button, located on the upper right-hand side of the screen. Result: The Select Staffing window opens. Note: You can optionally establish Wizard rules for each of your shifts. For example, you can tell the program that for any party with a theme of Wedding Reception, you need one bartender for every 15 guests, etc.; therefore the program will identify which events are understaffed. 4. Click any position ( Wait Staff, Bartender, etc.), or optionally hold your [Ctrl] key down to select other positions simultaneously. Note: You can also simply double-click an individual position to retrieve it. 5. Click OK at the bottom of the Select Staffing window. Result: The selected positions (shifts) are retrieved into the event. Note: You may want to display other shift details (Required, Price, Total, Hours, etc.), on the grid located on the Staffing tab, or on the Select Staffing window itself. Click the Quick Column Customizing button at the top left of either grid to choose columns to display. Select the desired shift(s) Required staff totals are based on the shift rule Click to view shift rule

55 Copying Event Comments from the Scratch Pad What are event comments? The Comments tab in the Sub-Event section of Event Manager is a place for you to enter the general special requests or notes concerning sub-events. These comments will print on your Contract and BEO, but can be suppressed, if desired. Copying from Scratch Pad 1. Click the Comments tab at the bottom of the screen. 2. Click into the large white Comments text block. 3. Click the Scratch Pad button, located at the bottom of the Event Manager screen. 4. Highlight the text you want to copy and press the Insert Text button. 5. Format the text by highlighting it and using the Format toolbar at the top of the screen or by highlighting the text, right-clicking, and selecting Font. Click on the Insert Text button to insert the highlighted text Highlight desired text Click the Scratch Pad button to access commonly used text
56 - 56 -
57 Unit 7: Booking a New Event Using the Event Wizard Topics covered in this unit include: Selecting a Customer for the Event Using the Incremental Search Tool Using Common Data-Entry Tools Entering Banquet Room Details Using the Room Selection Wizard Retrieving Menu Items Saving the Event
58 - 58 -
, entering basic details, and retrieving menu items.")
59 Booking a New Event Using the Event Wizard Search Tools Details Icon Grid Tools Navigation Bar The Event Wizard Screen Now that we ve discussed adding events in detail, let s explore a quick and easy alternative: the Event Wizard. This option lets you add a new event in three easy steps: selecting an account (and optional contact person), entering basic details, and retrieving menu items. You can access the Event Wizard from within your Event Manager screen, or you may click the Event Wizard button on the Tools sidebar on your Main screen. (If you have the Professional or Standard version of Caterease, you can even add a new event from the Event Scheduler. See the Event Scheduler section for more information.)

60 Step One: Selecting an Account Selecting an account This first step allows you to select an account for your new event, as well as select a booking and/or site contact person. You can either choose an account that already exists in your database or add a new one. Selecting Accounts 1. Click the Tools sidebar group on the left-hand side of your Main screen. 2. Click the Event Wizard button. 3. Either select an account for your new event or add a new account. 4. Click the plus sign button to the left of your selected account to access a drop-down list of contact people. Note: If no list appears, no contact people have been added for this account. You can add a contact person here by clicking the Show Details button at the top of the Select Account window, then clicking the Account Locked button at the bottom left and confirming you would like to unlock the account. 5. Optionally select a contact person's name to default as the Booking Contact and/or Site Contact of your new event. Note: In order for the name to default, you must have enabled this feature in New Booking Defaults. See the Setup section for more information. 6. Click Next. (Note: You may click the drop-down list to the right of the Next button to select any custom layouts.) Type a name into the Incremental Search field Details button

61 Step Two: Entering Basic Details Filling in Event Fields This window lets you quickly fill some general details about your new event. Some of this information may default based on your program's New Booking Defaults. You can type over it here, or click down arrows in various fields to access quick-pick lists. Entering Details 1. Optionally enter Party Name, Sales Representative, and other details in the Event Information section, either by typing directly into the fields or clicking the corresponding down arrows to access quick-pick lists. Note: These quick-pick lists are yours to create and control. See the section on Setup for more information. As an alternative to clicking the down arrow, try typing into your Sales Rep or other quickpick field. The quick-pick list will automatically scroll to match what you type. 2. Optionally enter a guest count for your new event. Note: Your Guaranteed guest count might default to a certain percent of your Planned number; this is a setting you can control on the Managers tab of your program's Global Settings. 3. Enter a date and start/end times for your new event, either by typing directly into the fields or using the drop-down calendar (date) or up and down arrows (times). 4. Optionally enter a Description, Type, Setup Style and Room for your new event either by either by typing directly into the fields or clicking corresponding down arrows to access quick-pick lists. 5. When finished, click OK. 6. Click Yes at the prompt to retrieve menu items for your new event, or click No to simply edit the new event by hand. Tip: This new event has not yet been saved. You will be prompted to save when you exit Event Manager, or you can simply click the Save Changes button at the top of the screen in the Event Manager. Some information may default from your New Booking Defaults


62 Time Wizard What is a time wizard? The Time Wizard is a shortcut way to enter times for a sub-event using your mouse rather than the number keys on your keyboard. 1. On Step 2 of the Event Wizard, click the Time Wizard button. 2. Click one of the the time-setting bars, hold your left mouse button down, and drag to the left or right. 3. Release the mouse button when the time is set as you want it. 4. Remove a time by clicking the time-setting bar with your right mouse button. 5. Click OK when finished. Note: To remove one of the times, click on it with your right mouse button, or simply highlight the text on the General tab of Event Manager and press your [Delete] key. Drag-and-drop time bars Right-click to remove time Sample

63 Entering Room Details What is meant by on premise versus off premise? You would consider an event on-premise if it were being held on your property - for example, in a banquet room. An event is off-premise if you are delivering food and supplies to another location. Entering room information for on-premise events allows Caterease to block that room space and check for any conflicts. Entering site location information is helpful for those events that are off-premise. Both sets of information can be entered in the Event Wizard. Adding Banquet Rooms 1. From the Venue tab, click into the Setup Style field. 2. Click the down arrow to the right of the Setup Style field and select a setup style from the corresponding quick-pick list. 3. Click into the Room field. 4. Click the down arrow located at the right of the Room field and select a room from the corresponding quick-pick list. Note: The number next to each room name indicates the maximum capacity of guests in that room for the selected setup style. NA indicates that the selected setup style is not recognized for that room

64 Room Selection Wizard Can t the program just pick a room for me? Well, that would be magic, wouldn't it? Try the Room Selection Wizard. This powerful tool will consider the date, time, setup style, and guest count of the party you are booking and will automatically choose the best matching room for that criteria. It will even show all other rooms as well as their availability. Accessing the Room Selection Wizard 1. In Event Wizard, be sure to fill out date, guest count, time, and setup style information. 2. Click the Room Selection Wizard button (ellipse). The best matching room for your sub-event will be highlighted in green. Using the Wizard Below are some suggestions for using the Room Selection Wizard: Click OK to accept the selected room, or simply double-click the room name. Select another room, setup style, or both, if desired, and click OK. Click the View Conflicts button to see reasons certain rooms are unavailable (highlighted in red). Click the View menu to optionally display room notes and picture or associated breakout rooms and setup styles. Click the Settings button for other options for the Wizard, such as allowing the selection of unavailable rooms, automatically showing the recommended room, or showing grid lines. Click Settings > Conflict Settings to optionally have the Wizard track booking conflicts or capacity conflicts. Click the Quick Column Customizing button to add other columns of information to the Wizard display, including room charge, default diagram, location, etc. Click to view room conflicts

65 Step Three: Retrieving Menu Items Retrieving menu items Menu items can be retrieved into an event from your pre-existing menus or unique items can be added to an event by hand. Step 3 in the Event Wizard opens your new event in the Event Manager and automatically opens the Select Menu Items window for you to retrieve items. Retrieving items 1. Select a menu title on the left-hand side of the Select Menu Items window. 2. Select a single menu item or multiple items using the following guidelines: Click an item to select it. Hold your left mouse button down and drag your cursor over multiple items. Click one item, hold the [Ctrl] button down on your keyboard and click other items. 3. Drop items from your menus onto your Food/Service tab using the following guidelines: Double-click a single item in the Select Menu Items window. Hold your mouse button down on one individual item (without moving) for a half-second and drag that item from the Select Menu Items window onto your Food/Service tab. Hold your left mouse button down on a group of selected items and drag and drop them onto the Food/Service tab. Click the Select Items button. Click OK. Note: Click the Insert Mode button Food/Service tab of your event. to retrieve menu items in specific positions on the 4. Click in the Qty column on the Food/Service tab and enter a quantity for each menu item. Click Insert Mode button to place items above other items Retrieve multiple items at once (See Retrieving Menu Packages )

66 Saving the Event What happens if I forget to save an event? Relax you can t forget. If you close your Event Manager or even your entire Caterease program, you will be asked if you want to save your changes. If you navigate away from an order (by searching for a different order or using your navigation buttons to scroll to a different order), it is an implied Save; your changes are saved automatically. Saving Changes 1. Click the Save Changes button at the top of the Caterease screen. 2. Click OK after carefully reviewing any prompt that might appear; or click Cancel, make corrections to the order, and repeat Step 1. If you are prompted as to a conflict (staffing or room), be sure to review the exact details of the problem by clicking the View Conflict button
67 Unit 8: Booking a New Event from the Scheduler Topics covered in this unit include: Changing the Sub-Event Calendar Grouping Modifying Event Information from the Calendar Accessing the Event Wizard from Sub-Event Calendar
68 - 68 -

69 Viewing the Sub-Events Scheduler Can the Event Scheduler show detailed venue information? Sure it can. With just a couple of mouse clicks, you can turn your Scheduler into a bar graph, showing which events are held in which locations at what times. You can even drag and drop events from one venue to another, one time to another, even one date to another. Since these details are specifically sub-event details, the first thing you must do is access the Sub-Event calendar. Displaying Sub-Events 1. Click the Scheduler button on the Main sidebar group to open the Scheduler. 2. On the Home ribbon at the top of the screen, click Display > Sub-Events. Grouping by Venue or Other Detail 1. In the Sub-events calendar, click the down arrow in Group By, at the top of the ribbon. 2. Choose Room, Site Name, or other detail. Displaying Groups in Bar Graph Format 1. Group your sub-events calendar as described above. 2. Click the Day button. Note: You can see more or fewer groups (or bars in the graph) by clicking the plus or minus sign in the navigation bar at the bottom left of the graph
 from any group to another, meaning you")
70 Modifying Event Information What type of event information can be modified in the Scheduler? There are several details about an event that you can modify from the Scheduler screen. Most impressively, in the Sub-Events calendar you can drag and drop event "bars" (those color-coded bars that indicate when and where an event is being held) from any group to another, meaning you can move them from one sales rep to another, one venue to another, one time to another, one day to another, and more! You can also stretch and shrink those bars, thereby changing the corresponding event's start and end times. Dragging Events from Group to Group 1. Group sub-events in the Scheduler by any detail, as discussed on the previous page. 2. Hold your left mouse button down over any event bar on the Scheduler screen. 3. Drag the bar to another group and then release it. Stretching and Shrinking Bars 1. Display events in a bar graph format, as described on the previous pages. 2. Float your mouse pointer (without clicking) over the top or bottom of any event bar on the Scheduler screen until it becomes a double-headed arrow. 3. Hold your left mouse button down and drag the edge of the bar upward or downward. 4. Release your mouse button. This highlights a period of time. Right-click to then add an event there. Click and drag/drop events to a new room; Confirm
71 Accessing Event Wizard from the Sub-Event Calendar (Seeimage on following page.) I can do this right from here? Yes, you can - if you have the Professional or Standard version of Caterease! Right from this Scheduler screen, you can add an event, including client information, room, times (Start, End, Setup, Tear Down), plus a host of other event and sub-event details. Then, when you're done, you can choose to open this event in Event Manager and edit it further (perhaps adding menu items, etc.), or you can remain in the Scheduler to review other dates or perhaps add more events. 1. Group your Sub-events calendar, as described on the previous page, and click the Day or Week view button. Note: Steps 1-4 are designed to optimize the event booking process. You can simply skip to Step 5, below, and fill in event date, times, and other information by hand. 2. Find a specific time and date that you would like to hold your new event. 3. In the appropriate group for your new event, hold your left mouse button down on the Scheduler screen at the time you want your new event to start. 4. Drag your left mouse button down until you reach your desired end time and then release your mouse button. 5. Click your right mouse button and select Add a New Event. 6. Select an account for your new event, or add a new account. 7. [Optional] Click the plus sign button to the left of your selected account and select a contact person's name to default as the Booking and/or Site Contact of your new event. 8. Click Next. 9. Enter Party Name, Sales Representative, and other details as desired in the Event Information section, either by typing directly into the fields or clicking corresponding down arrows to access quick-pick lists. 10. [Optional] Enter a guest count for your new event. 11. [Optional] Adjust the Setup and Tear Down times for the event. 12. [Optional] Enter a Description, Type, and Setup Style for your new event either by either by typing directly into the fields or clicking corresponding down arrows to access quick-pick lists. 13. When finished, click OK. Result: Your new event is saved, and a prompt appears, asking if you would like to open it in Event Manager. 14. Click Yes to continue editing your new event in Event Manager (adding menu items, etc.), or No to remain in the Scheduler

72 Click and drag through desired times Right-click to add a new event
73 Unit 9: Booking a New Event from Account Manager Topics covered in this unit include: Introducing the Account Manager Display Finding a Specific Account Adding a New Event from the Events Tab
74 - 74 -

75 Grid ACCOUNT MANAGER Account Information Tabs Display Full Grid Account Manager Tabs Add New Item Account Manager Screen The Account Manager shows you all information pertinent to any account in your database. From Account Manager, you can see a list of all Contact names, Events, Reminders, and History notes associated with a particular account. You can easily edit any of this information by selecting an item and clicking the View button. Open an event in order to make changes, edit the text of a history note, even respond to a reminder quickly and easily! As with other Managers in Caterease, the Account Manager makes use of the main toolbars across the top of your screen. These are the buttons you would use to add a new account, delete the current account, navigate from account to account, etc

76 Adding Events from Account Manager I thought I had to add events through Event Manager? As you may already know, adding events to Caterease needs to be done in Event Manager. Yet here we are, discussing the option of adding events from Account Manager. Caterease is designed, intentionally, to give you the ability to zigzag all over the place - to go where you want to go in the program whenever you want to go there. Therefore, if you ever find yourself looking at account information in Account Manager, and have the thought that you need to add an event for that customer, one mouse click will take you right into Event Manager and place you on a brand-new event with all of that customer s information. Adding an Event 1. Click the Events tab in the bottom window of Account Manager (if it is not already selected). 2. Click the Add New Event button, located on the lower right-hand side of the Account Manager screen. Note: This button is identical to the Add New Record button at the top of the Caterease screen, which is used to add new accounts. Don t confuse them. 3. Click Yes to confirm your choice. You will be taken into Event Manager and placed on a brand-new event for that customer. Enter event information as described in the previous chapter. Tip: You also have access to the Event Wizard from the Account Manager Events tab. (See the Event Wizard section for more information on how to use this tool.) Be sure to select the Events tab Optionally click the Event Wizard button
77 SECTION 2: Accounts (Customers) Unit 10: Adding a New Account in Account Manager Topics covered in this unit include: Adding a New Account Filling Out the Miscellaneous Tab Adding Contacts to an Account
78 - 78 -
79 Adding a New Account Haven t I already learned to add an account? We have already discussed adding an account as you book a new event. But what if you want to enter account information for no other reason than to have it on file for the future? This is where Account Manager comes in. Adding an Account 1. Access the Account Manager by clicking the Account Manager button on the sidebar. 2. Click the Add New Record button, located in the main toolbar at the top of your Caterease screen. 3. Click Yes to confirm your choice. 4. Type the name of your new account and press your [Enter] key to move to the next field. 5. Continue to fill out the fields as desired, pressing [Enter] or [Tab] after each one to move to the next field. Enter account information Add contact people
80 Filling Out the Miscellaneous Tab What is the Miscellaneous tab all about? When you are adding a new account to the program, the Miscellaneous tab allows you to enter some important details you can use to track the account. The fields on this tab are mostly quick-pick fields, meaning you can choose data from drop-down lists that are under your control. All of the details on this tab reflect the account you are in the process of adding. Filling out the Miscellaneous Tab 1. While adding an account, click the Miscellaneous tab. 2. Click the down arrow at the right of any field and choose from the corresponding quick-pick list (you can customize these lists). 3. Click the checkbox next to Tax Exempt if events for this account should default to tax exempt. Note: Click the checkbox to the left of Tax Exempt if you want to enter a tax exempt number for the account. 4. [Optional] Enter an expiration date of the tax exemption, or access the drop-down calendar to select a date. Adding or Removing a Field (See Unit 13 for more information) 1. Click your right mouse button anywhere on the Miscellaneous tab. 2. Select Customize. 3. Hold your left mouse button down on the name of any tab or field. 4. Drag that field name into the Available Items window to remove a field from the screen; drag an item from the Available Items pane onto your screen to add a field. 5. Repeat as desired. 6. Click Close when finished. (Remember to click the Save Current Window Settings button if you wish to set this as your new default arrangement.) Right-click and choose Customize to remove fields or add fields

81 Adding Contacts to an Account Shouldn t I add contact people in Account Manager? Contact people, like accounts, can be added in Event Manager as well as in Account Manager. Here we address adding contact people as you enter in a new event. Adding a Contact Person 1. Click the Add A New Contact button, located at the lower right of the Select Account form. Note: This button is identical to the Add New Account button at the top of the form. Be careful not to confuse them. 2. In the form that pops up, type the last name of the new contact person. 3. Press your [Enter] or [Tab] key to move to the next field. 4. Continue to fill out contact information as desired, pressing your [Enter] or [Tab] key to move from field to field. 5. In quick-pick fields such as Title, click the down arrow at the right of the field and pick an option from the corresponding list. 6. [Optional]Click the Credit Card Information button, select a credit card from the quick-pick list, and type in the remaining credit card information. 7. [Optional]Click on the Notes tab and type any notes pertinent to this particular contact person. These notes do not print anywhere; they are merely here for your reference. You can format the text you enter into this Notes text block by clicking your right mouse button and choosing Font. 8. [Optional] Click on the Picture tab, click your right mouse button, and select Load From File if you want to include a digital image of this contact person. 9. When finished, click the OK button at the bottom of the form to close the form and save your changes. Click to enter default credit card information
82 - 82 -
83 Unit 11: Adding an Account in Event Wizard Topics covered in this unit include: Entering General and Miscellaneous Details Adding a Contact Person
84 - 84 -

85 Adding an Account in Event Wizard What if the client I want isn t on the list? You can add a new client while in the process of booking an event in Event Wizard. The process you use and the details you enter are very similar to those in Account Manager and will be available throughout the entire program. Adding a New Account 1. Click the Tools sidebar group on the left-hand side of your Main screen. 2. Click the Event Wizard button. Note: You can also access the Event Wizard button at the bottom of the Event Manager screen (if you have added the button to the toolbar, or you may access it from the button at the top left-hand side of the screen. 3. Click the green plus sign button at the top of the Wizard screen to add a new account. Enter the name of the new client Click the Add A New Contact button to add a new contact person Fill in Miscellaneous information as desired
86 Adding a Contact Person Can I add contact people on-the fly in the Wizard? Contact people, like accounts and events, can be added in various places throughout Caterease, including the Event Wizard! Adding a Contact Person 1. Click the Add A New Contact button, located at the lower right of the Account Details form. 2. In the form that pops up, type the last name of the new contact person into the Last Name field. 3. Press your [Enter] or [Tab] key to move to the next field. 4. Continue to fill out contact information as desired, pressing your [Enter] or [Tab] key to move from field to field. 5. In quick-pick fields, such as Title, click the down arrow at the right of the field and pick an option from the corresponding quick-pick list. 6. Click the Credit Card Information button, select a credit card from the quick-pick list, and then type in the remaining credit card information. 7. [Optional] Click on the Notes tab and type any notes pertinent to this particular contact person. These notes do not print anywhere; they are merely here for your reference. You can format the text you enter into this Notes tab by highlighting the text, clicking your right mouse button, and choosing Font. 8. [Optional] Click on the Picture tab, click your right mouse button, and select Load From File if you want to include a digital image of this contact person. 9. When finished, click the OK button at the bottom right of the form to close the form and save your changes
87 Unit 12: Adding a New Account in Other Ways Topics covered in this unit include: Adding a New Account in Event Manager Adding a New Customer Who is Not A Company
88 - 88 -

89 Adding a New Account in Event Manager How does an existing customer differ from a new one? If you wish to add a new event for a new customer, that means you have never done any business with that customer before; that company s information has not yet been entered into Caterease. If, however, your new event is for an existing customer, that company s information is already in the program - you need only retrieve it. Once the details of a particular client have been entered into Caterease, you never have to type them a second time. Note: This topic discusses adding a new event manually from within Event Manager. As an option, see the chapter on using the Event Wizard. Adding a New Event 1. Access Event Manager by clicking the Event Manager button from the Main Caterease sidebar. 2. Click the Add Record button, located at the top of your Caterease screen. 3. Click Yes to confirm your choice. Search for an existing account Add a new account to your system Optionally select a contact person

90 Adding a New Customer Who is Not a Company What if my customer is an individual, as opposed to a company? In Caterease, there is an easy, shortcut way to enter individuals as customers so you never have to type the same thing more than once! 1. In Account Manager, click the Add New Record button, located in the main toolbar at the top of your Caterease screen. Result: A confirmation message appears. 2. Click Yes to confirm your choice. Note: Don't fill out any general account details; immediately move on to Step Verify that the Contacts tab at the bottom of the Account Manager is currently selected. 4. Click the Add A New Contact button, located on the right-hand side of Account Manager. Note: This button is identical to the Add Record button you clicked in Step 2, above. Be careful not to confuse them. Result: A New Contact window appears for you to enter contact person information. 5. Type the last name of the new contact person. 6. Press your [Enter] or [Tab] key. Result: Your cursor moves to the next field. 7. Continue to fill out contact information as desired, pressing [Enter] or [Tab] to move from field to field. Note: Drop-down quick-pick lists are offered for fields such as Title, and can be customized by you (see Editing Quickpick Lists). 8. Click the Copy To Client button, located at the top right of the New Contact window. Result: All name and address information from the contact person is copied into the respective fields for the client. Note: Any existing client details (if you have already typed an address for the client, for example) will NOT be overwritten; however, you can hold your [Shift] key down as you click Copy To Client to have ALL contact person information replace existing client details, if you want. 9. Click OK to close. Click to copy the contact information to the account General fields Add the Contact first
91 Unit 13: Advanced Account Management Topics covered in this unit include: Deleting an Account Viewing/Editing Contact Details Viewing/Editing Events Generating a Billing Statement Generating Reports Posting Payments to an Account Combining Duplicate Accounts Creating a Default Site Location
92


93 Deleting a Current Account How do I get rid of an old account? As this page shows, you cannot delete any accounts that have associated records such as room contracts, events, reminders, etc.; these records must be deleted first, before the account can be removed from your database. Deleting an Account 1. Check the Events tab, Reminders tab, Contact History tab and Guestrooms tab of Account Manager to confirm that there are no events booked for the current account. Caterease will not allow you to delete an account that has events assigned to it. 2. Click on the account you would like to delete (from the grid) and then click the Delete Record button, located on the toolbar at the top of the screen. Result: A confirmation prompt appears. 3. Click Yes to confirm your choice. Result: The account will be permanently removed. Caterease will prompt you to confirm your choice You must first delete any events associated with the account
. 2. Select one of the contact people listed on that tab to edit. 3.")
94 Viewing or Editing Contact Details How do I change existing contact information? You can edit any contact information you have entered into Caterease quickly and easily, following the steps below. Editing Contact Details 1. Click the Contacts tab in the bottom window of Account Manager (if it is not already selected). 2. Select one of the contact people listed on that tab to edit. 3. Click the Show Contact Details button, located on the lower right of your Account Manager form. 4. Click any tab on the Contact form and edit information as desired, as described on the previous page. 5. When finished, click OK to save your changes. Click Show Contact Details button Enter or edit information

95 Viewing or Editing Events Don t I have to be in Event Manager to do this? As with adding events from Account Manager, we are looking here at the flexibility of Caterease. If you want to retrieve an event in Caterease, you of course have to end up in Event Manager. However, here again the program allows you to zigzag from one location to another. In this case, you are in Account Manager and you decide you want to take a closer look at a particular event a customer has held (or is holding) with you. One mouse click will not only open Event Manager for you, but will place you on the exact event you want to examine. Viewing/Editing an Event 1. Click the Events tab in the bottom window of Account Manager (if it is not already selected). 2. Select one of the events listed on that tab. 3. Click the Select button,, located on the lower right of the Account Manager screen. 4. Click Yes to confirm your choice. You will be taken into Event Manager and placed on the event which you selected. Click the Select button to retrieve the highlighted event Be sure to select Events tab
 and a Billing Statement that will consolidate all events or")
96 Generating a Billing Statement What kinds of prints can I generate from Account Manager? In addition to a Fax Cover Sheet, you can print any number of custom merge letters (if you own the Marketing Tools add-in to the program) and a Billing Statement that will consolidate all events or guestrooms contracts booked by an account onto one statement. These prints are all available by opening Account Manager and clicking the Prints button on the Home ribbon tab. Fax Cover Sheet This option allows you to quickly print a fax cover sheet for the current account, including an optional memo section. The client name, contact person, fax number, etc., defaults from the current account, but can be edited on-the-fly, if desired. Merge Documents If you own the Caterease Marketing Tools Package, this option allows you to print one of your custom merge documents. Note: Since you are in Account Manager, event information will not merge into a document. Therefore, you should only print documents with no merge fields or only merge fields of account information from this area of the program. Billing Statement If the current account has many events with you, this option allows you to consolidate all of that financial information into one single billing statement. Note: The top portion of this print can be edited in your Miscellaneous Print Designer. Click Prints in Account Manager

97 Generating Reports from Account Manager What kind of reports can I generate from Account Manager? There are several reports available to you from the Account Manager. All of them are accessible by clicking the Accounts button on the Reports ribbon tab. Account List (Events) This report lists every account in your database, and all events (excluding those with a status of "Cancelled") associated with those accounts. Account List (Guestrooms) This report lists every account in your database, and all group bookings (excluding those with a status of "Cancelled") associated with those accounts. Inactive Accounts (Not available in the Express version) This report lists all accounts in your database that have no associated events or group room bookings - that is, all accounts with whom you've never done any business. Accounts Origination (Not available in the Express version) This report will list all accounts who were added to your database during the established date range. Note: For a list of all accounts in your database, set a date range of "Less than or equal to" today's date. Total Accounts Receivables (Not available in the Express version) This report lists all money owed to you by all accounts, including both event revenue and group room booking revenue (if applicable). Also indicated is how many days past due the money is ("0-30 days, "31-60 days, etc.). Click Reports > Accounts at the top of the screen Select Total Accounts Receivables at the bottom of the list
98 Posting Payments to an Account (See image on following page.) What if a large account wants to pay me for several events at once? Since this process is more about the account than it is about a specific event, you would post this large payment in Account Manager. A handy tool helps you spread large payments out across any number of events for a customer. 1. In Account Manager, retrieve the client you want to post a payment for. 2. On the toolbar at the bottom of the Account Manager, click the Multiple Payments Processing button. Result: The Multiple Payments Processing window displays, listing all events with outstanding balances. Note: As an option, you can also click the Select ribbon tab >Payments > Apply Payments. 3. On the left-hand side of the Multiple Payments Window, enter payment information (Amount, Pay Method, etc.). Note: The payment date will default to the current date, but can be changed if desired. Data-entry tools are available, such as a drop-down calculator to enter payment amount, and quick-pick lists for Pay Method and Credit Card. If credit card information has been stored with the contact person's information, click the Credit Card Information button at the top of the window to retrieve. 4. Highlight the particular events in the window to which you would like to apply payments. Note: If no events are listed in the window, then this client has no balances currently past due. In this case, you can remove the check from the Past Due Only checkbox at the lower left of the window to see all events with balances, regardless of due dates. 5. Click Disperse Payment at the top right of the window to have Caterease automatically disperse your payment amount, or manually enter the desired payment amount for each individual event directly into the Payment column in the grid. Note: Caterease will automatically disperse payment by paying off the first event in total, moving on to the second and repeating until payment funds are depleted. Once all events are paid in full, Caterease will offer to apply any leftover payment amount as a credit to the final event in the list. You can cancel the dispersing by clicking Cancel at the bottom of the window. Note: You must highlight events first (Step 5) before Caterease will automatically disperse payments. 6. Respond to message prompts as desired, depending on whether the payment does not meet or exceeds the balance due: If payment amount is less than balance due, a message will appear, indicating the remaining balance due. If payment amount exceeds balance due, a message will appear, offering to apply remaining payment as a credit to the last event selected. If you accept, the remaining payment amount is applied to the last event. If you decline, a message will inform you of the remaining payment amount; however, that remaining amount will not be applied to anything. 7. When finished, click OK. Result: A confirmation message displays. 8. Click OK again. Result: The Multiple Payments Processing window closes and your payments are processed

99 Enter Payment Details Select Events Click Disperse Payment

100 Combining Duplicate Accounts Oops! I entered the same client twice, and each one has events in my program. Can I combine them? Yes, you can and the powerful Combine Accounts tool will do all the work for you! 1. In Account Manager, find the duplicate account which you want to remove from the program. 2. Click the Select in the ribbon located at the top of your Caterease screen. 3. Choose General > Combine Accounts. Result: A confirmation message appears. 4. Click Yes to confirm. Result: An account selection window appears. 5. Select an existing account (or add a new one) to which you will reassign all of the events, contact people, and other details of the client you are removing. Note: See note in Step 2, above, for hints on searching for records. 6. Click OK. Result: A confirmation message appears. 7. Click Yes to confirm. Result: The information from your first account (selected in Step 2, above) is moved to your second account (selected in Step 6, above) and you are prompted to delete the first account from Step Click Yes to delete the first account (selected in Step 2, above). Result: The account is deleted. Choose Select > General > Combine Accounts Select a duplicate account from the list (Diebold Co.) Click Yes, then select account to combine into

101 Creating a Default Site Location My clients have preferred locations where they always want their parties held. You can assign a default site location to any or all of your clients in Account Manager, so whenever you book an event for that new client, his or her default site location comes into that new event automatically. 1. In Account Manager, find the account for which you wish to add a default site location. On the toolbar at the bottom of the Account Manager, click the Default Site Location button. Result: The Default Site Location window o 2. Enter the general information, such as name, address, etc., by simply typing into each field and optionally pressing your [Enter] or [Tab] key to move to the next field. Note: If the default site location is a commonly used one, or if the client wants to use their address as the default site location, see the tip below for important information on how to avoid repetitive typing. 3. Click the Directions tab and enter detailed directions to the default site location. 4. Click Close. Result: The window closes and your changes are saved. Tip: If the default site location is a commonly used one, click the Site Locations Database button at the top right of the Default Site Location window to select it from your default database. If the location is not yet in the database, you can type its information in the Default Site Location window and click the Add to Site Locations Database button to add it for future use. If the client wants to use his address as the default location, click the Copy from Client button, also located at the top right of the window. Click to select a stored site location Type the site location information Add the new site location to the site location database Click to add a Default Site Location
102
103 Unit 14: Customizing the Screen Display Topics covered in this unit include: Customizing Fields in Account Manager Customizing the Event Manager Screen Display Using the Split Screen Display Accessing the Full-Expand Mode Customizing the Sub-Event Screen Display Customizing the Sub-Event Layout Customizing the Event Wizard Display Creating a Custom Layout on the Event Wizard Display
104

105 Customizing Fields in Account Manager How about if I want to get rid of specific fields? Get rid of fields, rearrange fields, make up your own fields. With Caterease, you can completely redesign the screens to suit your needs. Removing Fields from the Screen 1. Click your right mouse button over the field name on either the General or Miscellaneous tab. Note: Do not right click the fields themselves, but rather on the name of the field. 2. Right-click. 3. Select Customize. Result: A pop-up Customize window appears. 4. Hold your left mouse button down on any field name and drag it and drop it into the Available Items pane. Result: The field is removed from the screen. 5. Click the Save Window Settings button (located at the top of the screen) if you wish to set this as your new default arrangement. Drag/drop fields to and from the Customize window Note: Refer to the Customization tutorial and corresponding manual for detailed explanations on how to customize your screens in Account Manager
106 Customizing the Screen Display in Event Manager What if I don t need some of this information on the screen? Caterease gives you the unique ability to completely redesign your various screen displays throughout the program to suit your particular business needs. Here, we discuss customizing the areas at the top of the Event Manager screen, as well as modifying the tabs on the General display. Adding or Removing Client/Organization Information/Financial Details 1. Float your mouse pointer over the client information (Client/Organization Information, top left) or financial information (Financials, top right) at the top of the Event Manager screen. 2. Click your right mouse button. Result: A pop-up window appears, listing optional fields to be displayed in this area of the screen. 3. Click or un-click checkboxes next to any fields. Result: Fields with check marks next to them will appear on the Event Manager screen. Right-click anywhere on the screen, in this case the Financials area Note: Refer to the Customization tutorial and corresponding manual for detailed explanations on how to customize your screens in Event Manager

107 Using the Split Screen in Event Manager Can I use the incremental search feature in Event Manager, too? To search for records incrementally, you must first sort them by one of the columns in the grid as in the split screen available in Account Manager. This same option is available in Event Manager, as well. Showing the Split Screen 1. Move your mouse pointer over the "quick-snap" bar along the left-hand side of Event Manager. 2. Click the area of the "quick-snap" bar pointing in the direction you want the pane to adjust: i.e., toward the screen display to stretch or open the pane; away from the display to collapse the pane. Result: The pane will collapse or stretch in the direction the arrows on the button are pointing. 3. To return the pane to its original size, click that same button, which will now be pointing in the opposite direction. Result: The pane will return to its original size. 4. Click the Save Window Settings button (located at the top of the screen) if you wish to set this as your new default arrangement. Result: A confirmation message will appear; click Yes and your new arrangement will be saved. Use the quick-snap bar to split the screen
. Result: Any columns with check marks will appear in the grid. 3.")
108 Accessing the Full-Expand Mode 1. To view the entire grid, click the Display Full Grid button, located at the top of the window. 2. Click the Quick Column Customizing button, located at the top left-hand side of the window (to the left of the Event # column). Result: Any columns with check marks will appear in the grid. 3. [Optional] Drag column headings left and right in the grid to reposition them, and click the column heading to sort by that detail. 4. Click the Save Current Window Settings button if you want this to be saved as the default arrangement for your expanded grid

109 Customizing the Sub-Event Screen Display in Event Manager How do I make the Sub-Event window more applicable to my company? Out of all the windows in Caterease, the Sub-Event window is the one you are most likely to customize, since it contains certain information that may not apply to your business. You may want to remove the site location details if you don t do off-premise parties, for example, or remove the room information if you do not have banquet rooms. Adding/Removing Fields from the Screen 1. Click anywhere in the pane on the left-hand side of the Sub-Event window. 2. Select Field Chooser. Result: A small Customization window opens. 3. To add fields, hold your left mouse button down on any field name in the Customization window and drag it to the Sub-Event details window (just above the Customization window). 4. Hold your left mouse button down and drag items up or down to reposition them on the screen. 5. If you want this to be the new default look for the program, click the Save Window Settings button. Sub-Event Details pane \

110 Customizing the Sub-Event Screen Layout 1. Open the Sub-Event display by double-clicking inside the Sub-Event Details pane. Alternatively, you may click the View/Edit Current Sub-Event button. 2. Right-click anywhere on the Sub-Event window. 3. To remove a tab from the window, right click on the tab you want to remove and click Customize. 4. Hold your left mouse button down on the tab and drag and drop that tab into the Available Items pane of the Customize window. Result: That tab is removed from the Sub-Event window. 5. If you want this to be the new default look for the program, click the Save Window Settings button. Note: Because of the endless variations available to you when customizing your screens, this topic is addressed here in very general detail. Refer to the Customization tutorial and corresponding manual for detailed explanations on how to customize your screen display

111 Customizing the Event Wizard Display Am I able to customize the screen display in the Event Wizard to reflect a particular type of event that I book on a regular basis? You can create your own custom Event Wizards to be used for any type of event you might book; you can create a custom wizard for off-premise parties, one for deliveries, one for weddings, etc., each showing the specific informaiton that applies to that type of event. You can even create layouts which have certain details conditionally required, depending on what type of event is being booked. Creating a Custom Layout 1. Open the Event Wizard. 2. From the Step 1 window, click the Next button. 3. Click the Layouts button at the top left of the Event Wizard window and choose Custom. Result: The Custom Layouts window displays. 4. [Optional] Click the Shared button at the bottom left of the window if you want your new layout to be available to all users on your Caterease network. 5. Click the Add Layout button, located at the top left-hand side of the window. Result: A new line is added to the window with the default name of New Layout. Note: You can update an existing layout on the list to show your current display by right-clicking the layout name and choosing Copy From Current. 6. Type a name of your new layout and click the Save Current Layout button. Note: If you want to retrieve custom window size and position settings, cutom grid views or custom toolbar settings with your saved layout, select those options first (Layouts > Include) before selecting your custom layout. 7. If you want this to be the new default layout of this window from now on, click the Save Window Settings button. If you want this to be the new default look for all users on your network, click the Settings button at the top right and choose Shared > Window Settings. 8. Click the X at the top right-hand side of the Custom Layout window to close it

112 Accessing an Existing Layout 1. Open the Event Wizard. 2. Click the down arrow to the right of the Next button. 3. Select the desired layout from the drop-down list
113 Unit 15: Event Manager Tools Topics covered in this unit include: Viewing/Editing an Event Checklist Viewing/Editing an Event Timeline Viewing/Modifying Event Tax Rates Viewing Driving Directions Adding Payments Scheduling Deposits Viewing Event Status History Viewing Related Events Establishing a List of Required Items Viewing/Adding Event-Related Files Applying Discount Rates Managing Multiple Events Simultaneously Copying an Event Switching/Editing Account Information
114

115 Click the Select ribbon tab and the General button to access certain event-specific tools The Event Manager Toolbar Most event tools are accessible through the Event Manager toolbar At the bottom of your Event Manager screen is a toolbar with various event-specific features, such as the Event Checklist, Payments, Deposits, etc. More features (Copy Event, Costing Summary, etc.), are available through the Tools > Select > General menu at the top of the Caterease screen. Many of these tools are discussed in detail on the following pages

116 Using the Event Checklist What is an Event Checklist? A checklist is much like a to-do list for your event: a list of tasks that need to be performed in relation to the event. 1. Click the Event Checklist button, located on the lower right-hand side of the Event Manager screen. Result: The Event Checklist window displays. 2. To add a new checklist to an event, click the Add A New Checklist Item button, located on the right-hand side of the Event Checklist window. 3. Type the checklist item into the Checklist Item field. 4. Enter a due date for the checklist item by clicking the down arrow to the right of the Due field to access a drop-down calendar. 5. Select the person who is responsible for completing the item by clicking the down arrow to the right of the Assigned To field and choosing a name from the quick-pick list. 6. [Optional] To add notes related to the checklist item, click the Show Checklist Item Notes button. In the text block which displays, type notes as desired. 7. When an item has been completed, click the corresponding checkbox in the Is Done column. Retrieving Items from Default Checklist 1. From the Event Checklist window, click the View or Select from Default Checklists button. 2. To add an existing checklist to a particular event, click the desired default checklist category from the left-hand pane of the window to select it. 3. From the right-hand pane, highlight one or more checklist items. 4. Click OK. 5. Click in the Due field and type a due date or click the down arrow to the right of the field to access the drop-down calendar. 6. Click the Assigned To field and type the name of the person responsible for this item or click the down arrow to choose a name from the corresponding quick-pick list. 7. When an item has been completed, click the corresponding checkbox in the Is Done column. Click the Quick-Column Customizing button to add columns

117 Using the Event Timeline In addition to the various time fields available in Event Manager, you can also create a detailed timeline unique to each party. 1. Click the Event Timeline button, located on the lower right-hand side of the Event Manager screen. Result: The Event Timeline window displays. 2. To add a new timeline to an event, click the Add a New Timeline button, located on the right-hand side of the Event Timeline window. Result: A new field displays (today s date auto-populates, by default). 3. Type the time the timeline item is due into the Timeline field. Alternatively, you may use the up-anddown arrows to select a time. 4. Type a description of the timeline item into the Timeline Item field. 5. Select a Category (Front of House, Back of House, etc.), by clicking the drop-down list to the right of the Category field to indicate who is responsible for completing the timeline item. 6. [Optional] To add notes related to the timeline item, click the Show Timeline Item Notes button. In the text block which displays, type notes as desired. Viewing a Default Event Timeline 1. From the Event Timeline window, click the View or Select from Default Timeline button, located at the top right-hand side of the window. 2. To add an existing timeline item to a particular event, click the desired timeline category from the lefthand pane of the window to select. 3. From the right-hand pane, highlight one or more timeline items. 4. Click OK. 5. Click in the Time field for a particular item and enter a time, or use the up-and-down arrows to adjust. 6. [Optional] Enter a Category to use for tracking of this item, or click the down arrow to choose a name from the corresponding quick-pick list
118 Displaying Event Tax/Service Charge Rates (See image on the following page) Do I have to set a tax schedule every time I book an order? Remember our rule of thumb: You should never have to type the same thing more than once. Your Caterease program has a default tax and service charge rate that you can create for all new orders (described later in this manual). This page addresses adjustments to the tax/service charge rates of one particular order. Editing Tax/Service Charge Rates on-the-fly 1. In Event Manager, click the View/Edit Event Tax/Service Charge Rates button, located at the lower right-hand side of the screen. 2. Click in any field and edit as desired, typing rates or using the up-and-down arrows to increase or decrease the rate one percentage point, respectively. 3. Press your [Enter] key to move from field to field. Applying Tax on Service Charge 1. Click in the checkbox labeled Tax Serv Chg, above the far right-hand column. 2. If the tax rates are different for the tax on Service Charge, click the At New Rate checkbox. Then click in any rate field below and edit as desired. 3. Press your [Enter] key to move from field to field. Making the Order Tax Exempt 1. Click in the checkbox labeled Tax Exempt at the lower left of the form. 2. Click in the Exempt # field and enter an optional tax exempt ID number. 3. Enter an optional expiration date for the tax exemption. Adding Additional Adjustments 1. Click in one of the fields at the lower right of the form. 2. Enter a dollar amount to be added to the subtotal, first, second, third tax, gratuity, or service charge of the order. Retrieving an Optional Tax Schedule 1. Click the Select Tax Schedule button. 2. Select a schedule from the list. 3. Click the OK button

119 Make an order Tax Exempt with one mouse click

120 Getting Driving Directions Can I quickly get up-to-date driving directions to the site location of an event? Caterease has a dynamic interface with the leading mapping websites MapQuest, Google Maps, and Virtual Earth so you can simply click a button and get up-to-the-minute driving directions. Using the Mapping Interface 1. Click the Get Map button on the toolbar at the bottom of the Event Manager window. Result: The Get Directions window displays, with your company's address automatically filled in as the Start information, and your client's address as the End information. Note: If you have not filled in this account's address, city, state, etc., then the End information will be blank. 2. Click the down arrow next to Map Provider in the Options section and choose your preferred mapping website. 3. Click OK. Result: Your web browser will open on your chosen website showing directions to the client's address. Note: This interface only works if you have a connection to the Internet currently active on your computer. Click to select the map provider Click to get directions

121 Posting Payments to an Event Adding a Payment 1. Click the Event Payments button, located at the bottom of the Event Manager screen. Result: The Event Payments window displays. 2. Click the Add Payment button, located at the top of the Event Payments form. 3. Enter an Amount for the payment. 4. Enter additional information (Pay Method, Comment, Credit Card Information) as desired. 5. Click the OK button to close the Payment Details form. Viewing or Editing Payment Details 1. Select any payment listed on the Event Payments form. 2. Click the View/Edit Payment Details button. 3. Edit the information as desired. 4. Click the OK button to close the Payment Details form

122 Scheduling Future Deposits for an Event Can I set up a schedule of deposits the customer will pay in the future? Yes! You have two options: You can either add as many future deposits as you need separately, entering due dates and amounts for each one, or you can create a default schedule of deposits and have Caterease automatically assign dates and amounts based on a custom set of rules you establish. Scheduling Deposits Manually 1. In Event Manager, click on the Event Deposits Due button, located on the bottom right-hand side of the Event Manager display. Result: The Event Deposits window opens. 2. Click the Add Deposit button, located at the top of the Event Deposits form. Result: A new, blank line is added to your deposits list. 3. Click the down arrow at the right of the Due Date field and select a due date for the new deposit using the drop-down calendar. Note: Of course, you can optionally type the date by hand. 4. Press your [Enter] key. Result: Your cursor moves to the next field - the Due Amount field. 5. Enter an amount for the deposit, or click the down arrow to get help from the drop-down calculator. 6. Press [Enter] and enter a Comment, if desired. Note: Examples of comments might include "Initial Deposit, "Final Payment, etc. 7. Repeat Steps 2-6 to add other deposits as desired. 8. Click the X at the top right of the window when finished. Result: A confirmation message appears. 9. Click Yes. Result: The Event Deposits window closes, saving your changes. Click to transfer deposit to Accounts Receivable Click the green plus sign to add a deposit schedule
123 Adding Scheduled Deposits to an Event The steps below describe how you can instantly create a detailed schedule of future deposits due for any event, based on the default schedule you created above. 1. In Event Manager, click on the Event Deposits Due button, located at the bottom right of the Event Manager display. Result: The Event Deposits window appears. 2. Click the Make Scheduled Deposits button at the top of the Event Deposits window. Result: A list of deposits is created, based on the deposits schedule you have created in your program. Click to add new deposit schedule
 or any custom status in-between.")
124 Checking Event Status History Can I track how long an event has been Tentative, Prospective, etc.? Quickly track the lifecycle of an event using the handy Event Status History tool. This feature shows specifically how much time an event has spent at each level of your sales process (from Prospective, to Tentative, to Definite) or any custom status in-between. Checking the Status History of an Event 1. Open an event in Event Manager. 2. Click the Event Status History button from the toolbar at the bottom of the Event Manager screen. 3. [Optional] Click the Print Grid button to print the grid. Print Grid button Event Status History button

125 Viewing Related Events How do I find other events like this one? The Related Events tool available only in the Professional version of Caterease, is an excellent way to quickly navigate through your events. Find parties related to each other, based on client name, sales rep, theme, or a variety of other options, and jump to them instantly, or even open them in a separate Event Manager! Using the Related Events Tool 1. Open an event in Event Manager. 2. Click the Related Events button in the toolbar at the bottom of Event Manager. Note: You may also click Select > General > Related Events. Results: A pop-up window appears, listing all events related to this one by a certain detail. 3. [Optional] Click the down arrow next to Relate By and choose to see events related by a different detail. Note: This window retains its settings, and thus shows the last detail you chose in the Relate By field. 4. [Optional] Float your mouse over any column heading and click the down arrow at the right of the column heading to filter events. (e.g., filter Event Date to show only related events for This Week ). Note: This window retains its settings, and thus shows the last filter you used. 5. [Optional] Open a related event in any of the following ways: Double-click an event. Select an event and click the Select button at the top left of the window. Right-click an event and opt to open it in the current Event Manager or a second Event Manager

126 Using Required Items What is a Required Items List? A Required Items List is a compilation of items that are to be included when you order a particular menu item. Setting up a Required Items List allows you to create a checklist of items that must accompany specific bookings. 1. Click the Required Items button in the toolbar at the bottom of Event Manager. 2. Click the Select Items button, located on the upper right-hand side of the window. 3. Click a title in the left-hand pane to choose a specific list of required items. 4. Retrieve items in any of the following ways: Double-click a single item to retrieve it. Drag your mouse over several items to select them all, or hold the [Shift] or [Ctrl] key down on your keyboard as you click. Drag and drop highlighted items from the Select Items window. Click the Drop Items button at the top left-hand side of the window to retrieve the currently highlighted item(s) and leave the window open. 5. Click the OK button at the bottom right-hand side of the window to retrieve the currently highlighted item(s) and close the window. 6. [Optional] Click the Quick Column Customizing button and choose to display additional columns
, that are somehow related to an event, you can associate those files to the party in Event Manager.")
127 Using Event-Related Files Am I able to associate contracts, prints, proposals, etc., with a particular event? If you have any computer files (Word documents, Excel spreadsheets, PDF s, images), that are somehow related to an event, you can associate those files to the party in Event Manager. For example, perhaps you want to maintain a copy of each updated contract on record, in order to compare changes over time. Or maybe you want to create a diagram of the party in an image software program and then attach that image as a JPG or BMP file. You can choose to embed a copy of each file into the Caterease database or, if you plan to make future changes to the file, you can establish a link to the file itself. 1. Click the Event-Related Files button, located at the bottom right-hand side of the Event Manager window. 2. Click the Add File button on the right-hand side of the Event-Related Files window. 3. Choose to embed the existing file into the database or establish a link to the existing file. Note: Embedding the file into the database copies the file in its current form and attaches it to the event, whereas establishing a link to a file will connect this event to a file on your computer or network that you may save over time. (When establishing a link to a file that is not saved on your computer, you will only be able to review that file when your computer has access to it.) 4. Click Yes to confirm your choice. Result: The Attach File window opens. 5. Browse to the desired file and double-click. Alternatively, you may locate the document from the File name drop-down list and click Open. Result: The document name displays in the Event Related Files window. 6. Click the Save Attached File button to save the file to the event. 7. [Optional] Enter a Comment to describe the file or its relationship to the event


128 Applying Event Discount Rates What are discount rates? Discount rates are a means for you to discount an event by a certain percentage of the menu prices. You can break a discount into different rates for each menu item type: Food, Beverages, Liquor, etc. Applying Discounts 1. In Event Manager, click the Select ribbon tab and click the General button. 2. Select Event Discounts. 3. Click in any field and enter a discount rate, either by typing into the field or using the up and down arrows to raise or lower the rate one percentage point, respectively. 4. Press your [Enter] key to move from field to field. 5. Repeat for any menu item type. 6. Click Close when finished. Choose Select > General > Event Discounts Type discount rates, or use arrows to set Optionally, add a flat-rate discount amount into the Additional field. Click the Copy button to copy amounts

129 Managing Multiple Events Simultaneously What if I get interrupted when I m working on an event? Then handle the interruption, without ever closing the event! Caterease lets you open multiple windows including multiple Event Managers simultaneously, so you can handle any interruption without losing your place! Opening Multiple Managers 1. With one Event Manager (or other Manager) open, click the Event Manager button (or other Manager button) on the Main sidebar. 2. Click Yes to confirm your choice. 3. Work as desired in the new Manager. 4. Close the second Manager to return to your previous Manager (or toggle between the two)
130 Copying an Event (See image on following page) What does Copy Event actually do? When you copy an event, it takes all details of that event (with the exception, of course, of payment information) and copies them to another date or dates. If a customer wants to repeat an event - or even make the event weekly, monthly, etc. - it can be accomplished in just a couple of mouse clicks. Copying an Event to Specific Dates 1. In Event Manager, select the Select tab then the General icon and then choose Copy Event. 2. Enter a date into the first field on the Specific Dates tab, or click the down arrow to get assistance from the drop-down calendar. 3. Enter more dates as desired. 4. At the bottom left of the Copy Event form, click any of the various checkboxes if you wish to include food/service items, staffing, auto-reminders or room diagrams in your copy, or if you want to use updated menu prices and costs. 5. Click OK. Copying an Event for Regular Intervals (Not Available in the Express Version) 1. Click the Optional Parameters tab. 2. Click the down arrow next to the Sequence field. 3. Choose a sequence for the copy. 4. Select a Beginning Date or day on which the copy should begin. 5. Enter the number of copies needed into the Number Of Copies field. 6. At the bottom left of the Copy Event form, click any of the various checkboxes if you wish to include food/service items, staffing, auto-reminders or room diagrams in your copy, or if you want to use updated menu prices and costs. 7. Click OK. Copying an Event for Specific Days Within a Range (Not Available in the Express Version) 1. Click the Within Range tab. 2. Click the checkbox(es) next to the specific day(s) you want your new events to occur on. 3. Enter a start date in the From field under Select Range. 4. Enter an end date in the To field under Select Range. 5. Select Days by clicking into the corresponding check boxes. 6. At the bottom left of the Copy Event form, click any of the various checkboxes if you wish to include food/service items, staffing, auto-reminders or room diagrams in your copy, or if you want to use updated menu prices and costs. 7. Click OK
131

132 Switching/Editing Account Information for an Event Why would I want to change the account information? There are two different concepts here: editing information for the existing account and switching the account altogether. It is extremely important to distinguish between the two. For example, imagine a client calls to tell you their area code has changed, so you need to update it in your records. This is an example of editing information for the existing client of an event. However, imagine a client tells you they want to hold the same exact event with you that their colleague held last year. First you would copy the original event, and then change the account from the colleague s name to the one who just called you on the phone. This is not editing existing account information; instead, it is changing or switching accounts completely. Editing Information for an Existing Account 1. Click the Additional Client Information button to the right of the Client name on your Event Manager screen. 2. Click the Show Details button at the top of the Select Account window. 3. Click the Account Locked button. 4. READ THE MESSAGE CAREFULLY. Confirm that you want to edit the account information, not only for this event but for every other event this account has ever booked with you. 5. Edit as desired. 6. Click OK when finished. Switching Accounts Entirely 1. From the Select Account window, click the Account Information button. 2. Search for a different account using the Search Records or Incremental Search tool OR click the Add New Account button to add a new account. 3. When finished, click OK. 4. Click Yes to confirm
133 SECTION 3: Tracking Data Unit 16: Tracking Current Events Topics covered in this unit include: Running a Current Events Query Customizing the Results Grid Sorting/Grouping Data Saving the Grid View Creating/Saving Filters Printing/Exporting Data Generating Batch Prints Batch ing EZ Chart View Using the Client Contacts Query Using the Accounts Receivable Query and Accounts Receivable Report
134

135 Running a Current Events Query What does this tool do? This powerful tool will quickly query your entire database, and find all events within a particular date range. From the results screen, you can select one, several, or all events listed and print reports, contracts, letters, and other prints. You can even completely manipulate the results screens (since they are both grids) adding, removing and rearranging columns, sorting and grouping data and then exporting the details. Running a Current Events Query 1. Click the Tools sidebar on the left side of Caterease. 2. Click the button labeled Current Events. 3. Click the down arrow under Days Out, and set a date range for your query. 4. Click under Options to suppress events with a status of Closed, Cancelled, Tentative, Definite, or Prospective. 5. Click OK. Create custom grid views or data filters

136 Customizing the Grid Can I control what I see in this grid? Caterease grids offer unprecedented power! These powerful tools let you look at any information you want. You can customize the columns displayed on a grid, sort or group the grid data by any detail, create footers to show subtotals for each of your groupings, and then print or export the grid that you have created. You can even save your custom grid views for future use, making a limitless number of custom displays just a mouse click away! 1. Click the Quick Column Customizing button, located at the top left of the detail grid (to the left of the first column heading). Result: A drop-down list of column headings appears. 2. Click the checkbox next to any optional field name. Result: Fields that are checked off will appear as columns in the grid. 3. [Optional] Hold your left mouse button down on that column name in the list and drag up or down to reposition it on the grid. Result: The column heading is moved to a new position in the grid. 4. [Optional] Click to remove the check next to any column heading in the list to remove that column from the grid. 5. [Optional] Click the Save Window Settings button at the top of the window if you want this to be the new default arrangement for this detail grid, or choose to save this as a custom grid view (see following pages) for instant access later. Result: A confirmation message will appear; click Yes and your new arrangement will be saved as the new default look for this grid. Click the Quick Column Customizing button to access display fields OR click on a column heading and drag/drop into position Click in the checkbox to display or remove columns OR drag and drop to the desired location
137 Sorting and Grouping Grid Data (See Image on next page) What if I want to rearrange the data I m looking at? Another powerful option in Caterease detail grids is the ability to separate data in to groups based on any grid detail. For example, maybe you would like to see the financial information for all of this month s parties grouped by sales representative complete with financial subtotals for each group. You can even group within groups seeing, for example, events grouped by sales representative and then perhaps grouped by status within each sales rep s group. Sorting Grid Data 1. Click the heading of a column you wish to sort by. Result: The records are sorted in ascending order by that column. 2. [Optional] Click the same column heading again to sort in descending order by that column. 3. [Optional] Hold the [Shift] key down on your keyboard and click the heading of another column. Result: Records are now sorted by this second column within the first column you selected. Note: Available in the Professional version only. Grouping Data 1. Click your right mouse button on the heading of any column in the grid. Result: A pop-up menu appears. Note: You must click on the heading of a column; clicking within a column presents a different pop-up menu. 2. Select Group By this Field. Result: A small panel containing your chosen column heading is displayed across the top of the detail grid, and grid data is now separated into groups based on your selection. 3. Repeat Step 2 to create sub-groups, or groups within groups (Professional version only). Note: For example, you could choose to group all events by Theme, and then by Sales Rep within Theme (sub-groups). 4. Click the plus sign to the left of each group in the grid to display the records in that group. Removing Groups 1. Click your right mouse button over any column heading in the group panel (the small panel along the top of the results grid.) Note: Each heading must be done individually. 2. Select Remove From Grouping. Result: The records are no longer grouped by that heading. 3. Repeat for any other group headings (if necessary). 4. Click the Group By Box button, located at the top right of the grid, to close the group panel. Result: The small panel at the top of the grid disappears

138 Click a column to sort data by column header Right mouse click and select Group By This Field

139 Saving the Grid View What if I have several different grid layouts I need? Once you create a custom grid display, you can save that view for future use. Perhaps every month you re going to want to look at your financial information grouped by sales representative. Create this view once, then save it to be pulled up every month, with just the click of a button. Views can be saved locally (meaning they will only be available on your machine) or shared across all Caterease users on the network. 1. Establish a custom grid view as outlined previously. 2. Click the Views button at the top left of the results grid display. 3. Choose Custom. Result: The Custom Grid Views window appears. 4. [Optional] Click the Shared button at the bottom of the Custom Grid Views window if you want this custom view to be shared with other users on your Caterease network. Note: The Local button is selected as a default; all local grid views will only be available on your computer. 5. Click the Add Grid View button. 6. Type a name for your new grid view. 7. Click the Save Current Grid View button. 8. Close the Custom Grid Views window. Click Custom, under Views, to add a new view, or open a saved view Save the grid view Click Views to access saved views Save the grid view locally (Local) or on the server (Shared)
140 Creating the Grid Filter (See image on following page) What if I don t want to see all the records that are listed in the grid? That s what grid filters are all about: filtering data! For example, perhaps you only want to look at events for a particular sales representative. Or maybe you only want to see parties with a particular status. Use the steps described below to filter out those records that you don t want to see. Establishing a Filter 1. Float your mouse pointer over a column heading in the grid to reveal a black down arrow at the right of the column heading. 2. Click the down arrow at the right of a particular column heading - for example, the column heading labeled "Status. Result: A drop-down list appears, listing all options available for that column. In our example of "Status, the drop-down list might include the options of "Definite, "Tentative, "Prospective, etc. 3. Select an option from the corresponding list. Result: A filter is instantly created, filtering out all records that do not match that selection. As an option, you can click the checkbox next to several options in the list to filter by multiple details. Note: The details of your filter are indicated in the lower left-hand corner of the grid. Changes made to a filter are automatically stored in temporary memory as long as this screen remains open, and can be retrieved as detailed below. 4. Repeat Steps 1-3 as desired to further filter data. Result: The filter updates to reflect your changes. Establishing a Custom Filter 1. Click the filter icon at the right of a particular column heading - for example, the column heading labeled "Status. Result: A drop-down list appears. 2. Select Custom. Result: The Custom Filter window appears. 3. Establish your first filter condition - for example, choose "Equals" as your comparison by clicking the down arrow on the left side of the window and "Definite" as the status to the right. Note: The example outlined above would be intended to filter out all events that do not have a status of "Definite. 4. [Optional] Select And or Or and repeat Step 3 on the second line to establish a second condition. 5. Click OK to set your filter

141 Click the filter icon to set a "snap filter" Current filter is displayed at the bottom of the screen

142 Saving the Grid Filter Just like custom grid views, you can save your custom filers for future use. Again, these can be saved locally or shared across the Caterease network. 1. Establish filters as outlined above. 2. Click the Filters button at the top left of the results grid display. Result: A drop-down list displays. 3. Choose Custom. 4. Result: The Custom Filters window opens. 5. [Optional] Click the Shared button at the bottom of the Custom Filters window if you want this custom filter to be shared with other users on your Caterease network. Note: The Local button, selected by default, means this filter will be available only on your computer. 6. Click the Add Filter button. Result: A new filter is added to your list, with the default name New Filter. 7. Type a name for your new filter. 8. Click the Save Current Filter button. 9. Close the Custom Filters window

143 Printing/Exporting Grid Data Can I print my custom grid or export it? Sure! Once you ve designed your custom grid, you can give it any title you want and print it as a completely customized report! Or, you can easily export it in a variety of formats for use in another software program. Printing a Grid 1. Customize your results grid as explained on the preceding pages. 2. Click the Print Grid button at the right of the grid display. Result: A print preview of your custom grid appears. 3. [Optional] Click the Print Title button at the top of the Print Preview screen to edit the text and format of the title of this print. 4. Click the Print button at the top of the Print Preview screen to send the print to your printer. Exporting Grid Data 1. Click your right mouse button anywhere in the grid display. 2. Select Export Data. 3. Choose an export format Microsoft Excel, text file, HTML, or XML. Result: A window appears for you to enter a name for your exported file and a directory for it to be saved in. 4. Click the down arrow next to Save In at the top of the window to choose a location for your exported file. 5. Click in the File Name field at the bottom of the window and type a name for your exported file. 6. Click Save. Result: A prompt will appear. 7. Note: If you have the Professional version of Caterease, this prompt will offer to open your export file for you automatically. If you have the Standard version, you will need to open a third-party application on your own and seek out the export file. Right-click anywhere in the grid Choose Export Data
144 Multiple/Batch Printing (See image on following page) So now that I have a list of parties, can I print all of their contracts? Believe it or not, you can! You can print a contract, invoice, or other print for any or all events in your list. Or you can print a contract AND an invoice AND other prints all at one time! Generating a Print for Multiple Events 1. Select multiple events by holding down your [Shift] or [Ctrl] key while selecting. 2. Click the Print button. Result: The Select Desired Print window appears. 3. Select the Prints, Sub-Prints, Documents, or Labels. Note: Batch printing is not available for reports. 4. Select a print title. 5. Click the Print button at the bottom right of the form. Result: One print for each of the selected events will automatically be sent to your printer. Note: Batch prints do not generate a Print Preview; they are sent to your printer automatically. Generating Multiple Prints for Multiple Events (Not available in Express version) 1. Select an event from your results screen, or hold your [Shift] or [Ctrl] key down to select multiple records. Note: The [Ctrl] key lets you select multiple records; the [Shift] key selects two records and all other in between them. 2. Click the Print button. Result: The Select Desired Print window appears. 3. Click the Multiple button. Result: A new panel opens along the right side of the Select Desired Print window. 4. Select the Prints, Sub-Prints, Documents, or Labels tab. Note: Multiple printing is not available (and not necessary) for reports. 5. Select a print title. 6. Click the right arrow button in the middle of the Select Desired Print window. Result: Your selected print title is moved to the right-hand panel. 7. Repeat for other desired prints. 8. Click the Print button the bottom right of the form. Result: Multiple prints for each of the selected events will be automatically sent to your printer. Note: Multiple prints do not generate a Print Preview; they are sent to your printer automatically

145 Click the Multiple button Click to save multiple print lists Number of Copies

146 ing in a Batch Great! Now what about ing? Well, if you have the Professional version of the program, you will not believe what you can do! From any query grid, you can generate batch s and even use merge letters as the outgoing message! That means a unique goes out to any number of recipients complete with optional attachments all with a single mouse click! 1. Select multiple events in the grid by holding down your [Shift] or [Ctrl] key while selecting. 2. Click the button at the top left of the query results screen. Result: An Untitled Message window appears. Note: The address for this outgoing will default to the Client associated with each selected record. 3. Click the down arrow to the right of the To... field and choose to send the to the general client e- mail address, or specifically to the booking contact or site contact of the selected events. 4. Type a subject for your into the Subject... field, or click the down arrow to the right of the field to access a custom quick-pick list. 5. Type a message as the body of your in the large white text block in the window. Note: If you own the Marketing Tools package, you can use one of your custom merge letters as the body of your . These letters will automatically merge in information from the current prospect, including name, salutation, current date, etc. 6. [Optional] Format the text of your using the Format toolbar on your window. 7. [Optional] Click the Attach button at the top of the window and choose File to attach a general computer file to your , or choose Print to attach one or several Caterease event prints. 8. Note: Attached files and prints appear in the small pane at the bottom of the window. 9. When finished, click Send. Result: The s are sent through your Outlook program, and any files you have attached are exported. Click to attach a merge document Click to attach an event print or Choose a merge document

 to choose a different criterion to base your chart on. Result: The chart updates to reflect your changes.")
147 Using the EZ Chart View This is amazing! Anything else? You mean, like single mouse click access to a dynamic graphing feature that will let you have all of the details in your grid in an easy-to-read, presentation-type format? Sure why not? Viewing a Chart 1. Click the Chart View button, located at the top of the query results grid. Result: The grid display changes to a chart. 2. [Optional] Click the down arrow to the right of Chart By (top of display) to choose a different criterion to base your chart on. Result: The chart updates to reflect your changes. Switching Chart Types 1. Click Bar Diagram at the top right of the chart. Result: A drop-down list of chart options appears. 2. Click a different chart type to select it. Customizing the Chart 1. Click Customize Chart at the top right of the chart. Result: A customization window appears. 2. Set optional settings on the Series, Options, and Sort by tabs. 3. Click the small X at the top right of the Customization window to close it. Printing the Chart 1. Click the Print Chart button at the right of the results screen. Result: A print preview screen appears. 2. Click the Print button at the top left-hand side of the Print Preview screen to send the print to your printer. Click to view in a chart Select a field to chart by Click to customize the chart
.")
148 Viewing Grid Results in Layout View Am I able to customize the information I would like to view? Yes! In addition to being able to view grid results in a chart view, you are able to view the grid results in a handy layout view (if you own the Professional version). The fields which display on the layout view are customizable, and the end result can be printed or ed, as described in other sections of this guide. Viewing Grid Results in Layout View 1. Click the Layout View button, located at the top of the query results grid. Result: The grid display changes to a layout view. 2. Click the Field Chooser button, located on the right-hand side of the screen, if you would like to add or remove fields


149 Generating the Client Contacts Query What is a Client Contacts Query? This special query tool allows you to instantly track all contact people for your various accounts. Choose from a couple of optional settings, and you instantly get a list that you can redesign, print, or export in various formats. 1. Click the Tools sidebar group and choose Client Contacts. 2. Optionally choose to see Only One Primary Contact, Contacts With Events Only, Contacts with All Address Fields Entered, or Only Active Accounts by clicking the checkbox next to each option. Note: Click a checkbox once to enable that option; click it again to remove the check and disable that option. 3. Click OK. Note: This grid can be redesigned, printed as a custom report, or exported for use in other software programs. Result of a Client Contacts Query: Click the appropriate checkbox Customize the fields Sort your data by column header Print the grid


150 Generating the Accounts Receivable Query Running an Accounts Receivable Query 1. Click the Tools sidebar on the left-hand side of Caterease. 2. Click the button labeled Accounts Receivable. 3. Click the down arrow under Days Outstanding, and set a date range for your query. 4. Click under Options to exclude events with very small balances. 5. Click OK to generate the query. Query Results:

151 Running the Accounts Receivable Report Running an Accounts Receivable Report 1. Click the Reports ribbon tab. 2. Click the Financials button and select Accounts Receivable. 3. Click the down arrow under Accounts Receivable As Of and set a date range for your query. 4. Click the checkbox next to any option to select it for your report: Show Payments- Click to show payments on the report Include Events with Negative Balances-Click to include events that have negative balances (events with credits applied) Include Events with Very Small Balances-Click to include events with small balances (of a few pennies) Include Payments Made After Accounts Receivable As Of Date-This option includes payments on the report even if they were made after the as of date you have selected. 5. Click OK to generate the report
152
153 Unit 17: Using the Events Query Topics covered in this unit include: Building a Custom Query Modifying and Saving Queries Generating Prints and Reports Editing an Events Query in a Batch
154
155 Querying Events What is an Events Query? The Events Query tool allows you to search through your entire database and find only those events you want to see. You can set any number of criteria to search by, and even save queries for future use. Once a query has been performed, you can print various reports based on the results, as well as event prints for any and all events on your results screen. Creating a Query 1. Select Events Query from the Queries sidebar. 2. Click on the button to add a criterion (condition). A condition will be added stating Event Date equals <empty>. 3. Click on the words Event Date in the condition and choose any condition from the drop-down list. This will be the first criteria you search by. 4. Click the comparison word next to your criteria and choose any option. Comparisons might say Is, Contains, Doesn t Contain, Is Empty, Is Between, etc. 5. Click <empty> in the condition and choose a value for the condition to be compared to. These lists are dynamic. If you are searching by Event Theme, then this list will be your quick-pick list of themes. If you are searching by date, this list will be days or ranges of days. If you are searching by financial fields, you will be given a window to type a specific value. 6. Add as many query conditions as desired following the steps above. Executing the Query 1. Create or edit a query as described above. 2. Click the Perform Query (lightning bolt) button. Perform Query button Save views and queries Create custom queries and grid views Use asterisk for column headings and arrangement /view

156 Saving Custom Queries Can I save queries for future use? Any custom query you build no matter how many conditions can be saved so that in the future it can be run, with a single click! Saving a Custom Query 1. Create an Events Query as described on the previous page. 2. Click the Queries button at the top left of the results grid display. 3. Choose Custom. Result: The Custom Queries window displays. 4. [Optional] Click the Shared button at the bottom of the Custom Queries window if you want this custom query to be shared with other users on your Caterease network. Note: The Local button is selected as a default; all local queries will only be available on your computer. 5. Click the Add Query button. 6. Type a name for your new query. 7. Click the Save Current Query button. 8. Close the Custom Queries window. Click Queries to open a query or save a custom query Choose Custom to save the new query

157 Editing an Events Query in a Batch Am I able to change some information about an entire group of customers? Yes! You can make changes to multiple items simultaneously within your Events Query. Change such items as status, tax rates, service charge rates, or a host of other options. 1. Create an Events Query as described on the previous page. 2. In the main pane of the window, select multiple items by either holding your [Shift] key down to select a group of contiguous items or by holding your [Ctrl] key down to select items at random. 3. Click your right mouse button over any one of the selected items. Result: A pop-up menu of options appears. 4. Choose Batch Processing. Result: The Batch Processing window opens. 5. On the General tab of the Batch Processing window, click the checkbox next to any field you would like to change for all of your selected items. 6. In the field itself, enter the new value you would like for the selected items. Note: Most fields have custom quick-pick lists for your convenience. Some have checkboxes you can enable or disable for the selected items. 7. When finished, click OK. Result: Your changes are applied and a confirmation appears. Depending on the number of changes/items, this could take a few minutes.
158
159 Unit 18: Activity Queries vs. Reports Topics covered in this unit include: Using the Food/Service Activity Query Generating a Food/Service Items Report Using the Payments Activity Query Generating the Payments Made Report
160
 to zero in on the exact details you want to see - for example, how many equipment items were used in a particular room, how many")
161 Food Service Activity Query What is a Food/Service Activity Query? This dynamic tool can show you all food or service items that have been ordered for an entire day or date range. You can then the results screen (described on the following page) to zero in on the exact details you want to see - for example, how many equipment items were used in a particular room, how many dessert items a specific sales representative sold, etc. In addition, the results of the query can be exported as an Excel spreadsheet, text file, HTML file, or XML file. As you can imagine, you can further manipulate the data in Excel to produce even more varied reporting. Performing a Food/Service Query 1. Click the Queries sidebar on the left-hand side of the screen. 2. Click the Food/Service Activity button. 3. Choose to track food/service items ordered before or on a specific date, after or on a specific date, or within a date range. 4. Choose to exclude items that have no quantities, or ones that have been ordered for cancelled events, or exclude modifiers. 5. Click OK. Select desired query parameters Select desired options

162 Food Service Activity Query Results Screen What can I do with the results of my activity query? As with any other details grid in the program, the results screen of the Food/Service Activity Query can be manipulated in many powerful ways. You can add or remove various columns of information to the grid, sort, or group the data by any detail, and even perform various snap filters to instantly filter out data. Adding Columns 1. Click the Quick Column Customizing button, located at the top left of the detail grid (to the left of the first column heading). 2. Click the checkbox next to any optional field name. 3. [Optional] Hold your left mouse button down on that column name in the list and drag up or down to reposition it within the grid. 4. Remember to click the Save Window Settings button if you want to save your new arrangement. Sorting Data 1. Click the heading of a column you wish to sort by. Using the Snap Filter Tool 1. Click the filter icon at the right of any column heading. 2. Make a selection from the corresponding drop-down list of choices. 3. Repeat steps 1 and 2 as desired to set more filter options. Click to add or remove columns to display Click the filter icon to set a snap filter Current filter is displayed at bottom of display

163 Tracking Food/Service Items in Express and Standard Versions Can I just get a quick printed report of menu items for a date range? The Food/Service Items Report is available no matter what version of Caterease you have, and although not quite as flexible as the query tool on the preceding pages it is nonetheless very flexible in its own right. This report allows you to track menu items ordered for events during any date range. Running the Food/Service Item Report 1. Click the Reports drop-down menu at the top of the Caterease screen. 2. Choose the Management subgroup. 3. Select the Food/Service Items report. 4. Select a specific date or date range to track menu items for, or use the relative date range options. Note: Items ordered for events occurring during this date range will be listed on the report. 5. [Optional] Enter a custom title for the report. 6. [Optional] Click the down arrow under Exclude Status and select one or more event statuses to be excluded from the report. 7. [Optional] Click the down arrow under Group By and choose to group menu items by a particular detail. 8. Optional] Click the checkboxes under Sort Order and choose to sort menu items by a particular detail. 9. [Optional] Click the checkboxes at the bottom of the window to optionally Exclude Items Without Quantities and to generate Separate Pages For Each Group. Choose date range Optionally group items Optionally exclude event status
 to zero in on the exact details you want to see - for example, how many payments had a Pay Method of \"Credit Card, how many were")
164 Running the Payments Activity Query What is a payments activity query? The powerful Payments Activity Query shows you all payments that have been received on a particular date or during a date range. You can then run various "snap filters" (described previously) to zero in on the exact details you want to see - for example, how many payments had a Pay Method of "Credit Card, how many were received for a particular Sales Representative, etc. Performing a Payments Activity Query 1. Click the Payments Activity button on the Queries sidebar group. 2. Choose to track payments received before or on a specific date, after or on a specific date, or within a date range. 3. Optionally choose to exclude events or group bookings that have been cancelled, to include only events that have been closed and also whether or not to include group bookings (if you own the Guestrooms Manager to track sleeping rooms). 4. Click OK to generate the query. Choose date range Choose from various query options


165 Viewing the Results of a Payment Activity Query What can I do with the results of my activity query? After you have customized the details appearing on your results grid adding and removing columns, sorting and grouping data, as described on previous pages you can export that data or even print the grid as a custom report. Exporting Grid Data 1. Arrange your grid data as you want it. 2. Click your right mouse button anywhere on the grid. 3. Select Export Data. 4. Choose a format to export to. Printing Grid Data 1. Arrange your grid data as you want it. 2. Click the Print Grid button at the top right of the results grid. 3. In the Print Preview window that appears, click the Print button to send the print to your default printer. Click Format > Title from the Print Preview screen to create the custom title
166 Tracking Payments Items in Express and Standard Versions Can I just get a quick printed report of payments received during a date range? Just like the Food/Service Items Report discussed earlier, the Payments Made Report is a quick, easy way to track payment details. Again, it is not quite as flexible as the Activity Query option however, it is available in all versions of the program. Running the Payments Made Report 1. Click the Reports drop-down menu at the top of the Caterease screen. 2. Choose the Financials subgroup. 3. Select the Payments Made report. 4. Select a specific date or date range to track payments for, or use the relative date range options. Note: This date range can reflect the date the payment was received, the date of the corresponding event, or either (see below). 5. [Optional] Enter a custom title for the report. 6. Choose whether you want your selected date range to reflect the dates payments were received, the dates events are held, or either. 7. Choose to group the report results by a particular detail choose from among Payment Date, Event Date, Pay Method, Sales Rep, Business Type, or Operation. 8. [Optional] Click the checkbox at the bottom of the window to optionally include details such as payment comment, check number, card number (last four digits), approval number, etc., from the report. Choose desired date range Group Items Choose Payment Date and/or Event Date
167 Unit 19: Prospect Manager Topics covered in this unit include: Adding Next Actions and Next Action Dates Setting a Prospect Status Establishing a Filter
168

169 Using the Prospect Manager Tool How can the Prospect Manager tool help me manage my leads? Prospect Manager allows you to maintain a detailed database of leads, separate from your accounts. If you own the Prospect Manager add-in, you are able to schedule the next action you need to take for each of those lead, along with a next action date. In addition, you can set up a filter in your Prospect Manager to instantly show you all prospects with a next action date of today (and, for that matter, your name as a sales rep), all with the click of a button! Selecting an Action Date 1. Access Prospect Manager by clicking the Prospect Manager button located on the Main Caterease sidebar. 2. Click into the Next Date field, located at the top of the Prospect Manager screen. 3. Type a date into the field, or click down arrow to the right of the Next Date field to access a dropdown calendar. Note: There are two different drop-down calendars from which to choose: The first drop-down calendar (to the immediate right of the Next Date field) drops down the standard calendar view; the second drop-down calendar, pictured on the next page, indicates the number of next actions that have been set for a particular date. Adding a Next Action (See image on following page) 1. Click the down arrow to the right of the Next Action field and select an option from the customizable quick-pick list


170 Setting a Prospect Status 1. From your Prospect Manager main screen, click the Status field, located towards the top right-hand side of the window. 2. Click the down arrow at the far right of the field to choose a status for the prospect from the customizable quick-pick list. Note: Prospects in Prospect Manager can be color-coded, grouped, and otherwise tracked based on a particular status
 filter out certain records from your grid based on next actions, next action date, follow-up type, etc. 1.")
171 Establishing a Filter Is there any way I filter out certain records based on next actions or next action dates? Absolutely! You can instantly (and temporarily) filter out certain records from your grid based on next actions, next action date, follow-up type, etc. 1. From your Prospect Manager screen, click the Display Full Grid button, located at the upper right-hand side of the screen. Result: Your Prospect Manager opens in full-grid mode. 2. Click the Quick Column Customizing button, located to the left of the Client/Organization field. Result: A drop-down list of column headings displays. 3. Click the checkbox next to the desired field name, such as Next Action and/or Next Date

172 Saving a Filter 1. Click the Filters button, located at the top left-hand side of the Prospect Manager screen. 2. Click Custom. Result: The Custom Filters window opens. 3. [Optional] Click the Shared button at the bottom of the Custom Filters window if you want this custom filter to be shared with other users on your Caterease network. Note: The Local button, selected by default, means this filter will only be available on your computer. 4. Click the Add Filter button. Result: A new filter is added to your list, with the default name New Filter. 5. Type a name for your new filter into the field. 6. Click the Save Current Filter button. Result: Your new filter is saved. Retrieving a Previously Saved Filter 1. Click the Filters button, located at the upper left-hand side of your main Prospect Manager screen. Result: The list of custom filters you have created display in a drop-down list. 2. Select the filter from the drop-down list
173 Unit 20: Contact Manager Topics covered in this unit include: Reviewing the Contact Manager Screen Adding Reminders/History Notes in Event Manager Adding a History Note While Sending a Contract Creating Reminders/History Notes in Account Manager Creating Auto Reminders Managing Current Reminders Viewing Reminders in a Calendar
174

175 Contact Manager Account information Click to see reminders for the current account Click to see Contact History notes for the current account The Contact Manager Module The Caterease Contact Manager lets you keep track of all contact you have had with your clients. History notes and reminders can be viewed or created here, and various related prints and reports can be generated. The Contact Manager features are interwoven throughout the entire Caterease program. You can create history notes or reminders in Event Manager; you can create or even edit them in Account Manager; you can check all current reminders at any time using the corresponding button on the Tools sidebar at the left of the Caterease screen. However, the Contact Manager gives you a clean, easy way to manage all this data quickly

176 Adding Reminders through Event Manager What is a reminder? If you own the Caterease Contact Manager add-in, you can create reminders to yourself that will pop up on your screen and remind you to do things. These reminders can be created in several places throughout the program, including Event Manager, and can be set so that they only prompt one particular Caterease user or all users. Adding a Reminder 1. Click the New Reminder button, located at the bottom right of the Event Manager screen. 2. Type a Subject for this reminder, or click the down arrow to the right of the field to select items from a quick-pick list. 3. Type a Location to associate with this reminder, or click the down arrow to the right of the field to select items from a quick-pick list. 4. [Optional] Assign a Label to the reminder by selecting the appropriate label from the quick-pick list. 5. Select a Date on which the reminder should appear. You can change months on the calendar by clicking the right or left arrows next to the name of the month, or holding your left mouse button down on the name of the month and dragging up or down. 6. Press [Enter]. 7. Enter an optional reminder Time. This time will be displayed with the reminder, but will not control what time the reminder appears (in other words, a reminder might say you need to do something at 12:00 PM, but it will appear when you first enter Caterease that day.) 8. Press [Enter]. 9. Click the down arrow to the right of the User field to select the user who should respond to this reminder. Select All Users if you wish the reminder to be seen by everybody. 10. Click the down arrow to the right of Category and select an optional category for tracking the reminder. (Examples might include Urgent, Follow-Up, etc.) 11. Click the down arrow to the right of Contact and change, if desired, or just accept the default. 12. Click in the Message box and type the reminder action (i.e., what you will be reminded to do). 13. When finished, click OK. Enter the date and time you wish to see the Reminder
 record of some action you did or conversation you had related to a certain client.")
177 Adding Contact History through Event Manager What s a contact history note? A Contact History Note is a written (or in this case, typed) record of some action you did or conversation you had related to a certain client. For example, if a customer calls to change the menu for their order, you may want to make a record of that call for future reference. Or if you make a few cold calls to try to build some business, you might note that as well. These history notes exist for your reference, can be referenced either on screen or in reports, and can be tracked either by category ( Menu Change, Cold Call, etc.), or by customer name. Adding a History Note 1. Click the New Contact History Item button, located at the bottom of the Event Manager screen. 2. Type as desired in the Comment text box. 3. Click in the Subject, Date, Time, User, Category, or Contact field and edit as desired. 4. When finished, click OK. Enter history note under Comment Add Contact History Note
178 Contact History: Auto-Save (See image on following page) Am I able to keep a record of proposals and contracts I send via ? Yes! The Contact History window allows you to save contact history. 1. Click the button at the top of the Event Manager screen. Note: This button is also available from any Print Preview screen, and will automatically attach whatever print you are previewing (Contract, Billing Statement, etc.), to the outgoing In the To field, type the address of the person you want to send your to, or click the Address Book button to access a list of addresses for all contact people associated with this account. Note: You can also access the list of addresses for this prospect by clicking the word To... at the left of the field. Note that this list is not your address book from Outlook; rather, it is the list of addresses you've entered into Caterease for the contact people of this recipient 3. [Optional] In the Cc field, type the address of the carbon copy recipient here (separate multiple recipient addresses by semicolons). 4. [Optional] In the Bcc field, type the address of the blind carbon copy recipient here (separate multiple recipient addresses by semicolons). 5. In the Subject field, type a subject for your , or click the down arrow to the right of the field to access a custom quick-pick list. 6. Click into the large white text block in the window. 7. Type a message as the body of your . Note: If you own the Marketing Tools package, you can use one of your custom merge letters as the body of your . These letters will automatically merge in information from the current prospect, including name, salutation, current date, etc. 8. [Optional] Format the text of your using the Format toolbar on your window. 9. [Optional] Click the Attach button at the top of the window and choose File to attach a file. Choose Print to attach a print. Note: This step will open a standard Windows browser window, where you can select a file or print to attach to the . Attached files appear in the small pane at the bottom of the window. 10. Click the Contact History tab. You can elect to Auto-Save content and Contact History Item Content by clicking their respective checkboxes from the Auto Save in Contact Manager button. 11. When finished, click Send. Result: The is sent through your Outlook program, and any files you have attached are exported
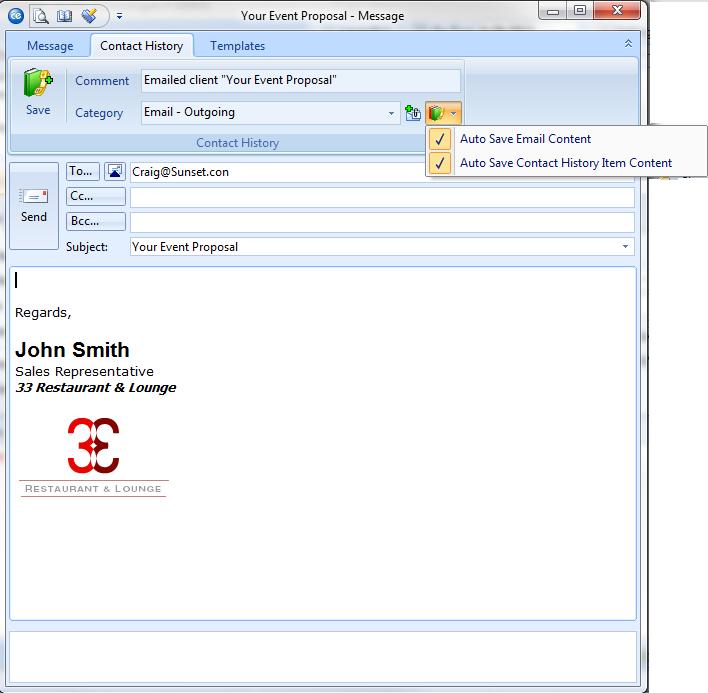
179

180 Creating Auto-Reminders What is an auto reminder? Let s describe this with an example: say it is your company protocol when you book a new event that you always must get a confirmed guest count 48 hours in advance of the party. You could create an automatic reminder that says, Call to confirm guest count, and have it automatically created whenever you book a new event. Furthermore, you can set this reminder to flag you two days before the event date, as necessary. You can even set reminders to prompt you a certain number of days from the date you book the party, rather than the event date itself. Accessing Auto-Reminders 1. Click the Contact Manager button on the Main sidebar. 2. Click the Automatic Reminders Setup button, located at the lower right-hand side of the screen. Note: You may also access this feature from Administration > Options > Automatic Reminders Setup. Adding an Auto-Reminder 1. Click the green plus sign at the top of the Automatic Reminders form. 2. Choose an action to trigger the creation of the reminder. 3. Set a date for the reminder to appear, relative to the Event Date, the Booked Date, or the Revised Date. 4. Enter optional reminder information, such as a time, category, or contact person. 5. Enter the text of the reminder that will prompt you. Choose what action will create the auto-reminder Choose when reminder should appear Enter the reminder text in the Message text box
.")
181 Inserting Merge Fields into an Auto-Reminder Message Create a custom auto-reminder by adding dynamic merge fields into your message. 1. Click in the Message text box. 2. Click the Insert Fields button at the top right-hand side of the message window. 3. Click the plus sign to the left of a particular category of fields (e.g., Event Fields, Financial Fields, etc.). Result: That category opens to show all related fields. Note: As an option, click the Full Expand button to expand all categories of merge fields at once. 4. Select a field and insert it in one of the following ways: Double-click the selected field to drop it in the current cursor position (where your cursor is currently blinking). Hold your left mouse button down onto the desired field, drag it into any position in the text block, and release. Click the Select button to drop the field into the current cursor position

182 Managing Current Reminders Viewing Current Reminders 1. Click the Tools sidebar on the left of the Caterease screen. 2. Click Active Reminders. These are the current reminders for the Caterease user who is currently logged into this machine. Selecting Reminders 1. Click any reminder on the Active Reminders form. 2. Click the Select button at the top of the form. 3. Choose to select the reminder using the following guidelines: Into Account Manager This option will open Account Manager on the account associated with this reminder. Into Event Manager This option will open Event Manager on the event that this reminder is linked to. If this option is not available when you click Select, this means that the highlighted reminder is not linked to any existing event. Into Contact Manager This option opens Contact Manager and positions you on the account associated with this reminder. Into Prospect Manager This option opens Prospect Manager and positions you on the account associated with this reminder. 4. Click Yes to confirm your choice. Click Print to print your current reminders Click to view reminder details Click one time on the phone icon to generate automatic History Notes You may choose to Snooze, Dismiss, or Dismiss All reminders If you are the Caterease administrator, you can choose whose reminders you see

183 Viewing Reminders in a Calendar Can I see my reminders in a calendar display? Absolutely! You can see reminders in a day-at-a-glance calendar, a week-at-a-glance, a custom work-week-at-aglance or a month-at-a-glance display, just like you would in Outlook. In fact, you can synchronize your Caterease calendar display with your Outlook calendar instantly! Displaying Reminders in Sub-Events 1. Click the Scheduler button on the Tools sidebar group to open the Scheduler. 2. Click the Display button from the middle of the Scheduler window. Select Reminders. Grouping Reminders by User, Category or Other Detail 1. In the Reminders calendar, click the down arrow next to Group By, at the top left of the window. 2. Choose User, Category or other detail. Note: Administrators are able to view reminders for all users. If you are logged in as a specific user, only your reminders will appear in the calendar display. Synchronizing with Outlook 1. In the Reminders calendar, right-click anywhere on the screen and select Export/Synchronize to Outlook. 2. Choose to export within a date range or a relative date range. 3. Choose to export Active Reminders Only, New Reminders Only, or both. 4. When finished making your selections, click OK. Click the Reminders button Click the down arrow to group the calendar by reminder fields
184
185 Unit 21: Marketing Tools Topics covered in this unit include: Accessing Marketing Tools Creating a New Merge Document Inserting Images into Merge Documents Inserting Tables into Merge Documents Inserting Dynamic Merge Tables
186
, You have (a certain party) in (a certain room) at (a certain time) on (a certain date).")
187 Using Marketing Tools What do I need the Marketing Tools Package for? The Caterease Marketing Tools package gives you the ability to create any number of dynamic merge letters, envelopes, and labels. In case you don t know what a merge letter is, it is basically this: Dear (So-and-So), You have (a certain party) in (a certain room) at (a certain time) on (a certain date). All of the information in parentheses would dynamically merge in data from specific orders. Therefore, one letter that you type one time will look completely unique for each separate order. Adding Merge Documents 1. Click the Marketing Tools button on the Setup sidebar along the left-hand side of your screen. 2. Click the Add Record button, located on your Main Caterease toolbar at the top of the screen. 3. Type a name for your new document and press your [Enter] key. 4. Click in the main text block of the Marketing Tools form and type the body of your document as desired. Insert fields anywhere in your document using the following steps: 5. Place your cursor where you would like the merge field inserted. 6. Click the Insert Merge Fields button, located at the top right of the Marketing Tools form. 7. Click the plus sign to the left of the group of merge fields you wish to access. 8. Select the field you want to insert, and either double-click it or drag it and drop it into your document. 9. Format your document s text using the Format toolbar at the top of your Caterease screen. Tip: You can optionally insert tables anywhere in your letter by clicking the Insert Merge Tables button Documents are listed on the left side of screen Click Insert Merge Fields button to add merge fields
188 Inserting Images into Merge Documents Can I put our logo at the top of our custom merge documents? You can put your logo or any other image anywhere you want! You can even choose to insert images as watermarks in the background of your print. Inserting an Image 1. Click in your document to place your cursor where you want the image to appear. 2. Right-click and select Insert Image. Alternatively, you may click the Insert button and select Insert Image. 3. Browse to your image, select it, and click Open. Result: The selected image is inserted into your document. Note: As a default, the image is inserted as a character (see Attach Modes, below). This means that it will move as other text moves, and you can use the Format toolbar to align it (left, center, right), among other things. Changing the Attach Mode of an Image (See image on following page) 1. Right-click an image in your document. Result: A pop-up menu appears. 2. Select Attach Mode. 3. Choose from the following options: As Character This is the default mode, where the image acts as any other character in the document and moves and wraps with the text around it. Relative to Paragraph - Auto Wrap Left or Right Attaches the image to a paragraph. Drag the image to any paragraph, and drag it left or right on the screen. If the image is closer to the right side of the page, text will wrap to its left (and vice versa). Relative to Paragraph - Auto Wrap Left AND Right Attaches the image to a paragraph. Drag the image to any paragraph, and drag it left or right on the screen. Text will automatically wrap on both sides of the image. Relative to Page - No Wrapping Attaches the image to the page. You can drag the image to any position you want. Text will not wrap. Note: Use this mode with a faded image to create a watermark effect. (You'll want to choose the "Behind Text" option, below). Relative to Page - Wrap Left and Right Attaches the image to the page. You can drag the image to any position you want, and text will automatically wrap on both sides as necessary. Behind Text/Under Text Places the image behind the text or under the text on the page as you drag it. Use this in conjunction with "Relative to Page - No Wrapping " (above) to create a watermark effect. Note: To select an image set Behind Text, hold your [Ctrl] key down as you click the image

189 Right-click image to change attach mode

190 Inserting Tables into Merge Documents (See image on following page) What if I want details in my letter to be organized into nice, straight rows and columns? Just like in your favorite word processor, tables are incredibly useful for organizing information in Caterease Marketing Tools. Furthermore, you can use borderless tables to arrange information in straight rows and columns all while keeping the document free of any graphic line work. Inserting a Table 1. Click in the document where you would like the table to be inserted. 2. Click the Create Table button, located on the Home ribbon tab at the top of the screen. Result: The Insert Table window appears. 3. Create a table by setting the following options: Number of Columns Set the number of columns you want in your table. Number of Rows Set the number of rows you want in your table. Alignment Select whether you want the table to appear on the left side of the page, in the center or on the right. Note: If the width of your table is 100% (see Width, below), then the table will take up the entire width of the page. Border Choose whether or not you want borders around the cells of your table. Note: Borders can be removed after the table has been inserted, if necessary. Width Set the width for your table as a percentage of the page you are placing it on. 4. When finished, click OK. Result: The table is inserted at the current position of your mouse pointer. Note: As an alternative, you can click Tables > Create Table button, move your mouse to indicate the number of columns and rows you want in your table, then click again to create it. Modifying a Table 1. Click your cursor in the cell of the table at the point you want to make a modification (or highlight multiple cells). 2. Click a button in the toolbar located along the right side of the Marketing Tools form to optionally delete the table, split cells, combine cells, insert a row, delete a row, insert a column, delete a column, or add/remove borders. Use the Quick Access Toolbar item Tables to create and modify tables
191 Inserting Dynamic Merge Tables Can I include specific sub-event details on my custom prints? Specific sub-event details, such as room and time information, menu items, staffing etc., can be inserted anywhere in your merge documents using powerful merge tables. You can choose what specific information appears where even optionally nesting merge tables within other tables for a split-page or other creative design. Inserting a Merge Table 1. Click in a merge document to place your cursor where you want the merge table to be. Note: You can click inside other tables (see Inserting Tables on the previous page) to arrange tables side by side on a page. 2. Click the Insert Merge Table button at the top of the Marketing Tools window. 3. Choose a specific merge table based on the following descriptions: Food/Service Items Fields to choose from include item Name, Description (formatted or unformatted), Picture, Time, Category, Prep Area, Unit, Item ID, Acct Code, Comment, Cost, Qty, Total, Recipe (formatted or unformatted), Notes (formatted or unformatted), Modifications (formatted or unformatted), vendor, Price, Returned. Proposal Items Fields to choose from include Name Descriptions (formatted or unformatted), Picture, Category, Time, Prep Area, Unit, Item ID, Acct Code, Comment, Cost, Price Qty, Total. Menu Items Fields to choose from include Name, Description (formatted or unformatted), Recipe (formatted or unformatted), Picture, Type, Category, Prep Area, Unit, Item ID, Acct Code, Comment, Vendor, Cost, Price, Menu. Payments Made Fields to choose from include payment Date, Amount, Pay Method, Card Type, Card Number, Comment, Expires. Deposits Due Fields to choose from include Due Date, Due Amount, Comment, Paid, Pay Date, Pay Amount. Event Timeline Fields to choose from include Date, Time, Item, Notes (formatted and unformatted), Category Scheduled Items Fields to choose from include Date, Start, End, Setup, Tear Down, Name, Type, Category, Comment, Notes (formatted and unformatted), Picture. Shifts Fields to choose from include Position, Date, Start, End, Hours, Uniform, Category, Comments, Price, Required, Booked, Confirmed, Total. Staffing Fields to choose from include Employee, Position, Date, Start, End, Uniform, Category, Telephone, Cellular, , Confirmed, Confirmed On. Sub-Events Fields to choose from include sub-event Description, Type, Times, Date, Planned Guests, Actual Guests, Guaranteed Guests, Room, Setup Style, Site Name, Site Address, Site City, Site State/Prov, Site Directions (formatted or unformatted), Site Website, Room Charge, Delivery Charge, Comments (formatted or unformatted). (Continued on next page.)

192 Food/Service Items Financial Summaries Group totals of menu items grouped by item Type or item Category. Proposal Items Financial Summaries Group totals of menu items grouped by item Type or item Category. Summary Totals Financial Summaries List financial totals including Adjustment, Delivery Charge, Room Charge, Discount, Subtotal, Gratuity, Service Charge, First Tax, Second Tax, Third Tax, Total Tax, Total, Paid, Balance, Cost, Profit. Insert Merge Table button
193 Unit 22: Using the Print Designer Topics covered in this unit include: Accessing the Print Designer Adding a New Print Customizing the Header Customizing Text Blocks in a Print Formatting Food/Service Items in a Print Advanced Print Settings Using the Miscellaneous Prints Designer
194
195 Using the Print Designer What is the Print Designer? Caterease gives you the remarkable flexibility to modify or completely recreate your prints. You can rearrange data on a print, insert company logos or even add text in any font, color, or size. Any changes made to new or existing prints is done through the Caterease Print Designer. Accessing the Print Designer 1. Click the Setup sidebar area on the left-hand side of your screen. 2. Click the Print Designer button. Adding a New Print 1. Click the Add Print button, located at the top left-hand side of the Print Designer window. Result: A confirmation window opens. 2. Click Yes to confirm your choice. Result: The Select Print Layout window opens. 3. Click a layout on the left-hand side of the window to select it. 4. Click OK. Result: A new print is added, and the Title field is highlighted for you to type in a new print title. 5. Type a title for your new print. 6. Press [Enter] to save your changes. Customizing the Header 1. Click the Edit Header button, located on the top right-hand side of the screen. Note: There are three separate panes within the header window. Each pane can be edited by following the steps below. 2. [Optional] Stretch or shrink any pane by holding your left mouse button down on the inside frame and dragging it. Note: You can also set all three panes to equal widths by clicking the Tools button and choosing Set Equal Widths. 3. Click on any pane and type as desired, using the toolbar at the top of the window to format text, to center or right-justify, etc. 4. [Optional] Insert images into the header, as described previously. 5. [Optional] Insert merge fields to dynamically merge information from the event, such as the event number, revision date, etc., as described below. 6. [Optional] Click the hyperlink field at the bottom of the header window and enter a URL (web address) to attach to this area of the print. Note: When you this print, the recipient can click any part of this header and be sent to the designated web address. Inserting Merge Fields 1. Type any text you want to act as a label for your merge field. Note: For example, you may want to identify the merge field for the person reading the print; i.e., Revised Date:, Party Name:, etc. 2. Click the Insert Fields button, located at the top right of the text window. Result: The Fields Explorer window is displayed. 3. Click the plus sign to the left of the group of merge fields you want to access. Result: That group expands, showing all related merge fields (e.g.., click the plus sign next to Event Fields to see event-specific merge fields)

196 Note: As an option, click the Full Expand button at the top of the Fields Explorer window to expand all categories of merge fields at once. See Appendix B for a comprehensive list of available merge fields. 4. Select the field you want to insert, and either double-click it or drag and drop it into the text window. Result: Double-clicking a merge field inserts it where the cursor currently resides; dragging and dropping a field allows you to place it anywhere. Change the font and font size Print Preview Click the plus sign, select a merge field, and insert

197 Selecting Fields 1. Click the down arrow at the right of a particular field (all fields located throughout the print in the Print Designer window). Result: A drop-down list of options appears. 2. Select a different field from the drop-down list of options. Note: Different sections of the various prints offer different field options. For example, each layout has a specific section where sub-event fields time fields, room or site location information, etc. are available. Suppressing Sections 1. Float your mouse pointer over a checkbox along the right of the Print Designer window. Result: A tooltip appears, identifying which section of the print that box corresponds to. 2. Enter a check in the box to suppress that section; remove the check to have that section appear. Note: Certain checkboxes work in the reverse; when you click them they SHOW the corresponding details. Be sure to read the speed tip carefully. Add, delete or copy a print Down arrows let you change merge fields Notes can be modified with rich-text formatting and merge fields Checkboxes suppress entire sections

198 Customizing Text Blocks in a Print (See image on next page) Can I type any text I want into my event prints? In the Print Designer, there are several areas where you can simply type free-flowing text as desired. You can format this text any way you want, and even pepper it with dynamic merge fields that will automatically pull unique information from each event as you print. Customizing Text Blocks (Also applies to Bottom Notes and Footer sections.) 1. Click the Edit Top Notes button. Result: The Top Notes window opens. Note: Also optionally click the Bottom Notes or Footer button to edit those sections. 2. Type into the text box as desired, optionally inserting merge fields and formatting the text as described previously. 3. When finished, click Close
199 Formatting Food/Service Items in a Print Can I control how my menu items appear on my prints? You have a lot of control over the appearance of your items. First and foremost, you determine whether each print will show the detailed description of each item complete with all of your rich-text formatting; or if you want only the name of each item to appear. Then, you can choose which other item details price, cost, quantity, etc.- appears on the print. Finally, you can make some advanced choices, such as grouping or filtering your items, or hiding certain items on certain prints. Using the Food/Service Filter 1. Click the Filter button, located to the right of the Menu selection, and choose which specific items should appear on this print, using the options outlined below: Exclude Items Without Quantities: This checkbox at the top of the window causes this print to ignore any menu items in an event that do not have quantities associated with them. Type: Choose (optionally) to only include items with a certain Type or Types (Food, Beverage, Liquor, etc.), or only items that do not have a certain Type or Types (using the Not Equals comparison). Category: Choose (optionally) to include items with a certain Category or Categories, or only items that do not have a certain Category or Categories. Note: This custom quick-pick list can be used to separate Appetizers from Entrees or Desserts or separate Beer and Wine from Liquor, etc. Prep Area: Choose (optionally) to only include items with a certain Prep Area or Prep Areas. 2. When finished, click OK. Choosing a Format for Your Items 1. Click the down arrow next to Format in the Food/Service Items section on the Print Designer screen. Result: A drop-down list of options appears. 2. Choose to include the name and description of menu items on the print, just the name, or just the description, a picture or the item, any modifications made to the item, a bar code, or notes. Click the down arrow to the right of the next field in the Food/Service Items section. 3. Choose to include any of the optional information from the drop-down list, or choose None to have nothing appear in this column on the print. 4. Repeat Steps 3 and 4 for the rest of the fields in the Food/Service Items section. Grouping Menu Items 1. Under the Food/Service Items area of the Print Designer, click the down arrow next to Group By. Note: This option is only available on print layouts 1, 2 and Select how you would like menu items grouped on the print by Type, Category, Prep Area or no grouping. Note: Menu item Type is a hard-coded list consisting of the options Food, Beverage, Liquor, Equipment, Labor, Room and Other. The other two options ( Category and Prep Area ) are custom quick-pick lists can you create through the File > Setup menu in the program. Hiding Items on the Print 1. On any print in your Print Designer, click the checkbox labeled Allow Food/Service Item Hiding, located midway down on the right. Result: Any menu item designated as "hidden" in an event will not appear on this print. Note: To see the label of a checkbox, float your mouse pointer over it without clicking. 2. Un-check the box to have hidden items display on the print

200 Select the food/service format for your prints Click to suppress the food/service items from the print Hide an item in a print Group food/service items as desired

201 Advanced Print Settings What other things can I control on my prints? You can translate your prints into a number of foreign languages, as well as into your own custom English translation using your specific words and phrases! You can also have Caterease automatically record the date on which you generate each event print. And finally, once you re done designing your perfect custom print, you can simply copy it (Professional version) to make minor changes, if you want. Translating a Print 1. Click the down arrow labeled Translate To at the bottom right of the Print Designer. 2. Select a foreign language for this print, or choose English to apply alternative terms and labels to the print. Selecting a Print Type 1. Click the title of the print you want to identify on the left side of the Print Designer screen. 2. Click the down arrow next to Print Type, at the bottom right side of your Print Designer. 3. Result: A drop-down list of options appears. 4. Choose the appropriate print type for this print "Contract, "Invoice, "BEO," or "None," if this print is none of the above. Note: Your program will optionally keep track of the date on which you generate these prints. Copying a Print 1. Click your right mouse button over any print title on the left-hand side of your Print Designer screen. Result: A pop-up menu appears. 2. Choose Copy Print. Result: A confirmation message appears. 3. Click Yes to confirm. Result: A new print an exact duplicate of the original is added, with your cursor blinking in the title. 4. Type a title for your new print and press [Enter]. 5. Edit the new print as desired. Click the down arrow next to Print Type and select a print type Click the down arrow to change language translations

202 Using the Miscellaneous Prints Designer Are there any other prints that I can modify? The Miscellaneous Prints Designer allows you redesign the tops of various prints, including the Billing Statement in Account Manager and all sub-prints in Event Manager. Customizing Miscellaneous Prints 1. Click the Setup Sidebar. 2. Click Miscellaneous Print Designer. 3. Click the down arrow at the top left of the window to choose a print. 4. Click the plus sign before any print category to see the prints in that category. 5. Select a print. 6. Modify using the Miscellaneous Print Designer tools of suppressing sections, rearranging fields, inserting merge fields, formatting text, etc. Select a print Click various down arrows to arrange data Insert merge fields and format fonts in notes sections
203 Unit 23: Adding Menus and Menu Items Topics covered in this unit include: Adding New Menus Adding Menu Items Creating Menu Packages
204

205 Adding New Menus What is the Menu Manager? The Caterease Menu Manager allows you to add a limitless number of menus and submenus to your program. You can name these anything you want, and rearrange them at any time into whatever order works best for you. Remember, these are food and service menus - meaning you should include any items you might be charging the customer for, including possibly Equipment items or Room Fees. Adding a Menu 1. Access the Menu Manager by clicking the Menu Manager button on the Setup sidebar on the left-hand side of your screen. 2. To the right of the Menu Titles panel (along the left side of the Menu Manager), click the Add A New Menu button. A new menu will be added to the bottom of your list. 3. Type a name for your new menu and press your [Enter] key. 4. Drag your new menu to any position on the list by clicking and holding your left mouse button on your new menu title and then dragging and dropping it (drop by letting go of your left mouse button). You can make the menu a submenu of another menu if you hold your [Shift] key down as you drag it. 5. As an option, you can click the Display Details button and type a long title, add a digital picture, and enter a description for the menu. Click the green plus sign to Add New Menu Click to move, add or remove menu item columns to display

206 Adding Menu Items Where do I click to add a new menu item? The Menu Manager makes use of the main toolbars located at the top of your screen. As with adding anything in Caterease, you add menu items by clicking the green plus sign located in this main toolbar. Adding Items 1. Access the Menu Manager by clicking the Menu Manager button on the Setup sidebar on the left-hand side of your screen. 2. In the left panel of the Menu Manager, click the title of the menu you want to add an item to. If accessing a sub-menu, click the plus sign to the left of the menu title. 3. Click the Add Record button, located in the main toolbar at the top of the screen, to add a blank line to the bottom of this menu. This button is identical to the Add New Menu button near the left panel of your form. Do not confuse them. 4. Type a Name for the new menu item. For more information on creating long descriptions of menu items, see Menu Item Description. 5. Press [Enter]. 6. Type a Price for the new menu item, or click the down arrow to the right of this field to get assistance from the calculator. 7. Press your [Enter] key twice, until you get to the Type column. 8. Click the down arrow and choose a Type for the menu item. Your options include Food, Beverage, Liquor, Equipment, Labor, Room, or Other. 9. Hold your left mouse button down over the name of your new menu item. 10. Drag to any new position on the menu and let go of the mouse button. Click the green plus sign to Add New Item Be careful that each item has the appropriate Type
207 Creating Menu Packages (See image on following page) 1. Access the Menu Manager by clicking the Menu Manager button on the Setup sidebar on the left-hand side of your screen. 2. In your Menu Manager, click the Package Items tab, located at the bottom right-hand side of the screen. 3. Click the Packages tab on the left-hand side of your screen. 4. To add a new package, click the Add New Item button from the top of the screen. 5. Type the name of the new package into the Name field and press [Tab] or [Enter]. 6. Type a Price into the Price field and press [Tab] or [Enter]. 7. Click the Select Items button, located on the lower right-hand side of the screen. Result: The Select Menu Items window displays. 8. Select a menu title. 9. From the available menus, select a single menu item or multiple items by following the guidelines below: Click an item to select it. Hold your left mouse button down and drag your cursor over multiple items. Click one item, hold the [Ctrl] key down on your keyboard, and drag your cursor over multiple items. Click one item, hold the [Ctrl] key down on your keyboard, and click other items. 10. Drop items from the selection screen into your menu package, using the following guidelines Double-click a single item in the Select Menu Items window. Hold your mouse button down on one individual item (without moving) for a half second and drag that item from the Select Menu Items window into your Menu Manager screen, dropping it on top of your menu package item. Hold your left mouse button down on a group of selected items and drag and drop them into the Menu Manager screen. Click the Select Items button or the OK button to select all highlighted items into the menu package. 11. Remove the price from each of the individual items in your package

208 Retrieve items by dragging and dropping, or clicking OK or Select Items
209 Unit 24: Establishing System Security Topics covered in this unit include: Accessing System Security Creating an Administrative Password Adding Users & Passwords Establishing Individual Access Rights Creating User Groups
210

211 Setting up Security What exactly does enabling security mean? Before you add users and passwords, you must first enable your overall system security. First, a single mouse click will enable password protection in your program. Without protection enabled, you could add all the users and security levels your little heart desired but they would be ignored by the program. Next you should assign a main system (or administrative) password. You can then prevent users from accessing certain information or performing certain tasks unless they are privy to this main password. Enabling Security 1. Click the Security button from the Administration ribbon tab at the top of the screen. 2. From the Administrator Settings screen, click the Enable System Security checkbox. 3. Click the Administrator Settings button. 4. From the Administrator Settings screen, click the ellipse button to set up an administrative password. 5. Click Yes at the Enter new Main Caterease Password? prompt. 6. Carefully type a password to serve as your main system (administrative) password (minimum of four characters). 7. Press your [Tab] key and retype the password into the Again field to verify. 8. [Optional] Add a picture to the Picture block by clicking your right mouse button into the field and then selecting Load From File. Browse to the desired image and double-click to select it. 9. When finished, click OK

212 Adding Users and Passwords 1. Click the Add User button (green plus sign), located at the top right of the Caterease Security screen. 2. Enter a User Name for the new user. 3. [Tab] or press [Enter] to move to the next field. 4. Enter and confirm a password as described above. Note: Passwords must have a minimum of four characters (numbers and/or letters), and are not casesensitive. 5. [Optional] Enter the name of this user as it exists in your Windows Active Directory into the Active Directory Name field. Note: Users with Active Directory Names will not need to log into Caterease separately; after they log into Windows, they will automatically be recognized when loading Caterease, and their specific program permissions will be established. 6. [Optional] Click the box labeled Is a Sales Representative, and enter a Sales Rep name if you would like this user s name to be included on your list of Sales Representatives. In addition, you can choose a color to be associated with this sales rep when color-coding options are used within the program. 7. [Optional] Enter the telephone, cellular number, and address of the sales rep into the fields provided. 8. [Optional] Click the Notes text block and enter any relevant notes associated with this user or his/her program access level. 9. [Optional] Add a picture to the Picture block by clicking your right mouse button into the field and then selecting Load From File. Browse to the desired image and double-click to select it. 10. Click the Security tab on the left side of New User window and establish security settings for this new user. 11. [Optional] Click the Groups tab and select the security groups to which this user belongs. Note: You can also select users into groups, as opposed to selecting groups for users. A user's security settings take priority over the group's; if a user is specifically allowed to or prohibited from doing something, that will determine access. 12. When finished, click OK
 is selected.")
213 Establishing Individual Access Rights 1. Access the Caterease Security window. 2. Click the Users tab on the left side of the window. Result: A list of currently established users is displayed. 3. Verify that Enable System Security (top left of the window) is selected. Note: Users will not be required to log into Caterease, and security settings will not take effect if the Enable System Security checkbox is not checked. 4. In the list of users, click the name of the one you wish to edit to select it. 5. Click the User Details button, located on the right-hand side of the User Security Details window. Result: The User Security Details window for the currently select user appears. 6. Click the Security tab on the left side of the User Security Details window. Result: A list of all possible security settings, separated into categories, is displayed. Note: By default, every new user you add is a member of the user group "Caterease Users, and therefore automatically inherits the permissions established in that group. Any setting listed with a red font indicates a setting that is disabled for this user because of a group (such as "Caterease Users) he belongs to. (These settings can be superseded by allowing/disallowing features here for the individual user.) 7. Click the small plus sign to the left of any category heading to expand that category of settings, or click the small minus sign button to collapse a category. Note: As an option you can right-click anywhere in the Security tab and choose Expand All to expand all categories of settings. 8. Click any checkbox consecutively to insert a green check mark, a red X, or a yellow dash - to respectively allow the user permission to perform that option, or deny permission, or defer to the permissions of the group that user is in (see #10, below). 9. [Optional] Click the Check All Security Settings button, Uncheck All Security Settings button or Clear All Security Settings button to edit all user security settings simultaneously. 10. [Optional] Click the Show Security Details button to view a window as you scroll through the settings, to help you identify which group or user s settings apply

214 Creating User Groups 1. Access the Caterease Security window. 2. Click the Groups tab on the left-hand side of the window. Result: A list of currently established security groups is displayed. Note: All users in the program will belong to the default group of "Caterease Users. While you can edit permissions in this group and affect all users, you cannot delete the group entirely. 3. Click the Add Group button on the right-hand side of the window. Result: A New Group window appears. 4. Enter a Group Name for the new group. 5. Enter a descriptive Category. 6. [Optional] Enter detailed Notes pertaining to the group or its specific security settings. 7. Click the Security tab on the left-hand side of the New Group window. Result: A list of all possible security settings, separated into categories, is displayed. 8. Click the small plus sign to the left of any category heading to expand that category of settings, or click a small minus sign button to collapse a category. Note: As an option you can right-click anywhere in the Security tab and choose Expand All to expand all categories of settings. 9. Click any checkbox consecutively to insert a green check mark, a red X, or a yellow dash - to respectively allow the user permission to perform that option, or deny permission, or defer to the permissions of other security groups that user is in. Note: As a default all settings are neutral, meaning access to a feature. 10. [Optional] Click the Check All Security Settings button, Uncheck All Security Settings button or Clear All Security Settings button to edit all user security settings simultaneously. 11. [Optional] Click the Users tab on the left side of the window and click the Select Users button to select users for this group. Note: You can also select groups for a user, as opposed to selecting users for a group. 12. When finished, click OK to close the New Group window
215 Unit 25: General Program Setup Topics covered in this unit include: Customizing Quickpick Lists Customizing Name Fields Establishing Required Fields Creating User Defined Fields Setting New Booking Defaults Establishing Default Tax Rates Using a Default Deposit Schedule Configuring Global Settings Customizing the Scratch Pad Adding to the Site Locations Database Creating Banquet Rooms/Setup Styles Assigning Setup Styles/Capacities/Breakout Rooms Blocking Banquet Rooms
216

217 Adding Items to the Quickpick Lists What is a Quickpick list? Throughout your Caterease program there are several drop-down or quickpick lists to assist you in data entry. These lists exist to save you the tedium of double entry and to keep your data consistent. For example, rather than having to type the event theme Wedding Reception multiple times (and risk accidental misspellings), you can simply pick it from your event theme quick-pick list. These lists are completely under your control, and can be edited by you at any time. Selecting a Quickpick List 1. Access the Setup Quickpick Lists form by clicking the Quickpicks button on the Setup sidebar on the left-hand side of your screen. 2. Click the sideways triangle to the left of any quick-pick category (left-hand side of screen) to see the corresponding lists. 3. Click the desired quick-pick list to select it. Adding a Quickpick Item 1. Click the Add New Item button, located at the top right of the Setup Quick-Pick Lists form. 2. Type a name for your new quick-pick item. Note: Some lists allow you to choose a default color for items. Grids in the program (and the Event Scheduler display) can be color-coded based on these lists. 3. When finished, click Close. Editing Existing Quickpick Items 1. Click any quick-pick item to select it. 2. Type as desired. Note: See above note regarding color. 3. When finished, click Close. Click the expand button to display the options

218 Customizing Name Fields Can I change the names of the various fields? If you do not like the term Sub-Event, or if you d rather use the field Category to track some specific piece of event information, either of these can be renamed through your program s Global Settings. 1. Click Administration > General at the top left of your Caterease screen. 2. Choose Customize Names. 3. Click in the General, Financials, or Events category fields and type a new name as desired. 4. When finished, click OK


219 Creating Required Fields How do I make sure my sales people enter the information I need? A perfect way to add structure to your sales people's data-entry process is by using the Required Fields feature. This tool allows you to designate certain fields in Event Manager as required, meaning an event cannot be saved unless this information is entered. Optional required fields include general event fields such as Event Theme, Event Date, guest counts, etc., as well as sub-event fields such as times, room information, or off-site location information. Designating Fields as Required 1. Click the Administration ribbon tab at the top of the screen. 2. Click the General button and choose Required Fields. Result: The Required Fields window displays. 3. Click any checkbox on the Events or Sub-Event tab to designate the corresponding field as required. Note: As an option, you can click your right mouse button anywhere on either tab to choose Check All Fields (or even Clear All Fields). 4. Click OK. Result: The window will close, saving your changes. Note: The next time you open Event Manager, any fields you designated as required will be highlighted in red on your screen. If your Event Manager was open when you established your required fields, you will need to close it and reopen it for the changes to take effect. Click Administration > General and choose Required Fields Choose the Manager needed (Accounts, Prospects, Events, Guestrooms) Click any field to make it required, or right click and choose Check All Fields

220 Creating User-Defined Fields What is a Use- Defined Field and what is its purpose? A User-Defined Field is one that is created by the user of the software. If there is a need for a new information field that does not exist in the Caterease database, the user may create the field. These fields are trackable and can be utilized in various reports, contracts, and letters. The user may create up to 15 fields in the Account Manager, 15 fields in the Event Manager, 10 in the Sub-Events, and 10 in the Guestrooms Manager. How to Create User-Defined Fields 1. Click the Administration ribbon tab at the top of the screen. 2. Click the Lists button and choose User Defined Fields. 3. Click on the tab reflecting which area of the program you want to create fields for: Accounts for your Account Manager, Events for your Event Manager, Sub-Events for the Sub-Event display or Guestrooms if you own the Guestrooms Manager. 4. Click on the first available field and type in your description of that field 5. Click the arrow under Type to format the new field using the following guidelines: Text alpha-numeric format Phone formatted for phone number entry Number formatted for numbers only Currency formatted for currency Date formatted for date entry Time-formatted for time entry 6. When finished, click OK. Choose the Manager desired Any field formatted as a text field can have a corresponding quick-pick list. Unassigned fields have NA Date fields will have corresponding drop-down calendars

221 Inputting User-Defined Fields Where can I use these new fields I ve created? User-defined fields can be added to your program in a variety of places your Event Manager, your Sub-Event form, your Account Manager or your Guest Rooms Manager (for hotels, motels, inns, etc.) You can even insert user-defined fields in your various prints, from contracts and invoices to merge letters and other prints. Adding User-Defined Fields to your Screen 1. Click your right mouse button on the user-defined fields area of the screen. 2. Select Customize. A small window pops up with available user defined fields. 3. Hold your left mouse button down on one of the available fields. 4. Drag it and drop it onto your screen. Other areas where user defined fields can be utilized You can display user-defined fields anywhere on your various event prints, including inserting them as merge fields in the following places: top notes and bottom notes sections in all contracts and invoices, top notes in all sub-prints, and anywhere in the body of your merge letters. See documentation on your Print Designer for more details. User-Defined Fields can have corresponding drop-down calendars, calculators or quick-pick lists

222 Creating New Booking Defaults What are new booking defaults? New Booking Defaults are all about preventing you from typing the same thing more than once. For example, if most of your accounts are within your city limits, you can make that city the default for every new client you book. That way, most of the time you will not have to type a city when you add a new account to your program. New Booking Defaults exist for several areas of your program - accounts, events, employees, or guest rooms. Entering Default Information 1. Click the Administration ribbon tab at the top of the screen. 2. Click the General button and choose New Booking Defaults. 3. At the top of the New Booking Defaults form, select the tab that has the information you want to enter or change. 4. Click in a field and type as desired or click in a quick-pick field, click the down arrow at the right of a field and select a default from the list. 5. Press your [Enter] key to move to the next field. 6. When finished, click OK to close the form and save your changes. Select your most commonly used event information from the quick-pick lists Select the desired tab to change related default settings

223 Setting Tax/Service Charge Defaults What are default tax/service charge rates? Your default tax and service charge rates are the rates that will automatically apply to each new order you book in Caterease. While you can certainly change tax and service charge rates at any time within a particular order, you obviously don t want to be doing that every single time you book a new event. So it s important to make sure your default tax and service charge rates are set correctly. Establishing Tax & Service Charge Rates 1. Click the Administration ribbon tab at the top of the screen. 2. Click the General button and choose Tax & Service Charge Rates. 3. Enter a new tax rate for your Food items by typing numbers as desired, or by clicking the up or down arrows next to the tax rate to increase or decrease the rate one percentage point, respectively. 4. Press your [Enter] or [Tab] key to move to the next field. 5. Repeat as desired for all three optional tax rates and your service charge rates. 6. If you wish to apply a tax to your service charge and/or gratuity rates, click the checkbox beside the words Tax Grat or Tax Serv Chg. 7. [Optional] Click the checkbox labeled At New Rate for Tax Grat or Tax Serv Chg. Note: Use this feature only if you wish to tax your gratuity or service charge rate at a rate that is different from your current tax rate(s). 8. To make all new orders in your program default to tax exempt, click the checkbox next to the words Tax Exempt at the bottom left of the form. 9. When finished, click the OK button at the bottom right of the form to close the form and save your changes. Change names of tax columns with Customize Names Make a new tax schedule Set Tax Exempt status as a default setting Add misc. numbers Check to tax service charge Check to tax gratuity

224 Using a Default Deposit Schedule What if I have a deposit schedule I use for all of my events? You have the option in Caterease of creating a unique default deposit schedule to be used for any event. Then you simply open the Deposits window in any event and click one button, and the program automatically creates a deposit schedule based on the rules you ve established. Creating a Default Deposit Schedule 1. Click the Options button on the Administration ribbon tab at the top of the screen. 2. Select Deposit Schedule. Result: The Default Deposit Schedule window displays. 3. Click the Add Record button at the top of the window. Result: A new record is added to the deposit schedule. Note: This new record will have certain default values that you can change using the steps below. 4. Set the number of days, weeks, or months out you want this deposit to be due using the first two fields on the right-hand side of this window (the Details section on the right-hand side of the window). Note: Achieve this by typing a number or using the up and down arrows in the first field and clicking the down arrow next to the second field and selecting Days, Weeks, or Months. 5. In the second row of fields, choose whether this deposit will be due before or after the event date or the date on which the event is booked. 6. In the third row, determine whether the amount of the deposit should be calculated as a percentage of the event totals or as a whole dollar amount, as follows: If setting a percentage of the event totals, use the fields in the fourth row to set the percentage amount (first field) and the total to use as the basis. Note: You would probably use the "Remaining balance due" option for all subsequent deposits after the first one. For example, a possible first deposit might be "50% of the Total balance due, but subsequent deposits might be based on the balance that remains. In other words, "Total balance due" represents the total amount of sales for that event, regardless of whether any deposits have been received. If setting a whole dollar amount, use the field in the fifth row to set that dollar amount either by typing into the field or clicking the down arrow to access the drop-down calculator. 7. Repeat to create additional deposits. 8. Click Close to close the window and save your changes

225 Creating a Default Event Timeline How can I create a default timeline to keep track of a reoccurring schedule? One of the most valuable tools in planning and executing an event is a detailed schedule. Follow the steps below to create a default timeline. 1. Click Administration > Lists > Default Timeline Items. 2. To add a new default timeline, click the Add New Timeline button, located on the left-hand side of the screen. 3. Click Yes to confirm your choice. Result: A new, empty field is added. 4. Type the name of the new timeline into the highlighted field. 5. Press [Enter] to save your timeline. Viewing an Existing Timeline 1. Click the Event Timeline button, located on the lower right-hand side of the Event Manager screen. 2. Click the View or Select from Default Timeline Items button, located on the top right-hand side of the window. 1. To add an existing timeline item to a particular event, click the desired timeline category from the lefthand pane of the window to select it. Result: All timelines which have been added to the category you selected will display. 2. Select an item or items you would like to retrieve and click OK. Adding an Event Timeline 1. Click the Event Timeline button, located on the lower right-hand side of the Event Manager screen

226 2. To add a new timeline to an event, click the Add A New Timeline button, located on the right-hand side of the Event Timeline window. 3. Type the time the timeline item is due into the Time field. Alternatively, you may use the up and down arrows to select a time. 4. Type a description of the timeline item into the Timeline Item field. 5. Select a Category (Front of House, Back of House, etc.), by clicking the drop-down list to the right of the Category field to indicate who is responsible for completing the timeline item 6. To add notes related to the timeline item, click the Show Timeline Item Notes button, located on the right-hand side of the Event Timeline window. 7. [Optional] Type notes into the text block as desired 8. After you have set your timeline, click the Save button, located at the top of your screen. Printing an Event Timeline 1. With your event open in Event Manager, click the bottom half of the Prints button from the Home ribbon tab at the top of the screen. 2. Click Event Subprints. 3. Choose Event Timeline. 4. Click the Print button at the top of the Print Preview screen to send the print to a printer

227 Global Settings: Managers Tab What are global settings? This screen allows you to make certain global changes to your program which will affect all users on your network. Accessing the Global Settings Managers tab 1. Click Administration > Settings > Global Settings at the top of the screen and click the Managers tab
228 Available Options Default Guaranteed Guests From Planned This option causes Caterease to default an event s Guaranteed Guest count to a certain percentage of the Planned Guest number. Click the plus sign to the left of this option to set the default percentage. Default Percent Sets the percentage for the default Guaranteed guest count (see above). Use the up or down arrow button to increase or decrease the percentage, respectively. Use Guaranteed Guests to Determine Guest Counts With this option selected, any event prints that show the general guest count, as opposed to specifically the Actual, Planned, or Guaranteed counts, will show the Guaranteed number if it is higher than the Actual number. Without this selected, the general Guest field shows the Actual count if there is one or, if not, the Planned Count. Use Guaranteed Guests in Qty Linking If you have any menu items with quantities linked to the guest count of your party, this setting will link those quantities to the Guaranteed guest count, as opposed to the Actual (or planned if there is no Actual count), as the default. Automatically Set Print Dates When you preview a print of a contract, invoice, or BEO, Caterease will automatically put the current date in the corresponding Event Specific Date field, if this option is checked. Auto-Close Event After Invoice Click the plus sign to the left of Automatically Set Print Dates if you wish to close events after an invoice has been generated. You can then deny certain users access to closed events (see Security Settings). Disable Keyboard Input For Room Selection Click this checkbox to require users to pick room names from their list rather than typing them by hand. Click it again to allow them to type room names by hand. Auto Close Event Upon Final Payment This setting will cause an event to be closed when a payment is posted that brings its balance due to $0. Closed events can optionally be locked for various users through the program s Security features. Notify Upon Payment Method Changes With this option selected, each time you post a payment to an event that has a different payment method from the event s default payment (selected on the Miscellaneous tab in Event Manager), you will prompted and asked if you want the event s payment method to be updated. Set Closed Status when Auto-Closing Event With this option selected, Caterease will automatically set the event status as Closed whenever you autoclose an event. Disable Keyboard Input for Room Selection Click this checkbox to require users to pick room names from their list of rooms rather than typing them by hand. Display Currency Symbol In Contracts This option causes the local currency symbol ($ in America) to print next to the totals in the financial summary section of contracts and BEO's
229 Suppress Zeros in Event Print Click this checkbox to suppress the zero in items that have no quantity set and the $0.00 on items that have no price in Invoice, Contacts, and Marketing Tools documents. Disable Sub-Event Date Validation Whenever you change an event date in Event Manager, the date(s) of your sub-event(s) are updated automatically. If you check this option, that sub-event date validation will be disabled, meaning any change to an event date will have no effect on its sub-events. Prompt for Status Change after Payment When you post a payment to an event, you most likely want the status of that event to be Definite. With this option checked, Caterease will prompt you if you post a payment to an event that is not Definite, and will even automatically change the status for you, if desired. Enable Quick Item Insert This setting is available in the Professional version. With this option selected, the user is able to use the down arrow on the Item Name tab to access a list of commonly used menu items. Apply Gratuity after Discount With this option selected, any discount you set in Event Manager using the Apply Discount tool will be applied prior to the gratuity being calculated for the event. Apply Service Charge After Discount With this option selected, service charge for an event will not be applied until any discount you might have set using the Apply Discount tool has been calculated. For example, an event with a total of $1000 and a 10% discount will have service charge applied to the discounted total of $900. Apply Tax After Discount With this option selected, tax for an event will not be applied until any discount you might have set using the Apply Discount tool has been calculated. Use Contact First and Last When Copying This setting is for your Account Manager. In Account Manager, you can copy a contact person s name, address, phone, etc., to the client so you don t have to type that information more than once. With this option selected, that copy will be in the format of First Name Last Name, as opposed to Last Name First Name. Numbering Prefixes Here you can change the default prefixes of numbers assigned to all new events, accounts, proposals, etc., by entering up to three alternative characters (numbers, letters, or symbols)

230 Global Settings: Fields Tab What are global settings? This screen allows you to make certain global changes to your program which will affect all users on your Caterease network. Specifically, the Fields tab allows you to rename certain fields in the program to better suit your company's needs. Options are listed below. Accessing the Global Settings Fields Tab 1. Click Administration > Settings > Global Settings at the top of the screen. 2. Click the Fields tab at the top of the form. Available Options Time Fields You can rename six of the time fields used in Event Manager. You, as the end user, can determine which of these time fields are displayed on your Event Manager screen
231 CPG Calculation This setting allows you to determine which financial totals should be used when calculating the cost per guest of your events. Options include food totals, liquor, beverages, equipment, labor, room, and other fees, as well as any additional adjustments you make in the event s tax/service charge window. Members/Non-Members Here you can rename these additional guest fields. Examples include Adults and Children, Vegetarian and Non-Vegetarian, etc. Inverse Relation By default, the Members and Non-Members guest count fields have an inverse relationship. That is, if a guest does not fall into one of those categories, he must fall into the other. (With this relationship, the most common name change to these fields is "Adults" and "Children" - if you're not one, you must be the other.) For example, if there are 100 guests at a party and you enter 60 into the Members field, Nonmembers will default to 40. Link to Actual With this checkbox selected along with the one above, the inverse relationship extends back to the Actual guest count. Using the example above, if you then changed the Non-Members number to 45, the Actual guest count would automatically update to 105. With this option disabled, any changes to the Members/Non-Members fields will not affect the Actual guest count. Name/Government Number Use this field to change the name of the government ID number (called Social Security # by default). Format Here you can establish the format for the government number field in the program- whether numbers, letters, or other characters (dashes, periods) are permitted or even required

232 Setting up the Scratch Pad What is a Scratch Pad? The concept behind your Scratch Pad is that you should be able to insert commonly used text throughout the program with one mouse click rather than typing the same stuff over and over. To that end, you can create a Scratch Pad with all of your normal comments, special requests, setup notes, etc., and even separate them into various categories to make locating the right notes easier. Setting Up the Scratch Pad 1. Click the Administration ribbon tab at the top of the screen. 2. Click the Lists button and choose Scratch Pad. 3. Click the Add Record button, located directly beside the list of categories in the panel on the left. 4. Type a name for your new category. Categories are used to break your Scratch Pad up and make locating certain notes easier. Examples might include Setup Notes, Equipment, Special Requests, etc. 5. Press your [Enter] key. 6. Click in the large white text block on the right of the Scratch Pad Setup form and type notes for this category as desired. 7. Format your scratch pad text using the Format toolbar located at the top of the screen. Add any number of categories to organize your Scratch Pad Click into the text block and type commonly used text

233 Using the Site Location Database What is a Site Location Database? If you do any off-premise functions, the Site Location Database can save you lots of time in needless repetitive typing. You can enter a location into this database - its description, address, directions, etc. - and from that point on you will merely have to retrieve this information rather than type it all over again from event to event. Accessing the Site Location Database 1. Click the Administration ribbon tab at the top of the screen. 2. Click the Venues button and choose Site Location Database. Adding a New Site Location 1. Click the Add New Record button (green plus sign), located on the main toolbar at the top of the Caterease screen. 2. Type a name for the new location into the Name field and press your [Enter] key. 3. Type an Address, City, State, Zip, Telephone, Fax number and Website for the location, if desired, pressing [Enter] or [Tab] after each one. 4. Click the down arrow at the right side of the Category field and select a category for your location. This field is optional, of course, and can be used for tracking your site locations. 5. Click in the Picture field and add a digital picture of your location, if desired, by clicking your right mouse button and selecting Load From File. 6. Click in the Description text box at the bottom of the display and type as desired to add a more detailed description of the location. This text can be formatted using the Format toolbar at the top of your Caterease display. 7. Click in the Notes tab and type any notes specific to this location (or use your Scratch Pad to insert any existing notes into the field). 8. Click the Directions tab and type specific directions to the location. This text can also be formatted using the Format toolbar at the top of your Caterease screen. Tabs to add Notes or Directions
234 Adding Banquet Rooms and Available Setup Styles (See image on following page) What information will Caterease need about our banquet rooms? There are a couple of things to think about when you re adding banquet rooms to Caterease. First of all, you need to add the basic information: a name for the room, perhaps a category it might fit into for tracking purposes, a default diagram (if you are using that facet of the program) and maybe a default room charge. Secondly, you need to tell Caterease which setup styles apply to this banquet room, what the maximum capacities are, and what other rooms might be breakouts of this particular room. (This second topic will be discussed on the following page.) Adding Banquet Rooms 1. Click the Administration ribbon tab at the top of the screen. 2. Click the Venues button and choose Banquet Rooms Setup. 3. Click the Add Room button on the top of the form. Note: You can also optionally add multiple locations for your rooms, and even drag and drop rooms from one location to another. Locations are a particularly convenient way to organize rooms in your program s Event Scheduler (see later section). 4. Type a name for your new room. 5. Optionally click the Room Details button to add a Category, Room Charge, Room Size, background Color (for Event Scheduler) and default Diagram for your room. Note: The Category of a room can be used to track that banquet room. Examples might include Ballroom, Meeting Space, etc. 6. [Optional] Click the Notes tab to add Notes about the banquet room. 7. Optionally add a digital picture of your new setup style by clicking the Picture tab, clicking your right mouse button and selecting Load From File. 8. When finished, close the Room Details window. Adding Setup Styles to the Default Setup Styles List 1. Click the Administration ribbon tab at the top of the screen. 2. Click the Venues button and choose Setup Styles. 3. At the top right of the Setup Styles form, click the Add New Setup Style button. Note: If you are using the interface with Room Viewer, you may want to click the Add Room Viewer Setup Style button to automatically populate this list with styles your diagramming program will recognize. 4. Type a name for the new setup style. 5. Optionally click in the Notes text window at the bottom of the Setup Styles form, and type any notes that pertain to your new setup style. 6. Optionally add a digital picture of your new setup style by clicking the Picture tab, clicking your right mouse button, and selecting Load From File. 7. When finished, close the Setup Style Details window

235 Click the green plus sign to add a new room
236 Assigning Setup Styles and Capacities Didn t we already talk about adding setup styles on the previous page? The previous page deals with creating your default list of setup styles all setup styles that would ever be used in any room. This page discusses selecting particular setup styles that apply to particular rooms, as well as entering the maximum capacity of guests for each setup style. Selecting Setup styles and Capacities 1. Click the Administration ribbon tab at the top of the screen. 2. Click the Venues button and choose Banquet Rooms Setup. 3. On the left side of the Banquet Rooms Setup window, select the desired banquet room. 4. At the right of the display, click the Select Setup Style button. 5. Highlight any setup style(s) that apply to the selected room. 6. Click the Select Setup Styles button to add the selected setup styles to your banquet room. 7. Click in the Capacity field beside each setup style on the Banquet Rooms Setup tab and type a maximum capacity for the selected room. If you desire, you can click the down arrow at the right of the Capacity column and use the available calculator to determine a maximum capacity. Establishing Breakout Rooms 1. On the left-hand side of the Banquet Rooms Setup window, select the desired banquet room. 2. At the lower right of the display, click the Select Breakout Rooms button. 3. Highlight any banquet room(s) that are breakouts of the selected room. For example, if you have a Ballroom ABC, then its breakout rooms might be Ballroom A, Ballroom B, Ballroom C, Ballroom A-B and Ballroom B-C (all possible rooms that can be formed by breaking the large ballroom apart). 4. Click the Select Banquet Rooms button to add the selected breakout rooms to your selected room. Setup Styles/Capacities/Breakouts reflect currently selected room Click the Select Setup Style button to retrieve setup styles Breakout Rooms are smaller parts of the currently selected room

237 Banquet Room Blocking What is the purpose of Banquet Room Blocking? Banquet room blocking allows you to block a function room without the need of booking an entire order. Adding a Room Blocking 1. Click the Administration ribbon tab at the top of the screen. 2. Click the Venues button and choose Banquet Rooms Blocking. 3. Click the green plus sign button to add a new blocking. Choose either Day Of The Week to apply room blocking on that day every week, or Specific Date for one-time only blockings. 4. Enter the Time Range you would like to block the room. 5. Click the down arrow to select the room you would like blocked. Choose All Rooms to block the entire facility or Specific Room to select a certain room (choose from the drop-down list). 6. [Optional] Type in the reason for blocking in the Comments field. 7. [Optional] Select a color to associate with the room-blocking. 8. Click OK when finished. 9. Repeat process for additional room blockings. Select Blocking Type Enter Date Range OR Enter Time Range
238
239 Unit 26: The Backstage Tab Topics covered in this unit include: The Information Tab The Dashboard Recent Activities Support Instant Messaging
240
 tab allows you to print, as well as offering various options such as a list of most recently edited documents or files.")
241 Using the Backstage Tab What is a Backstage Tab? You may not be familiar with the term "backstage, but you know the concept. In Microsoft Office products such as Word or Excel, the backstage ("File") tab allows you to print, as well as offering various options such as a list of most recently edited documents or files. In Caterease, the Backstage tab gives you access to many exciting tools, including: Information; Dashboard (Professional version only); Recent; Support; and Messages. Information This tab automatically updates from the Caterease website, and offers such information as latest news about the program, introductions to new features and even access to handy video tips. Dashboard This tab offers a quick-access view of what is going on with your company. Various style graphs can be displayed to show current event activity, accounts receivable or even contacts made by your Caterease team. Separate information into groups (to determine, for example, which rep has the most A/R, or how many outgoing phone calls or s have been logged), and even drill down into each group for more information. A grid at the bottom of the tab offers more details about the results, as well. Recent This tab shows a list of all events that have been recently edited by the current user. Double-click on any event to retrieve it into Event Manager


242 Click the plus sign to view the details Support This tab allows you to download such documents as our User License, Maintenance Agreement or even various user guides. In addition, you can our HelpDesk directly from here, or access their phone number. Messages This tab gives you the exciting opportunity to send user-to-user instant messages, so you can quickly share important information with the rest of your Caterease team! To delete a message, click on the message and click the Delete button
243 Unit 27: Backing Up Data and Managing Deleted Events Topics covered in this unit include: Performing a Backup Saving Backups Remotely Archiving Your Events Tracking Deleted Events
244

245 Performing a Backup How often should I backup data? A backup of your program s data should be done every single workday. If the morning has been busy, you might want to run a backup at lunchtime and again at quitting time. These backups may never be needed. Think of them as an insurance policy against data loss or corruption. If something happens to your computer s hard drive or if you suffer data corruption, a backup can be quickly restored. The procedure described here backs up your data onto your Caterease server s hard drive. You may want to use a zip drive, a write-able CD or a tape to store data remotely in case of hard-drive failure. Running a Backup 1. Click the Backup Data button on the System sidebar. 2. Click Backup at the top left of the form, if it is not already selected. 3. Click OK. The backup will automatically be done. The Backup file will be named starting with BU and followed by numbers which denote the year, month, and day, i.e.: BU ing a Backup 1. Click the Backup Data button on the System sidebar. 2. Select a backup from your list of recent backups. 3. Select Tools - Backup as Zip File. 4. Enter the address in the Send To field. 5. Enter the body of the in the Message window. The name, address and phone number of your company will be automatically added to the bottom of your message. 6. Click Send. Backup button Optional Tools, including Save Backup as Zip File List of previously run backups
.")
246 Backing Up Your Backup What happens if my server s hard drive fails? You might have noticed the Caterease backup is automatically saved on the hard drive of your Caterease server (or on your machine if you are not using a network). There is the possibility that your server s hard drive could melt down. Considering that all of the data of your entire business operation is located there, this could be a major disaster. It is therefore prudent to save your backup to some external location as well as on your server. You could save to a CD, to a zip drive or to a tape. (Bear in mind, however, that if you choose to use a tape backup, make sure that the backup includes ALL files and not just those that have been modified.) Other Practical Alternatives You might also your backup to your home or you could save it across your office network to another computer. The chances that two computers would fail at the same time are slim. Getting your backup to another location entirely in case of fire is another logical consideration. How Often Should You Backup Your Backup? This depends on the volume of business. How long would it take you to recoup a week s worth of lost data? We recommend creating a secondary backup no less often than once a week. Daily would be ideal. How is an Alternative Backup Performed? 1. Run your normal backup (see previous page). 2. If your Backup Files window automatically closes, click the Backup Data button again to reopen it. 3. Click on the backup file you just created to select it. 4. Click on the Tools button there will be a drop down menu displayed with Delete Backup(s), Save Backup As Zip File, Backup as Zip File. 5. Select Save Backup File As Zip File. 6. On the Save As window, type in a File name, and click Save. Click a backup to select it Click Tools and choose Save Backup or Backup Safeguard your data! Be sure to run a backup every single workday. In addition, you should save that backup externally on a regular basis. Click and choose location to save a copy of your backup

247 Archiving Your Events This feature allows you to archive old events so they are not part of your everyday database. 1. From the Administration tab, click the Archive button. 2. Select Archive Events. 3. Select a Date Range by choosing the option Less Than Or Equal To or Within Date Range. 4. If selecting Within Date Range, click the down arrow and choose a date from the drop-down calendar. All events prior to this date (and matching the options you choose below) will be archived. 5. Click under Options > Exclude Status to suppress events with a status of Definite, Tentative, Prospective, Closed, Cancelled. 6. Only Events with Zero Balances-Select this option to archive events only if they have zero balances (i.e., they do not owe money). 7. Only Closed Events-Select this option to only archive events for which you have entered Closed dates in Event Manager. 8. Click OK to generate the query. (Note: You will be prompted to run a Database Refresh.)
248 Tracking Deleted Events (See image on following page.) I thought when I deleted an event it was gone? Deleted events are indeed removed from your program's live data. You will no longer find them in Event Manager, in your Event Scheduler, in any queries or on any reports. The Deleted Events feature, however, functions like the Recycle Bin in your Windows operating system: Any events you delete will remain in your Deleted Events window and can even be restored (if you have the Professional version). Once you remove an event from your Deleted Events window, it is then gone for good. Accessing Deleted Events 1. Click the System sidebar group on the left side of your main screen. 2. Click Deleted Events. Finding Specific Events 1. Sort the list of deleted events by clicking any column heading. 2. Use the Incremental Search tool, located at the top left of the Deleted Events window, to quickly locate an event. Restoring Deleted Events (Professional version only) 1. Click a specific event to select it, or hold your [Ctrl] key down to highlight multiple events. 2. Click the Tools button at the top of the Deleted Events widow. 3. Select Restore Selected Event(s). 4. Click Yes to confirm. Note: If you have chosen to restore only one event, you will be asked if you want to retrieve it into Event Manager. Removing Deleted Events 1. Click one or more events to select them. 2. Click the Tools button at the top of the Deleted Events window. 3. Select Remove Selected Event(s). WARNING: Clicking Yes on this message (Step 4, below) will PERMANENTLY remove these events from your database. 4. If you want to permanently remove the selected events from your database, click Yes

249 Deleted Events is in the System Sidebar Group Select Events and Click Tools > Restore Selected Events
Caterease User Training Guide
 Caterease User Training Guide Copyright: 2016 Table of Contents Unit 1: Introducing Event Manager 15 Entering General Event Information 17 Searching for Events 19 Using the Event Finder 20 Reviewing and
Caterease Introduction Using the Event Wizard Accessing the Event Wizard Adding a Second Sub-Event Generating the Contract (or Other Print)
") Table of Contents Caterease Introduction... 2 Ribbon Tabs... 2 Navigation Pane (Sidebar)... 3 Frequently Used Buttons... 4 Event Manager: Using the Event Display... 7 Event Manager: Using the Sub-Event
Table of Contents Caterease Introduction... 2 Ribbon Tabs... 2 Navigation Pane (Sidebar)... 3 Frequently Used Buttons... 4 Event Manager: Using the Event Display... 7 Event Manager: Using the Sub-Event
Booking Your First Event
 Booking Your First Event Copyright 2018 TABLE OF CONTENTS Unit 1: Introducing Caterease - General Concepts 4 Ribbon Tab 5 Navigation Pane/Sidebar 6 Adding Records 9 Deleting Records 9 Selection Tool 10
Caterease Training Syllabus v12.5
 Caterease Training Syllabus v12.5 Day 1 Morning Session The morning session on Day One explores several different approaches to adding a new event. When this session is done, students will be able to:
Training Guide. Queries and Detail Grids
 Training Guide Queries and Detail Grids Queries and Detail Grids Copyright 2013 Table of Contents Unit 1: Checking Current Events/Accounts Receivable... 1.1 Tracking Your Current Events... 1.1 Generating
Booking Your First Event
 Booking Your First Event Copyright 2016 TABLE OF CONTENTS Unit 1: Adding a New Event 1 Viewing the Event Manager Sub-Event Display 2 Building a Menu 3 Retrieving Menu Items from Default Menus 4 Adding
Queries and Detail Grids
 Queries and Detail Grids Copyright 2016 TABLE OF CONTENTS Unit 1: Tracking Current Events and Accounts Receivable 2 Tracking Your Current Events 3 Generating Reports from a Results Grid 4 Available Reports
Managing Your Reminders and Contact History in Contact Manager
 Managing Your Reminders and Contact History in Contact Manager Copyright 2016 TABLE OF CONTENTS Unit 1: Finding an Account in Contact Manager 1 Using the Incremental Search Tool 1 Using the Navigation
Creating Custom Event Prints
 Creating Custom Event Prints Copyright 2018 TABLE OF CONTENTS Unit 1: Adding a New Event Print in Print Designer 5 Accessing the Print Designer 6 Adding a New Print 6 Layout Description Table 8 Creating
Customizing Your Food/Service Items in Menu Manager
 Customizing Your Food/Service Items in Menu Manager Copyright 2016 TABLE OF CONTENTS Unit 1: Menu Manager Setup Functions 4 Setting Up Food Service Types 4 Accessing Item Types from Event Manager 5 Copying
Creating Custom Merge Documents in Marketing Tools
 Creating Custom Merge Documents in Marketing Tools Copyright 2016 TABLE OF CONTENTS Unit 1: Creating New Merge Documents 5 Adding a New Document or Envelope 5 Copying an Existing Merge Document 7 Organizing
Creating Custom Merge Documents in Marketing Tools
 Creating Custom Merge Documents in Marketing Tools Copyright 2018 TABLE OF CONTENTS Unit 1: Creating New Merge Documents 5 Adding a New Document or Envelope 6 Inserting Dynamic Merge Fields 7 Changing
Microsoft Outlook Basics
 Microsoft Outlook 2010 Basics 2 Microsoft Outlook 2010 Microsoft Outlook 2010 3 Table of Contents Getting Started with Microsoft Outlook 2010... 7 Starting Microsoft Outlook... 7 Outlook 2010 Interface...
Once you click on the Enterprise Icon found on your desktop you will be asked for your password. This Default Code Is
 Once you click on the Enterprise Icon found on your desktop you will be asked for your password. This Default Code Is You should now see the main screen which is called the main screen or menu screen.
Outlook - an Introduction to Version 2003 Table of Contents
 Outlook - an Introduction to E-mail Version 2003 Table of Contents What is Outlook Starting Outlook The Navigation Pane Getting Help Creating and Sending a Message Using the College Exchange Directory
Table of Contents COURSE OVERVIEW... 3 LESSON 1: OUTLOOK 2010 CALENDAR INTERFACE... 5
 Table of Contents COURSE OVERVIEW... 3 LESSON 1: OUTLOOK 2010 CALENDAR INTERFACE... 5 OPEN OUTLOOK CALENDAR... 5 Ribbon... 6 Navigation Pane... 6 Appointment Area... 6 Task Pane... 6 To-Do Bar... 6 THE
Getting Started with EMS Desktop Client
 Getting Started with EMS Desktop Client Getting Started with EMS Desktop Client What is the EMS Desktop Client? Reservations and Bookings What is an Everyday User Reservation? Starting EMS Managing Database
Microsoft Office Outlook 2010
 Starting Microsoft Outlook 2010 with XP Click on Start, E-mail Microsoft Outlook or Start, All Programs, Microsoft Office, Microsoft Outlook. Starting Microsoft Outlook 2010 with Windows 7 Click on the
OUTLOOK TIPS AND TRICKS GINI COURTER, M.B.A., TRIAD CONSULTING
 1 OUTLOOK TIPS AND TRICKS GINI COURTER, M.B.A., TRIAD CONSULTING DISPLAYING THE ADVANCED TOOLBAR (2007) The Advanced toolbar isn t advanced; it s just the commands that they couldn t fit on the Standard
Office 365: . Accessing and Logging In. Mail
 Office 365: Email This class will introduce you to Office 365 and cover the email components found in Outlook on the Web. For more information about the Microsoft Outlook desktop client, register for a
Microsoft Dynamics GP is a robust accounting package that can meet
 In This Chapter Chapter 1 What Microsoft Dynamics GP Does Best Familiarizing yourself with the Microsoft Dynamics GP window Understanding Dynamics GP terms Knowing how Dynamics GP keeps your CPA happy
Status Bar: Right click on the Status Bar to add or remove features.
 Outlook 2010 Quick Start Guide Getting Started File Tab: Click to access actions like Print, Save As, etc. Also to set Outlook options. Ribbon: Logically organizes Command Buttons onto Tabs and Groups
A Document Created By Lisa Diner Table of Contents Western Quebec School Board October, 2007
 Table of Contents A Document Created By Lisa Diner Western Quebec School Board October, 2007 Table of Contents Some Basics... 3 Login Instructions... 4 To change your password... 6 Options As You Login...
Outlook 2007 Web Access User Guide
 Outlook 2007 Web Access User Guide Table of Contents Page i TABLE OF CONTENTS OUTLOOK 2007 MAIL... 1 Launch Outlook Web Access... 1 Screen Elements... 2 Inbox... 3 Read Mail... 3 Delete a Message... 3
Service Minder Plus Features/Helpful Hints
 Service Minder Plus Features/Helpful Hints This manual covers helpful hints and use of features. Note: These items will be addressed during the training sessions. This document is meant to be used as an
Outlook Web Access. In the next step, enter your address and password to gain access to your Outlook Web Access account.
 Outlook Web Access To access your mail, open Internet Explorer and type in the address http://www.scs.sk.ca/exchange as seen below. (Other browsers will work but there is some loss of functionality) In
Working with Pages... 9 Edit a Page... 9 Add a Page... 9 Delete a Page Approve a Page... 10
 Land Information Access Association Community Center Software Community Center Editor Manual May 10, 2007 - DRAFT This document describes a series of procedures that you will typically use as an Editor
Getting Started The Outlook Web Access Window
 QUICK Source Microsoft Outlook Web Access in Exchange Server 2003 Getting Started The Outlook Web Access Window ❶ ❷ ❸ ❹ ❺ ❻ ❼ ❽ Using the Reading Pane The Reading Pane allows you to view your e-mail messages
MotelMate. Demo guide. Motel Managment Software from Skagerrak Software. Thank you for trying MotelMate!
 MotelMate Motel Managment Software from Skagerrak Software Demo guide Installing and Opening the Demo. To install the Motel Mate Demo on Windows or Mac: 1. Insert the demo disk into the CD drive. 2. Open
2015 TECHNOLOGY SESSION: ADVANCING YOUR OUTLOOK 2013 SKILLS
 2015 TECHNOLOGY SESSION: ADVANCING YOUR OUTLOOK 2013 SKILLS Here s what you will learn in this session: Creating a professional signature Sort and organize your email using folders Attachments Identifying
Outlook: Communication Management Made Easy
 Applied Systems Client Network SEMINAR HANDOUT Outlook: Communication Management Made Easy Prepared for ASCnet Applied Systems Client Network 801 Douglas Avenue #205 Altamonte Springs, FL 32714 Phone:
TABLE OF CONTENTS TABLE OF CONTENTS... 1 INTRODUCTION... 2 USING WORD S MENUS... 3 USING WORD S TOOLBARS... 5 TASK PANE... 9
 TABLE OF CONTENTS TABLE OF CONTENTS... 1 INTRODUCTION... 2 USING WORD S MENUS... 3 DEFINITIONS... 3 WHY WOULD YOU USE THIS?... 3 STEP BY STEP... 3 USING WORD S TOOLBARS... 5 DEFINITIONS... 5 WHY WOULD
Outlook 2010 One. Wednesday, August 7, 9-11 am. Agenda:
 Page 1 Outlook 2010 One Wednesday, August 7, 9-11 am Agenda: Outlook Search Options Working with Attachments Creating a Signature Marking a Message as Read Flag an item for Follow-Up Reply, Reply All &
Outlook Web Access (OWA) PTHS District 209
 PTHS District 209") Outlook Web Access (OWA) PTHS District 209 Table of Contents Welcome to Outlook Web Access (OWA)... 1 To Access Your Proviso E-mail:... 1 If You Use Windows 95 or 98 or 2000 at Home... 2 About the Navigation
Outlook Web Access (OWA) PTHS District 209 Table of Contents Welcome to Outlook Web Access (OWA)... 1 To Access Your Proviso E-mail:... 1 If You Use Windows 95 or 98 or 2000 at Home... 2 About the Navigation
Outlook Quick Start Guide
 Getting Started Outlook 2013 Quick Start Guide File Tab: Click to access actions like Print, Save As, etc. Also to set Outlook Options. Quick Access Toolbar: Add your mostused tool buttons to this customizable
Working with PDF s. To open a recent file on the Start screen, double click on the file name.
 Working with PDF s Acrobat DC Start Screen (Home Tab) When Acrobat opens, the Acrobat Start screen (Home Tab) populates displaying a list of recently opened files. The search feature on the top of the
EXCEL 2003 DISCLAIMER:
 EXCEL 2003 DISCLAIMER: This reference guide is meant for experienced Microsoft Excel users. It provides a list of quick tips and shortcuts for familiar features. This guide does NOT replace training or
IBM Notes Client V9.0.1 Reference Guide
 IBM Notes Client V9.0.1 Reference Guide Revised 05/20/2016 1 Accessing the IBM Notes Client IBM Notes Client V9.0.1 Reference Guide From your desktop, double-click the IBM Notes icon. Logging in to the
Getting Started Guide
 Getting Started Guide Sage MAS Intelligence 90/200 Table of Contents Getting Started Guide... 1 Login Properties... 1 Standard Reports Available... 2 Financial Report... 2 Financial Trend Analysis... 3
Excel 2013 Intermediate
 Excel 2013 Intermediate Quick Access Toolbar... 1 Customizing Excel... 2 Keyboard Shortcuts... 2 Navigating the Spreadsheet... 2 Status Bar... 3 Worksheets... 3 Group Column/Row Adjusments... 4 Hiding
BASIC NAVIGATION & VIEWS...
 Content Overview VISUAL TOUR... 5 NEW FEATURES IN OUTLOOK 2010... 6 BASIC NAVIGATION & VIEWS... 7 SETTING PREFERENCES... 7 Creating an Outlook Shortcut... 7 Choosing a Startup View... 7 CUSTOMIZING INBOX
Section 1 Microsoft Excel Overview
 Course Topics: I. MS Excel Overview II. Review of Pasting and Editing Formulas III. Formatting Worksheets and Cells IV. Creating Templates V. Moving and Navigating Worksheets VI. Protecting Sheets VII.
T-Invoicer User Guide
 - 1 - T-Invoicer User Guide Introduction T-Invoicer is an entry level invoicing system designed for small & startup business's who need to invoice customers quickly & easily. T-Invoicer has all the basic
OUTLOOK HOW DO I? 2013
 OUTLOOK HOW DO I? Click on a Link to take you to that Section OUTLOOK - GENERAL... 2 GENERAL How Do I Navigate the 2010 Outlook Screen?... 2 GENERAL: How Do I Change the Reading Pane View?... 7 GENERAL:
TABLE OF CONTENTS CHAPTER
 TABLE OF CONTENTS CHAPTER 1...1 A QUICK OVERVIEW OF THE MICROSOFT EXCHANGE CLIENT...1 BASIC CONCEPTS AND FEATURES...1 STARTING THE MICROSOFT EXCHANGE CLIENT...1 SETTING OPTIONS FOR YOUR MESSAGES...3 LOOKING
Quick Tips & Tricks. Important You must use SEMICOLONS ( ie; ) to separate address when sending mail to multiple users
 to separate address when sending mail to multiple users") Quick Tips & Tricks Important You must use SEMICOLONS ( ie; ) to separate email address when sending mail to multiple users Customize Mail View Click, View, and then highlight Current View Click, Customize
Quick Tips & Tricks Important You must use SEMICOLONS ( ie; ) to separate email address when sending mail to multiple users Customize Mail View Click, View, and then highlight Current View Click, Customize
NHSP:Online. Flexible Worker User Guide. NHSP:Online. FW Training Manual July 2015 Page 1 of 26
 Flexible Worker User Guide Page 1 of 26 Contents Page Number Contents... 2 1. Getting Started... 3 2. Available Shifts... 7 3. Booking a Shift... 8 4. Refusing (Cancelling) Shifts... 9 5. Entering Availability...
2013 edition (version 1.1)
") 2013 edition (version 1.1) Contents 1 Introduction... 3 2 Signing in to your Office 365 account... 3 2.1 Acceptable Use Policy and Terms of Use... 4 3 Setting your profile and options... 4 3.1 Settings:
2013 edition (version 1.1) Contents 1 Introduction... 3 2 Signing in to your Office 365 account... 3 2.1 Acceptable Use Policy and Terms of Use... 4 3 Setting your profile and options... 4 3.1 Settings:
OUTLOOK Desktop App INTERFACE OVERVIEW MAIL MESSAGES QUICK START GUIDE. 1 Quick Access Toolbar - contains shortcuts for the most commonly used tools.
 OUTLOOK Desktop App QUICK START GUIDE INTERFACE OVERVIEW 1 Quick Access Toolbar - contains shortcuts for the most commonly used tools. 2 File tab (Backstage View) - contains tools to manage account and
VTH/FirstClass Quick Reference Guide: Your Desktop
 VTH/FirstClass Email Quick Reference Guide: Your Desktop The First Class Desktop is where everything begins for your Virtual Town Hall. The FC Desktop displays your mailbox, contacts, calendars, archives
OLPM. Calendaring. 1. Get the Big Picture with the To-Do Bar
 Microsoft Outlook 2007 Tips and Tricks Calendaring 1. Get the Big Picture with the To-Do Bar See your calendar in conjunction with tickler reminders and to dos by using the To-Do Bar. If the To-Do Bar
ADVANCED GroupWise 7.0
 ADVANCED GroupWise 7.0 Distributed by the Administrative Technology User Support Department under the Direction of Dr. Russell Clukey, Executive Director, Support Services. Feel free to contact the AT
Excel Select a template category in the Office.com Templates section. 5. Click the Download button.
 Microsoft QUICK Excel 2010 Source Getting Started The Excel Window u v w z Creating a New Blank Workbook 2. Select New in the left pane. 3. Select the Blank workbook template in the Available Templates
Microsoft Access 2013
 Microsoft Access 2013 Chapter 1 Databases and Database Objects: An Introduction Objectives Describe the features of the Access window Create a database Create tables in Datasheet and Design views Add records
Microsoft Outlook 2010 Hands On Guided Tour. Level 1
 Microsoft Outlook 2010 Hands On Guided Tour Level 1 Outlook 2010 Window Anatomy Level 1/Guide A, p.1 Welcome to Outlook 2010 at UMHS. This guide gives you a quick visual tour of the Outlook 2010 window.
Microsoft Access 2010
 Microsoft Access 2010 Chapter 2 Querying a Database Objectives Create queries using Design view Include fields in the design grid Use text and numeric data in criteria Save a query and use the saved query
QSalesData User Guide
 QSalesData User Guide Updated: 11/10/11 Installing the QSalesData Software... 2 Licensing the QSalesData Product... 3 Build QSalesData fields in ACT Step 2 of Install Checklist... 4 Adding the QB Data
Office of Instructional Technology
 Office of Instructional Technology Microsoft Excel 2016 Contact Information: 718-254-8565 ITEC@citytech.cuny.edu Contents Introduction to Excel 2016... 3 Opening Excel 2016... 3 Office 2016 Ribbon... 3
Getting Started Guide. Sage MAS Intelligence 500
 Getting Started Guide Sage MAS Intelligence 500 Table of Contents Getting Started Guide... 1 Login Properties... 1 Standard Reports Available... 2 Financial Report... 2 Financial Trend Analysis... 3 Dashboard
HGC SUPERHUB HOSTED EXCHANGE
 HGC SUPERHUB HOSTED EXCHANGE EMAIL OUTLOOK WEB APP (OWA) 2010 USER GUIDE V2013.6 HGC Superhub Hosted Email OWA User Guide @ 2014 HGC. All right reserved. Table of Contents 1. Get Started... 4 1.1 Log into
NCMail: Microsoft Outlook User s Guide
 NCMail: Microsoft Outlook 2007 Email User s Guide Revision 1.1 3/9/2009 This document covers how to use Microsoft Outlook 2007 for accessing your email with the NCMail Exchange email system. The syntax
Using Microsoft Excel
 About Excel Using Microsoft Excel What is a Spreadsheet? Microsoft Excel is a program that s used for creating spreadsheets. So what is a spreadsheet? Before personal computers were common, spreadsheet
Check-Inn: What s New in Version 6
 HOME SCREEN At a glance Access program information/support; return to home screen Messages Today s Diary Expand or shrink reservation grid Resize window without closing Check-Inn Refresh grid View support
ENTERING DATA & FORMULAS...
 Overview NOTESOVERVIEW... 2 VIEW THE PROJECT... 5 NAVIGATING... 6 TERMS... 6 USING KEYBOARD VS MOUSE... 7 The File Tab... 7 The Quick-Access Toolbar... 8 Ribbon and Commands... 9 Contextual Tabs... 10
Organising your inbox
 Outlook 2010 Tips Table of Contents Organising your inbox... 1 Categories... 1 Applying a Category to an E-mail... 1 Customising Categories... 1 Quick Steps... 2 Default Quick Steps... 2 To configure or
Service Minder Plus Features/Helpful Hints
 Service Minder Plus Features/Helpful Hints NOTE: These items will be addressed during the training sessions. This document is meant to be an overview resource for after completion of training. General
Microsoft How to Series
 Microsoft How to Series Getting Started with EXCEL 2007 A B C D E F Tabs Introduction to the Excel 2007 Interface The Excel 2007 Interface is comprised of several elements, with four main parts: Office
MICROSOFT OneNote 2013
 Q U I C K R E F E R E N C E G U I D E MICROSOFT OneNote 2013 Microsoft OneNote 2013 is the perfect place to gather and organize your ideas, thoughts, lists, plans, timelines, and references into one file.
Status Bar: Right click on the Status Bar to add or remove features.
 Excel 2013 Quick Start Guide The Excel Window File Tab: Click to access actions like Print, Save As, etc. Also to set Excel options. Ribbon: Logically organizes actions onto Tabs, Groups, and Buttons to
Introduction to Excel 2007
 Introduction to Excel 2007 These documents are based on and developed from information published in the LTS Online Help Collection (www.uwec.edu/help) developed by the University of Wisconsin Eau Claire
Microsoft Excel 2010 Handout
 Microsoft Excel 2010 Handout Excel is an electronic spreadsheet program you can use to enter and organize data, and perform a wide variety of number crunching tasks. Excel helps you organize and track
Vacation Rental Suite Client Curriculum
 Vacation Rental Suite Client Curriculum Reservations Escapia, Inc. www.escapia.com 1-800-ESCAPIA Vacation Rental Suite (VRS) 1 Escapia Inc. Confidential Revised: 6/12/2009 2009, Escapia INC. Corporation,
THE EXCEL ENVIRONMENT... 1 EDITING...
 Excel Essentials TABLE OF CONTENTS THE EXCEL ENVIRONMENT... 1 EDITING... 1 INSERTING A COLUMN... 1 DELETING A COLUMN... 1 INSERTING A ROW... DELETING A ROW... MOUSE POINTER SHAPES... USING AUTO-FILL...
The smarter, faster guide to Microsoft Outlook
 The smarter, faster guide to Microsoft Outlook Settings... 1 The Inbox... 1 Using E-Mail... 4 Sending Attachments... 6 Some things to watch out for with File Attachments:... 7 Creating an Email Signature...
Decatur City Schools
 Decatur City Schools Table of Contents Introduction...5 Objectives...5 Why GW web?...5 Log in options...5 The menu...7 Blue title bar...7 Navigation...7 Folder list...8 Buttons in the message pane...8
Horizon Tutorial - Booking an Inspection
 Horizon Tutorial - Booking an Inspection Horizon is built to save you time and effort, while reducing the chance for errors when booking inspections. With Horizon booking an inspection is easy and fast!
MS Word MS Outlook Level 1
 MS Word 2007 MS Outlook 2013 Level 1 Table of Contents MS Outlook 2013... 1 Outlook 2013 Interface... 1 The Ribbon in Outlook 2013... 2 Sneak a Peek... 2 Pin a Peek... 3 Managing the Size of the Outlook
Outlook Web App User s Guide
 Outlook Web App User s Guide The new Outlook Web App will be replacing your old Outlook Web Access. This upgrade includes many new features that were only previously available through Microsoft Outlook.
Creating a Spreadsheet by Using Excel
 The Excel window...40 Viewing worksheets...41 Entering data...41 Change the cell data format...42 Select cells...42 Move or copy cells...43 Delete or clear cells...43 Enter a series...44 Find or replace
It is recommended that you configure Internet Explorer to see the MLS as a trusted site.
 Tips for New Users Welcome to Rapattoni MLS! You now have access to the most advanced Internet-based multiple listing system on the market, with many exciting tools and features that will help you provide
Outlook Navigation
 Outlook 2010 Email Navigation Reading Pane Navigation Pane Inbox Navigation Pane Access your mail folders, view your calendar(s), and more. Inbox Browse through emails and meeting invites that have not
EVERY NATION OUTLOOK WEB ACCESS (OWA) USER S GUIDE
 USER S GUIDE") EVERY NATION OUTLOOK WEB ACCESS (OWA) USER S GUIDE Exchange 2003 Version Revised September 2005 TABLE OF CONTENTS WHAT S NEW IN OWA 2003?...2 General...2 Inbox and Message Composition...2 Tasks...2 INTRODUCTION
EVERY NATION OUTLOOK WEB ACCESS (OWA) USER S GUIDE Exchange 2003 Version Revised September 2005 TABLE OF CONTENTS WHAT S NEW IN OWA 2003?...2 General...2 Inbox and Message Composition...2 Tasks...2 INTRODUCTION
N C MPASS. Getting Started. Version 6.8
 N C MPASS Getting Started Version 6.8 Ontario Telemedicine Network (OTN) All rights reserved. Last update: May 24, 2018 This document is the property of OTN. No part of this document may be reproduced
NHSP:Online. Flexible Worker User Guide. NHSP:Online. FW Training Manual January 2014 Page 1 of 27
 Flexible Worker User Guide Page 1 of 27 Contents Page Number Contents...2 1. Getting Started...3 2. Available Shifts...7 3. Booking a Shift...8 4. Refusing (Cancelling) Shifts...9 5. Entering Availability...10
Introducing Office
 1 2 Contents Contents Introducing Office 2010 9 Microsoft Office 2010 10 Ribbon Technology 11 What s Needed 12 Installing Office 2010 13 Start an Application 14 The Application Window 15 Live Preview 16
Creating Reports in Access 2007 Table of Contents GUIDE TO DESIGNING REPORTS... 3 DECIDE HOW TO LAY OUT YOUR REPORT... 3 MAKE A SKETCH OF YOUR
 Creating Reports in Access 2007 Table of Contents GUIDE TO DESIGNING REPORTS... 3 DECIDE HOW TO LAY OUT YOUR REPORT... 3 MAKE A SKETCH OF YOUR REPORT... 3 DECIDE WHICH DATA TO PUT IN EACH REPORT SECTION...
Outlook 2007 Guide. Frequently Asked Questions
 Outlook 2007 Guide Frequently Asked Questions TABLE OF CONTENTS Share Your Default Calendar with Specified People... 1 Share a Custom Calendar with Specified People... 2 Share a Custom Calendar Folder
Introduction to 9.0. Introduction to 9.0. Getting Started Guide. Powering collaborative online communities.
 Introduction to 9.0 Introduction to 9.0 Getting Started Guide Powering collaborative online communities. TABLE OF CONTENTS About FirstClass...3 Connecting to your FirstClass server...3 FirstClass window
Microsoft Excel 2010 Basic
 Microsoft Excel 2010 Basic Introduction to MS Excel 2010 Microsoft Excel 2010 is a spreadsheet software in the new Microsoft 2010 Office Suite. Excel allows you to store, manipulate and analyze data in
Introducing Office
 Contents Contents 1 2 Introducing Office 2007 9 Microsoft Office 2007 10 Ribbon Technology 11 What s Needed 12 Installing Office 2007 13 Start an Application 14 The Application Window 15 Live Preview 16
Access Review. 4. Save the table by clicking the Save icon in the Quick Access Toolbar or by pulling
 Access Review Relational Databases Different tables can have the same field in common. This feature is used to explicitly specify a relationship between two tables. Values appearing in field A in one table
OUTLOOK 2010 QUICK GUIDE. Version 1.7
 OUTLOOK 2010 QUICK GUIDE Version 1.7 Table of Contents THE NAVIGATION PANE... 5 Mail... 5 Calendar... 5 Contacts... 5 Tasks... 5 Notes... 5 Folder List... 5 Shortcuts... 5 E-MAIL... 5 Create a new e-mail
Single User Guide Version 4.0.x
 Single User Guide Version 4.0.x Copyright 1992-2001 Milum Corporation. All rights reserved. Office Tracker Single-User Guide Version 4.0.x This manual, as well as the software described in it, is furnished
MaintScape Training Course Table of Contents
 MaintScape Training Course Table of Contents Table of Contents... 1 Training Course Requirements... 3 Overview and Main Modules... 3 Search Window... 4 Reports are produced from the Search Window... 6
OUTLOOK WEB ACCESS (OWA) USER S GUIDE. Exchange 2003 Version - OWA Guide
 USER S GUIDE. Exchange 2003 Version - OWA Guide") OUTLOOK WEB ACCESS (OWA) USER S GUIDE Exchange 2003 Version - OWA Guide TABLE OF CONTENTS WHAT S NEW IN OWA 2003?...2 General...2 Inbox and Message Composition...2 Tasks...2 INTRODUCTION TO OWA...3 Web-Based
OUTLOOK WEB ACCESS (OWA) USER S GUIDE Exchange 2003 Version - OWA Guide TABLE OF CONTENTS WHAT S NEW IN OWA 2003?...2 General...2 Inbox and Message Composition...2 Tasks...2 INTRODUCTION TO OWA...3 Web-Based
HARBORTOUCH RESERVATIONS & WAITLIST MANUAL
 RESERVATIONS & WAITLIST MANUAL Table of Contents Reservations Setup Wizard... 1 Introduction to the Setup Wizard... 1 Accessing the Reservations Setup Wizard... 2 Accessing Reservations... 2 Reservations
Create your first workbook
 Create your first workbook You've been asked to enter data in Excel, but you've never worked with Excel. Where do you begin? Or perhaps you have worked in Excel a time or two, but you still wonder how
Quick Start Guide for Lotus Notes 8.5.1
 Quick Start Guide for Lotus Notes 8.5.1 ELEMENTS OF LOTUS NOTES... 2 SOME NEW FEATURES:... 2 HOME PAGE... 3 Customize the Home page... 4 SET USER PREFERENCES... 4 Personalizing Your E-mail... 5 Personalizing
 Information Technology Virtual EMS Help https://msum.bookitadmin.minnstate.edu/ For More Information Please contact Information Technology Services at support@mnstate.edu or 218.477.2603 if you have questions
UNIVERSITY OF WOLLONGONG MICROSOFT OUTLOOK
 UNIVERSITY OF WOLLONGONG MICROSOFT OUTLOOK 2007 EMAIL Table of Contents INTRODUCTION... 2 WHAT S NEW... 2 MOBILE DEVICES... 2 OVERVIEW OF OUTLOOK... 3 NAVIGATION PANE... 3 VIEWING MAIL... 4 READING PANE...