User's Guide (Console Edition)
|
|
|
- Cornelius Mitchell
- 5 years ago
- Views:
Transcription


1 walker Service Quality Coordinator User's Guide (Console Edition) Windows/Solaris/Linux J2X ENZ0(00) January 2013
2 Preface Purpose of this manual This manual explains how to use the operation windows for walker Service Quality Coordinator, such as the Console and the Admin Console window. Target audience This manual is intended for users who will monitor distributed systems, create reports, and perform operations and distribution activities on the walker Service Quality Coordinator operation management client/console. Readers of this manual should also have a general understanding of basic operating system and GUI operations as well as a working knowledge of communications protocols such as TCP/IP and SMTP. Organization of walker Service Quality Coordinator manuals The walker Service Quality Coordinator manuals are organized as follows: - walker Service Quality Coordinator Technical Guide Provides an overview of the functions of walker Service Quality Coordinator. - walker Service Quality Coordinator Installation Guide Explains how to install and set up walker Service Quality Coordinator. - walker Service Quality Coordinator User's Guide Explains how to use the functions of walker Service Quality Coordinator. - walker Service Quality Coordinator User's Guide (Console Edition) Explains how to use those functions related to console windows. - walker Service Quality Coordinator User's Guide (Dashboard Edition) Explains how to use dashboard functions. - walker Service Quality Coordinator Reference Guide Explains commands, data formats, messages and so on. - walker Service Quality Coordinator Troubleshooting Guide Explains how to handle any problems that may occur. - walker Service Quality Coordinator User's Guide (Website Management Functions Edition) Explains the walker Service Quality Coordinator functions that relate to analyzing Web usage and monitoring Web content tampering. - walker Service Quality Coordinator User's Guide (walker User Management and Single Sign-On Edition) Explains how to install and use the walker User Management and walker Single Sign-On functions when walker Service Quality Coordinator is to be used. - walker User's Guide - walker User Management and Single Sign-On Explains how to install the walker User Management function and the walker Single Sign-On function. - walker Service Quality Coordinator Glossary This manual explains walker Service Quality Coordinator terminology. - i -
3 Positioning of this document This manual is common to the following walker Service Quality Coordinator products for Windows, Linux and Oracle Solaris: - walker Service Quality Coordinator Enterprise Edition V walker Service Quality Coordinator Standard Edition V Abbreviations - The term "Windows Server 2012" refers to the following products: - Microsoft(R) Windows Server(R) 2012 Foundation - Microsoft(R) Windows Server(R) 2012 Standard - Microsoft(R) Windows Server(R) 2012 Datacenter - The term "Windows Server 2008" refers to the following products: - Microsoft(R) Windows Server(R) 2008 R2 Foundation - Microsoft(R) Windows Server(R) 2008 R2 Standard - Microsoft(R) Windows Server(R) 2008 R2 Enterprise - Microsoft(R) Windows Server(R) 2008 R2 Datacenter - Microsoft(R) Windows Server(R) 2008 Foundation - Microsoft(R) Windows Server(R) 2008 Standard - Microsoft(R) Windows Server(R) 2008 Enterprise - Microsoft(R) Windows Server(R) 2008 Datacenter - Microsoft(R) Windows Server(R) 2008 Standard without Hyper-V(TM) - Microsoft(R) Windows Server(R) 2008 Enterprise without Hyper-V(TM) - Microsoft(R) Windows Server(R) 2008 Datacenter without Hyper-V(TM) - Microsoft(R) Windows Server(R) 2008 Standard Server Core - Microsoft(R) Windows Server(R) 2008 Standard without Hyper-V(TM) Server Core - Microsoft(R) Windows Server(R) 2008 Enterprise Server Core - Microsoft(R) Windows Server(R) 2008 Enterprise without Hyper-V(TM) Server Core - Microsoft(R) Windows Server(R) 2008 Datacenter Server Core - Microsoft(R) Windows Server(R) 2008 Datacenter without Hyper-V(TM) Server Core - The term "Windows Server 2003" refers to the following products: - Microsoft(R) Windows Server(R) 2003 R2, Standard Edition - Microsoft(R) Windows Server(R) 2003 R2, Enterprise Edition - Microsoft(R) Windows Server(R) 2003 R2, Datacenter Edition - Microsoft(R) Windows Server(R) 2003, Standard Edition - Microsoft(R) Windows Server(R) 2003, Enterprise Edition - Microsoft(R) Windows Server(R) 2003, Datacenter Edition - The term "Windows 8" refers to the following products: - Windows(R) 8 - ii -
4 - Windows(R) 8 Pro - Windows(R) 8 Enterprise - The term "Windows 7" refers to the following products: - Windows(R) 7 Home Premium - Windows(R) 7 Professional - Windows(R) 7 Enterprise - Windows(R) 7 Ultimate - The term "Windows Vista" refers to the following products: - Windows Vista(R) Home Basic - Windows Vista(R) Home Premium - Windows Vista(R) Business - Windows Vista(R) Enterprise - Windows Vista(R) Ultimate - The term "Windows XP" refers to the following products: - Microsoft(R) Windows(R) XP Home Edition - Microsoft(R) Windows(R) XP Professional Edition - Windows Server 2003 and Windows Server 2008 are referred to as "Windows Server 2008 and earlier". - Windows Server 2008 and Windows Server 2012 are referred to as "Windows Server 2008 and later". - Windows XP, Windows Vista, and Windows 7 are referred to as "Windows 7 and earlier". - Windows Vista, Windows 7 and Windows 8 are referred to as "Windows Vista and later". - Windows Server 2008 and earlier and Windows 7 and earlier are referred to as "Windows Server 2008/Windows 7 and earlier". - Windows Server 2008 and later and Windows Vista and later are referred to as "Windows Server 2008/Windows Vista and later". - Microsoft(R) SQL Server(TM) is abbreviated as "SQL Server". - Microsoft(R) Cluster Server is abbreviated as "MSCS". - Oracle Solaris might be described as Solaris, Solaris Operating, or Solaris OS. - Oracle Solaris zone might be described as Solaris container. - Oracle WebLogic Server is abbreviated as "WebLogic Server". - Oracle Database is abbreviated as "Oracle". - walker Centric Manager is abbreviated as "Centric Manager". - walker Resource Coordinator is abbreviated as "Resource Coordinator". - Interstage Application Server is abbreviated as "Interstage". - Symfoware Server is abbreviated as "Symfoware". - VMware(R) ESX(R) is abbreviated as "VMware ESX" or "ESX". - VMware(R) ESXi(TM) is abbreviated as "VMware ESXi" or "ESXi". - VMware(R) vcenter(tm) is abbreviated as "VMware vcenter" or "vcenter". - VMware vsphere(r) is abbreviated as "VMware vsphere". - iii -
5 - Versions of walker Service Quality Coordinator that operate under Windows are referred to as "Windows versions". - Versions of walker Service Quality Coordinator that operate under Solaris are referred to as "Solaris versions". - Versions of walker Service Quality Coordinator that operate under Linux are referred to as "Linux versions". - Solaris and Linux versions of walker Service Quality Coordinator are referred to collectively as "UNIX versions". - The term "Agent" is used to refer to articles common to both Agent for Server and Agent for Business. Conventions used in this document - Edition-specific information This manual deals mainly with the Standard Edition and Enterprise Edition of walker Service Quality Coordinator. The following symbols appear in the title or text of an article to distinguish between the Standard Edition (standard specification) and the Enterprise Edition. This indicates that the article relates specifically to walker Service Quality Coordinator Enterprise Edition. This indicates that the article relates specifically to walker Service Quality Coordinator Standard Edition. Also, walker Service Quality Coordinator Enterprise Edition referred to as "EE", and walker Service Quality Coordinator Standard Edition referred to as "SE". - Information specific to Windows or UNIX versions This document contains information common to both Windows versions and UNIX versions of walker Service Quality Coordinator. Information specific to only the Windows versions and information specific to only the UNIX versions are distinguished from common information by attaching the following symbols: [Windows] This indicates that the article relates specifically to Windows versions. [UNIX] This indicates that the article relates specifically to UNIX versions. The symbols [Solaris], [Linux], [AIX], and [HP-UX] are used to distinguish Solaris, Linux, AIX, and HP/UX versions of walker Service Quality Coordinator. If notice should be paid, the information is distinguished from common information by attaching the following symbols: This indicates that the article relates specifically to Solaris versions. This indicates that the article relates specifically to Linux versions. Symbols The symbols used with commands are explained below. [Entry example] [PARA={a b c...}] [Meaning of each symbol] - iv -
6 Symbol Meaning [] Items enclosed in square brackets are optional. {} Select one of the items enclosed in braces ( { } ). When all optional items enclosed in square brackets ( [ ] ) are omitted, the default value indicated by an underscore ( _ ) is used. Select one of the items separated by vertical bars.... The item immediately before the ellipsis (...) can be repeatedly specified. Export Restriction If this document is to be exported or provided overseas, confirm the regulations of Foreign Exchange and Foreign Trade Control laws adhere to all legal requirements according to those laws. Trademarks - Adobe, Adobe Reader, and Flash are either registered trademarks or trademarks of Adobe s Incorporated in the United States and/or other countries. - Apache and Tomcat are trademarks or registered trademarks of The Apache Software Foundation. - HP-UX is a registered trademark of the Hewlett-Packard Company. - IBM, IBM logo, AIX, AIX 5L, HACMP, Power, and PowerHA are trademarks of International Business Machines Corporation in the United States and other countries. - Intel and Itanium are trademarks or registered trademarks of Intel Corporation in the U.S. and other countries. - Linux is a registered trademark of Linus Torvalds. - Microsoft, Windows, Windows Server and the titles or names of other Microsoft products are trademarks or registered trademarks of Microsoft Corporation in the United States and other countries. All other trademarks are the property of their respective owners. - Oracle and Java are registered trademarks of Oracle and/or its affiliates. Other names may be trademarks of their respective owners. - Red Hat is registered trademarks of Red Hat, Inc. in the U.S. and other countries. - UNIX is a registered trademark of The Open Group in the United States and other countries. - VMware, the VMware logo, Virtual SMP and VMotion are trademarks or registered trademarks of VMware, Inc. in the United States and other countries. - Other company names and product names are trademarks or registered trademarks of respective companies. - The company names, system names, product names and other proprietary names that appear in this document are not always accompanied by trademark symbols (TM or (R)). This guide uses screenshots in accordance with Microsoft Corporation's guidelines. Acknowledgement This product includes software developed by the OpenSSL Project for use in the OpenSSL Toolkit. ( January v -
7 Copyright FUJITSU LIMITED - vi -
8 Contents Chapter 1 Admin Console Window Console Definitions Window Setting View Setting View tree Management configuration definition (ConfigurationSettings) Groups ProxyManagers Agents RelationTools Resources WebSites Resources (URL) HTTP/PORT/DNS/SMTP TxnIDs TxnIDs for TxnAnalysis(Sync), TxnAnalysis(Async), and TxnAnalysis(OssJava) Unregistered Agents Information (UnregisteredAgents) Registering Information about Unregistered Agents When Register Unregistered Agent in Bulk When Register Unregistered Agent Individually Deleting information about unregistered Agents User Definitions Window User Definition Registration...43 Chapter 2 Console...45 Chapter 3 Monitoring Window Summary View Monitor types of the Summary Tree Reloading the Summary tree Basic operation Manual Update and Auto Update Opening targets in the Drilled-Down display Display in another window and print Content-related operation methods Drilled-Down Display Drilled-Down Display Types of the Drilled-Down Tree Reloading the Drilled-Down tree Basic operation Display in another window and print History Displaying resources Invoking related tools How to perform operations relating to content Common operations WebSites tree Interstage(TxnAnalysis)JavaEE/Interstage(TxnAnalysis) tree TxnAnalysis(Sync)/TxnAnalysis(Async)/TxnAnalysis(OssJava)tree Invoking Functions Directly Invoking the Summary View Invoking the Drilled-Down Display...84 Chapter 4 Analysis/Planning Window Types of Categories vii -
9 4.2 Types of Reports Planning Virtual Aggregate P2V (Physical to virtual) Effective Use of Resources VMware virtual machine relocation VMware resource allocation optimization VMware tuning guidance Demand Forecast VMware resource pool ServerView Resource Orchestrator resource pool Increment Simulation Response simulation Generic Report Generic report Performance Analysis Virtualization Software VMware Hyper-V Linux virtualization function (KVM) Linux virtualization function (Xen) Solaris Zone Solaris Zone (Solaris 10) Network walker Centric Manager (Network) walker Network Manager TcpNetwork Storage ETERNUS SF Storage Cruiser (SAN Storage) ETERNUS SF Storage Cruiser (NAS) OS Windows UNIX Common to all operating systems Web Web transaction Application Interstage Application Server (IJServer Cluster) Interstage Application Server (Work Unit) Oracle WebLogic Server Microsoft.NET SAP NetWeaver Workload Database Symfoware server Oracle database Microsoft SQL Server Job walker Operation Manager Service Bus Interstage Service Integrator Service Service operational information End user response Generic report Generic report History viii -
10 History History Operating the Analysis/Planning Window Scenario Category My Category Management Report Report Management Conditions Target Settings Resource ID specification Display Settings Detail settings Saving Condition Settings Period Display Button Contents Display Area Using the Analysis/Planning Window Using Scenarios to Create Reports Referring to the History of Created Reports Registering a New Scenario and Saving Report Conditions Operations Using Scenarios Simulation of Aggregating Physical Servers to a Virtual Environment: [P2V (Physical to Virtual)] Simulating the Relocation of Virtual Machines: [VMware Virtual Machine Relocation] Analysis of Bottlenecks in Virtual Environment: [VMware Tuning Guidance] Optimization of Resources Allocated to a Virtual Machine: [Optimization of Resources Allocated to VMware] Future Prediction of Resource Demand: [ServerView Resource Orchestrator Resource Pool] Simulation of Resource Increase in Anticipation of an Increased Number of Requests: [Response Simulation] Chapter 5 Scheduled Report Types of Reports Scheduled Report Registration (Administrator Tasks) Registered Report Name Category Report Target Settings View Settings Operation Buttons (to register, edit, and delete report conditions) Period Specifications Operation Buttons (preview) Content Display Area Manipulating Scheduled Reports (Administrator Tasks) sqcmakereport(scheduled Report Creation Command) sqcdeletereport(scheduled Report Deletion Command) Example of registration with scheduler Backing up reports Scheduled Report View Search Conditions Area Scheduled Reports List Display Area Storing Reports (Administrator Tasks) Chapter 6 Notes Relating to Errors Content Display Errors How to Increase the Size of the Desktop Heap Other content display errors If "-1" is displayed as service operational information Application errors with tclsh Failure to collect server performance information ix -
11 6.5 PDB maintenance processing If Management Console buttons become inoperable If messages output by walker Service Quality Coordinator fail to appear in the status bar When Images and Characters Are not Displayed Correctly Appendix A Setup Commands and Resident Processes A.1 Server Resource Information Collection Policy Setup Command A.2 Response/Operation Information Collection Policy Setup Command A.3 sqcsetpolicy (Policy Application Command) A.4 Starting and Stopping Resident Processes A.5 Automatic Startup Settings for the thttpd Service/Daemon x -
12 Chapter 1 Admin Console Window This chapter explains how to use the Admin Console window The Admin Console window is made up of a Console Definitions and a User Definitions. Refer to the following file for details on how to start the Admin Console window name of the operation management client/ssqc/adminconsole.html In order to communicate with the management server, a virtual directory must be registered on the Web server. Refer to "How to Set Up Basic Authentication for Operation Management Clients" in the Installation Guide when setting up basic authentication in the Admin Console. The Console Definitions window initially appears as below. Note - If the browser is equipped with a pop-up blocking function, the definition window will not open in a separate window. The pop-up blocking function should be disabled in such cases. - The Admin Console window uses JavaScript. If JavaScript is not enabled, the definition window will not open in a separate window. JavaScript should be enabled in such cases. - Do not perform operations in the Admin Console window using the pop-up context menu that appears when the right mouse button is clicked. Window configuration - 1 -
13 Basic configuration Admin Console is organized as shown in the following table. Item No. Component (1) Global navigation The toolbar provides the following menu: (2) Console Definitions tab - Manual Opens the manual. This tab displays information about registered console definitions. (3) User Definitions tab Create and change users in this tab. The following sections present an overview of each of these windows. 1.1 Console Definitions Window This section explains the Console Definitions window. The Console Definitions window can be used to create and edit console definitions, and to display the Setting View and the Console window. The Console Definitions window initially appears as below. Window configuration - 2 -
14 Basic operation The Console Definition window contains a number of operation buttons. The following table explains the operation of each button. Button Create Setting View Console Copy Delete Reload Creates a new console definition. Operation After clicking this button, enter the name of the console definition to be created in the prompt that is displayed. Only the following characters can be used for console definition names: alphanumeric characters [a-z, A-Z, 0-9], hyphens ('-') and underscores ('_'). However, hyphens ('-') cannot be used as the first character. Console definition names are not case sensitive. Console definition names must be no more than 64 characters long. Existing console definition names cannot be used. Starts the Setting View for console definitions. Starts the Console window. Copies the specified console definition with the specified name. After clicking this button, enter the name of the console definition to be copied in the prompt that is displayed. Existing console definition names cannot be used. Deletes the specified console definition. However, "DefaultConsole" cannot be deleted. Displays console definitions using the latest information. Point - Starting time of Console gets longer according to the number of Agents. It takes about 15 seconds when it manages 300 Agents, in case of that CPU of the Operation Management Client is Xeon 3.3 GHz only as a guide (It depends on CPU performance and other conditions). To shorten starting time of Console, create multiple console definitions and divide the Agents to register. - The console definition can be done by the command. Refer to "sqcsetupconsoledefine (Console Definition Configuration Command)" in the Reference Guide. 1.2 Setting View This section explains the Setting View. The Setting View is opened by clicking the Setting View button on the Console Definitions tab of the Admin Console
15 Note When the definition window is started, the message below might be displayed. In this case, click OK and then click Update Console Definition on the displayed definition window. The update might take a few moments, depending on the number of registered Agents. The Setting View will be displayed as below
16 Window configuration Procedure The Setting View is organized as shown in the following table. Item No. Component (1) Global navigation The toolbar provides the following menus: - Save Console Definitions Saves the console definition. - Register Scheduled Report Opens a new Console window. - Update Console Definition Reloads console definitions. - Help Open the User's Guide (Console Edition). (2) Tree display area (3) Setting window display area Displays the walker Service Quality Coordinator environment configuration in a tree structure. Displays the settings window that can be used to enter information
17 Basic operation The operation basically consists of selecting a node to set up in the Definition window tree on the left and then entering information in the settings window on the right. Each setting window contains a number of operation buttons. The following table explains the operation of buttons that function in the same way in different windows. The following table shows the behavior of the buttons that are common to each setting window. Button Add Edit Delete Operation Opens an information window in its default state so that a new configuration definition can be added. Opens an information window with existing information so that the existing configuration definition can be edited. Deletes a configuration definition. If the OK button is clicked in response to the deletion prompt, the information will be deleted. Point The trees in any other Console windows that may be open at the same time are not updated automatically. It will be necessary to reload the tree using the procedures described in " Reloading the Summary tree"or " Reloading the Drilled-Down tree". View Apply Opens an information display window. Completes information entry and closes the window. At the same time, any information that has been added or modified will be applied to the local console definitions. Point The trees in any other Console windows that may be open at the same time are not updated automatically. It will be necessary to reload the tree using the procedures described in " Reloading the Summary tree"or " Reloading the Drilled-Down tree". Reset Cance l Close Clears any checkboxes that have been selected, and any text that has been entered. Cancels the information that has been entered and closes the window. Terminates viewing and closes the window Setting View tree The Setting View tree consists of the following levels. Top tree Level This is the default level that is displayed when the Setting View opens. It displays Settings, which is the root of the tree, and the system groups. When the system group node is selected, the display switches to the system group tree
18 Level group tree Proxy Manger tree Agent tree This tree displays the system group and the Proxy Managers and Agents under it. At the top of the system group tree is a Back node that can be used to return to the previous level. When the Proxy Manager or Agent node is selected, the display switches to the Proxy Manager or Agent tree. The tree displays the Proxy Manager or Agent and their subordinate configurations. With regard to SAN Storage, the AffinityGroup and RAIDGroup nodes are also divided into different levels. At the top of the tree is a Back node that can be used to return to the previous level. The following table lists the icons that are used to display the nodes making up the tree. Icon Meaning Indicates the Setting function (the root of the tree). Indicates that the node is used to return to the previous level. Indicates a folder used to store collected information. Indicates a system group. Indicates individual servers such as Proxy Managers and Agents. Indicates an instance defined by a middleware product, etc. Indicates a node for which information is to be set. Indicates a related tool. Setup items The following table lists the setup items that are available for each node of the Setting View tree. Tree configuration Settings -- ConfigurationSettings Groups ProxyManagers RelationTools ManagedObject -- ResponseCondition -- WebSites Resources(URL) ServiceCondition -- Location of description "1.2.2 Management configuration definition (ConfigurationSettings)" " Groups" " ProxyManagers" " RelationTools" " WebSites" " Resources (URL)" - 7 -
19 Tree configuration Agents HTTP PORT DNS SMTP RelationTools ManagedObject -- Instances -- Resources Interstage(TxnAnalysis)Jav aee Location of description " HTTP/PORT/DNS/SMTP" " Agents" " RelationTools" " Resources" -- Server Instances -- TxnIDs UnregisteredAgents Interstage(TxnAnalysis) -- Work Units -- TxnIDs TxnAnalysis(Sync/Async/ OssJava) " TxnIDs" " TxnIDs" -- TxnTime -- TxnIDs " TxnIDs for TxnAnalysis(Sync), TxnAnalysis(Async), and TxnAnalysis(OssJava)" "1.2.3 Unregistered Agents Information (UnregisteredAgents)" Management configuration definition (ConfigurationSettings) The ConfigurationSettings folder in the Settings tree is used to set the configuration information of objects to be managed. Be sure to make the following settings Groups ProxyManagers Agents Make the following settings if necessary RelationTools Resources WebSites Resources (URL) HTTP/PORT/DNS/SMTP TxnIDs - 8 -
20 TxnIDs for TxnAnalysis(Sync), TxnAnalysis(Async), and TxnAnalysis(OssJava) Groups This node registers system groups. groups are for organizing the multiple servers that make up the system being managed. groups are specified as display units in the summary, analysis, and scheduled report views. Managed host must belong to a group. The Group Settings window is shown below
21 Procedure 1. Click the Add button to display the Group Information window, and then set a system group name. Node name Grou ps Setting item name Group Name Set a display name that will be used to identify the system group. Set a name that is unique within the management configuration. Note, however, that it does not matter if the same name is also used as an Agent name or a Proxy Manager name. The following characters can be used for system group names: - Alphanumeric characters - Symbols (except for \ :, < > $ " ' [ ] = &)
22 Node name Setting item name Platform dependent characters cannot be used. The system group name can be no longer than 64 characters. 2. When the systems group is registered, the ProxyManagers and Agents folders are created under the system group folder. Point - It takes longer time to display graphs including system group information like Summary view, according to the number of Agents registered to the system group. It takes about 60 seconds when it manages 50 Agents, in case of that CPU of the Operation Management Client is Xeon 3.3 GHz only as a guide (It depends on the kind of monitor, period of data to be displayed, CPU performance of the Operation Management Client, and other conditions). To shorten the time to display, create multiple system groups and divide the Agents to register. - The registers systems group can be done by the command. Refer to "sqcsetupconsoledefine (Console Definition Configuration Command)" in the Reference Guide ProxyManagers This node registers Proxy Managers that will be managed. If end user response information and server operational information is not to be collected, there is no need to set up this folder. Point To collect information with a Manager and not a Proxy Manager, register the Manager as a Proxy Manager. Proxy Manager registration can also be performed easily with the Register Agent with Group window. Refer to "1.2.3 Unregistered Agents Information (UnregisteredAgents)" for details. Note that the Register Agent with Group window cannot be used when "pull" operations are being performed. In such cases, use the Proxy Manager Settings window (shown below) instead
23 - 12 -
24 Procedure 1. Click the Add button to display the Proxy Manager Information window, and then set information relating to the Proxy Manager. Node name ProxyManagers Setting item name Proxy Manager Name the display name for identifying the Proxy Manager. Set a name that is unique within the management configuration. Note, however, that it does not matter if the same name is also used as a system group name or an Agent name. The following characters can be used for Proxy Manager names: - Alphanumeric characters - Symbols (except for \ :, < > $ " ' [ ] = &)
25 Node name Setting item name Host Name Platform dependent characters cannot be used. The Proxy Manager name can be no longer than 64 characters. the identifier for the Proxy Manager. The same system name cannot be registered more than once within a single group, but identical host names can be registered in different groups. Point If a single Proxy Manager is used in multiple businesses, it is possible to create a system group for each business and to register the same Proxy Manager with each one. However, a different character string should be used in the ProxyManager name (display name). The identifier is a name that is displayed by the Policy Application Command. Refer to "A.3 sqcsetpolicy (Policy Application Command)" for details on the Policy Application Command. 2. Next, click either the Update All or the Update Details button to collect configuration information from the Proxy Managers. This configuration information is used for management purposes. If this operation is successful, the date and time that the configuration information was collected will be displayed to the left of the button. Note If the collection of configuration information fails, the collection date will not be updated. Check that the host name is correct, and that the Proxy Manager collection policy has been correctly created and applied. If the following message appears in the Collecting Configuration Information window, the problems listed below may be the cause. couldn't open socket: connection timed out - The IP address of the Manager that was specified at installation time is incorrect. - The Manager (its resident processes) is not running. 3. When configuration information is collected, a folder named ManagedObject is created in the Proxy Manager that performed the collection. The ManagedObject folder displays the following information targeted for collection by the Proxy Manager: - End user response information - Service operational information Point The configuration information that is collected here refers to the managed object configuration information (response and configuration information for managed objects) explained in "A.2 Response/Operation Information Collection
26 Policy Setup Command" Therefore, collection policies described in "A.2 Response/Operation Information Collection Policy Setup Command" must be created and applied on either the Manager or the Proxy Manager in advance. Also, the configuration information collection explained here must be performed each time collection policies are created and applied. [For "Pull" communications] For "pull" operations, another preliminary task must be performed before the settings in this window can be used to collect the configuration information. Perform the following procedure, and then click either the Update All or the Update Details button in the Setting View. Procedure Copy the managed object configuration information file from the managed server to the operation management client. - The location of the file on the managed server is as follows: [Windows] Variable file storage directory\control\managedconf_xxxx.xml [UNIX] /etc/opt/fjsvssqc/managedconf_xxxx.xml "XXXX" refers to the name that was specified with the -h option when the "A.3 sqcsetpolicy (Policy Application Command)" was executed. If the -h option was omitted, then this will be the host name of the system where this command was executed. - Copy this file to the following location on the operation management client. Installation directory\www\managedconf\managedconf_xxxx.xm Point The registers Proxy Manager and configuration information is collected can be done by the command. Refer to "sqcsetupconsoledefine (Console Definition Configuration Command)" and "sqcgetxmlconfig (Configuration Information Collection Command)" in the Reference Guide Agents This node registers Agents that will be managed. Point Agent registration can also be performed easily with the Register Agent with Group window. Refer to "1.2.3 Unregistered Agents Information (UnregisteredAgents)" for details. Note that the Register Agent with Group window cannot be used when "pull" operations are being performed. In such cases, use the Agent Settings window (shown below) instead. The Agent Settings window is shown below
27 - 16 -
28 Procedure 1. Click the Add button to display the Agent Information window, and then set information relating to the Agent. Node name Setting item name Agents Agent Name the display name for identifying the Agent. Set a name that is unique within the management configuration. Note, however, that it does not matter if the same name is also used as a system group name or a ProxyManger name. The following characters can be used for Agent names: - Alphanumeric characters - Symbols (except for \ :, < > $ " ' [ ] = &) Platform dependent characters cannot be used. The Agent name can be no longer than 64 characters
29 Node name Setting item name Host Name the identifier for the Agent. The same host name cannot be registered more than once within a single group, but identical system names can be registered in different groups. If a single Agent is used in multiple businesses, it is possible to create a system group for each business and to register the same Agent with each one. However, a different character string should be used in the Agent name (display name). The identifier is a name that is displayed by the Policy Application Command. Refer to "A.3 sqcsetpolicy (Policy Application Command)" for details on the Policy Application Command. Point For clustered Agent operations, specify either a physical host name or a physical IP address. 2. Next, click either the Update Details or the Update All button to collect the configuration information from the Agents on the managed server. This configuration information is used for management purposes. If this operation is successful, the date and time that the configuration information was collected will be displayed to the left of the button. Point If the collection of configuration information fails, the collection date will not be updated. Check that the host name is correct, and that the Agent collection policy has been correctly created and applied. If the following message appears in the Collecting Configuration Information window, the problems listed below may be the cause. couldn't open socket: connection timed out - The IP address of the Manager that was specified at installation time is incorrect. - The Manager (its resident processes) is not running. 3. When configuration information is collected, a folder named ManagedObject is created in the Agent that performed the collection. The configuration information targeted for collection by the Agent will be displayed within the ManagedObject folder. Point The configuration information that is collected here refers to the managed object configuration information (resource configuration information) explained in "A.1 Server Resource Information Collection Policy Setup Command". Therefore, collection policies described in "A.1 Server Resource Information Collection Policy Setup Command" must be created and applied on the Agent in advance
30 Also, the configuration information collection explained here must be performed each time collection policies are created and applied. [For "Pull" communications] For "pull" operations, another preliminary task must be performed before the settings in this window can be used to collect the configuration information. Perform the following procedure, and then click either the Update All or the Update Details button in the Setting View. Procedure Copy the managed object configuration information file from the managed server to the operation management client. - The location of the file on the managed server is as follows: [Windows] Variable file storage directory\control\managedconf_xxxx.xml [UNIX] /etc/opt/fjsvssqc/managedconf_xxxx.xml "XXXX" refers to the name that was specified with the -h option when the "A.3 sqcsetpolicy (Policy Application Command)" was executed. If the -h option was omitted, then this will be the host name of the system where this command was executed. - Copy this file to the following location on the operation management client. Installation directory\www\managedconf\managedconf_xxxx.xml Point The registers Agent and configuration information is collected can be done by the command. Refer to "sqcsetupconsoledefine (Console Definition Configuration Command)" and "sqcgetxmlconfig (Configuration Information Collection Command)" in the Reference Guide RelationTools When Proxy Managers and Agents are registered, a folder named "RelationTools" will be created. To call the related tools (that can be called from URLs) from this product's Drilled-Down display, set up this folder as well. The Related Tool Settings window is shown below
31 - 20 -
32 Procedure 1. Click the Add button to display the Related Tool Information window, and then set information relating to the related tool. Node name RelationTo ols Setting item name Related Tool Name the display name for identifying the tool. The following characters can be used for related tool names: - Alphanumeric characters - Symbols (except for \ :, < > $ " ' [ ] = &) Platform dependent characters cannot be used. The related tool name can be no longer than 64 characters. Existing related tool name cannot be used
33 Node name Setting item name URL the URL to call Resources This node is defined when it is necessary to display more specific resource content than the standard display unit in the Drilled-Down display of this product. Refer to " Displaying resources" for details on displaying resources with the Drilled-Down display function. The Resource Settings window is shown below
34 Procedure 1. Click the Add button to display the Resource Information window, and then set information relating to the resource. Node name Resources Setting item name Resource Name Resource ID the display name for identifying the resource. Set a name that is unique within the target Resources folder The following characters can be used for resource names: - Alphanumeric characters - Symbols (except for \, < > $ " ' [ ] = &) Platform dependent characters cannot be used. The resource name can be no longer than 64 characters. This is a character string displayed in the Resource ID column of the Drilled-Down display content that is used to filter display items by the resource


35 Node name Setting item name If the resource ID consists of multiple strings separated by colons (":") and the separated strings appear in the Drilled-Down tree between the ManagedObject node and the target node as nodes that represent instances, specify the strings below the instance node. Example: When "RDBSAR_ED" is selected, the following strings are displayed in the Resource ID column of the Drilled-Down display content: In addition, "CENTRIC" appears in the tree as a node that represents an instance. In this case, specify "RDBII_DICTIONARY" and "SYSTEMWALKER_DB" that appear below "CENTRIC". Resource IDs can be filtered using a prefix. Instead of specifying the entire resource ID, it is possible to specify only the initial portion that needs to be matched. a resource ID name that is unique within the Resources folder. Up to 64 characters (alphanumeric characters and symbols) can be used for the resource ID except for the following: \, < > " $ ' [ ] = &
36 WebSites By obtaining the configuration information, it becomes possible to check the configuration information relating to end user response management that was obtained from a Proxy Manager. Precondition of function This node is displayed only if "Managed object configuration information (response and managed object configuration information)" explained in "A.2 Response/Operation Information Collection Policy Setup Command" has been defined. The Web site operation status window is shown below
37 Procedure 1. Click the View button to display a Web site information window. Node name WebSites Display item name Site Name Displayed content Displays the site name defined by end user response management on a Manager or Proxy Manager Resources (URL) This node is defined when it is necessary to display more specific resource content than the standard display unit in the Drilled-Down display of this product. The URL of a Web page that has been fully downloaded (i.e., no error occurs when the Web page is displayed and the display is not interrupted) is set as a specific resource. Refer to " Displaying resources" for details on displaying resources with the Drilled-Down display function. The Resource(URL) Settings window is shown below
38 - 27 -
39 Procedure 1. Click the Add button to display the Resource(URL) Information window, and then set information relating to the resource. Node name Resources( URL) Setting item name Resource Name the display name for identifying the resource. Set a name that is unique within the target Resources folder The following characters can be used for resource names: - Alphanumeric characters - Symbols (except for \, < > $ " ' [ ] = &) Platform dependent characters can not be used. The resource name can be no longer than 64 characters
40 Node name Setting item name Resource ID (URL1) Resource ID (URL2) Normally, set URL1 only. Note, however, that different URLs can point to the same Web page, as shown in the following example: To view these two URLs together as a single Web page, use URL2 in combination with URL1 and set as follows: URL1: /SQC/ URL2: /SQC/index.html Up to 64 characters (alphanumeric characters and symbols) can be used for the resource ID except for the following: $ \ " ' [ ] < > = & ^ { } ( ) # * ;?, HTTP/PORT/DNS/SMTP These nodes can be used to verify the configuration information of service operation management that is collected from a Proxy Manager. Precondition of function These nodes are displayed only if "Managed object configuration information (response and managed object configuration information)" explained in "A.2 Response/Operation Information Collection Policy Setup Command" has been defined. The Service Operation Status window is shown below
41 - 30 -
42 Procedure 1. Click the View button to display a service information window. Node name HTTP PORT Display item name IP- Address URL to be monitore d by the service IP- Address Port Displayed content Displays the IP address defined by HTTP service operation management on a Manager or Proxy Manager. Displays the URL to be subject to service monitoring defined by HTTP service operation management on a Manager or Proxy Manager. Displays the IP address defined by port service operation management on a Manager or Proxy Manager. Displays the port defined by port service operation management on a Manager or Proxy Manager
43 Node name DNS SMTP Display item name IP- Address Port Resolved DNS host name IP- Address Port Displayed content Displays the IP address defined by DNS service operation management on a Manager or Proxy Manager. Displays the port defined by DNS service operation management on a Manager or Proxy Manager. Displays the host name resolved by DNS that is defined by DNS service operation management on a Manager or Proxy Manager. Displays the IP address defined by SMTP service operation management on a Manager or Proxy Manager. Displays the IP address defined by SMTP service operation management on a Manager or Proxy Manager TxnIDs This node is defined when it is necessary to display content that focuses on specific transaction IDs when displaying transaction breakdown analysis from the Interstage(TxnAnalysis)JavaEE/Interstage(TxnAnalysis) node in the Drilled- Down display of this product. For an overview of transaction breakdown analysis, refer to "Transaction breakdown analysis" in the User's Guide and " Interstage(TxnAnalysis)JavaEE/Interstage(TxnAnalysis) tree" of this manual. The Transaction ID Settings window is shown below
44 Procedure 1. Click the Add button to display the Transaction ID Information window, and then set a transaction ID. Node name TxnIDs Setting item name Transac tion ID Confirm the multiple transaction IDs that are displayed when an upper level Server Instance node or Work Unit node is selected, and then set the transaction ID to be viewed. Extract and specify the transaction ID part from the resource IDs displayed in the Resource ID column of the content displayed by selecting the Server Instance node or the Work Unit node. Resource ID - Server Instance name:transaction ID:component type:... - Work Unit name:transaction ID:component type:
45 Node name Setting item name The transaction ID format transaction number(process ID) Point The transaction number is a serial number within the process. If Work Unit process concurrency is set to a value of 2 or more, there is a chance that the transaction number will be duplicated. For this reason, the process ID should be specified as well. The transaction ID and subsequent resource IDs are filtered using their prefix. It is possible to specify the component type after the transaction ID. Set a transaction ID that is unique within the target TxnIDs folder. Up to 64 characters (alphanumeric characters and symbols) can be used for the transaction ID except for the following: \, < > " $ ' [ ] = & TxnIDs for TxnAnalysis(Sync), TxnAnalysis(Async), and TxnAnalysis(OssJava) This node is defined when it is necessary to display content that focuses on specific transaction IDs when displaying transaction breakdown analysis from the Interstage (Sync) Interstage (Async) or TxnAnalysis(OssJava) node in the Drilled-Down display of this product. For an overview of transaction breakdown analysis, refer to " Interstage(TxnAnalysis)JavaEE/ Interstage(TxnAnalysis) tree" of this manual. The Transaction ID Settings window is shown below
46 - 35 -
47 Procedure 1. Click the Add button to display the Transaction ID Information window, and then set a transaction ID. Node name TxnIDs Setting item name Transacti on ID Set the transaction ID by referring to the TransactionID_map in the Drilled-Down display window, which shows the correspondences between transaction IDs and the context IDs for transactions Unregistered Agents Information (UnregisteredAgents) The UnregisteredAgents tree in the Settings tree displays the host names of Agents that have been fully installed on the Agent side but have not been registered with the management configuration definition on the operation management client side. (This also applies to agents for Agent-based Monitoring, agents for Agentless Monitoring and Proxy Managers.)
48 Point If walker Service Quality Coordinator is linked with walker Resource Coordinator (server provisioning) (refer to "Linking to walker Resource Coordinator (server provisioning)"), a host name will be displayed in the form "server group name-host name" when server resource allocation (software image distribution to managed servers) is performed. If there is an unregistered Agent, the message "Unregistered Agent exists" will flash in the status bar of the Setting View, the Console window, and the Analysis window. This means that the existence of an unregistered Agent can be seen even if the Setting View is not open. This message will stop being displayed when all unregistered Agents have been allocated to system groups Registering Information about Unregistered Agents When Register Unregistered Agent in Bulk Unregistered Agent can be distributed to the one specified system group in bulk. As a result, Agent or Proxy Manager (or the both) is distinguished automatically, and registration and collection of the configuration information are done together. Starting If Unregistered Agents tree is clicked on the definition display tree, [Register Agent to Group] screen will be displayed. Node name Unregistered Agents Setting item name Group Display Name the system group of the registration destination. This corresponds to the Agent name specified in the Agent Information window
 The following characters can be used for display names: - Alphanumeric characters - Symbols (except for \ :, < > $ \" ' [ ] = &) Platform dependent characters cannot be used.")
49 Node name Setting item name Set a name that is unique within the management configuration. (The system name is set by default.) The following characters can be used for display names: - Alphanumeric characters - Symbols (except for \ :, < > $ " ' [ ] = &) Platform dependent characters cannot be used. The display name can be no longer than 64 characters. Procedure 1. the system group of the registration destination If the system group is not yet registered, a group called "DefaultGroup" will be displayed. The process of allocating Agents to DefaultGroup will cause a system group named "DefaultGroup" to be automatically created at the same time. 2. Check the check box of the Agent to distribute. If the checkbox on the table title is clicked, checkbox of all Agent will be on or off. 3. Click the Apply button. The following confirmation dialog box will be displayed. Click the OK button, then the registration is done. Click the Cancel button to return to the original window without performing registration processing When Register Unregistered Agent Individually Unregistered Agent can be distributed to the specified system groups. As a result, Agent or Proxy Manager (or the both) is distinguished automatically, and registration and collection of the configuration information are done together. Starting If an Agent displayed under the Unregistered Agents tree is clicked on the definition display tree, [Register Agent to Group] screen will be displayed

50 Node name Setting item name Host name of unregistered agent Group Display Name Select the checkbox for the system group to which the unregistered Agent is to be allocated. This corresponds to the Agent name specified in the Agent Information window. Set a name that is unique within the management configuration. (The system name is set by default.) The following characters can be used for display names: - Alphanumeric characters - Symbols (except for \ :, < > $ " ' [ ] = &) Platform dependent characters cannot be used. The display name can be no longer than 64 characters. Procedure Select the checkboxes for the system groups to which the unregistered Agents are to be allocated, and then click the Apply button below the image. If the system group is not yet registered, a group called "DefaultGroup" will be displayed. The process of allocating Agents to DefaultGroupwill cause a system group named "DefaultGroup" to be automatically created at the same time
51 Deleting information about unregistered Agents This section explains the procedure for deleting Agents (including Proxy Managers) listed in the UnregisteredAgents tree from Console. Preconditions This function is only valid if there is only one set of console definitions registered in the PDB of the Manager environment that the operation management client is connected to. Agents will only be deleted from the PDB in the Enterprise Manager or Manager environment that the operation management client is connected to. If there are multiple sets of console definitions, use the sqcpdberase command (described in "sqcpdberase (Data Deletion Command)" in the Reference Guide) to delete the data from the PDB so that it is not displayed. If the operation management client is connected to a Manager in a two-tier configuration model, only the Manager that the operation management client is connected to will be affected. Starting 1. If Unregistered Agents tree is clicked on the definition display tree, [Register Agent to Group] screen will be displayed. 2. If [Unregistered Agent delete] tab is clicked, [Unregistered Agent delete] screen will be displayed. Node name UnregisteredAgen ts Setting item name Delete Host Name Setting content Select the checkboxes for the unregistered Agents to be deleted. The display names for the unregistered agents are displayed in the Unregistered Agent List Registration window

52 Procedure 1. Click on the Unregistered tree to display the Unregistered Agent List Registration window in the pane on the righthand side of the window. 2. Select which Agents to delete. Select the checkboxes on the left-hand side of the names of the unregistered Agents to be deleted. Multiple Agents can be specified. 3. Click on the Delete button at the bottom of the window. The following confirmation dialog box will be displayed. Click the OK button to start the deletion processing. Click the Cancel button to return to the original window without performing deletion processing. Point If the Unregistered agent delete tab is clicked in an environment where multiple console definitions have been made, a window will be displayed indicating that this function cannot be used
53 Deleting Agents and Proxy Managers that have already been registered with Groups 1. Select the Groups tree where the Agents or Proxy Managers are registered, and display the Agent/Proxy Manager list window. 2. Clicking on the Delete button next to the name of an Agent (or Proxy Manager) moves the Agent (or Proxy Manager) from the Groups tree to the UnregisteredAgents tree. 3. Delete the Agent (or Proxy Manager) using the procedure in Section, " Deleting information about unregistered Agents". Reregistering Agents or Proxy Managers that have been deleted To enable Agents (or Proxy Managers) that have been deleted using this function to be registered in the Console again, execute "A.3 sqcsetpolicy (Policy Application Command)" in the environment for the Agent (or Proxy Manager). 1.3 User Definitions Window This section explains the User Definitions window. The User Definitions window can be used to create or edit user definitions, or to make settings for each user. The User Definitions window is displayed by clicking the User Definitions tab in the Management Console. Window Configuration
54 Basic operation The User Definitions window contains a number of operation buttons. The following table explains the operation of each button. Register Button Registers a new user definition. Operation After clicking this button, enter the name of the user definition to be created in the prompt that is displayed. The following characters can be used for user names: - Alphanumeric characters - Symbols (other than $\"',:[]<>=&/*?) Platform dependent characters cannot be used. "AdminConsole" and "admin" cannot be used as a user name. User names are not case sensitive. The user name can be no longer than 64 characters. Existing user names cannot be used. Console Definitions Assign Copy Assigns the console definition to be used by this user. Generates the HTML that is started when a user starts the Console. To set up basic authentication for the HTML that users start, refer to "How to Set Up Basic Authentication for Operation Management Clients" in the Installation Guide. Copies the specified user definition with the specified name. After clicking this button, enter the name of the user definition to be copied in the prompt that is displayed. Existing user names cannot be used. Note Launch HTML cannot be copied. Delete Reload Deletes the specified user definition. Displays user definitions using the latest information User Definition Registration Select the console definition to be used from the Register User Definition window that appears when the Console Definitions Assign button is clicked
55 Setting item name Console Definitions Select the console definition to be used from the list of current console definitions. An html file with the user name is created when a user definition is registered, and at the same time, the Admin Console is reloaded and the console definition that has been assigned is added to the line for the user
56 Chapter 2 Console This chapter explains the Operation Management Client console. This is the main window of the product. It is composed of the global header, the global navigation bar, and a display area. The display area contains the following three types of display, which are explained in chapters 3 and 4: - Monitoring window - Analysis/Planning window - Scheduled Report View Starting the Console The Admin Console window is started by specifying the following URL in a Web browser. Or name for operation management client/ssqc/adminconsole.html name of the operation management client/ssqc/xxx.html The "XXX" part of the second URL is a user name that has been registered in "1.3 User Definitions Window". To enter user names, first make basic authentication settings for each user by referring to "How to Set Up Basic Authentication for Operation Management Clients" in the Installation Guide. To start the Console from the Admin Console, click on the Console button on the Console Definitions tab of the Admin Console window

57 Note - If the browser is equipped with a pop-up blocking function, the Console will not open in a separate window. The popup blocking function should be disabled in such cases. - The Console uses JavaScript. If JavaScript is not enabled, the Console will not open in a separate window. JavaScript should be enabled in such cases. - Do not use the pop-up context menu that is displayed when the right mouse button is clicked to perform operations on the Console window. - When the Console is started, the message below might be displayed. In this case, click OK and then click Update Console Definition on the displayed Console. The update might take a few moments, depending on the number of registered Agents. About the graphs The graphs displayed in the console have the following peculiarities. - When you display in line graphs information collected at different intervals from different agents (for example information from a server with an Agent installed and information from a server being monitored by an agent for Agentless Monitoring), the display may be affected. Create system groups of Agents that have the same collection intervals. Example - In the summary view, when multiple Agents are displayed in a line graph and some of the Agents have been stopped, the times when they are stopped are not displayed


58 Example - In the summary view, when all monitored Agents have stopped and information is not being collected, the times when performance information is not being collected are not displayed in the line charts and area charts. Example - In the analysis/planning window and Scheduled Reports window, when Agents have stopped, the performance values at times when they are stopped are not displayed in the line charts and area charts


59 Example - In graphs other than those showing percentages in the full system inspection analysis/report and categorized diagnostic analysis/report, and in graphs in the detailed analysis/report, values may not be shown in the vertical axis of the graph. Look at the values in the tables to confirm. The above condition occurs when the performance values in the specified period are constantly "0". Example
60 Chapter 3 Monitoring Window The monitoring window is made up of a summary display, which allows the user to quickly grasp the operation status of the entire system, and the Drilled-Down display, which displays details when a problem occurs. Starting Start the Console by clicking the Console button on the Console Definitions tab of the Admin Console window. The console window can also be started by specifying its URL. Click on the Monitoring menu in global navigation in the Console to start
61 Note - Do not perform operations in the monitoring window using the context menu that appears when the right mouse button is clicked. Window configuration Once started, the following Monitoring window will appear
62 Basic configuration The Console is organized as shown in the following table. Item No. Component (1) Global Header (2) Global navigation The walker and Fujitsu logos are displayed. Global Navigation provides the following menus: - Monitoring Opens the Monitoring window. Allows checks on the current status and isolates faults when they occur. - Analysis/Planning Opens the Analysis/Planning window. Allows checks on the current status and isolates faults when they occur. A mid/longterm analysis and the planning of the service quality to prevent the trouble beforehand are done. - Scheduled Report Opens the Scheduled Report window. Displays reports about service levels for the customer or for capacity planning. - Update Console Definition Reloads the console definitions. - Help Opens the User's Guide (Console Edition)
63 Item No. Component (3) Tree display area (4) Content display area The Summary view and the Drilled-Down display are displayed in tree structure. It is possible to switch between the two display functions by clicking the relevant tabs. By default, the Summary view will be displayed when the Console is first opened. When a node in the tree is selected, the corresponding content of the Summary or Drilled-Down display will appear in this area. The Console provides two display functions: Summary view and Drilled-Down display. These functions are explained in the following two sections. 3.1 Summary View The Summary view displays representative information to enable the user to understand the current status of the entire system as a monitor. The Summary view is explained below Monitor types The following table lists the types of monitors that are available. It also indicates whether the monitor can be used for the different display targets. (SG: Group, PM: Proxy Manager, Agt: Agent) SG PM Agt Node name at the bottom part of Summary tree Outline Monitor name Yes No No Server Status Agent status display AgentStatusMonitor Point Information of CPU, Memory, and Disk is displayed as "-" when the status of Agent under VMware vcenter is "Running". Yes Yes No Service operation Summary of service operational information ServiceAvailMonitor - Operational status of the HTTP/DNS/ SMTP/PORT services (color-coded display) Yes Yes No End user response Summary of end user response information UserResponseMonitor - End user response time Yes No Yes Server resource Summary of server performance information ServerMonitor - CPU usage rate - Free memory rate
64 SG PM Agt Node name at the bottom part of Summary tree Monitor name VMware(host) VMware(Physical)Monit or - Disk I/O count Outline VMware ESX/VMware ESXi physical performance information summary - CPU usage rate - Available memory Yes No Yes - Disk I/O count Point This graph makes it easy to see how much the physical CPU, disk, and memory are being used and how much is available. VMware(Virtual machine stack) VMware(Virtual)StackM onitor VMware ESX/VMware ESXi virtual performance information stack graph - CPU usage rate - Memory usage - Disk I/O count Point No No Yes CPU usage rate is calculated with each physical CPU having a value of 100%.This means that the cumulative CPU usage rate of the CPUs of guest operating systems will be shown exceeding 100%. This graph makes it easy to see which guest OS is using the CPU, disk, and memory. It is possible to see information about the physical CPU, memory, and disk by displaying the CPU usage rate, available memory, and disk I/O count of "VMware(Physical)StackMonitor". VMware(cluster) VMware(Cluster)Monito r VMware vcenter cluster performance information stack graph - CPU usage - Memory usage No No Yes Point This graph makes it easy to see which cluster is using the CPU and memory. It is possible to see information about the physical CPU, memory, and disk for the hosts in a cluster by displaying the CPU usage rate,
65 SG PM Agt Node name at the bottom part of Summary tree Monitor name VMware(resource pool) VMware(ResourcePool )Monitor Outline available memory, and disk I/O count of "VMware(Physical)Monitor". VMware vcenter resource pool performance information stack graph - CPU usage - Memory usage Point No No Yes This graph makes it easy to see which cluster is using the CPU and memory. It is possible to see information about the CPU, memory, and disk for the virtual machines in a resource pool by displaying the CPU usage rate, available memory, and disk I/O count of "VMware(Virtual)StackMonitor". Hyper-V(host) HyperV(Physical)Monito r Hyper-V physical performance information summary - CPU usage rate Point Yes No Yes This graph makes it easy to see how much the physical CPU is being used and how much is available. It is also possible to see information about the physical memory and disk by the available memory and disk I/O count of "ServerMonitor". Hyper-V(Virtual machine stack) HyperV(Virtual)StackM onitor Hyper-V virtual performance information stack graph - CPU usage rate - Memory usage No No Yes Point CPU usage rate is calculated with each virtual CPU having a value of 100%. This means that the cumulative CPU usage rate of the CPUs of guest operating systems will be shown exceeding 100%. This graph makes it easy to see which guest OS is using the CPU
66 SG PM Agt Node name at the bottom part of Summary tree Monitor name Outline It is possible to see information about the physical CPU, memory, and disk by displaying the CPU usage rate of "HyperV(Physical)Monitor" and the available memory and disk I/O count of "ServerMonitor". Note The Memory usage is displayed from Windows Server 2008 R2 Service Pack1 and later. KVM(Virtual machine stack) KVM(Virtual)StackMoni tor Linux virtualization function (KVM) virtual performance information stack graph - CPU usage rate - Memory usage - Disk I/O count Point No No Yes CPU usage rate is calculated with each physical CPU having a value of 100%. This means that the cumulative CPU usage rate of the CPUs of guest operating systems will be shown exceeding 100%. This graph makes it easy to see which guest OS is using the CPU, disk, and memory. It is possible to see information about the physical CPU, memory, and disk by displaying the CPU usage rate, available memory, and disk I/O count of "ServerMonitor". Xen(Virtual machine stack) Xen(Virtual)StackMonit or Linux virtualization function (Xen) virtual performance information stack graph - CPU usage rate - Memory usage - Disk I/O count No No Yes Point CPU usage rate is calculated with each physical CPU having a value of 100%. This means that the cumulative CPU usage rate of the CPUs of guest operating systems will be shown exceeding 100%
67 SG PM Agt Node name at the bottom part of Summary tree Monitor name No No Yes Solaris Zone(Virtual machine stack) SolarisZone(Virtual)Stac kmonitor Outline This graph makes it easy to see which guest OS is using the CPU, disk, and memory. It is possible to see information about the physical CPU, memory, and disk by displaying the CPU usage rate, available memory, and disk I/O count of "ServerMonitor". Solaris Zone Virtualization function virtual performance information stack graph - CPU usage rate - Memory usage Point This graph makes it easy to see which Zone is using the CPU, disk, and memory. It is possible to see information about the Global Zone CPU, memory, and disk by displaying the CPU usage rate, available memory, and disk I/O count of "ServerMonitor". Yes No Yes Solaris Zone(Solaris 10) Summary of Solaris Zone(Solaris 10) ZoneMonitor(Solaris10) performance information - CPU usage rate - Memory usage rate Point If Solaris zones are bound to processor sets, the CPU usage will be 100% for each processor set. Yes No No Solaris Zone(Solaris 10) (Virtual machine stack) ZoneStackMonitor(Solar is10) Stack graph for Solaris Zone(Solaris 10) performance information - Stack graph for CPU usage rates - Stack graph for memory usage rates Point If Solaris zones are bound to processor sets, the CPU usage will be 100% for each processor set. To display a stack graph for CPU usage rates, it is necessary to create a system group for each processor set
68 SG PM Agt Node name at the bottom part of Summary tree Outline Monitor name Yes No Yes Web transaction Summary of Web transaction volume WebTrnMonitor information - Request count - Traffic volume Yes No Yes Network Summary of walker Resource TcpNetworkMonitor Coordinator (Network) performance information - Transmission line problems (including adjoining lines) Yes No Yes Storage Summary of walker Resource StorageMonitor Coordinator (Storage) performance information - Maximum read response time - Maximum write response time - Maximum disk usage rate No No Yes VMPool Summary of VM pool ROR(VMPool)Monitor - CPU usage rate - Memory usage rate No No Yes StoragePool Summary of storage pool ROR(StoragePool)Monit or - StoragePool usage rate Note In the storage pool where the Thin Provisioning function is effective, the number of L-Server that can be disposed is displayed as all 0 regardless of the kind of the L- Platform template. No No Yes NetworkPool Summary of network pool ROR(NetworkPool)Moni tor NetworkPool usage rate No No Yes ServerPool Summary of server pool ROR(ServerPool)Monito r - ServerPool usage rate Note When a physical server is not registered in the server pool of ServerView Resource Orchestrator, it is not displayed. No No Yes AddressPool Summary of address pool ROR(AddressPool)Moni tor - AddressPool usage rate
69 SG PM Agt Node name at the bottom part of Summary tree Outline Monitor name Note When a physical server is not registered in the server pool of ServerView Resource Orchestrator, it is not displayed. Yes No Yes Interstage(EJB) Interstage(EJB)Monitor Summary of Interstage Application Server (EJB) performance information - Maximum processing time for EJB applications - Pending request count Yes No Yes Interstage(TD) Interstage(TD)Monitor Summary of Interstage Application Server (TD) performance information - Maximum request processing time for objects - Pending request count Yes No Yes Interstage(CORBA) Interstage(CORBA)Moni tor Summary of Interstage Application Server (CORBA) performance information - Maximum request processing time for implementation repository IDs - Pending request count Yes No Yes Interstage(IJServer) Summary of Interstage Application Server Interstage(IJServer)Moni tor (IJServer) performance information - Maximum current heap usage rate for JavaVM Yes No Yes Interstage(JServerCluster ) Interstage(IJServerCluste r)monitor Summary of Interstage Application Server Java VM performance information - Mean value of amount of use of heap of Java VM (present) - Mean value of quantity consumed (present) in Perm area of Java VM - Garbage collection Yes No Yes Interstage(IBAS async) TxnAsyncMonitor Summary of Interstage Business Application Server performance information - The number of transactions that have been executed - The average and maximum execution times for multiple instances of the same transaction - The average and maximum execution times for all transactions that have been executed Yes No Yes Interstage(IBAS sync) Summary of Interstage Application Framework Suite performance information
70 SG PM Agt Node name at the bottom part of Summary tree Monitor name TxnSyncMonitor Outline - The number of transactions that have been executed - The average and maximum execution times for multiple instances of the same transaction - The average and maximum execution times for all transactions that have been executed Yes No Yes Interstage(IBAS OssJava Summary of Interstage Business Application TxnOssJavaMonitor Server Open Java Framework performance information Yes No Yes Interstage(ISI Sequence Summary) ISI SequenceMonitor(Summ ary) Yes No Yes Interstage(ISI Sequence Detail) ISI SequenceMonitor(Detail) Yes No Yes Interstage(ISI Queue Summary) ISI QueueMonitor(Summary ) Yes No Yes Interstage(ISI Queue Detail) ISI QueueMonitor(Detail) - The number of transactions that have been executed - The average and maximum execution times for multiple instances of the same transaction - The average and maximum execution times for all transactions that have been executed Summary of Interstage Service Integrator performance information - Sequence processing number (unit of group) Summary of Interstage Service Integrator performance information - Sequence processing number (unit of sequence) Summary of Interstage Service Integrator performance information - Number of queue stays (unit of group) Summary of Interstage Service Integrator performance information - Number of queue stays (unit of sequence) Yes No Yes WebLogicServer WebLogicServerMonitor Summary of Oracle WebLogic Server Java VM performance information - Mean value of amount of use of heap of Java VM (present) - Garbage collection Yes No Yes Operation Manager Summary of walker Operation OperationMgrMonitor Manager performance information - Change in job concurrency
71 SG PM Agt Node name at the bottom part of Summary tree Monitor name Outline - Change in the number of pending jobs - Change in the number of completed jobs - Change in the number of error jobs Yes No Yes MS-.NET MS-.NET performance information summary MS-.NET_Monitor - The number of requests waiting to be processed - The number of requests SAP SAP Monitor SAP performance information summary - Dialog response time Yes No Yes - Number of enqueue requests and queue length - Background usage rate - Number of RFC calls waiting to be executed Yes No Yes Symfoware Summary of Symfoware Server performance SymfowareMonitor information - Buffer hit rate - The number of times that the buffer has been used up - SQL count Yes No Yes Oracle Summary of Oracle Database Server OracleMonitor performance information - Buffer hit rate - Exclusive control wait count Yes No Yes MS-SQL MS-SQL performance information summary MS-SQL_Monitor - Buffer cache hit rate - The number of deadlocks - The number of transactions Yes No Yes User data Information about user data UserDataMonitor Group monitors collectively display information about Proxy Managers and Agents registered with the Group. Note that only those monitors that can be displayed for the display targets will appear in the tree. Monitors for which correct configuration information cannot be collected will not appear in the tree, even if they do exist. Refer to "Manager" in the Technical Guide and "Data Formats" in the Reference Guide for details on the information displayed in the Summary view
72 3.1.2 of the Summary Tree The summary tree is shown in two parts, upper and lower. The following table lists the icons that are used to display the nodes making up the tree. Icon Indicates a system group. Meaning Indicates a folder used to store collected information. Indicates individual Proxy Manager hosts. Indicates individual Agent hosts. Indicates each monitor Reloading the Summary tree The following methods can be used to reload the Summary tree. The method that is selected depends on the objective. Objective Default reload Reload Group, Proxy Manager or Agent tree Method The Summary tree can be reloaded in its default state by clicking the Summary tab. If the system group, Proxy Manager or Agent tree is displayed, the Monitor tree can be reloaded without changing the tree hierarchy by selecting the target node

73 3.1.3 Basic operation When the node indicating the monitor to be displayed is selected in the Summary tree on the left, the monitored content will be displayed on the right. "Loading..." appears in the content display area while the content is being made. While this message is displayed, the Update and Auto Update will be disabled Manual Update and Auto Update The Monitor can be manually or automatically updated with the most recent information. The options shown in the following table can be specified when performing the update process. Option Reference point Range Select the reference point for displaying the Monitor. The following reference points can be selected: As of now, Specified date If As of now is selected, the Monitor will be displayed with the current time as the reference point. If the Specified date is selected, any time up to three days before the current time can be selected as the reference point. Select the display range as the number of hours leading up to the present time or another specified time
74 Option Number of items displayed The following display periods can be selected: 1, 2, 4, 8, 12, 18 and 24 hours The default period is 2 hours. For the number of display items, either "All" or an arbitrary number of items can be specified. Point When the number of display items is set, for performance information where high performance values can cause problems (e.g., with CPU usage), high numbers are shown, and vice versa. The number of data items to display in the report is about up to10. The graph might collapse by explanatory notes in case of 10 or more. Auto Update/ Interval To perform updates automatically, select the interval and check the check box. The following update intervals can be selected: 1, 3, 5 and 10 minutes The default value is 10 minutes. The count of the update time starts when the check box is checked. Moreover, the count starts again at that time when the update time is changed when the auto update is done. Note that if the current content of the Monitoring view is still being displayed when the next automatic refresh is due, then this next refresh will be skipped, and the content will be updated with the following refresh. Please remove the check on the check box when you stop the auto update. To remove the need to specify the same option many times, once an option ([Reference point], [Range] and [Number of items displayed]) is specified, it is inherited by other monitors. Point If it is necessary to open multiple Consoles to display different types of monitors at the same time and view them at different automatic update intervals, the different options can be specified by starting Internet Explorer separately from the Start menu. Note The summary data for Agents that is held in the PDB is the summary data that has been received from the Agent for (up to) the latest retention period. The summary window in the Admin Console displays the summary data held in the PDB, so if an Agent is stopped, there may be differences in the display period, as compared to other Agents that are running. Note The following problems sometimes occur when users try to display the desired contents (graphs or tables). - The operation may terminate with error code "Chart is unavailable" is displayed instead of the graph image. - The graph image may be left out (only graphs are not displayed)
75 - The following error message may be displayed: "The specified CGI application misbehaved by not returning a complete set of HTTP headers. The headers it did return are: Unable to register TclNotifier window class" "ohd_update error." "Ohd file create error." These problems may be due to insufficient space in the desktop heap for the operation management client. Increase the size of the desktop heap by referring to "6.1 Content Display Errors" Opening targets in the Drilled-Down display When a problem is discovered with the monitor, open the respective Drilled-Down display by clicking on the Drilled- Down tab with the monitor displayed, and then selecting the detailed view icon in the Drilled-Down display tree Display in another window and print By clicking on the Display in separate window button in the lower right of the summary window, the monitor content in the current view is opened in a separate window. This makes it possible to display another monitor in the console for comparison. When the window is displayed separately, that window can then be printed by clicking the Print button Content-related operation methods This section explains the operations that can be performed on displayed monitor content. Table sorting When the header section of any column in a table displayed in monitor content is selected, the table can be sorted using the selected column as the sort key. Sorting can be toggled between ascending and descending order. Point - Numerical sorts operate correctly only when all the values in the specified column are numerical values. Sorting cannot be performed correctly if the column contains non-numerical data such as null values. - Date and time sorts cannot be performed correctly if the number of digits (yyyy/mm/dd hh:mm:ss, etc.) is not uniform throughout the column. Care must be taken when data has been imported from user data. Save in CSV Format The following buttons is available at the bottom of the Monitor contents tables: - Save in CSV format This link can be used to download the data in the range displayed in CSV format
76 3.2 Drilled-Down Display The Drilled-Down Display displays a variety of detailed information in chronological order based on the time that a problem occurred. This section explains the Drilled-Down Display Drilled-Down Display Types The Drilled-Down display supports the items listed in the following table. Item ResponseCondition ServiceCondition WebTrn Windows Solaris Linux Interstage Interstage(TxnAnalysis)J avaee Interstage(TxnAnalysis) TxnAnalysis(Sync) TxnAnalysis(Async) TxnAnalysis(OssJava) ISI WebLogicServer Symfoware Oracle OperationMGR TcpNetwork StorageResouce Resource Orchestrator UserData MS-SQL Outline Detailed end user response information Detailed service operation information Detailed Web transaction volume information Detailed Windows server performance information Detailed Solaris server performance information Detailed Linux server performance information Detailed Interstage Application Server performance information Interstage transaction breakdown anaysis (Java EE environment) Interstage transaction breakdown analysis (J2EE environment) Interstage Application Framework Suite transaction breakdown analysis Interstage Business Application Server transaction breakdown analysis Interstage Business Application Server transaction breakdown analysis Interstage Business Application Server Open Java Framework transaction breakdown analysis Detailed Interstage Service Integrator performance information Detailed Oracle WebLogic Server performance information Detailed Symfoware Server performance information Detailed Oracle Database Server performance information Detailed walker Operation Manager performance information Detailed walker Resource Coordinator (Network) performance information Detailed walker Resource Coordinator (Storage)/ ETERNUS SF Storage Cruiser performance information Detailed ServerView Resource Orchestrator performance information Information about user data Detailed Microsoft SQL Server performance information
77 Item MS-.NET SAP ECO VMware Hyper-V KVM Xen Zone Outline Detailed Microsoft.NET performance information Detailed SAP NetWeaver performance information Eco information Detailed VMware ESX/VMware ESXi performance information Detailed Hyper-V performance information Detailed Linux virtualization function (KVM) performance information Detailed Linux virtualization function (Xen) performance information Detailed Solaris Zone performance information Refer to "Manager" in the Technical Guide and "Data Formats" in the Reference Guide for details about the information displayed in detail. Point "Data Formats" can also be access by clicking on the "Item descriptions" link at the top right of the detailed view of the Drilled-Down Tree The Drilled-Down tree is shown in two parts, upper and lower. The following table lists the icons that are used to display the nodes making up the tree. Icon Indicates a system group. Meaning Indicates a folder used to store collected information. Indicates individual Proxy Manager hosts. Indicates individual Agent hosts. Indicates each Drilled-Down display item. Indicates an instance defined by a middleware product, etc. Indicates a related tool. Indicates a node for which information is being set. Settings are made in the same way as for the Setting View. Refer to "1.2 Setting View". Note Settings for the Drilled-Down tree remain in effect until the Console is closed. Console definitions made here cannot be saved. To save Console definitions, use the Setting View
78 Reloading the Drilled-Down tree The following methods can be used to reload the Drilled-Down tree. The method that is selected depends on the objective. Default reload Objective Reload system group, Proxy Manager or Agent tree Method The Drilled-Down tree can be reloaded in its default state by clicking the Drilled-Down tab. If the system group, Proxy Manager or Agent tree is displayed, the Monitor tree can be reloaded without changing the tree hierarchy by selecting the target node Basic operation To display detailed content, select an item from the display targets in the Drilled-Down tree on the left, specify the options at the top of the right window and then click the Display button. While the content is being generated, the message "Loading..." appears in the content display area. While this message is displayed, the Display button will be disabled. option The following table lists the options that can be specified
79 Option Reference point Range Comparison date /Multiple Select the time that will be used as the starting point for the Drilled-Down display. A time up to one week prior to the present time can be selected. The current time is selected by default when the window is opened. This option is used to select how many minutes either side of the starting point will be used as the Drilled-Down display's range. The following display ranges can be selected: 180, 120, 60, 30, 10 and 0 minutes The default is 60 minutes. If "0" (minutes) is selected, the time specified in the Date option will be indicated by a pinpoint. Comparison Put a check here if the Drilled-Down display is to be compared. The data from a specified period is compared to the data from the date selected as the Comparison date. Any time up to one week before the current time can be selected for Comparison date. The default is one day before the day when the window is opened. a real number between and 1000 for the multiplying factor. The default is 1. When a factor greater than 1 is specified, the information is emphasized if the data from the specified period is greater than that from the comparison date when multiplied by the factor. When a factor less than 1 is specified (between and 0.001), the information is emphasized if the data from the specified period is less than that from the comparison date when multiplied by the factor. Note As for the following Drilled-Down display items, this function is off the subject. ResponseCondition TxnAnalysis(Sync) TxnAnalysis(Async) TxnAnalysis(OssJava) Workload To remove the need to specify the same option many times, once an option is specified, it is inherited by other Drilled-Down displays Display in another window and print By clicking on the Display in separate window button in the lower right of the Drilled-Down display window, the Drilled- Down display content in the current view is opened in a separate window. This makes it possible to display other items in the console for comparison. When the window is displayed separately, that window can then be printed by clicking the Print button
80 History When the History button at the bottom right of the Drilled-Down display is clicked, the Drilled-Down history list window is displayed showing the details from the past two hours. By selecting any of the check boxes shown in the list and clicking the Show button, the selected Drilled-Down display content can be displayed in a single window. This enables multiple items to be listed together and compared Displaying resources Some of the nodes in the ManagedObject folder created automatically by collecting configuration information contain a Resources folder

81 By defining resources for this type of node, the user can display. By defining resources for this type of node, the user can display the content of specific resources in the Drilled-Down display. This is an example of the Drilled-Down display content displayed when the WIN_CPUBUSY node is selected. Registering "Resource #0" as a resource node enables content to be displayed by targeting only "#0"

82 Refer to " Resources" for details on how to define resources Invoking related tools If the RelationTools node is selected in the Drilled-Down tree, it is possible to invoke related tools that are registered with the Setting view. Refer to " RelationTools" for details on how to define related tools How to perform operations relating to content This section explains the operations that can be performed on displayed Drilled-Down display content Common operations Table sorting When the header section of any column in a table displayed in the Drilled-Down display content is selected, the table can be sorted using the selected column as the sort key. Sorting can be toggled between ascending and descending order
83 Note - Numerical sorts only operate correctly when all the values in the specified column are numerical values. Sorting cannot be performed correctly if the column contains non-numerical data such as Null values. - Date and time sorts cannot be performed correctly if the number of digits (yyyy/mm/dd hh:mm:ss, etc.) is not uniform throughout the column. Care must be taken when data has been imported from user data. Save in CSV Format The following buttons are located underneath the Drilled-Down display content: - Save in CSV format This link enables the displayed range of data to be downloaded in CSV format. Point If Server Instance under Interstage (TxnAnalysis) Java EE, Work Units under Interstage (TxnAnalysis), and data in TxnID units are downloaded and displayed in Excel, they will not be displayed correctly because the default display format of the collection time cell (sdattim) is "mm:ss.0". The display can be corrected by setting the display format of the cell to "yyyy/mm/dd hh:mm:ss.000" in the user definition. Analysis/Planning This link calls a Detailed Analysis/Planning window for displaying a graph of the data currently displayed WebSites tree For end use response information, specific content can be displayed by setting the URLs of fully downloaded Web pages (i.e., no errors occur when the Web page is displayed, or the display is not canceled) as specific resources in Resources (URL) under WebSites or in nodes under WebSites (URL, DNS, TCP). If an URL whose page is not fully downloaded is specified as a resource, the corresponding data will not be available and content will not be displayed. Refer to " Resources (URL)" for details on setting specific resources in the Drilled-Down display. Point By selecting a specific resource node under WebSites and clicking Completion number of cases among the items in the content table that is displayed, a new window will be opened and details about those completed items will be displayed as a data list. And, by clicking Elapsed Time in the table items, an internal sequence information showing the Web page data being downloaded will be displayed Interstage(TxnAnalysis)JavaEE/Interstage(TxnAnalysis) tree For transaction breakdown analysis information collected from Interstage Application Server, selecting a Server Instance or a Work Unit node under the Interstage(TxnAnalysis) tree displays the breakdown analysis information for all translations for the Web applications (servlets and JSPs) and EJB applications executed in that Server Instance or Work Unit

84 It is also possible to display breakdown analysis information focusing on a single transaction by specifying a specific transaction ID in TxnIDs under the Server Instance or the Work Unit node. Refer to " TxnIDs" for details on how to set specific transaction IDs. Viewing transaction breakdown analysis content This content displays the time between the start and termination of a component as the response time, and the time between one component invoking another component and control returning to the first component as the block time. These times are displayed for each Java EE application running on each IJServer cluster or J2EE application component running on each IJServer. Point No block time is displayed for components that do not invoke other components. The following screen shot shows the correspondence between the component sequence diagram and content. When a Server Instance or a Work Unit node is selected, information about multiple transactions is displayed. Components that relate to single transactions can be identified by the ID indicated by TxnID in the resource ID. When the node of a specific transaction ID that has been set is selected, only the information relating to the specific transaction ID will be displayed
85 The resource ID format used in transaction breakdown analysis is explained below. Resource ID format The resource ID format for each component is shown below. Java EE environment - Servlet container Server Instance name:transaction ID:ServletContainer:Web application name:requested URL - Web application (Servlet) Server Instance name:transaction ID:Servlet:Web application name:servlet name - Web application (JSP) Server Instance name:transaction ID:JSP:Web application name:servlet name - EJB container Server Instance name:transaction ID:EJB container:ejb application name:method name - EJB application (SessionBean) Server Instance name:transaction ID:SessionBean:EJB application name:method name - EJB application (EntityBean) Server Instance name:transaction ID:EntityBean:EJB application name:method name J2EE environment - Servlet container Work Unit name:transaction ID:ServletContainer:Web application name:requested URL - Web application (Servlet) Work Unit name:transaction ID:Servlet:Web application name:servlet name - Web application (JSP) Work Unit name:transaction ID:JSP:Web application name:servlet name - EJB container Work Unit name:transaction ID:EJBContainer:EJB application name:method name - EJB application (SessionBean) Work Unit name:transaction ID:SessionBean:EJB application name:method name - EJB application (EntityBean)
86 Work Unit name:transaction ID:EntityBean:EJB application name:method name Note When collecting time of multiple performance information for transaction breakdown analysis are exactly the same, display order of the performance information may be different from real calling order of components TxnAnalysis(Sync)/TxnAnalysis(Async)/TxnAnalysis(OssJava)tree Transaction breakdown information that has been collected from Interstage Business Application Server, Interstage Application Framework Suite, or Interstage Business Application Server Open Java Framework can be displayed by selecting the TxnTime nodes under the main TxnAnalysis tree. There are two types of content: the analysis results over the multiple servers that execute transactions for each system group, and the breakdown analysis information for the transactions on each server. Transaction breakdown analysis information can also be displayed for specific individual transactions by setting specific transaction IDs in the TxnIDs node under the TxnTime node. Refer to " TxnIDs for TxnAnalysis(Sync), TxnAnalysis(Async), and TxnAnalysis(OssJava)" for details on how to set up specific transaction IDs. Viewing transaction breakdown analysis content This content shows information for two types of transactions: synchronous transactions and asynchronous transactions. Analysis results are displayed for each type of transaction, as shown below, including both analysis results for transactions on each separate server and analysis results for each system group over the multiple servers that execute the transactions. Analysis results are displayed for only the transactions whose processing has completed on all of the servers executing the transaction. - Synchronous transactions (Interstage Application Framework Suite and Interstage Business Application Server) - The starting time, finishing time and execution time for each individual transaction on each server - The effective transaction time and the total communication time for the transaction - A list of correspondences between walker Service Quality Coordinator transaction IDs and Interstage context IDs - Asynchronous transactions or Open Java Framework (Interstage Business Application Server) - The starting time, finishing time and execution time for each individual transaction on each server, as well as the number of activities - The effective transaction time - The starting times, finishing times and effective times for the activities in transactions - A list of correspondences between walker Service Quality Coordinator transaction IDs and Interstage context IDs Note Refer to " TxnIDs for TxnAnalysis(Sync), TxnAnalysis(Async), and TxnAnalysis(OssJava)" for information about "The effective transaction time and the total communication time for the transaction ", "The starting times, finishing times and effective times for the activities in transactions" and " A list of correspondences between walker Service Quality Coordinator transaction IDs and Interstage context IDs"
87 Transaction Term Synchronous transaction Asynchronous transaction Context ID Correlation ID Transaction execution time Effective transaction time Communication time Meaning Business applications that are executed on Interstage are collectively referred to as "transactions". This function performs analysis processing for the state of servers while transaction control is retained by Interstage. "Synchronous transactions" are transactions whose processing on Interstage is executed sequentially from start to finish. If processing requests are issued to other servers, the transaction waits for the results to be returned. Synchronous transactions can be executed using both Interstage Application Framework Suite and Interstage Business Application Server. Unlike synchronous transactions, "asynchronous transactions" return immediately, without waiting for processing requests that have been issued to other servers to return. Requested processes are placed in Interstage queues and are executed in order. Asynchronous transactions can be executed using Interstage Business Application Server only. "Context ID" refers to the context ID section in the standard log. Refers to Correlation ID part within standard log. For synchronous transactions, "transaction execution time" refers to the total time taken from the time when a transaction is called to the time when it returns, Accordingly, if a transaction passes through multiple servers, the time taken to pass through these servers is also counted as the execution time for the server that made the original call. For asynchronous transactions, "transaction execution time" refers to the total time taken from the time when a transaction is called to the time when all activities complete. (Part (3) in the following diagrams) "Effective transaction time" refers to the time that a transaction spends actually running on a server. Accordingly, for synchronous transactions, if a processing request is issued to another server, neither communication time nor the time that a transaction spends executing on the other server are not counted as effective time. (Part (2) in the following diagrams) "Communication time" is the time that a transaction spends making processing requests and receiving processing results. (Part (3) in the following diagrams) Note "Context ID" is a term that is used with synchronous transactions. For asynchronous transactions, the term "correlation ID" is used
 -")
88 - Representation of execution time, effective time and communication time for a synchronous transaction (where the transaction is executed within a single server)
 -")
89 - Representation of execution time, effective time and communication time for a synchronous transaction (where the transaction is executed over multiple servers)
90 - Representation of execution time and effective time for an asynchronous transaction or Open Java Framework With the open Java framework, the processes performed by each of the subsystems (Struts, Spring, ibatis) are treated as activities. The breakdown for each activity is displayed below: Model View Controller Activity Applicable Log Output Occasion (message ID) M in the MVC model. Performs processes related to data and procedures. V in the MVC model. Performs processes related to display and output C in the MVC model. Responds to user input, and performs distribution to Model and View. Action-Class(8501) Spring-Controller(8542) Controller-Class(8543) Spring-Remote-App(8547) Struts-View(8502) Spring-View(8544) ActionServlet(8500) Spring-MVC(8541) Validator Checks values entered by the user. Struts-Validator(8503) DB Access Remote (communication time) Input-output of data to and from databases. Time required for network communication for Spring remote processing. Spring-Validator(8545) ibatis(8581) Spring-Remote(8546)
91 Analyze the transactions from each performance log and the execution time, effective time, and communication time for each activity, and collect transaction performance information. Information The definitions for execution time, effective time, and communication time are as follows: - Execution time: Time taken from invocation of a transaction until completion of all activities. - Effective time: Time during which activities are actually running on the server. - Communication time: Time taken for the communication to request processing and receive results in a transaction 3.3 Invoking Functions Directly This section explains how to invoke the Summary view and Drilled-Down displays directly Invoking the Summary View To invoke the summary view directly, add the following parameters. name for operation management client/ssqc/xxx.html? mode=monitor[&type=target_type&name=target_name[&monitor=monitor_name]] The "XXX" part of the URL is a user name that has been registered with the Admin Console. To enter user names, first make basic authentication settings for each user by referring to "How to Set Up Basic Authentication for Operation Management Clients" in the Installation Guide. Parameter The meaning of each parameter is explained in the following table. Parameter mode type name Meaning Specifies the function to be invoked. When invoking the Summary view, this parameter is fixed as "monitor". Specifies the type and name (display name) of the target to be displayed. These two parameters are specified together as a set. The following types can be specified: "Group" "ProxyManager" "Agent" Point "Name" cannot specify some characters (such as #,?, +, \ and $) in an URL directly. Use URL encoding to specify any of these characters
92 Parameter Note Meaning If "Group", "ProxyManager" or "Agent" is specified for "Type", and if the object corresponding to the display name specified for "Name" does not exist, the following message will be displayed in the lower part of the Summary tree of the Console from which the view was invoked. "The node selected is not exist." monitor Specifies the monitor name. The monitor names that can be specified are explained in "3.1.1 Monitor types". The content invoked by each parameter differs according to the extent of the specification. The following table lists the various parameter combinations. Invoked content mode type name monitor Summary view Yes No No Monitor target Yes Yes No Monitor content Yes Yes Yes Example of Summary view invocation If only the "mode" parameter is specified, the Console will start up with the summary display function selected. [Sample URL entry for invocation] [Sample startup window]
93 Example of monitor target invocation When the "mode" and "type/name" parameters are specified, the Console will start with the targets selected in the Summary tree. After the Console has opened, monitored content can be displayed simply by selecting the various nodes indicating the monitors in the tree. [Sample URL entry for invocation] [Sample URL entry for invocation]
94 Example of monitored content invocation When the "mode", "type/name" and "monitor" parameters are all specified, monitor content will be displayed directly. [Sample URL entry for invocation] mode=monitor&type=agent&name=agent_c&monitor=servermonitor [Sample startup window]
95 3.3.2 Invoking the Drilled-Down Display To invoke the Drilled-Down display directly, add the following parameters. name for operation management client/ssqc/xxx.html? mode=drilldown[&type=target_type&name=target_name] The "XXX" part of the URL is a user name that has been registered with the Admin Console. To enter user names, first make basic authentication settings for each user by referring to "How to Set Up Basic Authentication for Operation Management Clients" in the Installation Guide. Parameter The meaning of each parameter is explained in the following table. Parameter name mode type name Meaning Specifies the function to be invoked. When invoking the Drilled-Down view, this parameter is fixed as "drilldown". Specifies the type and name (display name) of the target to be displayed. These two parameters are specified together as a set. The following types can be specified: "Group"
96 Parameter name "ProxyManager" "Agent" Meaning Point "name" cannot specify some characters (such as #,?, +, \ and $) in an URL directly. Use URL encoding to specify any of these characters. Note If "Group", "ProxyManager" or "Agent" is specified for "type", and if the object corresponding to the display name specified for "name" does not exist, the following message will be displayed in the lower part of the Summary tree of the Console from which the view was invoked: "The node selected is not exist." The content invoked by each parameter differs according to the extent of the specification. The following table lists the various parameter combinations. Invoked content mode type name Drilled-Down display Yes No Drilled-Down display status target Yes Yes Example of Drilled-Down display invocation If only the "mode" parameter is specified, the Console will start up with the Drilled-Down display function selected. [Sample URL entry for invocation] [Sample startup window]
97 Example of Drilled-Down display target invocation When the "mode" and "type/name" parameters are specified, the Console will start with the targets selected in the Drilled- Down tree. After the Console has started, Drilled-Down display content can be displayed simply by selecting detailed parameters. [Sample URL entry for invocation] [Sample startup window]
98 - 87 -
99 Chapter 4 Analysis/Planning Window The service level management function can display the performance information collected by this product in a variety of report formats to suit the granularity of the information and the purpose of the report. The Analysis/Planning and Scheduled Report Registration windows have different scenarios categorized according to operational purposes. It is possible to meet your aims for analysis and planning by checking each report displayed in the categories in turn. The Analysis/Planning window displays reports as needed for analysis and planning of service quality over the medium to long term to avoid problems in the future. Point Past analysis/planning results and registered conditions for analysis are saved for each console definition. Refer to "5.5 Storing Reports (Administrator Tasks)" for details. 4.1 Types of Categories This table describes categories used for different operational aims. Usage Scenarios Categories My Category - - Create your own categories and register reports for your own use. Refer to " My Category Management" for details. If reports from version or earlier are migrated, they are displayed under My Category, as a "Transition report" category. Refer to "Tasks to perform on the Operation Management Client" in the Installation Guide for information on migration. Planning Virtual aggregate P2V (Physical to Virtual) Track resource usage and simulate P2V. Effective resources use VMware virtual machine relocation VMware resource allocation optimization VMware tuning guidance Track resource usage on VMware virtual hosts and simulate relocating virtual machines. Track resource usage on VMware virtual machines. Use the tuning guidance to see if there are any problems with the status or usage status of resources on VMware virtual hosts or virtual machines. Demand forecast VMware Resource pool This enables the demand for VMware resource pool resources to be anticipated. ServerView Resource Orchestrator Resource pool This enables the demand for ServerView Resource Orchestrator resource pool resources to be anticipated
100 Usage Scenarios Categories Increment simulation Response simulation Simulate the response times when servers are added based on past performance using forecast numbers of requests. Generic report Generic report Use the reports for future predictions when planning. Performance Analysis Virtualization software VMware The performance of VMware clusters, resource pools, virtual hosts, and virtual machines can be analyzed. Network Storage Hyper-V Linux Virtualization function (KVM) Linux Virtualization function (Xen) Solaris Zone Solaris Zone(Solaris 10) walker Centric Manager (Network) walker Network Manager TcpNetwork ETERNUS SF Storage Cruiser(SAN Storage) ETERNUS SF Storage Cruiser(NAS) The performance of Hyper-V virtual hosts and virtual machines can be analyzed. The performance of Linux virtualization function (KVM) virtual hosts and virtual machines can be analyzed. The performance of the Linux virtualization function (Xen) can be analyzed. The performance of Solaris Zone can be analyzed. The performance of Solaris Zone (Solaris 10) can be analyzed. The performance of walker Centric Manager (Network) can be analyzed. The performance of walker Network Manager can be analyzed. The performance of walker Resource Coordinator (Network Resource Manager) can be analyzed. The performance of ETERNUS SF Storage Cruiser (SAN Storage) can be analyzed. The performance of ETERNUS SF Storage Cruiser (NAS) can be analyzed. OS Windows The performance of Windows can be analyzed. UNIX OS common The performance of UNIX can be analyzed. The performance of all operating systems can be analyzed. Web Web transaction The performance of Web transactions can be analyzed
101 Usage Scenarios Categories Application Interstage Application Server (IJServer Cluster) Interstage Application Server (Work Unit) Oracle WebLogic Server Microsoft.NET SAP Netweaver Primesoft Server Workload The performance of Interstage Application Server (IJServer Cluster) can be analyzed. The performance of Interstage Application Server (Work Unit) can be analyzed. The performance of Oracle WebLogic Server can be analyzed. The performance of Microsoft.NET can be analyzed. The performance of SAP Netweaver can be analyzed. The performance of Primesoft Server can be analyzed. The performance of Workload Organizer can be analyzed. Database Symfoware Server The performance of Symfoware Servers can be analyzed. Oracle Database Microsoft SQL Server The performance of Oracle Databases can be analyzed. The performance of Microsoft SQL Servers can be analyzed. Job walker Operation Manager The performance of walker Operation Manager can be analyzed. Service bus Interstage Service Integrator The performance of Interstage Service Integrator can be analyzed. Service Service operational information Service operational information can be analyzed. End user response End user response can be analyzed. Generic report Generic report Use the report for time series displays and past comparisons for performance analysis. History - History Display reports that have already been created. Point The "Solaris Zone(Solaris 10)", "TcpNetwork", and "Workload" categories are not displayed by default. Use the following procedure to display them: Procedure 1. Backup the Scenario_Template.xml file found in the following location:
102 <Installation directory for the operation management client>\www\html\admin\slc \Scenario_Template.xml 2. Rename the following file and replace Scenario_Template.xml. Before: <Installation directory for the operation management client>\www\html\admin\slc \Scenario_Template_for_OldEdition.xml After: <Installation directory for the operation management client>\www\html\admin\slc \Scenario_Template.xml 3. Display the console, click the Analysis/Planning tab, and check that the following categories are displayed: - Solaris Zone(Solaris 10) - TcpNetwork - Workload Note The following table shows how reports have changed from V13.5 and earlier to reflect improvements made so that the Windows and UNIX operating systems can use the same reports. Information registered for analysis and scheduled reports in V13.5 or earlier is not carried over to V and later. Reregister this information. V13.5 or earlier V and later Category: Full Inspection Analysis/ Report Reports: Distribution of rsc. usage cond. (Windows) Category: Full Inspection Analysis/ Report Reports: Distribution of rsc. usage cond. (UNIX) Category: Full Inspection Analysis/ Report Reports: List of rsc. usage cond. (Windows) Category: Full Inspection Analysis/ Report Reports: List of rsc. usage cond. (Windows) Category: Categorized Diagnostic Analysis/ Report Reports: Resource piling (Windows) Category: Categorized Diagnostic Analysis/ Report Reports: Resource piling (UNIX) Category: Categorized Diagnostic Analysis/ Report Reports: Estimated response time (Requests) Usage: Planning Scenario: Virtual aggregate Category: P2V (Physical to Virtual) Reports: Server Distribution by rsc. usage cond. (Summary) Usage: Planning Scenario: Virtual aggregate Category: P2V (Physical to Virtual) Reports: List of rsc. usage cond. (Detail) Usage: Planning Scenario: Virtual aggregate Category: P2V (Physical to Virtual) Reports: P2V simulation Usage: Planning Scenario: Increment simulation Category: Response simulation
103 V13.5 or earlier V and later Category: Categorized Diagnostic Analysis/ Report Reports: Estimated response time (Servers) Reports: Response simulation (Request count) Usage: Planning Scenario: Increment simulation Category: Response simulation Reports: Response simulation (Adding servers) 4.2 Types of Reports This section describes the types of reports that are included in the categories described in "4.1 Types of Categories". The symbols on the first line of the "Analysis target and condition settings" column mean the following: - G: group - H: Host Planning This section describes the reports used in planning by category. The results of forecasts and simulations shown in the reports are calculated according to Fujitsu's own methods, based on past performance. These are offered as guides for the computer environment you are working with, but are not guaranteed to work in actual environments. Be aware that actual conditions may yield different results Virtual Aggregate P2V (Physical to virtual) Reports Analysis target and condition settings Display item Server Distributio n by rsc. usage cond. (Summary ) G Group - Server Distribution - By CPU Usage Rate - Server Distribution - By Memory Usage Rate - Server Distribution - By Disk I/O Count Check the status of resources to see whether the physical server's resources are being used effectively across the entire system. If a resource was changed, for example because of memory being added within a specified period, only the post-change information for this server will be displayed. - When considering virtual aggregation - Server Distribution - By Disk Throughput - Server Distribution - By Count for data sent/received over network The benefits of aggregation are mostly achieved when there are many servers that have low usage. Note that resource usage is high when you choose to virtually aggregate servers that have high usage. Point - Server Distribution - By Network Throughput - Hardware Resources information - The CPU performance (MHz) displayed is the performance value of one CPU core. - The loaded memory displayed is the memory capacity that is available for actual use
104 Reports Analysis target and condition settings Display item List of rsc. usage cond. (Detail) G Group - CPU (usage rate/ usage) - Memory (usage rate/usage) - Disk (I/O count/ throughput) - Network (Count for data sent/received over network/ throughput) Check the usage status of physical resources and the capacity of hardware resources (CPU and memory) across the entire system. - If a resource was changed, for example because of memory being added within a specified period, only the period after the change will be displayed for that server. - If this was saved in Excel(R) format, the information for all resources is displayed in a list on the [ALL] sheet. - Hardware Resources information Point - The CPU performance (MHz) displayed is the performance value of one CPU core. - The loaded memory displayed is the memory capacity that is available for actual use. P2V simulation - Specification s for displays that include P2V simulations - CPU Usage - Memory Usage - Disk I/O Count - Disk Throughput - Count for data sent/ received over network - Network Throughput The resource usage status can be simulated for a case where the selected servers are aggregated on one virtual environment. If a value becomes too great throughout a period of time or there is a bias depending on the time of day or day of the week, consider the combinations of the servers to be aggregated. If a tolerated threshold value was set, this checks that the value is not greatly exceeded. Not available with scheduled reports. Note The above report types are not displayed for servers being monitored by Agents from walker Service Quality Coordinator V or earlier or by an Agent for agentless monitoring Effective Use of Resources VMware virtual machine relocation Note - For VMware ESX (ssh connection), there are items that cannot be collected, so reports from this category cannot be used. - When performing VMware Virtual machine relocation simulations, register only one virtual host on the vcenter within a single system group
105 Reports Analysis target and condition settings Display item VMware rsc. usage cond. (List of host) G Group - CPU (usage rate/ usage) - Memory (usage rate/ usage) Track resource use on the VMware virtual hosts registered in the system group. Virtual hosts with available resources will be detected as virtual hosts that might be aggregated. - Disk (I/O count/ throughput) The overall CPU frequency (MHz) displayed is the total of all CPU cores fitted. - Network (Count for data sent/received over network/ throughput) - Hardware Resources information VMware rsc. usage cond. (Virtual machine stack) H Group and Host - CPU Usage - Memory Usage - Disk I/O Count - Disk Throughput - Count for data sent/ received over network Check the virtual machines located in the virtual host and their resource usage on the cumulative graph for the virtual hosts considered as migration sources in "VMware rsc. usage cond. (List of host)". Check the resource usage in each virtual machine in the migration source, and use this information to work out which virtual machine should go to which destination candidate host. - Network Throughput VMware virtual machine relocation simulation - Specificati ons for displays that include simulation s of VMware Virtual machine relocation - CPU Usage - Memory Usage - Disk I/O Count - Disk Throughput - Count for data sent/ received over network - Network Throughput Simulate the resource usage if virtual machines considered as migration candidates are relocated to virtual hosts considered as migration targets. Check results on graphs by time period, by day of the week, and by time series. Not available with scheduled reports VMware resource allocation optimization Note For VMware ESX (ssh connection), there are items that cannot be collected, so reports from this category cannot be used
106 Reports Analysis target and condition settings Display item VMware rsc. usage cond. (List of virtual machine) H Group and Host - CPU (usage rate/ usage) - Memory (usage rate/ usage) The resource usage status of the virtual machines on the selected virtual host are displayed in a list. Sort by CPU usage rate and memory usage rates to detect virtual machines with available resources and reduce the allocation of resources to virtual machines with low usage rates. CPU usage rate is calculated with each physical CPU having a value of 100%. This means that values over 100% may be displayed VMware tuning guidance Note For VMware ESX (ssh connection) and VMware ESX 3.5, there are items that cannot be collected, so reports from this category cannot be used. Reports VMware CPU tuning guidance Analysis target and condition settings H Group and Host Display item - Tuning guidance Check if there is a problem with the CPU usage status of the host or virtual machine. Refer to the tuning guidance when displayed. - Virtual Host, CPU Usage Rate - If the CPU usage rate of the host is constantly above 90% and the CPU wait rate on the virtual machine is constantly above 20% CPU waits are occurring due to overloading of the CPU. Consider increasing physical CPUs. - If the CPU usage rate of the host is constantly above 90% and the CPU wait rate on one of the virtual machines is constantly above 90% There is a bias in usage. Review the allocation of virtual CPUs in the virtual machines. - If the CPU usage rates on machines other than the host (0) are constantly above 90% and the CPU wait rate on the virtual machine is constantly above 20% CPUs are being overloaded, but CPU waits are not occurring. If batch processes are slow, consider switching to CPUs with higher CPU performance. Warning level: CPU usage rate of virtual host >= 90%
107 Reports Analysis target and condition settings Display item - Virtual Machine, CPU Usage Rate - Virtual Machine, Average CPU Usage Rate - Virtual Machine, CPU Wait Rate - CPU usage rate is calculated with each physical CPU having a value of 100%. This means that values over 100% may be displayed. - If there is no problem with the CPU usage rate of the host, but the CPU usage rate (per CPU) of the virtual machines is constantly above 90% Review the allocation of virtual CPUs in the virtual machines, (for example, by allocating virtual CPUs that are not being used on other virtual machines). Also, check that there are no problems with specific applications running on the virtual machines. If there are no problems, move the virtual machine to a different host, or migrate to a different virtual machine. - If there is no problem with the CPU usage rate of the virtual machine, but the CPU wait rate is constantly above 20% There may have been an over-allocation of virtual CPUs. Review the overcommit rate. Warning level: Virtual machine Average CPU usage rate (per CPU) >= 90% Virtual machine CPU wait rate >= 20% VMware Memory (Host) tuning guidance H Group and Host - Tuning guidance Check if there is a problem with the memory usage status of the virtual host. Refer to the tuning guidance when displayed. - Virtual Host, Swap Occurrence Status - Virtual Host, Memory Usage Status - When swap is occurring There is insufficient memory. Consider expanding memory. Warning level: Swap occurrence status > 0 MB - When swapping volume is greater than 0 Swapping may have occurred previously. Check whether memory insufficiency has occurred at times other than when creating and starting the virtual machine. Warning level: Swapping volume > 0 MB/sec - When the Memory compression volume is greater than 0 This may be due to insufficient physical memory. Consider expanding memory if there are problems with performance. Warning level:
108 Reports Analysis target and condition settings Display item Memory compression volume > 0 MB/sec - When balloon occurrence is greater than 0 This may be due to insufficient physical memory. Consider expanding memory if there are problems with performance. Warning level: Balloon occurrence > 0 MB/sec VMware memory (Virtual machine) tuning guidance H Group and Host - Virtual Host, Memory Usage - When the available memory is less than 6% of the total Indications of future memory insufficiency such as ballooning, memory compression, and swapping, may have already occurred. Consider expanding memory to prevent memory insufficiency occurring. Warning level: Free memory rate < 6% - Tuning guidance Check if there is a problem with the memory usage status of the virtual machine. Refer to the tuning guidance when displayed. - Virtual Machine, Swap Occurrence Status(Reads/ Writes) - When swap occurrence status (reads) or (writes) is greater than 0 Swap is occurring and there is insufficient memory. Consider expanding the memory. Warning level: Swap occurrence status (reads) > 0 MB Swap occurrence status (writes) > 0 MB - Virtual Machine, Swap Wait Rate - When swap wait rate is greater than 0 CPU waits are occurring on the virtual machine and there is insufficient memory. Review the allocation of memory on the virtual machines. Warning level: Swap wait rate > 0% - Virtual Machine, Swap Amount - When swap usage volume is greater than 0 Swapping may have occurred previously. Check whether memory insufficiency has occurred at times other than when creating and starting the virtual machine. Warning level: Swap usage volume > 0 MB/sec - Virtual Machine, Memory Compression Amount - When the memory compression status is greater than
109 Reports Analysis target and condition settings Display item This may be due to insufficient physical memory. Consider expanding the memory if there are problems with performance. Warning level: Memory compression status > 0 MB/sec - Virtual Machine, Memory Extension Amount - When the memory extension status is greater than 0 This may be due to insufficient physical memory. Consider expanding the memory if there are problems with performance. Warning level: Memory extension status > 0 MB/sec - Virtual Machine, Balloon Occurrence Amount - When the balloon usage volume is greater than 0 This may be due to insufficient physical memory. Consider expanding the memory if there are problems with performance. Warning level: Balloon usage volume > 0 MB/sec VMware Physical Disk H Group and Host - Virtual Host, Physical Disk Throughput(Reads/ Writes) - Virtual Host, Physical Disk I/O Count Track disk throughput and the I/O count on the virtual host. - When the CM (Controller Module) exceeds the maximum performance of each disk device Consider changing the deployment of RAID groups with high loads to distribute the load. - When there are RAID groups that exceed the maximum performance of the disk devices Consider adding RAID groups to distribute the load. If RAID5 is being used, consider changing to RAID0+1 or RAID1. - Virtual Host, Physical Disk Driver Access Performance(Reads/ Writes) Check the disk driver access performance of the virtual host. - When disk access performance is constantly 4ms or more a. When multiple machines are fitted in one datastore, reduce the number of virtual machines fitted in each single datastore (to distribute the load). b. Review the RAID configuration of the RAID group specified in the datastore. (Increase disks and review RAID level). c. Check the makeup of the virtual disks within the same RAID group (datastore)
110 Reports Analysis target and condition settings Display item Warning level: Disk access performance (kernel) (reads) >=4 ms *constantly Disk access performance (kernel) (writes) >=4 ms *constantly - Virtual Host, Physical Disk Kernel Access Performance(Reads/ Writes) Check the disk kernel access performance of the virtual host. - When disk access performance is constantly 20ms or more a. When multiple machines are fitted in one datastore, reduce the number of virtual machines fitted in each single datastore (to distribute the load). b. Review the RAID configuration of the RAID group specified in the datastore. (Increase disks and review RAID level). c. Check the makeup of the virtual disks within the same RAID group (datastore). Warning level: Disk access performance (driver) (reads) >= 20 ms *constantly Disk access performance (driver) (writes) >= 20 ms *constantly VMware Virtual Disk H Group and Host - Virtual Disk Throughput - Virtual Disk I/O Count Track disk throughput and the I/O count on the virtual machine. - When the CM (Controller Module) exceeds the maximum performance of each disk device Consider changing the deployment of RAID groups with high loads to distribute the load. - When there are RAID groups that exceed the maximum performance of the disk devices Consider adding RAID groups to distribute the load. If RAID5 is being used, consider changing to RAID0+1 or RAID1. - Virtual Disk, Access Performance(Reads/ Writes) Check the disk access performance of the virtual machine. VMware Physical NIC H Group and Host - Physical NIC, Network Usage Rate(Transmission/ Reception) Track the network usage rate of the physical NIC. - When the network usage rate (transmission) is exceeding a threshold a. The load on a physical NIC is high. Try reviewing the makeup of the physical network and dividing segments. (Refer to the VMware Virtual NIC and see which virtual
111 Reports Analysis target and condition settings Display item machines are tying up the bandwidth of the physical NIC). - When the network usage rate (reception) is exceeding a threshold a. The load on a physical NIC is high. Try reviewing the makeup of the physical network and dividing segments. (Refer to the VMware Virtual NIC and see which virtual machines are tying up the bandwidth of the physical NIC). b. Add physical NICs to the vswitch connected to the physical NIC where load is high. (Teaming). Warning level: Network usage rate >= threshold *constantly Circuit type: Threshold When a dedicated circuit is being used: 80% When a switching hub is being used: 60% When a repeater hub is being used: 30% - Physical NIC, Packet Drop Rate(Transmission/ Reception) Track the packet drop ratio of the physical NIC. - When packet drop rate (reception) is greater than 0 Check the CPU usage rate of the virtual machine and add virtual CPUs if the CPU usage rate is high. Also review the configuration of the virtual machine's network. - When packet drop rate (transmission) is greater than 0 Check the network usage rate of the physical NIC, and move virtual machines connected to physical NIC with high values to vswitches connected to different physical NICs. Alternatively, add physical NICs to the vswitch connected to the physical NIC where packet drop is occurring (Teaming). Warning level: Packet drop rate (transmission) > 0% Packet drop rate (reception) > 0% VMware Virtual NIC H Group and Host - Virtual NIC, Network Usage (Transmission/ Reception) - Virtual NIC, Packet Drop Rate (Transmission/ Reception) Check the network usage of virtual NICs. Check the packet drop ratio of the virtual NIC
112 Reports Analysis target and condition settings Display item Note The following are not displayed for VMware ESX 3.5, VMware ESX 4.0, or VMware ESX/ESXi 4.1: - Virtual NIC packet drop rate (transmission) - Virtual NIC packet drop rate (reception) Demand Forecast VMware resource pool Reports Analysis target and condition settings Display item Resource pool (CPU) (demand forecast) H Group, Host, and Resource ID - Resource Pool(CPU)(demand forecast) Perform regression analysis based on past CPU usage rates in the resource pool managed by VMware to anticipate the resources that will be used. Resource pool (Memory) (demand forecas H Group, Host, and Resource ID - Resource Pool(Memory) (demand forecast) Perform regression analysis based on past memory usage rates in the resource pool managed by VMware to anticipate the resources that will be used ServerView Resource Orchestrator resource pool Reports Analysis target and condition settings Display item VM pool (CPU) (demand forecast) H Group, Host, and Resource ID - VM pool (CPU) (demand forecast) Perform regression analysis based on past CPU usage rates in the VM pool managed by ServerView Resource Orchestrator to anticipate the resources that will be used
113 Reports Analysis target and condition settings Display item VM pool (Memory) (demand forecast) H Group, Host, and Resource ID - VM pool (Memory) (demand forecast) Perform regression analysis based on past memory usage rates in the VM pool managed by ServerView Resource Orchestrator to anticipate the resources that will be used. Storage pool (demand forecast) H Group, Host, and Resource ID - Storage pool (demand forecast) Perform regression analysis based on past usage rates in the storage pool managed by ServerView Resource Orchestrator to anticipate the resources that will be used. Network pool (demand forecast) H Group, Host, and Resource ID - Network pool (demand forecast) Perform regression analysis based on past usage rates in the network pool managed by ServerView Resource Orchestrator to anticipate the resources that will be used. Server pool (demand forecast) H Group, Host, and Resource ID - Server pool (demand forecast) Perform regression analysis based on past usage rates in the server pool managed by ServerView Resource Orchestrator to anticipate the resources that will be used. Address pool (demand forecast) H Group, Host, and Resource ID - Address pool (demand forecast) Perform regression analysis based on past usage rates in the address pool managed by ServerView Resource Orchestrator to anticipate the resources that will be used Increment Simulation Response simulation Reports Analysis target and condition settings Display item Request count (future prediction) H Specification s for displays that include - Request count (future prediction) Perform regression analysis based on past performance information for Web transactions to anticipate future request volume
114 Reports Analysis target and condition settings Display item request count future predictions Track the potential future increases in requests compared to the current number of requests. Response simulation (Request count) - Specification s for displays that include response simulations (requests or adding servers) - Response Time(Request Increase) The correlation coefficient between Web transaction performance information and the performance information of the operating systems of the servers making up the system is analyzed based on past performance, and a simulation can be performed of the trend in daily response times when the number of responses increases (expressed as a multiple of the current number of requests). Determine whether improvements are required in response time. Not available with scheduled reports. Point Response simulation is a simulation of response times, achieved by analyzing the relationship between the number of service requests in the past and the performance information (OS) of the various servers. The precision of the simulation can be increased by excluding time periods when batch processes are performed (after hours, for example) that have no bearing on actual request processes. Confirm the precision of the simulation by looking at the '(High)', '(Medium)', and '(Low)' reliability displayed after the response time in the table. '(High)' indicates that the simulation was performed with little interference and the precision of the simulation is therefore high. 'N/A' is displayed in the table if the simulation could not be performed because no performance information was found or no correlation was achieved between the number of requests and the performance information of the OS. The reliability can be improved by increasing the period in Analysis Conditions, and taking actions to decrease interference by excluding periods when batch work is performed, such as after hours. Refer to "Operating the Analysis/Planning Window" for information on how to configure analysis conditions. Response simulation (Adding servers) - Specification s for displays that include response simulations (requests or adding servers) - Request Times(Adding servers) The correlation coefficient between Web transaction performance information and the performance information of the operating systems of the servers making up the system is analyzed based on past performance, and a simulation can be performed of the trend in response times when a server is added. Determine where to add servers (in the Web layer, application layer, or database layer) and how many to add to improve response times
115 Reports Analysis target and condition settings Display item Not available with scheduled reports. Point Response simulation performs the simulation by analyzing the correlation coefficient between the number of requests and the performance information of the OS, so the precision of the simulated response times improves when there is sufficient correlation. The reliability of the above correlation coefficient is indicated by the three levels displayed in the table; '(High)', '(Medium)', and '(Low)'. '(High)' indicates that the response time has been simulated to a relatively high degree of precision due to sufficient correlations being achieved. '(Medium)' and '(Low)' indicate that the precision of the response time has been reduced due to insufficient correlations being achieved. If there is insufficient performance information for calculation, there may be interference from processes not directly related to requests, such as after-hours batch processing. If this is the case, reliability may be improved by changing the Analysis Conditions settings as shown below: - Make the analysis period longer. - Set the times other than service time as times when services are not running, such as nights or days off. Refer to "4.3 Operating the Analysis/Planning Window" for information on how to configure analysis conditions. Note If there is no performance information or there are many processes running that are not directly related to the number of requests, a correlation may not be established between the number of requests and the performance information of the OS, making it impossible to generate an analysis, in which case 'N/A' is displayed instead of a value. If this is the case, analysis may be made possible by changing the Analysis Conditions settings as shown below: - Make the analysis period longer. - Set the times other than service time as times when services are not running, such as nights or days off
116 Reports Analysis target and condition settings Display item Refer to "4.3 Operating the Analysis/Planning Window" for information on how to configure analysis conditions Generic Report Generic report Reports Future forecast display Analysis target and condition settings H Specification s for displays that include future predictions Display item - Displays specified field values as regression line graphs Performance Analysis This section describes the reports used for performance analysis by category Virtualization Software VMware Reports Analysis target and condition settings Display item VMware (Cluster) H Group and Host - CPU Usage - Memory Usage The CPU usage and memory usage for the cluster is displayed. This graph makes it easy to see which cluster is using the CPU or memory. Point It is possible to track CPU and memory usage by cluster. It is also possible to track CPU, memory, and disk by displaying "VMware (Virtual host)". VMware (Resource pool) H Group and Host - CPU Usage - Memory Usage The CPU usage and memory usage for the resource pool is displayed. This graph makes it easy to see which resource pool is using the CPU or memory. Point It is possible to track CPU and memory usage by resource pool
117 Reports Analysis target and condition settings Display item It is also possible to track CPU, memory, and disk by displaying "VMware (Virtual host)". When virtual resources are running low and physical resources are available, the manager can see which resource pools are using the resources in this report and reallocate resources if necessary. VMware (Host) VMware (Virtual machine) G Group H Group and Host - CPU Usage Rate - Free Memory Amount - Disk I/O Count Check the usage status of the physical CPU, memory, and disks. - CPU Usage Rate CPU usages by guest operating systems are stacked for display. This graph makes it easy to see which guests are using the CPU. CPU usage rate is calculated with each physical CPU having a value of 100%. This means that the cumulative CPU usage rate of the CPUs of guest operating systems will be shown exceeding 100%. - Memory Usage Memory usages by guest operating systems are stacked for display. This graph makes it easy to see which guest is using the memory. - Disk I/O Count Disk I/O by guest operating systems are stacked for display. This graph makes it easy to see which guest is using the disk. Point Monitoring guest operating systems with Agents enables the system manager to see what is happening with virtual CPUs, memories, and disks. It is also possible to track physical CPU, memory, and disk by displaying "VMware (Virtual host)". When virtual resources are running low and physical resources are available, the manager can see in this report which guests are using the resources and reallocate resources if necessary. Note With VMware ESX (ssh connection), the name of the Service console or kernel driver may be included as part of the virtual machine name Hyper-V
118 Reports Windows server HyperV (Host) HyperV (Virtual machine) Analysis target and condition settings G Group G Group H Group and Host Display item - CPU Usage Rate - Free Memory - Physical Disk Busy - Disk Usage Rate Track and compare trends and peaks in the usage status of CPU, disk, and memory. - CPU Usage Rate Track how much the physical CPU is being used and how much is available. It is possible to see information on the physical memory and disk by displaying the free memory and physical disk busy rate for "Windows Server". - CPU Usage Rate CPU usages by guest operating systems are stacked for display. This graph makes it easy to see which guests are using the CPU. CPU usage rate is calculated with each physical CPU having a value of 100%. This means that the cumulative CPU usage rate of the CPUs of guest operating systems will be shown exceeding 100%. - Memory Usage Memory usages by guest operating systems are stacked for display. This graph makes it easy to see which guest is using the memory. Point Monitoring guest operating systems with Agents enables the system manager to see what is happening with virtual CPUs and memories. It is also possible to track physical CPU by displaying "HyperV (Virtual host)", and track the physical memory by displaying "Windows Server". When virtual resources are running low and physical resources are available, the manager can see in this report which guests are using the resources and reallocate resources if necessary Linux virtualization function (KVM) Reports UNIX server KVM (Virtual machine) Analysis target and condition settings G Group H Group and Host Display item - CPU Usage Rate - Free Memory - Physical Disk Busy - Disk Usage Rate Track and compare trends and peaks in the use of the CPU, disk, and memory for the servers registered in the system group. - CPU Usage Rate CPU usages by guest operating systems are stacked for display. This graph makes it easy to see which guests are using the CPU. CPU usage rate is calculated with each physical CPU having a value of 100%. This means that the cumulative CPU usage
119 Reports Analysis target and condition settings Display item rate of the CPUs of guest operating systems will be shown exceeding 100%. - Memory Usage Memory usages by guest operating systems are stacked for display. This graph makes it easy to see which guest is using the memory. - Disk I/O Amount Disk I/O by guest operating systems are stacked for display. This graph makes it easy to see which guest is using the disk. Point Monitoring guest operating systems with Agents enables the system manager to see what is happening with virtual CPUs, memories, and disks. It is also possible to track the physical CPU, memory, and disk by displaying "UNIX Server". When virtual resources are running low and physical resources are available, the manager can see in this report which guests are using the resources and reallocate resources if necessary Linux virtualization function (Xen) Reports UNIX server Xen (Virtual machine) Analysis target and condition settings G Group H Group and Host Display item - CPU Usage Rate - Free Memory - Physical Disk Busy - Disk Usage Rate Track and compare trends and peaks in the use of the CPU, disk, and memory for the servers registered in the system group. - CPU Usage Rate CPU usages by guest operating systems are stacked for display. This graph makes it easy to see which guests are using the CPU. CPU usage rate is calculated with each physical CPU having a value of 100%. This means that the cumulative CPU usage rate of the CPUs of guest operating systems will be shown exceeding 100%. - Memory Usage Memory usages by guest operating systems are stacked for display. This graph makes it easy to see which guest is using the memory. - Disk I/O Amount Disk I/O by guest operating systems are stacked for display. This graph makes it easy to see which guest is using the disk. Point Monitoring guest operating systems with Agents enables the system manager to see what is happening with virtual CPUs, memories, and disks
120 Reports Analysis target and condition settings Display item It is also possible to track the physical CPU, memory, and disk by displaying "UNIX Server". When virtual resources are running low and physical resources are available, the manager can see in this report which guests are using the resources and reallocate resources if necessary Solaris Zone Reports UNIX server Solaris Zone (Virtual machine) Analysis target and condition settings G Group H Group and Host Display item - CPU Usage Rate - Free Memory - Physical Disk Busy - Disk Usage Rate Track and compare trends and peaks in the use of the CPU, disk, and memory for the servers registered in the system group. - CPU Usage Rate CPU usage rates by zones are stacked for display. This graph makes it easy to see which zone is using the CPU. - Memory Usage Memory usage by zones are stacked for display. This graph makes it easy to see which zone is using the memory. Point It is possible to track CPU and memory usage by zone. It is also possible to track the Global Zone CPU, memory, and disk by displaying "UNIX Server". When zone resources are running low and physical resources are available, the manager can see in this report which zones are using the resources and reallocate resources if necessary Solaris Zone (Solaris 10) This category is not displayed by default. Refer to the point in "4.1 Types of Categories" if displayed. Reports Analysis target and condition settings Display item Solaris Zone(Sola ris 10) G Group - CPU Usage Rate - Memory Usage Check the status of Solaris Zone resources for the servers registered in the system group. Point If Solaris zones are bound to processor sets, the CPU usage rate will be 100% for each processor set
121 Reports Solaris Zone(Sola ris 10) CPU Analysis target and condition settings H Group and Host Display item - CPU Usage Rate Track trends and peaks for CPU usage rates in Solaris zones. Point If Solaris zones are bound to processor sets, the CPU usage rate will be 100% for each processor set. Solaris Zone(Sola ris 10) memory Solaris Zone(Sola ris 10) CPU (Contour) H Group and Host H Group and Host - CPU Usage Time Track trends and peaks for CPU usage times in Solaris zones. - Memory Usage Rate Track trends and peaks for memory usage rates in Solaris zones. - Virtual Memory Size Track trends and peaks for virtual memory size in Solaris zones. - Real Memory Size Track trends and peaks for real memory size in Solaris zones. - CPU Usage Rate The rise and fall of CPU usage rates is represented by contour lines. Visually track and compare trends and peaks in CPU usage rates. This analysis is based on long-term data usage of approximately one month. Point If Solaris zones are bound to processor sets, the CPU usage rate will be 100% for each processor set. Solaris Zone(Sola ris 10) memory (Contour) H Group and Host - Memory Usage Rate The rise and fall of memory usage rates is represented by contour lines. Visually track and compare trends and peaks in memory usage rate. This analysis is based on long-term data usage of approximately one month Network walker Centric Manager (Network) Reports Centric Manager traffic Centric Manager packet Analysis target and condition settings H Group and Host H Display item - Line utilization rate Track and compare trends and peaks in the line utilization rate. - Number of octets Track and compare trends and peaks in the number of octets. - Number of packets Track and compare trends and peaks in the number of packets
122 Reports Analysis target and condition settings Group and Host Display item - Discard packet rate It can be used to identify interfaces that have a large number of packets that cannot be sent for reasons other than data errors (insufficient buffer size, etc). - Error packet rate It can be used to identify interfaces that have a large number of packets that cannot be sent because of data errors walker Network Manager Reports Network Manager network traffic Network Manager CPU load Network Manager collision Network Manager CRC error Network Manager drop packet Analysis target and condition settings H Group, Host, and Resource ID H Group, Host, and Resource ID H Group, Host, and Resource ID H Group, Host, and Resource ID H Group, Host, and Resource ID Display item - Input network utilization rates - Output network utilization rates These items display the average and maximum network traffic values, and the time when the maximum traffic occurred. Use the displayed report to locate and correct problems. - CPU Usage rate This item displays the average and maximum CPU usage rates, and the time when the maximum CPU usage occurred. Use the displayed report to locate and correct problems. - Collisions This item displays the average and maximum numbers of collisions, and the time when the maximum number of collisions occurred. Use the displayed report to locate and correct problems. - CRC Errors This item displays the average and maximum numbers of CRC errors, and the time when the maximum number of CRC errors occurred. Use the displayed report to locate and correct problems. - Input drop packets - Output drop packets These items display the average and maximum numbers of dropped packets, and the time when the maximum number of dropped packets occurred. Use the displayed report to locate and correct problems
123 Reports Network Manager transfer packet Network Manager discard packet Network Manager error packet Network Manager IP operating rates Network Manager RTT Analysis target and condition settings H Group, Host, and Resource ID H Group, Host, and Resource ID H Group, Host, and Resource ID H Group, Host, and Resource ID H Group, Host, and Resource ID Display item - Input packets - Output packets - Input discard packets - Output discard packets - Input error packets - Output error packets These items display the average and maximum numbers of sent and received packets, and the time when the maximum number of sent and received packets occurred. Use the displayed report to locate and correct problems. These items display the average and maximum numbers of discarded packets, and the time when the maximum number of discarded packets occurred. Use the displayed report to locate and correct problems. These items display the average and maximum numbers of error packets, and the time when the maximum number of error packets occurred. Use the displayed report to locate and correct problems. - IP Operating rates This item displays the average IP operating rate, the downtime length and the downtime frequency. Use the displayed report to locate and correct problems. - RTT - Ping These items display the average and maximum RTT values, and the average and maximum ping loss rates. Use the displayed report to locate and correct problems TcpNetwork This category is not displayed by default. Refer to the point in "4.1 Types of Categories" if displayed. Reports Analysis target and condition settings Display item TcpNetwo rk H - Number of TCP packets transferred If application processing performance is slow even though there are no problems with server resources (CPU, memory, disk), network performance may be causing a bottleneck
124 Reports Analysis target and condition settings Display item Group, Host, and Resource ID - Size of TCP packets transferred - Resend rate, duplicated reception rate, packet loss rate Take the appropriate action with reference to the graph. Take the appropriate action with reference to the graph. - Network problem situation Take the appropriate action with reference to the graph Storage ETERNUS SF Storage Cruiser (SAN Storage) Reports Storage CM CPU usage rate Storage CM (ROE) CPU usage rate Storage disk busy Storage throughput Analysis target and condition settings H Group, Host, and Resource ID H Group, Host, and Resource ID H Group, Host, and Resource ID H Group, Host, and Resource ID Display item - CM CPU Usage Rate Track and compare trends and peaks in the CM (Controller Module) CPU usage rate. - CM(ROE) CPU Usage Rate When the CPU usage rate of one or more CMs is 85% or greater, and the CPU usage rates of the remaining CMs are 75% or greater, there is the possibility that all CMs are under a high load. Track and compare trends and peaks in the CM (Controller Module) ROE usage rate. When the ROE usage rate is high, it is likely that there have been a massive number of accesses to encrypted volumes or to RAID6. When the ROE usage rate is low, and the CM CPU usage rate is high, it is likely that there have been a massive number of accesses to unencrypted volumes or to RAIDGroups other than those at the RAID6 level. - Disk Busy Track and compare trends and peaks in the disk usage rate. When the disk usage rate is 80% or greater, high-load applications may be concentrated in the same RAID group. Alternatively, the RAID configuration of the relevant RAID group may not be suitable. - Throughput Track and compare trends and peaks in the throughput
125 Reports Storage IOPS Storage response time Storage cache hit rate Analysis target and condition settings H Group, Host, and Resource ID H Group, Host, and Resource ID H Group, Host, and Resource ID Display item - IOPS Track and compare trends and peaks in the IOPS. - Response time Track and compare trends and peaks in response times. - Cache Hits Track and compare trends and peaks in the cache hit rate ETERNUS SF Storage Cruiser (NAS) Reports NAS CPU usage rate NAS NFS OPS NAS CIFS OPS Analysis target and condition settings H Group, Host, and Resource ID H Group, Host, and Resource ID H Group, Host, and Display item - NAS CPU usage rate Track and compare trends and peaks in CPU usage rates. - NAS NFS OPS Track and compare trends and peaks in NFS handling performance. - NAS CIFS OPS Track and compare trends and peaks in CIFS processing performance
126 Reports NAS HTTP OPS NAS network traffic NAS Amount of DISK R/W data NAS Amount of tape R/W data Analysis target and condition settings Resource ID H Group, Host, and Resource ID H Group, Host, and Resource ID H Group, Host, and Resource ID H Group, Host, and Resource ID Display item - NAS HTTP OPS Track and compare trends and peaks in HTTP processing performance. - Amount of network input data - Amount of network output data - Amount of reading data from disk - Amount of writing data to disk - Amount of reading data from tape - Amount of writing data to tape Track and compare trends and peaks in network traffic. Track and compare trends and peaks in disk read and write data amounts. Track and compare trends and peaks in tape read and write data amounts OS Windows Reports Analysis target and condition settings Display item Windows server G Group - CPU Usage Rate - Free Memory - Physical Disk Busy - Disk Usage Rate Check the status of resource usage for the servers registered in the system group. Windows CPU H - CPU Usage Rate(User, ) Track and compare trends and peaks in CPU usage rates
127 Reports Windows physical disks Windows disk space Windows memory Analysis target and condition settings Group and Host H Group and Host H Group and Host H Group and Host Display item If the CPU usage rate consistently exceeds 80%, a CPU bottleneck may be degrading performance, or such a problem may be about to occur. It is necessary to consider taking actions such as increasing or upgrading the CPUs, adjusting the application execution schedule, or relocating some applications to a different server. Warning level: CPU usage rate > 80% - CPU Queue Length If the number of CPU queue requests is consistently high, increasing the number of CPUs may be more effective than upgrading the CPU. Conversely, if the CPU usage rate is high when there are no queue requests, it indicates that the CPU performance is not enough to handle single processes, so a processor upgrade is recommended. Warning level: CPU queue length > 2 - Disk Busy Track and compare trends and peaks in load for each disk. If the physical disk busy rate continuously exceeds 60%, the disk load is causing a bottleneck and performance problems are either occurring now or may occur in the future. Warning level: Physical disk busy >= 60% - Disk Usage Rate Track and compare trends and peaks of I/O requests for each disk. If the number of physical disk queue requests is two or more, the disk load is causing a bottleneck and performance problems are either occurring now or may occur in the future. It is necessary to take actions such as distributing the disk load or adding disks. Warning level: Number of physical disk queue requests >= 2 - Free Memory Track and compare trends and peaks usage of each disk. - Page ins/page outs Track and compare trends and peaks in free memory amount. If the amount of available memory space approaches 4 MB intermittently, insufficient memory is causing a bottleneck, and performance problems are either occurring now or may occur in the future. Warning level:
128 Reports Windows process Windows CPU (Contour) Windows physical disk (Contour) Windows memory (Contour) Analysis target and condition settings H Group and Host H Group and Host H Group and Host H Group and Host Display item Available memory capacity < 4 MB - Disk Usage Rate Refer to the graph when responding to paging. - CPU Time This graph makes it possible to identify processes that consume too much CPU time. - Working set Size A cumulative graph showing the size of the working set used by different processes. In the case of a computer that has a high rate of physical memory usage rate, this analysis makes it possible to identify which processes consume a large amount of physical memory. - Pagefile Size A cumulative graph of the pagefile required for different processes. In the case of a computer that has a high rate of virtual memory usage, this analysis makes it possible to identify which processes consume a large amount of virtual memory. - CPU Usage Rate The rise and fall of the CPU usage rate is represented by contour lines. Visually track and compare trends and peaks in CPU usage rates. This analysis is based on long-term data usage of approximately one month. - Physical Disk Busy The rise and fall of the physical disk busy rate is represented by contour lines. Visually track and compare trends and peaks in the physical disk busy rate. This analysis is based on long-term data usage of approximately one month. - Free Memory The rise and fall of available memory capacity is represented by contour lines. Visually track and compare trends and peaks available memory capacity. This analysis is based on long-term data usage of approximately one month UNIX Reports Analysis target and condition settings Display item UNIX server G Group - CPU Usage Rate - Free Memory - Physical Disk Busy - Disk Usage Rate Check the status of resource usage for the servers registered in the system group. UNIX CPU H - CPU Usage Rate(User, ) Track and compare trends and peaks in CPU usage rates. If the CPU usage rate consistently exceeds 80%, a CPU bottleneck may be degrading performance, or such a problem may be about to occur
129 Reports Analysis target and condition settings Group and Host Display item It is necessary to consider taking actions such as increasing or upgrading the CPUs, adjusting the application execution schedule, or relocating some applications to a different server. Warning level: CPU usage rate > 80% - CPU Queue Length If CPU queue length > 10 or if CPU execution wait time rate > 90% or more, and (the number of queue requests) divided by (the number of processors) > 2, response may be being degraded because multiple processes are waiting for CPU allocation. If it is not possible to perform interactive job tuning or to restrict the number of concurrent processes, the user should consider increasing the number of CPUs. If CPU execution wait time rate > 90% and the number of queue requests < 1, a single program may be monopolizing the CPU. If there are no problems with the interactive job response, etc, there is no need to perform tuning. If there is a problem, lower the priority of the program that is monopolizing the CPU. Note that if there are any other resources that are experiencing a bottleneck, increasing the number of CPUs is unlikely to improve the situation. Warning level: CPU execution wait time rate > 90 and Requests count < 1 Note This information is displayed when a Solaris server is analyzed and reported. UNIX physical disk H Group and Host - Average Disk Busy Track and compare trends and peaks in load for each disk. Disk access wait times start to become noticeable when the physical disk busy rate exceeds 60%. When this rate reaches 80%, wait times, including the average access times, may start to become two to three times longer than normal. When the trend is towards 80% or higher, there is more than likely a bottleneck being caused by disk load. Bottlenecks caused by disk load can be diagnosed from the following items. You will need to consider taking actions to reduce the load, such as increasing the number of disks, or moving files to disk devices that have a lower load rate (i.e., review the disposition of data): Disk busy
130 Reports UNIX disk space UNIX memory Analysis target and condition settings H Group and Host H Group and Host Display item Service times in disk access Disk Queue Warning level: Disk Busy rate >= 60% and Service Time >= 30(ms) and Number of disk queue requests >= 2 - Service Times Service time is defined as the average time required to completely process a single I/O request. - Physical Disk Waiting Request Number This time also includes the time spent waiting for the completion of processing of requests in the I/O queue. Warning level: Service Time >= 30(ms) Track and compare trends and peaks of I/O requests for each disk. When the service time in disk access is equal to or greater than 30 ms, and there are a large number of requests waiting, it is likely that there is a concentration of access requests to the disk. Review the disposition of data. When the service time in disk access is equal to or greater than 30 ms, and there are not a large number of requests waiting, it is likely that there are disk devices with high loads connected within the same controller. Warning level: Service Time >= 30(ms) and Number of disk queue requests < 2 - Disk Usage Rate Track and compare trends and peaks usage of each disk. - Free Memory Track and compare trends and peaks in available memory capacity. If the amount of available memory space approaches the lotsfree kernel parameter (units: KB) intermittently, insufficient memory is causing a bottleneck, and performance problems are either occurring now or may occur in the future. Warning level: Available memory capacity < lotsfree - Swap ins/swap outs When swap-in is occurring:
131 Reports Analysis target and condition settings Display item There is no problem because the memory insufficiency is temporary and swapped out processes are just being swapped in. When swap-out is occurring: There is no problem because the memory insufficiency is temporary and only unnecessary processes are swapped out. These phenomena occur due to a large amount of processes being generated temporarily. When both are occurring: Currently swapping should not normally occur with UNIX. There may be a severe memory insufficiency which requires an increase in memory. Note This information is displayed when a Solaris server is analyzed and reported. UNIX process H Group and Host - CPU Time This graph makes it possible to identify processes that consume too much CPU time. - Memory Usage Rate A cumulative graph showing the memory usage rate of different processes. Determine which process is the cause of memory insufficiencies that occur. Note The graph showing the top ten processes using memory is not displayed in Linux. UNIX CPU (Contour) UNIX physical disk (Contour) UNIX memory (Contour) H Group and Host H Group and Host H Group and Host - CPU Usage Rate The rise and fall of the CPU usage rate is represented by contour lines. Visually track and compare trends and peaks in CPU usage rates. - Physical Disk Busy (Contour) This analysis is based on long-term data usage of approximately one month. The rise and fall of the physical disk busy rate is represented by contour lines. Visually track and compare trends and peaks in the physical disk busy rate. This analysis is based on long-term data usage of approximately one month. - Free Memory The rise and fall of available memory capacity is represented by contour lines. Visually track and compare trends and peaks in memory usage. This analysis is based on long-term data usage of approximately one month
132 Common to all operating systems Reports Analysis target and condition settings Display item Disk space G Group - Disk Usage Rate - Disk Availability Check the status of disk usage for the servers registered in the system group Web Web transaction Reports Web transaction Web transaction request Web transaction hitserver Web transaction hitclient Web transaction hitremote Analysis target and condition settings G Group H Group, Host, and Resource ID H Group, Host, and Resource ID H Group, Host, and Resource ID H Group, Host, and Resource ID Display item - Request count - Traffic - Error count - Web transaction request(request Count,Time Taken) Track and compare trends and peaks in the number of requests for each service and the time used for the requests. If the number of requests in each service, or the time required by requests exceeds the expected value, the user can consider taking actions such as adding another Web server. Track and compare trends and peaks in traffic volume for each service. If the volume of traffic exceeds the expected value, the user can consider taking actions such as adding another Web server. - Hit Server Count Track the occurrence of server hits in each service. - Hit Client Count Track the occurrence of client hits in each service. - Hit Remote Count Track the occurrence of remote hits in each service
133 Reports Web transaction traffic Web transaction error Analysis target and condition settings H Group, Host, and Resource ID H Group, Host, and Resource ID Display item - Traffic Track and compare trends and peaks in traffic volume for each service. If the volume of traffic exceeds the expected value, the user can consider taking actions such as adding another Web server. - Error count Track the occurrence of errors in each service Application Interstage Application Server (IJServer Cluster) Reports Interstage IJServer Cluster Interstage IJServer Cluster JVM Interstage IJServer Cluster JTA Interstage IJServer Cluster JDBC Analysis target and condition settings G Group H Group, Host, and Resource ID H Group, Host, and Resource ID H Group, Host, and Display item - Current Heap Size - Current Perm - Garbage Collection - Heap Size(avg/max/ min) - Perm Size(avg/max/ min) Check the JavaVM heap and Perm area usage amount, and garbage collection occurrences for the servers registered in the system group. Displays Java VM heap information. Track and compare trends and peaks in the heap information. Displays Java VM Perm area information. Track and compare trends and peaks in Perm area information. - Garbage collections Displays Java VM Garbage collection information. - Transaction(avg/ma x/min) - Connection Pool(avg/max/min) Track the occurrence of Garbage collections. Displays information about transactions used by applications. Track and compare trends and peaks in transaction counts. Information about JDBC connections that are pooled by Interstage. Track and compare trends and peaks in connection counts
134 Reports Interstage IJServer Cluster Thread Pool Analysis target and condition settings Resource ID H Group, Host, and Resource ID Display item - Connection Acquisition Wait Status(avg/max/min) When an attempt is made to obtain a connection from the pool but the maximum number of connections has already been reached, the system will wait for the connection timeout period until a connection is returned. This information relates to waiting for the connection to be returned. Track and compare trends and peaks in the frequency of connection waiting and the number of threads that are waiting for a connection. - Work items in queue The number of work items in the queue. Track the number of work items in a queue. - Total busy threads This is the total number of busy threads in a thread pool. - Average completion time of work items Track the total number of busy threads in a thread pool. This is statistical information about the average completion time of work items. Track the average completion time of work items. - Total usable threads This is the total number of usable threads in a thread pool. Track the total number of usable threads in a thread pool Interstage Application Server (Work Unit) Reports Analysis target and condition settings Display item Interstage( EJB) G Group - EJB Application Processing Time Check the processing times for EJB applications of the servers registered in the system group. Interstage( TD) G Group - Object Processing Time Check the processing times for transaction applications of the servers registered in the system group. Interstage (CORBA) G Group - Implementation Repository Processing Time ID Check the processing times for CORBA applications of the servers registered in the system group. Interstage( IJServer) G Group - Current Heap Size - Current Perm Check the size used by the heap and Perm area of the JavaVM of the servers registered in the system group. Interstage EJB application H Group, - EJB Application Processing Time(avg/max/min) The maximum, minimum and average processing times for EJB applications
135 Reports Analysis target and condition settings Display item Host, and Resource ID - When the maximum processing time for an entire period (one day) is long and the average processing time is close to the maximum processing time. The following causes are possible: - There is a performance-related problem with the server application. - The load on the system is high. Review the server applications and the system, giving particular attention to the above factors. - When the maximum, minimum and average processing times within a specific period are long. The load on the system may be high during a specific time period. Measure the performance of other server applications as well to confirm the load status. - When the maximum processing time is long but the average processing time is short and close to the minimum processing time. The following causes are possible: - The system load became high temporarily. - There is a performance-related problem with a server application under specific conditions. Review the system and server applications, giving particular attention to the above factors. - Wait Time(avg/max/ min) The maximum, minimum and average times from when a client receives a request until a method commences processing. - When the maximum, minimum and average wait times during a specific period are long. The load on the system may be high during a specific time period. Measure the performance of other server applications as well to confirm the load status. - When the maximum wait time is long but the average wait time is short and close to the minimum wait time. The following causes are possible: - The system load became high temporarily. - There is a performance-related problem with a server application under specific conditions. Review the system and server applications, giving particular attention to the above factors. - When the maximum wait time and the average wait time are long throughout a performance monitoring period. The performance of a server application is not sufficient to handle the number of requests from a client. Take
136 Reports Analysis target and condition settings Display item actions to raise the performance of server applications, such as increasing the number of concurrent processes in the Work Unit definition. - Requests / Wait Queues The cumulative number of processes that have been handled by the object since performance monitoring began, and the maximum number of requests that had to await processing by the object. - When there are many processes and process wait requests within a specific period. The number of requests to a server application within a specific period has increased. When the performance of a server application is not sufficient to handle the number of requests from a client, take actions to raise the performance of server applications, such as increasing the number of concurrent processes in the Work Unit definition. Measure the performance of other server applications as well to confirm the load status. - When the number of process wait requests is large but the average wait time is short. Use the isinfobj command to regularly check the queue status, and also check the load status during the collection interval. - VM memory used Maximum and average values of the amount of VM memory used. If a large amount of VM memory is being used, there may be a memory leak. Review the server applications with a view to identifying objects that can be deleted. - Sessions The number of current EJB objects. If the number of EJB objects has become larger than the number of connected (deployed) clients, this means that EJB objects may not have been removed when each session was disconnected, for every EJB object created when the session was established. If this is the case, make sure that each EJB object is removed when the session is disconnected. Interstage CORBA application H Group, Host, and Resource ID - Processing Time(avg/max/min) The maximum, minimum and average processing times for CORBA applications. - When the maximum processing time for an entire period (one day) is long and the average processing time is close to the maximum processing time. The following causes are possible: - There is a performance-related problem with the server application. - The load on the system is high. - When the maximum, minimum and average processing times within a specific period are long
137 Reports Analysis target and condition settings Display item The load on the system may be high during a specific time period. Measure the performance of other server applications as well to confirm the load status. - When the maximum processing time is long but the average processing time is short and close to the minimum processing time. The following causes are possible: - The system load became high temporarily. - There is a performance-related problem with a server application under specific conditions. Review the system and server applications, giving particular attention to the above factors. - Wait Time(avg/max/ min) The maximum, minimum and average times from when a client receives a request until an operation commences processing. - When the maximum, minimum and average wait times during a specific period are long. The load on the system may be high during a specific time period. Measure the performance of other server applications as well to confirm the load status. - When the maximum wait time is long but the average wait time is short and close to the minimum wait time. The following causes are possible: - The system load became high temporarily. - There is a performance-related problem with a server application under specific conditions. Review the system and server applications, giving particular attention to the above factors. - When the maximum wait time and the average wait time are long throughout a performance monitoring period. The performance of a server application is not sufficient to handle the number of requests from a client. Take actions to raise the performance of server applications, such as increasing the number of concurrent processes in the Work Unit definition. - Requests / Wait Queues The cumulative number of processes that have been handled by the object since performance monitoring began, and the maximum number of requests that had to await processing by the object. - When there are many processes and process wait requests within a specific period. The number of requests to a server application within a specific period has increased. When the performance of a server application is not sufficient to handle the number
138 Reports Analysis target and condition settings Display item of requests from a client, take actions to raise the performance of server applications, such as increasing the number of concurrent processes in the Work Unit definition. Measure the performance of other server applications as well to confirm the load status. - When the number of process wait requests is large but the average wait time is short. Use the isinfobj command to regularly check the queue status, and also check the load status during the collection interval. Interstage transaction application H Group, Host, and Resource ID - Object Processing Time(avg/max/min) The maximum, minimum, and average processing times for transaction applications. - When the maximum processing time for an entire period (one day) is long and the average processing time is close to the maximum processing time. The following causes are possible: - There is a performance-related problem with the server application. - The load on the system is high. - When the maximum, minimum and average processing times within a specific period are long. The load on the system may be high during a specific time period. Measure the performance of other server applications as well to confirm the load status. - When the maximum processing time is long but the average processing time is short and close to the minimum processing time. The following causes are possible: - The system load became high temporarily. - There is a performance-related problem with a server application under specific conditions. Review the system and server applications, giving particular attention to the above factors. - Wait Time(avg/max/ min) The maximum, minimum and average times from when a client receives a request until an object commences processing. - When the maximum, minimum and average wait times during a specific period are long. The load on the system may be high during a specific time period. Measure the performance of other server applications as well to confirm the load status. - When the maximum wait time is long but the average wait time is short and close to the minimum wait time. The following causes are possible:
139 Reports Analysis target and condition settings Display item - The system load became high temporarily. - There is a performance-related problem with a server application under specific conditions. Review the system and server applications, giving particular attention to the above factors. - When the maximum wait time and the average wait time are long throughout a performance monitoring period. The performance of a server application is not sufficient to handle the number of requests from a client. Take actions to raise the performance of server applications, such as increasing the number of concurrent processes in the Work Unit definition. - Requests/Wait queues The cumulative number of processes that have been handled by the object since performance monitoring began, and the maximum number of requests that had to await processing by the object. - When there are many processes and process wait requests within a specific period. The number of requests to a server application within a specific period has increased. When the performance of a server application is not sufficient to handle the number of requests from a client, take actions to raise the performance of server applications, such as increasing the number of concurrent processes in the Work Unit definition. Measure the performance of other server applications as well to confirm the load status. Interstage IJServer JVM H Group, Host, and Resource ID - Heap Size(avg/max/ min) - Perm Size(avg/max/ min) - Garbage collections(avg/max/ min) Track and compare trends and peaks in Java VM heap information. Track and compare trends and peaks in Java VM Perm area information. Track and compare trends and peaks in the number of occurrences of Garbage collection in Java VM. Interstage IJServer JTA H Group, Host, and Resource ID - Transaction(avg/ma x/min) Displays information about transactions used by applications. Track and compare trends and peaks in transaction counts. Interstage IJServer JDBC H Group, Host, and Resource ID - Connection Pool(avg/max/min) - Connection Acquisition Wait Status(avg/max/min) Information about JDBC connections that are pooled by Interstage. Track and compare trends and peaks in connection counts. When an attempt is made to obtain a connection from the pool but the maximum number of connections has already been reached, the system will wait for the connection timeout
140 Reports Analysis target and condition settings Display item period until a connection is returned. This information relates to waiting for the connection to be returned. Track and compare trends and peaks in the frequency of connection waiting and the number of threads that are waiting for a connection. - Establishment of Physical Connection(avg/max /min) Information about established connections and discarded connections. Track and compare trends and peaks in the number of established connections. - Acquisition of Connection from Application(avg/ma x/min) Information about connections used by applications. Track and compare trends and peaks in the number of established connections, etc. Interstate IJSserver SERVLET CONTAI NER H Group, Host, and Resource ID - Number sum total of Threads (avg/max/ min) - Number of Threads currently in progress (avg/max/min) Information about the total number of threads. Track and compare trends and peaks in thread counts. Information about the number of threads currently being processed. Track the number of threads currently being processed. Interstate IJSserver SERVLET WEBMO DULE H Group, Host, and Resource ID - The effective number of Sessions (avg/max/min) Check the number of valid sessions. Interstage IJSserver EVENT SERVICE H Group, Host, and Resource ID - Number of Connected consumers (avg/max/min) - Number of Connected suppliers (avg/max/min) Check the number of connected consumers. Check the number of connected suppliers. - Number of Accumulated event data items (avg/max/ min) Check the number of accumulated event data items Oracle WebLogic Server Reports Analysis target and condition settings Display item WebLogic Server G - Current heap size - Garbage collection Check the JavaVM heap information for the servers registered in the system group and number of occurrences of Garbage collections
141 Reports Analysis target and condition settings Display item Group Microsoft.NET Reports Analysis target and condition settings Display item MS-.NET G Group - Requests Count - Wait Queues Check the number of requests and the request queue status for the servers registered in the system group. MS-.NET ASP.NET H Group, Host, and Resource ID - Waiting Demands for Processing Count Track the number of MS-.NET requests waiting to be processed. - When the maximum processing time for an entire period (one day) is long and the average processing time is close to the maximum processing time. The following causes are possible: - There is a performance-related problem with the server application. - The load on the system is high. Review the server applications and the system, giving particular attention to the above factors. - When the maximum, minimum and average processing times within a specific period are long. The load on the system may be high during a specific time period. Measure the performance of other server applications as well to confirm the load status. - When the maximum processing time is long but the average processing time is short and close to the minimum processing time. The following causes are possible: - The system load became high temporarily. - There is a performance-related problem with a server application under specific conditions. Review the system and server applications, giving particular attention to the above factors. - Application Reboot Count Track the number of MS-.NET application reboots. Take the appropriate action with reference to the graph. - Worker Process Reboot Count Track the MS-.NET worker process reboot count. Take the appropriate action with reference to the graph
142 Reports MS-.NET Applicatio ns MS-.NET Remote procedure Analysis target and condition settings H Group, Host, and Resource ID H Group, Host, and Resource ID Display item - Transaction Count Track the number of MS-.NET transactions. - Number of Execution Requests Take the appropriate action with reference to the graph. Track the number of MS-.NET execution requests. Take the appropriate action with reference to the graph. - Session Count Track the number of active MS-.NET sessions. Take the appropriate action with reference to the graph. - Error Count Track the total number of MS-.NET errors. - Total Number of Remote Procedure Calls Take the appropriate action with reference to the graph. Track the total number of remote procedure calls for MS-.NET. Take the appropriate action with reference to the graph SAP NetWeaver Reports Analysis target and condition settings Display item SAP G Group - Dialog Response Time - Enqueue Enqueue Requests/Queue Length Check the Dialog response time, number of Enqueue requests and queue length, background usage rate, and number of RFC calls waiting for execution on SAP on the servers registered in the system group. - Background Utilization - Execution Waiting RFC Total Calls SAP Enqueue( Request) H Group, Host, and Resource ID - Enqueue Requests Track and compare trends and peaks in the number of enqueue requests. - Enqueue Requests Errors Track and compare trends and peaks in the number of enqueue request errors. - Dequeue Requests Track and compare trends and peaks in the number of dequeue requests. - Dequeue Requests Errors - Exclusion lock wait time Track and compare trends and peaks in the number of dequeue request errors. Track and compare trends and peaks in the time that parallel processes spend waiting to access lock tables. - Server time Track and compare trends and peaks in the time spent in the enqueue server
143 Reports SAP Enqueue( QueLengt h) SAP Dialog SAP Spool SAP Backgroun d SAP Update Analysis target and condition settings H Group, Host, and Resource ID H Group, Host, and Resource ID H Group, Host, and Resource ID H Group, Host, and Resource ID H Group, Display item - Runtime of data collector Track and compare trends and peaks in the time that the data collector (the RSCOLL00 program) spends executing. - Queue Length Enqueue server monitoring object: Track and compare trends and peaks in queue length. - Utilization (Lock owner) - Utilization (Lock arguments) - Utilization (Elementary Locks) Track and compare trends and peaks in the usage rates for lock owners within lock tables. Track and compare trends and peaks in the usage rates for lock arguments within lock tables. Track and compare trends and peaks in the usage rates for elementary locks within lock tables. - Errors Track and compare trends and peaks in the number of errors that occur with enqueue work processes. - Response Time Track and compare trends and peaks in the response times for the Dialog Service. - Front End Wait Time Track and compare trends and peaks in front-end standby times. - Dispatcher Wait Time - Load /Generation Time Track and compare trends and peaks in the dispatcher standby times for each dialog step. Track and compare trends and peaks in the load/generation times for GUI objects. - Roll Time Track and compare trends and peaks in roll times. - DB Request Time Track and compare trends and peaks in the processing times for logical database requests. - Load Factor Track and compare trends and peaks in the rate of load that Dialog processes place on the application server. - Dispatcher wait time Track and compare trends and peaks in the number of Dialog steps. - Load Factor Track and compare trends and peaks in the load rate for spool work processes. - Errors Track and compare trends and peaks in the number of errors that occur with spool work processes. - Load Factor Track and compare trends and peaks in the load rate for background work processes. - Errors Track and compare trends and peaks in the number of errors that occur with background work processes. - Response Time SAP Update task V1: Track and compare trends and peaks in the response times for each Dialog Step. - Dispatcher wait time SAP Update task V1: Track and compare trends and peaks in the dispatcher standby times in dispatcher queues
144 Reports SAP Roll Paging SAP Memory SAP Buffers Analysis target and condition settings Host, and Resource ID H Group, Host, and Resource ID H Group, Host, and Resource ID H Group, Host, and Resource ID Display item - Load factor (V1) SAP Update task V1: Track and compare trends and peaks in the load for update task work processes. - Errors (V1) Track and compare trends and peaks in the number of errors that have occurred for Update 1 work processes. - Load factor (V2) SAP Update task V2: Track and compare trends and peaks in the load for update 2 task work processes. - Errors (V2) Track and compare trends and peaks in the number of errors that have occurred for Update 2 work processes. - Paging area utilization Track and compare trends and peaks in the paging area usage rate. - Roll area utilization Track and compare trends and peaks in the roll area usage rate. - Extended Memory Utilization - Heap Memory Utilization - Management Slots Utilization Track and compare trends and peaks in the extended memory usage rate. Track and compare trends and peaks in the heap memory usage rate. Track and compare trends and peaks in the usage rate for EM management slots. - Work Processes Track and compare trends and peaks in the number of work processes in PRIV mode. - Buffer Utilization Track and compare trends and peaks in the buffer usage rate Workload This category is not displayed by default. Refer to the point in "4.1 Types of Categories" if displayed. Reports Analysis target and condition settings Display item Workload H Group, Host, and Resource ID - Allocated CPU - Used CPU Track and compare the amount of allocated CPU resources and the amount of used CPU resources for resource modules. Take the appropriate action with reference to the graph
145 Database Symfoware server Reports Symfoware Symfoware shared buffer Symfoware log area Symfoware disk I/O Symfoware database space usage rate Analysis target and condition settings G Group H Group, Host, and Resource ID H Group, Host, and Resource ID H Group, Host, and Resource ID H Group, Host, and Resource ID Display item - Buffer hit ratio - Buffer Dry up - SQL executions - Deadlocks Check the buffer cache hit rate, number of deadlocks, and number of SQL executions in Symfoware on the servers registered in the system group. - Buffer Hit Ratio The rate at which the shared buffer was hit (%). Fine-tune the shared buffer. Note that when application programs that mainly access a wide area of the table are executed without the addition of indexes, the on-buffer hit rate will become 0% or something similar, but this does not indicate a problem. - Buffer Dry Up The number of times that no unused buffers were available. - Recovery Log Over Count - Transaction Entry Dry Up Count - BI Log Dry Up Count Fine-tune the shared buffer. The number of times that the recovery log overflowed and a checkpoint occurred. Check the size of the recovery log, and increase it as necessary. Indicates if the transaction entries have been used up. Increase the number of transaction entries. Indicates if the BI log area has been used up. Increase the size of the BI log area. - DB Space I/O The number of I/O operations for each database space. - Database Space Usage Rate Take the appropriate action with reference to the graph. Track and compare usage trends and peaks for each database space Oracle database
146 Reports Analysis target and condition settings Display item Oracle G Group - Buffer cache hit ratio - Deadlocks Check the buffer cache hit rate and number of deadlocks on the Oracle servers registered in the system group. Oracle SGA H Group, Host, and Resource ID - Buffer Cache Hit Ratio The role of buffer caches is to reduce the number of accesses to the disk (data files). Increase the value of the initialization parameter "DB_BLOCK_BUFFERS" or "DB_CACHE_SIZE" that specifies the size of the buffer cache. * "DB_CACHE_SIZE" is a new initialization parameter that was added in Oracle9i. * Pay attention to the remaining physical memory capacity. - REDO log buffer cache The REDO log buffer cache stores the information that is written to the online REDO log. If processing to write to the REDO log buffer cache enters a wait state, increase the value of the initialization parameter "LOG_BUFFERS". If I/O processing performed from the REDO log buffer cache to a disk enters a wait state, move the REDO log file to a dedicated disk or a high-speed RAID device. If the REDO log file is located on the file system, consider using direct I/O or moving to a raw device. - Library Cache Hit Ratio The library cache stores the SQL statements that have been parsed and can be executed. Increase the value of the initialization parameter "SHARED_POOL_SIZE". Pay attention to the remaining physical memory capacity. - Data Dictionary Cache Hit Ratio The dictionary cache stores data dictionary information such as the status of file space for database segments (indexes, sequence, tables, etc) and object permissions. Increase the value of the initialization parameter "SHARED_POOL_SIZE". Pay attention to the remaining physical memory capacity. Oracle PGA H Group, Host, and Resource ID - Memory sort hit rate Sorts should be performed in memory whenever possible. Sorting in memory is far quicker than using the disk. Increase the value of the initialization parameter "SORT_AREA_SIZE" or "PGA_AGGREGATE_TARGET". * "PGA_AGGREGATE_TARGET" is a new initialization parameter that was added in Oracle9i
147 Reports Oracle disk I/O Oracle resource conflict Oracle table space usage rate Analysis target and condition settings H Group, Host, and Resource ID H Group, Host, and Resource ID H Group, Host, and Resource ID Display item - Amount of free table space area - Volume of database I/O - Ratio of zero rollback segment wait time * Pay attention to the remaining memory capacity. * Because changes to the above initialization parameter can change the execution plans for optimizing all SQL statements, be wary of changing the value, unless the memory sort hit rate has become a major problem. Displays the minimum value for the available tablespace capacity. Expand or add data files. Displays the volume of database I/O. Take the appropriate action with reference to the graph. Ideally, rollback segment header waiting should be kept to zero or a very small amount. When rollback segments are being used, there are an insufficient number of rollback segments and some need to be added. * If the UNDO table space is being used in Oracle9i or later, tuning will take place automatically. - Oracle tablespace Track and compare trends and peaks in usage for each tablespace Microsoft SQL Server Reports MS-SQL MS-SQL ACCESS METHOD MS-SQL Server BUFFER Analysis target and condition settings G Group H Group, Host, and Resource ID Display item - Buffer cache hit ratio - Deadlocks Count - Transaction Count - Full Scan Count - Index Count H - Buffer Cache Hit Count Check the buffer cache hit rate and number of deadlocks on SQL Servers on the servers registered in the system group. Track and compare MS-SQL access methods. Take the appropriate action with reference to the graph. Track the number of MS-SQL buffer cache hits. Take the appropriate action with reference to the graph
148 Reports MS-SQL Server CMGR MS-SQL Server DATABA SES MS-SQL Server GENERA LSTATIS TICS MS-SQL Server LOCKS MS-SQL Server MEMOR Y MS-SQL Server STATISTI CS Analysis target and condition settings Group, Host, and Resource ID H Group, Host, and Resource ID H Group, Host, and Resource ID H Group, Host, and Resource ID H Group, Host, and Resource ID H Group, Host, and Resource ID H Group, Host, and Display item - Access Count Track the number of MS-SQL accesses. Take the appropriate action with reference to the graph. - Cache hit rate Track MS-SQL cache hit rates. Take the appropriate action with reference to the graph. - Hits Count Track the number of MS-SQL hits. Take the appropriate action with reference to the graph. - Transaction Count Track the number of MS-SQL transactions. - Active Transaction Count Take the appropriate action with reference to the graph. Track the number of MS-SQL active transactions. Take the appropriate action with reference to the graph. - Log Area Ratio Track the MS-SQL log area ratio. - Number of Connected Users Take the appropriate action with reference to the graph. Track the number of connected users for MS-SQL. Take the appropriate action with reference to the graph. - Deadlocks Count Track the number of MS-SQL deadlocks. - Number of standby waiting lock requests - Total Amount of Memory - Number of SQLS Batch Requests Take the appropriate action with reference to the graph. Track the number of MS-SQL standby waiting lock requests. Take the appropriate action with reference to the graph. Track the memory capacity for MS-SQL. Take the appropriate action with reference to the graph. Track the number of requests for MS-SQL batches. Take the appropriate action with reference to the graph
149 Reports Analysis target and condition settings Display item Resource ID Job walker Operation Manager Reports Analysis target and condition settings Display item Operation Manager G Group - Job multiplicity - Number of execution waiting jobs - Number of jobs that have exceeded the predicted time Check the multiplicity and jobs waiting for execution on the walker Operation Manager in the servers registered in the system group. - Number of jobs that end - Number of Error Jobs Operation Manager subsystem H Group, Host, and Resource ID - Job multiplicity of each Subsystem (Job multiplicity, Network/Distributed execution job multiplicity) - Job net multiplicity of each Subsystem Track and compare trends and peaks in job multiplicity of each subsystem (Job multiplicity, Network/Distributed execution job multiplicity). If the CPU usage rate, available memory capacity, disk usage rate, or some other item exceeds a warning level, review job schedules and reduce the level of concurrency. Check deviations and peaks in the job net concurrency of different subsystems. - Number of execution waiting jobs of each Subsystem Track and compare trends and peaks in the number of pending jobs in different subsystems. If the number of pending jobs is large, review the job execution schedule. - Execution waiting time of each Subsystem Track and compare trends and peaks in the job execution wait times of different subsystems. If the execution wait time is long and the CPU usage rate, available memory capacity, disk usage rate, or some other item exceeds a warning level, take actions to reduce the level of job concurrency. - Number of jobs that have exceeded the predicted time of each Subsystem Track and compare trends and peaks in the number of jobs with execution time overruns in different subsystems. If the number of jobs with execution time overruns is large and the CPU usage rate, available memory capacity, disk usage rate, or some other item exceeds a warning level, take actions to reduce the level of job concurrency. - Number of completed jobs by subsystem Track and compare trends and peaks in the number of completed jobs in different subsystems. The number of completed jobs by subsystem also includes the following number of error jobs by subsystem
150 Reports Analysis target and condition settings Display item - Number of error jobs by subsystem Track the number of error jobs in different subsystems. Operation Manager queue H Group, Host, and Resource ID - Job multiplicity of each Queue (Job multiplicity, Network/Distributed execution job multiplicity) - Job net multiplicity of each Queue Track and compare trends and peaks in job multiplicity of each Queue (Job multiplicity, Network/Distributed execution job multiplicity). If the CPU usage rate, available memory capacity, disk usage rate, or some other item exceeds a warning level, review job schedules and reduce the level of concurrency. Track and compare trends and peaks in the job net multiplicity of different queues. - Number of execution waiting jobs of each Queue Track and compare trends and peaks in the number of pending jobs in different queues. If the number of pending jobs is large, review the job execution schedule. - Execution waiting time of each Queue Track and compare trends and peaks in the job execution wait times of different queues. If the execution wait time is long and the CPU usage rate, available memory capacity, disk usage rate, or some other item exceeds a warning level, take actions to reduce the level of job concurrency. - Number of jobs that have exceeded the predicted time of each Queue Track and compare trends and peaks in the number of jobs with execution time overruns in different queues. If the number of jobs with execution time overruns is large and the CPU usage rate, available memory capacity, disk usage rate, or some other item exceeds a warning level, take actions to reduce the level of job concurrency. Operation Manager project H Group, Host, and Resource ID - Job multiplicity of each Project - Job net multiplicity of each Project Track and compare trends and peaks in the job multiplicity of different projects. If the CPU usage rate, available memory capacity, disk usage rate, or some other item exceeds a warning level, review job schedules and reduce the level of concurrency. Track and compare trends and peaks in the job net multiplicity of different projects. - Number of execution waiting jobs of each Project Track and compare trends and peaks in the number of pending jobs in different projects. If the number of pending jobs is large, review the job execution schedule. - Execution waiting time of each Project Track and compare trends and peaks in the job execution wait times of different projects. If the execution wait time is long and the CPU usage rate, available memory capacity, disk usage rate, or some other item exceeds a warning level, take actions to reduce the level of job concurrency. - Number of jobs that have exceeded the predicted time of each Project Track and compare trends and peaks in the number of jobs with execution time overruns in different projects. If the number of jobs with execution time overruns is large and the CPU usage rate, available memory capacity, disk usage rate, or some other item exceeds a warning level, take actions to reduce the level of job concurrency. - Number of completed jobs by project Track and compare trends and peaks in the number of completed jobs in different projects
151 Reports Analysis target and condition settings Display item The number of completed jobs by project also includes the following number of error jobs by project. - Number of error jobs by project Track the number of completed error jobs in different projects Service Bus Interstage Service Integrator Reports ISI Sequence ISI Queue ISI Sequence ISI Queue Analysis target and condition settings G Group G Group H Group, Host, and Resource ID H Group, Host, and Resource ID Display item - Number of transactions Check the ISI sequence information of the servers registered in the system group. - Number of retention Check the ISI queue information of the servers registered in the system group. - Number of transactions Track and compare trends and peaks in the number of process in each sequence. - Number of retention Track and compare trends and peaks in the number of remaining items in each queue Service Service operational information Reports HTTP service Analysis target and condition settings G Specificati ons for Display item - HTTP Operating rate Check the status of the HTTP service to be monitored that is registered in the system group
152 Reports SMTP service DNS service PORT service Analysis target and condition settings displays that include service operationa l informatio n G Specificati ons for displays that include service operationa l informatio n G Specificati ons for displays that include service operationa l informatio n G Specificati ons for displays that include service operationa l informatio n Display item - STMP Operating rate Check the status of the SMTP service to be monitored that is registered in the system group. - DNS Operating rate Check the status of the DNS service to be monitored that is registered in the system group. - PORT Operating rate Check the status of the PORT to be monitored that is registered in the system group End user response Reports End user response Analysis target and condition settings Display item G - End user response Check the status of the response times of the URLs that are registered in the system group
153 Reports Analysis target and condition settings Display item Group Generic report Generic report Reports Timeseries Summary data time series display Correlatio n display Contour display Compariso n display of the past Analysis target and condition settings H detailed items H detailed items H Specifica tions for displays that include correlatio ns/ compositi ons H Specifica tions for displays that include contours H Specifica tions for displays that include past Display item - Displays specified field values as chronological graphs and tables. - Display the summary data as a time-series graph or table. - Displays two specified field values as correlation graphs and regression line graphs. - Displays specified fields as contour graphs. This analysis is based on long-term data usage of approximately one month. - Displays a graph that allows hourly data from the past month and the past week to be compared side-by-side with the data for the base day
154 Reports Transition compariso n display according to day Composite display Analysis target and condition settings comparis ons H Specifica tions for displays that include daily transition comparis ons H Specifica tions for displays that include correlatio ns/ compositi ons Display item - Displays a graph that compares data trends for the specified date and time period. - Displays a graph that allows two different items (such as response time and CPU usage rate) to be compared side-byside History This section explains the history display History History Reports Analysis target and condition settings Display item Displays reports created previously. Up to 50 reports are saved in the history. If this number is exceeded, reports will be automatically deleted in chronological order, starting from the oldest. Point If it is necessary to keep a report, click the Display button to open the display window, then use the File menu of the browser to save the report to another folder
155 Reports Analysis target and condition settings Display item Note Reports created in versions V13.5 or earlier have Registered Name displayed in the Report name column. 4.3 Operating the Analysis/Planning Window This section describes how to operate the Analysis/Planning window. Note The following kinds of problems may occur if you try to display content (graphs or tables): - The operation terminates with error code "Chart is unavailable" is displayed instead of the graphics for the graph. - The graph image may be left out (only graphs are not displayed). - The following error message may be displayed: "The specified CGI application misbehaved by not returning a complete set of HTTP headers. The headers it did return are: Unable to register TclNotifier window class" "ohd_update error." "Ohd file create error." These problems may be due to insufficient space in the desktop heap for the operation management client. Refer to "6.1 Content Display Errors" to increase the size of the desktop heap. Starting Start the console by clicking the Console button on the Console Definitions tab of the Admin Console window
156 Or start the console directly by specifying the URL. Click on Analysis/Planning on the global navigation bar in the console to start
157 Note - Do not perform operations in the Analysis/Planning window using the pop-up context menu that appears when the right mouse button is clicked. Window configuration When started, the following Analysis/Planning window is displayed
158 The Analysis/Planning window is made up of the following: No. Component (1) Global header (2) Global navigation bar The walker and Fujitsu logos are displayed. The menus are as follows: - Monitoring Opens the Monitoring window. Allows checks on the current status and isolates faults when they occur. - Analysis/Planning Opens the Analysis/Planning window. Analyze and plan service quality over the medium to long term to avoid future problems. - Scheduled Report Opens the Scheduled Report window. Displays reports about service levels for the customer or for capacity planning. - Update Console Definitions Reloads the console definitions. - Help Opens the User's Guide (Console Edition). (3) Analysis Conditions area Set and register categories, reports, and the analysis conditions for the various reports. Operations in the Analysis Conditions area are described in the sections that follow
159 No. Component (4) Contents display area The contents of the reports are displayed. Basic operations The following operations are possible in the Analysis/Planning window. Operation Use scenarios to create reports Refer to the history of created reports Edit My Category Analysis and planning that meets your aims is possible by checking each report displayed in the categories in turn. You can use the templates provided with the product and the "My Category" you register for each console. The analysis conditions can be saved when using a My Category. Displays a history of created reports. Up to 50 reports are saved in the history. If this number is exceeded, reports will be automatically deleted in chronological order. The following operations are possible with the My Category items you register for each console: - My Category Management - Add category Categories can be added by copying existing categories or by creating an empty category and copying reports registered in other categories to it. - Modify category name - Delete category - Report Management - Add reports - Modify report name - Delete report - Save analysis/planning conditions Conditions can be saved in the currently selected report, or they can be saved using a different name. See Refer to "Basic specifications in the Analysis Conditions area" for details on how to manipulate analysis conditions
 Report Select a report that matches the purpose of the operation. (3) Target Settings items relating to the report target.")
160 Components in the Analysis Conditions area Basic specifications in the Analysis Conditions area No. Component (1) Category Select a category that matches the purpose of the operation. (2) Report Select a report that matches the purpose of the operation. (3) Target Settings items relating to the report target. (4) View Settings report data intervals, number of display items, and file output. (5) Period the analysis period. The way to specify the number of display items depends on the type of report. CPU usage rates are used to troubleshoot high CPU usage rates by processes, so the highest are extracted. Available memory capacity is used to avoid system stoppages due to extremely low memory availability, so is extracted from the lowest up. The number of items that can be displayed legibly in the graph is about 10. The graph may be disrupted by the legend if there are more than 10. The graph size can be set in Advanced Settings for some report types. (6) Display button Click to display the analysis results in the report content area
161 4.3.1 Scenario Scenarios are prepared in the Analysis/Planning window to suit different operational purposes. Perform analysis and planning to suit your aims by checking each report displayed in turn Category The reports provided by walker Service Quality Coordinator are categorized according to operational aims. There are also cases where reports are further divided into separate categories. First select the category then select the required report in that category. Click My Category Management to show the My Category Management window, where categories can be added, modified, or deleted My Category Management The My Category Management window Categories can be added, modified, or deleted in the My Category Management window
162 Item My Category Add button Modify Name button Delete button Up button Down button Categories that have been registered are listed. The Add Category window is displayed where new categories can be added. Displays the Modify Category Name window where the name of the category can be modified. Delete the category selected in My Category. Click OK in the confirmation dialog box to go ahead and delete the category. Move the category selected in My Category up or down. The Add Category window
163 Method Used Category Name Item Create Empty Category Create a Copy of another category Category Creates an empty category. Register reports in it later. Creates a copy of another category. The Category list becomes available to select from when you select this option. The reports in the copied category can be changed later. Use to select a category when creating a copy of another category. a display name for identifying the scenario. Enter a new name for the category, irrespective of the method used. The name must be unique within the console definition. The following characters can be used for search category names: - Alphanumerics - Symbols (except for $ " ' [ ] < > /? ; : * \ &, = % # +) Platform-dependent characters are not allowed. The registered report name can be no longer than 36 characters. The Modify Category Name window Item Category Name a display name for identifying the scenario. The name must be unique within the console definition. The following characters can be used for search category names: - Alphanumerics - Symbols (except for $ " ' [ ] < > /? ; : * \ &, = % # +) Platform-dependent characters are not allowed. The registered report name can be no longer than 36 characters Report Select a report that matches your purpose. The items in Conditions depend on the report selected

164 Report Management is displayed when you select a My Category. Click Report Management to show the Report Management window, where reports can be added, modified, or deleted Report Management The Report Management window Reports can be added, modified, or deleted in the Report Management window
165 Report Item Add button Modify Name button Delete button Up button Down button Reports that have been registered are listed. The Add Report window is displayed where new reports can be added. Displays the Modify Report Name window where the name of the report can be modified. Delete the report selected in Report. Click OK in the confirmation dialog box to go ahead and delete the report. Move the report selected in Report up or down
166 Add Report window Item Select report. (The copy origin.) Report Name Category Report Select the category that includes the report that you want to copy. The reports included in the selected category are listed, so select the report you want to copy. The name of the report is displayed. a display name for identifying the report and condition settings. The name must be unique within the category. The following characters can be used for report names: - Alphanumerics - Symbols (except for $ " ' [ ] < > /? ; : * \ &, = % # +) Platform-dependent characters are not allowed. The registered report name can be no longer than 50 characters


167 The Modify Report Name window Item Report Name a display name for identifying the report and condition settings. The name must be unique within the category. The following characters can be used for report names: - Alphanumerics - Symbols (except for $ " ' [ ] < > /? ; : * \ &, = % # +) Platform-dependent characters are not allowed The registered report name can be no longer than 50 characters Conditions Target Settings When a report is specified, the following target setting items are displayed. Items displayed depend on the report specified. The following is an example of the window where you can specify the system group and host. The items that are specified are explained below for the different types. Group
168 Item Group Select the system group to be analyzed from the list. Group and Host Item Group Host Select the system group to be analyzed from the list. Select the host to be analyzed from the list. The list displays the hosts that have been registered with the selected system group. Group, Host, and Resource ID Item Group Host Resource ID Select the system group to be analyzed from the list. Select the host to be analyzed from the list. The list displays the hosts that have been registered in the selected system group. The content specified for Resource ID depends on the type. Refer to the " Resource ID specification" for more information. Note that only alphanumeric characters and symbols (except for \,<>"$'[]=&%) can be used. Length is limited to 128 characters. Specifications for displays that include future predictions Item Group Host Record ID Field name Display by difference Resource ID Select the system group to be analyzed from the list. Select the host to be analyzed from the list. The list displays the hosts that have been registered in the selected system group. When ALL_SERVER is selected, all hosts in the system group are analyzed. the record ID and field name of the analysis target. For the record ID, only the options corresponding to the selected host are displayed. For the field name, only the options corresponding to the selected record ID are displayed. If the Display by difference checkbox is selected, information for cumulative values can be displayed incrementally. Refer to "Drilled-Down/Report Information" in the Reference Guide for information on the record IDs and field names that can be specified. the resource ID to be targeted for analysis. All resource IDs are analyzed if this is omitted. Point Resource IDs can be retrieved by right-truncating the resource ID according to a specified search string. Example:
169 Item If the two resource IDs "AAA123" and "AAA456" exist, both can be targeted by specifying "AAA". detailed items Item Group Host Record ID Field name Display by difference Resource ID Select the system group to be analyzed from the list. Select the host to be analyzed from the list. The list displays the hosts that have been registered in the selected system group. When ALL_SERVER is selected, all hosts in the system group are analyzed. the record ID and field name of the analysis target. For the record ID, only the options corresponding to the selected host are displayed. For the field name, only the options corresponding to the selected record ID are displayed. If the Display by difference checkbox is selected, information for cumulative values can be displayed incrementally. Refer to "Drilled-Down/Report Information" in the Reference Guide for information on the record IDs and field names that can be specified. the resource ID to be targeted for analysis. All resource IDs are analyzed if this is omitted. Point Resource IDs can be retrieved by right-truncating the resource ID according to a specified search string. Example: If the two resource IDs "AAA123" and "AAA456" exist, both can be targeted by specifying "AAA". In the summary data time-series display, when Agents that have different collection intervals are in the same system group, the graph display will be affected if ALL_SERVER is selected. If the Display by difference checkbox is selected, some servers will not be displayed. Create system groups of Agents that have the same collection intervals. Specifications for displays that include correlations/compositions Group Data 1 specification Data 2 specification Item Host 1 Host 2 Record ID 1 Record ID 2 Field name 1 Select the system group to be analyzed from the list. Select a host containing one part of the data to be displayed from the list. The list displays the hosts that have been registered in the selected system group. When ALL_SERVER is selected, all hosts in the system group are analyzed. the record ID and field name of one of the pair to be displayed. For the record ID, only the options corresponding to the selected host are displayed
170 Item Field name 2 Display by difference Resource ID 1 Resource ID 2 For the field name, only the options corresponding to the selected record ID are displayed. If the Display by difference checkbox is selected, information for cumulative values can be displayed incrementally. Refer to "Drilled-Down/Report Information" in the Reference Guide for information on the record IDs and field names that can be specified. one of the resource IDs to be displayed. All resource IDs are analyzed if this is omitted. Point Resource IDs can be retrieved by right-truncating the resource ID according to a specified search string. Example: If the two resource IDs "AAA123" and "AAA456" exist, both can be targeted by specifying "AAA". Specifications for displays that include contours Item Group Host Record ID Field name Display by difference Resource ID Select the system group to be analyzed from the list. Select the host to be analyzed from the list. The list displays the hosts that have been registered in the selected system group. When ALL_SERVER is selected, all hosts in the system group are analyzed. the record ID and field name of the analysis target. For the field name, only the options corresponding to the selected record ID are displayed. If the Display by difference checkbox is selected, information for cumulative values can be displayed incrementally. Refer to "Drilled-Down/Report Information" in the Reference Guide for information on the record IDs and field names that can be specified. the resource ID to be targeted for analysis. All resource IDs are analyzed if this is omitted. Point Resource IDs can be retrieved by right-truncating the resource ID according to a specified search string. Example: If the two resource IDs "AAA123" and "AAA456" exist, both can be targeted by specifying "AAA". Specifications for displays that include past comparisons
171 Item Group Host Record ID Field name Display by difference Resource ID Select the system group to be analyzed from the list. Select the host to be analyzed from the list. The list displays the hosts that have been registered in the selected system group. When ALL_SERVER is selected, all hosts in the system group are analyzed. the record ID and field name of the analysis target. For the field name, only the options corresponding to the selected record ID are displayed. If the Display by difference checkbox is selected, information for cumulative values can be displayed incrementally. Refer to "Drilled-Down/Report Information" in the Reference Guide for information on the record IDs and field names that can be specified. the resource ID to be targeted for analysis. All resource IDs are analyzed if this is omitted. Point Resource IDs can be retrieved by right-truncating the resource ID according to a specified search string. Example: If the two resource IDs "AAA123" and "AAA456" exist, both can be targeted by specifying "AAA". Base day the base day used for comparison in the analysis. Specifications for displays that include daily transition comparisons Item Group Host Record ID Field name Display by difference Resource ID Select the system group to be analyzed from the list. Select the host to be analyzed from the list. The list displays the hosts that have been registered in the selected system group. When ALL_SERVER is selected, all hosts in the system group are analyzed. the record ID and field name of the analysis target. For the field name, only the options corresponding to the selected record ID are displayed. If the Display by difference checkbox is selected, information for cumulative values can be displayed incrementally. Refer to "Drilled-Down/Report Information" in the Reference Guide for information on the record IDs and field names that can be specified. the resource ID to be targeted for analysis. All resource IDs are analyzed if this is omitted. Point Resource IDs can be retrieved by right-truncating the resource ID according to a specified search string. Example:
172 Item If the two resource IDs "AAA123" and "AAA456" exist, both can be targeted by specifying "AAA". Specifications for displays that include P2V simulations Group Aggregation candidate Aggregation target's information Item Direct input of installed resource/aggregate to a host in operation CPU Core Number Memory Select the system group to be used in the P2V simulation from the list. Click the Add button to display the Add Candidate window. Select the host for the aggregation candidate and click OK. Multiple aggregation candidates can be selected. The selected hosts are displayed in a list. A maximum of 50 aggregation candidates can be specified. To remove a host that has been selected as a consolidation candidate, click Delete next to that host. If the aggregation target host has already been registered in the system group, select the aggregation target's Host. The number of CPUs and amount of memory in the specified host are shown as black lines in the displayed graph. Select Direct input of installed resource if not registered. When Direct input of installed resource is selected, enter numbers to specify the CPU (in GHz), the Core Number and Memory (in GB) of the aggregation target: - a number between and 1000 for CPU (clock count). - an integer between 1 and 1000 for Core Number. - a number between and for Memory. The number of CPUs and amount of memory in the specified host are shown as black lines in the displayed graph as hardware capacity. Host If you selected Aggregate to a host in operation, select the aggregation target host from the list. The same hosts cannot be selected as aggregation candidates. Note - When a system is monitored with an Agent from V or earlier, these systems are not displayed in the list as aggregation candidates or aggregation target hosts. - When a virtual machine is to be an aggregation candidate, monitor the server performance (OS) of the virtual machine using either an installed agent or an Agent for agentless monitoring. Specifications for displays that include simulations of VMware Virtual machine relocation
173 Group Relocation candidate Aggregation target's information Host Item Virtual machine Relocation candidate Direct input of installed resource/aggregate to a host in operation Host CPU Core Number Memory Select the system group to be used in the virtual machine relocation simulation from the list. Click the Add button to display the Add Candidate window. Select the migration source host from the Host list. Select the virtual machine that is the candidate for reallocation from the Virtual machine list and click OK. More than one virtual machine can be selected. When virtual machine aggregation candidates are added from multiple virtual hosts, repeat the above procedure. The relocation candidate(s) selected above is displayed. The display format is "host name: virtual machine name". A maximum of 50 relocation candidates can be specified. You can select up to five hosts that have virtual machines that are possible relocation candidates. To remove a host that has been selected as a consolidation candidate, click Delete next to that host. If the aggregation target host has already been registered in the system group, select the aggregation target's Host. The number of CPUs and amount of memory in the specified host are shown as black lines in the displayed graph. Select Direct input of installed resource if not registered. If you selected Aggregate to a host in operation, select the aggregation target host from the menu. The same hosts cannot be selected as aggregation candidates. When Direct input of installed resource is selected, enter numbers to specify the CPU (in GHz), the Core Number and Memory (in GB) of the aggregation target: - a number between and 1000 for CPU (clock count). - an integer between 1 and 1000 for Core Number. - a number between and for Memory. The number of CPUs and amount of memory in the specified host are shown as black lines in the displayed graph as hardware capacity. Note - Only VMware can be the target of virtual machine relocation simulation. - When a system is monitored with an Agent from V or earlier, these systems are not displayed in the relocation candidate or aggregation target's information lists. - Virtual hosts that have been stopped for five hours or more are not displayed in the list of relocation candidate virtual machines. - Select the virtual machine from the host name before migration if this procedure is performed immediately after migration. The list of virtual machines is updated every hour
174 Specifications for displays that include request count future predictions Item Group Host Service name Select the system group to be analyzed from the list. Select the host to be analyzed from the list. The list displays the hosts that have been registered in the selected system group. When ALL_SERVER is selected, all hosts in the system group are analyzed. the name (resource ID) of the service set to manage Web transaction volume. If omitted, all services will be extracted. Resource IDs can be retrieved by right-truncating the resource ID according to a specified search string. Specifications for displays that include response simulations (requests or adding servers) Item Group Server Groups (layer 1) Server Groups (layer 2) Server Groups (layer 3) Select the system group to be analyzed from the list. Divide hosts registered to the system group into web servers (layer 1), applications servers (layer 2), and database servers (layer 3). Click the Add button to display the Add Server window. Select the host from the Add Host list and click OK. a host where there is an Agent managing Web transaction volume in the server group (layer 1). Server group (layer 2) and server group (layer 3) do not have to be specified. A maximum of 50 hosts can be added across the three layers. Point The performance information that is used by the application server and the database server is CPU information. It is not intended to set up performance management for linkage middleware such as Interstage Application Server or Symfoware Server. Service name Request coefficient Adding servers Times other than service time the name (resource ID) of the service set to manage Web transaction volume. If omitted, all services will be extracted. Resource IDs can be retrieved by right-truncating the resource ID according to a specified search string. the expected request volume (as a rate of the current volume). Use "Request count (future prediction)" to predict the rate of increase, and specify that value. The current request count is used if you specify 1. Range: 0.1 to This is displayed for Response simulation (Adding servers). the number of servers to be added to each server group. Range: 0 to 99 periods when the service is not running (night, days off, scheduled maintenance times, etc), or periods when the number of requests is extremely low
175 Item The precision of the simulation is improved by excluding those periods when processes that have no direct bearing on requests are being performed. Select the days of the week, hours, and minutes to specify the periods to designate as "times other than service time". A maximum of ten conditions can be specified. Point When "Daily" is specified for a period, the values for response (request increase) and response (add server) in the table will be replaced with a hyphen. Specifications for displays that include service operational information Item Group Select the system group to be analyzed from the list Resource ID specification The following table lists the content to be specified for resource IDs for each report type: Report type Web transaction Request Web transaction hitserver Web transaction hitclient Web transaction hitremote Web transaction Traffic Web transaction Error Resource ID The following specified content depends on the category: the service name for the reports on the left. When using generic reports, connect the service names and URLs with colons (:). Example: imagine:/ssqc/console.html If only the service name is specified, all the data for that service name will be targeted for reporting. Note For the URL, specify the one specified in Inclusion in the transaction log definition file (tlawatch.ini). Refer to "Transaction Log Definitions" in the User's Guide for information on the transaction log definition file (tlawatch.ini). Interstage EJB application Interstage CORBA application Interstage transaction application Interstage IJServer JVM Interstage IJServer JTA Interstage IJServer JDBC the name of an EJB application. To monitor the performance of an EJB container, specify the name of the EJB container. the implementation repository ID. the object name. the object name
176 Report type Interstage IJServer SERVLET WebModule Interstage IJServer EVENT SERVICE Symfoware shared buffer Symfoware log area Symfoware disk I/O the RDB system name. Point Resource ID Alphanumeric characters are recommended. Oracle SGA Oracle PGA Oracle disk I/O Oracle resource conflict the instance name. Point Alphanumeric characters are recommended. Operation Manager Subsystem Operation Manager Queue Operation Manager Project the subsystem name. Example: subsystem00 the subsystem name and the queue name connected by a colon (:). Example: subsystem00:queue1 the subsystem name and the project name connected by a colon (:). Example: subsystem00:project5 Network Manager network traffic the node name and the host name connected by a colon (:). Network Manager CPU load Example: node1:interface1 the node name. Network Manager collision the node name and the host name connected by a colon (:). Network Manager CRC error Network Manager drop packet Network Manager transfer packet Network Manager discard packet Network Manager error packet Network Manager IP operating rates Network Manager RTT TcpNetwork Example: node1:interface1 the node name. the node name. the interface name. Storage CM CPU usage rate the Storage ID and the CM ID connected by a colon (:). Example: 00GR730#######GR73E02U####IA000003######:0x
177 Report type Point Resource ID This string is displayed in the resource ID column by selecting "CM" under "Storage" with the Drilled-down display view. Storage Disk busy the Storage ID and the Disk ID connected by a colon (:). Example: 00GR730#######GR73E02U####IA000003######:0x0 Point This string is displayed in the "Resource ID" column by selecting "Disk" under "Storage" with the Drilled-down display view. Storage throughput the Storage ID and the RAIDGroup ID connected by a colon (:). Storage IOPS Example: 00GR730#######GR73E02U####IA000003######:0x0 Point This string is displayed in the "Resource ID" column by selecting "RAIDGroup" under "Storage" with the Drilled-down display view. Workload resource module names separated by a colon (:). Example 1: When specifying one resource module: module1: Example 2: When specifying multiple resource modules: module1:module2: If no name is specified, all modules will be targeted Display Settings When a report is specified, the following display settings are displayed. Items displayed depend on the type of report specified. The following is an example of the window where you can specify the number of items displayed, the analysis data, and the file output
 An integer between 1 and 1000 can be entered. Only the entered number of data items will be displayed.")
178 Item Number of Items Displayed Select the number of data items that will be displayed for analysis. The number of data items can be selected as follows: - Top (Bottom) An integer between 1 and 1000 can be entered. Only the entered number of data items will be displayed. The number of items that can be displayed in the graph legibly is about 10. The graph may be disrupted by the legend if there are more than All All data is displayed. Analysis data Select the data interval to be used for analysis. The following data intervals can be selected: - 10 min Data retention period: 7 days (default) This period is suitable for analysis of approximately one day. - 1 hour Data retention period: 6 weeks (default) This period is suitable for analysis of approximately one week. - 1 day Data retention period: 13 months (default) This period is suitable for analysis of one month or more. This is not available with some report types. Note If a period prior to the data retention period is specified, no data will be displayed. Output to File Content is output in Excel(R) format. When the Creates an Excel(R) file checkbox is selected, the Save as Excel(R) button becomes active at the bottom of the analysis and report content area. Click this button to download the displayed content in Excel format
179 Item Note Disable clipboard redirection if the operation is to be performed using a remote desktop connection. Note A file is downloaded with an xlsx or xlsm extension when Save as Excel(R) is used. Enable macros when opening files with the xlsm extension. Information If an XML file is downloaded with Save as Excel(R), change the following in Internet Explorer: Go to Internet Options, Security, select the appropriate zone and click Custom level, then in the Miscellaneous section click Open files based on content, not file extension to disable it. Operation time Threshold value (Optional): CPU Memory Analysis mode the time period to be displayed. the starting time (hour/minute) and the finishing time (hour/minute) for operations. the CPU and memory usage rates that will be tolerated on the aggregation target server. (Optional) If this is specified, it is shown as a red line in the graph. [CPU]: Enter a number between 10 and 100. (Units: %) [Memory]: Enter a whole number between 10 and 100. (Units: %) the way the simulation is to be performed: - Hourly The maximum value (average value) for hourly resource usage is calculated for each aggregation candidate server and displayed as a stack. Check that there is no problem with the resources by hour after aggregation. - Weekly The maximum value (average value) for daily resource usage is calculated for each aggregation candidate server and displayed as a stack. Check that there is no problem with the resources by day of the week after aggregation. - time-line The resource usage for each aggregation candidate server is displayed as a stack Detail settings A Detail Settings area is displayed for some report types. Items displayed depend on the type of report that has been specified. The Detail Settings area is shown collapsed when a report is selected. Click the title bar of the Detail Settings area to specify detailed settings

180 Figure 4.1 Detail Settings area collapsed (example)
.")
181 Figure 4.2 Detail Settings area expanded (example) Generic report Title Item the title to be used for the graph and table. For an example of what is displayed when this is specified, refer to the illustration below (Example of a graph when Detail Settings have been specified). The following characters can be used for titles: - Alphanumerics - Symbols (except for $ " ' [ ] < > /? ; : * \ &,. = %) Platform-dependent characters are not allowed. The registered report name can be no longer than 24 characters. If a title is not specified, the field name is used for the title of the graph and the record ID is used for the title of the table
182 Unit Item the unit used on the Y axis. For an example of what is displayed when this is specified, refer to the illustration below (Example of a graph when Detail Settings have been specified). The following characters can be used for units: - Alphanumerics - Symbols (except for $ " ' [ ] < > /? ; : * \ &,. =) Platform-dependent characters are not allowed The registered report name can be no longer than 8 characters. Units are not displayed if this is omitted. Graph size Graph range (Y axis) the size of the graph in pixels. an integer between 200 and The default width is 700 pixels and height is 300 pixels. (For the contour display width is 750 pixels and height is 500 pixels). a value that is equal to or greater than the default value. - Minimum and Maximum to specify the range of the Y axis. When this is specified, the "minimum" and "maximum" shown in the illustration below this table ("Example of a graph when Detail Settings have been specified") use the specified values. (The numeric value applied as the maximum may not always appear.) a number between and The range of the data is used if this is omitted. - the interval between scale marks in Width of scale. When this is specified, the "Width of scale" shown in the illustration below this table ("Example of a graph when Detail Settings have been specified") uses the specified value. a number between 0 and The width of the scale is determined automatically if this is omitted. Threshold the threshold. For an example of what is displayed when this is specified, refer to the illustration below (Example of a graph when Detail Settings have been specified). a number between and This may not be displayed within the graph due to the range of the Y axis, even if you do specify it

183 Figure 4.3 Example of a graph when Detail Settings have been specified Miscellaneous Output object Graph settings Item Analyze according to the disk reading and writing Analyze according to the network sending and receiving CPU usage rate Memory usage rate Disk I/O Count Select to display a distribution graph and table showing reads and writes. Select to display a distribution graph and table showing sends and receives. Select to configure graphs. The default maximum for the markings is 100% and the number of markings is 10. Scale Max: Enter an integer between 10 and 100. (Units: %) Scale Number: Enter a whole number between 2 and 10. Select to configure graphs. The default maximum for the markings is 100% and the number of markings is 10. Scale Max: Enter an integer between 10 and 100. (Units: %) Scale Number: Enter a whole number between 2 and 10. Select to configure graphs. This setting is used to draw graphs for reading and writing (combined), and to draw separate graphs for reading and writing
184 Aggregatio n method Threshold Item Disk Throughput Count for data sent/received over network Network throughput Use maximum Use average Server group name (layer 1) Server group name (layer 2) Server group name (layer 3) The default number of markings is 10. Scale Max: Enter an integer between 10 and (Units: times per second) Scale Number: Enter a whole number between 2 and 10. Select to configure graphs. This setting is used to draw graphs for transfers, and to draw separate graphs for sending and receiving. The default number of markings is 10. Scale Max: Enter an integer between 10 and (Units: MB/sec) Scale Number: Enter a whole number between 2 and 10. Select to configure graphs. This setting is used to draw graphs for reading and writing (combined), and to draw separate graphs for reading and writing. The default number of markings is 10. Scale Max: Enter an integer between 10 and (Units: times per second) Scale Number: Enter a whole number between 2 and 10. Select to configure graphs. This setting is used to draw graphs for transfers, and to draw separate graphs for sending and receiving. The default number of markings is 10. Scale Max: Enter an integer between 10 and (Units: MB/sec) Scale Number: Enter a whole number between 2 and 10. Select whether to analyze using the maximum or the average. the threshold with a percentage. Threshold: Enter an integer between 1 and 100. (Units: %) the display name for the server group. The following characters can be used for display names: - Alphanumerics - Symbols (except for $"'[]<>/?;:*\&,.=) Platform-dependent characters are not allowed The name can be no longer than 36 characters Saving Condition Settings With My Category, you can save the conditions set in the Conditions area by clicking Save

185 Either save by overwriting the selected report, or save using another name. Report Name Item The name of the report selected in the Scenario area is displayed. The selected report is overwritten if you do not change the report name. When you change the report name, the report is added to the category selected in the Scenario area. The following characters can be used for report names: - Alphanumerics
![Item - Symbols (except for $ " ' [ ] < > /? ; : * \ &, = % # +) Platform-dependent characters are not allowed The registered report name can be no longer than 50 characters. 4.3.](/docs-images/93/111146287/images/186-0.jpg "3 Period A Period area is displayed for some report types. Items displayed depend on the type of report specified.")
186 Item - Symbols (except for $ " ' [ ] < > /? ; : * \ &, = % # +) Platform-dependent characters are not allowed The registered report name can be no longer than 50 characters Period A Period area is displayed for some report types. Items displayed depend on the type of report specified. The following is an example: Period/analysis period Item Start date the period of the analysis. End date Select the minute, hour, day, month and year using a list to specify the date and time that analysis will start and stop. Predicted day Item Date Prediction is performed up to the specified date. Select the day, month, and year from the lists Display Button This section explains the Display button
187 Button Displa y Creates a report using the specified conditions. Reports are displayed in the contents display area at the right of the analysis window. History can also be displayed. "Loading..." appears in the contents display area while the content is being produced. While this message is displayed, the Display button is disabled Contents Display Area This section explains the operations that can be performed on the report content displayed. Table sorting When the header section of any column in a table displayed in the report content is selected, the table can be sorted using the selected column as the sort key. Sorting can be toggled between ascending and descending order. Note - Numerical sorting only works correctly when all the values in the specified column are numerical values. Sorting cannot be performed correctly if the column includes non-numerical data such as null values. - Date and time sorts cannot be performed correctly if the number of digits (yyyy/mm/dd hh:mm:ss, etc) is not uniform throughout the column. Care must be taken when data has been input as user data. Save in CSV Format/Save in Excel(R) format/display in separate window/print The following buttons are in the lower part of the report content: - Save in CSV Format This enables the displayed range of data to be downloaded in CSV format. - Save in Excel(R) format This is displayed in the Analysis/Planning window when the Creates an Excel(R) file checkbox is selected and when scheduled reports are created. This link enables the displayed content to be downloaded in Excel(R) format. - Display in separate window Display the content in a separate window. - Print Print the displayed content. 4.4 Using the Analysis/Planning Window Using Scenarios to Create Reports This section describes how to create reports using scenarios
188 1. Select the category
189 2. The reports registered in the selected category are displayed, so select the report you want

190 3. the appropriate settings in the Conditions and Period items

191 4. Click the Display button at the bottom of the Analysis Conditions area Referring to the History of Created Reports This section describes how to refer to reference reports created in the past

192 1. Select History for the category. 2. When the lines in the displayed list are selected, relevant reports that were created previously are displayed in a separate window
193 Up to 50 reports are saved in the history. If this number is exceeded, reports will be automatically deleted in chronological order. Point If it is necessary to keep a report, select a line, then in the browser window that opens use the File menu to save the report to any folder Registering a New Scenario and Saving Report Conditions This section describes how to register a new scenario and save report conditions

194 1. Click My Category Management next to Category. 2. Click the Add button in the My Category Management that is displayed

195 3. In the Add Category window that is displayed, click either Create Empty Category or Create a Copy of another category. 4. If you select Create a Copy of another category, select a category that has already been registered in the console

196 5. Enter the new category name in the Category Name field and click OK. 6. Click OK in the My Category Management window
197 7. If the report is not registered in a newly registered category, click Report Management next to Report

198 8. Click the Add button in the Report Management window that is displayed. 9. In the Add Report window that is displayed, select the category that includes the report that you want to copy

199 10. The reports included in the selected category are listed, so select the report you want to copy. More than one report can be selected. Click OK after selecting. 11. Click OK in the Report Management window

200 12. Enter the appropriate Conditions and Period

201 13. Click the Display button at the bottom of the analysis conditions area. 14. When saving conditions, first check that there is no problem with the displayed report, then click Save next to Conditions
202 15. Enter a name for the report in the Save Condition Settings window that is displayed, then click the Save button. If you have changed the report name, a report with the specified conditions is added to the selected category. If you have not changed either the category or the report name, the selected report is overwritten. 4.5 Operations Using Scenarios Simulation of Aggregating Physical Servers to a Virtual Environment: [P2V (Physical to Virtual)] When aggregating physical servers to a virtual environment, you can use walker Service Quality Coordinator to perform precise simulations based on past operating performance. You can use the simulation to check beforehand that there will be no problems, and ensure that the aggregation occurs in the optimum virtual environment

203 This section describes the procedure for simulation using a "P2V (Physical to Virtual)" category scenario. Point Use the following procedure to test virtual aggregation with hosts within the same system group. Understanding the current status 1. In the Analysis/Planning window, select the "Server distribution by rsc. usage cond. (Summary)" report of the "P2V (Physical to Virtual)" category, specify the analysis conditions and display the report. Refer to "4.3 Operating the Analysis/Planning Window" for information on how to configure analysis conditions
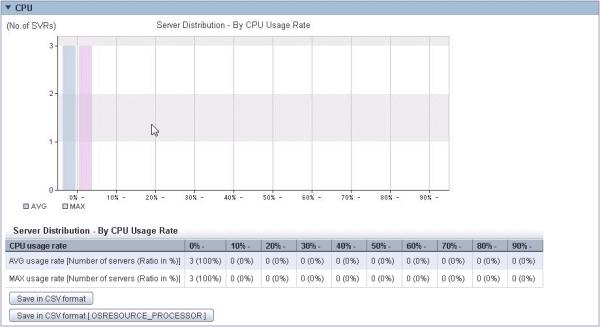

204
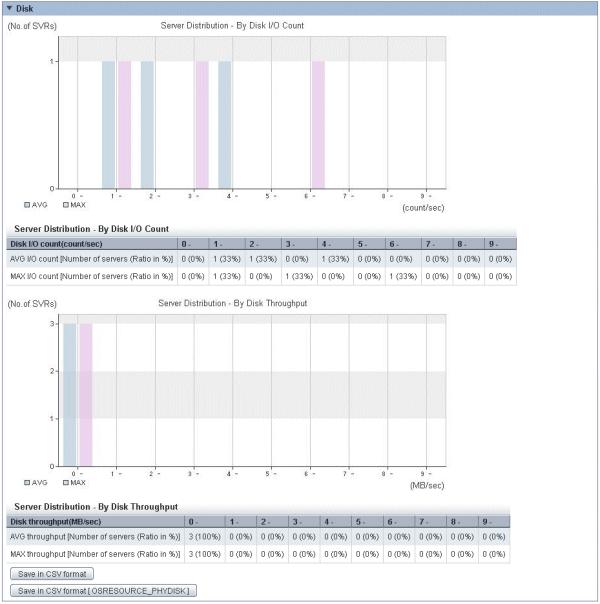
205

206 This report allows you to obtain an overview of the resource usage status of all servers that may be considered as virtual aggregation targets. Aggregation is effective when servers that are not making the most of their resources are aggregated. 2. In the Analysis/Planning window, select the "List of rsc. usage cond. (Detail)" report of the P2V (Physical to Virtual) category, specify the analysis conditions and display the report. Refer to "4.3 Operating the Analysis/Planning Window" for information on how to configure analysis conditions
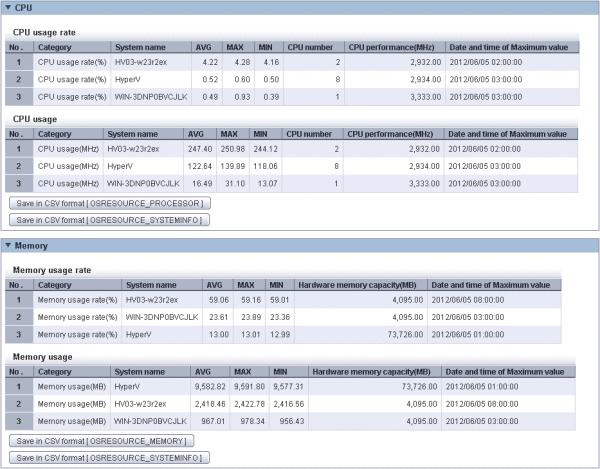

207

208 In the "List of rsc. usage cond. (Detail)" report, a list of resources allocated to each host and resource usage is displayed. For example, sort by CPU usage rate and memory usage rates to check which hosts have available resources. Consider hosts with low usage rates as aggregation candidates. Also check the hosts that are being considered as aggregation candidates to see whether the disk and network throughput is large or not. Aggregation simulation 1. In the Analysis/Planning window, select the "P2V simulation" report of the "P2V (Physical to Virtual)" category, specify the analysis conditions and display the report. Refer to "4.3 Operating the Analysis/Planning Window" for information on how to configure analysis conditions. - Simulation method: By Time Zone

209 - Simulation method: Time Series

210 - Simulation method: By Day Information about hosts to be aggregated is displayed in a stack graph and table. For each resource, if a value is too large throughout a period of time or there is a bias for certain time periods or days of the week, consider the combinations of hosts to be aggregated. If a threshold value was set, check whether that value is greatly exceeded Simulating the Relocation of Virtual Machines: [VMware Virtual Machine Relocation] Use walker Service Quality Coordinator to simulate the resource usage status that would occur when a virtual machine is moved from another host to an overcommitted host. By moving virtual machines based on the simulation, hosts can be secured

211 This section describes the procedure for simulation using a "VMware virtual machine relocation" category scenario. Point Use the following procedure to test relocation with virtual hosts within the same system group


212 Understanding the current status 1. In the Analysis/Planning window, select the "VMware resource usage status (virtual host list)" report of the "VMware virtual machine relocation" category, specify the analysis conditions and display the report. Refer to "4.3 Operating the Analysis/Planning Window" for information on how to configure analysis conditions


213 A list of resources allocated to each virtual host and resource usage is displayed. For example, sort by CPU usage rate and memory usage rates to check which hosts have available resources. Consider making the host with the lowest amount of resource usage the migration source, and the host with the next lowest rate as the migration target. Also check the hosts that are being considered as migration source and destination to see whether the disk and network throughput is large or not
 report of the \"VMware virtual machine relocation\" category, specify the analysis conditions and display the report. Refer to \"4.")
214 Considering relocation 1. In the Analysis/Planning window, select the VMware rsc. usage cond. (Virtual machine stack) report of the "VMware virtual machine relocation" category, specify the analysis conditions and display the report. Refer to "4.3 Operating the Analysis/Planning Window" for information on how to configure analysis conditions
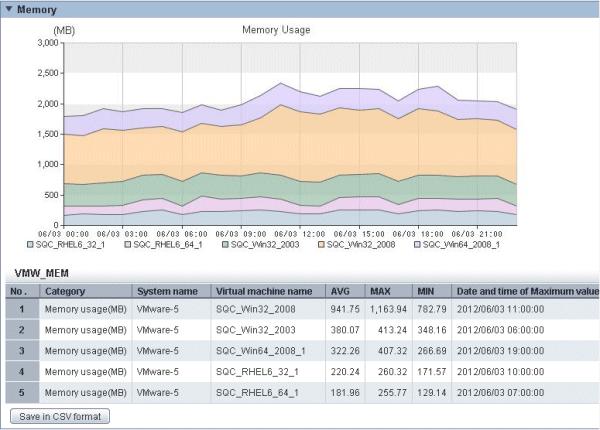
215
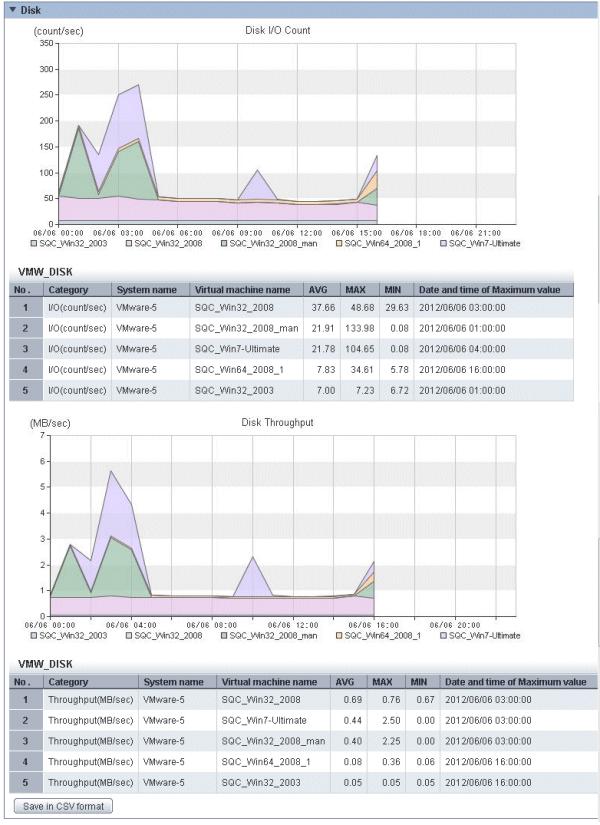
216

217 The resource usage information for the virtual machines on the virtual host is displayed in a stack graph. Check the resource usage in each virtual machine, and use this information to work out which virtual machine should go to which destination candidate host

218 Relocation simulation 1. In the Analysis/Planning window, select the "VMware Virtual machine relocation simulation" report of the "VMware virtual machine relocation" category, specify the analysis conditions and run the simulation. Refer to "4.3 Operating the Analysis/Planning Window" for information on how to configure analysis conditions. Display by time zone
219 Display by time series
220 Display by day of the week The information about virtual machines to be aggregated and all virtual machines in the aggregation target host are displayed in a stack graph. Tables are also displayed along with the above graphs. For each resource, if a value is too great throughout a period or there is a bias for certain time periods or days of the week, consider the combinations of the virtual machines to be relocated. If a threshold value was set, check whether that value is greatly exceeded Analysis of Bottlenecks in Virtual Environment: [VMware Tuning Guidance] This section describes how to detect bottlenecks in virtual environments (VMware) and gives guidance on measures to take. This section describes the procedure for using a "VMware tuning guidance" category scenario to detect bottlenecks and the actions to take

221 Bottleneck analysis 1. In the Analysis/Planning window, select the "VMware CPU tuning guidance" report of the "VMware tuning guidance" category, specify the analysis conditions and display the report. Refer to "4.3 Operating the Analysis/Planning Window" for information on how to configure analysis conditions

222
223 Check in the report displayed whether there are any problems with the CPU usage status of the virtual environment. If there are possible problems, these are marked with a yellow "Caution" in the background of the tuning guidance. Refer to the measures that are displayed. Refer to " VMware tuning guidance" for information on analyzing reports. 2. Using the same procedure as 1, display the reports shown below and check for problems with the memory, disks, and network in the virtual environment. Note that as with "VMware CPU tuning guidance", "Caution" and measures to take are displayed in the "VMware memory (Host) tuning guidance" and "VMware memory (Virtual machine) tuning guidance" reports. - VMware memory (Host) tuning guidance - VMware memory (Virtual machine) tuning guidance - Vmware Physical Disk - Vmware Virtual Disk - Vmware Physical NIC - Vmware Virtual NIC Refer to " VMware tuning guidance" for information on analyzing reports. Refer to the measures displayed on the screen and to the explanation in " VMware tuning guidance" when a bottleneck is detected Optimization of Resources Allocated to a Virtual Machine: [Optimization of Resources Allocated to VMware] Use walker Service Quality Coordinator to detect virtual machines with a low resource usage rate. Review the amount of resources allocated based on the results and secure available resources to optimize them

224 This section describes the procedure for attempting to optimize resources by using the "VMware resource allocation optimization" category scenario
\" report of the \"VMware resource allocation optimization\" category, specify the analysis")
225 Understanding the current status 1. In the Analysis/Planning window, select the "VMware resource usage status (Virtual machine list)" report of the "VMware resource allocation optimization" category, specify the analysis conditions and display the report. Refer to "4.3 Operating the Analysis/Planning Window" for information on how to configure analysis conditions

226 Sort by CPU usage rate and memory usage rates to detect virtual machines with available resources and reduce the allocation of resources to virtual machines with low usage rates Future Prediction of Resource Demand: [ServerView Resource Orchestrator Resource Pool] Use walker Service Quality Coordinator to make predictions about resource pool demand. Resources that may become insufficient can be predicted, so it is possible to develop a precise expansion plan. This section describes the procedure for using "ServerView Resource Orchestrator Resource pool" category scenarios to forecast the future demand for resources
 (demand forecast)\" report of the \"ServerView Resource Orchestrator Resource pool\" category, specify the analysis conditions and display the")
 usage to forecast the amount of resources used. Display other reports if necessary to perform a demand forecast of the resource pool. 4.5.")
227 Demand forecast 1. In the Analysis/Planning window, select the "VM pool (CPU) (demand forecast)" report of the "ServerView Resource Orchestrator Resource pool" category, specify the analysis conditions and display the report. Refer to "4.3 Operating the Analysis/Planning Window" for information on how to configure analysis conditions. Perform regression analysis based on past VM pool (CPU) usage to forecast the amount of resources used. Display other reports if necessary to perform a demand forecast of the resource pool Simulation of Resource Increase in Anticipation of an Increased Number of Requests: [Response Simulation] walker Service Quality Coordinator can predict the future number of requests and perform simulation analysis of the response in the layers that make up a system (e.g., the Web layer, application layer, and database layer), enabling planning for resource expansion and a simulation of the effects of this expansion before it is actually implemented

228 This section describes the procedure for simulation using a "Response simulation" category scenario
\" report of the \"Response simulation\" category, specify the analysis conditions and display the report. Refer to \"4.")
229 Future prediction of request counts 1. In the Analysis/Planning window, select the "Request count (Future prediction)" report of the "Response simulation" category, specify the analysis conditions and display the report. Refer to "4.3 Operating the Analysis/Planning Window" for information on how to configure analysis conditions. The future prediction results for each service are displayed. Check the rate of increase in requests compared to the current number of requests. The rate of increase is used as the request coefficient in the Response simulation (Request increase) report
\" report of the \"Response simulation\" category, specify the analysis conditions and")
230 Future prediction of response 1. In the Analysis/Planning window, select the "Response simulation (Request increase)" report of the "Response simulation" category, specify the analysis conditions and display the report. Refer to "4.3 Operating the Analysis/Planning Window" for information on how to configure analysis conditions

231 In the "Request count" graph and table, you can see the changes in request counts across a day when there is an increase in the request count. In the "Response" graph and table you can see the response times across the whole system as the request count increases, and also the response times in the layers of the system
232 Make sure that response times do not exceed reference values. If there are places where the reference value is exceeded, consider adding servers to the layer where the response times are the longest. Use the number of servers that you are considering adding as an analysis condition in the "Response simulation (Adding servers)" report. Point Response simulation is a simulation of response times, achieved by analyzing the relationship between the number of service requests in the past and the performance information (OS) of the various servers. The precision of the simulation can be increased by excluding time periods when batch processes are performed (after hours, for example) that have no bearing on actual request processes. Confirm the precision of the simulation by looking at the '(High)', '(Medium)', and '(Low)' reliability displayed after the response times in the table. '(High)' indicates that the simulation was performed with little interference and the precision of the simulation is therefore high. 'N/A' is displayed in the table if the simulation could not be performed because no performance information was found or barely any correlation was achieved between the number of requests and the operating system performance information. The reliability can be improved by increasing the period in Analysis Conditions, and taking measures to decrease interference by excluding periods when batch work is performed, such as after hours. Refer to "4.3 Operating the Analysis/Planning Window" for information on how to configure analysis conditions
\" report of the \"Response simulation\" category, set the analysis conditions and")
233 Post-resource increase simulation 1. In the Analysis/Planning window, select the "Response simulation (Adding servers)" report of the "Response simulation" category, set the analysis conditions and display the report. Refer to "4.3 Operating the Analysis/Planning Window" for information on how to configure analysis conditions
234 The response times after servers are added are displayed. It is also possible to see where response time is long or where a threshold is greatly exceeded. When the threshold is exceeded greatly, check the level where the response time is longest, add servers, then run the simulation again
235 Chapter 5 Scheduled Report "Service level management" collected performance information can be displayed in the report. In The Analysis/Planning window and the Scheduled Report Registration view, the scenario of each purpose of operation is prepared. The analysis and the planning along the purpose the displayed report is sequentially confirmed can be done. The Scheduled Rreport is a function to automate the output of reports such as the daily report, weekly reports, and monthly reports by registering the condition in the report beforehand and registering in the scheduler. This function registers the report conditions in the Scheduled Report Registration view, creates a report using the Scheduled Report Creation Command, and uses the Scheduled Report view to display the report. 5.1 Types of Reports Refer to "4.2 Types of Reports" about types of reports. Point The following reports cannot be used the Scheduled Report. - P2V simulation - VMware virtual machine relocation simulation - Response simulation (Request count) - Response simulation (Adding servers) 5.2 Scheduled Report Registration (Administrator Tasks) This section explains how to use the Scheduled Report Registration view for registering scheduled reports. Note The following problems sometimes occur when users try to display the desired contents (graphs or tables). - The operation terminates with error code "Chart is unavailable" is displayed instead of the graph image. - The graph image may be left out (only graphs are not displayed). - The following error message may be displayed. "The specified CGI application misbehaved by not returning a complete set of HTTP headers. The headers it did return are: Unable to register TclNotifier window class" "ohd_update error." "Ohd file create error." These problems may be due to insufficient space in the desktop heap for the operation management client. Increase the size of the desktop heap by referring to "6.1 Content Display Errors" Starting the Scheduled Report Registration View Open the Setting View by clicking the Setting View button on the Console Definitions tab of the Admin Console
236 Select Register Scheduled Report menu from the global navigation bar in the Console window
237 Note Do not perform operations in the Scheduled Report Registration View using the pop-up context menu that appears when the right mouse button is clicked. Configuration of the Scheduled Report Registration View The Scheduled Report Registration View will appear as below
238 The Scheduled Report Registration View is organized as shown in the following table. Item No. Component (1) Global header (2) Global navigation bar The walker and Fujitsu logos are displayed. The menus are as follows: - Save Console Definitions Saves the console definitions - Update Console Definitions Reloads the console definitions - Help Opens User's Guide (Console Edition). (3) Analysis conditions area (4) Content display area Report conditions can be set and registered. Each content is displayed
239 Basic operation of the Scheduled Report Registration View The Scheduled Report Registration View tabs perform the following operation. Operation Register report conditions Edit report conditions Copy report conditions Delete report conditions Test report conditions Register, Edit and Delete scenario Registers any report conditions. Select Register in Registered Report Name and enter a condition name in Category. Enter the required report conditions, then items other than the dates for starting and finishing reports are registered when the Register button is pressed. Change the content of registered report conditions. Select the condition name to be edited in Registered Report Name. Enter the required report conditions, then items other than the dates for starting and finishing reports are registered when the Save Over Current button is pressed. Copies the content of registered report conditions. Select the condition name to be copied in Registered Report Name. Enter the required report conditions, then the dialog appears when the Register button is pressed, so enter the condition name and click the OK button. Items other than the dates for starting and finishing reports are registered. Deletes a registered report condition. Select the condition name to be deleted in Registered Report Name and press the Delete button. Runs a test display to check that the specified report conditions are correct. Refer to "Configuration of the Analysis Conditions area" for details on how to use the Scheduled Report Registration view. Refer to "Basic operations". Point If the registered content of a scheduled report is changed (registered, edited, copied or deleted) using the Scheduled Report Registration View, the Save Console Definitions button on the global navigation bar must be clicked. There is no need to perform Save Console Definitions if a new scenario is being registered, or if a scenario is being edited or deleted
 Category Select a category according to the purpose of operation. (3) Report Select a report according to the purpose of operation.")
240 Configuration of the Analysis Conditions area Item No. Component (1) Registered Report Name A specification relating to the report name. (2) Category Select a category according to the purpose of operation. (3) Report Select a report according to the purpose of operation. (4) Target Settings A specification relating to the analysis target. (5) View Settings Specifies the data interval, the number of display items for the report and the file output. CPU usage rates etc. are extracted by a high-ranking number to do the high CPU usage rates by the process in the troubleshooting. Available memory capacity is extracted by the low-ranking number to prevent the system down by insufficient memory. The number of data items to display in the report is about up to 10. The graph might collapse by explanatory notes in case of 10 or more. (6) Operation buttons (to register, edit, and delete report conditions) Buttons for registering, changing, and deleting the report conditions. (7) Period Specifications the periods for reports
241 Item No. Component (8) Operation buttons (preview) Buttons for previewing the report conditions Registered Report Name A specification relating to the name of report. Item name Registered Report Name a display name to identify the analysis conditions. This name is used in the history display and in the scheduled report list. When Register is selected in Registered Report Name, a Category input field appears. After registration, this appears as Registered Report Name. The following characters can be used for condition names: - Alphanumeric characters - Symbols (except for $ " ' [ ] < > /? ; : * \ &,. =) Platform dependent characters can not be used. The registered report name can be no longer than 36 characters Category Refer to " Category". The My Category cannot be selected on the Scheduled Report Registration View. The My Category Management cannot be useed on the Scheduled Report Registration View Report Refer to " Report" Target Settings Refer to " Target Settings" View Settings Refer to " Display Settings" Operation Buttons (to register, edit, and delete report conditions) The operation buttons are explained
242 Button Register Register Save Over Current Delete Displayed when Register is selected in Registered Report Name. Registers new analysis conditions under the name specified in Category. Items other than the dates for starting and finishing analysis are registered. Displayed when a registered condition name other than Register is selected in Registered Report Name. Use when copying a condition for use. Registers new analysis conditions under the name specified in the dialog that appears when the Register button is pressed. Items other than the dates for starting and finishing analysis are registered. Displayed when a registered condition name other than Register is selected in Registered Report Name. Use when changing a condition. Items other than the dates for starting and finishing analysis are overwritten. Displayed when a registered condition name other than Register is selected in Registered Report Name. Use when deleting a condition Period Specifications Periods are explained. Item name Period/ Analysis Period Forecast Date the period of the analysis. Select the minute, hour, day, month and year using a drop-down list box to specify the date and time that analysis will start and stop. When the preview is done, the specified forecast until the date is done. The date is selected from the pull-down menu. This can be set in the following reports. - Future forecast display - Resource pool (CPU) (demand forecast) - Resource pool (Memory) (demand forecast) - VM pool (CPU) (demand forecast) - VM pool (Memory) (demand forecast) - Storage pool (demand forecast) - Network pool (demand forecast) - Server pool (demand forecast) - Address pool (demand forecast) - Request count (Future prediction) The Period and Analysis Period is decided according to the operand specified for "5.3.1 sqcmakereport(scheduled Report Creation Command)" command
243 5.2.8 Operation Buttons (preview) The operation buttons are explained. Button Preview Performs a test display of a report to verify that the content of the report is displayed correctly using the specified report conditions. Reports are displayed in the content display area on the right side of the report registration window. Point This operation only performs a test display of a report. It is not added to the daily, weekly or monthly scheduled report displays. While a report is being generated, the message "Loading..." will appear in the content display area. The Test button will be disabled while this message is being displayed Content Display Area Refer to "4.3.5 Contents Display Area". 5.3 Manipulating Scheduled Reports (Administrator Tasks) This section explains the commands that are used to create and delete scheduled reports that have been registered sqcmakereport(scheduled Report Creation Command) sqcdeletereport(scheduled Report Deletion Command) Refer to "Scheduled Report Operation Command" in the Reference Guide for details Example of registration with scheduler This section also explains how to make backups of scheduled reports Backing up reports Note Save up to about 5,000 scheduled reports for each console (depending on the operation management client disk performance). If a larger number is saved, then the display of the scheduled report list might be slow or not possible sqcmakereport(scheduled Report Creation Command) Execution environment This command can be run on an operation management client. Privileges required for execution The privileges of a user belonging to the "Administrators" group are required to execute this command
244 Note - To execute this command under Windows Server 2008/Windows Vista and later, execute with the administrator privilege. For Windows Server 2012/Windows 8 Right-click the Start menu (located at the bottom-left corner of the Desktop) and select Command Prompt (Admin). Run the command from the Command Prompt. For Windows Server 2008/Windows 7/Windows Vista From the Start menu, select All Programs - Accessories, then right-click Command Prompt, and select Run as administrator. Run the command from the Command Prompt. - To execute this command by registering it with Task Scheduler for the Windows Server 2008/Windows Vista and later, select the General tab of the Properties window for the task to be registered, and then select the Run with highest privileges checkbox. Function This command creates a scheduled report that has been registered using the Scheduled Report View. If this command is registered with a scheduler, the operation can be performed automatically. Created reports can be viewed in the Scheduled Report View. Syntax <Installation directory>\bin \sqcmakereport <Installation directory>\bin \sqcmakereport -c console_define [-g system_group] [-t begin_time -w begin_day -d begin_date] daily weekly monthly -c console_define [-g system_group] [-s start_day -e end_day] daily weekly monthly Operand Specifies the report format (daily, weekly or monthly). Options -c console_define Specifies the console definition name for the report to be created. This parameter cannot be omitted. -g system_group Specifies the system group name. Only registered scheduled reports whose conditions include the specified system group will be created. If this option is omitted, all scheduled reports that have been registered will be created. Point By registering the command with a scheduler with this option specified, report scheduling can be performed in system group units. -t begin_time
 that a weekly report will start.")
245 Specifies the time (0 to 23) local time that a daily report will start. A daily report will be created from 24 hours of data that commences at the specified time. If this option is omitted, the starting time defaults to "0". -w begin_day Specifies the day of the week (Su, Mo, Tu, We, Th, Fr, Sa) that a weekly report will start. A weekly report will be created from 7 days of data that commences on the specified day of the week. If this option is omitted, the starting day defaults to Sunday ("Su"). -d begin_date Specifies the date (1 to 28) that a monthly report will start. A monthly report will be created from one month of data that commences on the specified date. If this option is omitted, the starting date defaults to "1". Data from a given day is displayed after 9:00 AM on the next day. Refer to "Scheduled Report Operation Command" in the Reference Guide for details on options and other information. Usage example 1 The following example shows how to generate a daily report that begins at 9:00 am. It generates only reports where Business A is specified for the registration conditions for scheduled reports. > sqcmakereport -c DefaultConsole -g Business A -t 9 daily Usage example 2 The following uses registered scheduled reports to generate a daily report for 01 May > sqcmakereport -c DefaultConsole -s e daily Note When the Report Creation Command is executed, a number of pop-up messages such as the one shown below may open and then close on the Windows desktop momentarily. These windows are displayed when data is extracted from a PDB. They do not indicate a problem. If the command terminates abnormally with exception code 0xe06d7363, the desktop heap may be insufficient. Increase the size of the desktop heap by referring to "6.1 Content Display Errors". These pop-up windows can be prevented by specifying a different user from the usual login user in the "Run as:" option when registering the command with the scheduler. After executing the scheduled report creation command, check the results in the "5.4 Scheduled Report View"
246 5.3.2 sqcdeletereport(scheduled Report Deletion Command) Execution environment This command can be run on an operation management client. Privileges required for execution The privileges of a user belonging to the "Administrators" group are required to execute this command. Note - To execute this command under Windows Server 2008/Windows Vista and later, execute with the administrator privilege. For Windows Server 2012/Windows 8 Right-click the Start menu (located at the bottom-left corner of the Desktop) and select Command Prompt (Admin). Run the command from the Command Prompt. For Windows Server 2008/Windows 7/Windows Vista From the Start menu, select All Programs - Accessories, then right-click Command Prompt, and select Run as administrator. Run the command from the Command Prompt. - To execute this command by registering it with Task Scheduler for the Windows Server 2008/Windows Vista and later, select the General tab of the Properties window for the task to be registered, and then select the Run with highest privileges checkbox. Function This command is used to delete scheduled reports that are older than the number of days for which reports are to be stored. If this command is registered with the scheduler, it will delete scheduled reports automatically. Syntax sqcdeletereport -c console_define -d retention_days -w retention_days -m retention_days Options -c console_define Specifies the console definition name for the report to be deleted. This parameter cannot be omitted. -d retention_days Specifies the number of days (0 to 1500) to store daily reports. -w retention_days Specifies the number of days (0 to 1500) to store weekly reports. -m retention_days Specifies the number of days (0 to 1500) to store monthly reports. Point If the number of days to store reports is set to 0, no reports in the specified report format will be deleted

247 Reports that were created more than XX days before the command was executed will be deleted (where "XX" is the number of retention days). Usage example The following example shows the options used to specify a daily report storage period of 10 days, a weekly report storage period of 60 days and a monthly report storage period of 365 days. > sqcdeletereport -c DefaultConsole -d 10 -w 60 -m Example of registration with scheduler Use the Scheduled Report Creation Command and the Scheduled Report Deletion Command by registering them with software equipped with a scheduler function, such as walker Operation Manager. This section explains how to register these commands with scheduling software, using the Windows Task Scheduler as an example. 1. Select [Administrative Tools] and then [Task Scheduler] from the Control Panel
![2. [Create Task] of [Action] menu is clicked, [Create Task] screen is displayed, and [General] tab is selected.](/docs-images/93/111146287/images/248-0.jpg "[Name] and [Security options] are properly set.")
248 2. [Create Task] of [Action] menu is clicked, [Create Task] screen is displayed, and [General] tab is selected. [Name] and [Security options] are properly set. Point The user who has the Administrator authority is specified for [When running the task, use the following user account]
249 3. [Triggers] tab is selected
![4. [New] button is clicked, [New Trigger] screen is displayed.](/docs-images/93/111146287/images/250-0.jpg "The trigger condition of the task in the scheduled report is properly set to [Settings] and [Advanced settings] and [OK] clicks on a button.")
250 4. [New] button is clicked, [New Trigger] screen is displayed. The trigger condition of the task in the scheduled report is properly set to [Settings] and [Advanced settings] and [OK] clicks on a button. Point [Daily] is specified when the daily report is made, [Weekly] is specified when the weekly report is made, and when the monthly report is made, [Monthly] is specified
251 5. [Actions] tab is selected
![6. [New] button is clicked, [New Action] screen is displayed.](/docs-images/93/111146287/images/252-0.jpg "[Start a program] is selected with [Action], the sqcmakereport command (or sqcdeletereport command) is specified for [Program/script], the option of the command is specified for [Add")
252 6. [New] button is clicked, [New Action] screen is displayed. [Start a program] is selected with [Action], the sqcmakereport command (or sqcdeletereport command) is specified for [Program/script], the option of the command is specified for [Add arguments(optional)], and [OK] clicks on a button. Example of specifying [Program/script]. "C:\Program Files\walkerSQC-C\bin\sqcMakeReport.exe" Example of specifying [Add arguments(optional)]. -c DefaultConsole daily 7. [OK] of [Create Task] screen clicks on a button Backing up reports In order to preserve disk space, Fujitsu recommends that old scheduled reports be automatically deleted by scheduling the "5.3.2 sqcdeletereport(scheduled Report Deletion Command)". If it is necessary to retain past reports, the directory on the operation management client where the reports are stored can be backed up to another location
253 Scheduled daily, weekly and monthly reports are stored in a directory named "YYYYMMDDhhmmss_serial number" under the following directories. (YYYYMMDDhhmmss is the date and time of report creation.) - Daily Installation directory\www\html\consoleenvironments\console definition name \history_slc_daily - Weekly Installation directory\www\html\consoleenvironments\console definition name \history_slc_weekly - Monthly Installation directory\www\html\consoleenvironments\console definition name \history_slc_monthly Note If the save directory for analysis reports was changed using the method in "5.5 Storing Reports (Administrator Tasks)", then it must be backed up. Example Installation directory\www\html\consoleenvironments\defaultconsole \history_slc_daily \ _1 To view a report that has been backed up, open the file named "report.html" in the appropriate directory. Note - Only copy directories, and do not move them. To delete a directory from its original location, use the "5.3.2 sqcdeletereport(scheduled Report Deletion Command)". - Even if a report that has been deleted with the Scheduled Report Deletion Command is restored to its original location, it will not appear in the list of reports. View such reports from the directory to which they have been copied. - The date and time shown as part of the directory name ("YYYYMMDDhhmmss_serial number") is based on GMT. 5.4 Scheduled Report View This section explains how to use the Scheduled Report View. Starting the Scheduled Report View Open the Scheduled Report View by clicking the Console button on the Console Definitions tab of the Admin Console
254 The Scheduled Report View is started by selecting Scheduled Report from the global navigation bar in the Console window
255 Note Do not perform operations in the Scheduled Report View using the pop-up context menu that appears when the right mouse button is clicked. Window configuration The Scheduled Report View window will appear as below
256 The Scheduled Report View is organized as shown in the following table. Item No. Component (1) Global header The walker and Fujitsu logos are displayed. (2) Global navigation bar The menus are as follows: - Monitoring Opens the "Monitoring" window. Allows checks on the current status and isolates faults when they occur. - Analysis/Planning Opens the "Analysis/Planning" window. Analyzes service quality over the medium to long term to avoid future problems. - Scheduled Report Open the "Scheduled Report" window. Displays reports about service levels for the customer or for capacity planning. - Update Console Definition Reloads the console definitions - Help Opens User's Guide (Console Edition). (3) Search conditions area Set the search conditions to display the daily, weekly and monthly scheduled reports that were created in "5.3.1 sqcmakereport(scheduled Report Creation Command)". Search conditions can be registered

257 Item No. Component (4) Scheduled reports list area Scheduled reports are listed according to the search conditions specified in (3). Basic operation of the Scheduled Report view It is possible to operate it on the Scheduled Report view as follows. Operation Scheduled report displayed The scheduled report made by the sqcmakereport command is displayed. Refer to "5.3.1 sqcmakereport(scheduled Report Creation Command)" Search Conditions Area The search conditions area is explained. Basic operation Item No. Component (1) Search condition name Identifier for registered search conditions
User's Guide (Console Edition)
") walker Service Quality Coordinator User's Guide (Console Edition) Windows/Solaris/Linux J2X1-7660-01ENZ0(01) September 2012 Preface Purpose of this manual This manual explains how to use the operation
walker Service Quality Coordinator User's Guide (Console Edition) Windows/Solaris/Linux J2X1-7660-01ENZ0(01) September 2012 Preface Purpose of this manual This manual explains how to use the operation
User's Guide (Console Edition)
") Systemwalker Service Quality Coordinator User's Guide (Console Edition) Windows/Solaris/Linux J2X1-6830-02ENZ0(00) November 2010 Preface Purpose of this manual This manual explains how to use the operation
Systemwalker Service Quality Coordinator User's Guide (Console Edition) Windows/Solaris/Linux J2X1-6830-02ENZ0(00) November 2010 Preface Purpose of this manual This manual explains how to use the operation
User's Guide (Console Edition)
") Systemwalker Service Quality Coordinator User's Guide (Console Edition) Windows/Solaris/Linux J2X1-6830-03ENZ0(00) May 2011 Preface Purpose of this manual This manual explains how to use the operation
Systemwalker Service Quality Coordinator User's Guide (Console Edition) Windows/Solaris/Linux J2X1-6830-03ENZ0(00) May 2011 Preface Purpose of this manual This manual explains how to use the operation
User's Guide (Systemwalker User Management and Single Sign-On Edition)
") Systemwalker Service Quality Coordinator User's Guide (Systemwalker User Management and Single Sign-On Edition) Windows/Solaris/Linux J2X1-7665-02ENZ0(00) January 2013 Preface Purpose of this manual This
Systemwalker Service Quality Coordinator User's Guide (Systemwalker User Management and Single Sign-On Edition) Windows/Solaris/Linux J2X1-7665-02ENZ0(00) January 2013 Preface Purpose of this manual This
Systemwalker Service Quality Coordinator. Installation Guide. Windows/Solaris/Linux
 Systemwalker Service Quality Coordinator Installation Guide Windows/Solaris/Linux J2X1-7658-01ENZ0(01) September 2012 Preface Purpose of this manual This manual explains how to install Systemwalker Service
User's Guide (Website Management Functions Edition)
") Systemwalker Service Quality Coordinator User's Guide (Website Management Functions Edition) Windows/Solaris/Linux J2X1-7664-01ENZ0(00) July 2012 Preface Purpose of this manual This manual explains how
Systemwalker Service Quality Coordinator User's Guide (Website Management Functions Edition) Windows/Solaris/Linux J2X1-7664-01ENZ0(00) July 2012 Preface Purpose of this manual This manual explains how
Systemwalker Service Quality Coordinator. User's Guide. Windows/Solaris/Linux
 Systemwalker Service Quality Coordinator User's Guide Windows/Solaris/Linux J2X1-7659-01ENZ0(01) September 2012 Preface Purpose of this manual This manual describes the management functions provided by
Systemwalker Service Quality Coordinator. Technical Guide. Windows/Solaris/Linux
 Systemwalker Service Quality Coordinator Technical Guide Windows/Solaris/Linux J2X1-6800-03ENZ0(00) May 2011 Preface Purpose of this manual This manual explains the functions and usage of Systemwalker
Systemwalker Service Quality Coordinator. Reference Guide. Windows/Solaris/Linux
 Systemwalker Service Quality Coordinator Reference Guide Windows/Solaris/Linux J2X1-7662-01ENZ0(01) September 2012 Preface Purpose of this manual This manual explains the different commands and messages
Systemwalker Service Quality Coordinator. Technical Guide. Windows/Solaris/Linux
 Systemwalker Service Quality Coordinator Technical Guide Windows/Solaris/Linux J2X1-6800-02ENZ0(00) November 2010 Preface Purpose of this manual This manual explains the functions and usage of Systemwalker
Structure and Overview of Manuals
 FUJITSU Software Systemwalker Operation Manager Structure and Overview of Manuals UNIX/Windows(R) J2X1-6900-08ENZ0(00) May 2015 Introduction Purpose of This Document Please ensure that you read this document
ETERNUS SF Express V15.3/ Storage Cruiser V15.3/ AdvancedCopy Manager V15.3. Migration Guide
 ETERNUS SF Express V15.3/ Storage Cruiser V15.3/ AdvancedCopy Manager V15.3 Migration Guide B1FW-5958-06ENZ0(00) June 2013 Preface Purpose This manual describes how to upgrade to this version from the
ETERNUS SF Express V15.1/ Storage Cruiser V15.1/ AdvancedCopy Manager V15.1. Migration Guide
 ETERNUS SF Express V15.1/ Storage Cruiser V15.1/ AdvancedCopy Manager V15.1 Migration Guide B1FW-5958-03ENZ0(00) August 2012 Preface Purpose This manual describes how to upgrade to this version from the
FUJITSU Storage ETERNUS SF Express V16.3 / Storage Cruiser V16.3 / AdvancedCopy Manager V16.3. Migration Guide
 FUJITSU Storage ETERNUS SF Express V16.3 / Storage Cruiser V16.3 / AdvancedCopy Manager V16.3 Migration Guide B1FW-6000-04ENZ0(00) October 2015 Preface Purpose This manual describes how to upgrade to this
FUJITSU Storage ETERNUS SF Express V16.5 / Storage Cruiser V16.5 / AdvancedCopy Manager V16.5. Migration Guide
 FUJITSU Storage ETERNUS SF Express V16.5 / Storage Cruiser V16.5 / AdvancedCopy Manager V16.5 Migration Guide B1FW-6000-06ENZ0(01) June 2017 Preface Purpose This manual describes how to upgrade to this
Systemwalker Service Quality Coordinator. Reference Guide. Windows/Solaris/Linux
 Systemwalker Service Quality Coordinator Reference Guide Windows/Solaris/Linux J2X1-6840-03ENZ0(00) May 2011 Preface Purpose of this manual This manual explains the different commands and messages used
User's Guide - Master Schedule Management
 FUJITSU Software Systemwalker Operation Manager User's Guide - Master Schedule Management UNIX/Windows(R) J2X1-3170-14ENZ0(00) May 2015 Preface Purpose of This Document This document describes the Master
User's Guide (Website Management Functions Edition)
") Systemwalker Service Quality Coordinator User's Guide (Website Management Functions Edition) Windows/Solaris/Linux J2X1-6860-03ENZ0(00) May 2011 Preface Purpose of this manual This manual explains how
Systemwalker Service Quality Coordinator User's Guide (Website Management Functions Edition) Windows/Solaris/Linux J2X1-6860-03ENZ0(00) May 2011 Preface Purpose of this manual This manual explains how
FUJITSU Storage ETERNUS SF Storage Cruiser V16.3 / AdvancedCopy Manager V16.3. Cluster Environment Setup Guide
 FUJITSU Storage ETERNUS SF Storage Cruiser V16.3 / AdvancedCopy Manager V16.3 Cluster Environment Setup Guide B1FW-6006-04ENZ0(00) October 2015 Preface Purpose This manual provides information on installation
ETERNUS SF AdvancedCopy Manager V15.0. Quick Reference
 ETERNUS SF AdvancedCopy Manager V15.0 Quick Reference B1FW-5967-02ENZ0(00) April 2012 Preface Purpose This manual describes the pre-installation requirements, installation procedure, configuration procedure,
ETERNUS SF Storage Cruiser V15.0. Quick Reference
 ETERNUS SF Storage Cruiser V15.0 Quick Reference B1FW-5963-02ENZ0(00) April 2012 Preface Purpose This manual describes the pre-installation requirements, installation procedure, configuration procedure,
FUJITSU Software ServerView Resource Orchestrator Cloud Edition V Quick Start Guide. Windows/Linux
 FUJITSU Software ServerView Resource Orchestrator Cloud Edition V3.1.2 Quick Start Guide Windows/Linux J2X1-7622-06ENZ0(01) June 2014 Preface Purpose of This Document This manual explains the flow of installation
FUJITSU Software Systemwalker Operation Manager. Upgrade Guide. UNIX/Windows(R)
") FUJITSU Software Systemwalker Operation Manager Upgrade Guide UNIX/Windows(R) J2X1-3150-16ENZ0(00) May 2015 Preface Purpose of This Document This document describes the migration method, and notes when
FUJITSU Software Systemwalker Operation Manager Upgrade Guide UNIX/Windows(R) J2X1-3150-16ENZ0(00) May 2015 Preface Purpose of This Document This document describes the migration method, and notes when
Systemwalker Service Quality Coordinator. Reference Guide. Windows/Solaris/Linux
 Systemwalker Service Quality Coordinator Reference Guide Windows/Solaris/Linux J2X1-6840-02ENZ0(00) November 2010 Preface Purpose of this manual This manual explains the different commands and messages
FUJITSU Storage ETERNUS SF Storage Cruiser V16.5 / AdvancedCopy Manager V16.5. Cluster Environment Setup Guide
 FUJITSU Storage ETERNUS SF Storage Cruiser V16.5 / AdvancedCopy Manager V16.5 Cluster Environment Setup Guide B1FW-6006-06ENZ0(00) May 2017 Preface Purpose This manual provides information on installation
ServerView Resource Orchestrator Cloud Edition V Setup Guide. Windows/Linux
 ServerView Resource Orchestrator Cloud Edition V3.1.0 Setup Guide Windows/Linux J2X1-7610-02ENZ0(00) July 2012 Preface Resource Orchestrator Documentation Road Map The documentation road map for Resource
FUJITSU Storage ETERNUS SF Express V16.2 / Storage Cruiser V16.2 / AdvancedCopy Manager V16.2. Installation and Setup Guide
 FUJITSU Storage ETERNUS SF Express V16.2 / Storage Cruiser V16.2 / AdvancedCopy Manager V16.2 Installation and Setup Guide B1FW-5999-03ENZ0(02) July 2015 Preface Purpose This manual provides information
Troubleshooting Guide
 Systemwalker Runbook Automation Troubleshooting Guide Windows/Linux B1X1-0122-03ENZ0(00) July 2012 Preface Purpose of This Document This document describes how to deal with problems that occur with the
ServerView Resource Orchestrator Cloud Edition V Quick Start Guide. Windows/Linux
 ServerView Resource Orchestrator Cloud Edition V3.1.0 Quick Start Guide Windows/Linux J2X1-7622-02ENZ0(00) July 2012 Preface QSGDocument road map The following manuals are provided with Resource Orchestrator.
FUJITSU Software Systemwalker Software Configuration Manager. Operator's Guide. Windows/Linux
 FUJITSU Software Systemwalker Software Configuration Manager Operator's Guide Windows/Linux B1X1-0129-04ENZ0(00) March 2014 Preface Purpose of this Document This document explains patch management procedures
ETERNUS SF Express V15.0/ Storage Cruiser V15.0/ AdvancedCopy Manager V15.0. Migration Guide
 ETERNUS SF Express V15.0/ Storage Cruiser V15.0/ AdvancedCopy Manager V15.0 Migration Guide B1FW-5958-02ENZ0(01) May 2012 Preface Purpose This manual describes how to upgrade to this version from the previous
FUJITSU Software Systemwalker Software Configuration Manager. Release Notes. Windows/Linux
 FUJITSU Software Systemwalker Software Configuration Manager Release Notes B1X1-0125-05ENZ0(00) August 2014 Preface Purpose of this Document This document presents an overview of the functions that have
Operation Guide for Optimization Option
 ETERNUS SF Storage Cruiser V15.0 Operation Guide for Optimization Option Windows/Solaris/Linux B1FW-5965-02ENZ0(00) April 2012 Preface Purpose This manual describes Optimization Option, the optional product
User's Guide for Infrastructure Administrators (Resource Management)
") ServerView Resource Orchestrator Cloud Edition V3.0.0 User's Guide for Infrastructure Administrators (Resource Management) Windows/Linux J2X1-7612-01ENZ0(05) April 2012 Preface Purpose This manual provides
ServerView Resource Orchestrator Cloud Edition V3.0.0 User's Guide for Infrastructure Administrators (Resource Management) Windows/Linux J2X1-7612-01ENZ0(05) April 2012 Preface Purpose This manual provides
ETERNUS SF AdvancedCopy Manager Operator's Guide for Cluster Environment
 ETERNUS SF AdvancedCopy Manager 14.2 Operator's Guide for Cluster Environment J2X1-7452-04ENZ0(00) June 2011 Preface Purpose This manual explains the installation and customization of ETERNUS SF AdvancedCopy
Troubleshooting Guide
 Systemwalker Runbook Automation Troubleshooting Guide Windows/Linux B1X1-0122-04ENZ0(00) September 2012 Preface Purpose of This Document This document describes how to deal with problems that occur with
FUJITSU Software Systemwalker Software Configuration Manager. Parameter Reference. Windows/Linux
 FUJITSU Software Systemwalker Software Configuration Manager Parameter Reference /Linux B1X1-0313-03ENZ0(00) November 2015 Preface Purpose of this Document This document explains the parameter information
User's Guide for Infrastructure Administrators (Resource Management)
") FUJITSU Software ServerView Resource Orchestrator Cloud Edition V3.1.2 User's Guide for Infrastructure Administrators (Resource Management) Windows/Linux J2X1-7612-06ENZ0(05) June 2014 Preface Purpose
FUJITSU Software ServerView Resource Orchestrator Cloud Edition V3.1.2 User's Guide for Infrastructure Administrators (Resource Management) Windows/Linux J2X1-7612-06ENZ0(05) June 2014 Preface Purpose
FUJITSU Storage ETERNUS SF Express V16.1 / Storage Cruiser V16.1 / AdvancedCopy Manager V16.1. Installation and Setup Guide
 FUJITSU Storage ETERNUS SF Express V16.1 / Storage Cruiser V16.1 / AdvancedCopy Manager V16.1 Installation and Setup Guide B1FW-5999-02ENZ0(00) June 2014 Preface Purpose This manual provides information
ServerView Resource Orchestrator Virtual Edition V User's Guide. Windows/Linux
 ServerView Resource Orchestrator Virtual Edition V3.1.1 User's Guide Windows/Linux J2X1-7606-05ENZ0(04) August 2013 Preface Purpose of This Document This manual provides an outline of the operation method
FUJITSU Software Systemwalker Operation Manager. Release Guide. UNIX/Windows(R)
") FUJITSU Software Systemwalker Operation Manager Release Guide UNIX/Windows(R) B1X1-0251-02ENZ0(00) May 2015 Preface Purpose of This Document This document describes the migration method, notes, and incompatible
FUJITSU Software Systemwalker Operation Manager Release Guide UNIX/Windows(R) B1X1-0251-02ENZ0(00) May 2015 Preface Purpose of This Document This document describes the migration method, notes, and incompatible
FUJITSU Storage ETERNUS SF Express V16.5 / Storage Cruiser V16.5 / AdvancedCopy Manager V16.5. Installation and Setup Guide
 FUJITSU Storage ETERNUS SF Express V16.5 / Storage Cruiser V16.5 / AdvancedCopy Manager V16.5 Installation and Setup Guide B1FW-5999-06ENZ0(00) May 2017 Preface Purpose This manual provides information
ETERNUS SF AdvancedCopy Manager V13.3 Message Guide
 B1WW-8881-05ENZ0 (00) ETERNUS SF AdvancedCopy Manager V13.3 Message Guide ii Preface About This Manual This manual explains the messages output by ETERNUS SF AdvancedCopy Manager. Intended Reader This
Setup Guide for Wily Introscope Integration
 Interstage Business Process Manager Analytics V11.1 Setup Guide for Wily Introscope Integration Windows/Solaris/Linux B1X1-0028-01ENZ0(00) July 2010 About this Manual This document provides how to setup
FUJITSU Software ServerView Resource Orchestrator Virtual Edition V Operation Guide. Windows/Linux
 FUJITSU Software ServerView Resource Orchestrator Virtual Edition V3.1.2 Operation Guide Windows/Linux J2X1-7605-06ENZ0(03) June 2014 Preface Purpose of This Document This manual explains how to operate
User's Guide for Infrastructure Administrators
 FUJITSU Software ServerView Resource Orchestrator Cloud Edition V3.1.2 User's Guide for Infrastructure Administrators Windows/Linux J2X1-7613-06ENZ0(03) June 2014 Preface Purpose This manual provides an
ServerView Resource Orchestrator Virtual Edition V User's Guide. Windows/Linux
 ServerView Resource Orchestrator Virtual Edition V3.0.0 User's Guide Windows/Linux J2X1-7606-01ENZ0(05) April 2012 Preface Purpose This manual provides an outline of ServerView Resource Orchestrator (hereinafter
Systemwalker User's Guide - Systemwalker User Management and Single Sign-On. UNIX/Windows(R)
") Systemwalker User's Guide - Systemwalker User Management and Single Sign-On UNIX/Windows(R) J2X1-7470-05ENZ0(00) April 2012 Preface Purpose of This Document This document explains how to install the Systemwalker
Systemwalker User's Guide - Systemwalker User Management and Single Sign-On UNIX/Windows(R) J2X1-7470-05ENZ0(00) April 2012 Preface Purpose of This Document This document explains how to install the Systemwalker
ETERNUS SF AdvancedCopy Manager Operator's Guide for Tape Server Option
 ETERNUS SF AdvancedCopy Manager 14.0 Operator's Guide for Tape Server Option J2X1-7453-01ENZ0(00) July 2009 Preface Purpose This manual describes the functionality of ETERNUS SF AdvancedCopy Manager for
User's Guide for Tenant Users
 ServerView Resource Orchestrator Cloud Edition V3.0.0 User's Guide for Tenant Users Windows/Linux J2X1-7615-01ENZ0(05) April 2012 Preface Purpose This document explains how to operate the ROR Console provided
ServerView Resource Orchestrator V User's Guide. Windows/Linux
 ServerView Resource Orchestrator V2.3.0 User's Guide Windows/Linux J2X1-7530-01ENZ0(02) July 2011 Preface Purpose This manual provides an outline of ServerView Resource Orchestrator (hereinafter Resource
Dashboard / Output Guide
 Interstage Business Process Manager Analytics V11.0 Dashboard / Output Guide Windows/Solaris/Linux J2U3-0053-01(00) December 2009 About this Manual This document describes how to use the Dashboard to display
Interstage Business Process Manager Analytics V12.1. Migration Guide. Windows/Linux
 Interstage Business Process Manager Analytics V12.1 Migration Guide Windows/Linux B1X1-0160-02ENZ0(00) January 2013 Preface This chapter provides a general introduction to this user guide, describing its
ETERNUS SF AdvancedCopy Manager Overview
 ETERNUS SF AdvancedCopy Manager 14.2 Overview J2X1-7443-04ENZ0(00) June 2011 Preface Purpose This manual provides an overview of the ETERNUS SF AdvancedCopy Manager. This manual describes the ETERNUS SF
FUJITSU Storage ETERNUS SF Storage Cruiser V16.2 / AdvancedCopy Manager V16.2. Operation Guide for VMware vsphere Virtual Volumes
 FUJITSU Storage ETERNUS SF Storage Cruiser V16.2 / AdvancedCopy Manager V16.2 Operation Guide for VMware vsphere Virtual Volumes B1FW-6020-01ENZ0(02) July 2015 Preface Purpose This manual explains the
FUJITSU Software Interstage Business Process Manager Analytics V Migration Guide. Linux
 FUJITSU Software Interstage Business Process Manager Analytics V12.2.1 Migration Guide Linux B1X1-0160-04ENZ0(00) December 2014 Preface This chapter provides a general introduction to this user guide,
IaaS Integration Guide
 FUJITSU Software Enterprise Service Catalog Manager V16.1.0 IaaS Integration Guide Windows(64) B1WS-1259-02ENZ0(00) September 2016 Preface Purpose of This Document This document explains the introduction
Systemwalker Software Configuration Manager. Technical Guide. Windows/Linux
 Systemwalker Software Configuration Manager Technical Guide Windows/Linux B1X1-0126-04ENZ0(00) January 2013 Preface Purpose of this Document This document explains the functions of Systemwalker Software
Process Discovery (BPM-E) Web Flow Viewer User's Guide
 Web Flow Viewer User's Guide") Interstage Business Process Manager Analytics V11.1 Process Discovery (BPM-E) Web Flow Viewer User's Guide Windows B1X1-0030-01ENZ0(00) July 2010 About this Manual This manual explains the web-based flow
Interstage Business Process Manager Analytics V11.1 Process Discovery (BPM-E) Web Flow Viewer User's Guide Windows B1X1-0030-01ENZ0(00) July 2010 About this Manual This manual explains the web-based flow
Handbook for the Process Discovery
 Interstage Business Process Manager Analytics V12.1 Handbook for the Process Discovery Solaris J2S0-0435-01ENZ0(00) April 2013 About this Manual This section explains summary, chapter overview, abbreviations,
ServerView Resource Orchestrator V User's Guide. Windows/Linux
 ServerView Resource Orchestrator V2.2.1 User's Guide Windows/Linux J2X1-7526-01ENZ0(01) November 2010 Preface Purpose This manual provides an outline of ServerView Resource Orchestrator (hereinafter Resource
FUJITSU Software ServerView Resource Orchestrator Cloud Edition V Setup Guide. Windows/Linux
 FUJITSU Software ServerView Resource Orchestrator Cloud Edition V3.2.0 Setup Guide Windows/Linux J2X1-7610-07ENZ0(10) December 2016 Preface Purpose of This Document This manual provides information on
FUJITSU Storage ETERNUS SF Storage Cruiser V16.1. Operation Guide
 FUJITSU Storage ETERNUS SF Storage Cruiser V16.1 Operation Guide B1FW-6007-02ENZ0(01) July 2014 Preface Purpose This manual describes the FUJITSU Storage ETERNUS SF Storage Cruiser used by the following
ETERNUS SF Express V15.0. Operation Guide. Windows/Linux
 ETERNUS SF Express V15.0 Operation Guide Windows/Linux B1FW-5962-01ENZ0(02) March 2012 Preface Purpose This manual gives an overview of ETERNUS SF Express. ETERNUS SF Express is part of the following Storage
ETERNUS SF AdvancedCopy Manager V13.1 Operator's Guide for Tape Backup Option
 J2S2-0560-02ENZ0(A) ETERNUS SF AdvancedCopy Manager V13.1 Operator's Guide for Tape Backup Option Preface ++ Purpose This manual describes the functionality of ETERNUS SF AdvancedCopy Manager for Tape
Operation Guide for Optimization Function
 FUJITSU Storage ETERNUS SF Storage Cruiser V16.5 Operation Guide for Optimization Function Windows/Solaris/Linux B1FW-6008-06ENZ0(00) May 2017 Preface Purpose This manual describes the Optimization Function,
ServerView Resource Coordinator VE. Installation Guide. Windows/Linux
 ServerView Resource Coordinator VE Installation Guide Windows/Linux J2X1-7458-03ENZ0(00) February 2010 Preface Purpose This manual explains how to install ServerView Resource Coordinator VE (hereinafter
Operation Guide for Copy Control Module
 ETERNUS SF Express V15.3/ AdvancedCopy Manager V15.3 Operation Guide for Copy Control Module Windows/Solaris/Linux B1FW-5959-05ENZ0(01) April 2014 Preface Purpose This manual describes the how to use the
ETERNUS SF Storage Cruiser Message Guide. Windows/Solaris/Linux
 ETERNUS SF Storage Cruiser 14.2 Message Guide Windows/Solaris/Linux J2S2-1548-03ENZ0(00) June 2010 Preface Purpose This manual explains the output messages related to storage management of ETERNUS SF Storage
FUJITSU Storage ETERNUS SF Storage Cruiser V16.6 / AdvancedCopy Manager V16.6. Operation Guide for VMware vsphere Virtual Volumes
 FUJITSU Storage ETERNUS SF Storage Cruiser V16.6 / AdvancedCopy Manager V16.6 Operation Guide for VMware vsphere Virtual Volumes B1FW-6020-05ENZ0(00) December 2017 Preface Purpose This manual explains
ETERNUS SF AdvancedCopy Manager GUI User's Guide
 ETERNUS SF AdvancedCopy Manager 14.1 GUI User's Guide J2X1-7450-02ENZ0(00) January 2010 Preface Purpose of the User's Guide The AdvancedCopy Manager GUI User's Guide provides detailed information relating
FUJITSU Software ServerView Resource Orchestrator V Overview. Windows/Linux
 FUJITSU Software ServerView Resource Orchestrator V3.1.2 Overview Windows/Linux J2X1-7770-02ENZ0(02) June 2014 Preface Purpose of This Document This manual provides an overview of FUJITSU Software ServerView
Systemwalker Software Configuration Manager. Operation Guide. Windows/Linux
 Systemwalker Software Configuration Manager Operation Guide Windows/Linux B1X1-0128-04ENZ0(00) January 2013 Preface Purpose of this Document This document explains how to use the different features and
ETERNUS SF Storage Cruiser Message Guide. Windows/Solaris/Linux
 ETERNUS SF Storage Cruiser 14.0 Message Guide Windows/Solaris/Linux J2S2-1548-01ENZ0(00) July 2009 Preface Purpose This manual explains the output messages related to storage management of ETERNUS SF Storage
ServerView Resource Coordinator VE. Setup Guide. Windows/Linux
 ServerView Resource Coordinator VE Setup Guide Windows/Linux J2X1-7459-02ENZ0(00) November 2009 Preface Purpose This manual contains an outline of ServerView Resource Coordinator VE (hereinafter Resource
Interstage Business Process Manager Analytics V11.1. Installation Guide. Windows/Solaris/Linux
 Interstage Business Process Manager Analytics V11.1 Installation Guide Windows/Solaris/Linux J2U3-0052-02(00) July 2010 About this Manual This document describes how to install Interstage Business Process
ETERNUS SF AdvancedCopy Manager Glossary
 ETERNUS SF AdvancedCopy Manager 14.1 Glossary J2X1-7455-02ENZ0(00) January 2010 Preface Purpose This manual describes the terminology used in the ETERNUS SF AdvancedCopy Manager manuals. Intended Readers
Systemwalker Runbook Automation. Studio User's Guide. Windows/Linux
 Systemwalker Runbook Automation Studio User's Guide Windows/Linux B1X1-0116-05ENZ0(00) April 2014 Preface Purpose of this Document This document describes the procedures for developing and managing Automated
ETERNUS SF Express V15.2/ Storage Cruiser V15.2/ AdvancedCopy Manager V15.2. Web Console Guide. Windows
 ETERNUS SF Express V15.2/ Storage Cruiser V15.2/ AdvancedCopy Manager V15.2 Web Console Guide Windows B1FW-5955-04ENZ0(01) February 2013 Preface Purpose This Manual describes the ETERNUS SF Web Console
FUJITSU Storage ETERNUS SF AdvancedCopy Manager V16.1. Overview
 FUJITSU Storage ETERNUS SF AdvancedCopy Manager V16.1 Overview B1FW-6009-02ENZ0(00) June 2014 Preface Purpose This manual provides an overview for understanding the FUJITSU Storage ETERNUS SF AdvancedCopy
FUJITSU Software ServerView Resource Orchestrator Cloud Edition V Design Guide. Windows/Linux
 FUJITSU Software ServerView Resource Orchestrator Cloud Edition V3.1.2 Design Guide Windows/Linux J2X1-7673-05ENZ0(07) November 2015 Preface Purpose of This Document This manual provides an outline of
FUJITSU Software ServerView Resource Orchestrator Cloud Edition V Operation Guide. Windows/Linux
 FUJITSU Software ServerView Resource Orchestrator Cloud Edition V3.1.2 Operation Guide Windows/Linux J2X1-7611-06ENZ0(03) June 2014 Preface Purpose of This Document This manual explains how to operate
FUJITSU Software Interstage Studio V11.1. Installation Guide
 FUJITSU Software Interstage Studio V11.1 Installation Guide B1WD-3159-02ENZ0(00) November 2013 Preface Purpose This manual, the Interstage Studio Installation Guide, explains how to setup Interstage Studio.
ETERNUS SF AdvancedCopy Manager V13.2 Operator's Guide (Linux)
") J2UZ-8170-03ENZ0(A) ETERNUS SF AdvancedCopy Manager V13.2 Operator's Guide (Linux) ii Preface ++ Purpose This manual describes the operations available on ETERNUS SF AdvancedCopy Manager. ++ Intended Readers
J2UZ-8170-03ENZ0(A) ETERNUS SF AdvancedCopy Manager V13.2 Operator's Guide (Linux) ii Preface ++ Purpose This manual describes the operations available on ETERNUS SF AdvancedCopy Manager. ++ Intended Readers
User's Guide for Tenant Administrators
 FUJITSU Software ServerView Resource Orchestrator Cloud Edition V3.1.2 User's Guide for Tenant Administrators Windows/Linux J2X1-7614-06ENZ0(03) June 2014 Preface Purpose This manual provides an outline
Interstage Shunsaku Data Manager Using the Shunsaku Manuals
 Interstage Data Manager Using the Manuals Using the Manuals Trademarks Trademarks of other companies are used in this manual only to identify particular products or systems. Product Microsoft, Visual C++,
FUJITSU Storage ETERNUS SF AdvancedCopy Manager V16.0. Overview
 FUJITSU Storage ETERNUS SF AdvancedCopy Manager V16.0 Overview B1FW-6009-01ENZ0(01) May 2014 Preface Purpose This manual provides an overview for understanding the FUJITSU Storage ETERNUS SF AdvancedCopy
Systemwalker Software Configuration Manager. Reference Guide. Windows/Linux
 Systemwalker Software Configuration Manager Reference Guide Windows/Linux B1X1-0130-04ENZ0(00) January 2013 Preface Purpose of this Document This document explains the commands and files provided by Systemwalker
IaaS Integration Guide
 FUJITSU Software Enterprise Service Catalog Manager V16.0.0 IaaS Integration Guide Windows(64) B1WS-1259-01ENZ0(00) February 2016 Preface Purpose of This Document This document explains the introduction
ServerView Resource Coordinator VE V Messages. Windows/Linux
 ServerView Resource Coordinator VE V2.2.2 Messages Windows/Linux J2X1-7462-06ENZ0(04) August 2011 Preface Purpose This manual provides an explanation of messages used by ServerView Resource Coordinator
ServerView Resource Orchestrator Cloud Edition V Design Guide. Windows/Linux
 ServerView Resource Orchestrator Cloud Edition V3.1.0 Design Guide Windows/Linux J2X1767301ENZ0(00) July 2012 Preface Resource Orchestrator Documentation Road Map The documentation road map for Resource
ServerView Resource Orchestrator Virtual Edition V Messages. Windows/Linux
 ServerView Resource Orchestrator Virtual Edition V3.0.0 Messages Windows/Linux J2X1-7608-01ENZ0(05) April 2012 Preface Purpose This manual provides an explanation of messages used by ServerView Resource
ETERNUS SF AdvancedCopy Manager V13.2 GUI User s Guide
 B1WW-8871-03ENZ0(00) ETERNUS SF AdvancedCopy Manager V13.2 GUI User s Guide ii Preface ++ Purpose This manual explains how to operate the Web-GUI with ETERNUS SF AdvancedCopy Manager. ++ Reader This manual
ServerView Resource Orchestrator Virtual Edition V Setup Guide. Windows/Linux
 ServerView Resource Orchestrator Virtual Edition V3.0.0 Setup Guide Windows/Linux J2X1-7604-01ENZ0(06) March 2013 Preface Purpose This manual provides an outline of ServerView Resource Orchestrator (hereinafter
FUJITSU Storage ETERNUS SF Storage Cruiser V16.5. Operation Guide
 FUJITSU Storage ETERNUS SF Storage Cruiser V16.5 Operation Guide B1FW-6007-06ENZ0(00) May 2017 Preface Purpose This manual describes how to use FUJITSU Storage ETERNUS SF Storage Cruiser (hereafter abbreviated
Troubleshooting Guide
 Systemwalker Runbook Automation Troubleshooting Guide Windows/Linux B1X1-0122-05ENZ0(00) February 2013 Preface Purpose of This Document This document describes how to deal with problems that occur with
Operation Guide for Copy Control Module
 FUJITSU Storage ETERNUS SF AdvancedCopy Manager V16.2 Operation Guide for Copy Control Module Windows/Solaris/Linux B1FW-6015-03ENZ0(02) July 2015 Preface Purpose This manual describes the how to deliver
User's Guide for Tenant Users
 ServerView Resource Orchestrator Cloud Edition V3.1.1 User's Guide for Tenant Users Windows/Linux J2X1-7615-05ENZ0(03) August 2013 Preface Purpose This manual provides an outline of ServerView Resource
FUJITSU Storage ETERNUS SF Express V16.4 / Storage Cruiser V16.4 / AdvancedCopy Manager V16.4. Web Console Guide. Windows
 FUJITSU Storage ETERNUS SF Express V16.4 / Storage Cruiser V16.4 / AdvancedCopy Manager V16.4 Web Console Guide Windows B1FW-6001-05ENZ0(00) October 2016 Preface Purpose This manual describes the ETERNUS
FUJITSU Software ServerView Resource Orchestrator V Overview. Windows/Linux
 FUJITSU Software ServerView Resource Orchestrator V3.2.0 Overview Windows/Linux J2X1-7770-03ENZ0(11) December 2016 Preface Purpose of This Document This manual provides an overview of FUJITSU Software