INSTALLATION MANUAL for the Application ihc-mirf
|
|
|
- Michael Atkinson
- 6 years ago
- Views:
Transcription


1 INSTALLATION MANUAL for the Application ihc-mirf
2 Contents Introduction 3 Installing the application on a mobile phone 3 Settings 4 Control 12


3 Introduction The applications ihc-mirf (for mobile phones with IOS) are designed for comfortable control of the RF Control electrical installation using your mobile telephone. This is an RF Control system accessory, and as a part of the inels Smart Home Solution, its elegance blends in with any modern home. The menu is divided into clearly structured sections in which the icons indicate individual functions. Here you will also find faster access to your favorite functions, and you will maintain a constant clear view of what s happening in and around your home. Thanks to ihc-mirf (the application ), you can perfectly control the function of your wireless RF Control electrical installation. You thus keep complete control over your home lights, appliance switching and heating. The application only works with the device elan-rf-003 or elan-rf-wi-003. This unit must be used in your wireless installation. It is designed for devices with IOS 8.0 and higher. It is optimized for devices with a display resolution of 800x480 The application language follows the language set in the IOS Implemented communication with Axis video cameras, thanks to which you can monitor what s going on around your home. It also enables control for multiple users at once (by entering multiple IP addresses). It enable creation of week-long programming or communicating with temperature units. Setting options: max. number of actuator per application- 40 max. number of time schedules (for dimming and switching)- 16 max. number of time schedules, heating- 16 max. number of actuators in one schedule - 8 max. number of intervals in one schedule - 8 max. number of heating circuits - 16 max. number of heating and cooling devices in one heating circuit 10 max. number of central sources - 10 Downloading: Download the current version (named ihc-mirf) at the Apps store. Installing the application on a mobile phone - Connect to the Internet using your mobile telephone. - Activate the service app store. - In the search bar, enter the password inels and press Search. - Select the application inels Home Control RF Mobile for iphone from the list and open the dialog box with information on this application. - Click on Install. - After the application is successfully installed in the phone, instead of the button Install, the button Open appears. 3 / 14


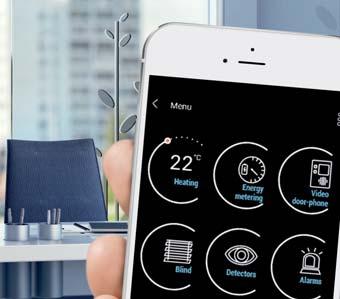
4 Settings The application ihc-marf is designed for controlling the installation so that once started, it immediately offers control over the electrical installation. To achieve this with as few presses as possible, you must first set up and configure the application. Initial display upon running the application*: Basic upper bar of the telephone Tab Scenes The home application desktop. After configuring, the basic tiles of the control system are displayed. Tab Cameras Tab Favorites By pressing Settings, the basic application settings menu displays. Setting the IP address of the communication interface, by means of which the telephone communicates with the wireless units elan-rf Selection for setting the tab Heating Selection for setting the tab Scenes Selection for setting the tab Others Selection for the basic configuration of the application and device, elan-rf device settings. Configuration of the project of the installation, assigning addresses, pairing actuators, assigning icons, etc. Selection for setting the tab Favorites Selection for setting the tab Cameras Help button Tab Settings * If elan is connected with the application, the top bar is blue. A grey bar shows loss of connection between elan and application. Tab - elan Settings Manually adding elan-rf: If you know the IP address elan-rf to which you want to connect, you can press the button Add. Enter its name (any name) and IP address. Automatic search: Press the icon search. Discovered elan-rf units appear that are located in your network to which you are currently connected by phone (home network). Icon Search Searched elan-rf By pressing the required elan-rf, a window opens up for you to name it. After entering the name, confirm by pressing OK (if manually entering, the elan-rf is named when added). In this device list, you can have several elan-rf devices and IP addresses configured. Here you can introduce one elan-rf even with two IP addresses (with an internal IP address for the home network and a public IP address for remote communication). Button for manually adding elan-rf By pressing Refresh, you can restart a search for elan-rf in your network For the application to run properly, you must highlight it in the list of the elan-rf with which the application is to primarily communicate 10s after designating the application starts automatically downloading all the settings from elan-rf (if elan is already coupled to RF). By pressing Back, you return to the settings menu. If you have already set up the elan-rf, click Back to go back to the desktop with set-up units. If you are setting up the elan-rf for the first time, continue setting it up according to the manual. Any name will suffice Selection of the required elan-rf 4 / 14
 In the field Select room type, choose the room icon.")

5 Tab - Configuration By pressing the tab Configuration, you will arrive at the basic settings menu. Rooms In the field Name of room, you can enter any name (even with diacritical marks) In the field Select room type, choose the room icon. If you only create one room, the device is displayed directly on the desktop. Window for name of room Window for selecting room icon Button for adding Rooms Button for saving the selected room Units To add a unit that you want to control through the application, you must fill in the fields: 1. Name of unit - any name 2. Enter the unit address the address is a six-digit code listed on the unit box. 3. Type of unit - select type of unit. 4. Temperature offset - set the offset (if the temperature from the actuator sensor differs from the true ambient temperature) - only for Thermal elements. 5. Select type of icon to be displayed. Entering any name of unit Entering added unit address Window for selecting unit type Removing a unit by a long press on the given unit. Modification / renaming by a short press on the given unit, you will open the settings options. Modify the offset Window for selecting icon type Button for saving the added device Added units Add units After adding rooms and all required units, it is a good idea for a clearer picture to assign units to individual rooms, in which they are found (not a condition). Select the room in the menu Add units. By pressing, you assign the unit to the selected room. By pressing Next, you can select the next option and continue assigning. Upon a change in assigned units, continue the same way by pressing, you change the device selection status. Selection of the room for adding units Confirmation button upon selecting the unit Next button for continuing and consequent saving 5 / 14


, this allows you to copy to other days.")
6 Plan In the plan, you can set the desired function element depending on day and time. In the Name field, type the name of schedule. In the Elements 1-8 mark the elements that you want to associate with the plan. One plan can be assigned to the elements of one type. Confirm by pressing OK. Displays menu functions for different types of elements: - Switching: the possibility of setting ON / OFF - Switch for blinds: blinds up / down. - Dimming: 3 adjustable levels of brightness and illumination up to 100%. Upon pressing the Next button a graph appears, where you can set the schedule function. When creating a plan, you will see a graph displayed for Monday. Click (+) New you can set the time intervals (in hours and minutes) and choose the desired function. You can create up to eight time periods for one day, which you can change at any time during use. You can set the timetable by using the Copy (+), this allows you to copy to other days. By pressing All-copy you can schedule all the days of the week. Pressing the Save button saves the settings. Modify / delete the time interval. In the required time plan, press Next. By a long press right on the time interval, you open a table for modifying the time or deleting the interval. Save the time interval modification by pressing Save and then confirming by pressing Save settings. Pressing expands all the elements associated with the schedule Vertical time interval slider Schedule for the different levels of brightness with a dimmer feature Fast modification of time interval. Shortly press the time interval, and it will set the sliders. You can modify the interval as needed by simply moving the sliders to the sides. 6 / 14


7 Tab - Heating You can control heating in the application from the central source to control e.g. of a RFATV-1 thermovalve mounted on a heater valve. Selection for setting the tab Heating Direct control of thermo-valve RFATV-1 You can add thermo-valve to the room as a separate unit, without having to be assigned to the heating area. Thermo-valve has a built in temperature sensor. App lets you operate your heating (where thermos-valve is installed). Name the thermo-valve Thermo-valve address Window for selecting unit type Modify the offset Confirmation button upon selecting the unit Window for selecting icon type Control using a time schedule The first step is selecting the central heating source (if it is necessary to control it) e.g. switching on an electric boiler. The next step is placing units for temperature control (heating units, switches, thermovalves) in the required space (room). You can have units placed in the required room for temperature control even without controlling the central heating. Naming the time plan Assigning modes: Selectable hysteresis 1. Time plan for heating, which you want to use. In the field Name, enter the name of the heating program In the field Hysteresis, select the required hysteresis in a range of C. Setting heat modes - by pressing on the window beside the time modes, you can modify temperatures for individual rooms. In the lower right corner, press Next. Adjustable temperatures for individual modes Once the menu drops down, select the temperature by means of pickers 7 / 14
 New, you can set the time intervals (in hours and minutes) and select a heating mode for them.")

8 The graph appears, where you set the time plan of heating modes. By default, the heating mode Minimum is set throughout the week throughout a 24-hour time axis. When creating a time plan, you will see displayed the heating mode for Monday. By pressing (+) New, you can set the time intervals (in hours and minutes) and select a heating mode for them. You can create up to 8 time intervals for a single day, which can be changed at any time during use. By pressing (+) Copy to, you can copy the set time schedule to other days. By pressing All, you will copy over the time schedule to all days of the week. By pressing the button Save, you can save the settings. Setting the start of the time interval Setting the end of the time interval Setting the end of the time interval Heating modes with set temperature Name Button for saving Time interval Button for adding a time interval Button for copying the daily plan Set day Slide for setting further days Modify / delete the time interval. In the required time plan, press Next. By a long press right on the time interval, you open a table for modifying the time and mode or deleting the interval. Save the time interval modification by pressing Save and then confirming by pressing Save settings. Option of changing the interval time Option of changing the heat mode Button for deleting time interval Button for storing the modified time interval Fast modification of time interval. Shortly press the time interval, and it will set the sliders. You can modify the interval as needed by simply moving the sliders to the sides. Vertical time interval slider Modified time interval 8 / 14
 Select the temperature sensor - select the required unit with temperature sensor (e.g. RFATV-1).")
.")


9 2. Heating circuits (heating rooms) to which you can assign time plans. Press Heating circuit, and by pressing Add at the bottom right, you will create a new heating circuit. Name enter the name of the heating circuit (e.g.: Room 1) Select the temperature sensor - select the required unit with temperature sensor (e.g. RFATV-1). Some units have two temperature sensors - internal and external - selected the required one*. Select the temperature plan from the set menu. Select holiday plan - a set menu. The schedule is be activated by one press and is used for temporary discontinuation of the extended schedule (not a condition). Select heating - here select the units found in the given area and those that you want to control heating of a room. If you have a controlled central heating source, you can assign it to the selected heating For easier control, we recommend creating a separate room for heating circuits, into which you will assign all heating circuits. Select the name of the heating circuit Select the temperature sensor Select the temperature plan Select the temperature plan Select the heating that the room contains Press to display the heating selection Selection of central heating source * RFSTI-11/G: a choice between internal and external sensors and mixedmode (mixed mode - measured space temperature sensor internal and external sensor monitors the critical temperature of the floor, when exceeding of the critical temperature occurs the floor heating is turned off regardless of the temperature measured by the internal sensor). 3. Central source Press Central source, and by pressing Add at the bottom right, you will create a new central source. Name enter the name of the central heating source. Unit select the unit by which you switch on the central source. Heating circuit indicate the heating circuits that you want linked to the central source. Save by pressing Save. Name of central heating source Select the unit for the central heating source Assigning a central heating source to the heating circuit Button for saving the central heating source Tab - Favorites By pressing Add, a list opens of configured devices, which you will designate with. After pressing Save, it is assigned to the list in the Favorites tab. THERMO-VALVE Field for selecting the device in the Favorites tab List of all devices configured in elan-rf Button for saving the Favorites tab configuration 9 / 14


10 Tab - Scenes The list of scenes is used to activate the user s predefined scenes, such as all off, all on, all blinds up, all on - all blinds down, etc. After pressing the Scenes tab, press Add. Name enter the name of the light scene. By designating you select the units you want to assign to the light scene. When finished selecting, press Next. Choose the functions of the single units you wish to perform when launching the scenes. Field for selecting from used units for configuration in the Scenes tab Name the scene Scroll bar of selected units in the created scene. Primarily, units are selected at the middle position of the scroll bar - under the scene name The Next button for selecting units switches to the display for setting the functions of selected units At the dimmer settings function, set the required brightness that the unit sets when the scene is activated Tab - Cameras If you wish to have video cameras always at hand, you can add them to the quick display - Tiles. In the ihc application, you can also view the current image (stream) from home security Axis IP video cameras, custom. By pressing Save, you will open the menu with settings to Axis IP video cameras. Note: When using other than the recommended IP cameras custom, format of stream requires mjpg. Please insert this format in the column Enter an address of camera. To access your stream please use e.g. web interface or check in the camera manual. If the stream is not in a format MJPG, the App connection attempt will fail. Example: Address format: ip address:port/mjpg/video.mjpg Address format example: :80/mjpg/video.mjpg Field for displaying the IP address of the installed video camera Field Type of video camera - selection field with menu of video camera manufactures inels cam, Axis and custom. ROOM Field for arbitrary naming of the IP video camera e.g. Living room Field for entering the log-in name to the added IP video camera Field for entering the log-in password to the added IP video camera After filling in items on the display, press Save. The application saves the settings and automatically adds the video camera to the list of devices in the Cameras tab. Removing a video camera from the list by a long press on the given item in the list. The application allows full screen video camera display; press and hold the relevant video camera view to open the PTZ panel to control it (if the PTZ camera supports it). CAMERA Cameras tab with defined video cameras and camera view in the tile position on the desktop Open tile of the defined IP video camera in the ihc application. The video image (stream) from the video camera now automatically reverses based on the telephone s approved services PTZ control elements 10 / 14


11 Tab - Other In the selection field Display panel Favorite items after startup, set the list of favorite items on the start page after starting the application. In the selection field Receive notifications on new firmware - set automatic checking of availability of the newest version of firmware for your elan-rf, and you will receive notifications to your mobile phone. After receiving notification, the application will ask you to update in the form of a red circle with an exclamation point. Pressing the button with the update offer will lead you to the menu Other. By pressing Update elan, the firmware in your elan-rf will be automatically updated. After using the function Receive notifications on new firmware, you must have an Internet connection via Wi-Fi network or mobile data. Confirmation button for displaying the panel Favorites after startup Confirmation button for obtaining notification on availability of a new firmware version of elan-rf Button after downloading the latest firmware version into a mobile telephone Enable checking of the time in elan - function monitors elan time synchronization and applications (eg. If elan is not connected to the Internet). If the difference is more than 5 minutes, the application displays a warning. Item Download newest firmware version is used to download the latest firmware version into your mobile telephone. In case you already have the current firmware installed in your mobile phone, it offers you the option to delete it. To use the function Receive notifications on new firmware, you must have an Internet connection via Wi-Fi network or mobile data. After connecting your telephone to the elan-rf device, you can press Update elan (in the menu Other), update firmware in elan-rf. Thanks to this, you have the option of updating the firmware in the device elan-rf even in places where an Internet connection is not available. Offer for update Click to start update Information on the progress of update Download settings elan - function allows you to download the current settings for the connected elan-rf directly to your phone. * Backup settings are stored in memory on your telephone. Record elan settings- displays the saved settings for elan that you can upload from your phone to the currently connected elan. License displays information Upgrade feature - when updating firmware from elan version or higher it is required to press the button (the new features are already assigned to the set features). Clear saved settings The application version is uploaded to your phone. elan upload status * After configuration is recommended to save your settings for the elan through an application or Web interface 11 / 14
 based on groups (e.g. Lights or All ).")

 Button for configuring the system and settings from the application Output Status indicators are automatically updated when any status/ mode/temperature change occurs.")


12 Control The main display in the ihc application is formed of so-called Tiles. This is a general overview of rooms in the intelligent electrical installation inels Home Control. Based on the previous steps for settings, the initial tiles of the application will appear on the screen: based on units in rooms (e.g. rooms as in living room ) based on groups (e.g. Lights or All ). If you want to control individual units, press the required room to which you have assigned the given unit. If the configuration is set up that there are more than 6 tiles on the default display, switch between them by dragging your finger up/down along the display, i.e. scrolling. After displaying the list of units in a certain room, you can control individual devices. Pressing inels displays the room set Basic overview of configured tiles in the application menu. Tile (room) Button for configuring the system and settings from the application Output Status indicators are automatically updated when any status/ mode/temperature change occurs. Warning: if you control the blinds using any other method eg. A key-chain, wall or other controller., The application displays the current status of the output. For correct display, perform a manual update of the status output. The manual update of Output Status indicators can be activated (in the case of the sleep mode) by dragging your finger across the screen (ie. scrolling). Then the Output indicators will be updated. Auto Symbol feature, works automatically according to schedule. The timing symbol shows the current timing (for dimmers - start / stop, with the switches - On- / Off -delay, with the switches for blinds - blinds move). Controlling dimmers Arrows for switching between individual rooms Symbol, icon assigned to the given unit, device You can scroll up and down through the tiles by dragging on the screen By a short press of the unit tile, you can change the unit status ON/OFF. In case of blinds UP/ DOWN Status bar of monitored rooms Auto Symbol Time Symbol Unit output status indicator, or device on - brightness at 70%. To bring up the brightness setting, the slider must be held on the unit tile Unit output status indicator, or device on, off If you hold your fi nger down on the device, you will see displayed e.g. for a dimmed light, a bar graph for setting the dimmed light brightness. Two buttons are displayed underneath it - increase and decrease, enabling smooth dimming and brightening of the light. If the dimmer is assigned to the schedule the possibility of switching on / off the Auto function will also be displayed. For the buttons increase and decrease, by pressing the arrows, a menu opens with options for setting the time of the increase / decrease functions. While setting the time the automatic time setting must be off, after saving the settings turn on the automatic setting for correct function of the schedule. By pressing a dimmer with RGB control option, you will see the menu displayed for setting color, brightness and the brightening mode. Settings of RGB light color Bargraph for setting the brightness Press to initiate gradual brightening Button for setting time Button for setting the time of the given function After setting the time, press to confirm Press to initiate gradual dimming Set time minutes : seconds Setting the light RGB brightness Switching off/on the RGB light Circus mode - automatic color change Currently selected color 12 / 14


13 Controlling switches For switches, you can run the function Delayed on / Delayed off and if the switch is assigned to a Schedule it will also show the possibility of switching on / off the Automatic function The delayed on / off time settings are set by pressing arrows by the buttons. While setting the time the automatic time setting must be off, after saving the settings turn on the automatic setting for correct function of the schedule. For delayed on/off, you can extend the time for up to one hour For switches for controlling blinds, the movement time of the blinds is set in the same manner as for previous ones. Setting the time applies to both directions. If the switch is assigned to a Schedule it will also show the possibility of switching on / off the Automatic function. While setting the time the automatic time setting must be off, after saving the settings turn on the automatic setting for correct function of the schedule. Button for lowering blinds Button for raising blinds Stopping the blinds Confirm the time Blue light - switched on Greyed out - off After setting the time, press to confirm Setting the movement time for blinds Thermo-valve control If you press and hold (long press) the icon of assigned thermovalve to room, the settings will be displayed: Manual temperature control 0-32 C The set / recorded temperature Display status - battery, open thermo-valve, the window status Adjusting the open window sensitivity Open window off time With any manipulation of batteries RFATV-1 (eg. Replacement) always recalibrate the thermal valve *. Display the current temperature Set temperature Buttons for quick temperature correction Manual temperature adjustment Display the battery s status Display the status of open thermo-valve Adjust the open window sensitivity Display the open window function Time setting of the open window Controlling the temperature control Heating circuits can be controlled right from the rooms in which they were assigned. For heating circuits in the room, the following is displayed: 1. Current heating mode to the given heating circuit. 2. Current temperature of sensor at the unit assigned to the heating circuit. 3. Heating circuit status backlit icon circuit is active, heating. Heating circuit status By a long press of the heating circuit, you will open the settings Indication of dead battery at the unit Current temperature of temperature circuit Display of the current heating circuit mode Indication of the unit already assigned in the heating area *Calibrating the RFATV-1: 1. open the battery cover 2. remove the batteries 3. after 30s, insert new batteries (observe the polarity) 4. close the battery cover 5. using a key, press the blue button. The thermovalve itself will find the extreme position open and closed on its own. During calibration, do not touch the thermovalve. A flashing green LED diode on the thermovalve indicates the end of calibration. 13 / 14

14 Heating circuit functions The heating circuit monitors the temperature by means of a selected sensor in the room. Once the temperature drops below the set level +/- of the hysteresis, the units in the room determined for heating begin to heat, (the thermovalve opens on the heater valve, the relay at the heater switches on, etc.) Change of heating mode in the circuit by a long press, you will open the required circuit, and based on the current requirement, you can: - change the heating mode - manually adjust the temperature C - switch on/off the entire circuit (regardless of its time plan) - set the function - sensitivity to an open window (displayed only when the temperature circuit is assigned to a thermo head) - inform on battery status - inform on current and set temperature After manual adjustment of the heating mode, the heating circuit in the following set time interval returns, and will continue to work according to the set time plan You can manually adjust the temperature at any time by +/- 5 C, the corrected temperature is only for the current time interval. By pressing, you switch on/off the entire heating circuit regardless of its time plan. By pressing the button for setting the function window sensitivity, you can set the sensitivity and time of switching off the heating while the window is open. Here you will find information on the current status of the function. If the heating circuit contains units that are battery powered and the application ascertains that one of the units has a weak or dead battery, the left part of the screen displays the battery icon. By pressing the battery icon, a list is displayed of units needing a change of batteries. Another method of displaying a dead battery is indicated directly on the main screen at specific units, (rooms). The icon is only informative. In the correction wheel, the Set and Current temperatures are displayed. Set temperature - set in the heating mode +/- temperature correction adjusted by user. Current temperature measured by temperature sensor of one of the connected units. If an icon appears at one of the units in the form of a lock, this means that the unit is already assigned into some heating circuit. The unit cannot be controlled where, by an accidental press, you did not switch on heating that you have set in a different preselected time plan. Heating circuit after power supply outage: During the schedule - returns to the set timetable When manually set - returns to the set timetable If it is manually turned off - remains off. 1. Buttons for quick temperature correction Set temperature correction 3. Battery status indicator 4. Automatic control of the heating circuit according to the selected heating plan 5. Holiday mode 6. ON/OFF 7. Manual temperature adjustment 8. Set temperature 9. Current temperature of heating circuit 10. Button for setting open window function 11. Temporary manual settings (function only applies until the next pre-set schedule changes 12. Manually setting (it does not change if you do not switch to another mode) 13. Option of changing the heat mode / 14
Installation Manual ihc-mirf Installation Manual for the Application ihc-mirf
 Installation Manual for the Application ihc-mirf Rev.:200214 Page 1 of 14 Contents 1. Introduction... 3 2. Installing the application on a mobile phone... 3 3. Basic settings... 4 4. Control... 12 Rev.:200214
Installation manual ihc-miirf
 rev.: 5 02-1/2017 1 / 43 Contents Contents...1 1....3...4 3. The initial launch of the application - Setup Guide...5 3.1 elan...6 3.2 Rooms...7 3.3 Units...8 3.4 Scenes...9 3.5 Cameras...10 3.6 Intercom...11
Installation manual ihc-mairf
 rev.: 6 02-215 / 2016 1 / 46 Contents Contents...1...3...4 3. Installing the application on a smartphone with OS Android...5 4. The initial launch of the application - Setup Guide...6 4.1 elan...7 4.2
elan-rf-003 Manual / rev.5 Page 1 of 13
 Page 1 of 13 1. Introduction... 3 2. Installing the elan-rf-003, IP address... 4 3. Logging in to the web interface elan-rf-003... 4 4. Settings... 5 Configuration panel... 6 Description of functions...
The Smart Prime 6 Frequently Asked Questions. The Smart Prime 6 handset
 The Smart Prime 6 handset How do I answer a call? When you receive a call, touch Slide the icon right to answer the call; Slide the icon left to reject the call; Slide the icon up to reject the call by
Document Number: /4/2012
 Copyright 2012 icontrol Networks, Inc. All rights reserved. No reproduction in whole or in part without prior written approval. icontrol Networks, icontrol, and icontrol logo design are pending trademarks
Smart Home Controller 2.3 Release Notes Contents
 Smart Home Controller 2.3 Release Notes Contents Smart Home Controller 2.3 Release Notes... 1 Eaton-SHC-7.5-2.3.x... 3 System Update Notes and Recommendations... 3 Features and Enhancements... 3 New Heating
Home Monitoring and Control service provided by Verizon Online LLC
 Home Monitoring and Control service provided by Verizon Online LLC A separate subscription to Verizon FiOS TV is required for use with FiOS TV service. About This Manual This manual is designed for online
Installation Manual ihc-ma Installation Manual for the application ihc-ma
 Installation Manual for the application ihc-ma Page 1 of Contents 1. Introduction... 3 2. Installing the application on the device... 4 3. Basic settings... 5 4. Control... 9 5. Configuration of Rooms...
1. CONTROL OF THE LIVING ENVIRONMENT WITH ENTIALIVING SYSTEM 4 2. LIGHTING CONTROL WITH ENTIALIVING SYSTEM 5
 User manual KAZALO 1. CONTROL OF THE LIVING ENVIRONMENT WITH ENTIALIVING SYSTEM 4 2. LIGHTING CONTROL WITH ENTIALIVING SYSTEM 5 3. TEMPERATURE CONTROL WITH ENTIALIVING SYSTEM 6 4. SHADING CONTROL WITH
USER HELP GUIDE. NOTE: We suggest that the user s device be upgraded to the most current version.
 USER HELP GUIDE Android Devices (4.4-5.1) Requirements: To install the fansync application on your Android device, the device must be supported by the manufacturer and have BLE enabled. Your Android device
GAME OF LIGHTS KIT FOR CONTROLLING LIGHTS VIA SMARTPHONE PERFECT LIGHT ATMOSPHERE FOR EVERY OCCASION AND MOOD. User s manual 2.
 GAME OF LIGHTS KIT FOR CONTROLLING LIGHTS VIA SMARTPHONE SAVING ENERGY COLOR SCENES YEARS GUARANTEE PERFECT LIGHT ATMOSPHERE FOR EVERY OCCASION AND MOOD. www.inels.com/kits User s manual 2.0 GAME OF LIGHTS
Page 2 of 7 How do you recognize a successful connection? After successful connection the app will show the Main Dashboard automatically. Main Navigat
 Page 1 of 7 What can you do with the Eaton xcomfort App? With this App you can easily control & visualize your xcomfort Smart Home installation. Which functionality does the App offer? The functions are
User Guide for Feit Electric App. Set up instructions for Alexa & Google Home.
 User Guide for Feit Electric App. Set up instructions for Alexa & Google Home. Smarter More Helpful Home Light Bulbs That Work with Alexa or Google Home Easily turn lights On/Off, dim, set groups and schedules.
ipad and iphone Basics
 ipad and iphone Basics 1 Physical Attributes On/Off Sleep/Wake Silent/ Screen rotation Lock Sight/Camera Or On/Off Sleep/Wake iphone 10 has no home button! Volume: Up/Down Not all 2 Multitasking The multitasking
App Instructions. Quick Start Guide. works with the Google Assistant
 App Instructions s Quick Start Guide works with the Google Assistant 1 OVERVIEW The Modern Forms App enables control of WiFi equipped Modern Forms Smart Fans. Log in with your existing Facebook Account,
Smart Home Controller 2.2 Release Notes
 Contents Eaton-SHC-7.5-2.2.x... 3 System Update Notes and Recommendations... 3 Features and Enhancements... 3 New xcomfort Room Controller Touch support... 3 Climate Function Update... 3 Planner Update...
GAMMA instabus Application Program Description. November CO Touch-Panel
 Use of the application program Product family: Product type: Manufacturer: Name: Order no.: Name: Order no.: Display Display units Siemens UP 588/2 Colour Touch Panel (AC 230 V) 5WG 588-2AB2 UP 588/22
USER S MANUAL. DAS-G01 The Power of Tomorrow
 USER S MANUAL DAS-G01 The Power of Tomorrow Richmond Heights 2018 0 USER S MANUAL DAS-G01 The Power of Tomorrow Richmond Heights 2018 Page 1 USER'S MANUAL TABLE OF CONTENTS Page # 1.0 GENERAL INFORMATION...
FOCIS Flex Inspection
 Test & Inspection FOCIS Flex Inspection Fiber Optic Connector Inspection Solution User s Guide www.flglobal.com, +1 (800) 321-5298 or +1 (603) 528-7780 Table of Contents Safety Information.... 3 FOCIS
ALIBI Witness 2.0 v3 Smartphone App for Apple ios Mobile Devices User Guide
 ALIBI Witness 2.0 v3 Smartphone App for Apple ios Mobile Devices User Guide ALIBI Witness 2.0 v3 is a free application (app) for Apple ios (requires ios 7.0 or later). This app is compatible with iphone,
CONTROL4 INTEGRATION WITH THE SHADE STORE MOTORS CONTROL4 INTEGRATION OVERVIEW:
 CONTROL4 INTEGRATION WITH THE SHADE STORE MOTORS CONTROL4 INTEGRATION OVERVIEW: Take your motorized window treatment experience to the next level by integrating them into your Savant smart home control
Manual Version: V1.01. Video Management Server Client Software User Manual
 Manual Version: V1.01 Video Management Server Client Software User Manual Thank you for purchasing our product. If there are any questions, or requests, please do not hesitate to contact the dealer. Notice
Guarding Expert Mobile Client Software
 Guarding Expert Mobile Client Software User Manual Thank you for purchasing our product. This manual applies to Guarding Expert (iphone) mobile client software; please read it carefully for the better
PRODUCT MANUAL LEDWizard Dynamic White LED Controller
 Product Description Thank you for purchasing Solid Apollo s LEDWizard Dynamic White LED Controller! Solid Apollo s LED Wizard Dynamic White RF controller lets you adjust the color temperature of your Dynamic
Quantum 3.2 Software. User Manual
 Quantum 3.2 Software User Manual Contents Quantum Vue 1 Main Dashboard 2 How much energy am I saving system-wide? Do I have any system alerts? How can I view/edit scheduled events? Energy 4 How do I view
Smart Home Controller 2.2
 Release Notes Smart Home Controller 2.2 Contents Release Notes... 1 Eaton-SHC-7.5-2.2.x... 3 Features and Enhancements... 3 New xcomfort Room Controller Touch support... 3 Climate Function Update... 3
Use of the application program. Table of Contents. GAMMA instabus Application program description. April B0 CO Room Control Unit
 Use of the application program Product family: Product type: Manufacturer: Displays Display and operating units Siemens AG Name Room control unit UP 227 DELTA i-system Order no.: Table of Contents 5WG1
Full manual Nedis SmartLife
 Full manual Nedis SmartLife Download the app: Nedis SmartLife from Apple App store or Google Play Store. Create account Select country code and enter full national phone number or email address and then
INSTALLATION & OPERATING INSTRUCTIONS when Touch-5 Wi-Fi Module is Installed in PCR-4 Driver/Receiver
 INSTALLATION & when Touch-5 Wi-Fi Module is Installed in PCR-4 Driver/Receiver Apple ios Step 1. Download App to your iphone or ipad from the itunes App Store. Enter pal lighting as your search term and
Connection Guide (for D SLR Cameras) En
 En") SB7J02(11)/ 6MB41011-02 Connection Guide (for D SLR Cameras) En Table of Contents Introduction...2 The Interface...2 Trouble Connecting?...2 More on SnapBridge...2 What You ll Need...3 What SnapBridge
SB7J02(11)/ 6MB41011-02 Connection Guide (for D SLR Cameras) En Table of Contents Introduction...2 The Interface...2 Trouble Connecting?...2 More on SnapBridge...2 What You ll Need...3 What SnapBridge
GAMMA instabus Application Program Description. July CO Colour Touch-Panel
 Use of the application program Product family: Product type: Manufacturer: Name: Order no.: Name: Order no.: Display Display units Siemens UP 588/12 Colour Touch Panel UP 588/13 Colour Touch Panel (AC
Getting Started. Activation Process. G450 Overview
 ntrusion Started G450 Home Control Gateway Getting Getting Started This Home Control Gateway is a controller that supports home automation devices within a Home Control ecosystem. Home automation devices
Do not place or mount Ocli 1 in an area where it will be exposed to water. Ocli 1 is designed for indoor use.
 1 Manual: Ocli 1 with Observeye Viewer App for Android Setting Up Ocli 1 Live Viewing with Ocli 1 Recording Video and Taking Snapshots Using Advanced Features Setting Up Ocli 1 Place or Mount the Camera
SAVANT PRO 8 APP AT A GLANCE
 SAVANT PRO 8 APP AT A GLANCE The Savant Pro 8 App enables all the features of your Savant Home, with fast access to rooms, scenes, services and much more. This guide will help you understand how to navigate
Total Connect 2.0 Online Help
 Security Events Users Locations Video Hints for use. After logging in hit F11 to toggle full screen mode. Hover over icons for tool tip help. Upon the initial login, control panel data should be imported
XTS36 Touch Screen X10 Lighting Control System Operating Manual
 X10 Lighting Control System Operating Manual 1 X10 Lighting Control System Operating Manual Rev 1.2 Introduction...3 Software Overview...4 How to Install...5 USB Driver Installation...6 Configuration Software
Virtual Keypad App Help Last update: 2017/02/02
 Virtual Keypad App Help 16461 Last update: 2017/02/02 Table of Contents Virtual Keypad App Help Center... 1 Managing Your App Account... 2 Using Your App... 3 System in Alarm... 4 Contacting Your Security
WaveLinx. This document is intended for Lighting Control Systems and IT professionals. User Manual
 User Manual WaveLinx This document is intended for Lighting Control Systems and IT professionals Important: Engage appropriate network security professionals to ensure all lighting control system hardware
NVMS User Manual. Version 2.1.0
 NVMS-1000 User Manual Version 2.1.0 Contents 1 Software Introduction... 1 1.1 Summary... 1 1.2 Operation Environment... 1 1.3 Install and Uninstall... 2 1.3.1 Install the Software... 2 1.3.2 Uninstall
PIVOT CMS CLIENT SOFTWARE USER MANUAL
 PIVOT CMS CLIENT SOFTWARE USER MANUAL 1 CMS USER GUIDE 1.1 PC REQUIREMENT Recommended PC Requirement OS CPU VGA RAM HDD Graphics Card OS CPU VGA RAM HDD Windows Vista, 7 or higher Intel Core2Quad Q9400
INTRODUCTION... 2 GETTING STARTED...
 Conventions used in this document: Keyboard keys that must be pressed will be shown as Enter or Ctrl. Controls to be activated with the mouse will be shown as Start button > Settings > System > About.
V0STAT51P-2 Programmable Wired Controller
 PRODUCT SPECIFICATIONS VARIABLE REFRIGERANT FLOW SYSTEMS VRF V0STAT51P-2 Programmable Wired Controller Bulletin No. 210766 March 2016 Grouping - Controller can control up to 16 indoor units on the same
COMPUTHERM S200 Wi-Fi socket
 COMPUTHERM S200 Wi-Fi socket Operating instruction COMPUTHERM S Series TABLE OF CONTENTS 1. A general description of the socket 4 2. Important warnings and safety recommendations 5 3. Meanings of the
Connection Guide (for KeyMission 80)
") Connection Guide (for KeyMission 80) Table of Contents Installing the SnapBridge app... 2 Connecting the Camera and a Smart Device... 3 Image Upload and Remote Photography... 7 Troubleshooting... 9 This
Connection Guide (for KeyMission 80) Table of Contents Installing the SnapBridge app... 2 Connecting the Camera and a Smart Device... 3 Image Upload and Remote Photography... 7 Troubleshooting... 9 This
Connection Guide (for COOLPIX)
") Connection Guide (for COOLPIX) This document describes the procedure for using the SnapBridge app (Version 2.0) to establish a wireless connection between a supported camera and smart device. When you
Connection Guide (for COOLPIX) This document describes the procedure for using the SnapBridge app (Version 2.0) to establish a wireless connection between a supported camera and smart device. When you
Tablet PC User Manual
 Tablet PC User Manual Please read all instructions carefully before use to get the most out of your Time2Touch Tablet PC. The design and features are subject to change without notice. Contents Important
Discover the Start screen.
 Discover the Start screen. Your Start screen has all of the information that matters most to you. Live tiles keep you up to date. Your favorite apps, such as Office apps, People, News, and more are front
CME E-quotes Wireless Application for Android Welcome
 CME E-quotes Wireless Application for Android Welcome This guide will familiarize you with the application, a powerful trading tool developed for your Android. Table of Contents What is this application?
DMS Local. User Manual. For Projector Management V 1.01
 DMS Local User Manual For Projector Management V 1.01 2 Copyright Copyright Copyright 2018 BenQ Corporation. All rights reserved. No part of this publication may be reproduced, transmitted, transcribed,
College of Pharmacy Windows 10
 College of Pharmacy Windows 10 Windows 10 is the version of Microsoft s flagship operating system that follows Windows 8; the OS was released in July 2015. Windows 10 is designed to address common criticisms
Overview - Danfoss Link and Connect software versions
 Overview - Danfoss Link and Connect software versions Danfoss Link CC Mk II (with minisd card) software 2.1.35 2.3.27 2.4.51 2.5.57 2.7.42 01-12-2010 The initial Danfoss Link CC software: Supports all
USER MANUAL. Mac Version
 USER MANUAL Mac Version Contents 1 Software Introduction... 1 1.1 Summary... 1 1.2 Install and Uninstall... 1 1.2.1 Install the Software... 1 2 Login Software... 3 2.1 Login... 3 2.2 Control Panel Instruction...
Enter your Appserv username and password to sign in to the Website
 Appserv Desktop Access Logging on from a Windows 10 Device Step 1. To sign in to the Appserv Desktop Access website, either enter the following address into the Microsoft Edge browser address bar, or click
Wireless RAK system setup guide
 Wireless RAK system setup guide 1 What you need to get started 2 Create a new Rasoft Pro Project File 2.1 Project name and House numbers 2.2 Save Locations 2.3 Adding rooms 2.4 Adding channels 2.5 Adding
Smarter More Helpful Home Light Bulbs That Work with Alexa or Google Home
 User Guide User Guide For Feit Electric App. Set up instructions for Alexa & Google Home. Smarter More Helpful Home Light Bulbs That Work with Alexa or Google Home Easily turn lights On/Off, dim, set groups
TOUCHDIAL Mobile App OPERATION GUIDE TABLE OF CONTENTS TOUCHDIAL MOBILE APP OPERATION GUIDE 1 OF 6 IG
 TOUCHDIAL Mobile App OPERATION GUIDE DIMMABLE ADJUSTABLE KELVIN COLOR-CHANGING TABLE OF CONTENTS 1. CONNECT MOBILE DEVICE TO TOUCHDIAL IFI HUB 1.1 Connect Mobile Device to Home ifi Network (Preferred)
IdeaTab A1000L-F. User Guide V1.0. Please read the Important safety and handling information in the supplied manuals before use.
 IdeaTab A1000L - UserGuide IdeaTab A1000L-F User Guide V1.0 Please read the Important safety and handling information in the supplied manuals before use. file:///c /Users/xieqy1/Desktop/EN UG/index.html[2013/8/14
Marian University Rooms 126, 130, 210, 218, 224, 228 (A)
") Marian University Rooms 126, 130, 210, 218, 224, 228 (A) User Guide Issues or questions? Contact the Sensory Technologies Client Solutions Center Phone: 800.488.4336 Email: csc@sensorytechnologies.com
Marian University Rooms 126, 130, 210, 218, 224, 228 (A) User Guide Issues or questions? Contact the Sensory Technologies Client Solutions Center Phone: 800.488.4336 Email: csc@sensorytechnologies.com
Brivis Touch. Owner s Manual
 Brivis Touch Owner s Manual Congratulations on purchasing a Brivis Touch Comfort Controller. This intelligent Controller can be used with a range of Brivis heating and cooling products. The Brivis Touch
Ctdigi.com. Instruction manual. Production by S & W Technology Labs
 Ctdigi.com Instruction manual Production by S & W Technology Labs I. Install app II. Guard camera Guard camera Introduction Accessory Sensor Scenario Guard 360 Introduction - Catalog - Install app Scenario
battery icon in the bottom right corner of the display screen.
 ATTENTION: This handbook contains important information regarding the safe and correct use of your tablet. Please be sure to read the following in order to maximize your enjoyment of the device and to
Microsoft IT Showcase. microsoft.com/itshowcase
 Getting to know Windows 10 Guide contents The purpose of this guide is to introduce you to the key features in Windows 10, and give you tips and tricks on how to get started using those features. You ll
Shortcut To Turn Off Laptop Display Windows 7
 Shortcut To Turn Off Laptop Display Windows 7 128 time-saving Keyboard Shortcuts for Windows 7. Large Shortcut Database with common applications. F11, Turn full page view on or off. 'Maximized' means full
PowerShield 8. Configuration Manual
 PowerShield 8 Configuration Manual Introduction Part Number 6300-103 23 August 2017 The information contained in this manual is copyright and may not be reproduced without the written authority of PowerShield
Getting Started. Gateway Activation Process. Gateway Descriptions
 Intrusion Getting Started G100 Z-Wave gateway Getting Started The G100 is a Z-Wave gateway that supports home automation devices within a Z-Wave ecosystem. Home automation devices are added to the network,
iridium for HDL-BUS Pro
 iridium for HDL-BUS Pro Fast Start: Connection Setting Manual for HDL-BUS Pro (Smart-Bus) equipment Review of iridium Software Package for HDL-BUS Pro: The iridium software package includes several components
GV-Eye Mobile App. Contents
 GV-Eye Mobile App. Contents 1.1 Specifications... 2 1.2 Supported GV-IP Devices and Software... 3 1.2.1 Supported Products for Connection... 3 1.2.2 Supported Products for Enabling Monitoring... 4 1.2.3
Video Management Software
 Video Management Software User Manual Web: europesecurity.eu Mail: info@europesecurity.eu Tel.: 0541 352 952 User s Manual 2 Contents CHAPTER : XMS CENTRAL USER MANUAL 1 PC REQUIREMENT 3 2 INSTALL 3 3
SIMPLE CONTROL. User Guide
 SIMPLE CONTROL User Guide Version 5.5 Version Information Simple Control User Guide, Version 5.5, released July 2018. Copyright Information All rights reserved. You may make copies of this document; however,
Deseo KNX Manual. Deseo KNX. Manual. basalte bvba hundelgemsesteenweg 1a 9820 merelbeke belgium. 1 / 65 v basalte
 Deseo KNX basalte bvba hundelgemsesteenweg 1a 9820 merelbeke belgium 1 / 65 v2.3 2012 basalte Table of contents: 1. Introduction... 5 2. Installation... 6 2.1 Identifying the parts... 7 2.1.1 Front view
SERIAL PORT TOOL. N-Button Lite Quick Start Guide
 SERIAL PORT TOOL N-Button Lite Quick Start Guide SERIAL PORT TOOL N-Button Lite Quick Start Guide Copyright 2014 All Rights Reserved. Notice: Portions of this manual require internet access. Table of Contents
Veris Sensors App. Quick Start Guide Pressure Monitoring. For Use with Differential Pressure / Air Velocity Transducers. Introduction.
 ZL0174-0C Page 1 of 7 2019 Veris Industries USA 800.354.8556 or +1.503.598.4564 / support@veris.com 0319 Quick Start Guide Pressure Monitoring Veris Sensors App For Use with Differential Pressure / Air
aaxa TECHNOLOGIES User Guide
 aaxa TECHNOLOGIES User Guide Caution! WARNING: Please use this product as instructed. Misuse may cause injury or death. DO NOT use while driving DO NOT expose to water or wet surfaces. Electric shock may
Table of Contents. Chapter 1 Introduction Chapter 2 Quick Install... 7
 AVA-88 WELCOME Congratulations on purchasing the AVA-88. The AVA-88 integrates multiple complicated control, automation and internet protocols into one simple plug-and-play device. It is a central controller
QUICK START GUIDE. U.S. Cellular Customer Care:
 QUICK START GUIDE U.S. Cellular Customer Care: 1-888-944-9400 Getting to Know Your Phone Camera Lens Proximity Sensor Earpiece Touch Screen Back Key 3.5 mm Headset Jack Microphone Laser Auto Focus Volume
Colour Touch Panel 3.5
 Guangzhou Video-star Electronics Industrial Co., Ltd K-BUS R Colour Touch Panel 3.5 User manual-ver. 1.2 CHTF-35/01.1 CHTF-35/01.2.21 CHTF-35/01.2.22 CHTF-35/01.2.24 KNX/EIB Intelligent Installation Systems
INNOV.NET PTY LTD. User guide
 User guide Version1 2016 0 Contents Compatibility... 1 What s in the package?... 1 Setup the RM Pro... 1 Meaning of the LED indicators... 2 Setup e-control on your smartphone... 2 Can I program a remote
ipads for Beginners For All HCPS Individual ipad Users
 ipads for Beginners For All HCPS Individual ipad Users May 2012 GETTING TO KNOW YOUR IPAD Buttons and Icons Sleep/Wake/Power- Press and release to put your ipad into sleep or wake mode. Press and hold
Exploring Windows 8. Starting Windows 8 for the First Time. About Windows 8 User Interface and Features. Get Started. Unlock Your Computer and Sign In
 About Windows 8 User Interface and Features This guide provides an overview of the new features in the Windows 8 user interface so you can get up and running quickly with the new operating system. Starting
Video recorders DX Series
 Page: 1 AHD DVR cameras, analog, IP CMS Program Manual How to install and use the client program to the DVR Page: 2 Contents of this handbook This manual describes how to install and use the CMS program
Application description. KNX push-button 1gang. KNX push-button 2gang. KNX push-button 3gang. KNX push-button 4gang. Page 1/51
 Application description KNX push-button 1, 2, 3 and 4gang Electrical/mechanical data: see the operating instructions for the product Order number Product designation Application programme TP product Radio
ipcam-wo Wireless Outdoor
 POWER NETWORK Total Connect Online Help Guide for: ip Cameras ipcam-wi Wireless Indoor ipcam-pt Pan and Tilt ipcam-wo Wireless Outdoor 800-08456 3/11 Rev. A TRADEMARKS Honeywell is a registered trademark
AI Suite 3 User Manual Quick Menu AI Suite 3 AI Suite 3 Main menu AI Suite 3 Utilities System requirements
 DE128 AI Suite 3 AI Suite 3 is an all-in-one interface that integrates several ASUS utilities and allows you to launch and operate these utilities simultaneously. Installing AI Suite 3 Ensure that you
User Guide Introduction
 Premium Wifi 2 User Guide Introduction Your new Helo Premium Wifi control panel control panel is used to control your sauna or steam generator. The screen on the control panel is a touchscreen, meaning
Catalogue. Assembling... 1 Unpack Charge the Battery Install the Memory Card Product Basics Buttons and Connections...
 Catalogue Assembling... 1 Unpack... 1 Charge the Battery... 1 Install the Memory Card... 1 1 Product Basics... 2 1.1 Buttons and Connections... 2 1.2 Start Up and Shut Down... 2 2 Introduction of Google
DART SVP. Software Manual For Web Based User Interface And For Apple ipod touch User Interface. Software Version 3.0.x ipod Application Version 1.
 DART SVP Software Manual For Web Based User Interface And For Apple ipod touch User Interface Software Version 3.0.x ipod Application Version 1.3 IonSense Inc. 999 Broadway Suite 404 Saugus, MA 01906 Table
Wi-Fi Pan & Tilt Camera AlwaysSafe App Manual. ios and Android. English
 Wi-Fi Pan & Tilt Camera AlwaysSafe App Manual ios and Android English Contents Contents Getting Started Adding a Camera 4 Configuring Initial Settings 6 Setting up Email Alerts 8 Editing the Email Alerts
Operation Guide CT32 ENGLISH
 Operation Guide CT32 The CT32 communicating thermostat operates via a high-quality, easy-to-use touch screen. To set or adjust your CT32, simply touch your finger firmly to the screen. The screen will
Phone Overview. Important buttons on your Jitterbug Smart
 Phone Overview Important buttons on your Jitterbug Smart A B A) Volume Button: PRESS upper end of button to increase volume, PRESS the lower end to decrease volume B) Power/Lock Button: PRESS and release
Motion Sensor 2 with temperature sensor
 Neo Coolcam Motion Sensor 2 with temperature sensor SKU: NEOEMS02Z Quickstart This is a Multilevel Sensor for Europe. To run this device please insert fresh 1 * CR123A batteries. Please make sure the internal
Your familiar Windows, only better.
 Your familiar Windows, only better. Your quick guide to Windows 8.1 Basics 2014 Microsoft Corporation. All rights reserved. This material is provided as-is, and for informational purposes only. Microsoft
Battery Charging The tablet has a built-in rechargeable Li-polymer battery.
 Attention: This handbook contains important security measures and the correct use of the product information, in order to avoid accidents. Pls make sure to reading the manual carefully before use the device.
Quick Start. MyAir4 User Manual. This section will give you a brief description about each of the buttons found on the home screen.
 User Manual Quick Start... 3 HOME... 4 SIMPLE TIMER... 4 AIR CON... 5 ZONES... 6 PROGRAMS... 7 HELP... 11 SETTINGS... 12 MyZone - (optional feature)... 15 Constant Zones... 17 Android Tablet... 18 Smart
ELAN INTEGRATION WITH THE SHADE STORE MOTORS ELAN INTEGRATION OVERVIEW:
 ELAN INTEGRATION WITH THE SHADE STORE MOTORS ELAN INTEGRATION OVERVIEW: Take your motorized window treatment experience to the next level by integrating them into your ELAN smart home control system. The
LIGHTIFY App - User-Guide
 LIGHTIFY App - User-Guide App Version 1.9.2 For me, light is for reinventing my home. What is light to you? Discover a new dimension of light Control your lights individually or in groups at home or on
Tel: sp.com Support: 8:30 AM to 8:00 PM Canadian statu tory holidays obser ved.
 KiSP, Toronto, ON Canada E-mail: KitsSupport@ki sp.com Canadian statu tory holidays obser ved. KITS Mobile Frequently Asked Questions Table of Contents About KITS Mobile... 2 Devices... 2 Licenses... 3
Model: Available in : Sapphire Black and Glacier White
 Model: Available in : Sapphire Black and Glacier White 1 Table of Contents Product Image 1 Locking/Unlocking the SmartStat 20 Table of Contents 2 Standby/Away Mode 21 What is a Programmable Room Thermostat?
Click Install View Touch. Installation starts. Click Next. Click Finish.
 1. Please read the instructions carefully. Improper installation may cause permanent damages, which may not be covered by the warranty. 2. Check all the parts in the package against the following parts
Getting to know your ipad exploring the settings, App store, Mail
 Getting to know your ipad exploring the settings, App store, Mail Exploring the settings Open the settings app from your homepage Wi-Fi Turn Wi-Fi on/off Add new Wi-Fi Connection Enter Network Name, any