Citrix XenDesktop 7.6, Provisioning Services 7.6 and the XenDesktop Setup Wizard with Write Cache and Personal vdisk Drives
|
|
|
- Fay Della Bradley
- 6 years ago
- Views:
Transcription

1 Citrix XenDesktop 7.6, Provisioning Services 7.6 and the XenDesktop Setup Wizard with Write Cache and Personal vdisk Drives Using Personal vdisks and Write Cache drives with XenDesktop 7.6 Prepared by Carl Webster
2 Table of Contents Introduction... 2 Lab Setup... 3 Create the Virtual Machine... 7 Install PVS Target Device Software Configure the vdisk in PVS Install the Virtual Delivery Agent Update Virtual Delivery Agent Software Update Personal vdisk Software Configure Personal vdisk PVS XenDesktop Setup Wizard Create XenDesktop Delivery Group Understanding How Personal vdisk Works User Installed Software Updating the Master Image Verify the Master Image Update
3 Introduction Citrix XenDesktop with personal vdisk technology is a high-performance enterprise desktop virtualization solution that makes virtual desktop infrastructure (VDI) accessible to workers who require personalized desktops by using pooled-static virtual machines. Provisioning Services (PVS) targets devices that use personal vdisks are created using the Citrix XenDesktop Setup Wizard. Within a Provisioning Services farm, the wizard creates target devices, adds target devices to an existing site's collection, and then assigns an existing vdisk, which is in standard image mode, to that device. The wizard also creates XenDesktop virtual machines to associate with each Provisioning Services target device. A catalog exists in Citrix Studio that allows you to preserve the assignment of users to desktops; the same users are assigned the same desktop for later sessions. In addition, a dedicated storage disk is created (before logon) for each user so they can store all personalizations to that desktop (personal vdisk). Personalizations include any changes to the vdisk image or desktop that are not made as a result of an image update, such as application settings, adds, deletes, modifications, or documents. Target devices using personal vdisks can also be reassigned a different vdisk if that vdisk is from the same base vdisk lineage. For additional information on using personal vdisks with XenDesktop, refer to XenDesktop's About Personal vdisks topic. Inventory is run when a Provisioning Services vdisk is configured or updated. The method selected to configure or update a vdisk image for use as a personal vdisk image may determine when vdisk inventory runs in your deployment. The content that follows identifies the different methods from which you can choose, provides the high-level tasks associated with each method, and indicates at which point inventory runs for each method. After configuring and adding a new personal vdisk image, do not use your golden VM as the machine template because it creates an unnecessary large disk as your write cache disk (the size of your original HDD). Assumptions: Provisioning Services 7.6 is installed and configured with a farm created. XenDesktop 7.6 is installed, and a Site is created and configured. Hosting resources are configured in Studio. PXE, TFTP, and DHCP are configured as needed. Active Directory is configured with at least one domain. All servers are members of the Active Directory domain. 2

, write cache and PvD as shown in Figure 1.")
4 Lab Setup All servers are running Microsoft Windows Server 2012 R2 fully patched. The lab consists of: 1 PVS 7.6 server 1 XenDesktop 7.6 Controller running Studio 1 SQL 2014 Server 1 Windows 8.1 VM XenServer 6.5 fully patched is used for the hosting environment. There are separate storage repositories for the virtual machines (VM), write cache and PvD as shown in Figure 1. Figure 1 The hosting resources are configured in Studio as shown in Figure 2. Figure 2 3


5 In Active Directory (AD), the following Organization Unit (OU) structure was created as shown in Figure 3. Figure 3 One of the reasons to use PvD is to allow users to install applications. To do this, an AD security group was created, shown in Figure 4, which will contain the AD user accounts. The AD security group will be made a member of the local administrators security group. Figure 4 4


6 Three AD user accounts were created, shown in Figure 5, for the three different PvD users. Figure 5 Those three test user accounts were placed in the LocalAdmins AD security group as shown in Figure 6. Figure 6 Most organizations that use XenDesktop to serve virtual desktops or servers require that event logs persist between reboot. Other items that may need to persist between desktop/vm reboots are antivirus definition files and engine updates. To accomplish these, a Group Policy 5
7 Preferences is used. Do not manually change the file system and registry because any folders that were manually pre-created on the write cache drive will not carry over when the XenDesktop setup wizard creates the write cache and PvD drives. Therefore, it is not necessary to do any of the items usually done by pre-creating a write cache drive. The write cache drive is always created as Drive D, and the PvD is created with the drive letter assigned during the wizard. The Group Policy Preferences should be linked at the OU, which will contain the computer accounts created by the wizard. Computer Configuration\Policies\Administrative Templates\Windows Components\Event Log Service\Application\Control the location of the log file - Enabled with a value of D:\EventLogs\Application.evtx Computer Configuration\Policies\Administrative Templates\Windows Components\Event Log Service\Security\Control the location of the log file - Enabled with a value of D:\EventLogs\Security.evtx Computer Configuration\Policies\Administrative Templates\Windows Components\Event Log Service\System\Control the location of the log file - Enabled with a value of D:\EventLogs\System.evtx Computer Configuration\Preferences\Folder - Action: Update, Path: D:\EventLogs Computer Configuration\Preferences\Control Panel Settings\Local Users and Groups - Action: Update, Group name: Administrators (built-in), Members: ADD, <DomainName>\<Security Group Name> User Configuration\Policies\Administrative Templates\Start Menu and Taskbar\Remove the Action Center icon - Enabled These settings will: Keep the user from getting pop-ups from the Action Center Create the EventLogs folder on drive D (the write cache drive) Redirect the application, security, and system event logs to the new D:\EventLogs folder Add the domain security group that contains user accounts who should be local admins to the desktop s local administrators group 6
8 Create the Virtual Machine Create a Windows VM to be used as the master or golden image. Do just a basic configuration of the VM at this time; do not install any applications yet. To optimize a Windows 7 image, see the Windows 7 Optimization Guide. To optimize a Windows 8 or 8.1 image, see the Windows 8 and 8.1 Virtual Desktop Optimization Guide. Once the basic VM is built, there are four things that may need to be done before joining the VM to the domain. 1. For Windows 7, fix the WMI error that is the application event log. Run the Microsoft Fix it from 2. For VMware, install the hotfix for using a VMXNet3 network card in ESXi. Request and install the hotfix from 3. From an elevated command prompt, run WinRM QuickConfig. This allows the desktops to work with Citrix Director. 4. Disable task offload by creating the following registry key: a. HKLM\System\CurrentControlSet\Services\TCPIP\Parameters\ b. Key: "DisableTaskOffload" (dword) c. Value: 1 The write cache drive will become drive D when it is created, so before installing any software, change the CD drive letter from D to another letter, such as Z, for example. The VM is now ready to join the domain. After joining the domain, shut down the VM. Now two hard drives need to be added to the VM one for the write cache drive and the other for the PvD drive. Nothing will be done to these drives; they are just stub holders so Windows knows there should be two additional drives. The write cache and PvD drive must be different sizes, with the PvD drive being larger. If they are the same size, it is possible that the write cache and page files can be placed on the PvD drive, not the write cache drive. Make sure the new drives are created in the proper storage locations as shown in Figures 7 through 9. PVS uses the different disk sizes to determine which disk to use for the write cache. The smaller of the two disks is used for the write cache. 7

9 Figure 7 Figure 8 8


10 Figure 9 Power-on the VM, log on with a domain account, start Computer Management, and click on Disk Management as shown in Figure 10. Figure 10 9


11 Click OK to initialize the two new drives as shown in Figure 11. Figure 11 The two new drives appear in Disk Management as shown in Figure 12. Figure 12 10

12 Leave the drives unformatted, and exit Computer Management. Install PVS Target Device Software At this time, any needed software and updates can be installed. The XenDesktop Virtual Delivery Agent will be installed later. After all software and updates are installed, mount the PVS 7.6 ISO to the VM, open My Computer and double-click the CD. When the PVS installer starts, click Target Device Installation on both screens as shown in Figures 13 and 14. Figure 13 11

13 Figure 14 Follow the Installation Wizard to install the PVS Target Device Software. On the last page of the wizard, leave Launch Imaging Wizard selected, and click Finish as shown in Figure 15. Figure 15 12

14 You can exit the PVS installer screen, and unmount/disconnect the PVS 7.6 ISO from the VM s CD drive. Click Next on the Imaging Wizard as shown in Figure 16. Figure 16 13


15 Enter the name or IP address of a PVS Server, select the option for Credentials, and click Next as shown in Figure 17. Figure 17 Select Create new vdisk, and then click Next as shown in Figure 18. Figure 18 14

16 Enter a vdisk name, select the Store and vdisk type, and then click Next as shown in Figure 19. Figure 19 Select the licensing type, and click Next as shown in Figure 20. Figure 20 15

17 Ensure only the C drive is selected, and click Next as shown in Figure 21. Figure 21 16
18 Enter a target device name, select the MAC address and the target device collection, and click Next as shown in Figure 22. Figure 22 17
19 Click Optimize for Provisioning Services as shown in Figure 23. Figure 23 18

20 Verify all check boxes are selected, and click OK as shown in Figure 24. Figure 24 Depending on the.net Framework versions installed on the VM, the optimization process could take from less than a second to over an hour. Once the process has completed, click Finish as shown in Figure


21 Figure 25 The vdisk is created. Once the vdisk is created, a reboot pop-up appears as shown in Figure 26. Important: Do not reboot at this time. Depending on your hypervisor, you may need to shut down to make the next change. The VM needs to be configured to boot from the network first and the hard drive second. If this change can be made while the VM is running, make the change, and click Yes. If not, click No, shut down the VM, make the change, and power-on the VM to continue. Figure 26 20


22 Before continuing, what did the Imaging Wizard do inside of PVS? First, a vdisk was created as shown in Figure 27. Figure 27 Second, a target device was created, as shown in Figure 28, with the MAC address of the VM, linked to the vdisk just created, and the target device is configured to boot from its hard disk because the vdisk is empty right now. Figure 28 Once the VM has been configured to boot from the network first and the hard drive second, either power-on the VM or click Yes to reboot the VM as previously shown in Figure 26. When the VM is at the logon screen, log on with the same domain account, and the Imaging Wizard process continues as shown in Figure

23 Figure 29 When the Imaging Wizard process is complete, click Finish, as shown in Figure 30, and shut down the VM. Note: If there are any errors, click Log, review the log, correct any issues, and rerun the Imaging Wizard. Figure 30 22


24 Configure the vdisk in PVS The Imaging Wizard has now copied the contents of the VM's C drive into the vdisk. That means the C drive attached to the VM is no longer needed. Detach the C drive from the VM as shown in Figures 31 and 32. Important: Do not delete the C drive; just detach it. Figure 31 Figure 32 23

25 Now that the VM has no C drive, how will it boot? In the PVS console, go to the Target Device, right-click and select Properties as shown in Figure 33. Figure 33 Change the Boot from field to vdisk as shown in Figure 34. Figure 34 The vdisk contains everything that was on the original C drive, and the vdisk is still set to Private Image mode. That means everything that is done to the vdisk is the same as making 24


26 changes on the original C drive. Any changes made now will persist. When the vdisk is changed to Standard Image mode, the vdisk is placed in read-only mode, and no changes can be made to it. Before the VM is powered on, an AD Machine Account must be created. Rightclick the target device, select Active Directory and then Create Machine Account... as shown in Figure 35. Figure 35 Select Lab/Desktops/XD76 from the Organization unit drop-down as shown in Figure 36. Figure 36 25

27 Once the correct Organization Unit has been selected, click Create Account as shown in Figure 37. Figure 37 When the machine account is created, click Close as shown in Figure 38. If there is an error reported, resolve the error and rerun the process. Figure 38 26


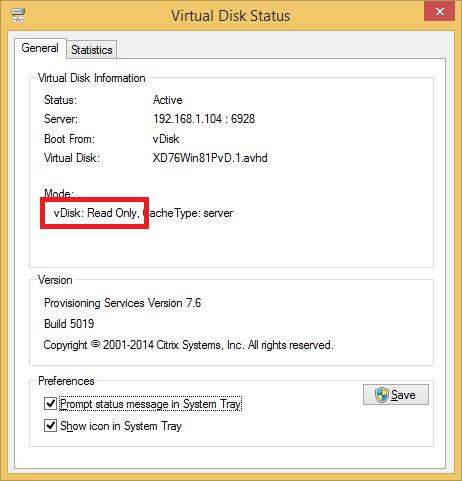
28 Power-on the VM, and log on with domain credentials. Open Computer Management, and click on Disk Management. Here you can see the holders for the 10GB write cache and 20GB PvD drives, and the C drive (which is the vdisk) as shown in Figure 39. Figure 39 Exit Computer Management. You can also verify the VM has booted from the vdisk by checking the Virtual Disk Status icon in the Notification Area as shown in Figure 40. Figure 40 27
29 As shown in Figure 41, the Virtual Disk Status shows: The vdisk status is active The IP address of the PVS server streaming the vdisk That the target device is booting from the vdisk The name of the vdisk The vdisk is in read/write mode Figure 41 Exit the Virtual Disk Status. 28

30 Install the Virtual Delivery Agent The XenDesktop 7.6 Virtual Delivery Agent (VDA) needs to be installed. Mount the XenDesktop 7.6 ISO to the CD. Double-click the CD drive, and the XenDesktop installation wizard will start. Click Start for XenDesktop as shown in Figure 42. Note: At this time, PvD is only supported for desktop operating systems. PvD is not supported for XenApp 7.6. Figure 42 29

31 Select Virtual Delivery Agent for Windows Desktop OS as shown in Figure 43. Figure 43 30
32 Select Create a Master Image, and click Next as shown in Figure 44. Figure 44 31
33 Select the appropriate HDX 3D Pro option, and click Next as shown in Figure 45. Figure 45 32
, click Add as shown in Figures 47 and 48. Repeat until all XenDesktop 7.")
34 Verify Citrix Receiver is selected, and click Next as shown in Figure 46. Figure 46 Enter the fully qualified domain name (FQDN) of a XenDesktop 7.6 Controller, click Test connection, and if the test is successful (a green check mark is displayed), click Add as shown in Figures 47 and 48. Repeat until all XenDesktop 7.6 Controllers are entered. Click Next when all Controllers are added. 33

35 Figure 47 Figure 48 34
36 Verify all options are selected, and click Next as shown in Figure 49. Figure 49 35
37 Select the appropriate firewall rules option, and click Next as shown in Figure 50. Figure 50 Click Install as shown in Figure 51. Figure 51 36
38 The VDA installation starts as shown in Figure 52. Figure 52 37
39 When the VDA installation completes, verify Restart machine is selected, and click Finish as shown in Figure 53. Figure 53 Disconnect/unmount the XenDesktop 7.6 ISO from the VM. 38
40 Update Virtual Delivery Agent Software At the time this content was written, there was one public update to the VDA software (ICAWS760WXnn005 where nn is either 32 or 64 for the bitness of your desktop OS). To check for available VDA updates, go to click on Support, and select XenDesktop from the drop-down. Change All Versions to XenDesktop 7.6, click on Software Updates and then on Public. If there is an update for XenDesktop 7.6, download and install it. After the VM restarts, log on to the desktop with domain credentials. Update Personal vdisk Software Check for updates to the Personal vdisk software at Sign in with your credentials, click on Downloads, select XenDesktop and Components from the two dropdowns. If there s a Personal vdisk update for XenDesktop 7.6, download and install it. Log on to the desktop again with domain credentials. Configure Personal vdisk By default, PvD uses two drive letters: V and P. V is hidden and is a merged view of the C drive with the PvD drive. If drive V is already used, the drive letter can be changed. If needed, change the hidden PvD drive letter: Key: HKEY_LOCAL_MACHINE\Software\Citrix\personal vdisk\config Value: VHDMountPoint [REG_SZ] Set this to the drive letter of your choice. Ensure that :\ is appended to the end of your entry (Example: X:\ ). User profile data and applications and machine settings are stored in the PvD. By default, this is a 50/50 split if the PvD size is at least 4GB or larger. The percent to be allocated for applications and machine settings can be configured by setting the following registry value: KEY: HKEY_LOCAL_MACHINE\Software\Citrix\personal vdisk\config VALUE: PercentOfPvDForApps o By default, this value is set to 50. o Changing this to 80 will result in the V drive being allocated to 80 percent of the PvD disk. 39
41 Note: This value must be changed before the PvD is placed into production. Everything is now complete. Before running the PvD inventory, follow your standard procedure for sealing the image. This process is unique to every environment. Manually run the PvD inventory. Press the Windows Key + S, type in update, and click Update personal vdisk as shown in Figure 54. Figure 54 The PvD inventory starts. Leave Shut down the system when update is complete selected as shown in Figure 55. Figure 55 After the inventory completes, the VM is shut down. 40
42 PVS XenDesktop Setup Wizard Make a copy of the VM, and create a template of the copy. That way the original VM is still available for future needs. When making the template, make sure the template is stored on a storage location that is available when running the XenDesktop Setup Wizard. If you do not, an error "<host resource> has no available templates defined that are fully accessible by all hosts" is displayed during the XenDesktop Setup Wizard. Change the template to boot from network only. In the PVS console, click on the vdisk Pool node, right-click the vdisk, and select Properties as shown in Figure 56. Figure 56 Change the access mode to Standard image and cache type to Cache on device hard drive as shown in Figure 57. Note: If you leave the cache type at the default of Cache on server, there will not be an option to configure the write cache drive size when you run the XenDesktop Setup Wizard. Note: With PVS 7.6, Cache in device RAM with overflow on hard disk is now the recommended option. It is highly recommend you read the following two articles by Dan Allen before deciding which cache type to use: 1. Turbo Charging your IOPS with the new PVS Cache in RAM with Disk Overflow Feature! Part One 2. Turbo Charging your IOPS with the new PVS Cache in RAM with Disk Overflow Feature! Part Two 41


43 Figure 57 Right-click the Site, and select XenDesktop Setup Wizard as shown in Figure 58. Figure 58 42


44 Note: If you get an error pop-up that states No Standard Image vdisk exists in this Site, that simply means the vdisk is still in Private Image mode. Click Next as shown in Figure 59. Figure 59 Enter the name of a XenDesktop 7.6 Controller, and click Next as shown in Figure 60. Figure 60 43


45 Select the host resource from those configured in Citrix Studio, and click Next as shown in Figure 61. Figure 61 Enter your credentials for the host resource, and click OK as shown in Figure 62. Figure 62 44

46 Select the appropriate template and VDA version and/or functionality desired, and click Next as shown in Figure 63. Figure 63 45

47 Select the vdisk, and click Next as shown in Figure 64. Figure 64 Select Create a new catalog or Use an existing catalog, and click Next as shown in Figure 65. If you create a new catalog, enter a catalog name and description. Note: The wizard creates a machine catalog in XenDesktop and a device collection in PVS with the catalog name entered here. 46

48 Figure 65 47

49 Select Windows Desktop Operating System, and click Next as shown in Figure 66. Figure 66 48
 with two vcpus, 2 GB RAM, a 10 GB write cache disk, and a 20 GB PvD disk, and change the PvD drive to Y. Click Next as shown in Figure 68.")
50 Because we are using PvD, select The same (static) desktop and Save changes and store them on a separate personal vdisk, and click Next as shown in Figure 67. Figure 67 Make the appropriate choices. Create three VMs (desktops) with two vcpus, 2 GB RAM, a 10 GB write cache disk, and a 20 GB PvD disk, and change the PvD drive to Y. Click Next as shown in Figure 68. Note: If you do not see the option Local write cache disk, that means you left the vdisk at the default of Cache on server. Exit this wizard, correct the vdisk properties, and rerun the wizard. 49

51 Figure 68 50

52 Select Create new accounts to have new AD computer accounts created, and click Next as shown in Figure 69. Figure 69 51

53 Select the domain, OU, and account naming scheme, and click Next as shown in Figure 70. Figure 70 Verify the summary information, click Finish, as shown in Figure 71, and the wizard will begin creating the following: Virtual machines AD computer accounts Target devices Machine catalog in XenDesktop Studio BDM 52

54 Figure 71 When the wizard is complete, click Done as shown in Figure 72. Figure 72 53
 shows the three target devices with only one")

55 The device collection in the PVS console (you may need to right-click the Site and select Refresh) shows the three target devices with only one powered on at this time as seen in Figure 73. Figure 73 Active Directory Users and Computers shows the new computer accounts as seen in Figure 74. Figure 74 54


56 Create XenDesktop Delivery Group In Citrix Studio, right-click on the Machine Catalogs node, and select Refresh. The new machine catalog created by the XenDesktop Setup Wizard is shown in Figure 75. Figure 75 Currently there is no Delivery Group to deliver the desktops. Right-click the Delivery Groups node in Citrix Studio, and select Create Delivery Group as shown in Figure 76. Figure 76 55


57 Click Next as shown in Figure 77. Figure 77 Select the machine catalog and the number of machines to be added from the catalog to this Delivery Group, and click Next as shown in Figure 78. Figure 78 56


58 Select Desktops, and click Next as shown in Figure 79. Figure 79 Click Add... as shown in Figure 80. Figure 80 57

59 Use the Select Users or Groups dialog to add users, and click OK as shown in Figure 81. Figure 81 Click Next as shown in Figure 82. Figure 82 58


60 Select the appropriate StoreFront option, and click Next as shown in Figure 83. Figure 83 Enter a Delivery Group name, display name, and an optional Delivery Group description for users, and click Finish as shown in Figure 84. Figure 84 59


61 From here, there are many options that can be configured. For example, edit the Delivery Group and set both weekdays and weekend peak hours to 24 hours as shown in Figure 85. Figure 85 To enable all desktops to be powered on at all times, start a PowerShell session on a Controller, and enter the following commands as shown in Figure 86: add-pssnapin *citrix* Get-brokerdesktopgroup set-brokerdesktopgroup -PeakBufferSizePercent 100 Figure 86 60

62 Exit the PowerShell session. After a few minutes, all the desktops will power on. The desktops will reboot one time before they are ready for users to log on. Back in the PVS console, the vdisk will show three connections and all three target devices will be powered on as shown in Figures 87 and 88. Figure 87 Figure 88 61
63 Understanding How Personal vdisk Works Now let us look at how the write cache and PvD drives work. All three desktops are powered on. Log on as a different user into each desktop. All three users are presented with the standard Windows 8.1 desktop configured during the creation of the master image VM as shown in Figure 89. Figure 89 Before taking a look at user customization and personalization, look at what is on the write cache and PvD drives. You will need to show system, hidden, and operating system files. Figures 92 and 93 show the write cache drive, which shows the write cache file, page file, and the EventLogs folder. 62
64 Figure 90 Figure 91 63
65 Figure 92 shows there is not much useful data on the PvD drive. Figure 92 64


66 Back in Citrix Studio, refresh the Delivery Group, and you will see there are now Sessions in use with no Unregistered or Disconnected machines as shown in Figure 93. Figure 93 Double-click the Delivery Group to see detailed information as shown in Figure 94. Figure 94 65

67 The first user configures their desktop as shown in Figure 95. Figure 95 The second user configures their background as shown in Figure 96. Figure 96 66
68 The third user configures their background as shown in Figure 97. Figure 97 Now that each user has customized their desktop, reboot each desktop, log on again to each desktop, and verify that the user s customizations persisted. 67
69 User Installed Software What about installing software? User1 installed NotePad++, User2 installed Google Chrome and User3 installed Mathematica. The three desktops are shown in Figures 98 through 100. Figure 98 Figure 99 68
70 Figure
71 Now that each user has installed an application, rebooted each desktop, logged on again to each desktop, and verified the their installed applications persisted. Since we are using PvD to allow users to install applications, where are the applications installed? Looking at User1, we can see that Notepad++ was installed to c:\program Files\Notepad++ as shown in Figure 101. Figure
72 User2's Google Chrome is installed to C:\Program Files\Google\Chrome\Application as shown in Figure 102. Figure
73 User3's Mathematica is installed to C:\Program Files\Wolfram Research\Mathematica\10.0 as shown in Figure 103. Figure 103 The C drive view is a combination of the hidden drive, V by default, and C. When users install applications, they will install as usual to the C drive. There is no need to install to the visible PvD drive, P by default. 72
74 Updating the Master Image How is the master image updated if an application needs to be installed for all users? It s simple; in the PVS console, create a maintenance version, update it, test it, and then make it available to users. In the PVS console, right-click the vdisk, and select Versions as shown in Figure 104. Figure 104 Click New as shown in Figure 105. Figure


75 A new Maintenance version of the vdisk is created as shown in Figure 106. Click Done. Figure 106 In the PVS console, go to the Device Collection that contains the original master target device is in, right-click the target device and click Properties as shown in Figure 107. Figure

76 Change the type to Maintenance, and click OK as shown in Figure 108. Note: In a production environment, you would have a dedicated target device to use for maintenance versions of vdisks. Figure
77 In the hypervisor, start that VM, and open the VM's console. An option to boot into either the production or maintenance version is shown. Select the maintenance version as shown in Figure 109. Figure 109 What has happened is that the target device has been configured to boot from a maintenance image, and during the boot-up communication, the PVS server recognized the MAC address and offered the target device the maintenance vdisk to boot from. The maintenance vdisk is in read/write mode so changes can be made to the vdisk. Log on to the desktop with domain credentials. Adobe Acrobat Reader was installed as shown in Figure 110. Note: Whatever software is installed, verify that any license agreements and pop-ups are acknowledged and any other configurations needed are done before sealing the image and running the PvD inventory. For example, in Acrobat Reader, acknowledge the license agreement, and disable the updater. 76

78 Figure 110 Before running the PvD Inventory, follow your standard procedure for sealing the image. This process is unique to every environment. Manually run the PvD inventory. Press the Windows Key + S, and type in Update personal vdisk as shown in Figure 111. Figure


79 The PvD inventory starts. Leave Shut down the system when update is complete selected as shown in Figure 112. Figure 112 After the inventory completes, the VM is shut down. Once the VM has shut down, in the PVS console, right-click the vdisk, and select Versions as shown in Figure 113. Figure

80 Select the Maintenance version, and click Promote as shown in Figure 114. Figure 114 PVS 7.6 adds the ability to now have a test version for a vdisk that uses PvD. This was not possible prior to version 7.6. Select Test, and click OK as shown in Figure 115. Figure
81 The vdisk version is promoted to Test, as shown in Figure 116. Click Done. Figure 116 In the PVS console, go to the device collection that contains the original master target device, right-click the target device, and click Properties as shown in Figure 117. Figure
82 Change the Type to Test, and click OK as shown in Figure 121. Note: In a production environment, you would have dedicated target devices to use for test versions of vdisks. Figure

83 In the hypervisor, start that VM, and open the VM's console. An option to boot into either the production or test version is shown. Select the test version as shown in Figure 119. Figure 119 What has happened is that the target device has been configured to boot from a test image, and during the boot-up communication, the PVS server recognized the MAC address and offered the target device the test vdisk to boot from. The test vdisk is in read-only mode, so no changes can be made to the vdisk. Log on to the desktop with domain credentials. There are several things to notice with the test version of the vdisk: The application that was installed for all users is there (Figure 120), The vdisk is in read-only mode (Figure 121), but The write cache is located on the PVS server (Figure 122) because There is no write cache drive (Figure 123) There is no PvD drive attached (also Figure 123), but The stub holders for the write cache and PvD drives are still there (Figure 124) 82

84 Figure 120 Figure

85 Figure 122 Figure

86 Figure 124 Once testing is completed, shut down the VM. Once the VM has shut down, in the PVS console, right-click the vdisk, and select Versions as shown in Figure 125. Figure

87 Select the test version, and click Promote as shown in Figure 126. Figure 126 Select Immediate, and click OK as shown in Figure 127. Figure
88 The updated vdisk is now available for use as shown in Figure 128. Click Done. Figure

89 Verify the Master Image Update Restart the desktops for them to start using the updated vdisk. The desktops will automatically reboot after a few minutes; this is normal. Wait until this reboot is complete before allowing the users access to the desktop. Log on to each desktop, and verify the new application is available and the user's original customizations and installed applications persisted after the update. The three desktops are shown in Figures 129 through 131. Figure 129 Figure

90 Figure 131 There are three other ways to complete this process. See 89
91 About Citrix Citrix (NASDAQ:CTXS) is a leader in mobile workspaces, providing virtualization, mobility management, networking and cloud services to enable new ways to work better. Citrix solutions power business mobility through secure, personal workspaces that provide people with instant access to apps, desktops, data and communications on any device, over any network and cloud. Citrix solutions are in use at more than 330,000 organizations and by over 100 million users globally. Learn more at Copyright 2015 Citrix Systems, Inc. All rights reserved. Citrix Provisioning Services, Citrix StoreFront, Citrix Receiver, and Citrix XenDesktop are trademarks of Citrix Systems, Inc. and/or one of its subsidiaries, and may be registered in the U.S. and other countries. Other product and company names mentioned herein may be trademarks of their respective companies. 90
Personal vdisk Implementation Guide. Worldwide Technical Readiness
 Worldwide Technical Readiness Table of Contents Table of Contents... 2 Overview... 3 Implementation Guide... 4 Pre-requisites... 5 Preparing PVS vdisk to be used with Personal vdisk... 6 Creating a Desktop
Vendor: Citrix. Exam Code: 1Y Exam Name: Managing Citrix XenDesktop 7.6 Solutions. Version: Demo
 Vendor: Citrix Exam Code: 1Y0-201 Exam Name: Managing Citrix XenDesktop 7.6 Solutions Version: Demo DEMO QUESTION 1 Scenario: A Citrix Administrator updates all of the machines within a Delivery Group.
Citrix Connector 7.5 for Configuration Manager. Using Provisioning Services with Citrix Connector 7.5 for Configuration Manager
 Citrix Connector 7.5 for Configuration Manager Using Provisioning Services with Citrix Connector 7.5 for Configuration Manager Prepared by: Subbareddy Dega and Kathy Paxton Commissioning Editor: Kathy
Dell EMC Ready Architectures for VDI
 Dell EMC Ready Architectures for VDI Designs for Citrix XenDesktop and XenApp for Dell EMC XC Family September 2018 H17388 Deployment Guide Abstract This deployment guide provides instructions for deploying
D. By deleting the difference disks of the virtual machines within the Delivery Group
 Volume: 138 Questions Question: 1 A Citrix Administrator updates all of the machines within a Delivery Group. After the update, an application stops working. The IT manager tells the administrator to revert
Dell EMC Ready System for VDI on VxRail
 Dell EMC Ready System for VDI on VxRail Citrix XenDesktop for Dell EMC VxRail Hyperconverged Appliance April 2018 H16968.1 Deployment Guide Abstract This deployment guide provides instructions for deploying
Dell EMC Ready System for VDI on XC Series
 Dell EMC Ready System for VDI on XC Series Citrix XenDesktop for Dell EMC XC Series Hyperconverged Appliance March 2018 H16969 Deployment Guide Abstract This deployment guide provides instructions for
Course: CXD-203 Managing Citrix XenDesktop 7 Solutions
 Course: CXD-203 Managing Citrix XenDesktop 7 Solutions OVERVIEW The Managing Citrix XenDesktop 7 Solutions course provides students with the skills required to effectively support a Citrix application
CXD-203: Managing App and Desktop Solutions with Citrix XenApp and XenDesktop 7.5
 CXD-203: Managing App and Desktop Solutions with Citrix XenApp and XenDesktop 7.5 The Managing App and Desktop Solutions with Citrix XenApp and XenDesktop 7.5 course provides students with the skills required
CXD-203: Managing Citrix XenDesktop 7 Solutions
 CXD-203: Managing Citrix XenDesktop 7 Solutions The Managing Citrix XenDesktop 7 Solutions course provides students with the skills required to effectively support a Citrix application and desktop virtualization
Open all default CPV Server s Windows firewall ports
 Citrix Provisioning version 1811 What s new November 7, 2018 This release includes updates to the CPV Server s Windows firewall ports. See the fixed and known issues for additional information about this
REVISED 1 AUGUST REVIEWER'S GUIDE FOR VMWARE APP VOLUMES VMware App Volumes and later
 REVISED 1 AUGUST 2018 REVIEWER'S GUIDE FOR VMWARE APP VOLUMES VMware App Volumes 2.13.1 and later Table of Contents Introduction Audience What You Will Learn Navigating This Document for App Volumes Use
"Charting the Course to Your Success!" Managing App and Desktop Solutions with Citrix XenApp and XenDesktop 7.6 CXD 203.
 Description Course Summary The 7.6 course provides students with the skills required to effectively support a Citrix application and desktop virtualization solution in a Windows 2012 R2 environment. During
Citrix Connector Citrix Systems, Inc. All rights reserved. p.1. About this release. System requirements. Technical overview.
 Citrix Connector 3.1 May 02, 2016 About this release System requirements Technical overview Plan Install Citrix Connector Upgrade Create applications Deploy applications to machine catalogs Publish applications
REVISED 1 AUGUST QUICK-START TUTORIAL FOR VMWARE APP VOLUMES VMware App Volumes and later
 REVISED 1 AUGUST 2018 QUICK-START TUTORIAL FOR VMWARE APP VOLUMES VMware App Volumes 2.13.1 and later Table of Contents Introduction Audience What You Will Learn Navigating This Document for App Volumes
Citrix 1Y0-201 EXAM Managing Citrix XenDesktop 7.6 Solutions
 Page No 1 Citrix 1Y0-201 EXAM Managing Citrix XenDesktop 7.6 Solutions Product: Demo For More Information: /1Y0-201-dumps-questions Page No 2 Question: 1 Scenario: Newly hired employees report they are
CITRIX 1Y0-200 EXAM QUESTIONS & ANSWERS
 CITRIX 1Y0-200 EXAM QUESTIONS & ANSWERS Number: 1Y0-200 Passing Score: 800 Time Limit: 120 min File Version: 38.7 http://www.gratisexam.com/ CITRIX 1Y0-200 EXAM QUESTIONS & ANSWERS Exam Name: Managing
Vendor: Citrix. Exam Code: 1Y Exam Name: Designing Citrix XenDesktop 7.6 Solutions. Version: Demo
 Vendor: Citrix Exam Code: 1Y0-401 Exam Name: Designing Citrix XenDesktop 7.6 Solutions Version: Demo DEMO QUESTION 1 Which option requires the fewest components to implement a fault-tolerant, load-balanced
Citrix 1Y0-201 EXAM Managing Citrix XenDesktop 7.6 Solutions. m/ Product: Full File. For More Information:
 Page No 1 https://www.dumpsplanet.com m/ Citrix 1Y0-201 EXAM Managing Citrix XenDesktop 7.6 Solutions Product: Full File For More Information: 1Y0-201-dumps Page No 2 Question: 1 Scenario: Newly hired
Citrix XenDesktop 5 Administration
 Citrix XenDesktop 5 Administration Duration: 5 Days Course Code: CXD-202 Overview: This course provides the foundation necessary for administrators to effectively centralize and manage desktops in the
1Y0-201 citrix. examsforall.com
 1Y0-201 citrix Number: 1Y0-201 Passing Score: 925 Time Limit: 120 min examsforall.com Exam A QUESTION 1 Which three options could a Citrix Administrator enable for users who connect to their provisioned
Deploying Virtual Apps and Desktops with Citrix Provisioning using Oracle Cloud Infrastructure
 Deploying Virtual Apps and Desktops with Citrix Provisioning using Oracle Cloud Infrastructure Citrix Virtual Apps and Desktops (formerly XenApp and XenDesktop) on Oracle Cloud (also known as Oracle Cloud
EXAM - 1Y Managing Citrix XenDesktop 7.6 Solutions. Buy Full Product.
 Citrix EXAM - 1Y0-201 Managing Citrix XenDesktop 7.6 Solutions Buy Full Product http://www.examskey.com/1y0-201.html Examskey Citrix 1Y0-201 exam demo product is here for you to test the quality of the
: CMB-310- XenApp, XenDesktop, and Provisioning Services 7.1x Administration (Fast Track)
") Module Title Duration : CMB-310- XenApp, XenDesktop, and Provisioning Services 7.1x Administration (Fast Track) : 5 days Overview This fast-paced administration course covers the major aspects of installing,
Module Title Duration : CMB-310- XenApp, XenDesktop, and Provisioning Services 7.1x Administration (Fast Track) : 5 days Overview This fast-paced administration course covers the major aspects of installing,
App Orchestration 2.0
 App Orchestration 2.0 Getting Started with Citrix App Orchestration 2.0 Prepared by: Jenny Berger Commissioning Editor: Erin Smith Version: 1.0 Last Updated: April 4, 2014 Page 1 Contents Welcome to App
Er XenApp død og begravet? Allan Bak, edgemo A/S
 Er XenApp død og begravet? Allan Bak, edgemo A/S Agenda Architecture Install, Manage, Support New features Migration/upgrade Demo 7 Current Architectures Receiver Policy Console Delivery Services / WebInterface
VMware Horizon Migration Tool User Guide
 VMware Horizon Migration Tool User Guide Version 3.0.0 August 2017 VMware End User Computing 1/31 @2017 VMware, Inc. All rights reserved. @2017 VMware, Inc. All rights reserved. This product is protected
Exam4Tests. Latest exam questions & answers help you to pass IT exam test easily
 Exam4Tests http://www.exam4tests.com Latest exam questions & answers help you to pass IT exam test easily Exam : 1Y0-301 Title : Deploying Citrix XenDesktop 7.6 Solutions Vendor : Citrix Version : DEMO
CMB-207-1I Citrix Desktop Virtualization Fast Track
 Page1 CMB-207-1I Citrix Desktop Virtualization Fast Track This fast-paced course covers select content from training courses CXA-206: Citrix XenApp 6.5 Administration and CXD-202: Citrix XenDesktop 5 Administration
XenDesktop Planning Guide: Image Delivery
 Consulting Solutions WHITE PAPER Citrix XenDesktop XenDesktop Planning Guide: Image Delivery ( / Machine Creation ) www.citrix.com Overview With previous versions of XenDesktop (version 4 and prior), the
Goliath Performance Monitor v11.7 POC Install Guide
 Goliath Performance Monitor v11.7 POC Install Guide Goliath Performance Monitor Proof of Concept Limitations Goliath Performance Monitor Proof of Concepts (POC) will be limited to monitoring 5 Hypervisor
Goliath Performance Monitor v11.7 Installation Guide
 Goliath Performance Monitor v11.7 Installation Guide http://www.goliathtechnologies.com 1 Legal Notices Inc. All rights reserved. www.goliathtechnologies.com Goliath Technologies believes the information
1Y0-201 Q&As Managing Citrix XenDesktop 7.6 Solutions
 CertBus.com 1Y0-201 Q&As Managing Citrix XenDesktop 7.6 Solutions Pass Citrix 1Y0-201 Exam with 100% Guarantee Free Download Real Questions & Answers PDF and VCE file from: 100% Passing Guarantee 100%
CITRIX 1Y0-200 EXAM QUESTIONS & ANSWERS
 CITRIX 1Y0-200 EXAM QUESTIONS & ANSWERS Number: 1Y0-200 Passing Score: 800 Time Limit: 120 min File Version: 38.7 http://www.gratisexam.com/ CITRIX 1Y0-200 EXAM QUESTIONS & ANSWERS Exam Name: Managing
CXD-203: MANAGING APP AND DESKTOP SOLUTIONS WITH CITRIX XENAPP AND XENDESKTOP 7.6
 ONE STEP AHEAD. CXD-203: MANAGING APP AND DESKTOP SOLUTIONS WITH CITRIX XENAPP AND XENDESKTOP 7.6 The Managing App and Desktop Solutions with Citrix XenApp and XenDesktop 7.6 course provides students with
1Y0-201 citrix. Number: 1Y0-201 Passing Score: 800 Time Limit: 120 min
 1Y0-201 citrix Number: 1Y0-201 Passing Score: 800 Time Limit: 120 min Sections 1. Managing a Citrix XenDesktop 7.6 Solution 2. Maintaining a Citrix XenDesktop 7.6 Solution 3. Monitoring a Citrix XenDesktop
Passleader.1Y0-201.Premium.VCE.171q. Vendor: Citrix. Exam Code: 1Y Exam Name: Managing Citrix XenDesktop 7.6 Solutions. Version: 15.
 Passleader.1Y0-201.Premium.VCE.171q Number: 1Y0-201 Passing Score: 925 Time Limit: 120 min File Version: 15.121 / Vendor: Citrix Exam Code: 1Y0-201 Exam Name: Managing Citrix XenDesktop 7.6 Solutions Version:
1Y0-202 Exam Dumps - Citrix Profile Management Exam Questions PDF
 Citrix Certified Associate Virtualization 1y0-202 Citrix XenApp and XenDesktop Administration 7.6 LTSR Thank You for Downloading 1y0-202 Updated Exam Questions citrix/1y0-202-pdf-exam-dumps Updated Versions:
Citrix Certified Associate Virtualization 1y0-202 Exam Questions
 Citrix Certified Associate Virtualization 1y0-202 Citrix XenApp and XenDesktop Administration 7.6 LTSR Thank You for Downloading 1y0-202 Updated Exam Questions citrix/1y0-202-pdf-exam-dumps Updated Versions:
Pass4Sure.1Y0-200_111,QA. Citrix 1Y0-200 Managing Citrix XenDesktop 7 Solutions Exam
 Pass4Sure.1Y0-200_111,QA Number: Citrix 1Y0-200 Passing Score: 800 Time Limit: 120 min File Version: 16.05 Citrix 1Y0-200 Managing Citrix XenDesktop 7 Solutions Exam This VCE has a lot of questions where
About Citrix Receiver for Chrome 1.4
 About Citrix Receiver for Chrome 1.4 Oct 09, 2015 Citrix Receiver for Chrome enables users to access virtual desktops and hosted applications from devices running the Google Chrome operating system. Resources
App Orchestration 2.5. Upgrading Session Machine Catalogs in App Orchestration 2.5. Prepared by: Mohit Menghnani Last Updated: July 25, 2014
 App Orchestration 2.5 Upgrading Session Machine Catalogs in App Orchestration 2.5 Prepared by: Mohit Menghnani Last Updated: July 25, 2014 Page 1 Contents Introduction... 4 Version upgrade methods... 4
TestKing.1Y0-200_121,QA
 TestKing.1Y0-200_121,QA Number: Citrix 1Y0-200 Passing Score: 800 Time Limit: 120 min File Version: 15.05 Created Questions into Sections, now we can learn by Sections with this help. Many new questions
COURSE OUTLINE IT TRAINING
 CMB-207-1I Citrix XenApp and XenDesktop Fast Track Duration: 5 days Overview: This fast-paced course covers select content from training courses CXA-206 and CXD- 202 and provides the foundation necessary
TestKing.1Y q
 TestKing.1Y0-200.96q Number: 1Y0-200 Passing Score: 800 Time Limit: 120 min File Version: 5.0 http://www.gratisexam.com/ 1Y0-200 Managing Citrix XenDesktop 7 Solutions Exam 1. I took the 1Y0-200 and I
Citrix 1Y Citrix XenApp and XenDesktop Administration 7.6 LTSR. Download Full version :
 Citrix 1Y0-202 Citrix XenApp and XenDesktop Administration 7.6 LTSR Download Full version : http://killexams.com/pass4sure/exam-detail/1y0-202 QUESTION: 132 A Citrix Administrator is creating a new XenDesktop
1Y Number: 1Y0-311 Passing Score: 800 Time Limit: 120 min File Version: 1.1. https://www.gratisexam.com/ 1Y0-311
 1Y0-311 Number: 1Y0-311 Passing Score: 800 Time Limit: 120 min File Version: 1.1 1Y0-311 Citrix XenApp and XenDesktop 7.15 LTSR Advanced Administration Exam A QUESTION 1 Which vdisk change will always
PASS4TEST. Prüfungshilfen für IT Zertifizierungen. Wir bieten Ihnen einen kostenlosen einjährigen Upgrade Service an
 PASS4TEST Prüfungshilfen für IT Zertifizierungen http://www.pass4test.de Wir bieten Ihnen einen kostenlosen einjährigen Upgrade Service an Exam : 1Y0-301 Title : Deploying Citrix XenDesktop 7.6 Solutions
Vendor: Citrix. Exam Code: 1Y Exam Name: Managing Citrix XenDesktop 7 Solutions Exam. Version: Demo
 Vendor: Citrix Exam Code: 1Y0-200 Exam Name: Managing Citrix XenDesktop 7 Solutions Exam Version: Demo Question Set 1 QUESTION 1 Scenario: A Citrix Administrator installs XenServer. The administrator provisions
Citrix XenApp / XenDesktop Setup Procedure For Q-Tel Workstation
 Citrix XenApp / XenDesktop Setup Procedure For Q-Tel Workstation This procedure is used for setting up Q-Tel Workstation as Citrix XenApps and XenDesktops. Contents 1.0 Requirements:... 1 2.0 Desktop Delivery
Goliath Performance Monitor v11.7 Prerequisites Guide
 Goliath Performance Monitor v11.7 Prerequisites Guide Goliath Performance Monitor Proof of Concept Limitations Goliath Performance Monitor Proof of Concepts (POC) will be limited to monitoring 5 Hypervisor
Citrix Provisioning Services and Machine Creation Services a technology comparison. Marius Leu, The Campus Ronald Grass, Citrix Systems GmbH
 Citrix Provisioning Services and Machine Creation Services a technology comparison Marius Leu, The Campus Ronald Grass, Citrix Systems GmbH Agenda Why should we use Provisioning Technologies? How Provisioning
CMB-310 Citrix Virtual Apps, Desktops and Provisioning 7.1x Administration (Fast Track)
") CMB-310 Citrix Virtual Apps, Desktops and Provisioning 7.1x Administration (Fast Track) COURSE OVERVIEW: This fast-paced administration course covers the major aspects of installing, configuring and managing
CMB-310 Citrix Virtual Apps, Desktops and Provisioning 7.1x Administration (Fast Track) COURSE OVERVIEW: This fast-paced administration course covers the major aspects of installing, configuring and managing
Provisioning Services 7.12
 Provisioning Services 7.12 Sep 13, 2016 New in this Release Fixed issues Known issues Features removed from future releases System requirements Provisioning Services product overview Provisioning Services
XenApp Secure Browser Installation with a Citrix Lifecycle Management Blueprint and NetScaler on Azure
 XenApp Secure Browser Installation with a Citrix Lifecycle Management Blueprint and NetScaler on Azure August 2016 Table of contents Overview... 5 What does the blueprint do?... 5 Provisioned Machine Configurations...
Provisioning Services 6.0
 Provisioning Services 6.0 2011 Citrix Systems, Inc. All rights reserved. Terms of Use Trademarks Privacy Statement Contents Provisioning Services 6.0 9 Provisioning Services Product Overview 10 Provisioning
Citrix 1Y Managing Citrix XenDesktop 7.6 Solutions. Download Full Version :
 Citrix 1Y0-201 Managing Citrix XenDesktop 7.6 Solutions Download Full Version : http://killexams.com/pass4sure/exam-detail/1y0-201 QUESTION: 116 Scenario: A Citrix Administrator needs to install a new
Reviewer s Guide: XenApp 7.5
 Reviewer s Guide: XenApp 7.5 Table of Contents Introduction... 3 What is XenApp 7.5?... 4 Getting Started... 6 Part 1: Download the software... 6 Part 2: Network design... 6 Part 3: Prerequisites... 7
Exam Questions 1Y0-201
 Exam Questions 1Y0-201 Managing Citrix XenDesktop 7.6 Solutions http://www.2passeasy.com/dumps/1y0-201/ 1. Scenario: A Citrix Administrator configures a profile management policy in Citrix Studio for the
PASS4TEST 専門 IT 認証試験問題集提供者
 PASS4TEST 専門 IT 認証試験問題集提供者 http://www.pass4test.jp 1 年で無料進級することに提供する Exam : 1Y0-201 Title : Managing Citrix XenDesktop 7.6 Solutions Vendor : Citrix Version : DEMO Get Latest & Valid 1Y0-201 Exam's Question
TECHNICAL WHITE PAPER AUGUST 2017 REVIEWER S GUIDE FOR VIEW IN VMWARE HORIZON 7: INSTALLATION AND CONFIGURATION. VMware Horizon 7 version 7.
 TECHNICAL WHITE PAPER AUGUST 2017 REVIEWER S GUIDE FOR VIEW IN VMWARE HORIZON 7: INSTALLATION AND CONFIGURATION VMware Horizon 7 version 7.x Table of Contents Introduction.... 3 JMP Next-Generation Desktop
Hands-on Lab Exercise Guide
 602: New Features of XenApp 7.6 Hands-on Lab Exercise Guide Worldwide Technical Enablement & Readiness January 2015 1 Table of Contents Contents... 2 Overview... 3 Scenario... 5 Lab Preparation... 6 Attach
XenApp and XenDesktop 7.12 on vsan 6.5 All-Flash January 08, 2018
 XenApp and XenDesktop 7.12 on vsan 6.5 All-Flash January 08, 2018 1 Table of Contents 1. Executive Summary 1.1.Business Case 1.2.Key Results 2. Introduction 2.1.Scope 2.2.Audience 3. Technology Overview
Connection Broker Managing User Connections to Workstations and Blades, OpenStack Clouds, VDI, and More
 Connection Broker Managing User Connections to Workstations and Blades, OpenStack Clouds, VDI, and More Quick Start Using Leostream with Citrix XenDesktop 7 and HDX Version 8.1 January 14, 2016 Contacting
Deploying App and Desktop Solutions with Citrix XenApp and XenDesktop (CXD-300)
") Deploying App and Desktop Solutions with Citrix XenApp and XenDesktop (CXD-300) COURSE OVERVIEW: This course provides students with the skills required to successfully deploy a complete Citrix hosted application
Deploying App and Desktop Solutions with Citrix XenApp and XenDesktop (CXD-300) COURSE OVERVIEW: This course provides students with the skills required to successfully deploy a complete Citrix hosted application
Netwrix Auditor. Virtual Appliance and Cloud Deployment Guide. Version: /25/2017
 Netwrix Auditor Virtual Appliance and Cloud Deployment Guide Version: 9.5 10/25/2017 Legal Notice The information in this publication is furnished for information use only, and does not constitute a commitment
Citrix Synchronizer 5.9.1
 Citrix Synchronizer 5.9.1 Release Documentation For IT administrators who want to install, configure and explore the new features in Synchronizer Table of Contents About This Release... 3 Installation...
Managing App and Desktop Solutions with Citrix XenApp and XenDesktop 7.6 (CXD-203)
") Managing App and Desktop Solutions with Citrix XenApp and XenDesktop 7.6 (CXD-203) COURSE OVERVIEW: The Managing App and Desktop Solutions with Citrix XenApp and XenDesktop 7.6 course provides students
Managing App and Desktop Solutions with Citrix XenApp and XenDesktop 7.6 (CXD-203) COURSE OVERVIEW: The Managing App and Desktop Solutions with Citrix XenApp and XenDesktop 7.6 course provides students
Citrix - CXD Deploying App and Desktop Solutions with Citrix XenApp and XenDesktop 7.6
 Citrix - CXD-300 - Deploying App and Desktop Solutions with Citrix XenApp and XenDesktop 7.6 Duration: 5 Days Course Price: $4,995 Course Description Course Overview This training course provides students
Citrix 1Y0-A03. Citrix XenDesktop 2.0 Enterprise Edition: Administration. Download Full Version :
 Citrix 1Y0-A03 Citrix XenDesktop 2.0 Enterprise Edition: Administration Download Full Version : https://killexams.com/pass4sure/exam-detail/1y0-a03 B. Do not auto-create client printers C. Turn off client
TestingEngine. Test4Engine test dumps questions free test engine latest version
 TestingEngine http://www.test4engine.com Test4Engine test dumps questions free test engine latest version Exam : 1Y0-311 Title : Citrix XenApp and XenDesktop 7.15 LTSR Advanced Administration Vendor :
Agenda. Flexcast Management Architecture XenDesktop 7: Install, Manage, Support Migration/upgrade Best Practices Demo Upgrade tips (if time permits)
") side 1 side 2 Agenda Flexcast Management Architecture XenDesktop 7: Install, Manage, Support Migration/upgrade Best Practices Demo Upgrade tips (if time permits) side 3 FlexCast Management Architecture
side 1 side 2 Agenda Flexcast Management Architecture XenDesktop 7: Install, Manage, Support Migration/upgrade Best Practices Demo Upgrade tips (if time permits) side 3 FlexCast Management Architecture
VDI-in-a-Box 5.1.x :27:51 UTC Citrix Systems, Inc. All rights reserved. Terms of Use Trademarks Privacy Statement
 VDI-in-a-Box 5.1.x 2015-03-16 16:27:51 UTC 2015 Citrix Systems, Inc. All rights reserved. Terms of Use Trademarks Privacy Statement Contents VDI-in-a-Box 5.1.x... 6 VDI-in-a-Box 5.1.x... 7 About Citrix
App Orchestration 2.6
 App Orchestration 2.6 Deploying App Orchestration 2.6 in a Complex Active Directory Environment Last Updated: July 25, 2014 Contents Overview... 3 Resources... 3 Tenants... 4 Offerings... 4 App Orchestration
Question: 2 When should a Citrix Engineer utilize the Processes White List feature of Workspace Environment Management (WEM)?
?") Volume: 66 Questions Question: 1 Scenario: A Citrix Engineer needs to configure a baseline Citrix policy for a new user group in the XenApp and XenDesktop environment. The users are connecting from branch
Volume: 66 Questions Question: 1 Scenario: A Citrix Engineer needs to configure a baseline Citrix policy for a new user group in the XenApp and XenDesktop environment. The users are connecting from branch
Goliath Performance Monitor v11.7 Prerequisites Guide
 Goliath Performance Monitor v11.7 Prerequisites Guide Goliath Performance Monitor Proof of Concept Limitations Goliath Performance Monitor Proof of Concepts (POC) will be limited to monitoring 5 Hypervisor
XenApp 7.x on Oracle Cloud Infrastructure
 2018-032 XenApp 7.x on Oracle Cloud Infrastructure OUT OF BAND DEPLOYMENT GUIDE CITRIX SYSTEMS, INC. Citrix.com 1 Deploying Citrix Cloud XenApp and XenDesktop Service with Oracle Cloud Infrastructure Deploying
Provisioning Services 7.18
 Provisioning Services 7.18 May 25, 2018 Provisioning Services (PVS) is software streaming technology that delivers patches, updates and other configuration information to multiple virtual desktop endpoints
Goliath Performance Monitor Frequently Asked Questions: Citrix XenServer
 Goliath Performance Monitor Frequently Asked Questions: Citrix XenServer Document Date: May 2015 www.goliathtechnologies.com Legal Notices Inc. All rights reserved. www.goliathtechnologies.com Goliath
AppController :21:56 UTC Citrix Systems, Inc. All rights reserved. Terms of Use Trademarks Privacy Statement
 AppController 2.6 2014-03-18 13:21:56 UTC 2014 Citrix Systems, Inc. All rights reserved. Terms of Use Trademarks Privacy Statement Contents AppController 2.6... 6 About This Release... 8 Getting Started...
PASS4TEST 専門 IT 認証試験問題集提供者
 PASS4TEST 専門 IT 認証試験問題集提供者 http://www.pass4test.jp 1 年で無料進級することに提供する Exam : 1Y0-200 Title : Managing Citrix XenDesktop 7 Solutions Exam Vendor : Citrix Version : DEMO Get Latest & Valid 1Y0-200 Exam's
Citrix 1Y Citrix XenApp and XenDesktop 7.15 LTSR Advanced Administration.
 Citrix 1Y0-311 Citrix XenApp and XenDesktop 7.15 LTSR Advanced Administration https://killexams.com/pass4sure/exam-detail/1y0-311 QUESTION: 78 Scenario: A Citrix Engineer is managing a XenApp and XenDesktop
VDI-in-a-Box 5.4. About VDI-in-a-Box. Get started. License VDI-in-a-Box. Manage VDI-in-a-Box Citrix Systems, Inc. All rights reserved. p.
 VDI-in-a-Box 5.4 Nov 16, 2016 About VDI-in-a-Box VDI-in-a-Box overview About this release Fixed issues Known issues Server requirements User device requirements Optional components Get started Download
XenApp 7.8 Deployment ISO. 29 th February 2016
 29 th February 2016 Document Details Document Name Author DG Version 1.0 Date 29th February 2016 Status Released Document History Date Modification Details 29/02/2016 N/A First Release Contents 1. Introduction...
XenDesktop & XenApp 7.15 Deployment ISO
 For Microsoft Windows 2016 Server 21 st September 2017 Document Details Document Name Author DG Version 1.0 Date 21 st September 2017 Status Released Document History Date Modification Details 21/09/2017
PASS4TEST. IT Certification Guaranteed, The Easy Way! We offer free update service for one year
 PASS4TEST IT Certification Guaranteed, The Easy Way! \ http://www.pass4test.com We offer free update service for one year Exam : 1Y0-A15 Title : Engineering a Citrix Virtualization Solution Vendors : Citrix
Citrix Exam 1Y0-301 Deploying Citrix XenDesktop 7.6 Solutions Version: 8.0 [ Total Questions: 112 ]
![Citrix Exam 1Y0-301 Deploying Citrix XenDesktop 7.6 Solutions Version: 8.0 [ Total Questions: 112 ]](/thumbs/93/112523827.jpg "Citrix Exam 1Y0-301 Deploying Citrix XenDesktop 7.6 Solutions Version: 8.0 [ Total Questions: 112 ]") s@lm@n Citrix Exam 1Y0-301 Deploying Citrix XenDesktop 7.6 Solutions Version: 8.0 [ Total Questions: 112 ] Citrix 1Y0-301 : Practice Test Topic break down Topic No. of Questions Topic 1: Pre-installation
s@lm@n Citrix Exam 1Y0-301 Deploying Citrix XenDesktop 7.6 Solutions Version: 8.0 [ Total Questions: 112 ] Citrix 1Y0-301 : Practice Test Topic break down Topic No. of Questions Topic 1: Pre-installation
CXS Citrix XenServer 6.0 Administration
 Course Overview View Course Dates & Register Today Students will learn to effectively install, configure, administer, and troubleshoot XenServer 6.0. Students will also learn how to configure a Provisioning
EMC VSPEX END-USER COMPUTING
 IMPLEMENTATION GUIDE EMC VSPEX END-USER COMPUTING Citrix XenDesktop 7 and Microsoft Hyper-V for up to 2,000 Virtual Desktops Enabled by EMC Next-Generation VNX and EMC Powered Backup EMC VSPEX Abstract
EMC VSPEX END-USER COMPUTING
 DESIGN GUIDE EMC VSPEX END-USER COMPUTING Citrix XenDesktop 7.1 and Microsoft Hyper-V Enabled by EMC VNXe3200 and EMC Powered Backup EMC VSPEX Abstract This describes how to design an EMC VSPEX end-user
Installing and Configuring vcloud Connector
 Installing and Configuring vcloud Connector vcloud Connector 2.6.0 This document supports the version of each product listed and supports all subsequent versions until the document is replaced by a new
Provisioning Services 7.9
 Provisioning Services 7.9 Jun 14, 2016 New in this release Fixed issues Known issues System requirements Provisioning Services product overview Provisioning Services product infrastructure Provisioning
Provisioning Services 7.11
 Provisioning Services 7.11 Sep 13, 2016 New in this Release Fixed issues Known issues System requirements Provisioning Services product overview Provisioning Services product infrastructure Provisioning
VMware App Volumes Installation Guide. VMware App Volumes 2.13
 VMware App Volumes Installation Guide VMware App Volumes 2.13 You can find the most up-to-date technical documentation on the VMware website at: https://docs.vmware.com/ If you have comments about this
XenDesktop 5 PoC s the easy way. Senior Systems Engineer, EMEA
 XenDesktop 5 PoC s the easy way paul.murray@eu.citrix.com Senior Systems Engineer, EMEA This is a Hands On workshop. So Very few marketing and positioning slides Many slides in the deck won t be presented
1Y Number: 1Y0-202 Passing Score: 800 Time Limit: 120 min File Version: Y0-202
 1Y0-202 Number: 1Y0-202 Passing Score: 800 Time Limit: 120 min File Version: 1.1 1Y0-202 Citrix XenApp and XenDesktop Administration 7.6 LTSR Exam A QUESTION 1 Which PowerShell cmdlet will a Citrix Administrator
Dell EMC Ready Architectures for VDI
 Dell EMC Ready Architectures for VDI Designs for VMware Horizon 7 on Dell EMC XC Family September 2018 H17387 Deployment Guide Abstract This deployment guide provides instructions for deploying VMware
Test Methodology We conducted tests by adding load and measuring the performance of the environment components:
 Scalability Considerations for Using the XenApp and XenDesktop Service Local Host Cache Feature with Citrix Cloud Connector Author: Jahed Iqbal Overview The local host cache feature in the XenApp and XenDesktop
Goliath Performance Monitor v11.7 Prerequisites Guide
 Goliath Performance Monitor v11.7 Prerequisites Guide http://www.goliathtechnologies.com 1 Legal Notices Inc. All rights reserved. www.goliathtechnologies.com Goliath Technologies believes the information
Accops HyWorks v3.0. Installation Guide
 Accops HyWorks v3.0 Installation Guide Last Update: 4/25/2017 2017 Accops Technologies Pvt. Ltd. All rights reserved. The information contained in this document represents the current view of Propalms