H.264 NETWORK CAMERA
|
|
|
- Rudolph Owens
- 5 years ago
- Views:
Transcription
1 318Z H.264 NETWORK CAMERA INSTALLATION GUIDE Please read instructions thoroughly before operation and retain it for future reference. N211_211V_quick_V1.0
2
3 IMPORTANT SAFEGUARD All lead-free products offered by the company comply with the requirements of the European law on the Restriction of Hazardous Substances (RoHS) directive, which means our manufacture processes and products are strictly lead-free and without the hazardous substances cited in the directive. The crossed-out wheeled bin mark symbolizes that within the European Union the product must be collected separately at the product end-of-life. This applies to your product and any peripherals marked with this symbol. Do not dispose of these products as unsorted municipal waste. Contact your local dealer for procedures for recycling this equipment. Trademark Acknowledgements iphone is the registered trademark of Apple Inc. BlackBerry and related trademarks, names and logos are the property of Research In Motion Limited and are registered and/or used in the U.S. and countries around the world. Used under license from Research In Motion Limited. Android is a trademark of Google Inc. Use of this trademark is subject to Google Permissions. Windows Mobile & Symbian mentioned in this document are the registered trademarks of their respective holders. Disclaimer We reserve the right to revise or remove any content in this manual at any time. We do not warrant or assume any legal liability or responsibility for the accuracy, completeness, or usefulness of this manual. The content of this manual is subject to change without notice. MPEG4 Licensing THIS PRODUCT IS LICENSED UNDER THE MPEG4 VISUAL PATENT PORTFOLIO LICENSE FOR THE PERSONAL AND NON-COMMERCIAL USE OF A CONSUMER FOR (i) ENCODING VIDEO IN COMPLIANCE WITH THE MPEG4 VISUAL STANDARD ( MPEG-4 VIDEO ) AND/OR (ii) DECODING MPEG4 VIDEO THAT WAS ENCODED BY A CONSUMER ENGAGED IN A PERSONAL AND NON-COMMERCIAL ACTIVITY AND/OR WAS OBTAINED FROM A VIDEO PROVIDER LICENSED BY MPEG LA TO PROVIDE MPEG4 VIDEO. NO LICENSE IS GRANTED OR SHALL BE IMPLIED FOR ANY OTHER USE. ADDITIONAL INFORMATION INCLUDING THAT RELATING TO PROMOTIONAL INTERNAL AND COMMERCIAL USES AND LICENSING MAY BE OBTAINED FROM MPEG LA, LLC. SEE GPL Licensing This product contains codes which are developed by Third-Party-Companies and which are subject to the GNU General Public License ( GPL ) or the GNU Lesser Public License ( LGPL ). The GPL Code used in this product is released without warranty and is subject to the copyright of the corresponding author. Further source codes which are subject to the GPL-licenses are available upon request. We are pleased to provide our modifications to the Linux Kernel, as well as a few new commands, and some tools to get you into the code. The codes are provided on the FTP site, and please download them from the following site or you can refer to your distributor:
4 TABLE OF CONTENTS 1. OVERVIEW Package Content Hardware Overview Rear Panel INSTALLATION & CONNECTION Install the Hardware Connect to power CAMERA CONNECTION TO INTERNET Camera Access via LAN Network Configurations via Wizard...9 APPENDIX 1 CREATING AN ACCOUNT FOR DDNS SERVICE...12 APPENDIX 2 API ID APPLICATION FOR SMS MESSAGING...15 APPENDIX 3 MOBILE SURVEILLANCE VIA EAGLEEYES...17 A2.1 Prerequisites...17 A2.2 Where to download...17
5 1. OVERVIEW 1.1 Package Content Network camera Installation Guide CD-ROM disc (including user manuals & CMS software Video Viewer ) RJ45 network cable Adapter Bracket 1.2 Hardware Overview 1
6 1.3 Rear Panel CONNECTOR / BUTTON Reset Default Power Indicator Video Output LAN Power Connector DESCRIPTION This button is hidden in the pinhole. Press and hold the reset button until the network camera rebooted. This will reset all parameters, including the IP address to factory default settings. When the camera is power-supplied, this indicator will be on as red. Connect to the video input connector of your monitor with a video cable (i.e. a RCA cable with the BNC connector, or a coaxial cable for video output. * The video cable is optional. Connect the camera to the network with the supplied RJ45 cable. Connect the DC 12V adapter for power supply. 2
.")
 Prepare all the parts needed for camera installation.")
7 2. INSTALLATION & CONNECTION 2.1 Install the Hardware This camera can be installed in two ways: ceiling-mounted and desktop. During the installation, please make sure the upper side of the camera is always facing up, as shown in Figure 1 below (Regardless of which installation way you re using). This is to ensure the video output won t be up side down. Note: The illustrations below are based on the ceiling-mounted installation. Note: For the detailed cable connection, please refer to 1.3 Rear Panel on Page 2. Tool needed: Power drill x 1 (not supplied within the sales package) Prepare all the parts needed for camera installation. Find the network camera, bracket package, a bag of screws & wall plugs, and a cap supplied with the sales package, as shown in Figure 1. Unpack the bracket package to find the bracket disassembled into three parts: the base, stem and joint lock. Figure 1: Parts needed for camera installation 1. Fix the base of the bracket. Figure 2: Screw the base to the ceiling Fix the base of the bracket with the supplied three screws to where the camera will be installed by using a power drill. 3
.")


8 2. Assemble the bracket: a). Align the stem with the central hole of the base, and rotate it to secure, as shown in Figure 3. b). Connect the joint lock to the stem and rotate it to secure, as shown in Figure 4. Figure 3: Connect the stem to the base Figure 4: Connect the joint lock to the stem 3. Connect the camera to the bracket. Ceiling-mounted: With the upper side of the camera facing up, align the mounting screw hole on the upper side with the screw thread of the joint lock, and rotate the camera to secure, as shown in Figure 4. Desktop: With the upper side of the camera facing up, align the mounting screw hole on the underside with the screw thread of the joint lock, and rotate the camera to secure. Figure 4: Connect the camera to the bracket Figure 5: Insert the cap to the camera 4. Insert the cap to the other mounting screw hole of the camera. Figure 6: Finish the installation Ceiling-mounted: Insert the cap to the mounting screw hole on the underside of the camera, as shown in Figure 5. Desktop: Insert the cap to the mounting screw hole on the upper side of the camera. 5. Adjust the viewing angle of the camera, and fasten the joint lock to fix the angle. The installation is completed, as shown in Figure 6. 4
9 2.2 Connect to power Plug the supplied power adapter to the camera s power connector and power outlet. Note: The regulated power adapter is DC12V 1A to operate this device. 5

 Select start All Programs Control Panel Network and Internet Connections Network Connections (If you re in Category View ).")
 In the General tab, select Use the following IP address, and set the IP address to 192.168.1.XXX (XXX can be any value from 1~255 except 10).")
10 3. CAMERA CONNECTION TO INTERNET Before using this network camera, please follow the instructions below to finish the network connection settings based on your installation environment: To configure the network settings, you must connect the camera to your PC by LAN. For details, please refer to 3.1 Camera Access via LAN at page 6. To configure the network settings via Wizard, please refer to 3.2 Network Configurations via Wizard at page Camera Access via LAN For Windows XP users: a) Select start All Programs Control Panel Network and Internet Connections Network Connections (If you re in Category View ). b) In LAN or High-Speed Internet, right-click on Local Area Connection, and select Properties. c) In the General tab, select Internet Protocol (TCP/IP), and select Properties. d) In the General tab, select Use the following IP address, and set the IP address to XXX (XXX can be any value from 1~255 except 10). Note: It s recommended to note down the current settings first and then change as instructed. It s helpful when you need to restore the PC network settings for connecting to Internet later. e) Click OK to close the Internet Protocol (TCP/IP) Properties dialog box. Then, click Close to close the Local Area Connection Properties dialog box. 6
 Right-click on Local Area Connection, and select Properties. c) In the General tab, select Internet Protocol Version 4 (TCP/IPv4), and select Properties.")
 Click OK to close the Internet Protocol Version 4 (TCP/IPv4) Properties dialog box.")
11 For Windows Vista users: a) Select (start) Control Panel Network and Internet to enter the Network and Sharing Center. Then, click Manage network connections (If you re in Category View ). b) Right-click on Local Area Connection, and select Properties. c) In the General tab, select Internet Protocol Version 4 (TCP/IPv4), and select Properties. d) In the General tab, select Use the following IP address, and set the IP address as described below. Note: It s recommended to note down the current settings first and then change as instructed. It s helpful when you need to restore the PC network settings for connecting to Internet later. e) Click OK to close the Internet Protocol Version 4 (TCP/IPv4) Properties dialog box. Then, click Close to close the Local Area Connection Properties dialog box. 7
 Right-click on Local Area Connection, and select Properties. Note: If your local area connection is not enabled, please also enable it.")

12 For Windows 7 users: a) Select (start) Control Panel Network and Internet to enter the Network and Sharing Center. Then, click Change adapter settings. b) Right-click on Local Area Connection, and select Properties. Note: If your local area connection is not enabled, please also enable it. c) In the Networking tab, select Internet Protocol Version 4 (TCP/IPv4), and select Properties. d) In the General tab, select Use the following IP address, and set the IP address as described below. Note: It s recommended to note down the current settings first and then change as instructed. It s helpful when you need to restore the computer s network settings for connecting to Internet later. e) Click OK to close the Internet Protocol Version 4 (TCP/IPv4) Properties dialog box. Then, click Close to close the Local Area Connection Properties dialog box. 8

 and password (admin), and enter the security code from the image below. Then, click LOGIN.")

13 3.2 Network Configurations via Wizard A quick installation wizard is available via your web browser for password change, date & time settings, and network configurations. Note: You can also change the settings in the system configuration page via your web browser later. For details, please refer to 5. ACCESSING THE CAMERA VIA WEB BROWSER in the user manual. Step1: Open your web browser, for example, Microsoft Internet Explorer, and enter in the URL address box. Step2: In the login page, key in the default user name (admin) and password (admin), and enter the security code from the image below. Then, click LOGIN. Step3: The wizard is then starting analyzing your network environment, and shows your network environment. Select Next to continue. Step4: In Account, change the access password if needed. If not, leave all the columns blank, and select Next. Step5: In Date and Time, check if the date and time setting are correct and modify if necessary. 9
 Enter the information of Server IP, Gateway and Net Mask obtained from your ISP (Internet Service Provider). b) Enter the port number. The valid number ranges from 1 to 9999.")
 Enter the user name and password obtained from your ISP. b) Continue the DDNS setting by clicking the DDNS button, as reminded in this page. - Select default in System Name.")
14 Step6: In Network, select the network type based on your network environment (Static IP / PPPoE / DHCP), and key in the information needed. Note: This camera doesn t support POE router or hub. For Static IP: a) Enter the information of Server IP, Gateway and Net Mask obtained from your ISP (Internet Service Provider). b) Enter the port number. The valid number ranges from 1 to The default value is 80. Typically, the TCP port used by HTTP is 80. However in some cases, it is better to change this port number for added flexibility or security. For PPPoE: a) Enter the user name and password obtained from your ISP. b) Continue the DDNS setting by clicking the DDNS button, as reminded in this page. - Select default in System Name. - In Hostname, keep the default value, i.e. the MAC address of this camera. Then, note down the whole address of the camera, for example, MAC000E5318C04C.ddns.dvrtw.com.tw. - (Optional) Enter your address to receive messages from the DDNS server. Note: Please at least use the default address to access your DVR remotely once. This is to ensure our DDNS server has your DVR registered. Then, you may change the host name to a more meaningful name to memorize later here. Note: You can also create a DDNS account from a website which provides free DDNS service. For details, please refer to APPENDIX 1 CREATING AN ACCOUNT FOR DDNS SERVICE at page 12. c) Select Save and return to the wizard. 10
 Continue the DDNS setting by clicking the DDNS button, as reminded in this page.")
15 For DHCP: a) Before selecting this option, you need to finish the DHCP router settings first. Get a router and connect it to the Internet via your computer (with Static IP or PPPoE setting). There are different setting methods for different routers. Please refer to their respective user manuals. b) Continue the DDNS setting by clicking the DDNS button, as reminded in this page. - Select default in System Name. - In Hostname, keep the default value, i.e. the MAC address of this camera. Then, note down the whole address of the camera, for example, MAC000E5318C04C.ddns.dvrtw.com.tw. - (Optional) Enter your address to receive messages from the DDNS server. Note: Please at least use the default address to access your DVR remotely once. This is to ensure our DDNS server has your DVR registered. Then, you may change the host name to a more meaningful name to memorize later here. Note: You can also create a DDNS account from a website which provides free DDNS service. For details, please refer to APPENDIX 1 CREATING AN ACCOUNT FOR DDNS SERVICE at page 12. c) Select Save and return to the wizard. Step7: In Apply, all the changes are listed. Check if the changes are correct. If yes, click Save. If no, click Back to where the changes should be made for modification, and click Save to apply the settings. You will be prompted to restart your web browser for network setting changes. Note: You can also change the settings in the system configuration page via your web browser later. For details, please refer to 5. ACCESSING THE CAMERA VIA WEB BROWSER in the user manual. Step8: Click Save and log out. Then, disconnect your camera and your PC, and connect them to Internet separately. Step9: Enter the host name you just note down in the URL address box of the web browser, and see if you can access the camera successfully. 11


16 APPENDIX 1 CREATING AN ACCOUNT FOR DDNS SERVICE For PPPOE or DHCP, you should enter the host name which points to the IP address of your network camera for login first. Besides using the default DDNS service, you can also apply for new DNS services. There are many websites for free DDNS service application, and below shows an example of DDNS account application from the website Step1: Go to and click Create Account to sign up a DDNS account. Step2: Enter all the information necessary for signing up an account according to the website instructions. Key in a user name for login, for example, headoffice523. Set the password and input it again to confirm. Key in your address and input it again to confirm. Then, click Create Account. Step3: The system will automatically send a confirmation to your account. Please read this within 48 hours and complete the procedure to activate your account according to the instructions in the . When the account is confirmed, you will see Account Confirmed. Your account is created successfully now. 12


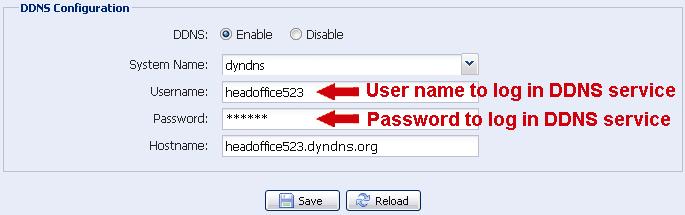
17 Step4: Click login, and enter the user name and password you preset before to log in. Step5: Click Add Host Services. Input a meaningful host name. Choose a host name. Enter the IP address you want to redirect. Note down the whole host name, for example, headoffice523.dyndns.org. Then, click Add To Cart for billing. Note: This service is free. Just finish the billing process, and NO paying information is required. Step6: Click Activate Services after checkout, and you re ready to use DDNS services now. Step7: Return to your web browser, and go to Network DDNS. Select Enable for DDNS. Select the system name you set when subscribing the DDNS service from the drop-down list, for example, dyndns. Enter the user name & password you used to log into the DDNS service. Enter the host name you set when subscribing the DDNS service, for example, headoffice
18 14


19 APPENDIX 2 API ID APPLICATION FOR SMS MESSAGING To allow the camera automatically sending a text message when an event happens, you need to apply an API ID from Clickatell, one mobile messaging company, first. Note: The SMS messaging is not totally free. You will be charged starting from the 11 th message. Please follow the steps below for application. Step1: Go to In New Customers, select Clickatell Central (API) from the drop-down list. Step2: Fill in your information to create an account, and click CONTINUE. Note: Note down the user name and password, and the mobile phone number you specified here for SMS notification setting later. Step2: When the account is created, the system will automatically send an to your specified 15

 you want the text message to be sent,")


20 address and ask you to activate your account. Click the link in the to complete account activation, and enter the login page as follows. Enter the password you set, and click Login. Step3: Enter the mobile phone number (including your country code) you want the text message to be sent, and click SEND ACTIVATION CODE. The system will send an activation code to that number for verification. Check if you receive a text message from Clickatell. Step4: Go back to Clickatell, and click the tab Manage my Products. Then, select HTTP from the drop-down list My Connections. Step5: In Add HTTP API, enter a descriptive name for this service, and make sure the dial prefix is correct and callback type is HTTP GET. Then, click Submit. Step5: You will get an API ID as follows. Note: Note down the API ID for SMS notification setting later. 16
. It s compatible with several popular mobile platforms, such as iphone, BlackBerry, Symbian, Windows Mobile and Android.")
21 APPENDIX 3 MOBILE SURVEILLANCE VIA EAGLEEYES EagleEyes is a mobile phone program used with our surveillance system (DVRs or network cameras) for remote surveillance. It has several advantages: It s free (Except EagleEyes Plus for iphone). It s compatible with several popular mobile platforms, such as iphone, BlackBerry, Symbian, Windows Mobile and Android. It s easy to download, install and configure. For more details about configuring and operating this program, please visit our official website A2.1 Prerequisites Before installing EagleEyes to your mobile phone for remote surveillance, make sure you have checked the following: Your mobile platform is iphone, BlackBerry, Symbian, Windows Mobile & Android. Mobile Internet services are subscribed and available to use for your mobile phone. Note: You might be charged for Internet access via wireless or 3G networks. For the Internet access rate details, please check with your local network operator or service provider. Your DVR or network camera is powered on and connected to Internet. You have noted down the IP address, port number, user name and password used to access your DVR or network camera from Internet. A2.2 Where to download Connect to from your mobile phone, and sign in. Note: Please DO NOT try to download EagleEyes from your computer. Then, select Software and the mobile platform of your phone to download EagleEyes to your phone. For BlackBerry, Symbian, Windows Mobile & Android, select the download link from the website to start downloading. Note: It s recommended to download EagleEyes for BlackBerry with the web browser of Opera. For iphone, two versions of EagleEyes are available: -- EagleEyes Plus (US$4.99), and -- EagleEyes Lite (Free). Select the version you want, and you ll be directed to App Store to download the application. Note: You can also find EagleEyes on App Store from your iphone. Go to App Store, and select Search. Enter the keyword eagleeyes to find and download the version you want. When the download is completed, EagleEyes will be installed automatically to the location where all applications are saved in your phone by default, or where you specify. 17
22 Note: For more details about configuring and operating this program, please visit our official website 18
1-PORT H.264 VIDEO SERVER
 1-PORT H.264 VIDEO SERVER USER MANUAL DN-16100 IMPORTANT SAFEGUARD All lead-free products offered by the company comply with the requirements of the European law on the Restriction of Hazardous Substances
NETWORK CAMERA SERIES
 NETWORK CAMERA SERIES ADVANCED NETWORK SETUP Please read instructions thoroughly before operation and retain it for future reference. 565_365_network_V0.9 IMPORTANT SAFEGUARD All lead-free products offered
AVN807A MEGAPIXEL NETWORK CAMERA SERIES
 AVN807A MEGAPIXEL NETWORK CAMERA SERIES ADVANCED NETWORK SETUP Please read instructions thoroughly before operation and retain it for future reference. n807a_network_v1.0 IMPORTANT SAFEGUARD All lead-free
PTZ NETWORK CAMERA SERIES
 353Z PTZ NETWORK CAMERA SERIES INSTALLATION GUIDE Please read instructions thoroughly before operation and retain it for future reference. N244_245_V0.9 Powerful Remote Surveillance Distance makes no difference
AVM328A MEGAPIXEL NETWORK CAMERA SERIES
 AVM328A MEGAPIXEL NETWORK CAMERA SERIES ADVANCED NETWORK SETUP Please read instructions thoroughly before operation and retain it for future reference. m328a_network_v1.0 IMPORTANT SAFEGUARD All lead-free
High Resolution Dome Network Camera Series
 357Z High Resolution Dome Network Camera Series INSTALLATION GUIDE Please read instructions thoroughly before operation and retain it for future reference. N222_V0.9 Powerful Remote Surveillance Distance
OUTDOOR IR NETWORK CAMERA Series
 OUTDOOR IR NETWORK CAMERA Series INSTALLATION GUIDE Please read instructions thoroughly before operation and retain it for future reference. 1. OVERVIEW 1.1 Package Content Network camera Installation
Installation Guide. Mobile Surveillance Distance makes no difference. eagleeyes_quick_v1.2
 Installation Guide Mobile Surveillance Distance makes no difference eagleeyes_quick_v1.2 IMPORTANT SAFEGUARD All lead-free products offered by the company comply with the requirements of the European law
Please read instructions thoroughly before operation and retain it for future reference.
 NETWORK SETUP For Video Recorder Please read instructions thoroughly before operation and retain it for future reference. We reserve the right to revise or remove any content in this manual at any time.
Please read instructions thoroughly before operation and retain it for future reference.
 SETUP For Video Recorder Please read instructions thoroughly before operation and retain it for future reference. We reserve the right to revise or remove any content in this manual at any time. We do
ADVANCED NETWORK SURVEILLANCE CAMERA
 ADVANCED NETWORK SURVEILLANCE CAMERA User Manual Please read instructions thoroughly before operation and retain it for future reference. IMPORTANT SAFEGUARD All lead-free products offered by the company
AVI321 / 311 Network Camera Series Quick Guide
 242Z AVI321 / 311 Network Camera Series Quick Guide All lead-free products offered by the company comply with the requirements of the European law on the Restriction of Hazardous Substances (RoHS) directive,
IP / CCTV OUTDOOR SPEED DOME CAMERA
 242Z IP / CCTV OUTDOOR SPEED DOME CAMERA Quick Installation Guide All lead-free products offered by the company comply with the requirements of the European law on the Restriction of Hazardous Substances
Powerful Remote Surveillance
 Powerful Remote Surveillance Distance makes no difference To Our Valuable Customers, Thank you for choosing this product. You ll be amazed by those useful functions this product provides, especially for
ROHS AND WEEE COMPLIANCE
 210Z ROHS AND WEEE COMPLIANCE All lead-free products offered by the company comply with the requirements of the European law on the Restriction of Hazardous Substances (RoHS) directive, which means our
MEGAPIXEL OUTDOOR IR NETWORK CAMERA SERIES
 MEGAPIXEL OUTDOOR IR NETWORK CAMERA SERIES USER MANUAL Please read instructions thoroughly before operation and retain it for future reference. N36x_26x_system_V1.0 IMPORTANT SAFEGUARD All lead-free products
NETWORK BULLET CAMERA USER MANUAL
 NETWORK BULLET CAMERA USER MANUAL Please read instructions thoroughly before operation and retain it for future reference. IMPORTANT SAFEGUARD All lead-free products offered by the company comply with
NETWORK CAMERA USER MANUAL
 NETWORK CAMERA USER MANUAL Please read instructions thoroughly before operation and retain it for future reference. IMPORTANT SAFEGUARD All lead-free products offered by the company comply with the requirements
Outdoor IR Camera. DVR / Camera Communication System Series
 348Z Outdoor IR Camera DVR / Camera Communication System Series Please read instructions thoroughly before operation and retain it for future reference. For the actual display & operation, please refer
H.264 Network DVR. User Manual
 H.264 Network DVR User Manual GUI Display with USB Mouse Control Please read instructions thoroughly before operation and retain it for future reference. For the actual display & operation, please refer
High Resolution Dome Network Camera Series
 High Resolution Dome Network Camera Series USER MANUAL Please read instructions thoroughly before operation and retain it for future reference. 222_system_V0.9 IMPORTANT SAFEGUARD All lead-free products
H.264 DAY & NIGHT NETWORK CAMERA USER MANUAL. Please read instructions thoroughly before operation and retain it for future reference.
 H.264 DAY & NIGHT NETWORK CAMERA USER MANUAL Please read instructions thoroughly before operation and retain it for future reference. N204_212_system_V1.0 IMPORTANT SAFEGUARD All lead-free products offered
H.264 DVR. User Manual
 H.264 DVR User Manual GUI Display with USB Mouse Control Please read instructions thoroughly before operation and retain it for future reference. For the actual display & operation, please refer to your
AVI201 / 202 / 212 Network Cameras User s Manual
 197Z AVI201 / 202 / 212 Network Cameras User s Manual Please read instructions thoroughly before operation and retain it for future reference. The image shown above may differ from the actual product appearance.
Video & Alarm CCTV Kit 4CH Network Video Recorder & 960p Wireless Cameras
 English Video & Alarm CCTV Kit 4CH Network Video Recorder & 960p Wireless Cameras Quick Start Guide Support, Helpdesk www.iget.eu/cs/helpdesk-centrum-cs https://helpdesk.intelek.cz/ MODELS: HGNVK-48902/48904
Wireless N Megapixel Network Camera F3101/3106
 Wireless N Megapixel Network Camera F3101/3106 86085L1000020 Package Contents Camera F3101/3106 Network Camera Quick Installation Guide To provide brief product information and quick installation and wireless
Zavio M511E / M511W Quick Installation Guide
 Zavio M511E / M511W Quick Installation Guide Please follow the installation steps below to set up your M511E / M511W IP Camera. Check the package contents against the list below. See P.1 Physical overview.
MPEG4 Licensing. GPL Licensing.
 MPEG4 Licensing THIS PRODUCT IS LICENSED UNDER THE MPEG4 VISUAL PATENT PORTFOLIO LICENSE FOR THE PERSONAL AND NON-COMMERCIAL USE OF A CONSUMER FOR (i) ENCODING VIDEO IN COMPLIANCE WITH THE MPEG4 VISUAL
Please read instructions thoroughly before operation and retain it for future reference.
 DIGITAL VIDEO RECORDER USER MANUAL Please read instructions thoroughly before operation and retain it for future reference. KD673_672_671_670_AC791_790_CD540_MR673_manual_V1.1 IMPORTANT SAFEGUARD CAUTION
Zavio F3100 / F3105 Quick Installation Guide
 Zavio F3100 / F3105 Quick Installation Guide Please follow the installation steps below to set up F3100 / F3105 IP Camera. Check the package contents against the list below. See P.1 Physical overview.
Zavio P5111/ P5116/ P5210 Quick Installation Guide
 86085M2000010 Zavio P5111/ P5116/ P5210 Quick Installation Guide Installation Steps Please follow the installation steps below to set up your P5111 / P5116/ P5210 Day/Night Pan/Tilt IP Camera. Check the
H.264 Network DVR. User Manual
 409Z H.264 Network DVR User Manual GUI Display with USB Mouse Control Please read instructions thoroughly before operation and retain it for future reference. For the actual display & operation, please
TL-SC3000 3GPP Surveillance Camera
 Rev:1.0.0 1910010104 COPYRIGHT & TRADEMARKS Specifications are subject to change without notice. is a registered trademark of TP-LINK TECHNOLOGIES CO., LTD. Other brands and product names are trademarks
DVG-2001S VoIP Terminal Adapter
 This product can be set up using any current web browser, i.e., Internet Explorer 6 or Netscape Navigator 6.2.3. DVG-2001S VoIP Terminal Adapter Before You Begin 1. If you purchased this VoIP Terminal
1 Hardware Installation
 1 Hardware Installation 1.1 Choosing the Best Location for Wireless Operation Many environmental factors may affect the effective wireless function of the DSL Router. If this is the first time that you
SOHO Camera install guide Model
 SOHO Network Camera quick install guide Model 524421 INT-524421-QIG-1008-03 introduction Thank you for purchasing the INTELLINET NETWORK SOLUTIONS SOHO Network Camera, Model 524421. This quick install
Quick Installation Guide
 V50.02 Model: FI8918W Quick Installation Guide Indoor Pan/Tilt Wireless IP Camera Black White For Windows OS ------- Page 1 For MAC OS ------- Page 14 Quick Installation Guide For Windows OS Package Contents
VWS2E 2-CHANNEL VIDEO WEB SERVER
 VWS2E 2-CHANNEL VIDEO WEB SERVER 1. Introduction To all residents of the European Union Important environmental information about this product This symbol on the device or the package indicates that disposal
Minimum System Requirements. Package Contents
 Ver. 1.00 DCS-6111 System Requirements Minimum System Requirements Internet Explorer 6.x or above Windows XP or Windows Vista 1.7GHz processor or higher 256MB of RAM 1 Ethernet connection Package Contents
Zavio F520E Quick Installation Guide
 Zavio F520E Quick Installation Guide Please follow the installation steps below to set up your F520E IP Camera. Check the package contents against the list below. See P.1 Physical overview. See P.1 Install
IP Mini PTZ CAMERA USER GUIDE
 IP Mini PTZ CAMERA USER GUIDE TYPE A: To switch the mount style, remove the two screws on the pan bottom and rotate 180 degree to remount. This Mini PTZ cylinder camera can support both wall mount and
C1002 IP Camera. Quick Installation Guide. Solwise Ltd., 1
 C1002 IP Camera Quick Installation Guide Solwise Ltd., www.solwise.co.uk, sales@solwise.co.uk 1 Trademarks and/or registered trademarks are the property of their respective owners The information presented
H.264 Network DVR. User Manual
 H.264 Network DVR User Manual GUI Display with USB Mouse Control Please read instructions thoroughly before operation and retain it for future reference. For the actual display & operation, please refer
A-300 Speed Dome. Quick Start Guide
 A-300 Speed Dome Quick Start Guide Thank you for purchasing our product. If there are any questions, or requests, please do not hesitate to contact the company you purchased the unit from. This manual
Lab - Connect to a Router for the First Time
 Introduction In this lab, you will configure basic settings on a wireless router. Recommended Equipment A computer with Windows installed An Ethernet NIC installed Wireless router Ethernet patch cable
DIGITAL VIDEO RECORDER
 DIGITAL VIDEO RECORDER USER MANUAL Please read instructions thoroughly before operation and retain it for future reference. KPD678_676_CPD536_538_manual_V1.0 IMPORTANT SAFEGUARD CAUTION RISK OF ELECTRIC
SAMSUNG ALL-IN-ONE SECURITY SYSTEM
 Quick Start Guide KIT MODEL SDH-B74041/SDH-B74081 DVR MODEL SDR-B74301 SAMSUNG ALL-IN-ONE SECURITY SYSTEM Thank you for purchasing the Samsung DVR Security System. Follow the simple steps in this guide
36CH / 32CH XVR SERIES
 36CH / 32CH XVR SERIES QUICK START Please read instructions thoroughly before operation and retain it for future reference. For the actual display & operation, please refer to your device in hand. To check
Quick Installation Guide DSL-2540U. ADSL Annex B/Ethernet Router with Built-in Switch
 ADSL Annex B/Ethernet Router with Built-in Switch BEFORE YOU BEGIN Delivery Package Router Power adapter DC 12V/0.5A RJ-11 telephone cable Ethernet cable (CAT 5E) Splitter CD-ROM with User Manual and (brochure).
DSL-G624T. Wireless ADSL Router. If any of the above items is missing, please contact your reseller. This product can be set up using any
 This product can be set up using any current web browser, i.e., Internet Explorer 6x or Netscape Navigator 7x. DSL-G624T Wireless ADSL Router Before You Begin 1. If you purchased this Router to share your
MEGAPIXEL OUTDOOR IR NETWORK CAMERA SERIES
 MEGAPIXEL OUTDOOR IR NETWORK CAMERA SERIES USER MANUAL Please read instructions thoroughly before operation and retain it for future reference. IMPORTANT SAFEGUARD Disclaimer We reserve the right to revise
Index Step 1 Setting up your surveillance system Step 2 Recording and accessing video on your DVR Step 3 Accessing your DVR from a Local Computer PC
 Talos DVR Quick Reference Guide 12-2011 Step 1 Setting up your surveillance system Designing your surveillance system 3 Installing the hard drive 4 Connecting a monitor 5 Initializing (turning on) your
DIGITAL VIDEO RECORDER
 DIGITAL VIDEO RECORDER USER MANUAL Please read instructions thoroughly before operation and retain it for future reference. KD678_677_676_675_AC758D_757_756D_755_CD536_538_manual_V1.2 IMPORTANT SAFEGUARD
Network Bullet Camera. Quick Operation Guide
 Network Bullet Camera Quick Operation Guide Thank you for purchasing our product. If there are any questions, or requests, please do not hesitate to contact the dealer. About This Document This manual
User Manual. Mobile Viewer Mobile Manager Software (MMS) 1 st Edition : 10 Jan nd Edition : 31 Mar rd Edition : 20 May 2010
 1 st Edition : 10 Jan nd Edition : 31 Mar rd Edition : 20 May 2010") Mobile Viewer Mobile Manager Software (MMS) User Manual The picture might differ according to the specification and model. Contents of this manual are protected under copyrights and computer program laws.
Mobile Viewer Mobile Manager Software (MMS) User Manual The picture might differ according to the specification and model. Contents of this manual are protected under copyrights and computer program laws.
PTZ NETWORK CAMERA SERIES
 PTZ NETWORK CAMERA SERIES USER MANUAL Please read instructions thoroughly before operation and retain it for future reference. N244_245_system_V0.9 Powerful Remote Surveillance Distance makes no difference
IP806GA/GB Wireless ADSL Router
 IP806GA/GB Wireless ADSL Router 802.11g/802.11b Wireless Access Point ADSL Modem NAT Router 4-Port Switching Hub User's Guide Table of Contents CHAPTER 1 INTRODUCTION... 1 Wireless ADSL Router Features...
DI-704P Ethernet Broadband Router. Ethernet (Straight Through) Cable. 5V DC Power Adapter
 Cable. 5V DC Power Adapter") 1 This product can be set up using any current Web browser, i.e., Internet Explorer or Netscape Navigator. DI-704P Ethernet Broadband Router and Print Server Before You Begin 1. If you purchased this router
1 This product can be set up using any current Web browser, i.e., Internet Explorer or Netscape Navigator. DI-704P Ethernet Broadband Router and Print Server Before You Begin 1. If you purchased this router
DG-HR1160M Portable Power Bank 3G Router User Manual
 DG-HR1160M Portable Power Bank 3G Router User Manual V1.0 2013-11-14 As our products undergo continuous development the specifications are subject to change without prior notice COPYRIGHT Copyright 2013
CE APPROVED.4 INTRODUCTION.5 PACKAGE CONTENTS. 6 PRE - INSTALLATION CHECKLIST. 6 SYSTEM REQUIREMENTS. 6 FEATURES AND BENEFITS.11 SETUP WIZARD.
 Web Edition Dec. 2002 Contents CE APPROVED...4 INTRODUCTION...5 PACKAGE CONTENTS... 6 PRE - INSTALLATION CHECKLIST... 6 SYSTEM REQUIREMENTS... 6 FEATURES AND BENEFITS... 7 4 - PORT CABLE/XDSL ROUTER...9
CHAPTER 7 ADVANCED ADMINISTRATION PC
 ii Table of Contents CHAPTER 1 INTRODUCTION... 1 Broadband ADSL Router Features... 1 Package Contents... 3 Physical Details... 4 CHAPTER 2 INSTALLATION... 6 Requirements... 6 Procedure... 6 CHAPTER 3 SETUP...
Zavio D510E-Varifocal lens Quick Installation Guide
 Zavio D510E-Varifocal lens Quick Installation Guide Please follow the installation steps below to set up your D510E-Varifocal lens IP Camera. Check the package contents against the list below. See P.1
DSC-N114_Network_Video_Recorder
 DSC-N114_Network_Video_Recorder Quick Start Guide 8200-1116-05 Regulatory information FCC information FCC compliance: This equipment has been tested and found to comply with the limits for a digital device,
TruVision IP Cam Open-Standards Quick Start Guide
 TruVision IP Cam Open-Standards Quick Start Guide P/N 1076514A-EN REV 1.0 ISS 07OCT11 Copyright 2011 UTC Fire & Security. All rights reserved. Trademarks and patents Interlogix, TruVision brand and logo
NETWORK VIDEO RECORDER SERIES
 NETWORK VIDEO RECORDER SERIES User Manual Please read instructions thoroughly before operation and retain it for future reference. Online manual download: www.surveillance-download.com/user/h306.swf h306_h312_h312pv_h312l_system_1.6
HIGH STORAGE MODELS WITH CD-RW DRIVE
 208 CPD HIGH STORAGE MODELS WITH CD-RW DRIVE CPD505HC_CPD507HC_QUICK_V1.2 1. OVERVIEW 1.1 Product Description With the high storage capacity feature, this MPEG-4 DVR model is designed to accommodate up
4-Port Broadband user manual Model
 4-Port Broadband Router user manual Model 524537 INT-524537-UM-0309-02 introduction Thank you for purchasing the INTELLINET NETWORK SOLUTIONS 4-Port Broadband Router, Model 524537. Combining a router,
Technical Support. Package Contents. Dual Band 11ac WiFi Router R6300 Installation Guide
 Technical Support Thank you for selecting NETGEAR products. After installing your device, locate the serial number on the label of your product and use it to register your product at www.netgear.com/register.
Corinex Communications Corp. assumes no responsibility or liability for any errors or inaccuracies that may appear in this book.
 Copyright This Quick Start Guide, as well as the software described in it, is furnished under license and may be used or copied only in accordance with the terms of the license. The content of this manual
Network Dome Camera Quick Start Guide
 Thank you for purchasing our product. If there are any questions, or requests, please do not hesitate to contact us. About This Document This manual may contain several technical incorrect places or printing
PWR Lit Indicates that the modem is switched on. 1-4 Lit Indicates that a computer is connected to the relevant port.
 MO251 / MO251UK Sweex Wireless ADSL 2/2+ Modem/Router 54 Mbps Annex A Introduction Do not expose the Sweex Wireless ADSL 2/2+ Modem/Router 54 Mbps Annex A to extreme temperatures. Do not place the device
DI GHz Wireless Router
 This product can be set up using any current web browser, i.e., Internet Explorer 6 or Netscape Navigator 6.2.3. DI-514 2.4GHz Wireless Router Before You Begin 1. If you purchased this router to share
3G Router 431R/421R/321R/311R/221R/211R. Quick Start Guide
 3G Router 431R/421R/321R/311R/221R/211R ---------------------------------------------------------- Version: 2.0----------------------------------------------------------- Check Package Contents: 3G Router
A. Monitor Settings. 1. Right-Click on the desktop. Select Properties. 2. Change color quality to highest (32bit).
.") A. Monitor Settings 1. Right-Click on the desktop. Select Properties 2. Change color quality to highest (32bit). 1 B. Hardware Installation 1. Connector Instruction Open the cover to find the cable connectors
A. Monitor Settings 1. Right-Click on the desktop. Select Properties 2. Change color quality to highest (32bit). 1 B. Hardware Installation 1. Connector Instruction Open the cover to find the cable connectors
CMOS/Mega-Pixel CMOS/CCD Internet Camera ICA-230 / ICA-M230 / ICA-501. Quick Installation Guide
 CMOS/Mega-Pixel CMOS/CCD Internet Camera ICA-230 / ICA-M230 / ICA-501 Quick Installation Guide Table of Contents Chapter 1. Introduction... 3 1.1 Before Installation... 3 1.2 System Requirements... 3 1.3
Camera A14 and A34 Dome Camera
 Camera A14 and A34 Dome Camera Quick Start Guide Thank you for purchasing our product. If there are any questions, or requests, please do not hesitate to contact the dealer. About This Manual: This manual
Aimetis A10D Thin Client
 Aimetis A10D Thin Client Disclaimers and Legal Information Copyright 2015 Aimetis Inc. All rights reserved. This material is for informational purposes only. AIMETIS MAKES NO WARRANTIES, EXPRESS, IMPLIED
Broadband Router DC-202. User's Guide
 Broadband Router DC-202 User's Guide Table of Contents CHAPTER 1 INTRODUCTION... 1 Broadband Router Features... 1 Package Contents... 3 Physical Details...3 CHAPTER 2 INSTALLATION... 5 Requirements...
ALL-IN-ONE SECURITY SYSTEM
 DO NOT OPEN CAUTION : TO REDUCE THE RISK OF ELECTRICAL SHOCK DO NOT OPEN COVERS. NO USER SERVICEABLE PARTS INSIDE. REFER SERVICING TO QUALIFIED SERVICE PERSONNEL. WARNING : TO PREVENT FIRE OR SHOCK HAZARD.
H.264 Network DVR. User Manual
 340Z H.264 Network DVR User Manual GUI Display with USB Mouse Control Please read instructions thoroughly before operation and retain it for future reference. For the actual display & operation, please
A. Monitor Settings. 1. Right-Click on the desktop. Select Properties. 2. Change color quality to highest (32bit).
.") A. Monitor Settings 1. Right-Click on the desktop. Select Properties 2. Change color quality to highest (32bit). 1 B. Hardware Installation 1. Connector Instruction Connect the power adaptor first and
A. Monitor Settings 1. Right-Click on the desktop. Select Properties 2. Change color quality to highest (32bit). 1 B. Hardware Installation 1. Connector Instruction Connect the power adaptor first and
DIGITAL VIDEO RECORDER
 DIGITAL VIDEO RECORDER USER MANUAL Please read instructions thoroughly before operation and retain it for future reference. 717ASV_715ASV_MANUAL_V0.9 IMPORTANT SAFEGUARD CAUTION RISK OF ELECTRIC SHOCK
Quick Start Guide V5.1.
 Quick Start Guide V5.1 1 Quick Start Guide Table of Content 1. Package Contents...1 2. Cautions... 1 3. System Requirements... 1 4. Hardware Overview... 2 4.1 Mini Dome Network Camera...2 4.2 IR Mini
DIGITCOM DVR System Quick installation MANUAL
 DIGITCOM DVR System Quick installation MANUAL Smart Industries Smart Group www.smarthomebus.com Methods of remote Access: 1- Using a Static IP address provided by your ISP 2- Using the Online server www.dvrnat.com
Hardware overview. Package contents MSM710, documentation, power supply, self-adhesive rubber feet.
 In MSM710 Controller Quickstart This Quickstart applies to both the MSM710 Access Controller (J9328A) and the MSM710 Mobility Controller (J9325A). This Quickstart introduces the HP ProCurve Networking
Quick Installation Guide
 Model: FI8916W Quick Installation Guide Indoor Pan/Tilt Wireless IP Camera Black White For Windows OS ------- Page 1 For MAC OS ------- Page 16 ShenZhen Foscam Intelligent Technology Co., Ltd Quick Installation
QUICK START GUIDE. Megapixel Network Camera for Video Surveillance.
 Version 3.0 QUICK START GUIDE Megapixel Network Camera for Video Surveillance 2016 Camerawelt www.camerawelt.com Table of Contents 1. Package Contents...2 2. Cautions... 2 3. System Requirements... 2
IS-BX-12 User Manual
 IS-BX-12 User Manual Ver 1.0 Sentry360 2014 Table of Contents 1. Overview...3 1.1 Features... 3 1.2 Package Contents... 4 1.3 Dimensions... 4 1.4 Connectors... 5 1.5 Light Sensor... 6 2. Camera Cabling...6
Quick Installation Guide
 Quick Installation Guide Full HD WDR Day & Night Outdoor Network Camera This document will guide you through the basic installation process for your new D-Link Network Camera. DCS-7513 Documentation also
SLS-ENVR2016 Network Video Recorder V2.2.2 Quick Setup Guide
 SLS-ENVR2016 Network Video Recorder V2.2.2 Quick Setup Guide The SLS-ENVR2016 series NVR is an intelligent and compact appliance that provides a network interface to monitor, record and playback video
Quick Start Guide.
 1 Table of Content 1. Package Contents...1 2. Cautions... 1 3. System Requirements... 1 4. Hardware Overview... 2 4.1 Mini Dome Network Camera...2 4.2 IR Mini Dome Network Camera...3 4.3 Vandal-proof
DI-808HV 8-Port Broadband VPN Router
 This product can be set up using any current web browser, i.e., Internet Explorer 6 or Netscape Navigator 6.2.3. DI-808HV 8-Port Broadband VPN Router 1. Thank you for purchasing this Router to share your
Business Internet Video Camera with Audio
 Business Internet Video Camera with Audio Quick Install Guide Package Contents WVC210 Camera Stand Power Supply (5V 2A) 6 Ethernet Cable Setup CD Antenna Quick Install Guide BUSINESS SERIES Model: WVC210
Full HD WDR Mini Dome IP Camera
 Full HD WDR Mini Dome IP Camera User s Manual DN-16086 Ver. 1.0 Table of Contents 1. Overview... 2 1.1 Features... 2 1.2 Package Contents... 3 1.3 Dimensions... 4 1.4 Installation... 5 1.5 Connectors...
H.264 Network DVR. User Manual
 H.264 Network DVR User Manual GUI Display with USB Mouse Control Please read instructions thoroughly before operation and retain it for future reference. For the actual display & operation, please refer
FS-IP3000-M User Manual. Ver 1.0
 FS-IP3000-M User Manual Ver 1.0 Sentry360 2014 Table of Contents 1. Overview... 3 1.1 Features... 3 1.2 Package Contents... 4 1.3 Dimensions... 5 1.4 Installation... 6 1.5 Connectors... 7 2. Connect Ethernet
DIGITAL VIDEO RECORDER
 DIGITAL VIDEO RECORDER USER MANUAL Please read instructions thoroughly before operation and retain it for future reference. CPD537ASV_535ASV_MANUAL_V0.95 IMPORTANT SAFEGUARD CAUTION RISK OF ELECTRIC SHOCK
User Guide. DOCSIS 3.0 High Speed Cable Modem TC7650 REV
 User Guide DOCSIS 3.0 High Speed Cable Modem TC7650 REV1.1.0 1910011895 Contents About This Guide..................................................... 1 Chapter 1. Get to Know Your Modem................................
Camera. Network Bullet Camera. Quick Operation Guide
 Camera Network Bullet Camera Quick Operation Guide 1 Thank you for purchasing our product. If there are any questions, or requests, please do not hesitate to contact the dealer. About This Document This
Industrial 8-Port 10/100/1000T 802.3af/at PoE + 2-Port 100/1000X SFP Managed Switch with Wide Operating Temperature
 Industrial 8-Port 10/100/1000T 802.3af/at PoE + 2-Port 100/1000X SFP Managed Switch with Wide Operating Temperature IGS-10020PT / IGS-10020HPT Quick Installation Guide Version 1.0 Table of Contents 1.