User Manual. Admin Report Kit for IIS (ARKIIS)
|
|
|
- Stewart Mosley
- 5 years ago
- Views:
Transcription

1 User Manual Admin Report Kit for IIS (ARKIIS)
2 Table of Contents 1 Admin Report Kit for Internet Information Server-(ARKIIS) About ARKIIS Who can Use ARKIIS? System requirements Technical Support How to activate the software? Web Sites Reports Connect to an IIS server List IIS Servers Disconnect Generate Web Sites Reports Filter Data Customize-Customize View Favorite Web Servers Favorite Web Sites-Add Web Sites to Favorites Custom Report Built-in Reports ExportPlus Tool BulkExport Tool Export Reports Export For Comparison Tool FTP Sites Reports Connect to a FTP server List FTP Servers Disconnect- Disconnect a FTP Server ii
3 Table of Contents 3.4 Generate FTP Sites Reports Filter Data Customize View Export Reports Application Pools Reports Connect to an IIS Server List IIS Servers Disconnect-Disconnect an IIS Server Generate Application Pool Reports Filter Data Customize-(Customize view) Export-(Export Reports) Web Service Extensions Reports Connect to an IIS Server List IIS Servers-(List all IIS servers in the enterprise) Disconnect-(Disconnect an IIS Server) Generate Web Service Extensions Reports Filter Data Customize-(Customize View) Export-(Export Reports) Schedule Manager Schedule Manager Launch Schedule Manager Manage Scheduled Tasks Create Task-(Add a New Task) Edit Task iii
4 Table of Contents 7.3 Delete Task Enable Task Not Available Task Access Denied Task Schedule Reports Scheduling Web Sites Standard Reports Scheduling Web Sites Built-in Reports Scheduling Web Sites BulkExport Reports Scheduling FTP Sites Standard Reports Scheduling Application Pools Standard Reports Scheduling Web Service Extension Reports Scheduling Export for Comparison Reports Insight Reports About Insight Reports How to get an Insight on Web Sites Reports? How to get an Insight on FTP Sites Reports? How to get an Insight on Application Pools Reports? How to get an Insight on Web Service Extensions Reports? How to get an Insight on Web Sites Virtual Directory Reports? How to get an Insight on FTP Sites Virtual Directory Reports? Security Reports About Security Reports How to generate Security reports? Export Reports Comparison Reports About Comparison Reports iv
5 Table of Contents 11.2 How to generate Comparison reports? Export Reports Log Analysis Reports About Log Analysis Reports How to get Log Analysis Reports on Web Sites? How to get Log Analysis Reports on FTP Sites? Filter Data Customize View Export Reports Troubleshooting Index v
6 Chapter 1 1 Admin Report Kit for Internet Information Server-(ARKIIS) 1.1 About ARKIIS About Admin Report Kit for Internet Information Server Admin Report Kit for IIS (ARKIIS) is a powerful reporting tool for Microsoft IIS Administrators. ARKIIS presents IIS configuration information from the IIS Metabase in the form of Trees, Tables and Views. All categories of information reported by ARKIIS are available across web servers and web sites. This means that information may be viewed and reported for several web servers in the enterprise simultaneously from a single server machine. ARKIIS assists in monitoring and tracking IIS configuration information in a certain way that is most suited for efficient administration and reporting requirements, especially web servers that have a large number of web sites, virtual directories and associated configuration settings. 1.2 Who can Use ARKIIS? Who can benefit from ARKIIS? Organizations running Microsoft Internet Information Servers can greatly benefit from ARKIIS. ARKIIS is a powerful reporting tool for Microsoft Internet Information Server Administrators. 1
7 CHAPTER 1 Admin Report Kit for Internet Information Server (ARKIIS) 1.3 System requirements Processor:: Intel Pentium Processor Operating System: o Windows NT 4.0 Workstation running Personal Web Server with SP6a or o Windows NT 4.0 Server running IIS 4.0 with SP6a or o Windows 2000 Professional / Server / Advanced Server running IIS 5.0 with SP4.0 or o Windows XP Professional running IIS 5.1 with SP2.0 or o Windows 2003 Server running IIS 6.0 with SP1 Memory: 64 MB of RAM Required disk space: 20 MB disk space Network adapter card Microsoft Data Access Components (MDAC) v2.8 only. 1.4 Technical Support You can read ARKIIS Frequently Asked Questions (FAQ) online at our website Please direct all technical support questions to support@vyapin.com. Please include the following information to expedite a response: a) Include the version of the product you are using. b) If the problem is associated with installation, include the steps that led to the problem. c) If the problem is associated with usage, please state the series of steps you performed. d) Include the version of the OS, info about any service packs or hot-fixes and Language of the OS installed. e) Include the Error Log File - e.g., C:\Program Files\ARKIIS\Log\ARKIISLog.log 2

8 CHAPTER 1 Admin Report Kit for Internet Information Server (ARKIIS) 1.5 How to activate the software? Once you purchase the software online or through any one of our resellers, you will receive a sale notification through from our sales department. We will send you an with the necessary instructions to activate the software. In case you do not receive an from our sales team after you purchase the software, please send the following information to our sales department at sales@vyapin.com with the sales order number: Company Name: End-user Company Name Location: City & Country for the Company Name given above Please allow 12 to 24 hours from the time of purchase for our sales department to process your orders. Image 1 - Activate screen Perform the following steps to activate the software: 1) Download evaluation/trial copy of software from the respective product page available in our website at 2) Install the software on the desired computer. 3) You will receive a license key through as soon as the purchase process is complete. 4) Click 'Activate' in Help -> About -> Activate menu to see the Activate dialog (as shown in Image 1). 3
.")
9 CHAPTER 1 Admin Report Kit for Internet Information Server (ARKIIS) 5) Copy the license key sent to you through and pastes it in the 'License Key' textbox. For help on how to copy the license key, click 'Click here to see how to copy and paste the license key' link in the Activate dialog (as shown in Image 2). Image 2 - How to copy license key screen 4
, and select Connect from the popup menu.")
10 Chapter 2 2 Web Sites Reports 2.1 Connect to an IIS server IIS Server Click Web Sites Report on the New button in the toolbar. OR Select Web Sites Report from the Report menu. OR Right click anywhere on the tree of Internet Information Servers (available in the left pane), and select Connect from the popup menu. The Connect to IIS Server dialog box will appear. 5
11 CHAPTER 2 Web Sites Reports Enter a server name in the textbox. Or Select a server from the Favorites dropdown. This dropdown will contain the list of web servers available in the Favorite Web Servers list. Or Click button to browse for computers running IIS. This operation may take some time depending on the size of the domain. Click If the given Server is available in the network and its Metabase is accessible then it will be added to the Internet Information Servers tree. 6
12 CHAPTER 2 Web Sites Reports 7


13 CHAPTER 2 Web Sites Reports 2.2 List IIS Servers List all IIS servers in the enterprise Click button from the tool bar. ARKIIS will enumerate all the domains in the enterprise and list them in the tree-view. When you expand a domain item, it will enumerate and list all IIS servers which belong to that domain. 2.3 Disconnect Disconnect an IIS server To disconnect an IIS Server, select the server and right-click on it to get the popup menu, and Click Disconnect <selected server>. 8
, State}.")
14 CHAPTER 2 Web Sites Reports 2.4 Generate Web Sites Reports Web Sites Click to view details about general information across all Web Sites. This report displays the following information: {Web Site Name, Identifier, IP Address, TCP Port, Host Header Name, Connection Unlimited, Connection Limited, Connection Timeout (seconds), State}. Click to view details about operators information across all Web Sites. This report displays the following information: {Web Site Name, Identifier, Operators} Click to view details about ISAPI Filters information across all Web Sites. This report displays the following information: {Web Site Name, Identifier, Filter Name, Status, Executable, and Priority} 9
15 CHAPTER 2 Web Sites Reports Click to view details about operators information across all Web Sites. This report displays the following information: [Web Site Name, Identifier, Content Source, Path, Read, Write, Script Source Access, Directory Browsing, and Log Visits, Index this Resource, User Name, HTTP redirection URL} Click {Application Settings -> } to view details about operators information across all Web Sites. This report displays the following information: {Web Site Name, Identifier, Application Name, Application pool name, Execute Permission, Application Protection, and Cache ISAPI Applications} Click {Application Settings -> } to view details about operators information across all Web Sites. This report displays the following information: {Web Site Name, Identifier, Extension, Executable Path, Verbs} Click {Application Settings -> } to view details about operators information across all Web Sites. This report displays the following information: {Web Site Name, Identifier, Enable Session State, Session Timeout (minutes), Enable Buffering, Enable Parent Paths, Default ASP language, ASP Script Timeout (seconds)} Click {Application Settings -> } to view details about operators information across all Web Sites. This report displays the following information: {Web Site Name, Identifier, Write unsuccessful client requests to event log, Enable debug exception catching, CGI Script timeout (seconds), Script File Cache, Disk Cache Limit, Disk Cache Directory, Number of Script Engines Cached} Click {Application Settings -> } to view details about operators information across all Web Sites. This report displays the following information: {Web Site Name, Identifier, Enable ASP Server Side Script debugging, Enable ASP Client Side Script debugging, Send Detailed ASP error messages to client, Send Text Error Message to Client, Error Message} Click to view details about operators information across all Web Sites. This report displays the following information: {Web Site Name, Identifier, Anonymous Access, Anonymous User Name, Allow IIS to control Password, Integrated Windows Authentication, Digest Authentication for Windows Domain Servers, Basic Authentication (password is sent in clear text), _Net passport authentication, Default domain, Realm} 10
16 CHAPTER 2 Web Sites Reports Click to view details about operators information across all Web Sites. This report displays the following information: {Web Site Name, Identifier, Granted IP Address, Denied IP Address, Granted Domain, and Denied Domain} Click to view details about operators information across all Web Sites. This report displays the following information: {Web Site Name, Identifier, Enable Content Expiration, Expire Immediately, and Expire after, Expire on} Click to view details about operators information across all Web Sites. This report displays the following information: {Web Site Name, Identifier, Custom Header Name, and Custom Header Value} Click to view details about operators information across all Web Sites. This report displays the following information: {Web Site Name, Identifier, enable Ratings, Violence, Sex, Nudity, Language, Address, Expire on, Modification Date} Click to view details about operators information across all Web Sites. This report displays the following information: {Web Site Name, Identifier, Enable Default Document, Documents, Enable Document Footer, and Footer Document} Click to view details about operators information across all Web Sites. This report displays the following information: {Web Site Name, Identifier, Enable Logging, Active Log Format, New Log Time Period, Use Local Time for file naming and rollover, Log file directory, Log file name, ODBC Data Source Name {DSN}, Table Name, User Name} Click to view details about operators information across all Web Sites. This report displays the following information: {Web Site Name, Identifier, SSL IP Address, and SSL Port} Click to view details about operators information across all Web Sites. This report displays the following information: {Web Site Name, Identifier, Require Secure channel when accessing this resource, Require 128 bit encryption, do not accept client certificates, accept certificates require client certificate, Enable client certificate mapping} 11
17 CHAPTER 2 Web Sites Reports Click to view details about operators information across all Web Sites. This report displays the following information: {Web Site Name, Identifier, Date, Time, Client IP Address, User Name, Service Name, Server Name, Server IP Address, Server Port, Method, URI Stream, URI Query, Protocol Status, Win 32 Status, Bytes Sent, Bytes Received, Time Taken, Protocol Version, Host, User Agent Cookie, Referrer} Click to view details about operators information across all Web Sites. This report displays the following information: {Web Site Name, Identifier, HTTP Error, Type, Contents} 12
18 CHAPTER 2 Web Sites Reports 2.5 Filter Data Filters are used in server level to view data depending on your requirements. It allows you to provide conditions for displaying the data. Filters are maintained for each server separately until they are explicitly cleared. Click toolbar in report window Or Select Filter... from Tools menu. Or Right click anywhere on the report s data available in the right pane, and select Filter from the popup menu. The Filter dialog window will be displayed. 13
 Choose a field name, an operator, and a possible value from the respective dropdown options. 3) Click 4) The Add to Filter will change to AND to Filter. The OR to Filter button will be enabled.")
19 CHAPTER 2 Web Sites Reports To set a filter condition, follow these steps. 1) Click (Clear All) button and clear the filter. 2) Choose a field name, an operator, and a possible value from the respective dropdown options. 3) Click 4) The Add to Filter will change to AND to Filter. The OR to Filter button will be enabled. The selected condition will be set as a filter and displayed (as shown below). 5) Click to apply the Filter. NOTE: Use the, and to build enhanced filter condition as shown below: (Field A = Value 1 AND Field B = Value 2) OR (Field C = Value 3 AND Field D = Value 4) Use Use to remove the parenthesis Delete a selected condition. The status bar s FILTERED indicator is used to indicate whether the current data is filtered or not. For a normal view, the status bar will appear as For a filtered view, the status bar will appear as 14
20 CHAPTER 2 Web Sites Reports 2.6 Customize-Customize View The customize feature helps the user to customize the reports that are displayed. Customize option is provided facility to select the properties that could be displayed in the current view. Click toolbar in report window Or Select Custom View... from Tools menu. The Custom View window, with the site properties will be displayed. Select all the properties that you want to view for the given IIS path and current category, and Click The status bar s CUSTOMIZED indicator is used to indicate whether the current view is customized or not. For a customized view, the status bar will appear as 15


21 CHAPTER 2 Web Sites Reports 2.7 Favorite Web Servers Add or remove favorite web servers The Favorites web servers feature helps the user to select servers and web sites that are frequently used. By this feature the user can add servers/web sites that are frequently used to generate reports, without the need to connect to the server every time. The report window provides two tabs for favorites in the left pane to view the Favorites. Click toolbar in report window Or Select My Favorite Web Servers under Web Sites Report from the Tools menu. Or Right click anywhere on the main window/report window, and select My Favorite Web Servers from the popup menu. 16
22 CHAPTER 2 Web Sites Reports Add to Favorites Type the IIS Server name in IIS Server Name text box and click The given IIS Server name will be added in the Favorites List. NOTE: The server name is not validated, so that the servers which are not currently available in the network can also be added in favorites. Or Click The IIS Servers dialog box will appear, with the list of available domains. Select all the required servers by clicking on them and click NOTE: Only those servers who s Metabase are accessible will only be allowed to be selected. The servers which are not selected will not be removed from the list, unless explicitly removed by clicking the remove button. Remove from Favorites Select the server to be removed from the Favorites List and click Or To remove all servers in the Favorites List click 17


23 CHAPTER 2 Web Sites Reports 2.8 Favorite Web Sites-Add Web Sites to Favorites The Favorite Web sites feature helps the user to select web sites that are frequently used. By this feature the user can add web sites that are frequently used to generate reports, without the need to connect to the web sites every time. The report window provides toolbar in the left pane to view the Favorite Web sites. Click toolbar in report window. OR Select My Favorite Web Sites under Web Sites Report from the Tools menu. In the ARKIIS Favorite Web Sites window that is displayed, select the web sites from the list, and Click. View your favorite web sites under My Favorite Web Sites in the tree view. 18

24 CHAPTER 2 Web Sites Reports 2.9 Custom Report Custom Report is one of the key features of Admin Report Kit for IIS (ARKIIS) that provides customized view for the IIS configuration settings. Normally IIS Reporting tools will report the IIS configuration settings according to tab classifications such as Web Site, Operators, Home Directory, etc. But the Custom Report utility combines any number of tabs and their properties and provides consolidated report for the selected Web Server. Custom reports can be generated for Web Server/Web Site and Virtual Directory Levels separately. Example: To see the status of both Web Site General Properties and its Operators information, the administrator has to perform the following steps. Click button in the toolbar report window. Or Select Custom Report..., Under the Web Sites Report from the Tools menu. Or Right click anywhere on the main/report window, and select Custom Report from the popup menu. By default the current machine's IIS Server will be displayed in the Internet Information Server tree, which appears on the left pane. And by default the Report Name is displayed as (none) and the General tab settings are currently loaded. The Custom Report window will appear as below: 19


25 CHAPTER 2 Web Sites Reports How to Connect another IIS Server from Custom Report? Select Connect... from the Report menu. Or Right click on the Internet Information Servers tree, and select Connect... from the popup menu. The Connect to server dialog box appears. Enter the IIS Server name in the Server name textbox and press 20
26 CHAPTER 2 Web Sites Reports If the given IIS Server is available in the network and is connectable then it will be attached in the Internet Information Server, Server tree. How to use custom reports? Report Name contains the list of reports that are available. By default it will be (none). Custom Reports can be viewed by selecting them from this New is used to create a new custom report. This will invoke the Custom Report Builder dialog box. Edit is used to modify the currently selected custom report. It can also be used to create a new custom report from the currently selected custom report. Delete is used to remove custom reports that are not needed. A report can be deleted only when it is not used (in Schedule). Export is used to export the data that is currently viewed. It invokes the Export Settings dialog box. Custom report builder is used to create/edit custom reports. 21

27 CHAPTER 2 Web Sites Reports How to create a new custom report? Click New from the Custom Report to invoke Custom Report Builder dialog box. Type the name for the custom report in Custom Report Name. Select the category from the left pane, to get the list of properties that are available for that. The properties will be displayed as a list of check boxes on the right pane. Select the required set of properties and click Save. How to edit a custom report? Select the custom report name in Report Name of Custom Report and click Edit to invoke Custom Report Builder dialog box. The selected report name will appear in Custom Report Name. Select the category from the left pane, to get the list of properties that are available for that. The properties will be displayed as a list of check boxes on the right pane. Select the required set of properties and click Save. How to create a custom report from an existing one? Select the custom report name in Report Name of Custom Report and click Edit to invoke Custom Report Builder dialog box. The selected report name will appear in Custom Report Name, change the report name and click Save. 22
28 CHAPTER 2 Web Sites Reports 2.10 Built-in Reports Built-in Reports feature offers a set of reports to retrieve frequently accessed significant information about web sites and virtual directories across domain(s)/server(s) in the enterprise. This feature supports applying filters to the report(s), to view part of the information that is of more significance. You can either have the report printed or exported to a file in various formats (HTML/CSV/MDB). The Built-in Reports can be grouped under the following categories: Web Site Reports Virtual Directory Reports Web Site Reports Web Site reports provide the frequently viewed significant information about the web sites available in the web servers. The built-in reports that are grouped under Web Site reports are given below: Web site state - STARTED / STOPPED / PAUSED Web site operators Web sites with their access permissions - Read / Write / Directory browsing Web sites with their connection settings - LIMITED/UNLIMITED Web sites with their Content Expiration settings - Enabled / Disabled Web sites with their execution permissions - None / Scripts / Executables Web sites with their application protection settings - HIGH / MEDIUM / LOW 23

29 CHAPTER 2 Web Sites Reports Virtual Directory Reports Virtual Directory reports provide the frequently viewed significant information about the virtual directories under the each web site available in the web servers. The built-in reports that are grouped under Virtual Directory reports are given below: Virtual directories with their access permissions - Read / Write / Directory browsing Virtual directories with their Content Expiration settings - Enabled / Disabled Virtual directories with their execution permissions - None / Scripts / Executables Virtual directories with their application protection settings - HIGH / MEDIUM / LOW Virtual directory Authentication Methods - ANONYMOUS / BASIC / INTEGRATED WINDOWS Virtual directories with their IP address and domain name restrictions Virtual directories with their default documents Virtual directory size Virtual directory permissions How to use Built-in Reports Wizard Select or Select Button from the toolbar. 24
30 CHAPTER 2 Web Sites Reports The Built-in Reports wizard will be loaded as shown below. Step-1: Select any one of the listed reports under Web Site or Virtual Directory Report 25
31 CHAPTER 2 Web Sites Reports Step-2: Select the Domain(s)/Server(s) for which the report needs to be generated. The different server selection options are given below: All Domains Generate the report for the entire enterprise. Selected Domain(s)/Server(s) Generate the report for the selected domain(s)/server(s). Favorite Servers Generate the report for the servers in the favorite-list. Server Generate the report for a given server. NOTE: All Domains option will be selected by default. e.g. To get the report for the servers in the favorite-list, select Favorite Servers option. You can change the favoritelist by clicking the Browse button, and Click Next to proceed. 26

32 CHAPTER 2 Web Sites Reports Step-3: This step is optional. You can specify report criteria to view the part of the report that is of significance. e.g. to get the list of web sites whose state is started, add criteria as "[State] = 'Started'". If you rather prefer to view the entire report, leave the criteria as empty. Click Next to proceed. Step-4: This step shows the summary information of the report settings. You can review the report settings specified in the previous steps, and If you need to change any of the settings, click Back. Click Finish to generate the Report. 27


33 CHAPTER 2 Web Sites Reports Data collection status dialog: During the report generation, the Data collection status dialog will be displayed as shown below. The data collection process will enumerate the servers' list and collect data for the enumerated servers. This process can be cancelled at any time by clicking Cancel button. However, the cancellation process will be performed only after completing the current server. 28

34 CHAPTER 2 Web Sites Reports If you had cancelled the report collection process, the data collected so far would be displayed. After collecting data for all listed servers, the dialog will display the collection status and total duration of the report generation. You can view the collection status against each server in this dialog. Click OK to view the report. If you rather want to Close the window, click Close. 29

35 CHAPTER 2 Web Sites Reports The report window will be displayed as shown below. The operations that can be performed in the Report window are To view the part of the displayed report, by specifying the report criteria. To recollect the entire data from the specified servers. To export the displayed report in various formats. To view the print preview of the displayed report. To print the displayed report. To close the report window. 30
. The files will be exported to the path as <given To path>\expplus_<mm_dd_yyyy_hh_mm_ss>\<iis path>_<site index of the web site>.")
36 CHAPTER 2 Web Sites Reports 2.11 ExportPlus Tool Using Export Plus, the whole/desired set of information about the server/web site/virtual directory can be exported in a single instance. Export Plus supports 3 types of file formats (HTML, MDB and CSV). The files will be exported to the path as <given To path>\expplus_<mm_dd_yyyy_hh_mm_ss>\<iis path>_<site index of the web site>.<given file format> While exporting as a MDB (Microsoft Access Database file), tables will be generated for each category. How to use Export Plus? There are three ways to open Export Plus dialog. They are Click toolbar in report window OR Select ExportPlus... under Web Sites Report from the Tools menu. OR Right Click anywhere on the main window/report window, and select Export Plus from the popup menu. The Connect to IIS Server dialog box will appear. 31

37 CHAPTER 2 Web Sites Reports Enter a server name in the textbox. Or Select a server from the Favorites dropdown. This dropdown will contain the list of web servers available in the Favorite Web Servers list. Or Click button to browse for computers running IIS. This operation may take some time depending on the size of the domain. Click The Export Plus dialog will appear. 32
38 CHAPTER 2 Web Sites Reports 33


39 CHAPTER 2 Web Sites Reports 2.12 BulkExport Tool The BulkExport tool helps the user to generate quick reports on all websites/virtual directories in given web server(s). BulkExport reports are generated based only on custom report. How to use BulkExport? There are three ways to open BulkExport dialog. They are Click toolbar in report window OR Select BulkExport... under Web Sites Report from the Tools menu. OR Right Click on workspace and select BulkExport... from the popup menu. 34
 Web Server Reports 2) Virtual Directory Reports Web Server Reports Web Server reports can be generated by selecting Web Servers tab.")
40 CHAPTER 2 Web Sites Reports The BulkExport dialog box will be displayed as shown below. BulkExport can generate two types of reports. They are: 1) Web Server Reports 2) Virtual Directory Reports Web Server Reports Web Server reports can be generated by selecting Web Servers tab. Specify web servers by selecting either Favorites or Domain option. The favorite-list can be modified by clicking Edit button. Select one Custom Report from the list. If you want to add new custom report, Click New button. Specify the export path and export type (HTML/MDB/CSV). Both Web Server and Virtual Directory report options use same the export path and export type. The Server Name as header option (only for web server reporting) is used to specify whether the server name is to be provided as header or repeated for each row of data in CSV format only. 35
41 CHAPTER 2 Web Sites Reports The BulkExport dialog with the above options will be displayed as shown below. Click OK to generate the reports. Click Close to close the BulkExport dialog. 36
42 CHAPTER 2 Web Sites Reports
43 CHAPTER 2 Web Sites Reports 2.13 Export Reports The Export feature helps the user to export the data displayed in reports generated by ARKIIS to HTML/CSV/MDB formats. Exporting supports HTML, Comma Separated Values and Microsoft Access MDB file formats for generating reports. Using the Export feature and user can export the report that is currently viewed. Click toolbar in report window Or Select Export... from Tools menu. The Export Settings dialog box will appear. Select the path and format (HTML/MDB/CSV) to which you want your data be exported. And click OK. NOTE: The report file will be generated as 38

44 CHAPTER 2 Web Sites Reports 2.14 Export For Comparison Tool The Export For Comparison Tool enables the user to export the entire data for all Web Sites and Virtual Directories for a selected web server into the application's internal database (stored as MS Access database.mdb file). This is especially useful for comparing and generating Comparison Reports with Web Site and Virtual Directory configuration across web servers. Perform the following steps to export to a database for comparison purposes: Select Export For Comparison... under Web Sites Report from the Tools menu. The Connect to IIS Server dialog box will appear. Enter a server name in the textbox. Or 39

45 CHAPTER 2 Web Sites Reports Select a server from the Favorites dropdown. This dropdown will contain the list of web servers available in the Favorite Web Servers list. Or Click button to browse for computers running IIS. This operation may take some time depending on the size of the domain. Click The Export For Comparison dialog will appear. Select the path where you want your data to be exported. and click OK. NOTE: The report file will be generated as <giventopath>\<compexp_dd_mm_yy_hh_ss>\<selectedservername>_<compare> <MDB> The file will be generated in Access 2000 format. 40


46 Chapter 3 3 FTP Sites Reports 3.1 Connect to a FTP server Click FTP Sites Report on the New button in the toolbar. Or Select FTP Sites Report from the Report menu. Or Right click anywhere on the tree of Internet Information Servers (available in the left pane), and select Connect from the popup menu. 41
47 CHAPTER 3 FTP Sites Reports The Connect to IIS Server dialog box will appear. Enter a server name in the textbox. Or Select a server from the Favorites dropdown. This dropdown will contain the list of web servers available in the Favorite Web Servers list. Or Click button to browse for computers running IIS. This operation may take some time depending on the size of the domain. Click If the given FTP Server is available in the network and its Metabase is accessible then it will be added to the Internet Information Servers tree. 42

48 CHAPTER 3 FTP Sites Reports 3.2 List FTP Servers List all FTP servers in the enterprise Click button from the toolbar ARKIIS will enumerate all the domains in the enterprise and list them in the tree-view. When you expand a domain item, it will enumerate and list all FTP servers which belong to that domain. 43

49 CHAPTER 3 FTP Sites Reports 3.3 Disconnect- Disconnect a FTP Server To disconnect a FTP Server, select the server and right-click on it to get the popup menu, and Click Disconnect <selected server>. 3.4 Generate FTP Sites Reports FTP Sites Click to view details about general information across all FTP Sites. This report displays the following information: {FTP site name, Identifier, IP Address, TCP Port, Maximum Connections, Connection Timeout (seconds), State}. 44
50 CHAPTER 3 FTP Sites Reports Click to view details about log file information across all FTP Sites. This report displays the following information: {FTP site name, Identifier, Enable Logging, Active log format, New Log Time Period, Use local time for file naming and rollover, Log file directory, Log file name, ODBC Data Source Name (DSN), ODBC Table name, ODBC User name}. Click to view details about Extended Log information across all FTP Sites. This report displays the following information: {FTP site name, Identifier, Date, Time, Client IP Address, User Name, Service Name, Computer Name, Server IP Address, Server Post, Method, URI Stem, URI Query, Protocol Status, Win32 Status, Bytes Sent, Bytes Received, Time Taken, Protocol Version, Host, User Agent, Cookie, Referrer}. Click to view details about Security Accounts information across all FTP Sites. This report displays the following information: {FTP site name, Identifier, Allow Anonymous Connections, User name, Allow only anonymous connections, Allow IIS to control password}. Click to view details about Message information across all FTP Sites. This report displays the following information: {FTP site name, Identifier, Welcome message, Exit message, Banner message, and Maximum connections message}. Click to view details about Home Directory information across all FTP Sites. This report displays the following information: {FTP site name, Identifier, Content source, Path, Read, Write, Log visits, Directory Listing Style}. Click to view details about general information across all Web Sites. This report displays the following information: {FTP site name, Identifier, All computer access, Granted IP Address (Subnet mask), Denied IP Address (Subnet mask)}. 45
51 CHAPTER 3 FTP Sites Reports 3.5 Filter Data Filters are used in server level to view data selectively. It allows you to input conditions for displaying the data. Filters are maintained for each server separately until they are explicitly cleared. Click toolbar in report window Or Select Filter... from Tools menu. Or Right click anywhere on the report s data available in the right pane, and select Filter from the popup menu. The Filter dialog window will be displayed. To set a filter condition, follow these steps. 1) Click (Clear All) button and clear the filter. 2) Choose a field name, an operator and a possible value from the respective dropdown options. 46
52 CHAPTER 3 FTP Sites Reports 3) Click 4) The Add to Filter will change to AND to Filter. The OR to Filter button will be enabled. The selected condition will be set as a filter and displayed (as shown below). 5) Click OK to apply the filter. NOTE: Use the, and to build enhanced filter condition as shown below: Field A = Value 1 AND Field B = Value 2) OR (Field C = Value 3 AND Field D = Value 4) Use Use to remove the parenthesis to delete a selected condition. The status bar s FILTERED indicator is used to indicate whether the current data is filtered or not. For a filtered view, the status bar will appear as 47
53 CHAPTER 3 FTP Sites Reports 3.6 Customize View The customize feature helps the user to customize the list of fields that are displayed in the current view. Click toolbar in report window Or Select Custom View... from Tools menu. The Custom View window, with the site properties will be displayed. Select all the properties that you want to view for the given FTP path and current category, and Click The status bar s CUSTOMIZED indicator is used to indicate whether the current view is customized or not. For a customized view, the status bar will appear as. 48
54 CHAPTER 3 FTP Sites Reports 3.7 Export Reports The Export feature helps the user to export the data displayed in reports generated by ARKIIS to HTML/CSV/MDB formats. Exporting supports HTML, Comma Separated Values and Microsoft Access MDB file formats for generating reports. Using the Export feature and user can export the report that is currently viewed. Click toolbar in report window Or Select Export... from Tools menu. Or Right click anywhere on the report s data available in the right pane, and select Export from the popup menu. The Export Settings dialog box will appear. Select the path and format (HTML/MDB/CSV) to which you want your data be exported. and click OK. NOTE: The report file will be generated as <given To path>\<dd_mm_yy_hh_ss>\<currently selected IIS path>_<currently viewing category>_<site index of the current FTP site>.<given As format> In the case of MDB (Access database) the file will be generated in Access 2000 format and will have a table with the same name as the currently viewing category. 49
55


56 Chapter 4 4 Application Pools Reports 4.1 Connect to an IIS Server Click Application Pools Report on the New button in the toolbar. Or Select New Application Pools Report from the Report menu. Or Right click anywhere on the tree of Internet Information Servers (available in the left pane), and select Connect from the popup menu. 51
57 Chapter:-4-Application Pools Reports The Connect to IIS Server dialog box will appear. Enter a server name in the textbox. Or Select a server from the Favorites dropdown. This dropdown will contain the list of web servers available in the Favorite Web Servers list. Or Click button to browse for computers running IIS. This operation may take some time depending on the size of the domain. Click If the given Application Pool Server is available in the network and its Metabase is accessible then it will be added to the Internet Information Servers tree. 52
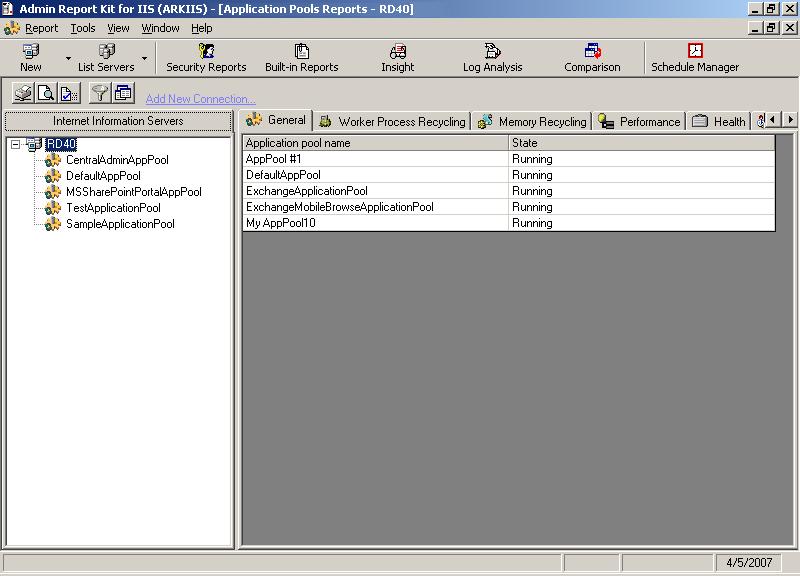
58 Chapter:-4-Application Pools Reports 53
59 Chapter:-4-Application Pools Reports 4.2 List IIS Servers List all IIS servers in the enterprise Click button from the toolbar ARKIIS will enumerate all the domains in the enterprise and list them in the tree-view. When you expand a domain item, it will enumerate and list all IIS servers which belong to that domain. 4.3 Disconnect-Disconnect an IIS Server To disconnect an IIS Server, select the server and right-click on it to get the popup menu, and Click Disconnect <selected server>. 54
60 Chapter:-4-Application Pools Reports 4.4 Generate Application Pool Reports Application Pool Click to view details about general information across all Application Pools in Web Sites. This report displays the following information: {Application pool name, state}. Click to view details about Worker Process Recycling information across all Application Pools in Web Sites. This report displays the following information: {Application pool name, Recycle, Recycle (in minutes), Recycle request settings, Number of recycle requests, Recycle schedule settings, and Scheduled recycle at}. Click to view details about Memory recycling information across all Application Pools in Web Sites. This report displays the following information: {Application pool name, Maximum virtual memory settings, Maximum virtual memory (mb)}. 55
61 Chapter:-4-Application Pools Reports Click to view details about Performance information across all Application Pools in Web Sites. This report displays the following information: {Application pool name, Idle timeout settings, Idle timeout (in minutes), Request queue limit settings, Number of request queues, Enable CPU monitoring, Maximum CPU use (percentage), Refresh CPU usage numbers (in minutes), Action performed when CPU usage exceeds maximum CPU use, Maximum number of worker processes}. Click to view details about general information across all Application Pools in Web Sites. This report displays the following information: {Application pool name, Enable pinging, Ping worker process (frequency in seconds), Enable rapid-fail protection, Rapid-fail protection failures, Rapid-fail protection time period (in minutes), Startup time limit (in seconds), Shutdown time limit (in seconds)}. Click to view details about Identity information across all Application Pools in Web Sites. This report displays the following information: {Application pool name, Application pool identity settings, Security account}. Click to view details about Applied Object information (list of Web sites and Virtual directories) for a selected Application Pool in Web Sites. This report displays the following information: {Application pool name, Object name, Object type, IP address, TCP port, State, Local path}. 56
62 Chapter:-4-Application Pools Reports 4.5 Filter Data Filters are used in server level to view data selectively. It allows you to input conditions for displaying the data. Filters are maintained for each server separately until they are explicitly cleared. Click toolbar in report window Or Select Filter... from Tools menu. Or Right click anywhere on the report s data available in the right pane, and select Filter from the popup menu. The Filter dialog window will be displayed. To set a filter condition, follow these steps. 1) Click (Clear All) button and clear the filter. 2) Choose a field name, an operator and a possible value from the respective dropdown options. 57
63 Chapter:-4-Application Pools Reports 3) Click 4) The Add to Filter will change to AND to Filter. The OR to Filter button will be enabled. The selected condition will be set as a filter and displayed (as shown below). 5) Click to apply the filter. NOTE: Use the, and to build enhanced filter condition as shown below: Field A = Value 1 AND Field B = Value 2) OR (Field C = Value 3 AND Field D = Value 4) Use to remove the parenthesis Use to delete a selected condition. The status bar s FILTERED indicator is used to indicate whether the current data is filtered or not. For a filtered view, the status bar will appear as 58
64 Chapter:-4-Application Pools Reports 4.6 Customize-(Customize view) The customize feature helps the user to customize the list of fields that are displayed in the current view. Click toolbar in report window Or Select Custom View... from Tools menu. The Custom View window, with the Application Pool properties will be displayed. Select all the properties that you want to view for the given Application Pool path and current category, and Click The status bar s CUSTOMIZED indicator is used to indicate whether the current view is customized or not. For a customized view, the status bar will appear as 59
65 Chapter:-4-Application Pools Reports 4.7 Export-(Export Reports) The Export feature helps the user to export the data displayed in reports generated by ARKIIS to HTML/CSV/MDB formats. Exporting supports HTML, Comma Separated Values and Microsoft Access MDB file formats for generating reports. Using the Export feature an user can export the report that is currently viewed. Click toolbar in report window Or Select Export... from Tools menu. The Export Settings dialog box will appear. Select the path and format (HTML/MDB/CSV) to which you want your data be exported. and Click. NOTE: The report file will be generated as <given To path>\<dd_mm_yy_hh_ss>\<currently selected IIS path>_<currently viewing category>_<site index of the current web site>.<given As format> In the case of MDB (Access database) the file will be generated in Access 2000 format and will have a table with the same name as the currently viewing category. 60

66 Chapter 5 5 Web Service Extensions Reports 5.1 Connect to an IIS Server Click Web Service Extensions Reports on the New button in the toolbar. Or Select New Web Service Extensions Reports from the Report menu. Or Right click anywhere on the tree of Internet Information Servers (available in the left pane), and select Connect from the popup menu. The Connect to IIS Server dialog box will appear. 61

67 Chapter-5- Web Service Extensions Reports Enter a server name in the textbox. Or Select a server from the Favorites dropdown. This dropdown will contain the list of web servers available in the Favorite Web Servers list. Or Click button to browse for computers running IIS. This operation may take some time depending on the size of the domain. Click If the given IIS Server is available in the network and its Metabase is accessible then it will be added to the Internet Information Servers tree. 62
68 Chapter-5- Web Service Extensions Reports 63
69 Chapter-5- Web Service Extensions Reports 5.2 List IIS Servers-(List all IIS servers in the enterprise) Click button from the toolbar ARKIIS will enumerate all the domains in the enterprise and list them in the tree-view. When you expand a domain item, it will enumerate and list all IIS servers which belong to that domain. 5.3 Disconnect-(Disconnect an IIS Server) To disconnect an IIS Server, select the server and right-click on it to get the popup menu, and click Disconnect <selected server>. 64

70 Chapter-5- Web Service Extensions Reports 5.4 Generate Web Service Extensions Reports Web Service Extensions Click to view details about Web Service Extensions information across all Web Sites. This report displays the following information: {Web service extension, Description, Status, Required files path, File access}. 65
71 Chapter-5- Web Service Extensions Reports 5.5 Filter Data Filters are used in server level to view data selectively. It allows you to input conditions for displaying the data. Filters are maintained for each server separately until they are explicitly cleared. Click toolbar in report window Or Select Filter... from Tools menu. Or Right click anywhere on the report s data available in the right pane, and select Filter from the popup menu. The Filter dialog window will be displayed. To set a filter condition, follow these steps. 1) Click (Clear All) button and clear the filter. 2) Choose a field name, an operator and a possible value from the respective dropdown options. 66
72 Chapter-5- Web Service Extensions Reports 3) Click 4) The Add to Filter will change to AND to Filter. The OR to Filter button will be enabled. The selected condition will be set as a filter and displayed (as shown below). 5) Click to apply the filter. NOTE: Use the, and to build enhanced filter condition as shown below: (Field A = Value 1 AND Field B = Value 2) OR (Field C = Value 3 AND Field D = Value 4) Use Use to remove the parenthesis to delete a selected condition. The status bar s FILTERED indicator is used to indicate whether the current data is filtered or not. For a filtered view, the status bar will appear as. 67

73 Chapter-5- Web Service Extensions Reports 5.6 Customize-(Customize View) The customize feature helps the user to customize the list of fields that are displayed in the current view. Click toolbar in report window Or Select Custom View... from Tools menu. The Custom View window, with the Application Pool properties will be displayed. Select all the properties that you want to view for the given Application Pool path and current category, and Click The status bar s CUSTOMIZED indicator is used to indicate whether the current view is customized or not. For a customized view, the status bar will appear as 68

74 Chapter-5- Web Service Extensions Reports 5.7 Export-(Export Reports) The Export feature helps the user to export the data displayed in reports generated by ARKIIS to HTML/CSV/MDB formats. Exporting supports HTML, Comma Separated Values and Microsoft Access MDB file formats for generating reports. Using the Export feature and user can export the report that is currently viewed. Click toolbar in report window Or Select Export... from Tools menu. The Export Settings dialog box will appear Select the path and format (HTML/MDB/CSV) to which you want your data be exported. And Click. NOTE: The report file will be generated as <given To path>\<dd_mm_yy_hh_ss>\<currently selected IIS path>_<currently viewing category>_<site index of the current web site>.<given As format> In the case of MDB (Access database) the file will be generated in Access 2000 format and will have a table with the same name as the currently viewing category. 69
75 Chapter 6 6 Schedule Manager 6.1 Schedule Manager For creating reports in non-interactive mode, ARKIIS provides a tool that facilitates scheduled report generation. The scheduled task created using Schedule Manager can be used to fetch the Internet Information Server settings for any number of servers across domains. The Schedule Manager can be used to manage (create/edit/delete tasks and add/delete reports) scheduled tasks created in ARKIIS. The Schedule Manager will create and store the settings as a task in the Windows Task Scheduler. Using Schedule Manager, you can schedule the following reports Web Sites Standard Reports Web Sites Built-in Reports Web Sites BulkExport Reports FTP Sites Standard Reports Application Pools Standard Reports Web Service Extensions Reports Export For Comparison Reports The scheduled task can be associated with only one type of report namely Web Sites Standard Reports or Web Sites Built-in Reports or Web Sites BulkExport Reports or FTP Sites Standard Reports or Application Pools Standard Reports or Web Service Extensions Reports or Export For Comparison Reports The scheduled task can be created with the task settings (schedule type, run as parameter) provided in the Task Properties dialog. The scheduled task will not run unless a valid password is set in Task Properties dialog. The reports can be generated for any number of selected domain(s)/server(s) in the enterprise. 70
76 Chapter-6-Schedule Manager The generated reports can be exported in different file formats (HTML, MDB and CSV) in the desired path/location and can also be printed. The path refers to the destination location where the generated report should be stored. The path can be changed while adding the reports. In HTML file format, the information will be stored in the html file. For each report, a HTML file will be generated. The HTML file will be stored in the specified destination path under a directory of the form <Prefix>_<TaskName>_MM_DD_YYYY_HH_MM_SS. In MDB file format, the information will be stored as tables in databases. For each report, a new database will be generated. The selected reports will be created as separate tables. The database will be stored in the specified destination path under a directory of the form <Prefix>_<TaskName>_MM_DD_YYYY_HH_MM_SS. In CSV file format, the information will be stored as comma separated values. For each report, a CSV file will be generated. The file will be stored in the specified destination path under a directory of the form <Prefix>_<TaskName>_MM_DD_YYYY_HH_MM_SS. S.No. Report Type Prefix 1 Web Sites Standard Reports SCH 2 Web Sites Built-in Reports BR 3 Web Sites BulkExport Reports BE 4 FTP Sites Standard Reports SCH 5 Application Pools Standard Reports SCH 6 Web Service Extensions Reports SCH 7 Export for Comparison Reports SCH 71


77 Chapter-6-Schedule Manager 6.2 Launch Schedule Manager Schedule Manager Window can be used to manage scheduled tasks that are maintained in ARKIIS. To open Schedule Manager Window Select on the toolbar The Schedule Manager window will be displayed as shown below. The Schedule Manager window has two panes. The left pane shows the list of scheduled tasks maintained in ARKIIS. The right pane shows the schedule settings as per the task selection in the left pane. Click button to create a new task. Scheduled tasks that are created will be displayed as shown below. When you select the Scheduled Tasks node in the left pane, the right pane shows a brief description (Run as account, schedule information) of each scheduled task that is available in the Windows Scheduled Tasks folder. When you select a task listed in the left pane, the right pane clearly shows the reports scheduled in the selected task. 72
78 Chapter-6-Schedule Manager The Schedule Manager window provides set of operations to manage the scheduled tasks. Before performing them, the scheduled task should be selected in either left pane or right pane. The set of operations are described in the following table: To Create a New Task To delete the selected scheduled task in the Schedule Manager. To edit the schedule settings of the selected scheduled task. To edit the report settings that is associated with the selected scheduled task. To enable/disable the selected scheduled task to run at the specified time. To close the Schedule Manager window. 73
79
80 Chapter 7 7 Manage Scheduled Tasks 7.1 Create Task-(Add a New Task) Click Schedule Manager Button Click New Task... button at the bottom-left of the Schedule Manager window. The Task Properties dialog will be displayed as shown below. Type the task name which should be unique in the Windows Task Scheduler. Choose any of the report type which needs to be scheduled. 75
81 CHAPTER 7 Manage Scheduled Tasks Type the Run as account and password. The task will not run unless you specify a valid password. Specify the schedule type and start time for when the task should run. To get the more information to add reports of specific report type, refer to the following topics in the Schedule Reports: Scheduling Web Sites Standard Reports Scheduling Web Sites Built-in Reports Scheduling Web Sites BulkExport Reports Scheduling FTP Sites Standard Reports Scheduling Application Pools Standard Reports Scheduling Web Service Extensions Reports Scheduling Export For Comparison Reports 7.2 Edit Task The Edit Task operation allows the user to edit the currently selected scheduled task in the Schedule Manager window. The Edit operation can be categorized as Edit Task Schedule settings Edit Task Reports settings Edit Task Schedule settings In the Edit Task Schedule settings operation, the schedule settings (Run as account, schedule type, and start time) for the currently selected scheduled task can be edited. Click Schedule Manager... in toolbar Select an existing task in either left pane or right pane, which needs to be edited. Click Edit Task Schedule... button at the bottom of the Schedule Manager window. The Task Properties dialog will be displayed with selected scheduled task as shown below. 76
82 CHAPTER 7 Manage Scheduled Tasks In the Edit Task Schedule option, the Task name and Report type cannot be changed since the task is being associated with report settings. The schedule settings like Run as account and password, schedule type and start time can be modified as required. Click OK to save the modified settings. Click Cancel to close the dialog without saving the modified settings Edit Task Reports Settings In the Edit Task Reports settings operation, the reports, selected servers, report output format (export and print settings) can be edited. Click Schedule Manager... in toolbar Select an existing task in either left pane or right pane, which needs to be edited. Click Edit Task Reports... button at the bottom-right of the Schedule Manager window. The Schedule Manager loads the corresponding report dialog depending on the task's report type. The report dialog with the previous settings will be loaded. Modify the report settings as required. Click OK / Finish for saving the settings. Click Close to close the dialog without saving the settings. 77

83 CHAPTER 7 Manage Scheduled Tasks 7.3 Delete Task The Delete Task operation allows the user to delete the currently selected scheduled task in the Schedule Manager window. It will delete both task settings and report settings. It is a permanent delete operation. On the Tools menu, click Schedule Manager... Select an existing task in either left pane or right pane, which needs to be deleted. Click Delete Task to delete the currently selected scheduled task. A confirmation dialog will be displayed as shown below. Click Yes to delete and No to cancel the delete operation. 78


84 CHAPTER 7 Manage Scheduled Tasks 7.4 Enable Task Using this option, the scheduled task can be enabled or disabled to run at the specified time. On the Tools menu, click the Schedule Manager... Select an existing task in either left pane or right pane, which needs to be enabled or disabled. Choose the required option in Enabled combo under Schedule Status column as shown below. Disabled task can be identified by red cross mark in its icon representation. 79

85 CHAPTER 7 Manage Scheduled Tasks 7.5 Not Available Task Not Available Task is a task which is maintained in ARKIIS database, but not available in Windows Task Scheduler. The left pane shows the list of scheduled tasks maintained in ARKIIS. If a task in that list is deleted accidentally in the Windows Task Scheduler, ARKIIS Schedule wizard will treat the deleted task as Not Available task. The Not Available task can be identified by its icon representation - {{N/A}} suffix appended to the task name. However, the Not Available task will not be listed in the right pane of the Schedule Manager window. When the Not Available task is selected in the left pane, the Edit Task Schedule... will be changed to Recreate Task. This option allows the user to recreate the task as new one. But the previous schedule settings will not be restored. The Not Available task won t be allowed to edit the reports and enable/disable the task in the Schedule Manager window. When you delete the Not Available task, the task will be deleted from the list of scheduled tasks maintained in ARKIIS. 80

86 CHAPTER 7 Manage Scheduled Tasks 7.6 Access Denied Task Access Denied Task is a task which is maintained in ARKIIS database, but the schedule settings will not be shown in the Schedule Manager. The left pane shows the list of scheduled tasks maintained in ARKIIS. If the current user does not have enough permission to retrieve schedule settings, the Schedule Manager will treat the task as Access Denied task. The Access Denied task can be identified by its icon representation - {{A/D}} suffix appended to the task name. However, the Access Denied task will not be listed in the right pane of the Schedule Manager window. When the Access Denied task is selected in the left pane, the operations (as listed below) that could be performed on the selected task will be grayed out. Edit Schedule Settings. Edit Report Settings. Enable or Disable Scheduled Task. Delete Task. Resolution Ensure the currently logged on user has Modify permission to access and edit the schedule settings of the task. 81
87
88 Chapter 8 8 Schedule Reports 8.1 Scheduling Web Sites Standard Reports Web Standard Report Schedule The Standard Report Schedule feature helps the user to create scheduled tasks for generating reports in a scheduled duration. Using Standard Report schedule, the following reports can be generated at scheduled intervals: Web Server Reports Web Site Reports Virtual Directory Reports It provides facility to specify the categories (tabs) for which the reports are to be generated. The categories (tabs) are maintained separately for each object. It provides facility to specify any custom report format to be used to generate reports instead of the categories list. It provides facility to specify the path to which the reports to be exported and the format for exporting. Each report is maintained separately for each object. It provides facility to specify the printer to which the reports could be send and is maintained separately for each object. How to create a new Standard Report Task On the Tools menu, Click Schedule Manager... Click New Task... button at the bottom-left of the Schedule Manager window. Ensure Standard Report option is selected and type the Task Name in the Task Properties dialog as shown below. 83

89 CHAPTER 8 Schedule Reports Specify the schedule settings (Run as account, schedule type, start time, etc). Click OK to open the Standard Report Schedule dialog. Click Cancel to close the Task Properties dialog. The Standard Report Schedule dialog will be displayed as shown below 84

90 CHAPTER 8 Schedule Reports Add a new web server / web site / virtual directory to the task Select Web Servers or Web Sites or Virtual Directories tab as you require. The bottom-left pane of the dialog provides the facility to add the new web server / web site / virtual directory to the task. Type the Web Server / Web site / Virtual directory name in the textbox or use Browse button to select from the list. Using Browse button enables the user to select multiple objects at a time and add it to the task. When the object name is typed use Add button to add the given object to the task. The Standard Report Schedule dialog will be displayed as shown below 85

91 CHAPTER 8 Schedule Reports When the newly added task is selected, the Schedule Manager window will be displayed as shown below: 86
92 CHAPTER 8 Schedule Reports 8.2 Scheduling Web Sites Built-in Reports Built-in Reports Schedule Wizard Built-in Reports schedule wizard allows the user to schedule the Built-in Report, report generation. This wizard offers a set of reports to retrieve frequently accessed significant information about web sites and virtual directories across domain(s)/server(s) in the enterprise. This feature supports applying filters to the report(s), to view the part of the report that is of more significance. You can either have the reports printed or exported as files in various formats (HTML/MDB/CSV). Using Built-in Reports schedule, the following reports can be generated at scheduled intervals: Web Server Reports Virtual Directory Reports Web Site Reports Web Site reports provide the frequently viewed significant information about the web sites available in the web servers. The built-in reports that are grouped under Web Site reports are given below: Web site state - STARTED / STOPPED / PAUSED Web site operators Web sites with their access permissions - Read / Write / Directory browsing Web sites with their connection settings - LIMITED/UNLIMITED Web sites with their Content Expiration settings - Enabled / Disabled Web sites with their execution permissions - None / Scripts / Executables Web sites with their application protection settings - HIGH / MEDIUM / LOW Web site Authentication Methods - ANONYMOUS / BASIC / INTEGRATED WINDOWS Web site with their IP address and domain name restrictions Web sites with their default documents Web site size Web site permissions Virtual Directory Reports Virtual Directory reports provide the frequently viewed significant information about the virtual directories under the each web site available in the web servers. 87
93 CHAPTER 8 Schedule Reports The built-in reports that are grouped under Virtual Directory reports are given below: Virtual directories with their access permissions - Read / Write / Directory browsing Virtual directories with their Content Expiration settings - Enabled / Disabled Virtual directories with their execution permissions - None / Scripts / Executables Virtual directories with their application protection settings - HIGH / MEDIUM / LOW Virtual directory Authentication Methods - ANONYMOUS / BASIC / INTEGRATED WINDOWS Virtual directories with their IP address and domain name restrictions Virtual directories with their default documents Virtual directory size Virtual directory permissions How to create a new Built-in Report Task On the Tools menu, Click Schedule Manager... Click New Task... button at the bottom-left of the Schedule Manager window. Select Built-in Report option and type the Task Name in the Task Properties dialog as shown below. 88

94 CHAPTER 8 Schedule Reports Specify the schedule settings (Run as account, schedule type, start time, etc.). Click OK to open the Built-in Reports Schedule wizard. Click Cancel to close the Task Properties dialog. The Built-in Reports Schedule wizard will be displayed as shown below. Step 1: Select one or more listed Web Site or Virtual Directory reports to be scheduled. You can specify the Report title in the Report Title textbox. e.g. For "List all web sites whose state is STARTED / STOPPED / PAUSED" report you can have the Report Title as "Report by status. Click Next to proceed. 89
/Server(s) Generate the report for the selected domain(s)/server(s).")
95 CHAPTER 8 Schedule Reports Step 2: Select the Domain(s)/Server(s) against which the report(s) need(s) to be generated. The different server selection options are given below: All Domains Generate the report for the entire enterprise Select Domain(s)/Server(s) Generate the report for the selected domain(s)/server(s). Favorite Servers Generate the report for the servers in the favorite-list. Server Generate the report for a given server. NOTE: All Domains option will be selected by default. E.g. To get the report(s) for the servers in the favorite-list, select Favorite Servers option, you can change the favoritelist by clicking Browse button. Click Next to proceed. 90

96 CHAPTER 8 Schedule Reports Step 3: This step is optional. You can specify report criteria to view the part of the report that is of significance. e.g. to get the list of web sites whose state is started, add criteria as "[State] = 'Started'". If you rather prefer to view the entire report, leave the criteria as empty. Click Next to proceed Step 4: Select Export to option and specify the path in which the report(s) to be stored and the export format (HTML/MDB/CSV). Select Print to option to directly send the report output to the specified printer. Click Next to proceed. NOTE: This information will be applied to all the reports scheduled in this task. 91


97 CHAPTER 8 Schedule Reports Step 5: This step shows the summary information of the report settings. You can review the report settings specified in the previous steps. If you need to change any of the settings, click back. Click Finish to save the settings and close the wizard. 92
. To schedule a BulkExport, at least one custom report is needed.")
98 CHAPTER 8 Schedule Reports The scheduled task will be added to the Schedule Manager window as shown below. 8.3 Scheduling Web Sites BulkExport Reports BulkExport Schedule BulkExport schedule feature, allows the user to schedule the bulk reports generation. BulkExport schedule will work based only on custom report(s). To schedule a BulkExport, at least one custom report is needed. BulkExport can generate the bulk reports for all web sites and virtual directories for the selected domain(s)/server(s) in the enterprise. Using BulkExport schedule, the following reports can be generated at scheduled intervals: Web Server Reports Virtual Directory Reports How to create a new BulkExport Task? On the Tools menu, Click Schedule Manager... Click New Task... button at the bottom-left of the Schedule Manager window. Select BulkExport Report option and type the Task Name in the Task Properties dialog as shown below. 93

99 CHAPTER 8 Schedule Reports Click OK to open the BulkExport Schedule dialog. Click Cancel to close the Task Properties dialog. The BulkExport Schedule dialog will be displayed as shown below 94
100 CHAPTER 8 Schedule Reports Scheduling Web Server Reports Web Server reports can be generated by selecting Include Web Server Reports check box. Specify web servers by selecting either Favorites or Domain option. The favorite-list can be modified by clicking Edit... button. Select one Custom Report from the list. If you want to add new custom report, Click New button. Specify the export path and export type (HTML/MDB/CSV). Both Web Server and Virtual Directory reports use same export path and export type. The Server Name as header option (only for web server reporting) is used to specify whether the server name is to be provided as header or repeated for each row of data in CSV format only. The BulkExport schedule dialog with the selected options will be displayed as shown below. Click Virtual Directories tab, to include Virtual Directory Reports also. Scheduling Virtual Directory Reports Virtual Directory Reports can be generated by selecting Include Virtual Directory Reports check box. Specify web server(s) or web site(s) by selecting either Favorite web servers or Favorite web sites or selected server option. The favorite-list can be modified by clicking Edit... button beside each option. Select one Custom Report from the list. If you want to add new custom report, Click New button. 95


101 CHAPTER 8 Schedule Reports Export path and type are common for both Web Server Reports and Virtual Directory Reports. The BulkExport schedule dialog will be displayed as shown below. Click OK to save the settings. Click Close to exit the dialog without saving the settings When the newly added task is selected, the Schedule Manager window will be displayed as shown below: 96
102 CHAPTER 8 Schedule Reports NOTE: This tool generates two files (ActivityLog.HTM and a Report file). The ActivityLog.HTM file provides the server list and their data collection status, which will help the user to get a quick glance of each server s report collection status. For Web Site Reports option, the Report file will be named as Favorite or the respective Domain Name depending on what has been selected and will be stored in the export path. For Virtual Directory Reports option, the Report file will be named as FavoriteSite or FavoriteServer or the respective Server Name depending on what has been selected and will be stored in the export path. 8.4 Scheduling FTP Sites Standard Reports FTP Standard Report Schedule The Standard Report Schedule feature helps the user to create scheduled tasks for generating reports in a scheduled duration. Using Standard Report schedule, the following reports can be generated at scheduled intervals: FTP Server Reports FTP Site Reports Virtual Directory Reports It provides facility to specify the categories (tabs) for which the reports are to be generated. The categories (tabs) are maintained separately for each object. It provides facility to specify the path to which the reports to be exported and the format for exporting. Each are maintained separately for each object. It provides facility to specify the printer to which the reports could be sent and is maintained separately for each object. How to create a new Standard Report Task? Click Schedule Manager... in toolbar Click New Task... button at the bottom-left of the Schedule Manager window. Ensure Standard Report option is selected and type the Task Name in the Task Properties dialog as shown below. 97
.")

103 CHAPTER 8 Schedule Reports Specify the schedule settings (Run as account, schedule type, start time, etc.). Click OK to open the Standard Report Schedule dialog. Click Cancel to close the Task Properties dialog. The Standard Report Schedule dialog will be displayed as shown below: 98
104 CHAPTER 8 Schedule Reports Add a new FTP server / FTP site / virtual directory to the task Select FTP Servers or FTP Sites or Virtual Directories tab as you require. The bottom-left pane of the dialog provides the facility to add the new FTP server / FTP site / virtual directory to the task. Type the FTP Server / FTP site / Virtual directory name in the textbox or use Browse button to select from the list. Using Browse button enables the user to select multiple objects at a time and add it to the task. When the object name is typed use Add button to add the given object to the task. The Standard Report Schedule dialog will be displayed as shown below 99

105 CHAPTER 8 Schedule Reports When the newly added task is selected, the Schedule Manager window will be displayed as shown below: 100
106 CHAPTER 8 Schedule Reports 8.5 Scheduling Application Pools Standard Reports Application Pool Standard Report Schedule The Standard Report Schedule feature helps the user to create scheduled tasks for generating reports in a scheduled duration. Using Standard Report schedule, the following reports can be generated at scheduled intervals: Web Servers Reports Application Pools Reports It provides facility to specify the categories (tabs) for where the reports are to be generated. The categories (tabs) are maintained separately for each object. It provides facility to specify the path to where the reports to be exported and the format for exporting. Each report is maintained separately for each object. It provides the facility to specify the printer to where the reports could be sent, and maintained separately for each object. How to create a new Standard Report Task? Click Schedule Manager... in toolbar Click New Task... button at the bottom-left of the Schedule Manager window. Ensure Standard Report option is selected and type the Task Name in the Task Properties dialog as shown below. 101
107 CHAPTER 8 Schedule Reports Specify the schedule settings (Run as account, schedule type, start time, etc.). Click OK to open the Standard Report Schedule dialog. Click Cancel to close the Task Properties dialog. The Standard Report Schedule dialog will be displayed as shown below: Add a new Web Server / Application Pool to the task Select Web servers or Application Pools tab as you require. The bottom-left pane of the dialog provides the facility to add the new Web server / Application Pool to the task. Type the Web server / Application Pool name in the textbox or use Browse button to select from the list. Using Browse button enables the user to select multiple objects at a time and add it to the task. When the object name is typed use Add button to add the given object to the task. 102
108 CHAPTER 8 Schedule Reports The Standard Report Schedule dialog will be displayed as shown below When the newly added task is selected, the Schedule Manager window will be displayed as shown below: 103
109 CHAPTER 8 Schedule Reports 8.6 Scheduling Web Service Extension Reports Web Service Extensions Standard Report Schedule The Standard Report Schedule feature helps the user to create scheduled tasks for generating reports in a scheduled duration. Using Standard Report schedule, the Web Service Extensions reports can be generated at scheduled intervals. It provides facility to specify the categories (tabs) for which the reports are to be generated. The categories (tabs) are maintained separately for each object. It provides facility to specify the path to which the reports to be exported and the format for exporting. Each report is maintained separately for each object. It provides facility to specify the printer to where the reports could be sent and is maintained separately for each object. How to create a new Standard Report Task? Click Schedule Manager... in toolbar Click New Task... button at the bottom-left of the Schedule Manager window. Ensure Standard Report option is selected and type the Task Name in the Task Properties dialog as shown below. 104

110 CHAPTER 8 Schedule Reports Specify the schedule settings (Run as account, schedule type, start time, etc.). Click OK to open the Standard Report Schedule dialog. Click Cancel to close the Task Properties dialog. The Standard Report Schedule dialog will be displayed as shown below: Add a new Web Server to the task Select Web Service Extensions tab as you require. The bottom-left pane of the dialog provides the facility to add the new web server. Type the web server name in the textbox or use Browse button to select from the list. Using Browse button enables the user to select multiple objects at a time and add it to the task. When the object name is typed use Add button to add the given object to the task. 105

111 CHAPTER 8 Schedule Reports The Standard Report Schedule dialog will be displayed as shown below When the newly added task is selected, the Schedule Manager window will be displayed as shown below: 106
112 CHAPTER 8 Schedule Reports 8.7 Scheduling Export for Comparison Reports Export For Comparison Report Schedule The Export For Comparison Report Schedule feature helps the user to create scheduled tasks to export the entire data for all Web Sites and Virtual Directories for a selected web server into the application's internal database (stored as MS Access database.mdb file). This is especially useful for comparing and generating Comparison Reports with Web Site and Virtual Directory configuration across web servers. Using this schedule feature, Export For Comparison report can be generated at scheduled intervals. It provides facility to specify the server name and path to which the reports are to be exported. How to create a new Export For Comparison Task? Click Schedule Manager... in toolbar Click New Task... button at the bottom-left of the Schedule Manager window Ensure Export For Comparison is selected and type the Task Name in the Task Properties dialog as shown below. Specify the schedule settings (Run as account, schedule type, start time, etc.). 107


113 CHAPTER 8 Schedule Reports Click OK to open the Standard Report Schedule dialog. Click Cancel to close the Task Properties dialog. The Standard Report Schedule dialog will be displayed as shown below: Add a new Web Server to the task Use Browse button to select from the list. Using Browse button enables the user to select server and add it to the task. The Standard Report Schedule dialog will be displayed as shown below When the newly added task is selected, the Schedule Manager window will be displayed as shown below: 108
114 CHAPTER 8 Schedule Reports 109
115
116 Chapter 9 9 Insight Reports 9.1 About Insight Reports The Insight tool in ARKIIS reports Summary and Detailed information based on "frequency of occurrence (Counts)" of their properties, for example, "Total number of Web sites that have been started". Some of the reported items in the Summary are based on certain parameters (Count, property value) that may be modified to get the desired report. The reports provide an "Insight" into IIS by producing some meaningful statistics on certain important properties in IIS. The Insight tool currently reports on the following: Web Sites Reports FTP Sites Reports Application Pools Reports Web Service Extensions Reports Web Sites Virtual Directory Reports FTP Sites Virtual Directory Reports 111
117 CHPATER 9 Insight Reports 9.2 How to get an Insight on Web Sites Reports? Click on button, OR Select Insight Reports from the Report menu. The Connect to IIS Server dialog box will appear. Enter a server name in the textbox. Or Select a server from the Favorites dropdown. This dropdown will contain the list of web servers available in the Favorite Web Servers list. Or Click button to browse for computers running IIS. This operation may take some time depending on the size of the domain. Click The report window will be launched after the server validation. Select and expand the Web Sites Reports in the left pane of the newly launched report window, and then click on child node. 112

118 CHPATER 9 Insight Reports The following message will appear on screen, if the report data has not been already collected: Select Yes to collect data. NOTE: If you select No, then the required data would not be collected. As a result, you may see zeroes against Insight items for which data is not available. The report would be displayed as shown below: View Options You can modify parameters of the selected item by clicking on View Options and get the desired report. The Options dialog would be displayed as shown below: 113

119 CHPATER 9 Insight Reports Modify the parameters and click OK to refresh the report. Note that parameters can be set both in "Summary" and "Details" view of Insight report. Furthermore, parameters can be set on an item-by-item basis only. NOTE: Some of the reported items may not have parameters to set. If the selected item does not have parameters, then you would see the following message appear on screen View Details You can view detailed information of the selected item, by clicking View Details. Details of the selected item would be displayed as shown below 114
120 CHPATER 9 Insight Reports To navigate back to the "Summary" view of the Insight report click Back. NOTE: Some of the reported items may not have any details, for instance, the item that displays the total count of objects. If the selected item does not have details associated with it, then you would see the following message appear on screen: Items Reported The following tables list the count-based items for Web Sites Reports and their corresponding settings: General Count-based Item Name Description Parameters Detail Report Total Number of Displays the total None No detail report Web Sites number of Web sites Number of Web Displays the count None Displays the Web sites sites that have of Web sites that details that have been been assigned an have been assigned assigned an IP IP Address an IP Address. Address. Total number of Displays the count None Displays the report for Web sites that of started Web sites started Web sites have been started Displays the Displays the count None Displays the report for report for started of paused Web sites paused Web sites Web sites 115
121 CHPATER 9 Insight Reports Total number of Displays the count None Displays the report for Web sites that of stopped Web stopped Web sites have been sites stopped Number of web Displays the count None Displays the web sites sites that have of web sites that that have 'unlimited 'unlimited have 'unlimited connections' connections' connections' Number of web Displays the count Specify a Displays web sites sites that have of web sites that number (count) that have 'connection 'connection have 'connection of connection limited' greater than limited' greater limited' greater than limited the specified number than N the specified number Number of web Displays the count Specify a Displays web sites sites that have of web sites that number (count) that have connection connection have connection of connection timeout greater than timeout greater timeout greater timeout the specified number. than N than the specified number. 116
122 CHPATER 9 Insight Reports Home Directory: Count-based Item Name Description Parameters Detail Report Number of web Displays the count of None Displays the Web sites sites that have read Web sites that have details that have read permission set read permission set permission set Number of web Displays the count of None Displays the Web sites sites that have Web sites that have details that have write write permission write permission set permission set set Number of web Displays the count of None Displays the Web sites sites that have Web sites that have details that have directory browsing directory browsing directory browsing permission set permission set permission set Number of web Displays the count of None Displays the Web sites sites that have Web sites that have details that have content content source in content source in source in local computer. local computer local computer Number of web Displays the count of None Displays the Web sites sites that have Web sites that have details that have content content source on content source on source on another another computer another computer computer. Number of web Displays the count of None Displays the Web sites sites that have Web sites that have details that have content content source content source source redirected to an redirected to an redirected to an URL URL URL 117
123 CHPATER 9 Insight Reports Application Settings: Count-based Item Name Description Parameters Detail Report Number of web sites Displays the Select an Displays the Web sites that have execute count of execute details that have the permissions set to X Web sites permission specified execute permission that have from the the specified list. execute permission Number of web sites Displays the Select an Displays the Web sites that have application count of application details that have the protection set to X Web sites protection specified application that have from the protection the specified list. application protection 118
124 CHPATER 9 Insight Reports Directory Security: Count-based Item Name Description Parameters Detail Report Number of web Displays the count None Displays the Web sites sites that have of Web sites that details that have the anonymous access have the anonymous access property set. anonymous access property set. property set. Number of web Displays the count None Displays the Web sites sites that have of Web sites that details that have allowed allowed IIS to have allowed IIS to IIS to control password. control password. control password. Number of web Displays the count None Displays the Web sites sites that have of Web sites that details that have authenticated have authenticated authenticated access set to access set to access set to 'Digest 'Digest authentication'. 'Digest authentication'. authentication'. Number of web Displays the count None Displays the Web sites sites that have of Web sites that details that have authenticated have authenticated authenticated access set to access set to access set to 'Basic 'Basic authentication'. 'Basic authentication'. authentication'. Number of web Displays the count None Displays the Web sites sites that have of Web sites that details that have authenticated have authenticated authenticated access set to access set to access set to 'Integrated Windows 'Integrated 'Integrated Windows authentication'. Windows authentication'. authentication'. 119
125 CHPATER 9 Insight Reports Restricted IP Address: Count-based Item Name Description Parameters Detail Report Number of web Displays the count None Displays the Web sites sites that have a of Web sites that details that have a list of list of IP have a list of IP IP Addresses granted Addresses granted Addresses granted access. access. access. Number of web Displays the count None Displays the Web sites sites that have a of Web sites that details that have a list of list of IP have a list of IP IP Addresses denied Addresses denied Addresses denied access. access. access. Http Header, Documents: Count-based Item Name Description Parameters Detail Report Number of web Displays the count None Displays the Web sites sites that have of Web sites that details that have Microsoft content expiration have Microsoft IIS IIS log file format in the set. log file format in the active log format. active log format. Number of Web Displays the count None Displays the Web sites sites that have of Web sites that details that have W3C W3C extended log have W3C extended extended log file format in file format in the log file format in the the active log format. active log format. active log format. Number of Web Displays the count None Displays the Web sites sites that have of Web sites that details that have ODBC ODBC logging in have ODBC logging logging in the active log 120
126 CHPATER 9 Insight Reports the active log in the active log format. format. format Number of Web Displays the count None Displays the Web sites sites that have of Web sites that details that have NCSA NCSA common log have NCSA common common log file format in file format in the log file format in the the active log format. active log format active log format. Web Sites Size: Count-based Item Name Description Parameters Detail Report Number of web Displays the count Specify a Displays the Web sites sites that have of Web sites that number details that have web sites web sites size have web sites size (count) of size greater than the greater than N. greater than the web sites specified number. specified number. size 121
127 CHPATER 9 Insight Reports Web Sites Permission: Count-based Item Name Description Parameters Detail Report Number of web Displays the count Select a Displays the Web sites sites that have of Web sites that Web Site details that have the Web Sites have the specified Permission specified Permission set. Permission set to Permission set. from the X. list. Number of web Displays the count Select an Displays the Web sites sites that have of Web sites that access type details that have the access type set to have the specified from the list specified access type. X. access type. 122
128 CHPATER 9 Insight Reports 9.3 How to get an Insight on FTP Sites Reports? Click on button, OR Select Insight Reports from the Report menu. The Connect to IIS Server dialog box will appear. Enter a server name in the textbox. Or Select a server from the Favorites dropdown. This dropdown will contain the list of web servers available in the Favorite Web Servers list. Or Click button to browse for computers running IIS. This operation may take some time depending on the size of the domain. Click The report window will be launched after the server validation. Select and expand the FTP Sites Reports in the left pane of the newly launched report window, and then click on child node. The following message will appear on screen, if the report data has not been already collected: 123


129 CHPATER 9 Insight Reports Select Yes to collect data. NOTE: If you select No, then the required data would not be collected. As a result, you may see zeroes against Insight items for which data is not available. The report would be displayed as shown below: View Options You can modify parameters of the selected item by clicking on View Options and get the desired report. The Options dialog would be displayed as shown below: 124

130 CHPATER 9 Insight Reports Modify the parameters and click OK to refresh the report. Note that parameters can be set both in "Summary" and "Details" view of Insight report. Furthermore, parameters can be set on an item-by-item basis only. NOTE: Some of the reported items may not have parameters to set. If the selected item does not have parameters, then you would see the following message appear on screen: View Details You can view detailed information of the selected item, by clicking View Details. Details of the selected item would be displayed as shown below: To navigate back to the "Summary" view of the Insight report click Back. NOTE: Some of the reported items may not have any details, for instance, the item that displays the total count of objects. If the selected item does not have details associated with it, then you would see the following message appear on screen: 125
131 CHPATER 9 Insight Reports Items Reported The following tables list the count-based items for FTP Sites Reports and their corresponding settings: General: Count-based Item Name Description Parameters Detail Report Total number of Displays the total None No detail report FTP sites. number of FTP sites Number of FTP Displays the count None Displays the FTP sites sites that have of FTP sites that details that have been been assigned an have been assigned assigned an IP Address. IP Address. an IP Address. Total number of Displays the count None Displays the report for sites that have of running FTP sites running FTP sites been running. Total number of Displays the count None Displays the report for FTP sites that of stopped FTP sites stopped FTP sites have been stopped Total number of Displays the count None Displays the count of FTP sites that of paused FTP sites paused FTP sites have been paused Number of FTP Displays the count Specify a Displays FTP sites that sites that have of FTP sites that number have 'Maximum 'Maximum have 'Maximum (count) of Connections' greater than Connections' Connections' greater maximum the specified number greater than N than the specified connections 126
132 CHPATER 9 Insight Reports number Number of FTP Displays the count Specify a Displays FTP sites that sites that have connection timeout greater than N of FTP sites that have connection timeout greater number (count) of connection have connection timeout greater than the specified number than the specified timeout number. Log File Settings: Count-based Item Name Description Parameters Detail Report Number of FTP Displays the count None Displays the FTP sites sites that have of FTP sites that details that have Microsoft IIS log have Microsoft IIS Microsoft IIS log file file format in the log file format in the format in the active log active log format. active log format. format Number of FTP Displays the count None Displays the FTP sites sites that have of FTP sites that details that have W3C W3C extended have W3C extended extended log file format in log file format in log file format in the the active log format. the active log active log format. format. Number of FTP Displays the count None Displays the FTP sites sites that have of FTP sites that details that have ODBC ODBC logging in have ODBC logging logging in the active log the active log in the active log format. format. format 127
133 CHPATER 9 Insight Reports Home Directory: Count-based Item Name Description Parameters Detail Report Number of FTP Displays the count None Displays the FTP sites sites that have of FTP sites that details that have content content source in have content source source in local computer local computer in local computer Number of FTP Displays the count None Displays the FTP sites sites that have of FTP sites that details that have content content source on have content source source on another another computer on another computer computer Number of FTP Displays the count None Displays the FTP sites sites that have of FTP sites that details that have read read permission have read permission set set permission set Number of FTP Displays the count None Displays the FTP sites sites that have of FTP sites that details that have write write permission have write permission set set permission set Number of FTP Displays the count None Displays the FTP sites sites that have of FTP sites that details that have allowed allowed log visits. have allowed log log visits. visits. Number of FTP FTP sites that have Select a Displays the FTP sites sites that have the specified directory details that have the directory listing directory listing listing style specified directory listing style set to X style from the list style. 128
134 CHPATER 9 Insight Reports Security Accounts, Directory Security: Count-based Item Name Description Parameters Detail Report Number of FTP Displays the count None Displays the FTP sites sites that have of FTP sites that details that have anonymous have anonymous anonymous access access property access property set. property set. set. Number of FTP Displays the count None Displays the FTP sites sites that have of FTP sites that details that have allowed allowed only have allowed only only anonymous anonymous anonymous connections. connections connections. Number of FTP Displays the count None Displays the FTP sites sites that have a of FTP sites that details that have a list of list of IP have a list of IP IP Addresses granted Addresses Addresses granted access. granted access. access. Number of FTP Displays the count None Displays the FTP sites sites that have a of FTP sites that details that have a list of list of IP have a list of IP IP Addresses denied Addresses denied Addresses denied access. access. access. 129
135 CHPATER 9 Insight Reports 9.4 How to get an Insight on Application Pools Reports? Click on button, Or Select Insight Reports from the Report menu. The Connect to IIS Server dialog box will appear. Enter a server name in the textbox. or Select a server from the Favorites dropdown. This dropdown will contain the list of web servers available in the Favorite Web Servers list. or Click button to browse for computers running IIS. This operation may take some time depending on the size of the domain. Click The report window will be launched after the server validation. Select and expand the Application Pools Reports in the left pane of the newly launched report window, and then click on child node. The following message will appear on screen, if the report data has not been already collected: 130

136 CHPATER 9 Insight Reports Select Yes to collect data. NOTE: If you select No, then the required data would not be collected. As a result, you may see zeroes against Insight items for which data is not available The report would be displayed as shown below: View Options You can modify parameters of the selected item by clicking on View Options and get the desired report. The Options dialog would be displayed as shown below: 131

137 CHPATER 9 Insight Reports Modify the parameters and click OK to refresh the report. Note that parameters can be set both in "Summary" and "Details" view of Insight report. Furthermore, parameters can be set on an item-by-item basis only. NOTE: Some of the reported items may not have parameters to set. If the selected item does not have parameters, then you would see the following message appear on screen: View Details You can view detailed information of the selected item, by clicking View Details. Details of the selected item would be displayed as shown below: To navigate back to the "Summary" view of the Insight report click Back. NOTE; Some of the reported items may not have any details, for instance, the item that displays the total count of objects. If the selected item does not have details associated with it, then you would see the following message appear on screen: 132
138 CHPATER 9 Insight Reports Items Reported The following tables list the count-based items for Web Sites Reports and their corresponding settings: General: Count-based Item Name Description Parameters Detail Report Total number of Displays the total None No detail report. Application Pools number of Application Pools. Total number of Displays the count None Displays the report for Application Pools of running running Application Pools. that have been Application Pools running. Total number of Displays the count None Displays the report for Application Pools of stopped stopped Application Pools that have been Application Pools stopped. 133
139 CHPATER 9 Insight Reports Worker Process Recycling: Count-based Item Name Description Parameters Detail Report Numbers of Displays the count None Displays the application application pools of application pools pools details that have that have recycle that have recycle recycle settings set. settings set. settings set. Number of Displays the count Specify a Displays application pools application pools of application pools number details that have 'Recycle that have that have 'Recycle (count) of (in minutes)'greater than 'Recycle (in (in minutes)' 'Recycle (in the specified number. minutes)' greater greater than the minutes)' than N. specified number. Number of Displays the count None Displays the application application pools of application pools pools details that have that have recycle that have recycle recycle schedule settings schedule settings schedule settings set. set. set. 134
140 CHPATER 9 Insight Reports Memory Recycling, Health, Identity: Count-based Item Name Description Parameters Detail Report Number of Displays the count of None Displays the application pools application pools that application pools that have have maximum virtual details that have maximum virtual memory set. maximum virtual memory set. memory set. Number of Displays the count of None Displays the application pools application pools that application pools that have have maximum used details that have maximum used memory set. maximum used memory set. memory set. Number of Displays the count of None Displays the application pools application pools that application pools that have enable have enable pinging details that have pinging set. set. enable pinging set. Number of Displays the count of None Displays the application pools application pools that application pools that have rapid-fail have rapid-fail details that have protection set. protection set. rapid-fail protection set. Number of Displays the count of None Displays the application pools application pools that application pools that have have predefined details that have predefined identity identity setting. predefined identity setting. setting. 135
141 CHPATER 9 Insight Reports Number of Displays the count of None Displays the application pools application pools that application pools that have have configurable details that have configurable identity setting. configurable identity identity setting. setting. Performance: Count-based Item Name Description Parameters Detail Report Number of Displays the count None Displays the application application pools of application pools pools details that have that have idle that have idle idle timeout set. timeout set. timeout set. Number of Displays the count None Displays the application application pools of application pools pools details that have that have request that have request request queue limit set. queue limit set. queue limit set. Numbers of Displays the count None Displays the application application pools of application pools pools details that have that have enable that have enable enable CPU monitoring CPU monitoring CPU monitoring set. set. set. Number of Displays the count Specify a Displays application pools application pools of application pools number details that have that have that have 'Maximum (count) of 'Maximum number of 'Maximum number of worker 'Maximum worker processes' greater number of worker processes' greater number of than the specified processes' than the specified worker number. greater than N. number. processes'. 136
142 CHPATER 9 Insight Reports 9.5 How to get an Insight on Web Service Extensions Reports? Click on button, Or Select Insight Reports from the Report menu. The Connect to IIS Server dialog box will appear. Enter a server name in the textbox. or Select a server from the Favorites dropdown. This dropdown will contain the list of web servers available in the Favorite Web Servers list. or Click button to browse for computers running IIS. This operation may take some time depending on the size of the domain. Click The report window will be launched after the server validation. Select and expand the Web Service Extensions Reports in the left pane of the newly launched report window, and then click on child node. The following message will appear on screen, if the report data has not been already collected: 137

143 CHPATER 9 Insight Reports Select Yes to collect data. NOTE: If you select No, then the required data would not be collected. As a result, you may see zeroes against Insight items for which data is not available. The report would be displayed as shown below: NOTE: All of the Insight items reported for Web Service Extensions do not have any parameters. View Details You can view detailed information of the selected item, by clicking View Details. Details of the selected item would be displayed as shown below: 138

144 CHPATER 9 Insight Reports To navigate back to the "Summary" view of the Insight report click Back. NOTE: Some of the reported items may not have any details, for instance, the item that displays the total count of objects. If the selected item does not have details associated with it, then you would see the following message appear on screen: 139
145 CHPATER 9 Insight Reports Items Reported The following tables list the count-based items for Web Service Extensions Reports and their corresponding settings: Summary: Count-based Item Name Description Parameters Detail Report Total number of Displays the total None No detail report Web service number of Web extensions. service extensions. Total number of Displays the count None Displays the detail reports Web service of allowed Web for allowed Web service extensions that service extensions. extensions. are allowed. Total number of Displays the count None Displays the detail reports Web service of prohibited Web for prohibited Web service extensions that service extensions. extensions. are prohibited. Total number of Displays the count None Displays the detail reports Web service of custom Web for custom Web service extensions that service extensions. extensions. are custom. 140
146 CHPATER 9 Insight Reports 9.6 How to get an Insight on Web Sites Virtual Directory Reports? Click on button, Or Select Insight Reports from the Report menu. The Connect to IIS Server dialog box will appear. Enter a server name in the textbox. or Select a server from the Favorites dropdown. This dropdown will contain the list of web servers available in the Favorite Web Servers list. or Click button to browse for computers running IIS. This operation may take some time depending on the size of the domain. Click The report window will be launched after the server validation. Select and expand the Web Sites Virtual Directory Reports in the left pane of the newly launched report window, and then click on child node. The following message will appear on screen, if the report data has not been already collected: 141

147 CHPATER 9 Insight Reports Select Yes to collect data. NOTE: If you select No, then the required data would not be collected. As a result, you may see zeroes against Insight items for which data is not available. The report would be displayed as shown below: View Options: You can modify parameters of the selected item by clicking on View Options and get the desired report. The Options dialog would be displayed as shown below: 142

148 CHPATER 9 Insight Reports Modify the parameters and click OK to refresh the report. Note that parameters can be set both in "Summary" and "Details" view of Insight report. Furthermore, parameters can be set on an item-by-item basis only. NOTE: Some of the reported items may not have parameters to set. If the selected item does not have parameters, then you would see the following message appear on screen: View Details You can view detailed information of the selected item, by clicking View Details. Details of the selected item would be displayed as shown below: To navigate back to the "Summary" view of the Insight report click Back. NOTE: Some of the reported items may not have any details, for instance, the item that displays the total count of objects. If the selected item does not have details associated with it, then you would see the following message appear on screen: 143
149 CHPATER 9 Insight Reports Items Reported The following tables list the count-based items for Web Sites Virtual Directory Reports and their corresponding settings: General: Count-based Item Name Description 144
150 CHPATER 9 Insight Reports 145
151 CHPATER 9 Insight Reports Directory Security Restricted IP Address: Count-based Item Name Description Parameters Detail Report Number of virtual Displays the count None Displays the virtual directories that of virtual directories directories details that have anonymous that have the have the anonymous access property anonymous access access property set. set. property set. Number of virtual Displays the count None Displays the virtual directories that of virtual directories directories details that have allowed IIS that have allowed to control IIS to control password. password. 146
152 CHPATER 9 Insight Reports Number of virtual Displays the count None Displays the virtual directories that of virtual directories directories details that have that have have authenticated access authenticated authenticated set to 'Integrated access set to access set to Windows authentication'. 'Integrated 'Integrated Windows Windows authentication'. authentication'. Number virtual Displays the count None Displays the virtual directories that of virtual directories directories details that have a list of IP that have a list of IP have a list of IP Addresses Addresses granted Addresses granted granted access. access. access. Number of virtual Displays the count None Displays the virtual directories that of virtual directories directories details that have a list of IP that have a list of IP have a list of IP Addresses denied Addresses denied Addresses denied access. access. access. 147
153 CHPATER 9 Insight Reports Virtual Directory Size: Count-based Item Name Description 148
154 CHPATER 9 Insight Reports 9.7 How to get an Insight on FTP Sites Virtual Directory Reports? Click on button, Or Select Insight Reports from the Report menu. The Connect to IIS Server dialog box will appear. Enter a server name in the textbox. or Select a server from the Favorites dropdown. This dropdown will contain the list of web servers available in the Favorite Web Servers list. or Click button to browse for computers running IIS. This operation may take some 149

155 CHPATER 9 Insight Reports Select Yes to collect data. NOTE: If you select No, then the required data would not be collected. As a result, you may see zeroes against Insight items for which data is not available. The report would be displayed as shown below: View Options: You can modify parameters of the selected item by clicking on View Options and get the desired report. The Options dialog would be displayed as shown below: 150
156 CHPATER 9 Insight Reports Modify the parameters and click OK to refresh the report. Note that parameters can be set both in "Summary" and "Details" view of Insight report. Furthermore, parameters 151
157 CHPATER 9 Insight Reports Items Reported The following tables list the count-based items for FTP Sites Virtual Directory Reports and their corresponding settings: General: Count-based Item Name Description Parameters Detail Report Total number of Displays the total None No detail report virtual number of virtual directories. directories in the selected server. Number of virtual Displays the count Select Displays the virtual directories that of virtual directories virtual directories details that have permission that have the directories have the specified set to X. specified permission permission permission set. set. from the list. Number of virtual Displays the count directories that have content source in local computer. 152
158 CHPATER 9 Insight Reports Directory Security: Count-based Item Name Description Parameters Detail Report Number of virtual Displays the count None Displays the virtual directories that of virtual directories directories details that have a list of IP that have a list of IP have a list of IP Addresses Addresses granted Addresses granted granted access. access. access. Number of virtual Displays the count None Displays the virtual directories that of virtual directories directories details that have a list of IP that have a list of IP have a list of IP Addresses denied Addresses denied Addresses denied access. access. access. 153
159 Chapter Security Reports 10.1 About Security Reports The Security Reports in ARKIIS reports on security information established for WebSites, FTP sites and Application Pools, 154

160 CHPATER 9 Insight Reports 10.2 How to generate Security reports? Click on button. Or Select Security Reports from the Report menu. The Connect to IIS Server dialog box will appear. Enter a server name in the textbox. or Select a server from the Favorites dropdown. This dropdown will contain the list of web servers available in the Favorite Web Servers list. or 155
161 CHPATER 9 Insight Reports Click button to browse for computers running IIS. This operation may take some time depending on the size of the domain. Click The report window will be launched after the server validation. 156
162 CHPATER 9 Insight Reports 10.3 Export Reports 157
163

164 CHPATER 9 Insight Reports Step 1: Select any one of the comparison options. Click Next to proceed. Step 2: This step shows the options to connect to a0 baseline server OR import a previously exported server database. 159
165 CHPATER 9 Insight Reports Select any one of the options. Click Next to proceed. Step 3: This step shows the list of web sites or virtual directories (based on the option 160
166 CHPATER 9 Insight Reports
167 CHPATER 9 Insight Reports 162

168 CHPATER 9 Insight Reports Click Finish to generate the report. During the report generation, the data collection status dialog will be displayed as shown below. After successful completion of this process, the report window will be displayed as shown below. 163
169 CHPATER 9 Insight Reports 11.3 Export Reports The Export feature helps the user to export the data displayed in reports generated by ARKIIS to HTML/CSV/MDB formats. Exporting supports HTML, Comma Separated Values 164

170 CHPATER 9 Insight Reports Select the path and format (HTML/MDB/CSV) to which you want your data be exported. And click OK. NOTE: The report file will be generated as <given To path>\<dd_mm_yy_hh_ss>\<currently selected IIS path>_<currently viewing category>_<site index of the current FTP site>.<given As format> In the case of MDB (Access database) the file will be generated in Access 2000 format and will have a table with the same name as the currently viewing category Log Analysis Reports About Log Analysis Reports The Log Analysis tool in ARKIIS reports detailed usage analysis information based on IIS logs. The tool provides meaningful statistics on certain important fields in IIS logs. The Log Analysis tool reports on the following IIS logs: Web Sites FTP Sites 11.5 How to get Log Analysis Reports on Web Sites? Click on button Or Select Log Analysis Reports from the Report menu. The Connect to IIS Server dialog box will appear. 165
171 CHPATER 9 Insight Reports Enter a server name in the textbox. Or Select a server from the Favorites dropdown. This dropdown will contain the list of web servers available in the Favorite Web Servers list. Or Click button to browse for computers running IIS. This operation may take some time depending on the size of the domain. Click The report window will be launched after the server validation. Select and expand the Web Sites in the left pane of the newly launched report window, and then click on child node. The following Select Dates dialog box will appear on the screen. It is used to select the 'Start date' and 'End date' to parse the logfiles. 166
172 CHPATER 9 Insight Reports If you want to change the date you can do it manually by selecting the drop down combo box. You can also do it by clicking following window. which will show you the Select the log files from which you want to be processed. Click. The Start date and End date will be assigned based on the selected log file dates. After completing the above steps, click data. on the Select Dates dialog to collect The report would be displayed as shown below: 167


173 CHPATER 9 Insight Reports Raw Data: It is an actual content that is stored in IIS log file. If you want to view the raw data of the currently selected items, click. The raw data would be displayed as shown below: Tab details: Click to view details about total number of hits across all web Sites. This report displays the following information: {Web site name, Identifier, No of Hits}. Click to view details about log file information based on Hits by month. This report displays the following information: {Web site name, Months, URL, No of Hits}. 168
174 CHPATER 9 Insight Reports Click to view details about log file information based on Hits by Hour. This report displays the following information: {Web site name, Hours, URL, No of Hits}. Click to view details about log file information based on Hits by day of week. This report displays the following information: {Web site name, Day Of Week, URL, No of Hits}. Click to view details about log file information based on Hits by status. This report displays the following information: {Web site name, Status, URL, Status Code, No of Hits} How to get Log Analysis Reports on FTP Sites? Click on menu. button, Or Select Log Analysis Reports, from the Report The Connect to IIS Server dialog box will appear. Enter a server name in the textbox. Or 169
175 CHPATER 9 Insight Reports Select a server from the Favorites dropdown. This dropdown will contain the list of web servers available in the Favorite Web Servers list. Or Click button to browse for computers running IIS. This operation may take some time depending on the size of the domain. Click The report window will be launched after the server validation. Select and expand the FTP Sites in the left pane of the newly launched report window, and then click on child node. The following Select Dates dialog box will appear on the screen. It is used to select the 'Start date' and 'End date' to parse the logfiles. If you want to change the date you can do it manually by selecting the drop down combo box. You can also do it by clicking following window., which will show you the 170

176 CHPATER 9 Insight Reports Select the log files from which you want to process. Click. The Start date and End date will be assigned based on the selected log file dates. After completing the above steps, click data. on the Select Dates dialog to collect The report would be displayed as shown below: 171


177 CHPATER 9 Insight Reports Raw Data: It is an actual content that is stored in IIS log file. If you want to view the raw data of the currently selected items, click. The raw data would be displayed as shown below: Tab details: 172
178 CHPATER 9 Insight Reports Click to view details about total number of hits across all web Sites. This report displays the following information: {FTP site name, Identifier, No of Hits}. Click to view details about log file information based on Hits by month. This report displays the following information: {FTP site name, Months, URL, No of Hits}. Click to view details about log file information based on Hits by Hour. This report displays the following information: {FTP site name, Hours, URL, No of Hits}. Click to view details about log file information based on Hits by day of week. This report displays the following information: {FTP site name, Day Of Week, URL, No of Hits}. Click to view details about log file information based on Hits by status. This report displays the following information: {FTP site name, Status, URL, Status Code, No of Hits} Filter Data Filters are used in server level to view data selectively. It allows you to input conditions for displaying the data. Filters are maintained for each server separately until they are explicitly cleared. Click toolbar in report window Or Select Filter... from Tools menu. Or Right click anywhere on the report s data available in the right pane, and select Filter from the popup menu. The Filter dialog window will be displayed. 173
 Choose a field name, an operator and a possible value from the respective dropdown options. 3) Click 4) The Add to Filter will change to AND to Filter. The OR to Filter button will be enabled.")
179 CHPATER 9 Insight Reports To set a filter condition, follow these steps. 1) Click (Clear All) button and clear the filter. 2) Choose a field name, an operator and a possible value from the respective dropdown options. 3) Click 4) The Add to Filter will change to AND to Filter. The OR to Filter button will be enabled. The selected condition will be set as a filter and displayed (as shown below). 5) Click OK to apply the filter. NOTE: 174
180 CHPATER 9 Insight Reports Use the, and to build enhanced filter condition as shown below: (Field A = Value 1 AND Field B = Value 2) OR (Field C = Value 3 AND Field D = Value 4) Use Use to remove the parenthesis button, to delete a selected condition. The status bar s FILTERED indicator is used to indicate whether the current data is filtered or not. For a filtered view, the status bar will appear as 11.8 Customize View The customize feature helps the user to customize the list of fields that are displayed in the current view. Click toolbar in report window Or Select Custom View... from Tools menu. The Custom View window, with the site properties will be displayed. 175

181 CHPATER 9 Insight Reports Select all the properties that you want to view for the given FTP path and current category, and Click The status bar s CUSTOMIZED indicator is used to indicate whether the current view is customized or not. For a customized view, the status bar will appear as 11.9 Export Reports The Export feature helps the user to export the data displayed in reports generated by ARKIIS to HTML/CSV/MDB formats. Exporting supports HTML, Comma Separated Values and Microsoft Access MDB file formats for generating reports. Using the Export feature an user can export the report that is currently viewed. Click toolbar in report window Or Select Export... from Tools menu. 176
User Manual. Admin Report Kit for IIS 7 (ARKIIS)
") User Manual Admin Report Kit for IIS 7 (ARKIIS) Table of Contents 1 Admin Report Kit for IIS 7... 1 1.1 About ARKIIS... 1 1.2 Who can Use ARKIIS?... 1 1.3 System requirements... 2 1.4 Technical Support...
User Manual Admin Report Kit for IIS 7 (ARKIIS) Table of Contents 1 Admin Report Kit for IIS 7... 1 1.1 About ARKIIS... 1 1.2 Who can Use ARKIIS?... 1 1.3 System requirements... 2 1.4 Technical Support...
User Manual. ARK for SharePoint-2007
 User Manual ARK for SharePoint-2007 Table of Contents 1 About ARKSP (Admin Report Kit for SharePoint) 1 1.1 About ARKSP 1 1.2 Who can use ARKSP? 1 1.3 System Requirements 2 1.4 How to activate the software?
User Manual. Admin Report Kit for Windows Enterprise (ARKWE) v.7.4
 v.7.4") User Manual Admin Report Kit for Windows Enterprise (ARKWE) v.7.4 Table of Contents 1 About Admin Report Kit for Windows Enterprise (ARKWE)... 1 1.1 System requirements... 2 1.2 Who can use ARKWE?... 2
User Manual Admin Report Kit for Windows Enterprise (ARKWE) v.7.4 Table of Contents 1 About Admin Report Kit for Windows Enterprise (ARKWE)... 1 1.1 System requirements... 2 1.2 Who can use ARKWE?... 2
Vyapin Virtualization Management Suite
 Vyapin Virtualization Management Suite Last Updated: June 2016 Copyright 2016 Vyapin Software Systems Private Limited. All rights reserved. This document is being furnished by Vyapin Software Systems Private
External Data Connector for SharePoint
 External Data Connector for SharePoint Last Updated: August 2014 Copyright 2014 Vyapin Software Systems Private Limited. All rights reserved. This document is being furnished by Vyapin Software Systems
External Data Connector for SharePoint
 External Data Connector for SharePoint Last Updated: July 2017 Copyright 2014-2017 Vyapin Software Systems Private Limited. All rights reserved. This document is being furnished by Vyapin Software Systems
User Manual. Admin Report Kit for Exchange Server
 User Manual Admin Report Kit for Exchange Server Table of Contents 1 About ARKES-Admin Report Kit for Exchange Server 1 1.1 System requirements 2 1.2 How to activate the software? 3 1.3 ARKES Reports Primer
User Manual. DocKIT for SharePoint
 User Manual DocKIT for SharePoint-2003 ------------------------------------------------------------------ Table of Contents 1 DocKIT Introduction 1 1.1 About DocKIT 1 1.2 DocKIT Primer 2 1.3 Who can Use
User Manual. Active Directory Change Tracker
 User Manual Active Directory Change Tracker Last Updated: March 2018 Copyright 2018 Vyapin Software Systems Private Ltd. All rights reserved. This document is being furnished by Vyapin Software Systems
Crystal Enterprise. Overview. Contents. Web Server Overview - Internet Information System (IIS)
") Overview Contents This document provides an overview to web server technology particularly Microsoft s Internet Information Server (IIS) and its relationship with. Although this article has been written
Overview Contents This document provides an overview to web server technology particularly Microsoft s Internet Information Server (IIS) and its relationship with. Although this article has been written
KYOCERA Net Admin User Guide
 KYOCERA Net Admin User Guide Legal Notes Unauthorized reproduction of all or part of this guide is prohibited. The information in this guide is subject to change without notice. We cannot be held liable
User Manual. SharePoint Farm Reporter
 User Manual SharePoint Farm Reporter Last Updated: July 2012 Copyright 2012 Vyapin Software Systems Private Ltd. All rights reserved. This document is being furnished by Vyapin Software Systems Private
Business Insights Dashboard
 Business Insights Dashboard Sage 500 ERP 2000-2013 Sage Software, Inc. All rights reserved. Sage, the Sage logos, and the Sage product and service names mentioned herein are registered trademarks or trademarks
User Manual. XPlica for SharePoint 2010
 User Manual XPlica for SharePoint 2010 Last Updated: December 2012 Copyright 2012 Vyapin Software Systems Private Ltd. All rights reserved. This document is being furnished by Vyapin Software Systems Private
User Manual. Dockit Archiver
 User Manual Dockit Archiver Last Updated: March 2018 Copyright 2018 Vyapin Software Systems Private Ltd. All rights reserved. This document is being furnished by Vyapin Software Systems Private Ltd for
User Manual. SPListX for SharePoint
 User Manual SPListX for SharePoint Last Updated: February 2013 Copyright 2008-2013 Vyapin Software Systems Private Ltd. All rights reserved. This document is being furnished by Vyapin Software Systems
AVALANCHE SE QUICK START
 AVALANCHE SE QUICK START Avalanche SE is a client management system designed to easily manage software and configuration updates to mobile devices. This document provides a brief overview of the core tasks
Web Applications Installation. version
 version 2017.1 Disclaimer This document is for informational purposes only and is subject to change without notice. This document and its contents, including the viewpoints, dates and functional content
Vyapin Office 365 Management Suite
 Vyapin Office 365 Management Suite Last Updated: December 2015 Copyright 2015 Vyapin Software Systems Private Limited. All rights reserved. This document is being furnished by Vyapin Software Systems Private
Developer Marketing: Build a Web Server Using Microsoft IIS 4.0 CBT Skill Builder Courseware
 Software Announcement April 10, 2001 Developer Marketing: Build a Web Server Using Microsoft IIS 4.0 CBT Skill Builder Courseware Overview Build your skills for Microsoft Certified Systems Engineer (MCSE)
Version Installation Guide. 1 Bocada Installation Guide
 Version 19.4 Installation Guide 1 Bocada Installation Guide Copyright 2019 Bocada LLC. All Rights Reserved. Bocada and BackupReport are registered trademarks of Bocada LLC. Vision, Prism, vpconnect, and
XLmanage Version 2.4. Installation Guide. ClearCube Technology, Inc.
 XLmanage Version 2.4 Installation Guide ClearCube Technology, Inc. www.clearcube.com Copyright and Trademark Notices Copyright 2009 ClearCube Technology, Inc. All Rights Reserved. Information in this document
EMCO Ping Monitor Enterprise 6. Copyright EMCO. All rights reserved.
 Copyright 2001-2017 EMCO. All rights reserved. Company web site: emcosoftware.com Support e-mail: support@emcosoftware.com Table of Contents Chapter... 1: Introduction 4 Chapter... 2: Getting Started 6
Getting Started with CMS
 CHAPTER 3 This chapter contains these sections that describe the Cluster Management Suite (CMS) on the Catalyst 3750 switch: Understanding CMS section on page 3-1 Configuring CMS section on page 3-8 Displaying
Interface Reference. McAfee Application Control Windows Interface Reference Guide. Add Installer page. (McAfee epolicy Orchestrator)
") McAfee Application Control 8.1.0 - Windows Interface Reference Guide (McAfee epolicy Orchestrator) Interface Reference Add Installer page Add an existing installer to the McAfee epo repository. Table 1
McAfee Application Control 8.1.0 - Windows Interface Reference Guide (McAfee epolicy Orchestrator) Interface Reference Add Installer page Add an existing installer to the McAfee epo repository. Table 1
Smart-X Software Solutions SecReport Enterprise User Guide
 Smart-X Software Solutions SecReport Enterprise User Guide Table of Contents: WELCOME 4 FEATURES AND CAPABILITIES 5 CONTENTS AND REQUIREMENTS 7 CONTENTS 7 REQUIREMENTS 8 LICENSING AND INSTALLATION 10 EVALUATION
Ekran System v.5.2 Deployment Guide
 Ekran System v.5.2 Deployment Guide Table of Contents About... 6 System Requirements... 7 Program Structure... 9 Deployment Process... 10 Server and Database... 11 About... 11 Database Types Comparison...
Upgrading from Call Center Reporting to
 Upgrading from Call Center Reporting to Reporting for Call Center Upgrade Document Reporting for Call Center Release 2.2.1xx Document Number: 200-0400-110 Document Status: Standard Document Version: 3.02
E-FORM RS USER ADMINISTRATION
 E-FORM RS USER ADMINISTRATION INSTALLING E-FORM RS When you purchase e-form RS, you will receive an e-mail message with your account number and password. As the system administrator, you should be the
BIG-IP Access Policy Manager : Portal Access. Version 12.1
 BIG-IP Access Policy Manager : Portal Access Version 12.1 Table of Contents Table of Contents Overview of Portal Access...7 Overview: What is portal access?...7 About portal access configuration elements...7
KnowledgeSync V6.0 Implementation Guide
 KnowledgeSync V6.0 Implementation Guide Pre-Installllatiion Confiiguratiion Welcome to KnowledgeSync! Welcome KnowledgeSync Active Alerts, the industry s leading Business Activity Monitoring (BAM) technology.
Interface Reference topics
 McAfee Content Security Reporter 2.6.x Interface Reference Guide Interface Reference topics Edit Permission Set page (Permission Sets page) Specify Content Security Reporter permissions and grant user
Installing Intellicus DotNet Client on Windows. Version: 16.0
 Installing Intellicus DotNet Client on Windows Version: 16.0 Copyright 2015 Intellicus Technologies This document and its content is copyrighted material of Intellicus Technologies. The content may not
Web Applications Installation. version 12.17
 version 12.17 Disclaimer This document is for informational purposes only and is subject to change without notice. This document and its contents, including the viewpoints, dates and functional content
User Manual. ARK for Exchange Server (ARKES)
") User Manual ARK for Exchange Server (ARKES) Last Updated: May 2018 Copyright 2018 Vyapin Software Systems Private Ltd. All rights reserved. This document is being furnished by Vyapin Software Systems Private
User Manual ARK for Exchange Server (ARKES) Last Updated: May 2018 Copyright 2018 Vyapin Software Systems Private Ltd. All rights reserved. This document is being furnished by Vyapin Software Systems Private
Table of Contents Chapter 1: Migrating NIMS to OMS... 3 Index... 17
 Migrating from NIMS to OMS 17.3.2.0 User Guide 7 Dec 2017 Table of Contents Chapter 1: Migrating NIMS to OMS... 3 Before migrating to OMS... 3 Purpose of this migration guide...3 Name changes from NIMS
Kaspersky Administration Kit 8.0 REFERENCE GUIDE
 Kaspersky Administration Kit 8.0 REFERENCE GUIDE P R O G R A M V E R S I O N : 8. 0 C R I T I C A L F I X 1 Dear User! Thank you for choosing our product. We hope that this documentation will help you
Instructions for Configuring Your Browser Settings and Online Security FAQ s
 Instructions for Configuring Your Browser Settings and Online Security FAQ s General Settings The following browser settings and plug-ins are required to properly access Digital Insight s webbased solutions.
Microsoft IIS version 6 Integration
 Microsoft IIS version 6 Integration Contents 1 Overview 2 Prerequisites 3 PINsafe Configuration 4 Configuring the IIS Server 4.1 Install the PINsafeIISFilter.exe 4.2 Configure the ISAPI filter 4.3 Create
PrinterOn Print Delivery Station
 PrinterOn Print Delivery Station Installation and Administration Guide Version 4.0.2 Contents Chapter 1: Introduction... 5 About the Print Delivery Station software... 5 PDS instances... 5 Print Delivery
AT&T Core Mobility Integrated Dispatch Console User Guide. Installation Guide. AT&T Integrated Dispatch Console 3.0
 Installation Guide AT&T Integrated Dispatch Console 3.0 October 2016 Table of Content 1. Introduction... 3 1.1. Purpose and Scope... 3 1.2. Terms and Definitions... 3 1.3. About this Manual... 5 1.4. What
Reporting Guide V7.0. iprism Web Security
 V7.0 iprism Web Security 800-782-3762 www.edgewave.com 2001 2012 EdgeWave. All rights reserved. The EdgeWave logo, iprism and iguard are trademarks of EdgeWave Inc. All other trademarks and registered
InSync Service User Guide
 InSync Service User Guide Matrix Logic Corporation 1 Published by Matrix Logic Corporation Copyright 2011 by Matrix Logic Corporation All rights reserved. No part of the content of this manual may be reproduced
Following are the system requirements for running e-form RS:
 When you purchase e-form RS, you will receive an e-mail message with your account number and password. As the system administrator, you should be the first person to sign on so you can set up accounts,
User Manual. Dockit Migrator for SharePoint
 User Manual Dockit Migrator for SharePoint Last Updated: November 2017 Copyright 2002-2017 Vyapin Software Systems Private Ltd. All rights reserved. This document is being furnished by Vyapin Software
Quest Collaboration Services 3.6. Installation Guide
 Quest Collaboration Services 3.6 Installation Guide 2010 Quest Software, Inc. ALL RIGHTS RESERVED. This guide contains proprietary information protected by copyright. The software described in this guide
Prophet 21 Middleware Installation Guide. version 12.16
 version 12.16 Disclaimer This document is for informational purposes only and is subject to change without notice. This document and its contents, including the viewpoints, dates and functional content
Metastorm BPM Release 7.6
 Metastorm BPM Release 7.6 Administration Guide May 2008 Metastorm Inc. email: inquiries@metastorm.com http://www.metastorm.com Metastorm BPM Release 7.6 Copyrights and Trademarks 1996-2008 Metastorm Inc.
KASPERSKY LAB. Kaspersky Administration Kit version 6.0. Administrator s manual
 KASPERSKY LAB Kaspersky Administration Kit version 6.0 Administrator s manual KASPERSKY ADMINISTRATION KIT VERSION 6.0 Administrator s manual Kaspersky Lab Visit our website: http://www.kaspersky.com/
KASPERSKY LAB. Kaspersky Administration Kit version 6.0. Reference Book
 KASPERSKY LAB Kaspersky Administration Kit version 6.0 Reference Book KASPERSKY ADMINISTRATION KIT VERSION 6.0 Reference Book Kaspersky Lab Ltd. Visit our website: http://www.kaspersky.com/ Revision date:
KG-TOWER Software Download and Installation Instructions
 KG-TOWER Software Download and Installation Instructions Procedures are provided for three options to download and install KG-TOWER software version 5.1. Download to a temporary folder and install immediately.
PageScope Enterprise Suite Ver. 3.1 Installation Guide
 PageScope Enterprise Suite Ver. 3.1 Installation Guide Enterprise Suite Contents 1 Summary 1.1 Introduction...1-1 1.1.1 About Device Manager...1-1 Basic functions... 1-1 1.1. Add-on (extension) applications...1-1.1.3
WebsitePanel User Guide
 WebsitePanel User Guide User role in WebsitePanel is the last security level in roles hierarchy. Users are created by reseller and they are consumers of hosting services. Users are able to create and manage
Installation on Windows Server 2008
 USER GUIDE MADCAP PULSE 4 Installation on Windows Server 2008 Copyright 2018 MadCap Software. All rights reserved. Information in this document is subject to change without notice. The software described
Load testing with WAPT: Quick Start Guide
 Load testing with WAPT: Quick Start Guide This document describes step by step how to create a simple typical test for a web application, execute it and interpret the results. A brief insight is provided
VMware Notification Service v2.0 Installation and Configuration Guide Configure ENSv2 for cloud and on-premises deployments
 VMware Email Notification Service v2.0 Installation and Configuration Guide Configure ENSv2 for cloud and on-premises deployments Workspace ONE UEM v9.4 Have documentation feedback? Submit a Documentation
BIG-IP Analytics: Implementations. Version 13.1
 BIG-IP Analytics: Implementations Version 13.1 Table of Contents Table of Contents Setting Up Application Statistics Collection...5 What is Analytics?...5 About HTTP Analytics profiles... 5 Overview:
Inmagic Content Server Enterprise Inmagic Content Server Standard Version 1.3 Installation Notes
 Inmagic Content Server Enterprise Inmagic Content Server Standard Version 1.3 Installation Notes Thank you for purchasing Inmagic Content Server. Content Server is an enterprise-wide scalable content management
KYOCERA Net Admin Installation Guide
 KYOCERA Net Admin Guide Legal Notes Unauthorized reproduction of all or part of this guide is prohibited. The information in this guide is subject to change without notice. We cannot be held liable for
Business Insight Authoring
 Business Insight Authoring Getting Started Guide ImageNow Version: 6.7.x Written by: Product Documentation, R&D Date: August 2016 2014 Perceptive Software. All rights reserved CaptureNow, ImageNow, Interact,
BIG-IP Analytics: Implementations. Version 12.1
 BIG-IP Analytics: Implementations Version 12.1 Table of Contents Table of Contents Setting Up Application Statistics Collection...5 What is Analytics?...5 About HTTP Analytics profiles...5 Overview: Collecting
Managing GSS Devices from the GUI
 CHAPTER 1 This chapter describes how to configure and manage your Global Site Selector Manager (GSSM) and Global Site Selector (GSS) devices from the primary GSSM graphical user interface. It includes
Instructions For Configuring Your Browser Settings and Online Banking FAQ's
 Instructions For Configuring Your Browser Settings and Online Banking FAQ's Instructions By Browser Type Google Chrome Firefox Internet Explorer 8 Internet Explorer 9 Safari Online Banking FAQ's Google
Deltek Touch Expense for Ajera. Touch 1.0 Technical Installation Guide
 Deltek Touch Expense for Ajera Touch 1.0 Technical Installation Guide June 01, 2018 While Deltek has attempted to verify that the information in this document is accurate and complete, some typographical
Sage 500 ERP 2016 Business Insights Dashboard Guide
 Sage 500 ERP 2016 Business Insights Dashboard Guide This is a publication of Sage Software, Inc. Copyright 2015 Sage Software, Inc. All rights reserved. Sage, the Sage logos, and the Sage product and service
Installation Guide. EventTracker Enterprise. Install Guide Centre Park Drive Publication Date: Aug 03, U.S. Toll Free:
 EventTracker Enterprise Install Guide 8815 Centre Park Drive Publication Date: Aug 03, 2010 Columbia MD 21045 U.S. Toll Free: 877.333.1433 Abstract The purpose of this document is to help users install
PageScope. Job Spooler Ver User s Guide. Job Spooler
 PageScope Job Spooler Ver. 1.6 User s Guide Job Spooler Contents Contents 1 Introduction 1.1 Welcome... 1-1 Trademark Acknowledgements... 1-1 1.2 Overview... 1-2 1.3 System Requirements... 1-3 Server computer...
Web Applications Installation. version
 version 2017.1 Disclaimer This document is for informational purposes only and is subject to change without notice. This document and its contents, including the viewpoints, dates and functional content
E-FORM RS USER ADMINISTRATION
 E-FORM RS USER ADMINISTRATION INSTALLING E-FORM RS When you purchase e-form RS, you will receive an e-mail message with your account number and password. As the system administrator, you should be the
Microsoft Windows Servers 2012 & 2016 Families
 Version 8 Installation Guide Microsoft Windows Servers 2012 & 2016 Families 2301 Armstrong St, Suite 2111, Livermore CA, 94551 Tel: 925.371.3000 Fax: 925.371.3001 http://www.imanami.com Installation Guide
How to Configure Authentication and Access Control (AAA)
") How to Configure Authentication and Access Control (AAA) Overview The Barracuda Web Application Firewall provides features to implement user authentication and access control. You can create a virtual
How to Configure Authentication and Access Control (AAA) Overview The Barracuda Web Application Firewall provides features to implement user authentication and access control. You can create a virtual
Bomgar Vault Server Installation Guide
 Bomgar Vault 17.2.1 Server Installation Guide 2017 Bomgar Corporation. All rights reserved worldwide. BOMGAR and the BOMGAR logo are trademarks of Bomgar Corporation; other trademarks shown are the property
Workstation Configuration Guide
 Workstation Configuration Guide August 13, 2018 Version 9.6.134.78 For the most recent version of this document, visit our documentation website. Table of Contents 1 Workstation configuration 4 1.1 Considerations
PMS 138 C Moto Black spine width spine width 100% 100%
 Series MOTOROLA and the Stylized M Logo are registered in the US Patent & Trademark Office. All other product or service names are the property of their respective owners. 2009 Motorola, Inc. Table of
Integrate Microsoft IIS
 Integrate Microsoft IIS EventTracker Enterprise Publication Date: Jan. 5, 2017 EventTracker 8815 Centre Park Drive Columbia MD 21045 www.eventtracker.com Abstract IIS (Internet Information Services) is
Skills Management Automated Install and Upgrade Guide
 Skills Management 8.5.648 Automated Install and Upgrade Guide Information contained herein is proprietary and confidential and cannot be disclosed or duplicated without the prior written consent of Genesys
Installation Guide. Cimatron Site Manager 2.0 Release Note
 Installation Guide Cimatron Site Manager 2.0 Release Note Installation Guide i Table of Contents Introduction... 1 Cimatron Site Manager Components... 2 Installation... 3 Hardware Requirements... 3 Software
Installation Guide for Pulse on Windows Server 2012
 USER GUIDE MADCAP PULSE 4 Installation Guide for Pulse on Windows Server 2012 Copyright 2018 MadCap Software. All rights reserved. Information in this document is subject to change without notice. The
NTP Software File Auditor for Windows Edition
 NTP Software File Auditor for Windows Edition An NTP Software Installation Guide Abstract This guide provides a short introduction to installation and initial configuration of NTP Software File Auditor
Reporting for Contact Center Setup and Operations Guide. BCM Contact Center
 Reporting for Contact Center Setup and Operations Guide BCM Contact Center Document Number: Document Status: Standard Document Version: 05.01 Date: September 2006 Copyright 2005 2006 Nortel Networks, All
ecopy PaperWorks Connector for Microsoft SharePoint Administrator s Guide
 ecopy PaperWorks Connector for Microsoft SharePoint Administrator s Guide Part Number: 73-00419 (05/2009) Licensing, Copyright, and Trademark Information The information in this document is subject to
LabTech Ignite Installation
 LabTech LabTech Ignite Installation LABTECH IGNITE INSTALLATION... 1 Overview... 1 Readiness Checklist... 1 Server Installation... 2 Creating a Client Import File... 17 Using SSL Connections... 18 SSL
SPList Export for SharePoint 2007 User Manual
 SPList Export for SharePoint 2007 User Manual Last Updated: January 2009 Copyright 2008-2009 Vyapin Software Systems Private Ltd. All rights reserved. This document is being furnished by Vyapin Software
IBM NetBAY Virtual Console Software. Installer and User Guide
 IBM NetBAY Virtual Console Software Installer and User Guide INSTRUCTIONS This symbol is intended to alert the user to the presence of important operating and maintenance (servicing) instructions in the
Print Audit 6. Print Audit 6 Documentation Apr :07. Version: Date:
 Print Audit 6 Version: Date: 37 21-Apr-2015 23:07 Table of Contents Browse Documents:..................................................... 3 Database Documentation.................................................
INSTALLATION AND USER GUIDE
 INSTALLATION AND USER GUIDE Introduction 1 Introduction About 6140 Agent Portal Mitel Networks 6140 Agent Portal allows an agent to receive call information via a number of different applications that
Monitor Application for Panasonic TDA
 Monitor Application for Panasonic TDA MAP Demo Getting Started Version 1.0 G3 NOVA Communications SRL 28 Iacob Felix, Sector 1, Bucharest, ROMANIA Phone: +1 877 777 8753 www.g3novacommunications.com 2005
The SSL device also supports the 64-bit Internet Explorer with new ActiveX loaders for Assessment, Abolishment, and the Access Client.
 WatchGuard SSL v3.2 Update 2 Release Notes Supported Devices SSL 100 and 560 WatchGuard SSL OS Build 452330 Revision Date 11 November 2014 Introduction WatchGuard is pleased to announce the release of
Avalanche Remote Control User Guide. Version 4.1
 Avalanche Remote Control User Guide Version 4.1 ii Copyright 2012 by Wavelink Corporation. All rights reserved. Wavelink Corporation 10808 South River Front Parkway, Suite 200 South Jordan, Utah 84095
NeuralStar Installation Guide
 NeuralStar Installation Guide Version 9.8 Release 3 May 2012 1st Edition Preface Software License Agreement Software is defined as the Kratos Technology & Training Solutions, Inc. computer programs with
Remote Support 19.1 Web Rep Console
 Remote Support 19.1 Web Rep Console 2003-2019 BeyondTrust Corporation. All Rights Reserved. BEYONDTRUST, its logo, and JUMP are trademarks of BeyondTrust Corporation. Other trademarks are the property
In this tutorial we will discuss different options available in the Options tab in EMCO Network Inventory 4.x.
 In this tutorial we will discuss different options available in the Options tab in EMCO Network Inventory 4.x. Include Options Tab Basic Info: This option enables you to configure EMCO Network Inventory
Workstation Configuration
 Workstation Configuration September 22, 2015 - Version 9 & 9.1 - - - - - - - - - - - - - - - - - - - - - - - - - - - - - - - - - - - - - - - - - - - - - - - - - - - - - - - - - - - - - - - - - - - - -
December P Xerox FreeFlow Core Installation Guide
 5.1.0.0 December 2017 702P06246 2017 Xerox Corporation. All rights reserved. Xerox, Xerox and Design, and FreeFlow are trademarks of Xerox Corporation in the United States and/or other countries. This
ForeScout Extended Module for Tenable Vulnerability Management
 ForeScout Extended Module for Tenable Vulnerability Management Version 2.7.1 Table of Contents About Tenable Vulnerability Management Module... 4 Compatible Tenable Vulnerability Products... 4 About Support
Ekran System v.5.5 Deployment Guide
 Ekran System v.5.5 Deployment Guide Table of Contents About... 6 System Requirements... 7 Program Structure... 10 Deployment Process... 12 Server and Database... 13 About... 13 Database Types Comparison...
Republicbank.com Supported Browsers and Settings (Updated 03/12/13)
") Republicbank.com Supported Browsers and Settings (Updated 03/12/13) We support the Internet Explorer 8.0 & 9.0. If you are using Internet Explorer 7.0 or earlier you will need to update your browser. Click
Republicbank.com Supported Browsers and Settings (Updated 03/12/13) We support the Internet Explorer 8.0 & 9.0. If you are using Internet Explorer 7.0 or earlier you will need to update your browser. Click
VMware Notification Service v2.0 Installation and Configuration Guide Configure ENS2 for cloud and on-premises deployments
 VMware Email Notification Service v2.0 Installation and Configuration Guide Configure ENS2 for cloud and on-premises deployments Workspace ONE UEM v9.5 Have documentation feedback? Submit a Documentation
User Manual. DocKIT for SharePoint 2010
 User Manual DocKIT for SharePoint 2010 Last Updated: November 2012 Copyright 2002-2012 Vyapin Software Systems Private Ltd. All rights reserved. This document is being furnished by Vyapin Software Systems
WhatsUp Gold 2016 Installation and Configuration Guide
 WhatsUp Gold 2016 Installation and Configuration Guide Contents Installing and Configuring WhatsUp Gold using WhatsUp Setup 1 Installation Overview 1 Overview 1 Security considerations 2 Standard WhatsUp