User Manual. Contents 1 WELCOME Features Installation Requirements Software Installation Software Operation...
|
|
|
- Brook Booth
- 5 years ago
- Views:
Transcription


1 CMS User Manual
2 Contents 1 WELCOME Features Installation Requirements Software Installation Software Operation Menu bar Camera list tree Camera Control Panel (PTZ) Preset Image settings Live view window Device information Settings Add cameras to the client Alter the name of existent area/ delete one existent area Add cameras to the client Alter information of the added cameras Delete one added cameras Set Groups Add groups Add cameras to one group Delete one group Operate Groups System Alter the login username and pwd of one added camera Alter the network IP/HTTP Port of the added camera Wireless LAN Settings Options LOG Backup System Miscellaneous Record and Alarm Management How to configure alarm? How to configure plan record? Others Alter the login username and password of the client Play back record files Search/play my record files The Play back UI Map
3 6 How to use the Log Log out the current user Obtaining technical support WELCOME FOSCAM offers the most comprehensive central management software FOSCAM IP Camera Client, designed for managing all FOSCAM MJPEG IP Camera with numerous features. It supports management or monitoring of hundreds of cameras for monitoring, recording, playback, and alarm management with efficient control. 1.1Features Powerful function for hundreds of live views Convenient remote access via client Real-time 64 channel live viewing and simultaneous 4 channel playback Supports Preset, you can set 16 presets for one camera Efficient data backup, search, and export Intelligent CAMERA CONTROL PANEL(PTZ) remote camera control Supports two-way audio Supports Group Switch Supports Logs Management Motion detection activates alarm Multi-level users management with password protection Supports Map alarm Supports three record methods: alarm record, plan record, manual record 1.2Installation Requirements PC: Pentium IV or above CPU: 2.0G or above Memory size: 2.0G or above Hard disk: 120G or above Suggested display screen: 1280 x 768 Suggested OS: Windows XP/ Windows 7 3

, if your PC s OS is Windows XP, pls install IPCamera Client Winxp(1.0.7). 2) Double click the software and install the program.")
4 1.3 Software Installation 1) Insert the CD in the CD drive of your computer. Open the CD; find the software per instructions; If your PC s OS is Windows7, please install this software: IPCamera Client Win7(1.0.7), if your PC s OS is Windows XP, pls install IPCamera Client Winxp(1.0.7). 2) Double click the software and install the program. Figure1.1 Click Next till you see the following screen: Figure1.2 4


5 Click Close and complete the software installation. An icon automatically after a successful installation. appears on the desktop Note: Sometimes the program will be treated as antivirus, so before installing, pls add the software as trusted program on your computer. 2 Software Operation Double click the icon and it will pop up the follow screen: Figure2.1 The default user and password are all admin, click Login and you will see the following UI: 5
 4 Preset 5 Image settings 6 Live view window 7 Status panel 2.1 Menu bar Figure2.")
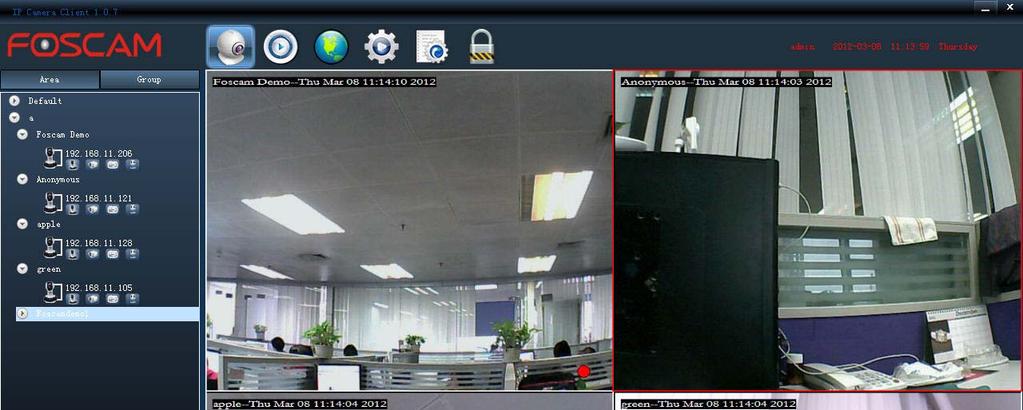
6 Figure2.2 First time you login the software, the whole video window is black, you need to add cameras to it (please read chapter 3 about how to add cameras). The UI can be divided into seven parts: 1 Menu bar 2 Camera list tree 3 Camera control panel (PTZ) 4 Preset 5 Image settings 6 Live view window 7 Status panel 2.1 Menu bar Figure2.3 Click it and back to the live view screen Click it and back to the Playback UI Click it and back to Setting UI Click it and back to the LOGS UI Log off and switch users 6

7 2.2 Camera list tree After adding device to the client, you can see the camera in the Camera list tree (pls read chapter3.1 about how to add cameras). There are two modes: Area and Group. Area: You can see all added cameras and which area they belong to. Such as the picture below, belongs to test area. There are five icons below one camera name, such as the following picture. apple is the added camera s name, you can change another name in the client(pls read chapter about how to change the camera name). Figure2.4 : Click the icon and the camera will be connected automatically. If connect successfully, the icon will be changed to. Click it again and disconnect the camera. : Click it and you can see the live view in the client. Click it again and stop playing. Note: If you want to see one camera s live view, first click the icon to connect the camera, then click view icon. : Record. Click it and do manual record. You can see a blue record icon in the video. Click it again and stop recording. The default storage path is the first disk on your computer. You can change another path, pls read chapter
, people will hear your talking around the camera.")
 Select one connected device, operate Camera Control Panel (PTZ) and the camera will rotate at eight directions.")
8 Figure2.5 : Snap. Snap the current video to a predetermined path. The default storage path is D disk (the path is different from the record file storage path). You can change another path, pls read chapter 3.5. :Talk. Click the icon and then talk to the camera (with the microphone plugged in your computer), people will hear your talking around the camera. The sound will come out from the built-in or outer speaker of the camera. Make sure the camera has built-in speaker or outer speaker. Group: Display the group information. Make sure you have configured the Group. 2.3 Camera Control Panel (PTZ) Select one connected device, operate Camera Control Panel (PTZ) and the camera will rotate at eight directions. Make sure the camera has connected with/built-in camera control panel. Figure2.6 : Click the icon and the camera will rotate top-left. :Click the icon and the camera will rotate up. : Click the icon and the camera will rotate bottom right. :Click the icon and the camera will rotate left. 8


9 : Click the icon and the camera will rotate right. : Click the icon and the camera will rotate bottom left : Click the icon and the camera will rotate down. : Click the icon and the camera will rotate bottom right. : Click here and the camera will horizontally &vertically rotate and then stop at the center. : Click the icon and the camera will horizontally rotate, click it again and stop rotating. : Click the icon and the camera will vertically rotate, click it again and stop rotating. If you click the horizon or vertical cruise button only once, the camera will patrol circles that you set before and then stop. You can set the patrol circles in the web UI or in the client. You can change the rotation speed in the web UI or in the client also. Figure2.7 Note: 1 Before operating PTZ, you need to click one camera s live video to choose the camera. Figure2.8 9

 in the client or in the web browser. Figure2.10 2.")
10 2 Make sure the camera has built-in or connected with PTZ. 2.4 Preset You can set 16 preset positions for one camera, but make sure the camera has built-in or connected with PTZ. Figure 2.9 Select one connected camera, once you have determined the viewing location, click the button Preset. This location can be retrieved by selecting the number assigned and clicking the Go button. NOTE:1 Make sure the camera has built-in or connected with Camera Control Panel(PTZ). 2 Before setting Preset positions, you need to select one connected camera s live video. 3 Make sure you have not disabled the camera s Camera Control Panel (PTZ) in the client or in the web browser. Figure Image settings Brightness, contrast, hue and saturation are used to adjust the quality of the video. Select one connected camera s live video then drag the slide bar to adjust the parameters. Resolution: The bigger the value is, the video will be clearer. Flip & Mirror : Show a reverse image.make sure your camera support this function, or else it has no effection after you select it. OSD: OSD is used to add timestamp on all videos. 10


11 Figure Live view window Figure2.12 There is a lab bar below the video window, look the above picture: Multi-device window: The client can monitor many cameras at one page, here you can choose the display num. The display num has much relation with PC. More num, higher requirement for PC. Click the icon, the client will be full-screen. Press ESC and exit the full-screen. : Select one camera, click the icon and you can hear the sound around cameras. Make sure you have opened the audio and the camera supports it. ( Open state Close state) Pre group. Click it and preview the videos of last group. 11

12 Next group. Click it and preview the videos of next group. NOTE: Make sure you must have set groups for the client and click start group switch button before clicking last/next page. one. Switch button. If you have set group, click this icon, you can see the page shown one by : The interval time between last page and next page. Choose switching time and click switch button, the pages will be showed automatically. Make sure you have configured the group. 2.7 Device information When you do some operation, here you can see the results. Such as the following picture: 3 Settings Figure2.13 Before using the software, you need to add devices to the client. Click the icon and back to Settings UI. 3.1 Add cameras to the client The default Camera list tree is null, you need to add Area first then add cameras to the area. Figure3.1 Click Add Area, you will see a dialog box. Enter the area name and click OK. 12

13 Figure Alter the name of existent area/ delete one existent area If you want to change another name for the existent area, click the area name and choose. Enter the new area name and click OK. Figure3.3 If you want to delete one existent area, click the area name and choose. Note: If you delete one area, all devices that you have added to the area will be deleted also Add cameras to the client The following steps are required before adding cameras to the client: 1) Install the IP Camera(s) which want to be monitored. 2) Login the IP Camera(s) by web browser and set the IP address, port, username & password and make sure the camera can be accessed by browsers 3) DDNS setting is a plus whenever you want to add the devices by WAN 4) Close the IP Camera Tool program, or else you can not search any camera in LAN. Add cameras in LAN : Click this icon, the software will search all device in LAN. 13


14 Figure3.4 Click the searched device, the device column turn to light blue. Figure3.5 Then click, it will pop-up a dialog box. Figure3.6 Fill in the device information. IP, User name, port and password must be the same as the camera accessed by web browsers. You cannot change Channel num, and all cameras of our company only support Channel 1. The Area cannot be null. By this way, you can add cameras in LAN one by one. Note: 1 One camera s Device name must be different from another. 2 The IP Camera Tool must be closed or else you cannot search all cameras in LAN. Add cameras in WAN Make sure the camera you want to add can be accessed by WAN IP or domain name in web browser. First click Search cameras button and then click Add camera. It will pop up the following screen. 14


15 Here IP address will be instead by a domain name or WAN IP. Figure3.7 If the camera has been added successfully, you will see it under the area. Figure3.8 Click the icon before the added camera name, you will see the IP or domain name. Figure Alter information of the added cameras :Click it and change some information about the added camera. Firstly you need select it s name not IP under the area it belongs to. Then click Edit Camera, it will pop up a dialog box. 15


16 Figure3.10 You can change the device name, port, user name and password. After you changed, make sure the camera can be accessed by web browser. If you have filled the wrong information and cannot see the view in the live view UI, you had better delete it from the area and re-add it again Delete one added cameras Select one camera s name not IP under the area it belongs to, and click the icon, you can delete it. 3.2 Set Groups You can pre-view the group page one by one if you set the Group correctly. Figure


17 3.2.1 Add groups : Click this icon and add group. Figure3.12 Fill in a group name and choose the Group num for one page. Click OK and save it. Figure Add cameras to one group Figure3.14 Add the camera channel to one group. 17


18 Remove one camera channel form one group Note: One camera can only be added one time Delete one group : Delete one existent group Operate Groups If you have configured well, back to the Live view UI(click the icon ) Group list. Figure3.15 Fill in a switching time, and click the Auto button, the group will be showed one by one. Figure3.16 Of course you can do manually by clicking the pre/next page button. Note:If you want to see the view, you need to connect the camera first and click the view button. 18


19 3.3 System Figure3.17 Here you can do basic settings for the added device Alter the login username and pwd of one added camera Click User and you can alter the login account, password and authority for the camera that added to the software. Double click the IP and click the account you want to change, entering new name, password and authority, then click Set and save it. Figure3.18 Figure3.19 Note: If you have changed the added camera s username and password which be used to add the camera, you need to re-add the camera again in the Cameras UI Alter the network IP/HTTP Port of the added camera Double click the IP that you want to change. If you choose Enable NET, the camera will obtain IP 19


20 from DHCP Server automatically. If you don t enable it, you can set it manually. Click set after finishing all settings. Figure3.20 Note: 1After altering the NET settings, you need to reboot the camera and reboot the client, or else the settings will not take effect. 2 After altering the NET settings, you should re-add the camera again in the Camera UI. 3 Make sure the camera can be login by the web browser again after altering the IP Wireless LAN Settings Double click the IP of the added camera and set wireless settings for one camera, Make sure the camera supports wireless mode. Figure3.21 Make sure that SSID, Encryption and the key or share key you filled in for the camera are exactly the same for your router.(for more details: read the camera s User Manual) Note: 1 After altering the Wireless LAN Settings, you need reboot the camera and plug out the network cable, or else the settings will not take effect. 2 You had better set a static IP for the camera, or else when the camera reboot and it will obtain a dynamic IP from DHCP and you need re-add or edit the camera again in the Camera UI if you want to view it continue. 20


21 3.3.4 Options User Manual Options contains six parts: ADSL, UPNP, DDNS, MAIL, MSN and FTP. You can read the camera s user manual about how to set. Figure LOG The log record shows who accessed the camera. Figure 3.23 There is a Export button at the bottom, click it and enter the file name and storage path, all record will be exported to a.txt file Backup Backup menu contains 4 parts: Upgrade Firmware, Upgrade Web UI, Backup Settings and Restore Settings. For more details: you can read the camera s user manual. Figure3.24 Note: Don t shut down the power during upgrade. 21


22 3.3.7 System User Manual Some basic settings about the IP Camera. For more details: read the camera s user manual. Figure Miscellaneous Some settings about CAMERA CONTROL PANEL(PTZ), but make sure the camera has built-in or connected with CAMERA CONTROL PANEL(PTZ), or else it has no effect. Figure Record and Alarm Management If you enable the Alarm settings, the camera will alarm when motion is trigged. Set the plan record, and the camera will recording during the time range you set How to configure alarm? Do the following steps: 1 Verify the alarm time First you should select one camera by double click the IP address not its camera name, then select Alarm. Third choose one day, Forth set the alarm time. Finally click Save. By this way, you can set alarm time for other days. 22


23 Figure the camera will adopt many ways when motion is detected Figure3.28 The camera will alarm when motion is trigged. And it will start recording automatically, you can find the recording file in the folder which you set( read step 3). If you want to receive images when motion is detected, you must set Mail Service Settings first. Figure3.29 Upload images to FTP. If you want to receive images when motion is detected, you must set FTP first. Click Save button after finishing all settings. 3 The storage path The client program will search all disks of your PC, and the default path is all disks. If you choose many disks as the storage path, the client will alarm when the current remaining storage space is 23

24 less than the space you set (the default space is 1G). Figure3.30 Normal record time: The plan record and manual record default time is 10 minutes, you can change the sustain time here. But the alarm record only last 1 minute, you cannot change it. Warning while free space less than: The default space is 1G. Click Save button after finishing all settings How to configure plan record? Configure plan record and camera will start recording automatically during the time you set. Do as the following steps: 1 verify the alarm time First you should select one camera by double click the IP address not its camera name, then choose one day and set the record time. Finally click Save. By this way, you can set plan record time for other days. 24


25 Figure3.31 Note: After all settings, you should re-start the client then the settings take effect. 2 The storage path If you have set the storage path for the alarm record, here you need not reset again. Manual record file, pre-record file, alarm record file has the same storage path. You need to reboot the client after finishing the plan record settings. When the camera alarming or recording, you can see the icon prompt in the Live View UI. 3.5 Others Figure3.32 : alarm icon : plan record icon Log save time: There are three modes: 30 days, 60days and 90 days. For example: If you select 25


26 30 days, for PC time, the logs that 30 days ago will be saved to one disk and the logs of the client will be cleared automatically. Capture picture mode: There is only one mode: JPEG. Automatically save log: Choose the storage path for logs. The default path is D disk. Picture save path: Choose the storage path for the captured pictures. The default path is D disk. Figure Alter the login username and password of the client Click this icon permissions. then click Users, you can alter/add/delete the user name, password and Figure3.34 Add: Enter one user name and password, select one permissions then click add, you will see a information cue, if success, you can see the new account in the left part. 26


27 Figure3.35 Delete: Select one account then click delete, you will see an information cue if success. Figure3.36 Edit: Select one account and enter the new user or password or permission. Then click Edit. Figure3.37 Note: The default admin account cannot be deleted. Please reset password at first using and prevent unauthorized users login. 27
 by the following way: 1 Select the date: year and month. 2 Choose one day 3 Click Search button.")

28 4 Play back record files Login the client and click this icon 4.1 Search/play my record files, here you can search all record files and play them. You can search all record files (alarm record file, plan record file, manual record file) by the following way: 1 Select the date: year and month. 2 Choose one day 3 Click Search button. If there are record files, you can see the camera name and MAC ID under Search button. 4 Choose the device and you can see all record files tag at the bottom of the UI. Figure4.1 :Plan record file :manual record file :alarm record file Figure4.2 4 Click the play button, the record file will play. If there are many devices under the Search button, choose four devices first, then you can see the record files tag of each device at the bottom of the UI. Then click the play button for each camera, the four cameras record file will play at the same time. When some record files are playing but you want to see another device s record files, you have to close all videos of four windows, and select device again, then click play button. 28


29 4.2 The Play back UI There is a button bar blow the window. Figure4.3 : Play one record file : Stop playing : Snap pictures : Full-screen. Press ESC and quit full-screen. : Speed up Speed down : Click it and the time bar will be amplified. : Click it and the time bar will be lessen. : The time bar roll to left. : The time bar roll to right. e.g :If you want to see the accurate time of record file, click the button. Figure4.4 29
,click the icon, Look the picture")

30 Figure4.5 Click the icon again, the record file tag lost,figure4.6( the display time from 0 o clock to 12 o clock, butthe record happened after 14 o clock),click the icon, Look the picture figure4.7 Figure4.6 Figure4.7 : Click it and the time bar will be minifiered. It has the opposite effect with. 5 Map Click the icon and back to the Map UI. When motion is detected, you will know which camera alarmed and where is the camera. Import the map 1 Click the new button and you can see the following screen. 30
. Then click OK. Look the following picture: Add cameras. Figure5.")
31 Figure5.1 Fill in the width and height of the map, the default width and height are all 700 pixel. Click the button and import the background (the pic must be.bmp file). Then click OK. Look the following picture: Add cameras. Figure5.2 Click the camera button under Basic Part, then click left mouse on the edited picture, you 31
32 can see one camera icon. Figure5.3 If you want to change the camera position, click the change button under operation window, then click left mouse on the camera, you can see the small blue box around the camera icon,then you can drag the camera tag to the suitable position. 32

33 Figure5.4 When you see the blue box around the camera, click right mouse, there are two option:set IP,cancel. Click Set ip, and choose one IP for the camera icon.click Enter then click right mouse. You can set ip for all cameras by this way. Figure5.5 33


34 Click the icon, you can write something to mark the camera. But the written content cannot be changed again. Figure5.6 Click Save after finishing edit. Next time you want to re-edit the map, you can open the file directly. If you configure the alarm correctly, when the motion is detected, the camera icon will flash and change to red color. Figure5.7 Others The map supports self-drawing map. There are other drawing tools on the left panel. line type: There are three types: straight line, rectangle and ellipse. line width. There are six types. The bigger the number, the wider the line. Line color: Select one color for the line. 34


35 Figure5.8 Then you can drag on the background. If you want to change another line type, such as ellipse, you need to click the right mouse first then choose a new line type. If you want to delete one edited line, click Delete key on your keyboard. Note: :When the map in this state, you cannot edit the map. Click the icon again, and the icon change to 6 How to use the Log, you can edit the map. Click the icon and you can search all logs. First choose the log type, the camera IP, User, Start and End time, then click search, you can see all logs that satisfied conditions. If you want to store the search result, click Export button and all logs will be exported to a file. 35

36 7 Log out the current user If you are leaving your PC, you had better log out the current account to prevent illegal user using. Click the icon user. and it will pop up a dialog box. Just click OK and logout the current 8 Obtaining technical support While we hope your experience with the client is enjoyable and easy to use, you may experience some issues or have questions that this User s Manual has not answered. Please contact your reseller and ask for help first, if they could not resolve your issue, please contact our company. 36
USER MANUAL. Mac Version
 USER MANUAL Mac Version Contents 1 Software Introduction... 1 1.1 Summary... 1 1.2 Install and Uninstall... 1 1.2.1 Install the Software... 1 2 Login Software... 3 2.1 Login... 3 2.2 Control Panel Instruction...
NVMS1000. User Manual
 NVMS1000 User Manual Contents 1 Software Introduction... 1 1.1 Summary... 1 1.2 Operation Environment... 1 1.3 Install and Uninstall... 2 1.3.1 Install the Software... 2 1.3.2 Uninstall the Software...
SunEyes V Series IP Camera P2P CMS user manual
 SunEyes V Series IP Camera P2P CMS user manual Version: 2.0 Date: July. 2015 This document is applicable to all series devices in our company. Page 1 ON page 40 foreword The HiP2P client of IP Camera is
NVMS User Manual
 NVMS-1000 User Manual Contents 1 Software Introduction...1 1.1 Summary... 1 1.2 Operation Environment... 1 1.3 Install and Uninstall... 2 1.3.1 Install the Software... 2 1.3.2 Uninstall the Software...
HooToo IP Camera User Manual(part two)
") HooToo Inc. HooToo IP Camera User Manual(part two) For Model: HT-IP210P Published by SunvalleyTek Group 2014/9/14 Content 1. IPCamClient (windows software)...3 Set up...3 CAM... 13 Local Setting... 13
HooToo Inc. HooToo IP Camera User Manual(part two) For Model: HT-IP210P Published by SunvalleyTek Group 2014/9/14 Content 1. IPCamClient (windows software)...3 Set up...3 CAM... 13 Local Setting... 13
Camera Control for Windows
 Camera Control for Windows 1910012275 REV1.1.0 Contents Chapter 1 Introduction... 1 1.1 Overview... 1 1.2 System Requirement... 1 Chapter 2 Software Installation... 2 Chapter 3 Quick Start... 5 3.1 Create
HIP2P Network Video Camera Client Terminal User Manual
 HIP2P Network Video Camera Client Terminal User Manual Document version:5.1 Page 1 of 34 } Preface Thank you for using our company's products. The network video camera client terminal is used to implement
NVMS User Manual. Version 2.1.0
 NVMS-1000 User Manual Version 2.1.0 Contents 1 Software Introduction... 1 1.1 Summary... 1 1.2 Operation Environment... 1 1.3 Install and Uninstall... 2 1.3.1 Install the Software... 2 1.3.2 Uninstall
NVMS User Manual
 NVMS-1000 User Manual Contents 1 Software Introduction...1 1.1 Summary... 1 1.2 Operation Environment... 1 1.3 Install and Uninstall... 2 1.3.1 Install the Software... 2 1.3.2 Uninstall the Software...
Quick Start Guide 4/8/16/24-Ch DVR
 Quick Start Guide 4/8/16/24-Ch DVR 1.1 Install Hard Drive 4/8/16/24-CH DVR Quick Start Guide Notice: 1.4/3/16-ch DVR supports one SATA hard drive. 24-ch DVR supports three SATA hard drives. Please use
Quick Start Guide 4/8/16-Ch DVR
 Quick Start Guide 4/8/16-Ch DVR 1 1. Install Hard Drive &DVD Writer 1.1Install Hard Drive Notice: 1. Support two SATA hard drives. Please use the hard drive the manufacturers recommend specially for security
Quick Start Guide 4/8/16-CH DVR.
 Quick Start Guide 4/8/16-CH DVR 1. Install Hard Drive &DVD Writer 1.1 Install Hard Drive Notice: 1. Support two SATA hard drives. Please use the hard drive the manufacturers recommend specially for security
H Series MiNi High Speed Dome. IP Camera. May 2011 V User Manual
 H Series MiNi High Speed Dome IP Camera May 2011 V1.1.0.1.2 User Manual Index 1 INTRODUCTION... 3 2 FUNCTION AND FEATURES... 3 3 APPEARANCE AND INTERFACE... 4 4 NETWORK CONNECTING... 7 2 1 Introduction
Wireless Pan & Tilt Camera
 User Manual Wireless Pan & Tilt Camera CIPCAMPTIWL v1.0 Index 1 INTRODUCTION... 4 1.1 THE PACKAGE INCLUDES... 4 1.2 FUNCTION AND FEATURES... 4 1.3 TECHNICAL SPECIFICATIONS... 4 2 APPEARANCE AND INTERFACE...
Quick Start Guide 4/8/16-Ch DVR
 Quick Start Guide 4/8/16-Ch DVR 1 1. Install Hard Drive &DVD Writer 1.1Install Hard Drive Notice: 1.This series support one SATA hard drive. Please use the hard drive the manufacturers recommend specially
1. Introduction Overview Product Information... 3
 1. Introduction... 3 1.1 Overview... 3 1.2 Product Information... 3 2. Device Connection... 3 2.1 Connection Diagram... 3 2.2 Wi-Fi Setting... 4 2.2.1 Set up WiFi by Mobile Phone... 4 2.2.2 WPS/QSS One
Quick Start Guide 4/8-CH DVR
 Quick Start Guide 4/8-CH DVR 1 1. Install Hard Drive &DVD Writer 1.1 Install Hard Drive Notice: 1. this series support one SATA hard drives. Please use the hard drive the manufacturers recommend specially
User Manual of P2P IP Cameras
 Updated on 20 August, 2013 User Manual of P2P IP Cameras This user manual applies to all the P2P IP Cameras as follows IPA Series: Home Pan-tilt IP Cameras IPB Series: Outdoor Waterproof IP Cameras IPC
TENVIS Technology Co., Ltd. User Manual. For H.264 Cameras. Version 1.0.0
 TENVIS Technology Co., Ltd User Manual For H.264 Cameras Version 1.0.0 Catalogue Basic Operation... 3 Hardware Installation... 3 Search Camera... 3 For Internet Explorer... 6 Playback Record Files... 9
CMS USER S MANUAL VER:
 CMS USER S MANUAL VER: 1.0 2009-1-6 1 INDEX INDEX... 2 Preface... 3 1. Introduction... 4 2. Install and uninstall CMS... 4 2.1 System requirement... 4 2.2 Computer Hardware Requirements... 5 2.3 Process
RemoteManager Software
 RMS RemoteManager Software User Manual Contents of this user manual are protected under copyrights and computer program laws. Functions or configurations are subject to be changed or modified without prior
Contents Contents. Chapter 1. Program Installation. Chapter 2. For the start of CMS. Chapter 3. Monitoring. Chapter 4. E-Map Mode
 CMS User's Manual Contents 0 Contents Chapter 1. Program Installation 1.1 PC specifications 1.2 Program Installation Chapter 2. For the start of CMS 2.1 Site Registration Setup (Network Camera Registration)
1 Features and Specifications Operational Requirements Faleemi Software Installation Faleemi Client Software Overview...
 1 Features and Specifications... 3 2 Operational Requirements... 3 3 Faleemi Software Installation... 3 4 Faleemi Client Software Overview... 4 5 Device List Menu... 4 5.1 Add device... 4 5.1.1 Search
NVMS1000. User Manual
 NVMS1000 User Manual Contents 1 Software Introduction... 1 1.1 Summary... 1 1.2 Operation Environment... 1 1.3 Install and Uninstall... 2 1.3.1 Install the Software... 2 1.3.2 Uninstall the Software...
Central Management Software. Cam Viewer 3 Lite. User Manual
 Central Management Software Cam Viewer 3 Lite User Manual Version 1.0.0 Table of Contents 1. System Requirement...4 2. Software Installation...5 3. Configuration Wizard...9 3.1 Channel...10 3.1.1 Adding
User s Manual of DVR ULTIMAX. Remote Client Software V wersja 2.40
 User s Manual of DVR ULTIMAX Remote Client Software V 4.0.1 ULTIMAX-304 ULTIMAX-308 ULTIMAX-316 ULTIMAX-504 ULTIMAX-508 ULTIMAX-516 ULTIMAX-704 ULTIMAX-708 ULTIMAX-716 wersja 2.40 Index 1 Software Install,
Smart CMS Client HiP2P User Manual. Version:V2018.5
 Smart CMS Client HiP2P User Manual http://iotsmatsolutions.net Version:V2018.5 1 1. Smart CMS client installation Please follow below steps to install the SMART CMS client monitoring system software; On
More Security, More Convenience. IPClient Software Guider (CMS Guider) V1.2
 V1.2") IPClient Software Guider (CMS Guider) V1.2 Content 1. INSTALLATION... 3 2. SOFTWARE OPERATION... 4 2.1.Login... 4 2.2. For Multi-windows... 6 2.3. System Settings... 6 2.3.1 Basic Settings... 6 2.3.2 User
IPClient Software Guider (CMS Guider) V1.2 Content 1. INSTALLATION... 3 2. SOFTWARE OPERATION... 4 2.1.Login... 4 2.2. For Multi-windows... 6 2.3. System Settings... 6 2.3.1 Basic Settings... 6 2.3.2 User
Neposmart NS14WG Indoor and NS14BG Outdoor Camera Web App User Manual
 Neposmart NS14WG Indoor and NS14BG Outdoor Camera Web App User Manual TM Contents Using the Desktop Web Interface... 3 Viewing Video Using VLC Media Player... 6 Web on Internet Explorer and Neposmart Control
User Manual. Model: FN7108E-B4-2T / FN7108E-B8-2T. Version: V1.0.2
 User Manual Model: FN7108E-B4-2T / FN7108E-B8-2T Version: V1.0.2 Table of Contents Table of Contents...I Security Warning... III Preface...IV Important Safety Instructions... V 1 Overview... 1 1.1 Product
NIGHT VISION & REMOTE PAN / TILT ROTATE/ TWO WAY AUDIO
 User Manual Model: FI8916W Indoor Pan/Tilt Wireless IP Camera NIGHT VISION & REMOTE PAN / TILT ROTATE/ TWO WAY AUDIO Black White CONTENTS 1 WELCOME... 1 1.1 Features... 1 1.2 Packing List... 2 1.3 Product
IP Camera User Manual
 Statement IP Camera User Manual If the user manual cannot help you to solve the problem, please call our technology center about the solutions. We will update the content for the new functions without
IP CAMERA User Manual 695h, 755h, 795h
 IP CAMERA User Manual 695h, 755h, 795h 1 Contents Chapter 1 - Login... 4 Chapter 2 - Main Interface... 6 2.1 Main Interface Display Status... 6 2.2 Operation of Live View Interface... 6 Chapter 3 - Setting
SURVEILLANCE KIT USER MANUAL. All in One Series
 SURVEILLANCE KIT USER MANUAL All in One Series Contents Part one Basic Operation 1 1. Basic Installation 1 1. Hard Disk Installation 1 2. Mouse Connection 1 2. Starting 1 3. Turn Off 1 4. Login 2 5. Preview
Central Management Software for NVR-915 / NVR-1615 CV5-M256
 Central Management Software for NVR-915 / NVR-1615 Table of Contents Chapter 1. Main Console... 4 1.1 Tool Bar... 4 1.2 NVR List... 5 1.3 Division List... 7 1.4 Group List... 9 1.5 PTZ Panel...11 1.6 Operation
IP Camera. Apr 2012 V
 H Series with Pan/Tilt Mega pixel IP Camera Apr 2012 V1.4.0.1.4 User Manual Index 1 INTRODUCTION... 4 1.1 THE PACKAGE INCLUDES... 4 1.2 FUNCTION AND FEATURES... 4 1.3 TECHNICAL PARAMETERS... 5 2 APPEARANCE
Video Surveillance Management Software NVClient V5 User Manual
 Video Surveillance Management Software NVClient V5 User Manual Version: V5.0 Update Date: 2013-12-12 Welcome Thanks for using the Company's digital video surveillance management software. Please read this
Wifi/IP Camera Instructions. Chapter 1 Introduction
 Wifi/IP Camera Instructions Chapter 1 Introduction This product is made from high-performance chips to achieve a m edia processor integrated with acquisition, compression and trans mission on audio and
Iphone OS and Android
 AHD Hybrid Digital Video Recorder Mobile phone application user manual Iphone OS and Android Model : 720P AHD DVR MT884 MT888 MT8816 1080P AHD DVR MT894 MT898 MT8916 www.magtec.com.my Contents 1 Network
NIGHT VISION & REMOTE PAN / TILT ROTATE/ TWO WAY AUDIO
 Model: IPCAM IP Wireless / Wired Camera NIGHT VISION & REMOTE PAN / TILT ROTATE/ TWO WAY AUDIO User Manual Color: Black Color: White CONTENTS 1 WELCOME...1 1.1 Features...1 1.2 Packing List...2 1.3 Product
User Manual. Model: FN3108XE-B4-1T / FN3108XE-B8-2T. Version: V1.2.3
 User Manual Model: FN3108XE-B4-1T / FN3108XE-B8-2T Version: V1.2.3 Table of Contents Table of Contents...I Security Warning... III Preface...IV Important Safety Instructions... V 1 Overview... 1 1.1 Product
Mobile Surveillance. User Manual
 Mobile Surveillance User Manual Contents 1 Network Configuration... 1 1.1 Access Device via WLAN...1 1.2 Access Device via 2G/3G/4G Network...1 2 By Phones with Android OS... 2 2.1 Installation Instruction...2
User Manual Model: FN3104W-B4
 User Manual Model: FN3104W-B4 Version: 1.0.3 Table of Contents Table of Contents...I Security Warning... III Preface...IV Important Safety Instructions... V 1 Overview... 1 1.1 Product Introduction...
VMS-A1 Client Software. User Manual
 VMS-A1 Client Software User Manual Contents Contents... 2 Chapter1. Overview... 4 1.1 Description... 4 1.2 Features & Functions... 4 Chapter2. Update Info... 6 Chapter3. Starting VMS-A1... 7 3.1 Installing
Network Video Recorder User Manual
 Network Video Recorder User Manual Model: FN3104H / FN3109H Version: 1.6.1 Table of Contents Table of Contents...I Security Warning... III Preface...IV Important Safety Instructions... V 1 Overview...
Dear users, the configuration for this camera is professional, so please read the user manual carefully before using the camera V4.
 Dear users, the configuration for this camera is professional, so please read the user manual carefully before using the camera. IP Camera (B series) User manual 2012-12 V4.19 Statement If the user manual
Model: M501W. Indoor Pan/Tilt IP Camera. -Contents- Shenzhen Dericam Technology Co., Limited
 User Manual Model: M501W Indoor Pan/Tilt IP Camera -Contents- Chapter 1. Introduction of Camera 2 Chapter 2. Package Contents 2 Chapter 3. Physical Descriptions.3 Chapter 4. Surveillance Software GUI.4
IP Camera user manual
 IP Camera user manual Product name:high definition IP Camera Document version:4.2 Editions suit for 1080P IP Camera Precautions Search and Login...1 Device searching...2 Install plugin...3 A. Real-time
Wireless IP Bird Box Camera
 Wireless IP Bird Box Camera Model: 4901-18 Operation and Installation Manual 1 WELCOME... 3 PRODUCT OVERVIEW... 4 HARDWARE INSTALLATION... 4 Attach the External Power Adapter... 4 SMARTPHONE OR TABLET
Everything in your eyes. ismartviewpro. (For Android) User Manual VER 5.2
 User Manual VER 5.2") IP Cloud Network Camera Everything in your eyes ismartviewpro (For Android) User Manual 2017-08 VER 5.2 1. ismartviewpro Summary ismartviewpro for android is our company developed application software
IP Cloud Network Camera Everything in your eyes ismartviewpro (For Android) User Manual 2017-08 VER 5.2 1. ismartviewpro Summary ismartviewpro for android is our company developed application software
Mobile Surveillance. User Manual
 Mobile Surveillance User Manual Contents 1 Network Configuration... 1 Access Device via WLAN... 1 Access Device via 2G/3G/4G Network... 2 2 By Phones with Android OS... 2 Installation Instruction... 2
IP Camera Centralization Management. Client Application. (IPCMonitor) Feb, 2013 Version User Manual
 Feb, 2013 Version User Manual") IP Camera Centralization Management Client Application (IPCMonitor) Feb, 2013 Version 1.10 User Manual INDEX 1 Introduction... 3 2 Computer Requirement... 3 3 Installation... 4 4 Devices list... 4 4.1
IP Camera Centralization Management Client Application (IPCMonitor) Feb, 2013 Version 1.10 User Manual INDEX 1 Introduction... 3 2 Computer Requirement... 3 3 Installation... 4 4 Devices list... 4 4.1
YesCam View User Manual For Easy Connection YesCam Series
 YesCam View User Manual For Easy Connection YesCam Series Seeing the video from anywhere Version:1.2.4 Date:2015.02.3 1 Table of Content 1. Introduction...4 2. System Requirement...4 3. Install YesCam
SuperLive Plus. User Manual
 SuperLive Plus User Manual Mobile Surveillance SuperLive Plus is a new generation of independent research and development surveillance. The app has an enhanced interface design, function integration and
RemoteManager USER S MANUAL
 Remote Monitoring Software RemoteManager USER S MANUAL Thank you for purchasing our products. Before operating the system, please read this User s Manual thoroughly and retain it for future reference.
NS15WG 1080P Web App User Manual
 NS15WG 1080P Web App User Manual Table of Contents 1. Getting Started... 4 Download the Web App...4 2. Web App Top Menu... 5 Live Video...6 Video Playback...6 Settings...6 3. Device Configuration... 6
IP Camera. Mar 2012 V
 H Series Mega pixels Waterproof IP Camera Mar 2012 V1.2.0.1.5 User Manual Index 1 INTRODUCTION... 4 1.1 THE PACKAGE INCLUDES... 4 1.2 FUNCTION AND FEATURES... 4 1.3 TECHNICAL PARAMETERS... 5 2 APPEARANCE
10X OPTICAL ZOOM & REMOTE PAN / TILT ROTATE
 User Manual Model: FI8620 IP Wired Camera 10X OPTICAL ZOOM & REMOTE PAN / TILT ROTATE CONTENTS 1 WELCOME... 1 1.1 Features... 1 1.2 Packing List... 2 1.3 Product views... 2 1.4 Preparations before use...
NetClient software user manual
 NetClient software user manual 1-1. General information Net Client is an application which provides users not only viewing and controling remote DVRs, but also receiving realtime event data or alarm signals
CMS USER S MANUAL VER:
 CMS USER S MANUAL VER: 1.0 2009-1-6 1 INDEX INDEX... 2 Preface... 3 1. Introduction... 4 2. Install and uninstall CMS... 4 2.1 System requirement... 4 2.2 Computer Hardware Requirements... 5 2.3 Process
Indoor Wireless/Wired IP Network Camera Model XX34A. User Manual
 Indoor Wireless/Wired IP Network Camera Model XX34A User Manual CONTENTS 1. INTRODUCTION... 3 1.1 FEATURES... 3 1.2 PACKING LIST... 3 1.3 PRODUCT VIEWS... 4 1.4 PC SYSTEM REQUIREMENTS... 6 1.5 HARDWARE
XIPLED Software User s Manual. For Firmware release V3.5.0.*
 XIPLED1080-36 Software User s Manual For Firmware release V3.5.0.* Product name: XIPLED1080-36 Release Date: 2014/10/02 Manual Revision: V02 Feature XIPLED1080-36 Live View All Series Camera/Video/Audio
Pro71600N3 NVR User Manual
 Pro71600N3 NVR User Manual User Information Admin User Name: Admin Password: IP Address: System Name: Table Of Contents 1. Menu Operation...4 1.1 Main Menu...4 2. Start & Shutdown System...5 2.1 Start
HD Pan Tilt IP Camera
 IP Camera User Guide Version 1.0.0.1 HD Pan Tilt IP Camera Page 1 Content 1. Hardware installation... 4 1.1 Hardware connection... 4 1.2 Network connection...5 1.3 WPS setting...5 2. ipad, iphone App introduction...5
errors, or places that do not match the product. If you have any unsolved please contact our technical support department.
 - 0 - Statement: This manual may contain several technical inaccuracies or typographical errors, or places that do not match the product. If you have any unsolved problems in the process of using product
User Manual. Model: FI8919W. Outdoor
 User Manual Model: FI8919W Outdoor Pan/Tilt Wireless IP Camera Table of Contents 1 Overviews... 2 1.1 Key Features... 3 1.2 Read Before Use... 3 1.3 Packing Contents...4 1.4 Physical Description... 4 2
F Series Indoor Fixed IP Camera. Quick Start Guide
 F Series Indoor Fixed IP Camera Quick Start Guide Welcome Thank you for purchasing our IP camera! Before install and use the IP camera, please read the following section carefully. Please keep this start
Wanscam. HW series IP Camera PC Web User Manual
 Wanscam HW series IP Camera PC Web User Manual Packing list: IP camera Mounting bracket Antenna Adaptor CD Lan cable Installation guide Screws Note: Some models don t have a separate antenna. Installation
K6 Series IP Camera Web Operation Manual
 K6 Series IP Camera Web Operation Manual Version1.3 1 Table of Contents 1 Network Connection...4 2 Main Interface Introduction...5 2.1 Log in...5 2.2 Monitor Channel Menu Tree...7 2.3 System Menu...10
PIVOT CMS CLIENT SOFTWARE USER MANUAL
 PIVOT CMS CLIENT SOFTWARE USER MANUAL 1 CMS USER GUIDE 1.1 PC REQUIREMENT Recommended PC Requirement OS CPU VGA RAM HDD Graphics Card OS CPU VGA RAM HDD Windows Vista, 7 or higher Intel Core2Quad Q9400
P2P IPCAM User Manual. (For Windows OS)
") P2P IPCAM User Manual (For Windows OS) IP camera User Manual Our products penetrate the P2P technology, such as computer plug and play with networking so it makes Telecom, China Netcom, 3G smooth exchange
P2P IPCAM User Manual (For Windows OS) IP camera User Manual Our products penetrate the P2P technology, such as computer plug and play with networking so it makes Telecom, China Netcom, 3G smooth exchange
VIH Series IP Camera. User s Manual V_
 VIH Series IP Camera User s Manual V_1.0-1 - Contents Table Over View... 1 Installation... 2 Live View... 9 Setup... 10 4.1 Status... 10 4.2 Network... 11 4.3 Stream... 12 4.4 Imaging... 13 4.5 Security...
Pro7400H1 Hybrid DVR User Manual
 Pro7400H1 Hybrid DVR User Manual User Information Admin User Name: Admin Password: IP Address: System Name: Table Of Contents 1. Menu Operation... 4 1.1 Main Menu... 4 2. Start Up/Shutdown System... 5
Error! Bookmark not defined.
 HD-NVR user manual Directory Part one Basic Operation... 3 1. Basic Installation... 3 1.1 Hard Disk Installation... 3 1.2 Mouse Connection... 3 2. Starting... 3 3.Turn Off... 3 4.Login... 4 5.Preview...
PCMS User Manual. User Manual PCMS. A-Series DVR (Cloud)
") PCMS User Manual A-Series DVR (Cloud) User Manual PCMS User Manual PCMS A-Series DVR (Cloud) 1 PCMS User Manual A-Series DVR (Cloud) Contents 1. Brief Introduction... 3 2. Application... 3 3. OS Compatibility...
PCMS User Manual A-Series DVR (Cloud) User Manual PCMS User Manual PCMS A-Series DVR (Cloud) 1 PCMS User Manual A-Series DVR (Cloud) Contents 1. Brief Introduction... 3 2. Application... 3 3. OS Compatibility...
Pro7804N1 NVR User Manual
 Pro7804N1 NVR User Manual Pro7804N1 User Manual BW R6.indd 1 User Information Admin User Name: Admin Password: IP Address: System Name: Table Of Contents 1. Menu Operation...4 1.1 Main Menu...4 2. Start
Siera CMS Panther v3.0
 1 This manual maybe exist inexact in technology, product feature, operation discrepancy or misprint. The content of the manual will renew according to the product function enhance, and regular change or
SAMSUNG ALL-IN-ONE SECURITY SYSTEM
 Quick Start Guide KIT MODEL SDH-B74041/SDH-B74081 DVR MODEL SDR-B74301 SAMSUNG ALL-IN-ONE SECURITY SYSTEM Thank you for purchasing the Samsung DVR Security System. Follow the simple steps in this guide
F Series Robot Model IP Camera V2.3 User Manual
 F Series Robot Model IP Camera 2010-5 V2.3 User Manual Index 1 INTRODUCTION... 4 2 FUNCTION AND FEATURES... 4 3 APPEARANCE AND INTERFACE... 5 3.1 APPEARANCE... 5 3.2 INTERFACE OF EQUIPMENT... 6 4 NETWORK
W Box VMS BOX T E C H N O L O G I E S.
 W Box VMS BOX T E C H N O L O G I E S www.wboxtech.eu Contents Contents... 1 Overview... 3 1.1 Description... 3 1.2 Running Environment... 3 1.3 Function Modules... 3 Live view... 6 2.1 User Registration
SPECIFICATIONS ARE SUBJECT TO CHANGE WITHOUT PRIOR NOTICE. THE INFORMATION CONTAINED HEREIN IS TO BE CONSIDERED FOR REFERENCE ONLY.
 COPYRIGHT 2010 by AVerMedia Information, Inc. All right reserved. Reproduction without permission is prohibited. No part of this document may be reproduced or transmitted in any form, or by any means without
Operation Guide. ismartviewplus V1.0.2 (For windows) July, 2017 Rev1.0
 July, 2017 Rev1.0") Operation Guide ismartviewplus V1.0.2 (For windows) July, 2017 Rev1.0 Statement If the user manual doesn t help you to resolve the problem, please contact us via our website for technical support. Notice
Operation Guide ismartviewplus V1.0.2 (For windows) July, 2017 Rev1.0 Statement If the user manual doesn t help you to resolve the problem, please contact us via our website for technical support. Notice
IP Wireless / Wired Camera REMOTE PAN/TILT ROTATE. User Manual
 IP Wireless / Wired Camera REMOTE PAN/TILT ROTATE User Manual CONTENTS 1 WELCOME...3 1.1 FEATURES... 3 1.2 PACKING LIST... 3 1.3 PRODUCT VIEWS... 4 1.4 PC SYSTEM REQUIREMENTS... 5 1.5 HARDWARE INSTRUCTION...
IP WEB User Manual V2.0
 IP WEB User Manual V2.0 Please read carefully before installing or contacting your supplier. The information contained at the time of printing is correct, but is subject to change without notice. This
DDNS UPNP
 PL-ADR0608/16-H2 PL-ADR0604-H2 Content 1 Product Introduction... 3 2 Installation... 3 2.1 Open-package Inspection... 3 2.2 Hard Disk Installation... 3 3. Local operation guide... 3 3.1 Boot operation...
SecuGuard. Basic 5.0. User s manual. Dec Version: 5.0.x
 SecuGuard Basic 5.0 User s manual Dec. 2009 Version: 5.0.x SecuGuard Basic System Requirement...5 Installation...6 Before Installing the Software... 6 Starting the Installation... 6 Quick Start...9 Install
Quick Start Guide (V1.03) UD.6L0201B1064A01
 UD.6L0201B1064A01") ivms-4200 PCNVR Quick Start Guide (V1.03) UD.6L0201B1064A01 Thank you for purchasing our product. If there is any question or request, please do not hesitate to contact the dealer. This manual applies
ivms-4200 PCNVR Quick Start Guide (V1.03) UD.6L0201B1064A01 Thank you for purchasing our product. If there is any question or request, please do not hesitate to contact the dealer. This manual applies
Table of Contents Introduction... 1 IE Remote Access... 2 Remote Preview... 8 Remote Live Surveillance... 11
 Notes on Safety Please use the specified power supply to connect. Do not attempt to disassemble the camera; in order to prevent electric shock, do not remove screws or covers. There are no user-serviceable
IP Wireless / Wired Camera REMOTE PAN/TILT ROTATE. User Manual
 IP Wireless / Wired Camera REMOTE PAN/TILT ROTATE User Manual NTENTS 1 WELCOME...3 1.1 FEATURES... 3 1.2 PACKING LIST... 3 1.3 PRODUCT VIEWS... 4 1.4 PC SYSTEM REQUIREMENTS... 6 1.5 HARDWARE INSTRUCTION...
CAMERAS IP START SERIES
 CAMERAS IP START SERIES Contents 1. Login Interface... 3 2. Preview... 4 2.1 Open/Close Preview... 5 2.2 Full-screen Preview... 5 2.3 Electronic Zoom-in... 5 2.3 PTZ Control... 6 3. File Management...
User Manual. Indoor HD IP Camera. Model: C1 V1.2
 User Manual Indoor HD IP Camera Model: C1 V1.2 Table of Contents 1 Overview... 2 1.1 Key Features...2 1.2 Read Before Use...3 1.3 Package Contents...3 1.4 Physical Description... 3 2 Access the IP Camera...
HD Pan Tilt IP Camera
 IP Camera User Guide Version 1.0.0.1 HD Pan Tilt IP Camera NIP-09L2J NIP-16L2J NIP-22L2J NIP-21L2J Page 1 Content 1. Hardware installation... 4 1.1 Hardware connection... 4 1.2 Network connection...5 1.3
Intelligent Security & Fire Ltd
 Copyright 2007-2009 Cortex Global Table of contents: Introduction... 3 1. Login... 3 1.1 Advanced login options... 4 2. Preview... 5 2.1 Main menu... 6 2.2 Camera list... 6 2.3 Main display... 6 2.4 Maps...
XL-ICA-311 RTSP DUAL Streaming IP Camera. User Manual
 XL-ICA-311 RTSP DUAL Streaming IP Camera User Manual Chapter 1. General Introduction... 3 1.1 Product Package Contents...3 1.2 System Requirements of IE browser...4 1.3 Outlooks and Connection...5 Mounting...7
DNVR(Digital Network Video Recorder) USER MANUAL. Before using this system, please read the user manual. carefully.
 USER MANUAL. Before using this system, please read the user manual. carefully.") DNVR(Digital Network Video Recorder) USER MANUAL DVR-104M9/DVR-416M9 DVR-816M9/DVR-832M9 Before using this system, please read the user manual carefully. 1 Attention: *Don t use the system at place with
DNVR(Digital Network Video Recorder) USER MANUAL DVR-104M9/DVR-416M9 DVR-816M9/DVR-832M9 Before using this system, please read the user manual carefully. 1 Attention: *Don t use the system at place with
AMDV960H4 User Manual
 s AMDV960H4 User Manual AMDV960H4 User Manual Version 1.3.2 www.amcrest.com 1 TABLE OF CONTENTS 1 PRODUCTION 4 1.1. Product Key Features 4 1.2. Front Panel Controls 5 1.3. USB Mouse 6 1.4. Soft Keyboard
Version: DSD0221EN01. Quick Start Guide
 Version: DSD0221EN01 Quick Start Guide Table of Contents Quick Installation Guide... 1 What s in the Box... 1 Quick Start Guide... 2 Notes for Installation... 2 Operation Steps for ios Device... 3 Live
Mobile DVR Record File Manager Software User s Manual
 Mobile DVR Record File Manager Software User s Manual Version 1.0.0 Table of Contents 1 General Introduction...4 1.1 Overview...4 1.2 General Performance...4 2 Installation...5 2.1 Installation Steps...5
IPC Online Operation Manual
 IPC Online Operation Manual 1 Overview An IP camera (hereinafter referred to as IPC) is a new product integrating network video technologies into a traditional camera. The IPC can realize simpler monitoring
Pan & Tilt IP Camera IPV38 / IPV38WE. User Manual
 Pan & Tilt IP Camera User Manual Index 1.0 INTRODUCTION 1.1 Features 1.2 Packing List 1.3 Product Views, Connections and Buttons 1.4 PC System Requirements 1.5 Hardware Installation 1.6 Software Installation