Table of Contents HOL-1757-MBL-5
|
|
|
- Cameron Powers
- 5 years ago
- Views:
Transcription
1 Table of Contents Lab Overview - - VMware AirWatch: Mobile App Management and App Development... 2 Lab Guidance... 3 Module 1 - Introduction to AppConfig (30 minutes)... 8 Login to the AirWatch Console... 9 Publish AirWatch Tunnel ios Device Enrollment Explore & Configure AppConfig Un-enrolling Your Device Module 2 - AirWatch REST API (30 minutes) Module Overview Login to the AirWatch Console ios Device Enrollment AirWatch REST API Module 3 - Per-App VPN using AirWatch Tunnel (30 minutes) Login to the AirWatch Console AirWatch Console Configuration - Publish VMware Tunnel ios Device Enrollment Testing Per App VPN Safari Domain Profile Configuration Testing Safari Domains with Per App Tunnel Module 4 - Introduction to AirWatch Android SDK (45 minutes) Explore AirWatch SDK for Android using Android Studio Login to the AirWatch Console AirWatch Console configuration for the SDK Sample App Enroll an Android Device Explore Android SDK on the enrolled device Conclusion and wrap up Page 1
2 Lab Overview - - VMware AirWatch: Mobile App Management and App Development Page 2
3 Lab Guidance Note: It will take more than 90 minutes to complete this lab. You should expect to only finish 2-3 of the modules during your time. The modules are independent of each other so you can start at the beginning of any module and proceed from there. You can use the Table of Contents to access any module of your choosing. The Table of Contents can be accessed in the upper right-hand corner of the Lab Manual. Enhance your enterprise application by leveraging AirWatch Developer Tools into an internal app. This lab targets AppConfig, AirWatch REST APIs, per-app VPN using AirWatch Tunnel and AirWatch Android SDK. At the end of each lab,we will validate the enhancements on an enrolled device to see the app enhancements in action. Each Module can be taken independently or you can start at the beginning and work your way through each module in sequence. In most cases, a unique "sandbox" instance of AirWatch will be created just for you when you begin a Module. When the Module has ended, this sandbox will be deleted and the device that you are enrolling in the lab will be returned to the state that it was in prior to the lab. The approximate time it will take to go through all the modules is around 2.5 hours. Lab Module List: Module 1 - Introduction to AppConfig (ACE) (30 minutes) (Basic) Explore how you can leverage this EMM exclusive feature to configure your enterprise app dynamically. Module 2 - AirWatch REST API (30 minutes) (Basic) Explore how can automate AirWatch EMM console action without having to log into the console. Module 3 - Per-App VPN using AirWatch Tunnel (30 minutes) (Basic) Enable proxy for your application without the need of any wrapping or without the inclusion of any third party resources. Module 4 - Introduction to AirWatch Android SDK (45 minutes) (Basic) Introduction to AirWatch Android SDK into a sample app using Android studio and then validate the SDK enhancements on an enrolled Android device. Lab Captains: All modules: Roger Deane, Shardul Navare, Justin Sheets. This lab manual can be downloaded from the Hands-on Labs Document site found here: Page 3

4 This lab may be available in other languages. To set your language preference and have a localized manual deployed with your lab, you may utilize this document to help guide you through the process: Location of the Main Console 1. The area in the RED box contains the Main Console. The Lab Manual is on the tab to the Right of the Main Console. 2. A particular lab may have additional consoles found on separate tabs in the upper left. You will be directed to open another specific console if needed. 3. Your lab starts with 90 minutes on the timer. The lab can not be saved. All your work must be done during the lab session. But you can click the EXTEND to increase your time. If you are at a VMware event, you can extend your lab time twice, for up to 30 minutes. Each click gives you an additional 15 minutes. Outside of VMware events, you can extend your lab time up to 9 hours and 30 minutes. Each click gives you an additional hour. Alternate Methods of Keyboard Data Entry During this module, you will input text into the Main Console. Besides directly typing it in, there are two very helpful methods of entering data which make it easier to enter complex data. Page 4
5 Click and Drag Lab Manual Content Into Console Active Window You can also click and drag text and Command Line Interface (CLI) commands directly from the Lab Manual into the active window in the Main Console. Accessing the Online International Keyboard You can also use the Online International Keyboard found in the Main Console. 1. Click on the Keyboard Icon found on the Windows Quick Launch Task Bar. Page 5

6 Click once in active console window In this example, you will use the Online Keyboard to enter the sign used in addresses. The sign is Shift-2 on US keyboard layouts. 1. Click once in the active console window. 2. Click on the Shift key. Click on key 1. Click on the "@" key. Notice sign entered in the active console window. Activation Prompt or Watermark When you first start your lab, you may notice a watermark on the desktop indicating that Windows is not activated. Page 6


7 One of the major benefits of virtualization is that virtual machines can be moved and run on any platform. The Hands-on Labs utilizes this benefit and we are able to run the labs out of multiple datacenters. However, these datacenters may not have identical processors, which triggers a Microsoft activation check through the Internet. Rest assured, VMware and the Hands-on Labs are in full compliance with Microsoft licensing requirements. The lab that you are using is a self-contained pod and does not have full access to the Internet, which is required for Windows to verify the activation. Without full access to the Internet, this automated process fails and you see this watermark. This cosmetic issue has no effect on your lab. Look at the lower right portion of the screen Please check to see that your lab is finished all the startup routines and is ready for you to start. If you see anything other than "Ready", please wait a few minutes. If after 5 minutes you lab has not changed to "Ready", please ask for assistance. Page 7
8 Module 1 - Introduction to AppConfig (30 minutes) Page 8
9 Login to the AirWatch Console To perform most of the lab you will need to login to the AirWatch Management Console. Launch Firefox Browser Double-click the Firefox Browser on the lab desktop. Page 9
10 Authenticate to the AirWatch Administration Console The default home page for the browser is Enter your AirWatch Admin Account information and click the Login button. NOTE - If you see a Captcha, please be aware that it is case sensitive! 1. Enter your Username. This is you address that you have associated with your VMware Learning Platform (VLP) account. 2. Enter "VMware1!" for the Password field. 3. Click the Login button. NOTE - Due to lab restrictions, you may need to wait here for a minute or so while the Hands On Lab contacts the AirWatch Hands On Labs server. Page 10
11 Accept the End User License Agreement NOTE - The following steps of logging into the Administration Console will only need to be done during the initial login to the console. You will be presented with the AirWatch Terms of Use. Click the Accept button. Page 11
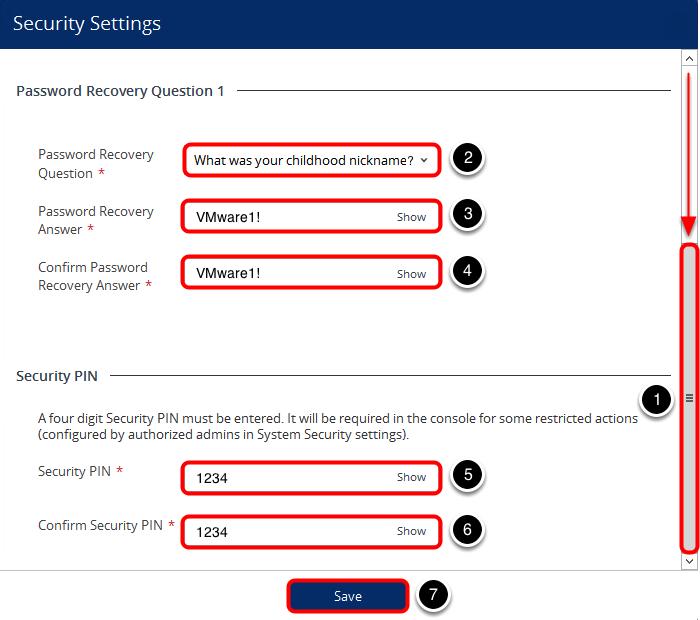
12 Address the Initial Security Settings After accepting the Terms of Use, you will be presented with a Security Settings popup. The Password Recovery Question is in case you forget your admin password and the Security PIN is to protect certain administrative functionality in the console. 1. You may need to scroll down to see the Password Recovery Questions and Security PIN sections. 2. Select a question from the Password Recovery Question drop-down (default selected question is ok here). 3. Enter "VMware1!" in the Password Recovery Answer field. 4. Enter "VMware1!" in the ConfirmPassword Recovery Answer field. 5. Enter "1234" in the Security PIN field. 6. Enter "1234" in the Confirm Security PIN field. 7. Click the Save button when finished. Page 12
13 Page 13
14 Close the Welcome Message After completing the Security Settings, you will be presented with the AirWatch Console Welcome pop-up. 1. Click on the Don't show this message again check box. 2. Close the pop-up by clicking on the X in the upper-right corner. Page 14

15 Publish AirWatch Tunnel In this lab, we will be leveraging a VPN profile to test our AppConfig settings. To apply this VPN profile, the AirWatch Tunnel Client needs to be installed on your device. We can leverage AirWatch to deploy the AirWatch Tunnel Client to the device through MDM. This section will walk you through the process of publishing a Public Application to your devices. Add a New Public Application In the top right corner of your AirWatch Console, 1. Click Add. 2. Click Public Application. Page 15

16 Search for the Application to Add 1. Select Apple ios from the Platform dropdown. 2. Enter "AirWatch Tunnel"in the Name field. 3. Click Next. Select AirWatch Tunnel from the Search Results Click Select on the AirWatch Tunnel application. Page 16
17 Assign the Application to an Assignment Group 1. Click the Assignment tab. 2. Select All yourname@ .shown.here as the Assignment Group. Page 17

18 Set the Deployment Options for the Application 1. Scroll down until you see the Deployment section. 2. Select Automatic: system push for the App Delivery Method. 3. Click Save & Publish. Page 18
19 Publish the Application Click Publish. Page 19
20 ios Device Enrollment Enroll Your ios Device You are now going to enroll your ios device for use with this module. Page 20
21 Download/Install AirWatch MDM Agent Application from App Store - IF NEEDED NOTE -Checked out devices will likely have the AirWatch MDM Agent already installed. You may skip this step if your device has the AirWatch MDM agent installed. At this point, if using your own ios device or if the device you are using does NOT have the AirWatch MDM Agent Application installed, then install the AirWatch Application. To Install the AirWatch MDM Agent application from the App Store, open the App Store application and download the free AirWatch MDM Agent application. Finding your Group ID The first step is to make sure you know what your Organization Group ID is. Page 21
22 1. To find the Group ID, hover your mouse over the Organization Group tab at the top of the screen. Look for the address you used to log in to the lab portal. 2. Your Group ID is displayed at the bottom of the Organization Group pop up. The Group ID is required when enrolling your device in the following steps. Launching the AirWatch MDM Agent Launch the AirWatch Agent app on the device. NOTE - If you have your own ios device and would like to test you will need to download the agent first. Page 22
23 Choose the Enrollment Method Click on the Server Details button. Attach the AirWatch MDM Agent to the HOL Sandbox Once the Agent has launched you can enroll the device. To do so, follow the below steps. 1. Enter "hol.awmdm.com" for the Server field. 2. Enter your Group ID for your Organization Group for the Group ID field. Your Group ID was noted previously in the Finding your Group ID step. 3. Tap the Go button. Page 23
24 NOTE - If on an iphone, you may have to close the keyboard by clicking Done in order to click the Continue button. Page 24
25 Authenticate the AirWatch MDM Agent On this screen, enter the Username and Password for the basic user account. 1. Enter "testuser" in the Username field. 2. Enter "VMware1!" in the Password field. 3. Tap the Go button. Page 25
26 Redirect to Safari and Enable MDM Enrollment in Settings The AirWatch Agent will now redirect you to Safari and start the process of enabling MDM in the device settings. Tap on Redirect & Enable at the bottom of the screen. Page 26
27 Install the MDM Profile Tap Install in the upper right corner of the Install Profile dialog box. Page 27
28 Install and Verify the AirWatch MDM Profile Tap Install when prompted at the Install Profile dialog. NOTE -If a PIN is requested, it is the current device PIN. Provided VMware devices should not have a PIN. Page 28
29 ios MDM Profile Warning You should now see the ios Profile Installation warning explaining what this profile installation will allow on the ios device. Tap Install in the upper-right corner of the screen. Page 29
30 Trust the Remote Management Profile. You should now see the ios request to trust the source of the MDM profile. Tap Trust when prompted at the Remote Management dialog. Page 30
31 ios Profile Installation Complete You should now see the ios Profile successfully installed. Tap Done in the upper right corner of the prompt. Page 31
32 AirWatch Enrollment Success Your enrollment is now completed. Tap Open to navigate to the AirWatch Agent. Accept the App Installation (IF NEEDED) You may be prompted to install a series of applications depending on which Module you are taking. If prompted, tap Install to accept the application installation. Page 32
33 Explore & Configure AppConfig We've completed the basic preparation for the lab and now we will take a look at how to use AppConfig for your MAM deployments. Observe the device behavior outside AppConfig Sample App In this section, we are going to validate the behavior and accessibility of various components outside of the AppConfig app where we are not leveraging AppConfig. The AppConfig app will be leveraging AppConfig to modify accessibility, connect to VPN, and display look-up values. Launch the AppConfig URL Web Clip Tap the AppConfig URL web clip on your device. This will attempt to open an internal resource using Safari. Confirm Internal Resource Cannot Be Reached Notice that from Safari, the internal URL cannot be reached since the device is not on the network and it does not have an active VPN connection to this resource. Page 33
34 Launch the Search AW Application Tap the Search AW application on your device. Page 34
35 Confirm Copy and Paste Functionality From the Web Clip This Web Clip opens a Google search for AirWatch. Notice that you can tap and hold to access the clipboard options on this page. Create ios Per App VPN Profile In this section, we will create a Per-App VPN profile which will be applied to the AppConfig app. This profile will allow the AppConfig app to connect to our internal resource through the VPN provided by the AirWatch Tunnel. We will configure this profile to only supply this connection to the AppConfig app instead of the entire device. Page 35


36 Add a New Profile Return to the AirWatch Console and find the Add button in the top-right corner. 1. Click Add. 2. Click Profile. Select Profile Platform Click Apple ios. Page 36
37 Configure the General Properties of the Profile 1. Enter "iosper-app VPN" as the Name. 2. Select All yourname@ .shown.here as the Assigned Group. NOTE - Do not click Save & Publish at this point. You will configure the profile payload and then save it at a later step. Page 37

38 Add a VPN Payload 1. Click VPN from the Payload menu. 2. Click Configure to access the VPN payload settings. Page 38
39 Configure the VPN Payload 1. Select AirWatch Tunnel from the Connection Type dropdown. 2. Click Save & Publish. Page 39
40 Publish the VPN Profile Click Publish. Upload the ios Internal App Now we will add the AppConfig app to the AirWatch Console so that it will be managed by AirWatch. Page 40


41 Add Internal Application Find the Add button in the top-right corner. 1. Click Add. 2. Click Internal Application. Upload Application Click Upload. Navigate to AppConfig.ipa From the selection window: 1. Expand Documents. 2. Expand HOL. 3. Expand AppConfig. 4. Select AppConfig.ipa Page 41

42 5. Click Open. Page 42

43 Save uploaded Application Click Save. Page 43
44 Confirm the Upload Click Continue. Setup AppConfig for the Internal Application Now, we will add the AppConfig settings and the Per-App VPN profile to the AppConfig Sample Application. In the next step, we will validate these enhancements on an enrolled device. Page 44
45 Add Application Assignment 1. Click the Details tab. 2. Click Save & Assign. Page 45

46 Update Assignment Click Add Assignment. Add Assignment Group and Push Mode 1. Set the Assignment Group as All your organization group. 2. Select Auto for the Push Mode. Page 46

47 Configure App Tunneling Options 1. Scroll down under the Policies section until you find the Remove On Unenroll and App Tunneling options. 2. Select Enabled for Remove on Unenroll. 3. Select Enabled for App Tunneling. 4. Select the "ios Per-App your organization group" profile from the list. Page 47
48 Add Application Configuration for Device UDID Even though it is possible to add as many configuration values as desired, to limit the scope of this lab, we are going to add only the following app configurations. 1. Scroll down if needed until you see the option Application Configuration. 2. Click to Enable Application Configuration. 3. Type in the Configuration Key as "Device UDID". 4. Type in the corresponding Configuration Value as {DeviceUid}. (NOTE - The keys and look up values are case sensitive). 5. Click on the option Add to insert a new row to add additional Application configurations in the next step. Add Application Configuration for Username, Address and Security Policy 1. Type in the Configuration Key as Enrollment User. 2. Type in the corresponding Configuration Value as {EnrollmentUser}. Click on the Add indicated with Blue border in the screenshot to add a new row. 3. Type in the Configuration Key as User Address. 4. Type in the corresponding Configuration Value as { Address}. Click on the Add indicated with Blue border in the screenshot to add a new row. 5. Type in the Configuration Key as Security Policy. 6. Select the Value Type as Boolean from the dropdown. (NOTE - All the other values in the lab are of type String). 7. Type in the corresponding Configuration Value as TRUE. (Note - The keys and look up values are case sensitive). Page 48
49 8. Click on Add to complete adding AppConfig Key-Values and Save. Page 49
50 Save and Publish the App 1. Validate that now you the assignment contains the All Devices group. 2. Validate that now you have VPN Access and Send Configuration Enabled. 3. Click on Save and Publish. Page 50
51 Validate Device Assignment and Internal App List 1. Preview the Device Assignment and validate that enrolled device is listed. 2. Click on Publish. Validate the App Configuration This section will validate the App Configuration that we have sent from the AirWatch Console. The look up values used in the AirWatch Console are replaced by the specific values based on the enrollment user and device Id. The sample application is designed to extract these values in the source code and display them for verification. These values, in addition to any other look up values sent from the AirWatch Console, can be readily accessed from within the application. Page 51

52 Accept the Application Installation Return to your ios device. You should receive a message from the OS requesting to install the internal application. You will need to tap Install to allow the application to install to the device. NOTE - You will not see this option if the device is Supervised. Page 52

53 Trust the App Developer Wait for the AppConfig app to download. 1. Tap the AppConfig app to launch the application. 2. ios will warn you that the App Developer is unknown. We used an independent developer account to sign this application that is not natively trusted by the OS. You should accept this warning by tapping Trust. NOTE - This prompt will be different depending on which OS is running on your device. Please follow the instructions in the prompt to trust the developer account. NOTE - You can also go ipad Settings > General > Profiles > Select the MDM profile which installed and trust the app from profile details. Page 53

54 Launch the AppConfig Sample App from the Device Once the application launches, tap App Configuration. Page 54


55 Verify the App Configuration Key - Value pairs 1. Verify that you are seeing the values as sent from the AirWatch console. Notice that the look up values are being replaced by the actual values from our enrolled user and device. 2. Click on Done to go back to the home page. Validate App Tunnel This section will validate that the AppConfig app is using AirWatch Tunnel to reach the internal URL, which is not externally accessible. If we launch the Webclip with the same URL then we see a server not found error. However, with the App Tunnel configuration, the AppConfig app can open a web view and can reach the same internal URL successfully. Launch & Enable the AirWatch Tunnel Client Next you will enable AirWatch Tunnel to handle network traffic. The user is only required to complete this step the first time AirWatch Tunnel is installed. Press the Home button on the ios device to return to the Launchpad. Swipe right if needed to see the downloaded applications. Select the AirWatch Tunnel client to open it. Page 55


56 Accept the VPN Security Warning Tap "YES" then press the home button to return to the Launchpad. Launch the AppConfig URL Web Clip Tap the AppConfig URL web clip on your device. This will attempt to open an internal resource using Safari. Confirm Internal Resource Cannot Be Reached Notice that from Safari, the internal URL cannot be reached since the device is not on the network and it does not have an active VPN connection to this resource. Page 56

57 Validate App Tunnel from AppConfig Sample App 1. Tap the AppConfig app on the device. 2. After the app is launched, tap App Tunnel. View the Internal Website 1. The application will launch and you will see the VPN icon appear indicating the connection is active. This website is available on an internal web server but not accessible from the public internet. 2. The website will load and you'll see the Welcome message. Page 57

58 3. Click Done to return to the AppConfig landing page. Validate Security Policies This section will validate how AppConfig can leverage Security Polices in order to enforce Data Loss Prevention. If we launch the Webclip on the device, we can copy and paste the date from the webpage. However, with Security Policy configuration, the AppConfig sample application prevents the Copy and Paste functionality from the same webpage. Page 58
59 Launch the Search AW Application Tap the Search AW application on your device. Page 59
60 Verify the Device Can Copy and Paste from the Web Clip This Web Clip opens a Google search for AirWatch. Notice that you can tap and hold to access the clipboard options on this page. Page 60
61 Validate Security Policy within AppConfig App 1. Tap the AppConfig app on the device. 2. After the app is launched, tap SecurityPolicy. Attempt to Copy from the AppConfig App 1. Long press on any word from the webpage 2. Validate that you are not able to access the clipboard options to Copy. This sample app allows the Copy/Paste settings to appear briefly and then disappear immediately. This validates that the Security Policy App config is enabling data Page 61

62 loss prevention within the app. However, you can perform the same operation outside without any restrictions. 3. Tap Done to return to the app landing page. AppConfig Wrap-Up You can see how deploying your apps using AppConfig settings can add another layer of functionality, control, and security around how users can interact with their enrolled devices. This only scratches the use cases of AppConfig, but hopefully provides some ideas around what you can accomplish. This concludes the demo of the AppConfig app on the device. Page 62

63 Un-enrolling Your Device You are now going to un-enroll the ios device from AirWatch. NOTE: The term "Enterprise Wipe" does not mean reset or completely wipe your device. This only removes the MDM Profiles, Policies, and content which the AirWatch MDM Agent controls. It will NOT remove the AirWatch MDM Agent application from the device as this was downloaded manually before AirWatch had control of the device. Enterprise Wipe (un-enroll) your ios device Enterprise Wipe will remove all the settings and content that were pushed to the device when it was enrolled. It will not affect anything that was on the device prior to enrollment. To Enterprise Wipe your device you will first bring up the AirWatch Console in a web browser. You may need to re-authenticate with your credentials (VLP registered address and "VMware1!" as the password). 1. Click Devices on the left column. 2. Click List View. 3. Click the checkbox next to the device you want to Enterprise Wipe. NOTE - Your Device Friendly Name will very likely be different than what is shown. It will, however, be in the same location as shown on image in this step. Page 63

64 Find the Enterprise Wipe Option 1. Click More Actions. NOTE - If you do not see this option, ensure you have a device selected by clicking the checkbox next to the device. 2. Click Enterprise Wipe under Management. Enter your security PIN. After selecting Enterprise Wipe, you will be prompted to enter your Security PIN which you set after your logged into the console ("1234"). 1. Enter "1234" for the Security PIN. You will not need to press enter or continue, the console will confirm your PIN showing "Successful" below the Security PIN input field to indicate that an Enterprise Wipe has been requested. NOTE: If "1234" does not work, then you provided a different Security PIN when you first logged into the AirWatch Console. Use the value you specified for your Security PIN. NOTE - If the Enterprise Wipe does not immediately occur, follow the below steps to force a device sync: 1. On your device, open the AirWatch Agent application. 2. Tap the Device section (under Status) in the middle of the screen. 3. Tap Send Data near the top of the screen. If this does not make the device check in and immediately un-enroll, continue to Step #4. 4. If the above doesn't make it immediately un-enroll, then tap Connectivity [Status] under Diagnostics. 5. Tap Test Connectivity at the top of the screen. NOTE - Depending upon Internet connectivity of the device and responsiveness of the lab infrastructure, this could take a couple of minutes Page 64

65 or more if there is excessive traffic occurring within the Hands On Lab environment. Feel free to continue to the "Force the Wipe" step to manually uninstall the AirWatch services from the device if network connectivity is failing. Verify the Un-Enrollment Press the Home button on the device to go back to the home screen. The applications pushed through AirWatch should have been removed from the device. NOTE - The applications and settings pushed through AirWatch management should have been removed. The Agent will still be on the device because that was downloaded manually from the App Store. Due to lab environment settings, it may take some time for the signal to traverse through the various Page 65

66 networks out and back to your device. Continue on to the next step to force the wipe if the needed. Page 66

67 Force the Wipe - IF NECESSARY If your device did not wipe, follow these instructions to ensure the wipe is forced immediately. Start by opening the ios Settings app. 1. Tap General in the left column. 2. Scroll down to view the Device Management option. 3. Tap Device Management at the bottom of the list of General settings. Page 67


68 Force the Wipe - IF NECESSARY Tap the Workspace Services profile that was pushed to the device. Force the Wipe - IF NECESSARY 1. Tap Remove Management on the Workspace Services profile. NOTE: If prompted for a device PIN, enter it to continue. VMware provisioned devices should not have a device PIN enabled. 2. Tap Remove on the Remove Management prompt. After removing the Workspace Services profile, the device will be un-enrolled. Feel free to return to the "Verify the Un-Enrollment" step to confirm the successful unenrollment of the device. Page 68
69 Module 2 - AirWatch REST API (30 minutes) Page 69
70 Module Overview AirWatch provides a collection of RESTful APIs which allow external programs to use the core product functionality by integrating the APIs with existing IT infrastructures and third-party applications. Leveraging the simplified REST style of software architecture, AirWatch REST APIs currently include Organization Group, Console Administration, Mobile Application Management, Mobile Device Management, Enrollment User Management, Smart Group Management and User Group Management functionalities. Leveraging REST-based APIs also allows several benefits to enterprises, including eliminated cost and time spent developing applications in-house. AirWatch APIs are fully able and ready to integrate with enterprise servers, programs and processes. Additionally, AirWatch APIs are efficient, run smoothly and are easily branded with enterprises. In this lab, you will: Configure the AirWatch Management Console to enable AirWatch REST API access. Setup a REST API Client in the Chrome Browser on the Control Center server. Enroll a device into AirWatch. Use the REST API Client to call "GET" API functions to retrieve data about the enrolled device. Use the REST API Client to call "POST" API functions to configure the enrolled device. Un-Enroll the device from AirWatch using the REST API. Page 70
71 Login to the AirWatch Console To perform most of the lab you will need to login to the AirWatch Management Console. Launch Firefox Browser Double-click the Firefox Browser on the lab desktop. Page 71
72 Authenticate to the AirWatch Administration Console The default home page for the browser is Enter your AirWatch Admin Account information and click the Login button. NOTE - If you see a Captcha, please be aware that it is case sensitive! 1. Enter your Username. This is you address that you have associated with your VMware Learning Platform (VLP) account. 2. Enter "VMware1!" for the Password field. 3. Click the Login button. NOTE - Due to lab restrictions, you may need to wait here for a minute or so while the Hands On Lab contacts the AirWatch Hands On Labs server. Page 72
73 Accept the End User License Agreement NOTE - The following steps of logging into the Administration Console will only need to be done during the initial login to the console. You will be presented with the AirWatch Terms of Use. Click the Accept button. Page 73
74 Address the Initial Security Settings After accepting the Terms of Use, you will be presented with a Security Settings popup. The Password Recovery Question is in case you forget your admin password and the Security PIN is to protect certain administrative functionality in the console. 1. You may need to scroll down to see the Password Recovery Questions and Security PIN sections. 2. Select a question from the Password Recovery Question drop-down (default selected question is ok here). 3. Enter "VMware1!" in the Password Recovery Answer field. 4. Enter "VMware1!" in the ConfirmPassword Recovery Answer field. 5. Enter "1234" in the Security PIN field. 6. Enter "1234" in the Confirm Security PIN field. 7. Click the Save button when finished. Page 74
75 Page 75
76 Close the Welcome Message After completing the Security Settings, you will be presented with the AirWatch Console Welcome pop-up. 1. Click on the Don't show this message again check box. 2. Close the pop-up by clicking on the X in the upper-right corner. Page 76
77 ios Device Enrollment Enroll Your ios Device You are now going to enroll your ios device for use with this module. Page 77
78 Download/Install AirWatch MDM Agent Application from App Store - IF NEEDED NOTE -Checked out devices will likely have the AirWatch MDM Agent already installed. You may skip this step if your device has the AirWatch MDM agent installed. At this point, if using your own ios device or if the device you are using does NOT have the AirWatch MDM Agent Application installed, then install the AirWatch Application. To Install the AirWatch MDM Agent application from the App Store, open the App Store application and download the free AirWatch MDM Agent application. Finding your Group ID The first step is to make sure you know what your Organization Group ID is. Page 78
79 1. To find the Group ID, hover your mouse over the Organization Group tab at the top of the screen. Look for the address you used to log in to the lab portal. 2. Your Group ID is displayed at the bottom of the Organization Group pop up. The Group ID is required when enrolling your device in the following steps. Launching the AirWatch MDM Agent Launch the AirWatch Agent app on the device. NOTE - If you have your own ios device and would like to test you will need to download the agent first. Page 79
80 Choose the Enrollment Method Click on the Server Details button. Attach the AirWatch MDM Agent to the HOL Sandbox Once the Agent has launched you can enroll the device. To do so, follow the below steps. 1. Enter "hol.awmdm.com" for the Server field. 2. Enter your Group ID for your Organization Group for the Group ID field. Your Group ID was noted previously in the Finding your Group ID step. 3. Tap the Go button. Page 80
81 NOTE - If on an iphone, you may have to close the keyboard by clicking Done in order to click the Continue button. Page 81
82 Authenticate the AirWatch MDM Agent On this screen, enter the Username and Password for the basic user account. 1. Enter "testuser" in the Username field. 2. Enter "VMware1!" in the Password field. 3. Tap the Go button. Page 82
83 Redirect to Safari and Enable MDM Enrollment in Settings The AirWatch Agent will now redirect you to Safari and start the process of enabling MDM in the device settings. Tap on Redirect & Enable at the bottom of the screen. Page 83
84 Install the MDM Profile Tap Install in the upper right corner of the Install Profile dialog box. Page 84
85 Install and Verify the AirWatch MDM Profile Tap Install when prompted at the Install Profile dialog. NOTE -If a PIN is requested, it is the current device PIN. Provided VMware devices should not have a PIN. Page 85
86 ios MDM Profile Warning You should now see the ios Profile Installation warning explaining what this profile installation will allow on the ios device. Tap Install in the upper-right corner of the screen. Page 86
87 Trust the Remote Management Profile. You should now see the ios request to trust the source of the MDM profile. Tap Trust when prompted at the Remote Management dialog. Page 87
88 ios Profile Installation Complete You should now see the ios Profile successfully installed. Tap Done in the upper right corner of the prompt. Page 88
89 AirWatch Enrollment Success Your enrollment is now completed. Tap Open to navigate to the AirWatch Agent. Accept the App Installation (IF NEEDED) You may be prompted to install a series of applications depending on which Module you are taking. If prompted, tap Install to accept the application installation. Page 89

90 AirWatch REST API In this section we will go through several REST APIs using both GET and POST commands. We will wrap up the module by un-enrolling the device using a DELETE API request. Get the REST API Key from console In this section, we will get the REST API Key. Click on All Settings Return to the AirWatch console. 1. Click Groups & Settings. 2. Click All Settings. Page 90

91 Navigate to REST API Settings 1. Click on System. 2. Expand the Advanced section. 3. Expand the API section. 4. Click REST API. Page 91
92 Note the REST API Key 1. Select Override for Current Setting. 2. Select Enabled for Enable API Access. 3. Using your mouse, highlight the API KEY that is in API Key text box. Right click on the text and select Copy. Page 92

93 Save the REST API Key 1. You may need to scroll down to find the Save button. 2. Click Save. 3. Click the Close button in the top right corner. Page 93

94 Open Notepad on the Main Console Server 1. Click the Windows Start Button. 2. Type "Notepad" in the search field. 3. Click on Notepad in the Programs list. Page 94

95 Paste the API Key Into Notepad 1. In Notepad, click on Edit. 2. Click on Paste. This will paste the API key into notepad. REST Client Setup In this section, you will configure a REST Client application/plugin on the Main Console server. This application will allow you to easily send REST API calls to AirWatch without having to go through the process of actually creating an application. For this module we will be using a plugin called Postman for Google Chrome. Launch the Chrome Browser On the desktop, launch Google Chrome by double clicking on the icon. Page 95


96 Open a New Tab In Chrome Click on the blank tab to open a new tab. Launch the Postman Chrome App 1. In the URL field, type "chrome://apps" and press enter. 2. Click on the Postman Icon. Enter Username and Password for POSTMAN REST API client In this section, we will prepare the Postman REST client to test AirWatch REST APIs. 1. Click on History and Collections bar. 2. Notice the History tab, which tracks the history of the REST APIs that you have used. You can reuse the entries from this section if you want to use the same API with any modifications. 3. Select the Authorization tab. 4. Click the Type dropdown. Page 96


97 5. Select Basic Auth. Enter The Credentials 1. Enter the AirWatch Administrator account name. This will be your address that you used to sign into the Lab. 2. Enter the password as "VMware1!" 3. Click on Show Password to ensure that you have entered the correct password. 4. Click on the Update request button. Page 97

98 Bring Up Notepad Select Notepad from the tray. Select the API Key From Notepad 1. In Notepad, click on Edit. 2. Click on Select All. Page 98

99 Copy the API Key From Notepad 1. Click on Edit. 2. Click on Copy. Select the Postman App. Select Postman from the tray. Page 99
100 Add the API Key to the Header 1. Click on the Headers tab. 2. Enter "aw-tenant-code" in the Header field. 3. Right click in the Value field by aw-tenant-code. 4. Select Paste. Now, we have our REST Client setup with Basic Authentication and another header with the AirWatch REST API key. In the following section, we will use this setup to make REST API calls. GET Commands - Enrolled Devices for a User GET commands are usually used to get some information from the server. The GET commands are primarily targeted towards 'get'ting information from the database without making any change to the data. The following API command requests information on the enrolled devices for a user. Search Device API request 1. Confirm that GET is selected.. Page 100


101 2. Enter the URL " search?user=testuser" in the URL field. NOTE - Please refer the section on how to copy and paste text in VLP in case you want to use that feature to enter URL. 3. Click the Send button. Validate Search Device API response 1. Ensure that you get a status as 200 OK. That indicates that your query is successful. 2. Click on the response format to Pretty. 3. Note the value of key Id under Devices. We will be using this in one of the POST API queries. You may use notepad to note down this value as you did with the REST API key. 4. Note the value of key UserId under Devices. We will be using this in the following REST APIs. You may use notepad to note down this value as you did with the REST API key. Page 101

102 GET Commands - Enrollment User Details This API command retrieves details about an enrollment user. For this lab, since we used 'testuser' to enroll the device, we going to use the user id of 'testuser' to retrive the enrollment user details. Enrollment User Details API request 1. Confirm that GET is selected. 2. Enter the URL in the URL field. Replace {UserId} with the UserId obtained from from step Click on the Send button. Validate Enrollment User API response 1. Ensure that you get a status as 200 OK. That indicates that your query is successful. 2. Confirm the information about the enrollment user. GET Commands - Device Applications In this step you will use the API to search for all Applications that are in the AirWatch App Catalog for Apple devices. Page 102


103 Application Search API request 1. Confirm that GET is selected. 2. Enter the URL " search?platform=apple" in the URL field. 3. Click on the Send button. Validate Application Search API response In this step, you will use the API to search for all Applications that are in the AirWatch App Catalog for Apple devices. 1. Ensure that you get a status as 200 OK. That indicates that your query is successful. 2. If you have multiple entries of ApplicatoinEntities, scroll down through the response until you find the entry with ApplicationName as AW REST API. 3. Note down the value of key Id under ApplicationEntity for the AW REST API entry. We will be using this value in one of the upcoming POST REST APIs. POST Commands - Lock Device POST REST API commands are usually intended to perform some action. In this section, we will 'post' some data to the database to make changes and we will verify those changes on the enrolled device. Page 103


104 POST Lock Device This API command can remotely lock a device. Prior to performing this step, please confirm that your enrolled device is on and unlocked. 1. Change the command type to POST. 2. Enter the URL " devices/{deviceid}/lockdevice". Replace {DeviceID} with the DeviceId returned in step Click on the button Send. Confirm Device Lock Confirm that the API Response status is a 202 Accepted. Confirm that the enrolled device is now locked. POST Commands - Send a Message This API command sends a push message to the enrolled device. In real world scenario, this API can be used to automate notifying managed devices about a certain event/ Page 104

105 action without requiring to login to the AirWatch EMM console and send push messages manually. Send Push Message to the enrolled device - Add Header for JSON In this section, we will explore how to make a JSON REST API request. We will add a header to the POST request so that API uses JSON format instead of XML that we have used so far. 1. Confirm that POST is selected. 2. Enter the URL " devices/{deviceid}/sendmessage" in the URL field. Replace {DeviceId} with the DeviceId returned in step Add the new header as "Content-Type". 4. Enter the value of the header as "application/json". Page 105

106 Send Push Message to the enrolled device - Add Body 1. Click the Body tab. 2. Click on the Raw radio button to change the format. 3. Select JSON (application/json) from the dropdown. 4. Enter the following text in the body section. Please refer to the section How to Copy and Paste in VLP if you prefer copy and paste the following text: { "MessageBody" : "AirWatch Test Push Message", "Application" : "AirWatch Agent", "MessageType" : "Push Notification" } 5. Ensure that you are not seeing X marks. If you do then double check quotes and commas in the text body to correct those errors. 6. Click on Send. Page 106
107 Confirm Message Delivery Ensure that you get the API response status as 202 Accepted is returned. You should now see a push notification with the text AirWatch Test Push Message on your device. POST Commands - Install an Application This API can install an application to the device. Page 107

108 Install Internal Application on the enrolled device In this step, we will install the internal application that we got in the application search API. This API can be used in real world scenario to automate app deployment on managed devices without requiring to login to the AirWatch EMM console and push the apps manually. 1. Confirm that POST is selected. 2. Enter the URL " internal/{applicationid}/install" in the URL field. Replace {applicationid} with the applicationid corresponding to the AW REST API application returned in step For this API, we are going to use the same header values as before. Ensure that you have selected the Body tab. Page 108
109 Confirm Application Installation 1. Ensure that you have selected format as Raw. 2. Ensure that you have selected the format as JSON(application/json). 3. Enter the following text in the request body: { "DeviceId" : {DeviceId} } Replace the {DeviceId} with the ID of the enrolled device returned from the search device API in step 3.2. NOTE - Ensure that the you have used lower case 'd' in Id of DeviceId. Otherwise you might get an error. Also, you should not use any quotes for the device id value. So your JSON body should look like, "DeviceId" : Click on Send. 5. Ensure that you get API response status as 202 Accepted. This should also install the AW REST API app on your enrolled device. DELETE Request In this section, you will see how to use a HTTP DELETE command. You will issue a single command to AirWatch to delete the device. Deleting a device will initiate an Enterprise Wipe (or un-enrollment) and will remove the device from the AirWatch database. This will NOT perform a factory reset on the device and will not in any way Page 109


110 delete any data from the device that was there prior to enrolling the device into AirWatch. Creating the DELETE Request 1. Ensure that you are selecting REST Query type as DELETE. 2. Use the following API to Delete the device from AirWatch EMM: " Replace {DeviceId} with the deviceid returned in step 3.2. Device Delete Confirmation 1. Select form-data to clear the API request body. 2. Click on Send. 3. Ensure that you get the API response status as 200 OK. The device will no longer be enrolled in AirWatch and the AW REST API app has been removed from the device along with any other applications that were present. Conclusion and Wrap Up This concludes the AirWatch REST API Module. There are many more API's available which can be leveraged to automate many of the AirWatch EMM console actions without Page 110
111 logging in to the console. REST APIs are powerful tools to perform bulk actions at the trigger of certain events to enhance the existing functionality of the AirWatch EMM solution. Page 111
112 Module 3 - Per-App VPN using AirWatch Tunnel (30 minutes) Page 112
113 Login to the AirWatch Console To perform most of the lab you will need to login to the AirWatch Management Console. Launch Firefox Browser Double-click the Firefox Browser on the lab desktop. Page 113
114 Authenticate to the AirWatch Administration Console The default home page for the browser is Enter your AirWatch Admin Account information and click the Login button. NOTE - If you see a Captcha, please be aware that it is case sensitive! 1. Enter your Username. This is you address that you have associated with your VMware Learning Platform (VLP) account. 2. Enter "VMware1!" for the Password field. 3. Click the Login button. NOTE - Due to lab restrictions, you may need to wait here for a minute or so while the Hands On Lab contacts the AirWatch Hands On Labs server. Page 114
115 Accept the End User License Agreement NOTE - The following steps of logging into the Administration Console will only need to be done during the initial login to the console. You will be presented with the AirWatch Terms of Use. Click the Accept button. Page 115
116 Address the Initial Security Settings After accepting the Terms of Use, you will be presented with a Security Settings popup. The Password Recovery Question is in case you forget your admin password and the Security PIN is to protect certain administrative functionality in the console. 1. You may need to scroll down to see the Password Recovery Questions and Security PIN sections. 2. Select a question from the Password Recovery Question drop-down (default selected question is ok here). 3. Enter "VMware1!" in the Password Recovery Answer field. 4. Enter "VMware1!" in the ConfirmPassword Recovery Answer field. 5. Enter "1234" in the Security PIN field. 6. Enter "1234" in the Confirm Security PIN field. 7. Click the Save button when finished. Page 116
117 Page 117
118 Close the Welcome Message After completing the Security Settings, you will be presented with the AirWatch Console Welcome pop-up. 1. Click on the Don't show this message again check box. 2. Close the pop-up by clicking on the X in the upper-right corner. Page 118

119 AirWatch Console Configuration - Publish VMware Tunnel In this chapter you will create a Per-App VPN profile and deploy an Application configured to use the VPN Tunnel on ios. Create an ios VPN Profile In this step you will configure the ios profile that will be delivered to the device to configure the VMware Tunnel Client on the device to allow only designated applications to access content on internal servers. If you completed the previous module already, "Introduction to AppConfig", then you have already created the Per-App VPN profile and you may use the ios Per-App VPN profile created in that lab. You may still walk through these steps if you'd like. Add a New Profile 1. Click Add. 2. Click Profile. Page 119
120 Select the OS the profile will be used for. Click Apple ios Page 120
121 Configure the General Properties of the Profile 1. Enter "Per-App VPN" as the Name. 2. Select All Devices as the Assigned Smart Group. Page 121
122 Add a VPN Payload 1. Click VPN from the Payload menu. 2. Click Configure to access the VPN payload settings. Page 122
123 Configure the VPN Payload 1. Select VMware Tunnel from the Connection Type dropdown. 2. Click the checkbox to enable the Enable VMware Tunnel option. 3. Click Save & Publish. Page 123
124 Publish the VPN Profile Click Publish. Add the VMware Tunnel Client as a Public Application In order to leverage the VPN profile, the VMware Tunnel Client must be installed on your device. We can leverage AirWatch to deploy the client as a managed application to the device This step will walk you through the process of adding the client application to the AirWatch Console to automatically install on enrolled devices. Please note, while it is required that the Tunnel client application is installed on any device using Per App Tunnel, it does not have to be a managed application. Users can download the VMware Tunnel client from the App Store. Page 124

125 Add a New Public Application 1. Click Add. 2. Click Public Application. Page 125
126 Search for the Application to Add 1. Select Apple ios from the Platform dropdown. 2. Enter "VMware Tunnel" in the Name field. 3. Select Next. Page 126

127 Select the VMware Tunnel Client from the Search Results Click Select on the VMware Tunnel application. Page 127
128 Assign the Application to an Assignment Group The Info Tab is configured already so we will continue to the next settings tab. 1. Click the Assignment tab. 2. Select All yourname@ .com as the Selected Assignment Group. 3. Select Automatic: system push for the App Delivery Method. Page 128
129 Configure the Application Policies 1. Scroll down to the bottom of the Policies section. 2. Select Enabled for Remove On Unenroll. 3. Click Save & Publish. Page 129
130 Publish the Application Click Publish. Add the VMware Browser as a Public Application Now that the Tunnel client is assigned to the appropriate group, this section walks through adding an application that is enabled to use Per App Tunnel. After enabling the setting that allows an application to use VPN, you must select the VPN profile that the app should use. This requires that any application you would like to leverage Per App VPN is pushed to the device from the AirWatch Console as a managed app. There is one exception to this, which is the Safari application on ios. This is covered in detail in a later section of this lab. Page 130
131 This step will walk you through the process of adding an application from the Public App store that will be associated to the VPN profile you created. Add a New Public Application 1. Click Add. 2. Click Public Application. Search for the Application to Add 1. Select Apple ios from the Platform dropdown. 2. Enter "VMware Browser" in the Name field. 3. Select Next. Page 131

132 Select the VMware Browser from the Search Results Click Select on the VMware Browser application. Page 132
133 Assign the Application to an Assignment Group The Info Tab is configured already so we will continue to the next settings tab. 1. Click Assignment tab. 2. Select All Devices as the Selected Assignment Group. 3. Select Automatic:system push for App Delivery Method Page 133
134 Set the Deployment Options for the Application Scroll down to find the Policies section. 1. Set App Tunneling to Enabled. 2. Select Per-App your@ .shown.here for the Per-App VPN Profile. 3. Click Save & Publish. Page 134
135 Publish the Application Click Publish. Page 135
136 ios Device Enrollment Enroll Your ios Device You are now going to enroll your ios device for use with this module. Page 136

137 Download/Install AirWatch MDM Agent Application from App Store - IF NEEDED NOTE -Checked out devices will likely have the AirWatch MDM Agent already installed. You may skip this step if your device has the AirWatch MDM agent installed. At this point, if using your own ios device or if the device you are using does NOT have the AirWatch MDM Agent Application installed, then install the AirWatch Application. To Install the AirWatch MDM Agent application from the App Store, open the App Store application and download the free AirWatch MDM Agent application. Finding your Group ID The first step is to make sure you know what your Organization Group ID is. Page 137


138 1. To find the Group ID, hover your mouse over the Organization Group tab at the top of the screen. Look for the address you used to log in to the lab portal. 2. Your Group ID is displayed at the bottom of the Organization Group pop up. The Group ID is required when enrolling your device in the following steps. Launching the AirWatch MDM Agent Launch the AirWatch Agent app on the device. NOTE - If you have your own ios device and would like to test you will need to download the agent first. Page 138

139 Choose the Enrollment Method Click on the Server Details button. Attach the AirWatch MDM Agent to the HOL Sandbox Once the Agent has launched you can enroll the device. To do so, follow the below steps. 1. Enter "hol.awmdm.com" for the Server field. 2. Enter your Group ID for your Organization Group for the Group ID field. Your Group ID was noted previously in the Finding your Group ID step. 3. Tap the Go button. Page 139
140 NOTE - If on an iphone, you may have to close the keyboard by clicking Done in order to click the Continue button. Page 140

141 Authenticate the AirWatch MDM Agent On this screen, enter the Username and Password for the basic user account. 1. Enter "testuser" in the Username field. 2. Enter "VMware1!" in the Password field. 3. Tap the Go button. Page 141

142 Redirect to Safari and Enable MDM Enrollment in Settings The AirWatch Agent will now redirect you to Safari and start the process of enabling MDM in the device settings. Tap on Redirect & Enable at the bottom of the screen. Page 142

143 Install the MDM Profile Tap Install in the upper right corner of the Install Profile dialog box. Page 143
144 Install and Verify the AirWatch MDM Profile Tap Install when prompted at the Install Profile dialog. NOTE -If a PIN is requested, it is the current device PIN. Provided VMware devices should not have a PIN. Page 144

145 ios MDM Profile Warning You should now see the ios Profile Installation warning explaining what this profile installation will allow on the ios device. Tap Install in the upper-right corner of the screen. Page 145
146 Trust the Remote Management Profile. You should now see the ios request to trust the source of the MDM profile. Tap Trust when prompted at the Remote Management dialog. Page 146
147 ios Profile Installation Complete You should now see the ios Profile successfully installed. Tap Done in the upper right corner of the prompt. Page 147


148 AirWatch Enrollment Success Your enrollment is now completed. Tap Open to navigate to the AirWatch Agent. Accept the App Installation (IF NEEDED) You may be prompted to install a series of applications depending on which Module you are taking. If prompted, tap Install to accept the application installation. Page 148

149 Testing Per App VPN Now that the device is enrolled and has received the settings we configured in the AirWatch Console, we are ready to begin testing the Per-App VPN functionality. Testing Per App VPN on ios The applications assigned in the previous steps should push down during enrollment. The VMware Tunnel and VMware Browser applications should be installed on your device. Launch the VMware Browser Press the Home button on the ipad to return to the Launchpad.Swipe right to see the downloaded applications if needed. Tap the VMware Browser icon to launch the application. If prompted, select OK to allow the Browser to send your device push notifications. Page 149

150 Access the Internal Website with VMware Browser 1. The application will launch and you will see the VPN icon appear indicating the connection is active. The application will now connect to AirWatch and retrieve the settings for your Sandbox Organization Group. These settings include a default homepage that has been pre-configured for this lab. This website is available on an internal web server but not accessible from the public internet. 2. The website will load and you'll see the Welcome message. Attempt to Access the Website From Safari We will now show that although the VPN connection is active, other applications on the device will not be able to access the Tunnel or the internal resources. Page 150

151 Select the URL from the VMware Browser 1. Press & hold the Navigation Bar in the AirWatch Browser. 2. Choose Select All to highlight the URL for the internal site. Copy the URL from the VMware Browser Select Copy. Page 151
152 Open Safari Return to the launchpad by pressing the Home button on the ipad. Open Safari by selecting the icon form the Launcher. Page 152
153 Paste the URL Into the Safari Browser 1. Open a new tab by selecting the + sign on the navigation bar. 2. Select the entry box on the navigation bar. 3. Press & hold for a count of two then release on the entry box and select Paste. 4. Select Go on the keyboard. Notice that the website does not load in the Safari browser due to DNS failure. The website is published to an internal DNS that can only be accessed when the VPN connection is being used. Although the VPN connection may remain active (look for the VPN icon in the status bar), Safari is not designated as an application that is allowed to use the Per-App VPN Tunnel. You may have multiple VPN configurations and multiple apps assigned for each VPN. Most Public applications (apps using Cocoa framework) are compatible with per-app VPN on ios. Page 153
154 Page 154

155 Safari Domain Profile Configuration In this chapter you create a Per-App VPN profile and deploy an Application configured to use the VPN Tunnel on ios. Add a New Version to the ios VPN Profile In this step you will update the ios profile created in the first step to include Safari domains. Update the Per-App VPN Profile Return to the AirWatch Console. 1. Click Devices. 2. Click Profiles & Resources. 3. Click Profiles. 4. Select the edit icon next to the Per-App VPN profile. Page 155
156 Add Version to update the existing profile 1. Click Add Version to allow editing. 2. Select the VPN payload on the left hand side. Page 156
157 Configure Safari Domains 1. Enter "airwlab.com"in the Safari Domains list. 2. Click "Save & Publish". NOTE - They syntax for Safari Domains does not require a wildcard character. Enter only the domain hostname to whitelist the entire domain to initiate VPN in Safari. Page 157
158 Publish the updated VPN Profile Click Publish. Page 158

159 Testing Safari Domains with Per App Tunnel Now that the VPN profile is updated to include the domain tested in the first example in the Safari Domains list, we can confirm these settings have updated on the device and test in the native Safari application. Testing Safari Domains with Per App Tunnel NOTE - This step is to demonstrate the changes that occur on the device after the updates to the VPN profile are published from the console. Tap Settings. Page 159

160 Open VPN Settings 1. Tap General. 2. Scroll down to find the VPN section. 3. Tap VPN. Page 160

161 Select Your VPN Configuration 1. Tap VPN Configuration #XXXXXX from your Per-App VPN profile. Page 161

162 View Included Per-App VPN Apps Note all managed applications from the AirWatch console enabled to use Per-App VPN and domains listed in Safari Domains in the VPN profile will appear in this list. Whitelisting a domain in the Safari Domains list will initiate a VPN connection on demand whenever the user browses to a site within this domain NOTE - Wildcards are not required when whitelisting a Safari Domain. The entire domain will automatically be whitelisted for VPN On Demand when added to VPN profile. Attempt to Access the Website From Safari We will now show that browsing to a site in the domain added to the "Safari Domains" list will initiate a VPN connection. Page 162

163 Open Safari Return to the launchpad by pressing the Home button on the ipad. Open Safari by selecting the icon form the Launcher. The VPN icon should not be displayed in the toolbar. Page 163
164 Paste the URL Into the Safari Browser 1. Open a new tab by selecting the + sign on the navigation bar. 2. Select the entry box on the navigation bar. 3. Press & hold for a count of two then release on the entry box and select Paste or type"internal.airwlab.com" 4. Select Go on the keyboard. Notice that the website now loads in the Safari browser after the VPN profile is updated to include airwlab.com in the Safari Domains list, whitelisting the domain for Per App VPN. The website is published to an internal DNS that can only be accessed when the VPN connection is being used. Page 164
165 Page 165

166 Browse to 1. Open a new tab by selecting the + sign on the navigation bar. 2. Select the entry box on the navigation bar. 3. Press & hold for a count of two then release on the entry box and select Paste or type" 4. Select Go on the keyboard. Notice that the website now loads in the Safari browser after the VPN profile is updated to include airwlab.com in the Safari Domains list, whitelisting the domain for Per App VPN. The website is published to an internal DNS that can only be accessed when the VPN connection is being used. Page 166
167 Module 4 - Introduction to AirWatch Android SDK (45 minutes) Page 167
168 Explore AirWatch SDK for Android using Android Studio The AirWatch Software Development Kit (SDK) for Android allows you to enhance your enterprise applications with MDM capabilities. By incorporating AirWatch SDK code within your Android app project, you can use AirWatch information such as enrollment or compromised status to add a layer of security and business logic however you see fit within your application. The Android SDK has two primary components or libraries: 1. Client SDK - The client SDK is a lightweight library for retrieving basic management and device information such as compromised status, environment info, and user information. 2. AWFramework - The AWFramework is a heavier library for more advanced SDK functionality such as application proxy and tunneling, integrated authentication, and encryption functions. In this lab, we are not going into specifics of each of the components. Rather, this is a walkthrough of how to setup AirWatch Android SDK and deploy the SDK enhanced app to a managed device and validate the SDK integration. Requirements Before integrating AirWatch SDK into an app, let us discuss the prerequisites. 1. Device Operating System - Android 4.0+ / Ice Cream Sandwich / APILevel IDE - Android Studio with the Gradle Android Build System (Gradle) v AirWatch Anchor App - AirWatch Agent v5.3+ for Android. The anchor app facilitates communication between the Enterprise Android App and the AirWatch environment. Whitelisting the Signing Key in AirWatch The AirWatch SDK for Android offers feature enhancements for apps deployed as Internal apps as well as Public Apps deployed via Play Store. However, for the SDK function calls to work, you must ensure your application signing key is whitelisted with the AirWatch environment. Depending upon the mode of app deployment, the process changes slightly. Page 168
169 Internal Apps For applications which are uploaded locally for internal distribution (either during production or testing), the following steps are taken to establish trust: 1. Sign the APK file with Android Studio Keystore. If you use the Debug Keystore from Android Studio, you can whitelist the app for debugging from the local IDE. However, if you use Release Keystore, the app is not eligible for debugging. 2. Upload the signed APK file to AirWatch Admin Console. 3. The AirWatch Admin Console extracts the application's public signing key. 4. The AirWatch Admin Console whitelists the application's public signing key with the AirWatch Agent. 5. When the application is launched, it calls AirWatch SDK for initial configuration. 6. The AirWatch Agent validates the signing key by comparing it to the one uploaded in the AirWatch Admin Console. Public Apps The automatic key whitelisting feature is currently only supported with Internal Apps. However, the trust for the Public Apps using AirWatch SDK can be established by manually whitelisting the public signing key. If the app developer shares the signing key then AirWatch can follow steps similar to the Internal apps flow for whitelisting. Integrate AirWatch SDK for Android into the Sample App In this section, we will setup the Android SDK Sample app to use AirWatch Android SDK. We will use Android Studio as Integrated Development Environment (IDE) to include the SDK libraries into the sample app project. After that, we will build, sign, and export the APK to upload into the AirWatch admin console. Launch Windows 10 VM In this section, we are going to use Android Studio which is installed on the Windows 10 VM. 1. Click on Win10-01.rdp remote desktop connection shortcut to launch the Win 10 VM. Page 169

170 Launch Android Studio from Taskbar 1. From the Taskbar, click on the Android Studio icon to launch it. Open an existing Android Studio Project Click on the option Open an existing Android Studio project. Page 170

171 Open the Sample App Project from Recent Projects Select the first project airwatch-sdk-test-app from Recent projects to launch Sample App. Page 171

172 Open the Sample App Project (Optional) NOTE - The following steps are optional depending how the Android Studio is setup. If you already have Android Studio open with the sample project, you can skip this step. 1. From the windows, select \holuser\documents\hol\android SDK. 2. Select Android SDK Select sample code. 4. Select airwath-sdk-test-app. NOTE - Android Studio can auto-detect the Android Project files and will put Android Studio icon before for easier identification and access. 5. Click Ok. Open the libs folder of the project and validate the required SDK libs 1. Select the View Project from the drop down. 2. Expand the root airwatch-sdk-test-app. 3. Right click on the folder libs. Page 172
173 4. Select the option Show in Explorer. 5. Validate that you have AirWatchSDK Jar file, AWFramework aar and gson-2.4 jar file included in the libs folder. You will see a lot of other libraries but these three are the primary libraries that are used for this lab. NOTE - If you do not see these libraries in the libs folder, then you can add those from the SDK package. These files are located in \Documents\HOL\ Android SDK\Android SDK v16.02\libs\awframework and ClientSDK folder. The following step demonstrates how to add the gson library to the project libs folder. Page 173

174 Add the gson library to the project libs folder For any SDK app, the developer needs to add the related libraries to the libs folder of the project, otherwise the project might not build correctly. To limit the scope of this lab, most of the files are already added in the correct folder for you. In this section, we are going to add the gson library as an example. Page 174

175 For troubleshooting any build errors, we should always check if the required libraries are added or not as the first troubleshooting step. NOTE - Perform this step only if you don't see gson library in your project's libs folder. Follow similar steps for AirWatchSDK jar file and/or AWFramework aar file in case they are missing in the libs folder. 1. From the taskbar at the bottom on the Desktop, click on the icon to launch File Explorer. 2. In the new Window, navigate to Documents\HOL\Android SDK\Android SDK v16.02\libs\clientsdk. 3. Right Click on gson-2.4 executable JAR file. 4. Click on Copy. 5. In another Window for libs folder (if you closed it, then reopen from Android Studio as described in the step above), Right Click on click on Paste to add the gson library. Close or minimize the Explorer window. Page 175

176 Build the Sample App Project To limit the scope of this lab, all the coding has already been implemented in the project. We have also verified that the project has the required libraries and added the gson library. Now it is ready to be built. Back to the Android Studio window, 1. Select the root airwatch-sdk-test-app. 2. From the toolbar, select Build. 3. Select the option Build > Rebuild Project. This will start the build. 4. Select the perspective Gradle Console From the bottom right. 5. The build time may vary depending on the VM configuration but after some time (~2 minutes), you should see the status as BUILD SUCCESSFUL. Page 176

177 Generate Signed APK 1. Select the root airwatch-sdk-test-app (if not done already). 2. From the toolbar, select Build. 3. Select the option Generate Signed APK... Page 177

178 Enter Master Password for keychain For this lab, keychain and keychain alias is already setup for you and is encrypted with a Master Password. When prompted, 1. Enter the password as "VMware1!". 2. Click on OK. 3. Keep all the defaults and click on Next. NOTE - The keychain is located at C:/Users/holuser/Documents/HOL/Android SDK/awks.jks and alias is auto-populated when you make the selection. Select APK Destination Folder For easier access, we are going to save the application on the Desktop. 1. Click on the Browse icon. Page 178

179 2. Click on the Desktop icon to select the destination folder as Desktop. 3. Click on OK to continue. Select Build Type 1. Select the Build Type as release. NOTE - If we select the build type as debug, it will allow us to run the app in the debug mode by connecting the device to the Computer and troubleshoot via Android Studio debugger. However, to limit the scope of this lab, we are going to sign the app with the release key. 2. Check the V1 (Jar Signature) checkbox. 3. Click Finish to start the process. Depending on machine resources, it will take anywhere from 2 to 3 minutes to complete the APK generation process. Page 179

180 While we are waiting to generated the signed APK, let us go ahead and create the SDK profile which we will assign to our sample app while uploading it to the AirWatch Console. Page 180
181 Login to the AirWatch Console To perform most of the lab you will need to login to the AirWatch Management Console. Launch Firefox Browser From the Windows 10 Virtual Machine, navigate to the desktop and double-click the Mozilla Firefox icon. Page 181
 account. 2.")
182 Authenticate to the AirWatch Administration Console The default home page for the browser is Enter your AirWatch Admin Account information and click the Login button. NOTE - If you see a Captcha, please be aware that it is case sensitive! 1. Enter your Username. This is you address that you have associated with your VMware Learning Platform (VLP) account. 2. Enter "VMware1!" for the Password field. 3. Click the Login button. NOTE - Due to lab restrictions, you may need to wait here for a minute or so while the Hands On Lab contacts the AirWatch Hands On Labs server. Page 182

183 Accept the End User License Agreement NOTE - The following steps of logging into the Administration Console will only need to be done during the initial login to the console. You will be presented with the AirWatch Terms of Use. Click the Accept button. Page 183
184 Address the Initial Security Settings After accepting the Terms of Use, you will be presented with a Security Settings popup. The Password Recovery Question is in case you forget your admin password and the Security PIN is to protect certain administrative functionality in the console. 1. You may need to scroll down to see the Password Recovery Questions and Security PIN sections. 2. Select a question from the Password Recovery Question drop-down (default selected question is ok here). 3. Enter "VMware1!" in the Password Recovery Answer field. 4. Enter "VMware1!" in the ConfirmPassword Recovery Answer field. 5. Enter "1234" in the Security PIN field. 6. Enter "1234" in the Confirm Security PIN field. 7. Click the Save button when finished. Page 184
185 Page 185

186 Close the Welcome Message After completing the Security Settings, you will be presented with the AirWatch Console Welcome pop-up. 1. Click on the Don't show this message again check box. 2. Close the pop-up by clicking on the X in the upper-right corner. Page 186

187 AirWatch Console configuration for the SDK Sample App In this section, we will modify the default SDK profile and assign it to the sample app. If we have more than one set of configurations then we can create custom SDK profiles and assign them individually. However, to limit the scope of this lab, we are going to change only the default profile. The profile payloads that we are targeting for this lab are, Authentication, Custom Settings and AirWatch App Tunnel. We will examine how these payloads take effect in the app by sending the configuration over the air. We will discuss each payload and the use case in the individual steps. Configure the Default SDK Profile in the AirWatch Console 1. Click on Apps & Books. 2. Click on AllApps & Books Settings. Page 187
188 Navigate to Security Policy 1. Under the Apps section, expand Settings And Policies. 2. Click Security Policies. Page 188
189 Authentication Type The Authentication payload enables the sample app to populate a prompt to authenticate upon launch. The sample app is already equipped with the all the code required to render the authentication box and this payload is used to specify related attributes e.g. type, timeout, allowed attempts etc. The use case here is to require the end user to authenticate in order to use app functionality and data. This restricts the exposure of sensitive resources to unmanaged/ unauthorized users. While there are multiple combinations possible to fulfill the corporate security requirements, we are going to use the following configuration for Authentication. 1. Change the Current Settings to Override. 2. Select the Authentication Type as Passcode. NOTE - We are only enabling Authentication Type as Passcode, however, Single Sign on will be disabled. 3. Select the Authentication Timeout to 1 minute(s). 4. Select Minimum Passcode Length to 6. Keep all the other options to default. Page 189
190 AirWatch App Tunnel AirWatch App Tunnel will allow the application to access backend resources to gather the required data and certain functionality. The advantage of using this payload is that so we do not need to enable device level VPN which could potentially expose the internal resources to any unintended third party apps. On top of that, we can also restrict the domains for which the traffic will be tunnelled to give more granular network access control. Now, we will configure the payload to use AirWatch Tunnel already setup at a higher Organization group. We will restrict the traffic to *.airwlab.com to tunnel only. 1. Scroll down until you see the option for AirWatch App Tunnel. 2. Click on Enabled for AirWatch App Tunnel if it is not selected already. 3. Ensure that Host Name is holtunnel.airwlab.com. 4. In the section for App Tunnel URLs enter "*.airwlab.com". NOTE - Using a Per App VPN Profile is another way of leveraging the AirWatch App Tunnel for proxying. Page 190
191 Save Security Policy settings 1. Scroll down to the bottom. 2. Click Save. You should see Saved Successfully at the top which confirms that configuration is saved. Enable Custom Settings 1. Click Settings under Settings And Policies. 2. Click Override for Current Setting. 3. Select Enabled for Custom Settings. 4. Click Custom Settings to expand the section. Page 191
192 Configure Custom Settings Custom settings allows the AirWatch admin to push down values which are variable across the organization group structure. e.g. the values such as username are not available before the device is enrolled. Another example would be to send down an authentication URL such as SAML auth. endpoint which may be different for different organization groups depending on the physical location. By using Custom Settings, an AirWatch admin can send down either hardcoded values (such as a URL) or they can leverage the look up values available within AirWatch console. e.g. when we push down the look up value {EnrollmentUser}, that value will get replaced by the actual enrollment user when the app is installed on a managed device. In this section, we are going to send one hardcoded value (URL) and one lookup value ({EnrollmentUser}) 1. Scroll down to so you can view the Custom Settings input field. 2. Type in the following in Custom Settings input field: "URL: and "username:{enrollmentuser}" 3. Click Save. You should see Saved Successfully at the top which confirms that configuration is saved. 4. Click on X at the top right to close the window. NOTE - An app developer can define variables for the values pushed down via Custom Settings and then those variable would be replaced by actual values in runtime. Page 192
193 Configure the SDK Sample App in the AirWatch Console Now we should have a SDK profile ready to be applied to the app. In this section, we will upload the app, assign the SDK profile we just configured and then setup the deployment option. Page 193

194 Add Internal Application 1. Click on Add in top right. 2. Click on Internal Application. Page 194

195 Upload the SDK Sample App to the AirWatch Admin Console 1. Click Upload. 2. Click Browse. Page 195
196 Navigate to AirWatch SDK Sample App 1. From the left pane, select the folder Documents. 2. Select the app that we signed and exported from Android studio: AirWatch SDKTest-release.apk. 3. Click on Open. 4. Click on Save. 5. Click on Continue at the bottom of the Add Application window. Page 196
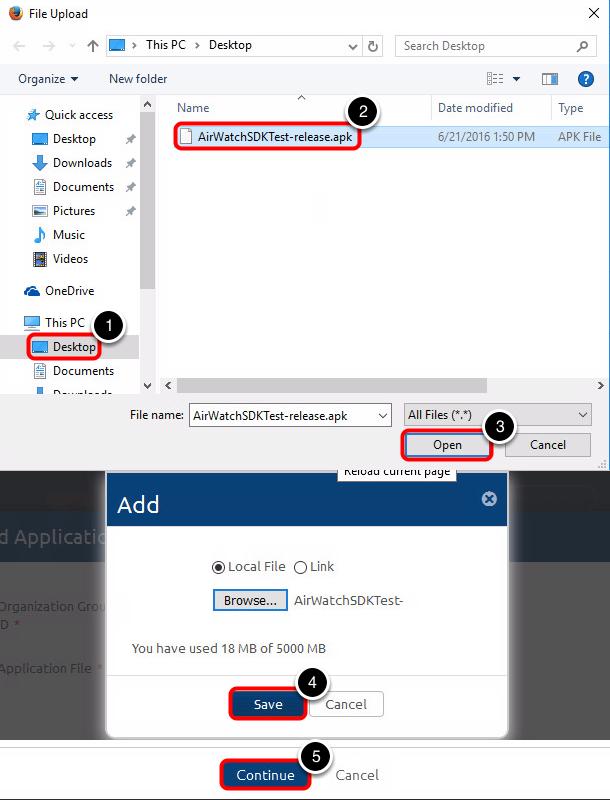
197 Page 197

198 Select enhancement mode as SDK 1. Now to select the SDK profile, click on the dropdown More. 2. Select the option enhancement mode as SDK. Page 198
199 Select Android Default Settings as SDK profile 1. Since we did not create a custom profile but rather changed the default profile, from the dropdown we are going to select Android Default We are not concerned with Application Profile for this lab. 2. Click on Save & Assign. Page 199

 for the Assignment Group. 2. Select Auto for Push Mode.")
200 Update Assignment Click on ADD ASSIGNMENT. Add Smart Group and Push Mode 1. Select All Devices for the Assignment Group. 2. Select Auto for Push Mode. Add Assignment Click Add at the bottom of the Add Assignment window. Page 200
201 Save and Publish the App 1. Validate that now you the assignment contains the All Devices group. 2. Click on Save and Publish. Page 201
202 Confirm Device Assignment and Publish Click Publish. Page 202
203 Enroll an Android Device Enrolling an Android Device with the Basic Account In this chapter you will be enrolling an Android device to install the SDK Sample App and validate the functionality. NOTE - The device screenshots may differ slightly based on the device model you are using for the lab. Finding your Group ID The first step is to make sure you know what your Organization GroupID is. 1. To find the Group ID, hover your mouse over the GroupID tab at the top of the screen. This may be shown in the form of the original address used to create the sandbox. 2. The GroupID will be displayed under the Organization Group name. The GroupID is required when enrolling your device. NOTE - This screen shot shows an example of what a Group ID is, and not what your Group ID is actually. Page 203

204 Download/Install AirWatch MDM Agent Application from App Store At this point, if the device you are using does NOT have the AirWatch MDM Agent Application installed, then install the AirWatch MDM Agent Application from the Google Play store. To Install the AirWatch MDM Agent application from the Google Play Store, open the Play Store application and download the free AirWatch MDM Agent application. NOTE - You will need to "Accept" the necessary access policies. Launching the AirWatch MDM Agent Launch the AirWatch Agent app on the device. If you have your using your own Android device and would like to test you will need to download the agent first. Select AirWatch MDM Agent Authentication Method Once the Agent has launched you can enroll the device. To do so, you must first select the AirWatch authentication method. Page 204

205 Tap on Server Details. Page 205

206 Attach the AirWatch MDM Agent to the HOL Sandbox After selecting the Server authentication method, you need to supply the information to authenticate. To do so, follow the below steps. 1. Enter " for Server. 2. For Group ID, enter the Group ID for your Organization Group. This was noted previously in the "Enroll your Android Device" step. 3. Tap the Continue button. NOTE - If on an iphone, you may have to close the keyboard by clicking "Done" in order to click the "Continue" button. Page 206

207 Authenticate the AirWatch MDM Agent On this screen, enter the credentials for the basic user we created in the earlier step. 1. Type in the Basic User Account Username. This should be 'testuser'. 2. Type in the Basic User Account Password. This should be 'VMware1!'. 3. Tap the Continue button. Page 207

208 Android Authentication Complete You should now see a screen stating the Authentication is complete and the following steps will be used to ensure the device is compliant with defined policies and profiles. Tap the Get Started button on the device screen. Page 208

209 Grant Permissions to AirWatch MDM Agent At this point, the AirWatch MDM Agent is ready to install the profile. When the next screen appears on your device, you will need to tap the Activate button. Tap the Continue button in the AirWatch MDM Agent wizard on your device. Page 209

210 Activate Device Administrator on Android You should now see the "Activate device administrator" screen on your device. You will now be taken to the Profile installation Screen. Tap the Activate button. Page 210

211 Install Enterprise Service You are now taken back to the AirWatch MDM Agent wizard and notified you will be installing the Enterprise Service. When the next screen appears on your device, you will need to tap the Activate button. Tap the Continue button in the AirWatch MDM Agent wizard on your device. Page 211

212 Complete Action Using - IF NEEDED If you see a "Complete Action Using" pop-up on your Android device, then a specific app package installer has not been selected as default. 1. Check the Use by default for this action box. 2. Select the Android Package Installer. NOTE - If you do not get this notification, ignore this step and go to the next step. Page 212
![AirWatch Service Installer You should now see the "AirWatch [device] Service Installer" screen on your device.](/docs-images/87/97225675/images/213-0.jpg "NOTE - In the example here, the device used is an LG Phone. Hence, the service is the \"AirWatch LG Service\".")
213 AirWatch Service Installer You should now see the "AirWatch [device] Service Installer" screen on your device. NOTE - In the example here, the device used is an LG Phone. Hence, the service is the "AirWatch LG Service". Tap the Install button. Page 213
![AirWatch Admin Service Installer You should now see the "AirWatch [device] Admin Service Installer" screen on your device.](/docs-images/87/97225675/images/214-0.jpg "NOTE - In the example here, the device used is an LG Phone. Hence, the service is the \"AirWatch LG Admin Service\".")
214 AirWatch Admin Service Installer You should now see the "AirWatch [device] Admin Service Installer" screen on your device. NOTE - In the example here, the device used is an LG Phone. Hence, the service is the "AirWatch LG Admin Service". Tap the Activate button. Page 214

215 Configure Enterprise Resources You should now see the device screen on "Part 3: Configure" stating the authentication and securing of the device was successful. You now would normally need to configure the enterprise resources which have been assigned to your device via AirWatch. These are settings commonly defined by your Information Technology department - which in this case is you! Tap the Continue button in the AirWatch MDM Agent configuration wizard on your device. Page 215

216 Install Applications At the "Install Applications" configuration screen, you (as the end user) would be given the option to install applications assigned to you by your Employer's Information Technology department. Since our "Android No Camera" profile did not include additional applications, only the basic support applications have been pushed here for the type of device. NOTE - Not all Android devices may need specific services or applications. Tap the Continue button in the AirWatch MDM Agent configuration wizard on your device. Page 216

217 Exit AirWatch MDM Agent You have now completed the AirWatch MDM Agent configuration wizard. Tap the Exit button in the AirWatch MDM Agent configuration wizard on your device. NOTE - You will be taken to the AirWatch Agent app and shown connectivity and device info. Page 217

218 Explore Android SDK on the enrolled device In this section we are going to install the SDK Sample app on the device and explore the SDK functionalities related to the payloads we configured. NOTE - This article uses device screenshots from a Nexus 5 device. However, they might differ slightly based on the device you are using for this lab. Launch the SDK Sample App Tap the AirWatch SDK Sample App to launch it. Allow the prompt The SDK sample app is targeting multiple features so you might see different prompts requesting access on the test device. Please go ahead and ALLOW all the prompts as they show up. Page 218

219 Enter Basic User Credentials (If Necessary) If prompted, enter the Username and Password for the AirWatch Basic User account: 1. Enter "testuser" for the Username. 2. Enter "VMware1!" for the Password. 3. Tap Login. Validate Authentication Notice how the application presents an authentication screen upon launch. As per the authentication configuration defined in the SDK profile, we have to setup a 6 character long passcode meeting the complexity requirements. This passcode will be required after the authentication timeout is expired to access the app data and app functionality so that it is secured during the idle period. Page 219

220 1. Review that the passode complexity is as per the configuration we setup in the Authentication payload of the SDK profile. 2. Setup a passcode which meet the requirements (e.g ). 3. Confirm the passcode in the next text field. 4. Tap Submit to set the passcode. You will receive a toast notification confirming that Passcode has been set successfully. Launch Client SDK AirWatch SDK sample app is primarily composed of two sections: Page 220

221 AirWatch Client SDK - Lightweight and consists of basic features. AirWatch Framework - Deeper integration for advanced features. Now we are going to validate the custom settings that we pushed as a payload from the custom settings. Custom settings is part of AirWatch Client SDK. Click to select AIRWATCH CLIENT SDK. Page 221

222 Validate Custom Settings 1. Select the option SDK Manager APIs. 2. Scroll down until you are at the section Custom Settings. Validate that we are seeing the hardcoded value for URL as lookup field {EnrollmentUser} has been replaced by the actual value of enrollment user which is testuser. NOTE - In the sample app, we are just displaying the values of the custom settings that we received from the console. In a real world scenario, the developer can assign these values to variables and use them however they like.) 3. Click on Back button twice until you return to the Home screen. Page 222
223 Launch AirWatch Framework In this section, we are going to hit an internal splash page from a basic web view within the app. If you navigate to this URL outside the sample app, the splash page will not load. But since we are assigning the AirWatch Tunnel payload to the sample app, it could use it to proxy the traffic to the whitelisted URLs (in this case, the domain is *.airwlab.com). AirWatch Tunnel is a part of advanced SDK kit, AirWatch Framework. Click to select AIRWATCH FRAMEWORK. Page 223

224 Validate AirWatch Tunnel 1. Scroll down to select Proxy Tunneling AWWebView/ Http/URL/OKHTTP. 2. Click on Web View. 3. Enter the URL in the text field as " NOTE - instead of entering the URL manually, we could have used the custom setting value that we pushed down from the last step, as an example. 4. Click Go. 5. Notice the splash page, which is not accessible outside this application, if we hit the same URL from a browser or any other app. Page 224
Table of Contents. VMware AirWatch: Technology Partner Integration
 Table of Contents Lab Overview - HOL-1857-08-UEM - Workspace ONE UEM - Technology Partner Integration... 2 Lab Guidance... 3 Module 1 - F5 Integration with Workspace ONE UEM (30 min)... 9 Introduction...
Table of Contents HOL-1757-MBL-6
 Table of Contents Lab Overview - - VMware AirWatch: Technology Partner Integration... 2 Lab Guidance... 3 Module 1 - F5 Integration with AirWatch (30 min)... 8 Getting Started... 9 F5 BigIP Configuration...
VMware AirWatch: Directory and Certificate Authority
 Table of Contents Lab Overview - HOL-1857-06-UEM - VMware AirWatch: Directory and Certificate Authority Integration... 2 Lab Guidance... 3 Module 1 - Advanced AirWatch Configuration, AD Integration/Certificates
VMware AirWatch - Workspace ONE, Single Sign-on and VMware Identity Manager
 VMware AirWatch - Workspace ONE, Single Sign-on and VMware Identity Table of Contents Lab Overview - HOL-1857-03-UEM - Workspace ONE UEM with App & Access Management... 2 Lab Guidance... 3 Module 1 - Workspace
VMware AirWatch - Mobile Application Management and Developer Tools
 VMware AirWatch - Mobile Application Management and Developer Tools Table of Contents Lab Overview - HOL-1857-05-UEM - VMware AirWatch: Mobile App Management and Developer Tools... 3 Lab Guidance... 4
Table of Contents HOL-1757-MBL-4
 Table of Contents Lab Overview - - VMware AirWatch: Productivity Apps... 2 Lab Guidance... 3 Module 1 - VMware Boxer (30 minutes)... 8 Login to the AirWatch Console... 9 AirWatch Console Configuration...
VMware AirWatch - Unified Endpoint Management for Windows 10
 VMware AirWatch - Unified Endpoint Management for Windows 10 Table of Contents Lab Overview - HOL-1857-02-UEM - Workspace ONE UEM - Managment for Windows 10 2 Lab Guidance... 3 Module 1 - Windows 10 Software
MANAGING ANDROID DEVICES: VMWARE WORKSPACE ONE OPERATIONAL TUTORIAL VMware Workspace ONE
 GUIDE APRIL 2019 PRINTED 17 APRIL 2019 MANAGING ANDROID DEVICES: VMWARE WORKSPACE ONE OPERATIONAL TUTORIAL VMware Workspace ONE Table of Contents Overview Introduction Audience Getting Started with Android
Guide to Deploying VMware Workspace ONE. VMware Identity Manager VMware AirWatch 9.1
 Guide to Deploying VMware Workspace ONE VMware Identity Manager 2.9.1 VMware AirWatch 9.1 Guide to Deploying VMware Workspace ONE You can find the most up-to-date technical documentation on the VMware
Guide to Deploying VMware Workspace ONE. DEC 2017 VMware AirWatch 9.2 VMware Identity Manager 3.1
 Guide to Deploying VMware Workspace ONE DEC 2017 VMware AirWatch 9.2 VMware Identity Manager 3.1 You can find the most up-to-date technical documentation on the VMware website at: https://docs.vmware.com/
VMware AirWatch Integration with Apple School Manager Integrate with Apple's School Manager to automatically enroll devices and manage classes
 VMware AirWatch Integration with Apple School Manager Integrate with Apple's School Manager to automatically enroll devices and manage classes Workspace ONE UEM v9.6 Have documentation feedback? Submit
VMware Workspace ONE Quick Configuration Guide. VMware AirWatch 9.1
 VMware Workspace ONE Quick Configuration Guide VMware AirWatch 9.1 A P R I L 2 0 1 7 V 2 Revision Table The following table lists revisions to this guide since the April 2017 release Date April 2017 June
VMware Workspace ONE UEM Integration with Apple School Manager
 VMware Workspace ONE UEM Integration with Apple School Manager VMware Workspace ONE UEM Integration with Apple School Manager VMware Workspace ONE UEM 1811 You can find the most up-to-date technical documentation
VMware AirWatch Integration with Apple School Manager Integrate with Apple's School Manager to automatically enroll devices and manage classes
 VMware AirWatch Integration with Apple School Manager Integrate with Apple's School Manager to automatically enroll devices and manage classes AirWatch v9.3 Have documentation feedback? Submit a Documentation
Deploying VMware Workspace ONE Intelligent Hub. October 2018 VMware Workspace ONE
 Deploying VMware Workspace ONE Intelligent Hub October 2018 VMware Workspace ONE You can find the most up-to-date technical documentation on the VMware website at: https://docs.vmware.com/ If you have
Guide to Deploying VMware Workspace ONE with VMware Identity Manager. SEP 2018 VMware Workspace ONE
 Guide to Deploying VMware Workspace ONE with VMware Identity Manager SEP 2018 VMware Workspace ONE You can find the most up-to-date technical documentation on the VMware website at: https://docs.vmware.com/
Vodafone Secure Device Manager Administration User Guide
 Vodafone Secure Device Manager Administration User Guide Vodafone New Zealand Limited. Correct as of June 2017. Vodafone Ready Business Contents Introduction 3 Help 4 How to find help in the Vodafone Secure
VMware AirWatch Chrome OS Platform Guide Managing Chrome OS Devices with AirWatch
 VMware AirWatch Chrome OS Platform Guide Managing Chrome OS Devices with AirWatch Workspace ONE UEM v9.4 Have documentation feedback? Submit a Documentation Feedback support ticket using the Support Wizard
VMware AirWatch Chrome OS Platform Guide Managing Chrome OS Devices with AirWatch
 VMware AirWatch Chrome OS Platform Guide Managing Chrome OS Devices with AirWatch AirWatch v9.3 Have documentation feedback? Submit a Documentation Feedback support ticket using the Support Wizard on support.air-watch.com.
VMware End User Computing Global Demo Environment Walkthrough Guide
 VMware End User Computing Global Demo Environment Walkthrough Guide Summary This VMware SmartGuide has been created to give a quick start walkthrough of accessing and operating the VMware End User Computing
Table of Contents HOL-1701-CHG-5
 Table of Contents Lab Overview: vrealize Operations Application Monitoring: Challenge Lab... 2 Lab Overview... 3 Lab Guidance... 5 Module 1 - Configuring a Custom Application (15 minutes)... 10 Introduction...
Workspace ONE Chrome OS Platform Guide. VMware Workspace ONE UEM 1811
 Workspace ONE Chrome OS Platform Guide VMware Workspace ONE UEM 1811 You can find the most up-to-date technical documentation on the VMware website at: https://docs.vmware.com/ If you have comments about
VMware AirWatch Android Platform Guide
 VMware AirWatch Android Platform Guide Workspace ONE UEM v9.4 Have documentation feedback? Submit a Documentation Feedback support ticket using the Support Wizard on support.air-watch.com. This product
Integrating AirWatch and VMware Identity Manager
 Integrating AirWatch and VMware Identity Manager VMware AirWatch 9.1.1 This document supports the version of each product listed and supports all subsequent versions until the document is replaced by a
AirWatch Container. VMware Workspace ONE UEM
 VMware Workspace ONE UEM You can find the most up-to-date technical documentation on the VMware website at: https://docs.vmware.com/ If you have comments about this documentation, submit your feedback
Integration with Apple Configurator 2. VMware Workspace ONE UEM 1902
 Integration with Apple Configurator 2 VMware Workspace ONE UEM 1902 You can find the most up-to-date technical documentation on the VMware website at: https://docs.vmware.com/ If you have comments about
CONFIGURING BASIC MACOS MANAGEMENT: VMWARE WORKSPACE ONE OPERATIONAL TUTORIAL VMware Workspace ONE
 GUIDE FEBRUARY 2019 PRINTED 26 FEBRUARY 2019 CONFIGURING BASIC MACOS MANAGEMENT: VMWARE WORKSPACE ONE OPERATIONAL TUTORIAL VMware Workspace ONE Table of Contents Overview Introduction Purpose Audience
GRS Enterprise Synchronization Tool
 GRS Enterprise Synchronization Tool Last Revised: Thursday, April 05, 2018 Page i TABLE OF CONTENTS Anchor End User Guide... Error! Bookmark not defined. Last Revised: Monday, March 12, 2018... 1 Table
ForeScout Extended Module for VMware AirWatch MDM
 ForeScout Extended Module for VMware AirWatch MDM Version 1.7.2 Table of Contents About the AirWatch MDM Integration... 4 Additional AirWatch Documentation... 4 About this Module... 4 How it Works... 5
Mobility Manager 9.5. Users Guide
 Mobility Manager 9.5 Users Guide LANDESK MOBILITY MANAGER Copyright 2002-2013, LANDesk Software, Inc. and its affiliates. All rights reserved. LANDesk and its logos are registered trademarks or trademarks
Sync User Guide. Powered by Axient Anchor
 Sync Powered by Axient Anchor TABLE OF CONTENTS End... Error! Bookmark not defined. Last Revised: Wednesday, October 10, 2018... Error! Bookmark not defined. Table of Contents... 2 Getting Started... 7
REVIEWERS GUIDE NOVEMBER 2017 REVIEWER S GUIDE FOR CLOUD-BASED VMWARE WORKSPACE ONE: MOBILE SINGLE SIGN-ON. VMware Workspace ONE
 REVIEWERS GUIDE NOVEMBER 2017 REVIEWER S GUIDE FOR CLOUD-BASED VMWARE WORKSPACE ONE: VMware Workspace ONE Table of Contents Introduction.... 3 Purpose of This Guide....3 Audience...3 Before You Begin....3
VMware AirWatch Google Sync Integration Guide Securing Your Infrastructure
 VMware AirWatch Google Sync Integration Guide Securing Your Email Infrastructure Workspace ONE UEM v9.5 Have documentation feedback? Submit a Documentation Feedback support ticket using the Support Wizard
Anchor User Guide. Presented by: Last Revised: August 07, 2017
 Anchor User Guide Presented by: Last Revised: August 07, 2017 TABLE OF CONTENTS GETTING STARTED... 1 How to Log In to the Web Portal... 1 How to Manage Account Settings... 2 How to Configure Two-Step Authentication...
Administering Workspace ONE in VMware Identity Manager Services with AirWatch. VMware AirWatch 9.1.1
 Administering Workspace ONE in VMware Identity Manager Services with AirWatch VMware AirWatch 9.1.1 You can find the most up-to-date technical documentation on the VMware website at: https://docs.vmware.com/
Workspace ONE UEM Certificate Authentication for Cisco IPSec VPN. VMware Workspace ONE UEM 1810
 Workspace ONE UEM Certificate Authentication for Cisco IPSec VPN VMware Workspace ONE UEM 1810 You can find the most up-to-date technical documentation on the VMware website at: https://docs.vmware.com/
VMware AirWatch Certificate Authentication for Cisco IPSec VPN
 VMware AirWatch Certificate Authentication for Cisco IPSec VPN For VMware AirWatch Have documentation feedback? Submit a Documentation Feedback support ticket using the Support Wizard on support.air-watch.com.
NotifyMDM Device Application User Guide Installation and Configuration for ios with TouchDown
 NotifyMDM Device Application User Guide Installation and Configuration for ios with TouchDown NotifyMDM for ios Devices, Version 3.x NotifyMDM for ios with TouchDown 1 Table of Contents NotifyMDM for ios
Table of Contents HOL-1710-SDC-6
 Table of Contents Lab Overview - - What's New: vsphere with Operations Management.. 2 Lab Guidance... 3 Module 1 - What's New in vsphere (90 minutes)... 9 vcenter Server Appliance (VSCA)... 10 vcenter
Google Sync Integration Guide. VMware Workspace ONE UEM 1902
 Google Sync Integration Guide VMware Workspace ONE UEM 1902 You can find the most up-to-date technical documentation on the VMware website at: https://docs.vmware.com/ If you have comments about this documentation,
VMware Identity Manager Administration. MAY 2018 VMware Identity Manager 3.2
 VMware Identity Manager Administration MAY 2018 VMware Identity Manager 3.2 You can find the most up-to-date technical documentation on the VMware website at: https://docs.vmware.com/ If you have comments
The University of Toledo Intune End-User Enrollment Guide:
 The University of Toledo Intune End-User Enrollment Guide: Contents Enroll your Android device in Intune... 2 Enroll your ios device in Intune... 15 Enroll your Mac OS X device in Intune... 25 Enroll your
VMware AirWatch tvos Platform Guide Deploying and managing tvos devices
 VMware AirWatch tvos Platform Guide Deploying and managing tvos devices AirWatch v9.3 Have documentation feedback? Submit a Documentation Feedback support ticket using the Support Wizard on support.air-watch.com.
VMware AirWatch Google Sync Integration Guide Securing Your Infrastructure
 VMware AirWatch Google Sync Integration Guide Securing Your Email Infrastructure AirWatch v9.2 Have documentation feedback? Submit a Documentation Feedback support ticket using the Support Wizard on support.air-watch.com.
NotifyMDM Device Application User Guide Installation and Configuration for Android
 NotifyMDM Device Application User Guide Installation and Configuration for Android NotifyMDM for Android, Version 3.x NotifyMDM for Android 1 Table of Contents NotifyMDM for Android 3 Installation Instructions
VMware AirWatch Tizen Guide
 VMware AirWatch Tizen Guide AirWatch v8.4 and higher Have documentation feedback? Submit a Documentation Feedback support ticket using the Support Wizard on support.air-watch.com. This product is protected
Table of Contents HOL-1703-SDC-4
 Table of Contents Lab Overview - - VMware NSX: Installation and Configuration...2 Lab Guidance... 3 Module 1 - NSX Manager Installation and Configuration (15 Minutes)... 6 Introduction... 7 Hands-on Labs
VMware Workspace ONE UEM Apple tvos Device Management. VMware Workspace ONE UEM 1811 VMware AirWatch
 VMware Workspace ONE UEM Apple tvos Device Management VMware Workspace ONE UEM 1811 VMware AirWatch You can find the most up-to-date technical documentation on the VMware website at: https://docs.vmware.com/
VMware Browser Admin Guide Configuring and deploying the VMware Browser
 VMware Browser Admin Guide Configuring and deploying the VMware Browser AirWatch v9.3 Have documentation feedback? Submit a Documentation Feedback support ticket using the Support Wizard on support.air-watch.com.
Managing Devices and Corporate Data on ios
 Managing Devices and Corporate Data on ios Overview Businesses everywhere are empowering their employees with iphone and ipad. Contents Overview Management Basics Separating Work and Personal Data Flexible
INSTALLATION AND SETUP VMware Workspace ONE
 GUIDE NOVEMBER 2018 PRINTED 9 JANUARY 2019 VMware Workspace ONE Table of Contents Installation and Setup Introduction Prerequisites Signing Up for a Free Trial Launching the Workspace ONE UEM Console Navigating
Pulse Workspace Appliance. Administration Guide
 Pulse Workspace Appliance Administration Guide Product Release 2.0, 1743.1 Document Revisions 1.0 Published Date January 2018 Pulse Secure, LLC 2700 Zanker Road, Suite 200 San Jose, CA 95134 The Pulse
Student Guide. Document Version: This guide documents features available in NETLAB+ VE version and later.
 Student Guide Document Version: 2018-02-15 This guide documents features available in NETLAB+ VE version 18.1.0 and later. Copyright 2018 Network Development Group, Inc. www.netdevgroup.com NETLAB Academy
Comodo Device Manager Software Version 4.0
 Comodo Device Manager Software Version 4.0 End User Guide Guide Version 4.0.112316 Comodo Security Solutions 1255 Broad Street Clifton, NJ 07013 Table of Contents 1.Introduction to Comodo Device Manager...
VMware AirWatch Integration with Apple Configurator 2 Guide Using Apple Configurator 2 and AirWatch to simplify mass deployments
 VMware AirWatch Integration with Apple Configurator 2 Guide Using Apple Configurator 2 and AirWatch to simplify mass deployments AirWatch v9.2 Have documentation feedback? Submit a Documentation Feedback
Texas Division How to Login and Register for My IT Support and ServiceNow
 Texas Division How to Login and Register for My IT Support and ServiceNow Go to texas.mychiitsuppport.org. You'll see the screen below. My IT Support/ServiceNow is a national system and utilizes national
McAfee MVISION Mobile AirWatch Integration Guide
 McAfee MVISION Mobile AirWatch Integration Guide Administrator's guide for providing Integration with AirWatch MDM September 2018 COPYRIGHT Copyright 2018 McAfee, LLC TRADEMARK ATTRIBUTIONS McAfee and
VMware AirWatch Symbian Platform Guide Deploying and managing Symbian devices
 VMware AirWatch Symbian Platform Guide Deploying and managing Symbian devices AirWatch v8.1 and higher Have documentation feedback? Submit a Documentation Feedback support ticket using the Support Wizard
Pulse Secure Client for Chrome OS
 Pulse Secure Client for Chrome OS Quick Start Guide Published March, 2018 Release 5.2r1 Version 1.6 2018 by Pulse Secure, LLC. All rights reserved 1 Pulse Secure, LLC 2700 Zanker Road, Suite 200 San Jose,
VMware Browser Admin Guide Configuring and deploying the VMware Browser
 VMware Browser Admin Guide Configuring and deploying the VMware Browser AirWatch v9.1 Have documentation feedback? Submit a Documentation Feedback support ticket using the Support Wizard on support.air-watch.com.
Table of Contents HOL VWS
 Table of Contents Lab Overview - - VMware Workspace ONE Getting Started...2 Lab Guidance... 3 Module 1 - Workspace ONE Overview(15 minutes)... 9 Introduction... 10 Workspace ONE Features... 12 Workspace
FortiNAC Citrix XenMobile Device Integration
 FortiNAC Citrix XenMobile Device Integration Version: 8.x Date: 09/07/2018 Rev: B FORTINET DOCUMENT LIBRARY http://docs.fortinet.com FORTINET VIDEO GUIDE http://video.fortinet.com FORTINET KNOWLEDGE BASE
Microsoft Intune App Protection Policies Integration. VMware Workspace ONE UEM 1811
 Microsoft Intune App Protection Policies Integration VMware Workspace ONE UEM 1811 Microsoft Intune App Protection Policies Integration You can find the most up-to-date technical documentation on the VMware
Windows 8/RT Features Matrix
 Windows 8/RT Features Matrix The following matrix shows what AirWatch features are available to the Windows 8.0/RT and the Windows 8.1/RT platforms. Feature Windows 8.0/RT Windows 8.1/RT Activation & Enrollment
Colligo Briefcase. for Good Technology. Administrator Guide
 for Good Technology Administrator Guide Contents Introduction... 2 Target Audience... 2 Overview... 2 Key Features... 2 Platforms Supported... 2 SharePoint Security & Privileges... 3 for Good Technology...
Remote Access Application Viewer User Guide. Version 2.5
 Remote Access Application Viewer User Guide Version 2.5 Table of Contents Table of Contents... 2 Logging into Application Viewer... 4 Setting up your browser for the first time... 8 Internet Explorer...
VMware Workspace One Web. VMware Workspace ONE UEM
 VMware Workspace One Web VMware Workspace ONE UEM You can find the most up-to-date technical documentation on the VMware website at: https://docs.vmware.com/ If you have comments about this documentation,
VMware AirWatch Mobile Application Management Guide Enable access to public and enterprise apps
 VMware AirWatch Mobile Application Management Guide Enable access to public and enterprise apps AirWatch v9.1 Have documentation feedback? Submit a Documentation Feedback support ticket using the Support
DSS User Guide. End User Guide. - i -
 DSS User Guide End User Guide - i - DSS User Guide Table of Contents End User Guide... 1 Table of Contents... 2 Part 1: Getting Started... 1 How to Log in to the Web Portal... 1 How to Manage Account Settings...
Remote Access Application Viewer User Guide. Version 2.3
 Remote Access Application Viewer User Guide Version 2.3 Table of Contents Table of Contents... 2 Logging into Application Viewer... 4 Setting up your browser for the first time... 8 Internet Explorer...
Windows quick start instructions Pg. 1. OS X quick start instructions Pg. 4. ios quick start instructions Pg. 6
 Page 1 of 12 Windows quick start instructions Pg. 1 OS X quick start instructions Pg. 4 ios quick start instructions Pg. 6 Android quick start instructions Pg. 9 Windows Quick Start Instructions STEP 1
VMware AirWatch ios Platform Guide Deploying and managing ios devices. Workspace ONE UEM v9.4
 VMware AirWatch ios Platform Guide Deploying and managing ios devices Workspace ONE UEM v9.4 H a v e d o c u m e n t a t io n f e e d b a c k? S u b m it a D o c u m e n t a t io n F e e d b a c k s u
Sophos Mobile Control Administrator guide. Product version: 5.1
 Sophos Mobile Control Administrator guide Product version: 5.1 Document date: June 2015 Contents 1 About Sophos Mobile Control...5 1.1 Sophos Mobile Control on premise and as a Service...5 1.2 About this
VMware AirWatch Cloud Connector Guide ACC Installation and Integration
 VMware AirWatch Cloud Connector Guide ACC Installation and Integration Workspace ONE UEM v1810 Have documentation feedback? Submit a Documentation Feedback support ticket using the Support Wizard on support.air-watch.com.
Remote Support 19.1 Web Rep Console
 Remote Support 19.1 Web Rep Console 2003-2019 BeyondTrust Corporation. All Rights Reserved. BEYONDTRUST, its logo, and JUMP are trademarks of BeyondTrust Corporation. Other trademarks are the property
Table of Contents HOL-HBD-1301
 Table of Contents Lab Overview... 2 - vcloud Hybrid Service Jump Start for vsphere Admins...3 Module 1 - vcloud Hybrid Service: Architecture and Consumption Principles...5 vcloud Hybrid Service... 6 vcloud
The guide for the Merrill Mobile catalog available for tablet-based devices. Version 3.0
 User Guide The guide for the catalog available for tablet-based devices. Version 3.0 Table of Contents General Information... 3 Setup: At a Glance...4 Current ipad and Tablet Users... 5 For ipad: Step
Go Ahead Bring Your Own Device to Work... 1 Requirements... 1
 Table of Contents Go Ahead Bring Your Own Device to Work... 1 Requirements... 1 1: Activate AT&T Toggle... 1 1.1: Welcome Email with ORANGE Banner... 1 1.2: Welcome Email with BLUE Banner... 2 1.3: Orange
Workstation Configuration
 Workstation Configuration September 22, 2015 - Version 9 & 9.1 - - - - - - - - - - - - - - - - - - - - - - - - - - - - - - - - - - - - - - - - - - - - - - - - - - - - - - - - - - - - - - - - - - - - -
Workstation Configuration
 Workstation Configuration December 15, 2017 - Version 9.3 - - - - - - - - - - - - - - - - - - - - - - - - - - - - - - - - - - - - - - - - - - - - - - - - - - - - - - - - - - - - - - - - - - - - - - - -
Codebook. Codebook for OS X Introduction and Usage
 Codebook Codebook for OS X Introduction and Usage What is Codebook Encrypted Data Vault Guards passwords and private data Keeps sensitive information organized Enables quick recall of secrets Syncs data
CHI Easy Access: Register From on the CHI Network
 CHI Easy Access: Register From on the CHI Network Go to chieasyaccess.org and click "Register Now." You'll see the screen below. Your CHI Easy Access account is configured to use the same password you
VMware AirWatch ios Platform Guide Deploying and managing ios devices
 VMware AirWatch ios Platform Guide Deploying and managing ios devices AirWatch v9.3 Have documentation feedback? Submit a Documentation Feedback support ticket using the Support Wizard on support.air-watch.com.
McAfee Enterprise Mobility Management 12.0 Software
 Product Guide McAfee Enterprise Mobility Management 12.0 Software For use with epolicy Orchestrator 4.6.7-5.1 Software COPYRIGHT Copyright 2014 McAfee, Inc. Do not copy without permission. TRADEMARK ATTRIBUTIONS
Forescout. eyeextend for VMware AirWatch. Configuration Guide. Version 1.9
 Forescout Version 1.9 Contact Information Forescout Technologies, Inc. 190 West Tasman Drive San Jose, CA 95134 USA https://www.forescout.com/support/ Toll-Free (US): 1.866.377.8771 Tel (Intl): 1.408.213.3191
VMware Workspace ONE UEM VMware AirWatch Cloud Connector
 VMware AirWatch Cloud Connector VMware Workspace ONE UEM 1811 You can find the most up-to-date technical documentation on the VMware website at: https://docs.vmware.com/ If you have comments about this
ZuluDesk Management System is a powerful Mobile Device Management (MDM) solution designed for schools to manage their Apple devices over WiFi.
 solution designed for schools to manage their Apple devices over WiFi.") !!! TRIAL GUIDE Introduction ZuluDesk Management System is a powerful Mobile Device Management (MDM) solution designed for schools to manage their Apple devices over WiFi. This guide is designed to support
!!! TRIAL GUIDE Introduction ZuluDesk Management System is a powerful Mobile Device Management (MDM) solution designed for schools to manage their Apple devices over WiFi. This guide is designed to support
Remote Support Web Rep Console
 Remote Support Web Rep Console 2017 Bomgar Corporation. All rights reserved worldwide. BOMGAR and the BOMGAR logo are trademarks of Bomgar Corporation; other trademarks shown are the property of their
Table of Contents... ii. Go Ahead Bring Your Own Device to Work... 1 Requirements... 1
 Table of Contents... ii Go Ahead Bring Your Own Device to Work... 1 Requirements... 1 1: Activate AT&T Toggle... 1 1.1: Welcome Email with ORANGE Banner... 1 1.2: Welcome Email with BLUE Banner... 2 1.3:
VMware Identity Manager Administration
 VMware Identity Manager Administration VMware AirWatch 9.1 This document supports the version of each product listed and supports all subsequent versions until the document is replaced by a new edition.
VMware AirWatch Workspace ONE Send Admin Guide Configuring and deploying Workspace ONE Send
 VMware AirWatch Workspace ONE Send Admin Guide Configuring and deploying Workspace ONE Send Workspace ONE UEM v9.5 Have documentation feedback? Submit a Documentation Feedback support ticket using the
Knox Mobile Enrollment
 Knox Mobile Enrollment SAMSUNG Knox Mobile Enrollment (hereinafter KME) is a service that you can use to install Knox Manage on a large number devices of Android or Android Enterprise s Fully Managed Device
Google Classroom User Manual
 Google Classroom User Manual Table of Contents Table of Contents 1 Google Classroom on a Computer 3 1: Making an Account 3 2: Change Your Profile Photo 5 3: Customize your Notifications 7 4: Join a Class
Getting Started with Soonr
 WWW.SOONR.COM Getting Started with Soonr A Quick Start Guide for New Users Soonr Inc. 12/19/2012 Revision 1.1 Copyright 2012, Soonr Inc., all rights reserved. Table of Contents 1 How Soonr Workplace Works...
Samsung Knox Mobile Enrollment. VMware Workspace ONE UEM 1902
 Samsung Knox Mobile Enrollment VMware Workspace ONE UEM 1902 You can find the most up-to-date technical documentation on the VMware website at: https://docs.vmware.com/ If you have comments about this
Table of Contents HOL CMP
 Table of Contents Lab Overview - - vrealize Orchestrator - Advanced... 2 Lab Guidance... 3 Module 1 - Creating Advanced vrealize Orchestrator Workflows (45 min)...9 Introduction... 10 Prompting User Input
TPS ISS ipad Setup Process. Setup your mobile Device
 TPS ISS ipad Setup Process Setup your mobile Device This document will walk you through the steps to setup you device to TPS network and exchange server. Drink, Linda 10/31/2013 Table of Contents TPS ipad
Using the Secure MyApps Environment
 Be the Difference. Using the Secure MyApps Environment Accessing UH Applications from Non-UH Devices This Job Aid is intended for UH employees who would like to remotely connect to UH applications, especially
Multi-Sponsor Environment. SAS Clinical Trial Data Transparency User Guide
 Multi-Sponsor Environment SAS Clinical Trial Data Transparency User Guide Version 6.0 01 December 2017 Contents Contents 1 Overview...1 2 Setting up Your Account...3 2.1 Completing the Initial Email and
The following device commands are used most frequently: Lock/Unlock device O - O O. Reset screen password O - O - Factory reset + Initialize SD Card
 10 Device management Administrators can install apps on an activated device using device commands and check the profiles settings. Moreover, they can update, delete, or re-install apps installed on users'