Model: WT-868. Wireless Timer Remote Control. English Manual Instruction
|
|
|
- Frank Conley
- 5 years ago
- Views:
Transcription


1 Model: WT-868 Wireless Timer Remote Control English Manual Instruction Thank you for your purchase of a JJC WT-868 Wireless Timer Remote Control. For the best performance, please read this manual instruction carefully before using. You must read it throughly and fully understand this manual to avoid improper operation lead to damage of the product. WT-868 Wireless Timer Remote doesn't just trip your shutter wirelessly. It's also equipped to handle a long list of timer functions: self-timer, interval timer, long exposure timer, as well as controlling the number of continuous shutter releases. It works with a vast array of different cameras--just swap out the camera release cable for the correct camera. The transmitter works at a distance up to 100m(328 feet) on any one of 16 channels over a reliable 2.4GHz frequency.
2 For Your Safety To prevent damage to your JJC product or injury to yourself or to others, read the following safety precautions in their entirety before using this product. Keep these safety instructions where all those who use the product will read them. WARNINGS Do not disassemble or modify. Keep Dry. Keep out of reach of children. Do not use in the presence of flammable gas. Do not expose to high temperatures. Observe proper precautions when handling batteries. Do not handle with wet hands. Cut power immediately in the event of malfunction. Do not remain in contact with the camera or controller for extended periods while the products are on or in use. Supplied Accessories The product is sold in the sets below. 1. Transmitter (WT-868TX) Receiver (WT-868RX) Manual (this manual) CR2 3V Lithium Battery AAA 1.5V Battery pc 1pc 1pc 1pc 2pcs
3 The name of each part: 1. Control Panel 2. Shutter Release Button 3. Background Light / Lock Button 4. Arrow Button 5. Indicator Light 6. Timer Start/Stop Button 7. SET Button 8. ACC Socket 9. Power Switch Transmitter (WT-868TX)
4 The name of each part: 1. Indicator Light 2. Control Panel 3. Power Switch 4. Channel Increase Button 5. Channel Reduce Button 6. Battery Hatch 7. Hot Shoe fixed nut 8. 1/4"-20 Threaded Sockets 9. ACC socket 10. Hot Shoe mount Receiver(WT-868RX)


5 11. Selection cursor 12. Timer display 13. LOCK indicator 14. Low power indicator 15. Timer active indicator 16. Speaker ON/OFF 17. SET indicator 18. Release indicator 19. Number of shots 20. Multi Exposure indicator 21. Channel display


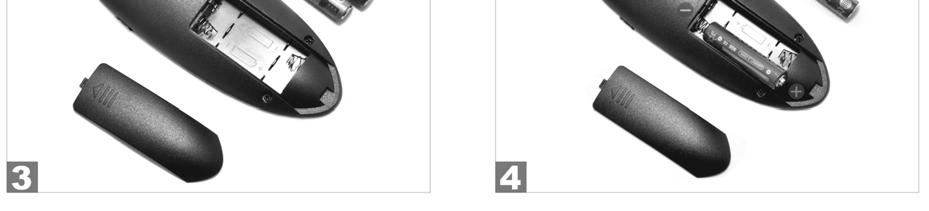
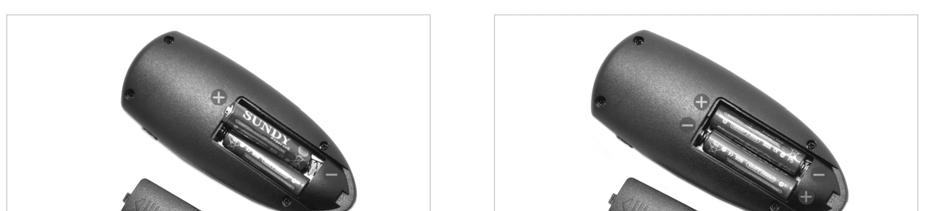
6 Install and replace the battery: WT-868(TX)
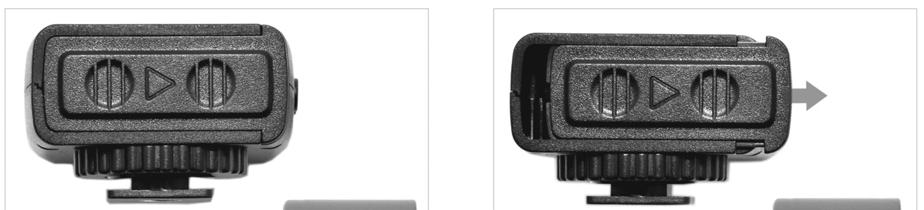

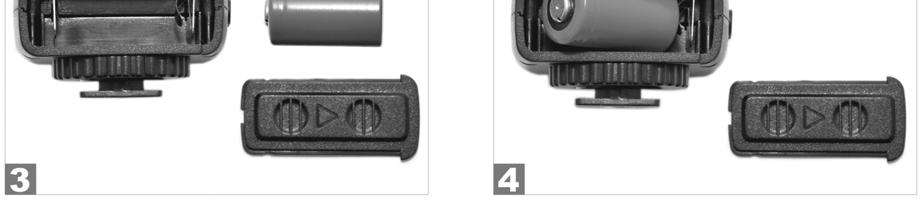


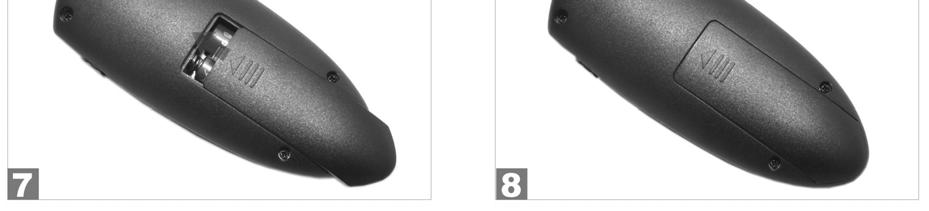
7 WT-868(RX)
8 Channel setting of WT-868TX 1. Turn on the power; the channel is default as the last time setting. 2. Use the arrow button to set the channel. 3. Press left or right button to move the selection cursor until it is disappeared. 4. The channel section will display. 5. Press the SET button to go into the Channel section, when the Channel number is flashing, press the up or down button to increase or decrease. 6. Press the SET button at any time to complete the operation and display the new setting for the selected item. 7. The channel of transmitter and receiver should be the same for shooting effectively. Channel setting of WT-868RX 1. Turn on the power; the channel is default as the last time setting. 2. Press channel Increase button or channel reduce Button to set the channel. 3. After press one of these buttons 2 seconds, the receiver will save the current channel as default channel. 4. The channel of transmitter and receiver should be the same for shooting effectively.


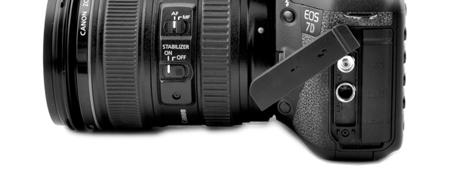
9 WT-868TX connected with the camera using as wired timer *Wired operation requires the use of a JJC Shutter Release Cable to fit your camera. (NOT INCLUDED. SEPARATE PURCHASE REQUIRED.)
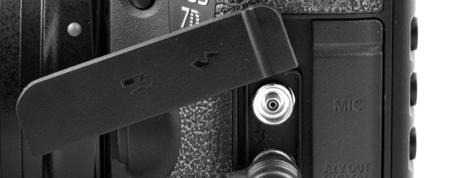
10 Connecting the WT-868TX: Turn the camera and WT-868TX off. Remove the remote socket cover from the camera. Insert the shutter release plug into the remote socket of camera. Insert the input plug into the ACC socket of WT-868TX. Turn the camera and WT-868TX on. Now you can start program the function and enjoy the timer trigger. Disconnecting the WT-868TX: Turn the camera and WT-868TX off. Disconnect the shutter release plug from the camera body. Replace the remote socket cover. Disconnect the input plug from the WT-868TX.


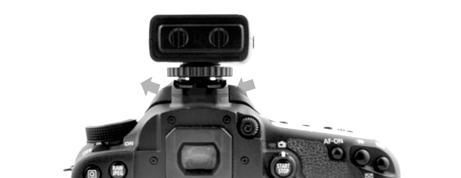
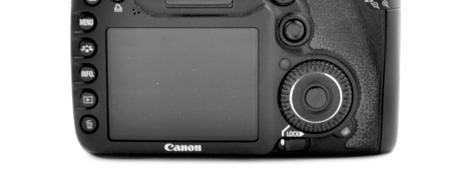


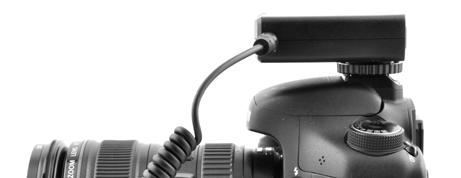


11 WT-868RX connected with the camera using as wireless timer
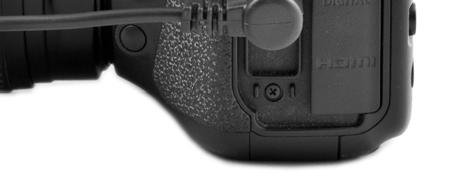
12 Connecting the WT-868RX: Turn the camera and WT-868RX off. Fix the WT-868RX on the hot shoe of camera Lock hot shoe fixed nut tightly when you fix it. Loosen hot shoe fixed nut when you remove the WT-868RX. Do not forcibly pull it, in order to avoid damage to the receiver and camera. Remove the remote socket cover from the camera. Insert the shutter release plug into the remote socket of camera. Insert the input plug into the ACC socket of WT-868RX. Turn the camera and WT-868RX ON. Use the channel Increase or reduce button to select the channel to match the WT-868TX. Now you can start program the function and enjoy the timer trigger. After programming, press the stop/start button of the WT-868TX to send the data to the WT-868RX and start the timer. Disconnecting the WT-868RX: Turn the camera and WT-868RX OFF. Disconnect the shutter release plug from the camera body. Replace the remote socket cover. Disconnect the input plug from the WT-868RX. Loosen hot shoe fixed nut to remove the WT-868RX.
13 WT-868TX Automatic Function Description (Wired and Wireless): Automatic Timer Function, Choose the Delay / Self Timer (DE), BULB/Long Exposure (BU), Interval Timer (INT) and number of shots for time interval photography exposure (Exposure Count (N)). Following table is the setting about the camera shutter speed. 1. Camera Setting a) Connect the WT-868TX or WT-868RX to the camera and turn ON. b) Adjust the camera setting Exposure Mode Shutter Speed Interval Timer Focus Mode Continuous M (manual) BULB OFF Auto Focus or Manual S (single frame) 2. Set Timer via WT-868TX Press the SET button. The SET icon will flash in the Control Panel. Adjust the following settings Option Description Supported Setting DE Just like the self timer on your camera. The WT-868TX allows you to set any delay (in 1 second increments) up to 0s to 99hrs 59min 59s 99 hours, 59 minutes and 99 seconds. BU It allows you to take time exposures up to 100 hours in length. 0s to 99hrs 59min 59s INT The Interval Timer can be set to any time period up to 100 hours as well. If you set it to 10 minutes, for example, one exposure will be taken every 10 minutes until either the film 1s to 99hrs 59min 59s runs out or the Exposure Count limit has been reached. N This setting permits you to set the number of exposures that will be taken, up to 999 shots. 1 to 999 shots or -- (unlimited) Speaker ON/OFF ON/OFF Delay(DE), Exposure/BULB(BU) and Interval Settings (INT) IMPORTANT: Please ensure the Interval time is longer than Exposure timer at least 2 seconds.


14 Setting the Timer Use the arrow button to set the timer. Press left or right to select, up or down to change. The current selection is indicated by the selection cursor. Press the SET button at any time to complete the operation and display the new setting for the selected item. To view other setting, press the arrow button left or right. The current selection is indicated by the selection cursor. Press the SET button to edit the current setting as described above. 1.Delay/Self Timer (Time until shooting starts) Hours Minutes Seconds 2. BULB/Long Exposure (Exposure Time) Hours Minutes Seconds 3. Interval Timer (INT) Hours Minutes Seconds 4.Number of Shots(N)

15 5.Speaker To ensure correct operation, choose an interval at least two seconds longer than the exposure time. When using autofocus, set the delay to two seconds or longer and choose an interval at least two seconds longer than the exposure time to ensure that the camera has time to focus. When using long exposure noise reduction, the interval should be at least twice the exposure time. Intervals of 00:00:00 will automatically be reset to 00:00:01 when the SET button is pressed to put settings into effect. To set the number of shots to - - (unlimited), select 1 and press the arrow button down or select 999 and press the arrow button up. After adjusting all setting, press the SET button to put the new settings ENABLE. A beep will sound (If the speaker is ON) and the SET icon indicator will go out.


16 Start the timer Wired Timer Remote Control Press the START/STOP button. The timer will start and TIMER ACTIVE will flash in the control panel. Between each shot, the control panel will show the time remaining until the next photograph is taken. If the speaker is ON, a beep will sound three times at ONE-SECOND intervals before the shutter opens. While the shutter is opened, the control panel will show the time remaining until the shutter closes, and the release lamp and RELEASE indicator will flash at ONE-SECOND intervals. The number of shots remaining will be updated each time a photograph is taken. 1. Flashes while timer is active 2. Between each shot :Time remaining until next shot. While shutter is open: Time remaining until shutter closes. 3. Number of shots remaining 4. Flashes while shutter is open
17 The Speaker and Release Lamp The following illustration shows when a beep will sound ( ) and the release lamp flash ( ) with a delay of 5s, exposure time of 4s, and an interval of 9s. End Shooting Shooting will end automatically when the selected number of shots has been taken. To end shooting before all photographs have been taken, press the START/STOP button. Wired remote control manual function description: 1. Turn OFF the WT-868TX. Remove the remote socket cover from the camera. 2. Connect the WT-868TX to the camera and turn the camera ON. 3. Select the M function and choose BULB of the camera. 4. Half press the shutter button for focus. 5. Fully press the shutter button for release shutter. 6. Slide the shutter button to the HOLD position. The camera locks the shutter. 7. Slide it to the opposite direction to release the lock. 8. Release the button to end shooting. Background Light / Lock Button Press the Background Light / Lock Button for 1 second to turn on the LED lamp of the control panel. Press the Background Light / Lock Button for 2 seconds to enable the Button Lock. Press the Background Light / Lock Button for 2 seconds to disable the Button Lock


18 Wireless Timer Remote Control After complete the timer setting of the WT-868TX, Press the START/STOP button of the transmitter. The transmitter will send all the setting data to the WT-868RX. Once the receiver get all the data, it will start and TIMER ACTIVE will flash in the control panel of the receiver. Between each shot, the control panel will show the time remaining until the next photograph is taken. If the transmitter speaker is ON, a beep will sound three times at ONE-SECOND intervals before the shutter opens. While the shutter is opened, the control panel will show the time remaining until the shutter closes, and the release lamp and RELEASE indicator will flash at ONE-SECOND intervals. The number of shots remaining will be updated each time a photograph is taken. 1. Flashes while timer is active 2. Between shots: Time remaining until next shot. While shutter is open: Time remaining until shutter closes. 3. Number of shots remaining 4. Flashes while shutter is open
19 The Speaker and Release Lamp The following illustration shows when a beep will sound ( ) and the release lamp flash ( ) with a delay of 5s, and exposure time of 4, and an interval of 9s. End Shooting Shooting will end automatically when the selected number of shots has been taken. To end shooting before all photographs have been taken, press the START/STOP button of the Transmitter. Wireless remote control manual function description 1. Turn OFF the WT-868TX and WT-868RX. Remove the remote socket cover from the camera. 2. Connect the WT-868RX to the camera and turn the camera ON. 3. Turn ON the WT-868TX and WT-868RX. 4. Half press the shutter release button of the WT-868TX, the transmitter will send signal for focusing to the receiver. The green indicator light will lit on the transmitter and receiver, and the camera is in the focusing state until the release or full-press the button. 5. Full-press the shutter release button and transmitter will send signal of shooting. The red indicator light will lit on the transmitter and receiver. The camera will release the shutter. Attention:Lock the shutter release button manually is not usable for wireless remote control manual function. Background Light Press the Channel Increase or Reduce button of WT-868RX to turn on background light of the control panel.
20 Using the camera to select shutter speed To take photographs at the shutter speed selected with the camera, adjust setting as follows: CAMERA Exposure mode Shutter speed Interval timer Focus mode Shooting mode M (manual) or S (shutter-priority auto) Any OFF AF-C or M S (single frame) WT-868TX Exposure time Interval O s Longer than camera shutter speed *When using autofocus, please choose an interval at least two seconds longer than the camera shutter speed to allow the camera have time to focus. When using long exposure noise reduction, choose an interval at least double the camera shutter speed.

 exposure time. Repeat 45 steps, then you will move to last exposure (-9-)9.")
21 Multi-Exposure (High Dynamic Range) Function Description: Setting the Multi-Exposure Use the arrow button to move selection cursor under BU, press the SET button and go into BU time section 1. Press the LEFT arrow button to get into multi-exposure selection2, Press UP or DOWN to change from single exposure -1- to nine exposures Press the SET button to complete the operation and display the new setting for the selected item4. Press the SET button to set first exposure (-1-) and press the arrow button to change exposure time5. After finish the first exposure time, press the right arrow button to get into the second (-2-) exposure time. Repeat 45 steps, then you will move to last exposure (-9-)9.To view other setting, press the ARROW button left or right. The current selection is indicated by the selection cursor. Press the SET button to edit the current setting as described above. Option Description Supported Setting BU -1- Multi-Exposure 1 group - 9 groups Multi-Exposure Time (HDR) Multi-Exposure Timer Example Table s 4s 6s 8s 10s 20s 40s 50s 60s Interval Time = Exposure Time + Break Time + Waiting Time After finish the setting of Multi-Exposure Timer, We can set the Interval Timer. When the timer is running, it will wait for 1s then run the next exposure.
22 Specification: Type: Transmission distance: Channel: Dimensions(W x H x D): Weight (without battery): FSK 2.4GHz wireless Remote control system 100 meters(328 feet) or above 16 channels Transmitter: 118 x 49 x 27 mm Receiver: 68 x 48 x 29mm Transmitter: 59g Receiver: 41g *Wired operation requires the use of a JJC Shutter Release Cable to fit your camera. (NOT INCLUDED. SEPARATE PURCHASE REQUIRED.) Product Compatibility List: CANON NIKON PENTAX SAMSUNG OLYMPUS PANASONIC SIGMA LEICA MINOLTA SONY FUJIFILM KODAK Cable-A replaces CANON RS-80N3 / TC-80N3 Cable-B replaces NIKON MC-30 / MC-36 / MC-36A Cable-C replaces CANON RS-60E3 / PENTAX CS-205 Cable-D replaces PANASONIC DMW-RSL1 Cable-E replaces OLYMPUS RM-CB1 Cable-F replaces MINOLTA RC-1000S/L / RM-S1AM / RM-S1LM Cable-G replaces NIKON MC-DC1 Cable-M replaces NIKON MC-DC2 Cable-J replaces OLYMPUS RM-UC1 Cable-H replaces SIGMA CR-11 Cable-I replaces SIGMA CR-21 Cable-K replaces FUJIFILM RR-80 Cable-N replaces SAMSUNG ED-SR2NX02 Cable-O replaces FUJIFILM RR-80A Cable-R replaces FUJIFILM RR-90
23 WT-868 Power Saving Function About receiver: When you turn on the power of the receiver,the background light of the control panel will last for 3s. When you press the channel +,- button to set channel,the background light of the control panel will last for 3s. When the receiver is left without operation for 30s,it will automatically go into half dormancy position. To reactivate it,just press the release button on the transmitter. About transmitter: When you press the Light / Lock Button,the background light of the control panel will last for 3s. When the transmitter is left without operation for 3s,it will automatically go into full dormancy position. About anti-interference With the popularization of FSK 2.4GHz Wireless Remote Control System, more and more equipments adopt this system. When the receiver can t work normally or continuously. Please select another channel and try again. CH GHz CH GHz CH GHz CH GHz CH GHz CH GHz CH GHz CH GHz CH GHz CH GHz CH GHz CH GHz CH GHz CH GHz CH GHz CH GHz
24 About trademark JJC is a trademark of JJC Company ONE YEAR UNCONDITIONAL GUARANTEE If for any reason, this JJC product fails within ONE YEAR of the date of purchase, return this product to your JJC dealer or contact service@jjc.cc and it will be exchanged for you at no charge( not include shipping cost). JJC products are guaranteed for ONE FULL YEAR against defects in workmanship and materials. If at any time after one year, your JJC product fails under normal use, we invite you to return it to JJC for evaluation. NOTE: 1. The warrant is only effective in one year under normal use. 2. Free maintenance will not be given under one of the following circumstance. The breakdown caused by the manipulation that did not follow the requests of the manual. The damage caused by the dismantle movement of a non-authorized maintainer. The breakdown, row harm or damaged because of the move or drop. The damage caused by customer inappropriate preservation, maintain, or the usage. Easy damaged pieces and present accessories are not concerned. The breakdown and the damage caused by the force majeure. Those products that has refitted or added other functions by your own will not be accepted to repair. 3. If at any time after one year, your JJC product fails under normal use, we invite you to return it to JJC for evaluation. Shenzhen JinJiaCheng Photography Equipment Co., Ltd Office TEL: / / Office FAX: Website: sales@jjc.cc / service@jjc.cc Address: Main Building,Changfengyuan,Chunfeng Rd, Luohu District, Shenzhen, Guangdong, China
WIRELESS SHUTTERBOSS. User Manual
 WIRELESS SHUTTERBOSS User Manual INTRODUCTION Thank you for choosing the Vello Wireless ShutterBoss. It has a range of up to 250 feet on 99 channels over the reliable FSK modulated 2.4 GHz frequency. But
WIRELESS SHUTTERBOSS. User Manual
 WIRELESS SHUTTERBOSS User Manual THANK YOU FOR CHOOSING VELLO The Vello Wireless ShutterBoss has a range of up to 250 feet on 99 channels over the reliable FSK modulated 2.4 GHz frequency. But this device
User Manual. Aputure Manufacturing Authority
 R User Manual R www.aputure.com Aputure Manufacturing Authority Foreword Thank you for purchasing Aputure Trigmaster Plus 2.4G. It inherits the advantages of previous flash and shutter trigger products
FREEWAVE FUSION USER MANUAL
 FREEWAVE FUSION USER MANUAL 2 INTRODUCTION Thank you for choosing the Vello FreeWave Fusion Wireless Shutter/Flash/Grouping Remote. This device triggers off-camera lights remotely from up to 300 feet away.
H-430. User Manual. Issued: November2011 v1.0. Website:
 H-430 User Manual Issued: November2011 v1.0 Website: http://www.ojecoco.com Introduction The H-430 is designed and manufactured by Ojecoco Photographic Technology Co., Ltd, a specialist producer of photographic
Cheetah Light LLC. (214) Instruction Manual
 Instruction Manual") CL-80 Cheetah Light LLC. www.cheetahstand.com info@cheetahstand.com ()7-98 Instruction Manual FOREWORD Before using this product Please read this user manual carefully in order to ensure your safety and
CL-80 Cheetah Light LLC. www.cheetahstand.com info@cheetahstand.com ()7-98 Instruction Manual FOREWORD Before using this product Please read this user manual carefully in order to ensure your safety and
Universal Timer Remote Instruction Manual
 PIXAPRO LTD. 50 Popes Lane, Oldbury, West Midlands, B69 4PA Tel: +44 (0)121 552 3113 Web: www.essentialphoto.co.uk E-mail: customerservice@essentialphoto.co.uk Company Registration No. 07601334 Universal
FreeWave Plus User Manual
 FreeWave Plus User Manual 2 INtroduction Thank you for choosing the Vello FreeWave Plus Wireless Remote Shutter Release. This device triggers your camera in either wired or wireless mode, allowing you
SHUTTERBOSS VERSION II USER MANUAL
 SHUTTERBOSS VERSION II USER MANUAL 1 INTRODUCTION Thank you for choosing the Vello ShutterBoss. This device is more than just a remote shutter release. It features many timer functions: self-timer, interval
Forward. Product Introduction. Specifications
 User Manual Forward TM Thanks for purchasing Aputure Gigtube Wireless DSLR digital remote viewfinder. Gigtube Wireless is a creative photography accessory which inherits the excellent performance TM of
PSL-C / PSL-N / PSL-R PowerSlave Transmitter / Receiver INSTRUCTIONS
 PSL-C / PSL-N / PSL-R PowerSlave Transmitter / Receiver INSTRUCTIONS Table of Contents Introduction...3 Key Features...4 Precautions...5 Overview...6 Contents Include...8 Compatible Devices...10 Battery
FREEWAVE FUSION BASIC 2.4 GHz WIRELESS FLASH/SHUTTER REMOTE TRIGGER. User Manual
 FREEWAVE FUSION BASIC 2.4 GHz WIRELESS FLASH/SHUTTER REMOTE TRIGGER User Manual THANK YOU FOR CHOOSING VELLO The Vello FreeWave Fusion Basic 2.4 GHz is your passport to a new world of photography. It expands
FREEWAVE FUSION BASIC WIRELESS FLASH/SHUTTER REMOTE TRIGGER. User Manual
 FREEWAVE FUSION BASIC WIRELESS FLASH/SHUTTER REMOTE TRIGGER User Manual THANK YOU FOR CHOOSING VELLO The Vello FreeWave Fusion Basic is your passport to a new world of photography. It expands your photographic
FREEWAVE CAPTAIN TTL TRIGGER USER MANUAL
 FREEWAVE CAPTAIN TTL TRIGGER USER MANUAL TABLE OF CONTENTS Introduction...3 Features...4 Compatible devices...5 Precautions...6-7 Box contents...8-9 Overview... 10-11 Installing the batteries & turning
FREEWAVE PLUS USER MANUAL
 FREEWAVE PLUS USER MANUAL 2 INTRODUCTION Thank you for choosing the Vello FreeWave Plus Wireless Remote Shutter Release. This device triggers your camera in either wired or wireless mode, allowing you
2.4 GHz 80-Channel. Transceiver. 2.4GHz PS-80. PowerSync Transceiver INSTRUCTIONS
 2.4 GHz 80-Channel Transceiver 2.4GHz PS-80 PowerSync 16-80 Transceiver INSTRUCTIONS 1 Table of Contents Introduction...3 Key Features...4-5 Contents...5 Device Layout / LCD...6-7 Precautions...8 Installing
Cheetah Light LLC. (214) Instruction Manual
 Instruction Manual") Cheetah Light LLC. www.cheetahstand.com info@cheetahstand.com ()7-98 Instruction Manual FOREWORD Before using this product. Please read this user manual carefully in order to ensure your safety and the
Cheetah Light LLC. www.cheetahstand.com info@cheetahstand.com ()7-98 Instruction Manual FOREWORD Before using this product. Please read this user manual carefully in order to ensure your safety and the
Camtraptions Wireless Trigger Camera Remote & Flash Trigger Index
 Camtraptions Wireless Trigger Camera Remote & Flash Trigger Index Index... 1 Overview... 2 Accessories... 2 Safety warnings... 3 Components... 3 Insert batteries... 4 Camera triggering... 5 Flash triggering...
TIMER REMOTE WITH VIDEO
 TIMER REMOTE WITH VIDEO TRS-0 COMPATIBLE WITH SONY CAMERAS WITH A MULTI-TERMINAL USER MANUAL PRECAUTIONS Please read and follow these instructions, and keep this manual in a safe place. There are no user-serviceable
IR SELFIE TRIGGER PLUS INFRARED REMOTE SHUTTER CONTROL. User Manual COMPLIANCE FCC. operation. that may cause undesired. including interference
 FCC COMPLIANCE This device complies with Part 15 of the FCC Rules. Operation is subject to the following two conditions: 1. This device may not cause harmful interference. 2. This device must accept any
N2 di-gps mini digital images GPS
 N2 di-gps mini digital images GPS Users Guide Ver 1.03 Please visit our website www.di-gps.com for the latest version of the user guide Fujifilm and S5 Pro are registered trademark or a trademark of FUJIFILM
Commander for wireless flash shooting Canon / Nikon / Sony INSTRUCTION MANUAL
 Commander for wireless flash shooting Canon / Nikon / Sony INSTRUCTION MANUAL Changes or modifications not expressly approved by the party responsible for compliance could void the user's authority to
KARLite PE16 Series 16ch Radio Triggers
 The KARLite 16ch 3-1 Radio Trigger set consists of the following items: 1 2 3 4 5 6 7 8 9 1. Instruction Sheet 2. Receiver Batteries 3. Receiver 4. Studio Strobe Mounting Strap 5. Transmitter 6. Transmitter
BLUETOOTH SHUTTERBOSS. User Manual
 BLUETOOTH SHUTTERBOSS User Manual THANK YOU FOR CHOOSING VELLO The Vello Bluetooth ShutterBoss Advanced Intervalometer represents the new generation of wireless triggering. Utilizing the power of Bluetooth
Copy of Instruction Manual Camera Wireless Remote Trigger
 Copy of Instruction Manual Camera Wireless Remote Trigger Gewerbering 26 86666 Burgheim Tel. +49 84 32 / 9489-0 Fax. +49 84 32 / 9489-8333 E-mail: info@foto-walser.de www.foto-walser.de 1 Inhalt 1. How
Commander for wireless flash shooting Canon / Nikon / Sony INSTRUCTION MANUAL
 Commander for wireless flash shooting Canon / Nikon / Sony INSTRUCTION MANUAL Changes or modifications not expressly approved by the party responsible for compliance could void the user's authority to
VM-260 FLEXIBLE MACRO FLASH. User s Manual
 Inspiration strikes VM-260 FLEXIBLE MACRO FLASH User s Manual Copyright 2017 Gradus Group. Bolt and other names of Bolt products are trademarks of Gradus Group. Other product and corporate names mentioned
TTL Wireless Flash Trigger FOR CANON. Instruction Manual. Made In China
 TTL Wireless Flash Trigger FOR CANON www.quadralite.eu info@quadralite.eu Made In China Instruction Manual Contents Foreword 3 4 5 7 7 13 Foreword Warning Names of Parts Body LCD Panel Battery Installing
di-gps Pro L digital images GPS receiver (Built-in data Logger)
") di-gps Pro L digital images GPS receiver (Built-in data Logger) User Guide Ver 1.4 Please visit our website www.di-gps.com for the latest version of the user guide V1.4 1 Contents Introduction 3 Warning
di-gps Pro L digital images GPS receiver (Built-in data Logger) User Guide Ver 1.4 Please visit our website www.di-gps.com for the latest version of the user guide V1.4 1 Contents Introduction 3 Warning
Commander for wireless flash shooting Canon INSTRUCTION MANUAL
 Commander for wireless flash shooting Canon INSTRUCTION MANUAL Changes or modifications not expressly approved by the party responsible for compliance could void the user's authority to operate the equipment.
FREEWAVE STRYKER LIGHTNING/MOTION TRIGGER. User Manual
 FREEWAVE STRYKER LIGHTNING/MOTION TRIGGER User Manual THANK YOU FOR CHOOSING VELLO The Vello FreeWave Stryker for Canon and Nikon is a 2-in-1 solution for intense light and infrared (IR) image triggering.
Studio Flash Trigger TR-Q6 TTL For the Rovelight RT Series. Canon TR-Q6RTC Nikon TR-Q6N Sony TR-Q6S
 Studio Flash Trigger TR-Q6 TTL For the Rovelight RT Series Canon TR-Q6RTC Nikon TR-Q6N Sony TR-Q6S Thank you for purchasing the ORLIT TR-Q6 TTL Wireless Radio Studio Transmitter. TR-Q6 RTC is designed
interfit S1 Battery-Powered TTL/HSS Flash
 lighting your creativity interfit S1 Battery-Powered TTL/HSS Flash Instruction Manual www.interfitphotographic.com Interfit S1 Battery-Powered TTL/HSS Flash Unit What s cool about the Interfit S1? The
di-gps N1 digital images GPS
 di-gps N1 digital images GPS Users Guide Ver 1.0a Please visit our website www.di-gps.com for the latest version of the user guide Canon and EOS are registered trademark or a trademark of Canon Inc. in
Rovelight RT 400 TTL MONOLIGHT
 Rovelight RT 400 TTL MONOLIGHT Thank You for Purchasing the ORLIT Rovelight RT-400 Please read all the information contained in this user s guide carefully, keep it in a safe place and pass it to other
BG-N4.2 BATTERY GRIP. Designed For The Nikon D7000 SLR Camera
 BG-N4.2 BATTERY GRIP Designed For The Nikon D7000 SLR Camera Introduction Thank you for choosing Vello and congratulations on your new BG-N4.2 battery grip purchase. Enjoy the many benefits that a battery
CM-7L RIGVISION 7 FIELD MONITOR WITH SHUTTER RELEASE USER MANUAL
 CM-7L RIGVISION 7 FIELD MONITOR WITH SHUTTER RELEASE USER MANUAL 2 INTRODUCTION Thank you for choosing the Elvid 7 Field Monitor with Shutter Release. The RigVision gives you a crisp, clear, full color
DESIGNED & MANUFACTURED by FLOATCAM
 DESIGNED & MANUFACTURED by FLOATCAM DC-Slider Motion Control PN377719 Package Includes: Motor Microprocessor Motor to Microprocess or Remote Controller Connection Cable AC Power Cable w/north American
Draft Bluetooth HEADSET HM1000
 Draft 1 2009-11-04 Bluetooth HEADSET HM1000 Contents Getting started Safety precautions Charging the headset Wearing the headset Using your headset Turning the headset on or off Pairing and connecting
FREEWAVE VIEWER VL WIRELESS LIVE-VIEW REMOTE. User's Manual
 FREEWAVE VIEWER VL WIRELESS LIVE-VIEW REMOTE User's Manual INTRODUCTION Thank you for selecting the Vello FreeWave Viewer VL Wireless Live-View Remote. The bright 3.5" color viewer displays the live view
impact INSTRUCTIONS LiteTrek 4.0 Monolight lighting equipment and accessories
 impact lighting equipment and accessories LiteTrek 4.0 Monolight INSTRUCTIONS Congratulations on your purchase of the Impact LiteTrek 4.0 Portable Monolight. Enjoy the many benefits of a portable strobe
Ricoh 240 SPEEDLIGHT
 Ricoh 240 SPEEDLIGHT This camera manual library is for reference and historical purposes, all rights reserved. This page is copyright by, M. Butkus, NJ. This page may not be sold or distributed without
-TX. Wireless Flash Controller. User Manual 用户手册
 -TX Wireless Flash Controller User Manual 用户手册 Contents General Description................. 1 Conventions used in the manual........... 2 Supported Functions List............... 3 Name of Parts/LCD.................
USB-FC-110 LYNX USB FOCUS CONTROLLER USER MANUAL
 USB-FC-110 LYNX USB FOCUS CONTROLLER USER MANUAL 2 INTRODUCTION Thank you for choosing the Elvid Lynx USB Focus Controller. The Elvid Lynx gives you remote control over focus and exposure (including shutter
Radio Transmitter. for Fujifilm FPRRR2TF
 R2 Radio Transmitter for Fujifilm FPRRR2TF Flashpoint R2 Radio Transmitter for Fujifilm Thank you for choosing Flashpoint! The Flashpoint R2 Radio System transmits TTL data directly to the vast R2 Family
EL-Skyport Software. EL-Skyport Studio Management Software. EL-Skyport 3.0. Software Features: What you need to make it work:
 EL-Skyport Software EL-Skyport Studio Management Software The latest release of the EL-Skyport software includes exciting features for photographers who are optimising their digital workflow by using MAC
CHEETAH. Wireless Power-Control Flash Trigger. For Canon. Instruction Manual. C h e e ta h L ig h t L L C. Made In China
 CHEETAH Wireless Power-Control Flash Trigger For Canon C h e e ta h L ig h t L L C. w w w.ch e e ta h sta n d.co m in fo @ c h e e ta h s ta n d.c o m ( 2 1 4 ) 7 3 4-11 9 8 Made In China Instruction Manual
Radio Transmitter. for Panasonic & Olympus FPRRR2TP
 R2 Radio Transmitter for Panasonic & Olympus FPRRR2TP Flashpoint R2 Radio Transmitter Thank you for choosing Flashpoint! The Flashpoint R2 Radio System transmits TTL data directly to the vast R2 Family
Digital 2.4GHz 3.5 LCD Monitor
 Digital 2.4GHz 3.5 LCD Monitor QC-3402 User Manual Specifications: 3.5 LCD Monitor Power Consumption: Frame Rate: Run Time: Input Voltage: Dimensions: 400mA 25fps 4 hours continuous 5VDC @ 1A 84(W) x 126(H)
Quick Start Guide. ipano AllView Pro Gigapixel Camera Mount #3600
 Quick Start Guide ipano AllView Pro Gigapixel Camera Mount #3600 PACKAGE CONTENTS ipano AllView Pro mount 8.4V 2A battery charger RS232 serial cable (RS232-RJ9) Electronic trigger cables X7 Vertical mounting
BTT005 Bluetooth Audio transmitter
 BTT005 Bluetooth Audio transmitter Before using 2 1. About BTT005.2 2. System requirements 2 3. Overview.2 Starting to use 2 1. Charging..2 2. Switching on/off the transmitter 3 3. Pairing with Bluetooth
TT680 Canon E-TTL II Compatible Flash
 TT6 Canon E- II Compatible Flash INSTRUCTION MANUAL Warning Always keep this product dry. Do not use in rain or in damp conditions. Do not disassemble. Should repairs become necessary, this product must
Serial No. OWNER S MANUAL. Installation & Operation
 Serial No. OWNER S MANUAL Installation & Operation Table of Contents Safety & Warranty Warnings 01 Parts List 02 GhostBed Electronics Quick Reference Guide... 03 Installation Guide 04 GhostBed Remote Control
Cactus V6 II Firmware Release Notes
 Cactus V6 II Firmware Release Notes Firmware FUJ.1.002 (Released on 03 Jul 2017) - Fixed various sync time and power output issues with Canon system flashes. - Fixed the problem in controlling zoom with
Manual. Bluetooth Headphone X9. Please read this manual before operating your headset, and keep it for future reference.
 Manual Bluetooth Headphone X9 Please read this manual before operating your headset, and keep it for future reference. Switching On and Off To switch the X9 on or off, hold down the MFB for about 4 seconds
LED Video Light 型号 : LED500 深圳市神牛摄影器材有限公司 深圳市神牛摄影器材有限公司 705-LE Instruction Manual 说明手册
 LED Video Light 深圳市神牛摄影器材有限公司 GODOX Photo Equipment Co., Ltd. 地址 /Add: 深圳市宝安区福永镇福洲大道西新和村华发工业园 A4 栋 Building A4, Xinhe Huafa Industrial Zone, Fuzhou RD West, Fuyong 深圳市神牛摄影器材有限公司 Town, Baoan District, Shenzhen
DF-383. Power Zoom AF DSLR Flash INSTRUCTION MANUAL
 DF-383 Power Zoom AF DSLR Flash INSTRUCTION MANUAL Introduction Thank you for purchasing the DF-383 digital power zoom flash gun. Your electronic flash is innovatively designed for both digital cameras
Electronic Flash FL-50R. Instruction Manual
 Electronic Flash FL-50R Instruction Manual Names of parts Flash Wide panel gp. 26 Light-emitting area AF illuminator light-emitting area gp. 30, 35 When the subject is dark or low-contrast, the built-in
Remote Control Electrical Roller Blinds
 Remote Control Electrical Roller Blinds Instruction Manual for Model HT200 Contents 1. Description of Remote Control Electrical Roller Blind General Information Technical Data 2. Parts List Model HT200
Freetalk Bluetooth Speakerphone
 Freetalk Bluetooth Speakerphone USER GUIDE Three Colours Available! 1713164 - Storm Blue 1713168 - Titanium 1713169 - Pure White Contents 1. About Bluetooth Speakerphone...3 2. About Bluetooth Technology...3
Cactus RF60 Firmware Release Notes
 Cactus RF60 Firmware Release Notes Version A.06 (Released on 25 May 2018) - Supports the Canon X-TTL firmware (firmware version prefix: CAN.A.xxx). Check the updated table below about the compatible RF60X
3-Axis Gimbal for Mirrorless and DSLR Cameras. Guilin Feiyu Technology Incorporated Company
 3-Axis Gimbal for Mirrorless and DSLR Cameras Guilin Feiyu Technology Incorporated Company User Manual EN V 2.1 1. Product Overview [5] [4] [3] [12] [7] [6] [9] [8] [2] [13] [14] [1] [15] [16] [17] [10]
BG-N10. Designed for the Nikon D600 and D610 SLR Camera
 BG-N10 BATTERY GRIP Designed for the Nikon D600 and D610 SLR Camera Introduction Thank you for choosing Vello and congratulations on your new BG-N10 battery grip purchase. Enjoy the many benefits that
COLOR VIDEO DOOR PHONE
 www.commax.in.ua COLOR VIDEO DOOR PHONE.in.ua Model No. CDV-72BE a513-11, Sangdaewon-dong, Jungwon-gu, Seongnam-si, Gyeonggi-do, Korea Int l Business Dept. Tel.; : +82-31-7393-540~550 Fax.; +82-31-745-2133
Copyright C 2014 DOD Tech All Rights Reserved
 USER MANUAL Copyright C 2014 DOD Tech All Rights Reserved CONTENTS IMPORTANT SAFETY INSTRUCTION 2 PACKAGE CONTENTS CONTROLS AND FUNCTIONS 3 4 INSTALLATION AND CONNECTION 6 GETTING STARTED 7 INTRODUCTION
BG-N8 BATTERY GRIP. Designed For The Nikon D300 and D300s SLR Cameras
 BG-N8 BATTERY GRIP Designed For The Nikon D300 and D300s SLR Cameras Introduction Thank you for choosing Vello and congratulations on your new BG-N8 battery grip purchase. Enjoy the many benefits that
24/7 Sprinkler Monitor. The Ultimate Rain/Freeze Sensor
 24/7 Sprinkler Monitor The Ultimate Rain/Freeze Sensor User s Manual PIONEER SALES, LTD. 5529 Redfield St. Dallas, TX 75235 Phone: (214) 276-0306 Fax: (214) 631-4218 Toll Free: 1-(866) 501-7745 1 Table
VS-260C TTL AUTOFOCUS FLASH
 Inspiration strikes VS-260C TTL AUTOFOCUS FLASH User s Manual Copyright 2015 Gradus Group. Bolt and other names of Bolt products are trademarks of Gradus Group. Other product and corporate names mentioned
H D D A S H C A M E R A
 H D D A S H C A M E R A User Manual All trademarks are acknowledged as the property of their respective owners. Unless otherwise stated their use does not imply that the trademark owner is affiliated with
WDH11 2.4GHz Digital Wireless Headphone
 WDH11 2.4GHz Digital Wireless Headphone User Manual Please read before using this headphone. INTRODUCTION This 2.4GHz Digital Wireless Headphone uses latest digital wireless technology that enables you
Camtraptions PIR Motion Sensor Manual. Firmware Version 2.1
 Camtraptions PIR Motion Sensor Manual Firmware Version 2.1 Index What is a PIR Motion Sensor?... 3 Controls... 4 Dials... 4 Switches... 4 On-off Switch... 5 Inserting Batteries... 6 Red LED Indicator...
YN622C-TX. Wireless Flash Controller. User Manual 用户手册
 YN622C-TX Wireless Flash Controller ZOOM CH User Manual 用户手册 Contents/Cautions General Description................. 1 Conventions Used in the Manual.......... 2 Supported Functions List...............
BG-N11 BATTERY GRIP. Designed for the Nikon D7100 SLR Camera
 BG-N11 BATTERY GRIP Designed for the Nikon D7100 SLR Camera Introduction Thank you for choosing Vello and congratulations on your new BG-N11 battery grip purchase. Enjoy the many benefits that a battery
3-Axis Stabilized Handheld Gimbal for Camera. Instructions. Guilin Feiyu Technology Incorporated Company
 3-Axis Stabilized Handheld Gimbal for Camera Instructions Guilin Feiyu Technology Incorporated Company User Manual E N V. 0 Catalogue. G6 Plus Overview 2. Quick Start Guide 3 3. Balance the Gimbal 4 Balance
User manual BT3900. Register your product and get support at
 User manual BT3900 Register your product and get support at www.philips.com/support Contents 1 Important 1 Safety 1 Notice 1 2 Your Bluetooth speaker 3 Introduction 3 What's in the box 3 Overview of the
SP mm F/2.8 Di VC USD (Model A009)
") SP 70-200mm F/2.8 Di VC USD (Model A009) Thank you for purchasing the Tamron lens as the latest addition to your photographic equipment. Before using your new lens, please read the contents of this Owner
SP 70-200mm F/2.8 Di VC USD (Model A009) Thank you for purchasing the Tamron lens as the latest addition to your photographic equipment. Before using your new lens, please read the contents of this Owner
Odin II. TTL Flash Trigger. Now available for Sony as well as Nikon & Canon
 www.phottix.com Odin II TTL Flash Trigger Now available for Sony as well as Nikon & Canon Transmitter Receiver Introducing The Phottix Phottix adds cutting-edge functionality and features to their lagship
Precautions. Please read carefully before using this product.
 Thank you for purchasing this BEWITH Mirror Media MM-1. It is designed to give you many years of enjoyment. Please read all instructions in this manual before attempting operation and keep it handy for
Escort LED LIGHTS USER MANUAL
 Escort LED LIGHTS USER MANUAL Escort INTRODUCTION THANK YOU FOR CHOOSING GENARAY The Escort series of LED light fixtures provides photographers and videographers with flicker-free continuous light. They
lighting your creativity BADGER UNLEASHED BATTERY-POWERED 250Ws TTL/HSS FLASH Instruction Manual
 lighting your creativity BADGER UNLEASHED BATTERY-POWERED 250Ws TTL/HSS FLASH Instruction Manual www.interfitphotographic.com Badger Unleashed Battery-Powered 250Ws TTL/HSS Flash What s cool about the
Light as soft as a cloud.
 Light as soft as a cloud. As part of Luxli s Softi series, the LED Ring Light with Camera Mount provides soft, flattering light without harsh shadows. Control the intensity when illuminating your subject
LED-200P. Mobile LED Light Set. User Manual
 LED-200P Mobile LED Light Set User Manual 2 Welcome Thank you for choosing Xuma. The LED-200P is a compact, durable, and versatile LED light set that is as useful at home as it is on the go. A variety
Owner s Manual RBC-AX32U(W)-E RBC-AX32U(WS)-E AIR CONDITIONER (SPLIT TYPE) Wireless remote controller kit. Model name: English.
-E RBC-AX32U(WS)-E AIR CONDITIONER (SPLIT TYPE) Wireless remote controller kit. Model name: English.") AIR CDITIER (SPLIT TYPE) Owner s Manual Wireless remote controller kit Model name: RBC-AX3U(W)-E RBC-AX3U(WS)-E Generic model name RBC-AX3U(W)-E Wireless remote controller model name WH-LSE Signal receiving
AIR CDITIER (SPLIT TYPE) Owner s Manual Wireless remote controller kit Model name: RBC-AX3U(W)-E RBC-AX3U(WS)-E Generic model name RBC-AX3U(W)-E Wireless remote controller model name WH-LSE Signal receiving
FHD Driving Recorder E272S/S272W. Quick Start Guide
 FHD Driving Recorder E272S/S272W Quick Start Guide 400-8401-030 www.polaroidcarcam.com 1 Introduction 1.1 Package Contents The package contains the following items. In case there is any missing or damaged
Thank you for purchasing a Nissin product
 INSTRUCTION MANUAL Changes or modifications not expressly approved by the party responsible for compliance could void the user's authority to operate the equipment. This device complies with Part 15 of
Copy of Instruction Manual. Battery Grip for Canon 7D
 Content Copy of Instruction Manual 1. How to understand the instruction manual... 4 1.1 1.2 Markings on the device... 4 Markings in this manual... 4 2. Important safety notes... 5 3. Unpack and check the
Chinon PW-600 / PW-610 Power Winder for Chinon cameras
 Chinon PW-600 / PW-610 Power Winder for Chinon cameras This camera manual library is for reference and historical purposes, all rights reserved. This page is copyright by M. Butkus, N.J. This page may
for Four Thirds / Micro Four Thirds cameras INSTRUCTION MANUAL
 for Four Thirds / Micro Four Thirds cameras INSTRUCTION MANUAL Changes or modifications not expressly approved by the party responsible for compliance could void the user's authority to operate the equipment.
Instruction Manual. Wireless Studio Flash
 T TTL Wireless Studio Flash Instruction Manual * All the trademarks in this manual are owned by the owner. * Some models of cameras max sync speed is only 1/4000s. If using the cameras which don t support
VS-260S TTL AUTOFOCUS FLASH
 Inspiration strikes. VS-260S TTL AUTOFOCUS FLASH User s Manual Copyright 2015 Gradus Group. Bolt and other names of Bolt products are trademarks of Gradus Group. Other product and corporate names mentioned
User Manual V K Camera with an Integrated 3-axis Gimbal
 User Manual V 1.1 4K Camera with an Integrated 3-axis Gimbal Table of Contents Introduction 3 At a Glance 3 Charging the Battery 4 Status Battery LED Indicator Description 4 Check the Battery Level 5 Insert
Pulse LED Instruction Guide
 PARTS LIST Light Fixture Aquarium Frame Mounts Instruction Guide WARNING: To guard against injury, basic precautions should be observed, including the following: A) READ AND FOLLOW ALL SAFETY INSTRUCTIONS.
INSTRUCTION MANUAL VOLTAGE REGULATOR MAXBEC2D PLUS EX
 VOLTAGE REGULATOR MAXBEC2D PLUS EX Released by JETI model s.r.o. 29. 10. 2014 CONTENT 1. INTRODUCTION... 3 2. DESCRIPTION... 4 2.1 MAXBEC2D PLUS... 4 2.2 MAGNETIC SWITCH... 4 2.3 RC SWITCH... 5 3. CIRCUITS...
TLKR T60/T61 OWNER'S MANUAL
 TLKR T60/T61 OWNER'S MANUAL RF ENERGY EXPOSURE AND PRODUCT SAFETY GUIDE FOR PORTABLE TWO-WAY RADIOS ATTENTION! Before using this product, read the RF Energy Exposure and Product Safety Guide that ships
LevelOne BLH-1000 Bluetooth Headset User s Manual
 LevelOne BLH-1000 Bluetooth Headset User s Manual - 1 - Introduction Introduction to Bluetooth Wireless Technology Bluetooth is a short- range wireless communication technology. It allows wireless connections
Chinon Power Winder For Chinon CE-3 Memotron and CM-3
 Chinon Power Winder For Chinon CE-3 Memotron and CM-3 This camera manual library is for reference and historical purposes, all rights reserved. This page is copyright by mike@butkus.org M. Butkus, N.J.
REUNION POWERED HI-FI SPEAKERS
 kitsound.co.uk Your product and batteries must be recycled or disposed of properly. Please contact your local recycling centre for more information on proper disposal. All trademarks are acknowledged as
di-gps Mini 3-DC series digital images GPS receiver
 di-gps Mini 3-DC series digital images GPS receiver Users Guide Ver 1.3 Please visit our website www.di-gps.com for the latest version of the user guide CONTENTS CONTENTS... 1 INTRODUCTION... 2 WARNING
INSTRUCTIONS Read this manual carefully before using your camera.
 INSTRUCTIONS Read this manual carefully before using your camera. WARNING Indicates circumstances under which mishandling resulting from ignoring this symbol could result in personal injury or property
User s Guide. Controller. Be sure to keep all user documentation handy for future reference.
 E User s Guide Controller Be sure to keep all user documentation handy for future reference. Read this first! The contents of this User s Guide are subject to change without notice. Copying of this manual,