Quick Start Guide. ipano AllView Pro Gigapixel Camera Mount #3600
|
|
|
- Ada May
- 6 years ago
- Views:
Transcription
 Electronic trigger cables X7 Vertical mounting dovetail plate")
 www.ioptron.")

1 Quick Start Guide ipano AllView Pro Gigapixel Camera Mount #3600 PACKAGE CONTENTS ipano AllView Pro mount 8.4V 2A battery charger RS232 serial cable (RS232-RJ9) Electronic trigger cables X7 Vertical mounting dovetail plate Vertical mounting dovetail plate screws X2 1/4" to 3/8" Camera Convert Screw Adapter Hex key wrench Padded carrying bag One year limited warranty ONLINE CONTENTS (click under Support Content menu) Manuals (you will need to refer to the full manual for details on set-up and operation). Tips for set up Mount firmware upgrade ipano Commander, a computer and wireless control center Reviews and feedback from other customers 1. Actual contents, specifications and color may vary. 1


 13.")

2 ipano AllView Pro Mount Parts 1. Height Lock 2. Primary Arm 3. Camera Mounting Platform 4. Dovetail Mounting Module 5. Chassis Bubble Level 6. Height Scale 7. Camera Level Indicator 8. Auxiliary Arm 9. Key Pad 10. Trigger Cable Port 11. Power Switch 12. DC Input (7.4V to 8.4V) 13. REMOTE Trigger Port 14. RS485 Port 15. RS232 Serial Port 16. Dovetail Saddle Locking Knob 17. Quick Release Plate Locking Knob 18. Camera Quick Release Plate 2
.")


3 Mount Setup 0. Charge the battery: The ipano AllView Pro uses an internal lithium rechargeable battery. Please full charge the battery after receiving the mount using the included wall plug charger (8.4V/2A). The LED indicator remains RED during the charging process and will turn to GREEN when charge is complete. DO NOT charge the mount with a 12V AC adapter/battery pack or a car cigarette plug. ONLY charge the mount using the included battery charger! Charge the mount battery before every operation. A low battery waning (a flashing battery status indicator or beeps) will occur if the battery is low, charging the battery using a wall plug charger or a 7.4V-8.4V DC power source. You may keep using the mount while charging. 1. Attach the Mount: Carefully thread the ipano mount onto your tripod and make sure it is securely tightened. The mount base has a 3/8 threaded socket. If your tripod only has a 1/4 threaded post, a 1/4 to 3/8 tripod adapter screw (included) is needed, Figure 2 3. Attach the Camera: Remove the Camera Quick Release Plate 18 from the Dovetail Mounting Module 4 by releasing the Plate Locking Knob 17. Install the Quick Release Plate 18 onto the camera tripod mounting hole and align the edges. Tighten the brass screw using a coin if needed, as shown in Figure 3. Figure 1 2. Install the Dovetail Mounting Module: Release the Dovetail Saddle Locking Knob 16 under the Camera Mounting Platform 3. Retreat the tip of the Locking Knob 16 below the surface of the Platform. Slide the Dovetail Mounting Module 4 into the Camera Mounting Platform 3. Tighten the Locking Knob. Figure 3 Mount the camera onto the Dovetail Mounting Module 4 by inserting the Quick Release Plate 18 into the dovetail saddle. If the center of the lens of the camera is aligned with the tripod mounting hole, just align the zero mark on the Quick Release Plate to the one on the dovetail saddle (Figure 5). If the center of the lens of the camera is off-centered from the tripod mounting hole by a distance C, as indicated in Figure 4, you need to shift the zero mark on the Quick Release Plate by C to the zero mark on the dovetail saddle. 3


, which can be accomplished by")


4 Use arrow button or to adjust the level of Camera Mounting Platform (3) by reading the Camera Level Indicator, as shown in Figure 7. Figure 4 Turn the Quick Release Plate Locking Knob (17) to lock the camera. Zero marks on Quick Release Plate and Dovetail saddle Figure 7 5. Adjust the Camera: When taking photographs for a stitched panorama, the entrance pupil of the camera lens needs to be kept in a constant position when the camera is rotated to point in a different direction for each shot. This point is sometimes referred to as the No-Parallax Point (NPP), which can be accomplished by adjusting the Camera Mounting Platform 3 back and forth, and Height Scale 6 up and down. Figure 5 4. Level the Mount: Adjust the tripod legs to level the mount by reading the Chassis Bubble Level Indicator 5 on the Mount Base, as shown in Figure 6. Figure 8 There are two positions for Camera Mounting Platform: 65mm and 80mm, as shown in Figure 9. If the distance from the base of the camera to the center of the lens is smaller than 65mm (see Figure 10), use the default setting (the inner scales). Otherwise, if the distance is greater than 65mm, you need to lower the Camera Mounting Platform to the 80mm position and use the outer scales. Figure 6 Figure 9 4


 and the entrance pupil")

5 Adjust Camera Height Position Find the height number of the camera, the distance from the base of the camera to the center of the lens. For example, the height number of a Canon EOS 5D Mark II is 43.5mm. Release Height Locks 1 on both Primary Arm and Auxiliary Arm. Adjust the camera by moving the Camera Mounting Platform 3 up and down so that the Height Scale is set at the 43.5mm by reading the inner scale. Zoom lens has different entrance pupil distance at different focal length. Mount Operation Key Pads OK MENU X Camera tilt up Camera tilt down Mount slew left Mount slew right Confirm Menu Return LCD Display Panel and Icons Figure 10 Adjust Camera Entrance Pupil Position Adjust the camera position based on the total entrance pupil distance. This number is the sum of the camera length number, (the distance between the middle of the tripod mounting hole to the base of the lens base, or base for adapter tube,) and the entrance pupil distance of the lens. For example, the length number of a Canon EOS 5D Mark II is 38.5mm. The entrance pupil distance of a Canon EF F2.8 lens is 79mm at 16mm focal length. Therefore, the total entrance pupil distance is 38.5mm +79mm=117.5mm. Figure 11 Slightly loosen the Dovetail Saddle Locking Knob 16. Move the Dovetail Mounting Module forward and backward so that the 117.5mm mark on the dovetail bar is aligned to the edge of the Camera Mounting Platform (refer to the inlet in Figure 11). Tighten the Dovetail Saddle Locking Screw. Other icons: Operation Menu 1. First Time Use If it is the first time operating the mount, the AllView Pro mount will ask you to set up the camera field of view (FOV). The system will ask you to: Set camera s zoom, press OK; Align the horizon to the top of the camera view finder/display screen using the key, press OK; Align the horizon to the bottom of the camera view finder/display screen using the key, press OK. Now you ve set the camera FOV 2. Matrix Panorama The Matrix Panorama will provide a rectangular panorama photo. When selecting Matrix Panorama, the system will provide 8 moving paths to choose. After choosing a moving path, move the camera to the starting diagonal corner, press OK. Then move the camera to the ending corner and press OK. The LCD will display the number of photos in each row and column the camera will take, and the total time it needs, based on the camera and mount settings. 5
6 The mount will ask if you want to preview the panorama. Press X to skip the preview or OK to preview. The mount will provide 5 positions for previewing: upper left corner, lower left corner, upper right corner, lower right corner and center position. Press OK to start taking photos after previewing. If the Check List is ON, the mount will ask a set of questions before take the first photo to make sure that the camera is set correctly. Use a 3x4 Matrix Panorama as an example. The mount will take the photo with the following path, if the first path is chosen. to the end position. Press OK. Now you can choose either total picture numbers or angle intervals for the whole swing Total Number Enter the time delays between each picture. Use the and buttons to switch between day, hour, minutes, and seconds. Use the and buttons to change the delay values where cursor is blinking. Move the cursor to Total number line and set the total pictures you want the camera to take. Press OK to confirm. The mount will calculate the angle intervals between each shot. Press OK to start. The mount is set to a default 3:2 Aspect Ratio and 30% Overlap. 3. Circular Panorama The Circular Panorama will provide a 360 panorama photo. Same as the Matrix Panorama, the mount can move from the start point to end point via one of eight (8) moving paths. After choosing a moving path, use the up and down button to move the camera to the starting point, press OK. Then move the camera to the ending point and press OK. The mount will calculate how many photos will be taken and if multiple paths are needed. The LCD will display the number of photos in each row and column the camera will take, and the total time it needs, based on the camera and mount settings. The mount will ask if you want to preview the panorama. Press X to skip the preview or OK to preview. The mount will provide 5 positions for previewing: upper left corner, lower left corner, upper right corner, lower right corner and center position. Press OK to start taking photos. If the Check List is ON, the mount will ask a set of question to make sure that the camera is set correctly. 4. Time-lapse Photography This Time-lapse Photography allows you to create timelapse images while moving the camera. You can pan, tilt or move diagonally the camera while taking the timelapse images. You can set the delay between each picture you are taking. To take a time-lapse panoramas (panoramas over a period of time,) please refer to Global Settings =>Interval Timer. First move the camera to the staring position using the arrow key. Press OK to confirm. Then move the camera 4.2. Interval Degree Enter the time delays between each picture. Use the and buttons to switch between day, hour, minutes, and seconds. Use the and buttons to change the delay values where cursor is blinking. Move the cursor to Interval Degree line and set the angle that camera will move between each picture taken. Press OK to confirm. The mount will calculate the total picture numbers. Press OK to start. 5. Customer Settings Bank This function lets you store up to six (6) customized settings of parameters for a quick reload Bank The 6 banks, numbered from A to F, are available for storing customized parameters. These parameters are AutoFocus (AF), Exposure, Mirror Lockup (Mup), Shutter Length, Repeat, Pretrigger Delay and Camera Field of View (FOV). The cursor will be in the first line when enter this submenu. Use the and buttons to switch between Bank A to Bank F. Press OK to choose to Load the stored parameters or Restoring Default factory preset data. To enter description of a customer bank, press or button to move the cursor to second line. Press OK button to enter a soft keypad. Move the cursor and press OK to enter the letter/number/sign on the cursor position. Press and HOLD the OK key to finish the entering. To delete a character, press and hold MENU button while move the or key to the character to be deleted. Release the MENU button and press the MENU button once to complete the deleting. To record parameters to a bank, just select the bank you like to use. Then go to settings below. At the end of the setting, the parameter will be stored in the bank you selected and it will loaded automatically next time the mount is turned on, until you change the settings or load the parameters from a different bank Autofocus 6
7 Turn the camera auto focus ON and OFF Time/Focus If the Autofocus is ON, this will set how long the camera will take to do the auto focus. The time can be set from 0.05 seconds to 1 second, with 0.05 seconds increments Mirror Lock-up Turn the camera Mirror Lock-up function ON and OFF Lock-up Time If Mirror Lock-up is set to ON, this will set how long the mirror will be flipped up and delayed before the shutter is triggered. The delay ranges from 0.25 seconds to 3 seconds with 0.25 seconds increments Period/Exposure Set the total time between the start of the shutter triggering and the next mount movement Shutter Length The amount of time that shutter signal is asserted ranging from bulb (B), 0.1 to 8 seconds Shutter Feedback This function is used to automatically detect a missed shutter trigger, hence a missed photograph at each position Shutter Retries If the Shutter Feedback is turned ON, this function will allow you to set how many times the camera will try to trig the shutter until it takes a photo successfully. It can set to try up to 10 times Pretrigger Delay This delay is between the end of the mount movement and beginning of the trigger signal to your camera. It will allow the camera to settle after mount movement. The delay time can be set between 0 to 3 seconds Camera Setup This will work through you to set the camera FOV. If you have a zoom lens, you need to set the zoom first. Follow the instruction on the screen to set up the camera FOV. 6. Global Settings 6.1. Aspect Ratio Set the ratio of the width to height of the camera system. The default setting is 3:2. You may set the aspect ratio to 1:1, 3:2, 4:3 and 16:9, as well as customer values from 0.50:1 to 2:00: Picture Overlap Set the overlap between each photos for panorama stitch. The overlap can be selected from 25% to 75%, with 5% increments. The default setting is 30% Rotate Tall Choose take the photo in landscape (normal) or portrait orientation Multi Picture This function will let you set the number of photographs that will be triggered per position Interval Timer This will set the mount to take a series of panoramas over a period of time. If Disable is selected, the mount will stop at the end of a session. If Ext. Trigger is selected, the mount will wait for the remote signal to start the panorama again. If Timer is selected, you can enter how long the mount will wait until next session is started, until you stop the mount Brackets Set exposure bracketing of 1, 3, 5, 7, or 9 photographs for HDR images by working with the camera AEB (automatic exposure bracketing) firmware. Use the EV Step Size setting to set the separation of exposure values EV Step Size Set the separation of exposure values (EVs) to 0.3, 0.7, 1.0, 1.3, 1.7 or Bracket Delay Set time delay between Brackets to allow your camera enough time to transfer the images. The delay can be set between 0.1 and 8 seconds Start Del/Trig This function will enable an external or timer delay trigger before the panorama capture begins Check List If Check List is selected, the mount will prompt you to check the camera before panorama capture begins Shutter Mode This function allows you to choose how the mount will operate the camera s shutter. If Remote is selected, the mount will trigger the shutter via the electronic trigger cable connected to the remote shutter port on 7

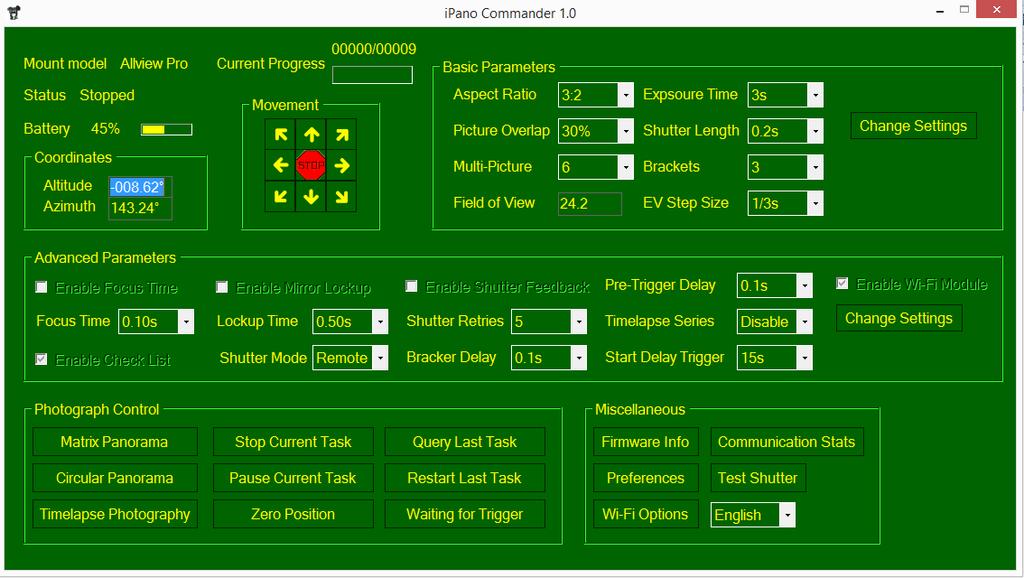
8 the camera. If Manual is chosen, you ll need to manually actuate the camera shutter and press the OK button on the mount to advance to the next photograph. 7. System 7.1. Language Select system language. Currently it has English and Chinese Firmware Information Display system firmware version Factory Reset Reset the system to factory default value Wi-Fi Switch Turn ON/OFF built-in Wi-Fi receiver Wi-Fi Option Information will display the basic information of the Wi-Fi module. It can be changed through a computer via RS232 port. Reset Wi-Fi will restart the Wi-Fi module. Factory WI-Fi will reset all the Wi-Fi information and settings to factory default Goto Zero Position Send the mount back to zero position Set Zero Position Set the zero position of the mount. 10. Computer Control The ipano AllView Pro mount can be connected to a computer for setting up the parameter and to control the mount operation. Please refer to the online instruction for more detail information Connect to a Computer Download and install ipano Commander. Connect the mount via RS232 port on the mount or WiFi connection. Click on downloaded ipano Commader to run it. When a Communication Port Settings screen is opened on your computer screen, select either RS232/USB Port or Wi-Fi/Ethernet based on the connection you set and click OK to connect the mount to the computer Set Beep Set when the mount will beep LCD Contrast Adjust LCD display contrast. 8. Camera Parameter For storing your camera and lens basic parameters, such as Center Position, Camera Height, Entry Pupil Positions for the camera and lens. 9. Short Cut Key 9.1. Latest Project To run last panorama project ipano Commander After the mount is connected, ipano Commander will be loaded. Now you can set the parameter on you computer. Some parameter changes need select Change Setting button first before any change can be made. Now enjoy the panorama! 9.2. Camera Setup To set up the camera zoom and FOV. 8
9 9
10 IOPTRON ONE YEAR LIMITED WARRANTY A. ioptron warrants your telescope, mount, or controller to be free from defects in materials and workmanship for one year. ioptron will repair or replace such product or part which, upon inspection by ioptron, is found to be defective in materials or workmanship. As a condition to the obligation of ioptron to repair or replace such product, the product must be returned to ioptron together with proof-ofpurchase satisfactory to ioptron. B. The proper Return Merchant Authorization (RMA) number must be obtained from ioptron in advance of return. Contact ioptron via e- mail at support@ioptron.com or call at to receive the RMA number to be displayed on the outside of your shipping container. All returns must be accompanied by a written statement stating the name, address, and daytime telephone number of the owner, together with a brief description of any claimed defects. Parts or product for which replacement is made shall become the property of ioptron. The customer shall be responsible for all costs of transportation and insurance, both to and from the factory of ioptron, and shall be required to prepay such costs. ioptron shall use reasonable efforts to repair or replace any telescope, mount, or controller covered by this warranty within thirty days of receipt. In the event repair or replacement shall require more than thirty days, ioptron shall notify the customer accordingly. ioptron reserves the right to replace any product which has been discontinued from its product line with a new product of comparable value and function. This warranty shall be void and of no force of effect in the event a covered product has been modified in design or function, or subjected to abuse, misuse, mishandling or unauthorized repair. Further, product malfunction or deterioration due to normal wear is not covered by this warranty. IOPTRON DISCLAIMS ANY WARRANTIES, EXPRESS OR IMPLIED, WHETHER OF MERCHANTABILITY OF FITNESS FOR A PARTICULAR USE, EXCEPT AS EXPRESSLY SET FORTH HERE. THE SOLE OBLIGATION OF IOPTRON UNDER THIS LIMITED WARRANTY SHALL BE TO REPAIR OR REPLACE THE COVERED PRODUCT, IN ACCORDANCE WITH THE TERMS SET FORTH HERE. IOPTRON EXPRESSLY DISCLAIMS ANY LOST PROFITS, GENERAL, SPECIAL, INDIRECT OR CONSEQUENTIAL DAMAGES WHICH MAY RESULT FROM BREACH OF ANY WARRANTY, OR ARISING OUT OF THE USE OR INABILITY TO USE ANY IOPTRON PRODUCT. ANY WARRANTIES WHICH ARE IMPLIED AND WHICH CANNOT BE DISCLAIMED SHALL BE LIMITED IN DURATION TO A TERM OF ONE YEAR FROM THE DATE OF ORIGINAL RETAIL PURCHASE. Some states do not allow the exclusion or limitation of incidental or consequential damages or limitation on how long an implied warranty lasts, so the above limitations and exclusions may not apply to you. This warranty gives you specific legal rights, and you may also have other rights which vary from state to state. ioptron reserves the right to modify or discontinue, without prior notice to you, any model or style telescope. If warranty problems arise, or if you need assistance in using your telescope, mount, or controller contact: ioptron Corporation Customer Service Department 6E Gill Street Woburn, MA support@ioptron.com Tel. (781) Fax. (781) Monday-Friday 9AM-5PM EST NOTE: This warranty is valid to U.S.A. and Canadian customers who have purchased this product from an authorized ioptron dealer in the U.S.A. or Canada or directly from ioptron. Warranty outside the U.S.A. and Canada is valid only to customers who purchased from an ioptron Distributor or Authorized ioptron Dealer in the specific country. Please contact them for any warranty. 10
Quick Start Guide. SkyGuide Pro Camera Mount Model: #3550
 Quick Start Guide SkyGuide Pro Camera Mount Model: #3550 PACKAGE CONTENTS 1 SkyGuider TM Pro camera mount with built in Li ion rechargeable battery AccuAlign TM dark field illuminated polar scope (installed)
ipano TM AllView Pro TM Camera Mount Instruction Manual
 ipano TM AllView Pro TM Camera Mount Instruction Manual Product #8600 This product is a precision instrument. Please read the included QSG before assembling the mount. Please read the entire Instruction
20810 Sockeye Pl #200 Bend, OR Support and Sales Questions:
 20810 Sockeye Pl #200 Bend, OR 97701 Support and Sales Questions: Tel: (866) 977-6688 Monday to Friday 9AM to 5PM Pacific Time or email support@evogimbals.com EVOGimbals.com English Manual V2.0 CONTENTS
GH-30. Gimbal Head. You re on steady ground
 GH-30 Gimbal Head You re on steady ground 1 INTRODUCTION Thank You for choosing Oben! The Oben GH-30 is a gimbal-type tripod head designed to balance a lens along its vertical and horizontal axes. The
DESIGNED & MANUFACTURED by FLOATCAM
 DESIGNED & MANUFACTURED by FLOATCAM DC-Slider Motion Control PN377719 Package Includes: Motor Microprocessor Motor to Microprocess or Remote Controller Connection Cable AC Power Cable w/north American
TAKAMA FLIP-ZIP INTRODUCTION. KEY FEATURES (Illustration - 1) MULTI-FUNCTIONAL TRIPOD MONOPOD KIT. Thanks for choosing Takama!
 MULTI-FUNCTIONAL TRIPOD MONOPOD KIT. Thanks for choosing Takama!") FLIP-ZIP TAKP4H58 TAKAMA FLIP-ZIP MULTI-FUNCTIONAL TRIPOD MONOPOD KIT INTRODUCTION Thanks for choosing Takama! The perfect hybrid accessory for photo and video cameras, this unique tripod will bring stability
FLIP-ZIP TAKP4H58 TAKAMA FLIP-ZIP MULTI-FUNCTIONAL TRIPOD MONOPOD KIT INTRODUCTION Thanks for choosing Takama! The perfect hybrid accessory for photo and video cameras, this unique tripod will bring stability
MANUAL. Set-up and Operations Guide Glidecam Industries, Inc. 23 Joseph Street, Kingston, MA Customer Service Line
 MANUAL Set-up and Operations Guide Glidecam Industries, Inc. 23 Joseph Street, Kingston, MA 02364 Customer Service Line 1-781-585-7900 Manufactured in the U.S.A. COPYRIGHT 2015 GLIDECAM INDUSTRIES,Inc.
2013 Red 40/Black 60 Scouting Camera Instruction Manual.
 2013 Red 40/Black 60 Scouting Camera Instruction Manual. Black 60 Red 40 Page1 Table of Contents Camera button info diagram: (Fig. 1)... 3 Installing the batteries:... 3 Installing the SD card:... 5 Understanding
PV Series. Owner s Manual. Photo Tripod
 PV Series Owner s Manual Photo Tripod Thank you for choosing Magnus. Congratulations on the purchase of your new Magnus tripod. This tripod features an adjustable center column for smooth and precise camera
Escort LED LIGHTS USER MANUAL
 Escort LED LIGHTS USER MANUAL Escort INTRODUCTION THANK YOU FOR CHOOSING GENARAY The Escort series of LED light fixtures provides photographers and videographers with flicker-free continuous light. They
WIRELESS SHUTTERBOSS. User Manual
 WIRELESS SHUTTERBOSS User Manual INTRODUCTION Thank you for choosing the Vello Wireless ShutterBoss. It has a range of up to 250 feet on 99 channels over the reliable FSK modulated 2.4 GHz frequency. But
FLEXIBLE MACRO BRACKET WITH ARCA-STYLE MOUNT. User Manual
 FLEXIBLE MACRO BRACKET WITH ARCA-STYLE MOUNT User Manual THANK YOU FOR CHOOSING VELLO The Vello CB-900 Flexible Macro Bracket with Arca-Style Mount is designed for DSLR and mirrorless cameras, as well
MPE5 Scouting Camera Instruction Manual.
 MPE5 Scouting Camera Instruction Manual. Page1 Table of Contents Button function diagram... 3 Introduction... 4 Installing the batteries... 4 Installing the SD card... 5 Setting the camera options... 6
Universal Tablet Holder
 Universal Tablet Holder 1 Thank you for choosing Auray. The Auray Universal Tablet Holder mounts your tablet onto a microphone stand s shaft or threaded mount for hands-free viewing while onstage or in
3-Axis Stabilized Handheld Gimbal for Camera. Instructions. Guilin Feiyu Technology Incorporated Company
 3-Axis Stabilized Handheld Gimbal for Camera Instructions Guilin Feiyu Technology Incorporated Company User Manual E N V. 0 Catalogue. G6 Plus Overview 2. Quick Start Guide 3 3. Balance the Gimbal 4 Balance
OptiView 250 OV-250 LCD VIEWFINDER USER MANUAL
 OptiView 250 OV-250 LCD VIEWFINDER USER MANUAL INTRODUCTION Thank you for choosing the Elvid OptiView 250. This LCD viewfinder provides 3 magnification for 3.0 and 3.2 LCD screens. It features a tripod
2014 MPE5 Covert Scouting Camera Instruction Manual
 2014 MPE5 Covert Scouting Camera Instruction Manual Page1 Page2 Table of Contents Button Function Diagram... 3 Introduction... 4 Installing the Batteries... 4 Installing the SD Card... 5 Programming the
Contents. MicroDome Recess Mount Installation. Arecont Vision MicroDome Installation Manual
 INSTALLATION MANUAL AV1455DN-F AV2455DN-F AV2456DN-F AV3455DN-F AV3456DN-F AV5455DN-F MicroDome Recess Mount Installation Contents Package Contents... 3 Warranty Information... 3 Installation Overview...
MPE6 Covert Scouting Camera Instruction Manual
 MPE6 Covert Scouting Camera Instruction Manual Page1 Table of Contents Introduction...4 Button Function Diagram...5 Installing the Batteries...6 Installing the SD Card...6 Programming the Camera..7 Formatting
FREEWAVE FUSION USER MANUAL
 FREEWAVE FUSION USER MANUAL 2 INTRODUCTION Thank you for choosing the Vello FreeWave Fusion Wireless Shutter/Flash/Grouping Remote. This device triggers off-camera lights remotely from up to 300 feet away.
Point n View Binocular and Digital Camera Owners Manual w w w. b a r s k a. c o m
 Point n View Binocular and Digital Camera Owners Manual 1 For more information about BARSKA and our optic products, please visit www.barska.com 2 Table Of Contents Features... 4 Specifications... 5 Basic
DX-M. Owner s Manual. Photo Tripod
 DX-M Owner s Manual Photo Tripod Thank you for choosing Magnus. Congratulations on the purchase of your new Magnus tripod. This tripod features a rapid center column that detaches to serve as an adjustable
USB-FC-110 LYNX USB FOCUS CONTROLLER USER MANUAL
 USB-FC-110 LYNX USB FOCUS CONTROLLER USER MANUAL 2 INTRODUCTION Thank you for choosing the Elvid Lynx USB Focus Controller. The Elvid Lynx gives you remote control over focus and exposure (including shutter
Woolich Racing. USB ECU Interface User Guide
 Woolich Racing USB ECU Interface User Guide 1) Introduction This user guide covers how to use the Woolich Racing USB ECU Interface. This includes: Connecting the USB ECU Interface into the Bike Harness
Instructions for PREMISE PRO Digital Surveillance Camera
 Important Battery lnformation - Only use Alkaline or Lithium batteries. We recommend the use of Energizer batteries. - Do not mix old and new batteries. Always replace ALL the batteries at the same time.
ACCESSORY 2 - MONITOR INSTRUCTION MANUAL
 8.5" LCD WIDESCREEN MONITOR with 2 Camera AV Inputs ACCESSORY - MONITOR SVAT ELECTRONICS INSTRUCTION MANUAL Version 1.1 Model# CLEARVU7 www.svat.com !IMPORTANT! PLEASE READ! SVAT ELECTRONICS NEED HELP?
Black Maverick Covert Scouting Camera Instruction Manual
 Black Maverick Covert Scouting Camera Instruction Manual Page1 Table of Contents Camera button info diagram: (Fig. 1)...4 Installing the batteries..5 Installing the SD card....5 Understand the main screen
MACROFIER Reverse Mount and Extension Tube with Automatic Functionality for Canon EOS Lenses. User Manual
 MACROFIER Reverse Mount and Extension Tube with Automatic Functionality for Canon EOS Lenses User Manual THANK YOU FOR CHOOSING VELLO Thank you for choosing the Vello Macrofier. This unique accessory allows
Ice Cam Covert Scouting Camera Instruction Manual
 Ice Cam Covert Scouting Camera Instruction Manual Page1 Page2 Table of Contents Camera button info diagram:..4 Installing the batteries & SD card:...5 Understanding the main screen info:....6 Accessing
IS70 USER MANUAL. 70mm SPOTTING SCOPE AND 3.1MP DIGITAL CAMERA. model #52212
 IS70 model #52212 70mm SPOTTING SCOPE AND 3.1MP DIGITAL CAMERA USER MANUAL INDEX Introduction........................2 Quick Start Guide....................3 Parts Identification...................4 Navigation
Fantasea Blue Ray Tray (Cat. No. 2040, 2045, 2050) Instruction Manual
 Instruction Manual") Fantasea Blue Ray Tray (Cat. No. 2040, 2045, 2050) Instruction Manual For Illustration- Blue Ray Double Tray with Housing 1 The Fantasea Blue Ray Tray allows integrating different components in an underwater
Fantasea Blue Ray Tray (Cat. No. 2040, 2045, 2050) Instruction Manual For Illustration- Blue Ray Double Tray with Housing 1 The Fantasea Blue Ray Tray allows integrating different components in an underwater
Owner s Manual. High-Definition Automotive Video Recorder. CDHD-X1000_IB_TP_ENG_V1_ indd 1. Warranty information inside.
 Owner s Manual High-Definition Automotive Video Recorder Warranty information inside. CDHD-X1000_IB_TP_ENG_V1_170117.indd 1 CDHD-X1000_IB_TP_ENG_V1_170117.indd 2 IMPORTANT SAFETY INFORMATION Do not expose
14 Digital Photo Frame Instructional Manual
 14 Digital Photo Frame Instructional Manual aluratek.com mnl M10423 model ADMPF214B Copyright 2017 Aluratek, Inc. All Rights Reserved. Table of Contents Frame Features... Frame Control Close-up... Remote
RS-600AF-V2 RS-850AF-V2. Camera. Track Slider. with Adjustable Feet
 RS-600AF-V RS-850AF-V Camera Track Slider with Adjustable Feet Warnings Please read and follow these instructions, and keep this manual in a safe place. Handle the unit with care. The camera sliding rail
What s in the box. SUP paddle sensor. Paddle sensor mounting track. Charger. USB cable. In your Motionize SUP kit you will find:
 User's Manual 1 What s in the box In your Motionize SUP kit you will find: SUP paddle sensor Paddle sensor mounting track Charger USB cable 2 Android & ios Requirements Android 5 or newer. iphone 5 or
w/ Integrated Color Camera
 SVAT ELECTRONICS now you can see SVAT ELECTRONICS now you can see COVERT DVR Covert DVR w/ Integrated Color Camera w/ Integrated Color Camera COMPLETE SYSTEM INSTRUCTION MANUAL Instruction Manual MODEL##
2016 MP8 Black Instruction Manual
 Page1 2016 MP8 Black Instruction Manual Table of Contents Quick Setup:...3 Camera button info diagram:...4 Installing the batteries... 5 Installing the SD card... 6 Customizing the camera settings... 8
WIRELESS SHUTTERBOSS. User Manual
 WIRELESS SHUTTERBOSS User Manual THANK YOU FOR CHOOSING VELLO The Vello Wireless ShutterBoss has a range of up to 250 feet on 99 channels over the reliable FSK modulated 2.4 GHz frequency. But this device
3-Axis Stabilized Handheld Gimbal
 3-Axis Stabilized Handheld Gimbal Guilin Feiyu Technology Incorporated Company User Manual EN V1.3 1. Product Overview * The showing sports camera is not included in the package Accessories Thumb Screw
10 Slim Digital Photo Frame Instructional Manual
 10 Slim Digital Photo Frame Instructional Manual aluratek.com mnl M10447 model ASGK410B Copyright 2017 Aluratek, Inc. All Rights Reserved. Table of Contents Frame Features... Frame Control Close-up...
Wireless Doorphone Intercom
 Security Made Smarter Wireless Doorphone Intercom EN INSTRUCTION MANUAL DOORBELL OVERVIEW MICROPHONE LEDS CAMERA LENS LIGHT SENSOR Detects ambient light and turns on the LEDS to provide clear color night
IMPORTANT MESSAGE BATTERY SAFETY! USER MANUAL English v1.2 WARRANTY LATEST INFORMATION
 IMPORTANT MESSAGE Thank you for choosing EVO Gimbals as your camera stabilization solution! We know that buying a new product can be very exciting and we are sure that you probably can not wait to use
User Guide. Digital Picture Key Chain NS-DKEYBK10/ NS-DKEYRD10
 User Guide Digital Picture Key Chain NS-DKEYBK10/ NS-DKEYRD10 Digital Picture Key Chain Contents Introduction............................... 3 Safety information......................... 3 Features..................................
Lynx Instruction Manual
 Lynx Instruction Manual 1.0 INTRODUCTION 2.0 HARDWARE - 2.1 Slider 3.0 USER INTERFACE - 3.1 Main Menu - 3.2 Fire Test Shot - 3.3 Backlight - 3.4 Bluetooth - 3.5 Reset - 3.6 Motor Sleep - 3.7 Torque 4.0
Digital Camera USER GUIDE
 Digital Camera USER GUIDE Jazwares, Inc. 2009 1 CONTENTS Please read the instructions along with the camera carefully before you use it, so that you can operate it conveniently. WELCOME, Safety Tips &
3-Axis Stabilized Handheld Gimbal for Camera. Instructions. Guilin Feiyu Technology Incorporated Company
 3-Axis Stabilized Handheld Gimbal for Camera Instructions Guilin Feiyu Technology Incorporated Company User Manual E N V2.0 Catalogue 1.Product Overview 1 2.Installation 2.1Battery Charging 2.2Battery
2014 Outlook Covert Scouting Camera Instruction Manual Covert s First Wide Angle Camera
 Page1 2014 Outlook Covert Scouting Camera Instruction Manual Covert s First Wide Angle Camera Page2 Table of Contents Camera button info diagram: (Fig. 1)... 3 Installing the batteries:... 3 Installing
RS-600AF RS-850AF RS-1200AF. Camera. Track Slider. With Adjustable Feet
 Camera Track Slider With Adjustable Feet RS-600AF RS-850AF RS-00AF Congratulations on your purchase of the Revo Camera Track Slider. Revo s camera track slider is a sturdy, portable, and lightweight mini
Everything in its place. OWNER S MANUAL. TRINITY 56 ROLLING WORKBENCH STAINLESS STEEL Model # TLS-4804 (Stainless Body) TLS-4805 (Black Body)
 TLS-4805 (Black Body)") Everything in its place. OWNER S MANUAL TRINITY 56 ROLLING WORKBENCH STAINLESS STEEL Model # TLS-4804 (Stainless Body) TLS-4805 (Black Body) PARTS LIST Your TRINITY 56in Stainless Steel Workbench should
Everything in its place. OWNER S MANUAL TRINITY 56 ROLLING WORKBENCH STAINLESS STEEL Model # TLS-4804 (Stainless Body) TLS-4805 (Black Body) PARTS LIST Your TRINITY 56in Stainless Steel Workbench should
SAVE THESE INSTRUCTIONS
 and Height Mounts Assembly, Installation and Operating Instructions Model Nos. QL, QLA, ARM250, QLM6 and QLAM6 NOTE: Check all parts for shipping damage. In case of shipping damage, DO NOT use. Contact
MWC-8. Operation MWC-8 800MHz Controller Manual. Operation Manual. manmwc9.
 MWC-8 Operation MWC-8 800MHz Controller Manual Operation Manual manmwc9 www.myeclubtv.com 1 CONTENTS Specifications. 3 Controller Orientation (Front / Rear) 4 Keypad Key Identification. 5 Main Features
VR-System PRO II USER MANUAL
 Tip The interactive presentation of the cubical panorama on the front page of this manual can be seen in the internet at www.pixelmagazin.de/audi-tt-016 VR-System PRO II USER MANUAL Information For more
1. Introduction P Package Contents 1.
 1 Contents 1. Introduction ------------------------------------------------------------------------------- P. 3-5 1.1 Package Contents 1.2 Tablet Overview 2. Using the Tablet for the first time ---------------------------------------------------
Checking the Package Contents
 Welcome Congratulations on your purchase of the Uniden DCX520 optional handset and charger. This additional handset is for use with the Uniden DCT5260, DCT5280, or DCT5285 base. You can place a fully featured
Installation Manual AV2245PM-W AV2246PM-W AV3245PM-W AV3246PM-W AV5245PM-W AV2245PM-D AV2245PM-D-LG AV2246PM-D AV2246PM-D-LG AV3245PM-D AV3245PM-D-LG
 Installation Manual AV2245PM-W AV2246PM-W AV3245PM-W AV3246PM-W AV5245PM-W W Models AV2245PM-D AV2245PM-D-LG AV2246PM-D AV2246PM-D-LG AV3245PM-D AV3245PM-D-LG D Models AV3246PM-D AV3246PM-D-LG AV5245PM-D
Model: WT-868. Wireless Timer Remote Control. English Manual Instruction
 Model: WT-868 Wireless Timer Remote Control English Manual Instruction Thank you for your purchase of a JJC WT-868 Wireless Timer Remote Control. For the best performance, please read this manual instruction
BG-N4.2 BATTERY GRIP. Designed For The Nikon D7000 SLR Camera
 BG-N4.2 BATTERY GRIP Designed For The Nikon D7000 SLR Camera Introduction Thank you for choosing Vello and congratulations on your new BG-N4.2 battery grip purchase. Enjoy the many benefits that a battery
Digital Camera USER GUIDE
 Digital Camera USER GUIDE Jazwares, Inc. 2009 1 CONTENTS Please read the instructions along with the camera carefully before you use it, so that you can operate it conveniently. WELCOME, Safety Tips &
FREEWAVE CAPTAIN TTL TRIGGER USER MANUAL
 FREEWAVE CAPTAIN TTL TRIGGER USER MANUAL TABLE OF CONTENTS Introduction...3 Features...4 Compatible devices...5 Precautions...6-7 Box contents...8-9 Overview... 10-11 Installing the batteries & turning
SHUTTERBOSS VERSION II USER MANUAL
 SHUTTERBOSS VERSION II USER MANUAL 1 INTRODUCTION Thank you for choosing the Vello ShutterBoss. This device is more than just a remote shutter release. It features many timer functions: self-timer, interval
Light as soft as a cloud.
 Light as soft as a cloud. As part of Luxli s Softi series, the LED Ring Light with Camera Mount provides soft, flattering light without harsh shadows. Control the intensity when illuminating your subject
SpeedVault Model SV 500 User Manual
 SpeedVault Model SV 500 User Manual Patented Rev 1 (10/11) Firearm Safety WARNING: The SpeedVault safe or any other firearm storage device cannot take the place of other safety procedures including advising
OPERATING INSTRUCTIONS FOR MODEL ST-15 5-DIGIT SPORTS TIMER
 OPERATING INSTRUCTIONS FOR MODEL ST-15 5-DIGIT SPORTS TIMER Table of Contents OPERATING INSTRUCTIONS... 0 MODEL ST-15... 0 2- YEAR WARRANTY... 2 IMPORTANT!... 3 Warranty Activation/Installation & Completion
C-pan arm USERS INSTRUCTIONS
 C-pan arm USERS INSTRUCTIONS Designed 1 of 12 and made in Denmark Thanks for purchasing a 9.Solutions product. With great passion, we design our products to be as versatile as possible. We hope that our
AUTOMOTIVE. D14VR User Guide DIGITAL VIDEO RECORDER
 AUTOMOTIVE D14VR User Guide DIGITAL VIDEO RECORDER WHAT'S INCLUDED D14VR WINDSHIELD BRACKET Car Charger DC POWER CORD USB CABLE USER GUIDE Welcome Thank you for choosing a Whistler product. We are dedicated
DataPort 350 & 525 USB 2.0 and FireWire Enclosure User s Guide (800)
") DataPort 350 & 525 USB 2.0 and FireWire Enclosure User s Guide WWW.CRUINC.COM (800) 260-9800 TABLE OF CONTENTS PAGE Package Contents 1 Features and Requirements 2 Installation 6 Trouble Shooting 16 Technical
DataPort 350 & 525 USB 2.0 and FireWire Enclosure User s Guide WWW.CRUINC.COM (800) 260-9800 TABLE OF CONTENTS PAGE Package Contents 1 Features and Requirements 2 Installation 6 Trouble Shooting 16 Technical
2.4GHz Wireless Optical Mouse
 2.4GHz Wireless Optical Mouse Model #: MP1950BLK User Manual PID #: 111587-109342 Rev. 140402 All brand name and trademarks are the property of their respective companies Mac and Mac OS X are registered
3-Lamp Fluorescent Ring Light 19" INSTRUCTIONS
 3-Lamp Fluorescent Ring Light 19" INSTRUCTIONS Introduction Thank you for choosing Impact. The Impact 3-Lamp Fluorescent Ring Light 19" is a continuous light for photography and video. It casts a soft,
HDF-2 High Depth-of-Field Macroscope
 HDF-2 High Depth-of-Field Macroscope Photo-Optical Company Manufacturers of precision optical instruments. Tel: (303) 440-4544 Fax: (303) 440-4144 E-mail: info@infinity-usa.com Web: www.infinity-usa.com
User Manual Version 1.0
 User Manual Version 1.0 Getting to know your Up (forward) Down (backwards) Power On/Off Page key for scrolling between two mapping screens Please read the following information in this booklet to ensure
3-Axis Stabilized Handheld Gimbal. Guilin Feiyu Technology Incorporated Company
 3-Axis Stabilized Handheld Gimbal Guilin Feiyu Technology Incorporated Company User Manual EN V1.1 1. Product Overview * The showing sports camera is not included in the package Thumb Screw Tilt Axis Cross
DVR 514 Digital Video Recorder
 DVR 514 Digital Video Recorder User Manual 2010 Sakar International, Inc. All rights reserved. Windows and the Windows logo are registered trademarks of Microsoft Corporation. All other trademarks are
Professional HD Security Camera
 Professional HD Security Camera 5MP HD Bullet Camera EN INSTRUCTION MANUAL 1 Welcome Congratulations on your purchase of the Swann 5MP Professional HD Security Camera. You ve made a fine choice for keeping
PSL-C / PSL-N / PSL-R PowerSlave Transmitter / Receiver INSTRUCTIONS
 PSL-C / PSL-N / PSL-R PowerSlave Transmitter / Receiver INSTRUCTIONS Table of Contents Introduction...3 Key Features...4 Precautions...5 Overview...6 Contents Include...8 Compatible Devices...10 Battery
MD-BD13B / DUAL SEGMENT TWIN-ARM. For (33-69 cm) LCD desktop computer monitors. User Manual
 LCD desktop computer monitors. User Manual") MD-BD13B / DUAL SEGMENT TWIN-ARM MONITOR mount For 13 27 (33-69 cm) LCD desktop computer monitors User Manual Thank you for choosing Gabor. The Gabor MD-BD13B mounts two 13 27 (33 69 cm) LCD computer monitors
MD-BD13B / DUAL SEGMENT TWIN-ARM MONITOR mount For 13 27 (33-69 cm) LCD desktop computer monitors User Manual Thank you for choosing Gabor. The Gabor MD-BD13B mounts two 13 27 (33 69 cm) LCD computer monitors
Thermal-Sensing Security Cameras
 Security Made Smarter Thermal-Sensing Security Cameras High-Accuracy Motion Activated 1080p HD Cameras EN INSTRUCTION MANUAL 1 Introduction Congratulations on your purchase of these thermal-sensing security
WR-5e Remote Control
 1. Introduction WR-5e Remote Control The WR-5e is a microprocessor based serial data remote control unit for Ashly NE or NX products. Compatible products currently include Pema amplifiers, ne8800 and ne4800
DataPort 250 USB 2.0 Enclosure User s Guide (800)
") DataPort 250 USB 2.0 Enclosure User s Guide WWW.CRU-DATAPORT.COM (800) 260-9800 TABLE OF CONTENTS PAGE Package Contents 1 Features and Requirements 2 Installation 4 Trouble Shooting 13 Technical Support
DataPort 250 USB 2.0 Enclosure User s Guide WWW.CRU-DATAPORT.COM (800) 260-9800 TABLE OF CONTENTS PAGE Package Contents 1 Features and Requirements 2 Installation 4 Trouble Shooting 13 Technical Support
Wall. No opening (Example: LA-030-W)
") Thank you very much for choosing an EIZO product. Please read this User s Manual carefully to familiarize yourself with safe and effective usage procedures. Please retain this manual for future reference.
Thank you very much for choosing an EIZO product. Please read this User s Manual carefully to familiarize yourself with safe and effective usage procedures. Please retain this manual for future reference.
User's Guide. Temperature / Humidity Datalogger. Model 42270
 User's Guide Temperature / Humidity Datalogger Model 42270 Warranty EXTECH INSTRUMENTS CORPORATION warrants this instrument to be free of defects in parts and workmanship for one year from date of shipment
3-Axis Stabilized Handheld Gimbal. Guilin Feiyu Technology Incorporated Company
 3-Axis Stabilized Handheld Gimbal Guilin Feiyu Technology Incorporated Company User Manual EN V1.0 1. Product Overview * The showing sports camera is not included in the package Thumb Screw Tilt Axis Cross
Wyred 4 Sound. Owner s Manual. Wyred 4 Sound 4235 Traffic Way Atascadero CA, Page 1 of 11. Wyred 4 Sound 2013 All rights reserved. v1.
 Wyred 4 Sound µdac Owner s Manual Wyred 4 Sound 4235 Traffic Way Atascadero CA, 93422 Wyred 4 Sound 2013 All rights reserved. v1.1 Page 1 of 11 Table of Contents READ FIRST Important 2 Package Contents
Complete User Guide. X1 Action Camera
 1 Complete User Guide X1 Action Camera x1 DISCOVER: ADVENTURE Contents Share your footage with us on social media #KBdiscover To view the entire Kaiser Baas product range visit: www.kaiserbaas.com Join
1. Introduction P Package Contents 1.
 1 Contents 1. Introduction ------------------------------------------------------------------------------- P. 3-5 1.1 Package Contents 1.2 Tablet Overview 2. Using the Tablet for the first time ---------------------------------------------------
3-Axis Wearable Gimbal for Action Camera. Instructions. Guilin Feiyu Technology Incorporated Company
 -Axis Wearable Gimbal for Action Camera Instructions Guilin Feiyu Technology Incorporated Company User Manual E N V. Catalogue. WGX Overview. Quick Start Guide. Function operation 4 Working Mode 4 Function
FLAP indicator. Installation manual Version 1.10
 FLAP indicator Installation manual Version 1.10 LXNAV d.o.o. Kidričeva 24, 3000 Celje, Slovenia tel +386 592 33 400 fax +386 599 33 522 info@lxnav.com www.lxnav.com 1 Important Notices... 3 1.1 Limited
NBS-2X NIMBUS STABILIZER QUICK-START GUIDE
 NBS-2X NIMBUS STABILIZER QUICK-START GUIDE PREC AUTIONS Please read and follow these instructions and keep this manual in a safe place. Keep this product away from children. Make sure everything is secure
D11VR. OWNER S MANUAL DVR Camera
 D11VR OWNER S MANUAL DVR Camera WHAT S INCLUDED FEATURE DESCRIPTION Features 3 2 1 18 10 D11VR WINDSHIELD BRACKET 4 7 5 8 6 9 11 12 14 13 16 17 15 DC POWER CORD USB CABLE OWNER S MANUAL Welcome Thank you
Instructions. Remote Controlled Rotator RCR
 LIMITED 1 YEAR WARRANTY Zircon Corporation, ("Zircon") warrants this product to be free from defects in materials and workmanship for one year from the date of purchase. Any in-warranty defective product
UNIDEN AUTOMOTIVE VIDEO RECORDER CAM 500
 UNIDEN AUTOMOTIVE VIDEO RECORDER CAM 500 IMPORTANT SAFETY INSTRUCTIONS This product is not waterproof. Do not expose it to rain or moisture. This product is intended for use in a motor vehicle. Don t install
D12VRS User Guide AUTOMOTIVE DIGITAL VIDEO RECORDER
 D12VRS User Guide AUTOMOTIVE DIGITAL VIDEO RECORDER WHAT'S INCLUDED D12VR MICRO SD CARD WINDSHIELD BRACKET Car Charger DC POWER CORD USB CABLE USER GUIDE Welcome Thank you for choosing a Whistler product.
9.2 TFT LCD COLOR MONITORING SYSTEM With 2 Indoor/Outdoor Color Cameras
 INSTRUCTION MANUAL 9.2 TFT LCD COLOR MONITORING SYSTEM With 2 Indoor/Outdoor Color Cameras MODEL: LCD0935 Copyright 2009 Wisecomm. All Rights Reserved. 1. IMPORTANT SAFETY PRECAUTIONS To prevent fire or
User's Guide Video Borescope Model BR200
 User's Guide Video Borescope Model BR200 Introduction Congratulations on your purchase of this Extech BR200 Video Borescope. This instrument was designed for use as a remote inspection device. It can be
CUBE Micro Station User Guide
 CUBE Micro Station User Guide Models TVS10AC CUBE Micro Station - User Guide 1 of 23 How To Use This Guide This User Guide is a resource to provide you guidelines and best practices as you begin using
CONTENDER LED FRESNEL SPOT FOCUSING LIGHT USER MANUAL
 CONTENDER LED FRESNEL SPOT FOCUSING LIGHT USER MANUAL Contender INTRODUCTION THANK YOU FOR CHOOSING GENARAY The Genaray Contender is a compact and versatile light that s ideal for still and tabletop photography,
Spotting Scope Instruction Manual
 Spotting Scope Instruction Manual 841103 / 846060T 03-16 SETUP and OPERATION Congratulations on the purchase of your Simmons spotting scope, a versatile high-performance spotting scope offering a wide
OSMO Release Notes Major Updates. Notes
 2017.08.31 1. Firmware Version: v1.11.2.70 2. DJI GO App ios Version: v3.1.15 3. DJI GO App Android Version: v3.1.11 1. Fixed an issue where videos could not be opened when recorded under multiple light
Eagle PT-MP1 Pan Tilt Communications Multiplexer Installation and Operations Manual Revision 3.0 August 20, 2001
 Eagle PT-MP1 Pan Tilt Communications Multiplexer Installation and Operations Manual Revision 3.0 August 20, 2001 Distributed by Hitachi Denshi America Ltd. 150 Crossways Park Drive Woodbury, NY 11797 (516)
HDR-8X8-Plus. User Manual. HDMI 4K 8x8 Switch Matrix Connect up to eight different HDMI video sources to eight different outputs.
 HDR-8X8-Plus User Manual HDMI 4K 8x8 Switch Matrix Connect up to eight different HDMI video sources to eight different outputs. Made in U.S.A. www.smartavi.com 1-800-AVI-2131 1 Table of Contents What s
2016 Night Stryker Covert Scouting Camera Instruction Manual
 2016 Night Stryker Covert Scouting Camera Instruction Manual Page1 Table of Contents Camera button info diagram: (Fig. 1)... 4 Installing the batteries..5 Installing the SD card....5 Understand the main