Praktica BC 1 Posted 9-27-'03
|
|
|
- Della Dawson
- 6 years ago
- Views:
Transcription
1 Praktica BC 1 Posted 9-27-'03 This camera manual library is for reference and historical purposes, all rights reserved. This page is copyright by M. Butkus, NJ. This page may not be sold or distributed without the expressed permission of the producer I have no connection with any camera company On-line camera manual library This is the full text and images from the manual. If you find this manual useful, how about a donation of $3 to: M. Butkus, 29 Lake Ave., High Bridge, NJ and send your address so I can thank you. Most other places would charge you $7.50 for a electronic copy or $18.00 for a hard to read Xerox copy. This will help me to continue to host this site, buy new manuals, and pay their shipping costs. It'll make you feel better, won't it? If you use Pay Pal, use the link below. Use the above address for a check, M.O. or cash. If you use PayPal.. use the link below Click here to go to main Camera Manual site <<< IF YOU WOULD LIKE THIS OR ANY PDF FILE PRINTED, BOUND AND MAILED TO YOU, SEE THIS OUTSIDE COMPANY'S' OFFER >>>

2 2 Introduction 4 3 Technical features 6 4 Guide to individual parts 10 5 Summary of instructions for automatic operation 19 6 Preparing to take pictures 23 Inserting the battery 25 Checking the battery 27 Inserting the film 294www.butkus.org Preparing to shoot 31 Setting the film speed 33 7 Taking pictures 34 Automatic shutter speed control 35 Semi-automatic mode 47 Flash photography 51 Changing the lens 55 Focusing 57 Depth-of-field indication 59 Stop down key 59 Shutter release 61 Locking the shutter release 61 Self-timer 63 Changing the film 65 8 Care of the camera 66
3 With the PRAKTICA BC 1 you have bought a quality miniature SLR camera with fully automatic shutter speed control in a range between 1/1000 s and 40 s. In addition, the camera's microelectronics make possible photography at fixed shutter speeds between 1/1000s and 1 s and unlimited shutter speeds with the B setting. The open-aperture TTL metering means a really bright viewfinder image as a result of the electronic transmission of aperture values from the lens to the camera. 17 LEDs at the right-hand edge of the viewfinder image provide information on all important shot data and operations, such as the shutter speed to be expected, underexposure and overexposure, automatic and semi-automatic operating modes as well as flash readiness with dedicated computerized flash units. In addition, the preselected aperture setting is visible at the bottom of the viewfinder image. Manual corrections can be made for deliberate overexposures and underexposures. The PRAKTICA BC 1 is suitable for use with both normal electronic flash units and computerized flash units.4www.but kus.org SLR camera for 24 x 36 mm frame size open-aperture TTL metering system with electronic transmission of aperture values automatic stepless electronic shutter speed control between 1/1000 s and 40 s changeover from automatic to semi-automatic mode possible--fixed speed range from 1/000s to 1s indication of shutter speed in viewfinder by LEDs indication of overexposure or underexposure aperture setting displayed at bottom of viewfinder image manual exposure compensation of + 2 exposure factors memory locking self-timer (approx. 8 s) with starting button focusing system comprises Fresnel lens with novel diagonal triple wedge,microprism ring and ground glass ring flash synchronization (approx. 1/90 s) at **** or automatic formation of flash speed in automatic setting with dedicated computerized flash unit, indication of flash readiness in viewfinder viewfinder image shows approx. 95 per cent of picture sides PRAKTICA bayonet (flange focal length 44.4 mm, internal diameter 48.5 mm)
4 kus.org kus.org connection for motor winder film information holder on rear of camera battery condition indication in viewfinder power source: 6 V primary battery 4www.but silicon photoelement as light sensor4www.but metering and control range: O-17 EV at 21 DIN and aperture 1.4 dimensions of body: 138 mm x87.5 mm x49 mm weight of body without battery: 530 g
5
6
7

8
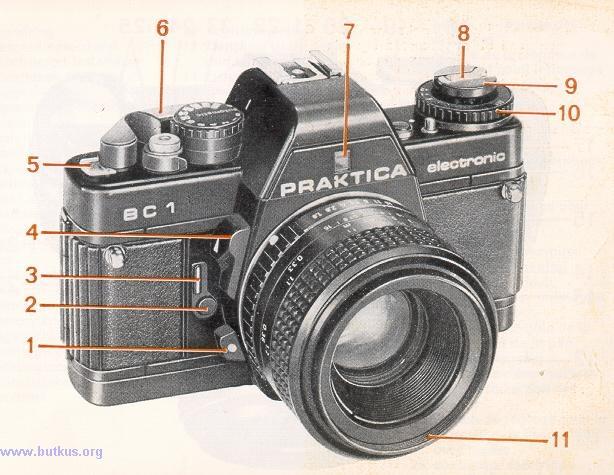
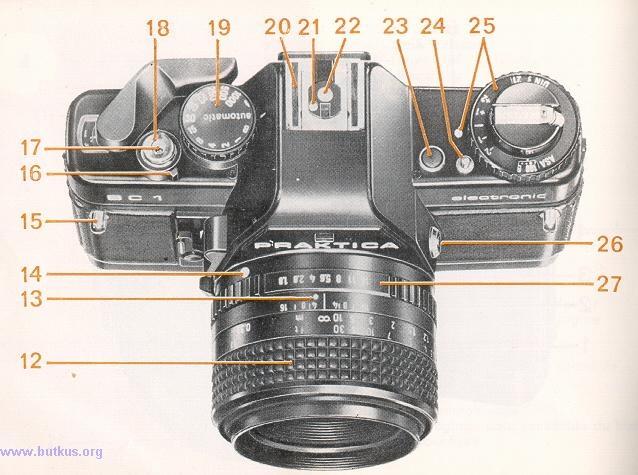
9 tkus. org 1 Unlocking key 2 Self-timer release 3 Self-timer cocking lever 4 Stop down key 5 Frame counter 6 Cocking lever 7 Aperture value indication 8 Rewind crank 9 Rewind button 10 Film speed setting ring 11 Filter thread 12 Focusing ring4www.bu 13 Depth-of-field scale and infrared spot 14 Lens positioning mark 15 Lug for carrying strap 16 Release lock with mark 17 Connection for cable release 18 Shutter release 19 Shutter speed/automatic setting knob 20 Hot shoe with center contact 21 Connection for computerized flash 22 Center contact 23 Memory lock and battery check button 24 Compensation unlocking button 25 Exposure compensation knob with marking 26 Flash nipple 27 Aperture setting ring 28 Film cartridge compartment 29 Shutter blades 35 Contacts for motor winder 36 Cover for battery compartment 37 Battery compartment locking screw
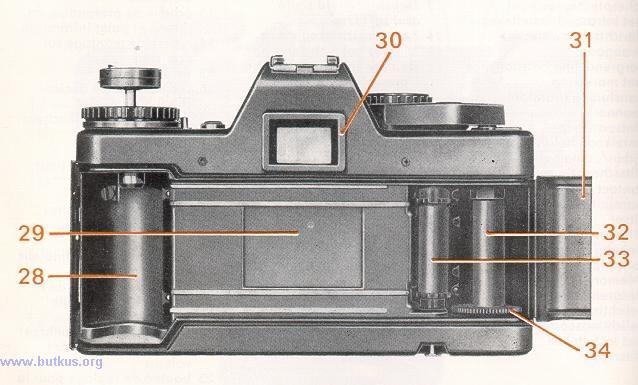
10 kus.org 30 Eyepiece with accessory holder 31 Camera back 32 Film take-up-spool 33 Film sprocket 34 Knurled spool base 38 Film information holder 39 Thread for tripod 40 Rewind release 41 Coupling for motor winder 42 Catch for motor winder 43 Eyepiece cover (see page 41) This summary is no substitute for a thorough knowledge of all the operating instructions contained in this booklet. Insert battery Note + and--pole markings in battery compartment cover (36). Open back Pull rewind button (9) upwards and the back will open. Insert film Adjust setting knob (19) to **** or a fast fixed shutter speed. Insert film cartridge in cartridge compartment (28), press rewind button (9) back in, insert the start of the film into the slit in the take-up spool (32) and turn the spool by the knurled edge (34) towards the center of the camera until the teeth of the sprocket (33) engage in the perforations in the film. Swing cocking lever (6) as far as it will go to check film travel. Close back Prepare to shoot Carry on releasing and cocking until the frame counter (5) indicates frame 1. Readjust setting knob (19) to automatic. Set film speed Lift and turn setting ring (10) until the correct film speed is opposite the mark.4www.but
11 Select aperture Set the desired aperture using the aperture setting ring (27) Focus Triple wedge: object is in focus when its contours and lines flow naturally Microprism ring: when focused correctly the object is clear and flicker-free Ground glass ring: used with poor lighting (eg for close-ups); image should appear clear and sharp. Release shutter Depress shutter release (18) slightly; the camera's automatic system starts to work and an LED shows the shutter speed. If the speed suits the subject, release the shutter; if not, alter the aperture. Film change Depress rewind release (40), fold out rewind crank (8) and turn in the direction of the arrow. When turning becomes easier the film has been completely rewound. Pull the rewind button (9) all the way up to unlock the back and then remove the film cartridge. Lens change Press unlocking key (1), turn lens anticlockwise as far as it will go and remove. Insert the lens so that the red markings are opposite one another and turn clockwise till it locks.

12 Inserting the battery A 6 V source is required to power the whole electronic system. It may be an alkali manganese, silver oxide or lithium battery.4www.butkus.org Under normal conditions, a fresh battery lasts for about 2 years. To insert the battery, turn the locking screw (37) of the battery chamber cover (36) counterclockwise until the cover can be opened. Wipe the contacts in the battery chamber and those of the fresh battery with a dry cloth. Press the plus pole of the battery against the spring contact (polarity marks on battery chamber cover) and tip the battery in. Close and lock the cover.

13 Checking the battery The shutter must be cocked. Press shutter release (18) and then memory button (23). If the LED indication is bright the battery still has a sufficient power reserve. When the battery is used up the LED goes out. In B and battery. settings it is not possible to check the Special attention should be paid to the battery and contacts. Frequent checks are advisable, cleaning when necessary. The battery is sensitive to low temperatures and should be suitably protected. When the camera is not being used for lengthy periods the battery should be removed from the camera.
. Press the rewind button (9) back in all the way, turning it if necessary.")
14 Opening the back Pull the rewind button (9) up as far as it will go to unlock the back. Open the back completely, the frame counter (5) will automatically return to the starting position. Insert the film cartridge into the cartridge compartment (28). Press the rewind button (9) back in all the way, turning it if necessary. Inserting the film Before the film is inserted the shutter speed setting knob (19) should be set to (approx. 1/90 s), as otherwise a slow shutter speed may be formed in the automatic setting. Do not use force. A slow shutter speed so formed can be cut short by changing from automatic to B. The cocking lever can be operated only when the shutter cycle is completed. Insert the start of the film at least 1 cm into the slit in the take-up spool (32). Then turn the spool by the knurled base (34) towards the middle of the camera through about one revolution. The teeth of the film sprocket (33) must engage in the perforation in the film. Check that the film is running properly by carefully operating the cockier' lever (6).
 may be swung out a little way without starting the winding procedure.")
15 Closing the back Press the middle of the lock side of the back against the camera body until the lock is heard to engage.4www.butkus.org Preparing to shoot The cocking lever (6) may be swung out a little way without starting the winding procedure. This readiness position increases handling reliability when taking rapid picture sequences. Swing cocking lever as far as it will go, return and press shutter release (18). Repeat procedure and continue to do so until the automatic frame counter (5) indicates frame 1.
 as an additional aid to the memory.")
16 Setting the film speed Lift film speed setting ring (10) and turn until the film speed value used is opposite the mark. The knurled ring locks when released. The flap from the film pack can be put into the film information ho holder (38) as an additional aid to the memory. Automatic shutter speed control In automatic mode the PRAKTICA BC1 operates automatically in a stepless shutter speed range from 1/1000 s to 40 s. The shutter speed is electronically controlled in line with the lighting conditions, the selected aperture and the film speed. LEDs at the edge of the viewfinder indicate the controlled shutter speed. Where the shutter speed range is exceeded this is indicated by OVER and UNDER. The TTL metering automatically takes into account all factors influencing the exposure such as focal length of the lens, filter and extensions. If lenses with the M 42 x 1 PRAKTICA thread are used with an adapter, light metering is automatic at working aperture.4www.but kus.org

17 Aperture selection The desired aperture is set against the mark on the lens mount by turning the aperture setting ring (27). The set aperture is displayed at the bottom of the viewfinder image. As a guide, the selection of the following values can be recommended for a film speed of 20 DIN = 80 ASA: aperture sunshine 8-11 cloud cover close-ups not below 8 The choice of aperture can also be made according to the desired depth-of-field (foreground, mid-ground, background) and by taking into account the speed information in the viewfinder (danger of blurring). See also the section on depth-of-field indication. A small aperture means a large depth-of-field, a large aperture a correspondingly smaller depth-of-field.


18 Automatic exposure indication Set shutter speed knob (19) to automatic. The electronics are switched on by slight pressure on the shutter release (18). In the viewfinder image the shutter speed calculated by the automatic system is shown by an LED display. If it appears unsuitable for the subject, it can be corrected by selecting another aperture. LEDs are allotted to selected speeds between 1/1000s and 8 s, with intermediate settings being indicated by the simultaneous lighting of two adjacent diodes. Shutter speeds between 8 s and 40 s are indicated by the permanent lighting of the UNDER LED, while speeds outside the 1/1000s to 40 s range are indicated by the flashing of the LED at OVER or UNDER. In this case the shutter is set for 1/1000s or 40s. If shutter speeds of 1/15s and slower are formed, the use of a tripod or other steady surface is recommended.4www.bu tkus. org ' Shutter release After the shutter speed has been checked in the viewfinder, the shutter is operated by fully depressing the shutter release (18). When pressure is removed from the shutter release the electronics are automatically switched off. With slow shutter speeds the removal of pressure from the shutter release does not affect the exposure procedure. In this case the electronics are switched off only where the shutter cycle has been completed. If the cycle needle to be broken off prematurely with a very long shutter speed (eg after an accidental shutter released, the shutter speed SE sting knob (19) should briefly be turned to B. If the camera is not held at eye level during automatic operation (eg with tripod shots), the eyepiece cover (43) which comes with the camera should be pushed into the holder (30).

 slightly to initiate the metering process and then briefly press the memory button (23) to lock in the metered value.")
19 Locking of metered values If the subject features extreme contrasts such as people wearing dark clothes in sunlit snow or a light-colored object in front of a dark background, the exposure value can be calculated by individual metering of the most important element in the picture from close up. The metered value calculated in the close-up measurement is stored, and the image section can be changed without another shutter speed being set. To store the metered value first depress the shutter release (18) slightly to initiate the metering process and then briefly press the memory button (23) to lock in the metered value. The shutter must be cocked. No new measurement is made before the shutter is released, and the shutter speed will correspond to the locked value. The locked value is erased when pressure is removed from the shutter release and the electronics are switched off.4www.but kus.org Exposure compensation Another way of influencing the exposure individually is by using the exposure compensation knob (25). Such compensation is necessary when the character of the object varies greatly from the norm, eg with dark objects in front of a light background (+1, +2) and with bright objects in front of a very dark background ( - 1, - 2). Press the unlocking button (24) and turn the knob in the desired direction. Starting from the initial position the shutter speed is reduced by 1 or 2 exposure factors when the knob is set to +1 or +2, respectively. The speed is correspondingly increased when the knob is set to--1 or--2. The knob can be set to half factors. At the borders of the film speed range--12 DIN and 36 DIN -- compensation by two factors is also possible (correspondingly to 6 DIN and 42 DIN). The compensation cannot extend the shutter speed range beyond the speeds of 1/1000s and 40 s. Remember to return the button to the neutral initial position following exposure compensated shots.4www.but kus.org
--this automatically changes the camera operation to semi-automatic mode.")
20 Semi-automatic mode If you want to shoot at a particular shutter speed, for reproductions or scientific work for example, set the PRAKTICA BC 1 to semi-automatic mode. Fixed shutter speeds from 1 s to 1/1000 are available. Select the speed you want using the shutter speed setting knob (19)--this automatically changes the camera operation to semi-automatic mode. As with automatic shutter speed control, the camera's electronics are switched on by gentle pressure on the shutter release. The shutter speed can again be checked using the LEDs in the viewfinder. While the LED corresponding to the set shutter speed flashes, the shutter speed required by the lighting conditions, the film speed and the selected aperture is shown at the same time by a steadily lit LED. (For intermediate speeds two adjacent LEDs light up.) To match the two, the aperture or shutter speed should be altered until the LEDs in the viewfinder are lit steadily. With and B settings there is no LED display. The flash speed of around 1/90 s is formed mechanically with and electronically when using a dedicated computerized flash unit in automatic position. All other shutter speeds including B are electronically controlled. It is also possible to photograph with without a battery. Holding the camera The illustrations show the best positions in which to hold the camera for upright and horizontal format shots. Hold the camera steadily and tightly and support the elbows against the body. In this way you will achieve blur-free pictures.4www.but kus.org
; the electrical connection is thus made.")
21 Flash photography If the available light is insufficient for hand-held shots (eg indoors) or if the subject has to be additionally "brightened up", flash should be used. All fitting electronic flash units can be used, whether computerized or not. Push the flash unit onto the hot shoe with center contact (20); the electrical connection is thus made. In the case of flash units without the center contact the electrical connection is made via the flash nipple. The simultaneous use of two flash units is possible with the two electrically separate connections. For electronic flash without computer control set the shutter speed knob (19) to. The set shutter speed (around 1/90 s) is formed mechanically. If a dedicated computerized flash unit is pushed onto the hot shoe in automatic setting, the electronic flash speed is automatically formed when flash readiness is achieved. Flash readiness is indicated by a green LED in the viewfinder when the flash unit is switched on and gentle pressure is applied to the shutter release. All other information on automatic speeds on the display is extinguished. When fixed speeds are used, flash readiness is indicated in addition to the information on the relevant speed on the display and in and B settings. To avoid incorrect exposures (overexposures) with flash when the surrounding light is bright, check by switching off the computerized flash unit that the shutter speed corresponding to the surrounding light is slower than 1/125s.4www.but kus.org
 on the camera and lens are opposite each other.")
22 Changing the lens Press the unlocking key (1) and turn the lens anti-clockwise as far as it will go. Remove the lens from the camera. Insert the lens in such a way that the red markings (1 and 14) on the camera and lens are opposite each other. Press the lens against the camera body and turn clockwise until the locking pin is heard to engage. By using the PRAKTICA adapter all original PRAKTICA lenses with the M 42 x 1 thread can be connected, lenses of other makes with the M 42 x 1 thread must be suitable for PRAKTICA cameras and equipped for metering at working aperture. The PRAKTICA BC 1 also works automatically with screw-thread lenses, the only difference being that the light metering is made with working aperture.
 triple wedge The wedge system allows highly accurate focusing Optimum sharpness is achieved when the contours and lines flow naturally.")
 ground glass ring Especially useful in macro and micro photography and when using lenses with a small relative aperture (greater than 4).")
23 focus.4www.bu tkus.org Focusing Focusing is possible using the triple wedge system, the microprism ring or the ground glass ring. 1) triple wedge The wedge system allows highly accurate focusing Optimum sharpness is achieved when the contours and lines flow naturally. Incorrectly aligned edges indicate that the image is out of 2) microprism ring The image is correctly focusing when the image inside the grid is clear and flicker free. 3) ground glass ring Especially useful in macro and micro photography and when using lenses with a small relative aperture (greater than 4). The image must appear clear and sharp in the ground glass ring. Depth-of-field indication The limits of the depth of field for the selected aperture can be read off from the depth-of-field scale (13) on the lens. Example: distance 3 m, aperture 8 -- depth of field ranges from around 2 m to 5 m. Infrared photography Infrared photography requires a slight correction to the focusing match the distance determined in focusing with the infrared mark (see arrow) on the lens. Stop down key The depth of field can also be judged by the ground glass ring in the viewfinder image. Push the stop down key (4) upwards. Do not meter or release when stopping down, as this will lead to an incorrect exposure.


24 Shutter release For ease of operation several functions have been combined in the shutter release (18). When the camera is cocked, gentle depression of the shutter release until pressure is felt switches on the automatic system and the LEDs for shutter speeds or flash readiness (with special flash units). Further pressure will release the shutter. Locking the shutter release Accidental exposure and unnecessary use of power as a result of unintentional pressing of the shutter release when the camera is cocked or not can be avoided by turning the release lock (16) clockwise to block the shutter release. To unlock turn in the opposite direction. Do not lock the shutter release when it is depressed. Self-timer Cock shutter, swing self-timer cocking lever (3) all the way down, release self-timer by pressing the starting button (2) at the pivot of the lever. The delay period is approximately 8 s. Do not cock the shutter while the delay mechanism is running. If a motor winder is attached to the camera and switched on, 4 to 5 frames can be exposed during the delay period as in continuous operation with fast shutter speeds. If this is not desired the motor winder should be switched off.4www.butkus.org To avoid incorrect metering in automatic operation the eyepiece should be covered with the eyepiece cover supplied.
, change the film.")
25 Changing the film The frame counter (5) indicates the number of frames which have already been exposed on a film when the shutter cycle is completed. If all the frames on a film have been exposed (red mark at 20 or 36), change the film. Press in the rewind release (40) until it locks, fold out the rewind crank (8) and turn moderately quickly in the direction of the arrow (clockwise) until increased resistance followed by easy movement indicate that the film has been fully rewound. Pull rewind knob all the way up to unlock the back. The film cartridge can now be removed. Do not change the film in bright sunlight. If more frames are exposed than are indicated on the film pack, it is possible that the cocking lever cannot be swung all the way. Do not use force. Wind back the film and swing the cocking lever as far as it will go. Protect the camera from impact, dust and moisture. Clean the cartridge and spool compartments, the film track and the back from time to time with a soft brush. Do not use any organic solvents such as spirit or varnish thinner to clean the camera. Do not expose the camera or lens to aggressive vapors.4www.butkus.org Remove fingerprints from the lens and eyepiece surfaces with lens cleaning paper. Do not touch the mirror, field lens or shutter blades. Dirt on these should only be removed by a service workshop. Use an optical brush for dust removal or blow out. Do not expose the camera to very high or low temperatures for lengthy periods. Avoid, for example, placing the camera in a car window in direct sunlight. The camera should be suitably protected from extreme cold. When using the camera near the sea or on the beach, protect it from salt water spray and sand. Avoid sudden changes in temperature. These may lead to the formation of condensation and thus to corrosion damage. Never attempt to make your own repairs to the camera. Consult a service workshop where necessary.
Praktica BCA On line manual
 Praktica BCA On line manual Posted by Alex Albu 12-19-'02 This manual can be used as a reference for many Praktica "Auto" cameras If the images are too small, I may have larger, almost identical images,
Praktica LB2 This camera manual library is for reference and historical purposes, all rights reserved.
 Praktica LB2 This camera manual library is for reference and historical purposes, all rights reserved. This page is copyright by, M. Butkus, NJ. This page may not be sold or distributed without the expressed
Konica TC-X posted 5-11-'03
 Konica TC-X posted 5-11-'03 This camera manual library is for reference and historical purposes, all rights reserved. This page is copyright by, M. Butkus, NJ. This page may not be sold or distributed
Ricoh 500G. This camera manual library is for reference and historical purposes, all rights reserved.
 Ricoh 500G This camera manual library is for reference and historical purposes, all rights reserved. This page is copyright by, M. Butkus, NJ. This page may not be sold or distributed without the expressed
Cosina E1 SOLAR. This camera manual library is for reference and historical purposes, all rights reserved.
 Cosina E1 SOLAR This camera manual library is for reference and historical purposes, all rights reserved. This page is copyright by, M. Butkus, NJ. This page may not be sold or distributed without the
Chinon 35FA Super / 35FA II
 Chinon 35FA Super / 35FA II Auto Focus camera Instruction and Illustrated manua This camera manual library is for reference and historical purposes, all rights reserved. This page is copyright by mike@butkus.org,
Ricoh 35 Flex (aka Sears SL-9) posted 2-29-'04
 posted 2-29-'04") Ricoh 35 Flex (aka Sears SL-9) posted 2-29-'04 This camera manual library is for reference and historical purposes, all rights reserved. This page is copyright by, M. Butkus, NJ. This page may not be sold
Ricoh 35 Flex (aka Sears SL-9) posted 2-29-'04 This camera manual library is for reference and historical purposes, all rights reserved. This page is copyright by, M. Butkus, NJ. This page may not be sold
Chinon CEII Memotron
 Chinon CEII Memotron This camera manual library is for reference and historical purposes, all rights reserved. This page is copyright by mike@butkus.org, M. Butkus, NJ. This page may not be sold or distributed
Chinon 35F-A Auto Focus camera Instruction and Illustrated manual On-line camera manual library
 Chinon 35F-A Auto Focus camera Instruction and Illustrated manual This camera manual library is for reference and historical purposes, all rights reserved. This page is copyright by mike@butkus.org, M.
Ricoh FF-700 posted 8-10-'03
 Ricoh FF-700 posted 8-10-'03 This camera manual library is for reference and historical purposes, all rights reserved. This page is copyright by, M. Butkus, NJ. This page may not be sold or distributed
Yashica 35-ME posted
 Yashica 35-ME posted 9-18-03 This camera manual library is for reference and historical purposes, all rights reserved. This page is copyright by, M. Butkus, NJ. This page may not be sold or distributed
Cosina Hi-Lite CE posted 5-22-'03
 Cosina Hi-Lite CE posted 5-22-'03 This camera manual library is for reference and historical purposes, all rights reserved. This page is copyright by, M. Butkus, NJ. This page may not be sold or distributed
Chinon 35 FS-A
 Chinon 35 FS-A This camera manual library is for reference and historical purposes, all rights reserved. This page is copyright by mike@butkus.org, M. Butkus, NJ. This page may not be sold or distributed
Ricoh FF-3AF. This camera manual library is for reference and historical purposes, all rights reserved.
 Ricoh FF-3AF This camera manual library is for reference and historical purposes, all rights reserved. This page is copyright by, M. Butkus, NJ. This page may not be sold or distributed without the expressed
Yashica 635 On-line users manual Posted 4-21-'03
 Yashica 635 On-line users manual Posted 4-21-'03 This camera manual library is for reference and historical purposes, all rights reserved. This page is copyright by, M. Butkus, NJ. This page may not be
COSINA CS-2. This camera manual library is for reference and historical purposes, all rights reserved.
 COSINA CS-2 This camera manual library is for reference and historical purposes, all rights reserved. This page is copyright by, M. Butkus, NJ. This page may not be sold or distributed without the expressed
Chinon Intrafocus 35F-MA
 Chinon Intrafocus 35F-MA This camera manual library is for reference and historical purposes, all rights reserved. This page is copyright by mike@butkus.org, M. Butkus, NJ. This page may not be sold or
Petri MF-3 posted 3-16-'04
 Petri MF-3 posted 3-16-'04 This camera manual library is for reference and historical purposes, all rights reserved. This page is copyright by, M. Butkus, NJ. This page may not be sold or distributed without
CHINON SPLASH On line manual posted 12-8-'02
 CHINON SPLASH On line manual posted 12-8-'02 This manual can be used as a reference for many Chinon "Auto" cameras If the images are too small, I may have larger, almost identical images, from the CE-4
Ricoh FF-90. This camera manual library is for reference and historical purposes, all rights reserved.
 Ricoh FF-90 This camera manual library is for reference and historical purposes, all rights reserved. This page is copyright by, M. Butkus, NJ. This page may not be sold or distributed without the expressed
Ricoh SLX 500 Posted 3-7-'04
 Ricoh SLX 500 Posted 3-7-'04 This camera manual library is for reference and historical purposes, all rights reserved. This page is copyright by, M. Butkus, NJ. This page may not be sold or distributed
Ricoh auto TLS EE posted 9-29-'03
 Ricoh auto TLS EE posted 9-29-'03 This camera manual library is for reference and historical purposes, all rights reserved. This page is copyright by, M. Butkus, NJ. This page may not be sold or distributed
Ricoh Singlex TLS. This camera manual library is for reference and historical purposes, all rights reserved.
 Ricoh Singlex TLS This camera manual library is for reference and historical purposes, all rights reserved. This page is copyright by, M. Butkus, NJ. This page may not be sold or distributed without the
User manual, 1965 year. Zenit TTL. This text is identical to the one in the User manual, English version, 1965 year.
 Zenit TTL This text is identical to the one in the User manual, English version, 1965 year. 1. Purpose and Advantages ZENIT-TTL camera is intended for taking amateur pictures on black-and-white color films.
I n s t r u c t i o n Manual
 Instruction Manual DESCRIPTION OF PARTS 1. Film Plane Reference Mark 2. "X" Synchr. Hot Shoe 3. Film Advance Lever 4. Cable Release Socket 5. Shutter Release/Meter ON Button 6. Exposure Counter Window
Ricoh 240 SPEEDLIGHT
 Ricoh 240 SPEEDLIGHT This camera manual library is for reference and historical purposes, all rights reserved. This page is copyright by, M. Butkus, NJ. This page may not be sold or distributed without
Yashica A Posted 8-26-'02
 Yashica A Posted 8-26-'02 This camera manual library is for reference and historical purposes, all rights reserved. This page is copyright by, M. Butkus, NJ. This page may not be sold or distributed without
Ricoh AF-7. This camera manual library is for reference and historical purposes, all rights reserved.
 Ricoh AF-7 This camera manual library is for reference and historical purposes, all rights reserved. This page is copyright by, M. Butkus, NJ. This page may not be sold or distributed without the expressed
Manual 35mm SLR Camera Controls
 Manual 35mm SLR Camera Controls A single-lens reflex camera (SLR) typically uses a mirror and prism system (hence "reflex", from the mirror's reflection) that permits the photographer to view through the
Chinon CE-5 On line manual
 Chinon CE-5 On line manual This manual can be used as a reference for many Chinon "Auto" cameras If the images are too small, I may have larger, almost identical images, from the CE-4 camera page. This
Ricoh AF-5. This camera manual library is for reference and historical purposes, all rights reserved.
 Ricoh AF-5 This camera manual library is for reference and historical purposes, all rights reserved. This page is copyright by M. Butkus, NJ. This page may not be sold or distributed without the expressed
Chinon Power Winder For Chinon CE-3 Memotron and CM-3
 Chinon Power Winder For Chinon CE-3 Memotron and CM-3 This camera manual library is for reference and historical purposes, all rights reserved. This page is copyright by mike@butkus.org M. Butkus, N.J.
Back to main on-line manual page
 This camera manual library is for reference and historical purposes, all rights reserved. This page is copyright by, M. Butkus, NJ. This page may not be sold or distributed without the expressed permission
INSTALLING THE AUTOMATIC EXPOSURE CONTROL (ELECTRIC EYE) BATTERY (Fig. 4, 5)
 BATTERY (Fig. 4, 5)") 35/35 EE COMPACT 1. Film winding lever 2. Film rewind lever/back cover release 3. Flash contact and shoe 4. Film counter window 5. Shutter release button 6. Strap lug 7. Self-timer lever (35 EE Only) 8.
35/35 EE COMPACT 1. Film winding lever 2. Film rewind lever/back cover release 3. Flash contact and shoe 4. Film counter window 5. Shutter release button 6. Strap lug 7. Self-timer lever (35 EE Only) 8.
User manual, 1992 year. Zenit 122. This text is identical to the one in the Instruction Manual, English version, 1992 year.
 Zenit 122 This text is identical to the one in the Instruction Manual, English version, 1992 year. 1. Purpose and advantages ZENIT-122 is a 35-mm single lens reflex camera intended for taking various amateur
Chinon PW-600 / PW-610 Power Winder for Chinon cameras
 Chinon PW-600 / PW-610 Power Winder for Chinon cameras This camera manual library is for reference and historical purposes, all rights reserved. This page is copyright by M. Butkus, N.J. This page may
Mamiya Winder ZE Posted 4-26-'03
 Mamiya Winder ZE Posted 4-26-'03 This camera manual library is for reference and historical purposes, all rights reserved. This page is copyright by, M. Butkus, NJ. This page may not be sold or distributed
Chinon Auto 357z posted On-line camera manual library Back to main on-line manual page
 Chinon Auto 357z posted 9-8-03 This camera manual library is for reference and historical purposes, all rights reserved. This page is copyright by mike@butkus.org M. Butkus, NJ. This page may not be sold
Ricoh L-20 posted
 Ricoh L-20 posted 8-10-2003 This camera manual library is for reference and historical purposes, all rights reserved. This page is copyright by, M. Butkus, NJ. This page may not be sold or distributed
Ricoh KR-10 (XR 1000X)
") Ricoh KR-10 (XR 1000X) This camera manual library is for reference and historical purposes, all rights reserved. This page is 2001 by M. Butkus, NJ. This page may not be sold or distributed without the
Ricoh KR-10 (XR 1000X) This camera manual library is for reference and historical purposes, all rights reserved. This page is 2001 by M. Butkus, NJ. This page may not be sold or distributed without the
Ricoh XR-10 (KR-10X)
") Ricoh XR-10 (KR-10X) This camera manual library is for reference and historical purposes, all rights reserved. This page is copyright by, M. Butkus, NJ. This page may not be sold or distributed without
Ricoh XR-10 (KR-10X) This camera manual library is for reference and historical purposes, all rights reserved. This page is copyright by, M. Butkus, NJ. This page may not be sold or distributed without
Chinon DSL Posted 7-11-'03
 Chinon DSL Posted 7-11-'03 This camera manual library is for reference and historical purposes, all rights reserved. This page is copyright by mike@butkus.org, M. Butkus, NJ. This page may not be sold
Chinon CM-1. This camera manual library is for reference and historical purposes, all rights reserved.
 Chinon CM-1 This camera manual library is for reference and historical purposes, all rights reserved. This page is copyright by M. Butkus, NJ. This page may not be sold or distributed without the expressed
Fujica ST 801. posted 2-8-'04. This camera manual library is for reference and historical purposes, all rights reserved.
 Fujica ST 801 posted 2-8-'04 This camera manual library is for reference and historical purposes, all rights reserved. This page is copyright by, M. Butkus, NJ. 2001 This page may not be sold or distributed
Technical Description, 1988 year. Zenit-11. This text is identical to the one in the Technical Description, English version.
 Zenit-11 This text is identical to the one in the Technical Description, English version. Attention! The present Description contains characteristics and essential operating principles of the ZENIT-11
Yashica Mat 124G posted '02
 Yashica Mat 124G posted 12-22-'02 This camera manual library is for reference and historical purposes, all rights reserved. This page is copyright by, M. Butkus, NJ. This page may not be sold or distributed
Ricoh TLS 401 Posted 12-8-'02
 Ricoh TLS 401 Posted 12-8-'02 This camera manual library is for reference and historical purposes, all rights reserved. This page is copyright by, M. Butkus, NJ. This page may not be sold or distributed
Zenith 80 posted 4-20-'03
 Zenith 80 posted 4-20-'03 This camera manual library is for reference and historical purposes, all rights reserved. This page is copyright by, M. Butkus, NJ. This page may not be sold or distributed without
Sears KS-1000 AKS Ricoh XR-1 Posted 3-7-'04
 Sears KS-1000 AKS Ricoh XR-1 Posted 3-7-'04 This camera manual library is for reference and historical purposes, all rights reserved. This page is copyright by, M. Butkus, NJ. This page may not be sold
Ricoh KR-5 - similar to Sears KS-500 and CR-5-35mm camera manual
 www.orphancameras.com Ricoh KR-5 - similar to Sears KS-500 and CR-5-35mm camera manual This camera manual library is for reference and historical purposes, all rights reserved. This page is copyright by
Loading the Camera - Step by step instructions
 Zenith 12 XP To get the best results from your Zenith study these instructions thoroughly to make sure you are familiar with the essential features of the camera before you start taking pictures. It is
Vivitar 2000 posted
 Vivitar 2000 posted 1-26-03 Camera Manual This is the full text and images from the manual. This may take 3 full minutes for all images to appear. If they do not all appear. Try clicking the browser "refresh"
Ricoh XR-1 On-line camera manual library
 Ricoh XR-1 On-line camera manual library This is the full text and images from the manual. This may take 3 full minutes for all images to appear. If they do not all appear, try clicking the browser "refresh"
Chinon CP-X. HTML Translations - German - Italian - French - Spanish - Others These links will not translate any PDF files
 Chinon CP-X HTML Translations - German - Italian - French - Spanish - Others These links will not translate any PDF files This is the full text and images from the manual. This may take 3 full minutes
CAMERA KIEV-19(M) Instructions for use
 Instructions for use") CAMERA KIEV-19(M) Instructions for use Note: This is the original Kiev-19 manual by Tento. The author who digitized it included the differences of the Kiev-19M as red notes. These notes are only included
CAMERA KIEV-19(M) Instructions for use Note: This is the original Kiev-19 manual by Tento. The author who digitized it included the differences of the Kiev-19M as red notes. These notes are only included
ROAMER I and ROAMER II posted 7-12-'03
 ROAMER I and ROAMER II posted 7-12-'03 This camera manual library is for reference and historical purposes, all rights reserved. This page is copyright by. M. Butkus, NJ. This page may not be sold or distributed
Ansco Viking 6.3 posted '03
 Ansco Viking 6.3 posted 10-17-'03 This camera manual library is for reference and historical purposes, all rights reserved. This page is copyright by, M. Butkus, NJ. This page may not be sold or distributed
Praktica LLC. This camera manual library is for reference and historical purposes, all rights reserved.
 Praktica LLC This camera manual library is for reference and historical purposes, all rights reserved. This page is copyright by, M. Butkus, NJ. This page may not be sold or distributed without the expressed
SPORTSMAN mm CAMERA. Instructions for use
 SPORTSMAN 125 35mm CAMERA Instructions for use Contents Parts of the camera page 4 and 5 If 35 mm. is new to you page 8 Step by step loading page 9 Setting the camera for sunshine snaps page 14 Unloading
I. BASIC OPERATION (PREPARATION)
") 10 lcon indicators used in this manual I. BASIC OPERATION (PREPARATION) Operation direction Attention Lamp blinking Attaching the Camera Strap 11 1 2 3 1. Use a coin or similar object to slide the clasp
10 lcon indicators used in this manual I. BASIC OPERATION (PREPARATION) Operation direction Attention Lamp blinking Attaching the Camera Strap 11 1 2 3 1. Use a coin or similar object to slide the clasp
Ricoh KR-5 Super
 Ricoh KR-5 Super This camera manual library is for reference and historical purposes, all rights reserved. This page is copyright by mike@butkus.org M. Butkus, N.J. Back to main on-line manual page If
Chinon Handyzoom 5001 This camera manual library is for reference and historical purposes, all rights reserved.
 Chinon Handyzoom 5001 This camera manual library is for reference and historical purposes, all rights reserved. This page is copyright by M. Butkus, N.J. This page may not be sold or distributed without
WELTAFLEX. posted 2-19-'04
 WELTAFLEX posted 2-19-'04 This manual is for reference and historical purposes, all rights reserved. This page is copyright by mike@butkus.org, M. Butkus, NJ. This page may not be sold or distributed without
ILFORD SPORTSMAN mm CAMERA
 ILFORD SPORTSMAN 300 35mm CAMERA 1 Contents ILFORD LIMITED ILFORD ESSEX Parts of the camera If 35 mm is new to you Step by step loading Setting the camera for sunshine snaps Unloading the camera The Lens
Ricoh KR-10M. This camera manual library is for reference and historical purposes, all rights reserved.
 Ricoh KR-10M This camera manual library is for reference and historical purposes, all rights reserved. This page is copyright by, M. Butkus, N.J. This page may not be sold or distributed without the expressed
Chinon S-360 Flash unit
 Chinon S-360 Flash unit This camera manual library is for reference and historical purposes, all rights reserved. This page is copyright by mike@butkus.org, M. Butkus, N.J. This page may not be sold or
FED 2 Fed-2 35mm FILM CAMERA instruction manual
 FED 2 Fed-2 35mm FILM CAMERA instruction manual This text is NOT identical to the one in the official Instruction Manual. 01. Film Counter 02. Film wind knob 03. Rangefinder optic 04. Aperture index dot
User English Manual for Sputnik Stereo Camera
 User English Manual for Sputnik Stereo Camera STEREOSCOPIC SET Stereoscopic photography in contrast to conventional to-dimensional photography makes it possible to obtain pictures which give correct three-dimensional
Nikon EM. I. Nomenclature. This text is identical to the Owner s manual.
 Nikon EM I. Nomenclature This text is identical to the. 01. Frame counter; 02. Shutter operation mode selector; 03. Shutter release button; 04. Shutter release fingerguard; 05. Film winding lever; 06.
Chinon CG-5 On-line users manual
 Chinon CG-5 On-line users manual This camera manual library is for reference and historical purposes, all rights reserved. This page is copyright by mike@butkus.org, M. Butkus, NJ. This page may not be
Contax Aria posted 7-3-'03
 Contax Aria posted 7-3-'03 This camera manual library is for reference and historical purposes, all rights reserved. This page is copyright by, M. Butkus, NJ. This page may not be sold or distributed without
Ricoh FF-9/FF-9s. This camera manual library is for reference and historical purposes, all rights reserved.
 Ricoh FF-9/FF-9s This camera manual library is for reference and historical purposes, all rights reserved. This page is copyright by, M. Butkus, NJ. This page may not be sold or distributed without the
RICOH AUTO 35 posted 8-4-'03
 RICOH AUTO 35 posted 8-4-'03 This camera manual library is for reference and historical purposes, all rights reserved. This page is copyright by. M. Butkus, NJ. This page may not be sold or distributed
Flash Socket Safety Cover Film Rewind Crank Film Plane Indicator Accessory Shoe Frame Counter Shutter Button Cable Release Socket Film Advance Lever
 Focusing Lever Selftimer Lever Shutter Speed Ring AUTOMATIC/MANUAL Aperture Ring ASA Film Speed Indicator Window Automatic EE Mark Focusing Ring Viewfinder Window Flash Socket Safety Cover Film Rewind
Chinon Genesis II. This camera manual library is for reference and historical purposes, all rights reserved.
 Chinon Genesis II This camera manual library is for reference and historical purposes, all rights reserved. This page is copyright by, M. Butkus, N.J. This page may not be sold or distributed without the
Kodak Retina Automatic I
 Kodak Retina Automatic I posted 2-19-'04 This camera manual library is for reference and historical purposes, all rights reserved. This page is copyright by mike@butkus.org, M. Butkus, NJ. This page may
Chinon GS-7 (Genesis)
") Chinon GS-7 (Genesis) This camera manual library is for reference and historical purposes, all rights reserved. This page is copyright by mike@butkus.org M. Butkus, NJ. This page may not be sold or distributed
Chinon GS-7 (Genesis) This camera manual library is for reference and historical purposes, all rights reserved. This page is copyright by mike@butkus.org M. Butkus, NJ. This page may not be sold or distributed
PD Prism Finder S. English Instructions
 PD Prism Finder S English Instructions Special Features 1. The Mamiya PD Prism Finder S is an eye-level finder with a build-in silicon diode and an electronic shutter-control circuit. 2. The finder enables
3, 4 5. Specifications of the ZENZA BRONICA SQ-A Parts of the ZENZA BRONICA SQ-A
 SQ-A Congratulations on your choice of the Bronica SQ-A single lens reflex camera that has been developed to give you quality performance, simple handling convenience and extremely useful versatility,
A R A X - 88 MEDIUM FORMAT CAMERA
 A R A X - 88 MEDIUM FORMAT CAMERA INSTRUCTIONS FOR USE 1. GENERAL NOTES The ARAX is a medium-format single lens reflex (SLR) camera with either an all-metal (gold or black) or light-tight rubberized fabric
Mamiya MSX1000& MSX500
 Mamiya MSX1000& MSX500 This camera manual library is for reference and historical purposes, all rights reserved. This page is copyright by, M. Butkus, NJ. This page may not be sold or distributed without
Model 7 Specifications
 0 1 2 Model 7 Specifications... 4 Film Winding...... 5 Shutter Button...... 7 Exposure Counter Dial...... 7 Film Winding... 8 Shutter Button Safety Device... 11 Shutter Button Safety Lock... 11 Exposure
Konica FP-1 On-line users manual Posted: April 21st 2003
 Konica FP-1 On-line users manual Posted: April 21st 2003 This camera manual library is for reference and historical purposes, all rights reserved. This page is copyright by, M. Butkus, NJ. This page may
Kodak Retina II (type 122)
") Kodak Retina II (type 122) The type 122 Retina II camera is a very uncommon model, there are probably fewer than a hundred in collections around the world, with instruction books rarer still, so I thought
Kodak Retina II (type 122) The type 122 Retina II camera is a very uncommon model, there are probably fewer than a hundred in collections around the world, with instruction books rarer still, so I thought
SP mm F/2.8 Di VC USD (Model A009)
") SP 70-200mm F/2.8 Di VC USD (Model A009) Thank you for purchasing the Tamron lens as the latest addition to your photographic equipment. Before using your new lens, please read the contents of this Owner
SP 70-200mm F/2.8 Di VC USD (Model A009) Thank you for purchasing the Tamron lens as the latest addition to your photographic equipment. Before using your new lens, please read the contents of this Owner
Selecting a Drive Mode
 38 Selecting a Drive Mode III. Consecutive-Frame Mode Consecutive pictures can be taken by holding down the shutter release button. Set the drive mode selector to P. if the AF mode selector is set to [S].
 . POSTED 6-27-' 04 This manual is for reference and historical purposes, all rights reserved. This page is copyright @ by M. Butkus. NJ. This page may not be sold or distributed without the expressed permission
SECTIONS. Multiple exposures Taking flash pictures Optional accessories Camera care Specifications
 SECTIONS Names of parts Mounting and dismounting the lens A word about the battery Load the film Multi-program auto exposure Taking pictures End of film Camera functions Taking self-timer pictures Exposure
Universal STERE-ALL Posted 1-17-'04
 Universal STERE-ALL Posted 1-17-'04 This camera manual library is for reference and historical purposes, all rights reserved. This page is copyright by, M. Butkus, NJ. This page may not be sold or distributed
Edixa-mat Reflex On-line users manual
 Edixa-mat Reflex On-line users manual This camera manual library is for reference and historical purposes, all rights reserved. This page is copyright by, M. Butkus, NJ. This page may not be sold or distributed
Fujica AX-1 On-line owners manual
 Fujica AX-1 On-line owners manual This camera manual library is for reference and historical purposes, all rights reserved. This page is copyright by M. Butkus, NJ. This page may not be sold or distributed
SP 90mm F/2.8 Di VC USD 1:1 Macro (Model F004)
") SP 90mm F/2.8 Di VC USD 1:1 Macro (Model F004) Thank you for purchasing the Tamron lens as the latest addition to your photographic equipment. Before using your new lens, please read the contents of this
SP 90mm F/2.8 Di VC USD 1:1 Macro (Model F004) Thank you for purchasing the Tamron lens as the latest addition to your photographic equipment. Before using your new lens, please read the contents of this
KALLO FLEX Posted 7-12-'03 On-line camera manual library Back to main on-line manual page
 www.orphancameras.com KALLO FLEX Posted 7-12-'03 This camera manual library is for reference and historical purposes, all rights reserved. This page is copyright by mike@butkus.org, M. Butkus, NJ. This
SP mm F/4-5.6 Di VC USD for Canon and Nikon (Model A005) SP mm F/4-5.6 Di USD for Sony (Model A005)
 SP mm F/4-5.6 Di USD for Sony (Model A005)") R SP 70-300mm F/4-5.6 Di VC USD for Canon and Nikon (Model A005) SP 70-300mm F/4-5.6 Di USD for Sony (Model A005) Thank you for purchasing the Tamron lens as the latest addition to your photographic equipment.
R SP 70-300mm F/4-5.6 Di VC USD for Canon and Nikon (Model A005) SP 70-300mm F/4-5.6 Di USD for Sony (Model A005) Thank you for purchasing the Tamron lens as the latest addition to your photographic equipment.
Ricoh XR-X3pf. This is the full text and images from the manual. If you find this manual useful, how about a donation of $4 to:
 Ricoh XR-X3pf This is the full text and images from the manual. This camera manual library is for reference and historical purposes, all rights reserved. This page is copyright by M. Butkus, N.J. This
Using the Apperture-Priority AE Mode
 Using the Apperture-Priority AE Mode When the desired aperture is selected, an appropriate shutter speed is automatically set by the camera for a proper exposure. The shutter speed dial can be released
Copy of Instruction Manual
 Copy of Instruction Manual 500/8,0 Tele Mirror Lens T2 Gewerbering 26 86666 Burgheim Tel. +49 84 32 / 9489-0 Fax. +49 84 32 / 9489-8333 email: info@foto-walser.de www.foto-walser.de 1 Content 0.... Introduction
28-300mm F/ XR Di VC LD Aspherical [IF] Macro (Model A020)
![28-300mm F/ XR Di VC LD Aspherical [IF] Macro (Model A020)](/thumbs/82/86828397.jpg "28-300mm F/ XR Di VC LD Aspherical [IF] Macro (Model A020)") R 28-300mm F/3.5-6.3 XR Di VC LD Aspherical [IF] Macro (Model A020) Thank you for purchasing the Tamron lens as the latest addition to your photographic equipment. Before using your new lens, please read
R 28-300mm F/3.5-6.3 XR Di VC LD Aspherical [IF] Macro (Model A020) Thank you for purchasing the Tamron lens as the latest addition to your photographic equipment. Before using your new lens, please read
PD Prism Finder. English Instructions
 PD Prism Finder English Instructions Special Features 1. The finder produces an unreversed, laterally correct and bright image, has a built-in Silicon Diode metering system and an eyepiece that is raised
EF-S60mm f/2.8 MACRO USM COPY ENG. Instruction
 EF-S60mm f/2.8 MACRO USM ENG Instruction Thank you for purchasing a Canon product. The Canon EF-S60mm f/2.8 MACRO USM lens is a macro lens that can be used for normal photography and close-up pictures