Contents. General Notes 2. External Lights 2. Buttons 3. Modes 3. Icons 4. Camera Operation 6. Setup Menu 9. Smart Device 12. General Information 15
|
|
|
- Marlene May
- 6 years ago
- Views:
Transcription
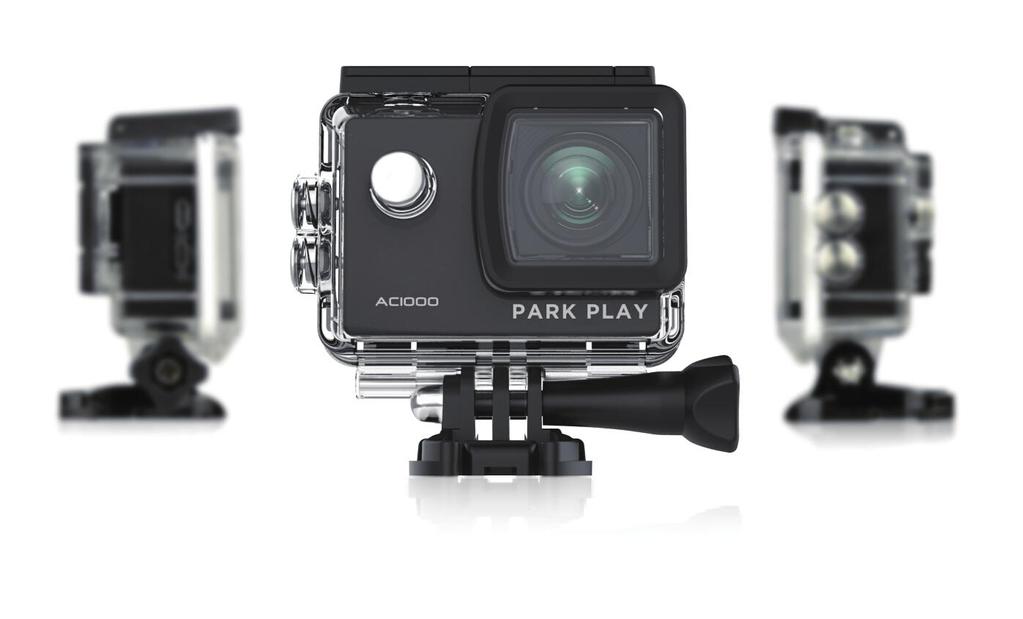
1 AC1000
2 Contents General Notes 2 External Lights 2 Buttons 3 Modes 3 Icons 4 Camera Operation 6 Setup Menu 9 Smart Device 12 General Information 15 Accessories 16 1

3 ParkPlay AC1000 Manual GENERAL NOTES When you open the camera package for the first time check the contents to make sure you have all the mounting hardware and accessories. Plastic films cover the camera display and lens. There are plastic films on both of the inside and outside of the lens cover and the back cover doors of the clear housing. Remove plastic films before using the camera. Notes are identified in parentheses () and are described at the end of each section. EXTERNAL LIGHTS The following lights indicate the operation described and can occur in several combinations. Blue light on: camera is on. Red light on: camera is connected to a charger. Amber light on: camera is connected to a smart device via WiFi. Blue light flashing: camera is recording video. Amber light flashing rapidly: camera WiFi is turned on but not connected to a smart device. Amber light flashing: camera is connected to WiFi while recording video. Red and amber lights on: WARNING There is a serious problem with charging. Disconnect the charger immediately due to the risk of severe overheating, and change to another adaptor (good quality) on your hand. If still cannot solve, please contact the retailer. Amber light Blue light Red light 2


4 BUTTONS Power/Mode: Press and release to turn on the camera. Press and release to change modes. Press and hold to turn off the camera. OK: Press to start or stop recording videos, take pictures, select menu items, or start or pause video playback. Up and Down: Press and release to navigate through menus and change letters and numbers in Setup. Press and hold to advance through several menu items in Setup. Press and hold to zoom in or out in Record or Camera modes. Press and release to fast forward or rewind videos during Playback. Press and release the Up button to connect to or disconnect from WiFi in Record or Camera modes. OK Up WiFi Down MODES Power/Mode Record: This is the first mode to appear after start screens or battery symbol screen. Camera Playback Setup: Press the Mode button to return to Record mode. 3
5 ON-SCREEN DISPLAY (OSD) ICONS ON-SCREEN DISPLAY (OSD) ICONS The battery charging symbol shows bars moving across a battery from left to right. When all bars are full and stop moving, it means that the battery is fully charged -OR- that the camera is connected to the charger and is operating without a battery. RECORD MODE ICONS Icons appear only when OSD Mode is turned on. If OSD Mode is turned off, then no icons appear on the display. In standard Record Mode: icons across the top beginning at the top left corner. Steady yellow circle and steady yellow numbers: Record mode selected. The yellow numbers are the remaining video recording time based on recording settings and available memory -OR- Alternating red and yellow flashing circle and steady red numbers counting up from 00:00:00: recording video showing the time for that segment. Yellow or red numbers shown in format HH:MM:SS. White letters and numbers in a blue box: video resolution and frames per second, such as 1080P30. White arrow loop with number: shows the Cyclic Record time segments. Microphone: audio recording is turned on. When OSD Mode is turned off, only the alternating red and yellow flashing circle can show that it is recording video. In Video Lapse Mode: icons across the top beginning at the top left corner. Steady yellow clock face with a number: Video Lapse mode with the selected time interval in seconds shown on the clock face -OR- Red flashing clock face with a number followed by steady red numbers 00:00:00: Recording in Video Lapse at the time interval in seconds shown on the clock face. When OSD Mode is turned off, there is only a flashing red clock face with a number shows that it is recording at the time interval in seconds shown on the clock face. All Other Record Mode icons: clockwise beginning with the battery icon at the top right corner. Battery icon: indicates remaining capacity. If there is a plug symbol within the battery icon, it indicates that the battery is charging or that the camera is operating without a battery while connected to the power source. Broadcast icon: only shows while using WiFi. Flashing white indicates that WiFi is turned on but haven t connected. Steady blue indicates that WiFi is turned on and already connected. Time: shows current time in 24-hour clock, HH:MM:SS. Time resets to 00:00:00 when the battery is replaced. Sometimes it resets to the current time when the camera is connected to a smart device via WiFi. Date: shows current date in YYYY-MM-DD. The date resets to default when the battery is replaced. Sometimes it resets to the current date when the camera is connected to a smart device via WiFi. Octagon with letter F: Motion Detection is on. Key symbol: indicates the video is protected while deleting videos. CAUTION: All videos and photos including protected videos could be deleted when the memory card is formatted. 4
6 The following icons are described clockwise beginning in the top left corner. CAMERA MODE ICONS Icons appear only when OSD Mode is turned on. If OSD Mode is turned off, then no icons appear on the display. Blue camera symbol: Camera mode. Number and letter: image size in megapixels (e.g., 12M). Battery icon: indicates remaining capacity. If there is a plug symbol within the battery icon, it indicates that the battery is charging or that the camera is operating without a battery while connected to the power source. Broadcast symbol: only shows while using WiFi. Flashing white indicates that WiFi is turned on but haven t connected. Steady blue indicates that WiFi is turned on and already connected. Up to 6 digit number: the number of photos you can take at the selected camera settings with the available remaining memory. Yellow clock face with a number: Capture Mode with the selected time interval in seconds shown on the clock face -OR- Red clock face with a number: taking photos in Capture Mode at the time interval shown. PLAYBACK MODE ICONS 12M Icons appear only when OSD Mode is turned on. If OSD Mode is turned off, then no icons appear on the display. Blue arrow: Playback mode -OR- Red. Arrow: playing back a video -OR- Blue. Pause: video playback paused. Battery icon: indicates remaining capacity. If there is a plug symbol within the battery icon, it indicates that the battery is charging or that the camera is operating without a battery while connected to the power source. White letters and numbers: video resolution, such as 1080FHD for MOV files -OR- White numbers: image size, such as 2048X1536 for JPG files. File name: a string of letters and numbers across the bottom of the display as follows: - For non-protected videos: YY_MMDD_hhmmss_XXX.MOV. - For protected videos: MMDD_hhmmss_XXX_EVE.MOV. - For photos: YY_MMDD_hhmmss_XXX.JPG (YY = year, MM = month, DD = day, hh = hour, mm = minute, ss = seconds, XXX = file sequence number, EVE = protected video, MOV = video and JPG = photo). 0109_152743_005_EVE.MOV 16_0109_152743_005.JPEG Key symbol: indicates the selected video is protected when OSD Mode is turned off. A Start and Stop icon appears at the bottom of the screen. The red arrow icon appears when the OK button is pressed to play back a video. The blue pause icon appears when the OK button is pressed to pause. 5
7 BASIC CAMERA OPERATION The following describes basic operation of the camera alone. For operation of connecting to a smart device, please check OPERATING CAMERA FROM A SMART DEVICE VIA WIFI. CHARGE BATTERY Plug the AC adapter into a household electrical outlet or plug a 12V adapter into a 12V vehicle outlet. Plug the USB x micro USB cable into the adapter and camera. The micro USB port is the upper cable connection on the side of the camera. It takes about 3 to 3.5 hours to fully charge a depleted battery. The red and blue external lights turn on and the battery charging symbol appears on the screen. The red light shuts off when the battery is fully charged. WARNING FOR USB OWNERS: If the AC adapter is not listed by Underwriters Laboratory (UL), therefore please carefully monitor the adapter and camera the first time you use them to be sure they don't overheat. INSERT OR REMOVE MEMORY CARD Use a Class 10 micro SD or micro SDHC memory card up to 128GB. Insert the memory card into the memory card slot on the side of the camera with the metal contacts facing the camera lens. The slot is spring-loaded and the card should be pushed in until you hear a click. The memory card only fits one way. If it won't go in, please don't force it. Turn it over and try again. To remove the memory card, please press it in until you hear it click. The spring mechanism pops out the card far enough to be pulled out. TURN CAMERA ON OR OFF If the camera is not connected to an adapter, press the Mode button to turn on the camera. The first sight is the Park Play logo and the AC1000 start interface followed by the Record mode interface. If the camera is connected to the power source with or without a battery installed and the camera is off, press the Mode button to turn on the camera. The first sight is the Park Play logo and the AC1000 start interface followed by the battery charging interface. The Recording mode will show up after press the Mode button again. Press and hold the Mode button to turn off the camera. If the camera is off and then you connect the camera to the power source, the camera turns on automatically and the battery charging interface appears after the AC1000 start interface. The Recording mode will show up after press the Mode button again. When you disconnect the charger, the camera turns off automatically. The camera turns on automatically when you connect it to a computer by using a USB cable. The dialog box of Mass Storage or PC Camera appears after the AC1000 start interface. It turns off automatically when the cable is disconnected. The camera turns on and off automatically when set to the Dash Cam mode. RECORD VIDEO Record mode is the first interface appears on the screen after start interface or the battery symbol interface when you turn on the camera. If you are not in Record mode, please just press the Mode button to change to the Record mode. Press the OK button to start recording. The steady yellow circle icon changes to an alternating yellow and red flashing circle after you started recording. The recording time appears at the top of the screen in red numbers. Press the OK button to stop recording. 6
8 Press the Mode button while recording to protect a video from accidental deletion. A key icon appears on the screen. Long press the Up button on the side of camera to zoom in up to 4x and long press the Down button to zoom out. Select Video Lapse in the Setup menu then press the OK button can start the time lapse recording. PLAYBACK VIDEO Press the Mode button and change to the Playback mode. Press the Down button can change to the next video or photo. Long press Down button can skim videos or photos quickly. Press the OK button to play back. The blue arrow icon will change to red. Press the OK button again to pause. A blue pause symbol will replace the red arrow. Press the Mode button to stop. Press the up button can go back to the previous video or photo. When playing back a video, press the Down button once to fast-forward (FF) at 2X speed, press again to FF at 4X, again to FF at 8X. Press the Up button during FF to decrease the speed. Press the Up button once during playback to rewind at 2X speed, press again for 4X, again for 8X. Press the Down button to reduce rewind speed by one setting. HDMI connection can also be used for playback in TV-Out Mode. TAKE PHOTOGRAPHS Press the Mode button to change to Camera mode. Press the OK button to take a photo. Long press the Up button to zoom in up to 4x. Long press the Down button to zoom out. Select the Capture Mode and press the OK button can start automatic shooting of photos at timed intervals. VIEW PHOTOGRAPHS Press the Mode button change to Playback mode. Press the Down button to change to the next photo. Long press the Down button to skim photos quickly. Press the Up button to go back to the previous photo or video. HDMI connection can also be used for playback in TV-Out Mode. Dash Cam Mode Press the Mode button until the Setup menu appears. Navigate to Page 4 of the menu, select Dash Cam then select On. Adjust any other settings on the Setup menu to your preference. Plug the camera into a 12V adapter and plug the adapter into a 12V outlet in your vehicle. Dash Cam mode works with or without a battery in the camera. When you start your vehicle, the camera turns on and starts recording video automatically. When you shut off your vehicle, it stops recording and turns off automatically. You can also turn off the camera manually while recording. Camera and Playback modes are disabled while recording in Car Mode and no setting can be changed. Video Lapse is disabled during Car Mode even if it's turned on. After the camera turns off you can turn it on manually and operate it as normal if there is a battery in the camera. CAUTION: Be careful not to use a continuously powered 12V outlet when Dash Cam Mode is On because the camera will operate continuously whenever it's connected and might drain the vehicle battery. 7
9 COPY FILES TO A COMPUTER Connect the camera to computer using a micro USB x USB cable. The camera turns on automatically and a dialog box on the camera display asks if the camera is Mass Storage or a PC Camera. Highlight Mass Storage and press the OK button. A blue interface with the words Mass Storage appears on the camera. Alternative Method: Remove the memory card and insert it into a card reader connected to your computer. With either method follow the procedures you normally use to download videos and photos. Files would not be automatically deleted after copied to a computer. DELETE VIDEOS AND PHOTOS To delete selected videos and photos except the protected videos, use one of the following two methods: a. In Playback mode navigate to a specific video or photo. Long press the Up button. b. A Delete dialog box appears with Delete Current?, Delete All? and Cancel. c. Select Delete Current?. When prompted to Erase This?, select OK. a. In Playback mode, navigate to the specific video or photo which you want to delete. b. Press the Mode button to advance to the Setup menu. c. Highlight Delete on page 6 of the Setup menu and press the OK button. d. A Delete dialog box appears with Delete Current? and Delete All? e. Highlight Delete Current? and press the OK button. f. When prompted to Erase This?, highlight OK then press the OK button. To delete all videos and photos except protected videos, use one of the following two methods: a. In Playback mode navigate to a specific video or photo. Long press the Up button. b. A Delete dialog box appears with Delete Current?, Delete All? and Cancel. c. Select Delete All?. When prompted to Erase All Images?, select OK. a. Press the Mode button until the Setup menu appears on the display. b. Highlight Delete on page 6 of the Setup menu and press the OK button. c. A Delete dialog box appears with Delete Current? and Delete All? d. Highlight Delete All? and press the OK button. e. When prompted to Erase All Images?, highlight OK and press the OK button. To delete all videos and photos including protected videos, use the following method. a. Press the Mode button until the Setup menu appears on the screen. b. Highlight Format on page 6 of the Setup menu and press the OK button. c. In response to All data will be deleted, highlight OK and press the OK button. Alternative method: To delete some or all videos and photos including protected videos, remove the memory card and insert it into a memory card reader connected to your computer. Select and delete files as you did normally on your computer. You can also use your computer to format the card to delete all files. UPGRADE FIRMWARE Connect the camera to you computer and choose Mass Storage option. Format the micro SD Card. Copy the firmware file(s) (.bin) onto the root of the micro SD Card. Eject and disconnect from the computer. Connect the camera with charger. The camera will be upgraded automatically. Wait about few minutes and it will turn on automatically after finishing the upgrade. After the firmware upgrade is complete, be sure to delete the files or you will be prompted to upgrade again. 8
10 USE HOUSING WITH WATERPROOF OR SLOTTED BACK DOOR WARNING: The waterproof back door looks nearly identical to the slotted back door. Be sure you're using the waterproof back door before immersing the housing in water. To use the housing, insert the camera facing forward, close the back door and place the back edge of the latch along the top of the back door. Press the latch down and forward until you hear it click into place. To remove the camera, slide the tab on top of the latch in the direction indicated while lifting up on the front of the latch. The latch will loosen and the housing can be opened. Carefully tip the camera out of the housing. To change the back door, open it 90 degrees and push it back off the main housing at the hinge. To install a door press it onto the main housing at the hinge at a 90 degree angle. NOTES FOR BASIC OPERATION The camera can be operated without a battery if it is connected to a power source. The zoom is electronic, not optical. It operates by enlarging and cropping a recording or photo, not by adjusting lenses. If you attempt to delete a protected video a blue pop-up appears with the word Protected!. A message then appears across the screen and you will not be able to change modes using the Mode button until you have played the video for a moment. Before placing the camera in the housing make sure you've installed an adequately charged battery and a memory card with sufficient remaining memory. SETUP MENU Press the Mode button until the Setup menu appears on the display. Use the Up and Down buttons to navigate the menu. Press the OK button to select a menu item. Page 1 Resolution: video resolution. Press the Up or Down buttons to see selections listed below. 1080FHD 1920x fps 720P 1280x720 60fps 720P 1280x720 30fps WVGA 848x480 30fps VGA 640x480 The default setting is 1080FHD 1920x fps. Loop recording: time length of file segments that a video recording is divided into. In Playback mode you can skip through segments. Select Off or 3, 5 or 10 minutes. The default setting is 3 minutes. FOV: Field of View. Choose from Off, Wide, Middle and Narrow. The default setting is Off. WDR: Wide Dynamic Range. Select Off or On. The default setting is Off. Motion Detection: when the camera detects movement it begins recording video. It stops recording after 10 seconds but starts again as soon as it detects motion. To turn on Motion Detection select On. Motion Detection range is about 5 centimeters (2 inches). The default setting is Off. Audio: select Off or On. Audio is recorded along with video when On is selected. The default setting is On. 9
11 Page 2 Volume: have range from 1 to 8. Time Stamp: select Off or On. The date and time appears on recordings and photos when On is selected. The default setting is On. TV-Out: To view a live camera feed or view recordings or videos stored on the memory card using a TV or monitor with an HDMI connection, connect the camera to the TV via a micro HDMI x HDMI cable, turn on the TV and select the input for the HDMI connection. The camera automatically turns On the TV Out setting when connected and turns it Off when disconnected. Taking pictures and recording videos are disabled when connected via HDMI. TV Mode: NTSC or PAL. This deals with frames-per-second, color encoding and other technical details for video recordings. The default setting is PAL. Choose NTSC in the US. OSD Mode: choose On or Off. When turned on, icons and on-screen data such as recording resolution, image size and others will appear on the camera display. Video Lapse: takes a series of photos at timed intervals while in Record mode. These can be played back as a time lapse video. Choose Off or 1, 2, 5, 10, 30 or 60 seconds intervals. The default setting is Off. Page 3 Image Size: size of photographs. Select from 12M, 10M, 8M, 5M, 3M, 2MHD, VGA or 1.3M. The default setting is 12M. Quality: choose from Fine, Medium and Normal. The default setting is Medium. Sharpness: choose from Strong, Normal and Soft. The default setting is Normal. White Balance: choose Auto, Daylight, Cloudy, Tungsten and Fluorescent. The default setting is Auto. Color: choose from Normal, B&W, Retro and Warm. The default setting is Normal. ISO: sensitivity to light. Lower numbers are less sensitive, higher numbers are more sensitive. Select Auto, 100, 200, 400, 800 or The default setting is Auto. Page 4 EV: choose +2.0, +5/3, +4/3, +1.0, +2/3, +1/3, +0.0, -1/3, -2/3, -1.0, -4/3, -5/3, Increasing exposure makes videos and images look lighter. Decreasing exposure makes videos and images look darker. The default setting is Underwater: Choose from Off and On. Choose On when you use this camera underwater. The default is Off. Photo Lapse: takes a single photo or begins automatic shooting at timed intervals in Camera mode. Choose Off, 3, 5, 10 or 20 second intervals. The default is Off. Burst mode: take several photos in one second. Choose from Off, 3, 5, and 10 photos. The default is Off. Dash Cam: choose On or Off. With Dash Cam Mode On the camera turns on automatically when it detects power while connected to a 12V adapter. The default setting is Off. License No Set: camera name. To enter a name for your camera, press the Mode button to enter the submenu. Press and release the Mode button to go to each entry. Use Up and Down buttons to change the value of the entry then press the OK button to select. When complete, press and release the Mode button until OK is highlighted then press OK button. 10
12 Page 5 Date/Time: set the date and time to be used for Time Stamp. Auto Power Off: amount of time before the camera automatically turns itself off. The camera will not automatically shut off while in Video Lapse or Capture Mode. If Motion Detection is turned On or while recording. Choose 3, 5 or 10 minutes or Off to shut off the camera manually. The default setting is 3 minutes. Keypad Tone: turns Keypad Tone On or Off when pressing camera buttons. Default is On. Screensavers: the amount of time before the screen goes dark while the camera remains on. Choose 30 seconds or 1, 3 or 5 minutes. Choose Off if you want the screen to stay on anytime the camera is on. The default setting is 1 minute. Frequency: frequency of household electricity. Choose 50Hz or 60Hz. The default setting is 50Hz. Choose 60Hz in the US. Rotate: rotates your photos and videos 180 degrees. Use this if you need to mount the camera upside down. Choose On to rotate. The default setting is Off. Page 6 WIFI SSID: name of camera WiFi network. WIFI Password: initial factory setting is Change to any combination of up to 8 letters and numbers or leave blank for no password. Language: select among several languages for display and menus. Default is English. Delete: delete all or selected images and videos except protected videos. Format: formats the memory card. Format a new card when you insert it into the camera for the first time. (CAUTION: All videos and photos including protected videos are deleted when you format the memory card). Default Setting: returns camera settings to defaults. Page 7 Version: shows the model name, firmware version, date of firmware and Trademark. NOTES FOR SETUP MENU Not all settings are retained after you turn off the camera. Check your settings when you turn the camera on again. Resets to default when the camera is turned off. This feature is disabled during WiFi operation. Images larger than 3M are resized by interpolation. This setting can't be adjusted during WiFi operation. The WiFi app is always in English. When you remove and replace the battery, the time resets to 00:00:00 and the date resets to default. Sometimes it resets to the current date and time when the camera is connected to a smart device via WiFi. When you select Default Settings the WiFi network name resets to original factory name. 11
13 OPERATING CAMERA FROM A SMART DEVICE VIA WIFI TO CONNECT TO SMART DEVICE VIA WiFi: Turn on WiFi on the camera by pressing and releasing the Up button. Turn on WiFi on the smart device. Connect the WiFi name which show on the camera screen. The password is also showed on the screen. The default is After the smart device verifies the WiFi connection, open the Park Play application by touching CONNECT YOUR CAMERA. APP ICONS ON SMART DEVICE The following describes the application icons beginning in the top left corner and continuing clockwise with the device in landscape orientation. Resolution: white letters and numbers such as 1080P 30fps in Video mode -OR- Resolution/time interval: video resolution and time interval in seconds in Timing Video mode, such as 1080P/1S -OR- Image size: in megapixels. Number and letter such as 3M in Taking Pictures mode - OR- Image size/time interval: in megapixels and seconds. Number and letter/number and letter such as 3M/3S in Time Take Pictures mode. Broadcast symbol: indicates WiFi on and connected. Battery: remaining capacity of camera battery or battery charging. Blue circle and line: camera power on. Red button: in Video or Timing Video mode touch the red button to start or stop recording. In Taking Pictures or Time Take Pictures mode touch the red button to take photographs. Gear symbol: touch to open the Settings menu. Movie Camera: Video mode -OR- Still Camera: Taking Pictures mode -OR- Movie Camera with Clock Face: Timing Video mode -OR- Still Camera with Clock Face: Time Take Pictures mode. Up to 6 digit number in Camera mode only: the number of photos you can take at the selected camera settings with the available remaining memory. Round photo icon: touch to open a list of files stored on the camera's memory card and your smart device. Date stamp: shows the date in YYYY/MM/DD and time in 24-hour clock. MODE SELECTION Touch the Movie Camera, Still Camera, Movie Camera with Clock Face or Still Camera with Clock Face icons can change to the modes listed below. Touch Video for Record mode. Touch Taking Pictures for Camera mode. Touch Timing Video for Video Lapse mode. Touch Time Take Pictures for Photo Lapse mode. SETTTINGS MENU VIDEO SETTING - settings are for Video mode Resolution: Video resolution. Choose from the following: 1080FHD 1920x fps 720P 1280x720 60fps 12
14 720P 1280x720 30fps WVGA 848x480 30fps VGA 640x480 The default setting is 1080FHD 1920x fps. Cyclic Record: time length of file segments that a continuous video recording is divided into. In Playback mode you can skip through segments. Select Off, 3, 5 or 10 minutes. The default setting is 3 minutes. WDR: Wide Dynamic Range. Select Off or On. The default setting is Off. Audio: select Off or On. Audio is recorded along with video when On is selected. The default setting is On. Date Stamp: select Off or On. The date and time appear on recordings and photos when On is selected. The default setting is On. Video Lapse: takes photos automatically at timed intervals while in Record mode. Choose 1, 2, 5, 10, 30 or 60 seconds intervals. This is same as Video Lapse in the camera Setup menu or Timing Video in the app Mode Selection menu. The default setting is 1 second. PHOTO SETTING settings are for Taking Pictures mode Photo Size: size of photographs. Select from 12M, 10M, 8M, 5M, 3M, 2MHD, VGA or 1.3M. The default setting is 12M. White Balance: choose Auto, Daylight, Cloudy, Tungsten or Fluorescent. Default is Auto. Exposure: choose +2/3, +1/3, +0.0, -1/3, -2/3, -1.0, -4/3, -5/3, Default Setting is Photo lapse: takes a single photo or begins automatic shooting at timed intervals in Camera mode. Choose 3, 5, 10 or 20 seconds intervals. This is same as Photo Lapse Mode in the camera Setup menu or Time Take Pictures in the app Mode Selection menu. The default setting is 3 seconds. OTHER SETTING Frequency: frequency of household electricity. Choose 50Hz or 60Hz. Default is 50Hz. Default Setting: returns camera settings to default values. Format: formats the memory card. Please format a new card when you insert it into the camera for the first time. (CAUTION: All videos and photos including protected videos could be deleted if you format the memory card). Auto Power Off: amount of time before the camera automatically turns itself off. Camera does not automatically shut off when recording video or in Timing Video or Time Take Pictures modes. Choose Off, 3, 5 or 10 minutes. Off if for shutting off the camera manually. The default setting is 3 minutes. WiFi setting: change the WiFi name and password for the camera WiFi network. The initial password is You can change to any combination of up to 8 letters and numbers or leave blank for no password. 13
15 BASIC OPERATION FROM SMART DEVICE Make sure WiFi connection with camera has been established. If you can see a live view from the camera on your device then they are connected. TO RECORD VIDEOS OR TAKE PHOTOS To record videos, check the mode icon to be sure the Movie Camera icon is shown. If not, please touch the movie camera icon. Touch the red button to start recording. To record time lapse videos, check the mode icon to be sure the Movie Camera with Clock Face icon is shown. If not, please touch the Movie Camera with Clock icon. Touch the red button to start recording time lapse video. To take photos, check the mode icon to be sure the Still Camera icon is shown. If not, please touch the Still Camera icon. Touch the red button to take a photo. To automatically take a series of photos at timed intervals, check the mode icon to be sure the Still Camera with Clock Face icon is shown. If not, please touch the Still Camera with Clock Face icon. Touch the red button to start taking photos TO RECORD VIDEOS OR TAKE PHOTOS Touch the Round Picture icon to open the file list showing video and photo files on the memory card and your smart device. The list includes all files whether they were recorded via WiFi operation or not. Photos and videos are listed separately. Touch the Select at the top right corner and choose the photo or video that you want to download to your smart device, then touch the Download icon at the bottom left corner. When you saw the progress bar is completed and the word Download appears at the top left corner, you can found the photo or video is already copied to you smart device. Files copied from the camera to your smart device are not deleted from the camera. To delete files except protected videos from the camera, touch the Select at the top right corner and choose the photo or video that you want to delete, then touch the Trash can icon at the bottom right corner. A dialog box appears with the word Delete resources in the camera. Touch Confirm to delete or Cancel to keep the file. You cannot delete a protected file by this way. To delete all files including protected videos, select Format in the Settings menu. TO VIEW PHOTOS AND VIDEOS ON YOUR SMART DEVICE Files are not stored directly on your smart device when recording videos or shooting photos via WiFi. They must be downloaded to the smart device as described above. Go to the app start interface and touch the Round photo icon at the bottom left corner. Select your smart device and you can scan the photo or video which you already downloaded. You can also view the files as you normally do on your device. NOTES FOR APP ICONS ON SMART DEVICE Some smart device icons that aren't part of the app appear around the edge of the screen. This resets to the camera default setting when camera is turned off. Images larger than 3M are resized by interpolation. When selecting default settings the WiFi network name resets to the original factory name. If you select Default Settings on the camera when not connected via WiFi, the WiFi network name resets to the original name. 14
16 GENERAL NOTES FOR OPERATING THE CAMERA FROM A SMART DEVICE VIA WIFI The Park Play WiFi application must be installed on your smart device in order for WiFi to function. The app allows you to see the camera view in real time, record video, take still photographs, and change some camera settings. After the WiFi connection has been established, all functions of the camera are disabled except taking photos and starting or stopping video recording. The WiFi app is in English regardless of the language chosen in the camera Setup menu. Zoom, Motion Detection and Protected Video functions are disabled during WiFi operation. Adjustment of settings for Quality, Sharpness and ISO are disabled during WiFi operation. Files are not stored directly on your smart device when recording videos or shooting photos via WiFi. To view them on the smart device, they must be downloaded to it. Settings changed during Wi-Fi operation are retained by the camera after Wi-Fi is disconnected. You can check the version of the app at the bottom of the app start interface. This OPERATING CAMERA FROM A SMART DEVICE VIA WIFI section describes WiFi operation with app Version 1.0 using an iphone 7 smart phone. Menus, settings, operation, etc., might vary with other firmware versions or other Android or ios smart devices. GENERAL INFORMATION The camera can record about 1-1/2 to 2 hours on a fully charged battery at 1080p30 with the display and WiFi off. Additional batteries and external single- and dual-battery chargers are available separately. To change the battery, open the battery compartment door on the bottom of the camera by sliding the tab and lifting up on the door. Remove the existing battery by pulling up on the battery strap. Install a freshly charged battery and push it all the way down into the compartment. Make sure the tab is up and the battery contacts line up with those in the bottom of the compartment. Replace the compartment door. For convenience, leave the battery strap sticking out when you replace the battery compartment door. This makes it easier to open. 15
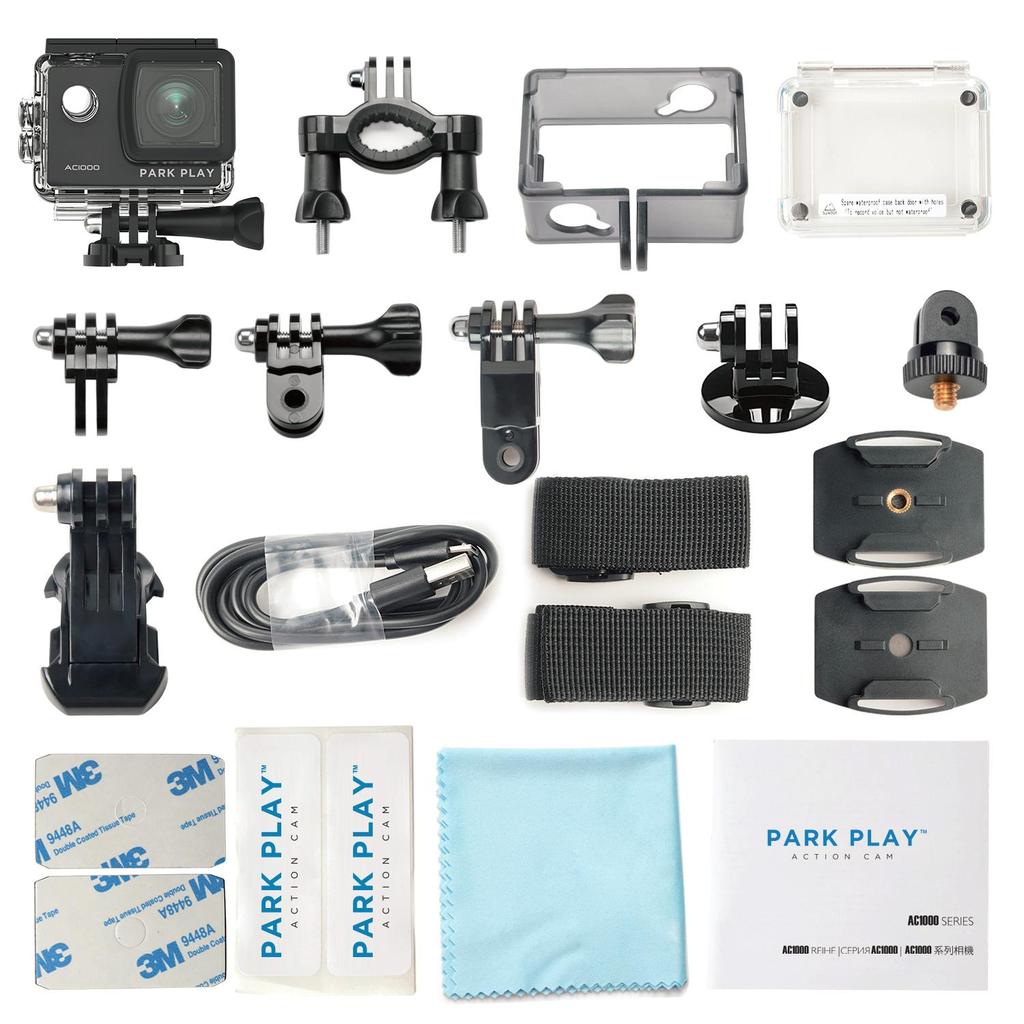
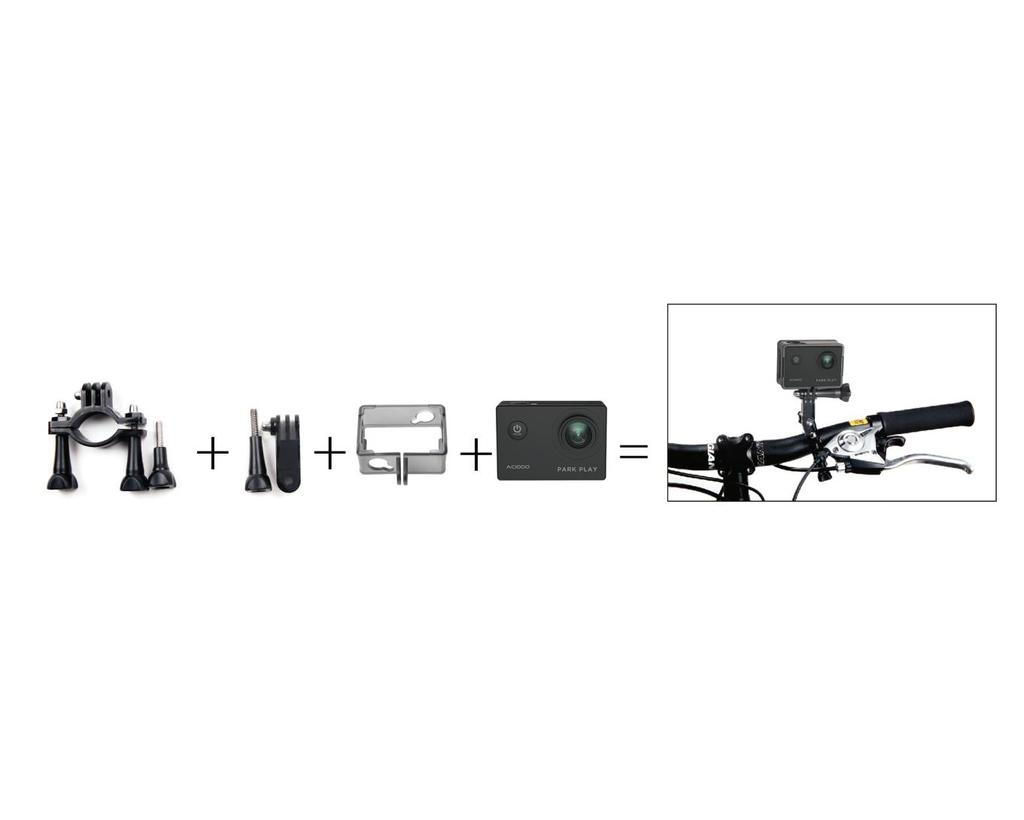
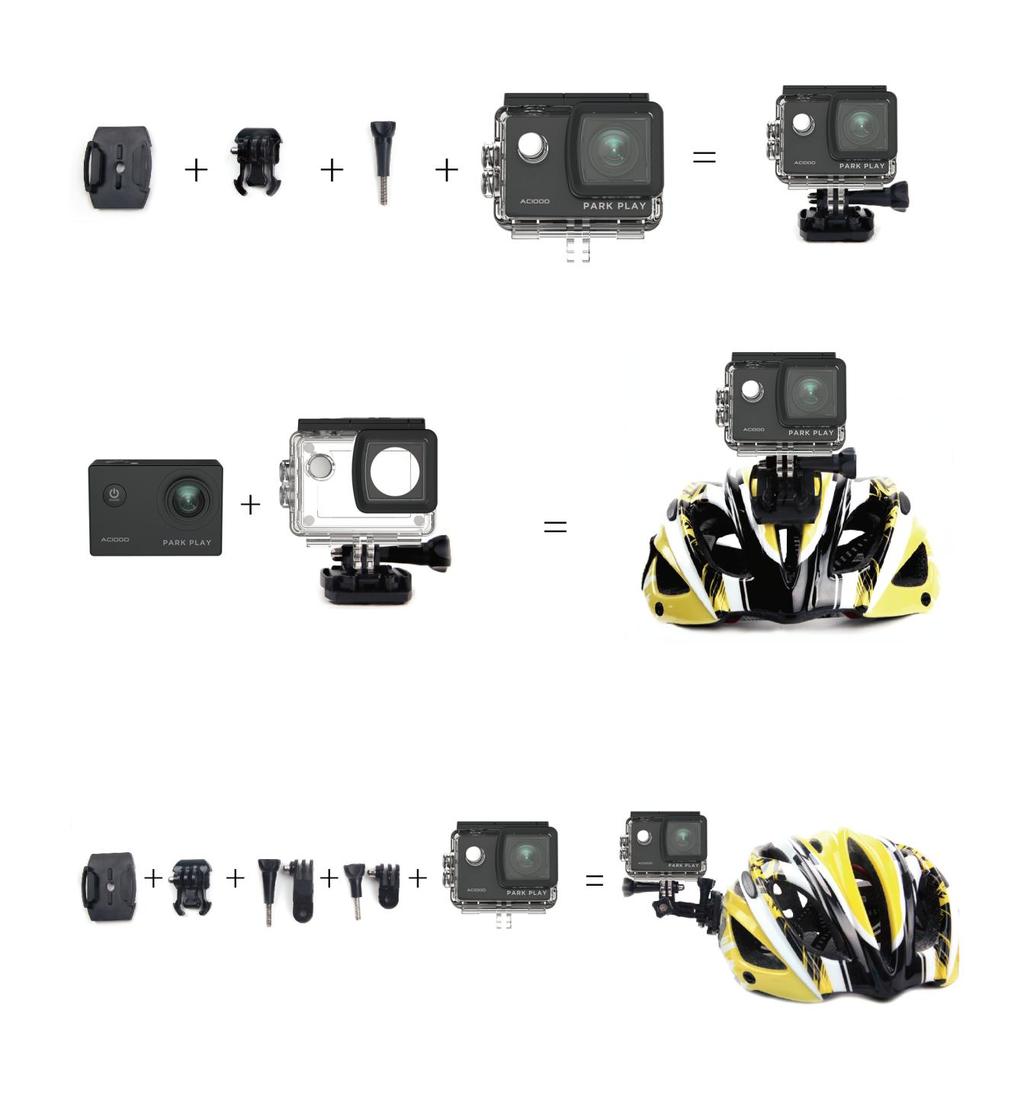
17 Accessories: 16
18 17
Quick start guide. Technical Assistance
 Technical Assistance If you need assistance setting up or using your Gator product now or in the future, call Gator Support. Australia TEL: 03 8587 8898 Quick start guide FAX: 03 8587 8866 Mon-Fri 9am
Complete User Guide. X1 Action Camera
 1 Complete User Guide X1 Action Camera x1 DISCOVER: ADVENTURE Contents Share your footage with us on social media #KBdiscover To view the entire Kaiser Baas product range visit: www.kaiserbaas.com Join
Polaris G50 Dash cam incident recorder.
 Polaris G50 Dash cam incident recorder. Operation manual Quick Guide Thank you for purchasing the Polaris G50 DVR. The Polaris G50 DVR is a great product for capturing adventures and incidents both on
ACTION CAMERA INSTRUCTION MANUAL MODEL: DV6000AF. Li-ion
 ACTION CAMERA Li-ion INSTRUCTION MANUAL MODEL: DV6000AF INTRODUCTION Congratulations on the purchase of this product. This device is perfect for capturing all those important moments in stunning 4k using
HD DV 2.0 LCD Screen SJ p 1 4 M P 30 FPS. User s Manual. Firmware v1.8
 SJ5000 HD DV 2.0 LCD Screen User s Manual 1080p 1 4 M P 30 FPS Firmware v1.8 INTRODUCTION We believe everyone has a dream. Our mission is to make you express yourself, your vision and dreams in order to
Dash Camera with 2.7 Display & GPS User Manual DC-27-G
 User Manual Introduction Thank you for purchasing your EchoMaster DVR Dash Camera. Drive, record and share with geolocation. Capture that shareable moment on your next roadtrip or safeguard yourself with
Contents Features :... 3 Performance and Specifications:... 4 Button Functions...5 Video settings:...5 Photo settings:... 6 System Setup settings:...6
 4K Sport DV FIREFLY 7S WiFi Gyro Image Stabilization LCD&OLED Dual screens SONY 12 Mega pixels COMS Sensor Ver 1.0 1 Contents Features :... 3 Performance and Specifications:... 4 Button Functions...5 Video
1 Key Features Video resolution: Image resolution: 12.4MP LENS: FOV
 User Manual Model : M360 Full-view Action Camera 1 Key Features Video resolution: 4K@24fps, 2K@30fps, 1080p@96fps, 1080p@60fps, 1080p@30fps, 720p@120fps, 720@60fps. Image resolution: 12.4MP LENS: FOV 360
Contents. Important Safety Notice. Your dash cam Introduction What's in the box
 Contents Important Safety Notice Your dash cam Introduction What's in the box Get started Install the dash cam Insert Micro SD card Turn on the dash cam Mode switch Video recording Video settings 6 6 Photo
Table of contents Introduction Getting Started Taking still images or videos
 User Manual Table of contents Introduction Features............................................1 Package contents.....................................2 Camera overview.....................................2
Item No.: 4SK108. User Manual. Thank you for choosing The Original Dash Cam. This manual offers detailed information on how to operate TODC (The
 Item No.: 4SK108 User Manual Thank you for choosing The Original Dash Cam This manual offers detailed information on how to operate TODC (The Original Dash Cam) WEE including: how to operate the device,
IN-CAR HD Digital Video Recorder
 IN-CAR HD Digital Video Recorder USER MANUAL KPT-200 In order to ensure better use of each function of your Kapture In-Car HD DVR, it is recommended that you read these product instructions carefully before
DVR101 HD DASH CAM & 12MP CAMERA
 DVR101 HD DASH CAM & 12MP CAMERA GENERAL - Display: 3 HD LCD - Chipset: Novatek 96223 - Image Sensor: SC1143, 1.0M CMOS - Outputs: USB - PC Interface: USB - Power Supply: 12/24V Cig. Lead Charger - Input
DashCam HD DVR Operating Manual Step by Step Set-Up Guide DashCam DVR sketch and operating key
 DashCam HD DVR Operating Manual Step by Step Set-Up Guide DashCam DVR sketch and operating key 1. Accessories Operating Manual Battery Mount USB Cable Vehicle Charger, the transformer adaptor automatically
Complete User Guide. Visit kaiserbaas.com for more information
 Complete User Guide Visit kaiserbaas.com for more information CONTENTS Safety Precautions 01 Product Diagram 02 Getting Started 03 Camera Modes 05 Camera Setup 06 Support 12 SAFETY PRECAUTIONS 01 - ENG
DVR 514 Digital Video Recorder
 DVR 514 Digital Video Recorder User Manual 2010 Sakar International, Inc. All rights reserved. Windows and the Windows logo are registered trademarks of Microsoft Corporation. All other trademarks are
DVR 794HDv4 Wi-Fi Action Camcorder
 DVR 794HDv4 Wi-Fi Action Camcorder User Manual 2009-2016 Sakar International, Inc. All rights reserved. Windows and the Windows logo are registered trademarks of Microsoft Corporation. All other trademarks
PREFACE. For B-PRO5 User Guide in english, please download at
 WARNING This is a hight tech product, please don t drop or hit it. Do not expose this product to any magnetized items. Avoid area that has strong radio or magnetic waves, This waves can cause damage, failure
Wifi Action Camera T86. User Manual
 Wifi Action Camera T86 User Manual Table of contents Contents Table of Contents...1 Safety Precautions...2 What s in the Box...3 Product Diagram...4 Remote Diagram...5 Setup Your T86...6 Video Mode...7
G3 Duo. Table of Contents. User Manual. GitUp Ltd. Getting Started. Camera Overview. Powering Camera On and Off. Touch Display Overview
 Table of Contents Getting Started 3 Opening the Case About Camera Case Charging the Battery Action Camera G3 Duo Inserting Removing Memory Cards Camera Overview 5 Status LEDs User Manual Slave Camera Connecting
2014 All Rights Reserved. Windows and the Windows logo are registered trademarks of Microsoft Corporation. All other trademarks are the property of
 2014 All Rights Reserved. Windows and the Windows logo are registered trademarks of Microsoft Corporation. All other trademarks are the property of their respective companies. 1 2 Thank you for purchasing
615HD Digital Video Camera
 615HD Digital Video Camera User Manual 2009-2011 Sakar International, Inc. All rights reserved. Windows and the Windows logo are registered trademarks of Microsoft Corporation. All other trademarks are
Drive. User Manual. HD Vehicle Accident Camera USB. Version 1 Video Video 1920x x LCD Screen. Night Operation
 Drive HD Vehicle Accident Camera HD User Manual Version 1 Video Video 1920x1080 1280x720 Supports up to 32GB USB Windows Compatible 2.0 Mac Built-in and Windows Microphone Compatible Night Operation 16.9
GETTING STARTED. Device Layout
 DVR 650 USER MANUAL GETTING STARTED Device Layout 1. Mode Button 2. Up Navigation Button 3. Record Button 4. OK (Confirm) Button 5. Emergency Lock Button 6. Down Navigation Button 7. Mute/Unmute Button
RECO Smart Cam. Quick Start Guide
 RECO Smart Cam Quick Start Guide E11074 / Revised Edition V2 / November 2015 NOTE: The screenshots in this Quick Start Guide are for reference only. 2 Hardware Micro USB port MicroSD card slot GPS port
HD DV 2.0 LCD Screen SJ5000X 1 2 M P 30 FPS. User s Manual
 SJ5000X HD DV 2.0 LCD Screen User s Manual 2K 1 2 M P 30 FPS INTRODUCTION We believe everyone has a dream. Our mission is to make you express yourself, your vision and dreams in order to make them real,
SPORT DV product specifications
 SPORT DV product specifications 1. Product picture: 2.Product features: 1. Allwinner V3 solution with high performance price 2. Sensor OV4689 3. 170-degree high-definition wide-angle lens 4. Maximum video
DVR 914HD WiFi Action Camcorder
 DVR 914HD WiFi Action Camcorder User Manual 2009-2015 Sakar International, Inc. All rights reserved. Windows and the Windows logo are registered trademarks of Microsoft Corporation. All other trademarks
User Manual Lets get Started
 Rayne Action Cameras @RayneCam_Offical Raynecam_official www.raynecam.com User Manual Lets get Started Included Accessories Before You Start We know you super excited to show the world your awesome videos
DVR 528 Digital Video Camera
 DVR 528 Digital Video Camera User Manual 2010 Sakar International, Inc. All rights reserved. Windows and the Windows logo are registered trademarks of Microsoft Corporation. All other trademarks are the
NCP-DVR720 USER MANUAL HD DASH CAM DVR WITH G-SENSOR
 USER MANUAL HD DASH CAM DVR WITH G-SENSOR NCP-DVR720 Caution... 5 Battery warning... 5 Notes on Installation... 5 1 Introduction... 6 1.1 Features... 6 1.2 Package Contents... 6 1.3 Product Overview...
USER MANUAL
 www.activeon.com USER MANUAL Table Of Contents Names of each part 1 Operation & button description 2 Start the camera 3 LCD screen shot 4 Graphical icon description 5 Video recording 8 Photo shoot 8 Quick
TE-DVR-MM User Manual
 TE-DVR-MM User Manual 1. Components Front Back Remote Control Wiring Connections: Yellow - Battery + Red - Accessory + Black - Ground 2. ibeam Brackets (Sold Separetly) 3. Operation AV1 = Video 1 input
H D D A S H C A M E R A
 H D D A S H C A M E R A User Manual All trademarks are acknowledged as the property of their respective owners. Unless otherwise stated their use does not imply that the trademark owner is affiliated with
Operation Manual Defender Car Vision 2020 HD Car DVR
 Operation Manual Defender Car Vision 2020 HD Car DVR 1 Thank you for buying Defender Car Vision 2020 HD car DVR. Before using the device read carefully this manual. mini-usb connector HDMI connector Function
PC 105 HD Dash Cam. Designed and tested by experts INSTRUCTION MANUAL GB support. Fo V
 PC 105 HD Dash Cam Designed and tested by experts INSTRUCTION MANUAL 2.0 120 Fo V 32GB support Congratulations on choosing the PC 105 Forward Facing HD Dash Cam. Please read these instructions carefully
DVR 960HD Digital Video Recorder
 DVR 960HD Digital Video Recorder User Manual 2010 Sakar International, Inc. All rights reserved. Windows and the Windows logo are registered trademarks of Microsoft Corporation. All other trademarks are
USER MANUAL PRUVEEO All Rights Reserved.
 PRUVEEO USER MANUAL 1 Warm Prompt We recommend that you carefully read this manual before using the dash cam, then read it again with the dash cam in your hands as this will help you to familiarize yourself
DR-115 Portable DVR System
 DR-115 Portable DVR System User Manual The DR-115 is a compact high definition DVR system and is part of our RecordCam series of Mobile DVR systems. It is designed to be mounted to the windshield of the
Please charge the unit for 8 hours prior to the first use to ensure that the 180mAh battery operates at its full capacity.
 Table of Contents Product Features...2 Product Layout...2 Usage...3 Starting use...3 Language setup...3 Battery charging...3 Inserting memory card...3 Removing memory card...3 Operation...4 Switch between
Copyright 2013 DOD Tech All Rights Reserved
 LS430W USER MANUAL Copyright 2013 DOD Tech All Rights Reserved Content IMPORTANT SAFETY INSTRUCTION...2 PACKAGE CONTENTS...3 CONTROLS AND FUNCTIONS...4 INSTALLATION AND CONNECTION...6 GETTING START...7
CAMERA-DC2 Digital Camera Instruction Manual
 CAMERA-DC2 Digital Camera Instruction Manual 80 Little Falls Road, Fairfield, NJ 07004 800.631.0868 www.hamiltonbuhl.com Read manual carefully before using the product and keep for future reference. 80
Cyclops Gear CGX2 User Manual
 CYCLOPS GEAR CGX2 4K WI-FI ACTION CAMERA Cyclops Gear CGX2 User Manual CONTENTS Quick Notes CGX2 Special Features Product Accessories CGX2 Interface Button function CGX2 Operation Power on/off Battery
DVR-100. User Manual
 DVR-100 User Manual 1 Product structure 2 1.Power button 2.OK button 3.Mode 4.Up button 5.Down button 6.Parking monitoring button 7.Lock button 8.Len 9.Night lights 10.USB 11.AV-OUT 12.HDMI OUT 13.Mic
In-Car DVR KPT-700 User Manual
 Full HD In-Car DVR KPT-700 User Manual Product Picture & Function 2 a) Device Introduction... 2 b) Button Function... 3 c) LED Light Status List... 5 d) Product Accessories... 5 Basic Operation 5 a) Micro
Falcon Dual Dash Cam
 Falcon Dual Dash Cam www.falcon-security.co.uk Contents Product Description Product Features Product Layout Button Functions Setup Operation Specifications Troubleshooting Product Description The Falcon
DV 5470 User Manual Package Contents:
 DV 5470 User Manual Package Contents: Manual Camera Pouch Installation CD Earbuds AV Cable CONTENTS 1. NOTICE...2 2. SETUP...3 2.1 BATTERY INSTALLATION...3 2.2 MEMORY CARD...4 2.3 CONFIGURATION & INSTALLATION...4
WITH REVERSING MIRROR. Instruction Manual
 WITH REVERSING MIRROR Instruction Manual Thank you for purchasing Powertrain Portable DVR. In order to help you operate the unit correctly, please read this instruction carefully before using. Part No:
D11VR. USER MANUAL DVR Camera
 D11VR USER MANUAL DVR Camera WHAT S INCLUDED D11VR WINDSHIELD BRACKET DC POWER CORD USB CABLE OWNER S MANUAL Welcome Thank you for choosing a Whistler product. We are dedicated to providing products that
User Manual PHD-1080W
 User Manual PHD-1080W Overview Getting Started Before Use: Fully charge the camera using the included USB cable and charger for 3-4 hours. The blue and red indicators will turn on when the camera is charging.
User Manual V K Camera with an Integrated 3-axis Gimbal
 User Manual V 1.1 4K Camera with an Integrated 3-axis Gimbal Table of Contents Introduction 3 At a Glance 3 Charging the Battery 4 Status Battery LED Indicator Description 4 Check the Battery Level 5 Insert
WiFi Action Camera (V-VMS601)
") WiFi Action Camera (V-VMS601) Thank you for purchasing the Valore Action Camera. Capture your best action moments with this compact and waterproof WiFi action camera. High definition image quality and
WiFi Action Camera (V-VMS601) Thank you for purchasing the Valore Action Camera. Capture your best action moments with this compact and waterproof WiFi action camera. High definition image quality and
USER MANUAL. Vision 2 Action Camera
 USER MANUAL Vision 2 Action Camera CONTENTS 01-20 21-40 English YOUR VISION2 BLACK 10 14 2 3 144 5 6 1. Shutter / Select Button 2. Power / Mode / Exit Button 3. MicroSD Slot 4. Micro USB Port 5. Micro
Car Video Recorder RoadRunner 560 / RoadRunner 560GPS User Manual Version 1.0
 Car Video Recorder Version 1.0 www.prestigio.com About this user manual This user manual is specially designed to detail the device s functions and features. -- Please read this manual before using the
1, Key features. Preface. Notes
 Car DVR User Manual Preface Thank you for purchasing this DVR, this device has a unique ultra-portable design; it can be used in various fields, to bring you convenient, safe, colorful daily life. Please
1. Introduction P Package Contents 1.
 1 Contents 1. Introduction ------------------------------------------------------------------------------- P. 3-5 1.1 Package Contents 1.2 Tablet Overview 2. Using the Tablet for the first time ---------------------------------------------------
FULL HD DASH CAM DVR
 USER MANUAL NCP-DVRGPS FULL HD DASH CAM DVR WITH GPS LOGGER Caution... 5 Battery warning... 5 Notes on Installation... 5 1 Introduction... 6 1.1 Features... 6 1.2 Package Contents... 6 1.3 Product Overview...
USER MANUAL. V50 Elite Action Camera
 USER MANUAL V50 Elite Action Camera CONTENTS Your V50 Elite Getting Started Overview of Modes Customizing Your V50 Elite Connecting Your V50 Elite With Remote Controlling Your V50 Elite With Your Voice
GHDVR380. Manual. FULL HD 1080P DaSH cam GPS TRaCKING P. Full. Resolution. Screen Size. Super Capacitor. G Sensor. Wide Angle.
 GHDVR380 FULL HD 1080P DaSH cam GPS TRaCKING + Manual Full HD 2.3 Resolution Screen Size 1080P 120 Wide Angle Super Capacitor G Sensor Suction Mount ! Introduction Thank you for purchasing the Gator GHDVR380
Product Manual. Intova Duo
 Product Manual Intova Duo 1 Introduction Thank you for purchasing an Intova Duo. Your Duo is a tough and robust Sports Camera with a wide range of features. Please read this manual carefully for usage
VIV-CV-1225V v2 Digital Camera Binoculars. Instruction Manual
 VIV-CV-1225V v2 Digital Camera Binoculars Instruction Manual 2009-2019 Sakar International, Inc. All rights reserved Windows and the Windows logo are registered trademarks of Microsoft Corporation. All
Preface. Product Features
 Warning 1 It is a high-precision product, do not fall or crash. 2. Do not expose the unit to strong magnetic objects, such as magnet and electrical motor. Avoid strong radio waves. Strong magnetic fields
DVR 520 / 1.8 Digital Video Recorder
 DVR 520 / 1.8 Digital Video Recorder User Manual 2010 Sakar International, Inc. All rights reserved. Windows and the Windows logo are registered trademarks of Microsoft Corporation. All other trademarks
4KW. User Manual. JB / Made in China. Kitvision 2015 Christchurch, Dorset, BH23 4FL, UK
 4KW 4 k A c t i o n C a m e r a User Manual JB. 4397 / Made in China. Kitvision 2015 Christchurch, Dorset, BH23 4FL, UK Contents 3 Functions 4 Box contents 6 Instructions for use 16 Changing the camera
USER MANUAL.
 USER MANUAL www.activeon.com Table Of Contents 1. Name of each part 2. How to use 3. Start the camera 4. LCD screen shot 5. Graphical icon description 6. Mode menu 7. Video mode 8. Photo mode 9. Playback
DVR 548HD Digital Video Recorder
 DVR 548HD Digital Video Recorder User Manual 2009-2011 Sakar International, Inc. All rights reserved. Windows and the Windows logo are registered trademarks of Microsoft Corporation. All other trademarks
User Manual VCC-008-KX1-NPNG. VCC-008-KX1-NPNG Manual.indd 1 27/02/ :24
 User Manual VCC-008-KX1-NPNG VCC-008-KX1-NPNG Manual.indd 1 27/02/2018 09:24 Contents 1. What s in the box? What s in the box 3 Guide to controls 4 Description of LED indicators 6 Charging and installing
HD Ca mcorder. User s Manual
 HD Ca mcorder User s Manual 1 Introducing the Camcorder Read this section to learn about the features and functions of the camcorder. This chapter also covers system requirements, package contents, and
Owner s Detailed Manual
 Owner s Detailed Manual Thank you for purchasing ELECKEY E6. Please refer to this guide for all operation. Please contact us freely if you need any help. Email: eleckey@ieleckey.com 1 / 18 Table of Contents
DVR 710HDv2 Digital Video Recorder
 DVR 710HDv2 Digital Video Recorder User Manual 2009-2011 Sakar International, Inc. All rights reserved. Windows and the Windows logo are registered trademarks of Microsoft Corporation. All other trademarks
Item No.: 4SK-K9 User s Manual
 Item No.: 4SK-K9 User s Manual Thank you for purchasing The Original Dash Cam K9. Please review this guide fully before use. For any questions not answered in this guide, please visit www.getdashcam.com
HD 720P DASH CAM MANUAL
 DVR720 E HD 720P DASH CAM MANUAL 720P 90 2.4 VIEW ANGLE LCD SCREEN LOOP RECORDING SOS FILE PROTECTION ! Introduction Thank you for purchasing the EOSS DVR720E Dash Cam. Please ensure that you have read
Prime 2/4 Cam DVR Dash Cam User Manual
 Prime 2/4 Cam DVR Dash Cam User Manual 0 Index 1. Features...13 2. Structure diagram...13 3. Part description...14 4. Operation instruction...15 Power on/off...15 Battery charging...15 Installing memory
DVR 560HD Digital Video Recorder
 DVR 560HD Digital Video Recorder User Manual 2010 Sakar International, Inc. All rights reserved. Windows and the Windows logo are registered trademarks of Microsoft Corporation. All other trademarks are
User Manual 4KW. JB b / Made in China. Kitvision 2016 Christchurch, Dorset, BH23 4FL, UK
 User Manual 4KW 4 K A C T I O N C A M E R A JB. 4397-b / Made in China. Kitvision 2016 Christchurch, Dorset, BH23 4FL, UK Contents 3 Functions 4 Box contents 6 Instructions for use 16 Changing the camera
FULL HD DUAL DASH CAM DVR
 USER MANUAL NCP-DVRT1 FULL HD DUAL DASH CAM DVR WITH REVERSE CAMERA & REVERSE MONITOR 2 Caution... 4 Battery warning... 4 Notes on Installation... 4 1 Introduction... 5 1.1 Features... 5 1.2 Package Contents...
Car DVR User Manual. 1, Key features. Preface. Notes
 Car DVR User Manual Preface Thank you for purchasing this DVR, this device has a unique ultra-portable design; it can be used in various fields, to bring you convenient, safe, colorful daily life. Please
Vividia HM-250 HDMI/LCD/USB/TV Portable. Digital Measurement Microscope
 Vividia HM-250 HDMI/LCD/USB/TV Portable Digital Measurement Microscope Table of Contents 1. Precaution. 3 2. Preparation..5 Package Contents.. 6 Part Names & Functions..6 3. Specifications.... 7 4. Use
Contents. I. Safety Instructions II. Parts of Sport Camera III. Technical Parameters...5. IV. Application Description...
 Contents I. Safety Instructions... 1 II. Parts of Sport Camera... 3 III. Technical Parameters...5 IV. Application Description...7 V. Detailed Description of All Menus...15 VI. WIFI Function Description...
Complete User Guide. X Limited Edition Action Camera
 1 Complete User Guide X Limited Edition Action Camera X DISCOVER: ADVENTURE Contents Share your footage with us on social media @KaiserBaas #KBdiscover To view the entire Kaiser Baas product range visit:
CLIP ON MIRROR MONITOR
 NCP-MIRDVR USER MANUAL CLIP ON MIRROR MONITOR WITH BUILT-IN DASH CAM DVR Caution...4 Battery warning...4 Notes on Installation...4 1 Introduction...5 1.1 Features...5 1.2 Package Contents...5 1.3 Product
USER MANUAL.
 USER MANUAL www.activeon.com Table Of Contents 1. Name of each part 2. Operation & button description 3. Start the camera 4. LCD screen shot 5. Graphical icon description 6. Video recording 7. Photo shoot
1. Introduction P Package Contents 1.
 1 Contents 1. Introduction ------------------------------------------------------------------------------- P. 3-5 1.1 Package Contents 1.2 Tablet Overview 2. Using the Tablet for the first time ---------------------------------------------------
Hamilton Electronics CAMERA-DC2. User s Manual
 Hamilton Electronics CAMERA-DC2 User s Manual 1 1. PARTS OF THE DIGITAL CAMERA...5 2. PREPARING FOR USING...6 INSTALLING THE BATTERY... 6 CHARGE THE BATTERY... 7 INSERTING THE MEMORY CARD... 9 FORMAT THE
Contents Page 1. Introduction 2. Safety Instructions 2. Important Safety Precautions 4. Product Specification 5. Contents 6
 CONTENTS PAGE Contents Page 1 Introduction 2 Safety Instructions 2 Important Safety Precautions 4 Product Specification 5 Contents 6 Getting to know your Camera 7 Using the Action Camera 9 Action Camera
2 Full HD Dash Cam Car DVR with Park Mode
 2 Full HD Dash Cam Car DVR with Park Mode USER MANUAL KPT-500 Before attempting to use or install your Kapture KPT-500, please ensure you have read and understood all of the safety notes below. Avoid
ViviCam S327 Digital Camera
 ViviCam S327 Digital Camera User Manual 2009-2012 Sakar International, Inc. All rights reserved. Windows and the Windows logo are registered trademarks of Microsoft Corporation. All other trademarks are
Copy. Welcome. Letter of warranty. Thanks for purchasing BulletHD BIKER PRO
 Copy Letter of warranty Welcome Thanks for purchasing BulletHD BIKER PRO Please read this instruction manual to ensure correct use of the product prior to use. Please keep this instruction manual in a
User Manual VCC-009-KX2-NPNG. VCC-009-KX2-NPNG Manual.indd 1 27/02/ :23
 User Manual VCC-009-KX2-NPNG VCC-009-KX2-NPNG Manual.indd 1 27/02/2018 09:23 Contents 1. What s in the box? What s in the box 3 Guide to controls 4 Description of LED indicators 6 Charging and installing
Insert the Micro SD Card to the slot. the setting; Menu Clock Settings. and press "OK" 00 : 00 : 00. to setup date: "YYYY/MM/DD", OK
 Hit Record Dash Cam & User s Manual Thank you for purchasing Hit&Record Dash Cam A60, please read the user s manual and make sure the package content is complete without missing before using the
2014 All Rights Reserved. Windows and the Windows logo are registered trademarks of Microsoft Corporation. All other trademarks are the property of
 2014 All Rights Reserved. Windows and the Windows logo are registered trademarks of Microsoft Corporation. All other trademarks are the property of their respective companies. 1 Thank you for purchasing
1080FHD High Definition Car Video Recorder User manual
 1080FHD High Definition Car Video Recorder User manual 1 / 11 Contents 1. POWER KEY------------------------------------------------------------------------- 4 2. OK KEY -----------------------------------------------------------------------------
WITNESS X-01 USER GUIDE ENGLISH
 WITNESS X-01 USER GUIDE ENGLISH TABLE OF CONTENTS Introduction... 3 Box Contents... 3 Support... 3 Features... 4 Operation... 8 Charging... 8 Display... 10 Video... 12 CarDV Mode... 14 Pre-Record... 15
INSTRUCTION MANUAL 1
 INSTRUCTION MANUAL 1 Precautions...4 Disclaimer 5 PREPARING FOR USE...6 Parts of the Camera.. 7-8 Inserting the Battery and SD Card..9-10 BASIC OPERATION.. 11 Powering the Camcorder On and Off...11 Setting
Vehicle Blackbox 1080p DVR dashcam
 Vehicle Blackbox 1080p DVR dashcam Common operations March, 06, 2018 (ver. 1.0) Button functions (A) (B) (D) (G) (E) (A) - On/Off button and quick access lamp functions (B) - Status LED - Start/Stop recording
Dear user! [ Table of Contents ]
![Dear user! [ Table of Contents ]](/thumbs/85/92120538.jpg "Dear user! [ Table of Contents ]") Dear user! Thank you for buying Neoline Wide S45 video recorder. Study this manual thoroughly in order to use the device correctly and to make its service life longer. Do not throw the user manual away
Dear user! Thank you for buying Neoline Wide S45 video recorder. Study this manual thoroughly in order to use the device correctly and to make its service life longer. Do not throw the user manual away
USER S MANUAL. Thank you for purchasing portable DVR from our company. In order to help you operate it correctly. Please read this user s
 USER S MANUAL Thank you for purchasing portable DVR from our company. In order to help you operate it correctly. Please read this user s manual carefully before using. Appearance of DVR 1 Power Button:
LYFE SILVER USER MANUAL ENGLISH
 LYFE SILVER USER MANUAL ENGLISH Table of Contents Box Content...1 Camera Basics...3 Indicator Light Statuses...4 Getting Started Battery Installation...5 microsd Card Insertion...5 Charging the Battery...6
MIUFLY Body Camera User Guide
 MIUFLY Body Camera User Guide 1 1. Introduction Product Overview Box contents 2. Technical Specifications 3. Features TABLE OF CONTENTS 4. Main Manu Optional Detail 5. Operation 6. Troubleshooting 2 1.
DVR 508NHD Digital Camcorder
 DVR 508NHD Digital Camcorder User Manual 2009-2012 Sakar International, Inc. All rights reserved. Windows and the Windows logo are registered trademarks of Microsoft Corporation. All other trademarks are