AD360II-C. TTL机顶外拍两用闪光灯 TTL Powerful & Portable Flash. For Canon 说明手册 / INSTRUCTION MANUAL. 深圳市神牛摄影器材有限公司 GODOX Photo Equipment Co., Ltd.
|
|
|
- Emil Flowers
- 5 years ago
- Views:
Transcription


1 AD360II-C TTL机顶外拍两用闪光灯 TTL Powerful & Portable Flash For Canon 深圳市神牛摄影器材有限公司 GODOX Photo Equipment Co., Ltd. 地址/Add: 深圳市宝安区福永镇福洲大道西新和村华发工业园A栋 Building A, Xinhe Huafa Industrial Zone, Fuzhou RD West, Fuyong Town, Baoan District, Shenzhen , China 电话/Tel: (8062) 传真/Fax: 邮箱/ AD36C0-00 Made In China 中英文双语 / Chinese English Bilingual 说明手册 / INSTRUCTI MANUAL
2 Foreword Warning Before using this product Please read this user manual carefully in order to ensure your safety and the proper operation of this product. Keep for future reference. Thank you for purchasing a GODOX product. WITSTRO TTL Powerful & Portable Flash AD360II-C adopts Godox 2.G wireless X system When using on the camera, AD360II-C is suitable for Canon EOS cameras; when using Godox 2.G wireless X system off camera, AD360II-C is compatible with Canon E-TTL II autoflash, Nikon i-ttl autoflash, etc. With master & slave functions, AD360II-C can also use in combination with Godox TTL camera flashes, TTL outdoor flashes, TTL studio flashes, etc. With this AD360II-C flash, your shooting will become simpler. You can easily achieve a correct flash exposure even in complex light-changing environments. WITSTRO AD360II-C flash system is an AD360II-C flash with a bare tube, external power pack, wireless manual power control, and a range of dedicated light shaping accessories. AD360II-C is 5 to 7 times powerful as typical hotshoe flashes with the size and weight alike. It offers studio quality light for outdoor and live shooting. The AD360II-C offers: Compatible wireless TTL system: Fully support Canon E-TTL II, Nikon i-ttl and other TTL systems in Godox 2.G wireless X system. Workable as Master or Slave unit in a wireless flash group. Dot-matrix LCD panel: with clear and convenient operation. Built-in 2.G wireless transmission: with all-in-one functions and 100 meters further transmission with X1 TTL wireless flash trigger. Studio quality light: up to 360Ws, GN 80 (m ISO 100, with AD-S2 standard reflector). One AD360II-C can overpower the sun. External battery pack: PB960 (lithium, 10.8V/5800mAh), s recycling and 50 full power flashes. Lightweight and portable even with power and accessories Wireless control: With built-in Godox 2.G wireless X system to achieve TTL control. Godox FT-16 flash trigger can also be used to wirelessly adjust flash power level and trigger the flash. AD360II-C has 3.5mm sync cord jack and PC sync socket to achieve various sync triggering mode. Wide-range accessories: softbox, beauty dish, snoots, color gels, etc. All lighting accessories fit for barebulb flashes from most brands. Power adjusts from full power to 1/128 in 1/3 stop increments Stable color temperature at 5600±200K over the entire power range 1/8000s high-speed sync flash, Focus-assist beam on/off & high-speed sync triggering The powerful and portable AD360II-C meets the demands of freelance commercial photographers, photojournalists, wedding and beach portraiture shooters, event and backpack photographers, photograph enthusiasts, etc. Always keep this product dry. Do not use in rain or in damp conditions. Do not disassemble. Should repairs become necessary, this product must be sent to an authorized maintenance center. Keep out of reach of children. Stop using this product if it breaks open due to extrusion, falling or strong hit. Otherwise, electric shock may occur if you touch the electronic parts inside it. Do not fire the flash directly into the eyes (especially those of babies) within short distances. Otherwise visual impairment may occur. Do not use the flash unit in the presence of flammable gases, chemicals and other similar materials. In certain circumstance, these materials may be sensitive to the strong light emitting from this flash unit and fire or electromagnetic interference may result. Do not leave or store the flash unit if the ambient temperature reads over 50 C.Otherwise the electronic parts may be damaged. Turn off the flash unit immediately in the event of malfunction
3 Contents Conventions used in this Manual This manual is based on the assumption that both the camera and camera flash s power switches are powered on. Reference page numbers are indicated by p.**. The following alert symbols are used in this manual: The Caution symbol indicates a warning to prevent shooting problem. The Note symbol gives supplemental information Foreword Warning Name of Parts Body LCD Panel Included Accessories Separately Sold Accessories Installing Reflector (Other Accessories) Attaching Flash Tube Connecting to a Power Pack Connecting the Flash to a Camera Replacing the Off-Camera Adapter Power Management Flash Mode E-TTL Autoflash FEC (Flash Exposure Compensation) FEB (Flash Exposure Bracketing) FEL: Flash Exposure Lock High-Speed Sync Second-Curtain Sync Flash Mode M: Manual Flash Flash Mode Multi/Stroboscopic Flash Wireless Flash Shooting: Optic Transmission Wireless Settings Master Unit's Flash Setting the Communication Channel Wireless ID Settings ETTL: Fully Automatic Wireless Flash Shooting ETTL: Use the Wireless Shooting of Flash Ratio M: Wireless Flash Shooting with Manual Flash Multi: Wireless Flash Shooting with Manual Flash Wireless Flash Shooting: Ratio (2.G) Transmission Other Applications Wireless Control Function Modeling Flash Auto Focus Assist Beam Assist Beam Setting Bounce Flash Sync Triggering PC Sync Socket Triggering C.Fn: Setting Custom Functions Control with the Camera s Menu Screen Protection Function Technical Data Troubleshooting Compatible Camera Models Maintenance
 : Master unit flash : High-speed sync (Page 1) : Second curtain sync (Page 2) : Master unit flash MF-Assist Beam Light Sensor : Flash exposure compensation (Page 0) Flash")


4 Name of Parts Name of Parts Body: LCD Panel (1)E-TTL Autoflash Tube Socket Accessory Locking Ring Umbrella Mounting Hole ETTL : E-TTL II/E-TTL autoflash S1/S2 AF : Auto focus Accessory Mount MF : Manual focus (Page 3) : Master unit flash : High-speed sync (Page 1) : Second curtain sync (Page 2) : Master unit flash MF-Assist Beam Light Sensor : Flash exposure compensation (Page 0) Flash exposure compensation amount Flash exposure bracketing sequence (Page 0) : Flash exposure bracketing Hotshoe Stand Lock Ring The display will only show the settings currently applied. The functions displayed above function buttons 1 to, such as SYNC and, change according to settings status. When a button or dial is operated, the LCD panel illuminated. (2) M Manual Flash M : Manual flash Release Button Function Button Manual flash output Function Button 3 Wireless Control Port Function Button 2 Function Button 1 Power Socket <MODE> Mode Selection Button / Power Switch 3.5mm Sync Cord Jack Mini USB Port PC Sync Socket < >Wireless Selection Button (3) Multi Flash Multi : Stroboscopic flash Number of flashes Flash frequency < >Test Button / Flash Ready Indicator

 : Radio transmission")


 Mini stand*1 () Off-camera adapter*1")
 Instruction")


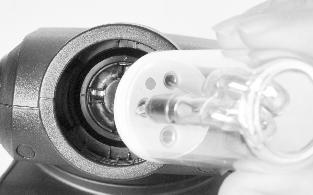
5 Name of Parts Name of Parts () Radio Transmission Shooting/Optic Transmission Shooting Master Unit Installing Reflector (Other Accessories) : Radio transmission wireless shooting : Optic transmission wireless shooting : Master Flash mode Gr : Group flash (radio transmission) : Master unit flash : Master unit flash RATIO : Flash ratio 1. Rotate Accessory Locking Ring ounter-clockwise until it is loosen. 2. Insert the reflector into the Accessory Mount. 3. Rotate Accessory Locking Ring clockwise to lock it up. Do not over-tighten. Firing group Channel Attaching Flash Tube Slave Unit : Slave icon : Slave Flash Duration 1. Remove the reflector or other accessories from the flash head. 2. Match the red dot on the base of the flash tube with the red dot in the Tube Socket. Push the flash tube in until it is securely seated into the socket. Included Accessories Connecting to a Power Pack (1) Flash tube*1 (2) Protecting bag*1 (3) Mini stand*1 () Off-camera adapter*1 (5) Reflector*1 (6) Power cable*1 (7) Reflector diffuser*2 (8) Instruction manual* Separately Sold Accessories The product can be used in combination with the following accessories sold separately, so as to achieve best photography effects: X1C Wireless Flash Trigger, FT-16 Remote Control, Softbox, Beauty Dish, Fold up umbrella, Snoots, Light stand, etc. 1. Before connecting, make sure that the power pack is turned off. 2. Plug one end of Power Cable into Power Socket of the flash unit, and insert the other end into the output socket of the power pack. 3.Turn on the power pack. Normally the flash unit will be fully charged and ready to work. The flash unit is not powered by itself, but draws power from Godox power pack PB960 (sold separately). For the instructions of the power pack, see the related user manual


6 Name of Parts Flash Mode E-TTL Autoflash Connecting the Flash to a Camera This flash has three flash modes: E-TTL, Manual (M), and Multi (Stroboscopic). In E-TTL mode, the camera and the flash will work together to calculate the correct exposure for the subject and the background. In this mode, multiple TTL functions are available: FEC, FEB, FEL, HSS, second curtain sync, modeling flash, control with the camera s menu screen. * Press <MODE> Mode Selection Button and three flash modes will display on the LCD panel one by one with each pressing. E-TTL Mode Press < MODE > Mode Selection Button to enter E-TTL mode. The LCD panel will display < ETTL >. 1. Loosen the locking ring on the mounting foot. 2. Slip the mounting foot of the flash unit into the camera hotshoe. 3. Secure the flash unit by rotating the locking ring the direction of the row. Press the camera release button halfway to focus. The aperture will be displayed in the viewfinder. When the shutter button is fully pressed, the flash will fire a pre-flash that the camera will use to calculate exposure and flash output the instant before the photo is taken. Replacing the Off-Camera Adapter The off-camera adapter is useful when using the product as an off-camera flash. There is a 1/" mounting hole at the bottom of the off-camera adapter. After replacing the adapter, the flash can be used mounting on GODOX AD-S13 portable light boom, AD-S16 floor light stand, and almost any other light stand. To install the off-camera adapter, FEC: Flash Exposure Compensation With FEC function, this flash can adjust from -3 to +3 in 1/3rd stops. It is useful in situations where minor adjusting of the TTL system is needed based on the environment. Setting FEC: 1. Use a screwdriver (not included) to remove the four screws at the bottom of this product. Then take out the bottom part carefully as illustrated. 2. Install the off-camera adapter at the bottom of this product. 3. Tighten all the screws. Press Function Button 2 1 < >. The icon < > and flash exposure compensation amount will be highlighted on the LCD panel. Set the flash exposure 2 compensation amount. Turn the Select Dial to set the amount. 0.3 means 1/3 step, 0.7 means 2/3 step. To cancel the flash exposure Press < SET > button again to 3 confirm the setting. compensation, set the amount to +0. Power Management / Power Switch controls the on/off of the flash unit. Turn off the power pack if the flash unit will not be used for an extended period (approx. 1 hour). FEB: Flash Exposure Bracketing You can take three flash shots while automatically changing the flash output for each shot from -3 to +3 in 1/3rd stops. The camera will record three images with different exposures: one exposed according to camera calculations, one over-exposed and another under-exposed. Over and under exposure amount is user adjustable. This function helps get correct exposure especially in shooting moving objects or when environmental lights are complex. C.Fn Disabling Auto Power Off function is recommended when the flash is used off camera. (C.Fn-APO, Page 56)
7 Flash Mode E-TTL Autoflash Flash Mode E-TTL Autoflash Press function button 3 1 < FEB >. The icon < > and the exposure bracketing amount will be highlighted on the LCD panel. FEL: Flash Exposure Lock Set the exposure bracketing 2 amount. Turn the Select Dial to set the amount. FEB will be cancelled after three photos are taken. "0.3"means 1/3 step, "0.7"means 2/3 step. Press <SET> button again to 3 confirm the setting. Then the FEC and FEB settings are displayed on the LCD panel. For best results, set the camera drive mode to "single" and ensure the flash is ready before shooting. FEB can be used with FEC and FEL. C.Fn You can prevent the FEB from being cancelled automatically after three photos are taken. (C.Fn-FEB ACL, Page 56) C.Fn The FEB shooting sequence can be changed. (C.Fn-FEB, Page 56) FEL can lock the correct flash exposure setting for any part of the scene. With <ETTL> displayed on the LCD panel, press the camera s <FEL> button. If the camera does not have the <FEL> button, press the < > button. 1 Focus the subject. Press the <FEL> button. 2 Aim the subject at the center of the viewfinder and press <FEL> button. The camera flash will fire a preflash and the required flash output for the subject is retained in memory. Each time the <FEL> button is pressed, a preflash will be fired and a new flash exposure setting will be locked. Press Function Button 1 < SYNC > so that < > is displayed. Second-Curtain Sync Check that < > is displayed 2 in the viewfinder. If you set a shutter speed that is the same as or slower than the camera s maximum flash sync speed, < > will not be displayed in the viewfinder. With high-speed sync, the faster the shutter speed, the shorter the effective flash range. To return to normal flash, press < SYNC > button again. Then < > will disappear. Multi flash mode cannot be set in high-speed sync mode. Over-temperature protection may be activated after 30 consecutive high-speed sync flashes. With a slow shutter speed, you can create a light train following the subject. The flash fires right before the shutter closes. Press function button < SYNC > button so that < > is displayed on the LCD panel. If the subject is too far away and underexposure, the < > icon will blink in the viewfinder. Move closer to the subject and try the FE lock again. If <ETTL> is not displayed on the LCD panel, FE lock cannot be set. If the subject is too small, FE lock might not be very effective. High-Speed Sync High Speed Sync (FP flash) enables the flash to synchronize with all camera shutter speeds. This is convenient when you want to use aperture priority for fill-flash portraits

8 Flash Mode M: Manual Flash Flash Mode Multi: Stroboscopic Flash The flash output is adjustable from 1/1 full power to 1/128th power in 1/3rd stop increments. To obtain a correct flash exposure, use a hand-held flash meter to determine the required flash output. With stroboscopic flash, a rapid series of flashes is fired. It can be used to capture a multiple images of a moving subject in a single photograph. You can set the firing frequency (number of flashes per sec. expressed as Hz), the number of flashes, and the flash output. Press < MODE > button so that 1 < M > is displayed. Turn the Select Dial to choose 2 a desired flash output amount. Press < SET > button again to 3 confirm the setting. Flash Output Range The following table makes it easier to see how the stop changes in terms of f/stop when you increase or decrease the flash output. For example, when you decrease the flash output to 1/2, 1/2-0.3, or 1/2-0.7, and then increase the flash output to more than 1/2, 1/2+0.3, 1/2+0.7, and 1/1 will be displayed. 1/1 1/ / / / /2 1/ /+0.7 1/ /+0.3 Optic S1 Secondary Unit Setting In M manual flash mode, press < S1/S2 > button so that this flash can function as an optic S1 secondary flash with optic sensor. With this function, the flash will fire synchronously when the main flash fires, the same effect as that by the use of radio triggers. This helps create multiple lighting effects. Optic S2 Secondary Unit Setting Press < S1/S2 > button so that this flash can also function as an optic S2 secondary flash with optic sensor in M manual flash mode. This is useful when cameras have pre-flash function. With this function, the flash will ignore a single "preflash" from the main flash and will only fire in response to the second, actual flash from the main unit. S1 and S2 optic triggering is only available in M manual flash mode. Display Flash Duration Flash duration refers to the length of time that from flash s firing to reach the half peak at maximum. The half peak at maximum is usually expressed as t=0.5. In order to provide the photographer with more concrete data, this product adopts t=0.1. The difference between t=0.5 and t=0.1 is shown in the following picture. A t=0.5 50% t=0.1 Figures displayed when reducing flash output level 10% t 1/ Figures displayed when increasing flash output level In M/Multi mode which without high-speed sync, flash duration is displayed on the LCD panel. Press <MODE> button so that 1 <MULTI> is displayed. Calculating the Shutter Speed During stroboscopic flash, the shutter remains open until the firing stops. Use the formula below to calculate the shutter speed and set it with the camera. Number of Flashes / Flash Frequency = Shutter Speed For example, if the number of flashes is 10 and the firing frequency is 5 Hz, the shutter speed should be at least 2 seconds. To avoid overheating and deteriorating the flash head, do not use stroboscopic flash more than 10 times in succession. After 10 times, allow the camera flash to rest for at least 15 minutes. If you try to use the stroboscopic flash more than 10 times in succession, the firing might stop automatically to protect the flash head. If this happens, allow at least 15 minutes' rest for the camera flash. Stroboscopic flash is most effective with a highly reflective subject against a dark background. Using a tripod and a remote control is recommended. A flash output of 1/1 and 1/2 cannot be set for stroboscopic flash. Stroboscopic flash can be used with bulb. If the number of flashes is displayed as --, the firing will continue until the shutter closes or the battery is exhausted. The number of flashes will be limited as shown by the following table. Maximum Stroboscopic Flashes: Flash Hz Output 1/ 1/8 1/16 1/32 1/6 1/ If the number of flashes is displayed as "--", the maximum number of flashes will be as shown in the following table regardless of the flash frequency. Set the flash frequency and flash times. 2 Press Function Button 3 < MULTI > button to select the flash times. Turn the Select Dial to set the number. Press Function Button < Hz Turn the Select Dial to set the number > button to select the flash times. After you finish the setting, press <SET> button and all the settings will be displayed. Flash Output Number of Flashes / / / / / /


 Press Function Button so 1 that < MENU2 > is displayed on the LCD panel. Press Function Button 1 < / > to 2 control the / of the master unit. < >:The master unit flash firing is.")


9 Wireless Flash: Optic Transmission Wireless Flash: Optic Transmission This product supports wireless flash application and functions as either a master or a slave unit. As a master unit, it can control Canon speedlites e.g. 580EXII, 600EX-RT via wireless. As a slave unit, it can receive wireless signals of Canon speedlites e.g. 580EXII, 600EX-RT and commanders of Canon cameras e.g. 7D/60D/600D. 2. Master Unit's Flash When the master unit is set to, only the slave units will fire a flash. You can set up two to three slave groups for E-TTL II autoflash shooting. With E-TTL II autoflash, you can easily create various lighting effects. Any flash settings (of flash exposure compensation, high-speed sync, FE lock, FEB, manual flash, Multi flash) on the master unit will be automatically sent to the slave units. So the only thing you need to do is to set the master unit to ETTL mode without any operation for the slave units at all during the shooting. This flash can work in ETTL autoflash, M manual flash, and Multi stroboscopic flash modes when set as a master unit. Positioning and Operation Range Indoors 15m(9.2ft) Press Function Button so 1 that < MENU2 > is displayed on the LCD panel. Press Function Button 1 < / > to 2 control the / of the master unit. < >:The master unit flash firing is. < >:The master unit flash firing is. Outdoors 10m(32.8ft) Even if the master unit flash firing is disabled, it still fires a preflash to transmit wireless signals. 80 8m(26.2ft) 12m(39.ft) 3. Setting the Communication Channel If there are other wireless flash systems nearby, you can change the channel IDs to prevent signal interference. The channel IDs of the master unit and the slave unit(s) must be set to the same. Even with multiple slave units, the master unit can control all of them via wireless. In this user manual, "master unit" refers to the camera flash on a camera and "slave unit" will be controlled by the master unit. 1. Wireless Settings You can switch between normal flash and wireless flash. For normal flash shooting, be sure to set the wireless setting to. Master Unit Setting Slave Unit Setting Press Function Button so 1 that < MENU3 > is displayed on the LCD panel. Press Function Button 1 so that 2 < CH > is displayed on the LCD panel. Turn the Select Dial to choose a channel ID from 1 to. Press the <SET> button to 3 confirm. Press < > button so that < > or < > are displayed on the LCD panel. Press < > button again so that < > or < > are displayed on the LCD panel.. Wireless ID Settings Change the wireless channels and wireless ID to avoid interference for it can only be triggered after the wireless IDs and channels of the master unit and the slave unit are set to the same. Press the <MENU> button to enter C.Fn ID. Press the <SET> button to choose channel expansion shutdown, and choose any figure from 01 to


 are set to a different channel, set them to the same channel. (Page 6) Position the camera and flashes. Position the camera and flashes as the picture shows.")
.")

10 Wireless Flash: Optic Transmission Wireless Flash: Optic Transmission 5. ETTL:Fully Automatic Wireless Flash Shooting Master Unit Setting 1 Attach a AD360II-C camera flash on the camera and set it as the master Unit. As a master unit, AD360II-C can control Canon speedlites e.g. 580EXII, 600EX-RT via wireless. Using Automatic Wireless Flash with a Single Slave Unit Slave Unit Setting 2 Set the other camera flash as the wireless slave unit. As a slave unit, AD360II-C can receive wireless signals of Canon speedlites e.g. 580EXII, 600EX-RT and commanders of Canon cameras e.g. 7D/60D/600D. Check the communication 3 channel. If the master unit and slave unit(s) are set to a different channel, set them to the same channel. (Page 6) Position the camera and flashes. Position the camera and flashes as the picture shows. (Page 5) Using Automatic Wireless Flash with Multiple Slave Units When stronger flash output or more convenient lighting operation is needed, increase the number of slave units and set it as a single slave unit. To add slave units, use the same steps as setting "automatic wireless flash with a single slave unit". Any flash group can be set (A/B/C). When the number of slave units is increased and the master unit flash firing is, automatic control is implemented to make all groups of flashes fire the same flash output and ensure the total flash output up is to standard exposure. The slave unit might be out of order or fire an unwanted flash due to the nearby fluorescent lamp or computer screen. Press the depth-of-field preview button on the camera to fire a modeling flash. If the slave unit s auto power off function is workable, press the master unit's test button to power it on. Please note that test firing is unavailable during the camera's regular metering time. By making some settings, the auto AF-assist transmitter will not blink after the slave unit's flash ready indicator is lightened. (C.Fn-AF/ Page 56) Using Fully Automatic Wireless Flash Set the master unit s flash 5 mode to <ETTL>. Set the master unit s flash mode to <ETTL>. For shooting, <ETTL> will automatically be set for the slave unit. Set the master unit flash firing as to fire a flash. Check that the flash is ready. 6 Check that the master flash ready indicator is lightened. When the slave flash ready indicator is ready, the AFassist beam lighting area will blinks at 1 second intervals. Check the flash operation. 7 Press the master unit's Test Button< >. Then, the slave unit will fire. If not, adjust the slave unit's angle toward the master unit and distance from the master unit. The FEC and other settings that set on the master unit will also be appeared on the slave unit automatically. The slave unit does not need any operation. Use the following settings to make wireless flashes according to the same methods with normal flash shooting. Flash Exposure Compensation ( / Page 0) Flash Exposure Bracketing( FEB / Page 0) Flash Exposure Lock(Page 1) High-Speed Sync ( SYNC / Page 1) Manual Flash (Page 3) Stroboscopic Flash (Page ) The firing frequency of stroboscopic flash during the optic transmission shooting can be set from 1Hz to 199Hz. Press Function Button so that < > < SYNC > or < FEB > are displayed. About Master Unit Use two or more master units. By preparing several cameras that with master units flash attached, cameras can be changed in shooting while keeping the same lighting source (slave unit)
.")


11 Wireless Flash: Optic Transmission Wireless Flash: Optic Transmission 6. ETTL: Use the Wireless Shooting of Flash Ratio Autoflash Shooting with Two Slave Unit Divide the slave units into A and B groups and balance their shooting illumination (flash ratio). Auto control exposure to make the total output of A and B flash groups up to standard exposure. Slave group A ID=A ID=A ID=A About Slave Group Control If three slave units are all set to < A > in terms of slave ID, these slave units will be controlled as if they were one camera flash in slave group A. When setting < RATIO A:B C >, group A, B and C will fire a flash synchronously; when setting< RATIO A:B >, group C will not fire a flash. If shooting under the situation that group C is toward the main shooting subject, over exposure might occurred. In some EOS film cameras that support E-TTL autoflash, you cannot perform multiple flash wireless shooting with a flash ratio setting. Setting the flash groups of 1 slave unit. Set the flash as slave unit. Press Function Button 3 < Gr > and choose <A> or <B>. Set one slave unit as <A>, the other as <B>. Setting < MENU 2 >. 2 Step 2 to Step are set on the master unit. Press the Function Button on the master unit so that < MENU 2 > is displayed. Setting flash ratio. Press Function Button 3 < Gr >. Turn the Select Dial to set the amount of flash ratio and press<set> button to confirm. Setting <RATIO A:B>. 3 Press Function Button 2 < RATIO > so that <RATIO A:B> is displayed. Taking the picture. 5 The slave units will flash according to the flash ratio. The flash ratio of 8:1 to 1:1 to 1:8 is equivalent to 3:1 to 1:1 to 1:3 (1/2 step increment). The details of the flash ratio settings are as follows. 8:1 :1 2:1 1:1 1:2 1: 1:8 5.6:1 2.8:1 1.:1 1:1. 1:2.8 1: M: Wireless Flash Shooting with Manual Flash This describes wireless (multiple shooting) using manual flash. You can shoot with a different flash output setting for each slave unit (firing group). Set all parameters on the master unit. Autoflash Shooting with Three Slave Unit You can add firing group C to firing groups A and B. C is convenient to set lighting so as to eliminate the subject's shadow. The basic setting method is the same as "Autoflash Shooting with Two Slave Unit". Setting the slave group <C>. C 1 Use the same method of step 1 (page 9) to set the slave unit of flash group<c>. Setting <RATIO A:B C>. 2 Use the same method of step 2 and step 3 (see page 9) to set the master unit as <RATIO A:B C>. A B Setting flash exposure compensation. 3 Use the same method of step 1 (page 9) to set the slave unit of flash group<c>. Press Function Button 2 < >. Turn the Select Dial to set the amount of flash exposure compensation and press<set> button to confirm. 1 Setting the flash mode to <M>. Setting the number of flash 2 groups. When < MENU1 > is displayed, press the Function Button 2 < RATIO > to set the groups to fire. The setting changes as follows each time you press the button: ALL(RATIO ) A/B(RATIO A:B) A/B/C(RATIO A:B:C). Setting flash output. 3 Press Function Button 3 < Gr >. Turn the Select Dial to set the flash output of the groups. Press <SET> button to confirm. Taking the picture. Each group fires at the set flash ratio. When ALL < RATIO > is set, set A, B or C as the firing group for the slave units. To fire multiple slave units with the same flash output, select ALL < RATIO > in step
 Setting <M> Flash Mode 2 Press <MODE> button so that < M > is displayed. Setting flash mode to <M>. Set the manual flash output.")


12 Wireless Flash: Optic Transmission Wireless Flash Shooting: Radio (2.G) Transmission You can directly operate the slave unit to manually set the manual flash or stroboscopic flash. Setting the slave unit. (Page 1 5) Setting <M> Flash Mode 2 Press <MODE> button so that < M > is displayed. Setting flash mode to <M>. Set the manual flash output. (Page 3) Using a flash (master/slave) with a radio transmission wireless shooting function make it easy to shoot with advanced wireless multiple flash lighting, in the same way as E-TTL II autoflash shooting. The basic relative position and operation range are as shown in the picture. You can then perform wireless E-TTL II /ETTL autoflash shooting just by setting the master unit to <ETTL>. AD360II-C adopts Godox 2.G wireless X system, which can be used in combination with other products in our factory. As a slave unit, AD360II-C is compatible with Canon E-TTL II and Nikon i-ttl systems. It will automatically change its system according to the master unit instead of setting by manual. Once received the master unit s signal, "Canon" or "Nikon" is displayed the LCD panel. Nikon cameras (use X1T-N, TT685N, etc) and Canon cameras (use X1T-C, TT685C, etc) can use one or more AD360II-C flashes simultaneously. 8 Multi: Wireless Flash Shooting with Manual Flash * As master unit, AD360II-C can control the following slave units: AD360II-C, AD360II-N, TT685C, X1R-C, TT600, etc. * As slave unit, AD360II-C can be controlled by the following master units: AD360II-C, AD360II-N, TT685C, TT685N, X1T-C, X1T-N, TT600, etc. Positioning and Operation Range (Example of wireless flash shooting) Autoflash Shooting with One Slave Unit Setting <MULTI> stroboscopic flash. Press <MODE> button so that <MULTI> is displayed. Setting the stroboscopic flash. (Page ) The firing frequency of stroboscopic flash during the optic transmission wireless shooting can be set from 1Hz to 199Hz. Transmission distance is about 70m Use the supplied mini stand to position the slave unit. Before shooting, perform a test flash and test shooting. The transmission distance might be shorter depending on the conditions such as positioning of slave units, the surrounding environment and whether conditions
13 Wireless Flash Shooting: Radio (2.G) Transmission Wireless Control Function Wireless Multiple Flash Shooting You can divide the slave units into two or three groups and perform E-TTL II/E-TTL autoflash while changing the flash ratio (factor). In addition, you can set and shoot with a different flash mode for each firing group, for up to 5 groups. Auto Shooting with Two Slave Groups Other Applications Auto Shooting with Three Slave Groups The flash unit is built in with a Wireless Control Port so that you can wirelessly adjust the power level of the flash and the flash triggering. To control the flash wirelessly, you need a FT-16 remote control set (oncamera and on-flash). Insert its receive end into the Wireless Control Port on the flash and insert the transmit end into the camera hot shoe. Settings made on the hotshoe-mounted transmit and receive ends will be wirelessly communicated to the flash. Then you can press the camera shutter release button to trigger the flash. You can also hold the transmit end at hand to control your off-camera flash. C A For full instructions on the use of FT series remote control, see its user manual. A B B Modeling Flash Wireless shooting using radio transmission has advantages over wireless shooting using optic transmission, such as being less affected by obstacles, and not having to point the slave unit's wireless sensor toward the master unit. The main functional differences are as follows: If the camera has a depth-of-field preview button, pressing it will fire the flash continuously for 1 second. This is called modeling flash. It enables you to see the shadow effects on the subject and the lighting balance. You can fire the modeling flash during wireless or normal flash shooting. To avoid overheating and deteriorating the flash head, do not fire the modeling flash for more than 10 consecutive Function Radio Transmission Optic Transmission Distance 70m Master (transmitter): approx. 3m; Slave (receiver): approx. 15m Channel 1~32 1~ A/B/C Power, 1/128~1/1 1/128~1/1 To be disturbed Hard Easy The Reason & Solution of Not Triggering in Godox 2.G Wireless 1. Disturbed by the 2.G signal in outer environment (e.g. wireless base station, 2.G wifi router, Bluetooth, etc.) To adjust the channel CH setting on the flash trigger (add 10+ channels) and use the channel which is not disturbed. Or turn off the other 2.G equipment in working. 2. Please make sure that whether the flash has finished its recycle or caught up with the continuous shooting speed or not(the flash ready indicator is lighten) and the flash is not under the state of over-heat protection or other abnormal situation. times. If you fire the modeling flash 10 consecutive times, allow at least 10 minutes break for the camera flash. The modeling flash cannot be fired with the EOS 300 and Type-B cameras. Auto Focus Assist Beam In poorly-lit or low-contrast shooting environments, the built-in auto focus assist beam will automatically light on to make it easier for autofocus. The beam will light up only when autofocus is difficult and get out as soon as the autofocus becomes correct. If you want to turn off the auto focus assist beam, set the AF to on the C.Fn settings. If you find the auto focus assist beam does not light up, this is because the camera has got a correct autofocus. Position Effective Range Center 0.6~10m / 2.0~32.8 feet Periphery 0.6~5m / 2.0~16. feet Please downgrade the flash power output. If the flash is in TTL mode, please try to change it to M mode(a preflash is needed in TTL mode). 3. Whether the distance between the flash trigger and the flash is too close or not Please turn on the close distance wireless mode on the flash trigger ( 0.5m): X1 series: press the test button and hold on, then turning it on until the flash ready indicator blinks for 2 times. XPro series: Set the C.Fn-DIST to 0-30m. Assist Beam Setting The flash has two ways to light on the assist beam: auto focus (AF) and manual focus (MF). Press Function Button 1 (MF/C.Fn) to choose. Auto focus (AF): The assist beam is lighted on by camera. Manual focus (MF): The assist beam is lighted on manually. Turn off the assist beam: Set "AF" to on the C.Fn menu, and the assist beam will be turned off.. Whether the flash trigger and the receiver end equipment are in the low battery states or not Please replace the battery(the flash trigger is recommended to use 1.5V disposable alkaline battery)


14 Other Applications C.Fn: Setting Custom Functions Bounce Flash By pointing the flash head toward a wall or ceiling, the flash will bounce off the surface before illuminating the subject. This can soften shadows behind the subject for a more natural-looking shot. This is called bounce flash. The following table lists the available and unavailable custom functions of this flash. Custom Function Signs Functions APO FEB ACL Auto power off FEB auto cancel To set the bounce direction, hold the flash head and turn it to a satisfying angle. FEB FEB order If the wall or the ceiling is too far away, the bounced flash might be too weak and result in underexposure. AF BEEP LIGHT LCD ID AF-assist beam Beeper Backlighting time LCD contrast ratio Wireless ID PC Sync Socket Triggering Use remote cable to connect the camera and the AD360II-C through its PC sync socket, and the flash will be fired synchronously with the camera shutter. Custom Functions No. C.Fn C.Fn-03 C.Fn-0 Sv LED 12sec Off in 12 sec. Always off Always lighting 0~9 10 levels Off Choose any figure from Wireless LED Off Lamp on Sync Triggering The Sync Cord Jack is a Φ3.5mm plug. Insert a trigger plug here and the flash will be fired synchronously with the camera shutter. Settings & Descriptions The wall or the ceiling should be a plain, white color for high reluctance. If the bounce surface is not white, a color cast may appear in the picture. Setting Signs C.Fn-08 C.Fn-20 C.Fn Press < MF/C.Fn > Button for 2 seconds or longer until C.Fn menu is displayed. The "Ver x.x" in the top-right corner refers to the software version. 2. Select the Custom Function No. Turn the Select Dial to select the Custom Function No. 3. Change the Setting. Press < SET > button and the Setting No. blinks. Turn the Select Dial to set the desired number. Pressing < SET > button will confirm the settings. After you set the Custom Function and press < MODE > button, the camera will be ready to shoot.. In the C.Fn states, long press the Clear button for 2 seconds until "OK" is displayed on the panel, which means the values in C.Fn can be reset
15 Control with the Camera's Menu Screen Protection Function If the camera flash is attached to an EOS camera which has a speedlite control function, the flash can be controlled using the camera's menu screen. For the menu operation procedure, refer to your camera's instruction manual. Setting Camera Flash Functions The following flash functions are settable according to different flash modes. 1. Flash mode 2. Shutter sync (1st/2nd curtain, high speed sync) 3. FEB. Flash exposure compensation 5. Flash firing 6. Clear camera flash's settings 1. Over-Temperature Protection To avoid overheating and deteriorating the flash head, do not fire more than 75 continuous flashes in fast succession at 1/1 full power. After 30 continuous flashes, allow a rest time of at least 75 minutes. If you fire more than 75 continuous flashes and then fire more flashes in short intervals, the inner overtemperature protection function may be activated and make the recycling time over 10 seconds. If this occurs, allow a rest time of about 10 minutes, and the flash unit will then return to normal. When the over-temperature protection is started, is shown on the LCD display. Number of flashes that will activate over-temperature protection: Power Output Level 1/1 Number of Flashes 75 Custom Functions of Camera Flash C.Fn-01,C.Fn-03,C.Fn-0,C.Fn-08, C.Fn-20, and C.Fn-22. Clear All Flash Custom Functions Flash function settings screen Flash C.Fn settings screen 1/2(+0.3,+0.7) 1/(+0.3,+0.7) 1/8(+0.3,+0.7) 1/16(+0.3,+0.7) 1/32(+0.3,+0.7) 1/6(+0.3,+0.7) 1/128(+0.3,+0.7) *Screens from the EOS-1D Mark III. If flash exposure compensation has already been set with the camera flash, flash exposure compensation cannot be set with the camera. To set it with the camera, the camera flash's flash exposure compensation must be set to zero. If any Flash Custom Functions and flash settings other than flash exposure compensation have been set by both the camera and the flash, the latest settings will take effect. Number of flashes that will activate over-temperature protection in high-speed sync triggering mode: Power Output Times 1/1 30 1/2(+0.3,+0.7); 0 1/(+0.3,+0.7) 50 1/8(+0.3,+0.7); 60 1/16(+0.3,+0.7) 75 1/32(+0.3,+0.7); 1/6(+0.3,+0.7); 100 1/128(+0.3,+0.7); 2. Other Protections The system provides real-time protection to secure the device and your safety. The following lists prompts for your reference: LCD Panel E1 Meaning A failure occurs on the recycling system so that the flash cannot fire. Please restart the flash unit. If the problem still exists, please send this product to a maintenance center. E2 E3 E9 The system gets excessive heat. Please allow a rest time of 10 minutes. The voltage on two outlets of the flash tube is too high. Please send this product to a maintenance center. There are some errors occurred during the upgrading process. Please using the correct firmware upgrade method
16 Technical Data Troubleshooting Model AD360II-C If there is a problem, refer to this Troubleshooting Guide. Type Compatible Cameras Slave Unit Compatible Cameras Canon EOS cameras (E-TTL II autoflash) Canon EOS cameras, E-TTL II autoflash (master unit use TTL wireless flash trigger X1C, etc.) Nikon cameras, i-ttl autoflash (master unit use TTL wireless flash trigger use X1N, etc.) Guide No. (m ISO 100) Vertical Rotation Angle Horizontal Rotation Angle Flash Duration 80 (m ISO 100, with AD-S2 standard reflector) -15 to 90 0 to 270 1/220 to 1/10000 seconds Exposure Control Exposure control system Flash exposure compensation (FEC) E-TTL II autoflash and manual flash Manual. FEB: ±3 stops in 1/3 stop increments (Manual FEC and FEB can be combined.) FE lock With < FEL > button or < > button Sync mode Multi flash High-speed sync (up to 1/8000 seconds), first-curtain sync, and second-curtain sync Provided (up to 100 times, 199Hz) Wireless Flash (Optic transmission and 2.G transmission) Wireless flash function Controllable slave groups Master, Slave, Off 3 (A, B, and C) Transmission Optic Master (transmitter): approx. 3m; The Camera Flash does not fire. The camera flash is not attached securely to the camera. Attach the camera s mounting foot securely to the camera. The electrical contacts of the Camera Flash and camera are dirty. Clean the contacts. < > or < > is not displayed in the view finder of camera. Wait until the flash is fully recycled and the flash ready indicator lights up. If the flash ready indicator lights up, but < > or < > is not displayed in the view finder, check whether this flash unit is securely attached to the camera hotshoe. The flash exposure is underexposed or overexposed. There was a highly reflective object (e.g. glass window) in the picture. Use FE lock (FEL). You used high-speed sync. With high-speed sync, the effective flash range will be shorter. Make sure the subject is within the effective flash range displayed. You used Manual Flash mode. Set the flash mode to ETTL or modify the flash output. range (approx.) 2.G Channels Optic Slave (receiver): Indoors: 12 to 15 m/ 39. to 9.2 ft.; Outdoors: 8 to 10 m/ 26.2 to 32.8ft. Master unit reception angle:±0 ; horizontally, ±30 vertically 70m (AD360II-C as a transmitter) 100m (X1C/X1N as a transmitter) (1, 2, 3, and ) This flash supports firmware upgrade through the USB port. Update information will be released on our official website. USB connection line is not included in this product. The USB port is a standard Micro USB socket. Common USB connection line is applicable. Modeling flash 2.G 32 (1~32) Fired with camera s depth-of-field preview button Compatible Camera Models Maintenance Auto Focus Assist Beam Effective range (approx.) Power Supply Power Supply Full Power Flashes Recycle Time Power Saving Sync Triggering Mode Color Temperature Dimensions Dimension Net Weight 2.G Wireless Frequency Range Center: 0.6~10m / 2.0~32.8 feet Periphery: 0.6~5m / 2.0~16. feet GODOX PB960 lithium power pack 50 (with PB960 power pack) Approx s (with PB960 power pack) Power off automatically after approx. 90 seconds of idle operation. (60 minutes if set as slave) Hotshoe, 3.5mm sync line, PC sync socket, Wireless control port 5600±200k 75*95*220mm (flash tube & reflector not included) 800g (flash tube & reflector not included) MHz-26.9MHz This flash unit can be used on the following Canon EOS series camera models: 5D Mark III 5D Mark II 6D 7D 60D 50D 0D 30D 650D 600D 550D 500D 50D 00D Digital 1100D 1000D This table only lists the tested camera models, not all Canon EOS series cameras. For the compatibility of other camera models, a selftest is recommended. Rights to modify this table are retained. Shut down the device immediately should abnormal operation be detected. Avoid sudden impacts and the product should be dedusted regularly. It is normal for the flash tube to be warm when in use. Avoid continuous flashes if unnecessary. Maintenance of the flash must be performed by our authorized maintenance department which can provide original accessories. This product, except consumables e.g. flash tube, is supported with a one-year warranty. Unauthorized service will void the warranty. If the product had failures or was wetted, do not use it until it is repaired by professionals. Max. Transmitting Power of 2.G Wireless 5dbm Changes made to the specifications or designs may not be reflected in this manual
17 FCC Warning This device complies with part 15 of the FCC Rules. Operation is subject to the following two conditions: (1) This device may not cause harmful interference, and (2) this device must accept any interference received, including interference that may cause undesired operation. Any Changes or modifications not expressly approved by the party responsible for compliance could void the user's authority to operate the equipment. Note: This equipment has been tested and found to comply with the limits for a Class B digital device, pursuant to part 15 of the FCC Rules. These limits are designed to provide reasonable protection against harmful interference in a residential installation. This equipment generates uses and can radiate radio frequency energy and, if not installed and used in accordance with the instructions, may cause harmful interference to radio communications. However, there is no guarantee that interference will not occur in a particular installation. If this equipment does cause harmful interference to radio or television reception, which can be determined by turning the equipment off and on, the user is encouraged to try to correct the interference by one or more of the following measures: -Reorient or relocate the receiving antenna. -Increase the separation between the equipment and receiver. -Connect the equipment into an outlet on a circuit different from that to which the receiver is connected. -Consult the dealer or an experienced radio/tv technician for help. *RF warning: This equipment complies with FCC radiation exposure limits set forth for an uncontrolled environment. This equipment should be installed and operated with minimum distance 20cm between the radiator & your body.
Cheetah Light LLC. (214) Instruction Manual
 Instruction Manual") Cheetah Light LLC. www.cheetahstand.com info@cheetahstand.com ()7-98 Instruction Manual FOREWORD Before using this product. Please read this user manual carefully in order to ensure your safety and the
Cheetah Light LLC. www.cheetahstand.com info@cheetahstand.com ()7-98 Instruction Manual FOREWORD Before using this product. Please read this user manual carefully in order to ensure your safety and the
Cheetah Light LLC. (214) Instruction Manual
 Instruction Manual") CL-80 Cheetah Light LLC. www.cheetahstand.com info@cheetahstand.com ()7-98 Instruction Manual FOREWORD Before using this product Please read this user manual carefully in order to ensure your safety and
CL-80 Cheetah Light LLC. www.cheetahstand.com info@cheetahstand.com ()7-98 Instruction Manual FOREWORD Before using this product Please read this user manual carefully in order to ensure your safety and
LC500 LED 棒灯. LED Light Stick
 LED 棒灯 LC500 LED Light Stick 深圳市神牛摄影器材有限公司 GODOX Photo Equipment Co., Ltd. 地址 /Add: 深圳市宝安区福永镇福洲大道西新和村华发工业园 A4 栋 Building A4, Xinhe Huafa Industrial Zone, Fuzhou RD West, Fuyong Town, Baoan District, Shenzhen
For Your Safety. Foreword
 Foreword For Your Safety Thank you for purchasing this product. This X35C camera flash applies to Canon series cameras and is compatible with TTL autoflash. With this TTL compatible flash, your shooting
AD600. 一体式外拍闪光灯 All-in-One Outdoor Flash 说明手册 / INSTRUCTION MANUAL. 深圳市神牛摄影器材有限公司 GODOX Photo Equipment Co., Ltd. 中英文双语 / Chinese English Bilingual
 一体式外拍闪光灯 All-in-One Outdoor Flash BM AD600 GR/C /ON 深圳市神牛摄影器材有限公司 GODOX Photo Equipment Co., Ltd. 地址/Add: 深圳市宝安区福永镇福洲大道西新和村华发工业园A栋 Building A, Xinhe uafa Industrial Zone, Fuzhou RD West, Fuyong Town, Baoan
手机闪光灯. 深圳市神牛摄影器材有限公司 GODOX Photo Equipment Co., Ltd. 说明手册 Instruction Manual
 深圳市神牛摄影器材有限公司 GODOX Photo Equipment Co., Ltd. 地址 /dd: 深圳市宝安区福永镇福洲大道西新和村华发工业园 4 栋 Building 4, Xinhe Huafa Industrial Zone, Fuzhou RD West, Fuyong Town, Baoan District, Shenzhen 518103, China 电话 /Tel: +86-755-29609320(8062)
TT680 Canon E-TTL II Compatible Flash
 TT6 Canon E- II Compatible Flash INSTRUCTION MANUAL Warning Always keep this product dry. Do not use in rain or in damp conditions. Do not disassemble. Should repairs become necessary, this product must
AD600E. TTL一体式外拍闪光灯 TTL All-in-One Outdoor Flash 说明手册 / INSTRUCTION MANUAL. 深圳市神牛摄影器材有限公司 GODOX Photo Equipment Co., Ltd.
 AD0E TTL一体式外拍闪光灯 TTL All-in-One Outdoor Flash 深圳市神牛摄影器材有限公司 GODOX Photo Equipment Co., Ltd. 地址/Add: 深圳市宝安区福永镇福洲大道西新和村华发工业园A栋 Building A, Xinhe uafa Industrial Zone, Fuzhou RD West, Fuyong Town, Baoan District,
AR400 大功率环形闪光灯. Powerful Ring Flash. Instruction Manual 82.AAR 说明手册 深圳市神牛摄影器材有限公司
 Powerful Ring Flash 大功率环形闪光灯 AR00 深圳市神牛摄影器材有限公司 地址 /Add: 深圳市宝安区福永镇福海大道西新和村华发工业园 A 栋 /F, Building A, Xinhe Huafa Industrial Zone, Fuhai RD West, Fuyong Town, Baoan District, Shenzhen, China 电话 /Tel: +86-7-96090(6)
LED Video Light 型号 : LED500 深圳市神牛摄影器材有限公司 深圳市神牛摄影器材有限公司 705-LE Instruction Manual 说明手册
 LED Video Light 深圳市神牛摄影器材有限公司 GODOX Photo Equipment Co., Ltd. 地址 /Add: 深圳市宝安区福永镇福洲大道西新和村华发工业园 A4 栋 Building A4, Xinhe Huafa Industrial Zone, Fuzhou RD West, Fuyong 深圳市神牛摄影器材有限公司 Town, Baoan District, Shenzhen
For Canon PIXAPRO LTD. 50 Popes Lane, Oldbury, West Midlands, B69 4PA. Company Registration No
 Pioneering TTL Li-ion Camera Flash For Canon PIXAPRO LTD. 50 Popes Lane, Oldbury, West Midlands, B69 PA INSTRUCTION MANUAL English Tel: 085 87 790 Web: www.essentialphoto.co.uk E-mail: customerservice@essentialphoto.co.uk
All-in-One Outdoor Flash
 All-in-One Outdoor Flash PIXAPRO LTD. 50 Popes Lane, Oldbury, West Midlands, B69 PA Tel: 05 7 790 Web: www.essentialphoto.co.uk E-mail: customerservice@essentialphoto.co.uk Company Registration No. 0760133
AR400 大功率环形闪光灯. Powerful Ring Flash
 Powerful Ring Flash 大功率环形闪光灯 AR00 深圳市神牛摄影器材有限公司 GODOX Photo Equipment Co., Ltd. 地址 /Add: 深圳市宝安区福海街道塘尾社区耀川工业区厂房 栋 层至 层 栋 层至 层 st to th Floor, Building / st to th Floor, Building, Yaochuan Industrial Zone,
TTL 无线引闪器 TTL Wireless Flash Trigger
 TTL 无线引闪器 TTL Wireless Flash Trigger For Sony 深圳市神牛摄影器材有限公司 GODOX Photo Equipment Co., Ltd 地址 /Add: 深圳市宝安区福永镇福洲大道西新和村华发工业园 A4 栋 Building A4, Xinhe Huafa Industrial Zone, Fuzhou RD West, Fuyong Town, Baoan
Zoom TTL Flash. for Fujifilm FPLFSMZFU. with integrated R2 Radio Transceiver
 Zoom TTL Flash for Fujifilm with integrated R2 Radio Transceiver FPLFSMZFU Thank You for Choosing Flashpoint! The new Flashpoint Zoom TTL Speedlight for Fujifilm with Integrated R2 Radio Transceiver is
For Nikon. TTL Li-ion Camera Flash PIXAPRO LTD. 50 Popes Lane, Oldbury, West Midlands, B69 4PA. Company Registration No
 TTL Li-ion Camera Flash For Nikon PIXAPRO LTD. 50 Popes Lane, Oldbury, West Midlands, B69 4PA Tel: 0845 872 7904 Web: www.essentialphoto.co.uk E-mail: customerservice@essentialphoto.co.uk INSTRUCTION MANUAL
TTL 无线引闪器 TTL Wireless Flash Trigger
 TTL 无线引闪器 TTL Wireless Flash Trigger 深圳市神牛摄影器材有限公司 GODOX Photo Equipment Co., Ltd. 地址 /Add: 深圳市宝安区福永镇福洲大道西新和村华发工业园 A4 栋 Building A4, Xinhe Huafa Industrial Zone, Fuzhou RD West, Fuyong Town, Baoan District,
一体式外拍闪光灯 All-in-One Outdoor Flash
 一体式外拍闪光灯 ll-in-one Outdoor Flash 深圳市神牛摄影器材有限公司 GODOX Photo Equipment Co., Ltd. 地址 /dd: 深圳市宝安区福永镇福洲大道西新和村华发工业园 栋 Building, Xinhe Huafa Industrial Zone, Fuzhou RD West, Fuyong Town, Baoan District, Shenzhen
TTL 无线引闪器 TTL Wireless Flash Trigger
 TTL 无线引闪器 TTL Wireless Flash Trigger 深圳市神牛摄影器材有限公司 GODOX Photo Equipment Co., Ltd. 地址 /Add: 深圳市宝安区福永镇福洲大道西新和村华发工业园 A4 栋 Building A4, Xinhe Huafa Industrial Zone, Fuzhou RD West, Fuyong Town, Baoan District,
迅丽 TTL 机顶闪光灯 Thinklite TTL Camera Flash
 迅丽 TTL 机顶闪光灯 Thinklite TTL Camera Flash For Nikon INSTRUCTION MANUAL 说明手册 中英文双语 / Chinese English Bilingual 705-TT685N-00 在使用本产品之前 : 请先仔细阅读本手册, 以确保您能安全使用 请保存好本手册以备将 来查询参考 Before using this product: Please
TTL 无线引闪器 TTL Wireless Flash Trigger
 TTL 无线引闪器 TTL Wireless Flash Trigger 深圳市神牛摄影器材有限公司 GODOX Photo Equipment Co., Ltd. 地址 /Add: 深圳市宝安区福永镇福洲大道西新和村华发工业园 A4 栋 Building A4, Xinhe Huafa Industrial Zone, Fuzhou RD West, Fuyong Town, Baoan District,
TTL 无线引闪器 TTL Wireless Flash Trigger
 TTL 无线引闪器 TTL Wireless Flash Trigger 深圳市神牛摄影器材有限公司 GODOX Photo Equipment Co., Ltd. 地址 /Add: 深圳市宝安区福永镇福洲大道西新和村华发工业园 A4 栋 Building A4, Xinhe Huafa Industrial Zone, Fuzhou RD West, Fuyong Town, Baoan District,
迅丽 TTL 机顶闪光灯 Thinklite TTL Camera Flash
 迅丽 TTL 机顶闪光灯 Thinklite TTL Camera Flash For Sony 深圳市神牛摄影器材有限公司 GODOX Photo Equipment Co., Ltd. 地址 /Add: 深圳市宝安区福永镇福洲大道西新和村华发工业园 A4 栋 Building A4, Xinhe Huafa Industrial Zone, Fuzhou RD West, Fuyong Town,
COPY INSTRUCTION MANUAL MODE D EMPLOI MANUAL DE INSTRUCCIONES. English. Français. Español
 English INSTRUCTION MANUAL MODE D EMPLOI MANUAL DE INSTRUCCIONES Français Español English 1 Introduction The Canon Speedlite 600EX-RT/600EX is a high-output, multi-feature flash unit for Canon EOS cameras,
Pioneering TTL Li-ion Camera Flash
 Pioneering TTL Li-ion Camera Flash For FUJIFILM PIXAPRO LTD. 50 Popes Lane, Oldbury, West Midlands, B69 4PA Tel: 0 55 Web: www.essentialphoto.co.uk E-mail: customerservice@essentialphoto.co.uk Company
TTL 锂电圆头机顶闪光灯 INSTRUCTION MANUAL 说明手册. TTL Li-ion Round Head Camera Flash 深圳市神牛摄影器材有限公司. GODOX Photo Equipment Co., Ltd.
 TTL 锂电圆头机顶闪光灯 TTL Li-ion Round Head Camera Flash INSTRUCTI MANUAL 说明手册 深圳市神牛摄影器材有限公司 GODOX Photo Equipment Co., Ltd. 705-VC000-00 Made In China 在使用本产品之前 : 请先仔细阅读本手册, 以确保您能安全使用 请保存好本手册以备将 来查询参考 Before using
TTL 无线引闪器 TTL Wireless Flash Trigger
 TTL 无线引闪器 TTL Wireless Flash Trigger 深圳市神牛摄影器材有限公司 GODOX Photo Equipment Co., Ltd. 地址 /Add: 深圳市宝安区福永镇福洲大道西新和村华发工业园 A4 栋 Building A4, Xinhe Huafa Industrial Zone, Fuzhou RD West, Fuyong Town, Baoan District,
Pioneering TTL Li-ion Camera Flash
 Pioneering TTL Li-ion Camera Flash For Olympus/Panasonic PIXAPRO LTD. 50 Popes Lane, Oldbury, West Midlands, B69 4PA Tel: 0 55 Web: www.essentialphoto.co.uk E-mail: customerservice@essentialphoto.co.uk
TTL 锂电机顶闪光灯. For Nikon 深圳市神牛摄影器材有限公司. GODOX Photo Equipment Co., Ltd. 在使用本产品之前 :
 TTL 锂电机顶闪光灯 Pioneering TTL Li-ion Camera Flash For Nikon 深圳市神牛摄影器材有限公司 GODOX Photo Equipment Co., Ltd. 地址 /Add: 深圳市宝安区福永镇福洲大道西新和村华发工业园 A4 栋 Building A4, Xinhe Huafa Industrial Zone, Fuzhou RD West, Fuyong
Foreword. Warning. Thank you for purchasing this product.
 TTL 锂电机顶闪光灯 Pioneering TTL Li-ion Camera Flash For Nikon INSTRUCTION MANUAL 说明手册 中英文双语 / Chinese English Bilingual 深圳市神牛摄影器材有限公司 GODOX Photo Equipment Co., Ltd. 地址 /Add: 深圳市宝安区福永镇福洲大道西新和村华发工业园 A 栋 Building
Zoom Li-on TTL Flash
 Zoom Li-on TTL Flash for Olympus/Panasonic with integrated R2 Radio Transceiver FPLFSMZL2O Thank You for Choosing Flashpoint! The new Flashpoint Zoom Li-on TTL Speedlight for Olympus/ Panasonic with Integrated
迅丽 TTL 机顶闪光灯. Thinklite TTL Camera Flash. For Canon 深圳市神牛摄影器材有限公司
 迅丽 TTL 机顶闪光灯 Thinklite TTL Camera Flash For Canon INSTRUCTION MANUAL 说明手册 中英文双语 / Chinese English Bilingual 深圳市神牛摄影器材有限公司 GODOX Photo Equipment Co., Ltd. 地址 /Add: 深圳市宝安区福海街道塘尾社区耀川工业区厂房 栋 层至 层 栋 层至 层 st
闪光灯信号发射器. User Manual 用户手册
 YN-E3-RT II 闪光灯信号发射器 User Manual 用户手册 Contents Introduction.................... 1 Nomenclature................... 2-4 Preparation Before Use............... 5-6 Wireless Flash Shooting................ 7
TTL Wireless Flash Trigger FOR CANON. Instruction Manual. Made In China
 TTL Wireless Flash Trigger FOR CANON www.quadralite.eu info@quadralite.eu Made In China Instruction Manual Contents Foreword 3 4 5 7 7 13 Foreword Warning Names of Parts Body LCD Panel Battery Installing
warning Foreword Compatible Camera Models
 TTL 锂电机顶闪光灯 Pioneering TTL Li-ion Camera Flash For Fuji INSTRUCTION MANUAL 说明手册 中英文双语 / Chinese English Bilingual 深圳市神牛摄影器材有限公司 GODOX Photo Equipment Co., Ltd. 地址 /Add: 深圳市宝安区福永镇福洲大道西新和村华发工业园 A 栋 Building
Phottix Laso TTL Flash Trigger_Transmitter
 Phottix Laso TTL Flash Trigger_Transmitter Thank you for purchasing a Phottix Product Note: Before using the Phottix Laso TTL Flash Trigger, please read this instruction manual carefully, while also referring
interfit S1 Battery-Powered TTL/HSS Flash
 lighting your creativity interfit S1 Battery-Powered TTL/HSS Flash Instruction Manual www.interfitphotographic.com Interfit S1 Battery-Powered TTL/HSS Flash Unit What s cool about the Interfit S1? The
Foreword. Warning. Thank you for purchasing this product.
 TTL 锂电机顶闪光灯 Pioneering TTL Li-ion Camera Flash For Olympus/Panasonic INSTRUCTION MANUAL 说明手册 中英文双语 / Chinese English Bilingual 深圳市神牛摄影器材有限公司 GODOX Photo Equipment Co., Ltd. 地址 /Add: 深圳市宝安区福永镇福洲大道西新和村华发工业园
EF180mm f/3.5l MACRO USM
 EF180mm f/3.5l MACRO USM ENG Instruction Thank you for purchasing a Canon product. The Canon EF180mm f/3.5l MACRO USM lens is a high-performance telephoto macro lens for EOS cameras that can be used for
On-Camera Flash for Canon, Nikon, or Sony
 USER GUIDE On-Camera Flash for Canon, Nikon, or Sony NS-DCF200C/NS-DCF200N/NS-DCF200S Note: Camera flashes are designed for specific camera makes. For example, you cannot use the Canon flash (NS-DCF200C)
EF-S60mm f/2.8 MACRO USM COPY ENG. Instruction
 EF-S60mm f/2.8 MACRO USM ENG Instruction Thank you for purchasing a Canon product. The Canon EF-S60mm f/2.8 MACRO USM lens is a macro lens that can be used for normal photography and close-up pictures
LED Video Light. 型号 /Model: Instruction manual 说明手册 705-LED Chinese English Bilingual 中英文双语
 LED Video Light 深圳市神牛摄影器材有限公司 GODOX Photo Equipment Co., Ltd. 地址 /Add: 深圳市宝安区福永镇福洲大道西新和村华发工业园 A4 栋 Building A4, Xinhe Huafa Industrial Zone, Fuzhou RD West, Fuyong Town, Baoan District, Shenzhen 518103,
for Four Thirds / Micro Four Thirds cameras INSTRUCTION MANUAL
 for Four Thirds / Micro Four Thirds cameras INSTRUCTION MANUAL Changes or modifications not expressly approved by the party responsible for compliance could void the user's authority to operate the equipment.
FREEWAVE FUSION USER MANUAL
 FREEWAVE FUSION USER MANUAL 2 INTRODUCTION Thank you for choosing the Vello FreeWave Fusion Wireless Shutter/Flash/Grouping Remote. This device triggers off-camera lights remotely from up to 300 feet away.
lighting your creativity BADGER UNLEASHED BATTERY-POWERED 250Ws TTL/HSS FLASH Instruction Manual
 lighting your creativity BADGER UNLEASHED BATTERY-POWERED 250Ws TTL/HSS FLASH Instruction Manual www.interfitphotographic.com Badger Unleashed Battery-Powered 250Ws TTL/HSS Flash What s cool about the
for Fujifilm cameras INSTRUCTION MANUAL
 for Fujifilm cameras INSTRUCTION MANUAL Changes or modifications not expressly approved by the party responsible for compliance could void the user's authority to operate the equipment. This device complies
EF24-105mm f/ IS STM COPY ENG. Instructions
 EF24-105mm f/3.5-5.6 IS STM ENG Instructions Thank you for purchasing a Canon product. The Canon EF24-105mm f/3.5-5.6 IS STM is a high-performance standard zoom lens that makes movie shooting comfortable.
FREEWAVE CAPTAIN TTL TRIGGER USER MANUAL
 FREEWAVE CAPTAIN TTL TRIGGER USER MANUAL TABLE OF CONTENTS Introduction...3 Features...4 Compatible devices...5 Precautions...6-7 Box contents...8-9 Overview... 10-11 Installing the batteries & turning
impact INSTRUCTIONS LiteTrek 4.0 Monolight lighting equipment and accessories
 impact lighting equipment and accessories LiteTrek 4.0 Monolight INSTRUCTIONS Congratulations on your purchase of the Impact LiteTrek 4.0 Portable Monolight. Enjoy the many benefits of a portable strobe
INSTRUCTION MANUAL. Type N. Thank you for purchasing a Nissin product. Compatible cameras DIGITAL TTL POWER ZOOM FLASH
 DIGITAL TTL POWER ZOOM FLASH INSTRUCTION MANUAL Type N Nissin Japan Ltd., Tokyo http://www.nissin-japan.com Nissin Marketing Ltd., Hong Kong http://www.nissindigital.com N1110 REV. 1.5 Thank you for purchasing
EF135mm f/2l USM EF200mm f/2.8l II USM EF300mm f/4l USM EF400mm f/5.6l USM COPY ENG. Instructions
 EF135mm f/2l USM EF200mm f/2.8l II USM EF300mm f/4l USM EF400mm f/5.6l USM ENG Instructions Thank you for purchasing a Canon product. The Canon EF135mm f/2l USM, the EF200mm f/2.8l II USM, the EF300mm
SHUTTERBOSS VERSION II USER MANUAL
 SHUTTERBOSS VERSION II USER MANUAL 1 INTRODUCTION Thank you for choosing the Vello ShutterBoss. This device is more than just a remote shutter release. It features many timer functions: self-timer, interval
Commander for wireless flash shooting Canon / Nikon / Sony INSTRUCTION MANUAL
 Commander for wireless flash shooting Canon / Nikon / Sony INSTRUCTION MANUAL Changes or modifications not expressly approved by the party responsible for compliance could void the user's authority to
INSTRUCTION MANUAL. Type N. Thank you for purchasing a Nissin product. Compatible cameras DIGITAL TTL POWER ZOOM FLASH
 DIGITAL TTL POWER ZOOM FLASH INSTRUCTION MANUAL Type N Nissin Japan Ltd, Tokyo http://wwwnissin-japancom Nissin Marketing Ltd, Hong Kong http://wwwnissindigitalcom N1110 REV 1 Thank you for purchasing
Commander for wireless flash shooting Canon / Nikon / Sony INSTRUCTION MANUAL
 Commander for wireless flash shooting Canon / Nikon / Sony INSTRUCTION MANUAL Changes or modifications not expressly approved by the party responsible for compliance could void the user's authority to
*520886* IntelliTouch Pool & Spa Control System MobileTouch Wireless Controller. User s and Installation Guide. P/N Rev A
 pool/spa control system IntelliTouch Pool & Spa Control System MobileTouch Wireless Controller User s and Installation Guide P/N 520886 - Rev A *520886* i MobileTouch Wireless Controller kit contents The
Radio Transmitter. for Fujifilm FPRRR2TF
 R2 Radio Transmitter for Fujifilm FPRRR2TF Flashpoint R2 Radio Transmitter for Fujifilm Thank you for choosing Flashpoint! The Flashpoint R2 Radio System transmits TTL data directly to the vast R2 Family
EF-S18-55mm f/ IS II COPY ENG. Instruction
 EF-S18-55mm f/3.5-5.6 IS II ENG Instruction Thank you for purchasing a Canon product. The Canon EF-S18-55mm f/3.5-5.6 IS II lens is a high-performance standard zoom lens developed for digital SLRs compatible
YN622C-TX. Wireless Flash Controller. User Manual 用户手册
 YN622C-TX Wireless Flash Controller ZOOM CH User Manual 用户手册 Contents/Cautions General Description................. 1 Conventions Used in the Manual.......... 2 Supported Functions List...............
for Canon EOS / Nikon digital SLR cameras for Sony digital SLR cameras INSTRUCTION MANUAL
 for Canon EOS / Nikon digital SLR cameras for Sony digital SLR cameras INSTRUCTION MANUAL Nissin Japan Ltd., Tokyo http://www.nissin-japan.com Nissin Marketing Ltd., Hong Kong http://www.nissindigital.com
EF85mm f/1.2l II USM
 EF85mm f/1.2l II USM ENG Instruction Thank you for purchasing a Canon product. The Canon EF85mm f/1.2l II USM lens is a high-performance medium telephoto lens developed for EOS cameras. It is equipped
EF-S17-55mm f/2.8 IS USM COPY ENG. Instruction
 EF-S17-55mm f/2.8 IS USM ENG Instruction Thank you for purchasing a Canon product. The Canon EF-S17-55mm f/2.8 IS USM lens is Features a large-aperture, high-performance standard 1. The Image Stabilizer
FREEWAVE FUSION BASIC WIRELESS FLASH/SHUTTER REMOTE TRIGGER. User Manual
 FREEWAVE FUSION BASIC WIRELESS FLASH/SHUTTER REMOTE TRIGGER User Manual THANK YOU FOR CHOOSING VELLO The Vello FreeWave Fusion Basic is your passport to a new world of photography. It expands your photographic
Thank you for purchasing a Nissin product
 INSTRUCTION MANUAL Changes or modifications not expressly approved by the party responsible for compliance could void the user's authority to operate the equipment. This device complies with Part 15 of
FreeWave Plus User Manual
 FreeWave Plus User Manual 2 INtroduction Thank you for choosing the Vello FreeWave Plus Wireless Remote Shutter Release. This device triggers your camera in either wired or wireless mode, allowing you
f200 English User Manual Contents
 f200 English User Manual Contents About this Guide...3 FCC Statement...3 WEEE Notice...3 CE Regulatory Notice...4 Notes on Installation...4 Caution...4 1 Introduction...5 1.1 Features...5 1.2 Package Contents...5
EF-S15-85mm f/ IS USM COPY ENG. Instruction
 EF-S15-85mm f/3.5-5.6 IS USM ENG Instruction Thank you for purchasing a Canon product. The Canon EF-S15-85mm f/3.5-5.6 IS USM lens is a standard zoom lens equipped with an Image Stabilizer and developed
Radio Transmitter. for Panasonic & Olympus FPRRR2TP
 R2 Radio Transmitter for Panasonic & Olympus FPRRR2TP Flashpoint R2 Radio Transmitter Thank you for choosing Flashpoint! The Flashpoint R2 Radio System transmits TTL data directly to the vast R2 Family
Thank you for purchasing a Nissin product
 INSTRUCTION MANUAL Changes or modifications not expressly approved by the party responsible for compliance could void the user's authority to operate the equipment. This device complies with Part 15 of
SHUTTER WORLD. PerfectTilt RF Motorized Shutter. User Manual
 SHUTTER WORLD PerfectTilt RF Motorized Shutter User Manual INTRODUCTION The PerfectTilt RF motorization system features a remote control that utilizes the latest in radio frequency technology. This user
TS-E50mm f/2.8l MACRO TS-E90mm f/2.8l MACRO TS-E135mm f/4l MACRO
 TS-E50mm f/2.8l MACRO TS-E90mm f/2.8l MACRO TS-E135mm f/4l MACRO ENG Instructions Thank you for purchasing a Canon product. The Canon TS-E50mm f/2.8l MACRO, Canon TS-E90mm f/2.8l MACRO, and Canon TS-E135mm
PSL-C / PSL-N / PSL-R PowerSlave Transmitter / Receiver INSTRUCTIONS
 PSL-C / PSL-N / PSL-R PowerSlave Transmitter / Receiver INSTRUCTIONS Table of Contents Introduction...3 Key Features...4 Precautions...5 Overview...6 Contents Include...8 Compatible Devices...10 Battery
EF70-300mm F4-5.6 IS USM. Instruction
 EF70-300mm F4-5.6 IS USM Instruction Thank you for purchasing a Canon USM lens. Dedicated to EOS cameras, the Canon EF70-300mm f/4-5.6 IS USM lens is a highperformance telephoto zoom lens equipped with
Film Status Indicator (FSI) A highlighted indicator advances from one symbol to another to identify the status of the film inside the cassette.
 A highlighted indicator advances from one symbol to another to identify the status of the film inside the cassette.") 3200AF Camera 1 Film Status Indicator (FSI) A highlighted indicator advances from one symbol to another to identify the status of the film inside the cassette. Unexposed 1 4 2 3 Processed Negatives Partially
3200AF Camera 1 Film Status Indicator (FSI) A highlighted indicator advances from one symbol to another to identify the status of the film inside the cassette. Unexposed 1 4 2 3 Processed Negatives Partially
FCC Regulatory Information
 DVW32C Advanced Wireless Voice Gateway - Safety and Installation Product Insert Federal Communications Commission (FCC) Interference Statement This equipment has been tested and found to comply with the
User manual BT3900. Register your product and get support at
 User manual BT3900 Register your product and get support at www.philips.com/support Contents 1 Important 1 Safety 1 Notice 1 2 Your Bluetooth speaker 3 Introduction 3 What's in the box 3 Overview of the
INSTRUCTION MANUAL. Thank you for purchasing a Nissin product. Compatible cameras DIGITAL TTL POWER ZOOM FLASH
 DIGITAL TTL POWER ZOOM FLASH Nissin Japan Ltd., Tokyo http://www.nissin-japan.com INSTRUCTION MANUAL Nissin Marketing Ltd., Hong Kong http://www.nissindigital.com S0710 REV. 1. Thank you for purchasing
U-Bell. Quick Start Guide. Two-way Audio. 180 Field of View. Motion Activated. 1080p Full HD. Night Vision. Wireless Video Doorbell DB1
 U-Bell Wireless Video Doorbell Quick Start Guide 1080p Full HD Two-way Audio Motion Activated 180 Field of View Night Vision U-Bell includes Lifetime Warranty DB1 Regulatory Information FCC Information
Forward. Product Introduction. Specifications
 User Manual Forward TM Thanks for purchasing Aputure Gigtube Wireless DSLR digital remote viewfinder. Gigtube Wireless is a creative photography accessory which inherits the excellent performance TM of
Use Specification of Pixie Princess
 User Manual ----------------------------------------------------------------------------1/14----------------------------------------------------------------------------- Preface Thank you for purchasing
mart atch B502 User Manual
 mart watch B502 User Manual Congratulations on your new ownership of a Polaroid smart watch. Please read the manual carefully for full understanding of all operations and functions of your new smart watch.
Appendix C: Features Table
 374 Appendices Appendix C Features Table Appendix C: Features Table Max guide number, meters 16 20 20 30 30 42 43 48 54 11 9 22 27 27 Max guide number, feet 52 65 65 98 98 137 140 156 176 36 30 72 88 88
Commander for wireless flash shooting Canon INSTRUCTION MANUAL
 Commander for wireless flash shooting Canon INSTRUCTION MANUAL Changes or modifications not expressly approved by the party responsible for compliance could void the user's authority to operate the equipment.
Studio Flash Trigger TR-Q6 TTL For the Rovelight RT Series. Canon TR-Q6RTC Nikon TR-Q6N Sony TR-Q6S
 Studio Flash Trigger TR-Q6 TTL For the Rovelight RT Series Canon TR-Q6RTC Nikon TR-Q6N Sony TR-Q6S Thank you for purchasing the ORLIT TR-Q6 TTL Wireless Radio Studio Transmitter. TR-Q6 RTC is designed
Thank you for purchasing a Canon product.
 Instructions ENG Thank you for purchasing a Canon product. Canon RF50mm F1.2 L USM is a large aperture standard lens for use with EOS R series cameras. USM stands for Ultrasonic Motor. Camera Firmware
DDW36A Advanced Wireless Gateway - Safety and Installation Product Insert. Federal Communications Commission (FCC) Interference Statement
 Interference Statement") DDW36A Advanced Wireless Gateway - Safety and Installation Product Insert Federal Communications Commission (FCC) Interference Statement This device has been tested and found to comply with the limits
DDW36A Advanced Wireless Gateway - Safety and Installation Product Insert Federal Communications Commission (FCC) Interference Statement This device has been tested and found to comply with the limits
FREEWAVE FUSION BASIC 2.4 GHz WIRELESS FLASH/SHUTTER REMOTE TRIGGER. User Manual
 FREEWAVE FUSION BASIC 2.4 GHz WIRELESS FLASH/SHUTTER REMOTE TRIGGER User Manual THANK YOU FOR CHOOSING VELLO The Vello FreeWave Fusion Basic 2.4 GHz is your passport to a new world of photography. It expands
Model: WT-868. Wireless Timer Remote Control. English Manual Instruction
 Model: WT-868 Wireless Timer Remote Control English Manual Instruction Thank you for your purchase of a JJC WT-868 Wireless Timer Remote Control. For the best performance, please read this manual instruction
REMOTE CONTROL USER MANUAL QUICK CONNECT MINI-SPLIT
 COMFORT...BUILT TO LAST QUICK CONNECT MINI-SPLIT REMOTE CONTROL USER MANUAL FOR THE REMOTE CONTROL INCLUDED WITH YOUR PERFECT AIRE MINI-SPLIT AIR CONDITIONER Before using the remote control with your air
-TX. Wireless Flash Controller. User Manual 用户手册
 -TX Wireless Flash Controller User Manual 用户手册 Contents General Description................. 1 Conventions used in the manual........... 2 Supported Functions List............... 3 Name of Parts/LCD.................
WIRELESS SHUTTERBOSS. User Manual
 WIRELESS SHUTTERBOSS User Manual INTRODUCTION Thank you for choosing the Vello Wireless ShutterBoss. It has a range of up to 250 feet on 99 channels over the reliable FSK modulated 2.4 GHz frequency. But
SPK User Manual. 900MHz Wireless Stereo Headphones INTRODUCTION FEATURES IMPORTANT SAFETY INFORMATION
 INTRODUCTION Thank you for purchasing our 900Mhz compact cordless stereo headphone system that takes advantage of the very latest advances in wireless transmission technology so you SPK-9100 900MHz Wireless
EF24-70mm f/2.8l USM ENG. Instruction
 EF24-70mm f/2.8l USM ENG Instruction Thank you for purchasing a Canon product. The Canon EF24-70mm f/2.8l USM lens is a high-performance, standard zoom lens for Canon EOS cameras. "USM" stands for Ultrasonic
WIRELESS SHUTTERBOSS. User Manual
 WIRELESS SHUTTERBOSS User Manual THANK YOU FOR CHOOSING VELLO The Vello Wireless ShutterBoss has a range of up to 250 feet on 99 channels over the reliable FSK modulated 2.4 GHz frequency. But this device
TV WIRELESS HEADPHONES
 TV WIRELESS HEADPHONES Item No. 206077 Owner s Manual Thank you for purchasing the Sharper Image TV Wireless Headphones. This updated version has a new design with new features, including a digital audio
Home Security Camera icamera-1000
 Home Security Camera icamera-1000 User Guide Table of Contents CHAPTER 1 INTRODUCTION... 1 Package Contents... 1 Features... 1 LEDs... 2 CHAPTER 2 INITIAL INSTALLATION... 4 Requirements... 4 Procedure...
Please review this guide fully before use. For any questions not answered in this guide, please contact WARNING Battery warning
 Please review this guide fully before use. For any questions not answered in this guide, please contact Support@Komando.com WARNING THIS DEVICE SHOULD NOT BE ADJUSTED BY THE DRIVER WHILE DRIVING. Battery
User manual Model: VIU-800 Brand:
 User manual Model: VIU-800 Brand: - 1 - This manual s main purpose is to introduce the correct way of using the Voter Identification Unit / Electronic Voting Machine (hereinafter referred to as "the device").
LevelOne BLH-1000 Bluetooth Headset User s Manual
 LevelOne BLH-1000 Bluetooth Headset User s Manual - 1 - Introduction Introduction to Bluetooth Wireless Technology Bluetooth is a short- range wireless communication technology. It allows wireless connections
Tablet PC. Android 5.1 User Manual
 Tablet PC Android 5.1 User Manual Tablet of Contents Specifications. What s inside the box Tablet Parts Getting started... How to use TF card How to connect to PC Connection to Internet.. Camera. Trouble