Owner's Manual HD-SDI Cameras & Domes
|
|
|
- Maximillian Neal
- 5 years ago
- Views:
Transcription


1 Owner's Manual HD-SDI Cameras & Domes GCH-K0274P 2 Megapixel Full HD Outdoor Motorised Dome SDI-Camera 18x Zoom ICR WDR GCH-K0274P ASP AG
2
3 Content: 1. Introduction 1 2. Important Safety Instructions 1 3. Package Contents 2 4. Installation 2 1. Installation Remarks 2 2. Switch & Connector Definition 3 3. Communication Switch Setting 4 4. ID Configuration 4 5. Camera Control Protocol Setup 7 6. Power Connection 5 7. Alarm Application 6 8. RS-485 Connector Definition 6 5. Operation and Configuration 7 1. OSD Display Format 7 2. OSD Menu Tree 8 3. Configuration Menu Switch Settings Index Table Introduction Based on the Television Standard for Full HD Television, HD-SDI products feature 2 Megapixel (1920x1080) pictures in real-time (30fps) transmitted over coax cabling. Get the advantages of an IP technology without their drawbacks. Get 16:9 megapixel pictures without network configuration, bandwidth problems and network security risks. Use existing coax cables and only exchange the cameras and recorders. Get a real live picture and see the things that happen in the now, not a few seconds later. Connect a monitor directly to a camera using only a HD-SDI-to-HDMI converter. HD-SDI products are easy to handle, easy to install and produce amazing high quality pictures. Combing the HD-SDI standard with a high quality SONY CMOS sensor, the HD-SDI High Speed Camera delivers up to 18x optical zoom ratio to capture a clear image in the distance. Continuous Auto Focus, Back Light Compensation and Auto Exposure functions are provided for clear and high quality images. A removable IR cut filter ensures 24 hours operation, while Privacy Masks are especially designed to avoid any intrusive monitoring at specific regions. All of the salient functions can be incorporated to meet your needs. The Home function allows users to specify a preset position as the home position or home functions (Sequence/Auto-pan/Cruise). Under this mode, HD-SDI Motordome Cameras can come back to the preset home position or functions when the camera has been idle for a user-defined period of time. Additionally, the unique Schedule function enables users to program a preset point or function (Sequence/Auto-pan/Cruise) so that these actions can be automatically performed in a certain period of time. The HD-SDI Motordome Camera provides variable pan/tilt speeds ranging from a fast patrol of 90 per second to a slow ramble of 0.5 per second with pan/tilt accuracy for fast and accurate tracking ability. The 360 endless rotation and -10 ~190 tilt travel make tracking the object passing directly beneath the dome possible. A maximum of 256 preset points can be programmed for precise location of target areas, and users can also define Sequence lines, Auto-Pan lines and Cruise routes for the camera to operate automatically. In addition, the RS- 485 communication port is available for remote control purposes. 2. Important Safety Instructions Be sure to use only the standard adapter that is specified in the specification sheet. Using any other adapter could cause fire, electrical shock, or damage to the product. Incorrectly connecting the power supply may cause explosion, fire, electric shock, or damage to the product. Do not connect multiple products to one single adapter. Exceeding the capacity may cause abnormal heat generation or fire. Do not place conductive objects (e.g. screwdrivers, coins or any metal items) or containers filled with water on top of the product. Doing so may cause personal injury due to fire, electric shock, or falling objects. If any unusual smells or smoke comes out of the unit, stop using the product. In this case, immediately disconnect the power source and contact the service center. Continued use in such a condition may cause fire or electric shock. English 1
4 If this product fails to operate normally, contact the nearest service center. Never disassemble or modify this product in any way. (GRUNDIG is not liable for problems caused by unauthorised modifications or attempted repair.) To prevent fire or electric shock, do not expose the inside of this device to rain or moisture. If the PTZ system looses its power supply during freezing temperatures and the power supply returns afterwards, the Swiftdome Camera will first heat up internally to +3 C and then the initialisation will start. In this way, it can be prevented that the sliding contacts and the motors get damaged through a cold start. 3. Package Contents These parts are included: 4. Installation 4.1. Installation Remarks Do not install the product in a location subject to high temperature (over 50 C), low temperature (below -10 C), or high humidity. Doing so may cause fire or electric shock. Keep out of direct sunlight and heat radiation sources. This may cause fire. Avoid aiming the camera directly towards extremely bright objects such as the sun, as this may damage the image sensor. Do not install the unit in humid, dusty or sooty locations. Doing so may cause fire or electric shock. Install it in a place with good ventilation. When installing the unit, fasten it securely and firmly. A falling unit may cause personal injury. If you want to relocate the already installed product, be sure to turn the power off and then move or reinstall it. General Operation Requirements: At least one control device is required for operation, such as a Control Keyboard, a DVR or a PC. The Motordome Cameras contain a built-in receiver that decodes commands originating from a control device. 2 English

5 Connect the HD-SDI Motordome Camera to other devices as shown in the diagram to complete a video surveillance solution Switch & Connector Definition Before connecting the Dome Camera to other devices of a CCTV system, please complete first the Dome Camera s ID and communication switch settings. These switches are located on the bottom of the Dome Camera. Additionally, the 22-Pin Connector for Data Cable connection and the ISP Connector for firmware upgrade kit connection are located on the back plate of the analogue Swiftdome Camera. English 3


6 There are various switches and connectors located on the Dome Camera s back plate as shown in the pictures below. Please refer to the diagram and the table for use of each switch/connector Communication Switch Setting The Dome Camera s communication switches are specified in the table below. RS-485 is the interface for communication between the Dome Camera and its control device. For this reason, the RS-485 setup of the Dome Camera and the control device must be the same. The RS-485 default setting is halfduplex (see the following diagram). Please do not change the default setting without the notice of a qualified specialist or supplier. 4 English

 in this manual.")


7 4.4. ID Configuration Please change the Dome Camera s ID if there is more than one Dome Camera in the same network. Use this switch to change your Motordome Camera s ID by setting the 10-bit dip switch. For instance, if the camera s ID is 006, set the SW 8 and SW 9 to ON, the rest to OFF, as shown below. For switch configuration details, please refer to the Switch Settings Index Table (Chapter 6) in this manual. NOTE: No two Dome Cameras should be given the same ID, otherwise a communication conflict may occur Camera Control Protocol Setup Define the protocol you are going to use based on the devices of your surveillance system. Generally, the use of one protocol is recommended even if the devices are provided from different manufacturers. Please refer to the table below for all supported protocols with their matching switch numbers and baud rate and choose a protocol for your Motordome Camera. The table below shows various protocols with their matching switch numbers and baud rates. Use the 6-bit dip switch (Camera Control Protocol Switch) to set your camera s control protocol and its baud rate Power Connection Please refer to the illustrations below for power connector definition before wiring. English 5

8 4.7. Alarm Application The Camera supports 4 digital alarm inputs and 2 digital alarm outputs. Please make sure the alarm connections are properly wired before starting to configure the alarm related settings. Please refer to the pin definition table below for alarm system wiring RS-485 Connector Definition Please refer to the illustrations below for RS485 connector definition before wiring. 6 English

9 5. Operation and Configuration 5.1. OSD Display Format Regarding information about the OSD display, position and function description, please refer to the table below. English 7

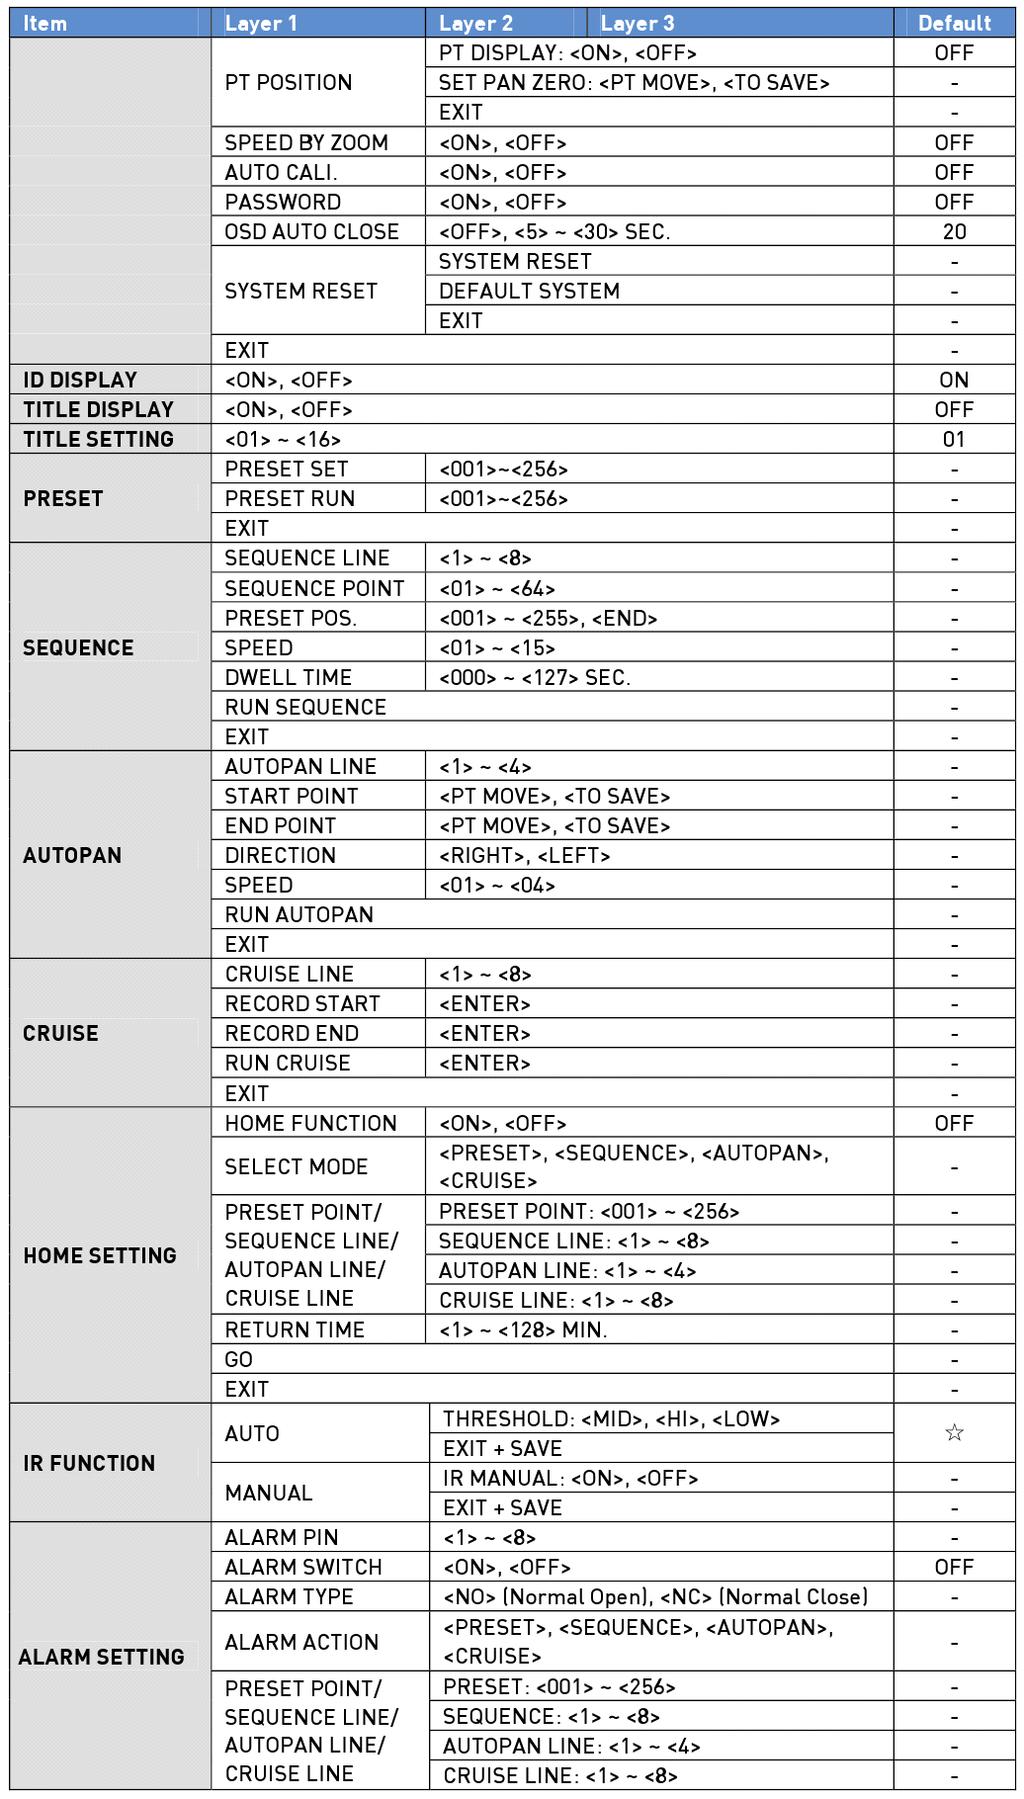
10 5.2. OSD Menu Tree The OSD setup menu structure is listed in the following section. The star symbol indicates the factory default. For detailed function description, please refer to 5.3. Configuration Menu. 8 English
11 English 9

12 5.3. Configuration Menu The detailed functions and parameter settings of your Motordome can be set by the OSD (On Screen Display) menu with a control device such as a control keyboard. The parameters that can be set through the OSD menu are described in the following sections. To enter the OSD menu of the selected camera, use the PTZ menuof the Grundig HD-SDI recorder (see the manual of the GRH series recorder) or use a keyboard that can call the PTZ OSD by the used protocol. To select a setup item, use the direction keys on the keyboard to move the OSD cursor in the OSD menu. To set up items, use the direction keys on a keyboard to move the OSD cursor in the OSD menu. For items with <ENTER>, press the <CAMERA MENU> key on the control keyboard to enter their sub menus. For other items, users can use the right/left direction key to select the functions, and then press the <CAMERA MENU> key on the control keyboard to enter their sub menus. For further detailed setup procedures, please refer to the user s manual of your installed control devices. NOTE: In the Camera OSD menu, the <CAMERA MENU> key functions as ENTER and EXIT. 10 English
13 During the Motordome Camera s start-up, the OSD Start Page will display information including the ID number, protocol/baudrate and camera initialising message. Furthermore, when certain camera errors occur, the error message(s) will be shown on the screen. If the problem(s) cannot be solved at once, please contact your supplier for assistance VIDEO TYPE Select the video format (NTSC/PAL) and resolution (1920x1080/1280x720) that matches the present TV system. When you select the resolution as <1920x1080>, the frame rate will be 30 fps for the NTSC system, and 25 fps for the PAL system. As for <1280x720>, the frame rate will be 60 fps for NTSC system and 50 fps for PAL system DEFAULT CAMERA The DEFAULT CAMERA option is used to restore some camera settings back to default setting. The settings that are affected include Backlight, Focus, Exposure Compensation, AE, WBC, Aperture, Noise Reduction, IR Function, and WDR. Once any one of the items is modified, the setting will become <OFF> automatically. Select <ON> for this item to recall the mentioned camera parameters BACKLIGHT The Backlight Compensation function prevents the centre object from being too dark in surroundings where excessive light is behind the centre object. When you set this item to <ON>, the centre object will be brightened in contrast to the edge of the picture (where backlight would most likely be located). After completing the setup of backlight, go back to Main Page 1 and continue to set the focus values FOCUS The Dome Camera s focus can be operated in two modes: Manual Focus mode and Auto Focus mode. AUTO (AF MODE): There are three options available for the AF Mode, including Normal mode, Zoom Trigger (Z. TRIG.) mode and PTZ Trigger (PTZ TRIG.) mode. The submenu of AUTO is shown below: - Normal Mode: In this mode, the camera will stay focussed automatically and continuously in any condition. English 11
14 - Zoom Trigger Mode (Z. TRIG.): In this mode, AF is activated at the time when zoom is changed. - PTZ Trigger Mode (PTZ TRIG): In this mode, AF is triggered when the Dome Camera is set to pan, tilt or zoom. - EXIT+SAVE: Press <YES> to save the selected AF Mode. MANUAL: In this mode, users can adjust the focus to near/far via the control keyboard s Focus Near/Far key AE MODE Exposure is the amount of light received by the image sensor and is determined by how wide you open the lens diaphragm (iris adjustment), by how long you keep the sensor exposed (shutter speed), and by other exposure parameters. With this item, users can define how the Auto Exposure (AE) function works. EXPOSURE COMPENSATION: The exposure value ranges from -10.5dB to 10.5dB. Select <OFF> to disable this function. AE MODE: - AUTO: In this mode, the camera s Brightness, Shutter Speed, IRIS and AGC (Auto Gain Control) control circuits work together automatically to get consistent video output level. - SHUTTER: With this option, the Shutter speed takes main control of exposure. Bright Value, Iris and AGC will function automatically in cooperation with the shutter speed to achieve a consistent exposure output. The range of shutter speed starts from 1/10000 to 1/25 at PAL systems (NTSC: 1/10000 to 1/30). - IRIS: With this option selected the iris of the lens will control the exposure. Bright Value, Shutter Speed and AGC circuit will function automatically in cooperation with the Iris to get consistent exposure output. The opening of a lens controls the amount of light reaching to the surface of the selected device. By increasing the F-stop number (F1.6, F2, F2.4, etc.), less light is permitted to pass. The option range is from F1.6 to F28. - MANUAL: In this mode, users can adjust the Shutter Speed (NTSC: 1/10000 ~ 1/30, PAL:1/10000 ~ 1/25), the Iris Value (F1.6 ~ F28) and the Gain Value (-3dB ~ 28dB). EXIT & SAVE: Exit the AE FUNCTION menu and go back to the Main Page 1 to set the WBC mode. 12 English
15 WBC MODE To display natural colours, the camera needs to know the reference colour temperature of the light source. Based on this reference colour temperature the camera will calculate the correct values for all colours. The camera can perform a measurement by itself or the user can set up the reference colour temperature manually. The scale unit of the colour temperature is Kelvin [K]. The following list shows the colour temperature of some light sources for reference. Users can select one of the White Balance Control modes according to the operating environment. Light Sources : Cloudy Sky (Colour Temperature: 6,000 to 8,000 K) Noon Sun and Clear Sky (Colour Temperature: 6,500 K) Household Lighting (Colour Temperature: 2,500 to 3,000 K) 75-watt Bulb (Colour Temperature: 2,820 K) Candle Flame (Colour Temperature: 1,200 to 1,500 K) AUTO: In this mode, white balance works within its colour temperature range. This mode computes the white balance value output using the colour information from the entire screen. It outputs the proper value using the colour temperature radiating from a black subject based on a range of values from 3000K to 7500K. INDOOR: 3200 K Base mode. OUTDOOR: 5800 K Base mode. ATW (Auto Tracing White Balance): The Dome Camera takes out the signals in a screen in the range from 2500 K to K. MANUAL: In this mode, users can change the White Balance value manually. - R GAIN/ B GAIN: R gain and B gain are adjustable and range from 0 to EXIT & SAVE: After the parameter setups relevant for WBC are completed, please exit the WBC MODE menu and go back to Main Page 1 to continue to set other functions under the Setup Menu 1. English 13
16 SETUP MENU 1 In Setup Menu 1, users can set functions like Slow Shutter, Noise Reduction, Aperture and Video Type. Please refer to the following description for use of each function. SLOW SHUTTER: The shutter speed determines how long the image sensor is exposed to light. The Dome Camera will automatically adjust the shutter speed based on the light condition of the operating environment. With the Slow Shutter function, the camera will still produce a clear image in low light conditions under 0.1 lux. DIGITAL NOISE REDUCTION: With the Digital Noise Reduction (D.N.R.), the processor analyses pixel by pixel and frame by frame to eliminate environmental noise signal so that the highest quality image can be produced, even in low light conditions. IMAGE INVERSE: Users can select <ON> to make the displayed image inversed vertically and horizontally. Occasions to employ the function include conferences, demonstration, testing, etc. The default setting is <OFF>. - Application: Users can see the displayed images, when a dome is placed on top of a desk, for instance. APERTURE: Users can adjust the enhancement of the edges of objects in the picture. There are 16 levels of adjustment; the options are from <01> to <16>. <01> represents no enhancement. When shooting a text, this function can make the text sharp. EXIT: Exit the SETUP MENU 1 and go back to the MAIN PAGE 1 to set other functions under the Setup Menu SETUP MENU 2 In Setup Menu 2, users can set functions including Flip, Angle Adjuster, PT Position, Speed by Zoom, Auto Calibration, Password, OSD Auto Close, and System Reset. Please refer to the following description for use of each function. 14 English
17 FLIP: Users can track an object continuously when it passes through underneath the Dome Camera by setting Flip to IMAGE (digital flip) or M.E. (mechanical flip). - IMAGE: IMAGE represents a digital IMAGE FLIP, which enables users to keep tracking objects seamlessly. Under this mode, almost no delay occurs, in contrast to M.E. mode. NOTE: The Privacy Mask function will be automatically disabled if the Image Flip function is enabled, and the screen will show MASK WILL BE SET OFF. - M.E.: M.E. is a standard mechanical operation. As the Dome Camera tilts to the maximum angle, it will pan 180, and then continue tilting to keep tracking objects. - OFF: Select this item to disable the flip function. - EXIT & SET: Exit the <FLIP Setting> menu and go back to <SETUP MENU 2> to set other functions. NOTE: To make the Dome Camera tilt between a specific range, such as -10 to +100, please go to ANGLE ADJUSTER (see next section) to set the angle range of the tilt. Otherwise, the camera will tilt 90 as set in the default setting. ANGLE ADJUSTER: The item is for adjusting the angle range of tilt motion. The Range of tilt motion varies in different FLIP modes: the angle ranges from -10 to +100 in the M.E. FLIP and FLIP OFF modes and from -10 to +190 in the IMAGE FLIP mode. English 15
18 - EXIT & SET: Exit the <ANGLE ADJUSTER> menu and go back to <SETUP MENU 2> to set other functions. PT POSITION: PT Position can display the Pan/Tilt position of the Dome Camera on the screen. - PT DISPLAY: Turn the item to <ON> to display the pan/tilt position on the screen. The display format will be XX YYY/ YY. - SET PAN ZERO: By using the <SET PAN ZERO> function, the user can set the north direction as coordinate zero. The display will show eight different directions including N, E, S, W, NE, SE, SW, SN depending on the closest direction which the Dome Camera faces. The PAN range is from 0 to 359, and the TILT range is from 10 to After lower than -90, the PAN degree will be automatically added 180. Press <TO SAVE> to save the pan zero setting. - EXIT & SET: Exit the <PT POSITION> menu and go back to <SETUP MENU 2> to set other functions. SPEED BY ZOOM: If this item is set to <ON>, the pan/tilt speed will be adjusted by an internal algorithm when zooming automatically. A larger zoom ratio leads to a lower rotation speed. AUTO CALI. (Auto Calibration): There is one horizontal and one vertical infrared ray check point in each dome. When the dome camera s position is moved during installation or maintenance, the relative distance between the original set point and the check point can change. Enable the Auto Calibration function, so that the dome will automatically detect the distance change and reset the point back to the original position. 16 English
19 PASSWORD: The administrator can activate the OSD Password function for security concerns. Once the function is turned on, the users are required to enter the password every time when accessing the OSD menu. The password setting procedure is like the following: STEP 1: Choose a number with the direction keys and then press the <CAMERA MENU> key (ENTER) for input. For example: <0> <CAMERA MENU>, <1> <CAMERA MENU>, <2> <CAMERA MENU>, <3> <CAMERA MENU>. PASSWORD: 0123 STEP 2: In the second line, enter the same password again to confirm the setting. STEP 3: Move the cursor to <SAVE> and press <CAMERA MENU> to save the setting. STEP 4: Move the cursor to <EXIT> and press <CAMERA MENU to exit the password setting page. If the OSD Password function is enabled and you press the <CAMERA MENU> key to enter the OSD menu, the password request message will be displayed as shown below. Please enter the password, press <ENTER> to access the OSD main menu. NOTE: When you activate the Password Function for the first time, please enter first the following Master Password to be allowed to setup the new password. The Master Password is: OSD AUTO CLOSE: Users can specify the duration during which the OSD menu stays on the screen. The time selection ranges from 5 to 30 seconds. To let the OSD menu stay on the screen, please set this option to OFF. SYSTEM RESET: Two types of system reset can be implemented under this item: - SYSTEM RESET: Select this function for system reboot. Press ENTER and the system reboot will start. English 17
20 - DEFAULT SYSTEM: This function allows users to restore the camera to its factory default state. Press ENTER to start the reset. EXIT: Exit the SETUP MENU 2 and go to MAIN PAGE 2 to set other functions ID DISPLAY Press the direction key down to turn the MAIN MENU page from 1 to 2, afterwards the menu item <ID DISPLAY> will be shown on the top. Users are allowed to choose whether the Dome Camera s ID will be displayed on the screen for identifying the domes. For more information, please refer to chapter 4.4. ID Configuration. ON: Display the ID of the selected dome at the right bottom of the monitor screen. OFF: Hide the ID of the selected dome TITLE DISPLAY Users are allowed to name a certain view area and display its title for easy recognition. With this item, users can choose to display or not to display the titles set in advance. ON: A title set for a certain view will be displayed when the dome stays in the view area. OFF: When the TITLE DISPLAY is set to <OFF>, no title will be displayed on the screen, even when titles were set in advance TITLE SETTING Up to 16 zone titles can be set with max. 20 characters for each title. Follow the steps below to set a camera title. 18 English
21 STEP 1: Move the dome to a view area for which you want to set a title. STEP 2: Access the OSD menu, go to MAIN PAGE 2 and select <TITLE SETTING>. STEP 3: Select a number that will represent the view area. STEP 4: Press the <CAMERA MENU> key (ENTER) to go to the editing page. STEP 5: Choose a character with the direction keys and then press the <CAMERA MENU> key (ENTER) for input. For example: <A> <CAMERA MENU>, <B> <CAMERA MENU>, <C> <CAMERA MENU> TITLE: ABC STEP 6: To delete the input characters, move the cursor to <DELETE> and press <CAMERA MENU> to delete the selected character. STEP 7: When the setting is completed, move the cursor to <SAVE> and press <CAMERA MENU> to save. After completing the title setting, go back to MAIN PAGE 2 to set up preset points PRESET STEP 1: Press the RIGHT/LEFT direction key on the keyboard to select a number (1 represents Preset Point 1, 2 represents Preset Point 2, etc.) PRESET SET: In total, 256 preset points can be set. Follow the steps below in the preset setting menu. STEP 2: Press the <CAMERA MENU> key (ENTER) on the keyboard, and then rotate the dome camera to a target shooting area/point. STEP 3: Press the <CAMERA MENU> key again to save the defined preset point. Once the setup of a preset point is completed, users can move the cursor to the next item to run the preset point. PRESET RUN: Press the <CAMERA MENU> key (ENTER), and the camera will go to the appointed point. To run another defined preset point, simply press the right/left key on the keyboard, select the preset point to which you want to go to, and press the <CAMERA MENU> key (ENTER) again. English 19
22 EXIT: Exit the PRESET menu and go back to MAIN PAGE 2 to set up a sequence. NOTE: Users can set preset points through a keyboard. Please refer to the control keyboard s quick guide for further information SEQUENCE The function executes the pre-positioning of the pan, tilt, zoom and focus features in a certain sequence for a camera. Before setting this function, users must preset at least two preset points. SEQUENCE LINE: Up to eight sequence lines can be configured in this Camera. Please use the LEFT/RIGHT direction keys to first select a line and then set its sequence points. SEQUENCE POINT: Up to 64 points can be set up for each Sequence line. The Sequence Points represent the order of the preset points that the Dome Camera will automatically run. The following setup items, including Preset Position, Speed and Dwell Time, will influence how the camera runs through each sequence point. PRESET POSITION: Users can assign a specific preset position to the selected Sequence Point with this item. The available options are from <1> to <255> and <END>. <END> is used for the Sequence Point following the last Sequence Point when the amount of sequence points (please refer to the previous section) is less than 64 points. NOTE: If you are not using all 64 points, please set the point following the last Sequence Point as <END> (PRESET POSITION) so that the sequence line can work properly. For example, if a user intends to set a Sequence Line with 5 sequence points. It is required to set the PRESET POSITION of Sequence Point 06 as <END>. SPEED: Users can set the pan/tilt speed of the Dome Camera from one Sequence Point to the next one. There are steps from 1 to 15 to define the speed the Dome Camera will use to move to the next Preset. Within this range, the PAN speed varies from 10 to 400 (degree/sec.), and the TILT speed varies from 8 to 400 (degree/sec.). DWELL TIME: The DWELL TIME is the duration time during which the Dome Camera will stay at a Sequence Point, and the range is from <000> to <127> seconds. The Dome Camera will go to the next sequence point when the DWELL TIME expires. If the setting is <000>, the Dome Camera will stay at this Sequence Point for less than 1 second and then shift to the next point. RUN SEQUENCE: Users can command the Dome Camera to run the selected Sequence line manually. Press the <CAMERA MENU> key (ENTER) to execute a sequence line. EXIT: Select this item to exit the SEQUENCE menu and go back to MAIN PAGE 2 to set up an Auto Pan. NOTE: Users can execute the sequence function through a keyboard. Please refer to the control keyboard s quick guide for further information. 20 English

23 AUTOPAN To execute Auto Pan means scanning an area horizontally so that the Dome Camera can catch a horizontal view. The parameters are listed as follows. AUTOPAN LINE: Up to eight auto pan lines can be configured in this Camera. Users can choose to execute a line by using the LEFT/RIGHT direction keys. In addition, users are able to command the Dome Camera to do endless panning by setting the start point just like the end point. START POINT: Follow the description below to set the start position of the AUTOPAN path. STEP 1: Move the cursor to <START POINT> and press <ENTER> while the item <PT MOVE> is flashing. Then the item will turn to <TO SAVE> automatically. STEP 2: Move the Dome Camera to a desired position and press <ENTER> to save the position as the start point; the cursor will move to <END POINT> automatically. Make sure to set the end point to complete the Auto Pan setting. NOTE: The tilt and zoom values of the start point will be recorded and fixed for the selected Auto Pan line. END POINT: Users are able to set the end point after the start point is defined. Pan the Dome Camera to another position and press <ENTER> to save the position as the end point. DIRECTION: This item is for setting the AUTOPAN direction of the Dome Camera. The camera will start to pan clockwise from the start point to the end point if your selection is <RIGHT>, and then return to the start point. The dome will start to pan anti-clockwise from the start point to the end point if your selection is <LEFT>. Please refer to the diagram below. SPEED: This item is for defining the Dome Camera rotation speed while running an Auto Pan. The speed is adjustable from 1 to 4 (10 ~ 45 degrees/sec.). English 21
24 RUN AUTOPAN: After all settings related to Auto-Pan are completed, select this item to execute the Auto-pan function. Press the <CAMERA MENU> key (ENTER) to run an Auto-Pan path. EXIT: Exit the AUTOPAN setup menu and go back to MAIN PAGE 2 to set up a cruise. NOTE: Users can execute the Auto Pan function through a keyboard. Please refer to the control keyboard s quick guide for further information CRUISE CRUISE is a route performed through manual operation, i.e. through adjusting the pan and tilt position manually. A saved Cruise can be recalled repeatedly, which means this Cruise can be executed time and time again when necessary. CRUISE LINE: Up to eight cruise lines can be configured in this Camera. Please use the LEFT/RIGHT direction keys to first select a line and then follow the steps below to start recording the cruise path. RECORD START: Follow the description below to record a CRUISE path. STEP 1: Rotate the Dome Camera to a desired view area (for some protocols, users may need to do it before entering the OSD menu), and press <ENTER> to perform a cruise path using the joystick on the control device. The already used up percentage of the memory buffer will be displayed on the screen. STEP 2: Pan and tilt the Dome Camera to form a path. NOTE: Beware of the memory size when building a Cruise route. Once the buffer percentage reaches 100%, the recording of the path will stop. RECORD END: The cursor will be moved to RECORD END while creating the cruise line; when the setting is completed, press <ENTER> to save the path. RUN CRUISE: After the cruise setting is completed, press the <CAMERA MENU> key (ENTER) to run the defined Cruise path. EXIT: Exit the CRUISE setup menu and go back to MAIN PAGE 2 to set up a home setting. NOTE: Users can also execute the cruise function through a keyboard. Please refer to the control keyboard s quick guide for further information. 22 English
25 HOME SETTING Users are able to set an operation mode to ensure constant monitoring. If the Dome Camera idles for a period of time, the selected function will be activated automatically; this is the HOME function. The HOME function allows constant and accurate monitoring to avoid that the Dome Camera stops or misses events. HOME FUNCTION: The item is used to enable or disable the HOME function. Use the left/right direction keys of the control keyboard to change the setting. SELECT MODE: Select one of the modes that the Dome Camera should execute when the HOME function is enabled and the RETURN TIME is up. The options include <AUTOPAN>, <SEQUENCE>, <CRUISE> and <PRESET>. Use the LEFT/RIGHT direction keys on the control keyboard to change the setting, and the items mentioned below will change in cooperation with your selection. - PRESET POINT: Select a Preset Point to which the Dome Camera should go after the Return Time function, which will be explained later, is activated. The preset point(s) should be set in advance, either in the PRESET setup menu or through the keyboard. - SEQUENCE LINE: Select a Sequence Line that the Dome Camera should execute when an alarm is triggered. The Sequence Line(s) should be defined in advance in the SEQUENCE setup menu. - AUTOPAN LINE: Select an Auto Pan Line that the Dome Camera should execute when an alarm is triggered. The Auto Pan Line(s) should be defined prior in the AUTOPAN setup menu. - CRUISE LINE: Select a Cruise Line that the dome camera should execute when an alarm is triggered. The Cruise Line(s) cshould be defined prior in the CRUISE setup menu. RETURN TIME: The Dome Camera starts to count down the selected RETURN TIME when the camera idles, and it will execute the SELECT MODE function if the return time is up. The RETURN TIME ranges from 1 to 128 minutes. GO: If the HOME function is enabled, the users are allowed to execute the HOME function manually by selecting this item. English 23
26 EXIT: Exit the HOME SETTING menu. Then go to MAIN PAGE 3 to carry on with other setups IR FUNCTION With the IR cut filter, the Dome Camera can still catch a clear image at night time or in a very dark light condition. During day time, the IR cut filter will be on to block the infrared light for a clear image. During night time or in dark light condition, the IR cut filter will be removed to catch infrared light, and the displayed images will become black and white. AUTO: The Internal circuit will automatically decide to remove the IR cut filter according to the light condition calculated by the internal light algorithm. - THRESHOLD: The Dome Camera will remove the filter immediately when the threshold value is reached. The threshold options are <LOW>, <MID> and <HI>. <LOW> threshold indicates a higher sensitivity and can improve reliability of the lens so that it is easier to switch to Day mode and relatively difficult to change into Night mode. While <HI> indicates that it is easier to switch to Night mode and difficult to change into Day mode. MANUAL: - IR MANUAL ON: Select the item to remove the IR cut filter. The camera will change to B/W (Night) mode. - IR MANUAL OFF: Select the item to attach the IR cut filter; the camera will be in Colour (Day) mode to disable the IR function. EXIT & SAVE: Exit the <IR FUNCTION> menus and go back to <MAIN PAGE 3> to set other functions ALARM SETTING The Motordome Camera provides four alarm inputs and two alarm outputs (N.O. and N.C.) to connect alarm devices. With this function, the Motordome Camera will cooperate with the alarm system to catch the images of an event. For wiring, please refer to chapter section 4. Installation and/or qualified service personnel. The adjustable alarm parameters are listed below. 24 English

27 ALARM PIN: The dome provides 4 alarm inputs and 2 outputs (N.O. or N.C.). Select an alarm connector of which you want to set the alarm-related parameters, and then set its alarm-related parameters in the Alarm Setting menu. For alarm pin definitions, please refer to chapter 4.7. Alarm Application. NOTE: If two or more alarm pins are triggered at the same time, a smaller alarm pin number will have higher priority of being handled. For example, if Alarm-1 and Alarm-3 are triggered simultaneously, only Alarm-1 will actually be handled. ALARM SWITCH: This item is used to enable or disable the selected alarm pin function. Use the LEFT/RIGHT direction keys on the control keyboard to change the setting. ALARM TYPE: There are two kinds of alarm types: Normal Open and Normal Close, which are illustrated below. Select an alarm type that corresponds with your alarm application. ALARM ACTION: The alarm actions include PRESET, SEQUENCE, AUTOPAN and CRUISE functions. Select one of these modes for a certain action to be executed when an alarm is triggered. Use the RIGHT direction key of the control keyboard to select a particular action mode. The items listed below will change according to your selected alarm action. Additionally, when an alarm is triggered, there the flash warning notice "ALARM" will be displayed in the upper right corner of the screen. NOTE: After an alarm condition (Dwell Time Setting: 1~127 seconds/ ALWAYS) was released, the Dome Camera will go back to the previous status before an alarm was triggered. - PRESET POINT: Select a Preset Point to which the Dome Camera should go when an alarm is triggered. The preset point(s) should be set in advance, either in the PRESET setup menu or through the keyboard. - SEQUENCE LINE: Select a Sequence Line that the Dome Camera should execute when an alarm is triggered. The sequence line(s) should be defined in advance, either in the SEQUENCE setup menu or through the keyboard. - AUTOPAN LINE: Select an Auto Pan Line that the Dome Camera should execute when an alarm is triggered. The Auto Pan Line(s) should be defined in advance, either in the AUTOPAN setup menu or through the keyboard. - CRUISE LINE: Select a Cruise Line that the Dome Camera should execute when an alarm pin is triggered. The Cruise Line(s) should be defined in advance, either in the CRUISE setup menu or through the keyboard. English 25
28 DWELL TIME: The DWELL TIME is the duration during which an alarm action is executed. If the PRESET mode is selected when an alarm takes place, the Dome Camera will go to the selected preset position and stay there for a user-defined period of time (1 ~ 127 seconds/always) when an alarm takes place. If other modes (SEQUENCE/AUTOPAN/CRUISE) have been selected, the camera will keep executing the selected mode (DWELL TIME: ALWAYS) until the alarm condition is released or the users rotate the joystick to change the status of the Dome Camera. NOTE: The dwell time is only adjustable when Preset is selected as the alarm action. When the dwell time is up, the Dome Camera will go back to the trigger position and recheck the alarm pin status. ALARM PRIORITY: Set the alarm priority from <1> to <4> for each alarm pin. If two or more alarms are triggered at the same time, a smaller alarm priority number will have higher priority of being handled. The default alarm priority is <1>. ALARM OUTPUT: Here you can define which Alarm Out output will be triggered when an event happened. - OFF: Both outputs are disabled - 1: The output no. 1 will be triggered - 2: The output no. 2 will be triggered - BOTH: Both outputs will be triggered EXIT: Exit the <ALARM SETTING> menu and go back to <MAIN PAGE3> to carry on with other setups WDR FUNCTION The Wide Dynamic Range (WDR) function is especially effective in solving indoor and outdoor contrast issues to enhance better image quality and video display. It enables the Dome Camera to catch detailed data from the dark part (Indoor) without any saturation from the bright part (Outdoor). NOTE: The Backlight function will be turned off automatically when the WDR function is enabled because the WDR function has better effects than Backlight Compensation. - ON: Activate the WDR function by selecting this option. In this mode, the Dome Camera will operate the WDR function automatically. - OFF: Deactivate the WDR function. Exit the WDR FUNCTION menu and go down in to MAIN PAGE 3 to set up a Privacy Mask. 26 English
29 PRIVACY MASK The Privacy Mask function aims to avoid any intrusive monitoring. Users can adjust the camera view position using the joystick, and adjust the mask size and area via the direction keys on the control keyboard. When setting a mask, it is suggested to set it at least twice bigger (height and width) than the masked object. The Dome Camera will assume that the center of the selected view is the starting point, and the joystick will be locked as users enter the SET MASK menu (this will be explained later). Please refer to the following description for setting privacy masks. NOTE: The Image Flip function will be disabled automatically while the Privacy Mask function is enabled. PRIVACY SWITCH: Users can enable or disable the Privacy Mask function through this item. Set this item to <ON> before configuring mask zones. TRANSPARENCY: The colour of a privacy mask can be set as transparent. Select <ON> to display transparent masks. COLOR: The colour of a privacy mask can be set through this item. The available colours are black, white, red, green, blue, cyan, yellow and magenta. SET MASK: Use the control device to move the Dome Camera to the area where you want to set a mask. Press <ENTER> to enter the mask setting menu. The dome will memorise the present position as a privacy mask position. Up to 16 masks can be set. - H CENTER: The original horizontal centre of a mask zone is the centre of a screen. It is possible to move a mask zone to another position by adjusting the horizontal value with the LEFT/RIGHT direction keys on the keyboard. The camera will pan right or left according to user s control. - V CENTER: The original vertical centre of a mask zone is the center of a screen. It is possible to move a mask zone to another position by adjusting the vertical value with the LEFT/RIGHT direction keys on the keyboard. The camera will tilt up or down according to the user s control. English 27
30 - H SIZE (00~80): Users can adjust the horizontal size of a privacy mask through this item. Setting the H and V size to 0 can delete the selected mask. - V SIZE (00~60): Users can adjust the vertical size of a privacy mask through this item. Setting the H and V size to 0 can delete the selected mask. - EXIT & SAVE: Exit the <SET MASK> menu and save the settings. CLEAR MASK: Users can delete a preset mask zone with this item. Please follow the steps listed below. STEP 1: Select the mask zone that is to be erased (e.g. 01). STEP 2: Press <ENTER> to confirm your selection. EXIT: Exit the PRIVACY MASK menu and go back to MAIN PAGE 3 to carry on with the time related setup TIME SETTING The time setting function is used to set the TIME related parameters of the Motordome Camera. Each item in the menu is listed as follows. TIME DISPLAY: Select <ON> to display Time information on the screen or <OFF> not to display this information. SET YEAR / MONTH / DAY: These items are for setting up the system date. SET HOUR / MINUTE: These items are for setting up the system time. EXIT+SAVE: Exit the TIME SETTING menu and go back to MAIN PAGE 3 to set up a schedule. 28 English
31 SCHEDULE FUNCTION The schedule function enables users to program the performance of a preset point or function (Sequence/Auto Pan/Cruise) automatically, in a specific period of time. SWITCH: Select <ON> to enable or <OFF> to disable the schedule function. POINT: Users are allowed to arrange 32 sets of schedule points, i.e. to each set of schedule points, one kind of schedule mode can be assigned. HOUR / MINUTE: These items are for setting up the time in which each schedule point is to be executed. MODE: This is for setting the schedule function of the selected schedule point. The options are listed as follows. - NONE: No action will be executed for the schedule if this item is selected. - PRESET: Users can select the PRESET mode as an action carried out in a schedule point. - SEQUENCE: Users can select the SEQUENCE mode as an action carried out in a schedule point. - AUTOPAN: Users can select the AUTOPAN mode as an action carried out in a schedule point. - CRUISE: Users can select the CRUISE mode as an action carried out in a schedule point. - IR FUNC. (IR Function): If the IR function mode is selected, the AUTO IR FUNCTION will be activated for a schedule point. SCHEDULE RESET: Users can reset the whole schedule with this item. EXIT: Exit the SCHEDULE menu and go back to MAIN PAGE EXIT OSD To exit the OSD setup menu, users can select this item at the bottom of MAIN PAGE 1 and MAIN PAGE 2. English 29

32 6. Switch Settings Index Table Please refer to the switch settings below for the Dome Camera s ID and protocol setup. 30 English

33 English 31

34 32 English

35 English 33

36 34 English

37 English 35

38 36 English
39 Specifications GCH-K0274P Image Sensor Pixels - Total Pixels - Effective Scanning System Image Size 1/2.8" Progressive Scan CMOS, 3 Megapixels 2144(H) x 1588(V), 3.40M pixels 2080(H) x 1553(V), 3.23M pixels Progressive 1920x1080, 1280x720 Frame Rate 25 fps (1920 x 1080), 50 fps (1280 x 720) Sensitivity Colour 0.3 Lux@F1.6 (IRE30) Sensitivity B&W 0.04 Lux@ F1.6 (IRE30) Col/B&W On/Off/Auto High Speed Shutter 1/30 ~ 1/ sec Focal Length 4.7 ~ 84.6 mm Zoom Ratio x 18 Focus Operation Auto, Manual Iris Operation Auto, Manual Pan Range 360 (Endless) Tilt Range -10 ~ 190 Pan Speed Manual: 0.5 /s ~ 90 /s, Preset: 400 /s (max.) Tilt Speed Manual: 0.5 /s ~ 90 /s, Preset: 400 /s (max.) Range Panning 360 endless Presets 256 PTZ Control Pan & Tilt speed proportional to Zoom ratio (On/Off) Protocol Pelco D, Pelco P,... Serial Interface(s) RS-485 PTZ Control Auto PAN, Preset,Sequence and Cruise Function Support Alarm Inputs 4 Alarm Outputs 2 OSD Yes Number of Privacy Zones 16 BLC On/Off AGC Auto, Manual Digital Noise Reduction (DNR) On/Off White Balance Auto, Manual, Indoor, Outdoor, ATW Protection Rating IP66 Operating Temperature -40 C ~ +50 C Humidity 10 ~ 90% no condensation Supply Voltage 24 VAC Power Consumption 65 W Weight 2.4 kg Dimensions (wxhxd) Ø x mm English 37
40 EC Declaration of Conformity GCH-K0274P 2 Megapixel Full HD Outdoor Motorised Dome SDI-Camera 18x Zoom ICR WDR It is hereby certified that the products meet the standards in the following relevant provisions: EC EMC Directive 2004/108/EC Low Voltage Directive 2006/95/EC Applied harmonised standards and technical specifications: EN 55022: 2006/A1: 2007 (Class A), IEC/EN : 2006/A2: 2009, IEC/EN : 2008 AS/ NZS CISPR22: 2009 (Class A) EN : 1995 /A1: 1998/ A2: 2003, IEC : 2008 IEC : 2010 IEC : 2010 IEC : 2005 IEC : 2008 IEC : 2004 Mains Supply Voltage Variations ASP AG Lüttringhauser Str Remscheid Germany Remscheid, Ludwig Bergschneider CEO 38 English
SDI Speed Dome Camera OSD Menu
 SDI Speed Dome Camera OSD Menu Indoor/ Outdoor Ver 1.2 00P9SH720ZXSEA2 Table of Contents 1. OSD Menu Tree...4 2. Configuration Menu...7 2.1 VIDEO TYPE...8 2.2 DEFAULT CAMERA...8 2.3 BACKLIGHT...8 2.4 FOCUS...8
Owner's Manual HD-SDI Cameras & Domes
 Owner's Manual HD-SDI Cameras & Domes GCH-K0305B 2 Megapixel Full HD CMOS Box HD-SDI Camera ICR WDR GCH-K0305B.43.1.14.03.2012 ASP AG Content: 1. Introduction 1 2. Important Safety Instructions 1 3. Package
Owner s Manual Motorized Dome Cameras
 Owner s Manual Motorized Dome Cameras GCA-C0245P GCA-C0345P Motorized Dome Day/Night Camera, 36x Zoom, WDR Motorized Dome Day/Night Camera, 36x Zoom, WDR GCA-C0245P.13.1.15.08.2011 ASP AG Content: 1.
Owner's Manual. HD-SDI Cameras & Domes. 2 Megapixel Full HD CMOS Box HD-SDI Camera GCH-K0302B ASP AG
 Owner's Manual HD-SDI Cameras & Domes EN GCH-K0302B 2 Megapixel Full HD CMOS Box HD-SDI Camera GCH-K0302B.65.1.24.07.2012 ASP AG Content: 1. Introduction 2 2. Important Safety Instructions 2 3. Package
Preface Notice Important Information Copyright Regulation
 f 0 Preface The information provided in this manual was current when published. The company reserves the right to revise and improve its products. All specifications are subject to change without notice.
Owner's Manual. HD Video Cameras. 2 Megapixel Full HD CMOS Box Ex-SDI Camera ICR WDR GCH-K1305B ASP AG
 Owner's Manual HD Video Cameras EN GCH-K1305B-1 2 Megapixel Full HD CMOS Box Ex-SDI Camera ICR WDR GCH-K1305B-1.164.1.18.06.2015 ASP AG Content: 1. Important Safety Instructions 1 2. Package Contents
/6\r4. English Version 1.1
 /6\r4 English Version 1.1 Preface The information provided in this manual was current when published. The company reserves the right to revise and improve its products. All specifications are subject to
CM-Z2212GY. Outdoor IR Speed Dome PTZ Camera
 Outdoor IR Speed Dome PTZ Camera User s Guide CM-Z2212GY 1201-1205, Sangda Mansion, High Technology Park, SAFETY PRECAUTIONS WARNING 1. Be sure to use only the standard adapter that is specified in the
EPTZ9200 / EPTZ9200i Speed Dome Camera
 EPTZ9200 / EPTZ9200i Speed Dome Camera AHD 1080p Outdoor / Indoor PTZ with True Day / Night and WDR (20x Optical Zoom) Features AHD Resolution 1080p / 720p and SD Output 20x Optical Zoom Lens UTC & RS-485
HD Mini Square Camera. Key Features
 HD Mini Square Camera 1080p (1920 x 1080) @ 30fps (Standard) Easy Installation (HD Over Coax (BNC)) Board Lens f= 3.6mm or 6.0 mm HD-SDI (Serial Digital Interface Type Video Output) Selectable TV Out (NTSC
GV-SD2322-IR (22x) Outdoor Low Lux IR IP Speed Dome
 Outdoor Low Lux IR IP Speed Dome") - 1 - GV-SD2322-IR (22x) Outdoor Low Lux IR IP Speed Dome 1/2.8" progressive scan low lux CMOS sensor Min. illumination at 0.01 lux (B/W) and 0.03 lux (color) Triple streams from H.264 and MJEPG Up to
- 1 - GV-SD2322-IR (22x) Outdoor Low Lux IR IP Speed Dome 1/2.8" progressive scan low lux CMOS sensor Min. illumination at 0.01 lux (B/W) and 0.03 lux (color) Triple streams from H.264 and MJEPG Up to
EYEMAX 2MP IR 25X Optical True WDR Starlight PTZ Camera
 1/2.8" 2Megapixel STARVIS CMOS Powerful 25x optical zoom Starlight technology 120dB true WDR 3D DNR Max. 25/30fps@1080P 25/30/50/60fps@720P IR distance up to 100m IP66 System Overview Featuring with powerful
GV-SD3732-IR (33x) 3 MP H.265 Low Lux WDR Pro Outdoor IR IP Speed Dome
 3 MP H.265 Low Lux WDR Pro Outdoor IR IP Speed Dome") - 1 - GV-SD3732-IR (33x) 3 MP H.265 Low Lux WDR Pro Outdoor IR IP Speed Dome 1/2.8" progressive scan low lux CMOS sensor Min. illumination at 0.03 lux (B/W) and 0.05 lux (color) Triple streams from H.265,
- 1 - GV-SD3732-IR (33x) 3 MP H.265 Low Lux WDR Pro Outdoor IR IP Speed Dome 1/2.8" progressive scan low lux CMOS sensor Min. illumination at 0.03 lux (B/W) and 0.05 lux (color) Triple streams from H.265,
Analog Speed Dome. New 1/4 Sensor. Privacy Masking. Multi-Protocol Telemetry. IP66 Protection. Designed For Constant Use.
 Professional Surveillance Solutions Analog Speed Dome Orion 3 Series 600 TVL 36x Zoom Lens 3.4-122.4mm lens Mechanical IR-cut Filter 400 Degrees Per Second PTZ with 256 Pre-Sets Multi-Protocol including
HuddleCamHD 10X-USB2
 HuddleCamHD 10X-USB2 USB 2.0 PTZ CAMERA INSTALLATION & OPERATION MANUAL Please check HUDDLECAMHD.com for the most up to date version of this document Precautions. Safety Tips. Please read this manual carefully
HD-TVI 1080P (2MP) Outdoor IR PTZ Dome Camera w/ 30 Optical Zoom
 Outdoor IR PTZ Dome Camera w/ 30 Optical Zoom") TVI (Transport Video Interface) 2MP (1080P) 30 Optical Zoom f=4~120mm Pelco D/P up to 120m (approx. 394ft) IR Distance High speed 300 rotation Heater & Blower UTC support D-WDR AC 24V Wall and Ceiling
TVI (Transport Video Interface) 2MP (1080P) 30 Optical Zoom f=4~120mm Pelco D/P up to 120m (approx. 394ft) IR Distance High speed 300 rotation Heater & Blower UTC support D-WDR AC 24V Wall and Ceiling
Xvision AHD 2.0 Professional Camera Range XHD. OSD Guide. Thank you purchasing your Xvision AHD 2.0 camera from Xvision.
 XHD XHD XHD XHD HD 1080P Xvision AHD 2.0 Professional Camera Range OSD Guide Thank you purchasing your Xvision AHD 2.0 camera from Xvision. Please ensure that you read and understand this OSD Guide before
DS-2AF7264/7268-AW. High Definition IR Wiper PTZ Dome Camera
 DS-2AF7264/7268-AW High Definition IR Wiper PTZ Dome Camera Key features IR function: 0 Lux minimum illumination Up to120m IR distance IR light MTBF reaching up to 30,000 hours System function: SONY high
CM55-VCU USB 3.0 HD PTZ Camera User Manual v2.1
 CM55-VCU USB 3.0 HD PTZ Camera User Manual v2.1 www.avonic.eu 1 Safety Notes Before installing the device, please read this manual carefully and follow instructions indicated to ensure proper operation.
DS-2AF7023I. H Series IR Analog PTZ Dome Camera
 DS-2AF7023I H Series IR Analog PTZ Dome Camera Key features IR function: 0 Lux minimum illumination Up to 150m IR distance IR light MTBF reaching up to 30,000 hours System function: 1/3 high performance
Owner's Manual Digital Recording Systems
 Owner's Manual Digital Recording Systems GKB-A0110M Keyboard with 3D joystick GKB-A0110M.62.1.04.06.2012 ASP AG Content: 1. Introduction 1 2. Key Features of the Keyboard 2 3. Important Safety Instructions
Camera Installation Manual Ver 1.0. Pan, Tilt and Zoom Dome Camera / PTZ
 Camera Installation Manual Ver 1.0 1 Introduction Features 3 Components 4 System Configuration 5 2 Installation Wall Mount 6 Ceiling Mount 7 Final Assembly 8 3 Camera Addressing Camera Address Setting
TruVision HD-TVI (1080P) / Analog Wedge Camera Configuration Manual
 / Analog Wedge Camera Configuration Manual") TruVision HD-TVI (1080P) / Analog Wedge Camera Configuration Manual P/N 1073421-EN REV B ISS 13JUL18 Copyright Trademarks and patents Contact information and manuals / tools / firmware 2018 United Technologies
TruVision HD-TVI (1080P) / Analog Wedge Camera Configuration Manual P/N 1073421-EN REV B ISS 13JUL18 Copyright Trademarks and patents Contact information and manuals / tools / firmware 2018 United Technologies
HDC-SDOMEO51MIR-B USER MANUAL. HD Portable Rugged PTZ Cameras
 HDC-SDOMEO51MIR-B USER MANUAL HD Portable Rugged PTZ Cameras Safety Notes Thank You for Choosing Our HD table Rugged PTZ Camera! When you open the box: 1. Check that the packing and the contents are not
DS-2AF5023. H Series 5 Inch Analog PTZ Dome Camera
 DS-2AF5023 H Series 5 Inch Analog PTZ Dome Camera Key features System function: 1/3 high performance CCD ±0.1 Preset Accuracy Self-adaptive to HIKVISION, Pelco-P/D protocol 3D intelligent positioning function
HD SDI 1080P ICR OSD 42 IR Vandal Dome Camera
 HDVDX42-4AVF HD SDI 1080P ICR OSD 42 IR Vandal Dome Camera Optional Bracket MB-4VD USER MANUAL FEATURES SDI 1080P - 1920 x 1080, 30fps, 2.0 Megapixel 1/2.8 2.0 Megapixel Progressive Scan CMOS 3.3mm~12mm
1080p HDcctv PTZ Camera
 1080p HDcctv PTZ Camera 1920 x 1080 (1080p@30fps), 1280 x 720 (720p@60fps) 120X Zoom (12X Optical, 10X Digital) Auto-focus, WDR (Wide Dynamic Range), BLC/HSBLC, 3DNR(Digital Noise Reduction) HD-SDI (Serial
SPD hour All-Round Surveillance PTZ (25X) High Speed Color Dome Camera
 High Speed Color Dome Camera") SPD-2500 24-hour All-Round Surveillance PTZ (25X) High Speed Color Dome Camera www.samsungcctv.com www.webthru.net Broaden your surveillance with the Samsung SPD-2500. See how one speed dome camera can
SPD-2500 24-hour All-Round Surveillance PTZ (25X) High Speed Color Dome Camera www.samsungcctv.com www.webthru.net Broaden your surveillance with the Samsung SPD-2500. See how one speed dome camera can
VITEK VTD-IR2811DN FEATURES: 1/3 Color CCD with 560 TV of Lines Resolution (600 TV Lines in B/W mode)
") VTD-IR2811DN 560 TV Line Indoor Day/Night IR Dome Camera VITEK FEATURES: 1/3 Color CCD with 560 TV of Lines Resolution (600 TV Lines in B/W mode) 20 Infrared LEDs enable Viewing in Total Darkness up to
VTD-IR2811DN 560 TV Line Indoor Day/Night IR Dome Camera VITEK FEATURES: 1/3 Color CCD with 560 TV of Lines Resolution (600 TV Lines in B/W mode) 20 Infrared LEDs enable Viewing in Total Darkness up to
INSTRUCTION MANUAL Ver 3.0. Indoor Pan, Tilt and Zoom Dome Camera / ACD-1000-LG27
 INSTRUCTION MANUAL Ver 3.0 Indoor 1 Introduction Features 3 Components 4 System Configuration 5 2 RS485 and PTZ Basics Physical Connection 6 Multiple PTZ Setup 7 ID, Protocol, Baud Rate 9 3 Installation
Supplied Accessories.
 Precautions. Safety Tips. Please read this manual carefully before using the camera. Avoid damage from stress, violent vibration or liquid intrusion during transportation, storage or installation. Take
ST-PTZ High-Speed Intelligent Dome PTZ Color Camera
 INSTALLATION MANUAL ST-PTZ550-27 High-Speed Intelligent Dome PTZ Color Camera Copyright North American Cable Equipment, Inc. 1 PACKAGE CONTENTS This package contains: One ST-PTZ550-27 high-speed intelligent
SVD-4120A SSNR Low Light, WDR, Day & Night Vandal-Proof Color Dome Camera
 Low Light, WDR, Day & Night Vandal-Proof Color Dome Camera SVD-4120A www.samsungcctv.com Built-in chip Originally Developed by Samsung Techwin Crisp and clear images in any light Samsung Techwin's new
Supplied Accessories.
 Precautions. Safety Tips. Please read this manual carefully before using the camera. Avoid damage from stress, violent vibration or liquid intrusion during transportation, storage or installation. Take
Professional Pan Tilt Zoom Camera ST-HD-PTZ-2MP INSTALLATION MANUAL
 Professional Pan Tilt Zoom Camera ST-HD-PTZ-2MP INSTALLATION MANUAL www.nacebrands.com www.securitytronix.com Description: The ST-HD-PTZ-2MP is a professional-grade intelligent dome color camera with Pan/Tilt/Zoom
DynaHawk TM 701/801 Series Integrated High Speed Dome Camera. Calibration. Scheduling. Speed Day/Night WDR Protocols Privacy.
 DynaHawk TM 701/801 Series Integrated High Speed Dome Camera AUTO Calibration Scheduling 400 Speed Day/Night WDR Protocols Privacy AllWeather Network Features New PRECISE AND ACCURATE TRACKING Scheduling
DANNOVO HD USB 3.0 PTZ Video Conference Camera User Manual
 DANNOVO HD USB 3.0 PTZ Video Conference Camera User Manual V 2.3(ENGLISH VERSION) Please read this Manual before set up Camera, and stick to its requirements strictly for Safety reason. Suggest you save
Quick Start Guide. Thank you for purchasing our products. Please read the cut-sheet carefully before operating. Safety Precaution
 Quick Start Guide Item Number: IV-BV7660IR-AHDM Thank you for purchasing our products. Please read the cut-sheet carefully before operating. Safety Precaution Warning * To prevent fire or shock hazard,
HD SDI 1080p WDR DNR 24 IR OSD Bullet Camera
 HD21B24-940 HD SDI 1080p WDR DNR 24 IR OSD Bullet Camera USER MANUAL FEATURES SDI 1080p - 1920 x 1080 1/2.9" Sony Exmor 4.0mm Fixed Lens 0.5 Lux 24 IR LED IR distance up to 50ft / 24m 700mA max 12V DC
dome camera. Image Inverse feature
 is the smart high speed dome camera which is built on quality and performance by GE specifically for Asia market. It is available with 35 optical zoom, high-resolution 540 TV lines, and advanced features.
Vandal Proof Mini Speed Dome Camera
 Integrated High Speed Dome Vandal Proof Mini Speed Dome Installation Accessories CCTV System Control Keyboard Vandal Proof Mini Speed Dome Schedule DynaHawk 500 / 600 Series The DynaHawk 500 / 600 series
HDD-2080Z03IR D Article number: /3" HD-SDI Dome, WDR, Day&Night, 1920x1080, 3-9mm, 3x AF Zoom, Infrared, 12/24V
 Article number: 211419 1/3" HD-SDI Dome, WDR, Day&Night, 1920x1080, 3-9mm, 3x AF Zoom, Infrared, 12/24V Mainfeatures 1/3" 2.0 MP progressive scan CMOS sensor Resolution max. 1920 x 1080 (Full HD) 1.5G
INSTALLATION MANUAL. ST-PTZIR480-22X High-Speed Intelligent Dome IR PTZ Color Camera. Copyright North American Cable Equipment, Inc.
 INSTALLATION MANUAL ST-PTZIR480-22X High-Speed Intelligent Dome IR PTZ Color Camera Copyright North American Cable Equipment, Inc. PACKAGE CONTENTS This package contains: One ST-PTZIR480-22X high-speed
MG20S (AF 20 times) Specification
 Specification") MG20S (AF 20 times) Specification SERIES NO. MG20S MAIN FUNCTION Auto Focus CCD Megapixel Zoom module with Electronic PTZ HDTV mode. :20 times Zoom / SDTV(D1) App. :80 times Zoom IMAGE SENSOR 1/3-inch
MG20S (AF 20 times) Specification SERIES NO. MG20S MAIN FUNCTION Auto Focus CCD Megapixel Zoom module with Electronic PTZ HDTV mode. :20 times Zoom / SDTV(D1) App. :80 times Zoom IMAGE SENSOR 1/3-inch
SVEX-W125 EXPLOSION PROOF CAMERA FEATURES: FEATURES:
 EXPLOSION PROOF CAMERA SVEX-W125 Stainless Steel Material Stand Installation Pan / Tilt w/ Camera Housing All Kinds of Camera Optional Multiple Protocol for Multi-Control System 350 Pan Turning +90 ~ -90
195Z. 321Z_Manual_V0.82
 195Z User Manual Please read instructions thoroughly before operation and retain it for future reference. The image shown above may differ from the actual product appearance. 321Z_Manual_V0.82 IMPORTANT
HDB-2080Z03IR D Article number: /3" HD-SDI Camera, WDR, Day&Night, 1920x1080, 3-9mm, 3x AF Zoom, Infrared, 12/24V
 Article number: 211417 1/3" HD-SDI Camera, WDR, Day&Night, 1920x1080, 3-9mm, 3x AF Zoom, Infrared, 12/24V Mainfeatures 1/3" 2.0 MP Progressive Scan CMOS sensor Resolution max. 1920x1080 (Full HD) 1.5G
TCM x Zoom H.264 IP D/N Outdoor Speed Dome. Hardware User s Manual. Ver. 2012/6/25
 TCM-6630 36x Zoom H.264 IP D/N Outdoor Speed Dome Hardware User s Manual Ver. 2012/6/25 Table of Contents 0. Precautions 4 1. Introduction 5 Package Contents... 5 Features and Benefits... 6 Safety Instructions...
WDR Speed Dome. Hi-POE. High Performance Sensor WDR. Environment Protection. Designed For Constant Use. P-Iris Lens. Orion SX Series 2nd Generation
 Professional Surveillance Solutions WDR Speed Dome Orion SX Series 2nd Generation 60fps @ 720p 30fps @ 1080p 20x Zoom Lens Mechanical IR-cut filter P-Iris Lens WDR Quad Stream PoE + (IEEE 802.3at) OnVif
HD-SDI & EX-SDI HIGH DEFINITION-SERIAL DIGITAL INTERFACE CAMERA
 SECURITY SOLUTIONS 2015 HIGH DEFINITION-SERIAL DIGITAL INTERFACE EX EX-SDI Plug Huviron s EX-SDI is single cable HDMI over SDI cascading point-to-point extender set capable of transmitting lossless 1080p
DS-2DF1-614X/604X Network Speed Dome. Technical Manual
 DS-2DF1-614X/604X Network Speed Dome Technical Manual 1 Notices The information in this documentation is subject to change without notice and does not represent any commitment on behalf of HIKVISION. HIKVISION
ON-SCREEN DISPLAY (OSD) GUIDE FOR PRO-T890 HD CAMERA
 GUIDE FOR PRO-T890 HD CAMERA") ON-SCREEN DISPLAY (OSD) GUIDE FOR PRO-T890 HD CAMERA EN CONTENTS CONTENTS...2 INTRODUCTION...3 OPERATING THE OSD...4 MAIN MENU...5 OUTPUT MODE...7 EXPOSURE...8 SPECIAL...9 SPECIAL - DPC...10 ADJUST...11
ON-SCREEN DISPLAY (OSD) GUIDE FOR PRO-T890 HD CAMERA EN CONTENTS CONTENTS...2 INTRODUCTION...3 OPERATING THE OSD...4 MAIN MENU...5 OUTPUT MODE...7 EXPOSURE...8 SPECIAL...9 SPECIAL - DPC...10 ADJUST...11
BLK-HD33IR HD-SDI Digital Video IR LED Dome Camera User Manual
 BLK-HD33IR HD-SDI Digital Video IR LED Dome Camera User Manual Please read this manual before using your camera, and always follow the instructions for safety and proper use. Save this manual for future
Iris Innovations. IM-PTZ-16 Micro-PTZ Camera. Iris Innovations
 IM-PTZ-16 Micro-PTZ Camera Iris Innovations Unit 9 Swanwick Business Center, Bridge Road, Swanwick SO31 7GB T +44(0)1489 570797 www.boat-cameras.com Thanks for choosing the PTZ-16! When You Open The Box...
HTSD12XH. 960H 12X Optical Zoom. Indoor / Outdoor Speed Dome Camera
 HTSD12XH 960H 12X Optical Zoom Indoor / Outdoor Speed Dome Camera Please read this manual thoroughly before operation and keep it handy for further reference. CONTENTS Warning & Caution What s in the Box?
PTZ Conference Room USB Camera
 PTZ Conference Room USB Camera P/N 35520 User's Manual SAFETY WARNINGS AND GUIDELINES Please read this entire manual before using this device, paying extra attention to these safety warnings and guidelines.
PTZ Optics Affordable HDMI, HD-SDI, IP and USB video conferencing cameras
 PTZ Optics Affordable HDMI, HD-SDI, IP and USB video conferencing cameras as PTZ Optics Affordable HDMI, HD-SDI, IP and USB video conferencing cameras as P T Z OPTICS 12X USB PTZ OPTICS Video Conferencing
Speed Dome. Technical Manual
 Speed Dome Technical Manual 1 Notices The information in this documentation is subject to change without notice and does not represent any commitment on behalf of HIKVISION. HIKVISION disclaims any liability
TruVision HD-TVI Series 4 PTZ Dome Camera Configuration Manual
 TruVision HD-TVI Series 4 PTZ Dome Camera Configuration Manual P/N 1073207-EN REV C ISS 03FEB17 Copyright Trademarks and patents Manufacturer 2017 United Technologies Corporation. Interlogix is part of
ULISSE COMPACT UNIT WITH INTEGRATED DAY/NIGHT CAMERA
 2014/01/20 UNIT WITH INTEGRATED DAY/NIGHT CAMERA MAIN FEATURES Variable speed: 0.1-200 /s Pan/Tilt Horizontal continuous rotation, vertical -90 /+90 IP66 Day/Night camera 36x, 28x or 10x: True Progressive
ALI-TS3025R 5MP HD-TVI 265 ft IR Outdoor Bullet Camera Quick Installation Guide
 ALI-TS3025R 5MP HD-TVI 265 ft IR Outdoor Bullet Camera Quick Installation Guide The ALIBI ALI-TS3025R indoor/outdoor HD-TVI bullet cameras include a high sensitivity sensor with the ability to send HD
Starlight 5MP IP PTZ Camera
 Starlight 5MP IP PTZ Camera SS-ES132P-Z2/Z3 Key Features Up to 2592 1944@30fps Smart IR, IR Range: 500m Optical Zoom: 36X, Digital Zoom: 16X Compression Technique: S+265/H.265/H.264 HP/MP/BP/M-JPEG Codec
HDD-2080M2810IR D Article number: /3" HDcctv Dome, Fix, Day&Night, 1920x1080, 12/24V, mm, Infrared, 3D-DNR
 Article number: 211418 1/3" HDcctv Dome, Fix, Day&Night, 1920x1080, 12/24V, 2.8-10mm, Infrared, 3D-DNR Mainfeatures 1/3" 2.0 MP Progressive Scan CMOS sensor Resolution max. 1920x1080 (Full HD) 1.5G HD-SDI
HDB-2080Z03IR D Article number: /3" HD-SDI Camera, WDR, Day&Night, 1920x1080, 3-9mm, 3x AF Zoom, Infrared, 12/24V
 Article number: 211417 1/3" HD-SDI Camera, WDR, Day&Night, 1920x1080, 3-9mm, 3x AF Zoom, Infrared, 12/24V Mainfeatures 1/3" 2.0 MP Progressive Scan CMOS sensor Resolution max. 1920x1080 (Full HD) 1.5G
ALI-TP4013R 3MP HD-TVI 130 IR Outdoor Bullet Camera Quick Installation Guide
 ALI-TP4013R 3MP HD-TVI 130 IR Outdoor Bullet Camera Quick Installation Guide The ALIBI ALI-TP4013R indoor/outdoor HD-TVI bullet cameras include a high sensitivity sensor with the ability to send HD video
Models GV SD010 18X GV SD010 23X GV SD010 36X
 Provide 18X, 23X, 36X CIF and D1 resolution H.264, MPEG4 and MJPEG 2 way audio Digital In x 4, Digital Out x 1 Preset speed up to 400 /sec Auto calibration Digital image flip Minimum illumination 0.01
TruVision HD-TVI PTZ Dome Camera Configuration Manual (TVP-6101/ TVP-6102/ TVP-6103)
") TruVision HD-TVI PTZ Dome Camera Configuration Manual (TVP-6101/ TVP-6102/ TVP-6103) P/N 1073486-EN REV B ISS 16JUL18 Copyright Trademarks and patents Manufacturer Certification 2018 United Technologies
TruVision HD-TVI PTZ Dome Camera Configuration Manual (TVP-6101/ TVP-6102/ TVP-6103) P/N 1073486-EN REV B ISS 16JUL18 Copyright Trademarks and patents Manufacturer Certification 2018 United Technologies
ULISSE COMPACT THERMAL
 2015/03/17 OUTDOOR PTZ CAMERA DUAL VISION, DAY/NIGHT AND THERMAL, FOR TOTAL DARKNESS MONITORING IP66 PROTECTION TYPE 4X TYPE 4X THERMAL WIPER INTEGRATED CAM FEATURES Variable speed: 0.1-200 /s Pan/Tilt
HuddleCamHD 3x USB 2.0 PTZ CAMERA INSTALLATION & OPERATION MANUAL
 HuddleCamHD 3x USB 2.0 PTZ CAMERA INSTALLATION & OPERATION MANUAL Precautions. Safety Tips. Please read this manual carefully before using the camera. Avoid damage from stress, violent vibration or liquid
FastCam Outdoor Speed Dome Camera
 FastCam Outdoor Speed Dome Camera CC-9760 & CC-9760-I USER INSTRUCTION MANUAL Version: V1.2 Doc No.: 20051114001 1 A BOUT THIS GUIDE Conventions used in this guide To make sure that you perform certain
1/3 2.2 megapixels Progressive Scan CMOS WDR (Wide Dynamic Range)
") HDC-2220M1080 Home Security HDcctv / HD-SDI Plug & Play HDC-2220M1080 1/3 HDcctv Camera, Day&Night, 1920x1080, WDR, 20x Auto Focus Zoom, 12VDC Art-Nr. 202435 Main Features 1/3 2.2 megapixels Progressive
HDC-2220M1080 Home Security HDcctv / HD-SDI Plug & Play HDC-2220M1080 1/3 HDcctv Camera, Day&Night, 1920x1080, WDR, 20x Auto Focus Zoom, 12VDC Art-Nr. 202435 Main Features 1/3 2.2 megapixels Progressive
TVB-2080Z03IR Article number: /2,8" HD-TVI Camera, Day&Night, 1920x1080, WDR 3x AF Zoom, Infrared, 12/24V
 Article number: 212115 1/2,8" HD-TVI Camera, Day&Night, 1920x1080, WDR 3x AF Zoom, Infrared, 12/24V Mainfeatures 1/2.8" 2.0 MP progressive scan CMOS sensor Resolution max. 1920x1080 (Full HD) HD-TVI video
 OSD (On Screen Display) MENU Camera functions and settings can be adjusted or changed by activating the OSD menu. When the OSD menu is activated, text will display on the monitor. The user can then move
Color Speed Dome Camera. Manual
 Color Speed Dome Camera Manual Contents 1. Safety Precautions...2 2. Symbol Description...3 3. Features...4 4. Package List...5 5. Component and Structure Description...6 6. Camera Setting...8 7. Installation...13
ST-HDC2FD QUICK START GUIDE. Or contact technical
 ST-HDC2FD QUICK START GUIDE www.nacebrands.com www.securitytronix.com User Manual Thank you for purchasing our product. If there are any questions, or requests, please do not hesitate to contact the dealer
2.01 N : D1 resolution 37x Zoom Outdoor Network Vandal-proof PTZ Security Camera
 PART 1 - NOT USED PART 2 - PRODUCTS 2.01 N5013-37: D1 resolution 37x Zoom Outdoor Network Vandal-proof PTZ Security Camera A. Functional Description The specified product shall be an all-in-one style outdoor
SPD High Speed Color Dome Camera
 High Speed Color Dome Camera SPD-2200 Powerful 220X Zoom (f = 3.9~85.8mm) Programmable 128 Preset Positions 24 hour Surveillance with Day & Night Functions 8 Privacy Area Masking Auto Flip and Alarm on
SERVICE MANUAL 1/3 SONY DSP COLOR CCD CAMERA 600TVL O.S.D. WDR SERIES
 SERVICE MANUAL 1/3 SONY DSP COLOR CCD CAMERA 600TVL O.S.D. WDR SERIES The serial number of this product may be found on the bottom of the unit. You should note the serial number of this unit in the space
USER MANUAL. 1080P Eco - 4 in 1 Series
 USER MANUAL 1080P Eco - 4 in 1 Series Contents 1) CAUTIONS 2 ) Product Introduction 2.1 Camera Introduction 2.2 Product Features 3) Menu Instruction 4) Product Installation 4.1 General Notes 4.2 Installation
FCB-EV Series Color Block Camera
 FCB-EV Series Color Block Camera FCB-EV7100 FCB-EV5500 FCB-EV5300 FCB-EV7500 FCB-EV7300 FCB-EV7310 * This brochure is published based on the features and specifications for firmware Version 0310. Introduction
TURBO HD D7T Series Dome Camera
 TURBO HD D7T Series Dome Camera User Manual UD02018B User Manual Thank you for purchasing our product. If there are any questions, or requests, do not hesitate to contact the dealer. This manual applies
PRO-SERIES HD On-Screen Display
 PRO-SERIES HD On-Screen Display INSTRUCTION MANUAL Accessing the On-Screen Display (OSD) The hyphen indicates the option or setting selected. Use the up and down arrows to navigate. SYSTEM DOME INFO ID
Speed Dome. Technical Manual
 Speed Dome Technical Manual 1 Notices The information in this documentation is subject to change without notice and does not represent any commitment on behalf of HIKVISION. HIKVISION disclaims any liability
TruVision HD-TVI 1080P Wedge Camera Configuration Manual
 TruVision HD-TVI 1080P Wedge Camera Configuration Manual P/N 1073184-EN REV A ISS 23JUN16 Copyright Trademarks and patents Contact information Customer support 2016 United Technologies Corporation. All
4 MP PTZ Dome IP-Camera 36x Zoom ICR IR LED H.265
 4 MP PTZ Dome IP-Camera 36x Zoom ICR IR LED H.265 GD-CI-AT4747P 36x motorized optical zoom with 16x Privacy Zone Masking Function digital zoom IR LEDs integrated Panspeed (280 /sec) / Tiltspeed (250 /sec),
FCB-EV Series. Colour Block Cameras FCB-EV7500 FCB-EV7300 FCB-EV7310 FCB-EV7100 FCB-EV5500 FCB-EV
 FCB-EV7500 FCB-EV7300 FCB-EV5500 FCB-EV7310 FCB-EV5300 FCB-EV Series Colour Block Cameras FCB-EV7500 FCB-EV7300 FCB-EV7310 FCB-EV5500 FCB-EV5300 IMAGE IMAGE SENSING SOLUTIONS Colour Block XCD Camera MV6
HDC-2080Z03 D Article number: /3" HD-SDI Camera, WDR, Day&Night, 1920x1080, 3x AF Zoom, 3-9mm, 12/24V
 Article number: 211421 1/3" HD-SDI Camera, WDR, Day&Night, 1920x1080, 3x AF Zoom, 3-9mm, 12/24V Mainfeatures 1/3" 2.0 MP progressive scan CMOS sensor Resolution max. 1920x1080 (Full HD) 1.5G HD-SDI video
Low-Light Color High Speed Dome Camera
 Low-Light Color High Speed Dome Camera CCDA1425-LL High-speed dome camera High resolution ¼-inch low-light color camera (EX-View CCD) Low light sensitive to 0.05 lux 18x optical zoom (4.1 73.8 mm) 12x
UVD-XP3DNR(-P) Camera User Manual
 Camera User Manual") GE Security UVD-XP3DNR(-P) Camera User Manual REV 01.00 ISS 02SEP09 Copyright 2009 GE Security, Inc. This document may not be copied in whole or in part or otherwise reproduced without prior written consent
GE Security UVD-XP3DNR(-P) Camera User Manual REV 01.00 ISS 02SEP09 Copyright 2009 GE Security, Inc. This document may not be copied in whole or in part or otherwise reproduced without prior written consent
Aegis Electronic Group FCB-EV7520 FCB-EV7320
 FCB-EV7520 FCB-EV7320 FCB-EV7500 FCB-EV7300 FCB-EV7310 FCB-EV5500 FCB-EV5300 FCB-EV Series Colour Block Cameras FCB-EV7520 FCB-EV7320 FCB-EV7500 FCB-EV7300 FCB-EV7310 FCB-EV5500 FCB-EV5300 IMAGE IMAGE
FCB-EV Series. Colour Block Cameras FCB-EV7500 FCB-EV7300 FCB-EV7520 FCB-EV7320 FCB-EV7310 FCB-EV7100 FCB-EV5500 FCB-EV5300
 FCB-EV7520 FCB-EV7320 FCB-EV7500 FCB-EV7300 FCB-EV5500 FCB-EV7310 FCB-EV5300 FCB-EV Series Colour Block Cameras FCB-EV7520 FCB-EV7320 FCB-EV7500 FCB-EV7300 FCB-EV7310 FCB-EV5500 FCB-EV5300 IMAGE IMAGE
Speed Dome DS-2DF1-783 Technical Manual
 Speed Dome DS-2DF1-783 Technical Manual Notices The information in this documentation is subject to change without notice and does not represent any commitment on behalf of HIKVISION. HIKVISION disclaims
SERVICE MANUAL 1/3 SONY DSP COLOR CCD CAMERA OVER 650TVL SERIES
 SERVICE MANUAL 1/3 SONY DSP COLOR CCD CAMERA OVER 650TVL SERIES The serial number of this product may be found on the bottom of the unit. You should note the serial number of this unit in the space provided
VZ-TVI-B3040MZVF 3MP Motorized VF EXIR Bullet Camera
 VZ-TVI-B3040MZVF 3MP Motorized VF EXIR Bullet Camera User Manual User Manual Thank you for purchasing our product. If there are any questions, or requests, please do not hesitate to contact the dealer.
High Speed in-ceiling and Outdoor PTZ Dome Cameras with multi-protocol capabilities
 High Speed in-ceiling and Outdoor PTZ Dome Cameras with multi-protocol capabilities DESCRIPTION Infinova s V1740 series represents a state-of-the-art line of outdoor, in-ceiling and Bracket mount Pan,
Architecture and Engineering Specifications SANYO VCC-HD Megapixel Full-HD Day/Night 10x AF High Speed Dome Camera
 Architecture and Engineering Specifications SANYO VCC-HD5600 2 Megapixel Full-HD Day/Night 10x AF High Speed Dome Camera A. General Characteristics: 1. Full Pan-Tilt-Zoom Functionality with continuous
Speed Dome Camera User Manual
 783z Speed Dome Camera User Manual The product image shown above may differ from the actual product. Please use this camera with a DVR which supports HD video recording. Please read the instructions thoroughly
HuddleCamHD 30x USB 3.0 PTZ CAMERA INSTALLATION & OPERATION MANUAL
 HuddleCamHD 30x USB 3.0 PTZ CAMERA INSTALLATION & OPERATION MANUAL Please check HUDDLECAMHD.com for the most up to date version of this document Precautions. Safety Tips. Please read this manual carefully
Low Light Speed Dome. Starvis Sensor. Hi-POE. Ultra Wide Dynamic Range. Ernitec Image Stabilization. Environment Protection. Designed For Constant Use
 Professional Surveillance Solutions Low Light Speed Dome Orion DX 2 Low Light Edition Starvis CMOS Sensor 0.02 Lux Colour 60fps @ 1080p 30fps @ 1080p Wide Dynamic Range 120dB EIS Image Stabilization 30x
ALI-TS4015R 5MP HD-TVI 135 ft IR Varifocal Outdoor Bullet Camera Quick Installation Guide
 ALI-TS4015R 5MP HD-TVI 135 ft IR Varifocal Outdoor Bullet Camera Quick Installation Guide The ALIBI ALI-TS4015R indoor/outdoor HD-TVI bullet cameras include a high sensitivity sensor with the ability to