Transport Data Logger TDL 110 Operating Instructions
|
|
|
- Alexander Mathews
- 5 years ago
- Views:
Transcription


1 Transport Data Logger TDL 110 Operating Instructions
2 2 21 Table of Contents 1 Introduction and Intended Use 5 2 Safety and Environment Radio Frequency Radiation Exposure and Further Information Disposal 6 3 Technical Specifications Measured Parameters Device Specification Operating Conditions Resolutions Accuracies 8 4 Mounting the TDL 8 5 Operation Connecting to the TDL Configuring the TDL Logging Interval Settings Changing the Setup Changing the PIN Clearing the Data Reset Reading and Transferring Data Reading the Data Exchanging the Data Blinking Pattern 16 6 Maintenance Changing the Battery Cleaning the TDL 18 7 Annex Recycling EU Declaration of Conformity Federal Communications Commission (FCC) Notice Industry Canada (IC) Notice Export Restrictions 20
3 3 21 List of Figures Figure 1: Overview TDL 5 Figure 2: Mounting the TDL using screws 8 Figure 3: Activating the TDL 9 Figure 4: Search for TDL and list of found TDL 9 Figure 5: Configuring the TDL 10 Figure 6: Enter the PIN 11 Figure 7: Start logging 11 Figure 8: Delayed logging start 11 Figure 9: Change settings 12 Figure 10: Change setup 13 Figure 11: Change PIN 13 Figure 12: Reading and transferring data 14 Figure 13: LED on the TDL 16 Figure 14: Changing the battery 17 List of Tables Table 1: Device Specifications 7 Table 2: Operating Conditions 7 Table 3: Configurable Resolutions 7 Table 4: Accuracies 8 Table 5: Logging Intervals 12 Table 6: Blinking Pattern 16

4 4 21 About these Operating Instructions Ensure that the TDL 110 is working correctly by: Reading these instructions carefully before using the TDL 110. Always following these instructions. Caution Indicates a hazardous situation in which the user must proceed as noted. Always follow these instructions. Notice Indicates a non-critical situation which should be noted to avoid damage to materials. Always follow these instructions. INFO General information and instructions that must be followed TIP Practical advice

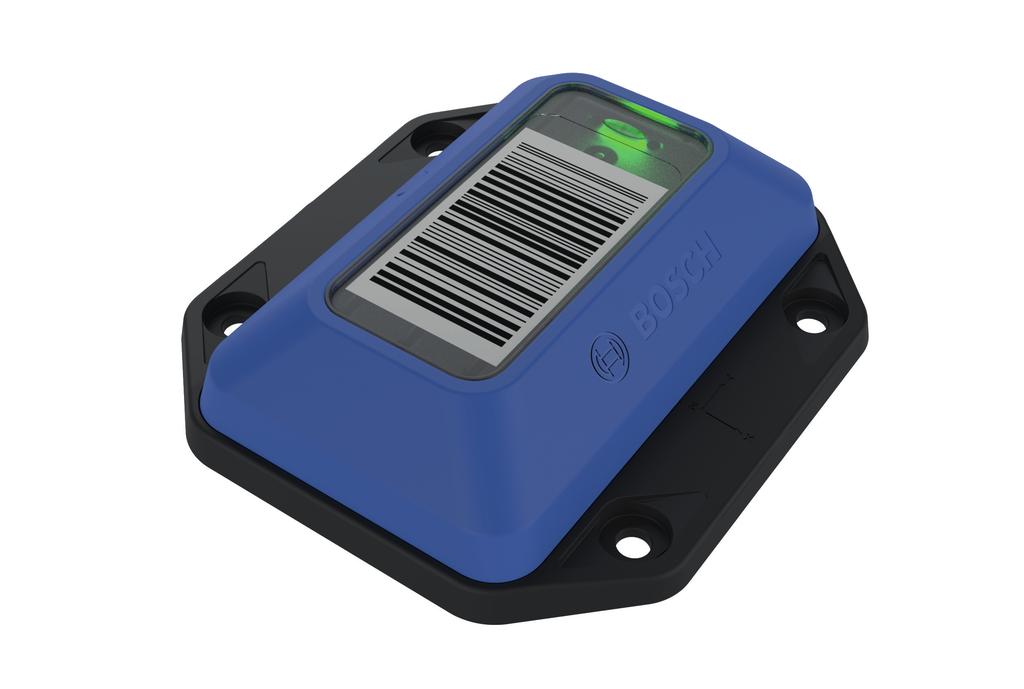
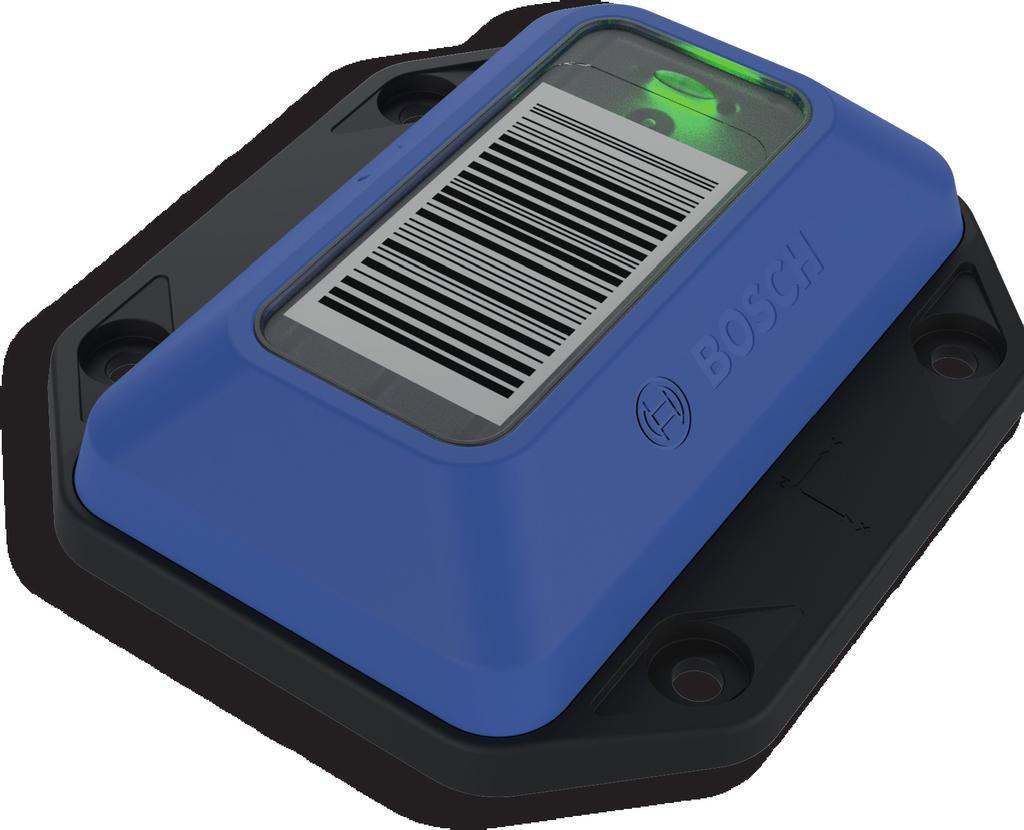
5 Introduction and Intended Use By being attached to the shipment and measuring and recording relevant parameters like temperature, humidity, tilt and shock, the TDL makes the delivery process of goods visible and traceable. These measurements are then documented and visualized through a mobile application. Since the limits of each parameter can be individually configured, any violation of these limits is traceable and clearly assignable to the stations throughout the entire transport process. The Transport Data Logger is designed according to the information provided in the data sheet. Any use or operation which requires specific requirements and standards which aren t explicitly mentioned in the data sheet must be validated and tested on customer s own responsibility Figure 1: Overview TDL 1 Surface: place your shipment code here 2 Button (see chapter 5 Operation) 3 LED (green/red) (see chapter 5.5 Blinking Pattern) 4 Mounting holes (4x) (see chapter 4 Mounting the TDL) 5 Battery (see chapter 6.1 Changing the Battery) 6 Mounting plate (see chapter 4 Mounting the TDL) For further assistance please refer to: or to: support@bosch-connectivity.com

6 Safety and Environment Caution Lithium Battery! The device contains a lithium battery. Handling the battery incorrectly could cause a fire. Use only original or approved batteries. Read and follow the valid transportation regulations. Notice Forfeiting the Warranty! Opening the casing without authorization could present risks to the user and will void any warranty. Do not open the housing. Use only original or approved spare parts. 2.1 Radio Frequency Radiation Exposure and Further Information The radiated output power of the device is far below the FCC radio frequency exposure limits. Nevertheless, the device shall be used in such a manner that the potential for human contact during normal operation is minimized. 2.2 Disposal Disposing of this product correctly will help save valuable resources and prevent any potential negative effects on human health and the environment, which could otherwise arise from inappropriate waste handling. Please contact your local authority for further details of your nearest designated collection point. Penalties may be applicable for incorrect disposal of this waste, in accordance with your national legislation. For further information please refer to chapter 7.1 Recycling.
7 Technical Specifications 3.1 Measured Parameters Temperature Humidity Tilt Shock 3.2 Device Specification Attribute Dimension (W x H x D): Weight: Power Supply: Battery Lifetime: Value 91 mm x 102 mm x 25 mm 100 g CR 123A Lithium Battery 2 Years (10 min. Measuring Cycle, +25 C) Enclosure Protection Class: IP 54 Electrical Protection Class: III Measuring Cycle (selectable): 1 min 4 hours Memory Capacity: 2 Years (15 min. Measuring Cycle, see Table 5: Logging Intervals) Communication: Bluetooth 4.0 (Low Energy) Bluetooth Frequency Band: GHz Transmission Power: 5 dbm Recommended Storage Temperature: 0 C +40 C Table 1: Device Specifications 3.3 Operating Conditions Attribute Range Operating Temperature Range: -25 C +80 C Humidity Range: 0 % rh 100 % rh (non-condensing) Shock/Acceleration Range: ± 8.0 g per axis; ±13.8 g three-dimensional Table 2: Operating Conditions 3.4 Resolutions Attribute Resolution Temperature: 0.5 C Humidity: 1 % rh Tilt: (30 steps) Shock: 0.1 g Table 3: Configurable Resolutions
 Acceleration/Shock: ± 10 % Table 4: Accuracies 4 Mounting the TDL The TDL comes with an integrated mounting plate at the bottom side.")
8 Accuracies Attribute Value Temperature: ± 0.5 C (0 C +60 C) ± 1 C (-25 C +80 C) Humidity: ± 5 % rh typical ± 10 % rh maximum (20 % rh... 80% rh at 25 C) Acceleration/Shock: ± 10 % Table 4: Accuracies 4 Mounting the TDL The TDL comes with an integrated mounting plate at the bottom side. The mounting plate provides four mounting holes for screw fastening purposes Figure 2: Mounting the TDL using screws 1 Screwdriver 2 Screw 3 Mounting holes In general, the TDL can be mounted in any position as required. The fastening, depending on the specific requirements, can be carried out with screws or with double-sided adhesive tape. In case shock shall be measured a direct and non-absorbing connection between the TDL and the monitored good is required. For achieving this we recommend using either screws or a fiber-reinforced adhesive tape. Recommended screws are either M5 countersunk head or M4 carriage bolt.
 of your device in your app store s search box to find the app easily.")


9 Operation You need to download the Transport Data Logger app to use the TDL 110. The required app Transport Data Logger is available in your Google Play Store or Apple App Store free of charge. Type Bosch Transport Data Logger or the product number/order number ( ) of your device in your app store s search box to find the app easily. The app runs on Android version 5 (Lollipop) or higher and on ios version 9 or higher. You can customize the way that the TDL measures and records data in accordance with your individual requirements in the app. You can also control and record data from as many TDL units as required. 5.1 Connecting to the TDL 1. Activate Bluetooth LE on your smartphone. For devices running Android 6, enable GPS as well. INFO To enable Bluetooth LE Android 6 requires localization service to be activated. 2. To activate the TDL, press the button on the device for 0.3 to 1.5 seconds. INFO For correct functionality it is important to press and hold the button between 0.3 and 1.5 seconds. Figure 3: Activating the TDL 3. Start the Transport Data Logger app. 4. To find the activated TDL, tap Search. 5. Locate and select the TDL from the list. 6. Confirm the connection by selecting Pair. INFO 1. Pairing must be completed within 30 seconds. 2. If Pairing was canceled via the app, turn Bluetooth off/on or wait for five minutes. 3. In case a password is required, please enter six times zero (000000) which represents a standard password. Figure 4: Search for TDL and list of found TDL

![Notice Convention for Characters Only defined characters are allowed for the e-mail address and TDL name. Allowed characters: [A-Z][a-z][0-9][@.,;/\ +-*_] 4.](/docs-images/86/93540660/images/10-4.jpg "Configure the logging interval. The measurement frequency depends on the required monitoring period of the TDL.")
 by tapping Set values. 6. Swipe up and down to configure minimum and maximum values.")
10 Configuring the TDL To configure your TDL, follow the steps shown in the app. 1. Choose and enter a name for the TDL (optional). 2. Enter an address to transfer data (optional). This address will be the default recipient address when sending data via Tap Continue. Notice Convention for Characters Only defined characters are allowed for the address and TDL name. Allowed characters: [A-Z][a-z][0-9][@.,;/\ +-*_] 4. Configure the logging interval. The measurement frequency depends on the required monitoring period of the TDL. As an aid for configuration refer to the overview of the recommended configuration intervals in Logging Interval. 5. Choose a measurement parameter (temperature, humidity, tilt, shock) by tapping Set values. 6. Swipe up and down to configure minimum and maximum values. INFO At least one value must be configured. However the temperature, humidity and tilt measurement values will be recorded even without the configuration of a threshold value. 7. Tap Continue. Figure 5: Configuring the TDL


11 Enter your desired PIN and confirm. Notice No TDL Access! You cannot configure the TDL without a valid PIN. It is impossible to reset the PIN; even at the factory. Always make a note of the PIN and store it in a safe place. 9. To start logging immediately, tap Start logging and confirm that logging will start only when the TDL device is disconnected. The device confirms logging start by flashing three times the green LED. To start logging later, tap Disconnect in the app. The device confirms the disconnection by flashing three times the red LED. Then press the button on the TDL for 2 to 5 seconds when you want to start logging. The TDL blinks green three times to confirm that logging has started. INFO The measurement starts immediately after you tap on Start logging. The TDL uses its current position as a reference for the tilt measurement. If you configure the TDL in a different position to its final mounting position we suggest to tap Disconnect in the app and activate the TDL later in its final mounting position with a button press of 2 to 5 seconds. Figure 6: Enter the PIN Figure 7: Start logging Figure 8: Delayed logging start
12 Logging Interval Required Monitoring Time Recommended Logging Interval 1 month 1 min 3 months 2 min 6 months 4 min 9 months 6 min 12 months 7 min 15 months 10 min 18 months 12 min 21 months 13 min 24 months 15 min Table 5: Logging Intervals These recommendations are based on assumptions, made for a specific number of shocks and tilts per day. At the end of the monitoring period the stored data can be analyzed and then cleared. The measurement can be started from scratch again. For logging intervals that are longer than 15 minutes, the battery with a lifetime of 24 months will be the limiting factor. 5.3 Settings You can change the settings of your TDL at any time. Any change to the settings is protected by the PIN. To change settings, please connect to the respective TDL. Logging is stopped during the TDL configuration. 1. Connect to a previously configured TDL. 2. Swipe down to Settings. 3. Tap on the desired setting and make the changes. Figure 9: Change settings


13 Changing the Setup 1. Tap Change Setup to set new values. 2. When ready, tap Change to apply the new changes. Notice Storage of Measurement Data The log files are associated with a specific shipment. Data logging can be interrupted upon request by tapping Stop logging. The data recording will continue and data will be stored in the same file as long as the settings remain unchanged. The logging starts over and the data will be stored in a new file if you change settings Changing the PIN Figure 10: Change setup 1. Tap Change PIN to set a new PIN. 2. Set the new PIN and re-enter the new PIN. 3. When ready, tap Change to apply the new PIN. Figure 11: Change PIN Notice No TDL Access! You cannot configure the TDL without a valid PIN. It is impossible to reset the PIN; even at the factory. Always make a note of the PIN and store it in a safe place Clearing the Data 1. Tap Clear Data to clear the logging data. A new window Do you want to clear all logged data stored on the TDL? appears. 2. Tap Clear to clear the data Reset 1. Tap Reset. A new window All setup and logged data will be cleared. Do you want to continue? appears. After the reset the device will be in the delivery state. 2. Tap Reset. 3. The LED blinks red three times to confirm the reset..


14 Reading and Transferring Data Reading the Data 1. Connect your smartphone to a configured TDL. Overview Screen This screen provides an overview of the four parameters, showing you at a glance if any violations have occurred during the logging period. Green check marks indicate that no violation has occurred, whereas an exclamation mark indicates that the limit values have been exceeded at least once during the logging period. If an icon is shown grayed out, no limit value has been defined for this parameter. 2. Tap Download Details. 3. Confirm Stop logging & download. 4. Enter your PIN. Notice Risk of Data Loss An interrupted connection can cause damage to data. Do not lock your phone while downloading data. 5. Tap Show Details. The summary screen appears. 6. Tap the desired measurement parameter to view those measurements. 7. Tap an entry date for more detailed information.
15 Exchanging the Data Notice Account Required The report will be sent from the account on your smartphone. Ensure that the account on your smartphone is configured correctly. 1. Ensure Follow that the the steps in address until the in the summary app is valid. screen appears. Alternatively, choose a recent log file from the Log Files folder and open it. Go to the summary screen. 2. Tap Send report. 3. Your smartphone will start your program and open an with the predefined address (see chapter 5.2 Configuring the TDL). You can add additional addressees if required. The contains: General information, such as TDL identification number, TDL name and duration of the transport Configured limit values for all parameters Minimum and maximum values that where measured during the transport A graphical transport summary The CSV file that contains all the raw data and additional information, such as the shock intensity to help analyze the shock event Notice Importing Data to Excel Some programs may show unintended characters due to an incompatible character set. Ensure that your data reading program is set to UTF-8 character format.
 Blinks 3 times (2 Hz) Blinks 3 times (10 Hz) Blinks 3 times (10 Hz) Blinks reiteratively (0.")
16 Blinking Pattern The TDL is equipped with a two-color LED to indicate the status of the TDL. Figure 13: LED on the TDL Color Behavior Meaning Triggered by Mobile App Device Blinks 3 times (2 Hz) Blinks 3 times (2 Hz) Blinks 3 times (10 Hz) Blinks 3 times (10 Hz) Blinks reiteratively (0.2 Hz) TDL starts logging Tap Start Logging After transferring the configuration push the Tap Disconnect while TDL continues logging button for 2 to 5 s logging TDL does not start logging TDL has been reset Configuration transmission or change setup has been successful Configuration transmission or change setup has failed Bluetooth is enabled, either connection or advertising Tap Disconnect while not logging Tap Reset Transfer a configuration or changed setup to the TDL Transfer a configuration or changed setup to the TDL Possible reasons: Vibrations or a bad Bluetooth connectivity Push the button for 0.3 to 1.5 s Table 6: Blinking Pattern Lights up for 3 s Lights up for 3 s Lights up for 1 s Blinks 5 times (10 Hz) No violation has been registered One or more violations have been registered Invalid operation, Bluetooth connection is already established Invalid operation, TDL is not ready to start logging or is already logging TDL starts up after battery change Push the button for 0.3 to 1.5 s Push the button for 0.3 to 1.5 s Any button press Button press for 2 to 5 s Change of battery

. 6. Position the mounting plate on the TDL. 7.")
17 Maintenance 6.1 Changing the Battery The battery is accessible from the bottom of the TDL Figure 14: Changing the battery 1 Screws (4x Torx T6); Torque 0.5 Nm 2 Mounting plate 3 Battery 4 TDL Notice Risk of Data Loss No data can be measured or stored while the battery is being changed. Always stop logging before removing the battery. 1. Stop logging. If desired transfer the data to your smartphone (refer to chapter Reading the Data). 2. Place the TDL down so that its bottom is facing upwards. 3. Remove the four screws by using a Torx T6 screwdriver. 4. Remove the mounting plate. 5. Change the battery (CR 123A Lithium Battery). 6. Position the mounting plate on the TDL. 7. Fasten the four screws with a torque of 0.5 Nm. 8. The TDL is now ready for use and can be configured (see chapter 5 Operation). Caution Damage to Materials can cause Risk of Fire! Liquid which enters the device can cause short circuits and damage the device. This could cause fire, data loss and incorrect measurements. Ensure that the battery cover is positioned correctly. Always fasten the screws with a torque of 0.5 Nm.
18 Cleaning the TDL Use only a soft cloth. Avoid using abrasive cloths and materials. Caution Damage to Materials can cause Risk of Fire! Liquid which enters the device can cause short circuits and damage the device. This could cause fire, data loss and incorrect measurements. Do not use aerosol sprays, solvents, or abrasives. Do not spray cleaners directly onto the item. Do not allow moisture to enter into any openings.

19 Annex 7.1 Recycling Disposal according to the WEEE Directive 2012/19/EU The unit, accessories and packaging should be sorted for environmental friendly recycling. Do not dispose of the device into household waste! According to the European Guideline 2012/19/EU, electric and electronic devices that are no longer usable must be collected separately and disposed of in an environmentally correct manner. For disposal in countries outside of the European Union This symbol is only valid in the European Union (EU). If you wish to discard this product please contact your local authorities or dealer and ask for the correct method of disposal. 7.2 EU Declaration of Conformity Hereby, Bosch Connected Devices and Solutions GmbH declares that the radio equipment Transport Data Logger TDL 110 is in compliance with Directive 1999/5/EG. The full text of the EU declaration of conformity is available at the following internet address: Federal Communications Commission (FCC) Notice This device complies with Part 15 of the FCC Rules. Operation is subject to the following two conditions: (1) This device may not cause harmful interference and (2) This device must accept any interference received, including interference that may cause undesired operation. The manufacturer is not responsible for any changes or modifications not expressly approved by the party responsible for compliance. Such modifications may void the FCC authorization to operate this equipment. NOTE: This equipment has been tested and found to comply with the limits for a Class B digital device, pursuant to Part 15 of the FCC Rules. These limits are designed to provide reasonable protection against harmful interference in a residential installation. This equipment generates, uses and can radiate radio frequency energy and, if not installed and used in accordance with the instructions, may cause harmful interference to radio communications. However, there is no guarantee that interference will not occur in a particular installation. If this equipment does cause harmful interference to radio or television reception, which can be determined by turning the equipment off and on, the user is encouraged to try to correct the interference by one or more of the following measures: Reorient or relocate the receiving antenna. Increase the separation between the equipment and receiver.

.")
 this device must accept any interference, including interference that may")

20 20 21 Connect the equipment into an outlet on a circuit different from that to which the receiver is connected. Consult the dealer or an experienced radio/tv technician for help. 7.4 Industry Canada (IC) Notice This device complies with Industry Canada license-exempt RSS standard(s). Operation is subject to the following two conditions: (1) this device may not cause harmful interference and (2) this device must accept any interference, including interference that may cause undesired operation. This Class B digital apparatus complies with Canadian ICES-003. Complies with IMDA standards DB Export Restrictions Due to legal regulations the device is not available in the following countries or regions: Cuba, Crimea, Iran, North Korea, Syria and Ukraine.
21 Bosch Connected Devices and Solutions GmbH Ludwig-Erhard-Straße Reutlingen Germany
Transport Data Logger TDL 110 Operating Instructions
 Transport Data Logger TDL 110 Operating Instructions 2 20 TDL 110 Transport Data Logger Table of Contents 1 About these Operating Instructions 3 1.1 Meanings of the used signal words 3 1.2 Meanings of
Complies with IMDA standards DB CISS Connected Industrial Sensor Solution. Quick Start Guide
 Complies with IMDA standards DB101762 CISS Connected Industrial Sensor Solution Quick Start Guide Connected Industrial Sensor Solution CISS Software Downloads The Robust Acceleration, Vibration & Condition
To force your device to restart, press and hold the power button until your device vibrates.
 Quick Start CPN-W09 1 Your device at a glance Before you start, let's take a look at your new device. To power on your device, press and hold the power button until your device vibrates and the screen
BBW200 SmartClim Bluetooth Smart Temperature and Humidity Sensor User Manual
 BBW200 SmartClim Bluetooth Smart Temperature and Humidity Sensor User Manual Thank you for purchasing the BBW200 SmartClim sensor from BEEWI. Please read the following instructions to learn how to configure
InTemp CX500 Series Temperature Logger Manual
 InTemp CX500 Series Temperature Logger Manual (CX501 model shown) InTemp CX500 series loggers measure temperature in transportation monitoring applications. These Bluetooth Low Energy-enabled loggers are
User Guide Microsoft Portable Power (DC-21)
") User Guide Microsoft Portable Power (DC-21) Issue 1.0 EN-US User Guide Microsoft Portable Power (DC-21) Contents For your safety 3 About your portable charger 4 Keys and parts 5 Charge your portable charger
User Guide Microsoft Portable Power (DC-21) Issue 1.0 EN-US User Guide Microsoft Portable Power (DC-21) Contents For your safety 3 About your portable charger 4 Keys and parts 5 Charge your portable charger
User Guide Wireless Charging Plate DT-903
 User Guide Wireless Charging Plate DT-903 Issue 1.0 EN User Guide Wireless Charging Plate DT-903 Contents Safety 3 About your accessory 4 Keys and parts 5 Charge your phone 6 Get notifications 7 About
User Guide Nokia Wireless Charger DT-601
 User Guide Nokia Wireless Charger DT-601 Issue 1.1 EN-US Parts Get to know your wireless charger. 1 USB cable 2 Indicator light 3 Charging area The surface of this product is nickel-free. Some of the accessories
Always there to help you. Register your product and get support at AEA1000. Question? Contact Philips.
 Always there to help you Register your product and get support at www.philips.com/welcome Question? Contact Philips AEA1000 User manual Contents 1 Important 2 Important safety information 2 Notice 3 English
VoiceLink User Guide. Life sounds brilliant.
 VoiceLink User Guide www.bestsound-technology.co.uk Life sounds brilliant. Content VoiceLink 4 Included in delivery 5 Intended use 6 General notes on safety 7 Before you start 8 Using the VoiceLink 11
+Cam Quick Start Guide
 CAUTION RISK OF ELECTRIC SHOCK DO NOT OPEN CAUTION TO REDUCE THE RISK OF ELECTRIC SHOCK, DO NOT REMOVE COVER (OR BACK). NO USER SERVICEABLE PARTS INSIDE, REFER SERVICING TO QUALIFIED SERVICE PERSONNEL.
HD40H(X) Performance Series Camera. User Guide
 Performance Series Camera. User Guide") HD31H(X) HD30H(X) HD40H(X) Performance Series Camera User Guide Document 1 2 HD40H(X)/HD30H(X)/HD31H(X) Camera User Guide Thank you for purchasing our product. If there are any questions, or requests,
HD31H(X) HD30H(X) HD40H(X) Performance Series Camera User Guide Document 1 2 HD40H(X)/HD30H(X)/HD31H(X) Camera User Guide Thank you for purchasing our product. If there are any questions, or requests,
Bluetooth Hands-Free Speaker Phone Custom Accessories 23685
 Bluetooth Hands-Free Speaker Phone Custom Accessories 23685 1. Product Description This versatile Bluetooth speakerphone is specially designed for the user to enjoy convenient and free wireless communication.
1. Product description
 User Manual 1. Product description Phone Finder is a brilliant Bluetooth device which allows you to find your phone in just one click. Once clicked, your phone will ring, vibrate and flash so that you
For more information. Go to Settings > About phone > Legal information to read the legal information.
 Quick Start Guide For more information Go to http://consumer.huawei.com/en/ to download the user guide for your device and read the FAQ, privacy policy, and other information. Go to Settings > About phone
Hardware Installation 1. Install two AA batteries in the mouse. Pairing Process in Vista and Windows XP SP2
 Hardware Installation 1. Install two AA batteries in the mouse. Pairing Process in Vista and Windows XP SP2 1. Open the Windows control panel, then select Bluetooth devices. 2. Click Add.. 3. Select My
User Guide Nokia Wireless Charging Car Holder CR-200/CR-201
 User Guide Nokia Wireless Charging Car Holder CR-200/CR-201 Issue 1.3 EN-US About your wireless charging car holder With the Nokia Wireless Charging Car Holder CR-200/CR-201, you can access and charge
Nokia Wireless Charging Plate DT-900 User Guide
 Nokia Wireless Charging Plate DT-900 User Guide Issue 1.4 2 About your wireless charger With the Nokia Wireless Charging Plate DT-900, you can charge your phone or other compatible device without the hassle
Alcatel - Lucent 8115 Audioffice
 Alcatel - Lucent 115 Audioffice User guide R100 AL90050USAAed01 2 Table of contents Important information 3 Safety guidelines 3 1 Discover your Alcatel-Lucent 115 Audioffice dock Box content Your Alcatel-Lucent
The Portable Air Pollution Monitor
 The Portable Air Pollution Monitor Quick Start Guide CONTENTS 1 Get to know your Atmotube Setting up the Atmotube 2 Installing the Atomotube application 3 Indication on device 4 Atmotube at a glance 5
SafeNet Reader CT1100. For Windows 7, 8.1 and 10 User Guide
 SafeNet Reader CT1100 For Windows 7, 8.1 and 10 User Guide General Features Device features Button for pairing/ connect Bluetooth Smart LED indicator low battery LED indicator Bluetooth Smart connect Connector
Tabel of Content. What s in the Box 01. Feature Introduction 02. Setting Up the Camera and Monitor 03. Replacing the Camera lens 11.
 Tabel of Content What s in the Box 01 Feature Introduction 02 Setting Up the Camera and Monitor 03 Replacing the Camera lens 11 Safety 12 Customer service 15 What s in the Box Feature Introduction Monitor
SP-1V SPEAKER USER GUIDE
 SP-1V SPEAKER USER GUIDE VERTU SP-1V BLUETOOTH TRAVEL SPEAKER USER GUIDE VERSION 1.0 English 1 2 English VERTU SP-1V BLUETOOTH TRAVEL SPEAKER Thank you for purchasing the Vertu SP-1V Bluetooth travel speaker.
BTK-A21 Bluetooth Headset User Manual
 BTK-A21 Bluetooth Headset User Manual Thank you for purchasing the Mini Bluetooth Headset BTK-A21, we hope you will be delighted with its operation. Please read this user's guide to get started, and to
Quick Start Guide KB20. A3 10 Type Case CJB1G9KALAAB
 Quick Start Guide A3 10 Type Case CJB1G9KALAAB KB20 Catalog Specification... 3 Getting started... 4 Connecting Keyboard and Tablet... 5 Indicator Status... 6 Keyboard Interface... 6 Hot Keys... 7 Battery
Activity Tracker. User s Manual
 Activity Tracker User s Manual Table of Contents Important Precautions.... 1 Questions?... 2 What s In The Box... 2 Getting Started..................................................................................................
Daily use. indicating that the loud speakers
 BeoLab 8002 Guide WARNING: To reduce the risk of fire or electric shock, do not expose this appliance to rain or moisture. Do not expose this equipment to dripping or splashing and ensure that no objects
VIRTUAL REALITY ALIEN ATTACK GAME. Item No Owner s Manual
 VIRTUAL REALITY ALIEN ATTACK GAME Item No. 206103 Owner s Manual Thank you for purchasing the Sharper Image Virtual Reality Alien Attack Game. Please read this guide and store it for future reference.
Federal Communications Commission (FCC) Statement
 Statement") FCC Information This device complies with Part 15 of the FCC rules. Operation is subject to the following two conditions: (1) this device may not cause harmful interference, and (2) this device must accept
FCC Information This device complies with Part 15 of the FCC rules. Operation is subject to the following two conditions: (1) this device may not cause harmful interference, and (2) this device must accept
Please read this safety information carefully and keep this user manual for later reference.
 Please read this safety information carefully and keep this user manual for later reference. This LED bulb is for indoor use only. Please disconnect this bulb from bulb holder before cleaning. Don t use
User Manual. eufy Security SpaceView Baby Monitor
 User Manual Anker Innovations Limited. All rights reserved. Eufy and the Eufy logo are trademarks of Anker Innovations Limited, registered in the United States and other countries. All other trademarks
mart atch B502 User Manual
 mart watch B502 User Manual Congratulations on your new ownership of a Polaroid smart watch. Please read the manual carefully for full understanding of all operations and functions of your new smart watch.
Honor Whistle Smart Control Rechargeable Headset User Guide
 Honor Whistle Smart Control Rechargeable Headset User Guide Box contents 1 x Headset 3 x Ear tips (small, medium and large) 1 x Ear hook Your headset at a glance 1 x USB adapter 1 x User guide 1 Charging
Installation instructions RF-identification system with integrated AS-i slave DTSLF / / 2010
 Installation instructions RF-identification system with integrated AS-i slave UK DTSLF 704153 / 07 04 / 2010 Inhalt 1 Preliminary note...4 1.1 Symbols used...4 2 Safety instructions...4 2.1 General...4
HONGKONG UCLOUDLINK NETWORK TECHNOLOGY LIMITED. 4G Free Roaming Hotspot
 HONGKONG UCLOUDLINK NETWORK TECHNOLOGY LIMITED 4G Free Roaming Hotspot E1 4G High Speed Internet E1 connects to the 4G or 3G local network automatically. It will switch to the best and the most stable
Lyric C1 Wi-Fi Security Camera
 Lyric C1 Wi-Fi Security Camera Home Quick Installation Guide Download the Honeywell Lyric app NOTE: Have your Wi-Fi password available and confirm your router communicates at 2.4 GHz before installation.
Thanks for shopping with Improvements! Orbit Bluetooth Tracker Card Item #569169
 Thanks for shopping with Improvements! Orbit Bluetooth Tracker Card Item #569169 To order, call 1-800-642-2112 West Chester, OH 45069 Made in China 1217 If you have questions regarding this product, call
Moff Band INSTRUCTION MANUAL
 Moff Band INSTRUCTION MANUAL Moff Band A wearable smart toy version 0.6 Table of contents Introduction Package Wearing Moff Band Setting up Moff using a smartphone Compatibility Introduction Installing
Manual LEICKE Sharon Mobile Bluetooth Keyboard with integrated Touchpad For Samsung Tablets (with limited functions universal for Android too)
") Manual LEICKE Sharon Mobile Bluetooth Keyboard with integrated Touchpad For Samsung Tablets (with limited functions universal for Android too) Product number: SI54196 Thank you for purchasing the Bluetooth
Manual LEICKE Sharon Mobile Bluetooth Keyboard with integrated Touchpad For Samsung Tablets (with limited functions universal for Android too) Product number: SI54196 Thank you for purchasing the Bluetooth
Always there to help you. Register your product and get support at NC1. Question? Contact Philips.
 Always there to help you Register your product and get support at www.philips.com/support Question? Contact Philips NC1 User manual Contents 1 Important safety instructions 2 Hearing Safety 2 General
USER GUIDE. Element Wireless Smart Plug Model: E1C-NB6
 USER GUIDE Element Wireless Smart Plug Model: E1C-NB6 Introduction: Sengled Element Smart Plugs enable automation of your non-smart devices and home appliances. You can control devices remotely and set
W10 PRO QUICK START GUIDE
 W10 PRO QUICK START GUIDE GETTING STARTED Thank you for purchasing a Hipstreet product and we hope you enjoy using it. Please visit our website at www.hipstreet.com IMPORTANT SAFETY PRECAUTIONS Always
Operation Manual for Cloud 3700F Version 0
 Operation Manual for Cloud 3700F Version 0 Version: 0 Page 1 of 5 Document History Version Date Description of Change Author 0.0 06 May 2014 Initial version Sarav Version: 0 Page 2 of 5 Table of Contents
Multi-zone weather station Model: RAR501 / RAA501H USER MANUAL
 Multi-zone weather station Model: RAR501 / RAA501H USER MANUAL Specifications... 7 Precautions... 8 About Oregon Scientific... 8 EU-Declaration of conformity... 9 FCC statement... 9 EN Index Overview...
888385_01 Install.book Page 1 Wednesday, November 11, :45 PM. SMDR6 Installation Guide
 888385_01 Install.book Page 1 Wednesday, November 11, 1998 2:45 PM SMDR6 Installation Guide 888385_01 Install.book Page 2 Wednesday, November 11, 1998 2:45 PM 888385_01 Install.book Page i Wednesday, November
MONOPRICE. Bluetooth Over-the-Ear Headphones with External Speakers. User's Manual. Model 15276
 MONOPRICE Bluetooth Over-the-Ear Headphones with External Speakers Model 15276 User's Manual SAFETY WARNINGS AND GUIDELINES This device is intended for indoor use only. Do not expose this device to water
FCC/CE Certification Information
 USER MANUAL Smart Security Light Model No.:HSC600184 Before using the product, please read the guide carefully to avoid any damages to the product in virtue of faulty operation or misuse. FCC/CE Certification
Additional Help & Info
 USER MANUAL Additional Help & Info If you need additional help or information, please go to REM-Fit.com for tips, info, support & tutorials. Register your product at REM-Fit.com/register ZEEQ is a registered
Quuppa LD-7L Installation Guide and Safety Information
 Quuppa LD-7L Installation Guide and Safety Information 1 Quuppa LD-7L Installation Guide and Safety Information 2016 Quuppa Contents For your safety Introduction Quuppa LD-7L dimensions Safety Information
INSTALLATION INSTRUCTIONS
 INSTALLATION INSTRUCTIONS 9245IN- ** SHOWERHEAD WITH SOUND CAPSULE BEFORE YOU BEGIN All information is based on the latest product information available at the time of publication. Kohler Co.reserves the
ToolSmart Digital Moisture Meter
 ToolSmart Digital Moisture Meter Model: TS06 User s Manual ToolSmart Digital Moisture Meter r Model:TS06 Overview TS06 ToolSmart Digital Moisture Meter measures the moisture content by detecting the electrical
FZ-VEBG11x. Cradle. Model No. FZ-VEBG11 1. Model No. U Universal R China 1: Area U: Universal R: China
 ORDER NO. CPD1306201CE Cradle Model No. FZ-VEBG11x This is the Service Manual for the following areas. U for Universal R for China Model No. FZ-VEBG11 1 U Universal R China 1: Area U: Universal R: China
Instruction Manual for
 Instruction Manual for BEDDI BEDDI Instruction Manual 1 4 2 5 3 6 9. 7 Visit our tutorial page for more video and info http://www.wittidesign.com/en/tutorial/beddi 8 10 11 12 13 Understanding BEDDI Controls
UA-06XB Beeper Bluetooth Headset. User Manual
 UA-06XB Beeper Bluetooth Headset User Manual Contents Product Specifications... 3 Components... 3 Beeper Overview... 4 Retractable Mechanism... 5 Ringer and Anti-Lost Function... 6 Wearing Style... 7-10
Instruction Manual. for BEDDI
 Instruction Manual for BEDDI Ver. 5 20/3/2017 BEDDI Instruction Manual Understanding BEDDI Controls 1 Smartphone Holder You can leave your smartphone here while it is charging. Supports up to a phone with
Supertooth One Users manual
 Supertooth One Users manual Bluetooth Handsfree Kit For Bluetooth Mobile Phones A. Product Description SUPERTOOTH ONE is a Bluetooth handsfree kit that supports headset or handsfree profile phones. Its
Headset. MM 80i TRAVEL. Instruction manual
 Headset MM 80i TRAVEL Instruction manual Important safety instructions In order to prevent hearing damage and health problems: Set the volume to a low level before inserting the ear canal phones into your
Z-Wave Ceiling-mount Smoke Detector HZS-200E/HZS-200A
 Z-Wave Ceiling-mount Smoke Detector Copyright Z-Wave Ceiling-mount Smoke Detector Copyright 2015 by PLANET Technology Corp. All rights reserved. No part of this publication may be reproduced, transmitted,
USER MANUAL.
 USER MANUAL www.activeon.com Table Of Contents 1. Name of each part 2. Operation & button description 3. Start the camera 4. LCD screen shot 5. Graphical icon description 6. Video recording 7. Photo shoot
SafeNet Reader K1100. For Windows 7, 8.1 and 10 User Guide
 SafeNet Reader K1100 For Windows 7, 8.1 and 10 User Guide General Features Device features Connector for USB battery charging and USB usage LED indicator low battery For workstations without built in Bluetooth
SMARTPLUG. Quick Start Guide. Model: isp6x. Intelligent Home Solutions. Control your SmartPlug from anywhere with your smartphone WHAT YOU LL NEED
 Model: isp6x Intelligent Home Solutions Quick Start Guide SMARTPLUG Control your SmartPlug from anywhere with your smartphone WHAT YOU LL NEED WiFi network transmitting at 2.4GHz 1 Apple device running
BLACKBERRY RADAR H2 ITC100 1 ITC100 2 February 2019
 BLACKBERRY RADAR H2 ITC100 1 ITC100 2 February 2019 1 Safety information Before you start using the BlackBerry Radar H2 device (herein after referred to as device), review the safety and regulatory information
FEMTOCELL MULTI-BAND SOHO B2/B4 (SS2FII)
") FEMTOCELL MULTI-BAND SOHO B2/B4 (SS2FII) Table of Contents Welcome... 3 Box Content... 4 Connection Overview... 5 Quick Setup... 6 Common Troubleshooting Procedures... 10 FAQs... 11 2 Welcome The Femtocell
FEMTOCELL MULTI-BAND SOHO B2/B4 (SS2FII) Table of Contents Welcome... 3 Box Content... 4 Connection Overview... 5 Quick Setup... 6 Common Troubleshooting Procedures... 10 FAQs... 11 2 Welcome The Femtocell
PMX 680i SPORTS. Instruction manual
 PMX 680i SPORTS Instruction manual Important safety instructions In order to prevent damage to health: Set the volume to a low level before putting the earphones on. Avoid listening at high volume levels
PILOT QUICK START GUIDE
 PILOT QUICK START GUIDE www.hipstreet.com Getting started Device Layout Camera Touch screen App Menu 01 Back Button Home Button Menu Button History Button Volume -/+ Buttons Power Button Volume Buttons
7 Inch Quad Core Tablet
 7 Inch Quad Core Tablet Cautions This user manual has been specially designed to guide you through the functions and features of your device. ) Please read this manual carefully before using your device
Portable camera installation tool
 Portable camera installation tool NPD 3001 WAP User Guide en english Portable camera installation tool Table of contents en 3 Table of contents 1 Safety 4 1.1 Safety precautions 4 1.2 Important safety
PLEASE READ BEFORE OPERATING THIS EQUIPMENT.
 PLEASE READ BEFORE OPERATING THIS EQUIPMENT. HALO BOLT ACDC WIRELESS Thank you for choosing HALO! Powerful, compact and easy to use, the HALO BOLT ACDC WIRELESS can safely jump start your car or charge
NIMBUS a personal dashboard for your digital life
 INVENTED BY REAL PEOPLE LIKE YOU Ryan Pendleton NIMBUS a personal dashboard for your digital life OVERVIEW Part of the Quirky + GE collection of smart products, Nimbus is a highly customizable 4-dial clock
Activity Watch. User s Manual. Model No. Model No. Model No. Model No. IFMATKR115.0 IFWATKR115.0 IFGCLM115.0 IFGCLW115.0
 Activity Watch User s Manual Model No. Model No. Model No. Model No. IFMATKR115.0 IFWATKR115.0 IFGCLM115.0 IFGCLW115.0 Table of Contents Important Precautions.... 1 Questions?... 2 What s In The Box...
RM1 Bluetooth Remote Controller
 RM1 Quick Start Guide (Please study this Guide thoroughly before use) RM1 Bluetooth Remote Controller The FiiO RM1 is a Bluetooth remote controller for controlling Bluetooth-enabled devices. It may be
FCC Regulatory Information
 DVW32C Advanced Wireless Voice Gateway - Safety and Installation Product Insert Federal Communications Commission (FCC) Interference Statement This equipment has been tested and found to comply with the
ATW-CHG3 / ATW-CHG3N. User Manual TWO-BAY CHARGING STATION
 ATW-CHG3 / ATW-CHG3N User Manual TWO-BAY CHARGING STATION Introduction Thank you for purchasing this Audio-Technica product. Before using the product, read through this user manual to ensure that you will
Control Panel. Power LED indicator
 Control Panel Power LED indicator Mode LED indicator 1. Power button: Long press for three seconds to power off Short press for one second to check the battery capacity 2. Preset button(under Wi-Fi mode):
WIRELESS BLUETOOTH BOOMBOX
 G-BOOM WIRELESS BLUETOOTH BOOMBOX Wireless Bluetooth Rugged Construction Rechargeable Battery USB Device Charging G-650 Welcome to G-PROJECT Thanks for purchasing G-BOOM and joining G-Project. With just
OVERVIEW. *Press and release. *Hold for 5 seconds. *Charging port
 User Manual OVERVIEW *Press and release *Hold for 5 seconds *Press and release *Charging port TLink only has three buttons with three basic functions. However, updates may be released through the application
User manual BT3900. Register your product and get support at
 User manual BT3900 Register your product and get support at www.philips.com/support Contents 1 Important 1 Safety 1 Notice 1 2 Your Bluetooth speaker 3 Introduction 3 What's in the box 3 Overview of the
Chant. Portable Bluetooth Audio System
 Chant Portable Bluetooth Audio System Greetings and Welcome to the House of Marley We are pleased and honored you have selected this Marley product to become a part of your music experience. What You Get
Activity Tracker. User s Manual. Model No. Model No. Model No. Model No. IFACT115.0 IFACT215.0 IFVUEWM115.0 IFVUEWM215.0
 Activity Tracker Model No. Model No. Model No. Model No. User s Manual IFACT115.0 IFACT215.0 IFVUEWM115.0 IFVUEWM215.0 Table of Contents Important Precautions.... 1 Questions?... 2 What s In The Box...
Congratulations on choosing the No.1 brand in HD camera/ light combos. The tips below are essential for all Fly12 users.
 Quick Start Guide Congratulations on choosing the No.1 brand in HD camera/ light combos. The tips below are essential for all Fly12 users. TIPS Fly12 comes pre-installed with a class 10 microsd card Once
RONIN 2 Diagram. 1. Grip 2. Gimbal Connector 3. HD-SDI Output 4. Power Button V Accessory Power Port
 RONIN 2 Diagram 1. Grip 2. Gimbal Connector 3. HD-SDI Output 4. Power Button 5. 14.4V Accessory Power Port 6. Pan Motor 7. Camera Upper Mounting Plate 8. GPS 9. HD-SDI Input 10. Focus Mounting Plate 11.
Wireless Bluetooth Music Receiver
 Wireless Bluetooth Music Receiver Quick Start Guide Model: BTM300 Package Contents: Diamond Bluetooth Music Receiver (BTM300) x 1 Quick Installation Guide x 1 3.5mm to 3.5mm stereo cable x 1 3.5mm to RCA
User Manual. Optoma NuForce BE Free8 Truly Wireless Premium Earphones. Version VA3.0
 User Manual Optoma NuForce BE Free8 Truly Wireless Premium Earphones Regulatory model name: APBEFREEB Version VA3.0 1 Contents WHAT S IN THE BOX BE Free8 EARPHONES THE BASICS Charging your BE Free8 Battery
Manual Leicke Sharon. Mobile Bluetooth Keyboard for ios Devices
 Manual Leicke Sharon Mobile Bluetooth Keyboard for ios Devices Thank you for purchasing the Bluetooth Keyboard Case from Sharon. We hold several brands to produce and distribute our products: LEICKE (power
Lenovo K6 NOTE. Quick Start Guide. Lenovo K53a48. Read this guide carefully before using your smartphone.
 Lenovo K6 NOTE Quick Start Guide Lenovo K53a48 Read this guide carefully before using your smartphone. Reading before using your smartphone For your safety Before assembling, charging or using your mobile
ES-CAM4A Motorized IP Camera
 ES-CAM4A Motorized IP Camera www.etiger.com EN Specifications - Image sensor: 1/3.2 CMOS, 2 MP - Video resolution 320x240, 640x480, 1280x720 (H.264) - Digital zoom: x2 - Rotation: horizontal (-175 / +175
User Manual. Product Name: LED Spot Light. Model:Q01BM SOLAR PROJECTION SPOTLIGHT SET BLUETOOTH CONTROLLED. Instruction Manual
 User Manual SOLAR PROJECTION SPOTLIGHT SET BLUETOOTH CONTROLLED Product Name: LED Spot Light Model:Q01BM1740-08 Manufacture: Quanxin Lighting & Electrical (USA) Inc Instruction Manual Model: Q01BM1740-08
Instructions for use. Phone Adapter 2.0
 Instructions for use Phone Adapter 2.0 167807UK / 2018.01.31 Contents Using the ConnectLine phone adapter 4 Streamer Pro versus Streamer 1.4 5 Incoming calls 6 Outgoing call 10 Cleaning the Phone Adapter
Bluetooth Mini Keyboard. User s Manual. Version /05 ID NO: PAKL-231B
 Bluetooth Mini Keyboard User s Manual Version 1.0 20010/05 ID NO: PAKL-231B1501-00 0 About This Manual This manual is designed to assist you in installing and using the Bluetooth Keyboard Information in
CONTENTS. Safety Information Cleaning and Maintenance Function Information Messaging
 CONTENTS Safety Information... - 3 - Cleaning and Maintenance... - 3 - Function Information... - 5 - Messaging... - 7 - Email... - 8 - Camera... - 9 - Music... - 10 - FM Radio... - 12 - Sound Recorder...
BW50 SportBuds. User Guide. Control Buttons & Operations. On / Off. Play / Pause / Answer. Volume / Track Selection. Models: GDI-EXBW50...
 BW50 SportBuds Models: GDI-EXBW50...59 User Guide Control Buttons & Operations On / Off PRESS & HOLD the Multi-Function Button for 5 seconds to turn it on for the first time or to connect to a new device.
PowerView. Hub QUICK START GUIDE
 PowerView Hub QUICK START GUIDE When prompted, scan or type the Accessory Setup Code below. Table of Contents Kit Contents. 3 Connections. 5 Home Automation Integration. 13 Troubleshooting. 15 2018 Hunter
5 B&W Rear View System Camera
 5 B&W Rear View System Camera Instruction Manual MODEL: CA453 www.lorexcctv.com Copyright 2007 LOREX Technology Inc. Thank you for purchasing the Lorex 5 Black & White Rear View System Camera. This system
Get to Know Your Tablet
 Get to Know Your Tablet 1 8 My Verizon You re now connected to Verizon 4G LTE. Lightning fast, Lightning strong. For more information, visit verizonwireless.com/4glte. REGISTER at verizonwireless.com/myverizon
MP BT-200 Lightweight Bluetooth Over-the-Ear Headphones
 MP BT-200 Lightweight Bluetooth Over-the-Ear Headphones P/N 33397 User's Manual CONTENTS SAFETY WARNINGS AND GUIDELINES... 3 FEATURES... 4 CUSTOMER SERVICE... 5 PACKAGE CONTENTS... 5 PRODUCT OVERVIEW...6
PTT-100-VZ Wireless Speaker Microphone
 Federal Communication Commission Interference Statement This equipment has been tested and found to comply with the limits for a Class B digital device, pursuant to Part 15 of the FCC Rules. These limits
testo 184 Data logger Instruction manual
 testo 184 Data logger Instruction manual 2 1 Safety and the environment 1 Safety and the environment 1.1. About this document Use > Please read this documentation through carefully and familiarize yourself
USER GUIDE. AXIS T8120 Midspan 15 W 1-port ENGLISH
 USER GUIDE AXIS T8120 Midspan 15 W 1-port ENGLISH Legal Considerations Video and audio surveillance can be prohibited by laws that vary from country to country. Check the laws in your local region before
Freetalk Bluetooth Speakerphone
 Freetalk Bluetooth Speakerphone USER GUIDE Three Colours Available! 1713164 - Storm Blue 1713168 - Titanium 1713169 - Pure White Contents 1. About Bluetooth Speakerphone...3 2. About Bluetooth Technology...3
Smartphone Docking Station with Speaker and Bed Shaker
 TM WARRANTY The Silent Call AlarmDock is warranted for (see individual items for length of warranty) from the day of purchase to be free of defects in material and workmanship. This warranty is limited