Masking Engine User Guide. October, 2017
|
|
|
- Andrea Simon
- 5 years ago
- Views:
Transcription
1 Masking Engine User Guide October, 2017
2 Masking Engine User Guide You can find the most up-to-date technical documentation at: docs.delphix.com The Delphix Web site also provides the latest product updates. If you have comments about this documentation, submit your feedback to: 2017 Delphix Corp. All rights reserved. Delphix and the Delphix logo and design are registered trademarks or trademarks of Delphix Corp. in the United States and/or other jurisdictions. All other marks and names mentioned herein may be trademarks of their respective companies. Delphix Corp Seaport Blvd, Suite 200 Redwood City, CA 94063
3 Masking Engine Overview Basic Tasks for a Database File Certify Data Create and Define a Rule Set Create and Define Connections Create or Import an Environment Masking Your Data Profile Data and Define Inventory Provision Data Start Masking Masking Engine Components Profiling Data Provisioning and or Subsetting Data Masking Data Certifying Data Understand and Manage the Masking Engine Delphix Masking Engine - Database User Permissions for executing Masking and Profiling jobs Managing Environments Managing Connectors Managing Rule Sets Managing the Masking Inventory Managing Jobs File Masking Flat File Masking Tokenization Monitor Jobs Scheduler Tab Settings Tab Admin Tab Risk Tab Restarting Delphix Masking
4 Masking Engine Overview The Delphix Masking Engine is a multi-user, browser-based web application that provides complete, secure, and scalable software for your data masking and tokenization needs, while meeting enterprise-class infrastructure requirements. There are several advantages to using Delphix to mask your data: Risk reduction By using masked data that is suitable for a large number of business activities, instead of copies of the real data, the risk of a data breach is greatly reduced. Instead of having 20 databases with sensitive data to be secured, you can have just one. Automated identification of sensitive data (profiling) The Delphix Profiler identifies the location of sensitive data automatically across all your databases, copybooks, and files, the time-consuming work associated with a data masking project is reduced significantly. Faster masking of sensitive data Delphix is 10x faster in securing your data because of its easy-to-use web browser interface and the fact that there is no programming required! Referential integrity Delphix's patented, repeatable deterministic algorithms automatically maintain referential integrity, not only within a database but across heterogeneous databases and file types. Leverage investment The Delphix Masking Engine can automatically create mappings based on the inventory of sensitive data. This allows you to use the powerful Extract-Transform-Load (ETL) engine within your existing infrastructure, without needing to code and maintain hundreds or thousands of jobs. Another major advantage is that you can use the masking algorithms deployed as mapplets, use provided mapplets, or write your own mapplets to use with the Masking Engine. Safe data sharing By sharing masked data safely and easily, relationships with partners, third parties, and outside vendors improve. Lowers costs By automating the entire masking process, securing only essential data, and provisioning only the data you need, costs to secure sensitive data are greatly reduced. 4
5 Basic Tasks for a Database File Whether you plan simply to mask data, or to profile, provision, AND mask data, you need to perform certain tasks. Masking databases is similar to masking files, but not identical. If you are working with a source, you must perform the following tasks. The links in this list describe the tasks Create or Import an Environment. Define Connections. Define a Rule Set. Profile Data and Define Inventory. Provision Data (Databases only). Mask Data. 7. Certify Data (Databases only). 5
6 Certify Data After completing the other tasks and masking your data, you should create a job to certify your data on an ongoing basis. This alerts you if unmasked data is introduced to a masked database. Certifying Data 3. Create a Certify job, as described in Creating a New Certify Job below. Run the Certify job. Confirm that no unmasked data has been introduced. For detailed information about certifying data, see Certifying Data. Creating a New Certify Job Click Certify. The Create Certify Job window appears. You will be prompted for the following information: a. Job Name A free-form name for the job you are creating. Must be unique. b. c. d. Multi Tenant Check box if the job is for a multi-tenant database. Rule Set Select a rule set that this job will execute against. Generator The default value is Delphix. e. f. No. of Streams The number of parallel streams to use when running the jobs. For example, you can select two streams to run two tables in the ruleset concurrently in the job instead of one table at a time. Remote Server (optional) The remote server that will execute the jobs. This option lets you choose to execute jobs on a remote server, rather than on the local Delphix instance. Note: This is an add-on feature for Delphix Standard Edition. g. Min Memory (MB) (optional) Minimum amount of memory to allocate for the job, in megabytes. h. i. Max Memory (MB) (optional) Maximum amount of memory to allocate for the job, in megabytes. Feedback Size (optional) The number of rows to process before writing a message to the logs. Set this parameter to the appropriate level of detail required for monitoring your job. For example, if you set this number significantly higher than the actual number of rows in a job, the progress for that job will only show 0 or 100%. j. Prescript (optional) Specify the full pathname of a file that contains SQL statements to be run before the job starts, or click Browse to specify a file. If you are editing the job and a prescript file is already specified, you can click the Delete button to remove the file. (The Delete button only appears if a prescript file was already specified.) For information about creating your own prescript files, see Creating SQL Statements to Run Before and After Jobs. k. Postscript (optional) Specify the full pathname of a file that contains SQL statements to be run after the job runs, or click Browse to specify a file. If you are editing the job and a postscript file is already specified, you can click the Delete button to remove the file. (The Delete button only 6
7 l. m. n. o. p. appears if a postscript file was already specified.) For information about creating your own postscript files, see Creating SQL Statements to Run Before and After Jobs. Delta Masking Check this box to mask rows that are not masked and are identified as part of the certification process as polluted. Batch Update (optional) Enable or disable use of a batch for updates. A job's statements can either be executed individually, or can be put in a batch file and executed at once, which is faster. Disable Trigger (optional) Whether to automatically disable database triggers. The default is for this check box to be clear and therefore not perform automatic disabling of triggers. Comments (optional) Add comments related to this certification job. (optional) Add address(es) to which to send status messages. When you are finished, click Save. 7
8 Create and Define a Rule Set After you create an environment and connectors, you need to define a rule set. Defining a Rule Set for a Database or File Click on the name of an Environment, and then click the Rule Set tab. The Rule Set screen appears. Click Create Rule Set to the upper right of the Rule Set screen. The Create Rule Set screen appears. This screen lets you specify which tables belong in the Rule Set. a. Enter a Name for your Rule Set. b. c. d. e. Select a Connector name from the dropdown. The list of tables/files for that connector appears. Click individual tables/file names in the list to the right to select them, or click Select All in the bottom left to select all the tables. Click Save. You are returned to the Rule Set screen. 3. When you are finished, click Save. 4. You may then need to define the Rule Set by modifying the table settings as described in Managing Rule Sets. For example: For a table, you may want to filter data from the table. For a file, you must select a File Format to use. 8
9 Create and Define Connections After you create an environment, you need to create connections. To define connectors: 3. Click the name of an environment. In the Environment Overview screen, click the Connector tab. The Connector List screen appears. In the upper right-hand corner, click Create Connection. The Create Connection window appears, prompting you for connection information for the database or file. 4. Click Save. You are returned to the Connectors screen, where you can add additional connectors if necessary. For detailed information about connections, see Managing Connectors. 9
10 Create or Import an Environment Creating a New Environment Importing an Environment Environments define the scope of work for masking. In order to mask or provision databases and files, you first need to create an environment; this is where the masking engine will store the connection information as well as the masking and provisioning rules for those data stores. An environment can contain multiple database connections and multiple file connections. Creating a New Environment In the upper right-hand corner of the screen, click Add Environment. The screen prompts you for the following items: a. Application Name The name of the application associated with this environment, for informational purposes. (An integrated test environment can have multiple applications.) b. Environment Name The display name of the new environment. c. Purpose The way the environment is used in the development process: Development, Gold Copy, QA, Training, and so on. Either click Save to return to the Environments List/Summary screen, or click Save & View to display the Environment Overview screen. Importing an Environment In the upper right-hand corner of the screen, click Import Environment. The screen prompts you for the following items: a. Application Name The name of the application associated with this environment, for informational purposes. (An integrated test environment can have multiple applications. b. Environment Name The name of the environment that you want to import. c. d. Purpose The way the environment is used in the development process: Development, Gold Copy, QA, Training, and so on. Select Use to browse for the XML file that contains the information you want to import. (This file must be a previously exported Delphix Agile Data Masking environment.) Either click Save to return to the Environments List/Summary screen, or click Save & View to display the Environment Overview screen. 10
11 Masking Your Data You can mask data on-the-fly or you can provision it first and then mask it (in-place masking). If you plan to use Delphix Masking to provision your data before masking it, you must first follow the procedure in the preceding section, Provision Data. Masking Your Data Create a masking job. a. Now that you have identified and prepared your data for masking, you can create a new masking job and confirm it. i. Select Mask. The Create Masking Job window appears. ii. Choose appropriate rule settings. You will be prompted for the following information: Job Name A free-form name for the job you are creating. Must be unique across the entire application. 3. Masking Method Select In-Place. Multi Tenant Check this box to allow this job to be used with multiple databases. Provision Masked VDBs A job must be Multi Tenant to use it when creating a masked virtual database (VDB). 4. Rule Set Select a rule set against which this job will execute. iii. When you are finished, click Save. Run the masking job. i. Under Action, click Run to run the masking job. ii. Click the job to view the progress of the masking job. 3. Confirm that you have masked data/generated the masking job: 11
12 i. ii. Examine the data in the database columns or the fields in the file to determine whether the data is masked. Run the application that uses the data to ensure that you do not see any unmasked data and that there are no issues in running the application. For detailed information about masking data, see Masking Data. 12
13 Profile Data and Define Inventory Before performing any profiling, be sure that your administrator has set up the site profiles according to the Masking Engine Admin Guide. After selecting tables (connectors) and defining a rule set, which you did in the preceding sections, you create a profiling job. The purpose of profiling data is to determine what data you want to mask by updating an inventory of your data with sensitive elements identified. You can then review and edit that inventory. If you are using a source file instead of a source database, you can choose to either populate your inventory manually or use profiling to profile your data. Because profiling assigns algorithm information to fields or columns, you might prefer not to profile your data if you would rather manually assign these properties. If you choose not to profile your data, skip this section. You can mask data on-the-fly or you can provision the data (using Delphix Masking or other tools) and then mask it (in-place masking). For a mainframe environment, the masking engine generates code for provisioning and masking on the mainframe system. When you defined a rule set, an empty inventory was automatically created.)\ A profiling job updates or populates an inventory of your data and identifies potential sensitive data elements based on the profiling set (rule sets) you use. When you examine your inventory, you might determine that you only want to select certain columns to mask, to finalize your inventory. For information about the inventory, see Managing the Masking Inventory. Profiling Data Create a profiling job as described in Creating a New Profiling Job. Run the profiling job you just created. When you run this profiling job, it updates/populates an inventory. 3. To view the inventory, click the Inventory tab while in an Environment Overview. 4. Examine the inventory to ensure that the profiling job has included everything you want to mask. For example, if you selected a First Name field, you probably want the Last Name field as well. To see which columns were selected for masking, select the associated rule set. Make sure you have included all sensitive data elements (for example, personal identifying information) from the table that you want to mask. 5. If necessary, modify the inventory. When a profiling job runs, it automatically updates the inventory for the given rule set. If you do not want the Profiler to automatically update the inventory, change the ID Method to User. For detailed information about profiling data, see Profiling Data. What you do next depends on how you plan to mask your data. If you plan to mask your data in-place and you want to use Delphix Masking to provision your data, proceed with Provision Data next. If you plan to mask data on-the-fly, or have already provisioned your data outside of Delphix Masking, continue with Mask Data. 13
14 Provision Data If you are using a source file, instead of a source database, do NOT provision your data. Skip this section. Prerequisites Before you can provision data, you must first: create your source environment in the masking engine ( Create or Import an Environment) define connections ( Define Connections) define a rule set ( Define a Rule Set) create a target environment ( Create or Import an Environment) Provisioning Data 3. Create a provisioning job as described in Creating a New Provisioning Job. Run the provisioning job. Ensure you have the information you need. For detailed information about provisioning data, see Provisioning and/or Subsetting Data. 14
15 Start Masking Delphix Masking is a Web application that you use within a browser window. Starting Delphix Masking Enter your Delphix Masking URL into your client browser. This URL will be different depending on the type of installation you have deployed. To better understand the types of Masking Engine deployments, read the section "Before You Begin" in Delphix Masking Quick Start Guide. a. For the Standalone Masking Engine: Engine IP or DNS name>:8282/dmsuite b. For the Combined Delphix Engine and Masking Engine: Engine IP or DNS name>:8282/dmsuite Enter your User Id and Password. User Id is not case-sensitive; Password is case-sensitive. If this is your first time logging in, the default Administrator is username delphix_admin, password Delphix_ Click Login. The Environments List/Summary screen appears. For detailed information about this screen, see Environment List/Summary Screen. The username appears in the upper right corner of the screen. The 4. To log out of Delphix Masking, click Log Out to the right of the username. 15
16 Masking Engine Components Delphix consists of the following major components: Profiler Provisioning Masking Certification The following sections describe each component. 16
17 Profiling Data Profiling is one of the major components in Delphix masking. The purpose of profiling data is to determine what data you want to mask by updating an inventory of your data with sensitive data elements identified. You can then review and edit that inventory. A profiling job updates or populates an inventory of your data and identifies potentially sensitive data elements based on the profiling set (rule sets) you use. When you defined a rule set, the masking engine automatically created an empty inventory. When you examine your inventory, you might determine that you only want to select certain columns to mask, to finalize your inventory. The Delphix profiler uses two different methods to identify the location of sensitive data: Searching through the column names in the target database by querying the database catalog (metadata). Looking at the data itself using a sampling algorithm, to see whether there is any sensitive data. This is especially useful for files, and for comment and notes fields in a database. If you are using a source file instead of a source database, you can choose to populate your inventory manually or use the Delphix Masking Profiling module to profile your data. Because profiling assigns algorithm information to fields or columns, you might prefer not to profile your data if you would rather manually assign these properties. If you choose not to profile your data, skip this section. 17
18 Provisioning and or Subsetting Data The Delphix Engine allows you to provision all or a subset of data to a target you choose. It can create a target database for you on your existing systems or in the cloud. While the target database will normally be the same type as the source, it can also be different for example, Oracle to SQLServer. This power and flexibility will provide your development and testing teams with the ability to procure fresh, secure data from a source environment and move it to their non-production environment any time they need it. Provisioning jobs perform extract and load functions only. The Delphix Engine does not transform data as part of this process. Practical Subset Example This section provides an example of when you might want to subset data. All the functionality for provisioning is done at the individual table level. If you want to filter information based on customers, as part of the rule set you can filter as follows: Columns Select a column or columns from a table when you do not want to load data to all the columns in a table Filter Specify a filter to run on the data before loading it to the target database Join Table Specify a SQL join condition so you can define primary key/foreign key relationships between tables List Select a list to use for filtering data in a table Custom SQL Use SQL statements to filter data for a table To change these filters, see Modifying Tables in a Rule Set. 18
19 Masking Data After you create an environment, connection, rule set, and inventory, you mask data. Masking Overview Masking In-Place Advantages/Disadvantages: On-the-Fly Masking Advantages/Disadvantages: Masking a Primary Key Column Masking Overview To maintain Referential Integrity (RI), Delphix masks each field on itself. This repeatable masking automatically maintains RI (for verbatim matches), even if it is between applications or platforms. For example, if you want to match the values between a parent and children, simply select the same algorithm to mask them. This ensures that referential integrity is maintained within the same database. Furthermore, Delphix creates the integrity across database platforms (between SQL Server and DB2, for example) or across files (tab-delimited files) and relational data (a column in a SQL Server database) just select the same masking algorithm. As a practical example, assume you have an SSN column in a Microsoft SQL Server database, an SSN column in a DB2 database, and an SSN field in a tab-delimited file. If the SSN value was across the two databases and the file, and you use the same SSN algorithm for all three, the masked value (for example, ) will be the same for all three. There are two ways to mask data. You can mask data on-the-fly or you can provision it first and then mask it. The following sections explain these two options. Masking In-Place With in-place masking, production data that already exists in a nonproduction environment is masked, in place. Advantages/Disadvantages: The main advantage to in-place masking is when you have provisioned data to a non-production environment that contains some production data. Delphix can mask the data in those existing environments. In-place masking masks only the columns you flag in the inventory, leaving the other columns alone. The main disadvantage is that production data is copied potentially into a nonproduction environment while the masking takes place, so sensitive data might exist in the nonproduction environment until the masking is complete. On-the-Fly Masking With on-the-fly masking, you specify the source of the information to be masked, and where the masked data will be loaded. On-the-fly masking is an Extract Transform Load (ETL) process. 19
20 The Delphix Engine extracts the data from a source environment, such as a production copy, gold copy, or disaster recovery copy (only read from a database not an archived file). The Delphix Engine transforms, or masks, the data in the memory of the application server on which it resides, and then loads the masked data to the target environment. Delphix does not modify the original source data; only the target data changes. Advantages/Disadvantages: One advantage to on-the-fly masking is that sensitive production data doesn't get persisted in any nonproduction environment. This method only requires a production source and nonproduction target environment. Because on-the-fly masking uses all insert statements, it typically performs better than in-place masking, which uses updates. The main disadvantage to on-the-fly masking is that it requires an active connection to a source production environment or copy. Masking a Primary Key Column Because primary keys require unique values, you must mask those columns using a Delphix algorithm that can guarantee uniqueness. You apply the same mapping algorithm to both the primary key column and the foreign key column so the values between the columns will match. For information about creating algorithms, see Delphix Administrator's Guide. 20
21 Certifying Data After profiling and masking data, you want to monitor or audit the process (also known as certifying your data). This alerts you if unmasked data is introduced to a masked database. For example, if you mask your master customer database once a week, and an input file of unmasked is introduced by mistake, you want to be able to detect that. The purpose of the Delphix certification module is to identify such a situation. To do so, you create a Certification job against that database (see Creating a New Certify Job). The Certifying job goes through every row in the tables in a rule set and verifies that every value designated for masking in the inventory is masked. The Certification job output lists the fields designated for masking, along with the result of the certification: Clean, Polluted, or Not Applicable. Polluted data indicates that Delphix encountered a value that could potentially be an unmasked production value. Not Applicable indicates that Delphix was unable to determine whether the value is masked. Certification and Delta Masking As part of the certification process for databases, you can specify to mask rows that are not masked but are identified as part of the certification process as polluted. In other words, if the certification process finds "polluted rows," Delta Masking instructs Delphix to mask the polluted records to ensure that those polluted rows get masked. A Practical Certification Example When a certification job runs, it looks at the inventory defined for that database. If the inventory indicates to mask the Customer.First_Name column with the First Name Secure Lookup algorithm, the certification job ensures that there are only masked values for that column. The First Name Secure Lookup algorithm uses a look-up file that contains all the first names used to mask a column. When the certification job runs, it compares the values in the Customer.First_Name column with the look-up file, which contains only the mask values. If any names in the column do not match the names in the look-up file, Delphix indicates that it found polluted data in the Customer.First_Name column. You can use the Delphix Certification module to certify all data masked with Secure Lookup Algorithms. You can also certify data masked with Segmented Mapping Algorithms, keeping in mind that the segmented mapping algorithm must specify a range for each segment. For example, if the SSN Segmented Mapping algorithm first segment has a range from , and there is SSN data in the Customer.SSN column with the first three digits of 435, the certification job will tag the Customer.SSN column as containing polluted rows. With the Telephone algorithm, the middle segment is the exchange. Because the exchange is always masked to an exchange of 555, any other exchange will indicate polluted data. We recommend that you run certification jobs at least once in between refreshes, when the refreshes for a database are scheduled 7 days or more apart. 21
22 Understand and Manage the Masking Engine The following sections detail the various tabs and functions in Delphix, presented in the order in which they appear in the Delphix application: Managing Environments Managing Connectors Managing Rule Sets Managing Masking Inventory Managing Jobs Tokenization 22
23 Delphix Masking Engine - Database User Permissions for executing Masking and Profiling jobs Introduction This document provides the recommended list of permissions required for executing Masking and Profiling jobs on the Delphix Masking Engine. Recommend creating a separate Database user (i.e. named - Masking User ) to be created across all the databases with the appropriate permissions on the schemas to be masked. If needed create multiple users. The appropriate permissions for the database Masking User are listed below. The benefits of having a separate DB Masking User : Replicating the new user (and privileges) are easier Access Audits are much easier Can be created as central AD user and used at many places simultaneously List of Database Entitlements Required to Run Masking Jobs Read data from Tables Write data to Tables Update data in tables Create indexes Drop indexes Create triggers Drop triggers Disable triggers Enable triggers Alter tables add column Alter table delete column Create constraints Delete constraints Disable constraints Enable constraints List of Database Entitlements Required to Run Profiling Jobs View Definition (Schema) Read Data from Tables 23
24 Managing Environments Environments define the scope of work in Delphix. In order to mask or provision databases and files within Delphix, you first need to create an Environment in which Delphix will store the connection information and masking and provisioning rules for those data stores. An environment can contain multiple database connections and multiple file connections. The Environment List/Summary Screen Creating or Importing an Environment Creating a New Environment Importing an Environment Exporting an Environment Copying and Deleting Environments The Environment Overview Screen The Environment List/Summary Screen The Environment List/Summary screen provides a dashboard overview of what Delphix is doing. It is the first screen that appears when a user logs in to Delphix. You can also reach it by clicking the Environments tab or by clicking the Environment List link elsewhere in the application. To search for an environment, enter an environment name in the Search field and click Search. The Environments List/Summary screen contains the following columns: Application The name of the application. Environment The name of the environment. Purpose The purpose of this environment. Jobs Running The number of running jobs. Export Export the environment. Copy Copy the environment. Delete Delete the environment. Creating or Importing an Environment Environments define the scope of work for masking. In order to mask or provision databases and files, you first need to create an environment; this is where the masking engine will store the connection information as well as the masking and provisioning rules for those data stores. An environment can contain multiple database connections and multiple file connections. Creating a New Environment In the upper right-hand corner of the screen, click. Add Environment The screen prompts you for the following items: 24
25 a. Application Name The name of the application associated with this environment, for informational purposes. (An integrated test environment can have multiple applications.) b. Environment Name The display name of the new environment. c. Purpose The way the environment is used in the development process: Development, Gold Copy, QA, Training, and so on. Either click Save to return to the Environments List/Summary screen, or click Save & View to display the Environment Overview screen. Importing an Environment In the upper right-hand corner of the screen, click Import Environment. The screen prompts you for the following items: a. Application Name The name of the application associated with this environment, for informational purposes. (An integrated test environment can have multiple applications. b. Environment Name The name of the environment that you want to import. c. d. Purpose The way the environment is used in the development process: Development, Gold Copy, QA, Training, and so on. Select Use to browse for the XML file that contains the information you want to import. (This file must be a previously exported Delphix Agile Data Masking environment.) Either click Save to return to the Environments List/Summary screen, or click Save & View to display the Environment Overview screen. Exporting an Environment You can export an environment from the Environment List/Summary screen. You can later import that environment to a different instance of Delphix, such as a development test instance or a production instance. To export an environment: Click the Export icon. The popup fills in the following items: a. Environment Name b. File Name. 3. Click Export. All the information for the specified environment (connectors, rule sets, inventory, jobs, and so on) is exported to an XML file. A status popup appears. When the export operation is complete, you can click on the Download file name to access the XML file. Copying and Deleting Environments 25
26 You can copy and delete environments from the Environment List/Summary screen. To copy an environment: Click the Copy icon to the right of the environment status. The popup prompts you for the following items: a. Name b. c. Purpose Application Name 3. Click Save. The environment definition is copied to a new name. The copy feature is a very powerful tool. If you have multiple similar environments, you can create one, copy it multiple times, and make necessary changes without having to start from scratch. Each environment will need its own connections, but you can update the connections that get copied. However, you will need to create new jobs for each copied environment. When you copy an environment, all of its connectors, rule sets, and inventory are copied with it. To avoid confusion when using copied environments, we recommend that you change descriptive information to be different from the original. To delete an environment: Click the Delete icon to the right of the environment status and copy icon. Clicking the Delete icon deletes EVERYTHING for that environment: connections, inventory, rule sets, and so on. The Environment Overview Screen You can reach the Environment Overview screen by clicking an environment name from the Environments List/Summary screen. 26
, and the Application Name.")
27 Masking Environment Overview This screen gives an overview of the Environment and the Environment Status. The left of the screen displays the environment Name, Purpose (for example, DEV or QA), and the Application Name. The Environment Status lists the Current Status, and dates for Last Data Refresh, Last Masked, Last Certified, and Last Profiled. The files listed on the right side of the window are pdfs of the last certification job (C) and the last masking job inventory (M). The body of the page displays all jobs currently defined for THIS environment, along with the status of the jobs (created, running, succeeded, or failed). For information about Jobs and the icons on this screen, see Managi ng Jobs. You can use the icons in the Jobs heading to create new jobs. See Monitor Jobs. 27

28 Managing Connectors The masking engine stores database connection information in an object called a "connector." When in an Environment Overview, click the Connector tab to view the list of connectors within an environment. For each connection, you must manually define a corresponding connector with the same name. The Connector List The Connector List screen shows the connectors that have been created within the environment. Creating or Editing a Connector To edit a connector, click the Edit icon to the right of the connector. To create a new connector: In the upper right-hand corner of the Connector tab, click Create Connection. The Create Connection window appears, prompting you for connection information for a database or file. 28
29 Create Connector Click Save. Each new connector uses the source system access credentials so appropriate access is granted when reading source data. To edit a connector: In the Connector tab, click the Edit icon for the connector you want to edit. Change any information necessary. To change the password: a. Select the checkbox next to Change Password. b. In the field that appears, enter the new password. 3. Click Save. Deleting Connectors To delete a connector, click the Delete icon to the far right of the connector name. When you delete a connector, you also delete its rule sets and inventory data. Database Connectors The fields that appear are specific to the DBMS Type you select. If you need assistance determining these values, please contact your database administrator. All required fields are marked with an asterisk on the screen. You can only create connectors for the databases and/or files listed. If your database or file type is not listed here, you cannot create a connector for it. Kerberos Authentication (Sybase, Oracle, or DB2 only, optional) Whether to use a Kerberos connection to the database. This box is clear by default. If this box is checked, the application code makes a Kerberos connection to the database instead of using a login/password. Connection Type (Oracle or MS SQL Server only) Choose a connection type: 29
30 Basic Basic connection information. Advanced The full JDBC connect string. Connection Name The name of the database connector (specific for your Delphix application). For each Connection Name, you must manually define a corresponding connector with the same name. Schema Name The schema that contains the tables that this connector will access. Database Name The name of the database to which you are connecting. Host Name / IP or Username (Oracle only) Hostname/IP The network host name or IP address of the database server. ODBC DNS Name (ODBC and Microsoft Access only) Login ID The user login this connector will use to connect to the database. Password The password associated with the Login ID or Username. (This password is stored encrypted.) System Number (SAP only) SAP Client (SAP only) Language (SAP only) Port The TCP port of the server. SID (Oracle only) Oracle System ID (SID). Instance Name (MS SQL Server only) The name of the instance. This is optional. If the instance name is specified, the connector ignores the specified "Port" and attempts to connect to the "SQL Server Browser Service" on port 1434 to retrieve the connection information for the SQL Server instance. If the instance name is provided, be sure to make exceptions in the firewall for port 1434 as well as the particular port that the SQL Server instance listens to. Server Name (Informix only) The name of the Informix server. Custom Driver Name (SQL Anywhere only) The name of the custom driver. JDBC URL (SQL Anywhere and Advanced connector mode for Oracle, MS SQL Server, and Sybase only) The name of the custom JDBC URL. All database types have a Test Connection button at the bottom left of the New Connector window. We highly recommend that you test your connection before you save it. Do so before you leave this window. When you click Test Connection, Delphix uses the information in the form to attempt a database connection. When finished, a status message appears indicating success or failure. File Connectors The values that appear correlate to the File Type you select. All required fields are marked with an asterisk on the screen. Connector Name The name of the file connector (specific to your Delphix application and unrelated to the file itself). Connection Mode Local Files, SFTP, FTP, HTTP & HTTPS. Path The path to the directory where the file(s) are located. Operating System Choose the operating system on which the file resides: Windows or Linux. (This 30
31 value does not appear for Mainframe Copybooks.) If you select SFTP or FTP for Connection Mode, the following additional values appear: Server Name The name of the server used to connect to the file. User Name The User Name to connect to the server. Public Key Authentication (Optional) (Only appears for SFTP.) Check this box to specify a public key. When you check this box, the Available Keys dropdown appears. Choose a key from the dropdown. (The path on the server to the location that contains the keys is configured in a Delphix property files.) Password The associated Password for the server. Port The Port used to connect to the server. "Local" File Connectors have restricted access to the local (Masking Engine) file system. By default, the Path for "Local" File Connectors is automatically prepended with /mnt/; in other words, they are restricted to /mnt and its sub-directories. 31

32 Managing Rule Sets A "rule set" points to a collection of tables or flat files that the masking engine uses for profiling, provisioning, and masking, and certifying data. For mainframe systems, the rule set represents a copybook definition for a file. The Rule Set Screen The Create Rule Set Window Creating a Rule Set Copying a Rule Set Editing/Modifying a Rule Set Deleting a Rule Set Modifying Tables in a Rule Set (For Distributed Environment) Logical Key Edit Filter Custom SQL Table Suffix Add Column Join Table List Removing a Table The Rule Set Screen From anywhere within an Environment, click the Rule Set tab to display the Rule Sets associated with that environment. The Rule Set screen appears. If you have not yet created any rule sets, the Rule Set list is empty. Rule Set Screen 32
33 The Create Rule Set Window In the upper right-hand corner, click the +Create Rule Set button. The Create Rule Set window appears. Rule Set Name Input Field When editing an existing rule set, this field will be filled with the existing rule set name by default. Connector List When creating a new rule set, all available connectors will be listed here. When editing an existing rule set, only the connector currently in use will appear. Table or File List If a database connector is selected in the connector list, all available tables in the database will appear in this list. If a file connector is selected, all available files will appear in this list. Selected Table or File Number Displays how many tables or files you have selected. 33
34 Search Query Input Field You can enter a search query here. After typing the search query, press ENTER to execute the search query. search query Use * to match any characters in the names of tables or files. If you have selected a table or file before searching and it is not in the search results, it will not be included in the rule set. You can add back the table or file by removing the search query. Clear Search Button Click to remove any search query. Select All Button Click to select all tables or files in the table or file list. Clear All Button Click to de-select all tables or files. File Name Patterns Editor This editor will appear only when the selected connector is a file connector. Add File Pattern Button Click to add a new file pattern entry below. File Pattern Input Field Enter the file pattern here. Remove File Pattern Button Click to remove a file pattern. Creating a Rule Set To create a new rule set: In the upper right-hand corner of the Rule Set screen, click +Create Rule Set. 34
35 The Create Rule Set screen appears. This screen lets you specify which tables belong in the rule set. (Note: A similar screen appears when you edit a Rule Set.) a. The Edit Rule Set feature is disabled for a mainframe environment. Enter a name for the new rule set. 3. Select a Connector name from the drop-down menu. The list of tables for that connector appears. If you have not yet created any connectors, the list is empty. 4. Click individual table names to select them, or click Select All to select all the tables in the connector. 5. Click Save. You are returned to the Rule Set screen. Copying a Rule Set This feature is disabled for a mainframe environment. When you copy a rule set, you also copy the ' for that rule set. To copy a rule set: Click the Copy icon to the right of the rule set on the Rule Set screen. The Copy Rule Set window appears. Enter a Name for the new rule set. Click Save. Modify the rule set as you want, using the procedures described above. Editing/Modifying a Rule Set This feature is disabled for a mainframe environment. To edit a rule set: 3. Click the Edit icon to the right of the rule set on the Rule Set screen. Click the Edit Rule Set button towards the top. The Create Rule Set screen appears. This screen lets you specify which tables belong in the rule set. Modify the rule set as you want, using the preceding procedures. If you have tables with names that change monthly, for example tables that are appended with the current date, you can set a table suffix for a rule set. Deleting a Rule Set If you delete a Rule Set, any inventory associated with that Rule Set will also be deleted. Also, any filter conditions defined for that Rule Set will be deleted. To delete a rule set, click the Delete icon to the right of the rule set on the Rule Set screen. 35
36 Modifying Tables in a Rule Set (For Distributed Environment) The features in this section are disabled for a mainframe environment. For additional information about any of the features in this section, see Provisioning and or Subsetting Data. You can modify tables in a rule set as follows: Logical Key Edit Filter Custom SQL Table Suffix Add Column Join Table List Logical Key If your table has no primary keys defined in the database, and you are using an In-Place strategy, you must specify an existing column or columns to be a logical key. This logical key does not change the target database; it only provides information to Delphix. For multiple columns, separate each column using a comma. Note: If no primary key is defined and a logical key is not defined an identify column will be created. To enter a logical key: From the Rule Set screen, click the name of the desired rule set. Click the green edit icon to the right of the table whose filter you wish to edit. On the left, select Logical Key. Edit the text for this property. To remove any existing code, click Delete. Click Save. Edit Filter Use this function to specify a filter to run on the data before loading it to the target database. To add a filter to a database rule set table or edit a filter: From the Rule Set screen, click the name of the desired rule set. Click the green edit icon to the right of the table you want. On the left, select Edit Filter. Edit the properties of this filter by entering or changing values in the Where field. 36
37 Be sure to specify column name with table name prefix (for example, customer.cust_id <1000). To remove an existing filter, click Delete. Click Save. Custom SQL Use this function to use SQL statements to filter data for a table. To add or edit SQL code: From the Rule Set screen, click the name of the desired rule set. Click the green edit icon to the right of the table you want. On the left, select Custom SQL. Enter custom SQL code for this table. Delphix will run the query to subset the table based on the SQL you specify. To remove any existing code, click Delete. Click Save. Table Suffix To set a table suffix for a rule set: In the Rule Set screen, click the name of the desired rule set. Click the green edit icon to the right of the table for which you wish to set the suffix. On the left, select Table Suffix. The Original Table Name will already be filled in. (Optional) Enter a Suffix date Pattern (for example, mmyy). (Optional) Enter a Suffix Value, if you want to append a specific value. (Optional) Enter a Separator (for example, _). This value will be inserted before the suffix value (for example, tablename_0131). Click Save. Add Column Use this function to select a column or columns from a table when you don't want to load data to all the columns in a table. To add a column to a database rule set table or edit a column: 3. From the Rule Set screen, click the name of the desired rule set. Click the green edit icon to the right of the table you want. On the left, select Add Column. 37
38 4. 5. Select one or more column names to include in the table. To remove a column, deselect it. You can also choose Select All or Select None. Select Save. Join Table Use this function to specify a SQL join condition so that you can define primary key/foreign key relationships between tables. To define or edit the join condition for a table: From the Rule Set screen, click the name of the desired rule set. Click the green edit icon to the right of the table you want. On the left, select Join Table. Edit the properties for this join condition. To remove an existing join condition, click Delete. Click Save. List Use this function to select a list to use for filtering data in a table. To add or edit a list: From the Rule Set screen, click the name of the desired rule set. Click the green edit icon to the right of the table you want. On the left, select List. Edit the text file properties for this list. a. Select a column. b. c. Enter or browse for a filename. Files that have already been specified appear next to Existing File To remove an existing list file, click Delete. Click Save. Removing a Table To remove a table from the rule set: From the Rule Set screen, click the name of the desired rule set. Click the red delete icon to the right of the table you want to remove. If you remove a table from a rule set and that table has an inventory, that inventory will also be removed. 38
39 39 Masking Engine User Guide 2017 Delphix

40 Managing the Masking Inventory The Inventory Screen Inventory Settings Managing a Database Inventory Setting Column Criteria for a Table Row Types and Creating New Row Types for Tables Managing a File Inventory Setting Field Criteria for a File Defining Fields Adding Record Types for Files Masking XML Documents Importing and Exporting an Inventory Delphix stores the masking rules for each sensitive column in the Delphix repository database in the environment's inventory. The Inventory Screen From anywhere within an environment, click the Inventory tab to see the Inventory Screen. This displays the inventory for the environment's rule sets. Inventory Settings To specify your inventory settings: On the left-hand side of the screen, select a Rule Set from the drop-down menu. Below this, Contents lists all the tables or files defined for the rule set. Inventory Screen 3. Select a table or file for which you want to create or edit the inventory of sensitive data. The Columns or Fields for that specific table or file appear. 4. If a column is a primary key (PK), Foreign Key (FK), or index (IDX), an icon indicating this will appear to 40
41 5. the left of the column name. If there is a note for the column, a Note icon will appear. To read the note, click the icon. If you selected a table, metadata for the column appears: Data Type and Length (in parentheses). This information is read-only. 6. Choose how you would like to view the inventory: a. All Fields Displays all columns in the table or all fields in the file (allowing you to mark new columns or fields to be masked). b. Masked Fields Filters the list to just those columns or fields that are already marked for masking. 7. Choose how to determine whether to mask/unmask a column: a. Auto The default value. The profiling job can determine or update the algorithm assigned to a column and whether to mask the column. b. User The user's choice overrides the profiling job. The user manually updates the algorithm assignment, mask/unmask option of the column. The Profiler will ignore the column, so it will not be updated as part of the Profiling job. In order to use the Secure Lookup algorithm, the user would select it as a user-defined algorithm and assign it to the specific column. Secure Lookup automates the creation of a secure lookup algorithm by building a list of replacement values based on the existing unique values in the target column and creating a secure lookup using those values. In that respect, it is simply shuffling the values. Managing a Database Inventory The following sections apply to databases. Setting Column Criteria for a Table You must select a database from the Select Rule Set dropdown menu on the left, not a file system. To set criteria for sensitive columns: 3. Click the green edit icon to the right of a column's name. To mask the selected column, select the Mask check box. a. If you do not want to mask this column, clear this check box. From the Domain drop-down menu, select the appropriate sensitive data element type for the column. 4. The Delphix masking engine defaults to a Masking Algorithm as specified in the Settings screen. If necessary, you can override the default algorithm for a column. a. To select a different masking algorithm, choose one from the Algorithm dropdown. For detailed descriptions of these algorithms, see Managing Algorithm Settings. For information about how to create your own algorithms and how to add them to domains, see Delphix Administrator's Guide. If you select a DATESHIFT algorithm and you are not masking a datetime or timestamp column, you must specify a Date Format. (This field only appears if you select a DATESHIFT algorithm from the Masking 41
42 Algorithm dropdown.) For a list of acceptable formats, click the Help link for Date Format. The default format is yyyy-mm-dd. Select the Row Type according to its purpose, using "All Row" as a convention for all rows. If you need to create a row type (for example, if filter conditions are required), see Row Types and Creating New Row Types for a Table next. Select an ID Method: a. Auto The default value. The profiling job can determine or update whether to mask a column. b. User The user decides whether to mask/unmask a column. The user's choice overrides the profiling job. (The user masking is done after the profiling job is finished.) You can add/remove notes in the Notes text field. When you are finished, click Save. You must click Save for any edits to take effect. Row Types and Creating New Row Types for Tables Delphix provides a feature called Row Types that limits masking of a given column to a specific subset of rows. You must select a database from the Select Rule Set drop-down menu on the left, not a file system. To create a new row type: From an Environment's Inventory tab, click +Row Types in the upper right. The Row Type window appears, listing existing row types. Click + Add a Row Type. The Add Row Type window appears. Name the Row Type according to its purpose. For example, if you want to subset the rows to only take rows with addresses, you can name this row type "Address Rows". To limit the masking to a subset of rows, specify an appropriate Where Clause. Click Save. Managing a File Inventory The following sections apply to files: Setting Field Criteria for a File Defining Fields Adding Record Types for Files File inventory is based on file format, not on file content. Therefore, if you make a change to a file inventory, that change applies to all files that use that format. 42
43 Setting Field Criteria for a File You must select a file system from the Select Rule Set dropdown menu on the left, not a database. To set criteria for sensitive fields: From an Environment's Inventory tab, click the green edit icon to the right of the field you want. To mask this field, check the Mask check box (in the View Inventory pane). Clear this check box if you do not want to mask this field. Choose the appropriate sensitive data element type for the field from the Domain dropdown. Delphix defaults to a masking Algorithm as specified in the Settings screen. If necessary, you may override the default algorithm for a field. 6. To select a different masking algorithm, choose one from the Algorithm dropdown. For descriptions of these algorithms, see Algorithms. If you select a DATESHIFT algorithm, you must specify a Date Format. (This field only appears if you select a DATESHIFT algorithm from the Masking Algorithm dropdown.) For a list of acceptable formats, click the Help link for Date Format. The default format is yyyy-mm-dd Choose a Record Type from the dropdown. If you are masking a delimited or fixed file, specify a Position: the field number (for delimited files) or the character position (for fixed files) of the beginning of the field within the data record. If you are masking a fixed file, specify a Length (the length of this field within the data record). Notes can be added/removed in the Notes text field. (Fields with notes display a Note icon in the Notes column.) Click Save when you are finished. You must click Save for any edits to take effect. Defining Fields Note: A file system must be selected from the Select Rule Set dropdown menu on the left, not a database. To create new fields: From an Environment's Inventory tab, click Define fields to the far right. The Edit Fields window appears. 43
44 Defining Fields Edit the fields as described in Setting Field Criteria for a File. When you are finished, click New to create a new field, or click Save to update an existing field. Adding Record Types for Files Note: You must select a file system from the Select Rule Set dropdown menu on the left, not a database. To add a new Record Format: 3. In the upper right-hand corner of an environment's Inventory tab, click Record Types. The Record Type window appears. Click +Add a Record Type towards the bottom of the window. The Add Record Type window appears. Enter values for the following fields: a. Record Type Name A free-form name for this record format. b. c. d. e. Header/Body/Trailer If the file has header or trailer records, you will need to create file formats for them. Select the appropriate type. Delphix allows for masking of multiple headers, multiple trailers, and multiple types of body records. Record Type ID (optional) For body records, specify the value of the record type code or other identifier that allows Delphix to identify records that qualify as this record type. Position # (optional) Specify the field number (for delimited files) or the character position number (for fixed files) of the beginning of the Record Type Identifier within the data record. Length # (optional) For fixed files, specify the length of the Record Type Identifier within the data record. 4. Click Save when you are finished. Masking XML Documents In order to mask an XML file there are a few steps you must do. 44
45 3. First you have to import the XML file format under Settings > File Format. You can simply use the XML file itself to import the format. If you have multiple xml files using this format you can use this format for all those files. If there are different xml formats you will have to import a file format for each type of xml document. Then you can go to the appropriate environment and create a connector for XML files. Once you create the connector you can create a ruleset with the XML file(s) you need. After you create the ruleset, you must go back and edit the ruleset and edit the file(s) in the ruleset. There you assign the file format that you created and what the end_of_record terminator is for that file. 4. Then save this information. Once this is done you will see the XML fields show up on the inventory page so you can set up your masking. This is not a database. To add a new Record Format: From an environment's Inventory tab, click Record Types in the upper right-hand region. The Record Type window appears. Near the bottom of the window, click +Add a Record Type. The Add Record Type window appears. Importing and Exporting an Inventory The format of an imported.csv file must exactly match the format of the exported inventory. If you plan to import an inventory, before importing the inventory, you should export it and then update the exported file as needed before you import it. To export an inventory: Click the Export icon at the upper right. The Export Inventory popup appears with the name of the currently selected Rule Set as the Inventory Name and a corresponding.csv File Name. Click Save. A status popup appears. When the export operation is complete, you can click on the Download file name to access the inventory file. To import an inventory: In the upper right-hand corner, click the Import icon. The Import Inventory popup appears. Click Select to browse for the name of a comma-separated (.csv) file. 3. Click. Save The inventory you imported appears in the Rule Set list for this environment. 45

46 Managing Jobs Delphix creates "jobs" to profile, provision, and mask, and certify data. Jobs on the Environment Overview Screen The Environment Overview screen provides status of any jobs running or previously run within the environment. When you create jobs for an environment, you must create them from the Environment Overview screen of the environment they mask or the environment they use as a source for data provisioning. The following columns appear in the Jobs section of the screen: Name Rule Set Status Action Edit Delete Creating New Jobs In the Environment Overview screen, select one of the jobs icons to create the corresponding job: Profile Mask Certify Provision Environment Overview Screen showing Create Job buttons 46
47 Creating a New Profiling Job You can create profiling jobs for databases, copybooks, delimited files, fixed-width, and Excel files. A Profiling job for a mainframe system cannot assign groups because it does not have the heuristics needed to determine sensitive elements per group. The Profiler assigns group-sensitive elements to a single group. Then, in inventory, groups are updated as needed to establish the sensitive element field group sets. To create a new profiling job: Click Profile. The Create Profiling Job window appears. Create Profile Job You will be prompted for the following information: a. Job Name A free-form name for the job you are creating. Must be unique. b. Multi Tenant Check the box if the job is for a multi-tenant database. This option allows existing rulesets to be re-used to mask identical schemas via different connectors. The connector can be selected at job execution time. c. d. Rule Set Select a rule set that this job will execute against. Generator The default value is Delphix. e. f. No. of Streams The number of parallel streams to use when running the jobs. For example, you can select two streams to run two tables in the ruleset concurrently in the job instead of one table at a time. Remote Server (optional) The remote server that will execute the jobs. This option lets you choose to execute jobs on a remote server, rather than on the local Delphix instance. Note: This is an add-on feature for Delphix Standard Edition. g. Min Memory (MB) (optional) Minimum amount of memory to allocate for the job, in megabytes. 47
48 h. i. j. Max Memory (MB) (optional) Maximum amount of memory to allocate for the job, in megabytes. Feedback Size (optional) The number of rows to process before writing a message to the logs. Set this parameter to the appropriate level of detail required for monitoring your job. For example, if you set this number significantly higher than the actual number of rows in a job, the progress for that job will only show 0 or 100%. Profile Sets (Optional) The name of a profiler set, which is a subset of expressions (for example, a subset of financial expressions). (See Delphix Administrator's Guide.) Note: If you do not select a profile set, Delphix will use all defined expressions instead of just a subset. k. Comments (optional) Add comments related to this job. l. (optional) Add address(es) to which to send status messages. Separate addresses with a comma (,). When you are finished, click Save. For information about running jobs, see Running and Stopping Jobs from the Environment Overview Screen. Creating a New Masking Job To create a new masking job: Click Mask. The Create Masking Job window appears. Create masking job You will be prompted for the following information: a. Job Name A free-form name for the job you are creating. Must be unique across the entire application. b. Masking Method Select either In-Place or On-The-Fly. For more information on masking 48
49 type, see Mask Data. c. Multi Tenant Check box if the job is for a multi-tenant database. Provision Masked VDBs A job must be Multi Tenant to use it when creating a masked virtual database (VDB). d. Rule Set Select a rule set that this job will execute against. or: e. Generator The default value is Delphix. f. g. h. Repository Folder name The folder name in the repository where the objects should be imported. Parameter File Path (optional) If checked, this tells Delphix to configure the sessions and workflows to use a parameter file that contains the source and target connection information. If unchecked, the Delphix Engine will generate sessions/workflows that use the connector names as defined within the Delphix Engine, which will require connections with the same names defined within the repository. Import Mapplet (optional) if checked, this tells the Delphix Engine to import mapplets that are assigned to columns in the inventory along with the mappings/sessions/workflows. If unchecked, Delphix will not attempt to import any mapplets that are assigned in the inventory. i. Mask Method Choose either of the following: i. No. of Streams The number of parallel streams to use when running the jobs. For example, you can select two streams to run two tables in the Rule Set concurrently in the job instead of one table at a time. j. ii. iii. Import When you click the Run icon, creates the mappings but does not execute the workflow. You later run the job. Import and Run When you click the Run icon, creates the mappings and executes the workflow. Remote Server (optional) The remote server that will execute the jobs. This option lets you choose to execute jobs on a remote server, rather than on the local Delphix instance. Note: This is an optional feature for Delphix. 49
50 k. Min Memory (MB) (optional) Minimum amount of memory to allocate for the job, in megabytes. l. m. n. o. p. q. r. s. t. u. Max Memory (MB) (optional) Maximum amount of memory to allocate for the job, in megabytes. Update Threads The number of update threads to run in parallel to update the target database. For databases using T-SQL, multiple update/insert threads can cause deadlocks. If you see this type of error, reduce the number of threads that you specify in this box. Commit Size (optional) The number of rows to process before issuing a commit to the database. Feedback Size (optional) The number of rows to process before writing a message to the logs. Set this parameter to the appropriate level of detail required for monitoring your job. For example, if you set this number significantly higher than the actual number of rows in a job, the progress for that job will only show 0 or 100%. Bulk Data (optional) For In-Place masking only. The default is for this check box to be clear. If you are masking very large tables in-place and require performance improvements, check this box. Delphix will mask data to a flat file, and then use inserts instead of updates to bulk load the target table. Disable Constraint (optional) Whether to automatically disable database constraints. The default is for this check box to be clear and therefore not perform automatic disabling of constraints. For more information about database constraints, see Enabling and Disabling Database Constraints. Batch Update (optional) Enable or disable use of a batch for updates. A job's statements can either be executed individually, or can be put in a batch file and executed at once, which is faster. Disable Trigger (optional) Whether to automatically disable database triggers. The default is for this check box to be clear and therefore not perform automatic disabling of triggers. Drop Index (optional) Whether to automatically drop indexes on columns which are being masked and automatically re-create the index when the masking job is completed. The default is for this check box to be clear and therefore not perform automatic dropping of indexes. v. Prescript (optional) Specify the full pathname of a file that contains SQL statements to be run before the job starts, or click Browse to specify a file. If you are editing the job and a prescript file is already specified, you can click the Delete button to remove the file. (The Delete button only appears if a prescript file was already specified.) For information about creating your own prescript files, see Creating SQL Statements to Run Before and After Jobs. w. Postscript (optional) Specify the full pathname of a file that contains SQL statements to be run after the job finishes, or click Browse to specify a file. If you are editing the job and a postscript file is already specified, you can click the Delete button to remove the file. (The Delete button only appears if a postscript file was already specified.) For information about creating your own postscript files, see Creating SQL Statements to Run Before and After Jobs. x. y. Comments (optional) Add comments related to this masking job. (optional) Add address(es) to which to send status messages. When you are finished, click Save. 50
51 Masking Jobs list For information about running jobs, see Running and Stopping Jobs from the Environment Overview Screen. Creating a New Certify Job To create a new certify job: Click Certify. The Create Certify Job window appears. You will be prompted for the following information: a. Job Name A free-form name for the job you are creating. Must be unique. b. c. d. Multi Tenant Check box if the job is for a multi-tenant database. Rule Set Select a rule set that this job will execute against. Generator The default value is Delphix. e. f. No. of Streams The number of parallel streams to use when running the jobs. For example, you can select two streams to run two tables in the ruleset concurrently in the job instead of one table at a time. Remote Server (optional) The remote server that will execute the jobs. This option lets you choose to execute jobs on a remote server, rather than on the local Delphix instance. Note: This is an add-on feature for Delphix Standard Edition. g. Min Memory (MB) (optional) Minimum amount of memory to allocate for the job, in megabytes. h. i. Max Memory (MB) (optional) Maximum amount of memory to allocate for the job, in megabytes. Feedback Size (optional) The number of rows to process before writing a message to the logs. Set this parameter to the appropriate level of detail required for monitoring your job. For example, if you set this number significantly higher than the actual number of rows in a job, the progress for that job will only show 0 or 100%. 51

52 j. Prescript (optional) Specify the full pathname of a file that contains SQL statements to be run before the job starts, or click Browse to specify a file. If you are editing the job and a prescript file is already specified, you can click the Delete button to remove the file. (The Delete button only appears if a prescript file was already specified.) For information about creating your own prescript files, see Creating SQL Statements to Run Before and After Jobs. k. Postscript (optional) Specify the full pathname of a file that contains SQL statements to be run after the job runs, or click Browse to specify a file. If you are editing the job and a postscript file is already specified, you can click the Delete button to remove the file. (The Delete button only appears if a postscript file was already specified.) For information about creating your own postscript files, see Creating SQL Statements to Run Before and After Jobs. l. m. n. Delta Masking Check this box to mask rows that are not masked and are identified as part of the certification process as polluted. Batch Update (optional) Enable or disable use of a batch for updates. A job's statements can either be executed individually, or can be put in a batch file and executed at once, which is faster. Disable Trigger (optional) Whether to automatically disable database triggers. The default is for this check box to be clear and therefore not perform automatic disabling of triggers. o. p. Comments (optional) Add comments related to this certification job. (optional) Add address(es) to which to send status messages. When you are finished, click Save. For information about running a job, see Running and Stopping Jobs from the Environment Overview Screen. Creating a New Provisioning Job When you provision data, you define the provisioning job within the source environment (from source to target). On the other hand, a masking job is defined from the target environment. To create a new provisioning job: Click Provision. The Create Provisioning Job window appears. 52
53 Create provisioning job You will be prompted for the following information: a. Job Name A free-form name for the job you are creating. b. c. d. e. f. Target Environment The environment into which the data will be loaded. Multi Tenant Check box if the job is for a multi-tenant database. Rule Set Select a rule set that this job will execute against. Target Connector The database connector into which the data will be loaded. Generator g. h. i. Repository Folder name The folder name in the repository where the objects should be imported. No. of Streams The number of parallel streams to use when running the jobs. For example, you can select two streams to run two tables in the ruleset concurrently in the job instead of one table at a time. Remote Server (optional) The remote server that will execute the jobs. This option lets you choose to execute jobs on a remote server, rather than on the local Delphix instance. Note: This is an add-on feature for Delphix Standard Edition. j. Min Memory (MB) (optional) Minimum amount of memory to allocate for the job, in megabytes. k. l. m. n. o. p. q. Max memory (MB) (optional) Maximum amount of memory to allocate for the job, in megabytes. Commit Size (optional) The number of rows to process before issuing a commit to the database. Feedback Size (optional) The number of rows to process before writing a message to the logs. Set this parameter to the appropriate level of detail required for monitoring your job. For example, if you set this number significantly higher than the actual number of rows in a job, the progress for that job will only show 0 or 100%. Disable Constraint (optional) Whether to automatically disable database constraints. The default is for this check box to be clear and therefore not perform automatic disabling of constraints. For more information about database constraints, see Enabling and Disabling Database Constraints. Batch Update (optional) Enable or disable use of a batch for updates. A job's statements can either be executed individually, or can be put in a batch file and executed at once, which is faster. Truncate (optional) Whether to truncate target tables before loading them with data. If this box is selected, the tables will be "cleared" before the operation. If this box is clear, data is appended to tables, which potentially can cause primary key violations. This box is clear by default. Disable Trigger (optional) Whether to automatically disable database triggers. The default is for this check box to be clear and therefore not perform automatic disabling of triggers. r. Prescript (optional) Specify the full pathname of a file containing SQL statements to be run before the job starts, or click Browse to specify a file. If you are editing the job and a prescript file 53
 For information about creating your own prescript files, se")
54 is already specified, you can click the Delete button to remove the file. (The Delete button only appears if a prescript file was already specified.) For information about creating your own prescript files, see Creating SQL Statements to Run Before and After Jobs. s. Postscript (optional) Specify the full pathname of a file containing SQL statements to be run after the job finishes, or click Browse to specify a file. If you are editing the job and a postscript file is already specified, you can click the Delete button to remove the file. (The Delete button only appears if a postscript file was already specified.) For information about creating your own postscript files, see Creating SQL Statements to Run Before and After Jobs. t. u. Comments (optional) Add comments related to this provisioning job. (optional) Add address(es) to which to send status messages. When you are finished, click Save. Running and Stopping Jobs from the Environment Overview Screen To run or rerun a job from the Environment Overview screen: Click the Run icon (play icon) in the Action column for the desired job. The Run icon changes to a Stop icon while the job is running. When the job is complete, the Status changes. To stop a running job from the Environment Overview screen: Locate the job you want to stop. In the job's Action column, click the Stop icon A popup appears asking, "Are you sure you want to stop job?" Click OK. When the job has been stopped, its status changes. After the job completes successfully, return to the Inventory and check that the Domain and Method po pulated automatically for sensitive data. Sample screenshot below. Profile job completion 54
55 55 Masking Engine User Guide 2017 Delphix
56 File Masking Delphix will mask a number of different file types and formats. These include fixed-width, delimited, Excel, Mainframe/VSAM, and XML. The purpose of this document is to provide an overview of general guidelines on how to successfully mask files using Delphix. This document will not replace Delphix training or the Delphix manual set, it is in addition to these items. Overview Delphix supports 2 masking methodologies, In-Place and On-The-Fly. In-Place requires a single file connection and Delphix will read from that file, mask data in memory, and update the file with the masked data. On-The-Fly requires 2 file connections. One connection for the source file, and one connection to the target where the masked file will be placed. The target file path specified in the connector of the target rule set must point to an existing file. In this scenario, Delphix will read the file from the source connection, mask in memory, and write the masked data to the target file. File Formats Unlike databases files for the most part do not have built in metadata to describe the format of the fields in the file. You must provide this to Delphix so it can update the file appropriately. This is done through the settings tab where you will see a menu item on the left for File Format. Select File Format and you will see options to create a file format or input a file format. This will depend on the type of file and how you want to let Delphix know the format of the file. Mainframe and XML Files For Mainframe/VSAM files, you can specify the file format via Input Format option which will import the copybook directly into Delphix. You can input this file from SFTP, FTP, or Local. Please select Copybook as the Import Format Type. For XML files you can also input the file format with the input format option. You can use the file you want to mask as the format. Delphix will input the format of the file directly. You can input this file from SFTP, FTP, or Local. Please select XML as the Import Format Type. Delimited, Excel, Fixed Files For Delimited, Excel, and Fixed files you can either manually create the format of the file yourself, or you can input a text file which describes the structure of the file to Delphix. To input the file format for delimited or Excel files create a text document with the column names each on its own line. For example: Name Address City State To input the file format for fixed files create a text document with the column names and the length of each 56
57 column on its own line. For example: Name,25 Address,40 City,20 State,2 Then input this file as the file format. The name of the text file will be the name of the file format. The file will need to be local to the Delphix server. To create a format manually, you can just click the create format button and give the format a name. We will input the details of the format a little later in this document. Create a File Connector In your environment you will need to create a connector to access the files. Each file type will require a separate connector. When you create the connector, scroll down to the particular file type you desire and select it. After you select this you will need to select the connection mode. This can be either a directory on the Delphix server or a share that is accessible as a local directory on the Delphix server. For Mainframe/VSAM, Delimited, or Fixed files the connector mode can be: Local SFTP FTP These connection modes (other than local) will require additional information. We provide a test connection button to test the validity of the connection. If you are doing in-place masking the file(s) will be masked and updated in the directory pointed to by the connector. If you plan to do on-the-fly masking then you will need to create a separate environment and connector to be the source for the files to be masked. The masked files will get put into the directory pointed to by the connector you created previously (the target). However, the file path specified in the connector of the target rule set must point to an existing file the target directory. It does not have to be a copy of the file, just an entry in the directory with the same name. It will be replaced by the masked file. Create a Ruleset Once you create a connector, you can click on the ruleset tab and create a ruleset. Click on create ruleset, give it a name, and provide the file connector you previously created. Once you do this you will see a list of files that the connector points to. You can select a single file, multiple files, or all the files. Once you click save the ruleset with the file or files will be saved. Once you create a ruleset with a file or set of files, you will need to assign those files to their appropriate file format. This is accomplished by editing the ruleset. When you click on the edit button for the file a popup screen called edit file will appear with the file name. There will be a dropdown for the format so you can select the proper format for the file. If the file is a Mainframe/VSAM file with a copybook you will see a checkbox to signify if the file is variable length. For all other file types, select the end-of-record to let Delphix know whether the file is in windows/dos format (CR+LF) or Linux format (LF). If the file is a delimited file you will have a space 57
58 to put in the delimiter. If there are multiple files in the ruleset you will have to edit each one individually and assign it to the appropriate file format. File Inventory For Excel, Delimited, or Fixed files, if you created the file format by importing it, then the format for the file will be set. When you go to the inventory page and select the rule set and file, you will see a line showing all the records which you can expand to see the inventory. If your file has a header and/or footer, you will need to click Record Type, click Add Record Type, and select Header and/or Footer from the drop-down menu. Then enter a name for this and the number of rows or lines. Now you can assign the appropriate masking algorithms either by running the profiler or setting them manually on the all records section. If you did not import a format and just created a file format with the Create Format button, you must enter the actual layout of the file into Delphix. You can do this for Excel, Delimited, and Fixed files Navigate to the inventory screen. Select the appropriate rule set and file. Click Record Type and add the appropriate record types. Select Body from the drop-down menu and give it a name, such as "Body." If you the columns are defined in your file, you can import the file using the Import button. If not, then just save. If your file has a header or footer, you can add those next. If you did not import the format, you must enter it manually. a. Click Define Fields. b. c. When the screen pops up, enter the field name. Select the record type (body) and position in the record If the file is a fixed-length file, you must also enter the length of the field. Optional: Set the masking here. Alternatively, you can set the masking with the profiler. For XML or VSAM files, once you select the ruleset and the file, you will see the inventory for the file, and you can edit this inventory with the appropriate masking settings like any Delphix data source by either using the profiler or setting this manually. Redefine Conditions For VSAM files, the inventory also allows for the entry of Redefine Conditions, which are used to handle any occurrences of COBOL's REDEFINES construct that might appear in the Copybook. In COBOL, the REDEFINES keyword allows an area of a record to be interpreted in multiple different ways. In the example below, for instance, each record can hold either the details of a person (PERSON-DET) or the details of a company (COMP-DET). 58
59 01 CS-CUSTOMER-RECORD. 05 CUST-TYPE PIC X(1). 05 PERSON-DET. 10 PERSON-FIRSTNAME PIC X(20). 10 PERSON-LASTNAME PIC X(40). 10 PERSON-ADDRESS1 PIC X(50). 10 PERSON-CITY PIC X(20). 10 PERSON-STATE PIC X(5). 10 PERSON-ZIP PIC X(10). 10 PERSON-SSN PIC S9(9) COMP COMP-DET REDEFINES PERSON-DET. 10 COMP-ENTITYNM PIC X(53). 10 COMP-ADDRESS1 PIC X(50). 10 COMP-CITY PIC X(20). 10 COMP-STATE PIC X(5). 10 COMP-ZIP PIC X(10). 10 COMP-PHONE PIC X(12). Depending on which group is present, different masking algorithms may need to be applied. Below is the inventory corresponding to this copybook, which allows algorithms to be selected separately for each group. In order to do any masking however, the masking engine must be able to determine, for each record, which 59
60 fields should be read, so that the correct algorithms can be applied. In order to do this, the masking engine uses Redefine Conditions, which are specified in the inventory. Redefine Conditions are boolean expressions which can reference any fields in the record when they are evaluated. In the example copybook above, the field CUST-TYPE is used to indicate which group is present. If CUST-TYPE holds a 'P', a PERSON-DET group is present, and if it holds a 'C', COMP-DET is present. This can be expressed in the inventory by specifying a Redefine Condition with the value [CUST-TYPE]='P'. This expression indicates that, for each record read from the source file during the masking job, the value of the field CUST-TYPE should be read and compared against the string 'P'. If it is equal, the masking engine will read from the record the fields subordinate to PERSON-DET, and will apply any masking algorithms specified on those fields. Similarly, a Redefine Condition with the value [CUST-TYPE]='C' should be applied to the COMP-DET field. Exactly one of the conditions should evaluate to 'true' for each group of redefined fields. For example, a copybook might have fields A, B REDEFINES A, and C REDEFINES A. Of the Redefine Conditions attached to A, B, and C, one and only one should evaluate to true for each record. Entering a Redefine Condition Click on the orange REDEFINED or REDEF button next to the redefined or redefining field Enter a condition in the dialog box which appears. This is the expression, which, when it evaluates to true, causes the subordinate fields to be read and, if they have algorithms assigned, masked. 3. Click 'Submit' Format of Redefine Conditions Redefine Conditions allow fields to be compared against either number or string literals. Square brackets enclosing a field name indicate a variable, which takes on the value of the named field: [Field1] = 'An example String' String literals can be enclosed in either single or double quotes. For fields that are numeric (e.g. PIC S99V9), the operators <, <=, >, and >= can be used in addition to the = operator, e.g. [Field2] <= Also, conditions can be joined using AND, OR, and NOT to form more complex conditions: 60
61 ([Field3] > 5 AND [Field3] < 10) OR NOT [FIELD4] = 'Z' 61
62 Flat File Masking Prerequisites How it works Approach Environment setup for File Masking Connections Connection Mode Define a File Format for file type. Create a Rule Set for file Edit the file in rule set and apply format Review and Manage the Inventory for your Rule Set Create Header /Footer Create record types This example shows an Inventory with 3 record types (different file formats) Edit record types Apply algorithms Qualify Record types Create a job to mask and run the job Execute your job by clicking the Action button Review your results, examples below Troubleshooting This document is guides you through masking various type of files. The Delphix Masking Engine supports masking for the follow file types: Delimited Fixed Width VSAM (EBCDIC encoding) XML Excel files Prerequisites Installation: Agile masking installed with valid license (file masking option) Basic knowledge: Experience working in Delphix Masking for databases or files Characteristics: Description and type of files How it works Agile masking uses a Connector to connect to files systems to access the files. User credentials are required to connect and fetch the file. The File Format/Record formats are required, which defines field layout. These 62

63 formats can be manually created or uploaded via a file into Agile Masking under Setting and File Formats. Once a Format is uploaded we create a Rule Set and associated the file format, the Inventory tab displays the field structure same as a DB table and user can associate algorithms to fields. Additional record type/file formation may be uploaded if required. Approach Agile Masking support 2 approaches to File Masking which includes IN-PLACE and ON-THE_FLY. Currently we have customer using one method or another and also mixed approaches. Environment setup for File Masking Agile Masking manages work by Application and Environments which are user defined and a simply a way to group work logically by (support team, business group, development team, etc.) Example: of a masking Application and Environments. For IN_PLACE Masking option only 1 Environment is needed For ON_THE_FLY Masking option 2 environments are required for Source and Target 63
64 Connections Create connections in the environment intended. Connection types must matches the File type that you are masking. Connections can be created for (Source/Read and Target/Write) using the following connection types: Delimited, Fixed Width, VSAM (EBCDIC encoding), XML, and Excel files files Connection Mode Local File This can be a file on a local drive, volume, or a shared directory FTP connection Used to connect to FTP location 3. SFTP connection Used to connect to SFTP site using SFTP protocol (not FTP/S) 64
65 Note for ON_THE_FLY Masking: The Source Environment requires Connection information only to read from the Source. The Target Environment manages all other information (Connection, Rule Set, Inventory and jobs) Define a File Format for file type. FF Option 1: Recommended for masking files with multiple formats/record types throughout the file. Create a blank File Format Under the main Settings tab choose File Format and click on Create Format Multiple record type are uploaded in the masking Inventory FF Option 2: Recommended for masking files with a single format/record type throughout the file. Create a blank File Format Under the main Settings tab choose File Format and click on Create Format. Ensure the File Format type corresponds to the Connection type (i.e. Delimited File type to a Delimited type Connector. User can import file format from your local drive or FTP/SFTP site. 65


66 Under the main Settings tab choose File Format and click on Create Format. Choose File-Delimited type, SFTP for the file location and give the details on how to login to the server where the file resides. The Path should be the directory where the file resides. Create a Rule Set for file Create a rule set for the Connector we defined above. Choose the file you would like to mask. The user can specify a pattern to be read if the file name changes (i.e. *.HR_File*.* ) In case of On-The-Fly jobs a file placeholder (dummy file) is required in the target directory to create rule set even though it is populated after masking from source connector. Edit the file in rule set and apply format Click on Pencil (Edit) for the Rule set you created: 66

67 Click on Pencil (Edit) for the File you chose: Choose the correct file Format, End of Record, and Delimiter for this Rule Set. Review and Manage the Inventory for your Rule Set This involves multiple steps defining the header, body, and footer for the file. In the example below, I have a header and body in the file but not a trailer. Create Header /Footer Click on Record Type and Add a Record Type and choose Header for creating a Header and the number of lines for the header (I have only 1 line in my file). Masking engine will skip this line while processing the file. Create record types Click on Record Type and Add a Record Type and choose Body for creating the body fields. Click on Selec t to import the file format (med.head in my example) and Save. This example shows an Inventory with 3 record types (different file formats) 67
 columns.")
68 Edit record types For masking files with more than 1 format we must qualify each record in the file to match your masking design. Apply algorithms Go ahead and define the Domain and algorithm for the fields you want to mask. In the example above we are masking both DT103 and DT105 to Date Of Birth (DOB) columns. Qualify Record types Click on Record Type and on the Record name to edit. In this example only the records with DT1 In the first position and W in the second position will mask using the Dates1 record format. The release supports up to 3 qualifiers per record. Create a job to mask and run the job 68
69 Masking job will mask the file and replace the file with the masked values. If you want to preserve the original file you should a separate copy of the file. Execute your job by clicking the Action button 69


70 Review your results, examples below Troubleshooting User specified needs to have RWX /700 privileges on the target directory. In case of a shared file server ensure that the local system account running Agile masking should have access Alternatively Agile masking tomcat server should be running with a service ID which is having access to shared paths. 70


71 Tokenization This section describes how to create and manage jobs. Tokenization uses reversible algorithms so that the data can be returned to it's original state. Tokenization is a form of encryption where the actual data such as names and addresses are converted into tokens that have similar properties to the original data (text, length, etc.) but no longer convey any meaning. Creating a Tokenization Algorithm From the Home page, click Settings. Add Algorithm. You will see the popup below: Select Tokenization Algorithm. Enter a name and description. Create a Domain Once you have created an algorithm, you will need to associate it with a domain. 3. From the Home page, click Settings. Select Domains. C lick Add Domain. You will see the popup below: 4. Enter a domain name and associate it with your algorithm. Create a Tokenization Environment 71

72 From the Home page, click Environments. C lick Add Environment. You will see the popup below: Select Tokenize/Re-Identify as the purpose. Click Save. Note This environment will be used to re-identify your data when required. Create a Connection and Rule Set At this point, you can proceed in the same fashion as if you were using Delphix to perform normal masking. You have made all the changes needed to use Tokenization (reversible) algorithms instead of Masking (irreversible) algorithms. Note it is possible to create two different environments for the same application one for Masking and one for Tokenization. 3. From the Home page, click Environments. Click Connector. Click Create Connection. You will see the popup below: Create the Rule Set and Apply File Format If you are masking a file you will need to create a Rule Set and the associated File Format. 72
73 3. From the Home page, click Environments. Click Rule Set. Click Edit Rule Set. You will see the popup below: Apply the Tokenization Algorithm In Step 1, you created a tokenization algorithm you can now apply to the field. You will see the popup below: Create and Execute a Tokenization Job From the Home page, click Environments. C lick Tokenize. 3. Set up a Tokenize job using tokenization method. Execute the job. 73
74 4. You will be prompted for the following information: a. Job Name A free-form name for the job you are creating. b. c. d. e. Tokenization Method Select Tokenization Method. Multi Tenant Check box if the job is for a multi-tenant database. Rule Set Select a rule set that this job will execute against. Generator f. g. h. i. j. k. No. of Streams The number of parallel streams to use when running the jobs. For example, you can select two streams to run two tables in the ruleset concurrently in the job instead of one table at a time. (This option only appears if you select DMsuite as the Generator.) Remote Server (optional) The remote server that will execute the jobs. This option lets you choose to execute jobs on a remote server, rather than on the local Delphix instance. Note: This is an add-on feature for Delphix Standard Edition. (This option only appears if you select DMsuite as the Generator.) Min Memory (MB) (optional) Minimum amount of memory to allocate for the job, in megabytes. (This option only appears if you select DMsuite as the Generator.) Max memory (MB) (optional) Maximum amount of memory to allocate for the job, in megabytes. (This option only appears if you select DMsuite as the Generator.) Commit Size (optional) The number of rows to process before issuing a commit to the database. Feedback Size (optional) The number of rows to process before writing a message to the logs. Set this parameter to the appropriate level of detail required for monitoring your job. For example, 74
 Whether to automatically disable database constraints. The default is for this check box to be clear and therefore not perform automatic disabling of constraints.")
75 l. m. n. o. p. if you set this number significantly higher than the actual number of rows in a job, the progress for that job will only show 0 or 100%. Disable Constraint (optional) Whether to automatically disable database constraints. The default is for this check box to be clear and therefore not perform automatic disabling of constraints. For more information about database constraints, see Enabling and Disabling Database Constraints. Batch Update (optional) Enable or disable use of a batch for updates. A job's statements can either be executed individually, or can be put in a batch file and executed at once, which is faster. Truncate (optional) Whether to truncate target tables before loading them with data. If this box is selected, the tables will be "cleared" before the operation. If this box is clear, data is appended to tables, which potentially can cause primary key violations. This box is clear by default. Disable Trigger (optional) Whether to automatically disable database triggers. The default is for this check box to be clear and therefore not perform automatic disabling of triggers. Drop Index (optional) Whether to automatically drop indexes on columns which are being masked and automatically re-create the index when the masking job is completed. The default is for this check box to be clear and therefore not perform automatic dropping of indexes. q. Prescript (optional) Specify the full pathname of a file containing SQL statements to be run before the job starts, or click Browse to specify a file. If you are editing the job and a prescript file is already specified, you can click the Delete button to remove the file. (The Delete button only appears if a prescript file was already specified.) For information about creating your own prescript files, see Creating SQL Statements to Run Before and After Jobs. r. Postscript (optional) Specify the full pathname of a file containing SQL statements to be run after the job finishes, or click Browse to specify a file. If you are editing the job and a postscript file is already specified, you can click the Delete button to remove the file. (The Delete button only appears if a postscript file was already specified.) For information about creating your own postscript files, see Creating SQL Statements to Run Before and After Jobs. s. t. Comments (optional) Add comments related to this provisioning job. (optional) Add address(es) to which to send status messages. 5. When you are finished, click Save. Result Snapshot Here is a snapshot of the data before and after Tokenization to give you an idea of what the it will look like. Before Tokenization After Tokenization 75

76 Steps to Re-Identify Use the Tokenize/Re-Identify environment. 3. From the Home page, click Environments. Click Re-Identify. Create a re-identify job and execute. You will be prompted for the following information: a. Job Name A free-form name for the job you are creating. b. c. d. Multi Tenant Check box if the job is for a multi-tenant database. Rule Set Select a rule set that this job will execute against. Generator The default value is Delphix. e. f. No. of Streams The number of parallel streams to use when running the jobs. For example, you can select two streams to run two tables in the ruleset concurrently in the job instead of one table at a time. (This option only appears if you select DMsuite as the Generator.) Remote Server (optional) The remote server that will execute the jobs. This option lets you choose to execute jobs on a remote server, rather than on the local Delphix instance. Note: This is an add-on feature for Delphix Standard Edition. (This option only appears if you select DMsuite 76
77 g. h. i. j. k. l. m. as the Generator.) Min Memory (MB) (optional) Minimum amount of memory to allocate for the job, in megabytes. (This option only appears if you select DMsuite as the Generator.) Max memory (MB) (optional) Maximum amount of memory to allocate for the job, in megabytes. (This option only appears if you select DMsuite as the Generator.) Commit Size (optional) The number of rows to process before issuing a commit to the database. Feedback Size (optional) The number of rows to process before writing a message to the logs. Set this parameter to the appropriate level of detail required for monitoring your job. For example, if you set this number significantly higher than the actual number of rows in a job, the progress for that job will only show 0 or 100%. Bulk Data (optional) For In-Place masking only. The default is for this check box to be clear. If you are masking very large tables in-place and require performance improvements, check this box. Delphix will mask data to a flat file, and then use inserts instead of updates to bulk load the target table. (This option only appears if you select DMsuite as the Generator.) Batch Update (optional) Enable or disable use of a batch for updates. A job's statements can either be executed individually, or can be put in a batch file and executed at once, which is faster. Drop Index (optional) Whether to automatically drop indexes on columns which are being masked and automatically re-create the index when the masking job is completed. The default is for this check box to be clear and therefore not perform automatic dropping of indexes. n. Prescript (optional) Specify the full pathname of a file containing SQL statements to be run before the job starts, or click Browse to specify a file. If you are editing the job and a prescript file is already specified, you can click the Delete button to remove the file. (The Delete button only appears if a prescript file was already specified.) For information about creating your own prescript files, see Creating SQL Statements to Run Before and After Jobs. o. Postscript (optional) Specify the full pathname of a file containing SQL statements to be run after the job finishes, or click Browse to specify a file. If you are editing the job and a postscript file is already specified, you can click the Delete button to remove the file. (The Delete button only appears if a postscript file was already specified.) For information about creating your own postscript files, see Creating SQL Statements to Run Before and After Jobs. p. q. Comments (optional) Add comments related to this provisioning job. (optional) Add address(es) to which to send status messages. 4. When you are finished, click Save. Result Snapshot Here is a snapshot of the data before and after re-identification to give you an idea of what to expect. Before Re-Identification 77
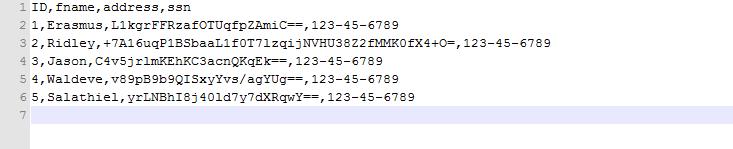
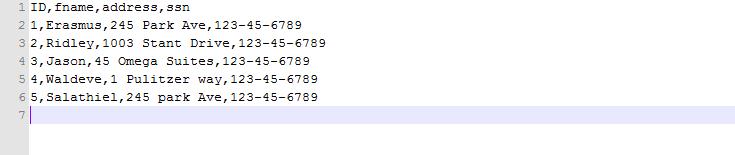
78 After Re-Identification 78

79 Monitor Jobs Click the Monitor tab at the top of the screen to display all of the jobs defined to Delphix. This screen provides an overview of job activity within the entire Delphix application, and also provides a mechanism to view execution results and to run or rerun jobs. You will only see jobs associated with environments for which you have the appropriate role definition. If any job does not succeed, you can correct the errors and then rerun the job. Monitor screen The following columns appear in the Jobs Editor: Environment Job Name Type Progress Status To go to the Environment Overview screen for any environment, click the Environment name. To see detailed information for any job, click the Job Name. To search for a job, enter a job name in the SearchFilter field and press Enter. 79
80 Scheduler Tab Scheduling Job(s) to Run To schedule new job(s) To edit a schedule To delete a schedule Enabling and Disabling Database Constraints Creating SQL Statements to Run Before and After Jobs (For Distributed Environment) Click the Scheduler tab at the top of the screen to display the list of jobs scheduled to run. This screen provides an overview of scheduled jobs and lets the user configure schedules for jobs to run. The following columns appear on the Scheduler screen: Groups Status Start End Frequency Edit Delete To search for a job group: Enter a job group name in the Search field. Click Search. Scheduling Job(s) to Run To schedule new job(s) In the upper right-hand corner of the screen, click. The screen Create Scheduler Schedule Jobs appears. 80

81 Schedule Job screen c. d. e. mm/dd/yyyy. a. b. You will be prompted for the following information: Group Name A free-form name for this job schedule. Scheduled Date Enter the date when you want to run the job group, in the form Scheduled Time Enter the time when you want to run the job group, in the form hh:mm. Frequency (Optional) Select the frequency at which you want to run this job group: Daily, Weekly, Monthly, Yearly. Default is daily if none is chosen. Jobs Jobs are grouped by their Environment. Expand Environments and use the check boxes to add jobs to this group. When you are finished, click Save. All of the jobs you specified for this job group will be run, serially, beginning at the appointed time. Jobs will run serially (one after the other). If you want to run jobs simultaneously, create two schedules with the start time separated by a minute (do not start them at the exact same time). Upon completion of each job, an message that contains job start and end times, along with the completion status, is sent to the user whose address is specified in the E mail field (in the Edit Job window). To edit a schedule From the Scheduler tab, click the Edit icon to the right of the schedule you want. To delete a schedule From the Scheduler tab, click the Delete icon to the right of the schedule you want. Enabling and Disabling Database Constraints Depending on the type of target database you are using, the Delphix Engine can automatically enable and disable database constraints. 81
82 The ability to enable and disable constraints ensures that the Delphix Engine can update columns that have primary key or foreign key relationships. You can set Delphix to handle constraints automatically. Support for disabling constraints is dependent on your RDBMS. If your RDBMS does not support disabling of foreign keys, for example, constraints must be added or dropped using prescript or postscript. Creating SQL Statements to Run Before and After Jobs (For Distributed Environment) When you create a masking job or a certification job, you can specify SQL statements to run before (prescript) you run a job and/or after (postscript) the job has completed. For example, if you want to provision a schema from the source to a target, you would use a prescript (SQL statements) to disable constraints and truncate data on the target. You create prescript and postscript by creating a text document with the SQL statement(s) to execute. If the text file contains more than one SQL statement, each statement must be separated by a semicolon [;] EXCEPT when variables are being used in the script. Any time variables are used, a semicolon should not be used between statements until those variables are no longer needed. For example: VARCHAR(250) [no semicolon after this statement] [no semicolon after this statement] RESTORE DATABASE Delphix FROM DISK WITH FILE = 1; [semicolon at the end] For information about how and where to specify the pathname for prescript and postscript files, see Creating a New Masking Job, Creating a New Certify Job, or Creating a New Provisioning Job. 82
83 Settings Tab This user guide only gives an overview of the Delphix settings. For more detailed information, see the Delphix Administrator's Guide. Click the Settings tab at the top of the screen to view or change Delphix settings. There are several areas to which settings are applied: Algorithms Types of Algorithms Domains (Masking) Profiler Custom Algorithms File Formats Remote Server Algorithms The main methods used by Delphix algorithms are secure lookup and segmented mapping. Delphix also includes some algorithms for specific types of data, such as phone numbers and dates. These standard Delphix algorithms are available if you select Delphix as the generator. From the Settings tab, if you click Algorithm to the left, the list of algorithms will be displayed. Types of Algorithms Secure Lookup Algorithm Uses a lookup file to assign masked values in a consistent manner. The design of the algorithm introduces intentional collisions Segmented Mapping Algorithm Replaces data values based on segment definitions. For example, an ACCOUNT NUMBER algorithm might keep the first segment of an account number but replace the remainder or remaining segments with a random number. Mapping Algorithm: Sequentially maps original data values to masked values that are pre-populated to a lookup table through the Delphix user interface Binary Lookup Algorithm Much like the Secure Lookup Algorithm, but used when entire files are stored in a specific column Tokenization Algorithm Replaces the data value with an algorithmically generated token that can be reversed. These are only used when you create a tokenization environment. Min/Max Algorithm: This algorithm allows you to make sure all the values in the database are within a specified range. They prevent unique identification of individuals by characteristics that are outside the normal range, such as age over 99. Data Cleansing Algorithm If the target data needs to be put in a standard format prior to masking, you can use this algorithm. For example, Ariz, Az, Arizona can all be cleansed to AZ. 83
84 Free Text Redaction Algorithm This algorithms masks or redacts free text columns of files. It uses either a Whitelist or Blacklist to determine what words are masked or not masked. This algorithm may require additional configuration to work in the manner you desire. These Delphix Algorithm Frameworks give you the ability to quickly and easily define the algorithms you want, directly on the Settings tab. Then, you can immediately propagate them. Anyone in your organization who has Delphix can then access the info. Domains (Masking) Domains specify certain data to be masked with a certain algorithm. From the Settings tab, if you click Domains to the left, the list of domains will be displayed. From here, you can add, edit, or delete domains. You can set a domain's algorithm here; to change a domain's selection expressions or to group domains into sets, continue to the next section. Profiler The profiler is used to group domains into Profile Sets (aka Profiles) and assign expressions to domains. Profile Sets can be used in Profiling Jobs. From the Settings tab, if you click Profiler to the left, a list of expressions will be displayed. From here, you can work with: Expressions Expressions are used to specify what data is sensitive. This can be done at either the column or data level. Each expression is assigned to a domain, and domains can be grouped into profile sets. You can add, edit, or delete expressions from the Profiler Settings page. Profile Sets (Profiles) A profile set is a group of domains. Said another way, it is a group of certain data to be masked in certain ways. You can add, edit, or delete profiles by clicking + Profiler Set at the top of the Profiler Settings page. Custom Algorithms From the Settings tab, if you click Custom Algorithms to the left, the list of custom algorithms will be displayed. From here you can add, edit, or delete custom algorithms. File Formats File formats are a way of organizing the types of files to be masked. Before a file can be masked, it needs to have a file format assigned to it. From the Settings tab, if you click File Format to the left, the list of file formats will be displayed. From here, you can add or delete file formats. To assign a file format: In the Rule Set screen, select a rule set. Click the green edit icon to the right of a file. 84
85 Remote Server The Delphix Engine typically executes jobs on a local instance. Remote servers are for executing jobs elsewhere. From the tab, if you click to the left, the list of remote servers will be displayed. From Settings Remote Server here, you can add, edit, or delete remote servers. 85
86 Admin Tab For more detailed Admin information, see the Delphix Administrator's Guide. Click the Admin tab at the top of the screen for administrator settings and information. Users From the Admin tab, if you click Users to the left, the list of users will be displayed. From here you can add, edit, or delete users. Along with regular user information (name, username, etc.), users have permissions. You can set these permissions by the user's role and what environments they can access. About From the Admin tab, if you click About to the left, the list of information about your current Delphix installation is shown: Delphix Version Operating System Application Server Database Masking Java Version Expiration Date Licensed Data Sources The following figure shows a sample of the information displayed in the About section: Figure 23 About Section 86

87 Risk Tab The screenshot below shows user entitlement information for Oracle databases. The following columns will display on the Risk screen: Owner Table name Column name Grantee Click Create PDF to generate a report. Ad hoc Reporting on the Delphix Repository Delphix comes with some sample Adhoc Reports developed using Pentaho Report Designer. The reports run against the Delphix repository and can either be used as is or modified to create new reports to meet your needs. The included list of reports are: Masking Completed A report designed to show how much masking work has been completed in the given time period. It defaults to the last month. This report only includes successful jobs. Risk Mitigation Shows how many sensitive data elements have been masked over the last month Utilization Shows how many jobs have been run and what sort of jobs they are. It also shows how many jobs have been run by the various Delphix users. 87
Delphix Masking Engine with Virtualization Quick Start Guide. December, 2017
 Delphix Masking Engine with Virtualization Quick Start Guide December, 2017 Delphix Masking Engine with Virtualization Quick Start Guide You can find the most up-to-date technical documentation at: docs.delphix.com
Masking Algorithms Guide November 2015
 Masking Algorithms Guide November 2015 Delphix Data Masking Overview Revision: 13 October 2016 You can find the most up-to-date technical documentation at: http://www.delphix.com/support The Delphix Web
VMware Identity Manager Administration
 VMware Identity Manager Administration VMware Identity Manager 2.4 This document supports the version of each product listed and supports all subsequent versions until the document is replaced by a new
Mission Control 5.0. Mission Control Admin Guide. January, 2016
 Mission Control 5.0 Mission Control Admin Guide January, 2016 Mission Control Admin Guide You can find the most up-to-date technical documentation at: docs.delphix.com The Delphix Web site also provides
Mission Control Admin Guide. August, 2017
 Mission Control Admin Guide August, 2017 Mission Control Admin Guide You can find the most up-to-date technical documentation at: docs.delphix.com The Delphix Web site also provides the latest product
Setting Up Resources in VMware Identity Manager. VMware Identity Manager 2.8
 Setting Up Resources in VMware Identity Manager VMware Identity Manager 2.8 You can find the most up-to-date technical documentation on the VMware website at: https://docs.vmware.com/ If you have comments
SUREedge MIGRATOR INSTALLATION GUIDE FOR VMWARE
 SUREedge MIGRATOR INSTALLATION GUIDE 5.0.1 FOR VMWARE 2025 Gateway Place, Suite #480, San Jose, CA, 95110 Important Notice This document is provided "as is" without any representations or warranties, express
Oracle Big Data Cloud Service, Oracle Storage Cloud Service, Oracle Database Cloud Service
 Demo Introduction Keywords: Oracle Big Data Cloud Service, Oracle Storage Cloud Service, Oracle Database Cloud Service Goal of Demo: Oracle Big Data Preparation Cloud Services can ingest data from various
CA GovernanceMinder. CA IdentityMinder Integration Guide
 CA GovernanceMinder CA IdentityMinder Integration Guide 12.6.00 This Documentation, which includes embedded help systems and electronically distributed materials, (hereinafter referred to as the Documentation
Setting Up Resources in VMware Identity Manager (On Premises) Modified on 30 AUG 2017 VMware AirWatch 9.1.1
 Modified on 30 AUG 2017 VMware AirWatch 9.1.1") Setting Up Resources in VMware Identity Manager (On Premises) Modified on 30 AUG 2017 VMware AirWatch 9.1.1 Setting Up Resources in VMware Identity Manager (On Premises) You can find the most up-to-date
Setting Up Resources in VMware Identity Manager (On Premises) Modified on 30 AUG 2017 VMware AirWatch 9.1.1 Setting Up Resources in VMware Identity Manager (On Premises) You can find the most up-to-date
EnterpriseTrack Reporting Data Model Configuration Guide Version 17
 EnterpriseTrack EnterpriseTrack Reporting Data Model Configuration Guide Version 17 October 2018 Contents About This Guide... 5 Configuring EnterpriseTrack for Reporting... 7 Enabling the Reporting Data
Talend Open Studio for Data Quality. User Guide 5.5.2
 Talend Open Studio for Data Quality User Guide 5.5.2 Talend Open Studio for Data Quality Adapted for v5.5. Supersedes previous releases. Publication date: January 29, 2015 Copyleft This documentation is
Getting Started with VMware View View 3.1
 Technical Note Getting Started with VMware View View 3.1 This guide provides an overview of how to install View Manager components and provision virtual desktops. Additional View Manager documentation
VMware AirWatch Certificate Authentication for Cisco IPSec VPN
 VMware AirWatch Certificate Authentication for Cisco IPSec VPN For VMware AirWatch Have documentation feedback? Submit a Documentation Feedback support ticket using the Support Wizard on support.air-watch.com.
VMware Identity Manager Administration. MAY 2018 VMware Identity Manager 3.2
 VMware Identity Manager Administration MAY 2018 VMware Identity Manager 3.2 You can find the most up-to-date technical documentation on the VMware website at: https://docs.vmware.com/ If you have comments
Professional Edition User Guide
 Professional Edition User Guide Pronto, Visualizer, and Dashboards 2.0 Birst Software Version 5.28.6 Documentation Release Thursday, October 19, 2017 i Copyright 2015-2017 Birst, Inc. Copyright 2015-2017
Setting Up Resources in VMware Identity Manager
 Setting Up Resources in VMware Identity Manager VMware Identity Manager 2.7 This document supports the version of each product listed and supports all subsequent versions until the document is replaced
Using the vrealize Orchestrator Operations Client. vrealize Orchestrator 7.5
 Using the vrealize Orchestrator Operations Client vrealize Orchestrator 7.5 You can find the most up-to-date technical documentation on the VMware website at: https://docs.vmware.com/ If you have comments
vcenter Chargeback User s Guide
 vcenter Chargeback 1.5 This document supports the version of each product listed and supports all subsequent versions until the document is replaced by a new edition. To check for more recent editions
Synchronization Agent Configuration Guide
 SafeNet Authentication Service Synchronization Agent Configuration Guide 1 Document Information Document Part Number 007-012848-001, Rev. B Release Date March 2015 Applicability This version of the SAS
DocAve 6 SharePoint Migrator
 DocAve 6 SharePoint Migrator User Guide Service Pack 4, Cumulative Update 2 Revision C Issued July 2014 Table of Contents About SharePoint Migration... 5 Complementary Products... 5 Submitting Documentation
ForeScout Extended Module for Advanced Compliance
 ForeScout Extended Module for Advanced Compliance Version 1.2 Table of Contents About Advanced Compliance Integration... 4 Use Cases... 4 Additional Documentation... 6 About This Module... 6 About Support
Synchronization Agent Configuration Guide
 SafeNet Authentication Service Synchronization Agent Configuration Guide 1 Document Information Document Part Number 007-012848-001, Rev. E Release Date July 2015 Applicability This version of the SAS
Realms and Identity Policies
 The following topics describe realms and identity policies: Introduction:, page 1 Creating a Realm, page 5 Creating an Identity Policy, page 11 Creating an Identity Rule, page 15 Managing Realms, page
vrealize Suite Lifecycle Manager 1.0 Installation and Management vrealize Suite 2017
 vrealize Suite Lifecycle Manager 1.0 Installation and Management vrealize Suite 2017 vrealize Suite Lifecycle Manager 1.0 Installation and Management You can find the most up-to-date technical documentation
Using the Horizon vrealize Orchestrator Plug-In
 Using the Horizon vrealize Orchestrator Plug-In VMware Horizon 6 version 6.2.3, VMware Horizon 7 versions 7.0.3 and later Modified on 4 JAN 2018 VMware Horizon 7 7.4 You can find the most up-to-date technical
IBM Campaign Version-independent Integration with IBM Engage Version 1 Release 3.1 April 07, Integration Guide IBM
 IBM Campaign Version-independent Integration with IBM Engage Version 1 Release 3.1 April 07, 2017 Integration Guide IBM Note Before using this information and the product it supports, read the information
Policy Manager for IBM WebSphere DataPower 7.2: Configuration Guide
 Policy Manager for IBM WebSphere DataPower 7.2: Configuration Guide Policy Manager for IBM WebSphere DataPower Configuration Guide SOAPMDP_Config_7.2.0 Copyright Copyright 2015 SOA Software, Inc. All rights
ZENworks Reporting System Reference. January 2017
 ZENworks Reporting System Reference January 2017 Legal Notices For information about legal notices, trademarks, disclaimers, warranties, export and other use restrictions, U.S. Government rights, patent
vcenter Chargeback Manager Installation and Upgrade Guide
 vcenter Chargeback Manager Installation and Upgrade Guide vcenter Chargeback Manager 2.6.0 This document supports the version of each product listed and supports all subsequent versions until the document
Administering Cloud Pod Architecture in Horizon 7. Modified on 26 JUL 2017 VMware Horizon 7 7.2
 Administering Cloud Pod Architecture in Horizon 7 Modified on 26 JUL 2017 VMware Horizon 7 7.2 Administering Cloud Pod Architecture in Horizon 7 You can find the most up-to-date technical documentation
VMware AirWatch Certificate Authentication for EAS with NDES-MSCEP
 VMware AirWatch Certificate Authentication for EAS with NDES-MSCEP For VMware AirWatch Have documentation feedback? Submit a Documentation Feedback support ticket using the Support Wizard on support.air-watch.com.
VMware Identity Manager Administration
 VMware Identity Manager Administration VMware AirWatch 9.1 This document supports the version of each product listed and supports all subsequent versions until the document is replaced by a new edition.
Working with Database Connections. Version: 7.3
 Working with Database Connections Version: 7.3 Copyright 2015 Intellicus Technologies This document and its content is copyrighted material of Intellicus Technologies. The content may not be copied or
Bomgar PA Integration with ServiceNow
 Bomgar PA Integration with ServiceNow 2017 Bomgar Corporation. All rights reserved worldwide. BOMGAR and the BOMGAR logo are trademarks of Bomgar Corporation; other trademarks shown are the property of
Setting Up Resources in VMware Identity Manager (SaaS) Modified 15 SEP 2017 VMware Identity Manager
 Modified 15 SEP 2017 VMware Identity Manager") Setting Up Resources in VMware Identity Manager (SaaS) Modified 15 SEP 2017 VMware Identity Manager Setting Up Resources in VMware Identity Manager (SaaS) You can find the most up-to-date technical documentation
Setting Up Resources in VMware Identity Manager (SaaS) Modified 15 SEP 2017 VMware Identity Manager Setting Up Resources in VMware Identity Manager (SaaS) You can find the most up-to-date technical documentation
INSTALL GUIDE BIOVIA INSIGHT 2016
 INSTALL GUIDE BIOVIA INSIGHT 2016 Copyright Notice 2015 Dassault Systèmes. All rights reserved. 3DEXPERIENCE, the Compass icon and the 3DS logo, CATIA, SOLIDWORKS, ENOVIA, DELMIA, SIMULIA, GEOVIA, EXALEAD,
akkadian Global Directory 3.0 System Administration Guide
 akkadian Global Directory 3.0 System Administration Guide Updated July 19 th, 2016 Copyright and Trademarks: I. Copyright: This website and its content is copyright 2014 Akkadian Labs. All rights reserved.
Advanced Service Design. vrealize Automation 6.2
 vrealize Automation 6.2 You can find the most up-to-date technical documentation on the VMware website at: https://docs.vmware.com/ If you have comments about this documentation, submit your feedback to
Developing and Deploying vsphere Solutions, vservices, and ESX Agents. 17 APR 2018 vsphere Web Services SDK 6.7 vcenter Server 6.7 VMware ESXi 6.
 Developing and Deploying vsphere Solutions, vservices, and ESX Agents 17 APR 2018 vsphere Web Services SDK 6.7 vcenter Server 6.7 VMware ESXi 6.7 You can find the most up-to-date technical documentation
Contents Using the Primavera Cloud Service Administrator's Guide... 9 Web Browser Setup Tasks... 10
 Cloud Service Administrator's Guide 15 R2 March 2016 Contents Using the Primavera Cloud Service Administrator's Guide... 9 Web Browser Setup Tasks... 10 Configuring Settings for Microsoft Internet Explorer...
Get Started with Cisco DNA Center
 About Cisco DNA Center, on page 1 Log In, on page 1 Log In for the First Time as a Network Administrator, on page 2 Default Home Page, on page 3 Use Global Search, on page 5 Where to Start, on page 6 About
VMWARE HORIZON CLOUD WITH VMWARE IDENTITY MANAGER QUICK START GUIDE WHITE PAPER MARCH 2018
 VMWARE HORIZON CLOUD WITH VMWARE IDENTITY MANAGER QUICK START GUIDE WHITE PAPER MARCH 2018 Table of Contents Introduction to Horizon Cloud with Manager.... 3 Benefits of Integration.... 3 Single Sign-On....3
Null Service and Loopback Service Drivers Implementation Guide NetIQ Identity Manager. February 2018
 Null Service and Loopback Service Drivers Implementation Guide NetIQ Identity Manager February 2018 Legal Notice For information about NetIQ legal notices, disclaimers, warranties, export and other use
Administering Cloud Pod Architecture in Horizon 7. VMware Horizon 7 7.1
 Administering Cloud Pod Architecture in Horizon 7 VMware Horizon 7 7.1 Administering Cloud Pod Architecture in Horizon 7 You can find the most up-to-date technical documentation on the VMware Web site
Administering View Cloud Pod Architecture. VMware Horizon 7 7.0
 Administering View Cloud Pod Architecture VMware Horizon 7 7.0 You can find the most up-to-date technical documentation on the VMware Web site at: https://docs.vmware.com/ The VMware Web site also provides
Perceptive Matching Engine
 Perceptive Matching Engine Advanced Design and Setup Guide Version: 1.0.x Written by: Product Development, R&D Date: January 2018 2018 Hyland Software, Inc. and its affiliates. Table of Contents Overview...
Administering Cloud Pod Architecture in Horizon 7. Modified on 4 JAN 2018 VMware Horizon 7 7.4
 Administering Cloud Pod Architecture in Horizon 7 Modified on 4 JAN 2018 VMware Horizon 7 7.4 You can find the most up-to-date technical documentation on the VMware website at: https://docs.vmware.com/
AvePoint Governance Automation 2. Release Notes
 AvePoint Governance Automation 2 Release Notes Service Pack 2, Cumulative Update 1 Release Date: June 2018 New Features and Improvements In the Create Office 365 Group/Team service > Governance Automation
VMware AirWatch Certificate Authentication for EAS with ADCS
 VMware AirWatch Certificate Authentication for EAS with ADCS For VMware AirWatch Have documentation feedback? Submit a Documentation Feedback support ticket using the Support Wizard on support.air-watch.com.
Installing and Configuring vcloud Connector
 Installing and Configuring vcloud Connector vcloud Connector 2.5.0 This document supports the version of each product listed and supports all subsequent versions until the document is replaced by a new
IMPLEMENTING SINGLE SIGN-ON (SSO) TO KERBEROS CONSTRAINED DELEGATION AND HEADER-BASED APPS. VMware Identity Manager.
 TO KERBEROS CONSTRAINED DELEGATION AND HEADER-BASED APPS. VMware Identity Manager.") IMPLEMENTING SINGLE SIGN-ON (SSO) TO KERBEROS CONSTRAINED DELEGATION AND HEADER-BASED APPS VMware Identity Manager February 2017 V1 1 2 Table of Contents Overview... 5 Benefits of BIG-IP APM and Identity
IMPLEMENTING SINGLE SIGN-ON (SSO) TO KERBEROS CONSTRAINED DELEGATION AND HEADER-BASED APPS VMware Identity Manager February 2017 V1 1 2 Table of Contents Overview... 5 Benefits of BIG-IP APM and Identity
Workspace ONE UEM Certificate Authentication for EAS with ADCS. VMware Workspace ONE UEM 1902
 Workspace ONE UEM Certificate Authentication for EAS with ADCS VMware Workspace ONE UEM 1902 You can find the most up-to-date technical documentation on the VMware website at: https://docs.vmware.com/
Yubico with Centrify for Mac - Deployment Guide
 CENTRIFY DEPLOYMENT GUIDE Yubico with Centrify for Mac - Deployment Guide Abstract Centrify provides mobile device management and single sign-on services that you can trust and count on as a critical component
Backup Solution. User Guide. Issue 01 Date
 Issue 01 Date 2017-08-30 Contents Contents 1 Introduction... 1 1.1 What Is the Backup Solution?... 1 1.2 Why Choose the Backup Solution?... 2 1.3 Concepts and Principles...3 1.3.1 Basic OBS Concepts...3
SUREedge MIGRATOR INSTALLATION GUIDE FOR HYPERV
 SUREedge MIGRATOR INSTALLATION GUIDE 5.0.1 FOR HYPERV 2025 Gateway Place, Suite #480, San Jose, CA, 95110 Important Notice This document is provided "as is" without any representations or warranties, express
Data Federation Administration Tool Guide SAP Business Objects Business Intelligence platform 4.1 Support Package 2
 Data Federation Administration Tool Guide SAP Business Objects Business Intelligence platform 4.1 Support Package 2 Copyright 2013 SAP AG or an SAP affiliate company. All rights reserved. No part of this
SUREedge MIGRATOR INSTALLATION GUIDE FOR NUTANIX ACROPOLIS
 SUREedge MIGRATOR INSTALLATION GUIDE 5.0.1 FOR NUTANIX ACROPOLIS 2025 Gateway Place, Suite #480, San Jose, CA, 95110 Important Notice This document is provided "as is" without any representations or warranties,
Realms and Identity Policies
 The following topics describe realms and identity policies: About, page 1 Create a Realm, page 8 Create an Identity Policy, page 15 Create an Identity Rule, page 15 Manage a Realm, page 20 Manage an Identity
DEPLOYMENT GUIDE DEPLOYING F5 WITH ORACLE ACCESS MANAGER
 DEPLOYMENT GUIDE DEPLOYING F5 WITH ORACLE ACCESS MANAGER Table of Contents Table of Contents Introducing the F5 and Oracle Access Manager configuration Prerequisites and configuration notes... 1 Configuration
This document contains information on fixed and known limitations for Test Data Management.
 Informatica Corporation Test Data Management Version 9.6.0 Release Notes August 2014 Copyright (c) 2003-2014 Informatica Corporation. All rights reserved. Contents Informatica Version 9.6.0... 1 Installation
Introduction to application management
 Introduction to application management To deploy web and mobile applications, add the application from the Centrify App Catalog, modify the application settings, and assign roles to the application to
ZENworks 2017 Audit Management Reference. December 2016
 ZENworks 2017 Audit Management Reference December 2016 Legal Notice For information about legal notices, trademarks, disclaimers, warranties, export and other use restrictions, U.S. Government rights,
Firewall Enterprise epolicy Orchestrator
 Integration Guide McAfee Firewall Enterprise epolicy Orchestrator Extension version 5.2.1 COPYRIGHT Copyright 2011 McAfee, Inc. All Rights Reserved. No part of this publication may be reproduced, transmitted,
Configuring the Oracle Network Environment. Copyright 2009, Oracle. All rights reserved.
 Configuring the Oracle Network Environment Objectives After completing this lesson, you should be able to: Use Enterprise Manager to: Create additional listeners Create Oracle Net Service aliases Configure
Guide to Deploying VMware Workspace ONE with VMware Identity Manager. SEP 2018 VMware Workspace ONE
 Guide to Deploying VMware Workspace ONE with VMware Identity Manager SEP 2018 VMware Workspace ONE You can find the most up-to-date technical documentation on the VMware website at: https://docs.vmware.com/
ZENworks Service Desk 8.0 Using ZENworks with ZENworks Service Desk. November 2018
 ZENworks Service Desk 8.0 Using ZENworks with ZENworks Service Desk November 2018 Legal Notices For information about legal notices, trademarks, disclaimers, warranties, export and other use restrictions,
Installing and Configuring vcloud Connector
 Installing and Configuring vcloud Connector vcloud Connector 2.6.0 This document supports the version of each product listed and supports all subsequent versions until the document is replaced by a new
Working with Database Connections. Version: 18.1
 Working with Database Connections Version: 18.1 Copyright 2018 Intellicus Technologies This document and its content is copyrighted material of Intellicus Technologies. The content may not be copied or
Installing and Configuring vcenter Support Assistant
 Installing and Configuring vcenter Support Assistant vcenter Support Assistant 6.0 This document supports the version of each product listed and supports all subsequent versions until the document is replaced
Centrify for Dropbox Deployment Guide
 CENTRIFY DEPLOYMENT GUIDE Centrify for Dropbox Deployment Guide Abstract Centrify provides mobile device management and single sign-on services that you can trust and count on as a critical component of
Directory Integration with VMware Identity Manager
 Directory Integration with VMware Identity Manager VMware AirWatch 9.1 This document supports the version of each product listed and supports all subsequent versions until the document is replaced by a
Developing and Deploying vsphere Solutions, vservices, and ESX Agents
 Developing and Deploying vsphere Solutions, vservices, and ESX Agents Modified on 27 JUL 2017 vsphere Web Services SDK 6.5 vcenter Server 6.5 VMware ESXi 6.5 Developing and Deploying vsphere Solutions,
McAfee Security Management Center
 Data Sheet McAfee Security Management Center Unified management for next-generation devices Key advantages: Single pane of glass across the management lifecycle for McAfee next generation devices. Scalability
Sage Construction Central Setup Guide (Version 18.1)
") Sage 300 Construction and Real Estate Sage Construction Central Setup Guide (Version 18.1) Certified course curriculum Important Notice The course materials provided are the product of Sage. Please do
Sage 300 Construction and Real Estate Sage Construction Central Setup Guide (Version 18.1) Certified course curriculum Important Notice The course materials provided are the product of Sage. Please do
Intellicus Enterprise Reporting and BI Platform
 Getting Started with Intellicus Intellicus Enterprise Reporting and BI Platform Intellicus Technologies info@intellicus.com www.intellicus.com Getting Started with Intellicus i Copyright 2012 Intellicus
ForeScout Extended Module for Tenable Vulnerability Management
 ForeScout Extended Module for Tenable Vulnerability Management Version 2.7.1 Table of Contents About Tenable Vulnerability Management Module... 4 Compatible Tenable Vulnerability Products... 4 About Support
Installing and Configuring vcenter Multi-Hypervisor Manager
 Installing and Configuring vcenter Multi-Hypervisor Manager vcenter Server 5.1 vcenter Multi-Hypervisor Manager 1.1.2 This document supports the version of each product listed and supports all subsequent
Workspace ONE UEM Certificate Authentication for Cisco IPSec VPN. VMware Workspace ONE UEM 1810
 Workspace ONE UEM Certificate Authentication for Cisco IPSec VPN VMware Workspace ONE UEM 1810 You can find the most up-to-date technical documentation on the VMware website at: https://docs.vmware.com/
Lenovo ThinkAgile XClarity Integrator for Nutanix Installation and User's Guide
 Lenovo ThinkAgile XClarity Integrator for Nutanix Installation and User's Guide Version 1.0 Note Before using this information and the product it supports, read the information in Appendix A Notices on
INSTALLATION GUIDE Spring 2017
 INSTALLATION GUIDE Spring 2017 Copyright and Disclaimer This document, as well as the software described in it, is furnished under license of the Instant Technologies Software Evaluation Agreement and
VMware AirWatch - Workspace ONE, Single Sign-on and VMware Identity Manager
 VMware AirWatch - Workspace ONE, Single Sign-on and VMware Identity Table of Contents Lab Overview - HOL-1857-03-UEM - Workspace ONE UEM with App & Access Management... 2 Lab Guidance... 3 Module 1 - Workspace
Table of Contents. Configure and Manage Logging in to the Management Portal Verify and Trust Certificates
 Table of Contents Configure and Manage Logging in to the Management Portal Verify and Trust Certificates Configure System Settings Add Cloud Administrators Add Viewers, Developers, or DevOps Administrators
VMware Skyline Collector Installation and Configuration Guide. VMware Skyline Collector 2.0
 VMware Skyline Collector Installation and Configuration Guide VMware Skyline Collector 2.0 You can find the most up-to-date technical documentation on the VMware website at: https://docs.vmware.com/ If
Ansible Tower Quick Setup Guide
 Ansible Tower Quick Setup Guide Release Ansible Tower 2.4.5 Red Hat, Inc. Jun 06, 2017 CONTENTS 1 Quick Start 2 2 Login as a Superuser 3 3 Import a License 4 4 Examine the Tower Dashboard 6 5 The Setup
Workspace Administrator Help File
 Workspace Administrator Help File Table of Contents HotDocs Workspace Help File... 1 Getting Started with Workspace... 3 What is HotDocs Workspace?... 3 Getting Started with Workspace... 3 To access Workspace...
QuickStart Guide for Mobile Device Management. Version 8.7
 QuickStart Guide for Mobile Device Management Version 8.7 JAMF Software, LLC 2013 JAMF Software, LLC. All rights reserved. JAMF Software has made all efforts to ensure that this guide is accurate. JAMF
Developing and Deploying vsphere Solutions, vservices, and ESX Agents
 Developing and Deploying vsphere Solutions, vservices, and ESX Agents vsphere 5.0 This document supports the version of each product listed and supports all subsequent versions until the document is replaced
Change and Configuration Management Administration
 CHAPTER 7 Change and Configuration Management Administration These topics provide administrative information on Change and Configuration Management: Configuring Global Settings for Configuration Management,
VMware Skyline Collector Installation and Configuration Guide. VMware Skyline 1.4
 VMware Skyline Collector Installation and Configuration Guide VMware Skyline 1.4 You can find the most up-to-date technical documentation on the VMware website at: https://docs.vmware.com/ If you have
Orgnazition of This Part
 Orgnazition of This Part Table of Contents Tutorial: Organization of This Part...1 Lesson 1: Starting JReport Enterprise Server and Viewing Reports...3 Introduction...3 Installing JReport Enterprise Server...3
Guide to Deploying VMware Workspace ONE. VMware Identity Manager VMware AirWatch 9.1
 Guide to Deploying VMware Workspace ONE VMware Identity Manager 2.9.1 VMware AirWatch 9.1 Guide to Deploying VMware Workspace ONE You can find the most up-to-date technical documentation on the VMware
Managing Software Images Using Software Management
 CHAPTER 8 Managing Software Images Using Software Management Manually upgrading your devices to the latest software version can be an error-prone, and time-consuming process. To ensure rapid, reliable
Using the vcenter Orchestrator Perspectives Plug-In
 Using the vcenter Orchestrator Perspectives Plug-In vcenter Orchestrator 4.1 vcenter Orchestrator 4.2 This document supports the version of each product listed and supports all subsequent versions until
AvePoint Online Services for Partners 2
 AvePoint Online Services for Partners 2 User Guide Service Pack 1 Issued June 2017 Table of Contents What s New in this Guide...4 About...5 Submitting Documentation Feedback to AvePoint...6 Browser Support
Enterprise Vault.cloud CloudLink Google Account Synchronization Guide. CloudLink to 4.0.3
 Enterprise Vault.cloud CloudLink Google Account Synchronization Guide CloudLink 4.0.1 to 4.0.3 Enterprise Vault.cloud: CloudLink Google Account Synchronization Guide Last updated: 2018-06-08. Legal Notice
Managing External Identity Sources
 CHAPTER 5 The Cisco Identity Services Engine (Cisco ISE) integrates with external identity sources to validate credentials in user authentication functions, and to retrieve group information and other
Using SAP NetWeaver Business Intelligence in the universe design tool SAP BusinessObjects Business Intelligence platform 4.1
 Using SAP NetWeaver Business Intelligence in the universe design tool SAP BusinessObjects Business Intelligence platform 4.1 Copyright 2013 SAP AG or an SAP affiliate company. All rights reserved. No part
Oracle Warehouse Builder 10g Runtime Environment, an Update. An Oracle White Paper February 2004
 Oracle Warehouse Builder 10g Runtime Environment, an Update An Oracle White Paper February 2004 Runtime Environment, an Update Executive Overview... 3 Introduction... 3 Runtime in warehouse builder 9.0.3...
Delphix Engine Quick Start Guide for SAP ASE. April, 2018
 Delphix Engine Quick Start Guide for SAP ASE April, 2018 Delphix Engine Quick Start Guide for SAP ASE You can find the most up-to-date technical documentation at: docs.delphix.com The Delphix Web site