Comodo Certificate Manager Version 5.7
|
|
|
- Lee Collins
- 6 years ago
- Views:
Transcription
1 ff Comodo Certificate Manager Version 5.7 Quick Start Guide Guide Version Comodo CA Limited, 3rd Floor, 26 Office Village, Exchange Quay, Trafford Road, Salford, Greater Manchester M5 3EQ, United Kingdom

2 Comodo Certificate Manager - Quick Start Guide This tutorial briefly explains how an administrator can setup Comodo Certificate Manager then issue and manage SSL, Client, Code Signing and Device authentication certificates. The guide will take you through the following processes - click on any link to go straight to that section as per your current requirements. Step 1 - Log in to CCM Step 2 - Create Organizations and Departments Step 3 - Run a Discovery Scan for SSL certificates installed on Organization/Department network Step 4 - Add Administrators Step 5 - Add Domains and delegate them to Organizations/Departments Step 6 - Manage Certificates Request and Issuance of SSL Certificates Request and Issuance of Client Certificates Request and Issuance of Code Signing Certificates Request and Issuance of Device Authentication Certificates Step 7 - Generate Reports Step 1 - Log in to CCM Once your Organization has subscribed for a Comodo account, your Comodo account manager will provide you with a username, password and login URL for the Certificate Manager interface. By default, the format of this URL is: CUSTOMER URI]/ 2
.")
3 If you have not been supplied with your login details, please contact your Comodo account manager. If you are not able to login with your login details, please raise a support ticket at the Comodo Support portal by clicking the 'CCM Support' link (requires account creation). Depending on the access control settings set by your administrator, you will be prompted to change your password after logging in for the first time. Tip: You may also change your password at any time from the 'My Profile' dialog. You can access this dialog by clicking your username at the top right of the interface. Step 2 - Create Organizations and Departments Any certificate ordered through CCM must be assigned to an Organization. Each Organization can have multiple Departments. Once created, you can delegate domains and assign dedicated administrators to specific Organizations or Departments. Organizations are typically managed by a Registration Authority Officer (RAO) administrator while Departments are typically managed by a Domain Registration Authority Officer (DRAO). A Master Registration Authority Officer (MRAO) can manage all Organizations and all Departments. Once an Organization or Department has been created: Appropriately privileged officers can request and delegate domains to that Organization/Department Appropriately privileged officers can request, approve/decline requests and manage certificates on behalf of that Organization or Department. End-users can enroll into (or be assigned membership of) that Organization or Department and be provisioned with client certificates Administrators can run a certificate discovery scan on their networks. All discovered certificates will be assigned to the Organization you specify during scan configuration. You are advised to plan the Organization/Department structure you'd like. All certificates that are newly applied or pre-installed in the network and identified by discovery scans are automatically assigned to an Organization or Department. These named entities will feature in the 'O' and 'OU' fields of your issued certificate. Once issued, you cannot 'reassign' a certificate to the auspices of another Organization in CCM. To create an Organization Open the 'Organizations' management area by clicking the 'Settings' tab and then clicking 'Organizations' sub-tab. 3

4 Click 'Add' The 'Add New Organization' dialog contains six tabs. At this point you need only complete the 'General' tab to create the Organization - but should review the other tabs prior to requesting certificates. General - Allows you to configure high level details relating to the new Organization. (Mandatory) EV Details - Provide additional company details which are required for the validation of EV certificates for the Organization. (Optional) Client Certificate - Configure enrollment and term settings relating to S/MIME ( and client) certificates issued to end-users belonging to the Organization or Department (Optional) SSL Certificate - configure enrollment and term settings related to SSL certificates issued to the domains associated with the Organization (or Department of the Organization). (Optional) Code Signing Certificate- Allows you to enable or disable issuance of code signing certificates issued to end-users belonging to the Organization (or Department of the Organization). (Optional) Device Certificate - Allows you to configure a self-enrollment link for issuance of device certificates from Private Certificate Authorities that are added to your account. (Optional) This section explains the configuration parameters under the 'General' tab. The configuration of individual certificate settings for the Organization is optional. Refer to the section 'Organization Management' in the administrator guide for more details. General Settings Field Name Description Organization Name The name of the Organization to be created. Address 1 Organization's address (used for issuing SSL and S/MIME certificates ) 4
5 Address 2 Organization's address (used for issuing SSL and S/MIME certificates) Address 3 Organization's address (used for issuing SSL and S/MIME certificates) City City where the Organization is located (used for issuing SSL and S/MIME certificates) State/Province State or province (used for issuing SSL and S/MIME certificates) Postal Code Postal code (used for issuing SSL and S/MIME certificates) Country Two characters country code (used for issuing SSL and S/MIME certificates) Validation Status Indicates the progress of Organizational Validation (OV) on the 'Organization' in question. States can be 'Not validated', 'Validated', 'Pending', 'Failed', 'Expired'. The Validation Status will be displayed only if OV certificates are enabled for the CCM account. Anchor Certificate Indicates the status of Anchor certificate. The Anchor Certificate is issued after the Organization Validation is completed. This is used as a reference for Organization Validation status by CCM whenever an OV SSL certificate is requested for the Organization or Departments under it. The Anchor Certificate field will be displayed only if OV certificates are enabled for the CCM account. Enter the parameters as explained above and click 'OK'. The Organization will be added to the list under the 'Organizations' sub-tab. You can repeat the process to add more Organizations'. To add a Department under an Organization Open the 'Organizations' management area by clicking the 'Settings' tab then select the 'Organizations' sub-tab. Choose the Organization from the list and then click the 'Departments' button that appears at the top. 5


6 Click the 'Add' button The 'Add New Department' dialog will open. This interface is similar to 'Add New Organization' dialog. The settings made here will apply only to the new Department. Repeat the process to add more Departments under the Organization. 6
7 Step 3 - Run a Discovery Scan for SSL certificates installed on Organization/Department network A discovery scan will identify all existing certificates on your network and import them into CCM for further management. Discovered certificates are given 'Unmanaged' status, which means they were not ordered through CCM. Once imported, you can easily renew or replace discovered certificates with Comodo equivalents. You are advised to create the Organization/Department structure you'd like before creating and running a discovery scan. On completion of a discovery scan, all identified certificates will be automatically assigned to the Organization/Department configured in the discovery task. The administrators in charge of the organization/department will then receive notifications relevant to the certificate (for example, certificate expiry reminders). Comodo advises you run a scan at the earliest opportunity so that you gain a firm inventory of your company's certificate assets. Discovery scans are, however, optional at this stage and can be run at anytime. You can skip to step 4 if you wish to do this later. To run a discovery scan, you need to: 1. Install the CCM agent on your network and configure it for certificate discovery. Once installed, this agent will also allow you to use CCM's automatic certificate installation feature. 2. Create and run a 'Discovery Task' by specifying target IP ranges. Any certificates discovered by the scan will be displayed in the 'SSL Certificates' area of the 'Certificates' interface. To install and configure the agent Click the 'Discovery' tab then select 'Agents' Click 'Download Agent' 7

8 Select the Organization/Department on whose behalf you want to discover certificates and choose version of the Agent appropriate for you server operating system. Click 'Download' and save the setup file. Transfer the agent setup file to the web server or any computer in the network to be scanned and install it. To install the agent on Windows, right-click on the setup file and select 'Run as Administrator'. If you are installing the Linux version of the Agent, run the installation from the command line. Once successfully installed, the 'Agent' will be listed in the CCM interface: 8

9 The next step is to configure the Agent to scan the internal network by specifying the address of the network to be scanned. Choose the agent from the 'Agents' interface and click 'Edit'. 9

10 Field Name Description Name Enables you to edit the name of the Certificate Controller Agent. Version Displays the version number of the Agent. IP Address Displays the IPv6 Loopback address, IPv4 loopback address, IPV6 version IP Address, IPv4 version IP Address and MAC address of the server on which the agent is installed. Local Configuration URI Displays the URL that can be used to access the agent via a web browser for configuring it. For more information, refer to the section 'Configuring the Certificate Controller Agent' through Web Interface in the Administrator guide. Alternative Name Enables you to specify an alternative name for the Agent 10


11 Active Enables you to set the Agent in active state or inactive state. Auto update Indicates whether the agent is enabled for auto update Organization Enables you to change the Organization associated the Agent. Department Enables you to change the Department associated with the Agent. Secret Key Displays the secret key generated by the Agent to authenticate itself to Remote Comodo CM server. The secret key must have 10 characters. You can copy and save the secret key in a safe location for use in a new agent, in case the agent has to be reinstalled in the same server, to authenticate itself to the CCM server for scanning the same internal network. Keystore password Displays the key store password generated by the Agent. You can copy and save the secret key store password in a safe location for use in a new agent, in case the agent has to be reinstalled in the same server. Comments Enables you to type a descriptive comment on the purpose of the Agent Edit the values if required. To edit the CIDR ranges, click the 'CIDR Ranges' tab. To add a new CIDR range, click 'Add'. The 'Add CIDR Range' dialog will open. 11

12 Enter the internal IP address range to be scanned, set whether the Agent is to be Active and type a description for the range in the dialog and click OK'. The CIDR Range will be added in the 'CIDR Ranges' tab. You can add as many ranges as you want by repeating the same procedure. The Servers tab allows you to add local/remote servers for auto-installation of SSL certificates. You can add servers at a later time by editing the agent. Click 'OK' in the 'Edit Agent' interface The agent is now configured to scan the servers covered by the specified CIDR range and can be used to run a discovery task on the network. To create a Discovery Task Open the 'Discovery Tasks' interface by clicking the 'Discovery' tab and then clicking the 'Discovery Tasks' sub-tab Click 'Add' 12

13 Enter a name for identifying the discovery task in the Name field Leave 'Agent' at the default 'Auto' setting. Click 'Add' beside 'Ranges to Scan' to specify the the network/server to be scanned. You can specify the network/server in CIDR notation, by IP address or by hostname. 13
 The port number(s) for IP range.")
14 Form Element CIDR Description Short for 'Classless Internet DOMAIN Routing'. Type the IP address you wish to scan followed by network prefix, e.g /16 should be specified here. Enter the same CIDR value specified for the agent. IP Type the IP address you wish to scan Host name Enter the host name you wish to scan Ports (required) The port number(s) for IP range. Click 'OK' when you have specified your targets. The range will be added to the 'Ranges to Scan' field Click 'OK' in the 'Add' dialog. The 'Assignment Rules' tab lets you add rules which will assign discovered certificates to a specific organization/department based on criteria you define. 14

'. For example, you could assign all certificates that contain 'example.")
15 Existing rules can be added to the task by clicking the right-arrow button. Click the 'Create New Assignment Rule' button to set up a new rule: Enter a name for the new assignment rule in the first text field. Each individual rule allows you to assign certificates to a single organization or department based on one or more conditions. Set the rule conditions by modifying the parameters under 'When a certificate is discovered that meets below condition(s)'. For example, you could assign all certificates that contain 'example.com' in the common name to a specific organization. Use the '+' button to add more conditions. For example, you may also want to assign all certificates that contain 'mycompany.com' to the same organization/department. Select the target Organization/Department in the 'Assign to...' area. Click 'OK' to save the rule. You can create multiple rules per task to assign different types of certificate to different organizations. The newly created discovery task will be displayed in the list. You can run scans as per the task now. 15


16 To start the scan Open the 'Discovery Tasks' interface by clicking the 'Discovery' tab and then clicking the 'Discovery Tasks' sub-tab. Select the Discovery Task to be executed. Click 'Scan' from the options at the top. After the scan is complete, discovered certificates will be assigned to the chosen organization/department and will be listed in the 'Certificates' > 'SSL Certificates' interface. To view the results Open the certificates management area by clicking 'Certificates' then 'SSL Certificates': The discovered certificates will be displayed as a list along with details like the Organization/Department to which 16
17 they are assigned. If you wish to re-assign the unmanaged certificates to a different Organization/Department, there are a couple of options: Renew/replace the 'unmanaged' certificate with a Comodo equivalent through CCM, so that it becomes 'managed'. You need to specify the new Organization/Department during the renewal/application process in order for the certificate to be issued to the new Organization/Department. OR Identify the IP addresses of the servers on which the certificate/are installed. Then run a new discovery task on these IPs which assigns discovered certificates to your desired Organization/ Department. Select the certificate from the 'Certificates' > 'SSL Certificates' interface and click the 'Details' button from the top to view the 'Certificate Details' Identify the IP addresses of the server on which it is installed Create a new discovery task which scans just those IP addresses. Specify your new Organization/Department during scan configuration. After running the scan, discovered certificates will be automatically reassigned to the new Organization/Department. Step 4 - Add Administrators Once the Organizations and Departments are created you can add and assign dedicated administrators to each Organization/Department. Administrators will be able to procure and manage certificates for their org/dep. There are 7 types of administrator: Master Registration Authority Officer (MRAO) Registration Authority Officer (RAO) - SSL Registration Authority Officer (RAO) - S/MIME Registration Authority Officer (RAO) - Code Signing Department Registration Authority Officer (DRAO) - SSL Department Registration Authority Officer (DRAO) - S/MIME Department Registration Authority Officer (DRAO) - Code Signing Administrative Roles: Master Registration Authority Officer (MRAO) The MRAO is the top level administrator and can access all areas and functionality of the CCM interface and has control over the certificates, domains and notifications of any Organization or Department. The MRAO also has full rights over the creation and privileges of Registration Authority Officers (RAOs), Department Registration Authority Officers (DRAOs) and end-users of any Organization or Department. Registration Authority Officer (RAO) A Registration Authority Officer (RAO) is an administrative role created by an MRAO or fellow RAO for the purposes of managing the certificates and end-users belonging to one or more CCM Organizations and their Departments. The RAOs can create Departments and DRAO Administrators within their own Organization, but they should be approved by the MRAO. RAO Administrators cannot create a new Organization or edit the General settings of any Organization even those Organizations to which they have been delegated control. Department Registration Authority Officer (DRAO) 17
 of an Organization. DRAOs have visibility of and can request certificates only for the Department(s) that have been delegated to them.")
18 Department Registration Authority Officers are created by, and subordinate to, the RAO class of Administrator and assigned control over the certificates, users and domains belonging to a Department(s) of an Organization. DRAOs have visibility of and can request certificates only for the Department(s) that have been delegated to them. They have no access to manage certificates belonging to Organizations or Departments for which they have not been granted permissions. It is also possible to create an Administrator with more than one Admin privileges. Further details about the privileges and security roles of these administrator types refer to the section 'Administrative Roles' in the Administrator Guide. To add an Administrator Open the 'Administrators' management area by clicking the 'Admin' tab. Click the 'Add' button to open the 'Add new Client Admin' form. 18
19 Form Element Description Credentials Login* Enter login username for the new administrator. * Enter full address of the new administrator. Forename* Enter first name of the new administrator. Surname* Enter surname of the new administrator. Title Enter the title for the new administrator. Telephone Number Enter the contact phone number for the new administrator. Street Enter the address details of the new administrator. Locality State/Province Postal Code Country Relationship The role of the new administrator, for example, RAO SSL Administrator. Certificate Auth You can specify whether the new administrator must authenticate themselves to Certificate Manager with his/her client certificate over a https: connection prior to being 19
20 Form Element Description granted login rights. Only a client certificate issued to the new administrator through CCM can be selected for authenticating him/her. If no certificates are issued at this moment, you can select 'Disabled' from the drop-down and specify a certificate at a later time by editing the administrator. For more details, refer to the section 'Editing Administrators' in the Administrator Guide. Password* Confirm Password* Enter the password for the new administrator to access the CCM interface and reenter the same for confirmation. The new administrator will need to change the password upon his/her first login. Privileges You can assign admin management privileges to the new administrator. The new administrator will be able to add, edit or remove other administrators of their own level or of lower level in the hierarchy, depending on the options selected here. Allow creation of peer admin users Enables the new administrator to add new administrators from their management interface. Allow editing of peer admin users Enables the new administrator to edit roles of existing administrators from their management interface. Allow deleting of peer admin users Enables the new administrator to remove existing administrators from their management interface. Note: The new administrator can create, edit or delete the other administrators of their own tier and administrators of the lower tier. Allow domain validation without Dual Approval The new administrator will be privileged so that the domain creation/delegation approved by the administrator will be activated immediately, without the requirement of approval by a second MRAO. This checkbox will be active only for Administrators with MRAO role. Allow DCV Enables the new administrator to initiate Domain Control Validation (DCV) process for newly created domains. The privilege is available only for MRAO and RAO/DRAO SSL Administrators. Allow SSL Details changing Enables the new MRAO or RAO/DRAO SSL administrator to change the details of SSL certificates from the Certificates > SSL Certificates interface. Allow SSL auto approve The SSL certificates requested by the MRAO administrator is automatically approved and those by RAO/DRAO SSL administrators are automatically approved by the administrator of same level and await approval from higher level administrator. WS API use only The administrator account can only be used for API integration. CCM GUI access will not be allowed for this account. MS AD Discovery Enables the new administrator to access the Settings > MS Agents interface, integrate an AD server to CCM by downloading and installing the MS agent and view the certificates/web servers discovered by the MS agents by scanning respective AD servers. Note: 'Allow domain validation without Dual Approval' and 'Allow DCV' fields will only be visible if the features are enabled for your account. 20
21 Form Element Description Role You can assign the role to the new administrator and assign them to their Organizations and Departments. MRAO Admin RAO Admin SSL RAO Admin S/MIME RAO Admin Code Signing RAO Device Cert DRAO Admin SSL DRAO Admin S/MIME DRAO Admin Code Signing DRAO Device Cert The new Administrator can be assigned to a particular Organization/Department by selecting the appropriate Organization/Department from the list that appears after selecting a role. All Organizations are listed by default. Clicking the '+' button beside the Organization name expands the tree structure to display the Departments associated with the Organization. Clicking on 'Expand All' expands the tree structure to display all the Departments under each Organization. Clicking on 'Collapse All' in the expanded view collapses the tree structure of all the Organizations and hides the Departments under each Organization. Complete the 'Add New Client Admin' form and click 'OK'. You can communicate the login URL for CCM, the username and password to the new administrator through any out-of-band communication like , enabling them to login to CCM. Upon their first login, they will be prompted to change their password. Repeat the process to add more administrators. Step 5 - Add Domains and delegate them to Organizations/Departments The next step is to enroll domains for which the certificates are to be issued and delegating them to respective Organizations and Departments. Each domain added to CCM must undergo approval by administrator of higher authority level and Domain Control Validation (DCV) to qualify them for being issued with SSL certificates. You can create domains, initiate DCV and delegate/re-delegate them to the required Organizations/Departments and restrict the certificate types that can be offered for the domains, depending on the purpose(s) for which its use is authorized. Domains created by: MRAO admins can add and manage domains to any Organization/Department. The domains added by them are auto-approved. RAO admins can add and manage domains to the Organization delegated to them (and their sub-ordinate Departments) The domains added by them are to be approved by two MRAOs with appropriate privileges or by one MRAO with 'Domain validation without Dual Approval' privilege. DRAO can add and manage domains to the Department(s) delegated to them. The domains added by them are to be approved by the RAO admin of the Organization to which the department belongs and then by two MRAOs with appropriate privileges or by one MRAO with 'Domain validation without Dual Approval' privilege. 21

22 Note: Dual MRAO Approval for created Domains and Domain Control Validation (DCV) options will be visible only if the respective features are enabled for your account. To add and delegate a new domain Open the 'Domain Delegations' interface by clicking the 'Settings' > 'Domains' and then clicking 'Delegations'. Click the 'Add' button at the top left of the 'Domain Delegations' interface. This will open the 'Create domain' dialog. Field Name Description Domain The domain name Description A short description of the domain. Organizations/Departmen Enables you to delegate the currently created domain to an Organization/Department. ts All Organizations are listed by default. Clicking the '+' button beside the Organization name expands the tree structure to display the Departments associated with the Organization. The created domain can be associated to the Organization(s) and/or the Department(s) by selecting the respective checkbox(es). A single domain can be delegated to more than one Organization/Department. Clicking on 'Expand All' expands the tree structure to display all the Departments under each Organization. Clicking on 'Collapse All' in the expanded view collapses the tree structure of all the Organizations and hides the Departments under each Organization. If required, you can re-delegate the domain to a different Organization/Department at a 22
23 Field Name Description later time. SSL, S/MIME, Code Signing Enables you to allow or restrict the types of certificates that can be requested for the created domain, by checking or unchecking the respective checkboxes. The certificate types can be restricted according to the purpose of the domain created. Active Enables you to toggle the status of the domain between active and inactive states. Default = Active state. Enter the details as shown above and click 'OK'. The domain will be added to CCM and delegated to the selected Organization/Department with the delegation status 'Approved', if added by an MRAO admin or 'Requested' if added by a RAO or DRAO admin. Once approved, you can start the DCV process. MRAO admins can initiate DCV process for all registered Domains. RAO admins can initiate DCV process for the domains delegated to the Organizations that are administrated by them. DRAO admins can initiate DCV process for domains delegated to the Departments that are administrated by them. DCV can be carried out in three ways: - An activation will be sent to the domain administrator. The domain will be validated on clicking the validation link in the by the domain administrator. HTTP/HTTPS - CCM generates a text file to be placed in the root of the web server. You can download and forward the.txt file to the domain administrator and instruct them to place the file in the web server. CCM can validate the domain by the presence of the text file in the server. CNAME - CCM creates a DNS CNAME record for the domain. You can forward the record to the domain administrator and instruct them to create a DNS record using the same. CCM can validate the domain through its DNS record. This section explains the simple method of DCV to start with. If you require details on HTTPS/HTTP and CNAME methods, please refer to the section 'Validating the Domain' in the Administrator guide. To initiate DCV for a Domain 1. Open the DCV interface by clicking 'Settings' > 'Domains' > 'DCV'. 2. Next, initiate DCV by selecting the domain and clicking the 'DCV' button that appears at the top. This will open the DCV wizard: 23

24 Select the from as the 'DCV method and click 'Next' On selection of method, the next step allows you to select the address of the Domain Administrator for sending the validation . 24

25 3. Select the address of the administrator who can receive and respond to the validation mail from the drop-down and click 'Validate'. An automated will be sent to the selected Domain Administrator address. The DCV status of the Domain will change to 'Submitted'. On receiving the , the domain administrator should click the validation link in it and enter the validation code in 25
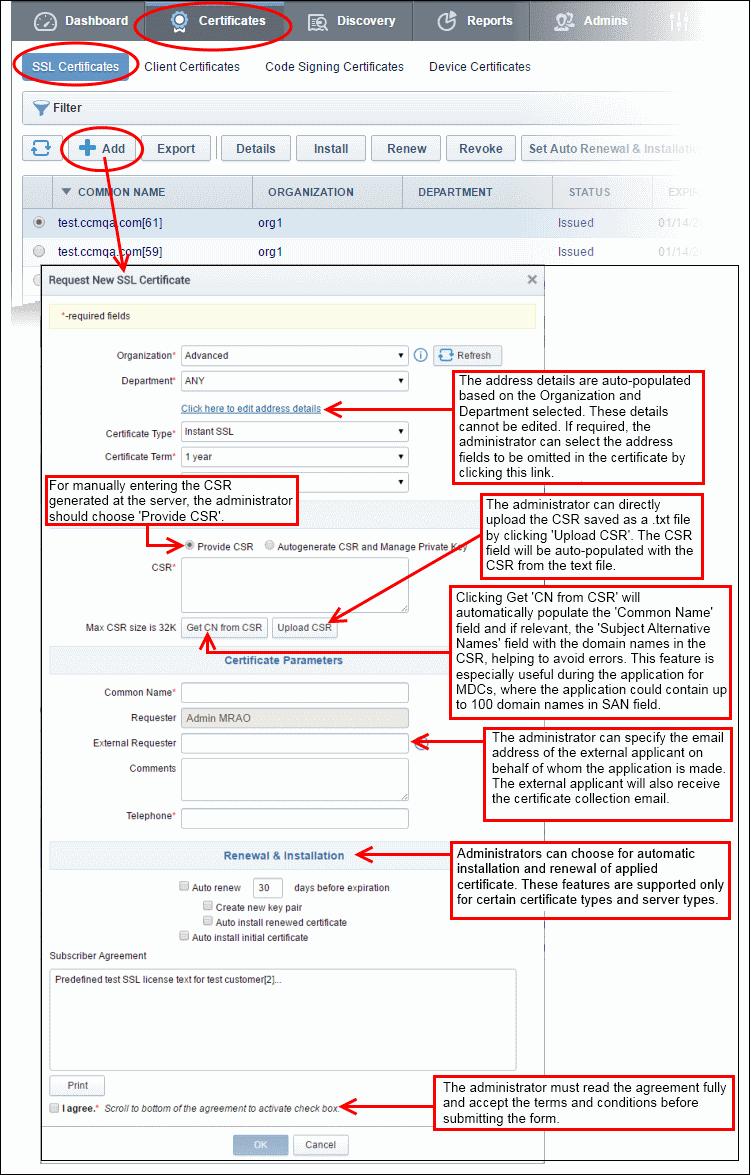
26 the validation from that appears on clicking the validation link in order to complete the validation process. Once completed, the DCV status of the Domain will change to 'Validated'. You can now request and approve certificates for the domain. Step 6 - Manage Certificates Once domains delegated to organizations are approved and validated, you can begin requesting certificates for them. The following sections explain more about each type of certificate: Request and Issuance of SSL Certificates Request and Issuance of Client Certificates Request and Issuance of Code Signing Certificates Request and Issuance of Device Authentication Certificates Request and Issuance of SSL Certificates CCM allows you to apply for SSL certificates for DCV validated domains in the following ways: Automatic enrollment, request and installation - You can configure CCM to create certificate requests for enrolled domains then automatically install the certificate on the web server. Agents installed on a server in the network can automatically generate a CSR and forward it to CCM to create a certificate request for admin approval. Once approved and issued, the agent will collect the certificate and install on the target server. The agent can also renew an expiring certificate in the same manner. Self-enrollment by external applicant - You can direct applicants to the request form to order SSL certificates for their domains. Applicants using this method must validate their application to Certificate Manager by: Entering the appropriate Access Code specified for their Organization or Department. The Access Code is a mixture of alpha and numeric characters specified for the Organization/Department when it was created. and The address they enter on the form must be from the domain that the certificate application is for. This domain must belong to the same Organization or Department. Using Built-in application Form - Admins can login and request SSL certificates using the built-in application form available in the CCM console. After the form is submitted and the request approved, CCM will send a collection to you (or to you and an external applicant if required). You or the external applicant can download the certificate and install it on the target server. The reminder of this section explains request and issuance of the certificate using the built-in application form. For detailed explanations and tutorials on the other methods, refer to the section 'Request and Issuance of SSL Certificates' in the Administrative guide. To apply for a SSL certificate Open the SSL Certificates management area by clicking the 'Certificates' tab and then clicking 'SSL Certificates'. Click 'Add'. The 'Request New SSL Certificate' form will appear. 26
27 27
28 Form Element Description Organization (required) Choose the Organization that the SSL certificate will belong to. Department (required) Choose the Department that the SSL certificate will belong to. Click here to edit address Clicking this link will expand the address fields. details The address fields are auto-populated from the details in the 'General Properties' tab of the Organization or Department on whose behalf this certificate request is being made. These fields cannot be modified but, in the case of OV level certificates, the administrator can choose to omit them from the certificate by selecting the 'Remove' checkbox next to the fields. The allowed address details will appear in the issued certificate and the removed details will appear as "Details Omitted". For EV level certificates, it is mandatory to include organization name, address, incorporating or registration agency, certificate requester and contract signer. It is not possible to remove these fields from the Comodo EV or Comodo EV MDC forms. Certificate Type (required) Choose Type of the certificate that the applicant wishes to order. See Appendix Comodo SSL Certificates for a list of certificate types. Certificate Term (required) Select the term length of the certificate. Server Software (required) Select the server software that is used to operate their web server (for example, Apache, IIS etc). Installation support documentation is available from Comodo support portal here: _m=knowledgebase&_a=view&parentcategoryid=1&pcid=0&nav=0 CSR CSR/Auto generate CSR The Certificate Signing Request (CSR) should be entered into this field in order for and Manage Private Key Comodo CA to process your application and issue the certificate for the domain. CCM is capable of auto-generating the CSR and storing the private keys in your local server. Select 'Autogenerate CSR and Manage Private Key' to do so. For more details, refer to 'Method 3 - Built-in Enrollment Form - Auto CSR Generation' in the main guide. Select 'Provide CSR' if you wish to paste or upload a CSR manually. The CSR can be entered in two ways: o Pasting the CSR directly into this field 28
 The applicant can upload the CSR as a.txt file in the local computer. This is an alternative to copying and pasting the CSR.")
29 Form Element Description o Uploading the CSR saved as a.txt file by clicking the 'Upload CSR' button See later in this table if you need help with this. Upload CSR (optional) The applicant can upload the CSR as a.txt file in the local computer. This is an alternative to copying and pasting the CSR. Get CN from CSR (optional) Once the CSR has been pasted correctly, clicking this button will auto-populate the Common Name (CN) field. Using this method helps to avoid human error by ensuring the domain name mentioned in the application form exactly match that in the CSR. If the domain name mentioned in this application form do not match that in the CSR, then Comodo CA will not be able to issue the certificate. Special Note regarding MDC applications: In order to successfully order a MultiDomain Certificate, the applicant need only list the additional domains in the SAN field on this form. In certain circumstances, however, the applicant may have created a CSR that already contains these Subject Alternative Names. In this case, clicking the 'Get CN from CSR' button will also auto-populate the 'Subject Alternative Names' form fields as well as the 'Common Name' field. Certificate Parameters Common Name (required) Type the domain that the certificate will be issued to. Single Domain certificates - enter domain name using the form: domain.com. Wildcard Certificates - enter domain name using the form: *.domain.com. Multi-Domain Certificates - enter the primary domain name using the form: domain.com. Subject Alternative Names (required for Multi Domain certificates) If the certificate 'Type' is a Multi-Domain Certificate (MDC) then the applicant should list the 'Subj Alt Name' additional domains here. Each domain should be separated by a comma. Requester (autopopulated) The 'Requester' is field is auto-populated with the name of the administrator making the application. External Requester (optional) If the application is made on behalf of an external applicant enter the address of the external requester in this field, The applicant will also receive a certificate collection . Note: The 'Requester' will still be the administrator that is completing this form (to view this, open the 'Certificates Management' area and click 'View' next to the certificate in question.) The address of the 'External Requester' will be displayed as the 'External Requester' in the 'View' dialog of an issued certificate. This field is not required when requesting for EV SSL certificate and hence will be hidden. Comments (optional) Enables you to add comments. 29
30 Form Element Description Renewal & Installation Auto renew Create new key pair Auto install renewed certificate Auto install initial certificate Leave these fields blank if you plan to manually install the certificate. Background Note: CCM supports auto-installation and renewal of SSL certificates. Autoinstallation/renewal is available for the following server types: Apache/Mod SSL Apache - SSL Apache Tomcat Microsoft IIS 1.x to 4.x (Server R2) Microsoft IIS 5.x and above (Server R2) Administrators can configure automatic installation and renewal through the options under 'Automatic & Renewal'. These fields will appear only if you choose: An SSL certificate type enabled for auto-installation A server software type which supports auto-installation CCM currently supports auto-installation only for 'Instant SSL' from Comodo CA. Other certificate types will be enabled for auto-installation in future versions. For more details on enrollment of SSL Certificates for auto-installation, refer to the section 'Automatic Installation and Renewal' in the main guide. Subscriber Agreement (required) You must accept the terms and conditions before submitting the form by reading the agreement and clicking the 'I Agree' checkbox. Note: The Subscriber Agreement will differ depending on the type of SSL certificate selected from the 'Certificate Type' drop-down. If Comodo EV SSL Certificate or Comodo EV Multi-Domain SSL Certificate is selected, The 'I Agree' checkbox will not be shown and the agreement will be taken as accepted, when the user submits the application. Fill-in the details as explained above and click 'OK'. The certificate will be added to the list in the 'Certificates' > 'SSL Certificates' interface, with the status 'Requested'. The next step is to approve the request. To approve the certificate request Choose the certificate from the 'Certificates' > 'SSL Certificates' interface and click 'Approve'. 30


31 Enter a message that will be sent along with the approval notification . Click 'OK'. Once the Administrator has approved the request, the certificate status will change to 'Approved'. CCM will forward the application to Comodo CA, then the status will change to 'Applied'. Next, if validation is successful, then Comodo will issue the certificate. CCM will send a Certificate Collection to the certificate requester and the 'Status' of the certificate will change to 'Issued'. The next step is to collect the certificate. This can be done is two ways: Through Certificate Collection From the CCM interface Collection of SSL Certificate Through Once the certificate has been issued, CCM will automatically send a collection to the you and the external applicant. The will contain a summary of the certificate details, a link to the certificate collection form and a unique certificate ID that will be used for validation. 31

32 By clicking the link in the collection , you/external applicant will be able to download the certificate file. The certificate can now be installed on the server. The precise installation process depends on the web server type and a range of installation guides are available at the Comodo support website at: First select the Comodo certificate type and then choose the appropriate web server software to view a detailed guide explaining the import process. Collection of SSL certificate from CCM interface You can download the certificate from the SSL Certificates management area of the CCM console. To download the certificate Open the SSL Certificates management area by clicking the 'Certificates' tab and then clicking 'SSL Certificates'. Choose the certificate and click the 'Details' button from the top. The certificate details dialog will appear. 32

33 Click the 'Select' button Click the appropriate button to download the certificate in desired format. The certificate can now be installed on the server. The precise installation process depends on the web server type and a range of installation guides are available at the Comodo support website at: First select the Comodo certificate type and then choose the appropriate web server software to view a detailed guide explaining the import process. 33
34 Request and Issuance of Client Certificates CCM allows you to issue client certificates to end-users for enrolled domains. Client certificates can only be issued for domains which have been delegated to an organization or department. Client certificates can be requested/issued in two ways: Adding End-users to CCM - You can add end-users to CCM by entering their details manually or by importing a list of end-users from a CSV file. You can then initiate the issuance process by sending endusers an invitation mail from the CCM console. On clicking the validation link in the , the user will be presented with a certificate registration form which they need to complete and submit. After issuance, CCM will send a collection to the user so they can download and install the certificate. Auto-creation of end-users by self-enrollment - End-users can enroll themselves to CCM by completing the self-enrollment form. Users must enter the 'Access Code' or 'Secret code' specific to the organization to which the domain belongs. The Access Code and the Secret code are specified under the 'Client Certificates' tab in the Create/Edit Organization/Department dialog. Upon successful validation of the application, the end-user will be automatically added to CCM and will receive a collection to download and install the certificate. The reminder of this section explains the method of manually adding the end-users and provisioning them with client certificates. For detailed explanations on directing end-users to self enrollment, refer to the section 'Request and Issuance of Client Certificates' in the Administrator guide. You can add client certificate end-users to CCM in the following ways: Manually enter the details of each end-user - You need to enter the details of each user manually in the 'Add New Person' form to add the user to CCM. The 'Add New Person' form is accessible from the 'Client Certificates' area under the 'Certificates' tab in the CCM console. Import a list of users from a CSV file - You can create a.csv file containing a list of users with details like user name, address, Organization, Department and so on. Each entry should have six mandatory and six optional fields for the details, in a specified order. You can upload the.csv file to the 'Client Certificates' area under the Certificates tab in the CCM console to add the users in the list to CCM. Auto-enroll users through Active Directory (AD) Integration - You can integrate your AD server with CCM by installing the CCM AD agent. You can then automatically import end-users and provision client certificates to them. For more details, contact your Comodo Account Manager. This section explains the process of manually adding the end-users. For explanations and tutorials on importing users from a.csv file, refer to the section 'Request and Issuance of Client Certificates' in the Administrator guide. To add an end-user Open the 'Client Certificates' management area by clicking the 'Certificates' tab and then clicking 'Client Certificates'. Click the 'Add' button to open the 'Add New Person' form: 34

35 Form Element Description Organization Select the Organization that they wish the new end-user belongs to. Department If required, choose the Department that the end-user belongs to. Domain The drop-down lists the domains delegated for the selected Organization/Department. Choose the domain in which the user is existing. The domain must have been prevalidated by DCV process and the address of the user should be from the same domain. Address Enter the username part of the address of the user. The domain part is 35
36 Form Element Description automatically entered as the domain chosen. First Name Enter the first name of the end-user. Middle Name If required, enter the middle name of the end-user. Last Name Enter the last name of the end-user. Note: The combined length of First Name and the Last name should not exceed 64 characters. Secret ID A 'Secret ID' (or 'Secret Identifier'/SID) is used to identify the details of an existing enduser in CCM. Assigning SIDs to users will simplify the client certificate enrollment process for those users and therefore help eliminate errors. This is because, as the details of the user are already stored, the end-user need only specify the address If you wish to allow enrollment by Secret ID then fill this field with a alpha-numeric string. Validation Type Note: The 'Validation Type' drop down will only be visible if enabled by your Comodo account manager. You can specify the type of client certificate that is issued to an applicant. The difference between the two lies in the degree of user authentication is carried out prior to issuance. The two options are 'Standard' and 'High'. 'Standard' certificates can be issued quickly and take advantage of the user authentication mechanisms that are built into CCM. A user applying for a 'Standard Personal Validation' certificate is authenticated using the following criteria: User must apply for a certificate from an a domain that has been delegated to the issuing Organization The Organization has been independently validated by an web-trust accredited Certificate Authority as the owner of that domain User must know either a unique Access Code or Secret ID that should be entered at the certificate enrollment form. These will have been communicated by the administrator to the user via out-of-band communication. User must be able to receive an automated confirmation sent to the address of the certificate that they are applying for. The will contain a validation code that the user will need to enter at the certificate collection web page. 'High Personal Validation' certificates require that the user undergo the validation steps listed above AND Face-to-Face meeting with the issuing Organization Note: The additional validation steps must be completed PRIOR to the administrator selecting 'High Personal Validation' type. Principal Name Note: The 'Principle Name' field will only be visible if 'Principal Name Support' is enabled by your Comodo account manager. You can enter the address that should appear as principal name in the certificate to be issued. Note: For the Organizations/Departments enabled for Principal Name support, the client certificates issued to the end-users of the Organization/Department will include an 36

37 Form Element Description additional name - Principal Name, in addition to the RFC822 name in the Subject Alternative Name(SAN) field. If included, the Principal Name will be the primary address of the end-user to whom the certificate is issued. But this can be customized at a later time by editing the end-user if Principal Name Customization is enabled for the Organization/Department. Administrators can check whether an Organization or Department is enabled for Principal Name support from the 'Settings' interface. Click 'Settings' > 'Organizations', select an organization in the list, click the 'Edit button' and open the 'Client Cert' tab. This field will be grayed out for organizations that do not have Principal Name support enabled. If Principal Name support is enabled for an organization but not for the department, this field will be auto populated with the address entered in the Address field. Copy Auto-fills the Principal Name field with the address entered in the Address field. Enter the details of the end-user as explained above and click 'OK'. The end-user's details can be modified at any time by clicking the 'Edit' button at the top after selecting the checkbox next to their name in the main list of end-users. If any information in this dialog is changed, with the exception of Secret ID, any previously issued client certificates for this address shall be automatically revoked. CCM maintains a username history. If the username is changed, the Administrator will still be able to search for the client certificates using both the old name and the new name. The user will be added to the list of users in the Client Certificates interface. Repeat the process to add more number of users. To initiate enrollment for the end-user for client certificate Open the 'Client Certificates' management area by clicking the 'Certificates' tab and then clicking 'Client Certificates'. Select the user and click 'Certificates' from the options at the top. 37

38 Click 'Send Invitation'. A confirmation dialog will appear. 38
39 Certificate Type - If your Organization's account has been enabled for High Personal Validated Certificates AND the administrator has specified a 'Validation Type' of 'High' * for this user THEN the 'Certificate Type' value will be a drop down menu rather than flat text. This menu will offer a choice between sending an invitation for a 'High Personal Validated' or a "Standard Personal Validated' certificate. The default choice is 'High Personal Validated'. Certificate Term - You can choose the term length for the certificate to be issued to the end-user. The 'Term' drop-down displays the term options allowed for your Organization. Click 'OK'. An invitation will be sent to the end-user. Repeat the process to enroll more users. The invitation will contain the URL of the certificate validation form, a request validation code and instructions for downloading the certificate. The request code will be contained within the URL so that applicants can simply click the link or copy and paste the URL in their browser. On completion of the validation and user registration processes, a certificate collection form will appear, enabling the end-user to download and save the certificate. An example mail is shown below. 39

40 Upon clicking the link the user will be taken to the user registration form. 40
41 41
42 Form Element Description Code (required) The validation request code. This field is auto-populated when the applicant clicks the validation link contained in the . (required) address of the applicant. This field is auto-populated. PIN (required) The applicant should specify a PIN for the certificate to protect the certificate. Re-type PIN (required) Confirmation of the above. Pass-Phrase (required) The end-user needs to enter a pass-phrase for their certificate. This phrase is needed to revoke the certificate should the situation arise. Select address fields to remove from the certificate (optional) By default, the address details are displayed in the 'Certificate Details' dialog. The applicant can hide these details selectively by selecting the 'Remove' checkboxes beside the required address fields. EULA Acceptance (required) Applicant must accept the terms and conditions before submitting the form. The user needs to fill-in the information as explained above, accept to the 'End User License Agreement' and click 'Submit'. Upon successful submission of the 'User Registration' form, a download dialog will be displayed enabling the enduser to download and save the certificate. CCM will deliver the certificate to the end-user in PKCS#12 file format (.p12 file). The pass-code specified in the PIN fields is used to protect access to this.p12 file. The end-user will be asked for this PIN when he/she imports the certificate into the certificate store of their machine. Request and Issuance of Code Signing Certificates CCM allows you to issue code signing certificates to end-users belonging to domains pre-enrolled to it. Only the end-users having their addresses in the domains that were pre-added to CCM and delegated to respective Organizations/Domains are eligible for the code signing certificate issuance from the CCM. You can add code signing certificate end-users to CCM in two ways: Manually entering the details of each end-user - You need to enter the details of each user manually in the 'Add New Code Signing Certificate' form to add the user to CCM. The form is accessible from the 'Code Signing Certificates' area under the 'Certificates' tab in the CCM console. Importing list of users from a CSV file - You can create a.csv file containing a list of users with details like user name, address, Organization, Department and so on. Each entry should have four mandatory and two optional fields for the details, in a specified order. You can upload the.csv file to the 'Code Signing Certificates' area under the 'Certificates' tab in the CCM console. 42

43 Once the users are added, CCM will automatically send invitation mails to them. On clicking the validation link in the , the end-user will be presented with a 'User Registration' form. The end-user needs to fill-in and submit the form. CCM will send a collection to the end-user in order for them to download and install the certificate. This section explains the process of manually adding the end-users. For explanations and tutorials on importing users from a.csv file, refer to the section 'Request and Issuance of Code Signing Certificates' in the Administrator guide. To add an end-user Open the 'Code Signing Certificates' area by clicking the 'Certificates' > 'Code Signing Certificates'. Click the 'Add' button to open the 'Add New Code Signing Certificate' form: Add New Code Signing Certificate dialog - Table of parameters Field Description Organization Select the Organization to which the end-user belongs. Department Select the Department to which the end-user belongs. Domain Select the domain pertaining to the Department 43

44 Add New Code Signing Certificate dialog - Table of parameters Field Description Term Select the term of the certificate. Address Enter the username part of the address of the user. The domain part is automatically entered as the domain chosen. Full Name Full name of the applicant. Contact Enter the contact address of the applicant that should be included in the certificate. The contact address may be the customer facing address like support@company.com, sales@company.com etc. Complete the 'Add New Code Signing Certificate' form. Click 'OK'. Repeat the process to add more users. If the end-user is an existing user, the corresponding certificate will be automatically added to CCM and a certificate collection will be sent to the end-user. If the end-user is a new user, an invitation mail will be sent to initiate self enrollment process. The invitation will contain the URL of the user registration form, a request validation code and instructions for downloading the certificate. The request code will be contained within the URL so that applicants can simply click the link or copy and paste the URL in their browser. On completion of the validation and user registration processes, a certificate collection form will appear, enabling the end-user to download and save the certificate. An example mail is shown below. Upon clicking the link the user will be taken to the user registration form. 44
45 Form Element Description Code (required) The Code field will be auto-populated with the certificate request code, on clicking the validation link in the . If not, the end-user can copy the request code from the and paste in this field. (required) The address of the applicant. This field will be auto-populated. Advanced Private Key Options The applicant can select the key size for the private key of the certificate (Default = 2048 bit) Key Size Note: The private key is generated locally by the crypto module of the browser/ operating system. The key never leaves the computer and no copy is ever transmitted to the certificate issuer. Comodo does not collect a copy of the private key at any time and cannot be recovered if it is lost. The certificate is useless without it. Hence the end-users are strongly advised to backup their private key, during certificate installation process. 45

46 Form Element Description Subscriber Agreement (required) Applicant must accept the terms and conditions before submitting the form by reading the agreement and selecting the 'I Agree' checkbox. Generate Starts the certificate generation process. Once the end-user submits the form, the certificate request will be automatically generated and a request will be sent to CCM. CCM will process the request and send a certificate request to Comodo CA Server. Once the certificate is issued CCM collects the certificate and sends a notification to the end-user. The end-user can follow the link to download and install the certificate can use it for digitally signing the executables. Request and Issuance of Device Certificates CCM allows you to apply for device certificates in the following ways: Through Active Directory - Device certificates can be issued to devices that have been enrolled to Active Directory. Through SCEP - CCM has a SCEP server integrated. Administrators can push a configuration profile to the devices for enrollment of certificates to CCM. Through API Integration - Mobile Device Management (MDM) solutions can be integrated to CCM through API. Administrators can apply configuration profiles to managed devices to enroll for certificates to CCM. For details on API integration refer to the document at Through Self Enrollment - Device certificates can be requested by applicants using the self-enrollment form for issuance of certificates from Private CAs. The self-enrollment form will be available by clicking a link provided by an administrator. See Issuance of Device Certificate through Self-Enrollment for more details. The reminder of this section explains request and issuance of device certificates from Private CAs using the self enrollment method. For detailed explanations and tutorials on the other methods, refer to the section 'Request and Issuance of Device Certificates' in the Administrative guide. Prerequisite for requesting and issuance of device certs from private CA 46

47 The issuance of device certificates is enabled for your account Device certificates are added under 'Settings' > 'Certificates' > 'Device Cert Types' The issuance of device certificate through self-enrollment is enabled for the organization/department under 'Settings' > 'Organizations' / 'Department' > 'Add' or 'Edit' button > 'Device Certificate' tab To add device certificates Open the device certificates management area by clicking the 'Certificates' tab under 'Settings' and then clicking 'Device Cert Types'. Click the 'Add' button at the top to open the 'Add New Device Cert Type' form. 47
 Drop-down The drop-down will display the Private CAs that are added for your account. Contact your Comodo account manager to add more Private CAs.")
48 Form Element Type Description Name (required) Text Field Enter an appropriate name for the device certificate Term (required) Text Field The validity period of the device certificate CA Name (required) Drop-down The drop-down will display the Private CAs that are added for your account. Contact your Comodo account manager to add more Private CAs. Key Usage and Extended Key Usage Check Boxes Determines the device certificate capabilities. Click 'OK' after entering the details in the form. The new device cert type will be added to the list and will be available for self-enrollment. The next step is to configure the URL for the self-enrollment form and send the same to applicants. To configure the URL for the self-enrollment form Go to 'Settings' > 'Organizations' and click 'Add' or select the organization, then click 'Edit' Click the 'Device Certificate' tab of the organization / department that you want to configure the enrollment form URL Select the ''Self Enrollment' check box and enter the URI extension for the link. The device self enrollment link for the organization will be automatically displayed below the field. By default, the format of this URL is: CUSTOMER URI>/device/<set URI extension>. After configuring the self-enrollment link, send the same to the end-users via or any other form of communication method. User applies for device certificate via self-enrollment method The applicant clicks on the link or copies and paste the the URL into the address bar of any browser to open the self-enrollment form. 48
49 Form Element Type Description Certificate Type (required) Drop-down The configured device cert types will be listed from the drop-down. Address (required) Text Field The certificate collection will be sent to this address. CSR (required) Text Field The certificate signing request generated from the device. The user contacts the administrator if no CSR is available. The user clicks 'Submit' after completing the form. The requested certificate will be displayed in the Device Certificate interface and you can either approve or reject the request. To approve the device certificate request Open the device certificates interface by clicking 'Certificates' > 'Device Certificates' The screen displays device certificates enrolled for the account. Device certs requested via enrollment method will be displayed as 'Awaiting Approval'. 49


50 Select the certificate and click 'Approve Decline' button at the top. Click 'Approve' The status of the approved certificate will display as 'Applied' under the 'State' column. The certificate request will be processed and sent to the applicant's address entered in the enrollment form. The status of the certificate will display as 'Issued' after the collection is sent. The applicant can download the device certificate by clicking the link in the and install it in the device. 50
Comodo Certificate Manager Version 6.0
 ff Comodo Certificate Manager Version 6.0 Quick Start Guide Guide Version 6.0.022218 Comodo CA Limited, 3rd Floor, 26 Office Village, Exchange Quay, Trafford Road, Salford, Greater Manchester M5 3EQ, United
Comodo Certificate Manager
 Comodo Certificate Manager Integration of Identity Provider for Single Sign-On Comodo CA Limited 3rd Floor, 26 Office Village, Exchange Quay, Trafford Road, Salford, Greater Manchester M5 3EQ, United Kingdom.
Comodo Certificate Manager Version 6.0
 Comodo Certificate Manager Version 6.0 RAO Administrator Guide Guide Version 6.0.022318 Comodo CA Limited, 3rd Floor, 26 Office Village, Exchange Quay, Trafford Road, Salford, Greater Manchester M5 3EQ,
Comodo Certificate Manager
 Comodo Certificate Manager SSL Certificates Enrollment, Collection, Installation and Renewal Comodo CA Limited 3rd Floor, 26 Office Village, Exchange Quay, Trafford Road, Salford, Greater Manchester M5
Comodo Certificate Manager
 Comodo Certificate Manager Introduction to Auto-Installer Comodo CA Limited, 3rd Floor, 26 Office Village, Exchange Quay, Trafford Road, Salford, Greater Manchester M5 3EQ, United Kingdom. Certificate
Comodo Certificate Manager
 Comodo Certificate Manager Introduction to Auto-Installer Comodo CA Limited, 3rd Floor, 26 Office Village, Exchange Quay, Trafford Road, Salford, Greater Manchester M5 3EQ, United Kingdom. Certificate
Integration of Identity Provider for Single Sign-On
 Integration of Identity Provider for Single Sign-On InCommon c/o Internet2 1000 Oakbrook Drive, Suite 300 Ann Arbor MI, 48104 Integration of Identity Provider for Single Sign-On InCommon Certificate Manager
Comodo Certificate Manager
 Comodo Certificate Manager Version 5.7 SSL Certificates Enrollment, Collection, Installation and Renewal Guide Version 5.7.032817 Comodo CA Limited 3rd Floor, 26 Office Village, Exchange Quay, Trafford
SSL Certificates Enrollment, Collection, Installation and Renewal
 SSL Certificates Enrollment, Collection, Installation and Renewal InCommon c/o Internet2 1000 Oakbrook Drive, Suite 300 Ann Arbor MI, 48104 Enrolling For Your Certificate This is step-by-step guide will
Software Version 5.0. Administrator Guide Release Date: 7th April, InCommon c/o Internet Oakbrook Drive, Suite 300 Ann Arbor MI, 48104
 Software Version 5.0 Administrator Guide Release Date: 7th April, 2015 InCommon c/o Internet2 1000 Oakbrook Drive, Suite 300 Ann Arbor MI, 48104 Table of Contents 1 Introduction to InCommon Certificate
Comodo Certificate Manager
 ff Comodo Certificate Manager Code Signing on Demand Cloud Version Comodo CA Limited, 3rd Floor, 26 Office Village, Exchange Quay, Trafford Road, Salford, Greater Manchester M5 3EQ, United Kingdom 1 Introduction
Comodo Certificate Manager Version 5.4
 Comodo Certificate Manager Version 5.4 Introduction to Auto-Installer Comodo CA Limited, 3rd Floor, 26 Office Village, Exchange Quay, Trafford Road, Salford, Greater Manchester M5 3EQ, United Kingdom.
Comodo Certificate Manager Version 5.7
 Comodo Certificate Manager Version 5.7 Introduction to Auto-Installer Comodo CA Limited, 3rd Floor, 26 Office Village, Exchange Quay, Trafford Road, Salford, Greater Manchester M5 3EQ, United Kingdom.
Comodo Certificate Manager Software Version 5.0
 Comodo Certificate Manager Software Version 5.0 Introduction to Auto-Installer Comodo CA Limited, 3rd Floor, 26 Office Village, Exchange Quay, Trafford Road, Salford, Greater Manchester M5 3EQ, United
Comodo Certificate Manager
 ff Comodo Certificate Manager Code Signing on Demand Cloud Version Comodo CA Limited, 3rd Floor, 26 Office Village, Exchange Quay, Trafford Road, Salford, Greater Manchester M5 3EQ, United Kingdom 1 Introduction
Comodo Server Security Server
 Comodo Server Security Server Software Version 2.4 Quick Start Guide Guide Version 2.4.041718 Comodo Security Solutions 1255 Broad Street Clifton, NJ 07013 1. Comodo Server Security Server Quick Start
Comodo Certificate Manager
 Comodo Certificate Manager Simple Certificate Enrollment Protocol Comodo CA Limited 3rd Floor, 26 Office Village, Exchange Quay, Trafford Road, Salford, Greater Manchester M5 3EQ, United Kingdom. Simple
Domain Control Validation in Comodo Certificate Manager
 Domain Control Validation in Comodo Certificate Manager The purpose of this document is to explain the new domain control validation (DCV) processes for the Comodo Certificate Manager. DCV is an industry
Comodo Certificate Manager
 ff Comodo Certificate Manager Code Signing on Demand Hosted Version Comodo CA Limited, 3rd Floor, 26 Office Village, Exchange Quay, Trafford Road, Salford, Greater Manchester M5 3EQ, United Kingdom 1 Introduction
Overview and Tutorial
 Overview and Tutorial Comodo Certificate Auto-installer is an easy-to-use utility which simplifies the often complex process of obtaining and installing an SSL certificate on IIS/Apache web-servers. The
Domain Control Validation in Comodo Certificate Manager
 Domain Control Validation in Comodo Certificate Manager The purpose of this document is to explain the new domain control validation (DCV) processes for the Comodo Certificate Manager. DCV is an industry
CSM. RAO Administrator Quick Start Guide (QSG) Version 1.05
 Version 1.05") CSM RAO Administrator Quick Start Guide (QSG) Version 1.05 Disclaimer Copyright 2011 AusCERT Pty Ltd. All rights reserved. Guide version Software version Date issued V1.05 V2.3.23.3 28-Oct-2011 V1.04 V2.3.23.3
CSM RAO Administrator Quick Start Guide (QSG) Version 1.05 Disclaimer Copyright 2011 AusCERT Pty Ltd. All rights reserved. Guide version Software version Date issued V1.05 V2.3.23.3 28-Oct-2011 V1.04 V2.3.23.3
Code Signing on Demand Cloud Version. InCommon c/o Internet Oakbrook Drive, Suite 300 Ann Arbor MI, 48104
 Code Signing on Demand Cloud Version InCommon c/o Internet2 1000 Oakbrook Drive, Suite 300 Ann Arbor MI, 48104 1 Introduction Code Signing on Demand (CSoD) offers customers a faster, more intuitive and
Domain Control Validation in Comodo Certificate Manager
 Domain Control Validation in Comodo Certificate Manager The purpose of this document is to explain the new domain control validation (DCV) processes for the Comodo Certificate Manager. DCV is an industry
Comodo Certificate Manager
 ff Comodo Certificate Manager Code Signing on Demand Hosted Version Comodo CA Limited, 3rd Floor, 26 Office Village, Exchange Quay, Trafford Road, Salford, Greater Manchester M5 3EQ, United Kingdom 1 Introduction
Domain Control Validation in Comodo Certificate Manager
 Domain Control Validation in Comodo Certificate Manager The purpose of this document is to explain the new domain control validation (DCV) processes for the Comodo Certificate Manager. DCV is an industry
Comodo Certificate Manager
 Comodo Certificate Manager Code Signing End User Guide Comodo CA Limited 3rd Floor, 26 Office Village, Exchange Quay, Trafford Road, Salford, Greater Manchester M5 3EQ, United Kingdom. Step 1: Validate
Initiating Domain Control Validation (DCV)
") Initiating Domain Control Validation (DCV) InCommon c/o Internet2 1000 Oakbrook Drive, Suite 300 Ann Arbor MI, 48104 Domain Control Validation in InCommon Certificate Manager The purpose of this document
Initiating Domain Control Validation (DCV) InCommon c/o Internet2 1000 Oakbrook Drive, Suite 300 Ann Arbor MI, 48104 Domain Control Validation in InCommon Certificate Manager The purpose of this document
Comodo Certificate Manager
 Cert dialog Comodo Certificate Manager Overview of Custom Fields Comodo CA Limited, 3rd Floor, 26 Office Village, Exchange Quay, Trafford Road, Salford, Greater Manchester M5 3EQ, United Kingdom. 1 Introduction
Comodo Accounts Management Software Version 15.0
 2 Comodo Accounts Management Software Version 15.0 Reseller Portal Guide Guide Version 15.0.072117 Comodo Security Solutions 1255 Broad Street Clifton, NJ 07013 Table of Contents 1.The Reseller Portal...
Comodo One Software Version 3.18
 rat Comodo One Software Version 3.18 Service Desk Staff Guide Guide Version 4.8.122817 Comodo Security Solutions 1255 Broad Street Clifton, NJ 07013 Table of Contents 1 Introduction to Service Desk Module...
Comodo Certificate Manager
 Comodo Certificate Manager Device Certificate Enroll API Comodo CA Limited 3rd Floor, 26 Office Village, Exchange Quay, Trafford Road, Salford, Greater Manchester M5 3EQ, United Kingdom Table of Contents
Comodo One Software Version 3.5
 rat Comodo One Software Version 3.5 Service Desk Quick Start Guide Guide Version 3.14.011117 Comodo Security Solutions 1255 Broad Street Clifton, NJ 07013 Comodo Service Desk - Quick Start Guide This tutorial
Comodo One Software Version 3.16
 rat Comodo One Software Version 3.16 Service Desk Staff Guide Guide Version 4.6.112817 Comodo Security Solutions 1255 Broad Street Clifton, NJ 07013 Table of Contents 1 Introduction to Service Desk Module...3
Comodo Certificate Manager
 Comodo Certificate Manager Device Certificate Enroll API Comodo CA Limited 3rd Floor, 26 Office Village, Exchange Quay, Trafford Road, Salford, Greater Manchester M5 3EQ, United Kingdom Table of Contents
Comodo One Software Version 3.26
 rat Comodo One Software Version 3.26 Service Desk Staff Guide Guide Version 4.16.101018 Comodo Security Solutions 1255 Broad Street Clifton, NJ 07013 Table of Contents 1 Introduction to Service Desk Module...3
Enterprise Certificate Console. Simplified Control for Digital Certificates from the Cloud
 Enterprise Certificate Console Simplified Control for Digital Certificates from the Cloud HydrantID Enterprise Management Console HydrantID s HydrantSSL Enterprise service and HydrantCloud Managed PKI
Comodo One Mobile Software Version 1.16
 Yesrat Comodo One Mobile Software Version 1.16 User Guide Guide Version 1.16.032817 Comodo Security Solutions 1255 Broad Street Clifton, NJ 07013 Table of Contents 1 Introduction to C1 Mobile...3 1.1 Signing
Partner Documentation Reseller Portal Guide
 2 Partner Documentation 1. Introduction and Enrollment One of the benefits of MSP Consortium membership is access to Comodo's range of enterprise security and management tools at greatly discounted rates.
Comodo One Software Version 3.3
 rat Comodo One Software Version 3.3 Network Assessment Tool Quick Start Guide Guide Version 1.3.032817 Comodo Security Solutions 1255 Broad Street Clifton, NJ 07013 Comodo One - Network Assessment Tool
This help covers the ordering, download and installation procedure for Odette Digital Certificates.
 This help covers the ordering, download and installation procedure for Odette Digital Certificates. Answers to Frequently Asked Questions are available online CONTENTS Preparation for Ordering an Odette
Service Desk Staff Guide. Software version 4.16 Guide version ITarian 1255 Broad Street Clifton, NJ 07013
 Service Desk Staff Guide Software version 4.16 Guide version 4.16.110618 ITarian 1255 Broad Street Clifton, NJ 07013 Table of Contents 1 Introduction to Service Desk Module...3 1.1 Quick Start...5 1.2
User Guide. Version R92. English
 AuthAnvil User Guide Version R92 English October 9, 2015 Agreement The purchase and use of all Software and Services is subject to the Agreement as defined in Kaseya s Click-Accept EULATOS as updated from
Comodo cwatch Web Security Software Version 1.0
 rat Comodo cwatch Web Security Software Version 1.0 Webhost Reseller Guide Guide Version 1.0.121916 Comodo Security Solutions 1255 Broad Street Clifton, NJ 07013 Table of Contents 1 Introduction to Comodo
Comodo Certificate Manager Software Version 5.7
 Comodo Certificate Manager Software Version 5.7 Device Certificates Enrollment Simple Certificate Enrollment Protocol Comodo CA Limited 3rd Floor, 26 Office Village, Exchange Quay, Trafford Road, Salford,
Comodo Certificate Manager
 Comodo Certificate Manager Reports Web Services API Comodo CA Limited 3 rd Floor, 26 Office Village, Exchange Quay, Trafford Road, Salford, Greater Manchester M5 3EQ, United Kingdom. Table of Contents
Comodo Certificate Manager
 Comodo Certificate Manager Device Certificates Enrollment Simple Certificate Enrollment Protocol Comodo CA Limited 3rd Floor, 26 Office Village, Exchange Quay, Trafford Road, Salford, Greater Manchester
COMODO CA SSL CERTIFICATES
 COMODO CA SSL CERTIFICATES Key Features and Comparisons Thank you for considering Comodo CA as your SSL security provider. This document contains a feature and price comparison of the Comodo range of certificates.
Configure the IM and Presence Service to Integrate with the Microsoft Exchange Server
 Configure the IM and Presence Service to Integrate with the Microsoft Exchange Server Configure a Presence Gateway for Microsoft Exchange Integration, page 1 SAN and Wildcard Certificate Support, page
COMODO CA SSL CERTIFICATES
 COMODO CA SSL CERTIFICATES Key Features and Comparisons Thank you for considering Comodo CA as your SSL security provider. This document contains a feature and price comparison of Comodo s range of certificates.
User Guide. Version R94. English
 AuthAnvil User Guide Version R94 English March 8, 2017 Copyright Agreement The purchase and use of all Software and Services is subject to the Agreement as defined in Kaseya s Click-Accept EULATOS as updated
Comodo One Software Version 3.16
 rat Comodo One Software Version 3.16 Service Desk End-User Guide Guide Version 4.6.110317 Comodo Security Solutions 1255 Broad Street Clifton, NJ 07013 Introduction to Service Desk Module Comodo Service
Comodo Certificate Manager
 Comodo Certificate Manager Reports Web Services API Comodo CA Limited 3 rd Floor, 26 Office Village, Exchange Quay, Trafford Road, Salford, Greater Manchester M5 3EQ, United Kingdom. Table of Contents
Comodo Device Manager Software Version 4.0
 Comodo Device Manager Software Version 4.0 CDM Cloud Portal Setup Guide Guide Version 4.0.061815 Comodo Security Solutions 1255 Broad Street Clifton, NJ 07013 Comodo Device Manager - Cloud Portal Setup
GlobalSign Enterprise Solutions. Enterprise PKI. Administrator Guide. Version 2.6
 GlobalSign Enterprise Solutions Enterprise PKI Administrator Guide Version 2.6 1 TABLE OF CONTENTS GETTING STARTED... 3 ESTABLISHING EPKI SERVICE... 3 CLIENT AUTHENTICATION CERTIFICATE... 4 ESTABLISHING
Comodo Certificate Manager
 Comodo Certificate Manager SMIME Enroll API Comodo CA Limited 3rd Floor, 26 Office Village, Exchange Quay, Trafford Road, Salford, Greater Manchester M5 3EQ, United Kingdom Table of Contents Version History...
Comodo SecureBox Management Console Software Version 1.9
 6. Comodo SecureBox Management Console Software Version 1.9 Quick Start Guide Guide Version 1.9.041918 Comodo Security Solutions 1255 Broad Street Clifton, NJ 07013 Comodo SecureBox Management Console
GlobalSign Enterprise Solution epki Administrator guide v1.9. GlobalSign Enterprise Solutions
 GlobalSign Enterprise Solutions epki Quick Start Guide Managing PersonalSign and DocumentSign Certificates Across Your Organization Effectively GlobalSign Enterprise Solution epki Administrator guide v1.9
Secure Access Manager (SAM) Administrator Guide December 2017
 Administrator Guide December 2017") Secure Access Manager (SAM) Administrator Guide December 2017 Copyright 2017 Exostar, LLC All rights reserved. 1 SECURE ACCESS MANAGER (SAM) OVERVIEW... 4 ADMINISTRATIVE ROLES OVERVIEW... 4 SAM NAVIGATIONAL
Secure Access Manager (SAM) Administrator Guide December 2017 Copyright 2017 Exostar, LLC All rights reserved. 1 SECURE ACCESS MANAGER (SAM) OVERVIEW... 4 ADMINISTRATIVE ROLES OVERVIEW... 4 SAM NAVIGATIONAL
Integrating AirWatch and VMware Identity Manager
 Integrating AirWatch and VMware Identity Manager VMware AirWatch 9.1.1 This document supports the version of each product listed and supports all subsequent versions until the document is replaced by a
Public. Atos Trustcenter. Server Certificates + Codesigning Certificates. Version 1.2
 Atos Trustcenter Server Certificates + Codesigning Certificates Version 1.2 20.11.2015 Content 1 Introduction... 3 2 The Atos Trustcenter Portfolio... 3 3 TrustedRoot PKI... 4 3.1 TrustedRoot Hierarchy...
Comodo SecureBox Management Console Software Version 1.9
 6. Comodo SecureBox Management Console Software Version 1.9 Administrator Guide Guide Version 1.9.032817 Comodo Security Solutions 1255 Broad Street Clifton, NJ 07013 Table of Contents 1.Introduction to
Odette CA Help File and User Manual
 How to Order and Install Odette Certificates For a German version of this file please follow this link. Odette CA Help File and User Manual 1 Release date 31.05.2016 Contents Preparation for Ordering an
Comodo Certificate Manager
 Comodo Certificate Manager Simple, Automated & Robust SSL Management from the #1 Provider of Digital Certificates 1 Datasheet Table of Contents Introduction 3 CCM Overview 4 Certificate Discovery Certificate
Setting Up Resources in VMware Identity Manager (On Premises) Modified on 30 AUG 2017 VMware AirWatch 9.1.1
 Modified on 30 AUG 2017 VMware AirWatch 9.1.1") Setting Up Resources in VMware Identity Manager (On Premises) Modified on 30 AUG 2017 VMware AirWatch 9.1.1 Setting Up Resources in VMware Identity Manager (On Premises) You can find the most up-to-date
Setting Up Resources in VMware Identity Manager (On Premises) Modified on 30 AUG 2017 VMware AirWatch 9.1.1 Setting Up Resources in VMware Identity Manager (On Premises) You can find the most up-to-date
SAML-Based SSO Configuration
 Prerequisites, page 1 SAML SSO Configuration Task Flow, page 5 Reconfigure OpenAM SSO to SAML SSO Following an Upgrade, page 9 SAML SSO Deployment Interactions and Restrictions, page 9 Prerequisites NTP
Rat. Service Desk. Quick Start Guide. Software version 4.16 Guide version ITarian 1255 Broad Street Clifton, NJ 07013
 Rat Service Desk Quick Start Guide Software version 4.16 Guide version 4.16.110618 ITarian 1255 Broad Street Clifton, NJ 07013 Itarian Service Desk - Quick Start Guide This tutorial explains how ITarian
Comodo ONE Software Version 3.2
 rat Comodo ONE Software Version 3.2 Remote Monitoring and Management Quick Start Guide Guide Version 6.1.082316 Comodo Security Solutions 1255 Broad Street Clifton, NJ 07013 Comodo ONE - Remote Monitoring
Guide to Deploying VMware Workspace ONE with VMware Identity Manager. SEP 2018 VMware Workspace ONE
 Guide to Deploying VMware Workspace ONE with VMware Identity Manager SEP 2018 VMware Workspace ONE You can find the most up-to-date technical documentation on the VMware website at: https://docs.vmware.com/
Guide to Deploying VMware Workspace ONE. VMware Identity Manager VMware AirWatch 9.1
 Guide to Deploying VMware Workspace ONE VMware Identity Manager 2.9.1 VMware AirWatch 9.1 Guide to Deploying VMware Workspace ONE You can find the most up-to-date technical documentation on the VMware
22 August 2018 NETOP REMOTE CONTROL PORTAL USER S GUIDE
 22 August 2018 NETOP REMOTE CONTROL PORTAL USER S GUIDE CONTENTS 1 Overview... 3 1.1 Netop Remote Control Portal... 3 1.2 Technical Requirements... 3 2 General... 4 2.1 Authentication... 4 2.1.1 Forgot
APPLICANT S GUIDE TO THE SUPPLIER AND EQUIPMENT REGISTRATION DATABASE
 L APPLICANT S GUIDE TO THE SUPPLIER AND EQUIPMENT REGISTRATION DATABASE Table of Contents 1. Introduction 3 1.1 General Information 4 2. Responsible Supplier 7 2.1 First Time Registration 7 2.1.2 Resending
Comodo Certificate Manager Software Version 5.6
 Comodo Certificate Manager Software Version 5.6 Introducing The Certificate Dashboard Comodo CA Limited, 3rd Floor, 26 Office Village, Exchange Quay, Trafford Road, Salford, Greater Manchester M5 3EQ,
Reports Web Services API. InCommon c/o Internet Oakbrook Drive, Suite 300 Ann Arbor MI, 48104
 Reports Web Services API InCommon c/o Internet2 1000 Oakbrook Drive, Suite 300 Ann Arbor MI, 48104 Table of Contents 1 Introduction... 4 2 Authentication... 4 2.1 Authentication via Username and Password...4
Comodo Certificate Manager Version 5.5
 Comodo Certificate Manager Version 5.5 Device Certificate Enroll API Guide Version 5.5.082616 Comodo CA Limited 3rd Floor, 26 Office Village, Exchange Quay, Trafford Road, Salford, Greater Manchester M5
Comodo One Software Version 3.23
 rat Comodo One Software Version 3.23 Service Desk Quick Start Guide Guide Version 4.13.061318 Comodo Security Solutions 1255 Broad Street Clifton, NJ 07013 Comodo Service Desk - Quick Start Guide This
Partner Documentation Reseller Portal Guide
 2 Partner Documentation 1.Introduction and Enrollment One of the benefits of MSP Consortium membership is access to Comodo's range of enterprise security and management tools at greatly discounted rates.
Comodo Certificate Manager Version 5.7
 Comodo Certificate Manager Version 5.7 Device Certificate Enroll API Guide Version 5.7.032817 Comodo CA Limited 3rd Floor, 26 Office Village, Exchange Quay, Trafford Road, Salford, Greater Manchester M5
Remote Support 19.1 Web Rep Console
 Remote Support 19.1 Web Rep Console 2003-2019 BeyondTrust Corporation. All Rights Reserved. BEYONDTRUST, its logo, and JUMP are trademarks of BeyondTrust Corporation. Other trademarks are the property
Comodo SiteInspector Software Version 3.3
 Comodo SiteInspector Software Version 3.3 Administrator Guide Guide Version 3.3.032812 Comodo Security Solutions 1255 Broad Street STE 100 Clifton, NJ 07013 Table of Contents 1 Introduction to Comodo SiteInspector...
SIX Trade Repository AG
 January 2018 Table of contents 1. General information 4 1.1 Purpose and scope of the manual 4 1.2 References 4 2. General information and navigation 5 2.1 Using with Internet Explorer 5 2.2 User login
VMware AirWatch Google Sync Integration Guide Securing Your Infrastructure
 VMware AirWatch Google Sync Integration Guide Securing Your Email Infrastructure AirWatch v9.2 Have documentation feedback? Submit a Documentation Feedback support ticket using the Support Wizard on support.air-watch.com.
Software Version 4.2. Overview of Custom Fields. InCommon c/o Internet Oakbrook Drive, Suite 300 Ann Arbor MI, 48104
 Software Version 4.2 Overview of Custom Fields InCommon c/o Internet2 1000 Oakbrook Drive, Suite 300 Ann Arbor MI, 48104 1 Introduction An SSL or a Client certificate has standard fields that contain information
VSP16. Venafi Security Professional 16 Course 04 April 2016
 VSP16 Venafi Security Professional 16 Course 04 April 2016 VSP16 Prerequisites Course intended for: IT Professionals who interact with Digital Certificates Also appropriate for: Enterprise Security Officers
Comodo Offline Updater Utility Software Version
 Comodo Offline Updater Utility Software Version 1.2.30701.2 i User Guide Guide Version 1.2.011811 Comodo Security Solutions 525 Washington Blvd. Jersey City, NJ 07310 Table of Contents 1.Introduction to
Comodo Certificate Manager Version 5.6
 Comodo Certificate Manager Version 5.6 Reports Web Services API Guide Version 5.6.011317 Comodo CA Limited 3 rd Floor, 26 Office Village, Exchange Quay, Trafford Road, Salford, Greater Manchester M5 3EQ,
IceWarp SSL Certificate Process
 IceWarp Unified Communications IceWarp SSL Certificate Process Version 12 Printed on 20 April, 2017 Contents IceWarp SSL Certificate Process 1 Choosing the Proper Certificate Type... 2 Creating your CSR
Remote Support Web Rep Console
 Remote Support Web Rep Console 2017 Bomgar Corporation. All rights reserved worldwide. BOMGAR and the BOMGAR logo are trademarks of Bomgar Corporation; other trademarks shown are the property of their
Comodo cwatch Web Security Software Version 1.1
 rat Comodo cwatch Web Security Software Version 1.1 Quick Start Guide Guide Version 1.1.092117 Comodo Security Solutions 1255 Broad Street Clifton, NJ 07013 Comodo cwatch Web Security Quick Start Guide
CertAgent. Certificate Authority Guide
 CertAgent Certificate Authority Guide Version 6.0.0 December 12, 2013 Information in this document is subject to change without notice and does not represent a commitment on the part of Information Security
Comodo ONE Software Version 3.3
 rat Comodo ONE Software Version 3.3 Remote Monitoring and Management Quick Start Guide Guide Version 6.1.032817 Comodo Security Solutions 1255 Broad Street Clifton, NJ 07013 Comodo ONE - Remote Monitoring
Comodo Certificate Manager
 Comodo Certificate Manager Windows Auto Enrollment Setup Guide Comodo CA Limited 3rd Floor, 26 Office Village, Exchange Quay, Trafford Road, Salford, Greater Manchester M5 3EQ, United Kingdom. Table of
Comodo Certificate Manager Software Version 5.0
 Comodo Certificate Manager Software Version 5.0 Introducing The Certificate Dashboard Comodo CA Limited, 3rd Floor, 26 Office Village, Exchange Quay, Trafford Road, Salford, Greater Manchester M5 3EQ,
QuickStart Guide for Mobile Device Management. Version 8.7
 QuickStart Guide for Mobile Device Management Version 8.7 JAMF Software, LLC 2013 JAMF Software, LLC. All rights reserved. JAMF Software has made all efforts to ensure that this guide is accurate. JAMF
Comodo Certificate Authority Proxy Server Installation guide
 Comodo Certificate Authority Proxy Server Installation guide Rev. 0006 1.Prerequisite 1.1 Server requirement Windows Server 2008 /2008 R2 (Standart/Enterprise/Datacenter) Active Directory Domain Services
VMware Horizon Cloud Service on Microsoft Azure Administration Guide
 VMware Horizon Cloud Service on Microsoft Azure Administration Guide VMware Horizon Cloud Service VMware Horizon Cloud Service on Microsoft Azure 1.4 You can find the most up-to-date technical documentation
E X O S T A R, LLC D A T E : M AY V E R S I O N : 4.0
 SECURE ACCESS MAN AG E R USER GUI DE E X O S T A R, LLC D A T E : M AY 2 0 1 7 V E R S I O N : 4.0 1 S E C U R E AC C E S S M A N A G E R 1 INTRODUCTION... 3 1.1 SUMMARY... 3 2 BASIC FUNCTIONS... 3 2.1
Fasthosts Customer Support Generating Certificate Signing Requests
 Fasthosts Customer Support Generating Certificate Signing Requests Generating a CSR is the first step to take when you want to apply an SSL certificate to a domain on your server. This manual covers how
Comodo Certificate Manager Version 5.7
 Comodo Certificate Manager Version 5.7 Reports Web Services API Guide Version 5.7.032817 Comodo CA Limited 3 rd Floor, 26 Office Village, Exchange Quay, Trafford Road, Salford, Greater Manchester M5 3EQ,
Comodo Accounts Management Software Version 17.0
 2 Comodo Accounts Management Software Version 17.0 Reseller Portal Guide Guide Version 17.0.121917 Comodo Security Solutions 1255 Broad Street Clifton, NJ 07013 Table of Contents 1.The Reseller Portal...3