Software Version 5.0. Administrator Guide Release Date: 7th April, InCommon c/o Internet Oakbrook Drive, Suite 300 Ann Arbor MI, 48104
|
|
|
- Ashley Watts
- 5 years ago
- Views:
Transcription
1 Software Version 5.0 Administrator Guide Release Date: 7th April, 2015 InCommon c/o Internet Oakbrook Drive, Suite 300 Ann Arbor MI, 48104
2 Table of Contents 1 Introduction to InCommon Certificate Manager Guide Structure Definitions of Terms Organizations and Departments Certificate Types Administrative Roles Security Roles - Comparative Table Multiple Security Roles Organizations and Departments Reports Logging into Your Account The Main Interface - Summary of Areas Release Notes The Dashboard Certificates Management SSL Certificates Area Overview of the Interface Sorting and Filtering Options SSL Certificate 'Details' Dialog Resending Notification for Certs with 'Issued' State Viewing Installation Details of Certificates Restarting Apache after Auto-Installation of SSL Certificate InCommon SSL Certificates Definition of Terms Request and Issuance of SSL Certificates to web servers and Hosts Prerequisites Automatic Installation and Renewal Method 1 - Enterprise Controller Mode Method 2 - InCommon CM Controller Mode Initiating SSL Enrollment using Application Forms Method 1 - Self Enrollment Form Initiating the Self Enrollment Process The Self Enrollment Form Form Parameters Method 2 - Built-in Enrollment Form Accessing the Built-in Application Form The Built-In Application Form Form Parameters Certificate Collection Collection of SSL Certificate Through Collection of SSL certificate by Administrator Downloading and Importing SSL Certificates Certificate Requests - Approving, Declining, Viewing and Editing Certificate Renewal Certificate Renewal by Administrators Certificate Renewal by the End-User
3 Certificate Revocation, Replacement and Deletion The Client Certificates area Overview Sorting and Filtering Options 'Certs' Dialog Adding Cert End-Users Manually Adding End-Users 'Add New Person' form - Table of Parameters Loading multiple end-users from a comma separated values (.csv) file Procedure Overview Requirements for.csv file For Organizations with Principal Name Support Enabled For Organizations without Principal Name Support General Rules The Import Process Errors in.csv file Auto Creation of End-Users via Certificate Self Enrollment Form Editing End-Users Deleting an end-user Request and Issuance of Client Certificates to Employees and End-Users Self Enrollment by Access Code Prerequisites Procedure Overview Initiating the Enrollment Process The Access Code Based Self Enrollment Form Form Parameters Validation of the Application Certificate Collection Self Enrollment by Secret Identifier Prerequisites Procedure Overview Initiating the Enrollment Process Secret Identifier Based Self Enrollment Form Form Parameters Certificate Collection Enrollment by Invitation Prerequisites Procedure Overview Initiating the Enrollment Process Validation of the Address Certificate Collection Revocation of Client Certificates Revocation of Client Certificates by End Users Procedure Overview Revocation form Form Parameters Viewing End-User's Certificate
4 3.3 The Code Sign Certificates Area Sorting and Filtering Options Code Sign Certificates View Dialog Adding Certificates to be Managed Manually Adding Certificates Loading multiple certificates from a comma separated values (.csv) file Procedure Overview Requirements for.csv file Auto Creation of End-Users by Initiating Self Enrollment Request and Issuance of Code Signing Certificates Prerequisites Procedure Overview Initiating the Enrollment Process Validation of address and Requisition Downloading and Installing the Certificate Admin Management Section Overview Sorting and Filtering Options Adding Administrators 'Add New Client Admin' form - Table of Parameters Example: Adding a New Administrator with Multiple Security Roles The 'Certificate auth' Field Editing Administrators Deleting an Administrator Settings Overview Organizations Section Overview Example Scenarios Organization Management Organizations Area Overview Summary of Fields and Controls Sorting and Filtering Options Editing an Organization General Settings Imposing Access Restrictions to CM interface EV Details Tab Client Cert Settings Tab Client Cert Settings - Table of Parameters Customize an Organization's Client Certificate Types Defining Key Usage Template for an Organization's Client Certificates SSL Certificates Settings Tab SSL Certificates - Table of Parameters Customize an Organization's SSL Certificate Types Customize an Organization's Server Software Types 'Code Signing Certificate' Settings tab Code Signing Certificates - Table of Parameters
5 ' Template' tab Viewing and Editing the Templates Managing the Departments of an Organization Departments Dialog - Table of Parameters Sorting and Filtering Options Creating Departments General Settings - Table of Parameters Editing Departments belonging to an Organization Managing Domains belonging to a Department Deleting an Existing Department Managing the Domains of an Organization Departments Domains Section Overview Wildcard Domains Domain Management The Domains area Domain Delegations Summary of Fields and Controls Sorting and Filtering Options Tool Tip DCV Summary of Fields and Controls Sorting and Filtering Options Creating a New Domain Create Domain - Table of Parameters Validating the Domain Changing DCV method for Validation Pending Domains Delegating/Re-delegating an Existing Domain Viewing, Validating and Approving Newly Created Domains View Domain Summary of Fields and Controls Approval of Creation and Delegation of Domains Viewing Requisition Details of a Domain Request Details - Table of Parameters Encryption and Key Escrow Introduction and basic concepts Setting up Key Escrow for a Department Master Keys Required Prior to Client Cert Issuance Encryption Summary of Fields and Controls Encrypting the Private Keys Re-encryption Recovering a User's Private Key from Escrow Notifications Adding a Notification Notification Types 'Client Certificate Expiration' Create Notification Form
6 Table of Parameters 'Client Certificate Revoked' Create Notification Form Table of Parameters 'Code Signing Certificate Downloaded' Create Notification Form Table of Parameters 'Code Signing Certificate Revoked' Create Notification Form Table of Parameters 'Code Signing Certificate Expiration' Create Notification Form Table of Parameters 'Code Signing Certificate Requested' Create Notification Form Table of Parameters 'SSL Approved' Create Notification Form Table of Parameters 'SSL Awaiting Approval' Create Notification Form Table of Parameters 'SSL Declined' Create Notification Form Table of Parameters 'SSL Expiration' Create Notification Form Table of Parameters 'SSL Issuance Failed' Create Notification Form Table of Parameters 'SSL Revoked' Create Notification Form Table of Parameters 'Discovery Scan Summary' Create Notification Form Table of Parameters 'Remote SSL Certificate Installed ' Create Notification Form Table of Parameters 'Remote SSL Certificate Installation Failed ' Create Notification Form Table of Parameters 'Client Admin Creation' Create Notification Form Table of Parameters 'Domain Awaiting Approval' Create Notification Form Table of Parameters 'Domain Approved' Create Notification Form Table of Parameters 'DCV Expiration' Create Notification Form Table of Parameters 'DCV Validated' Create Notification Form Table of Parameters 'DCV Needed-New Domain' Create Notification Form Table of Parameters Certificate Discovery and Agents Certificate Discovery Area Discovery Tasks Sorting and Filtering Options Prerequisites Overview of Process
7 Adding IP Range and Start Scanning Editing a Discovery Task Deleting a Discovery Task Viewing History of Discovery Tasks View Scan Results Agents Sorting and Filtering Options Configuring the Agent for Auto-Installation and Internal Scanning - Overview of the Process Prerequisites Configuring the Agent for Auto-Installation and Internal Scanning - Detailed Explanation of the Process Configuring the Certificate Controller Agent through Web Interface Agent Configuration Server Management Reports Overview Reports - Security Roles Access Table Client Certificates Reports Report Type: Client Certificates - Table of Parameters Discovery Scan Log Reports Discovery Scan Log Report: Summary type Report Type: Discovery Scan Log :Summary - Table of Parameters Discovery Scan Log Report: Detail type Report Type: Discovery Scan Log :Detail - Table of Parameters SSL Certificates Reports Report Type: SSL Certificates - Table of Parameters Code Signing Certificates Report Report Type: Code Signing Certificates - Table of Parameters DCV Report Report Type: DCV Report - Table of Parameters Version and Feature Information My Profile Logging out of InCommon Certificate Manager Appendix 1 - Your responsibilities when ordering SSL Certificates Appendix 2 - Simple Certificate Enrollment Protocol Introduction Settings
8 1 Introduction to InCommon Certificate Manager InCommon Certificate Manager (CM) centralizes and streamlines the life-cycle management of web server, SMIME and code signing certificates through a unified interface. The system features full integration with InCommon Certificate Authority and enables nominated administrators to manage the lifespan, issuance, deployment, renewal and revocation of certificates on an Organization, Department and per-user basis. By consolidating and automating the often disparate processes involved in complex enterprise wide PKI deployments, CM reduces the need for manual certificate management and thus creates a more efficient, productive and secure certification environment. 1.1 Guide Structure This guide is intended to take you through the step-by-step process of Organization, configuration and use of InCommon Certificate Manager service. Section 1, Introduction to InCommon Certificate Manager - Contains a high level overview of the solution and serves as an introduction to the main themes and concepts that are discussed in more detail later in the guide including security roles, Organizations, Reports and a summary of the main areas of the interface. Section 2, The Dashboard - Contains an overview of the dashboard that provides a at-a-glance graphical summary of key life-cycle information (such as certificates approaching expiry, certificates issued/requested and DCV status). Section 3, Certificates Management - Contains an overview of the area's main functionality and detailed explanations on how to request, collect and manage SSL certificates for web servers and hosts, client certificates for employees and corporate clients (end-users) and code signing certificates for digitally signing executables and scripts Section 4, Admin Management - Covers the creation and management of Certificate Service Manager administrators and the assigning of privileges and responsibilities to those administrators. Section 5, Settings - Contains overviews and tutorials pertaining to the functional areas housed under the 'Settings' tab, including guidance on how to edit an Organization, manage Organizations, add domains and associate them with an Organization or Department, set up Notifications, and manage Encryption settings. To view detailed information about each area, click on the links below: Organizations Departments Domains Encryption and Key Escrow Notifications Section 6, Certificate Discovery and Agents - explains how to scan and monitor a network for all installed SSL certificates including certificates that may or may not have been issued using CM, any third party vendor certificates and any self-signed certificates. This section also explains how to download and install agents that are used for automatic installation of certificates and for certificate scan. Section 7, The Reports section - Contains an overview of the area, descriptions of each report type and guidance on how to access the required report type. Section 8, Version and Feature Information - explains how to view the version of CM and the features enabled for the subscription. 8
9 Section 9, My Profile - explains how to changes the time format and the password. Section 10, Logging out of InCommon Certificate Manager explains the process for logging out. Appendix 1, Appendix 1 - Your responsibilities when ordering SSL Certificate contains a very short summary of certificate issuance guidelines. Appendix 2, Appendix 2 - Simple Certificate Enrollment Protocol explains about the Simple Certificate Enrollment Protocol (SCEP) mechanism for automating the requests and renewal of digital certificates. 1.2 Definitions of Terms Organizations and Departments Organizations and Departments are created by administrators for the purposes of requesting, issuing and managing InCommon digital certificates. Each Organization can have multiple Departments. Organizations are typically managed by a Registration Authority Officer (RAO) while Departments are typically managed by a Department Registration Authority Officer (DRAO). Once an Organization or Department has been created: Appropriately privileged administrators can request and delegate domains to that Organization/Department Appropriately privileged administrators can request, approve/decline requests and manage certificates on behalf of that Organization or Department. End users can enroll into (or be assigned membership of) that Organization or Department and be provisioned with client certificates Certificate Types InCommon Certificate Manager can be used to request and manage the following types of digital certificate: SSL Certificates - SSL Certificates are used to secure communications between a website, host or server and end users that are connecting to that server. An SSL certificate will confirm the identity of the Organization that is operating the website; encrypt all information passed between the site and the visitor and will ensure the integrity of all transmitted data. Client Certificates - Client certificates are issued to individuals and can be used to encrypt and digitally sign messages; to digitally sign documents and files and to authenticate the identity of an individual prior to granting them access to secure online services. Code Signing Certificates - Code Signing Certificates are used to digitally sign software executables and scripts. Doing so helps users to confirm that the software is 'genuine' by verifying content source (authentication of the publisher of the software) and content integrity (that the software has not been modified, corrupted or hacked since the time it was originally signed) Administrative Roles There are 2 classes of Administrator in InCommon Certificate Manager: Registration Authority Officer (RAO) - A Registration Authority Officer (RAO) manages the certificates and end-users belonging to one or more CM Organizations. They have control over the certificates that are ordered on behalf of their Organization(s); over Domains that have been delegated to their Organization/Dept; over any 9
10 Departments of their Organization and over that Organization's end-user membership. RAOs can also create peer RAOs for their Organizations and edit or remove existing RAOs of their Organizations, if appropriate privileges are assigned by the Master Administrator. Department Registration Authority Officer (DRAO) - Department Registration Authority Officers are created by, and subordinate to, the RAO class of Administrator. They are assigned control over the certificates, users and domains belonging to a Department(s) of an Organization. DRAOs can also create peer DRAOs for their Departments and edit or remove existing RAOs of their Departments, if appropriate privileges are assigned by the RAO or the Master Administrator. RAO and DRAO administrators are sub-divided into specific roles by certificate type: RAO SSL administrators RAO SMIME administrators RAO Code Signing administrators DRAO SSL administrators DRAO SMIME administrators DRAO Code Signing administrators The privileges of any particular CM administrator are, therefore, broadly defined by the elements described in sections 1.2.1, and 1.2.3: 1) The Organization or Department that they are delegated to 2) The specific type of certificate that they are delegated responsibility for 3) Their specific administrative class (whether they are an RAO or a DRAO) CM also uses the following terms to identify personnel: End-User Owner Requester The following table contains detailed summaries of the privileges that apply to each type of administrator and also features descriptions of the 'end-user', 'owner' and 'requester' types of personnel. RAO Administrators Security Role / Type of Administrator RAO SSL (Registration Authority Officer - SSL Certificates) Definition Administrators with the security role 'RAO SSL' have privileges to request and manage SSL certificates for domains that have been delegated to their Organization RAO SSL admins have visibility and control over SSL certificates for Organizations that have delegated to them. They can approve or decline requests for SSL certificates that have been made using the SelfEnrollment form for their Organization(s) and sub-ordinate Department(s). They have no access to manage SSL certificates belonging to Organizations for which they have not been granted permissions. RAO SSL admins can only manage SSL Certificates and have no privileges to manage other certificate types (such as client certificates and 10
11 Security Role / Type of Administrator Definition code signing certificates)- including those that belong to the Organization that he or she is the SSL Administrator of. RAO SSL admins will see only those Organizations that have been delegated to them in the 'Organizations' area. RAO SSL admins cannot create new Organizations. Neither can they edit the General settings of any Organization - even those Organizations of which they are SSL Certificate administrator. RAO SSL administrators can create Departments Organizations that have been delegated to them RAO SSL admins cannot approve or request the creation of administrators that have more privileges than themselves. They can: only within Request the creation of fellow RAO SSL admins only for Organizations that have been delegated to them if the Master Administrator has enabled this feature for them Request and approve the creation of DRAO SSL admins Cannot request or approve the creation of any type of administrator for Organizations that have not been delegated to them Cannot request or approve creation of administrators of any other certificate type - even for those Organizations that have been delegated to them RAO SSL admins can delegate Domains to sub-ordinate Departments of Organizations that they have been delegated to them. RAO SSL admins can initiate DCV process for the Domains delegated to sub-ordinate Departments of Organizations that they administrate if they were given 'Allow DCV' privileges. RAO SSL with 'Allow DCV' privileges can be created only by the Master Administrator. RAO SSL Admins can setup Certificate Discovery (CD) Agents in a local network for scanning internal hosts with internally facing IP addresses for installed SSL certificates for the Organization(s) that are delegated to them and any sub-ordinate Departments there of. RAO SSL admins can view the SSL certificates Reports and Certificate Discovery Reports and edit notification templates only for the Organization that they were assigned rights to. RAO SSL admins cannot access or manage Encryption Settings. RAO SSL admins can initiate DCV process for the Domains delegated to sub-ordinate Departments of Organizations that they administrate if they were given 'Allow DCV' privileges. RAO SSL with 'Allow DCV' privileges can be created only by Master Administrator or fellow RAO SSL admins with such privileges. Agents also facilitate the automatic installation of SSL certificates on Apache, Apache Tomcat and IIS web servers. 11
12 Security Role / Type of Administrator Definition RAO SSL admins can only view Activity Logs for their Organization(s). An 'at-a-glance' summary of Administrator security roles and access rights is available here. RAO SMIME (Registration Authority Officer - SMIME Certificates) Administrators with the security role 'RAO SMIME' have privileges to access, manage, request and approve the requests of Client Certificates for domains that have been delegated to their Organization RAO SMIME admins have visibility and control over the client certificates belonging to End-Users of the Organizations for which they have been assigned rights. They have no access to manage the Client Certificates of End-Users that belong to Organizations which they have not been granted permissions. RAO SMIME admins can only manage SMIME certificates and have no privileges to manage other certificate types (such as SSL Certificates and code signing certificates) - including those that belong to the Organization of which they are SMIME Administrator. RAO SMIME admins will see only those Organizations that have been delegated to them in the 'Organizations' area. RAO SMIME admins cannot create new Organizations. Neither can they edit the General settings of any Organization - even those Organizations of which they are SMIME administrator. RAO SMIME admins can define Key Usage Templates (KUT) for client certificates that belong their own Organizations and Departments. Key Usage Templates dictate whether client certificates are capable of (1) Signing, (2) Encryption or (3) BOTH Signing and Encryption. The templates which are made available to an RAO SMIME will be specified by the Master Administrator. RAO SMIME administrators can create Departments only within Organizations that have been delegated to them RAO SMIME admins cannot approve or request the creation of administrators that have more privileges than themselves. They can: Request the creation of fellow RAO SMIME admins only for Organizations that have been delegated to them if the Master Administrator has enabled this feature for them Request and approve the creation of DRAO SMIME admins Cannot request or approve the creation of any type of administrator for Organizations that have not been delegated to them Cannot request or approve creation of administrators of any other certificate type - even for those Organizations that have been delegated to them RAO SMIME admins admins can delegate Domains to sub-ordinate Departments of Organizations that have been delegated to them. When creating a new Department, an RAO SMIME admins can: 12
13 Security Role / Type of Administrator Definition Enable or disable the ability of RAO SMIME admins (themselves) to recover the private keys of client certificates that belong to this Department Enable or disable the ability of DRAO SMIME admins to recover the private keys of client certificates that belong to this Department All or any combination of the above RAO SMIME admins can only view Activity Logs and edit notification templates only for their Organization. An 'at-a-glance' summary of Administrator security roles and access rights is available here. RAO Code Signing (Registration Authority Officer - Code Signing Certificates) Administrators with the security role 'RAO Code Signing' have privileges to access, manage, request and approve the requests of Code Signing Certificates for domains that have been delegated to their Organization RAO Code Signing Administrators have visibility and control over the code signing certificates belonging to End-Users of the Organization for which they have been assigned rights. They have no access to manage the Code Signing Certificates of End-Users that belong to Organizations of which they have not been granted permissions. RAO Code Signing admins can only manage Code Signing Certificates. They have no privileges to manage other types such as SSL or SMIME including those SSL/SMIME certificates belonging to the Organization of which they are Code Signing Certificate Administrator. RAO Code Signing admins will see only those Organizations that have been delegated to them in the 'Organizations' area. RAO Code Signing admins cannot create new Organizations. Neither can they edit the General settings of any Organization - even those Organizations of which they are Code Signing Certificate administrator. RAO Code Signing administrators can create Departments only within Organizations that have been delegated to them RAO Code Signing admins cannot approve or request the creation of administrators that have more privileges than themselves. They can: Request the creation of fellow RAO Code Signing admins only for Organizations that have been delegated to them if the Master Administrator has enabled this feature for them Request and approve the creation of DRAO Code Signing admins Cannot request or approve the creation of any type of administrator for Organizations that have not been delegated to them Cannot request or approve creation of administrators of any other certificate type - even for those Organizations that have been delegated to them RAO Code Signing admins can delegate Domains to sub-ordinate 13
14 Security Role / Type of Administrator Definition Departments of Organizations that have been delegated to them. RAO Code Signing admins can only view Activity Logs and edit notification templates only for their Organization. An 'at-a-glance' summary of Administrator security roles and access rights is available here. DRAO Administrators Security Role / Type of Administrator DRAO SSL (Department Registration Authority Officer SSL Certificates) Definition Method 1 - Self Enrollment Form outline Administrators with the security role 'DRAO SSL' have privileges to access, manage and request SSL certificates for domains that have been delegated to their Department by an RAO DRAO SSL admins have visibility and control over SSL certificates that belong to their delegated Department(s). A DRAO SSL admin can only request SSL certificates for domains that have been delegated to their Department. They can approve or decline requests for SSL certificates made using the Self-Enrollment form for their Department(s). They have no access to manage SSL certificates belonging to Departments for which they have not been granted permissions. They will only see their own Departments(s) listed in the 'Departments' area. The 'Organizations' area is not visible to DRAOs. DRAO SSL admins have no visibility of and cannot request certificates of any other type - including those other certificate types that belong to the Department of which they are DRAO SSL. It is possible for an RAO to make the same individual a 'DRAO SMIME', 'DRAO SSL', and a 'DRAO Code Signing' for the same Department during the Admin creation or editing process (for more details, see section 3. Admin Management). DRAO SSL admins cannot request the creation of administrators that have more privileges than themselves. They can: Request the creation of fellow DRAO SSL admins only for Departments that have been delegated to them if the RAO administrator has enabled this feature for them Cannot request the creation of any type of administrator for Departments that have not been delegated to them Cannot request creation of administrators of any other certificate type - even for those Departments that have been delegated to them DRAO SSL Admins can setup Certificate Discovery (CD) Agents in a local network for scanning internal hosts with internally facing IP addresses for installed SSL certificates for the Department(s) that are delegated to them. DRAO SSL admins can view Reports, edit Access Control Lists and modify 14
15 Security Role / Type of Administrator Definition Method 1 - Self Enrollment Form outline Templates for the Department that has been delegated to them. DRAO SSL admins cannot access or manage Encryption Settings. DRAO SSL admins cannot view Activity Logs. DRAO SSL admins can initiate DCV process for the Domains delegated to their Department(s) administrate if they were given 'Allow DCV' privileges. DRAO SSL admin with such privileges can be created only by Master Administrator or RAO SSL having the same privilege. Agents also facilitate the automatic installation of SSL certificates on Apache, Apache Tomcat and IIS web servers. An 'at-a-glance' summary of Administrator security roles and access rights is available here. DRAO SMIME (Department Registration Authority Officer SMIME Certificates) Administrators with the security role 'DRAO SMIME' have privileges to access, manage and request Client Certificates for domains that have been delegated to their Department by an RAO DRAO SMIME admins have visibility over the client certificates belonging to End-Users of the Department(s) which have been delegated to them. They have no access to manage the Client Certificates of End-Users that belong to Departments which they have not been delegated. They will only see their own Departments(s) listed in the 'Departments' area. The 'Organizations' area is not visible to DRAOs. A DRAO SMIME admin can only request SMIME certificates for domains that have been delegated to their Department. DRAO SMIME admins have no visibility of and cannot request certificates of any other type - including those other certificate types that belong to the Department of which they are DRAO SMIME. It is possible for an RAO to make the same individual a 'DRAO SMIME', 'DRAO SSL', and a 'DRAO Code Signing' for the same Department during the Admin creation or editing process (for more details, see section 3. Admin Management). DRAO SMIME admins cannot request the creation of administrators that have more privileges than themselves. They can: Request the creation of fellow DRAO SMIME admins only for Departments that have been delegated to them if the RAO administrator has enabled this feature for them Cannot request the creation of any type of administrator for Departments that have not been delegated to them Cannot request creation of administrators of any other certificate type - even for those Departments that have been delegated to them DRAO SMIME admins can request the addition of new Domains only for to Departments that have been delegated to them. If enabled for their Department, a DRAO SMIME admin can recover the 15
16 Security Role / Type of Administrator Definition Method 1 - Self Enrollment Form outline private keys of client certificates belonging to their Department DRAO Code Signing admins can view Reports, edit Access Control Lists and modify Templates for the Department that has been delegated to them. DRAO SMIME admins cannot view Activity Logs. An 'at-a-glance' summary of Administrator security roles and access rights is available here. DRAO Code Signing (Department Registration Authority Officer Code Signing Certificates) Administrators with the security role 'DRAO Code Signing' have privileges to access, manage and request Code Signing certificates for Departments of a Organization that have been delegated to them by an RAO. DRAO Code Signing admins have visibility of and can request Code Signing certificates for the Department(s) that have been delegated to them. They have no access to manage Code Signing certificates belonging to Departments for which have not been delegated to them. They will only see their own Departments(s) listed in the 'Departments' area. The 'Organizations' area is not visible to DRAOs. A DRAO Code Signing admin can only request Code Signing certificates for domains that have been delegated to their Department. DRAO Code Signing admins have no visibility of and cannot request certificates of any other type - including those other types of certificate that belong to the Department of which they are DRAO Code Signing. It is possible for an RAO to make the same individual a 'DRAO SMIME', 'DRAO SSL', and a 'DRAO Code Signing' for the same Department during the Admin creation or editing process (for more details, see section 3. Admin Management). DRAO Code Signing admins cannot approve or request the creation of administrators that have more privileges than themselves. They can: Request the creation of fellow DRAO Code Signing admins only for Departments that have been delegated to them if the RAO administrator has enabled this feature for them Cannot request the creation of any type of administrator for Departments that have not been delegated to them Cannot request creation of administrators of any other certificate type - even for those Departments that have been delegated to them DRAO Code Signing admins can request the creation of new Domains only for Departments that have been delegated to them. DRAO Code Signing admins can view Reports, edit Access Control Lists and modify Templates for the Department that has been delegated to them. DRAO Code Signing Administrators cannot access or manage Encryption Settings. 16
17 Security Role / Type of Administrator Definition Method 1 - Self Enrollment Form outline DRAO Code Signing Administrators cannot view Activity Logs. An 'at-a-glance' summary of Administrator security roles and access rights is available here. End-User, Owner and Requester Security Role / Type of Administrator End-User Definition An End-User in CM is a person that has been issued with or requested a Client Certificate or has made an application for an SSL certificate using the Self Enrollment form. 'End-Users' have no access rights whatsoever to the CM interface. They exist in CM only as a function of their request for or ownership of a client certificate. A new End-User and the Client Certificate for that End-User can be created in CM via: Manual creation by a Master or Client Certificate Administrator in the 'Client Certificate' area; The End-User ordering a Client Certificate using the Self Enrollment Form; End-User is imported into CM from.csv file. A new End-User will also be added via SSL certificate applications made through the self enrollment form. If the applicant does not already exist as an End-User then InCommon Certificate Manager will automatically add this applicant when the form is submitted. End Users that are auto-created in this way will not (yet) have a Client Certificate. All End-Users and Client Certificates owned or requested by that End-User are listed in the 'Client Cert' sub-tab of the 'Certificates Management' section of CM interface. Owner The Owner of the certificate is the Administrator that first approved the request for the certificate. The privileges of the 'Owner' therefore depend on that Administrator's administrative role. (See the definitions above). Requester The Requester of the certificate is the person that created and successfully submitted the initial application for the certificate. The 'Requester' can be any class of Administrator or End-User SSL certificates and Client certificates can be requested by people that do not yet 'exist' in CM as either End-Users or Administrators if they applied using use the self-enrollment/external application forms 17
18 1.2.4 Security Roles - Comparative Table Administrator Management Action Controls RAO DRAO Configure other Add, View Administrators Delete, Edit Create DRAOs of Subordinate Departments Create DRAOs of Delegated Department who are responsible for same Certificate who are responsible for the same Type certificate type if enabled by a RAO administrator or Master Administrator Create RAOs of Delegated Organization who are responsible for same Certificate Type Approve/Reject Approve, Administrator Reject Creation Requests DRAOs of Subordinate Departments who are responsible for same Certificate Type Activate/Deacti Check box vate Administrators RAOs of Delegated Organization who are responsible for same Certificate Type DRAOs of Subordinate Departments who are responsible for same Certificate Type Certificate Management Action Controls RAO Directly submit Add, Renew, Certificate Replace Requests using the built-in application form Delegated Organizations Subordinate Departments Directly submit Add, Renew, Certificate Approve, Requests to the Decline, Install issuing Certificate Authority for AutoInstallation by InCommon CM (IIS, Apache and Apache Tomcat only) Delegated Organizations Approve/Declin Approve, e Certificate Decline Requests that have been made using the Metho Delegated Organizations Subordinate Departments DRAO Delegated Departments Only those Certificate Types for which RAO is responsible Only those Certificate Types for which DRAO is responsible Delegated Departments Subordinate Departments RAO SSL RAO SSL RAO SMIME RAO SMIME RAO Code Signing RAO Code Signing Only those Certificate Types for which RAO is responsible Delegated Departments Only those Certificate Types for which DRAO is responsible 18
19 d 1 - Self Enrollment Form Manage Certificates View, Edit, Revoke Delegated Organizations Subordinate Departments Delegated Department Only those SSL certificates for which RAO is responsible Certificate Discovery Add CIDR, RAO SSL Delete CIDR, Setup Certificate RAO SMIME Discovery (CD) RAO Code Signing agent for internal scanning Request New Domains for... Add Approve / Reject New Domain Requests Approve, Reject Delegate Existing Domains to... Delegate DRAO SSL DRAO SMIME DRAO Code Signing Delegated Organizations Subordinate Departments Delegated Departments Subordinate Departments Subordinate Departments RAOs can only delegate domains to the Departments belonging to the Organization that have been delegated to them but cannot redelegate or remove a domain's delegation. Activate/Deacti Check box vate Existing Domains Initiate DCV Only those SSL certificates for which DRAO is responsible Select method RAO SSL of DCV as applicable to the domain On Domains added to Delegated Organizations and Subordinate Departments DRAO SSL On Domains added to Delegated Department RAO SMIME DRAO SMIME RAO Code Signing DRAO Code Signing Department Management Action Controls RAO DRAO Create and Manage Departments Add, Delete, Edit Subordinate Departments of Delegated Organization Approve Department Approve Subordinate Departments of Delegated 19
20 Creation Organization Key Escrow Action Manage Encryption of client certificates Controls Initialize, Reencrypt RAO SMIME DRAO SMIME Delegated Organizations Subordinate Departments Delegated Departments Recover private Decrypt keys from escrow Delegated Organizations Subordinate Departments Delegated Departments Can permit Administrators other than themselves to recover keys for a particular RAO SMIME Admins DRAO SMIME Admins Allow key recovery by... (checkbox) Organization or Department * Escrow privileges are configured at the point of Organization / Department creation. If granted escrow privileges, the RAO SMIME admin will be subsequently be able to specify any, all or none of the following for any Departments they create: 1. Whether or not the RAO SMIME admin (themselves) should have the ability to recover the private keys of client certificates of that belonging to that Department 2. Whether or not the DRAO SMIME admin should have the ability to recover the private keys of client certificates belonging to that Department See 'Encryption and Key Escrow' for more details. Notifications, Reports and Miscellaneous Action Controls RAO Administrator DRAO Administrator Configure access control settings Add, Delete, Edit CIDR View Notifications for... Add, Delete, Edit Delegated Organizations Subordinate Departments Delegated Department Create Notifications for... Add, Delete, Edit Delegated Organizations Subordinate Departments Delegated Department View Reports for... See 'Reports - Delegated Organizations Subordinate Departments Delegated Department Security Role Access Table' section for 20
21 details. Modify Templates for Edit Delegated Organizations Subordinate Departments Delegated Department Multiple Security Roles Multiple security roles may be selected for any particular administrator. An RAO that has been granted administrative rights over multiple certificate types for a particular Organization can assign similar, multi-role, privileges to a sub-ordinate DRAO administrator for a particular Department Organizations and Departments The creation of an Organization and the delegation of a domain to that Organization is an important step towards the issuance and effective management of SSL, code signing or client certificates via the Certificate Manager interface. Organizations and Departments are created by administrators for the purposes of requesting, issuing and managing certificates for domains and employees. Organizations can be sub-divided into Departments for the purposes of certificate and end-user management. (See section Organization for more details). Each Organization can have multiple Departments. Organizations are typically managed by a Registration Authority Officer (RAO). Departments are typically managed by a Department Registration Authority Officer (DRAO). Once an Organization has been created: RAO administrators can create multiple Departments within an Organization (See ' Organizations / Section Overview' for more details). RAO and DRAO administrators can directly request that certificates be issued to domains that have been delegated to their Department. They can also approve/decline certificate requests from individuals that have applied using one of the external application forms. End-users can be assigned membership of an Organization or Department and provisioned with client certificates for the domain that is associated with that Organization/Department. Administrators can manage the client certificates of end-users belonging to an Organization or Department via the 'Certificates Management - Client Certificates' interface and can manage SSL certificates for the Organization via the 'Certificate Managements - SSL Certificates' area. Code Signing Certificates are managed from the 'Code Signing' area A wide range of Organization and Department specific notifications can be set up to alert personnel to changes in certificate status, changes to domain status, Discovery Scan Summaries, Admin creation and more. RAOs and DRAOs can utilize the Certificate Discovery feature to audit then monitor all existing certificates on the network by assigning them to either an organization or one of its departments. Certificate reports can be viewed and exported for that Organization and/or specific Department Reports Certificate reports can be viewed and exported for an Organization and/or Department via the Report section. An appropriately privileged administrator is enabled to view different types of reports according their security roles. The following types of reports are available: Type of Report SSL Certificates Description Enables the administrator to monitor all statistics related to SSL certificates 21

22 Type of Report Description including usage, ownership, issuance, provisioning and status. Discovery Scan Log Enables the administrator to view the Discovery Scan Log. A Discovery Scan is an audit of all SSL certificates installed on your network. Client Certificates Enables the administrator to monitor all statistics, related to client certificates including usage, ownership, issuance, provisioning and status. DCV Report Enables RAO/DRAO SSL administrators to generate a report containing details on all of their registered domains, with their DCV status and expiration dates. For more detailed information see the 'Reports' section of the guide. 1.3 Logging into Your Account Once your Organization has subscribed for an InCommon Certificate Manager account, InCommon will provide your account manager with a username, password and login URL for the Certificate Manager interface. By default, the format of this URL is: If you have not been supplied with your login details, please contact your InCommon account manager. If you are not able to login with your login details, please see the support information page by clicking 'Support link'. Depending on the Access Control Settings specified by the administrator, you will be prompted to change your password after logging in for the first time. You may also change your password at any time via the 'My Profile' area. 22
23 1.4 The Main Interface - Summary of Areas InCommon Certificate Manager interface has a tab structure that facilitates access to all major settings. There are (a maximum of) seven tabs that cover each of the main functional areas of the application. These are 'Dashboard', 'Certificates Management', Discovery, 'Report', 'Admin Management', 'Settings', and 'About'. The 'Certificate Management' tab contains sub-sections for managing the certificate types that have been enabled for your company. There is therefore a maximum of three sub-sections - 'SSL Certificates', 'Client Certificates and 'Code Signing Certificates' The 'Discovery' tab contains sub-sections for scanning the network for installed certificates and for managing CD agents. The sub-sections are Discovery Tasks and Agents. The 'Settings' tab contains sub-sections for 'Organizations, 'Domains', 'Notifications', 'Encryption'. The remainder of this introduction contains an introduction to each tabbed area and the Security Role requirements for access to that area. Full details of the actual usage and functionality of the tabbed areas listed above are in sections 2.The Dashboard, Certificates Management, 4. Admin management, 5. Settings, 6. Certificate Discovery and Agents, 7. Reports, 8.Version and Feature Information, 9. My Profile and 10. Logging out of InCommon Certificate Manager. Dashboard: Contains graphs and charts that display snap-shot summaries of certificate key life-cycle information such as certificates approaching expiry, certificates issued/requested, DCV status, breakdown of certificates by types, issuers, and more. 23

24 Click here for more information about the Dashboard. Certificates Management Contains up to three sub-sections for the management of SSL, Client and Code Signing certificates. These sub-tabs are accessible according to administrator security role privileges: 24
.")
25 Security Role / Type of Administrator Available Action RAO SSL Can access all areas and functionality of the SSL Certificates section; has visibility and control over SSL Certificates belonging to their delegated Organization(s). RAO SMIME Can access all areas and functionality of the Client Certificates section; has visibility and control over client certificates and end-users belonging to their delegated Organization(s). RAO Code Signing Can access all areas and functionality of the Code Signing Certificates section; has visibility and control over Code Signing Certificates issued to end-users belonging to their delegated Organization(s). DRAO SSL Can access all areas and functionality of the SSL Certificates section; has visibility and control only over SSL Certificates belonging to belonging to their delegated Department(s). DRAO SMIME Can access all areas and functionality of the Client Certificates section; has visibility and control over client certificates and end-users belonging to their delegated Department(s). DRAO Code Signing Can access all areas and functionality of the Code Signing Certificates section; has visibility and control over Code Signing Certificates issued to end-users belonging to their delegated Department(s). Click here for more information about the Certificates Management section. Certificate Discovery and Agents: InCommon Certificate Manager uses Certificate Discovery agent, a small piece of software that facilitates discovery of SSL certificates installed in the network and automatic request and installation of SSL certificates on remote servers. The Discovery area in the CM interface enables the administrators to configure certificate discovery agents for the network and to commence certificate discovery tasks. The scan results can be obtained from the Reports area. 25
26 The 'Discovery' area is accessible only by RAO and DRAO SSL administrators. Security Role / Type of Administrator Available Action RAO SSL Can set up agents for and can scan for certificates requested, issued, expired, revoked and replaced for Organizations ( and any sub-ordinate Departments) that have been delegated to them. DRAO SSL Can set up agents for and can scan for certificates requested, issued, expired, revoked and replaced only for the Department(s) that have been delegated to them. Click here for more information about the Discovery section. Report: Enables administrators to view a range of reports depending on their privilege level. The 'Reports' interface is fully explained in Section 7. Reports. 26
27 Available reports are 'Client Certificates', 'Discovery Scan Logs', 'SSL Certificates', 'Code Signing Certificates' and 'DCV Report'. The types of report available to a particular administrator is dependent on their security role: Security Role / Type of Administrator RAO SSL RAO SMIME Available Action Can view: 'Certificate Discovery' reports on scans that have been run on behalf of their delegated Organization(s) and Department(s) (Only RAO SSL Admins) 'SSL / SMIME / Code Signing Certificate' report that is appropriate to their administrative type and for their Organization(s) and Department(s) only DCV Report for their Organization(s) and Department(s) only (Only RAO SSL Admins) RAO Code Signing DRAO SSL DRAO SMIME Can view: 'Certificate Discovery' reports on scans that have been run on behalf of their delegated Department(s) (Only DRAO SSL Admins) 'SSL / SMIME / Code Signing Certificate' report that is appropriate to their administrative type for their Department(s) only DCV Report for their Department(s) only (Only DRAO SSL Admins) DRAO Code Signing Admin Management : Enables the currently logged-in administrator to view a list of administrative personnel. The 'Admin Management' interface is fully explained in 4.Admin Management 27
 and any subordinate Department(s) who are responsible for the same certificate type(s) as themselves Request the creation")
28 The visibility of other administrators and the availability of controls in this area is dependent on which type of administrator is currently logged in: Security Role / Type of Administrator RAO SSL Available Action View/Edit RAOs and DRAOs of their delegated Organization(s) and any subordinate Department(s) who are responsible for the same certificate type(s) as themselves Request the creation of fellow RAOs who are responsible for the same certificate type(s) as themselves Approve/Reject the creation of DRAOs who are responsible for the same certificate type(s) as themselves from View DRAOs of their delegated Department(s) who are responsible for the same certificate type(s) as themselves Request the creation of fellow DRAOs who are responsible for the same certificate type(s) as themselves Edit their own details RAO SMIME RAO Code Signing DRAO SSL DRAO SMIME DRAO Code Signing Click here for more information about Admin Management section. Settings: The 'Settings' area contains several tabs relating to the overall configuration of CM. The number of tabs that are visible to a particular administrator is dependent on their security role (RAO or DRAO). 28
.")
29 1. Organizations: Visible only to RAO class administrators. RAOs can view, edit, request new domains and add Departments to Organizations that have been delegated to them. 2. Departments: Visible only to DRAO class administrators (DRAO s see a Departments tab instead of the Organizations tab). Allows DRAOs to view all Departments that have been delegated to them and to request new domains for those Departments. 3. Domains: RAOs can view domains for Organization that they control, can delegate domains to subordinate Departments and can request new domains for their Organization. DRAOs can view existing domains and request the addition of new ones. 4. Encryption: Allows RAO/DRAO SMIME administrators to initialize a new master key pair or to re-encrypt the private keys of client certificates held in escrow. Click here for more information about the 'Settings' area About: Enables currently logged-in administrator to view the version of CM and the features that are enabled and disabled for the account. 29
30 My Profile: Enables currently logged-in administrator to view/edit address details and change the password. 30
31 Logout: Logging out of InCommon Certificate Manager. 1.5 Release Notes Version History Version Number Version 5.0 Version 4.6 List of Changes Redesigned User Interface. Improved Dashboard with drill-down statistical reports. Support for issuance of certs to private domain names. Added the new Dashboard feature with graphs and charts that allow the administrator to quickly gain an overview of all SSL, SMIME and code-signing certificates on the network. 31
32 Version History Version Number Version 4.5 List of Changes Added a new report type 'Notification log Statistics' to enable Master administrators to generate and view logs of automated notification s sent to other administrators during various events Added ability to external applicants to renew their SSL certificates through self-renewal form, by entering their certificate ID and Pass Phrase. Various bug fixes and UI improvements Added new process of validating organizations for the issuance of OV SSL certificates Improved the process of validating organizations for the quick issuance of EV SSL certificates. Added ability to create domains without delegating them to organizations or departments. Various bug fixes Streamlined the DCV process for a faster validation. Added ability to sort items in various interfaces by clicking the column headers Added ability to search and filter certificates based on requester in SSL Certificates interface Custom field data included for a certificate will continue on the renewal certificates too Various bug fixes and several optimizations to improve the performance of the database and application server for improved stability Various bug fixes Introduced HTTPS method introduced in addition to HTTP. Updated and improved SCEP support of ios. Enhanced the self-enrollment form, optimized to be used on iphones. When a user wants to enroll and install a client certificate with the self-enrollment form, InCommon CM presents an optimized page. After the enrollment process completes, the user can automatically install the certificate onto the ios device. Several UI improvements, including saving search filters. The filters configured for various interfaces will be saved and automatically applied when the same interface is opened again Enabled auto installation feature for Apache Tomcat server. Version 4.1 supports auto-installation / auto-renewal for following platforms: Apache Web Server (Linux 32/64bit) IIS 7/7.5/8 (Windows 32/64) Apache Tomcat (Windows 32/64bit, Linux 32/64bit) Various Bug Fixes User Interface changes Multiple certificate discovery tasks can be run at the same time Agents will automatically check for newer versions and update itself Version 4.4 Version 4.3 Version 4.2 Version 4.1 Version
33 Version History Version Number Version 2.11 Version 2.10 List of Changes Added automatic installation and renewal of SSL certificates. This feature is enabled for accounts on a per-case basis. There are two available modes: Enterprise Controller Mode - Software installed on a local host will communicate directly with the CA issuance infrastructure to automatically apply for and install certificates on designated web servers. Certificate Manager Controller mode - An agent is installed on each web server which will communicate with InCommon CM for certificate requests. If a request exists, the agent will generate a CSR and present it to the administrator for approval in the InCommon CM interface. Various Bug fixes Various Bug Fixes Added functionality for scanning internal servers for installed certificates using Certificate Discovery (CD) Agent, installed in a local computer. Various Bug Fixes Added three methods , HTTP file and DNS CNAME for Domain Control Validation (DCV) functionality to validate new and existing domains Enhanced logging for system resources/usage statistics Improved error handling/logging Added a column 'External Requester' to SSL report Improvements to the notifications system Version Version Bug Fixes: Version Version Fixed bug whereby Master Administrator is sent 'Discovery Scan Summary' notification even though the Notify Master Admin(s) check-box is not selected Fixed bug related to issue of SSL through Self-Enrollment Links for local hostnames Fixed bug whereby an administrator was not able to edit organization under certain circumstances RAO administrators can see only the client cert types that are allowed for them Fixed logo bug in IE 9.0 window Fixed bug related to invalid CSR common name Fixed issue related to mismatch of available notifications during Notification creation RAOs can set up a notification which notifies Master Administrators Fixed bug related to incorrect timing of 'Your session has expired' messages Fixed bug whereby Domains are in a 'Suspended' state after an entry by RAO The functionality Settings > Templates for editing templates of messages corresponding to various events is restricted only to Master Administrators. Domain creation/delegation requests approved by Master Administrator with privilege 'Allowing domain validation without Dual Approval' are activated immediately without requiring approval by a second Master Administrator. Domains created by DRAO Administrators are to be approved by RAO of the Organization to which the department belongs prior to approval by Master Administrators. Added option to specify default Client Certificate Type(s) for all Organizations. 33
34 Version History Version Number List of Changes Add 'Apply' button to Client Cert customization interfaces Bug Fixes: All the server types are now available in the self-enrollment form for applying for SSL certificate. Administrators can now enroll for EV SSL Certificate manually Fixed issues related to Firefox version 4 Browser. Only the default Client Cert types customized for an organization are made visible in the selfenrollment forms. RAO and DRAO can send invitations for Client Certificates only for Certificate types allowed for their Organization. SCEP Logs are improved Added Key Usage Template (KUT) functionality to determine capabilities of Client Certificates of endusers belonging to an Organization. Added functionality to display only required fields in the request forms for EVSSL certificates (both Built-in application form and the Self Enrollment form) Subscriber's Agreements are made specific to the Certificate type selected while requesting for SSL Certificate and Code Signing Certificates. Implemented Simple Certificate Enrollment Protocol (SCEP) support to Client Certificates in addition to SSL Certificates. Bug Fixes: Version Version Fixed bug whereby user can now enroll for Code Signing Certificates through Internet Explorer Fixed bug whereby DRAO Administrators can request for SSL certificates from the management interface Correct Subscriber Agreements are displayed on both built-in application form and Self enrollment form according to Certificate type selected. Fixed bug to accept CSR of size less than 2048 bits for SSL Certificate replacement Master Administrator admin can add a new delegation for approved domain without dual MRAO approval. Dual Master Administrator Approval check-boxes are selected by default while creating new domains. Added Dual Master Administrator Approval for New Domains. When enabled, each new domain created by an RAO or a DRAO needs to be approved by two Master Administrators. The Domain will remain in 'Requested' status until both the Master Administrators have approved it; Administrators that have privileges to 'Allow creation of admin users' privileges are now allowed to create peer level admins without needing approval from a higher level administrator; Bug Fixes: Person upload notification messages are now customizable; Fixed bug whereby a Master Administrator could bypass 'dual domain auto approval' by using 'domain edit'; Fixed bug that sometimes allowed domains created by a Master Administrator to be automatically sent 34
35 Version History Version Number List of Changes forward for validation without requiring approval from second Master Administrator; Active' checkbox in Settings/Domains is now, by default, always enabled for Master Administrator; Fixed bug where some notifications did not correspond to the modified Template; Fixed bug that caused domain delegation requests to be displayed incorrectly; Fixed occasional bug whereby an Master Administrator could modify their own privileges and/or those of a fellow Master Administrator; Fixed occasional internal error that occurred when editing a deleted Administrator; Fixed bug whereby an incorrect error would be displayed while importing from CSV; Fixed Internal error that occurred when an RAO Admin tried to approve a Domain that had not yet been delegated by DRAO Admin; Fixed bug that allowed Administrators to add and activate a domain for an Organization that has already been added to a Department; Fixed bug whereby incorrect data was displayed in the domain details window; Fixed bug whereby Client Certificate Administrators that were created in a certain manner were not made to follow password policy rules; Fixed bug whereby variables could not be added via the 'Insert Variables' button while editing an template in Internet Explorer; Fixed bug whereby only active Master Administrator by changing admin role of another Master Administrator. 2 The Dashboard The CM Dashboard will be displayed by default when an administrator first logs into the CM interface. The dashboard provides a heads-up-display which allows the administrator to quickly gain an overview of all SSL, SMIME and codesigning certificates on the network. The charts and graphs in the dashboard provide an essential combination of key life-cycle information (such as certificates approaching expiry, certificates issued/requested and DCV status) as well as important technical insights like how many servers have support for perfect forward secrecy, renegotiation and RC4 suites. Chart data is updated in real-time, so any modifications should be reflected in the dashboard near-instantly. Security Roles: RAO SSL, RAO SMIME and RAO Code Signing - can view charts relevant to the certificate types, domains and web servers of the Organizations (and any sub-ordinate Departments) that have been delegated to them. DRAO SSL, DRAO SMIME and DRAO Code Signing - can view the charts relevant to the certificate types, domains and web servers of the Departments that have been delegated to them. 35

36 The area at the top of the dashboard allows you to filter chart data and features a real-time summary of Active/Revoked certificates: 36
37 Filtering Options: The statistics displayed in the dashboard can be filtered based on the time period and by Organization/Department: To add a filter, select the type of the filter from the 'Add Filter' drop-down. The available options are: Organization - Choose an Organization / Department from the respective drop-downs and click 'Apply'. Time Period - Select the time period for which you wish to view statistics from the 'Time Period' dropdown and click 'Apply'. To remove a filter, click the ' - ' button beside the filter. To reset the filters, click 'Clear'. Charts available in first release. Click any link to view more details: Expiring Certificates by Issuer InCommon, self-signed and 'Other Trusted' certificates expiring within 180 days DCV Expiring Domains Domains for which Domain Control Validation will expire within 180 days Certificates Types (Managed) Single Domain, Wildcard, Multi-Domain, UCC etc. Certificates by Validation Level EV, DV, OV. SSL Certificate Types Certificates issued through InCommon CM and broken down by brand names like Instant SSL, Premium SSL, EV SSL etc. Certificate Requests versus Certificates Issued Certificates by CA Comodo, VeriSign, GoDaddy, Thawte, self-signed etc. Certificate Requests by Category of Certificate SSL requests, SMIME requests, Code signing requests Certificates By Duration How many of your certificates are 1 year, 2 year, 3 year etc DCV Status The current stage in the Domain Control Validation process held by your certificate-hosting domains Certificates by Organization - Certificates broken down by the Organizations they are issued to. Certificates by Key Strength - Certificates by the strength of key with which they were signed (1024 bit, 2048 bit etc) Certificates by Signing Algorithm - Certificates by hashing and signing algorithms (e.g. SHA1withRSA) Certificates by Public Key Algorithm - Certificates broken down by encryption algorithm (RSA, DSA etc) Charts which are coming soon. Click any link to view more details: EV Express Validation - Organizations whose eligibility for accelerated EV validation will expire within 180 days. Forward Secrecy - The degree to which forward secrecy is supported on the web-servers hosting your certificates Hosted by OS - Details the server operating systems used to host your certificates (Windows, Linux etc) 37

38 RC4 Support - The level of support for RC4 suites on the web-servers that host your certificates Renegotiation Support - The level of renegotiation support on the web-servers that host your certificates Supported Protocols - The types of encryption protocols supported by the web-servers that host your certificates Certificates by port number - The port numbers used for SSL traffic on the web-servers that host your certificates Expiring Certificates The 'Expiring Certificates' bar graph shows the number of certificates expiring within the next 30, 60, 90 and 180 days. Expiring certificates are further broken down according to signer. 'Trusted' certificates are those from other CAs which you may want to replace with InCommon certificates in order to benefit from InCommon CM's management capabilities. Hovering the mouse cursor over a legend or graph displays the number of certificates in each category. Clicking on the information icon Clicking on the graph icon displays a tool tip explaining the chart displays a report with the breakdown of statistics shown in the chart: 38

39 'Expiring Certificates Report' Table Column Descriptions Column Header Description Common Name The domain for which the certificate was issued. This domain name refers to the 'Common Name' field in the SSL certificate itself. Organization Name of the Organization that has been issued with the certificate. Department The specific Department of the Organization that is associated with the certificate. This column will be blank if a Department has not been delegated as the controlling entity. Expires The expiration date of the certificate. DCV Expiring Domains Indicates how many of your domains are within 30, 60, 90 and 180 days of DCV (domain control validation) expiry. DCV validity lasts for one year so It is possible DCV might be approaching expiry even though your certificate is not. If DCV is allowed to expire, it will not mean your certificate becomes invalid/stops functioning. However, your next application for that domain will need to pass DCV again. 39


40 Placing the mouse cursor over a legend or graph displays a tool-tip showing the number of domains within that time-frame. Clicking on the information icon Clicking on the graph icon displays a tool tip explaining the chart displays a report with the breakdown of statistics shown in the chart: 'DCV Expiring Domains Report' Table Column Descriptions Column Header Description Name The name of the domain. Delegation Status Indicates whether domain is active or inactive Date Requested Indicates the date on which the domain was requested. DCV Status Indicates the request/approval status of the domain. Certificate Types (Managed) 40

41 The 'Certificate Types' pie chart summarizes the different types of SSL certificates installed on servers in your network. (single domain, wildcard, multi-domain etc). This chart covers only 'managed' certificates issued through InCommon CM. Hovering your mouse cursor over a legend item or section displays additional details such as the actual quantity of certificates of that type. Clicking on the information icon Clicking on the graph icon displays a tool tip on the chart displays a report with the breakdown of statistics shown in the chart 'Managed Certificate Types Report' Table Column Descriptions Column Header Description Common Name The domain for which the certificate was issued. This domain name refers to the 'Common Name' field in the SSL certificate itself. Organization Name of the Organization that has been issued with the certificate. Department The specific Department of the Organization that is associated with the certificate. This column will be blank if a Department has not been delegated as the controlling entity. 41


42 SSL Type Indicates type of the certificate with its brand name Certificates by Validation Level The chart displays the composition of your certificate portfolio according to certificate validation level. This includes the number of Domain Validated, Organization Validated and Extended Validation certificates on your network. Hovering the mouse cursor over a bar displays the exact number of certificates in that category. Clicking on the information icon Clicking on the graph icon displays a tool tip on the chart displays a report with the breakdown of statistics shown in the chart 'SSL Certificates by Validation Level Report' Table Column Descriptions Column Header Description Common Name The domain for which the certificate was issued. This domain name refers to the 'Common Name' field in the SSL certificate itself. Organization Name of the Organization that has been issued with the certificate. 42

43 Department The specific Department of the Organization that is associated with the certificate. This column will be blank if a Department has not been delegated as the controlling entity. Sub Type Indicates validation level of the certificate, like Domain Validated, Organization Validated and Extended Validation. SSL Types The 'SSL Types' chart details the quantities of SSL certificates issued by InCommon CM according to certificate brand name. Hovering your mouse over a legend or sector displays additional details. Clicking on the information icon Clicking on the graph icon displays a tool tip on the chart displays a report with the breakdown of statistics shown in the chart 43
44 'SSL Types Report' Table Column Descriptions Column Header Description Common Name The domain for which the certificate was issued. This domain name refers to the 'Common Name' field in the SSL certificate itself. Organization Name of the Organization that has been issued with the certificate. Department The specific Department of the Organization that is associated with the certificate. This column will be blank if a Department has not been delegated as the controlling entity. SSL Type Indicates brand name of the certificate. Note: Certificates with 'Issued' status are shown with blue text. Certificates Requested Vs Issued The 'Certificates Requested Vs Issued' graph allows you to view certificate issuance against certificate requests over time. Placing the mouse cursor over the graph nodes displays more details about the number of certificates that were requested and issued on that date. Clicking on the information icon Clicking on the details icon displays a tool tip on the chart displays a report with the breakdown of statistics shown in the chart 44

45 'Certificates Requested Vs Issued Report' Table Column Descriptions Column Header Description Certificate Type The domain for which the certificate was issued. This domain name refers to the 'Common Name' field in the SSL certificate itself. Organization Name of the Organization that has been issued with the certificate. Department The specific Department of the Organization that is associated with the certificate. This column will be blank if a Department has not been delegated as the controlling entity. Order Number Indicates brand name of the certificate. Serial Number Displays the serial number of the certificate that is unique and can be used to identify the certificate. Term The length of time the certificate is (or will be) valid for from the time of issuance. For certificates that have not yet been approved, this is the certificate lifetime that was requested during the application process. State Indicates the current status of the certificate. Requested The date at which the certificate was requested by the end-user or the administrator Collected The date at which the certificate was collected by the end-user or the administrator Expires The date of expiry of the certificate Certificates by CA 45
 and those which are self-signed.")

46 The 'Certificates by CA' chart allows you to determine what % of your certificates are publicly trusted by providing a break-down of certificates by signer. This includes all certificates signed by Certificate Authorities (CA) and those which are self-signed. It also highlights certificates from other CA's which you may want to replace with InCommon equivalents in order to benefit from InCommon CM's management capabilities. Placing your mouse cursor over a legend or sector displays the number of certificates by that signer and their % of the total certificates. Clicking on the information icon Clicking on the graph icon displays a tool tip on the chart displays a report with the breakdown of statistics shown in the chart 'Certificates by CA Report' Table Column Descriptions Column Header Description Common Name The domain for which the certificate was issued. This domain name refers to the 'Common Name' field in the SSL certificate itself. Organization Name of the Organization that has been issued with the certificate. 46

47 Department The specific Department of the Organization that is associated with the certificate. This column will be blank if a Department has not been delegated as the controlling entity. Vendor Shows the vendor that has issued the certificate. Note: Certificates with 'Issued' status are shown with blue text. Certificate Requests The 'Certificates Requests' graph displays the number of InCommon CM orders placed over time for SSL, SMIME and Code Signing certificates. Hovering the mouse cursor over the nodes on the graph displays the exact number of certificates that were requested. Clicking on the information icon Clicking on the graph icon displays a tool tip on the chart displays a report with the breakdown of statistics shown in the chart 47

48 'Certificates Requests Report' Table Column Descriptions Column Header Description Certificate Type The domain for which the certificate was requested / issued. This domain name refers to the 'Common Name' field in the SSL certificate itself. Organization Name of the Organization that has been issued with the certificate. Department The specific Department of the Organization that is associated with the certificate. This column will be blank if a Department has not been delegated as the controlling entity. Order Number Indicates brand name of the certificate. Serial Number Displays the serial number of the certificate that is unique and can be used to identify the certificate. Term The length of time the certificate is (or will be) valid for from the time of issuance. For certificates that have not yet been approved, this is the certificate lifetime that was requested during the application process. State Indicates the current status of the certificate. Requested The date at which the certificate was requested by the end-user or the administrator Collected The date at which the certificate was collected by the end-user or the administrator Expires The date of expiry of the certificate Certificates by Duration 48

49 The 'Certificates by Duration' pie chart is a break-down of your certificates by term length. Hovering your mouse cursor over a legend or section displays the exact number of certificates with that term length and their percentage of the total. Clicking on the information icon Clicking on the graph icon displays a tool tip on the chart displays a report with the breakdown of statistics shown in the chart 49
50 'Certificates by Duration' Table Column Descriptions Column Header Description Certificate Type The domain for which the certificate was requested / issued. This domain name refers to the 'Common Name' field in the SSL certificate itself. Organization Name of the Organization that has been issued with the certificate. Department The specific Department of the Organization that is associated with the certificate. This column will be blank if a Department has not been delegated as the controlling entity. Order Number Indicates brand name of the certificate. Serial Number Displays the serial number of the certificate that is unique and can be used to identify the certificate. Term The length of time the certificate is (or will be) valid for from the time of issuance. For certificates that have not yet been approved, this is the certificate lifetime that was requested during the application process. State Indicates the current status of the certificate. Requested The date at which the certificate was requested by the end-user or the administrator Collected The date at which the certificate was collected by the end-user or the administrator Expires The date of expiry of the certificate DCV Status The chart shows a summary of Domain Control Validation (DCV) status of certificates on your network. DCV is required in order for InCommon to issue certificates to your domains and sub-domains. We advise customers to first pass DCV on their high level domain (e.g. domain.com). Once the HLD has passed DCV then future applications will be faster because all sub-domains, including wildcards, will be considered passed. 50


51 Hovering your mouse cursor over a legend or section displays the quantity of domains with a particular status and their percentage of the total domains. Clicking on the information icon Clicking on the graph icon displays a tool tip on the chart displays a report with the breakdown of statistics shown in the chart 'DCV Status Report' Table Column Descriptions Column Header Description Name The name of the domain. Delegation Status Indicates whether domain is active or inactive Date Requested Indicates the date on which the domain was requested. DCV Status Indicates the request/approval status of the domain. You can select the columns to be displayed by clicking the settings icon at the top right of the table and choosing the columns. Certificates by Organization 51

52 The 'Certificates by Organization' chart shows how many certificates have been issued to each Organization in your InCommon CM account. Hovering your mouse cursor over a legend or section displays the precise number and percentage of total certificates issued to to a particular Organization. Clicking on the information icon Clicking on the graph icon displays a tool tip on the chart displays a report with the breakdown of statistics shown in the chart 'Certificates by Organization' Table Column Descriptions Column Header Description Certificate Type The domain for which the certificate was requested / issued. This domain name refers to the 'Common Name' field in the SSL certificate itself. Organization Name of the Organization that has been issued with the certificate. Department The specific Department of the Organization that is associated with the certificate. This column will be blank if a Department has not been delegated as the controlling entity. 52
53 Order Number Indicates brand name of the certificate. Serial Number Displays the serial number of the certificate that is unique and can be used to identify the certificate. Term The length of time the certificate is (or will be) valid for from the time of issuance. For certificates that have not yet been approved, this is the certificate lifetime that was requested during the application process. State Indicates the current status of the certificate. Requested The date at which the certificate was requested by the end-user or the administrator Collected The date at which the certificate was collected by the end-user or the administrator Expires The date of expiry of the certificate Key Strength The 'Key Strength' chart shows the composition of your certificate portfolio based on the size of their signature. This can be useful for identifying certificates which need to replaced in order to be compliant with National Institute of Standards (NIST) recommendations. NIST has stated that all certificates issued after 1st January 2014 should be of at least 2048 bit key length. Placing your mouse cursor over a legend or sector displays the exact number of certificates with a particular signature size and their percentage of the total certificates. Clicking on the information icon Clicking on the graph icon displays a tool tip on the chart displays a report with the breakdown of statistics shown in the chart 53
54 'Key Strength Report' Table Column Descriptions Column Header Description Common Name The domain for which the certificate was issued. This domain name refers to the 'Common Name' field in the SSL certificate itself. Organization Name of the Organization that has been issued with the certificate. Department The specific Department of the Organization that is associated with the certificate. This column will be blank if a Department has not been delegated as the controlling entity. Expires The date of expiry of the certificate Key Algorithm Displays the type of algorithm used for the encryption. Key Size Displays the key size used by certificate for the encryption. Note: Certificates with 'Issued' status are shown with blue text. Signature Algorithm 54
55 The chart provides an overview of the algorithms used by your certificates to hash and sign data. This chart can be useful for identifying certificates using weaker algorithms which may need to be replaced before their expiry dates. InCommon recommends SHA-256 and upwards. MD5 has been proven insecure and Microsoft has stated its products will stop trusting SHA-1 code-signing and SSL certificates in 2016 and 2017 respectively. For more details, see Placing your mouse cursor over a legend or sector displays the exact number of certificates using a particular signature algorithm and their percentage of the total certificates. Clicking on the information icon Clicking on the graph icon displays a tool tip on the chart displays a report with the breakdown of statistics shown in the chart 'Signature Algorithm Report' Table Column Descriptions Column Header Description Common Name The domain for which the certificate was issued. This domain name refers to the 'Common Name' field in the SSL certificate itself. Organization Name of the Organization that has been issued with the certificate. 55
56 Department The specific Department of the Organization that is associated with the certificate. This column will be blank if a Department has not been delegated as the controlling entity. Expires The date of expiry of the certificate Signature Algorithm Displays the type of signature algorithm used by the certificate Public Key Algorithm This chart provides an overview of the algorithms used to encrypt data by certificates on your network. Example algorithms include RSA, DSA and ECC. Placing your mouse cursor over a legend or sector displays the exact number of certificates using a particular public key algorithm and their percentage of the total certificates. Clicking on the information icon Clicking on the graph icon displays a tool tip on the chart displays a report with the breakdown of statistics shown in the chart 56

57 'Public Key Algorithm Report' Table Column Descriptions Column Header Description Common Name The domain for which the certificate was issued. This domain name refers to the 'Common Name' field in the SSL certificate itself. Organization Name of the Organization that has been issued with the certificate. Department The specific Department of the Organization that is associated with the certificate. This column will be blank if a Department has not been delegated as the controlling entity. Expires The date of expiry of the certificate Signature Algorithm Displays the type of signature algorithm used by the certificate Key Algorithm Displays the type of algorithm used for the encryption. EV Express Validation - coming soon Displays the percentage of Organizations for which accelerated validation of one or more EV certificates will expire within 30, 90 and 180 days. Once an EV certificate has been validated for the high level domain (e.g. domain.com) it qualifies for EV Express and subsequent EV applications for that domain and it's sub-domains will be issued much more quickly (assuming address and contact details are not changed). EV Express status lasts for 13 months before it must be renewed by re-validating the details of the certificate on the high level domain. 57

58 Forward Secrecy Enabled - coming soon Displays the percentage of certificates which are hosted on web-servers which have perfect forward secrecy fully or partially enabled. Forward secrecy prevents encrypted data from previous sessions from being decrypted in the event that the private key of the certificate is compromised. Hosted by OS - coming soon Provides a visual break-down of the server operating systems used to host your certificates. 58


59 RC4 Support - coming soon Indicates the degree to which the RC4 streaming cipher is supported by servers hosting your certificates. If your environment can operate without RC4, it is best practice to disable it. Renegotiation Support - coming soon Renegotiation is a feature that makes it possible to adjust the parameters of an SSL connection without disrupting the user experience by requiring an entirely new session. Take, for example, the case of an anonymous user browsing an ecommerce website who adds some products to the shopping cart then decides to login and purchase. Renegotiation allows the data from the 'anonymous' session to be transposed in a fluid and secure fashion. Unfortunately, security flaws were discovered in renegotiation in TLS 1 / SSL 3 which required a patch to fix. Unpatched web servers are shown here as 'Insecure renegotiation'. 59
60 Supported Protocols - coming soon Shows the support for various cryptographic protocols on the web servers which are used to host your certificates. While we recommend each customer to investigate the precise impact of disabling a given protocol by analyzing the browsers used by their visitors, InCommon would recommend the following: TLS 1.0, 1.1, Enable SSL Discretionary. Disable preferred * SSL Disable * SSL 3.0 is needed mainly for Windows XP / Internet Explorer 6.0 users. Microsoft have discontinued support for these systems and their use by the public has waned significantly. However, InCommon CM customers may want to retain support in the short-medium term if widely supported by their user base. Certificates by port number - coming soon Shows the port numbers that are used for secure connections on web-servers that host your certificates. 60
61 3 Certificates Management The Certificates Management tab provides appropriately privileged administrators with the ability to request, collect, revoke and manage SSL, Client and Code Signing certificates. It is divided into three main administrative areas, namely the SSL Certificates tab, the Client Certificates tab and the Code Signing Certificates tab. This chapter provides guidance on the Certificates Management interface and explains the processes behind the administration and provisioning of SSL and Client Certificates to servers and end-users and Code Signing Certificates for digitally signing executables and scripts. The chapter is divided into the following main sections: 3.1 The SSL Certificates area - High level introduction to the SSL interface. Contains brief explanations of functionality and an overview of InCommon SSL certificate types Request and Issuance of SSL Certificates to web servers and Hosts - Detailed explanations of the entire application, provisioning and life management of SSL web server certificates. 61
62 3.2 The Client Certificates area - Introduction to the Client Certificate interface that covers basic interface functionality and the creation, import and management of certificate end-users Request and Issuance of Client Certificates to Employees and End-Users - Detailed explanations of the initiation, application, provisioning, collection and management of Client Certificates. 3.3 The Code Signing Certificates area - Introduction to the Code Sign Certificate interface that covers basic interface functionality and the application, import and management of code signing certificates Request and Issuance of Code Signing Certificates- Explains the initiation, application, requisition, collection and management of Code Signing Certificates. Note: Administrators can also run a 'Discovery Scan' on their servers which will audit and monitor their entire network for all installed SSL certificates (including certificates issued by other vendors). Once completed, all discovered certificates are automatically imported into the 'Certificates Management' area. This feature is covered in greater detail in the Certificate Discovery section of this guide. 3.1 SSL Certificates Area Overview of the Interface The SSL Certificates Area provides RAO / DRAO SSL administrators with the information and controls necessary to manage the life-cycle of SSL certificates for an Organization. RAO SSL admins can request and manage certificates for their delegated Organization(s). Can approve or decline certificate requests made for automatic installation and using the external application form for their Organization. DRAO SSL admins can request SSL certificates for domains belonging to their delegated Department(s). Can approve or decline certificate requests made for automatic installation and using the external application form for their Organization. Note: The SSL Certificates area is visible only to RAO / DRAO SSL administrators. SSL Certificates Sub-tab - Table of Parameters 62
63 Field Name Description Common Name The domain name that was used during the SSL certificate request. This domain name refers to the 'Common Name' in the SSL certificate itself. Organization Name of the Organization that requested or has been issued with the certificate listed in the 'Common Name' column. Department Indicates the specific Department of the Organization that is associated with the certificate. This column will be blank if a Department has not been delegated as the controlling entity. Status Indicates the current status of the certificate. Requested The certificate application was made for auto-installation or using either the Self Enrollment Form or the Built-in application form. Once the applicant has requested the certificate, his/her request appears in the 'SSL Certificates' sub-tab with a 'Requested' state. The Administrator can "View", "Edit", "Approve" or "Decline" this request. A certificate can be requested by An applicant using the Self Enrollment Form. An RAO SSL administrator- for Organizations and Departments which they have been delegated control. Can use Self Enrollment Form or the Built In Application Form. A DRAO SSL administrator - for Departments of an Organization which they have been delegated control. Can use Self Enrollment Form or the Built In Application Form. Approved A certificate request that was made using the Auto Installation feature or the Self Enrollment Form has been approved by one of the following: An RAO SSL administrator of the Organization on whose behalf the request was made. A DRAO SSL administrator of the Department on whose behalf the request was made. Applied The request has been sent to the Certificate Authority (CA) for validation. In order to accelerate the validation process, the administrator can request the domain control administrator to complete the domain control validation process, through out-of-band communication like , if the response for DCV is not received for long time. Issued (number of found certificates) The certificate was issued by CA and collected by Certificate Manager. A Blue font color (Issued) means that the certificate was issued by CA but was not installed. Placing the mouse cursor over the Common Name will display the name of the Vendor that is associated with this certificate. Expired The certificate is invalid because its term has expired. Placing the mouse cursor over the Common Name will display the name of the Vendor that is associated with this certificate. A number in parentheses to the right of the certificate s status indicates how many servers this specific certificate is installed upon. Placing the mouse cursor over the State column will display all the IP address / Port combinations that this certificate was found on. A number in parentheses to the right of the certificate s status indicates how many servers this specific certificate is installed upon. Placing the mouse cursor over the State column will display all the IP address / Port combinations that this certificate was found on and will display a certificate expired warning. Revoked The certificate is invalid because it has been revoked. Placing the mouse cursor over the Common Name will display the name of the Vendor that is associated with this certificate. 63
64 A number in parentheses to the right of the certificate s status indicates how many servers this specific certificate is installed upon. Placing the mouse cursor over the State column will display all the IP address / Port combinations that this certificate was found on and will display a certificate revoked warning. Declined A certificate request that was made using the Self Enrollment Form or the Built-in Application form has been rejected by one of the following: An RAO SSL administrator can decline certificate requests for Organizations over which they have been delegated control. An DRAO SSL administrator can decline certificate requests for Departments over which they have been delegated control. Invalid The Certificate Authority did NOT process the certificate request because of an error the applicant made in the enrollment form (e.g. CSR contains incorrect details). Rejected The Certificate Authority rejected the request after a validation check. Unmanaged (n - number of found certificates) This state applies to certificates that were detected by a network Discovery Scan but were NOT ordered and issued through InCommon Certificate Manager (including any pre-existing InCommon certificates that may have been ordered from the website or partner API s). The red color (Unmanaged) indicates, that he certificate's term has expired. Placing the mouse cursor over the Common Name will display the name of the Vendor that is associated with this certificate. A number in parentheses to the right of the certificate s status indicates how many servers this specific certificate is installed upon. Placing the mouse cursor over the State column will display all the IP address / Port combinations that this certificate was found on. Expires Expiration term of the certificate. Server Software Indicates the current status of the server on which the certificate is auto- installed. Blank The server is not configured for Auto-Installation and Auto-Renewal. Active The server is configured for Auto-Installation and Auto-Renewal. Error Indicates that errors generated during the server configuration or automatic certificate installation. Restart Required Indicates that the server has to be restarted after automatic installation of a certificate by InCommon CM. The installation will be active only on next restart of the server. Note: Restarting the server after automatic certificate installation is required only for Apache. The server can be restarted from the Certificate Details dialog. For more details please see Restarting Apache after Auto-Installation of SSL Certificate. Indicates the current status of the server on which the certificate is auto- installed. Note: The administrator can add more column headers from the drop-down button beside the last item in the column: 64

65 Order Number The order number of the certificate request as assigned by the Certificate Authority, when the request was made. Self Enrollment Certificate ID Displays the unique enrollment ID assigned to the certificate request, If the certificate was obtained by self enrollment by the domain administrator. IP address Displays all the IP address / Port combinations that the certificate is installed. Issuer Displays the details of the Certificate Authority that issued the certificate and the name of the certificate. Serial Number Displays the serial number of the certificate that is unique and can be used to identify the certificate. Requester Displays the name of the CM administrator that has requested the certificate through the auto-install feature or the built-in enrollment form, or of end-user that has requested the certificate through the self-enrollment form. Requested Displays the date of the certificate request. External Requester Displays the the address of the external requester on behalf of whom the administrator has requested the certificate through the built-in enrollment form. Subject Alt Name Displays the names of domain(s) for which the certificate is used for. City Displays the name of the city entered while creating the Organization / Department. State Displays the name of the state/province entered while creating the Organization / Department. Country Displays the name of the country entered while creating the Organization / Department. 65
66 Signature Algorithm Displays the signature algorithm used by the certificate. Key Algorithm Displays the type of algorithm used for the encryption. Key Size Displays the key size used by certificate for the encryption. MD5 Hash Displays the MD5 hash for the certificate. SHA1 Hash Displays the SHA1 hash for the certificate. Control Buttons Details Allows the administrator to view information about the certificate (see the section SSL Certificate 'Details' Dialog). Note: The type of control buttons that are displayed above the column header depends on the state of the selected certificate Revoke Revokes the certificate. Install Uses the auto-installer feature to install the certificate on the target web server. See the section Automatic Installation and Renewal for more details. Replace Replaces the existing certificate with a new one. Note: you will be prompted to specify new CSR. Approve Approves certificate requests that were made for Auto Installation and using the auto-installation feature or the Self Enrollment Form and sends the request for the certificate to InCommon CA (the issuing Certificate Authority). Once submitted, the certificate State will change to 'Applied'. If the request is approved by InCommon CA, the certificate State changes to 'Issued'. If the request was declined by InCommon CA because of incorrect enrollment details (for example, a mistake in the CSR or other form value), then 'State' will be listed 'Invalid'. If the request was declined by InCommon CA for legal reasons then the certificate will have a status of 'Rejected'. 1) Certificate requests can be approved by: An RAO SSL administrator of the Organization on whose behalf the request was made. A DRAO SSL administrator of the Department on whose behalf the request was made Decline Declines the certificate request. This request will not be sent to InCommon Certificate Authority for processing. Edit Enables administrator to edit SSL certificate parameters. This option is available only for certificates with a state of 'Requested', 'Rejected' or 'Invalid'. Renew Clicking the 'Renew' button will open the 'Renew Certificate' dialog which will be pre-populated with the company and domain details of the existing certificate. Clicking 'OK' will submit the certificate renewal request. This control is available only for the certificates states of: Issued, Expired and Unmanaged Sorting and Filtering Options Administrators can search for particular SSL certificates using filters. 66


67 To apply filters, click on the down arrow at the right end of the 'Filters' stripe. The filter options will be displayed. You can add filters by selecting from the options in the 'Add Filter' drop-down and group the results with other options that appears depending on the selection from the 'Add Filter' drop-down. To add a filter Select a filter criteria from the 'Add Filter' drop-down. Enter or select the filter parameter as per the selected criteria. The available filter criteria and their filter parameters are given in the following table: Filter Criteria Filter Parameter Common Name Enter the common name or domain name for the certificate fully or in part. Subject Alt Name Enter the subject alternative name for the certificate fully or in part. Status Choose the state of the certificate from the 'State' drop-down. Type Choose the type of the certificate from the 'Type' drop-down. Discovery Status Choose the status, that is whether the certificate is deployed or not from the 'Discovery Status' drop-down. Vendor Select the vendor of the certificate (CA) from the Vendor drop- 67

68 down. Organization Select the Organization and/or the department to which the certificate belongs, from the 'Organization' and 'Department' dropdowns. Hide Duplicated Choose Hide Duplicated if you want duplicate certificates are not to be listed and select the 'Hide duplicated' check box. Issuer Enter the name of the issuer of the certificate. Serial Number Enter the serial number of the certificate in full or part. Requester Enter the name of the CM administrator that has requested the certificate through the auto-install feature or the built-in enrollment form, or of end-user that has requested the certificate through the self-enrollment form, in full or part. External Requester Enter the address of the external requester on behalf of whom the administrator has requested the certificate through the built-in enrollment form, in full or part. Key Algorithm Enter the key algorithm of the certificate. Key Size Enter the key size in bits. SHA1 Hash Enter the SHA1 Hash of the certificate. MD5 Hash Enter the MD5 Hash of the certificate. Tip: You can add more than one filter at a time to narrow down the filtering. To remove a filter criteria, click the '-' button to the left if it. Select the criteria by which the results are to be grouped from the 'Group by' drop-down and enter or select the grouping parameter For example, if you want to filter the certificates with a specific Common Name starting with 'testdomain.com' and group the results by their 'Status', then select 'Common Name' from the 'Add Filter' drop-down, enter 'testdomain.com' and select 'Status' from the 'Group by' drop-down. The certificates, having 'testdomain.com' in their common name will be displayed as a list, grouped based on their 'status'. 68

69 To remove the filter options, click the 'Clear' button. Note: The search filters once configured for the interface will be automatically saved. When you are re-opening the 'SSL certificates' interface in future, the configured filters will be in action and only the search results will be displayed. If you do not want the filters to be saved, click the 'Clear' button SSL Certificate 'Details' Dialog The SSL Certificate Details dialog displays the complete details of the selected certificate with its certificate chain details and also allows the administrator to: Download the certificate for installation on to required servers Upload the private key of the certificate for storage and management by the Private Key Store Download the private key of the certificate, managed by the Private Key Store View the installation details of the certificate Resend notification to requester for issued certificate Restart Apache after Auto-Installation of SSL Certificate To view the SSL certificate details dialog, select the certificate from the Certificates > SSL certificates interface and click the 'Details' button at the top. 69

70 The certificate details dialog contains three panes: Certificate Details Vulnerability Details Certificate Chain Details Certificate Details The 'Certificate Details' pane displays the number of days remaining for the certificate to expire and information contained in the certificate and controls for downloading it. The precise contents of the 'Certificate Details' pane is dependent on the current 'State' of the certificate: 70
71 71
72 SSL Certificates 'Details' Dialog - Table of Parameters Field Type Description Common Name Text Field The domain name that was used during the SSL certificate request. This domain name refers to the 'Common Name' in the SSL certificate itself. State Text Field State of the certificate (for the definitions see on the table above). Download Control Allows the administrator to download the certificate in different formats. Order Number Text Field Order number of the certificate request. Vendor Text Field A vendor that is associated with the certificate. The vendor for self-signed SSL certificates is 'Self-Signed'. Discovery Status Text Field There are two possible values: Not Deployed and Deployed. Deployed - A certificate that is installed on the network (as found by the certificate discovery scan) Not Deployed - any certificate that is listed in the 'SSL Certificates' area but which was not detected as installed on the network during a certificate discovery scan. Self-Enrollment Certificate ID Text Field Displays the unique ID of the certificate. Type Text Field Displays the brand name of the certificate. Server Software Text Field Indicates the server type on which the certificate was issued. Clicking 'View' allows you to view the installation status of the deployed certificate. Refer to the section Viewing the installation details of the certificate for more details. Clicking 'Edit' allows you to change the Server Software for which the certificate is intended. Server Software State Text Field Indicates the state of the server on which the certificate is installed. (For the definitions see on the table above). Term Text Field The length of time the certificate is (or will be) valid for, from the time of issuance. For certificates that have not yet been approved, this is the certificate lifetime that was requested during the application process. Owner Text Field Name of the 'Owner' of the certificate. The Owner of the certificate is the Administrator that first approved the request for the certificate. Requested by Text Field Displays either: The address of the end-user that requested this certificate using the Self Enrollment Application form or The name of the administrator that requested this certificate using the auto-install feature or the Built-In Application form. 72

73 SSL Certificates 'Details' Dialog - Table of Parameters Field Type Description External Requester Text Field The address of the applicant on behalf of whom the administrator has applied for this certificate through the built-in application form in the CM interface, as an alternative to making an applicant to complete the 'Self Enrollment' form'. Requested Text Field Date that the certificate was requested. Approved Text Field Date that the certificate was approved. Expires Text Field Date that the certificate expires. Comments (optional) Text Field Information for administrator. Organization Text Field Name of the Organization on behalf of which the certificate was requested Department Text Field Name of the Department on behalf of which the certificate was requested Address 1: Text Fields Displays the address of the Organization as mentioned while requesting for the certificate. Address 2: Only those address fields that were allowed to be displayed while applying for the certificate are shown here and the rest of the fields are displayed as "Details Omitted". Address 3: City: State or Province: Postal Code: Serial Number Text Field Indicates the serial number of the certificate issued. Signature Algorithm Text Field Displays the signature algorithm of the public key of the certificate Public Key Algorithm Text Field Displays the encryption algorithm of the public key of the certificate Public Key Size Text Field Displays the key length of the public key in bits Revoked Text Field Date that the certificate was revoked (if applicable.) MD5 Hash Text Field Displays the MD5 Hash value of the certificate SHA1 Hash Text Field Displays the SHA1 Hash value of the certificate Change Pass Phrase Control Enables the administrator to set or change the self-enrollment pass-phrase of the certificate. This phrase is required to revoke certificates should the situation arise. 73

74 The following sections explain in detail on the tasks that can be accomplished from the 'Certificate Details' pane. Resending Notification for Certs with 'Issued' State Viewing Installation Details of Certificates Restarting Apache after Auto-Installation of SSL Certificate Vulnerability Details The 'Vulnerability Details' pane displays the list of vulnerabilities to the server and data traffic that are mitigated by the certificate. Certificate Chain Details The 'Certificate Chain Details' pane displays the details of the 'Root' and 'Intermediate' certificates linked to the SSL certificate chain. Clicking on the 'Root', 'Intermediate' and the 'Personal' tabs, displays the certificate details of the Root, Intermediate and the self SSL certificate respectively. 74

75 Resending Notification for Certs with 'Issued' State The 'Details' dialog for SSL certificates with 'Issued' state allows the administrator to resend the 'Certificate Enrolled' notification to the domain control administrator. the applicant that applied for the certificate through the Self Enrollment Form and/or the applicant on behalf of whom the administrator has applied for the certificate through the Built-in Enrollment Form. An automated notification for collection of certificate will be sent to the Domain Administrator once CCM issues the Certificate. However, if the certificate is not downloaded by the domain administrator for a long time, CCM administrator can resend the notification for certificate collection. The 'Certificate Details' pane of the details dialog for the SSL certificate with the Issued state, displays a 'Resend' button beside the Owner and Requested by and External Requester (if applicable) fields. The 'View' dialog for the SSL certificate with the Issued state, displays a 'Resend' button beside the Owner and Requested by: fields. 75
76 Clicking the 'Resend' button will create a schedule for CM to resend the notification Viewing Installation Details of Certificates The 'Details' dialog for SSL certificates added for auto installation to IIS or Apache, allows the administrator to view the installation state of the certificate. The 'Certificate Details' pane of the details dialog for the SSL certificate added for auto installation, displays a 'View' button beside the 'Server Software' field. Clicking the 'View' button will display a Nodes dialog that provides the details on the Agent responsible for autoinstallation, the node server upon which the certificate is installed and the installation status. 76

77 Restarting Apache after Auto-Installation of SSL Certificate The Apache will need to be restarted to finalize the installation of the SSL certificate. Administrators can do this remotely from the CM interface by clicking the 'Restart' button on the 'Certificate Details' pane of the details dialog. Clicking 'Restart' will reboot the server. After rebooting, the Server Software State will change to 'Active' InCommon SSL Certificates Definition of Terms Validation Levels OV : Organization Validated certificates include full business and company validation from a certificate authority using currently established and accepted manual vetting processes. EV : Browsers with EV support display more information for EV certificates than for previous SSL certificates. Microsoft Internet Explorer 7, Mozilla Firefox 3, Safari 3.2, Opera 9.5, and Google Chrome all provide EV support. Certificate Types SDC : Single Domain Certificates will secure a single fully qualified domain name. WC : Wildcard Certificates will secure the domain and unlimited sub-domains of that domain. 77
78 MDC : Multi-Domain Certificates will secure up to 100 different domain names on a single certificate. Certificate Name Validation Level Type Description Maximum Term Length 1 year - 3 years InCommon SSL Certificate SDC OV Secures a single domain InCommon Wildcard SSL Certificate WC OV Secures domain and unlimited sub-1 year - 3 domains of that domain years InCommon Multi-Domain SSL Certificate (MDC) MDC OV Secures multiple Fully Qualified1 year - 3 domains on a single certificate years InCommon Unified Communication Certificate (UCC) MDC OV Secures multiple Fully Qualified domains on a single certificate. 1 year - 3 Specifically designed for use with years Microsoft Exchange and Microsoft Office Communications servers InCommon Intranet SSL Certificate SDC OV Secures a single internal host 1 year - 3 years Comodo Extended Validation (EV) SSL Certificate SDC EV Secures a single domain 1 year - 2 years EV Secures domains Comodo EV Multi-Domain SSL Certificate (EVMDC) MDC multiple Fully Qualified 1 year - 2 on a single certificate years Request and Issuance of SSL Certificates to web servers and Hosts Summary of steps for requesting and issuing an SSL certificate: 5. Applicant confirms completion of the prerequisites; 6. A certificate request is made via the Self Enrollment form or the Built-in Application form. 7. The certificate will appear in the 'SSL Certificates' area of InCommon Certificate Manager with the state 'Requested'. The RAO SSL or DRAO SSL administrator (as applicable) will receive an notification that a certificate request is awaiting approval. 8. The certificate request will then need to be checked and approved or declined by appropriately privileged SSL Administrator. If it is approved then the request will be forwarded to InCommon CA for validation and issuance or rejection. 9. If the certificate is applied through InCommon Certificate Manager interface for automatic installation, the certificate will be issued and its state will be changed to 'Issued' in the 'Certificates Management' area. The administrator can choose to install the certificate remotely by clicking the 'Install' button in the InCommon Certificate Manager interface. If the certificate is applied through the an application form, a collection mail will be sent to the applicant which contains a link to the certificate collection form (see section Certificate Collection for more details). The applicant can manually download and install the certificate. A collection mail will be sent to the applicant which contains a link to the certificate collection form (see section Certificate Collection for more details). The applicant can manually download and install the certificate. 78

79 10. Once an administrator has approved the request, that administrator becomes the 'Owner' of the request. At this stage, the administrator can also choose to 'View', 'Edit' or 'Decline' the request. See Certificate Request Approval for more details. 11. The applicant will be designated as 'Requester' of the certificate. If the applicant does not exist then CM will automatically add this applicant as a new 'End-user' at the time the certificate enrollment form is successfully submitted Prerequisites The domain for which the SSL certificate is to be issued has been enabled for SSL certificates, has been prevalidated by InCommon through DCV process and that the domain has been activated for account by your InCommon account manager. All certificate requests made on 'pre-validated' domains or sub-domains thereof are issued automatically. If you request a certificate for a brand new domain, then this domain will first have to undergo validation by InCommon. Once validated, this new domain will be added to your list of pre-validated domains and future certificates will be issued immediately. For applications using Enterprise Controller mode, the administrator has installed the Certificate Controller on a control server and configured it to communicate with the remote hosts. (See the section Agents for more details.) For applications using Incommon Certificate Manager Controller mode, the administrator has installed the agent on all hosts on which certificates are to be automatically installed. The Agent is responsible for creating the CSR, fetching the certificates and installing it in the host. (See the section Agents for more details.) Organization/Department that the domain will belong to. (See chapter 'Settings - Organizations'- for more details.) If the administrator wishes to enable external SSL applications, that the administrator has checked the 'Self Enrollment' box in the SSL tab of the 'Create/Edit' Organizations dialog box (see screen-shot, below). 79
80 If the administrator wishes to enable external SSL application using the Self Enrollment Form, that the administrator has specified an Access Code in the SSL tabof the 'Create/Edit' Organizations dialog box (see screen-shot). InCommon recommends using a mixture of alpha and numeric characters that cannot not easily be guessed. The applicant (be it an administrator or an external applicant using the Self Enrollment Form) has already created the Certificate Signing Request (CSR) using his web server software prior to beginning the application. This helps avoid potential errors on the certificate application form by allowing the common name (CN) to be automatically drawn from the CSR. Please note that CSR must be 2048 bit and must contain the following fields: Common Name (Fully Qualified Domain Name) Organization Organization Unit Locality State/Province Country (2 character ISO code) For enrollment of through Built-in Enrollment Form using the auto-csr generation feature, the Master Administrator has setup a Private Key Store in their local network by installing the Private Key Store Controller and configured it to connect to CM. Note - Contact your Master Administrator if the feature is not available for you and should you require it. Optional: The administrator has checked the 'Sync. Expiration Date' box and specified the day of the month upon which the certificate will expire Automatic Installation and Renewal InCommon Certificate Manager has the ability to automatically install SSL certificates on Apache and IIS servers. There are two available modes: Enterprise Controller Mode Requires one-time installation of the certificate controller software on a central control server inside your network. The controller communicates with each remote host and co-ordinates automatic CSR generation and certificate installation. InCommon CM Controller Mode Requires an agent to be installed on each individual web server. These agents communicate with InCommon CM to co-ordinate automatic CSR generation and certificate installation. See Method 2 - InCommon CM Controller Mode See Method 1 - Enterprise Controller Mode 1. Enterprise Controller Mode i. Certificate Controller software is installed on a host in your network. This controller will communicate with your remote web-hosts and will automatically apply for and install certificates on to them. The controller is configured through a web-interface and can be configured to communicate directly with InCommon CA infrastructure through a proxy server. ii. The controller periodically polls CM for certificate requests for remote servers. If a request exists, it will automatically generate a CSR for the web server and present the application for administrator approval via the InCommon CM interface. On approval, the agent will submit the CSR to InCommon CA and track the order 80
81 number. Once the certificate is issued by CA, the controller will download the certificate and allow the administrator to install the certificate from the InCommon CM interface. iii. The auto-installation/renewal is enabled for the following server types: Apache2 (httpd) Apache Tomcat IIS 5.0 to 8.0 (Server R2) Refer to the section Method 1 - Enterprise Control Mode for a tutorial on automatic installation of Certificates on remote web servers. 2. InCommon CM Controller Mode i. This mode requires an agent to be installed on each of the web servers for which certificate autoinstallation/renewal is required. ii. The agent periodically polls InCommon CM for certificate requests for web servers enabled for automatic certificate installation. If a request exists, it will automatically generate a CSR for the web server and present the application for administrator approval via the InCommon CM interface. On approval, the agent will submit the CSR to InCommon CA and track the order number. Once the certificate is issued by the CA, the agent will download the certificate and allow the administrator to install the certificate from the InCommon CM interface. iii. The auto-installation/renewal is enabled for the following server types: Apache2 (httpd) Apache Tomcat IIS 5.0 to 8.0 (Server R2) Refer to the section Method 2 - InCommon CM Controller Mode for a tutorial on automatic installation of Certificates on web servers. Background Note: It is possible for one Organization to have multiple certificates for different domain names Method 1 - Enterprise Controller Mode Enterprise Controller mode enables administrators to automatically install certificates on any remote server on the network. Certificate Controller software needs to be installed on a control server and this software will communicate with web-hosts on your network. If a new certificate is required, it will coordinate with the host to generate a CSR, submit it to InCommon CA, collect the certificate and install it. The certificate controller software is accessible through a dedicated web-interface and can be configured to communicate with InCommon CA through a company owned proxy server for additional security. Certificate Manager Administrator can add remote servers for automatic installation of certificates through Discovery > Agents interface. Note: The Certificate Controller software should have been installed on the control server prior to the application for a certificate for a remote server. Refer to the section Agents for more details on installing the controller and the section Configuring the Certificate Controller Agent through Web Interface for more details on configuring the controller to connect to InCommon CA through a proxy server (optional). 81
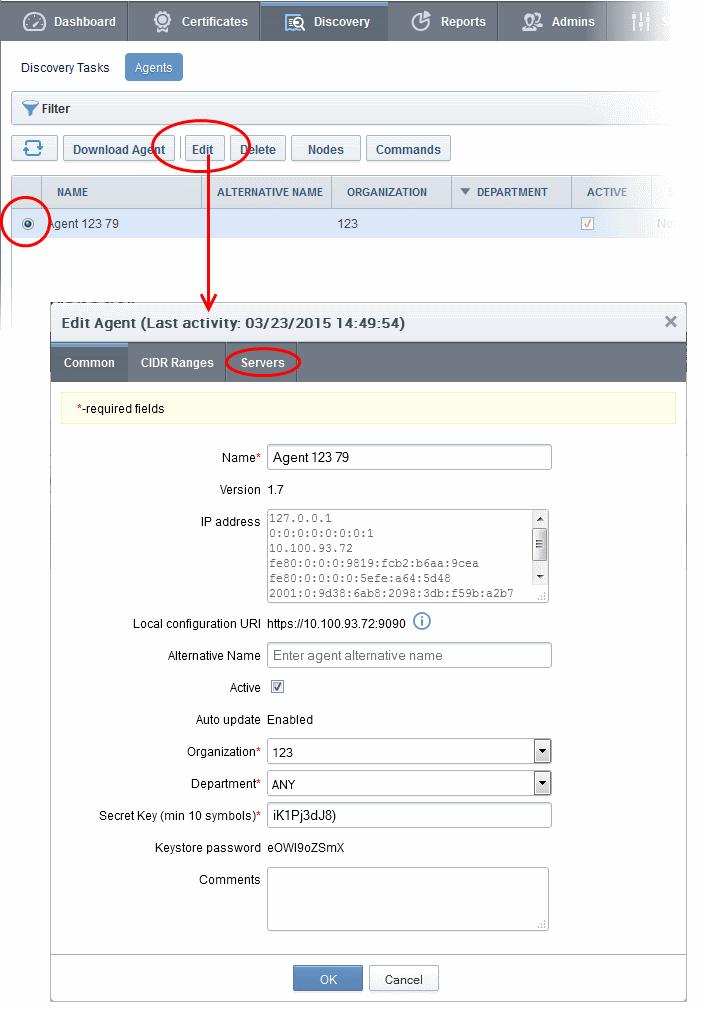
82 82

83 Select the controller and click 'Edit' at the top to open the 'Edit Agent' dialog and choose the Servers tab 'Edit Agent' dialog. The server on which the controller is installed will be displayed in the list of servers. Click 'Add' to associate a remote server to the controller. The 'Add Web Server' dialog will open. Add Web Server - Table of Parameters Field Name Type Description Name String Enables the Administrator to enter the name of the server. Vendor drop-down Enables the Administrator to select the vendor of the server. State Path to web server Indicates whether or not the server is initialized. String Enables the Administrator to specify the network path for the server. 83

84 Add Web Server - Table of Parameters Remote Checkbox IP Address / Port String Enables the Administrator to specify whether the server is Remote or Local. While adding remote servers for agent-less automatic certificate installation, this checkbox should be selected. Enables the Administrator to specify the IP address and connection port of the server for remote connection. Note: This field will be enabled only if 'Remote' is selected. User Name String For IIS server - Enables the Administrator to specify the username of the administrator for logging-into the server. For Apache - Enables the Administrator to specify the private key file path to enable agent to access the server Note: This field will be enabled only if 'Remote' is selected. Password String For IIS server - Enables the Administrator to specify the login password for the administrator account for logging into the server For Apache - Enables the Administrator to specify the passphrase of the private key file path Note: This field will be enabled only if 'Remote' is selected. Enter the parameters and click OK. The server will be added to the controller. It will take a few minutes for the server to become 'Active'. 84
. The 'Add for Auto Install' dialog will be displayed with the 'Nodes' interface opened.")
85 Once the remote server is added to the controller, the administrator can apply for the domains hosted from the server through the Certificates Management > SSL Certificates area of InCommon CM interface by clicking the 'Add For Auto Install' button (as shown). The 'Add for Auto Install' dialog will be displayed with the 'Nodes' interface opened. The 'Nodes' interface displays a tree structure of servers associated with the Certificate Controller and the domains hosted by them. Select the domain from the remote server for which you wish to install a SSL certificate and click Next. The Data interface will be displayed enabling you to select the server software and the SSL certificate type. 85
86 Select the Server type from the Server Software drop-down. Select the SSL certificate type that you wish to order from the SSL Type drop-down. The drop-down will list only the certificate types that are enabled for the Organization. See section InCommon SSL Certificates for a list of certificate types. Select the term length of the certificate from the Term drop-down. Click Next. The 'Schedule 'interface will be opened. If you want to manually install the certificate, select 'Manual' If you want to install the certificate at a scheduled time, select 'Schedule' and then select your time zone, and set a time period. The Certificate Controller will generate the CSR and submit to InCommon CA, when it polls the CM for the first time, within the set time period. Click 'Next'. 86
87 If you are applying for a SSL certificate for a node with HTTP protocol, the Port interface will open. If you you have chosen a node with HTTPS protocol, this step will be skipped and the EULA interface will open. Specify the HTTPS port for installing the certificate, (Default = 9443) Click 'Next'. The EULA interface will open. Read the EULA fully and accept to it by selecting 'I Agree' checkbox. Click 'OK' to save your application. 87
88 The certificate will be added to the SSL Certificates interface and its status will be displayed as 'Requested'. The CSR for the requested certificate will be generated automatically. On successful creation of CSR, the 'Approve' button will appear for the certificate. Click the 'Approve' button to approve the request, enter the approval message in the 'Approval Message' dialog and click 'OK'. 88
89 On approval, the CSR will be submitted to InCommon CA to apply for the certificate. The certificate status will be changed to 'Applied'. The Certificate Controller will track the order number and download the certificate from the CA, once it is issued and stores it. The certificate status will be changed to 'Issued'. To check whether the Certificate Controller has stored the certificate, click Settings > Discovery > Agents Select the controller and click 'Commands' button You will see successful execution of 'Store Certificate' command. 89

90 To install the certificate on to the remote server, click 'Install' from the 'Certificates Management' interface. 90
 as required Click 'Next'.")
91 The 'Install Certificate' dialog will be displayed with the nodes interface opened. The node upon which the certificate is to be installed is pre-selected. If you want to install the same certificate to additional nodes or to a different node, select the node(s) as required Click 'Next'. If you have chosen to install the certificate on to a node with HTTP protocol, the 'Port' interface will open to specify the HTTPS port on to which the certificate has to be installed. If you have chosen a node with HTTPS protocol, this step will be skipped and the Schedule interface will open. 91
92 Specify the port and click 'Next'. The 'Schedule' interface will open. If you want to install the certificate instantly, select 'Install now' If you want to install the certificate at a later time, select 'Schedule', then select your time zone, and set a time period. The certificate will be installed on the remote server when the certificate controller polls CM for the first time, within the set time period. Click 'OK'. The certificate installation will begin instantly or at the scheduled time as set in the 'Schedule' interface and the Server Software state of the certificate will be displayed as 'Installing ' Upon completion of installation, For IIS servers and Tomcat servers: the certificate will be activated immediately and the Server Software state will be indicated as 'Active'. 92
93 For Apache server: the certificate will be activated upon restart of the server. The Server Software state will be indicated as 'Restart Required'. Tip: The server can be restarted from InCommon CM through the Certificate Details dialog. For more details, refer to Restarting Apache after Auto-Installation of SSL Certificate. Upon restarting the server, the certificate will be activated and the Server Software state will be indicated as 'Active'. To check whether the Certificate Controller has installed the certificate, click Discovery > Agents Select the controller and click the 'Commands' button. You will see successful execution of 'Install Certificate' command. 93
94 To view the details of the command, select the command and click the 'Details' button from the top. 94
95 Method 2 - InCommon CM Controller Mode Certificate Manager administrators can apply for new certificates for domains hosted from different web servers, directly from the 'Certificate Management - SSL Certificates' area. The InCommon CM Controller Mode requires an agent to be installed on each web server upon which the certificates are to be auto-installed/renewed. Refer to the section Agents for more details on installing the agent. To apply for a certificate click the 'Add For Auto Install' button (as shown). The 'Add for Auto Install' dialog will be displayed with the 'Nodes' interface opened. The 'Nodes' interface displays a list of Agents installed in your servers for different Organizations and Departments, with the list of server nodes under each Agent. Select the domain for which you wish to install a SSL certificate and click Next. The Data interface will be displayed enabling you to select the server software and the SSL certificate type. 95
96 Select the Server type from the Server Software drop-down. Select the SSL certificate type that you wish to order from the SSL Type drop-down. The drop-down will list only the certificate types that are enabled for the Organization. See section InCommon SSL Certificates for a list of certificate types. Select the term length of the certificate from the Term drop-down. Click Next. The 'Schedule' interface will be opened. If you want to install the certificate manually, select 'Manual' If you want to install the certificate at a scheduled time, select 'Schedule' and then select your time zone, and set a time period. The CSR will be generated and submitted to InCommon CA, during the first polling by the Agent, within the set time period. Click 'Next'. If you are applying for a SSL certificate for a node with HTTP protocol, the Port interface will open. If you you have chosen a node with HTTPS protocol, this step will be skipped and the EULA interface will open. 96
97 Specify the HTTPS port for installing the certificate (Default = 9443) Click 'Next'. The EULA interface will open Read the EULA fully and accept to it by selecting 'I Agree' checkbox. Click OK to save your application. The certificate will be added to the SSL Certificates interface and its status will be displayed as 'Requested'. 97
98 The Agent will generate a CSR for the requested certificate automatically during its first polling cycle in the set schedule period. If you want to generate the CSR instantly, click 'Refresh'. On successful creation of CSR, the 'Approve' button will appear for the certificate. Click the 'Approve' button to approve the request, enter the approval message in the 'Approval Message' dialog and click 'OK'. 98
99 On approval, the CSR will be submitted to InCommon CA to apply for the certificate. The certificate status will be changed to 'Applied'. The Agent will track the order number and download the certificate from the CA, once it is issued and stores it. The certificate status will be changed to 'Issued'. To check whether the Agent has stored the certificate, click Discovery > Agents Select the Agent and click 'Commands' from the top You will see successful execution of 'Store Certificate' command. 99

100 To install the certificate, click 'Install' from the 'Certificates Management' interface. 100
 as required Click 'Next'.")
101 The 'Install Certificate' dialog will be displayed with the nodes interface opened. The node upon which the certificate is to be installed is pre-selected. If you want to install the same certificate to additional nodes or to a different node, select the node(s) as required Click 'Next'. If you have chosen to install the certificate on to a node with HTTP protocol, the 'Port' interface will open to specify the HTTPS port on to which the certificate has to be installed. If you have chosen a node with HTTPS protocol, this step will be skipped and the Schedule interface will open. 101
102 Specify the port and click 'Next'. The 'Schedule' interface will open. If you want to instantly install the certificate, select 'Install now' If you want to install the certificate at a later time, select 'Schedule', then select your time zone, and set a time period. The Agent will install the certificate when it polls the CM for the first time, within the set time period. Click 'OK'. The certificate installation will begin instantly or at the scheduled time as set in the 'Schedule' interface and the Server Software state of the certificate will be displayed as 'Installing...' Upon completion of installation, For IIS servers and Tomcat servers: the certificate will be activated immediately and the Server Software state will be indicated as 'Active'. 102

103 For Apache servers: the certificate will be activated upon restart of the server. The Server Software state will be indicated as 'Restart Required'. Tip: The server can be restarted from InCommon CM through the Certificate Details dialog. For more details, refer to Restarting Apache after Auto-Installation of SSL Certificate Upon restarting the server, the certificate will be activated and the Server Software state will be indicated as 'Active'. To check whether the Agent has installed the certificate, click Settings > Agents and click 'Commands' button for the respective agent. You will see successful execution of 'Install Certificate' command. 103
104 To view the details of the command, select the command and click the 'Details' button from the top. 104
105 Initiating SSL Enrollment using Application Forms The SSL Administrators or the applicants authorized by them can make request for certificates to be installed on to the web servers by submission of application forms. On successful submission and validation by InCommon CA, the certificate will be issued and a notification will be sent to the applicant. The applicant can download the certificate and install it on to respective web server. CM offers two types of SSL application forms: 1. The Self Enrollment Form - Administrators can apply or direct applicants to the request form to order SSL certificates. Applicants using this method must validate their application to Certificate Manager by: i. Entering the appropriate Access Code for the Organization or Department. The Access Code is a mixture of alpha and numeric characters that the applicant needs to provide in order to authenticate the request to Certificate Manager. and ii. The address they enter must be from the domain that the certificate application is for. This domain must have been assigned to the Organization or Department. Refer to the section Method 1 - Self Enrollment Form for a tutorial on applying for and installing certificates through the self-enrollment form. 2. The Built-in Application Form - Administrators can login and request SSL certificates using the built-in application form available at the Certificates Management > SSL Certificates area. Refer to the section Method 2 - Built-in Enrollment Form for a tutorial on applying for and installing certificates through the Built-in application form. On successful completion of application submission, the certificate will be added to the Certificates Management > SSL Certificates area with the status 'Requested'. An appropriately privileged SSL administrator should approve the request. On approval, CM will forward the application to InCommon CA. After validating the application, the CA will issue the certificate and the certificate status will be changed to 'Issued'. A collection will be sent to the administrator or the applicant. The applicant can collect, download and install the certificate in the respective web server. For more details on collection of the certificate, refer to the section Certificate Collection. For more details on downloading and installing the certificate, refer to the section Downloading and Importing SSL Certificates. 105
106 Method 1 - Self Enrollment Form Initiating the Self Enrollment Process After completing the prerequisite steps the administrator needs to communicate enrollment details to all and any endusers they wish to issue SSL certificates to (for example, via ). The communication must contain the following information: 1. A link to the Self Enrollment Form The Access Code specified in the Organization or Department's SSL settings tab. Furthermore, the address that the applicant enters at the self-enrollment form must match a domain that has been assigned to the Organization or Department The Self Enrollment Form The application form for SSL certificates is hosted, by default, at: End-users should be directed to this page using the administrators preferred communication method. Please refer to the preceding section, Initiating the Self Enrollment process for more details. 106
107 Clicking the 'Certificate enrollment' link will open the self enrollment form Before proceeding to the full application form, the applicant has to authenticate the request by: Entering the correct Access Code for the Organization or Department Entering an address from a domain that has been assigned to that Organization or Department. Clicking 'Check Access Code' will contact CM to authenticate that the applicant has the right to apply for a certificate If both Access Code and address are successfully verified then the applicant will move onto the full certificate application form: 107
108 The 'Access Code' and ' ' address fields will be pre-populated. The domain that the user specifies in the 'CN' field must be the same domain as the applicant's address. The applicant MUST be able to receive s at this address. 108
109 Applicants requesting Extended Validation (EV) SSL certificates need to follow the steps on the following InCommon EV SSL page It is possible for Certificate Manager Account holders to use their own, custom form templates rather than the default form supplied by InCommon. Contact your account manager for more details on enabling this functionality and for submitting custom banners for application forms Form Parameters Comodo, an InCommon partner provides a range of CSR generation documents designed to assist Administrators and external applicants through the CSR creation process. For a list of these documents, please visit: generation' section and web server software). Form Element Access Code (required) Type Text Field (Select 'CSR Description An Access Code identifies a particular Organization or Department and is used to authenticate certificate requests that are made using the SelfEnrollment form. Organizations and Departments are uniquely identified by combination of the Organization's 'Access Code' and the 'Common Name' (domain) specified in General properties. Multiple Organizations or Departments can have the same Access Code OR the same Common Name - but no single entity can share both. Administrators should choose a complex Access Code containing a mixture of alpha and numeric characters that cannot easily be guessed. This code should be conveyed to the applicant(s) along with the URL of the sign up form. Applicants that request a certificate using the Self Enrollment Form will need to enter this code. (required) Text Field Address Details Text Fields Clicking the link Click here to edit address details displays the address fields. Displayed on clicking the Click here to edit address details link. Address 1: Address 2: Address 3: City: State or Province: Postal Code: (all auto-populated) Applicant should enter their full address. The address must be for a domain that has been assigned to the Organization or Department. The address fields are auto-populated from the details in the 'General Settings' tab of the Organization or Department on whose behalf this certificate request is being made. These fields cannot be modified but, in the case of OV level certificates, the applicant can choose to omit them from the certificate by selecting the 'Remove' checkbox next to the fields. The allowed address details will appear in the issued certificate and the removed details will appear as "Details Omitted". For EV level certificates, it is mandatory to include and display address details of the Organization, Incorporation or Registration Agency, Certificate Requester and the Contract Signer. Therefore text fields for entering the these address details will be displayed and the option to remove certain 109
110 Form Element Type Description fields is not available on the EV self-enrollment form on selecting Comodo EV SSL Certificate or Comodo EV Multi-Domain SSL Certificate from the 'Certificate Type' drop-down. Certificate Types (required) Drop-down Applicant should select certificate type. For a list of InCommon SSL list certificate types, see the section InCommon SSL Certificates Certificate Term (required) Drop-down Applicant should select the life time of the certificate chosen from the list 'Certificate Type ' drop-down. The available term lengths for different certificate types displayed in the drop-down list (and therefore available to the applicant) can be customized according to the needs of the Organization. Please refer to sections Creating a new Organization, Customize an Organization's SSL Certificate Types and SSL Types for more details. Server Software (required) Drop-down Applicant should select the server software that is used to operate their web list server (for example, Apache, IIS etc). Installation support documentation is available from the InCommon's support portal here: _m=knowledgebase&_a=view&parentcategoryid=1&pcid=0&nav=0 CSR (required) Text Field A Certificate Signing Request (CSR) is required to be entered into this field in order for InCommon CA to process your application and issue the certificate for the domain. The CSR can be entered in two ways: Pasting the CSR directly into this field Uploading the CSR saved as a.txt file by clicking the 'Upload CSR' button Background: In public key infrastructure systems, a certificate signing request (also CSR or certification request) is a message sent from an applicant to a certificate authority in order to apply for a digital identity certificate. Before creating a CSR, the applicant first generates a key pair, keeping the private key secret. The CSR contains information identifying the applicant (such as a directory name in the case of an X.509 certificate), and the public key chosen by the applicant. The corresponding private key is not included in the CSR, but is used to digitally sign the entire request. The CSR may be accompanied by other credentials or proofs of identity required by the certificate authority, and the certificate authority may contact the applicant for further information. Upon uploading or pasting the CSR, the form will automatically parse the CSR. Administrators that require assistance to generate a CSR should consult the InCommon knowledge article for their web server type here: 110
.")
111 Form Element Type Description _m=knowledgebase&_a=view&parentcategoryid=33&pcid=1&nav=0,1 Special Note regarding MDC applications: The CSR you generate only needs to be for the single 'Common Name' (aka the 'Primary Domain Name'). You should type the additional domains that you require in the 'Subject Alternative Name' field' on this form. Get CN from CSR (optional) Control Once the CSR has been entered correctly, clicking this button will autopopulate the Common Name (CN) field. Using this method helps to avoid human error by ensuring the domain name mentioned in the application form exactly match that in the CSR. If the domain name mentioned in this application form do not match that in the CSR, then InCommon CA will not be able to issue the certificate. Special Note regarding MDC applications: In order to successfully order a Multi-Domain Certificate, the applicant need only list the additional domains in the SAN field on this form. In certain circumstances, however, the applicant may have created a CSR that already contains these Subject Alternative Names. In this case, clicking the 'Get CN from CSR' button will also auto-populate the 'Subject Alternative Names' form fields as well as the 'Common Name' field. Upload CSR (optional) Control The applicant can upload the CSR saved as a.txt file in the local computer, instead of copying and pasting the CSR into the CSR field - helping to avoid errors. Common Name (required) Text Field Applicants should enter the correct fully qualified domain name for the Organization or Department Single Domain certificates - enter domain name using the form: domain.com. Wildcard Certificates - enter domain name using the form: *.domain.com. Multi-Domain Certificates - enter the primary domain name using the form: domain.com. Subject Alternative Names (required for Multi-Domain certificates) Text Field If the certificate 'Type' is a Multi-Domain Certificate (MDC) then the applicant should list the 'Subj Alt Name' additional domains here. Each domain listed in this field should be separated by a comma. Self Enrollment Pass Phrase (optional) Text Field This phrase is needed to revoke the certificate when using the external revocation page at: 111
112 Form Element Type Description manager.com/customer/real_customer_uri/ssl?action=revoke Re-type Self Enrollment Pass Phrase (required if specified in the field above) Text Field Confirmation of the above. Comments (optional) Text Field Applicant can enter information for the administrator. Subscriber Agreement Checkbox Applicant must accept the terms and conditions before submitting the form by reading the agreement and clicking the 'I Agree' checkbox. Note: The Subscriber Agreement will differ depending on the type of SSL certificate selected from the 'Certificate Type' drop-down. If Comodo EV SSL Certificate or Comodo EV Multi-Domain SSL Certificate is selected, The 'I Agree' checkbox will not be shown and the agreement will be taken as accepted, when the user submits the application. Enroll Control Submits the application and enrolls the new certificate request. Reset Control Clears all data entered on the form. Note: In addition to the standard fields in the Self Enrollment form, custom fields such as 'Employee Code, Telephone' can be added by the Master Administrator. Contact your Master Administrator if such custom fields are required Method 2 - Built-in Enrollment Form 112

113 Accessing the Built-in Application Form Certificate Manager administrators can apply for new certificates directly from the 'Certificate Management - SSL Certificates' area by clicking the 'Add' button (as shown) The Built-In Application Form The built in SSL certificate application form is very similar to the Self Enrollment Form but does not require an access code: 113

114 Note: Each type of certificate has a slightly different form Form Parameters 114
115 Form Element Type Description Organization (required) Dropdown list Administrators should choose the Organization that the SSL certificate will belong to. Department (required) Dropdown list Administrators should choose the Department that the SSL certificate will belong to. Click here to edit address Text Fields Clicking this link will expand the address fields. details The address fields are auto-populated from the details in the 'General Properties' tab of the Organization or Department on whose behalf this certificate request is being made. These fields cannot be modified but, in the case of OV level certificates, the administrator can choose to omit them from the certificate by selecting the 'Remove' checkbox next to the fields. The allowed address details will appear in the issued certificate and the removed details will appear as "Details Omitted". For EV level certificates, it is mandatory to include and display address details of the Organization, Incorporation or Registration Agency, Certificate Requester and the Contract Signer. Therefore text fields for entering the these address details will be displayed and the option to remove certain fields is not available on the EV self-enrollment form on selecting Comodo EV SSL Certificate or Comodo EV Multi-Domain SSL Certificate from the 'Certificate Type' drop-down. Certificate Type (required) Dropdown list Applicant should select certificate type. For a list of Comodo SSL certificate types, see section InCommon SSL Certificates for a list of certificate types. The specific certificate types displayed in the drop-down list (and therefore available to the applicant) can be customized according to the needs of the Organization. Please refer to sections Editing an Organization and Customize an Organization's SSL Certificate Types for more details. Certificate Term (required) Dropdown list Applicant should select the term length of the certificate. The term lengths of specific certificate types displayed in the drop-down list (and therefore available to the applicant) can be customized according to the needs 115
116 Form Element Type Description of the Organization. Please refer to sections Editing an Organization and Customize an Organization's SSL Certificate Types for more details. Server Software (required) Dropdown list The administrator should select the server software that is used to operate their web server (for example, Apache, IIS etc). Installation support documentation is available from Comodo support portal here: _m=knowledgebase&_a=view&parentcategoryid=1&pcid=0&nav=0 CSR (required) Text Field The Certificate Signing Request (CSR) is required to be entered into this field in order for CA to process your application and issue the certificate for the domain. The CSR can be entered in two ways: Pasting the CSR directly into this field Uploading the CSR saved as a.txt file by clicking the 'Upload CSR' button Background: In public key infrastructure systems, a certificate signing request (also CSR or certification request) is a message sent from an applicant to a certificate authority in order to apply for a digital identity certificate. Before creating a CSR, the applicant first generates a key pair, keeping the private key secret. The CSR contains information identifying the applicant (such as a directory name in the case of an X.509 certificate), and the public key chosen by the applicant. The corresponding private key is not included in the CSR, but is used to digitally sign the entire request. The CSR may be accompanied by other credentials or proofs of identity required by the certificate authority, and the certificate authority may contact the applicant for further information. Upon uploading or pasting the CSR, the form will automatically parse the CSR. Administrators that require assistance to generate a CSR should consult the Comodo knowledgebase article for their web server type here: _m=knowledgebase&_a=view&parentcategoryid=33&pcid=1&nav=0,1 Special Note regarding MDC applications: The CSR you generate only needs to be for the single 'Common Name' (aka the 'Primary Domain Name'). You should type the additional domains that you require in the 'Subject Alternative Name' field' on this form. Get CN from CSR (optional) Control Once the CSR has been pasted correctly, clicking this button will auto-populate the Common Name (CN) field. Using this method helps to avoid human error by ensuring the domain name mentioned in the application form exactly match that in the CSR. If the domain name mentioned in this application form do not match that in the CSR, then InCommon CA will not be able to issue the certificate. Special Note regarding MDC applications: In order to successfully order a Multi-Domain Certificate, the applicant need only list the additional domains in 116

117 Form Element Type Description the SAN field on this form. In certain circumstances, however, the applicant may have created a CSR that already contains these Subject Alternative Names. In this case, clicking the 'Get CN from CSR' button will also auto-populate the 'Subject Alternative Names' form fields as well as the 'Common Name' field. Upload CSR (optional) Control The applicant can upload the CSR saved as a.txt file in the local computer, instead of copying and pasting the CSR into the CSR field - helping to avoid errors. Common Name (required) Text Field Type the domain that the certificate will be issued to. Single Domain certificates - enter domain name using the form: domain.com. Wildcard Certificates - enter domain name using the form: *.domain.com. Multi-Domain Certificates: enter the primary domain name using the form: domain.com. Subject Alternative Names (required for Multi Domain certificates) Text Field If the certificate 'Type' is a Multi-Domain Certificate (MDC) then the applicant should list the 'Subj Alt Name' additional domains here. Each domain should be separated by a comma. Requester (autopopulated) Text Field The 'Requester' is field is auto-populated with the name of the administrator making the application. External Requester (optional) As an alternative to making an applicant complete the 'Self Enrollment' form, the administrator can complete the application themselves using this built-in form and specify an 'External Requester'. Entering the address of an external requester in this field will mean that person will also receive a certificate collection . Note: The 'Requester' will still be the administrator that is completing this form (to view this, open the 'Certificates Management' area and click 'View' next to the certificate in question.) The address of the 'External Requester' will be displayed as the 'External Requester' in the 'View' dialog of an issued certificate. This field is not required when requesting for EV SSL certificate and hence will be hidden. Comments (optional) Text Field Enables administrator to add comments. Subscriber Agreement Control Applicant must accept the terms and conditions before submitting the form by 117
118 Form Element Type (required) Description reading the agreement and clicking the 'I Agree' checkbox. Note: The Subscriber Agreement will differ depending on the type of SSL certificate selected from the 'Certificate Type' drop-down. If Comodo EV SSL Certificate or Comodo EV Multi-Domain SSL Certificate is selected, The 'I Agree' checkbox will not be shown and the agreement will be taken as accepted, when the user submits the application. OK Control Submits the application to Certificate Manager for approval. If the form was completed correctly then the certificate will appear in the 'SSL' area with the state 'Requested'. Cancel Control Cancels the application. Note: In addition to the standard fields in the Built-in Application form, custom fields such as 'Employee Code, Telephone' can be added by the Master Administrator. Contact your Master Administrator if such custom fields are required Certificate Collection After InCommon CA has issued the certificate, the next stage of the provisioning process is for the applicant to download their certificate. Once the certificate has been issued, InCommon Certificate Manager will automatically send a collection to the applicant. The certificate can be downloaded by the applicant by clicking the link in the . Also, the issued SSL certificate can be downloaded by a RAO SSL or DRAO SSL administrator from the SSL Certificate Details dialog accessed from the Certificates Management > SSL certificates tab Collection of SSL Certificate Through 1. Once the certificate has been issued, InCommon Certificate Manager will automatically send a collection to the applicant. This can be either an external applicant using the self enrollment method or a InCommon CM administrator using the built-in application form.) The will contain a summary of the certificate details, a link to the certificate collection form and a unique certificate ID that will be used for validation. 118

119 2. Having clicked the link in the collection , the end-user will be able to download the certificate file. 119

120 Collection of SSL certificate by Administrator The issued certificate can also be downloaded and provided to the applicant from the SSL Certificate Details dialog. Click the 'Details' button at the top after selecting the issued certificate in the SSL Certificates tab of the Certificate management interface. The resulting dialog contains options to download the issued certificate in several formats at its top: Click the 'Select' button Click the appropriate button to download the certificate in desired format. 120

121 Downloading and Importing SSL Certificates Once the application process has been successfully completed, the applicant needs to download the certificate, save it to a secure place on their hard drive and import it into the certificate store of their computer. Click 'Download' and save the certificate in your hard drive. The precise installation process depends on the web server type and a range of installation guides are available at the InCommon's Partner Comodo support website at: First select the InCommon certificate type and then choose the appropriate web server software to view a detailed guide explaining the import process Certificate Requests - Approving, Declining, Viewing and Editing A certificate request will appear in the 'SSL Certificates' area after the applicant has successfully applied for a certificate using either the Auto Installer, Self Enrollment Form or the Built-in application form. Use the filter option to view all the certificates that are in 'Requested' state. Select the certificate that you want to approve, decline, view or edit. At this point, the certificate request has NOT been submitted to InCommon CA and is pending approval from a Certificate Manager administrator. (If the application was made by an administrator, that administrator can, of course, approve their own request.) If the administrator does not want to submit this request, they should click the 'Decline' button. 121
122 Note: Declining a certificate request will change the certificate status to 'Declined'. If an 'SSL Declined' Notification has been set up then an will be automatically sent to the requester informing them that the request has been declined. However, this request can still be 'Approved' at any time in the future by a 'SSL' or 'Client + SSL' administrator. If the administrator wishes to view the details of the request, they should click the 'Details' button at the top after selecting the checkbox next to the certificate name. If the administrator wishes to modify the request they should click the 'Edit' button. (for example, administrators may wish to correct certain request fields in the application before submitting to InCommon CA for processing). To approve the request and submit the application to InCommon CA for processing, administrators should click the 'Approve' button next to the certificate name in the 'Controls' column. After clicking the Approve' button, an 'Approval Message' box will be displayed. This allows the Administrator to type a message that will be sent along with the approval notification . Click 'OK' to add the message and send the approval . Note: The SSL Approved Notification should have been set up for the requester to receive the notification. Once the Administrator has approved the request and submitted it to InCommon CA, the certificate state will be displayed as 'Approved'. If the request has applied by InCommon CA, the state of the certificate is changed to the proper value - 'Applied' (It also can be rejected by CA). Next, if validation is successful, then InCommon will send a Certificate Collection to the certificate requester and the 'State' of the certificate will change to one of 'Issued'. Please see the 'SSL Certificates' chapter for full details of the options available in this area Certificate Renewal There are two broad ways that SSL certificates can be renewed in InCommon CM SSL administrators can renew certificates from the SSL certificates interface External applicants can renew using the self-renewal form 122

123 Certificate Renewal by Administrators The SSL Certificates interface allows administrators to renew both managed certificates and unmanaged certificates. As the name suggests, unmanaged certificates are those are listed in CM but are not currently managed by CM. Usually these are certificates that were identified during discovery scans but were not originally ordered using CM. The processes for renewing managed and unmanaged certificates are different. Managed Certificates A managed certificate is a certificate which has been issued, via CM, to a specific combination of domain and organization. Unmanaged Certificates An 'unmanaged certificate' is a certificate which was found installed on servers during a discovery scan but was not issued via CM. You will need to submit a CSR the first time you apply for a You will need to submit a new CSR during renewal of an certificate for any such combination. After issuance, this 'Unmanaged' certificate because CM does not have one on certificate will become managed. record. After issuance, this certificate will become managed. Managed certificates are those with CM statuses of Issued, Applied or Requested For renewals of managed certificates, you will typically not need to submit a CSR because CM shall re-use the existing CSR. General note: If you moved a domain from one organization to another or modified the address details of an organization, then you are effectively creating a new certificate application, not 'renewing' a certificate. In these circumstances, you will also have to submit a new CSR. Renewing a 'Managed' Certificate If the administrator wishes to renew a managed certificate, they should select the radio button beside it and click the 'Renew' button at the top. On clicking 'Renew', CM will automatically request a renewal with the same details as the existing certificate. 123

124 Once issued, the renewed certificate will become available for collection and installation. Refer to the section Certificate Collection for more details. Renewing an 'Unmanaged' Certificate If the administrator wishes to renew an unmanaged certificate, they should select the radio button beside it and click the 'Renew' button at the top. Clicking the 'Renew' button will open the 'Renew SSL Certificate' form. This form is similar to the Built-in Enrollment form with the company and domain details pre-populated from the existing certificate. If needed, the administrator can select the new certificate type and edit the details. 124

125 The administrator should paste or upload a new CSR, accept to the Certificate Subscriber Agreement and click the OK button. CM will place a request for the renewal certificate with the new CSR Once issued, the renewal certificate can be collected and installed. Refer to the section Certificate Collection for more details. After installation, the status of the certificate changes to 'Managed' Certificate Renewal by the End-User End-users can renew their certificates through the self renewal application form. The self renewal form is hosted by default at 125
126 Clicking the Certificate renewal link will open the self renewal form Before proceeding to the full renewal application form, the user has to authenticate the request by: Entering the correct self enrollment certificate ID. The certificate ID is available from certificate collection received during enrollment. The Certificate ID is also available from the Certificates > SSL interface. If needed, the administrator can communicate the Self enrollment certificate ID to the user through any out of band communication method like . The renewal/revocation passphrase entered in the self-enrollment form, while enrolling for the certificate. Clicking 'Renew' will automatically renew the certificate with the same details as in the existing certificate. Once issued, the renewal certificate can be collected and installed. Refer to the section Certificate Collection for more details Certificate Revocation, Replacement and Deletion In the 'SSL Certificates' sub-tab of 'Certificates' interface explained above, the administrator has also the option to revoke, renew, replace or delete a certificate. 126

127 If the Administrator wishes to revoke a certificate, they should first select the certificate and click the 'Revoke' button at the top. After clicking the Revoke' button, a 'Revoke reason' message box will be displayed. This allows the administrator to type a message that will be sent along with the revoke notification . Click 'OK' to add the message and send the revoke . Note: The SSL Revoked Notification should have been set up for the requester to receive the notification. If the administrator wishes to replace an existing certificate, they should select the it and click the 'Replace' button at the top. Clicking the 'Replace' button will open the 'Replace existing SSL' dialog which requires a new CSR and reason for replacing the certificate. If the administrator wishes to delete a certificate, they should select the checkbox beside it and click the 'Delete' button at the top. Please see the 'SSL Certificates' chapter for full details of the options available in this area. 3.2 The Client Certificates area Overview The 'Client Certificates' area allows administrators to manage end-users client certificates and their owners' details. Visibility of the 'Client Certificates' area is restricted to: RAO SMIME administrators - can view the client certificates and end-users of Organizations (and any subordinate Departments) that have been delegated to them. DRAO SMIME administrators - can view the client certificates and end-users of Departments that have delegated to them. 127
. Control Buttons Add Allows the administrator to add a new end-user and configure a client certificate for that user.")
128 Client Certificates' table Column Name Description Name End-user's name. End-user's address. Organization Name of the Organization that the end-user belongs to. Department Name of the Department that the end-user belongs to (if applicable). Control Buttons Add Allows the administrator to add a new end-user and configure a client certificate for that user. Export Export the currently displayed list to a spreadsheet in.csv format Import from CSV Enables the administrator to import list of new end-users in.csv format into the Certificate Manager database. Refresh Updates the currently displayed list of users. Will remove any users that have been recently deleted and add any that have been recently created. Will update details such as Organization, etc if those details have recently changed. Certificate Control Edit Buttons Note: The types Delete of certificate control buttons that are displayed in the table header depends Certs on the state of the selected certificate Enables the administrator to edit the end-user's details. Enables the administrator to delete the end-user. Enables the administrator to view/manage the end-user's Client certificates. 128


129 Sorting and Filtering Options Clicking on a column header sorts the items in the alphabetical order of the entries in the respective column Administrators can search for particular client certificates by using filters. To apply filters, click on the down arrow at the right end of the 'Filters' stripe. The filter options will be displayed. You can add filters by selecting from the options in the 'Add Filter' drop-down and group the selection with other options that appears depending on the selection from the 'Add Filter' drop-down. For example, if you want to filter the certificates with 'Name' and group with 'Organization', select 'Name' from the 'Add Filter' drop-down: Tip: You can add more than one filter at a time to narrow down the filtering. To remove a filter criteria, click the '-' button to the left if it. Enter part or full name in the Name field. Select 'Organization' from the 'Group by' drop-down. Click the 'Apply' button. The filtered items based on the entered parameters will be displayed: 129


130 To remove the filter options, click the 'Clear' button. Note: The search filters once configured for the interface will be automatically saved. When you are re-opening the 'Client Certificates' interface in future, the configured filters will be in action and only the search results will be displayed. If you do not want the filters to be saved, click the 'Clear' button 'Certs' Dialog Clicking the 'Certs' button at the top after selecting the check box next to a end-user's name will list all the client certificates belonging to that end-user. Certificates are listed in chronological order (newest first). If a certificate has been revoked, then the date of revocation is displayed in the 'Revoked' column. This interface allows the administrator to revoke, download, view and send invitation for that certificate. (See below) Sorting and Filtering Options 130

131 Clicking on a column header sorts the items in the alphabetical order of the entries in the respective column Administrators can search for a particular certificate by using filters. To apply filters, click on the down arrow at the right end of the 'Filters' stripe. The filter options will be displayed. You can add filters by selecting from the options in the 'Add Filter' drop-down. The options available are: Expires Allows you to filter certificates that are expiring in next 3, 7, 14, 30, 60 and 90 days Certificate Type Allows you to filter certificates based on their validation type Order Number Allows you to search for a certificate with a specific order number Serial Number - Allows you to search for a certificate with a specific serial number State Allows you to filter certificates based on their states Choose the filter and enter the parameters. Click the 'Apply' button. The results will displayed based on the filters selected / entered. To remove the filter options, click the 'Clear' button. Note: The search filters once configured for the interface will be automatically saved. When you are re-opening the 'Certificates' interface in future, the configured filters will be in action and only the search results will be displayed. If you do not want the filters to be saved, click the 'Clear' button. Client Certificate 'Cert' Dialog - Table of Parameters Form Element Type Description View Button Allows administrators to view an end-user s certificate. See Viewing End-User's certificate for more details. Revoke Button Allows administrators to revoke an end-user s certificate. Once revoked, the date and time of revocation is displayed in this column. Download Button Allows administrators to download a copy of the end-user s certificate. * 131
132 Send Invitation Button Enables the administrator to send an to the end-user with instructions on how to apply for/collect their client certificate. See 'Request and issuance of 'Client Certificates to Employees and End-Users' for an explanation of the process from this point. Refresh Control Reloads the list. *InCommon Certificate Manager creates a copy of each end-user s certificate which it saves on the server. This duplicate certificate is protected in two ways: i) The key pair of each end-user's certificate is encrypted by a master public key. See the Encryption and Key Escrow section for more details; ii) Password protected with an administrator set password. The end-user will be asked for this password every time he wish to download a certificate. InCommon Certificate Manager stores the individual private keys of end-user s client certificates so that they can be retrieved at a later date by the administrator or end-user. Due to the highly sensitive and confidential nature of this feature, all end-users' key pairs are stored in encrypted form so that they cannot be easily stolen or compromised. Each end-user s key pair is encrypted using a master public key that is stored by CM. In order to decrypt this end-user's key pair the administrator must paste the corresponding master private key into the space provided. Admin can set a password (PIN) to protect access to private key in.p12 file as well. The Administrator is able to bypass the password but should be aware that not but not all programs will subsequently allow the certificate to be imported if they do so. (PIN may be 7 characters maximum.) The following is a summary of browsers in which it is possible to import.p12 with empty password field. Browser Windows 7 Vista XP Mac IE IE IE 8 - FF 2 FF 3 Opera 9 Opera 10 Netscape9 Safari WARNING! If an administrator downloads an end-user's certificate, this certificate will be revoked Adding Cert End-Users There are several methods of adding end-users to Organizations in Certificate Manager. Manually adding end-users Loading multiple end-users from a comma separated values (.csv) file Auto Creation of end-users via certificate Self Enrollment Forms Note: A new End-User will also be created and added to this interface via SSL certificate applications made through the SSL Self Enrollment form. If the applicant does not already exist as an End-User when the form is submitted then a new End-User will be created with the name 'requesterssl <DOMAIN.com>' (where DOMAIN.com = the domain name for 132

133 which the application is being made) This End-User will automatically be assigned membership of the Organization that the SSL Certificate was ordered for but will not own a Client Certificate Manually Adding End-Users Click 'Certificates Management' - > Clients Cert at the top left of the CM interface; Click the Add button to open the Add New Person form: Click 'OK' to add the end-user to Certificate Manager. An end-user's details can be modified at any time by clicking the 'Edit' button at the top after selecting the checkbox next to their name in the main list of end-users. If any information in this dialog is changed, with the exception of Secret ID, any previously issued client certificates for this address shall be automatically revoked. CM maintains a user name history. If the user's name is changed, the Administrator will still be able to search for the client certificates using both the old name and the new name. 'Validation Type' drop down will only be visible if enabled by your InCommon account manager 'Add New Person' form - Table of Parameters Form Element Organization Type Description Drop down menu Administrator should select the Organization that they wish the new end-user to belong to. 133
134 Form Element Type Description Department Drop down menu If required, the administrator should specify the Department that the end-user is to belong to. Domain Drop down menu Administrator should select the domain from which to issue from the drop down menu. This drop-down will only display domains that have been correctly delegated to the Organization/Department selected earlier. Address Text Field Administrator should enter the address of the end-user. The address must be for the domain belonging to the Organization. First Name Text Field Administrator should enter the first name of the end-user. Middle Name Text Field If required, the administrator should enter the middle name of the end-user. Last Name Text Field Administrator should enter the last name of the end-user. Note: The combined length of First Name and the Last name should not exceed 64 characters. Secret ID Text Field A 'Secret ID' (or 'Secret Identifier'/SID) is used to identify the details of an existing end-user in CM. Assigning SIDs to users will simplify the client certificate enrollment process for those users and therefore help eliminate errors. This is because, as the details of the user are already stored, the enduser need only specify the address If the administrator wishes to allow enrollment by Secret ID then they must fill out this field. Validation Type Drop Down Menu Note: The 'Validation Type' drop down will only be visible if enabled by your InCommon account manager. Allows the administrator to specify the type of client certificate that is issued to an applicant. The difference between the two lies in the degree of user authentication is carried out prior to issuance. The two options are 'Standard' and 'High'. 'Standard' certificates can be issued quickly and take advantage of the user authentication mechanisms that are built into CM. A user applying for a 'Standard Personal Validation' certificate is authenticated using the following criteria: User must apply for a certificate from an a domain that has been delegated to the issuing Organization The Organization has been independently validated by an web-trust accredited Certificate Authority as the owner of that domain User must know either a unique Access Code or Secret ID that should be entered at the certificate enrollment form. These will have been communicated by the administrator to the user via out-of-band communication. User must be able to receive an automated confirmation sent to the address of the certificate that they are applying for. The will contain a validation code that the user will need to enter at the certificate collection web page. 'High Personal Validation' certificates require that the user undergo the validation steps listed above AND Face-to-Face meeting with the issuing Organization Note: The additional validation steps must be completed PRIOR to the administrator selecting 'High Personal Validation' type. 134
135 Form Element Principal Name Type Text Field Description The Administrator can enter the address that should appear as principal name in the certificate to be issued. Note: For the Organizations/Departments enabled for Principal Name support, the client certificates issued to the end-users of the Organization/Department will include an additional name - Principal Name, in addition to the RFC822 name in the Subject Alternative Name(SAN) field. If included, the Principal Name will be the primary address of the end-user to whom the certificate is issued. But this can be customized at a later time by editing the end-user if Principal Name Customization is enabled for the Organization/Department. The Administrator can check whether an Organization or department is enabled for Principal Name support/customization by contacting the Master Administrator. This field will be disabled for the Organizations for which the Principal Name support is not enabled. If the Principal Name support is enabled for an Organization and not enabled for the Department belonging to the Organization, this field will be auto populated with the address entered in the Address field. Copy Button Auto-fills the Principal Name field with the address entered in the Address field Loading multiple end-users from a comma separated values (.csv) file Administrators can import list of end-users into InCommon Certificate Manager in comma separated values (.csv) format. After importing the list, your employees then only need to complete the self enrollment with their secret code. Note: The ability to loading multiple end-users from a.csv file functionality is only available to RAO SMIME and DRAO SMIME administrators Procedure Overview Summary of required steps for adding end-users by loading a.csv file: 1. Administrator generates a.csv file using containing a list of end-users..csv files can be exported directly from spreadsheet programs such as Excel or Open Office Calc. 2. Administrator loads the.csv file by clicking the 'Import from CSV' button in the 'Certificates Management' > 'Client Certificates' interface 3. CM sends an notification containing a link to the self-enrollment form and the secret identifier to each enduser included in the.csv file. Note: For the CM to automatically send the notification s to the end-users, the administrator should have configured for this by selecting the checkbox 'Send invitations on successful upload' in the Import persons from CSV dialog while loading the.csv file. If not configured, the administrator should manually send an containing a link to the selfenrollment form and the secret identifier to each end-user. Refer to the section 'The import process' for more details. 4. End-users collect and install their certificates. 135
136 Requirements for.csv file The fields per user in the.csv differs for Organizations depending on whether or not the Principal Name Support is enabled for the Organization. The Administrator can check whether an Organization or department is enabled for Principal Name support/customization by contacting the Master Administrator For Organizations with Principal Name Support Enabled There are 12 potential fields per user that can be imported via.csv. 6 are mandatory and there is one conditionally mandatory value. The 12 potential fields are as follows: First Name Middle Name Last Name Address (Primary) Alternative Address(es) Validation Type Organization Department Secret Identifier Phone Country Principal Name Each entry should have 12 fields. Even the optional fields without values must be included but should be left blank ( ). 'Department' will be mandatory if the administrator that is importing is a DRAO SMIME. Master Administrator, RAO SMIME (and DRAO SMIME administrators that are also Master Administrator or RAO SMIME administrators) have the option to leave this field blank. See General Rules for more details. The 'Secret ID' value can be used to add a layer of authentication to the process. If specified, the user will need to type the identifier at the certificate enrollment form to complete the process. With the exception of the 'Secret ID' and 'Phone', make sure the fields are imported using as specified below (including commas (,) and quotation marks ( ) ). For the Organizations enabled with Principal Name support, the Principal Name field must be entered with the value. For the Organizations that are not enabled with Principal Name Support, the field must be included but should be left blank ( ). If an Organization is enabled for Principal Name support and a Department belonging to the Organization is not enabled for Principal Name support, when loading end-users of the Department, the Principal Name field must be included but should be left blank. The Administrator can check whether an Organization or Department is enabled for Principal Name support/customization by contacting the Master Administrator. The following table explains the requirements and formats of the values. 136
137 Values Required First Middl Last Valid Organizat Departm Secre Phon Country Princip Name e Name Address Addresses ation ion ent t ID e al Name (primary) (Alternativ Type Name e) Yes Yes Yes Yes Yes Yes 1 Min Length (character s) Max Length (character s) Valid address Valid address, separated by space Format A-Z, A-Z, a-z, A-Z, a-z, 0Characters A-Z, a- A-Z, allowed z, 0-9, a-z, 0- a-z, 0-0-9, '.', '-', 9, '.', '-', '_' '.', '-', ' ' 9, '.', '-', ' ' 9, '.', '-', ' ' '_' Valid two letter country code 'high', ANY empty or 'stand ard' ANY ANY ANY A-Z, a-z ANY Example: "First1","Middle1","Last1","User----1-al@abc.com","User----1-secal@abc.com","standard",System,sysdep,"Secret1", ,"UA", User----1-al@abc.com For Organizations without Principal Name Support There are 11 potential fields per user that can be imported via.csv. 6 are mandatory and there is one conditionally mandatory value. The 11 potential fields are as follows: First Name Middle Name Last Name Address (Primary) Alternative Address(es) Validation Type Organization Department 137
138 Secret Identifier Phone Country 'Department' will be mandatory if the administrator that is importing is a DRAO SMIME. RAO SMIME (and DRAO SMIME administrators that are also RAO SMIME administrators) have the option to leave this field blank. See General Rules for more details. The 'Secret ID' value can be used to add a layer of authentication to the process. If specified, the user will need to type the identifier at the certificate enrollment form to complete the process. With the exception of the 'Secret ID' and 'Phone', make sure the fields are imported using as specified below (including commas (,) and quotation marks ( ) ) The following table explains the requirements and formats of the values. Values First Midd Last Nam le Nam Addre e Nam e ss e Required Yes Vali Organiz Departm Addres dati ation ent ses on Secret ID Phon e Countr y (prima (Altern Typ ry) ative) e Yes Yes Yes Yes Yes Min 1 Length (characte rs) Max 128 Length (characte rs) Valid addres s Valid address, separat ed by space Format Character A-Z, s allowed a-z, 0-9, '.', '-', '' A-Z, a-z, 0-9, '.', '-', '' A-Z, A-Z, a- A-Z, a- 'high ANY a-z, z, 0-9, z, 0-9, ', 0-9, '.', '-', '_' '.', '-', '_' emp '.', '-', ty or '' 'stan dard' Valid two letter country code ANY ANY ANY A-Z, a-z Example: 138
139 General Rules The import will fail if: Any mandatory field in Requirements for.csv file is missing The Organization does not exist The Department, if present, does not exist The Department, if present, does not exist for the specified Organization The Primary Address is not in a valid format or the domain cannot be determined The domain of the Primary Address is not delegated to the Organization The domain of the Primary Address is not delegated to the Department (if Department is supplied) The Secondary Address (if supplied) is not in a valid format or the domain cannot be determined The domain of the Secondary Address is not delegated to the Organization The domain of the Secondary Address is not delegated to the Department (if Department is supplied) The administrator attempting the import does not have the correct permissions for the Organization and/or Department: RAO SMIME administrators have permission to import for Organizations (and any subordinate Departments) that have been delegated to them. RAO SMIME may leave the 'Department' field blank. DRAO SMIME administrators have permission to import for Departments that have delegated to them. DRAO SMIME administrators cannot leave the 'Department' field blank unless they are also an RAO SMIME for the same Organization The Import Process To load the.csv file Click 'Import from CSV' in 'Certificates Management' > 'Client Certificates' interface The 'Import from CSV' dialog will appear. Click the 'Browse' button and navigate to the.csv file 139

140 Click 'Submit'. An import status dialog box is displayed. You will see a progress bar indicating that information is being uploaded: 140


.")
141 CM will inform you when the process is finished: All imported users appear in the list of end-users in the 'Client Certificates' section and notification s containing a link to the self-enrollment form and the secret ID will be automatically sent to the imported end users, if the check box 'Send invitations on successful upload' is selected Errors in.csv file CM will inform you if there is an error in the.csv file (mandatory fields are missing, for example). Only the end-users included in the lines without errors will be loaded to CM and the end-users included in the lines with errors will not be loaded. 141

142 Auto Creation of End-Users via Certificate Self Enrollment Form End-users applying via the SSL or Client Certificate enrollment form are automatically added to the 'Certificate Management - Client Certificates' area. For more details see: Request and issuance of client certificates to employees and end-users Editing End-Users All end-user details can be modified at any time by clicking the 'Edit' button after selecting the end-user's name. Notes: If any information in this dialog is changed, with the exception of 'Secret ID', any previously issued client certificates for this address shall be automatically revoked. For security reasons, the 'Secret ID' field is not displayed. If the SID needs to be changed, administrator can click the Reset Secret ID link. On clicking the link, the Secret ID text box will be displayed, enabling the administrator to specify a new SID. To change the SID, the administrator can type a new SID in this field. 142

143 To retain the existing SID, the administrator can click the Don't Reset Secret ID link. 'Validation Type' drop down will only be visible if enabled by your InCommon account manager. For an explanation of validation types, see 'Validation Type' in the 'Add New Person' table of parameters. Renaming an end-user does not affect the search and filtering actions in the Client Certificates Interface. CM allows the administrators to search for particular user or client certificates using both the old name and the new name in case a user name is changed. To customize the Principal Name for the end-user, type the new Principal Name as it should appear in the in the Subject Alternative Name (SAN) field of the certificate in the Principal Name field. To revert the Principal Name to the address of the end-user, click the 'Copy ' button. This button will be available only if this feature is enabled for your account. Full details of the fields available when editing an existing end-user are available in the section 'Add New Person' form table of parameters Deleting an end-user An administrator can delete any end-user by clicking 'Delete' button after selecting the end-user's name. Once the end-user is deleted, their certificate will be revoked Request and Issuance of Client Certificates to Employees and End-Users End-users can be enrolled for client certificates (a term which covers certificates, end-user authentication certificates and dual-use certificates) in three ways: Self Enrollment of End-Users by Access Code - Involves directing the end-users to apply for their own client certificate by accessing the self enrollment form. The Administrator has to inform the end-user of the URL at which the self-enrollment form is hosted and the access code of the Organization to which the end-user belongs. This should be done by out-of-band communication such as . See the section Self Enrollment by Access Code for more details. Self Enrollment of End-Users by Secret Identifier - Involves directing the end-users to apply for their own client certificate by accessing the self enrollment form. The Administrator has to inform the end-user of the URL at which the self-enrollment form is hosted and the Secret Identifier of the Organization to which the end-user belongs. This should be done by out-of-band communication such as . See the section Self Enrollment by Secret Identifier for more details. Enrollment by Administrator's Invitation - Involves sending invitation mails to end-users previously added to CM. The Administrators can send the invitation mail from the CM interface itself. The invitation mail will contain a 143
144 validation link and instructions for the end-users to download and install their certificates. See the section Enrollment by Invitation for more details Self Enrollment by Access Code This section explains how the administrator can direct the end-user for self-enrollment using the access code specified for the Organization and how the end-user can apply for, collect, download and install their certificate Prerequisites The domain from which the client certificate is to be issued has been enabled for SMIME certificates, has been pre-validated by InCommon and that the domain has been activated by your InCommon account manager. (i.e. if you wish to issue client certs to then mycompany.com must have been prevalidated by InCommon). However, if you request a certificate for a brand new domain, then this domain will first have to undergo validation by InCommon. Once validated, this new domain will be added to your list of pre-validated domains and future certificates will be issued immediately. The domain from which the client certificates are to be issued has been delegated to the Organization or Department. See Editing an Existing Organization for more details on adding a domain to an Organization. The RAO SMIME or DRAO SMIME administrator has been delegated control of this Organization or Department The administrator has checked the 'Self Enrollment' box in the 'Client Cert' tab of the 'Create/Edit' Organizations dialog box. 144

145 The administrator has specified an Access Code in the 'Client Cert' tab of the 'Create/Edit' Organizations dialog box. This should be a mixture of alpha and numeric characters that cannot easily be guessed Procedure Overview 1. Administrator confirms completion of the prerequisite steps. 3. Administrator directs the personal certificate applicant to the 'Access Code' based Self Enrollment Form - making sure the application is done from the end-user's computer (see section Initiating the enrollment process). 4. Applicant completes then submits the Self Enrollment Form, specifying the correct Access Code for the Organization's domain. (See section The Self Enrollment Form) 5. CM sends a validation mail to the applicant which contains a link to the Account Validation form and a request code. (See section Validation of the Application for more details) 6. Applicant completes the Account Validation form. The certificate request is sent to InCommon CA servers. If the application is successful, the applicant will be able to download and install their personal certificate. (See section Certificate Collection.) 7. If the applicant already exists as an 'End-User' (viewable in the Client Certificates area of Certificates Management' section) then the certificate will be added to their account. If the applicant does not exist as an 'End-User' then CM will automatically add this applicant as a new 'End-user' at the point of certificate issuance. If the applicant already exists as an Administrator ( visible in 'Admin Management' ) but not as as a (client certificate) 'End-User' then CM will automatically add this applicant as a new 'End-user' to the Client Certificates area'. (Click Here for further details) 145
146 Initiating the Enrollment Process After completing the prerequisite steps, administrators need to communicate enrollment details to all and any end-users they wish to issue client certificates to. The communication must contain the following information: 1. A link to the Access Code based Self Enrollment Form - action=enroll&swt=ac 2. The client access code specified in that Organization's Client Cert settings tab These details can be informed to the applicant by the any preferred out-of-band communication method like . The end-user can access the form at the given url, fill-in with the necessary details and submit it. Please Note: The domain of the address that the end-user specifies in the Self Enrollment Form MUST match a 'Common Name' (domain) associated with an Organization or Department within an Organization. The applicant MUST be able to receive s at this address. The access code the end-user enters at the Self Enrollment Form MUST match the access code specified by the administrator for that specific Organization. 146
147 The Access Code Based Self Enrollment Form Form Parameters Form Element Type Description Access Code(required) Text Field This is the Access Code specified for the Organization or Department. First Name (required) Text Field Applicant should enter their first name Middle Name (optional) Text Field If required, the applicant should enter their middle name Last Name (required) Text Field Applicant should enter their last name 147
148 Form Element Type Description (required) Text Field Applicant should enter their full address. The address must be for the domain belonging to the Organization. Pass-Phrase (required) Text Field This phrase is needed to renew or revoke the certificate should the situation arise. Re-type Pass-Phrase (required) Text Field Confirmation of the above Eula Acceptance (required) Check-box Applicant must accept the terms and conditions before submitting the form. Enroll Control Submits the application and enrolls the applicant for the client certificate. Cancel Control Clears all data entered on the form Note: In addition to the standard fields in the Enrollment form, custom fields such as 'Employee Code, Telephone' can be added by the Master Administrator. Contact your Master Administrator if such custom fields are required. After completing the form and clicking the 'Enroll' button, a confirmation dialog will be displayed......and the applicant will receive an containing a URL for validating the application, a request validation code and instructions for downloading the certificate. Upon clicking the link, the end-user will be taken to the Account Validation form. See the section Validation of the Application for more details. On completion of the validation process, a certificate collection form will appear, enabling the end-user to download and save the certificate. See the section Certificate Collection for more details Validation of the Application The applicant will receive a validation on successful submission of the Self Enrollment Form and after being processed at InCommon. The validation will contain a link to the Account Validation form. The link will also contain a randomly generated 'Request Code' that the end-user will need in order to validate that they are the correct applicant. Simply clicking on the link in the will automatically populate the request 'Code' and ' ' fields in the Account Validation form. 148
149 Note: It is possible for administrators to modify the contents of these s in the ' Templates' area under Organization > Edit. Upon clicking the link the applicant will be taken to the validation form. 149
150 Form Element Type Description Code (required) Text Field The validation request code. This field is auto-populated when the applicant clicks the validation link contained in the . (required) Text Field address of the applicant. This field is auto-populated. PIN (required) Text Field The applicant should specify a PIN for the certificate to protect the certificate. Re-type PIN (required) Confirmation of the above. Select address fields to remove from the certificate Check boxes By default, the address details are displayed in the View Certificate Details dialog. The applicant can hide these details selectively in the View Certificate Details dialog by selecting the 'Remove' check boxes beside the required address fields. Click here for more details. Validate Control Completes the validation process and enables the applicant to download the certificate Cancel Control Clears all data entered on the form Selecting Address Fields to be Removed from the Certificate The following address fields
151 Address1; Address2; Address3: City; State/Province; Postal Code....are automatically populated with the address details of the Organization or Department that the user belongs to. The applicant can choose to remove these details from the client certificate by selecting the 'Remove' check-boxes below beside the corresponding field. The selected details will not be included in the certificate that is issued. The 'View Certificate Details' dialog will state 'Details Omitted' next to these fields Certificate Collection Upon successful submission of the Account Validation form, a download dialog will be displayed enabling the applicant to download and save the certificate. The applicant can collect the certificate by clicking 'Download' and save the file in a safe location in his/her computer. 151
152 CM will deliver the certificate to the end-user in PKCS#12 file format (.p12 file). The PIN specified in the PIN fields is used to protect access to this.p12 file. The end-user will be asked for this PIN when he/she imports the certificate into the certificate store of their machine. New end-users: If the end-user does not already exist in Certificate Manager (viewable in the Client Certificates area of Certificates Management' section) then he/she will be automatically created and added as a new enduser belonging to the Organization for which the certificate was issued. This new end-user will now be viewable in the Client Certificates Sub-tab of the interface with the following parameters: Name: The name that the end-user specified at the Client Self Enrollment Form The address that the certificate was issued to (as specified at the Client Self Enrollment Form) Organization: Name of the Organization to which this end-user belongs to. Existing end-users: If the end-user already exists, then the certificate will be associated with their end-user name. See section 'The Client Certificates Area' for more information regarding end-user and client certificate management Self Enrollment by Secret Identifier This section explains how the administrator can direct the end-user for self-enrollment using the Secret Identifier specified for the Organization and how the end-user can apply for, collect, download and install their certificate Prerequisites The domain from which the client certificate is to be issued has been enabled for SMIME certificates, has been pre-validated by InCommon and that the domain has been activated by your InCommon account manager. (i.e. if you wish to issue client certs to end-user@mycompany.com, then mycompany.com must have been prevalidated by InCommon). However, if you request a certificate for a brand new domain, then this domain will first have to undergo validation by InCommon. Once validated, this new domain will be added to your list of pre-validated domains and future certificates will be issued immediately. The domain from which the client certificates are to be issued has been delegated to the Organization or Department. See Editing an Existing Organization for more details on adding a domain to an Organization. The RAO SMIME or DRAO SMIME administrator has been delegated control of this Organization or Department The administrator has checked the ''Web API' box in the 'Client Cert' tab of the 'Create/Edit' Organizations dialog box. 152
153 The administrator has specified a Secret ID for the user using either the 'Add User' or 'Edit User' dialog boxes or when 'Importing from.csv'. The secret code should be a mixture of alpha and numeric characters that cannot easily be guessed. 153

154 Procedure Overview Administrator confirms completion of the prerequisite steps. Administrator directs the personal certificate applicant to either the 'Secret Identifier' based Self Enrollment Form - makininitiating the enrollment processg sure the application is done from the end-user's computer (see section Initiating the enrollment process). Applicant completes then submits the Self Enrollment Form, specifying the correct Secret Identifier assigned to him/her. (See section The Self Enrollment Form) The certificate request is sent to InCommon CA servers. If the application is successful, the applicant will be able to download and install their personal certificate. (See the section Certificate Collection) Initiating the Enrollment Process After completing the prerequisite steps, administrators need to communicate enrollment details to each end-user, they wish to issue client certificates to. The communication must contain the following information: 1. A link to the Secret Identifier based Self Enrollment Form The secret identifier specified for the end-user. These details can be informed to the applicant by the any preferred out-of-band communication method like . The end-user can access the form at the given url, fill-in with the necessary details and submit it. 154
155 Please Note: The domain of the address that the end-user specifies in the Self Enrollment Form MUST match a 'Common Name' (domain) associated with an Organization or Department within an Organization. The applicant MUST be able to receive s at this address. The Secret Identifier the end-user enters at the Self Enrollment Form MUST match the identifier specified for him/her by the administrator Secret Identifier Based Self Enrollment Form The applicant needs to fill the application form, shown below: 155
156 156
157 Form Parameters Form Element Type Description Address (required) Text Field Applicant should enter their full address. The address must be for the domain belonging to the Organization. Secret identifier (required) Text Field Applicant should enter the Secret ID specified for him/her. This should have been communicated to the applicant by the administrator. Annual Renewal Pass-Phrase (required) Text Field This phrase is needed to renew or revoke the certificate should the situation arise. Password (required) Text Field The applicant should specify a password for the certificate. This is needed for accessing the certificate e.g. while exporting the certificate for backup and while importing the certificate to restore the certificate from the backup. The password should be entered in the first text box and reentered in the second text box for confirmation. The password should be of at least eight characters. Select address fields to remove from the certificate Check boxes By default, the address details are displayed in the View Certificate Details dialog. The applicant can hide these details selectively in the View Certificate Details dialog by selecting the 'Remove' check boxes beside the required address fields. Click here for more details. Eula Acceptance (required) Check-box Applicant must accept the terms and conditions before submitting the form. Enroll Control Submits the application and enrolls the applicant for the client certificate. Cancel Control Clears all data entered on the form Note: In addition to the standard fields in the Enrollment form, custom fields such as 'Employee Code, Telephone' can be added by the Master Administrator. Contact your Master Administrator if such custom fields are required. Selecting Address Fields to be Removed from the Certificate The following address fields... Address1; Address2; City; State/Province; Postal Code....are automatically populated with the address details of the Organization or Department that the user belongs to. The applicant can choose to remove these details from the client certificate by selecting the 'Remove' check-boxes below beside the corresponding field. The selected details will not be included in the certificate that is issued. The 'View Certificate Details' dialog will state 'Details Omitted' next to these fields. After completing the form and clicking the 'Submit' button a certificate collection form will appear, enabling the end-user to download and save the certificate. See the section Certificate Collection for more details. Note: It is possible for CM Account holders to use their own, custom form templates rather than the default form supplied by InCommon. See your InCommon account manager for more details on enabling this functionality. 157
158 Certificate Collection Once the enrollment form is submitted, a download dialog will be displayed enabling the applicant to download and save the certificate. The applicant can collect the certificate by clicking 'Download' and save the file in a sale location in his/her computer. CM will deliver the certificate to the end-user in PKCS#12 file format (.p12 file). The PIN specified in the password fields is used to protect access to this.p12 file. The end-user will be asked for this PIN when he/she imports the certificate into the certificate store of their machine Enrollment by Invitation This section explains how the administrator can invite the end-user for enrollment from the CM interface and how the end-user can apply for, collect, download and install their certificate Prerequisites The domain from which the client certificate is to be issued has been enabled for SMIME certificates, has been pre-validated by InCommon and that the domain has been activated by your InCommon account manager. (i.e. if you wish to issue client certs to end-user@mycompany.com, then mycompany.com must have been prevalidated by InCommon). 158
159 However, if you request a certificate for a brand new domain, then this domain will first have to undergo validation by InCommon. Once validated, this new domain will be added to your list of pre-validated domains and future certificates will be issued immediately. The domain from which the client certificates are to be issued has been delegated to the Organization or Department. See Editing an Existing Organization for more details on adding a domain to an Organization. The RAO SMIME or DRAO SMIME administrator has been delegated control of this Organization or Department The administrator has added the end-user(s) to the Certificates Management > Client Certificates area of CM Procedure Overview Client certificates can be provisioned to the employees and end-users by inviting them for enrollment. Overview of stages: 1. Administrator confirms completion of the prerequisite steps. 2. Administrator sends invitation for enrollment to the end-users from the CM interface. (see section Initiating the Enrollment Process) 3. CM sends an Invitation mail to the end-user which contains a link to the User Registration Form. (See section Validation of the Address for more details) 4. The end-user completes the User Registration form. The certificate request is sent to InCommon CA servers. If the registration is successful, the end-user will be able to download and install their personal certificate. (See the section Certificate Collection) Initiating the Enrollment Process After completing the prerequisite steps, administrators need to send invitations to the end users. To send invitation administrator should: Click Certificate Management > Client Certificates. The list of end-users added previously will be displayed. Click 'Certs' button at the top after selecting the checkbox beside the end-user's name; In the dialog that appears press 'Send Invitation' button. (See screenshot below). 159

160 After clicking 'Send Invitation', the 'Confirm Invitation' dialog will be displayed: 160
161 The confirmation dialog displays the details of the user and allows the administrator to choose the client certificate type and the term. Certificate Type - If your Organization's account has been enabled for High Personal Validated Certificates AND the administrator has specified a 'Validation Type' of 'High' * for this user THEN the 'Certificate Type' value will be a drop down menu rather than flat text. This menu will offer a choice between sending an invitation for a 'High Personal Validated' or a "Standard Personal Validated' certificate. The default choice is 'High Personal Validated'. Certificate Term - You can choose the term length for the certificate to be issued to the end-user. The 'Term' drop-down displays the term options allowed for your Organization. Upon clicking 'OK', an invitation will be sent to the end-user. The will contain the URL of the certificate validation form, a request validation code and instructions for downloading the certificate. The request code will be contained within the URL so that applicants can simply click the link or copy and paste the URL in their browser. See the section Validation of the Address for more details. On completion of the validation and user registration processes, a certificate collection form will appear, enabling the enduser to download and save the certificate. See the section Certificate Collection for more details Validation of the Address The end-user will receive an Invitation on the administrator clicking the 'Send Invitation' button. The invitation will contain a link to the User Registration form. The link will also contain a randomly generated 'Request Code' that the end-user will need in order to validate that they are the correct applicant. Simply clicking on the link in the will automatically populate the request 'Code' and ' ' fields in the User Registration form. 161

162 Note: It is possible for administrators to modify the contents of these s in the ' Templates area under Organizations > Edit. Upon clicking the link the applicant will be taken to the user registration form. 162
163 163
164 Form Element Type Description Code (required) Text Field The validation request code. This field is auto-populated when the applicant clicks the validation link contained in the . (required) Text Field address of the applicant. This field is auto-populated. PIN (required) Text Field The applicant should specify a PIN for the certificate to protect the certificate. Re-type PIN (required) Text Field Confirmation of the above. Pass-Phrase (required) Text Field The end-user needs to enter a pass-phrase for their certificate. This phrase is needed to revoke the certificate should the situation arise. Select address fields to remove from the certificate Check boxes By default, the address details are displayed in the View Certificate Details dialog. The applicant can hide these details selectively in the View Certificate Details dialog by selecting the 'Remove' check boxes beside the required address fields. Click here for more details. Eula Acceptance (required) Check box Applicant must accept the terms and conditions before submitting the form. Submit Control Submits the application. Cancel Control Clears all data entered on the form Selecting Address Fields to be Removed from the Certificate The following address fields... Address1; Address2; Address3: City; State/Province; Postal Code....are automatically populated with the address details of the Organization or Department that the user belongs to. The applicant can choose to remove these details from the client certificate by selecting the 'Remove' check-boxes below beside the corresponding field. The selected details will not be included in the certificate that is issued. The 'View Certificate Details' dialog will state 'Details Omitted' next to these fields Certificate Collection Upon successful submission of the Account Validation form, a download dialog will be displayed enabling the applicant to download and save the certificate. 164
165 The applicant can collect the certificate by clicking 'Download' and save the file in a sale location in his/her computer. CM will deliver the certificate to the end-user in PKCS#12 file format (.p12 file). The pass-code specified in the PIN fields is used to protect access to this.p12 file. The end-user will be asked for this PIN when he/she imports the certificate into the certificate store of their machine. See section 'The Client Certificates Area' for more information regarding end-user and client certificate management Revocation of Client Certificates The client certificates belonging to any end-user can be revoked by two ways: The Administrator can revoke the client certificate belonging to any end-user, from the Certs dialog accessible by clicking Certificates Management > Client Certificates > clicking Certs button at the top after selecting the checkbox beside the end-user's name. See the section 'Certs' Dialog for more details; The end-user can directly revoke their client certificate. See the section Revocation of Client Certificates by End Users for more details. 165
166 Revocation of Client Certificates by End Users End Users can revoke their client certificates on their own, when a necessity arises. On such an occasion, the end-user can request the administrator. The Administrator can direct the end-user to access the revocation interface hosted at The pass-phrase set for the certificate is required for revoking the certificate by the end-user Procedure Overview 1. The end-user requests for access to the self revocation interface to the Administrator. 2. The Administrator directs the end-user to the manager.com/customer/incommon/smime?action=revoke revocation interface hosted at 3. The end-user accesses the revocation interface and fills the revocation form with the address and the passphrase set by him/her during self-enrollment or User Registration and submits the form. 4. The client certificate is revoked Revocation form Form Parameters Form Element Type Description (required) Text Field The end-user should enter their full address. Pass-Phrase (required) Text Field The end-user should enter the pass-phrase of the client certificate. This Pass-phrase must be the same as entered during self enrollment or in the User Registration form. Revoke Control Revokes the certificate Cancel Control Cancels the process Viewing End-User's Certificate Administrators can view the certificates applied for, downloaded by or issued to the end-users from the Client Certificates area. 166

167 Selecting the person whose certificate is to be viewed and clicking the 'Certs' button at the top will open the 'Certificates for...' dialog. Select the certificate that you want to view the details and click the 'View' button at the top. 167
168 Client Certificate 'View' Dialog - Table of Parameters Field Type Description Indicates the current status of the certificate. State Invited The end-user has been sent an invitation by the Administrator Requested The request has been sent to the Certificate Authority (CA) for approval. Applied The end-user has validated the and applied for the certificate. Issued The certificate was issued by CA and collected by Certificate Manager. A Blue font color (Issued) means that the certificate was issued by CA but was not installed. Downloaded The end-user has downloaded the certificate. Revoked The certificate in question is invalid because it was revoked. Expired The certificate in question is invalid because it's term has expired. Rejected CA rejected the request after validation check. 168
169 Ordered Numeric Date of the request made by InCommon Certificate Manager to CA. Type Text Field Type of the client certificate, prefixed with the customer name. Certificate Term The life term of the certificate Cert subject Name and address of the end-user Principal Name Text Field Principal name included in the certificate. Address 1: Text Fields Displays the address of the Organization as mentioned while requesting for the certificate. Address 2: Only those address fields that were allowed to be displayed while applying for the certificate are shown here and the rest of the fields are displayed as Details Omitted. Address 3: City: State or Province: Postal Code: Collected Numeric Date of the collection of certificate by CM from CA. Revoked Numeric Date of the revocation of the certificate. Expires Numeric Expiry date of the certificate. Order Number Numeric Order number of the certificate request made to CA. Serial Number Numeric Serial number of the certificate. Key Escrow Indicates whether Key Escrow is available for certificate recovery by the administrator. 3.3 The Code Sign Certificates Area The Code Sign Certificates area provides administrators with the information and controls necessary to manage the lifecycle of code signing certificates for their respective Organization/Department. Visibility of the 'Code Signing Certificates' area is restricted to: RAO Code Signing administrators - can view the code signing certificates and their applicants of Organizations (and any subordinate Departments) that have been delegated to them. DRAO Code Signing administrators - can view the code signing certificates and their end-users of Departments that have been delegated to them. 169

170 Code Sign Certificates area - Table of Parameters Field Name Description Name The name of the applicants. The address of the applicant. Order Number Order number of the certificate request made to CA. State Indicates the current status of the certificate. Invited The applicant has been sent an invitation by the Administrator Requested The request has been sent to the Certificate Authority (CA) for approval. Applied The applicant has validated the and applied for the certificate. Issued The certificate was issued by CA and collected by Certificate Manager, but not downloaded by the applicant. Downloaded The applicant has downloaded the certificate. Revoked The certificate in question is invalid because it was revoked. Expired The certificate in question is invalid because it's term has expired. Rejected CA rejected the request after validation check. Organization Name of the Organization to which the applicant belongs. Department Name of the Department to which the applicant belongs. Expires Control Buttons Expiration term of the certificate. Add Allows the administrator to add new applicant for the process of issuing code signing certificate Export Allows administrators to save the list of code signing certificates in CSV format. 170
171 Code Sign Certificates area - Table of Parameters Certificate Control Buttons Import from CSV Allows administrators to import a list of code signing certificates into InCommon CM in comma separated values (.csv) format. Refresh Updates the currently displayed list of users. Will remove any users that have been recently deleted and add any that have been recently created. Will update details such as Organization, etc if those details have recently changed. View Allows to view information about the certificate (see Code Sign certificate ''View' dialog description). Resend Invitation Re-sends the invitation to the applicant (thus validating the applicant s address and enabling them to request their certificate). Approve Approves the certificate request from the applicants (end-users) and sends the request for the certificate to CA. If the request is approved by InCommon CA, the certificate State changes to 'Issued'. If the request was declined by InCommon CA because of incorrect enrollment details (for example, a mistake in the CSR or other form value), then 'State' will be listed 'Invalid'. If the request was declined by InCommon CA for legal reasons then the certificate will have a status of 'Rejected'. Note: The types of certificate control buttons that are displayed in the table header depends on the state of the selected certificate 1) Certificate requests can be approved by: An RAO Code signing Administrator of the Organization on whose behalf the request was made. A DRAO Code signing Administrator of the Department within the Organization on whose behalf the request was made. Decline Declines the certificate request. This request will not be sent to InCommon CA for processing. Revoke Revokes the certificate. Delete Deletes the certificate. Sorting and Filtering Options Clicking on a column header sorts the items in the alphabetical order of the entries in the respective column. Administrators can search for particular code signing certificate by using filters. 171


172 To apply filters, click on the down arrow at the right end of the 'Filters' stripe. The filter options will be displayed. You can add filters by selecting from the options in the 'Add Filter' drop-down and group the selection with other options that appears depending on the selection from the 'Add Filter' drop-down. For example, if you want to filter the certificates with 'Name' and group with 'Organization', select 'Name' from the 'Add Filter' drop-down: Enter part or full name in the Name field. Select 'Organization' from the 'Group by' drop-down. Click the 'Apply' button. The filtered items based on the entered parameters will be displayed. To remove the filter options, click the 'Clear' button. Note: The search filters once configured for the interface will be automatically saved. When you are re-opening the 'Code Signing Certificates' interface in future, the configured filters will be in action and only the search results will be displayed. If you do not want the filters to be saved, click the 'Clear' button. 172
173 3.3.2 Code Sign Certificates View Dialog Clicking the 'View' button after selecting a certificate listed in the Code Sign Certificates tab will open a panel containing a summary of that certificate's details. Code Sign Certificate 'View' Dialog - Table of Parameters Form Element Name Type Text Field State Order Number Description The name of the applicant. Indicates the current status of the certificate. Invited The applicant has been sent an invitation by the Administrator. Requested The request has been sent to the Certificate Authority (CA) for approval. Applied The applicant has validated the and applied for the certificate. Issued The certificate was issued by CA and collected by Certificate Manager, but not downloaded by the applicant. Downloaded The applicant has downloaded the certificate. Revoked The certificate in question is invalid because it was revoked. Expired The certificate in question is invalid because it's term has expired. Rejected CA rejected the request after validation check. Numeric Order number of the certificate request made to CA. 173
174 Code Sign Certificate 'View' Dialog - Table of Parameters Text Field The address of the applicant. Contact Text Field Contact address or alternative address of the applicant. The contact address may be the customer facing address like support@company.com, sales@company.com etc. Organization Text Field Name of the Organization to which the applicant belongs. Term Numeric The life term of the certificate. Invited Numeric Date at which invitation was sent to the end-user. Requested Numeric Date of the request made by InCommon CM to CA. Collected Numeric Date of the collection of certificate by InCommon CM from CA. Downloaded Numeric Date of download of certificate by the end-user. Expires Numeric Expiry date of the certificate. Response from CA Text Field Comments, if any, from the CA Adding Certificates to be Managed There are several methods of adding certificates to the Code Sign Certificates area of Certificate Manager. Manually adding certificates Loading multiple certificates from a comma separated values (.csv) file Auto Creation of end-users by initiating self enrollment Manually Adding Certificates Click Certificates Management > Code Signing Certificates Click the Add button to open the Add New Code Signing Certificate form. 174

175 Add New Code Signing Certificate dialog - Table of parameters Field Type Description Organization Drop-down Select the Organization to which the applicant belongs. Department Drop-down Select the Department to which the applicant belongs. Domain Drop-down Select the domain pertaining to the Department Term Drop-down Select the term of the certificate. Address Text field Enter the address of the applicant. Full Name Text field Full name of the applicant. Contact Text field Enter the contact address of the applicant that should be included in the certificate. The contact address may be the customer facing address like support@company.com, sales@company.com etc. Complete the 'Add New Code Signing Certificate' form. Click 'OK'. If the applicant is an existing user, the corresponding certificate will be automatically added to CM. If the applicant is a new user, an invitation mail will be sent to initiate self enrollment process. Refer to Request and issuance of code signing certificates for more details on self enrollment Loading multiple certificates from a comma separated values (.csv) file Administrators can import a list of code signing certificates into InCommon Certificate Manager in comma separated values (.csv) format. After importing the list, the certificates belonging to existing users will be automatically added and 175
176 invitation s will be sent to new users automatically to initiate the self enrollment process, Refer to Request and issuance of code signing certificates for more details on self enrollment Procedure Overview Summary of required steps for adding certificates by loading a.csv file: 1. Administrator generates a.csv file using containing a list of the certificates..csv files can be exported directly from spreadsheet programs such as Excel or Open Office Calc. 2. Administrator loads the.csv file to CM by clicking 'Load from CSV' in 'Certificates Management' > 'Code Sign Certificates' interface Requirements for.csv file There are 6 potential values per certificate that can be imported in CM, but 4 are mandatory. As long as each user listed in the.csv file has at least these four elements then they can be added into the system. The 6 potential values are as follows. Mandatory values are highlighted in red. Make sure to export with the commas (,) and the quotation marks ("") as specified below Organization, Department, Term, Address, Full Name, Contact Address The following table explains the requirements and formats of the values. Values Required Organization Department Term Address Full Name Contact Address Yes No Yes Yes Yes No Min Length (characters) Max Length (characters) Format Characters allowed intege Valid address Valid name r ANY ANY Valid address A-Z, a-z, 0-9, '.', '-', A-Z, a-z, 0-9, '.', '-', ' A-Z, a-z, 0-9, '.', '-', 10 '_','@' ' '_', '@' Example: "Test Organization","Test Department","1 year","john_s@example.com","johnsmith","jsmith@alternative .com" In order to do load the.csv file to CM, click on 'Import from CSV' in 'Certificates Management' > 'Code Sign Certificates' interface. A File Upload dialog will appear. Click the 'Browse' button, and navigate to the.csv file, and click on 'Submit'. 176

177 An import status dialog box is displayed. You will see a progress bar indicating that information is being uploaded. On successful completion, all the imported data will appear in the list of certificates in 'Code Sign Certificates' and 'Organization' areas. 177

178 Auto Creation of End-Users by Initiating Self Enrollment Certificates issued to end-users by the self enrollment process are automatically added to the 'Certificate Management Code Sign Certificates' area. For more details see: Request and issuance of code signing certificates Request and Issuance of Code Signing Certificates Prerequisites The domain for which the code signing certificate is to be issued has been enabled for Code Signing certificates, has been pre-validated by InCommon CA and that the domain has been made activate by your InCommon account manager. (i.e. if you wish to issue code signing certs to then mycompany.com must have been pre-validated by InCommon.) All certificate requests made on 'pre-validated' domains or sub-domains thereof are issued automatically. However, if you request a certificate for a brand new domain, then this domain will first have to undergo validation by InCommon CA. Once validated, this new domain will be added to your list of pre-validated domains and future certificates will be issued immediately. The domain from which the client certificates are to be issued has been delegated to the Organization or Department.. See Editing an Existing Organizationfor more details on adding a domain to an Organization. The RAO Code Signing or DRAO Code Signing administrator has been delegated control of this Organization or Department The delegated RAO administrator has enabled Code Signing Certificates for the Organization by selecting the 'Enabled' check box in the 'Code Signing tab' of the 'Add New/Edit' Organizations dialog box (see screen-shot below) 178

179 Procedure Overview The Code Signing Certificates can be provisioned to the employees and end-users using a self-enrollment process. Overview of stages 1. The delegated RAO or DRAO Administrator confirms completion of the prerequisite steps. 2. The Administrator sends an invitation to the applicant for enrollment. 3. Applicant validates the address, completes the online form for auto-generation of CSR and requests for the certificate. 4. The certificate request is sent to InCommon CA servers by InCommon CM. 5. If the application is successful, InCommon CM sends an with a download link to the applicant, enabling to download the certificate. 6. The certificate will be automatically added to the applicant account in InCommon CM and will be manageable form the 'Code Sign Certificates' area Initiating the Enrollment Process After completing the prerequisite steps, Administrators need to send an invitation to the end-user. To send invitation and initiate the process Click the Add button from the 'Code Sign Certificates' area. 179

180 Add New Code Signing Certificate dialog - Table of parameters Field Type Description Organization Drop-down Select the Organization to which the applicant belongs. Department Drop-down Select the Department to which the applicant belongs. Domain Drop-down Select the domain pertaining to the Department Term Drop-down Select the term of the certificate. Address* Text field Enter the address of the applicant. The invitation message will be sent to this address. This will be validated before commencing the request process. Full Name* Text field Enter the Full name of the applicant. Contact Text field Enter the contact address of the applicant that should be included in the certificate. The contact address may be the customer facing address like support@company.com, sales@company.com etc. Note: Fields marked with * are mandatory. 180

181 Fill the necessary details and click 'OK'. An invitation will be automatically sent to the applicant. The certificate status will be set to 'INVITED' and added to 'Code Signing Certificates' area of CM. Note: For the new applicants added by importing a.csv file, the invitations will be sent automatically Validation of address and Requisition The applicant will receive an invitation with a link to validate his/her address. An example is shown below. Note: It is possible for administrators to modify the contents of these s in the ' Templates' area under Organization > Edit. Upon clicking the link in the mail, the address will be validated and the applicant will be taken to user registration form. 181
182 Form Parameters Form Element Type Description Code (required) Text Field The Code field will be auto-populated with the certificate request code, on clicking the validation link in the . If not, the end-user can copy the request code from the and paste in this field. (required) Text Field The address of the applicant. This field will be auto-populated. Advanced Private Key Options CSP Drop Down The applicant can select the cryptographic service provider for the certificate from the drop-down (Default = Microsoft Cryptographic Provider v1.0) Key Size Drop Down The applicant can select the key size for the private key of the certificate 182
183 Form Element Type Description (Default = 2048 bit) Note: The private key is generated locally by the crypto module of the browser/ operating system. The key never leaves the computer and no copy is ever transmitted to the certificate issuer. InCommon does not collect a copy of the private key at any time and cannot be recovered if it is lost. The certificate is useless without it. Hence the applicants are strongly advised to backup their private key, during certificate installation process. Exportable Checkbox The applicant can choose whether or not the certificate is exportable. User Protected Checkbox If enabled, you will be asked to set password and security levels during the certificate collection process. Windows will prompt you for a password and/or your permission every time you access your certificate to code sign. Subscriber Agreement (required) Checkbox Applicant must accept the terms and conditions before submitting the form. Generate Control Starts the certificate generation process. The applicant needs to fill-in the form, accept to the subscriber agreement by reading it and selecting the checkbox 'I Agree' and clicking the 'Generate' button. The certificate request will be automatically generated and a request will be sent to CM. The certificate status will be set to 'REQUESTED' in the Code Sign Certificates area. InCommon CM will process the request and send a certificate request to InCommon CA Server. The certificate status will be set to 'APPLIED' Downloading and Installing the Certificate The CM will collect the certificate from the server and send a notification mail to the end-user with a link to download the certificate. The certificate status will be changed to 'ISSUED' in Code Sign Certificates area. The applicant can follow the link and download the certificate. The certificate status will be changed to 'DOWNLOADED' in CM. The certificate can be installed by the applicant and used to digitally sign the executables. 183
184 4 Admin Management 4.1 Section Overview The Admin Management tab allows administrators to create, manage and edit permissions for new and existing administrators. There are 6 types of administrators Registration Authority Officer (RAO) - SSL Registration Authority Officer (RAO) - SMIME Registration Authority Officer (RAO) - Code Signing Department Registration Authority Officer (DRAO) - SSL Department Registration Authority Officer (DRAO) - SMIME Department Registration Authority Officer (DRAO) - Code Signing Administrative Roles: Registration Authority Officer (RAO) A Registration Authority Officer (RAO) is an administrative role created by a Master Administrator at InCommon CA or fellow RAO for the purposes of managing the certificates and end-users belonging to one or more CM Organizations. They have control over the certificates that are ordered on behalf of their Organization(s); over Domains that have been delegated to their Organization/Dept by the Master Administrator at InCommon CA; over any Departments of their Organization and over that Organization's end-user membership. The RAOs can create Departments and DRAO Administrators within their own Organization, but they should be approved by the Master Administrator at InCommon CA. RAO Administrators cannot create a new Organization or edit the General settings of any Organization - even those Organizations to which they have been delegated control. Click here for more details. Department Registration Authority Officer (DRAO) Department Registration Authority Officers are created by, and subordinate to, the RAO class of Administrator. They are assigned control over the certificates, users and domains belonging to a Department(s) of an Organization. DRAOs have privileges to access, manage and request certificates for Departments of a Organization that have been delegated to them by a RAO. DRAOs have no Admin creation rights. They can edit only self or fellow DRAO administrators of the Department(s) that have been delegated to them. DRAOs have visibility of and can request certificates only for the Department(s) that have been delegated to them. They have no access to manage certificates belonging to Organizations or Departments for which they have not been granted permissions. Click here for more details. It is also possible to create an Administrator with more than one Admin privileges. Further details about the privileges and security roles of these administrator types can be found in section Security Roles The remainder of this chapter contains detailed explanations of the controls available from the 'Admin Management' tab. 184
 Login String The login username of the administrator.")
185 Admin Management Area - Table of Parameters Fields Values Description Name String Administrator's full name. address String Administrator's Address (it will be used for client certificate enrollment, notifications) Login String The login username of the administrator. Type Role Shows the type of the administrators. Standard Indicates that the administrator is a standard administrator. IdP Template Indicates that the administrator is added as Identity Provider (IdP) template. IdP User Indicates that the administrator is added as IdP user. RAO Admin SSL RAO SSL Administrators have privileges to access, manage, request and approve the requests of SSL certificates for Departments/domains belonging to their Organization. (More...) RAO Admin SMIME RAO SMIME Administrators have privileges to access, manage, request and approve the requests of Client Certificates for Departments/domains that have been delegated to their Organization. (More...) RAO Admin Code Signing RAO Code Signing Administrators have privileges to access, manage, request and issue the Code signing Certificates for end-users belonging to their Organization. (More...) DRAO Admin SSL DRAO SSL Administrators have privileges to access, manage and request SSL certificates for Departments of a Organization that have been delegated to them by a RAO Admin. (More...) DRAO Admin SMIME DRAO SMIME Administrators have privileges to access, manage, request Client Certificates for domains that have been delegated to their Department. (More...) DRAO Admin Code DRAO Code Signing Administrators have privileges to access, manage, request and 185
 Checkbox Indicates whether the administrator is active or not. Also allows delegated RAO admins to switch other admins between active and inactive states according to their privilege levels.")
186 Admin Management Area - Table of Parameters Fields Active Values Description Signing issue the Code signing Certificates for end-users belonging to their Department. (More...) Checkbox Indicates whether the administrator is active or not. Also allows delegated RAO admins to switch other admins between active and inactive states according to their privilege levels. Note: An administrator can enable or disable the columns displayed in the table, from the drop-down at the right end of the table header: Control Buttons Add Enables RAO Administrators to add new administrators. Edit Enables RAO Administrators to modify the details of the selected administrator. Delete Deletes the administrator. NOTE: If an Administrator is deleted, the details of that Administrator can be viewed but they will no longer be editable. Refresh Refreshes the list. Administrator Control Buttons Edit Enables RAO administrators to modify the details of the selected administrator. Note: The availability of the control buttons depends on the chosen administrator. Delete Deletes the administrator. Note: If an Administrator is deleted, the details of that Administrator can be viewed but they will no longer be editable. View Enables admins to view the details of RAO/DRAO added by another RAO, pending approval. Approve Enables admins to approve RAO/DRAO added by an RAO. The newly added administrator becomes active only on approval by the Master administrator. Reject Enables MRAO admins to reject RAO/DRAO added by an RAO, pending approval. Reset Lockout Enables Master admins to unlock the login screen that has been locked due to consecutive five wrong attempts to login. 186


187 4.1.1 Sorting and Filtering Options Clicking on the column header 'Name', ' ' or Type sorts the items in the alphabetical order of the entries in the respective column. Administrators can search for particular administrator by using filters under the sub-tab: You can add filters by selecting from the options in the 'Add Filter' drop-down and group the selection with other options that appears depending on the selection from the 'Add Filter' drop-down. For example if you want to search for DRAO SSL administrators belonging to 'org1' Organization and 'dept1' Department and group them based on their types: Choose 'Role' from the 'Add Filter' drop-down Choose 'Organization' from the 'Add Filter' drop-down The Organization and Department filters will be displayed. Choose 'org1' Organization and 'dept1' Department from the 'Organization' and 'Department' drop-downs respectively Choose 'Type' from the 'Group by' drop-down 187


188 Click the 'Apply' button. The filtered items based on the entered and selected parameters will be displayed: To remove the filter options, click the 'Clear' button. Note: The search filters once configured for the interface will be automatically saved. When you are re-opening the 'Admins' interface in future, the configured filters will be in action and only the search results will be displayed. If you do not want the filters to be saved, click the 'Clear' button. 4.2 Adding Administrators 1. Click the Admins tab at the top of the Certificate Manager interface 2. Click the Add button to open the Add new Client Admin form. 3. Complete the 'Add New Client Admin' form. 188
189 4. Click 'OK' to add the administrator to the Certificate Manager 'Add New Client Admin' form - Table of Parameters Form Element Type Description Credentials Login* Text Field Enter login username for the new administrator. * Text Field Enter full address of the new administrator. Forename* Text Field Enter first name of the new administrator. Surname* Text Field Enter surname of the new administrator. Title Text Field Enter the title for the new administrator. Telephone Number Text Field Enter the contact phone number for the new administrator. 189
190 Form Element Type Description Street Text Field Enter the address details of the new administrator. Locality Text Field State/Province Text Field Postal Code Text Field Country Drop-down Relationship Text Field The role of the new administrator, for example, RAO SSL Administrator. Certificate Auth Drop-down Enables the administrator to specify whether the new administrator must authenticate themselves to Certificate Manager with his/her client certificate over a https: connection prior to being granted login rights. The drop-down is auto-populated with the client certificate(s) issued by CM for the new administrator, based on his/her address in the ' ' field. If authentication is needed, the administrator can select the certificate from the drop-down. The new administrator can login to CM, only if the specified certificate is installed on the computer from which he/she attempts to login. If authentication is not needed, the administrator can select 'Disabled' from the drop-down. Password* Text Field Confirm Password* Text Field Enter the password for the new administrator to access the CM interface and reenter the same for confirmation. The new administrator will need to change the password upon his/her first login. Privileges Administrator can assign admin management privileges to the new administrator. The new administrator will be able to add, edit or remove other administrators of their own level or of lower level in the hierarchy, depending on the options selected here. Allow creation of peer admin users Checkbox Enables the new administrator to add new administrators from their management interface. Allow editing of peer admin users Checkbox Enables the new administrator to edit roles of existing administrators from their management interface. Allow deleting of peer admin users Checkbox Enables the new administrator to remove existing administrators from their management interface. 190
191 Form Element Type Description Note: The new administrator can create, edit or delete the other administrators of their own tier and administrators of the lower tier. Refer to the descriptions under Administrative Roles in the section 4.1 Section Overview for more details. Allow domain validation without Dual Approval Checkbox The new administrator will be privileged so that the domain creation/delegation approved by the administrator will be activated immediately, without the requirement of approval by a second MRAO. This checkbox will be active only for Administrators with MRAO role. Refer to the section Domains for more details. Allow DCV Checkbox Enables the new administrator to initiate Domain Control Validation (DCV) process for newly created domains. The privilege is available only for MRAO and RAO/DRAO SSL Administrators. Allow SSL Details changing Checkbox Enables the new MRAO or RAO/DRAO SSL administrator to change the details of SSL certificates from the Certificates > SSL Certificates interface. Allow SSL auto approve Checkbox The SSL certificates requested by the MRAO administrator is automatically approved and those by RAO/DRAO SSL administrators are automatically approved by the administrator of same level and await approval from higher level administrator. Note: 'Allow domain validation without Dual Approval' and 'Allow DCV' fields will only be visible if the features are enabled for your account. Role Administrator can assign the role to the new administrator. For more details on the roles, refer to the section Administrative Roles. Checkboxe The new Administrator can be assigned to a particular s Organization/Department by selecting the appropriate RAO Admin SMIME Organization/Department from the list that appears after selecting a role. All RAO Admin Code Organizations are listed by default. Clicking the '+' button beside the Signing Organization name expands the tree structure to display the Departments associated with the Organization. DRAO Admin SSL DRAO Admin SMIME DRAO Admin Code Signing Clicking on 'Expand All' expands the tree structure to display all the Departments under each Organization. Clicking on 'Collapse All' in the expanded view collapses the tree structure of all the Organizations and hides the Departments under each Organization. RAO Admin SSL Note: Fields marked with * are mandatory. 191
. 3. Complete the 'Add New Client Admin' form. i.")
192 4.2.2 Example: Adding a New Administrator with Multiple Security Roles 1. Click the 'Admin Management' tab at the top left of the Certificate Manager interface. 2. Click the 'Add' button to open the 'Add new Client Admin' form (as shown below). 3. Complete the 'Add New Client Admin' form. i. Fill out the contact, login details and password and select the privileges that should apply to the new administrator ii. Next, you should specify the new administrator's security role: A new administrator can be: RAO Admin SSL - Will be able to manage ONLY SSL certificates and ONLY for selected Organization(s). 192
.")
193 RAO Admin SMIME - Will be able to manage ONLY client certificates and ONLY for selected Organization(s). RAO Admin Code Signing - Will be able to manage ONLY the code signing certificates issued to end-users belonging to the selected Organization(s). DRAO Admin SSL - Will be able to manage ONLY SSL certificates and ONLY for selected Departments(s). DRAO Admin SMIME - Will be able to manage ONLY client certificates and ONLY for selected Departments(s). DRAO Admin Code Signing - Will be able to manage ONLY the code signing certificates issued to end-users belonging to the selected Department(s). The same RAO can be assigned as RAO SSL, RAO SMIME and RAO Code Signing as required. Similarly, same DRAO can be assigned as RAO SSL, RAO SMIME and RAO Code Signing as required. Further details about the privileges and security roles of these administrator types can be found in section Administrative Roles iii. Select the Organization/Department to which the new administrator will have access as shown above. If the single RAO is chosen as RAO SSL, RAO SMIME and/or RAO Code Signing, he or she can have the multiple privileges only for a particular Organization. Similarly, If the single DRAO is chosen as DRAO SSL, DRAO SMIME and/or DRAO Code Signing, he or she can have the multiple privileges only for a particular Department. iv. Click 'OK' to save all changes and finish the process The 'Certificate auth' Field If enabled, the administrators currently being created will only be able to login to Certificate Manager after authenticating themselves with an certificate. This means, that the Certificate Manager Server will request the certificate specified during creation of the administrator in addition to their login and password details. If Certificate Manager does not detect the authentication certificate specified during adding an admin, an error will be displayed and the administrator will not be able to login. 193
194 If Certificate Manager does not detect the correct authentication certificate during login, an error stating that data doesn't match. The administrator should restart the browser and select the correct digital certificate when requested at the login page. If the correct certificate is not detected or is not present on the administrator's system then they will not be able to access the Certificate Manager interface. Note: In the event that an administrator has replaced their certificate used for 'Certificate Auth', Certificate Manager needs to re-sync their certificate information. You will need to re-select the appropriate certificate. To do this: Open the Admins interface by clicking the 'Admins' tab Click 'Edit' button at the top after selecting the radio button next to the administrator's name to re-open the administrator configuration dialog Select the new authentication certificate from the 'Certificate Auth' drop down. Save by clicking 'OK'. 4.3 Editing Administrators All parameters of any administrator can be modified at any time by selecting the administrator and clicking the 'Edit' button at the top. Full details of the options available when editing an existing administrator are available in the section 'Add New Client Admin' form - table of parameters. 194

195 4.4 Deleting an Administrator Master Administrator can delete any administrator by clicking 'Delete' button at the top after selecting the administrator's name. Click OK to delete the Administrator. 5 Settings 5.1 Overview The 'Settings' area contains several tabs relating to the overall configuration of CM. The number of tabs that are visible to a particular administrator is dependent on their security role. Organizations - Visible only to RAO class administrators. RAOs can view, edit, request new domains and add Departments to Organizations that have been delegated to them. Departments - Visible only to DRAO class administrators (DRAO s see a Departments tab instead of the Organizations tab). Allows DRAOs to view all Departments that have been delegated to them and to request new domains for those Departments. Domains - RAO class administrators can view the domains belonging to their Organization; can delegate domains to subordinate Departments and can request new domains for their Organization. DRAOs can view existing domains and request the addition of new ones. 195
196 Notifications - Allows administrators to precisely define notifications to various personnel based on a range of parameters - including notifications triggered by SSL certificate status, notifications triggered by Client Certificate status and notifications triggered by Discovery Scan Summaries. Encryption - Visible only to RAO/DRAO SMIME administrators. Allows administrators to initialize a new master key pair or to re-encrypt the private keys of client certificates held in escrow. Note: SMIME administrators are strongly advised to familiarize themselves with the information in this section. 5.2 Organizations Section Overview The 'Organizations' area allows RAO class administrators to view and manage their delegated Organizations and any Departments of that Organization. From here, RAOs can: Edit the way their Organization issues certificates Modify the content of notifications that are issued on behalf of their Organization Create, Edit or Delete Departments of that Organization Request the addition of new Domains for their Organization Delegate existing Domains to any Organization or Department that they control 'Organizations' and 'Departments' and the delegation of domains to these entities is crucial to the issuance and effective management of SSL, code signing and SMIME certificates via the Certificate Manager interface. Each Organization can have multiple Departments. 'Organizations' can only be managed by an RAO administrators whereas 'Departments' can be managed by a dedicated DRAO administrator or by the RAO. (Note: DRAO class administrators cannot view or access the 'Organizations' area - they see the 'Departments' area instead.) Summary: Organizations are umbrella entities for the purposes of requesting, issuing and managing certificates for domains and employees. Each Organization can have multiple Departments. Furthermore, each Organization and each Department can have multiple domains delegated to it. RAO class administrators can manage all certificates (of the type that they have privileges for), domains and users belonging to their Organization and any of its sub-departments. They are also able to create new Departments and appoint DRAO administrators. RAO class administrators can request that certificates be issued to domains that have been delegated to their Organization. They can also approve/decline certificate requests from individuals using the external application form. RAO SSL administrators can manage SSL certificates for their Organization/Departments via the 'Certificate Managements - SSL Certificates' area. RAO Code Signing administrators can manage Code Signing Certificates for their Organization/Departments from the 'Code Signing' area. RAO SMIME administrators can manage the client certificates of end-users belonging to their Organization/Departments via the 'Certificates Management - Client Certificates' area. End-users can be assigned membership of an Organization or Department and provisioned with client certificates for the domain that is associated with that Organization/Department. 196
197 A wide range of Organization and Department specific notifications can be set up to alert personnel to changes in certificate status, changes to domain status, Discovery Scan Summaries, Admin creation and more. RAO and DRAO SSL administrators can utilize the Certificate Discovery feature to audit a network for the presence of SSL certificates then assign any unmanaged certificates to their Organization or Department. Reports can be run, viewed and exported for an Organization or Department CM Entity Organization Administrator Types RAO Administrator - SSL RAO Administrator - SMIME RAO Administrator - Code Signing Certificates Department RAO Administrator - SSL RAO Administrator - SMIME RAO Administrator - Code Signing Certificates DRAO Administrator - SSL DRAO Administrator - SMIME DRAO Administrator - Code Signing Certificates Although we strongly advise administrators to carefully plan any Organizational and administrative structure beforehand, it is, of course, possible to rearrange and tweak your structure at a later date. Organizations, Departments, Domains and Administrators are each created and configured as independent entities in CM. It is the association and delegation of these entities into a coherent superstructure which forms the key to an effective certificate management hierarchy for your enterprise. If you would like further advice on setting up an Organizational structure and administrative chains-ofcommand then please contact your InCommon account manager Example Scenarios In order to maximize the effectiveness of your CM implementation, it is important that you first decide the structure of your Organizational and administrative hierarchy. CM's flexibility allows you to create and delegate hierarchies that are as simple or sophisticated as you require. You can delegate the same domain to multiple Departments You can delegate multiple admins to a single Department You cannot delegate domains directly to admins The examples listed below are merely workable suggestions for reasonably straightforward situations. Administrators should, of course, follow their own policies when determining how to setup and manage domains between Organizations and Departments. Each example outlines a hypothetical issuance scenario followed by two or three alternative solutions that are possible through CM: Example 1: Scenario: You wish to issue only SSL certificates for a single first level domain and two sub-domains. 197
198 Solution 1 - Simple: Certificates for all domains are delegated to the Organization and managed by a single RAO SSL admin Request the creation of an RAO SSL admin if one does not already exist Do not create any DRAO SSL admins Do not create any Departments Delegate the domain and all sub-domains your Organization Organization Name Organization Admin(s) Department Name / Department Admin Domains Your Organization RAO SSL Solution 2 - Simple: Create three Departments and delegate a domain to each one. Create a single DRAO SSL admin to manage all Departments. Request the creation of an RAO SSL admin if one does not already exist Create and approve a DRAO SSL admin Create three Departments Delegate each domain to a separate Department Delegate the DRAO SSL to manage all three Departments Organization Name Organization Admin(s) Department Name / Department Admin Department 1 Your Organization RAO SSL Department 2 Domains DRAO SSL Department Solution 3 - Intermediate: Create three Departments and delegate a domain to each one. Create three DRAO SSL admins to manage each of the Departments. Request the creation of an RAO SSL admin if one does not already exist Create and approve three DRAO SSL Admins Create three Departments Delegate each Domain to one of these Departments Delegate one DRAO SSL Admin to each of the Departments Organization Name Organization Admin(s) Department Name / Department Admin Your Organization RAO SSL Department 1 / DRAO SSL 1 Department 2 / DRAO SSL 2 Domains 198
199 Department 3 / DRAO SSL 3 Example 2: Scenario: Your company issues both SSL certificates and SMIME certificates. Your company operates 2 distinct websites, each with it's own unique first level domain name and two sub-domains. Solution 1 - Simple: Request the creation of one RAO SSL admin and one RAO SMIME admin if they do not already exist Do not create any DRAO class admins Do not create any Departments Delegate both first level domains and all sub-domains to your Organization The RAO SSL admin manages all SSL certificates for all domains The RAO SMIME admin manages all Client Certificates for all domains Organization Name Organization Admin(s) Department Name / Department Admin Domains Your Organization RAO SSL RAO SMIME Solution 2 - More sophisticated: Request the creation of one RAO SSL admin and one RAO SMIME admin if they do not already exist Create four Departments Create four DRAO SSL admins Create two DRAO SMIME admins Delegate the top level Domain and the two sub-domains of website #1 each to a separate Department. Assign a DRAO SSL admin to each of these Departments. Delegate the top level Domain and the two sub-domains of website #2 all to Department 4. Assign the remaining DRAO SSL admin to this fourth Department. Delegate one DRAO SMIME as administrator of Departments 1,2 and 3. Delegate the other DRAO SMIME as admin of Department 4 Organization Name Your Organization Organization Admin(s) Department Name / Department Administrator RAO SSL Domains Department 1 DRAO SSL 1 Department 2 DRAO SSL
200 Organization Name Organization Admin(s) Department Name / Department Administrator Department 3 DRAO SSL 3 Domains Department 4 DRAO SSL RAO SMIME Department 1 Department 2 DRAO SMIME 1 Department Department 4 DRAO SMIME Organization Management Organizations Area Overview Click the 'Organizations' sub-tab of the 'Settings' tab to open the Organization management area. This area: Lists all Organizations available to an RAO admin Allows RAO and DRAO admins to modify certificate settings and templates for their Organization and/or Department Allows RAO admins to request new and delegate existing Domains to an Organization or Department Allows RAO admins to search and filter Organizations by Name and Department. Administrative Roles: 200
 that has/have been delegated to them. DRAO Administrators cannot view the 'Organizations' area.")
201 RAO Administrators - can only see their own Organization(s) in the 'Organizations' area. They cannot create new Organizations but can manage and create Departments for the Organization(s) that has/have been delegated to them. DRAO Administrators cannot view the 'Organizations' area. They have visibility only of the 'Departments' tab. They have the rights to manage only the Department(s) that has/have been delegated to them. The following table provides a summary of the ability of Administrator types to manage Organizations and Departments: RAO DRAO Can Manage the Delegated Organization Can create Department(s) and manage Subordinate Can manage Delegated Department (s) (via the 'Departments' sub-tab) Summary of Fields and Controls Column Display Description Name String Name of the Organization City String Name of the City where the Organization is located State String Name of the State or province Country String Two character country code Postal Code Numeric The postal code or zip code of the city Validation Status String Indicates whether the organization has been validated by the Master Administrator. Note: An administrator can enable or disable the columns from the drop-down button beside the last item in the column: Control Buttons Refresh Updates the list of displayed Organizations. Organization Edit Control Buttons Enables administrators to modify Client, SSL and Code Signing Certificate settings pertaining to an existing Organization. Note: The Organization control buttons appear only on selecting an Enables administrators to view, edit and delegate domains to the Organization and the Departments within the Organization. Departments Enables administrators to view and manage Departments that belong to that Organization. Domains 201


202 Organization Sorting and Filtering Options Clicking on the column header 'Name' sorts the items in the alphabetical order of the names of the organizations. Administrators can search for particular organization by using the filters. To apply filters, click on the down arrow at the right end of the 'Filters' stripe. The filter options will be displayed. You can add filters by selecting from the options in the 'Add Filter' drop-down and group the selection with other options that appears depending on the selection from the 'Add Filter' drop-down. Enter part of or full name in the 'Name' field and click the Apply button. The filtered items based on the entered parameters will be displayed. 202

203 To remove the filter options, click the 'Clear' button. Note: The search filters once configured for the interface will be automatically saved. When you are re-opening the 'Organizations' interface in future, the configured filters will be in action and only the search results will be displayed. If you do not want the filters to be saved, click the 'Clear' button Editing an Organization Selecting an Organization and clicking the 'Edit' button at the top will open the Edit Organization dialog. 203

204 The dialog enables the RAO and DRAO Administrators to modify certificate and settings for their Organization or Department. The precise functionality available in this dialog depends on the type of RAO administrator that is logged in: RAO SMIME admins see 'General Settings', 'Client Cert' and ' Template' tabs RAO SSL admins see 'General Settings'', 'SSL' and ' Template' tabs RAO Code Signing admins see 'General Settings', 'Code Signing Certificate' and ' Template' tabs Note: Any changes you make to the settings of an existing Organization will NOT affect certificates that have already been issued. 204

205 General Settings RAO and DRAO Administrators cannot edit the name and address details in the 'General' settings relating to an Organization. Please contact the Master Administrator at InCommon CA should your company wish these details to be altered. Note: The Master Administrator at InCommon is the person responsible for approving requests made by RAO and DRAO administrators. This includes approving requests for creating new domains; delegating domains to Organizations and requests for new SSL and Code Signing Certificates. The Master Administrator also initiates the process for validating an organization and departments under it for the request and issuance of OV SSL certificates. ACL: Enables the administrator to configure and limit incoming access to the CM interface to certain IP addresses and ranges. This is very useful if they want to grant access only to certain IP addresses and so prevent unauthorized or unsecured access to the CM interface. After specifying one or more IP addresses or ranges in CIDR notation, only administrators attempting to login from these specified addresses will be allowed access Imposing Access Restrictions to CM interface Security Roles: RAO - can impose access restrictions to CM for the management of the certificates, administrators, end-users and settings for the Organizations (and any subordinate Departments) that have been delegated to them. 205

206 DRAO - can impose access restrictions to CM for the management of the certificates, end-users and settings for the Departments that have been delegated to them. To limit incoming access to the CM interface Click the 'Edit' beside 'Access Control List' under the 'General' tab of the 'Edit Organization' dialog. The 'Access Control for...' dialog will appear. Column Display Description CIDR Short for Classless Internet DOMAIN Routing. Administrator should specify IP range: it should be IP address followed by network prefix, e.g /16. Description Contains a short description for the IP range as entered by the administrator while creating the CIDR. Controls Description 206

207 Edit Enables administrator to edit CIDR's details. Delete Enables administrator to delete the CIDR. Add Opens 'Add IP Range' dialog. Refresh Updates the list of IP ranges. To Add a new IP Range Click 'Add'. The 'Add IP Range' dialog will appear. Enter the IP range, followed by network prefix, e.g /16. Enter a short description for the IP range Click OK. The IP range will be added as a new CIDR and the access to CM from the new IP range will be allowed EV Details Tab RAO and DRAO Administrators cannot edit the details in the 'EV Details' tab relating to an Organization. Please contact the Master Administrator at Comodo CA should your company wish these details to be altered. Note: The EV details tab is displayed only if Extended Validation Registration Authority (EVRA) feature is enabled for your InCommon CM account. Contact your Master Administrator for enabling this feature. 207

208 Client Cert Settings Tab The 'Client Cert' tab allows RAO SMIME administrators to configure enrollment and term settings relating to client certificates issued to end-users. The settings chosen in this section relate only to those client certificates issued to the domain associated with the currently selected Organization. 208

209 Client Cert Settings - Table of Parameters Field Name Self Enrollment Type Description Check-box Checking this box will allow the end-users that belong to the Organization to apply for a personal certificate using the enrollment form hosted (by default) at: action=enroll&swt=ac. The Administrator can communicate the selfenrollment URL and the Access Code specified for the Organization to an end-user, enabling the end-user for self enrollment. Default state - not checked Access Code (Appears only if the 'Self Enrollment' check-box is selected) String (Required) Web API Check-box Default state - not Users that apply for a client certificate using the enrollment forms will also be automatically created as a new 'End-User' in this Organization/Department if they do not already exist. (List of endusers is viewable in the Client Certificates area of Certificates Management' section). Access Code - To authenticate the certificate application, applicants are required to provide an access code at the Client Certificate Self Enrollment Form. The RAO administrators can modify the Access Code set by the Master Administrator while creating the Organization and should choose a complex access code containing a mixture of alpha and numeric characters that cannot be easily guessed. This access code should be conveyed to the applicant(s) along with the URL of the sign up form. Checking this box enables certificate enrollment through the WebService API. This requires a special agreement with InCommon. For detailed 209
210 Field Name Type Description checked instructions please refer to Web API documentation. Secret Key (Appears only if the 'Web API' check-box is selected) String The Secret key is a phrase that is unique to the Organization. This phrase restricts access for enrolling certificates for that Organization. Allow Key Recovery by Master Administrator Check-box If selected, the Master Administrator will have the ability to recover the private keys of client certificates issued by this Organization. At the point of creation, each client certificate will be encrypted with the Master Administrator's master public key before being placed into escrow. If this box is selected then the Organization will not be able to issue client certificate UNTIL the Master Administrator has initialized their master key pair in the Encryption tab. Default state - checked Allow Key Recovery by Organization administrators Check-box Default state - checked Not modifiable See 'Encryption and Key Escrow' for a more complete explanation of key recovery processes. If selected, the RAO will have the ability to recover the private keys of client certificates issued by this Organization. At the point of creation, each client certificate will be encrypted with the RAOs master public key before being placed into escrow. If this box is selected then the Organization will not be able to issue client certificate UNTIL the RAO has initialized their master key pair in the Encryption tab. See 'Encryption and Key Escrow' for a more complete explanation of key recovery processes. Client Cert Types Button 'Customize' Key Usage Template Drop-down The Client Cert types customization options allow the administrator to specify the Client Certificate types and term lengths that will be available for this Organization through the Self Enrollment Forms. Refer to the section Customize an Organization's Client Certificate Types for more details. Clicking the 'customize' button will open the 'Bind Client Cert Types' interface. All choices made in the 'Bind Client Cert Types' interface will apply only to this specific Organization.. If a particular certificate type or term is not visible in the 'Bind Client Cert Types' area then it may need enabling in the 'Client Cert Types' area. RAO SMIME and DRAO SMIME Administrators should seek the advice of the Master Administrator. The Key Usage Template (KUT) options allow administrators to specify the scope of key usage in client certificates of this Organization and its subordinate Departments. It is possible for a key to be capable of (1) Digitally signing (2) Encrypting (3) Both signing and encrypting. Please refer to the section 'Defining Key Usage Template for an Organization's Client Certificates' for more details. The 'KUT' drop-down will display the list of options to specify the usage scope of the keys of client certificates of end-users belonging to the organization. The options are limited to those as allowed by the Master Administrator. 210

211 Field Name Type Description The KUT defined through the 'Key Usage Template' drop-down will apply only to this specific Organization Customize an Organization's Client Certificate Types The types and term lengths of Client Certificates that are available to any particular Organization can be customized using the 'Bind Client Cert Types' interface. Creating a targeted 'certificate roster' simplifies the certificate selection procedure at the application forms and helps avoid applications for certificates which are inappropriate for that Organization. Security Roles: RAO SMIME - can customize client certificate type availability only for the Organizations and the Departments belonging to the Organizations that are delegated to them. DRAO SMIME - cannot customize client certificate type availability. To access the 'Bind Client Cert Types' interface, click the 'Customize' button under the Client Cert tab of the Edit Organization interface: This will open the 'Bind Client Cert Types' for that Organization, that enables to restrict the Client Cert types that will be available to applicants using the Self Enrollment Form for that Organization. By default, the 'Customized' option is left unchecked so that all the certificate types are available through the self enrollment forms (both Access Code and Secret ID based application forms). 211

212 To restrict the Client Cert types and their term lengths: 1. Select the 'Customized' check box. 2. Check the names of the certificates you wish to be available for the Organization leave the others unchecked. 3. Click the 'Select' button next to the certificate name to choose which terms will be available. If you want to set the selected term as default term for the selected certificate type, select Default radio button. 4. Select the Validation type from the drop-down. The two options available are 'Standard' and 'High' validation types. 'Standard' certificates can be issued quickly and take advantage of the user authentication mechanisms that are built into CM. A user applying for a 'Standard Personal Validation' certificate is authenticated using the following criteria: User must apply for a certificate from an a domain that has been delegated to the issuing Organization The Organization has been independently validated by an web-trust accredited Certificate Authority as the owner of that domain User must know either a unique Access Code or Secret ID that should be entered at the certificate enrollment form. These will have been communicated by the administrator to the user via out-of-band communication. User must be able to receive an automated confirmation sent to the address of the certificate that they are applying for. The will contain a validation code that the user will need to enter at the certificate collection web page. 'High Personal Validation' certificates require that the user undergo the validation steps listed above AND Face-to-Face meeting with the issuing Organization Note: The additional validation steps must be completed PRIOR to the administrator selecting 'High Personal Validation' type. 212

213 5. Click 'OK'. The administrator needs to log out then back in again for the customization options to take effect. Only the types and terms of client certificates that are selected in the 'Bind Client Cert Types' interface will now be available in the 'Type' drop-down field of the Self Enrollment form Defining Key Usage Template for an Organization's Client Certificates Security Roles: RAO SMIME - Can define KUT for Organization(s) delegated to them and the Departments belonging to those Organizations. The KUT options available for an Organization depend on the templates defined for the Organization by the Master Administrator. DRAO SMIME - cannot view or change the KUTs. The KUT for the Client Certificates of the end-users belonging to any particular Organization can be defined through 'Key Usage Template' drop-down. Defining the templates restrict the usage of the client certificates to the purposes of digital signing, encryption or both depending on the nature of the Organization and limits the inappropriate usage by the endusers. To define KUT for the Organization Click the drop-down arrow beside the 'Key Usage Template' drop-down box. The list of options as allowed by the Master Administrator for the Organization will be displayed. Select the option and click OK. Notes: Only one KUT can be specified by the RAO Administrator for an Organization and it will apply only to this specific Organization. 213

214 If the Master Administrator has not assigned any templates, the options will not be available SSL Certificates Settings Tab The 'SSL' tab allows RAO SSL administrators to specify Self Enrollment, certificate types and term lengths, Web API capabilities and expiry synchronization settings relating to the SSL certificates issued to the domain associated with the Organization (or Department of the Organization) SSL Certificates - Table of Parameters Field Name Self Enrollment Type Check-box Default state - not checked Description Checking this box will enable external requests for SSL certificates to be made by using the Self Enrollment Form. Certificates requested using the Self Enrollment Form will appear in the 'SSL Certificates' sub-tab of 'Certificates Management' section of InCommon Certificate Manager before they are submitted to InCommon CA for validation. It is the responsibility of the administrator to review then approve or decline the request. If the request is approved it will then be forwarded to InCommon CA for processing. If the application is made for a domain that has been 214
215 Field Name Type Description pre-validated for your account then certificate will be issued immediately. If the application is made for a new domain, then InCommon will first need to validate your company's ownership of that domain prior to issuing the certificate. After successful validation, the new domain will be added to your list of 'pre-validated' domains and future certificates will be processed immediately. To successfully complete the SSL request, the applicant must supply the correct Access Code for the Organization the Self Enrollment Form. This Access Code should be communicated to the applicant using out-of-bands methods. Provided that the Access Code matches the Organization being applied for AND the address that the applicant entered at the enrollment form is from the same domain as that Organization's 'Common Name' then SSL certificates can be requested by individuals that do not yet exist in InCommon Certificate Manager. In such circumstances, a new end-user will be automatically created under the 'SSL Certificates' sub-tab of CM interface with the enduser name 'requesterssl <DOMAIN.com>' (where DOMAIN.com = the domain name for which the application is being made). This EndUser will automatically be assigned membership of the Organization that the SSL Certificate was ordered for but will not own a Client Certificate. Access Code (Appears only if the 'Self Enrollment' check-box is selected) String Sync. Expiration Check-box Date Access Code - To help authenticate the certificate application to Certificate Manager, applicants are required to provide an access code at the Self Enrollment Form. Administrators should choose a complex access code containing a mixture of alpha and numeric characters that cannot easily be guessed. This access code should be conveyed to the applicant(s) along with the URL of the sign up form. Applicants requesting an SSL certificate using the Self Enrollment Form will be required to enter this code. Checking this box will enable the ability to modify and synchronize the expiration month and day of all certificates issued to the Organization. It is possible to select only a specific day of the month for expiry (simply select 'Not Used' for 'Sync. Month') It is possible to select both a specific day and a specific month for expiry. It is not possible to specify just a month of expiry. Sync. Month: Drop-down Selection Allows Administrators to choose a specific month of the year during which all certificates issued to the Organization will expire. Administrators will also need to choose a specific day of expiration. Sync. Day: String RAO SSL administrators can specify the day of the month on which certificates issued to the domain will expire. Numeric character. Between 1-31 if no specific month is Specifying a certain day of the month for expiry for all SSL certificates issued to an Organization(s) can greatly simplify the certificate management process - especially in enterprises with large volumes of certificates. 215
216 Field Name Type Description chosen. Between 1-31 ; 1-30 or 1-28 if a specific month is also chosen. Note 1: Certificate terms cannot exceed the duration selected at the SSL certificate application form. This means: IF a specific Month is ALSO selected at the 'Sync. Month' drop down THEN the certificate will expire on the occurrence of that precise date that is closest to the certificate term selected on the SSL Certificates Self Enrollment Form or the Built In Application Form IF a specific Month is NOT selected at the 'Sync. Month' drop down THEN the certificate will expire on the numbered day of the month that is nearest to the certificate term selected on the SSL Certificates Self Enrollment Form or the Built In Application Form Example: Ordinarily, a 2 year certificate issued on the 12th of August 2008 would expire 730 days later on the 12th August However: If the administrator has ONLY specified day 16 as the 'sync expiry day' then the certificate will expire on the 16th of July 2010 If the administrator has ONLY specified day 5 as the 'sync expiry day', then the certificate will expire on the 5th August 2010 If the administrator has specified 14th of June as the sync expiry 'day' and 'month', then the certificate will expire on the 14 th June 2010 If the administrator has specified 14th of August as the sync expiry 'day' and 'month', then the certificate will expire on the 14 th August 2009 Note 2: Specifying a sync expiry day only affects certificates issued from that point forward. The expiry date of certificates that have already been issued will not change. The sync expiry day will, however, apply to all renewals of existing certificates. Web API Check-box Default state - not checked Secret Key (Appears only if the 'Web API' check-box is selected) String SSL Types Button The Secret key is a phrase that is unique for all Organizations. This phrase restricts access for certificate enrollment for that Organization. 'Customize' Checking this box enables certificate enrollment through the WebService API. This requires a special agreement with InCommon. For detailed instructions please refer to Web API documentation. Used in pair with 'Organization ID' (visible only for already created Organizations). The SSL types customization options allow the RAO SSL admin to specify the SSL Certificate types and term lengths that will be available for this Organization for new certificate applications. Clicking the 'Customize' button will open the 'Bind SSL Types' interface. All choices made in the 'Bind SSL Types' interface will apply only to this specific Organization. It is possible to make different certificate types and terms available to the applicant depending on whether the application is made using the Built-in application form (Admin UI) or the (Self) Enrollment form. If a particular certificate type or term is not visible in the 'Bind SSL Types' area then it may need enabling in the 'SSL Types' area. SSL 216
217 Field Name Type Description Administrators should seek the advice of the Master Administrator. Server Software Button 'Customize' The Server Software customization options allow the administrator to specify the types of server software that are allowed for this Organization. Clicking the 'Customize' button will open the 'Server Software' interface, with a list of server software The administrator can select the server software that can be used for the Organization All choices made in the ' Server Software' interface will apply only to this specific Organization. The server software selected in this field will be available in the 'Server Software' drop-down of both the Built-in application form (Admin UI) or the (Self) Enrollment form. See section Customize an Organization's Server Software Types for more details on this Customize an Organization's SSL Certificate Types The types and term lengths of SSL certificates that are available to any particular Organization can be customized using the 'Bind SSL Types' interface. Creating a targeted 'certificate roster' simplifies the certificate selection procedure at the application forms and helps avoid applications for certificates which are inappropriate for that Organization. Security Roles: RAO SSL - can customize SSL certificate type availability only for Organizations (and any subordinate Departments) that are delegated to them. DRAO - cannot customize SSL certificate type availability. To access the 'Bind SSL Types' interface, click the 'Customize' button under the SSL tab of the 'Edit Organization' interface: 217

218 This will open the 'Bind SSL Types' for that Organization. Admin UI - Determines the SSL certificate types that will be available to applicants using the Built-In Application form for that Organization. Enrollment Form - Determines the SSL certificate types that will be available to applicants using the Self Enrollment Form for that Organization. It is therefore possible to choose a different selection of certificate availabilities for an Organization depending on whether the Built-in or Self-Enrollment form is to be used. By default, the 'Customized' option is left unchecked so that all the certificate types are available through both types of application form. To restrict the SSL types and their durations 1. Select the 'Customized' option below either or both 'Admin UI' or 'Enrollment Form'. 2. Check the names of the certificates you wish to be available to that Organization and leave the others unchecked. 3. Click the 'Select' button next to the certificate name to choose which terms will be available. 218

219 4. Click 'OK'. The administrator needs to log out then back in again for the customization options to take effect. The types and terms of SSL certificates that are selected in the 'Bind SSL Types' interface will now be available in the 'Type' and 'Term' drop-down fields of this Organization's application forms Customize an Organization's Server Software Types Security Roles: RAO SSL - can customize server software types that can be used for only for Organizations (and any subordinate Departments) that are delegated to them. DRAO - cannot customize server software types. The types of server software that can be used to any particular Organization can be customized using the 'Server Software' interface. Only those allowed server software will be listed in the Server Software drop down of both the Self Enrollment and the Built-in Application forms for adding new SSL certificate for that Organization. To access the 'Server Software' interface, click the 'Customize' button beside 'Server Software', under the SSL tab of the Edit Organization interface. This will open the 'Server Software' for that Organization. 219
220 By default, no server software will be selected. To restrict the Server Software types select the names of the server software you wish to allow for that Organization and leave the others unchecked. Click OK to save the selection. The administrator needs to log out then back in again for the customization options to take effect. Note: All choices made in the 'Server Software' interface will apply only to this specific Organization 'Code Signing Certificate' Settings tab The 'Code Signing' tab allows the Administrators to enable request/issuance of Code Signing Certificates for the Organization. The setting in this section relate only to those certificates issued to the domain associated with the currently selected Organization. 220
221 Code Signing Certificates - Table of Parameters Field Name Enabled Type Check-box Description Checking this box will enable the request and issuance of Code Signing Certificates to end-users that are members of this Organization. Default state - not checked ' Template' tab CM sends automated notifications to applicants, administrators and end-users of all types of certificates upon events such as the certificate status updates, approvals, certificate collection, revocation etc. These are set by the respective administrators in the Notifications area. The ' Template' tab in the 'Edit Organization' dialog allows the Administrator to directly edit/customize the content of the automated notification s as set by him/her in the Notifications area. CM is shipped with several types of templates corresponding to various notifications, related to different types of certificates and events. But the templates displayed in the list and can be edited are dependent on the role of the administrator. For example, RAO SSL and DRAO SSL administrators will see the templates of notifications corresponding to only SSL certificates and so on. 221

222 Viewing and Editing the Templates Selecting an template and clicking the 'Edit' button at the top will open the 'Edit Template' dialog for the respective type. An example is shown below. 222

223 The Title field displays the subject line of the to be sent. The 'Body' field contains the body content of the message. The body content contains the text portions and the variables which will be replaced with the exact values from the details of the corresponding certificate/domain while sending the automatically. The dialog allows the administrator to directly customize the content and add or remove the variables according to the need. Selecting the checkbox 'Send notification in HTML format' will send automated notifications to administrators, applicants and end-users in HTML format. Clicking 'Insert Variables' will display a list of the variables used in the specific template. The administrator can select the variable to be inserted into the content from the list. This is useful if the administrator has accidentally deleted variable(s) which are essentially required in the template. 223

224 Clicking 'Revert to default' enables the administrator to reset to the default content as shipped with CSM. Clicking 'Show Default' will display the default content for administrator to refer. 224
225 Managing the Departments of an Organization RAO administrators can view and edit Departments belonging to an Organization by selecting it and clicking the 'Departments' button at the top. 225

226 Departments Dialog - Table of Parameters Column Display Description Name A list of all Departments that have been delegated to the Administrator that is currently logged in. The list is displayed in ascending alphabetical order. City Displays the name of the city entered at the time of creating the department State Displays the name of the State entered at the time of creating the department Country Displays the name of the Country entered at the time of creating the department Postal Code (Zip Code) Displays the postal code entered at the time of creating the department Validation Status Displays whether the department is validated for the request and issuance of OV SSL certificates by the Master Administrator. Note: An administrator can add more column headers from the drop-down button beside the last item in the column: 226

227 Controls Buttons Department Control Buttons Add Enables Administrators to modify General, Client, SSL and Code Signing Certificate settings pertaining to an existing Department. Refresh Updates the list of displayed Organizations. Edit Enables Administrators to modify General, Client, SSL, Code Signing Certificate and Template settings pertaining to a Department. Note: The Department control buttons appear only on Delete selecting a Department Domains Deletes the Department. The Control is not visible to DRAO Administrators. Enables Administrators to view, edit and delegate domains to the Departments Sorting and Filtering Options Clicking on the column header 'Name' sorts the items in the alphabetical order of the names of the departments. Administrators can search for particular department by using filters under the sub-tab: To apply filters, click on the down arrow at the right end of the 'Filters' stripe. The filter options will be displayed. You can add filters by selecting from the options in the 'Add Filter' drop-down and group the selection with other options that appears depending on the selection from the 'Add Filter' drop-down. For example, if you want to filter the Department by 'Name': 227

228 Enter the name of the department in part or full in the 'Name' field. Click the 'Apply' button. The filtered items based on the entered parameters will be displayed: To remove the filter options, click the 'Clear' button. Note: The search filters once configured for the interface will be automatically saved. When you are re-opening the 'Departments' interface in future, the configured filters will be in action and only the search results will be displayed. If you do not want the filters to be saved, click the 'Clear' button Creating Departments An Organization may consist of sub-ordinate Departments, managed by DRAO administrators. In order to provide certificates to the employees, end-users or websites pertaining to the Departments, the RAO administrators must first create the Departments under the Organization and associate domains to the Departments. RAO administrators can add a new Department at any time by clicking the 'Add' button located at the top of the 'Departments' dialog. Before you can issue organization validated (OV) SSL certificates for a Department under an Organization, the Organization must first be validated by Comodo. The organization validation process is initiated by the Master Administrator. When a new department is added under a validated organization, its address details will be fetched from the Organization s anchor certificate and these will auto-populate the department s General tab. The department name will be blank for the administrator to complete and this will be shown as the Organizational Unit (OU) in the final certificate. If a Department was added with different address details before the parent Organization was validated, then these details will be replaced with those in the anchor certificate the next time an OV certificate is ordered for the department. 228

229 General Tab: 'General' settings allows the RAO administrator to configure high level details relating to the new Department if the parent Organization has not been validated. These details will be replaced with those in the anchor certificate issued for the parent Organization the next time an OV certificate is ordered for the department. If the parent Organization is already validated by InCommon for the request and issuance of OV SSL certificates, the address details except the Department Name will be auto populated with the parent organization's address. The administrator must fill the Department Name field, which will display as 'Organizational Unit' (OU) in the final certificate. The details in the 'General' section are used for Client, SSL and Code Signing Certificates requested on behalf of that Department. Client and SSL certificates may only be automatically issued to common names of domains (and sub-domains) delegated to the Organization which InCommon CA has pre-validated that you have the right to use. If you apply for certificates on a new domain, then InCommon CA will first need to validate your ownership of the domain before the certificate can be issued for it. See Delegating Domains for more details. For more details on these fields, see 'General Settings' - table of parameters' General Settings - Table of Parameters Field Name Department Values String (required) Description The name of the Department to be created which will display as 229
230 Field Name Values Name Description ''Organizational Unit' (OU) in the final OV SSL certificate. Address 1 String (required) Address 2 String Address 3 String City String State/Province String Postal Code String Country String If the parent Organization is already validated by Comodo for the request and issuance of OV SSL certificates, the address details except the Department Name will be auto populated with the parent organization's address and noneditable. If the parent Organization is not validated, then the administrator can fill these details, but will be replaced with those in the anchor certificate issued for the parent Organization after validation the next time an OV certificate is ordered for the department. Validation Status Indicates the progress of organizational validation (OV) on the InCommon CM parent Organization in question. States can be Not validated, Validated, Pending, Failed, Expired. Anchor Certificate Issued after the organization validation is completed for the parent Organization of the department. Indicates the status of Anchor certificate. This is used as a reference for organization validation status by InCommon CM whenever an Organization Validated SSL certificate is requested for an Organization or Departments under it. The 'EV Details' Tab - see EV Details tab for more details The 'SSL Certificate' tab - see SSL Certificate Settings tab for more details The 'Code Signing' tab - see Code Signing Certificates Settings tab for more details Client Cert Tab The Client Certificate tab is the same as that explained in Client Certificate Settings Tab but contains an additional setting related to key recovery: 230
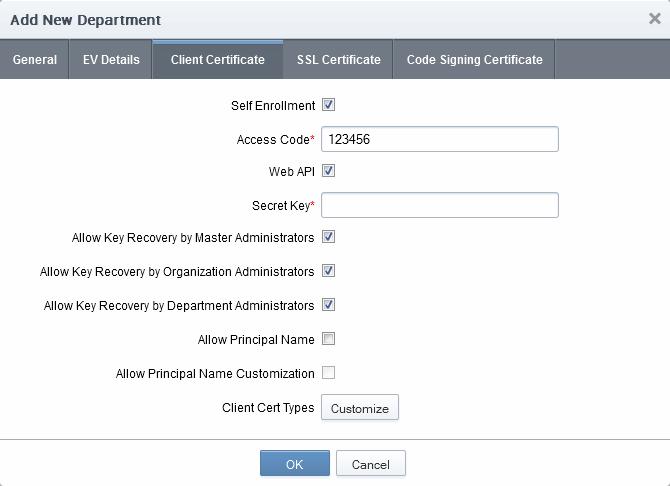
231 231
232 Allow Key Recovery by Master Check-box Administrator Default state - checked if preenabled by Master Administrator If selected, the Master Administrator will have the ability to recover the private keys of client certificates issued by this Organization. At the point of creation, each client certificate will be encrypted with the Master Administrator master public key before being placed into escrow. If this box is selected then the Organization will not be able to issue client certificate UNTIL the Master Administrator has initialized their master key pair in the 'Encryption' tab. See 'Encryption and Key Escrow' for a more complete explanation of key recovery processes. Check-box Default state - checked if preenabled by Master Administrator If selected, the RAO Administrator will have the ability to recover the private keys of client certificates issued by this Organization. At the point of creation, each client certificate will be encrypted with the RAOs master public key before being placed into escrow. If this box is selected then the Organization will not be able to issue client certificate UNTIL the RAO has initialized their master key pair in the 'Encryption' tab. Allow Key Recovery by Organization RAO See 'Encryption and Key Escrow' for a more complete explanation of key recovery processes. Allow Key Recovery by Department DRAO Check-box Default state - checked If selected, the DRAO Administrator will have the ability to recover the private keys of client certificates issued by this Department. At the point of creation, each client certificate will be encrypted with the DRAOs master public key before being placed into escrow. If this box is selected then the Department will not be able to issue client certificate UNTIL the DRAO has initialized their master key pair in the 'Encryption' tab. See 'Encryption and Key Escrow' for a more complete explanation of key recovery processes. 232

233 * The settings outlined above will be active ONLY IF they have been enabled for your Organization Editing Departments belonging to an Organization The existing Departments under any Organization can be edited by the appropriately privileged administrator at any time by selecting the Department and clicking the Edit button at the top in the 'Departments' interface. The Edit Department dialog will appear. General Tab The General settings area is similar to the General settings area in Create New Department dialog except for an additional option ACL. For details on other options, - see General Settings - Table of Parameters For more details on ACL - see Imposing Access Restrictions to CM interface For more details on Client Certs tab - see Client Certs tab under Creating Departments For more details on 'SSL Certificate' tab - see 'SSL Certificate' Settings tab For more details on 'Code Signing Certificate' tab - see 'Code Signing Certificate' Settings tab For more details on ' Template' tab - see ' Template' tab 233


234 Managing Domains belonging to a Department The domains delegated to a Department can be viewed and managed by selecting the Department and clicking the 'Domains' button from the top. The 'Domains' dialog enables appropriately privileged Administrators to view, edit and delegate any Domains attached to the Department. A detailed explanation on this area is available in section: Domains Area Overview Deleting an Existing Department The Administrator can click the 'Delete' button at the top after selecting the checkbox beside the Department name if he/she no longer wishes to issue certificates from it. Note: Deleting an Organization will automatically revoke any certificates issued to that Department and will delete any end-users that are members of it. For this reason, InCommon Certificate Manager will prompt for confirmation: Managing the Domains of an Organization The Administrators can view a manage the domains delegated to an Organization by selecting it and clicking the 'Domains' button at the top. The 'Domains' dialog displays a list of Domains attached to the Organization and the Departments under that Organization. 234

235 A detailed explanation of the controls available in this area is available in section 5.4.Domains 5.3 Departments The Departments tab allows DRAO Administrators to manage existing domains and add new domains to the Departments that have been delegated to them. Clicking the 'Edit' button at the top after selecting the checkbox next to a listed Department will allow the DRAO Administrator to manage the certificates issued by the Department. Important Note: The 'Departments' area is visible only to DRAO Administrators. RAOs will instead see the 'Organizations' tab and can manage the Departments associated with any specific Organization (for which they are assigned rights to) by clicking the Departments button after selecting it beside the Organization name from the Organizations interface. Refer to Managing Departments of an Organization for more details. The 'Departments' area is, in effect, a limited view of the information available in 'Organizations' area - containing data and controls relating to the Department that the DRAO is responsible for. 235

236 The 'Departments' area similar to the 'Departments' dialog appearing on clicking the Departments button after selecting the checkbox beside an Organization name from the 'Organizations' interface. Detailed explanations on the options and controls in this area are available at Managing Departments of an Organization. 5.4 Domains Section Overview The 'Domains' tab allows Administrators to view the list of domains associated with the Organizations that are enrolled with CM and the Departments within the Organizations. The Administrators can also create new domains, initiate Domain Control Validation (DCV) and delegate/re-delegate existing domains to the required Organizations/Departments and restrict the certificate types that can be offered for the domains, depending on the purpose(s) for which its use is authorized, from this interface. 236
237 RAO Administrators can create, edit and delegate domains to Organizations (RAO s) and Departments of those Organizations (DRAO s) that have been delegated to them. RAO Administrators can initiate DCV request, approve and manage certificates for such domains. The domains created or approved by RAO are to be validated and approved by Master Administrator(s). DRAO Administrators can create, edit and delegate domains to the Department that have been delegated to them. They can initiate DCV request, approve and manage certificates for such domains. The domains created by DRAO are to be validated and approved first by the RAO of the Organization to which the Department belongs and then by Master Administrator(s). The 'Domain Awaiting Approval' notification will be sent to Master Administrator only after the domain created by DRAO is first approved by RAO. The following table provides a summary of the ability of administrators to manage domains: Action Request New Domains for.. Approve/Reject New Domain Requests Initiate Domain Control Validation (DCV) Delegate Existing Domains to... Activate/Deactivate Domains RAO Administrator Delegated Organizations Subordinate Departments DRAO Administrator Delegated Departments (Responsibility of InCommon) (Responsibility of InCommon) Subordinate Departments (Responsibility of InCommon) (Responsibility of 237
238 InCommon) Validating and Approving created Domains Can approve domains created by DRAO Administrators of the Departments under the Organization, prior to approval by the Master Administrator. Note: A single domain can be delegated to more than one Organization/Department as per requirements Wildcard Domains When a wildcard domain is created and delegated to an organization or a department, and is validated by Master Administrator, then the primary domain and all the sub-domains belonging to it are automatically validated only for the same organization or the department. For example, if *.example.com is delegated and validated for a specific organization 'Test Organization', then all the sub-domains such as anything.example.com and something.example.com are automatically validated and approved for the 'Test Organization'. If the sub-domains of a primary domain delegated to an organization or department are to be delegated to other organizations or departments, they need to be validated and approved by the Master Administrator. For example, if *.example.com is delegated and validated for a specific organization 'Test Organization' and: If an RAO wants to re-delegate the subdomain(s) such as anything.example.com and something.example.com to other organization 'Demo Organization' then the re-delegation needs to be validated and approved by the Master Administrator. If a DRAO wants to re-delegate the subdomain(s) such as anything.example.com and something.example.com to a department 'Test Department' (a department that belongs to the same organization) then the re-delegation needs to be validated and approved by the RAO Domain Management The Domains area Click the 'Domains' sub-tab of the 'Settings' tab to open the Domain management area: 238
239 The Domain management area is divided into two areas accessible by clicking the respective tabs at the top left: Delegations - Displays a list of all enrolled domains with their delegation status and controls to approve delegate/redelegate them. DCV - Displays list of enrolled domains as a tree structure with their Domain Control Validation (DCV) status and controls to initiate the DCV process Domain Delegations The Domain Delegations area is displayed by default under Domains > Settings and displays a list of requested and approved domains. RAO Administrator - can add new domains to the Organizations that have been delegated to them, view the requested and approved domains delegated to their Organizations with their delegation and DCV status. The RAO Administrator can also view the full details of a domain, delegate/redelegate domains to their Organizations/Departments, Approve domains requested by DRAO Administrators. The domains created or approved by RAO are to be approved by two Master Administrators or a single master Administrator with appropriate privileges. The RAO Administrator can also create domains without delegating to them any Organizations/Departments. Only the Master Administrator can view these undelegated domains and delegate to them required Organizations/Departments. DRAO Administrator - can add new domains to the Departments that have been delegated to them, view the requested and approved domains delegated to their Departments with their delegation and DCV status. The DRAO Administrator can also view the full details of a domain, delegate/redelegate domains to their Departments. The domains created by DRAO are to be validated and approved first by the RAO of the Organization to which the Department belongs and then by two Master Administrators or a single Master Administrator with appropriate privileges. The DRAO Administrator can also create domains without delegating to 239
240 them any Departments. Only the Master Administrator can view these undelegated domains and delegate to them required Organizations/Departments Summary of Fields and Controls Column Display Description Domain A list of all available Domains created for this account. List is displayed in ascending alphabetical order. The domains which are awaiting validation and approval are displayed in red. Active The checkbox allows the administrator to toggle the domain between the active and inactive states. Delegation Status Indicates the request/approval status of the domain. Date Requested Indicates the date on which the domain was requested. DCV Status Indicates the validation status of the domain. Note: DCV Status column will be visible only if the respective feature is enabled for your account. Note: An administrator can enable or disable the columns from the drop-down button beside the last item in the table header: Controls Contains controls that allow RAO administrators to view and add new domains, delegate any existing domain to an Organization/Department. DRAO Administrators can only create Domains and associate it to the Departments that have been delegated to them. Add Enables administrators to create a new Domains to be associated with the existing Organizations and Departments, for the purposes of issuing certificates to end-users. Refresh Updates the list of displayed Domains. Domain Control Buttons View Note: The Domain control buttons are visible only on selecting a domain Enables administrators to view the Organization Name, Description, Requested by, address, Date Added and status of an existing domain. Delegate Enables administrators to associate or delegate an existing domain to Organizations and Departments as required. Note: This control is not visible to DRAO Administrators. Delete Deletes the domain. This control is available only for domains yet to be approved. 240


241 Sorting and Filtering Options Clicking on a column header sorts the items in the alphabetical order of the entries in the respective column Administrators can search for particular domain by using filters: Filter Options Description Domain Name Enables Administrators to filter the list of Domains by name. State Enables Administrators to filter the list of Domains based on their active state: ANY - Displays the list of all the domains; Active - Displays the list of Domains which are currently active, as set by the administrator. Inactive - Displays the list of Domains which are currently inactive, as set by the administrator. Status Enables Administrators to filter the list of Domains based on their status: ANY - Displays the list of all the domains; Requested - Displays the list the domains which are requested and awaiting for approval by MRAO. Approved - Displays the list of Domains which are already approved by the RAO. Organization Enables to filter only the domains associated with the Organization selected from the drop-down menu. Note: This Field is not visible to RAO and DRAO Administrators. You can add filters by selecting from the options in the 'Add Filter' drop-down. For example, if you want to filter the domain with the domain name, select 'Domain Name': 241


242 Enter the domain name in part or full in the 'Name' field. If you want to group the results based on their delegation status or their DCV status, select the option from the 'Group by' drop-down. Click the 'Apply' button. The filtered items based on the entered parameters will be displayed: 242

243 To remove the filter options, click the 'Clear' button. Note: The search filters once configured for the interface will be automatically saved. When you are re-opening the 'Domains' interface in future, the configured filters will be in action and only the search results will be displayed. If you do not want the filters to be saved, click the 'Clear' button Tool Tip On pointing the mouse cursor over a domain, the Organizations/Departments to which the domain is delegated is displayed as a tool tip DCV The DCV area of the Domains interface displays a list of registered domains along with their DCV status and expiration dates. Domains enrolled by RAO/DRAO SSL Administrators domains are to be approved by Master Administrator(s) before subjecting to validation. RAO SSL Administrator - can initiate DCV process for the domains delegated to the Organizations that are administrated by them. DRAO SSL Administrator administrated by them. can initiate DCV process for domains delegated to the Departments that are The Administrator can choose anyone from the three methods to initiate DCV process for a domain: - InCommon CM will send an automated with a validation link to the address of the domain administrator. The domain will be validated on the domain administrator visiting the validation link in the mail. 243

244 DNS CNAME - InCommon CM will send a hash value that must be entered as DNC CNAME for the domain. InCommon CM will validate by checking the DNS CNAME of the domain HTTP/HTTPS File - InCommon CM will send a.txt file which is to be placed at the root of the web server. InCommon CM will validate the domain based on the presence of the sent file. If a wildcard domain is created and delegated to an Organization or a Department, InCommon CM will validate only the registered High Level Domain (HLD). If the HLD is successfully validated, all the sub domains within the name space of the HLD will be considered validated. For more details on initiating DCV process, refer to the section Validating the Domain Summary of Fields and Controls Column Display Registered Domain Description A list of all available Domains created for this account. List is displayed in ascending alphabetical order as a tree structure. Clicking the '+' beside a domain name displays the sub domains of the registered domain. Tip: The [+] and [-] beside 'Registered Domain ' enable the Administrator to expand all the domain names and collapse the tree structure respectively. DCV Status Indicates the validation status of the domain. The status can be one of the following: Not Started - The DCV process has not started for the registered high level domain (HLD). Awaiting Submittal - The. DCV process has started but the request has not yet been submitted to the Domain Administrator. This status will be available only for the following DCV methods: HTTP/HTTPS DNS CNAME 244

245 Submitted - The DCV request has been submitted to the domain administrator. Validated - The registered high level domain (HLD) has been successfully validated. Expired - The DCV request has expired for the HLD. DCV Expiration Indicates the expiry date of the DCV request. Method Indicates the DCV Method chosen by the administrator for validating the domain. Controls Contains a control enabling RAO/DRAO SSL Administrators to initiate or restart the DCV process for a Domain. Refer to the section Validating the Domain for more details. DCV Controls Description DCV Enables administrators to initiate or restart the DCV process for the selected Domain. Refer to the section Validating the Domain for more details. Refresh Updates the list of displayed Domains Sorting and Filtering Options Administrators can search for particular domain by using filters: To apply filters, click on the down arrow at the right end of the 'Filters' stripe. The filter options will be displayed. You can add filters by selecting from the options in the 'Add Filter' drop-down and group the selection with other options that appears depending on the selection from the 'Add Filter' drop-down. Enter name of the domain in part or full in the Name field. 245

246 The available filter criteria and their filter parameters are given in the following table: Filter Options Description Domain Enables Administrators to filter the list of Domains by name. DCV Status Enables Administrators to filter the list of Domains based on their DCV status: Expires in Organization ANY - Displays the list of all the domains; Not Started - Displays only the Domains for which the. DCV process has not yet been started. Awaiting Submittal - Displays only the Domains for which the DCV process has started but the request has not yet been submitted to the Domain Administrator. Submitted - Displays only the Domains for which the DCV request has been submitted to the domain administrator. Validated - Displays only the Domains for which the validation has been successfully completed Expired - Displays only the domains for which the DCV request has expired Enables Administrators to filter the list of Domains based on the remaining days for their DCV expiry. The administrator can choose the domains to be listed, whose DCV request expires in: Any Next 3 days Next 7 days Next 14 days Next 30 days Next 60 days Next 90 days Enables to filter only the domains associated with the Organization selected from the drop-down menu. Note: This Field is not visible to RAO and DRAO Administrators. Click the 'Apply' button. The filtered items based on the entered parameters will be displayed: 246

247 To remove the filter options, click the 'Clear' button. Note: The search filters once configured for the interface will be automatically saved. When you are re-opening the 'Domains' > 'DCV' interface in future, the configured filters will be in action and only the search results will be displayed. If you do not want the filters to be saved, click the 'Clear' button Creating a New Domain In order to request, approve and manage all the company's certificates, the administrator should first create domains corresponding to different Organizations/Departments of the company. These domains are to be delegated to respective Departments and/or Organizations delegated to them. The delegated domains are to be validated through Domain Control Validation process, which is to be initiated by RAO/DRAO SSL Administrators with the sufficient privileges. Only approved and validated domains are facilitated for the request and approval of the SSL certificates and the issuance of client certificates to the end-users falling within the domain. The administrator can also restrict the certificate types that can be requested for the domain depending on the purpose for which its use is authorized. Note: The administrator can select the certificate type for the domain depending on the privilege levels. E.g. A RAO SSL administrator can allow or restrict the availability of only SSL certificates for the created domain. To create a new domain click the 'Add' button located at the top of the 'Domains' area. This will open the 'Create domain' dialog. 247
248 Create Domain - Table of Parameters Field Name Values Description Domain String (required) The name of the Domain. Description String A short description of the domain. Organizations/D Check-boxes epartments Enables the administrator to delegate the currently created domain to an Organization/Department. All Organizations are listed by default. Clicking the '+' button beside the Organization name expands the tree structure to display the Departments associated with the Organization. The created domain can be associated to the Organization(s) and/or the Department(s) by selecting the respective checkbox(es). A single domain can be delegated to more than one Organization/Department. Clicking on 'Expand All' expands the tree structure to display all the Departments under each Organization. Clicking on 'Collapse All' in the expanded view collapses the tree structure of all the Organizations and hides the Departments under each Organization. SSL, Smime, Code Signing Check-boxes Enables the administrator to allow or restrict the types of certificates that can be requested for the created domain, by checking or unchecking the respective check boxes. The certificate types can be restricted according to the purpose of the domain created. 248
249 Validating the Domain The administrator can choose to validate the domain at the time of creation by sending an automated domain control validation (DCV) to the domain administrator. RAO SSL Administrator - can initiate DCV process for the domains delegated to the Organizations that are administrated by them. DRAO SSL Administrator administrated by them. can initiate DCV process for domains delegated to the Departments that are InCommon CM enables the Administrator to initiate DCV process by three methods: - InCommon CM will send an automated with a validation link to the selected address of the domain administrator. The domain will be validated on the domain administrator visiting the validation url in the mail. DNS CNAME - InCommon CM will send a hash value that must be entered as DNC CNAME for the domain. InCommon CM will validate by checking the DNS CNAME of the domain HTTP/HTTPS File - InCommon CM will send a.txt file which is to be placed at the root of the web server. InCommon CM will validate the domain based on the presence of the sent file. If a wildcard domain is created and delegated to an Organization or a Department, InCommon CM will validate only the registered High Level Domain (HLD). If the HLD is successfully validated, all the sub domains within the name space of the HLD will be considered validated. To initiate DCV for a Domain 1. Open the DCV interface by clicking Settings > Domains > DCV. 2. Next, initiate DCV by selecting the domain and clicking the 'DCV' button that appears at the top. This will open the DCV wizard: 249

250 Select the DCV method from: HTTP/HTTPS CNAME and click 'Next' On selection of method, the next step allows you to select the address of the Domain Administrator for sending the validation

251 3. Select the address of the administrator who can receive and respond to the validation mail from the dropdown and click 'Validate'. An automated will be sent to the selected Domain Administrator address. The DCV status of the Domain will change to 'Submitted'. 251

252 On receiving the , the domain administrator should click the validation link in it and enter the validation code in the validation from that appears on clicking the validation link in order to complete the validation process. Once completed, the DCV status of the Domain will change to ' Validated' HTTP/HTTPS On selection of HTTP or HTTPS method, the next step allows you to download the.txt file for sending to the Domain Administrator. InCommon CM creates a Hash value for the.txt file and stores it for future reference on validating the domain. The DCV status of the Domain will be changed to 'Awaiting Submittal'. 3. Click 'Download' and save the.txt file or create a new notepad file, copy and paste the string given in item 1 and save the file with the name given in item Click Close. InCommon CM will save the hash value generated for future comparison 5. Send the.txt file to the Domain Administrator through any out-of-band communication method like and request the domain administrator to place the file in the root of the HTTP server, so that the file is accessible by one of the paths specified in item Once the Domain Administrator has placed the.txt file on the HTTP server, open the DCV interface by clicking Settings > Domains > DCV tab 7. Resume the DCV process by clicking the DCV button in the row of the Domain 252

253 8. Click 'Test' to check whether the file has been placed in the web server root. If the file is present, the DCV Submission dialog will appear. Click 'Submit'. The DCV status of the domain will change to 'Submitted' 9. InCommon CM will validate the Domain on successful submission and the DCV status of the domain will change to 'Validated'. DNS CNAME On selection of CNAME method, InCommon CM creates a DNS CNAME record for the requested domain and stores its hash value for future reference. The next step allows you to get the DNS CNAME record for the requested domain. The DCV status of the Domain will be changed to 'Awaiting Submittal'. 3. Copy the CNAME DNS record given in item no. 1 and pass it to the domain administrator through out-of-band communication method like and request the domain administrator to create the record for the domain. 4. Click Close. InCommon CM will save the hash value generated for future comparison 5. After the Domain Administrator has created the record, open the DCV interface by clicking Settings > Domains > DCV tab 6. Resume the DCV process by clicking the DCV button in the row of the Domain 7. Click 'Test' to check whether the record has been created. If it is created, the DCV Submission dialog will appear. Click 'Submit'. The DCV status of the domain will change to 'Submitted' 253
254 8. InCommon CM will validate the Domain on successful submission and the DCV status of the domain will change to 'Validated' Changing DCV method for Validation Pending Domains The RAO/DRAO SSL Administrator with appropriate privileges can change the DCV method for the domains whose validation is pending, from the DCV interface. To change the validation method 1. Open the DCV interface by clicking Settings > Domains > DCV. 2. Click the 'DCV' button in the row of the domain with DCV status is 'Awaiting Submittal' or 'Submitted'. The DCV wizard will start. 3. Click 'Back' The wizard will move to the previous step of selecting the DCV method 4. Select the new DCV method and continue the process as explained in the section Validating the Domain Delegating/Re-delegating an Existing Domain The administrator can delegate or re-delegate the domain to Organizations/Departments according to the requirement from the 'Domains' > 'Delegate' area. Selecting the domain and clicking 'Delegate' button from the top opens the 'Delegate Domain' interface that allows the administrator to delegate or re-delegate the domain. The administrator can also select the certificates to be made available for the domain on delegation to the specific Organization/Department based on purpose of delegating the domain to the Organization/Department. 254

255 Also the administrator can validate the domain before delegating/re-delegating it specific Organization/Department by clicking the 'Validate' link. Clicking the link enables the administrator to send an automated to the domain control administrator to check the domain control authority. See 'Validating the Domain' for more details. The domains delegated by other administrators are to be approved by two Master Administrators at InCommon CA. Full details on delegating a domain are available in the previous section, 'Create Domain - Table of Parameters' Viewing, Validating and Approving Newly Created Domains The Domains created by self or other Administrators can be viewed by RAOs. To view the details of a domain, select the checkbox beside it and click the 'View' button at the top. The view dialog also enables the administrators to view the requisition details of the domain creation/delegation. The delegations that are yet to be approved are displayed in red. The 255

256 domain becomes active only after Master Administrator(s) approve it and only then it enables for request and issuance of SSL certificates and client certificates View Domain Summary of Fields and Controls Column Display Description Organization Displays the list of all Organizations delegated to the selected domain. List is displayed in ascending alphabetical order. Department Displays the list of Department that is delegated the domain. Description Short description of the domain. Requested by Displays the name of the administrator who has created the domain. Date Requested The date at which the domain was added to CM. Date Approved The date at which the domain was added approved. Allowed Cert Types The Certificate types that are enabled and available for the domain. Note: An administrator can enable or disable the columns from the drop-down button beside the last item in the table header: 256

257 Controls Refresh Updates the list of displayed Organizations and Departments and their details. Delegation Control Buttons Details Enables the administrator to view the requisition details of the domain. Note: The Delegation control buttons are visible only on selecting a domain Approve Enables Master administrator to approve the creation and delegation of the domain by RAO and DRAO administrators. Note: This control button is visible only for Domains with 'Requested' status and only to RAO administrator. Reject Enables Master administrator to decline the creation and delegation of the domain by RAO and DRAO administrators. Note: This control button is visible only for Domains with 'Requested' status and only to RAO administrator Approval of Creation and Delegation of Domains Domains that are created and delegated by: RAO Administrators are to validated by Master Administrator(s) to become active; DRAO Administrators are to be first validated and approved by the RAO Administrator of the Organization to which the Department delegated with the domain and then by Master Administrator(s) to become active. Domains which are awaiting approval are displayed in red color in the Domains area of the CM interface. The RAO Administrator can check the validity of the Domain and approve/reject the request for the Domain. To approve or reject a domain delegations Open the 'View Domain' dialog. Select the Organization/Department for which the domain delegation has been requested. Click 'Approve' or 'Reject' button from the top. 257

258 If a domain is created/delegated by a DRAO Administrator, it will be displayed in red only to the RAO Administrator of the Organization to which the Department belongs, indicating it is awaiting approval, in the Domains area of the CM interface. Once it is validated and approved by the RAO Administrator, it becomes visible to the Master Administrators for validation/approval. If a domain is created by an RAO Administrator, it will be displayed in red to the Master Administrators indicating that it is awaiting validation/approval. Once a requested domain is validated and approved by a Master Administrator(s), a domain approval notification will be sent and the domain will be enabled for request and issuance of SSL certificates, Client certificates and Code Signing certificates Viewing Requisition Details of a Domain The administrator can view the request details of the domain delegation by selecting an Organization or a Department and clicking the 'Details' button from the 'View Domain' interface. 258
259 Request Details - Table of Parameters Field Description Organization Indicates the name of the Organization to which the domain is delegated. Department Indicates the name of the Department to which the domain is delegated. Domain Indicates the name of the selected Domain. Requested by The name of the Administrator who has requested for the approval of the delegation of the domain to the Organization/Department. Date Requested Date of requisition for delegation. RAO Approver The RAO administrator who approved the domain delegation Date RAO Approved The date on which the request was approved by the RAO administrator. MRAO Approver The Master administrator who approved the domain delegation Date MRAO Approved The date on which the request was approved by the master administrator. Status Indicates whether the domain has been approved or awaiting approval for delegation. State Indicates whether the domain is active or inactive as set by the administrator. Description A short description for the domain as entered by the administrator while creating it. Address address of the administrator who has requested for the delegation of the 259
260 domain. Allowed Cert Types Indicates the Certificate types which could be requested/issued for the domain. 5.5 Encryption and Key Escrow Introduction and basic concepts If required, InCommon Certificate Manager can store the individual private keys of end-user s client certificates so that they can be recovered at a later date by appropriately privileged administrators. This allows important data and messages to be decrypted should the end-user lose their private key. Due to the highly sensitive and confidential nature of this feature, all escrowed private keys are stored in encrypted form so that they cannot be easily stolen or compromised. At the time the public/private key pair is generated for an end-users client certificate, the private key of that certificate will be automatically encrypted and escrowed (stored) by CM. This happens every time a new client certificate is generated. It is possible to specify that keys in escrow be independently retrieved by three types of administrator - RAO SMIME, DRAO SMIME and the Master Administrator (at InCommon CA). When creating a Department, the RAO SMIME can choose whether they wish the private keys to be retrievable by the DRAO SMIME, by the RAO SMIME (themselves) and/or by the 'Master Administrator' (InCommon). Therefore, it is possible for CM to store up to 2 encrypted versions of the private keys of client certificates of an Organization - and up to 3 versions for a Department. Each version will be separately encrypted by a different 'master' public key. These master public keys are stored by Certificate Manager. The corresponding master private keys are not stored in Certificate Manager (the master 'private' key is required for decryption/retrieval). These keys must be saved in a secure location by the Administrator that is creating the Organization/Department. There is one master key pair per Organizational tier (Master (InCommon), RAO and DRAO) These keys are generated (if required) during the creation of that Organizational tier (e.g. during Organization creation or during Department creation). Therefore, one master key pair will be used by all RAO SMIME Administrators of a particular Organization - the Organization Master Key. Similarly, if key retrieval is required at the Departmental level then one pair of master keys will be used by all DRAO SMIME Admins of a particular Department - the Department Master Key. IF 'Allow key recovery by RAO/DRAO' is enabled at the point of Organization/Department creation THEN these master key pairs must be initialized prior to issuing client certificates. It is not possible to issue client certificates UNTIL the master private keys have been initialized. See 'Master Keys Required Prior to Client Cert Issuance' for more details. Retrieving the private key of a user's client certificate from escrow will cause the revocation of that certificate. This is true if any one of the aforementioned administrative types chooses to retrieve from escrow. A private key can is retrieved from escrow by clicking the 'Download' button next to the chosen certificate. See Recovering a User's Private Key from Escrow for more details. 260
261 5.5.2 Setting up Key Escrow for a Department Key recovery options are chosen during the creation of an Department. Once chosen, these settings cannot be reversed. This section will deal purely with the key recovery elements of Department creation. The key recovery settings are just one part of the overall Departmental creation process. Administrators are therefore advised to treat this section as an information gathering exercise on key escrow prior to creating a new Department. For a full outline of all steps and options involved in the creation a Department, please see Managing the Departments of an Organization Only RAO SMIME Administrators are able to specify key recovery settings for an Organization. This is because only those types of Administrator are able to create a Department. To set key recovery options Select 'Settings' > 'Organizations'. Select the 'Organization' and click 'Departments' from the top to open the 'Departments' interface Click 'Add' from the 'Departments' interface to open Add New Department interface Click the 'Client Cert' tab to view and configure key recovery options: 261
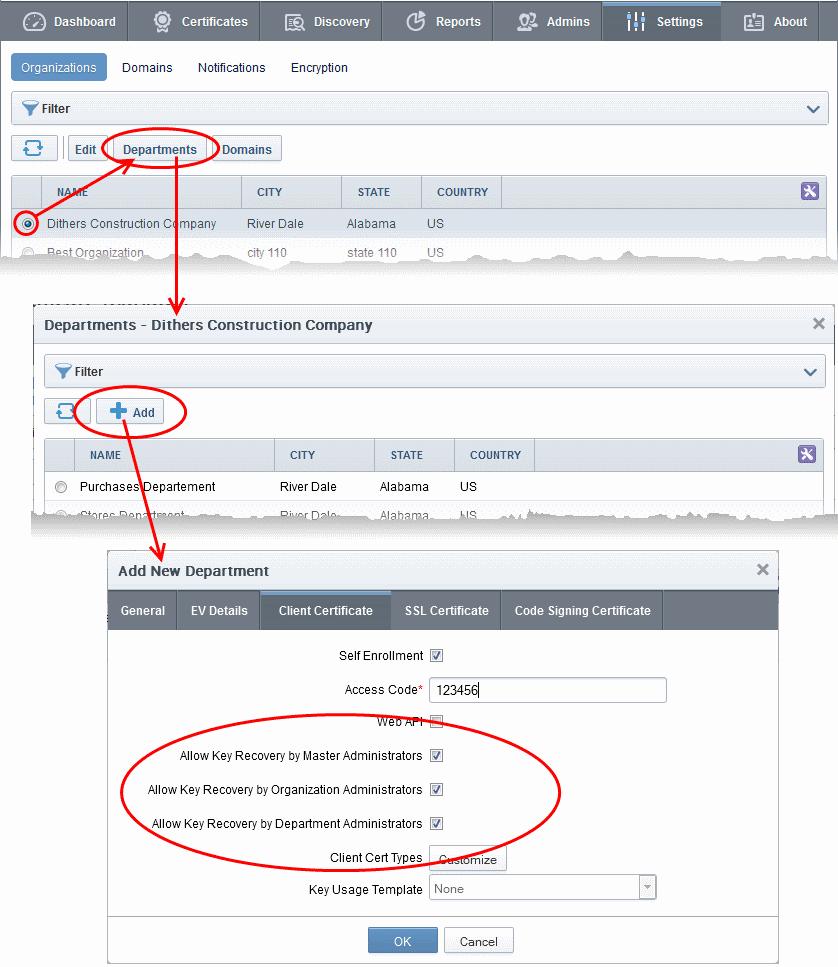
262 262
263 Allow Key Recovery by Master Administrators Checkbox Allow Key Recovery by Organization Administrators Check-box Allow Key Recovery by Department Administrators Check-box Default state checked if preenabled by Master Administrator Default state checked if preenabled by Master Administrator Default state checked if preenabled by Master Administrator If selected, the Master Administrator will have the ability to recover the private keys of client certificates issued by this Department. At the point of creation, each client certificate will be encrypted with the Master Administrator's master public key before being placed into escrow. If this box is selected then the Department will not be able to issue client certificate UNTIL the Master Administrator has initialized their master key pair in the Encryption tab If selected, the RAO will have the ability to recover the private keys of client certificates issued by this Department. At the point of creation, each client certificate will be encrypted with the RAOs master public key before being placed into escrow. If this box is selected then the Department will not be able to issue client certificate UNTIL the RAO has initialized their master key pair in the Encryption tab. If selected, the DRAO SMIME Administrator will have the ability to recover the private keys of client certificates issued by this Department. At the point of creation, each client certificate will be encrypted with the DRAOs master public key before being placed into escrow. If this box is selected then the Department will not be able to issue client certificates UNTIL the DRAO has initialized their master key pair in the Encryption tab. Fill out the 'General Information' tab (and optionally the 'SSL' / 'Code Signing Certificate' tabs if those cert types are required). See Creating Departments for full details concerning the creation of a new Department. Once you are satisfied with all settings, click 'OK' to add the Department Master Keys Required Prior to Client Cert Issuance The diagram below is an overview of the master keys necessary per recovery requirements for the successful issuance of client certificates: 263
264 264
265 Notes: Administrators can find out whether recovery is checked for an Organization by clicking 'Settings > Organizations', clicking the 'Edit' button of the Organization in question then selecting the 'Client Cert' tab. 265
266 RAO SMIME Administrators can find whether recovery is checked for a Department by clicking 'Settings > Organizations', then clicking the 'Departments' button of the Organization in question. Next, select the Department in question and click 'Edit' button, then select the 'Client Cert' tab. 'MPK must exist' means that the key must have been initialized. If the key has not been initialized then the Organization or Department in question will not be able to issue client certificates. If key escrow is required through all tiers (Organization + Department) then this means that 2 master private keys will need to be initialized. To check initialization status, the currently logged in administrator should click the 'Encryption' tab Encryption This area allows administrators to encrypt the private keys of user's client certificates. If key recovery was specified during the creation of a Department, then this step is essential. No client certificates can be issued until the master key pairs have been initialized. Note: This area is visible and accessible by RAO/DRAO SMIME Administrators if key recovery has been enabled for their specific Organization/Department. To use this feature the administrator needs to initialize private key encryption by clicking 'Initialize Encryption' button Summary of Fields and Controls Column Display Description Scope The Hierarchy level of the Organization/Department. It can be the Master, Organization or Department. Name The name of the Organization/Department. State Indicates the status of private key encryption. Controls Refresh Reloads the list. Encryption Controls Initialize Encryption Starts the initial encryption process. This control is available only when the private key encryption has not been done earlier and the status is Not Initialized, for and Organization/Department. Re-encrypt Starts the re-encryption process of the private keys of the certificates Note: The Encryption control buttons will appear only on selecting the scope and 266


267 depending on the state of private key encryption of the end-users of belonging to an Organization/Department. This control is available only if the private keys are already encrypted. Encrypting the Private Keys To use this feature the administrator needs to initialize private key encryption by clicking 'Initialize Encryption' button. The process will be started and a master private key will be generated. The administrators need to copy the private key and paste it in a.txt file and store in a secure location. Note: This master private key is not stored within InCommon Certificate Manager. We advise administrators to save the private key in a secure, password protected, location. It will be required should the administrator wish to either re-encrypt the keys or download a user's client certificate. On clicking 'Done', the state is changed to 'Public key is loaded'. All the private keys of user client certificates are now encrypted using the master public key of the administrator that began this process. Decryption will require the private key that was saved earlier. 267

268 5.5.6 Re-encryption The re-encryption area allows RAO SMIME and DRAO SMIME Administrators to change their master key pair then automatically re-encrypt existing end-users key pairs with the new master public key. This may be necessary if the original private key becomes compromised or administrative personnel leave the company. To start the Re-encryption process Click the 'Reencrypt' button to launch the process: The Administrator will be prompted to paste the existing master private key to start the process: 268
269 Paste the Master key and click OK. The re-encryption dialog will appear. This will provide a brief summary of the forthcoming process. Click 'Next' to continue: Click the 'Generate Key Pair' to generate the new keys: 269

270 Copy and paste the private key into a.txt file then save it in a secure, password protected location. Click continue. The re-encryption of the private keys will be started. Click 'Proceed' to begin re-encrypting the private keys of client certificates. Upon successful re-encryption, a summary screen will be displayed. 270
271 5.5.7 Recovering a User's Private Key from Escrow The administrator may need to recover a users private key in order to decrypt data if, for example, the original client certificate belonging to an end-user was lost or if the user left the company. The end-user's private key can be downloaded from the 'Certificates' > 'Client Certificates' interface. Note - administrators should have their master private key ready - it will be required to complete this process. Open the 'Client Certificates' interface by clicking 'Certificates' > 'Client Certificates'. Select the end-user and click the 'Certs' button from the top. The 'Certificates for' interface will open with the list of all the certificates belonging to the end-user in chronological order (newest first). Select the certificate and click 'Download'. 271
 to protect access to private key in.p12 file as well. Note: Successfully downloading the private key of a client certificate will revoke that certificate. 5.")
272 In order to decrypt this end-user's key pair the Administrator must paste the corresponding master private key into the space provided in order to download any end-user s client certificates. Admin can set a password (PIN) to protect access to private key in.p12 file as well. Note: Successfully downloading the private key of a client certificate will revoke that certificate. 5.6 Notifications Notifications enable RAO and DRAO Administrators to set up and manage notifications to various personnel including notifications triggered by SSL certificate status, notifications triggered by Client Certificate status and Discovery Scan Summaries. CM also enables the Administrators to customize the templates of the notifications as required. Refer to Viewing and Editing Templates for more details. Administrative Roles: RAO - can see the notification types set up by them for the users belonging the Organizations (and any subordinate Departments) that have been delegated to them. They can create new notification types and can edit settings for notification only for the Organization and Departments that have been delegated to them. DRAO - can only see their own Department(s) in the 'Departments' column. The 'Organizations' area is not visible to DRAOs. They have rights to manage only the Department delegated to them. 272
/Department(s) for which the notification was created.")
273 Notifications - Summary of Fields and Controls Column Display Description Description Provides a short description for the notification, as entered by the administrator during creation. Organization/Department The Organization(s)/Department(s) for which the notification was created. The notification mails will be sent to the only to Administrators of these Organization(s)/Department(s). Days Number of days in advance of the event, the notification will be sent to the Administrators. Created by Displays the name of the administrator who has created the notification. Note: An administrator can enable or disable the columns from the drop-down button beside the last item in the table header: Control Buttons Add Enables the Administrator to add a new notification. Refresh Updates the list of displayed Notifications. Notification Control Buttons Edit Enables the administrator to edit the notification. Note: The Notification control buttons are visible only on selecting a Notification Delete Enables the Administrator to delete the notification. Important Note: An administrator can either edit or delete an existing notification when all the following conditions are true: 273


274 The administrator has authority for all of the organizations and departments contained within the scope of the notification. The administrator has authority for the notification type. The notification was created at the same or lower level than that of the administrator. Sorting and Filtering Options Clicking on a column headers 'Description' and 'Days' sorts the items in the alphabetical order of the entries in the respective column. Administrators can search for a particular notification from the list by using filters under the sub-tab: To apply filters, click on the down arrow at the right end of the 'Filters' stripe. The filter options will be displayed. You can add filters by selecting from the options in the 'Add Filter' drop-down and group the selection with other options that appears depending on the selection from the 'Add Filter' drop-down. For example, if you want to filter the notification type set for an Organization/Department, select 'Organization' from the 'Add Filter' drop-down: Select the organization to which the department belongs from the Organization drop-down. Select the department from the Department drop-down. To group the results based on the days parameter, select 'Days' from the 'Group by' drop-down. 274

275 Click the 'Apply' button. The filtered items based on the selected parameters will be displayed: To remove the filters, click the 'Clear' button. Note: The search filters once configured for the interface will be automatically saved. When you are re-opening the 'Notifications' interface in future, the configured filters will be in action and only the search results will be displayed. If you do not want the filters to be saved, click the 'Clear' button Adding a Notification The administrator can add a new notification by clicking the 'Add' button at the bottom of Notifications sub-tab and filling out the form that appears. 275

276 When adding a notification administrator should first select a Notification Type. There are several types of notifications available for selection. The list of notification types in the drop-down is dependent on the role of the administrator. For example, RAO SSL and DRAO SSL administrators will see the options corresponding to only SSL certificates and so on. 276

277 An administrator can create notifications when he/she has authority for all of the organizations and departments contained within the scope of the notification and the administrator has authority for the notification type. Similarly, an administrator can view existing notifications when he/she has authority for any of the organizations or departments contained within scope of the notification and the administrator has authority for the notification type. The following table explains the notifications that are available for administrators according to their administrative roles. Notification Notification Type Administrator Type Client Certificate Expiration Client Certificate RAO SMIME admins, DRAO SMIME admins. Client Certificate Revoked Client Certificate RAO SMIME admins, DRAO SMIME admins. Code Signing Certificate Downloaded Code Signing Certificate RAO Code Signing admins, DRAO Code Signing admins. Code Signing Certificate Revoked Code Signing Certificate RAO Code Signing admins, DRAO Code Signing admins. Code Signing Certificate Expiration Code Signing Certificate RAO Code Signing admins, DRAO Code Signing admins. Code Signing Certificate Requested Code Signing Certificate RAO Code Signing admins, DRAO Code Signing admins. SSL Approved SSL Certificate RAO SSL admin, DRAO SSL admin. SSL Awaiting Approval SSL Certificate RAO SSL admin, DRAO SSL admin. 277
278 Notification Notification Type Administrator Type SSL Declined SSL Certificate RAO SSL admin, DRAO SSL admin. SSL Expiration SSL Certificate RAO SSL admin, DRAO SSL admin. SSL Issuance Failed SSL Certificate RAO SSL admin, DRAO SSL admin. SSL Revoked SSL Certificate RAO SSL admin, DRAO SSL admin. Discovery Scan Summary Other All administrators. Remote SSL Certificate Installed SSL Certificate RAO SSL admin, DRAO SSL admin Remote SSL Certificate Installation Failed SSL Certificate RAO SSL admin, DRAO SSL admin Client Admin Creation Other All administrators. Domain Awaiting Approval Other All administrators. Domain Approved Other All administrators. DCV Expiration Domain Control Validation RAO SSL admin, DRAO SSL admin DCV Expired Domain Control Validation RAO SSL admin, DRAO SSL admin DCV Validated Domain Control Validation RAO SSL admin, DRAO SSL admin DCV Needed-New Domain Domain Control Validation RAO SSL admin, DRAO SSL admin 278
279 Notification Notification Type Administrator Type Detailed description of each type of form is given below. The 'Create Notification' form varies pursuant to the selected 'Notification Type' Notification Types 'Client Certificate Expiration' Create Notification Form Enables administrator to set notification about terms of expiration of client certificates. 279
280 Table of Parameters Form Element Type Description Description (required) Text Field Administrator should enter text of the notification in this field. Organization/Department (required) Check Boxes Administrator can select Organization(s)/Departments(s), to the members of which this notification has to be sent. Selecting the check box at the top of the 'Organization' column enables the notification to the members of all the Organizations/Departments. If the notification is to be sent only to members of certain Organizations, then select the respective Organizations. Selecting 'Any' in the 'Departments' column enables the notification to the members of all the Departments of the selected Organization. If the notification is to be sent only to members of certain department(s) of the selected Organization(s), uncheck 'Any' and select the required the Departments. Days in advance to notify (required) Text Field Enables the administrator to set number of days the end-user will be informed about expiration of the certificate before the event. Administrator can also specify whether the notification has to be sent to the member(s) only once or daily till the expiration date by selecting the respective radio button. Notify Requester (required) Check-box Enables the administrator to set the notification for person that requested the certificate. Notify Client Certificate RAO Admin(s) (required) Check-box Enables the administrator to set the notification for RAO SMIME Admin(s) of the selected Organization(s). Notify Client Certificate DRAO Admin(s) (required) Check-box Enables the administrator to set the notification for DRAO SMIME Admin(s) of the selected Department(s). Subscribers (optional) Text Field Administrator can specify additional address to which the notifications will be sent. 280
281 'Client Certificate Revoked' Create Notification Form Enables the Administrator to create a notification that will be sent to selected personnel upon revocation of a client certificate Table of Parameters Form Element Type Description Description (required) Text Field Administrator should enter text of the notification in this field. Organization/Department (required) Check Boxes Administrator can select Organization(s)/Departments(s), to the members of which this notification has to be sent. Selecting the check box at the top of the 'Organization' column enables the notification to the members of all the Organizations/Departments. If the notification is to be sent only to members of certain Organizations, then select the respective Organizations. Selecting 'Any' in the 'Departments' column enables the notification to the members of all the Departments of the selected Organization. If the 281
282 notification is to be sent only to members of certain department(s) of the selected Organization(s), uncheck 'Any' and select the required the Departments. For Certificates Revoked by: (required) Check-box Administrator should select a person (administrator or user) after whose revoke action, the notification will be send. Notify Requester (required) Check-box Enables the administrator to set the notification for person, who requested the certificate. Notify Client Certificate RAO Admin(s) (required) Check-box Enables the administrator to set the notification for RAO SMIME Admin(s) of the selected Organization(s). Notify Client Certificate DRAO Admin(s) (required) Check-box Enables the administrator to set the notification for DRAO SMIME Admin(s) of the selected Department(s). Subscribers (optional) Text Field Administrator can specify additional address to which the notifications will be sent 'Code Signing Certificate Downloaded' Create Notification Form Enables the Administrator to create a notification that will be sent to selected personnel whose Code Signing Certificate was downloaded by the Administrator. 282
283 Table of Parameters Form Element Type Descriptions Description (required) Text Field Administrator should enter text of the notification in this field. Organization/Department (required) Check Boxes Administrator can select Organization(s)/Departments(s), to the members of which this notification has to be sent. Selecting the check box at the top of the 'Organization' column enables the notification to the members of all the Organizations/Departments. If the notification is to be sent only to members of certain Organizations, then select the respective Organizations. Selecting 'Any' in the 'Departments' column enables the notification to the members of all the Departments of the selected Organization. If the notification is to be sent only to members of certain department(s) of the selected Organization(s), uncheck 'Any' and select the required the Departments. Notify Requester (required) Check-box Enables the administrator to set the notification for person, who 283
284 requested the certificate. Notify Code Signing RAO Admins(s) (required) Check-box Enables the administrator to set the notification for RAO Code Signing Certificate Admin(s) of the selected Organization(s)/Department(s). Notify Code Signing DRAO Admins(s) (required) Check-box Enables the administrator to set the notification for DRAO Code Signing Certificate Admin(s) of the selected Department(s). Subscribers (optional) Text Field Administrator can specify additional address to which the notifications will be sent 'Code Signing Certificate Revoked' Create Notification Form Enables the Administrator to create a notification that will be sent to selected personnel whose Code Signing Certificate was revoked. 284
285 Table of Parameters Form Element Type Description Description (required) Text Field Administrator should enter text of the notification in this field. Organization/Department (required) Check Boxes Administrator can select Organization(s)/Departments(s), to the members of which this notification has to be sent. Selecting the check box at the top of the 'Organization' column enables the notification to the members of all the Organizations/Departments. If the notification is to be sent only to members of certain Organizations, then select the respective Organizations. Selecting 'Any' in the 'Departments' column enables the notification to the members of all the Departments of the selected Organization. If the notification is to be sent only to members of certain department(s) of the selected Organization(s), uncheck 'Any' and select the required the Departments. Notify Requester (required) Check-box Enables the administrator to set the notification for person, who requested the certificate. Notify Code Signing RAO Admins(s) (required) Check-box Enables the administrator to set the notification for RAO Code Signing Certificate Admin(s) of the selected Organization(s)/Department(s). Notify Code Signing DRAO Admins(s) (required) Check-box Enables the administrator to set the notification for DRAO Code Signing Certificate Admin(s) of the selected Department(s). Subscribers (optional) Text Field Administrator can specify additional address to which the notifications will be sent. 285
286 'Code Signing Certificate Expiration' Create Notification Form Enables the Administrator to create a notification that will be sent to selected personnel whose Code Signing Certificate is due to expire Table of Parameters Form Element Type Description Description (required) Text Field Administrator should enter text of the notification in this field. Organization/Department (required) Check Boxes Administrator can select Organization(s)/Departments(s), to the members of which this notification has to be sent. Selecting the check box at the top of the 'Organization' column enables the notification to the members of all the Organizations/Departments. If the notification is to be sent only to members of certain Organizations, then select the respective Organizations. Selecting 'Any' in the 'Departments' column 286
287 Form Element Type Description enables the notification to the members of all the Departments of the selected Organization. If the notification is to be sent only to members of certain department(s) of the selected Organization(s), uncheck 'Any' and select the required the Departments. Days in advance to notify (required) Text Field Enables the administrator to set number of days the end-user will be informed about expiration of the certificate before the event. Administrator can also specify whether the notification has to be sent to the member(s) only once or daily till the expiration date by selecting the respective radio button. Notify Requester (required) Check-box Enables the administrator to set the notification for person, who requested the certificate. Notify Code Signing RAO Admins(s) (required) Check-box Enables the administrator to set the notification for RAO Code Signing Certificate Admin(s) of the selected Organization(s)/Department(s). Notify Code Signing DRAO Admins(s) (required) Check-box Enables the administrator to set the notification for DRAO Code Signing Certificate Admin(s) of the selected Department(s). Subscribers (optional) Text Field Administrator can specify additional address to which the notifications will be sent. 287
288 'Code Signing Certificate Requested' Create Notification Form Enables the Administrator to create a notification that will be sent to selected personnel whose Code Signing Certificate is been requested by the Administrator to the CA Table of Parameters Form Element Type Description Description (required) Text Field Administrator should enter text of the notification in this field. Organization/Department (required) Check Boxes Administrator can select Organization(s)/Departments(s), to the members of which this notification has to be sent. Selecting the check box at the top of the 'Organization' column enables the notification to the members of all the Organizations/Departments. If the notification is to be sent only to members of certain Organizations, then select the respective Organizations. Selecting 'Any' in the 'Departments' column enables the notification to the members of all the Departments of the selected Organization. If the notification is to be sent only to members of 288
289 Form Element Type Description certain department(s) of the selected Organization(s), uncheck 'Any' and select the required the Departments. Notify Requester (required) Check-box Enables the administrator to set the notification for person, who requested the certificate. Notify Code Signing RAO Admins(s) (required) Check-box Enables the administrator to set the notification for RAO Code Signing Certificate Admin(s) of the selected Organization(s)/Department(s). Notify Code Signing DRAO Admins(s) (required) Check-box Enables the administrator to set the notification for DRAO Code Signing Certificate Admin(s) of the selected Department(s). Subscribers (optional) Text Field Administrator can specify additional address to which the notifications will be sent. 289
290 'SSL Approved' Create Notification Form Enables the Administrator to create a notification that will be sent to selected personnel upon Approval of an SSL certificate request by an Administrator Table of Parameters Form Element Type Description (required) Text Field Description Administrator should enter text of the notification in this field. 290
291 Form Element Organization/Department (required) Type Check Boxes Description Administrator can select Organization(s)/Departments(s), to the members of which this notification has to be sent. Selecting the check box at the top of the 'Organization' column enables the notification to the members of all the Organizations/Departments. If the notification is to be sent only to members of certain Organizations, then select the respective Organizations. Selecting 'Any' in the 'Departments' column enables the notification to the members of all the Departments of the selected Organization. If the notification is to be sent only to members of certain department(s) of the selected Organization(s), uncheck 'Any' and select the required the Departments. 291
292 Form Element Type Description Certificate type: (required) Drop-down Administrator should select type of SSL certificate for which the notification is to be set. Notify owner (required) Check-box Enables the administrator to set the notification for the Owner of the certificate. The Owner of the certificate is the Administrator that first approved the request for the certificate. Notify Requester (required) Check-box Enables the administrator to set the notification for person, who requested the certificate. Notify SSL RAO Admin(s) (required) Check-box Enables the administrator to set the notification for RAO SSL Admin(s) of the selected Organization(s)/Department(s). Notify SSL DRAO Admin(s) (required) Check-box Enables the administrator to set the notification for DRAO SSL Admin(s) of the selected Department(s). Subscribers (optional) Text Field Administrator can specify additional address to which the notifications will be sent 'SSL Awaiting Approval' Create Notification Form Enables the administrator to set a notification about an SSL certificate state after the certificate was requested. An SSL certificate request must be approved by the administrator. Before the request is approved, its state is 'Awaiting Approval'. 292
293 Table of Parameters Form Element Type Description Description (required) Text Field Administrator should enter text of the notification in this field. Organization/Department (required) Check Boxes Administrator can select Organization(s)/Departments(s), to the members of which this notification has to be sent. Selecting the check box at the top of the 'Organization' column enables the notification to the members of all the Organizations/Departments. If the notification is to be sent only to members of certain Organizations, then select the respective Organizations. Selecting 'Any' in the 'Departments' column enables the notification to the members of all the Departments of the selected Organization. If the notification is to be sent only to members of certain department(s) of the selected Organization(s), uncheck 'Any' and select the required the Departments. 293
294 Form Element Type Description Certificate type: (required) Drop-down Administrator should select type of SSL certificate for which the notification is to be set. Notify Requester (required) Check-box Enables the administrator to set the notification for person, who requested the certificate. Notify SSL RAO Admin(s) (required) Check-box Enables the administrator to set the notification for RAO SSL Admin(s) of the selected Organization(s)/Department(s). Notify SSL DRAO Admin(s) (required) Check-box Enables the administrator to set the notification for DRAO SSL Admin(s) of the selected Department(s). Subscribers (optional) Text Field Administrator can specify additional address to which the notifications will be sent 'SSL Declined' Create Notification Form Enables the Administrator to create a notification that will be sent to selected personnel whose SSL Certificate request was declined by the Administrator. 294
295 295
296 296
297 Table of Parameters Form Element Type Description Description (required) Text Field Administrator should enter text of the notification in this field. Organization/Department (required) Check Boxes Administrator can select Organization(s)/Departments(s), to the members of which this notification has to be sent. Selecting the check box at the top of the 'Organization' column enables the notification to the members of all the Organizations/Departments. If the notification is to be sent only to members of certain Organizations, then select the respective Organizations. Selecting 'Any' in the 'Departments' column enables the notification to the members of all the Departments of the selected Organization. If the notification is to be sent only to members of certain department(s) of the selected Organization(s), uncheck 'Any' and select the required the Departments. Certificate type: (required) Drop-down Administrator should select type of SSL certificate for which the notification should be set. Notify Owner (required) Check-box Enables the administrator to set the notification for the Owner of the certificate. The Owner of the certificate is the Administrator that first approved the request for the certificate. Notify Requester (required) Check-box Enables the administrator to set the notification for a person, who requested the certificate. Notify SSL RAO Admin(s) (required) Check-box Enables the administrator to set the notification for RAO SSL Admin(s) of the selected Organization(s)/Department(s). Notify SSL DRAO Admin(s) (required) Check-box Enables the administrator to set the notification for DRAO SSL Admin(s) of the selected Department(s). Subscribers (optional) Text Field Administrator can specify additional address to which the notifications will be sent 'SSL Expiration' Create Notification Form Enables the Administrator to create a notification that will be sent to selected personnel whose SSL Certificates are due to expire, in advance. 297
298 298
299 Table of Parameters Form Element Type Description Description (required) Text Field Administrator should enter text of the notification in this field. Organization/Department (required) Check Boxes Administrator can select Organization(s)/Departments(s), to the members of which this notification has to be sent. Selecting the check box at the top of the 'Organization' column enables the notification to the members of all the Organizations/Departments. If the notification is to be sent only to members of certain Organizations, then select the respective Organizations. Selecting 'Any' in the 'Departments' column enables the notification to the members of all the Departments of the selected Organization. If the notification is to be sent only to members of certain department(s) of the selected Organization(s), uncheck 'Any' and select the required the Departments. Certificate type: (required) Drop-down Administrator should select type of SSL certificate for which the notification is to be set. Days in advance to notify (required) Text Field Enables the administrator to set number of days the notification will be sent about expiration of the certificate before the event. Administrator can also specify whether the notification has to be sent only once or daily till the expiration date by selecting the respective radio button. Notify Owner (required) Check-box Enables the administrator to set the notification for a person, who owns the certificate. Notify Requester (required) Check-box Enables the administrator to set the notification for a person, who requested the certificate. Notify SSL RAO Admin(s) (required) Check-box Enables the administrator to set the notification for RAO SSL Admin(s) of the selected Organization(s)/Departments. Notify SSL DRAO Admin(s) (required) Check-box Enables the administrator to set the notification for DRAO SSL Admin(s) of the Department(s). Subscribers (optional) Text Field Administrator can specify additional address to which the notifications will be sent 'SSL Issuance Failed' Create Notification Form Enables the Administrator to create a notification that will be sent to selected personnel for whom the SSL Certificate issuance has failed. 299
300 Table of Parameters Form Element Type Description Description (required) Text Field Administrator should enter text of the notification in this field. Organization/Department (required) Check boxes Administrator can select Organization(s)/Departments(s), to the members of which this notification has to be sent. Selecting the check box at the top of the 'Organization' column enables the notification to the members of all the Organizations/Departments. If the notification is to be sent only to members of certain Organizations, then select the respective Organizations. Selecting 'Any' in the 'Departments' column enables the notification to the members of all the Departments of the selected Organization. If the notification is to be sent only to members of certain department(s) of the selected Organization(s), uncheck 'Any' and select the required the Departments. Certificate type: (required) Drop-down Administrator should select type of SSL certificate for which the notification is to be set. 300
301 Form Element Type Description Notify owner (required) Check-box Enables the administrator to set the notification for the Owner of the certificate. Notify Requester (required) Check-box Enables the administrator to set the notification for a person, who requested the certificate. Notify SSL RAO Admin(s) (required) Check-box Enables the administrator to set the notification for RAO SSL Admin(s) of the selected Organization(s). Notify SSL DRAO Admin(s) (required) Check-box Enables the administrator to set the notification for DRAO SSL Admin(s) of selected the Department(s). Subscribers (optional) Text Field Administrator can specify additional address to which the notifications will be sent 'SSL Revoked' Create Notification Form Enables the administrator to set the notification about SSL certificates 'Revoke' action (the certificate could be revoked by the administrator or by the end-user). 301
302 Table of Parameters Form Element Type Description Description (required) Text Field Administrator should enter text of the notification in this field. Organization/Department (required) Check boxes Administrator can select Organization(s)/Departments(s), to the members of which this notification has to be sent. Selecting the check box at the top of the 'Organization' column enables the notification to the members of all the Organizations/Departments. If the notification is to be sent only to members of certain Organizations, then select the respective Organizations. Selecting 'Any' in the 'Departments' column enables the notification to the members of all the Departments of the selected Organization. If the notification is to be sent only to members of certain department(s) of the selected Organization(s), uncheck 'Any' and select the required the Departments. 302
303 Form Element Type Description Certificate type: (required) Drop-down Administrator should select type of SSL certificate for which the notification is to be set. For Certificates Revoked by: (required) Check-box Administrator should select a person (administrator or user) after whose revocation action, the notification is to be sent. Notify Owner (required) Check-box Enables the administrator to set the notification for the Owner of the certificate. Notify Requester (required) Check-box Enables the administrator to set the notification for a person, who requested the certificate. Notify SSL RAO Admin(s) (required) Check-box Enables the administrator to set the notification for RAO SSL Admin(s) of the selected Organization(s)/Department(s). Notify SSL DRAO Admin(s) (required) Check-box Enables the administrator to set the notification for DRAO SSL Admin(s) of the selected Department(s). Subscribers (optional) Text Field Administrator can specify additional address to which the notifications will be sent 'Discovery Scan Summary' Create Notification Form Enables the Administrator to create a notification with a summary of certificate discovery scan results, for sending to selected personnel. 303
304 Table of Parameters Form Element Type Description Description (required) Text Field Administrator should enter text of the notification in this field. Organization/Department (required) Check boxes Administrator can select Organization(s)/Departments(s), to the members of which this notification has to be sent. Selecting the check box at the top of the 'Organization' column enables the notification to the members of all the Organizations/Departments. If the notification is to be sent only to members of certain Organizations, then select the respective Organizations. Selecting 'Any' in the 'Departments' column enables the notification to the members of all the Departments of the selected Organization. If the notification is to be sent only to members of certain department(s) of the selected Organization(s), uncheck 'Any' and select the required the Departments. Certificates type: (required) Drop-down Administrator should select type of SSL certificate for which the discovery scan summary notification will be set. 304
305 Form Element Type Description Notify SSL RAO Admin(s) (required) Check-box Enables the administrator to set the notification for RAO SSL Admin(s) of the selected Organization(s)/Department(s). Notify SSL DRAO Admin(s) (required) Check-box Enables the administrator to set the notification for DRAO SSL Admin(s) of the selected Organization(s)/Department(s). Subscribers (optional) Text Field Administrator can specify additional address to which the notifications will be sent 'Remote SSL Certificate Installed ' Create Notification Form Enables the Administrator to create a notification that will be sent to selected personnel whose SSL Certificate was remotely installed by the Administrator. 305
306 Table of Parameters Form Element Type Description Description (required) Text Field Administrator should enter text of the notification in this field. Organization/Department (required) Checkboxes Administrator should select Organization(s)/Departments(s), to the members of which this notification has to be sent. Selecting 'Any' (checked by default) enables the notification to the members of all the Organizations. If the notification is to be sent only to members of certain Organizations/Departments, then select the checkbox with the drop-down arrow. The tree structure of Organizations and departments will be displayed. Choose the Organizations/Departments from the tree structure. Certificate Type: (required) Drop-down Administrator should select type of SSL certificate for which the 'SSL certificate was installed remotely' notification is to be set. Notify Owner (required) Checkbox Enables the administrator to set the notification for the Owner of the certificate. Notify Requester (required) Checkbox Enables the administrator to set the notification to the person who requested the Admin status. Notify SSL RAO Admin(s) (required) Checkbox Enables the administrator to set the notification for RAO SSL Admin(s) of the selected Organization(s)/Department(s). Notify SSL DRAO Admin(s) (required) Checkbox Enables the administrator to set the notification for DRAO SSL Admin(s) of the selected Department(s). Subscribers (optional) Text Field Administrator can specify additional address to which the notifications will be sent 'Remote SSL Certificate Installation Failed ' Create Notification Form Enables the Administrator to create a notification that will be sent to selected personnel whose remote SSL Certificate installation failed. 306
307 Table of Parameters Form Element Type Description Description (required) Text Field Administrator should enter text of the notification in this field. Organization/Department (required) Checkboxes Administrator should select Organization(s)/Departments(s), to the members of which this notification has to be sent. Selecting 'Any' (checked by default) enables the notification to the members of all the Organizations. If the notification is to be sent only to members of certain Organizations/Departments, then select the checkbox with the drop-down arrow. The tree structure of Organizations and departments will be displayed. Choose the Organizations/Departments from the tree structure. Certificate Type: (required) Drop-down Administrator should select the type of SSL certificate for which the 'Remote installation failed' notification is to be sent. Notify Owner (required) Checkbox Enables the administrator to set the notification for the Owner of the certificate. 307
308 Form Element Type Description Notify Requester (required) Checkbox Enables the administrator to set the notification to the person who requested the Admin status. Notify SSL RAO Admin(s) (required) Checkbox Enables the administrator to set the notification for RAO SSL Admin(s) of the selected Organization(s)/Department(s). Notify SSL DRAO Admin(s) (required) Checkbox Enables the administrator to set the notification for DRAO SSL Admin(s) of the selected Department(s). Subscribers (optional) Text Field Administrator can specify additional address to which the notifications will be sent 'Client Admin Creation' Create Notification Form Enables the Administrator to create a notification to selected personnel upon creation of new Client Cert Administrators (RAO Admin SMIME and RAO Admin SMIME). 308
309 Table of Parameters Form Element Type Description Description (required) Text Field Administrator should enter text of the notification in this field. Organization/Department (required) Check boxes Administrator can select Organization(s)/Departments(s), to the members of which this notification has to be sent. Selecting the check box at the top of the 'Organization' column enables the notification to the members of all the Organizations/Departments. If the notification is to be sent only to members of certain Organizations, then select the respective Organizations. Selecting 'Any' in the 'Departments' column enables the notification to the members of all the 309
310 Form Element Type Description Departments of the selected Organization. If the notification is to be sent only to members of certain department(s) of the selected Organization(s), uncheck 'Any' and select the required the Departments. Notify Requester (required) Check-box Enables the administrator to set the notification to the person who requested the Admin status. Notify SSL RAO Admin(s) (required) Check-box Enables the administrator to set the notification all the RAO SSL Admin(s) of the selected Organization(s)/Departments. Notify SSL DRAO Admin(s) (required) Check-box Enables the administrator to set the notification all the DRAO SSL Admin(s) of the selected Departments. Notify Client Certificate RAO Admin(s) (required) Check-box Enables the administrator to set the notification all the RAO SMIME Admin(s) of the selected Organization(s)/Departments. Notify Client Certificate DRAO Admin(s) (required) Check-box Enables the administrator to set the notification all the DRAO SMIME Admin(s) of the selected Departments. Notify Code Signing RAO Admin(s) (required) Check-box Enables the administrator to set the notification all the RAO Code Signing Admin(s) of the selected Organization(s)/Departments. Notify Code Signing DRAO Admin(s) (required) Check-box Enables the administrator to set the notification all the DRAO Code Signing Admin(s) of the selected Departments. Subscribers (optional) Text Field Administrator can specify additional address to which the notifications will be sent. 310
311 'Domain Awaiting Approval' Create Notification Form Enables the administrator to set a notification about a request of a domain delegation to an Organization/Department. The Domain delegation request must be approved by the RAO Administrator. Before the request is approved, its state is 'Awaiting Approval' Table of Parameters Form Element Description (required) Type Text Field Description Administrator should enter text of the notification in this field. 311
312 Form Element Type Description Organization/Department (required) Check boxes Administrator can select Organization(s)/Departments(s), to the members of which this notification has to be sent. Selecting the check box at the top of the 'Organization' column enables the notification to the members of all the Organizations/Departments. If the notification is to be sent only to members of certain Organizations, then select the respective Organizations. Selecting 'Any' in the 'Departments' column enables the notification to the members of all the Departments of the selected Organization. If the notification is to be sent only to members of certain department(s) of the selected Organization(s), uncheck 'Any' and select the required the Departments. Notify Requester (required) Check-box Enables the administrator to set the notification to the person who requested the delegation of a created domain to an Organization/Department. Notify SSL RAO Admin(s) (required) Check-box Enables the administrator to set the notification all the RAO SSL Admin(s) of the selected Organization(s)/Departments. Notify SSL DRAO Admin(s) (required) Check-box Enables the administrator to set the notification all the DRAO SSL Admin(s) of the selected Departments. Notify Client Certificate RAO Admin(s) (required) Check-box Enables the administrator to set the notification all the RAO SMIME Admin(s) of the selected Organization(s)/Departments. Notify Client Certificate DRAO Admin(s) (required) Check-box Enables the administrator to set the notification all the DRAO SMIME Admin(s) of the selected Departments. Notify Code Signing RAO Admin(s) (required) Check-box Enables the administrator to set the notification all the RAO Code Signing Admin(s) of the selected Organization(s)/Departments. Notify Code Signing DRAO Admin(s) (required) Check-box Enables the administrator to set the notification all the DRAO Code Signing Admin(s) of the selected Departments. Subscribers (optional) Text Field Administrator can specify additional address to which the notifications will be sent. Important Note: The 'Domain Awaiting Approval' notification will be sent to Master Administrator only after the requested domain is approved by RAO 'Domain Approved' Create Notification Form Enables the Administrator to create a notification that will be sent to selected personnel upon Approval of creation and delegation of a domain to an Organization/Department. Important Note: The 'Domain Approved' notification will be sent only on final approval of a requested domain by Master Administrator(s). 312
313 313
314 Table of Parameters Form Element Type Description Description (required) Text Field Administrator should enter text of the notification in this field. Organization/Department (required) Check boxes Administrator can select Organization(s)/Departments(s), to the members of which this notification has to be sent. Selecting the check box at the top of the 'Organization' column enables the notification to the members of all the Organizations/Departments. If the notification is to be sent only to members of certain Organizations, then select the respective Organizations. Selecting 'Any' in the 'Departments' column enables the notification to the members of all the Departments of the selected Organization. If the notification is to be sent only to members of certain department(s) of the selected Organization(s), uncheck 'Any' and select the required the Departments. Notify Requester (required) Check-box Enables the administrator to set the notification to the person who requested the delegation of a created domain to an Organization/Department. Notify SSL RAO Admin(s) (required) Check-box Enables the administrator to set the notification all the RAO SSL Admin(s) of the selected Organization(s)/Departments. Notify SSL DRAO Admin(s) (required) Check-box Enables the administrator to set the notification all the DRAO SSL Admin(s) of the selected Departments. Notify Client Certificate RAO Admin(s) (required) Check-box Enables the administrator to set the notification all the RAO SMIME Admin(s) of the selected Organization(s)/Departments. Notify Client Certificate DRAO Admin(s) (required) Check-box Enables the administrator to set the notification all the DRAO SMIME Admin(s) of the selected Departments. Notify Code Signing RAO Admin(s) (required) Check-box Enables the administrator to set the notification all the RAO Code Signing Admin(s) of the selected Organization(s)/Departments. Notify Code Signing DRAO Admin(s) (required) Check-box Enables the administrator to set the notification all the DRAO Code Signing Admin(s) of the selected Departments. Subscribers (optional) Text Field Administrator can specify additional address to which the notifications will be sent 'DCV Expiration' Create Notification Form Enables administrator to set notification about expiration of domain control validation if it is due to expire. 314
315 Table of Parameters Form Element Type Description Description (required) Text Field Organization/Department (required) Check boxes Administrator can select Organization(s)/Departments(s), to the members of which this notification has to be sent. Selecting the check box at the top of the 'Organization' column enables the notification to the members of all the Organizations/Departments. If the notification is to be sent only to members of certain Organizations, then select the respective Organizations. Selecting 'Any' in the 'Departments' column enables the notification to the members of all the Departments of the selected Organization. If the notification is to be sent only to members of certain department(s) of the selected Organization(s), uncheck 'Any' and select the required the Departments. Text Field Administrator should enter text of the notification in this field. Enables the administrator to set number of days the end-user will be informed about expiration of the certificate before the event. Administrator can also specify whether 315
316 Days in advance to notify (required) the notification has to be sent to the member(s) only once or daily till the expiration date by selecting the respective radio button. Notify Owner (required) Check-box Enables the administrator to set the notification for the Owner of the certificate. Notify Requester (required) Check-box Enables the administrator to set the notification to the person who requested the delegation of a created domain to an Organization/Department. Notify SSL RAO Admin(s) (required) Check-box Enables the administrator to set the notification all the RAO SSL Admin(s) of the selected Organization(s)/Departments. Notify SSL DRAO Admin(s) (required) Check-box Enables the administrator to set the notification all the DRAO SSL Admin(s) of the selected Departments. Subscribers (optional) Text Field Administrator can specify additional address to which the notifications will be sent 'DCV Validated' Create Notification Form Enables the Administrator to create a notification that will be sent to selected personnel on successful completion of Domain Control Validation (DCV). 316
317 Table of Parameters Form Element Type Description Description (required) Text Field Administrator should enter text of the notification in this field. Organization/Department (required) Check boxes Administrator can select Organization(s)/Departments(s), to the members of which this notification has to be sent. Selecting the check box at the top of the 'Organization' column enables the notification to the members of all the Organizations/Departments. If the notification is to be sent only to members of certain Organizations, then select the respective Organizations. Selecting 'Any' in the 'Departments' column enables the notification to the members of all the Departments of the selected Organization. If the notification is to be sent only to members of certain department(s) of the selected Organization(s), uncheck 'Any' and select the required the Departments. Notify Owner (required) Check-box Enables the administrator to set the notification for the Owner of the certificate. Notify Requester (required) Check-box Enables the administrator to set the notification to the person who requested the delegation of a created domain to an Organization/Department. 317
318 Notify SSL RAO Admin(s) (required) Check-box Enables the administrator to set the notification all the RAO SSL Admin(s) of the selected Organization(s)/Departments. Notify SSL DRAO Admin(s) (required) Check-box Enables the administrator to set the notification all the DRAO SSL Admin(s) of the selected Departments. Subscribers (optional) Text Field Administrator can specify additional address to which the notifications will be sent 'DCV Needed-New Domain' Create Notification Form Enables the Administrator to create a notification that will be sent to those personnel selected when a new domain is created and awaiting validation. 318
319 Table of Parameters Form Element Type Description Description (required) Text Field Administrator should enter text of the notification in this field. Organization/Department (required) Check boxes Administrator can select Organization(s)/Departments(s), to the members of which this notification has to be sent. Selecting the check box at the top of the 'Organization' column enables the notification to the members of all the Organizations/Departments. If the notification is to be sent only to members of certain Organizations, then select the respective Organizations. Selecting 'Any' in the 'Departments' column enables the notification to the members of all the Departments of the selected Organization. If the notification is to be sent only to members of certain department(s) of the selected Organization(s), uncheck 'Any' and select the required the Departments. Notify Owner (required) Check-box Enables the administrator to set the notification for the Owner of the certificate. Notify Requester (required) Check-box Enables the administrator to set the notification to the person who requested the delegation of a created domain to an Organization/Department. Notify SSL RAO Admin(s) (required) Check-box Enables the administrator to set the notification all the RAO SSL Admin(s) of the selected Organization(s)/Departments. Notify SSL DRAO Admin(s) (required) Check-box Enables the administrator to set the notification all the DRAO SSL Admin(s) of the selected Departments. Subscribers (optional) Text Field Administrator can specify additional address to which the notifications will be sent. 6 Certificate Discovery and Agents CM allows administrators to scan for SSL certificates installed in a network including certificates issued by third party vendors and self-signed certificates. Agents installed in the network facilitate this discovery process. Refer to the following sections for more detailed explanation on each area. Certificate Discovery Agents 6.1 Certificate Discovery Area Discovery Tasks The Certificate Discovery option is a very convenient tool for scanning and monitoring a network for all installed SSL certificates (including InCommon Certificates that may or may not have been issued using InCommon Certificate Manager, any 3rd party vendor certificates and any self-signed certificates). Security Roles: RAO Administrators can scan for certificates requested, issued, expired, revoked and replaced for Organizations (RAOs) and Departments of those Organizations (DRAOs) that have been delegated to them. DRAO Administrators can scan for certificates requested, issued, expired, revoked and replaced for the Department that have been delegated to them. 319

320 Discovery Tasks area - Table of Parameters Field Element Values Description Name String Name of the certificate discovery task. Organization String Name of the organization selected for the discovery task. Department String Name of the department selected for the discovery task. Ranges to Scan String Displays the IP ranges that will be scanned during this task. State String Displays the status of the scan, that is, whether it is successful, failed, in progress or canceled. Clicking on the state displays respective result. For example, clicking on 'Successful' will display the number of certificates discovered. Schedule String Displays whether the scan is to be run manually or scheduled. Last Scanned String Displays the date and time of the last scan performed. Note: The administrator can enable or disable desired columns from the drop-down at the right end of the table header: Control Buttons Add Enables administrator to add a new certificate discovery task. Refresh Updates the list of displayed discovery tasks. Edit Enables administrator to edit the selected discovery task such as change the IP range and more. Delete Enables administrator to delete a discovery task from the list. Discovery Task control Buttons Note: The Discovery Task control buttons are visible only on selecting a domain 320

321 Scan Enables administrator to start a new scan for the selected discovery task. Cancel Enables administrator to cancel a discovery scan. This button will appear after starting a new scan. History Displays the details of past scans performed for the selected discovery task and allows administrators to download scan reports. Last Scan Details Displays the results of the last scan for the selected discovery task. Clean Results Removes all the discovered certificates from the SSL certificates tab Sorting and Filtering Options Clicking on a column headers 'Name', 'Organization', 'Department', 'Schedule' or 'Last Scanned' sorts the items in the alphabetical order of the entries in the respective column. Administrators can search for a particular discovery task by using filter. You can add filters by selecting from the options in the 'Add Filter' drop-down and group the selection with other options that appears depending on the selection from the 'Add Filter' drop-down. Filter Criteria Filter Parameter Name Enter the name of the discovery task fully or in part Organization Select the Organization and/or the department to which the certificate belongs, from the 'Organization' and 'Department' dropdowns. Select a filter criteria from the 'Add Filter' drop-down Enter or select the filter parameter as per the selected criteria. Tip: You can use more than one filter at a time. To remove a filter criteria, click the '-' button to the left if it. Select the criteria by which the results are to be grouped from the 'Group by' drop-down and enter or select the grouping parameter 321

322 For example, if you want to filter the discovery tasks with a specific Common Name starting with 'Dithers' and group the results by 'Organizations/Departments', then select 'Name' from the 'Add Filter' drop-down, enter 'Dithers' and select 'Organization/Department' from the 'Group by' drop-down. The tasks, having 'test' in their name will be displayed as a list. The filtered items based on the entered parameters will be displayed: To remove the filter options, click the 'Clear' button. Note: The search filters once configured for the interface will be automatically saved. When you are re-opening the 'Discovery Tasks' interface in future, the configured filters will be in action and only the search results will be displayed. If you do not want the filters to be saved, click the 'Clear' button Prerequisites The administrator has defined a default Organization/Department and has installed the discovery agent. All unmanaged certificates found during the certificate discovery scanning process will be assigned to the default Organization/Department. A discovery scan cannot be performed until the agent is installed and a default Organization is defined. 322
323 Overview of Process 1. Run a scan of networks in order to find all deployed SSL certificates. 2. CM will automatically integrate all newly discovered certificates into the 'SSL Certificates' area (Certificates Management > SSL Certificates). 3. CM will assign certificates that were not issued using CM to the default Organization with the status 'Unmanaged'. 4. CM will update the status of existing certificates that were issued using CM (if necessary). 5. 'Unmanaged' certificates can become 'Managed' by renewing the particular certificate. 6. The compiled results of the scan can be viewed in the 'Discovery Scan Log' Adding IP Range and Start Scanning 1. To begin a discovery scan, click 'Discovery' > Discovery' Tasks'> 'Add' to open the scan configuration form Form Element Element Type Description Name Text Field Type the name of the discovery task. Organization Drop-down Select an organization to which discovered certificates will be assigned. Department Drop-down Choose a specific department of the selected organization to be assigned discovered certificates. 323

324 Add Control Button Opens 'Add Scan Range' dialog for specifying the scan ranges. Edit Control Button Enables the administrator to edit the selected scan range. Remove Control Button Enables the administrator to delete the selected scan range. OK Control Button Enables the administrators to add the discovery task to the list. Cancel Control Button Cancel the process of creating the discovery task. Schedule Tab Allows the administrator to schedule the scan. 2. Click the 'Add' button to add the CIDR, IP or the host name in the Add Scan Range dialog. Form Element Element Type Description CIDR Text Field Short for 'Classless Internet DOMAIN Routing'. Type the IP address you wish to scan followed by network prefix, e.g /16 should be specified here. IP Text Field Type the IP address you wish to scan. Host name Text Field Enter the host name you wish to scan. Ports to Scan (required) Text Field The port number(s) for IP range. OK Control Enables the administrator to add specified data into the scan list. Cancel Control Enables the administrator to add cancel the process. 3. Click OK after selecting and entering the appropriate details. The administrator can add more scan ranges for the same discovery task. Repeat the process as explained above. 324

325 The entered scan ranges will be displayed. The administrator can edit or remove the scan range after selecting it. The entered scan ranges will be displayed. The administrator can edit or remove the scan range after selecting it. 325
, Daily, Weekly, Monthly, Quarterly, Semi-Annually and Annually. 5.")
326 4. Click the 'Schedule' tab to set the scan frequency for the discovery task. Scan frequency that could be set for the discovery task are: Manual (on demand), Daily, Weekly, Monthly, Quarterly, Semi-Annually and Annually. 5. Click 'OK'. The newly created discovery task will be displayed in the list. 326


327 6. Select the discovery task to run the certificate discovery scan. The control buttons for managing the task will be displayed at the top. 7. Click the 'Scan' button to commence the discovery scan for the selected task. CM allows administrators to run multiple discovery tasks at a time. After a scan has started, select another task and click the scan button at the top. 327
 * (# ports per address)) / 300 = Number of minutes for scan. Note: The timeout interval and number of threads per minute may be subject to minor fluctuation.")
328 Discovery scanning uses a 2 second timeout for each IP/Port combination with 10 threads running at once. This information can be used to approximate how long a scan will take. ((# IP Addresses) * (# ports per address)) / 300 = Number of minutes for scan. Note: The timeout interval and number of threads per minute may be subject to minor fluctuation. Admins are advised to treat these figures as an approximate calculation of scanning times. Example: Scanning a single range xxx.xxx.0.0/16 for a single port (443) equals 65,536 IP addresses. ((65536)(1))/300 = approx 218 minutes. The progress of the scan can be viewed in the row of the selected discovery task under the 'State' column. 8. Click the 'Cancel' button if you want to cancel the scanning process. If you cancel the scanning process, the entire system will revert to the state that existed before the scan was started (i.e., any data collected during scanning will not be applied until the scanning process is completed). If you cancel the scanning, you should specify the reason for in the 'Cancel Reason' dialog and click OK. After the scan is complete, administrators will be notified of the result via . Please note the notification should have been configured in the Discovery Scan Summary notifications area. 328

329 The results of the scan can be viewed at 'SSL certificates' sub-tab of the 'Certificate Management' section and the 'Reports' section Editing a Discovery Task Administrators can edit an existing discovery task from the list such as change the task name, organization, department and the schedule for the scan. To edit a task, select it and click the edit button at the top. 329

330 The interface allows the administrator to change the task name, select another organization and department, add new scan range, edit existing scan ranges or remove it. In the schedule tab, the scan frequency can be edited. For more details refer to section Adding IP Range and Start Scanning Deleting a Discovery Task To delete a discovery task from the list, select and click the 'Delete' button at the top. 330

331 Confirm the deletion in the dialog that appears Viewing History of Discovery Tasks CM allows administrators to view the history of up to last five scan results of each discovery task, view details of each task and download the report from the interface. To view the history of a discovery task, select it and click the 'History' button at the top. 331

332 The 'History of scan..." dialog will be displayed. Click the 'Report' button to download all the discovery scan reports, which is in the form.csv file. To view the list of certificates discovered during a scan, choose the scan and click the 'Details' button that appears at the top. 332

333 Click the 'Report' button to download all the reports for the discovered certificates, which is in the form.csv file. To view the details of latest result of certificates discovered for a discovery task, select it and click the 'Last Scan Details' button at the top. 333

334 The details of certificates discovered during the last scan for the selected task will be displayed. Click the 'Report' button to download the report, which is in the form.csv file. 334
 certificates and update the status of any existing certificates. There are, therefore, two types of SSL certificates that could be discovered.")
335 View Scan Results Upon completion of the Discovery Scan, InCommon Certificate Manager will automatically update the 'SSL Certificates' area with the results of the scan. It will add any newly discovered (unmanaged) certificates and update the status of any existing certificates. There are, therefore, two types of SSL certificates that could be discovered. Certificates issued by InCommon Certificate Manager (also known as 'Managed' certificates). InCommon Certificate Manager will simply update that certificates existing entry with any status changes that may have occurred. These certificates will stay assigned to the Organizations that they are currently assigned to and will not be assigned to the default Organization. Certificates that were not issued by InCommon Certificate Manager (also known as 'Unmanaged certificates) If the certificate was NOT issued by CM then it is assigned to the default Organization with Unmanaged status. This category covers: Self-signed certificates Certificates issued by InCommon CA but not via InCommon Certificate Manager Certificates issued by 3rd party vendors / other certificate authorities 335
. Clicking the 'Renew' button will begin the ordering process for new InCommon SSL certificate with the same parameters.")
336 To bring an 'Unmanaged' certificate under the control of InCommon Certificate Manager you have to 'Renew' that certificate (to be more precise you will be effectively 'replacing' that certificate with an equivalent InCommon certificate). Clicking the 'Renew' button will begin the ordering process for new InCommon SSL certificate with the same parameters. Certificate Type View in the SSL Certificates Sub-Tab State Certificates, issued by CM One of the SSL certificates state listed here. Certificates, Self-signed not issued by certificates CM Unmanaged View Self-signed certificates are marked with red cross alongside their common name. (Background - 'Self Signed' means that the certificate was not signed (issued) by a Trusted Certificate Authority. As such, these certificates will not be recognized by popular Internet browsers such as IE, Firefox, Opera. Konqueror, Safari and Chrome. ) Issued by Unmanaged InCommon CA but not via CM Issued by 3rd party vendor Unmanaged You can download the compiled scan results in.csv format in Discovery Scan Log report under the Reports tab. The Discovery Scan Log report contains information concerning to overall scan options and discovered SSL certificates information. InCommon advises administrator to: i. Schedule regular discovery scans as a matter of course; 336

337 ii. Run a manual scan after every change to SSL certificate configuration. Otherwise, it is possible that the 'SSL Certificates' area will show inaccurate information. (e.g. you may have uploaded a certificate to your website but in CM the certificate will have a state of Issued and a discovery status of Not deployed if you haven t rerun the scan). iii. Run a manual scan after any change to the network in general. To remove the discovered certificates from the SSL Certificates screen for a particular discovery scan, navigate to Discovery > Discovery Tasks, select the discovery task and click the 'Clean Results' button. In the confirmation dialog, click 'OK' to confirm removal of the certificates in the SSL Certificates interface Agents InCommon Certificate Manager uses agents for: Automatic installation of certificates (on Apache, Apache Tomcat and IIS and 8 only) - The controller/agent installed on the web server, will periodically poll CM for requests for certificates that have been enabled for auto-installation. If a request exists, it will automatically generate a CSR on the web server and present the application for administrator approval via the CM interface. On approval, the agent submits the CSR to InCommon CA and tracks the order number. Once the certificate is issued by the CA, the agent downloads the certificate and allows the administrator to install the certificate from the CM interface. The controller installed on one server can be configured to communicate with the other remote servers in the network. Once configured, it enables automatic installation of certificates on the remote servers without the need of installing the agent on them. Discovery of SSL certificates installed on internal servers - The agent installed on the web server or any local machine in the network, will scan and monitor internal servers for all installed SSL certificates. It is possible for administrators to configure InCommon CM to scan externally facing IP addresses directly from the 'Discovery Tasks' area (as explained in Discovery Tasks). However, InCommon CM can only scan internal hosts IF an agent 337
 that have been delegated")
338 which is configured to communicate with the InCommon CM servers is installed on the local network. After scanning the local network, the agent will send a report back to the InCommon CM console. Security Roles: RAO - can set up Certificate Controller agent for installing certificates and scanning internal servers of Organizations ( and any sub-ordinate Departments) that have been delegated to them, for certificates requested, issued, expired, revoked and replaced. DRAO - can set up Certificate Controller agent for installing certificates and scanning internal servers of Department that have been delegated to them for certificates requested, issued, expired, revoked and replaced. The Agents Interface: Column Display Description Name Displays the name specified for the Certificate Controller Agent. Alternative Name Displays the alternative name specified for the Certificate Controller Agent. Organization Displays the Organization to which the Certificate Controller Agent is associated. Department Displays the Department to which the Certificate Controller Agent is associated. Active The checkbox displays whether the agent is active or inactive and allows the administrator to change the state if required. State Displays whether or not the agent is connected to CM. Note: The administrator can enable or disable the columns as desired, from the drop-down button at the right end of the table header. 338

339 Controls Download Agent Starts downloading the Certificate Controller Agent setup file of the selected agent. Refresh Updates the list of displayed Agents. Edit Enables administrators to modify the Agent configuration settings. Delete Removes the Agent. Nodes Enables administrators to view and edit the server nodes for which the Agent is configured. Commands Enables administrators to view the details of the commands like generation of CSR, scanning internal servers, executed by the Agent. Agent Controls Sorting and Filtering Options Clicking on the column headers 'Name', 'Alternative Name', 'Organization', or 'Department' sorts the items in the alphabetical order of the entries in the respective column. Administrators can search for a particular agent by using the filter. You can add filters by selecting from the options in the 'Add Filter' drop-down and group the selection with other options that appears depending on the selection from the 'Add Filter' drop-down. Filter Options Description Organization Enables Administrators to filter the list of Agents by Organization. Active Enables Administrators to filter only the active agents. Show deleted Enables Administrators to include the deleted agents in the list. Name Enables to filter the agents by entering the name fully and partially. Alternative Name Enables to filter the agents by entering the alternative name fully and partially. 339


340 For example if you want to search for an agent by the name filter and belonging to a particular organization and department: Choose 'Name' from the 'Add Filter' drop-down and enter the name of the agent in full or part. Select 'Organization' or 'Department' in the 'Group by:' drop-down. Click the 'Apply' button. The filtered items based on the entered and selected parameters will be displayed: To remove the filter options, click the 'Clear' button. 340
341 Note: The search filters once configured for the interface will be automatically saved. When you are re-opening the 'Agents' interface in future, the configured filters will be in action and only the search results will be displayed. If you do not want the filters to be saved, click the 'Clear' button Configuring the Agent for Auto-Installation and Internal Scanning - Overview of the Process This section is a brief summary of the steps needed to set up a certificate controller/agent for automatic installation and renewal of SSL certificates and run an internal scan. Click any of the bullet points below to go to a more detailed explanation of that stage: 1. Add a new IP range for Internal Scanning by creating a new CIDR in the Discovery Tasks tab. 2. Download and Install the agent on a server 3. Configure the Agent for adding CIDR ranges for certificate discovery and specifying local and remote servers on to which the certificates are to be auto-installed. 4. Return to the 'Discovery Tasks' tab and click 'Scan'. 5. The results can be viewed by selecting the 'Discovery Scan Log' under the 'Reports' tab. Newly discovered certificates will be added to the 'SSL Certificates' area of 'Certificates Management' and assigned to the Organization that has been set for that agent Prerequisites The administrator has defined at least one Organization. The Organization will be designated as the owner of certificates discovered by the agent during the agent configuration and installation process Configuring the Agent for Auto-Installation and Internal Scanning - Detailed Explanation of the Process 1. Add a new IP range for Internal Scanning by creating a new CIDR in the 'Discovery Tasks' tab and specify the ports to be scanned. The IPs you enter here should, naturally, be internal addresses. Once added, you will be able to initiate internal scans from this interface by clicking the 'Scan Now' button. See Adding IP range and Start Scanning for further reading. 341

342 Note: CM is capable of scanning for installed certificates in external servers via Internet. If there is no agent installed in the server to be scanned, CM will request the user to install the agent. 2. Download and Install the agent on a server in the network. To download the Agent setup file, click 'Download Agent' from the Agents interface. Note: The Agent is also responsible for automatic application and installation of SSL certificates. The Agent installed on one of the servers can be configured to communicate with the other web servers in the network without the need of any additional software, hence is capable of installing certificates on to the remote servers automatically. The important aspect is that the all the servers should be able to connect to InCommon CM. Select the Organization/Department(s) for which you want to use the CD Agent for discovery of certificates and choose Windows version or Linux version of the Agent setup file depending on the Operating system of the server. Click 'Download' and browse to the location where you want to save the setup file. The CD agent needs administrative privileges for installation. To install the Agent, right click on the setup file and select 'Run as Administrator' and follow the setup instructions in the wizard. If you are installing the Linux version of the Agent, run the installation from the command line. On completion of installation, the Agent will be added to the CM interface. 342

343 The next step is to configure the Agent to: apply for and install SSL certificates on the local server apply for and install SSL certificates on the remote servers in the network scan the internal network by linking it to the CIDR created under the Certificate Discovery tab for internal scanning, by specifying the IP Range of the internal network To Edit the Agent Properties, click the 'Edit' button at the top after selecting the Agent. 343

344 Edit Agent > Common Tab - Table of Parameters Field Name Name Type String Description Enables the Administrator to edit the name of the Certificate Controller Agent. Version Specifies the version of the Agent IP Address Displays the IPv6 Loopback address, IPv4 loopback address, IPV6 IP Address 344
345 Edit Agent > Common Tab - Table of Parameters IPv4 IP Address physical address of the server on which the agent is installed Local Configuration URL Displays the IP of the server in which the agent is installed. This URL is used to access the agent via a web browser for managing. Refer to the section Configuring the Certificate Controller Agent through Web Interface for more details. Alternative Name String Enables the Administrator to specify an alternative name for the Agent Active Checkbox Enables the Administrator to set the Agent in active state or inactive state. Auto update String Indicates whether the agent is enabled for auto update Organization Drop-down list Enables the Administrator to change the organization to be associated with the Agent. Department Drop-down list Enables the Administrator to change the department to be associated with the Agent. Secret Key String Displays the secret key generated by the Agent to authenticate itself to Remote InCommon CM server. The secret key must have 10 characters. The administrator can copy and save the secret key in a safe location for use in a new agent, in case the agent has to be reinstalled in the same server, to authenticate itself to the CM server for scanning the same internal network. Keystore password String Comments String Displays the key store password generated by the Agent. The administrator can copy and save the secret key store password in a safe location for use in a new agent, in case the agent has to be reinstalled in the same server. Enables the Administrator to type a descriptive comment on the purpose of the Agent Edit the values if required. To edit the CIDR ranges, click the 'CIDR Ranges' tab. The CIDR Ranges tab will open. 345


346 To add a new CIDR range, click 'Add'. The 'Add CIDR Range' dialog will open. Enter the internal IP address range to be scanned, set whether the Agent is to be Active and type a description for the range in the dialog and click OK. The CIDR Range will be added in the 'CIDR Ranges' tab. 346

347 You can add as many ranges as you want by repeating the same procedure. To edit an existing CIDR range, select it and click 'Edit' from the top. The Edit CIDR Range dialog will open. To delete CIDR range, click 'Delete'. The confirmation dialog will open. To configure servers for auto-installation of certificates and scanning by the agent, click the 'Servers' tab. 347


348 The Servers tab displays the list of Servers for which the agent is configured for auto-installation of certificates. On installation, the agent discovers the server upon which it is installed and adds it to the list automatically, enabling autoinstallation of certificates on it. You can edit the properties of the server by selecting it and clicking the Edit button from the top. Edit Web Server - Table of Parameters Field Name Type Description Name String Enables the Administrator to edit the name of the Server. Vendor Drop-down list Enables the Administrator to select the vendor of the server. 348
349 Edit Web Server - Table of Parameters Path to web server String State Remote Enables the Administrator to specify the network path for Apache. This is required only if Apache is not from the CM console. Indicates whether or not the server is connected. Checkbox Enables the Administrator to specify whether the server is local or remote. For the server in which the agent is installed, the checkbox should remain un-selected. Configuring the Certificate Controller for Automatic Certificate Installation on Remote Servers You can add other remote servers in the network to enable the agent to communicate with them. The agent polls CSM periodically for certificate requests for the added remote servers. If a request exists, it will automatically generate a CSR on the web server and present the application for administrator approval via the CM interface. On approval, the agent will submit the CSR to InCommon CA and track the order number. Once the certificate is issued by the CA, the agent will download the certificate and allow the administrator to install the certificate from the CM interface. To add a remote server to the agent Select the checkbox beside the agent and click the 'Edit' but at the top and move to the Servers tab by clicking Next two times in the Edit Agents dialog Click 'Add' under the Servers tab in the Edit Agent dialog 349

350 Add Web Server - Table of Parameters Field Name Type Description Name String Enter the name of the server. Vendor drop-down Choose the vendor of the server. State String Indicates whether or not the server is initialized. Path to Web Server String Enables the Administrator to specify the network path for remote Apache 2.x and Tomcat servers. This is required only if Apache server is not accessible from the CM console. Remote Checkbox Enables the Administrator to specify whether the server is Remote or Local. While adding remote servers for agent-less automatic certificate installation, this checkbox should be selected. IP Address / Port String Specify the IP address and connection port of the server for remote connection. Note: This field will be enabled only if 'Remote' is selected. User Name String Specify the username of the administrator for logging-into the server. Note: This field will be enabled only if 'Remote' is selected. Password String Specify the log-in password for the administrator account for logging-into the server Note: This field will be enabled only if 'Remote' is selected. Enter the parameters and click OK. 350

351 The remote server will be added with the state 'Initialized'. Click OK in the Edit Agent dialog to save your changes. The agent will discover the newly added server and connect to it within a few minutes and the state will be changed to 'Connected'. The Agent, is now configured to auto-install the certificates in the remote server and to scan the internal network. The Agent authenticates itself to remote InCommon CM server via combination of the secret key and awaits further instructions. The Agent polls CM every 1 minute to find out whether there are any instructions such as an instruction to 'Scan Now'. When the 'Scan Now' button is clicked, CM will tell the agent which CIDRs to scan. The agent performs this scan and sends the results back. The Agent properties can be configured through the Agent's web interface accessible by typing Address/host name of the server on which the agent is installed>:9090 in the browser address bar. The administrator can change the connection settings, polling interval, certificate management settings and server settings from the web interface. Refer to the section Configuring the Certificate Controller Agent through Web Interface for more details. 3. Go back to 'Discovery Tasks' tab and click 'Scan'. You can also schedule the scans to run periodically to discover the SSL certificates installed in the internal servers. See Adding IP range and Start Scanning for more details. 4. Certificate discovery results can be viewed by selecting the 'Discovery Scan Log' under the 'Reports' tab. Newly discovered certificates will be added to the 'SSL Certificates' area of 'Certificates Management'. All certificates will be assigned to the Organization that was specified for the agent in Step 2. See the section, View Scan Results, for a more detailed account of scan reports and managing newly discovered certificates. Administrators that have not already done so may also want to familiarize themselves with the information in section The SSL Certificates Area Configuring the Certificate Controller Agent through Web Interface The Certificate Controller Agent can be configured by logging-in to its web-interface. To access the Agent configuration web interface Type Address/host name of the server on which the agent is installed>:9090 in the address of your browser. The login dialog will appear: Enter your InCommon CM username and password. The Agent configuration interface will open. 351
352 It has two tabs: Agent Configuration Server Management Agent Configuration The Agent Configuration tab displays the connection management settings and certificate management settings of the agent and enables the administrator to edit them, if required. 352
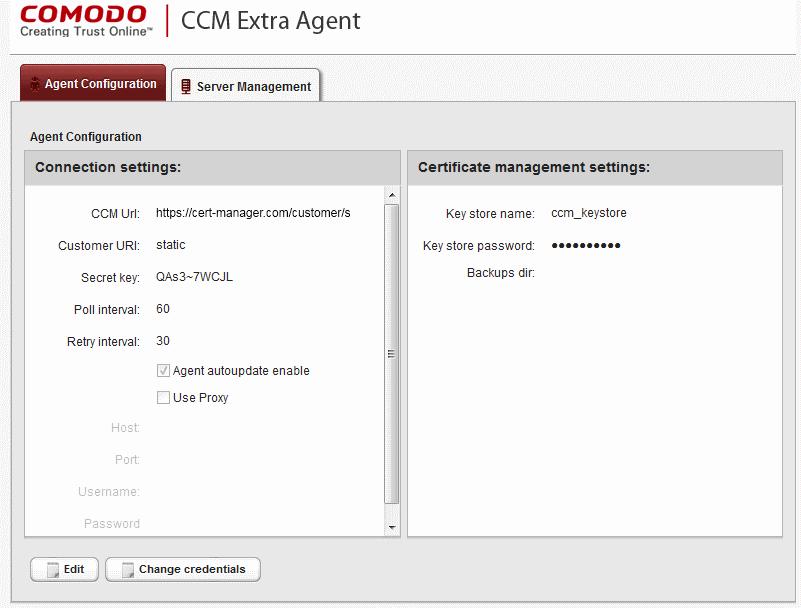
353 353
354 Agent Configuration - Table of Parameters Field Type Description Connection Settings CM url Text field Displays the url of CM server Customer uri Text field Displays the uniform resource identifier (URI) of the customer Secret key Text field Displays the secret key unique to the agent, which it uses to identify it to CM. This value should not be altered Poll Interval Text field Displays the time interval at which the agent polls the CM for new certificate requests (in seconds) and enables the administrator to edit it in edit mode. Retry interval Text field Displays the time interval set for retrying polling on CM server if polling fails (in seconds) and enables the administrator to edit it in edit mode. Agent autoupdate enable Checkbox Indicates whether the agent is enabled for auto-update. The checkbox enables the administrator to switch the auto-update on/off in edit mode. Use Proxy Checkbox Indicates whether the agent is configured to use a proxy server. The checkbox and the text fields below it enable the Administrator to instruct the agent to use proxy server and to specify the proxy server details, if required. Host Text field Displays the IP/Host name of the proxy server and enables the Administrator to specify it in edit mode Port Text field Displays the port of the proxy server for the agent to connect and enables the Administrator to specify it in edit mode Username Text field Displays the username of the administrator account to login to the proxy server and enables the Administrator to specify it in edit mode Password Text field Displays the password of the administrator account to login to the proxy server and enables the Administrator to specify it in edit mode Certificate Management Settings Key store name Text field The name of the CM keystore file, pertaining to the agent. By default, it will be 'cm_keystore'. The Administrator can edit it in the edit mode Keystore password Text field The password to access the CM keystore file. The Administrator can edit it in the edit mode Backup dir Text field Displays the folder path for backup of keystore file. The Administrator can edit it in the edit mode. To edit the agent configuration settings, click the 'Edit' button at the bottom left. The Agent Configuration page will open in edit mode. 354

355 Edit the required fields and click 'Save' for your changes to take effect. Changing Login Credentials for the Agents Configuration Console By default, the administrator can use the username and password of their CM account to login to the agent configuration. If needed, the administrator can change their username and password for the agent configuration console at any time. To change the username and password Click 'Change credentials' from the agent configuration interface. The 'Change Credentials' dialog will appear. 355

356 To change your username, directly edit the Login field Enter your existing password in the 'Old Password' field Enter your new password in the New password field and reenter it for confirmation in the Password Confirmation field Click 'Save' From the next login to the agent configuration console, you need to use the new username and password Server Management The Server Management tab enables the administrator to view, add and edit the servers for which the agent is configured. 356


357 The 'Server Management' tab displays the list of servers added to the agent with the vendor and activation status details. The administrator can add new servers and edit the details like the login username and password for the existing servers through this interface. Column Display Description Name Displays the name of the server. Vendor Displays the vendor of the server. State Indicates whether or not the server is initialized. Host Displays the IP address or the host name of the server for remote connection Port Displays the connection port of the server for remote connection. Note: The administrator can enable or disable desired columns from the drop-down at the right end of the table header: 357

358 Controls Add Enables the Administrator to add a new server to the agent Refresh Updates the list of displayed servers. Edit Enables administrators to modify the Server configuration settings. Delete Removes the Server. Server Controls Note: The Server control buttons will appear only on selecting a server. To add a server Click 'Add' from the top left. The 'Add new server' dialog will appear. Add new server - Table of Parameters Field Name Type Description 358
359 Add new server - Table of Parameters Server name String Enter the name of the server. Server vendor drop-down Choose the vendor of the server from the drop-down. Path String Specify the network path for the Tomcat server. This is required only if the Tomcat server is not accessible from the CM console. Note: This field will appear only of Tomcat server is selected in the Server vendor drop-down. Remote Checkbox Specify whether the server is Remote or Local. While adding remote servers for agent-less automatic certificate installation, this checkbox should be selected and the login credentials for an administrative account on the server are to be provided. Host String Specify the IP address or host name of the server for remote connection. Note: This field will be enabled only if 'Remote' is selected. Port String Specify the connection port of the server for remote connection. Note: This field will be enabled only for remote 'Tomcat' server. User Name String Enter the username of the administrator for loggin-into the server. Note: This field will be enabled only if 'Remote' is selected. Password String Enter the log-in password for the administrator account for logging-into the server. Note: This field will be enabled only if 'Remote' is selected. Enter the parameters and click 'OK'. The new server will be added and enabled for automatic installation of SSL certificates and to run scans for certificate discovery. To edit a server Select the server and click the 'Edit' button that appears on top. 359

360 The Edit server dialog will open. The interface is similar to Add new server interface. Edit the required fields and click 'OK' for your changes to take effect. 7 Reports 7.1 Overview The 'Report' tab enables the administrator to generate and view reports that reflect an activity and other statistics related to usage, provisioning and monitoring of SSL and Client and Code Signing Certificates. There are a maximum of five main types of reports available: Client Certificates report, Discovery Scan Log, SSL Certificates report, Code Signing Certificates report and DCV report. Administrators will find the Report functionality especially useful when troubleshooting any issues relating to the provisioning, installation and management of client, SSL or code signing certificates. The Report section is a permanent archive of all actions that took place with all certificates that were issued and managed via InCommon Certificate Manager. 360
361 Note: The options available in the drop-down depends on the privilege level of the administrator that is logged in: RAO/DRAO SSL admins - can see Discovery Scan Log, SSL Certificates Logs and DCV Report; RAO/DRAO SMIME admins - can see only Client Certificates Logs ; RAO/DRAO Code Signing admins - can see only Code Signing Certificates Logs. Report Type Client Certificates Description Selecting this type of report enables RAO/DRAO SMIME administrators to generate and view reports regarding Client Certificate Activity. Reports are delivered in.csv format and can be filtered to show only certificates with a specific current status, namely: Any (all certificates of any status) Enrolled - Downloaded Enrolled - Pending Download Revoked Expired Not Enrolled The reports can be further sorted by Organization/Department, (status specific) Date and by Time Interval. Discovery Scan Log Selecting this type of report enables RAO/DRAO SSL administrators to choose between a detailed or a summary reports, generate and view log reports from the scanning processes. Reports are delivered in.csv format. The reports can be further sorted by Organization/Department. SSL Certificates Selecting this type of report enables RAO/DRAO SSL administrators to generate and view reports regarding SSL Certificate Activity. Reports are delivered in.csv format and can be filtered to show only certificates with a specific current status, namely: Any (all certificates of any status) Requested 361
362 Report Type Description Issued Revoked Expired The reports can be further sorted by Organization/Department, (status specific) Date and by Time Interval. Code Signing Certificates Selecting this type of report enables RAO/DRAO Code Signing administrators to generate and view reports regarding Code Signing Certificate Activity. Reports are delivered in.csv format and can be filtered to show only certificates with a specific current status, namely: Any (all certificates of any status) Enrolled - Downloaded Enrolled - Pending Download Revoked Expired The reports can be further sorted by Organization/Department, (status specific) Date and by Time Interval. DCV Report Selecting this type of report enables RAO/DRAO SSL administrators to generate and view a report on registered domains with their Domain Control Validation (DCV) status. Reports are delivered in.csv format and can be filtered to show only certificates with a specific current status, namely: Any (all certificates of any status) Not Started Awaiting Submittal Submitted Validated Validated Renewing Expired The reports can be further sorted by Organization/Department, (status specific) Date and by Time Interval. 7.2 Reports - Security Roles Access Table The following table provides a summary of the ability of the administrators to generate different types of reports. RAO Administrator Report Type/Organization DRAO Administrator SSL SMIME Code Signing SSL SMIME Code Signing Client Certificates Discovery Scan Log SSL Certificates Code Signing Certificates DCV Report Report Type Scope Can view reports for Organizations (and any sub- Can view reports for Department that have 362

363 ordinate Departments) that have been delegated to them been delegated to them 7.3 Client Certificates Reports The 'Client Certificates' option enables the RAO/DRAO SMIME administrators to generate and view reports that reflect an activity and other statistics related to usage, provisioning and monitoring of client certificates. The administrator is able to filter the reports by certificate status. The certificate statuses can be Any, Enrolled - Downloaded, Enrolled - Pending Download, Revoked, Expired, and Not Enrolled. Reports can also be filtered by Organization, status specific dates and time interval. Once the 'Client Certificates' type of reports is selected the following form appears: Report Type: Client Certificates - Table of Parameters Form Element Current Status Control Drop-down list Description Enables administrator to generate a report in.csv format for Client Certificates with a specific current status: Any - Generates a report for ALL client certificates regardless of their current status. Enrolled - Downloaded - Generates a report of those client certificates that have been successfully enrolled for by the End-User and subsequently downloaded. Enrolled - Pending Download - Generates a report of those client certificates that have been successfully enrolled for by the End-User but have not yet been downloaded. Revoked - Generates a report for client certificates that have been revoked. Expired - Generates a report only for client certificates that have expired and are due for renewal. Not Enrolled - Generates a report only for those end-users that belong to an Organization and are listed in the Client Certificates tab as a client certificate user but haven't enrolled for their client certificate. 363

364 Form Element Date Selection Control Drop-down list Description Enables administrator to set a specific date for collecting a report. It can be date of certificate enrollment, date of certificate download, date of certificate revocation or expiration. The choices displayed on this drop-down menu is dependent on the status chosen in the 'Current Status' drop down. Clicking on the calendar buttons beside from: and To: text boxes enables the administrator to select a date range for which the report has to be generated. If no dates are specified, the report will be generated for all the scans, regardless of the dates. Organization/Dep artment Check-boxes Enables the administrator Organizations/Departments. to generate reports for specific If multiple Organizations/Departments are selected then the administrator will receive a single report that covers those selected Organizations/Departments. Each Organization will be displayed on a separate row in the Organizations column and each Department will be displayed in a separate row in the 'Departments' column. Clicking on Expand All expands the tree structure to display all the Departments under each Organization. Clicking Select All will generate a report for ALL Organizations that were assigned to that administrator. If NO Organization/Department is selected, the report will be generated for all the Organizations/Departments, delegated to the specific administrator. Refresh Control Enables the administrator to update the information in the form. Generate Report Control Starts the report generation. 7.4 Discovery Scan Log Reports The 'Discovery Scan Log' option enables the RAO/DRAO SSL administrators to generate and view log reports from the scanning processes. The administrator is able to select any one of the following two types of the Discovery Scan Log Reports: Summary Detail Discovery Scan Log Report: Summary type The Summary type discovery scan log report is generated for a specified time period. The.csv format report generated will have the following information corresponding to each scan run in the specified period: Certificate ID; Start Date; End Date; IP Ranges Scanned; IP addresses Scanned; SSL certificates Found; New SSL certificates Found; InCommon certificates Found; 364
365 New InCommon SSL certificates Found; Other SSL certificates Found; New Other SSL certificates Found; Self-signed certificates Found; New Self-signed certificates Found; Scan Type (manual or scheduled); Completion Status: (Scan Completed Scan Failed (if the scan is failed - the fail reason) Scan Canceled by User); Reason for failure (in case of failed scan); The person who requested the scan (for manual scans); The person who canceled the scan (for manual and scheduled scans); Reason for canceling the scan (in case of canceled scan); Settings (CIDR range, port settings etc). On selecting the Summary type, the following form appears Report Type: Discovery Scan Log :Summary - Table of Parameters Form Element Scan Date Control Calendar buttons Description Enables the administrator to generate a report in.csv format for Discovery Scan Log for a specified time period. Clicking on the calendar buttons beside from: and To: text boxes enables the administrator to select a date range for which the report has to be generated. If no dates are specified, the report will be generated for all the scans, regardless of the dates. Organization Drop-down Enables the administrator to specify an Organization for which the discovery scan log has to be generated. Selecting 'Any' will generate a report for the Organizations that have been delegated to the specific administrator. 365
366 This option is not visible to DRAO administrator. Department Drop-down Enables the administrator to specify a Department belonging to the selected Organization for which the discovery scan log has to be generated. Selecting 'Any' will generate a report for the Departments belonging to the selected Organization. For DRAO admins, selecting 'Any' will generate a report for all the Departments that are delegated to him/her. Generate Report Control Starts the report generation Discovery Scan Log Report: Detail type The Detail type discovery scan log report is generated for a specific manual or scheduled scan and will contain in-depth details of the certificates found during the selected scan. The report generated in.csv format will contain the following information: Organization; Department; IP Address:Port; Common Name; Valid From; Valid to; Issuer; Subject Serial Number Subject Alt Name; City State Country; Key Algorithm; Key size; MD5 Hash; SH1 Hash; Date and Time found; Cipher. On selecting the Detail type, a list of previously run manual/scheduled scans (up to last 10 scans with the most recent on top) are displayed. The administrator can select a scan by clicking on it to generate a detailed discovery scan log report. 366


367 Report Type: Discovery Scan Log :Detail - Table of Parameters Form Element Control Description Type Radio buttons Enables administrators to choose between a detailed report or a summary report. Both types are generated in.csv format. Organization Drop-down Enables the administrator to specify an Organization for which the discovery scan log has to be generated. Selecting 'Any' will generate a report for the Organizations that have been delegated to the specific administrator. This option is not visible to DRAO administrator. Department Drop-down Enables the administrator to specify a Department belonging to the selected Organization for which the discovery scan log has to be generated. Selecting 'Any' will generate a report for the Departments belonging to the selected Organization. For DRAO admins, selecting 'Any' will generate a report for all the Departments that are delegated to him/her. List of most recent scans Generate Report Enables the administrator to select a scan for which the detailed discovery scan report has to be generated. After selecting an entry from the list, click the 'Generate Report' button to generate the detailed report (.csv format). Control Starts the report generation. 7.5 SSL Certificates Reports The 'SSL Certificates' option enables the RAO/DRAO SSL administrators to generate and view reports that reflect an activity and other statistics related to usage, provisioning and monitoring of SSL certificates. The administrator is able to 367

368 generate the following types of reports: Requested, Issued, Revoked and Expired SSL certificates. Additionally, there is an ability to filter the certificates by date of request, issuance, revocation or expiration. Once the 'SSL Certificates' type of reports is selected the following form appears: Report Type: SSL Certificates - Table of Parameters Form Element Current Status Control Drop-down list Description Enables the administrator to generate a report in.csv format for SSL certificate with a specific current status: Any - Generates a report for ALL SSL certificate types regardless of their current status. Requested - Generates a report only for SSL certificate types that have been requested. Issued - Generates a report of those SSL certificates that have been issued successfully. Revoked - Generates a report only for SSL certificates that have been revoked. Expired - Generates a report only for SSL certificate types that have expired and are due for renewal. Date Selection Drop-down list Enables the administrator to set a specific date parameter for the report. The parameters are Issued Date, Requested Date, Revoked Date and Expiration Date. The choices displayed on this drop-down menu is dependent on the status chosen in the 'Current Status' drop down. Clicking on the calendar buttons beside from: and To: text boxes enables the administrator to select a date range for which the report has to be generated. If no dates are specified, the report will be generated for all the scans, regardless of the dates. 368
369 Form Element Control Organization/Depa Check-boxes rtment Description Enables the administrator to specify reports containing SSL certificates belonging to particular Organizations/Departments. If multiple Organizations/Departments are selected then the administrator will receive a single report that covers those selected Organizations/Departments. Each Organization will be displayed on a separate row in the Organizations column and each Department will be displayed in a separate row in the 'Departments' column. Clicking on Expand All expands the tree structure to display all the Departments under each Organization. Clicking on Select All will generate a report for ALL Organizations that were assigned to that administrator. If NO Organization/Department is selected, the report will be generated for all the Organizations/Departments, delegated to the specific administrator. Refresh Control Enables administrator to update the information in the form. Generate Report Control Starts the report generation. 7.6 Code Signing Certificates Report The 'Code Signing Certificates' option enables the RAO/DRAO Code Signing administrators to generate and view reports that reflect an activity and other statistics related to usage, provisioning and monitoring of Code Signing certificates. The administrator is able to filter the reports by certificate status. The certificate statuses can be Any, Enrolled - Downloaded, Enrolled - Pending Download, Revoked and Expired. Reports can also be filtered by Organization, status specific dates and time interval. Once the 'Code Signing Certificates' type of reports is selected the following form appears: 369


370 7.6.1 Report Type: Code Signing Certificates - Table of Parameters Form Element Current Status Control Drop-down list Description Enables administrator to generate a report in.csv format for Client Certificates with a specific current status: Any - Generates a report for ALL code signing certificates regardless of their current status. Does not display any SSL certificates. Enrolled - Downloaded - Generates a report of those code signing certificates that have been successfully enrolled for by the End-User and subsequently downloaded. Enrolled - Pending Download - Generates a report of those code signing certificates that have been successfully enrolled for by the End-User but have not yet been downloaded. Revoked - Generates a report for client certificates that have been revoked. Expired - Generates a report only for client certificates that have expired and are due for renewal. Date Selection Drop-down list Enables administrator to set a specific date for collecting a report. It can be date of sending invitation by the administrator, certificate enrollment, date of certificate request, date of certificate issuance, download, date of certificate revocation or expiration. The choices displayed on this drop-down menu is dependent on the status chosen in the 'Current Status' drop down. Clicking on the calendar buttons beside from: and To: text boxes enables the administrator to select a date range for which the report has to be generated. If no dates are specified, the report will be generated for all the scans, regardless of the dates. Organization/Dep artment Check-boxes Enables the administrator Organizations/Departments. to generate reports for specific If multiple Organizations/Departments are selected then the administrator will receive a single report that covers those selected Organizations/Departments. Each Organization will be displayed on a separate row in the Organizations column and each Department will be displayed in a separate row in the 'Departments' column. Clicking on Expand All expands the tree structure to display all the Departments under each Organization. Clicking Select All will generate a report for ALL Organizations that were assigned to that administrator. If NO Organization/Department is selected, the report will be generated for all the Organizations/Departments, delegated to the specific administrator. Refresh Control Enables the administrator to update the information in the form. Generate Report Control Starts the report generation. 7.7 DCV Report The 'DCV Report' option enables RAO/DRAO SSL administrators to generate and view reports that contain a list of all domains with their validation status and expiration of the DCV process. The administrator is able to filter the reports based on the DCV status. The DCV status can be Any, Awaiting Submittal, Submitted, Validated, Validated Renewing and Expired. Reports can also be filtered by Organization/Department, specific dates and time interval. Once the 'DCV Report' type of reports is selected the following form appears: 370
371 371
372 7.7.1 Report Type: DCV Report - Table of Parameters Form Element Current Status Control Drop-down list Description Enables the administrator to generate a report in.csv format for DCV report of Domains with a specific current DCV status: Any - Generates a report for Domains regardless of their current status. Not Started - Generates a report on domains that have been added to CM but have not yet started the DCV process Awaiting Submittal - Generates a report only for Domains that are being waiting for submission of DCV request to the Domain administrator. Submitted - Generates a report only for Domains for which DCV request has been submitted. Validated - Generates a report on domains that have been successfully validated. Validated Renewing - Generates a report only for Domains that require renewal of Validation. Expired - Generates a report only for Domains for which the DCV request has expired. Expiration Date Enables the administrator to set an expiration date range for DCV request to generate a report on Domains whose DCV request is expiring within the date range. Clicking on the calendar buttons beside From: and To: text boxes enables the administrator to select a date range for which the report has to be generated. If no dates are specified, the report will be generated for all Domain Control Validated domains, regardless of the dates. Organization/Depa Check-boxes rtment Enables the administrator to select Organizations/Departments to generate report on Domains of specific Organizations/Departments. If multiple Organizations/Departments are selected then the administrator will receive a single report that covers those selected Organizations / Departments. Each Organization will be displayed on a separate row in the Organizations column and each Department will be displayed in a separate row in the 'Departments' column. Clicking on Expand All expands the tree structure to display all the Departments under each Organization. Clicking on Select All will generate a report for ALL Organizations that were assigned to that administrator. If NO Organization/Department is selected, the report will be generated for all the Organizations/Departments, delegated to the specific administrator. Refresh Control Enables administrator to update the information in the form. Run Control Starts the report generation. 8 Version and Feature Information The 'About' tab enables the administrator to view the CM version and the features that are enabled for the subscription. RAO and DRAO can only see a list of features related to SSL, Client Certificate and/or Code Signing Certificate according to their administrative role. 372
373 9 My Profile The 'My Profile' area contains a details summary for the Administrator that is currently logged into the system. Administrators can view their login name, their full name, the address that is associated with their account and their administrative role. The administrator can also change the interface language and their password from this interface. To access this interface, click the username text link beside the 'Logged as' label at the top right side of the interface. 373
374 This area also allows the Administrator to edit the following details: Address Details: Title Telephone Number Street Locality 374

375 State/ Province Postal Code Country Relationship Preferences: Interface Language - CM interface is available in multiple languages. The 'Current locale' drop-down menu enables the administrators to change the interface language according to their preferences. The settings will take effect only on clicking the 'Save' button. Password - To change the administrators password, click the Change' button next to 'Password label. Hover the mouse cursor on the help button to view the password policy and change the password accordingly. Grid Settings - Click Reset to default to adjust the column widths and sorting preferences customized in various interfaces of InCommon CM to default values. 10 Logging out of InCommon Certificate Manager Administrator can log out from the interface by clicking on the 'Logout' button located at the top right side of the interface. 375
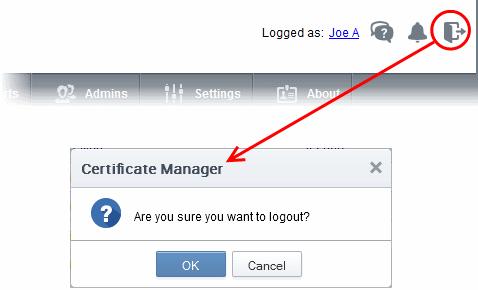
376 376
377 Appendix 1 - Your responsibilities when ordering SSL Certificates In order to make the certificate issuance process as fast and seamless as possible for immediate certificate issuance, the Certificate Manager Account holder has a number of responsibilities. It is your responsibility to ensure the following: You have the right to use the domain name contained in the SSL application. You must only approve applications for domain names you own. The named individual in the Corporate Secure Certificate is a bonafide employee or representative of your company. Making an illegitimate certificate application could affect the contract you signed with InCommon and your Certificate Manager Account and could be a breach of the Certificate Manager Subscriber Agreement. Appendix 2 - Simple Certificate Enrollment Protocol Introduction The Simple Certificate Enrollment Protocol (SCEP) is a mechanism for automating the requests of digital certificates. An administrator, by using SCEP, can automatically re-enroll and retrieve new digital certificates for the ones that are due to expire or expired. It was developed originally by Cisco Systems for use in network devices such as routers, but its use has expanded to other hardware and software devices. A recent example of a SCEP-capable system would be Apple s ios platform and the devices that run it (iphone, ipad, ipod Touch). InCommon CM supports SCEP and is integrated with a fully-compliant SCEP server. This document describes the settings required to access and use InCommon CM as a SCEP server to enroll certificates. Note: SCEP can only be used by third-party software that requests certificates using the SCEP protocol. If you are considering creating a custom certificate application, the InCommon CM APIs may be a better choice, as they are easier to use and support additional functionality not available through SCEP. Settings 1. Enabling Self-Enrollment and Setting Access Code Users can download certificates through SCEP only if Self-Enrollment is enabled and access code set in InCommon CM. This can be done while adding a new organization/department or editing organization/department by the Master Administrator or the RAO Administrator. To enable self-enrollment and set access code for organizations: In the 'Organizations' screen, click the 'Add' button or the 'Edit' button beside an existing organization. In the 'Add New Organization' or 'Edit Organization' dialog, click the 'Client cert' tab. 377

378 Select the Self Enrollment checkbox. The Access Code field will appear. Enter the access code in the field. This should be a mixture of alpha and numeric characters that cannot easily be guessed. Click 'OK'. To enable self-enrollment and set access code for departments: In the 'Organizations' screen, click the respective 'Department' button beside an Organization for which you want to enable self-enrollment and set access code. In the 'Departments' dialog, click the 'Add' button or the 'Edit' button beside an existing department. In the 'Add New Department' or 'Edit Department' dialog, click the 'Client cert' tab. 378
Comodo Certificate Manager Version 6.0
 Comodo Certificate Manager Version 6.0 RAO Administrator Guide Guide Version 6.0.022318 Comodo CA Limited, 3rd Floor, 26 Office Village, Exchange Quay, Trafford Road, Salford, Greater Manchester M5 3EQ,
Integration of Identity Provider for Single Sign-On
 Integration of Identity Provider for Single Sign-On InCommon c/o Internet2 1000 Oakbrook Drive, Suite 300 Ann Arbor MI, 48104 Integration of Identity Provider for Single Sign-On InCommon Certificate Manager
Comodo Certificate Manager Version 5.7
 ff Comodo Certificate Manager Version 5.7 Quick Start Guide Guide Version 5.7.032817 Comodo CA Limited, 3rd Floor, 26 Office Village, Exchange Quay, Trafford Road, Salford, Greater Manchester M5 3EQ, United
Comodo Certificate Manager Version 6.0
 ff Comodo Certificate Manager Version 6.0 Quick Start Guide Guide Version 6.0.022218 Comodo CA Limited, 3rd Floor, 26 Office Village, Exchange Quay, Trafford Road, Salford, Greater Manchester M5 3EQ, United
CSM. RAO Administrator Quick Start Guide (QSG) Version 1.05
 Version 1.05") CSM RAO Administrator Quick Start Guide (QSG) Version 1.05 Disclaimer Copyright 2011 AusCERT Pty Ltd. All rights reserved. Guide version Software version Date issued V1.05 V2.3.23.3 28-Oct-2011 V1.04 V2.3.23.3
CSM RAO Administrator Quick Start Guide (QSG) Version 1.05 Disclaimer Copyright 2011 AusCERT Pty Ltd. All rights reserved. Guide version Software version Date issued V1.05 V2.3.23.3 28-Oct-2011 V1.04 V2.3.23.3
Code Signing on Demand Cloud Version. InCommon c/o Internet Oakbrook Drive, Suite 300 Ann Arbor MI, 48104
 Code Signing on Demand Cloud Version InCommon c/o Internet2 1000 Oakbrook Drive, Suite 300 Ann Arbor MI, 48104 1 Introduction Code Signing on Demand (CSoD) offers customers a faster, more intuitive and
Comodo Certificate Manager
 Comodo Certificate Manager Integration of Identity Provider for Single Sign-On Comodo CA Limited 3rd Floor, 26 Office Village, Exchange Quay, Trafford Road, Salford, Greater Manchester M5 3EQ, United Kingdom.
SSL Certificates Enrollment, Collection, Installation and Renewal
 SSL Certificates Enrollment, Collection, Installation and Renewal InCommon c/o Internet2 1000 Oakbrook Drive, Suite 300 Ann Arbor MI, 48104 Enrolling For Your Certificate This is step-by-step guide will
Comodo Certificate Manager
 Comodo Certificate Manager Introduction to Auto-Installer Comodo CA Limited, 3rd Floor, 26 Office Village, Exchange Quay, Trafford Road, Salford, Greater Manchester M5 3EQ, United Kingdom. Certificate
Reports Web Services API. InCommon c/o Internet Oakbrook Drive, Suite 300 Ann Arbor MI, 48104
 Reports Web Services API InCommon c/o Internet2 1000 Oakbrook Drive, Suite 300 Ann Arbor MI, 48104 Table of Contents 1 Introduction... 4 2 Authentication... 4 2.1 Authentication via Username and Password...4
Comodo Certificate Manager
 ff Comodo Certificate Manager Code Signing on Demand Cloud Version Comodo CA Limited, 3rd Floor, 26 Office Village, Exchange Quay, Trafford Road, Salford, Greater Manchester M5 3EQ, United Kingdom 1 Introduction
Comodo Certificate Manager
 ff Comodo Certificate Manager Code Signing on Demand Cloud Version Comodo CA Limited, 3rd Floor, 26 Office Village, Exchange Quay, Trafford Road, Salford, Greater Manchester M5 3EQ, United Kingdom 1 Introduction
Software Version 4.2. Overview of Custom Fields. InCommon c/o Internet Oakbrook Drive, Suite 300 Ann Arbor MI, 48104
 Software Version 4.2 Overview of Custom Fields InCommon c/o Internet2 1000 Oakbrook Drive, Suite 300 Ann Arbor MI, 48104 1 Introduction An SSL or a Client certificate has standard fields that contain information
Comodo Certificate Manager
 Comodo Certificate Manager Introduction to Auto-Installer Comodo CA Limited, 3rd Floor, 26 Office Village, Exchange Quay, Trafford Road, Salford, Greater Manchester M5 3EQ, United Kingdom. Certificate
Enterprise Certificate Console. Simplified Control for Digital Certificates from the Cloud
 Enterprise Certificate Console Simplified Control for Digital Certificates from the Cloud HydrantID Enterprise Management Console HydrantID s HydrantSSL Enterprise service and HydrantCloud Managed PKI
Comodo Certificate Manager Software Version 5.0
 Comodo Certificate Manager Software Version 5.0 Introduction to Auto-Installer Comodo CA Limited, 3rd Floor, 26 Office Village, Exchange Quay, Trafford Road, Salford, Greater Manchester M5 3EQ, United
VSP18 Venafi Security Professional
 VSP18 Venafi Security Professional 13 April 2018 2018 Venafi. All Rights Reserved. 1 VSP18 Prerequisites Course intended for: IT Professionals who interact with Digital Certificates Also appropriate for:
VSP16. Venafi Security Professional 16 Course 04 April 2016
 VSP16 Venafi Security Professional 16 Course 04 April 2016 VSP16 Prerequisites Course intended for: IT Professionals who interact with Digital Certificates Also appropriate for: Enterprise Security Officers
Comodo Certificate Manager
 ff Comodo Certificate Manager Code Signing on Demand Hosted Version Comodo CA Limited, 3rd Floor, 26 Office Village, Exchange Quay, Trafford Road, Salford, Greater Manchester M5 3EQ, United Kingdom 1 Introduction
Initiating Domain Control Validation (DCV)
") Initiating Domain Control Validation (DCV) InCommon c/o Internet2 1000 Oakbrook Drive, Suite 300 Ann Arbor MI, 48104 Domain Control Validation in InCommon Certificate Manager The purpose of this document
Initiating Domain Control Validation (DCV) InCommon c/o Internet2 1000 Oakbrook Drive, Suite 300 Ann Arbor MI, 48104 Domain Control Validation in InCommon Certificate Manager The purpose of this document
Managed Access Gateway. User Guide
 Managed Access Gateway User Guide Version 3.0 Exostar, LLC April 20, 2013 Table of Contents Table of Contents...ii Purpose... 1 Log-in to your MAG Account... 2 Additional MAG Login Options... 2 First Time
Comodo Certificate Manager Version 5.7
 Comodo Certificate Manager Version 5.7 Introduction to Auto-Installer Comodo CA Limited, 3rd Floor, 26 Office Village, Exchange Quay, Trafford Road, Salford, Greater Manchester M5 3EQ, United Kingdom.
SSL Web Service API. InCommon c/o Internet Oakbrook Drive, Suite 300 Ann Arbor MI, 48104
 SSL Web Service API InCommon c/o Internet2 1000 Oakbrook Drive, Suite 300 Ann Arbor MI, 48104 Table of Contents Version History... 4 1 Introduction... 4 2 Authentication... 4 2.1 Authentication via Username
Managed Access Gateway. User Guide
 Managed Access Gateway User Guide Version 2.2 Exostar, LLC November 3, 2011 Table of Contents Table of Contents... ii Purpose... 1 Log-in to your MAG Account... 2 Additional MAG Login Options... 2 First
Comodo Certificate Manager Version 5.4
 Comodo Certificate Manager Version 5.4 Introduction to Auto-Installer Comodo CA Limited, 3rd Floor, 26 Office Village, Exchange Quay, Trafford Road, Salford, Greater Manchester M5 3EQ, United Kingdom.
CLIQ Web Manager. User Manual. The global leader in door opening solutions V 6.1
 CLIQ Web Manager User Manual V 6.1 The global leader in door opening solutions Program version: 6.1 Document number: ST-003478 Date published: 2016-03-31 Language: en-gb Table of contents 1 Overview...9
AirWatch Mobile Device Management
 RSA Ready Implementation Guide for 3rd Party PKI Applications Last Modified: November 26 th, 2014 Partner Information Product Information Partner Name Web Site Product Name Version & Platform Product Description
Comodo Certificate Manager
 Comodo Certificate Manager Simple, Automated & Robust SSL Management from the #1 Provider of Digital Certificates 1 Datasheet Table of Contents Introduction 3 CCM Overview 4 Certificate Discovery Certificate
Comodo Dome Shield - Admin Guide
 rat Comodo Dome Shield Software Version 1.12 Administrator Guide Guide Version 1.12.111717 Comodo Security Solutions 1255 Broad Street Clifton, NJ 07013 Table of Contents 1 Introduction to Comodo Dome
VMware AirWatch Certificate Authentication for EAS with NDES-MSCEP. For VMware AirWatch
 VMware AirWatch Certificate Authentication for EAS with NDES-MSCEP For VMware AirWatch H a v e d o c u m e n t a t io n f e e d b a c k? S u b m it a D o c u m e n t a t io n F e e d b a c k s u p p o
Guide to Deploying VMware Workspace ONE. VMware Identity Manager VMware AirWatch 9.1
 Guide to Deploying VMware Workspace ONE VMware Identity Manager 2.9.1 VMware AirWatch 9.1 Guide to Deploying VMware Workspace ONE You can find the most up-to-date technical documentation on the VMware
CertAgent. Certificate Authority Guide
 CertAgent Certificate Authority Guide Version 6.0.0 December 12, 2013 Information in this document is subject to change without notice and does not represent a commitment on the part of Information Security
VMware AirWatch Certificate Authentication for EAS with NDES-MSCEP
 VMware AirWatch Certificate Authentication for EAS with NDES-MSCEP For VMware AirWatch Have documentation feedback? Submit a Documentation Feedback support ticket using the Support Wizard on support.air-watch.com.
RESTful API TLS/SSL. InCommon c/o Internet Oakbrook Drive, Suite 300 Ann Arbor MI, 48104
 RESTful API TLS/SSL InCommon c/o Internet2 1000 Oakbrook Drive, Suite 300 Ann Arbor MI, 48104 Table of Contents Version History... 2 1 Introduction... 3 1.1 HTTP Methods... 3 1.2 HTTP Status Codes... 3
User Guide. Version R94. English
 AuthAnvil User Guide Version R94 English March 8, 2017 Copyright Agreement The purchase and use of all Software and Services is subject to the Agreement as defined in Kaseya s Click-Accept EULATOS as updated
Guide to Deploying VMware Workspace ONE with VMware Identity Manager. SEP 2018 VMware Workspace ONE
 Guide to Deploying VMware Workspace ONE with VMware Identity Manager SEP 2018 VMware Workspace ONE You can find the most up-to-date technical documentation on the VMware website at: https://docs.vmware.com/
VMware AirWatch Integration with RSA PKI Guide
 VMware AirWatch Integration with RSA PKI Guide For VMware AirWatch Have documentation feedback? Submit a Documentation Feedback support ticket using the Support Wizard on support.air-watch.com. This product
Device Certificates Enrollment Simple Certificate Enrollment Protocol
 Device Certificates Enrollment Simple Certificate Enrollment Protocol InCommon c/o Internet2 1000 Oakbrook Drive, Suite 300 Ann Arbor MI, 48104 Device Certificates Enrollment - Simple Certificate Enrollment
VMware AirWatch Integration with OpenTrust CMS Mobile 2.0
 VMware AirWatch Integration with OpenTrust CMS Mobile 2.0 For VMware AirWatch Have documentation feedback? Submit a Documentation Feedback support ticket using the Support Wizard on support.air-watch.com.
VMware AirWatch Certificate Authentication for EAS with ADCS
 VMware AirWatch Certificate Authentication for EAS with ADCS For VMware AirWatch Have documentation feedback? Submit a Documentation Feedback support ticket using the Support Wizard on support.air-watch.com.
Integrating AirWatch and VMware Identity Manager
 Integrating AirWatch and VMware Identity Manager VMware AirWatch 9.1.1 This document supports the version of each product listed and supports all subsequent versions until the document is replaced by a
Workspace ONE UEM Integration with OpenTrust CMS Mobile 2. VMware Workspace ONE UEM 1811
 Workspace ONE UEM Integration with OpenTrust CMS Mobile 2 VMware Workspace ONE UEM 1811 You can find the most up-to-date technical documentation on the VMware website at: https://docs.vmware.com/ If you
DigiCert User Guide. Version 6.4
 DigiCert User Guide Version 6.4 Table of Contents 1 User Management... 9 1.1 Roles and Account Access... 9 1.1.1 Administrator Role... 9 1.1.2 User Role... 9 1.1.3 EV Verified User... 9 1.1.4 CS Verified
DigiCert User Guide (GÉANT)
") DigiCert User Guide (GÉANT) Version 6.8 Table of Contents 1 User Management... 10 1.1 Roles and Account Access... 10 1.1.1 Administrator Role... 10 1.1.2 User Role... 10 1.1.3 EV Verified User... 10 1.1.4
DigiCert User Guide (GÉANT) Version 6.8 Table of Contents 1 User Management... 10 1.1 Roles and Account Access... 10 1.1.1 Administrator Role... 10 1.1.2 User Role... 10 1.1.3 EV Verified User... 10 1.1.4
User Guide. Version R92. English
 AuthAnvil User Guide Version R92 English October 9, 2015 Agreement The purchase and use of all Software and Services is subject to the Agreement as defined in Kaseya s Click-Accept EULATOS as updated from
Comodo Certificate Manager
 Comodo Certificate Manager SSL Certificates Enrollment, Collection, Installation and Renewal Comodo CA Limited 3rd Floor, 26 Office Village, Exchange Quay, Trafford Road, Salford, Greater Manchester M5
Guide to Deploying VMware Workspace ONE. DEC 2017 VMware AirWatch 9.2 VMware Identity Manager 3.1
 Guide to Deploying VMware Workspace ONE DEC 2017 VMware AirWatch 9.2 VMware Identity Manager 3.1 You can find the most up-to-date technical documentation on the VMware website at: https://docs.vmware.com/
Sophos Mobile Control Administrator guide. Product version: 5.1
 Sophos Mobile Control Administrator guide Product version: 5.1 Document date: June 2015 Contents 1 About Sophos Mobile Control...5 1.1 Sophos Mobile Control on premise and as a Service...5 1.2 About this
GlobalSign Enterprise Solutions
 GlobalSign Enterprise Solutions Secure Mobile Access User Guide ios Identity certificates epki for ios Network Authentication 1 Table of Contents Introduction... 3 Establishing an epki Account... 3 Configuring
Managed Access Gateway. Request Management Guide (For Administrators)
") Managed Access Gateway Request Management Guide (For Administrators) Version 2.0 Exostar, LLC October 14, 2013 Table of Contents Purpose...1 Overview...2 Organization Administrator Tasks...3 Verify User's
Managed Access Gateway Request Management Guide (For Administrators) Version 2.0 Exostar, LLC October 14, 2013 Table of Contents Purpose...1 Overview...2 Organization Administrator Tasks...3 Verify User's
ENTRUST CONNECTOR Installation and Configuration Guide Version April 21, 2017
 ENTRUST CONNECTOR Installation and Configuration Guide Version 0.5.1 April 21, 2017 2017 CygnaCom Solutions, Inc. All rights reserved. Contents What is Entrust Connector... 4 Installation... 5 Prerequisites...
CertAgent. Certificate Authority Guide
 CertAgent Certificate Authority Guide Version 7.0 July 5, 2018 Information in this document is subject to change without notice and does not represent a commitment on the part of Information Security Corporation.
Partner Center: Secure application model
 Partner Center: Secure application model The information provided in this document is provided "as is" without warranty of any kind. Microsoft disclaims all warranties, either express or implied, including
Symantec Managed PKI. Integration Guide for AirWatch MDM Solution
 Symantec Managed PKI Integration Guide for AirWatch MDM Solution ii Symantec Managed PKI Integration Guide for AirWatch MDM Solution The software described in this book is furnished under a license agreement
Comodo One Software Version 3.3
 rat Comodo One Software Version 3.3 Patch Management Module Administrator Guide Guide Version 2.2.101316 Comodo Security Solutions 1255 Broad Street STE 100 Clifton, NJ 07013 Table of Contents 1 Introduction
GlobalSign Enterprise Solutions. Enterprise PKI. Administrator Guide. Version 2.6
 GlobalSign Enterprise Solutions Enterprise PKI Administrator Guide Version 2.6 1 TABLE OF CONTENTS GETTING STARTED... 3 ESTABLISHING EPKI SERVICE... 3 CLIENT AUTHENTICATION CERTIFICATE... 4 ESTABLISHING
Streamline Certificate Request Processes. Certificate Enrollment
 Streamline Certificate Request Processes Certificate Enrollment Contents At the end of this section, you will be able to: Configure TPP to allow users to request new certificates through Aperture Policy
E X O S T A R, LLC D A T E : M AY V E R S I O N : 4.0
 SECURE ACCESS MAN AG E R USER GUI DE E X O S T A R, LLC D A T E : M AY 2 0 1 7 V E R S I O N : 4.0 1 S E C U R E AC C E S S M A N A G E R 1 INTRODUCTION... 3 1.1 SUMMARY... 3 2 BASIC FUNCTIONS... 3 2.1
Volume Licensing Service Center User Guide MICROSOFT VOLUME LICENSING
 Volume Licensing Service Center User Guide MICROSOFT VOLUME LICENSING Contents Overview of the Volume Licensing Service Center... 3 Registering to the Volume Licensing Service Center... 3 Signing New Open
Comodo Certificate Manager
 Comodo Certificate Manager Version 5.7 SSL Certificates Enrollment, Collection, Installation and Renewal Guide Version 5.7.032817 Comodo CA Limited 3rd Floor, 26 Office Village, Exchange Quay, Trafford
Verizon MDM UEM Unified Endpoint Management
 Verizon MDM UEM Unified Endpoint Management Version: 1.0 Last Updated: 3/29/18 Table of Contents Unified Endpoint Management (UEM) Overview... 4 Account Dashboard... 4 Unified Endpoint Management (UEM)
CERTIFICATE POLICY CIGNA PKI Certificates
 CERTIFICATE POLICY CIGNA PKI Certificates Version: 1.1 Effective Date: August 7, 2001 a Copyright 2001 CIGNA 1. Introduction...3 1.1 Important Note for Relying Parties... 3 1.2 Policy Identification...
Extranet User Manager User Guide
 Extranet User Manager User Guide Version 3.1 April 15, 2015 Envision IT 7145 West Credit Avenue Suite 100, Building 3 Mississauga, ON L5N 6J7 www.envisionit.com/eum TABLE OF CONTENTS NOTICE... 1 INTENDED
Workspace ONE UEM Certificate Authentication for Cisco IPSec VPN. VMware Workspace ONE UEM 1810
 Workspace ONE UEM Certificate Authentication for Cisco IPSec VPN VMware Workspace ONE UEM 1810 You can find the most up-to-date technical documentation on the VMware website at: https://docs.vmware.com/
BSE-SINGLE SIGN ON. For Brokers/ Banks/ Mutual Funds
 BSE-SINGLE SIGN ON For Brokers/ Banks/ Mutual Funds Contents Introduction:... 2 Features:... 2 Advantages:... 2 On-boarding process.... 3 SSO application Login Process... 7 Authentication via OTP... 7
Secure Access Manager User Guide September 2017
 Secure Access Manager User Guide September 2017 1 1 INTRODUCTION... 3 1.1 SUMMARY... 3 2 BASIC FUNCTIONS... 3 2.1 LOGIN TO YOUR SAM ACCOUNT... 3 2.1.1 How to Activate your Account... 3 2.1.2 How to Login
Comodo Certificate Manager
 ff Comodo Certificate Manager Code Signing on Demand Hosted Version Comodo CA Limited, 3rd Floor, 26 Office Village, Exchange Quay, Trafford Road, Salford, Greater Manchester M5 3EQ, United Kingdom 1 Introduction
Volume Licensing Service Center User Guide
 Volume Licensing Service Center User Guide Microsoft Volume Licensing February 2015 What s new License Summary has been improved with expanded search capabilities Contents What s new... 1 Overview of the
Cloud Services. Spam Manager. Quarantine Admin Guide
 Cloud Services Spam Manager Quarantine Admin Guide 10/23/2014 CONTENTS Introduction... 2 About Spam Quarantine Tasks... 2 Quarantine Deployment Tasks... 2 Before Activation of Spam Manager... 4 After Activation
This chapter provides an overview of user access management and Segment Management pods in the SNTC portal.
 SNTC Administration This chapter provides an overview of user access management and Segment Management pods in the SNTC portal. Overview The Administration tab in the SNTC portal allows the customer administrator
Administrator Guide. Find out how to set up and use MyKerio to centralize and unify your Kerio software administration.
 Administrator Guide Find out how to set up and use MyKerio to centralize and unify your Kerio software administration. The information and content in this document is provided for informational purposes
Certificate Management
 Certificate Management This guide provides information on...... Configuring the NotifyMDM server to use a Microsoft Active Directory Certificate Authority... Using Certificates from Outside Sources...
Vodafone Secure Device Manager Administration User Guide
 Vodafone Secure Device Manager Administration User Guide Vodafone New Zealand Limited. Correct as of June 2017. Vodafone Ready Business Contents Introduction 3 Help 4 How to find help in the Vodafone Secure
Workspace ONE UEM Integration with RSA PKI. VMware Workspace ONE UEM 1810
 Workspace ONE UEM Integration with RSA PKI VMware Workspace ONE UEM 1810 You can find the most up-to-date technical documentation on the VMware website at: https://docs.vmware.com/ If you have comments
Sophos Central Enterprise. Help
 Help Contents About Sophos Central Enterprise...1 Dashboard... 2 Alerts... 3 Logs... 4 Audit Logs...4 Sub-Estates... 6 Unlink sub-estates... 7 Delete sub-estates...8 Licenses...9 Trials...10 Manage Administrators...
Entrust Connector (econnector) Venafi Trust Protection Platform
 Venafi Trust Protection Platform") Entrust Connector (econnector) For Venafi Trust Protection Platform Installation and Configuration Guide Version 1.0.5 DATE: 17 November 2017 VERSION: 1.0.5 Copyright 2017. All rights reserved Table of
Entrust Connector (econnector) For Venafi Trust Protection Platform Installation and Configuration Guide Version 1.0.5 DATE: 17 November 2017 VERSION: 1.0.5 Copyright 2017. All rights reserved Table of
13241 Woodland Park Road, Suite 400 Herndon, VA USA A U T H O R : E X O S T A R D ATE: M A R C H V E R S I O N : 3.
 SECURE ACCESS MAN AG E R FIRST TIME LOGIN GUIDE A U T H O R : E X O S T A R D ATE: M A R C H 2 0 1 5 V E R S I O N : 3.0 1 S E C U R E A CCESS M A N A G E R SECURE ACCESS MANAGER OVERVIEW... 3 SUMMARY...
DigiCert User Guide (GÉANT)
") DigiCert User Guide (GÉANT) Version 8.3 Table of Contents 1 User Management... 10 1.1 Roles and Account Access... 10 1.1.1 Administrator Role... 10 1.1.2 User Role... 10 1.1.3 EV Verified User... 10 1.1.4
DigiCert User Guide (GÉANT) Version 8.3 Table of Contents 1 User Management... 10 1.1 Roles and Account Access... 10 1.1.1 Administrator Role... 10 1.1.2 User Role... 10 1.1.3 EV Verified User... 10 1.1.4
VMware AirWatch Integration with SecureAuth PKI Guide
 VMware AirWatch Integration with SecureAuth PKI Guide For VMware AirWatch Have documentation feedback? Submit a Documentation Feedback support ticket using the Support Wizard on support.air-watch.com.
AWS Remote Access VPC Bundle
 AWS Remote Access VPC Bundle Deployment Guide Last updated: April 11, 2017 Aviatrix Systems, Inc. 411 High Street Palo Alto CA 94301 USA http://www.aviatrix.com Tel: +1 844.262.3100 Page 1 of 12 TABLE
Comodo Certificate Manager
 Comodo Certificate Manager Reports Web Services API Comodo CA Limited 3 rd Floor, 26 Office Village, Exchange Quay, Trafford Road, Salford, Greater Manchester M5 3EQ, United Kingdom. Table of Contents
Sophos Mobile as a Service
 startup guide Product Version: 8 Contents About this guide... 1 What are the key steps?... 2 Change your password... 3 Change your login name... 4 Activate Mobile Advanced licenses...5 Check your licenses...6
SSL Certificates Certificate Policy (CP)
") SSL Certificates Last Revision Date: February 26, 2015 Version 1.0 Revisions Version Date Description of changes Author s Name Draft 17 Jan 2011 Initial Release (Draft) Ivo Vitorino 1.0 26 Feb 2015 Full
SSL Certificates Last Revision Date: February 26, 2015 Version 1.0 Revisions Version Date Description of changes Author s Name Draft 17 Jan 2011 Initial Release (Draft) Ivo Vitorino 1.0 26 Feb 2015 Full
Comodo Server Security Server
 Comodo Server Security Server Software Version 2.4 Quick Start Guide Guide Version 2.4.041718 Comodo Security Solutions 1255 Broad Street Clifton, NJ 07013 1. Comodo Server Security Server Quick Start
Sophos Mobile in Central
 startup guide Product Version: 8.1 Contents About this guide... 1 What are the key steps?... 2 Activate Mobile Advanced licenses... 3 Configure settings... 4 Configure personal settings...4 Configure technical
VMware AirWatch Certificate Authentication for Cisco IPSec VPN
 VMware AirWatch Certificate Authentication for Cisco IPSec VPN For VMware AirWatch Have documentation feedback? Submit a Documentation Feedback support ticket using the Support Wizard on support.air-watch.com.
AusCERT Certificate Services Manager. AusCERT Certificate Services Manager Reports Web Services API 1
 AusCERT Certificate Services Manager Reports Web Services API 1 Table of Contents 1 Introduction...4 2 Remote Functions...4 2.1 Function for Getting Activity Report...4 2.1.1 Arguments...4 2.1.1.1 AuthData
Public. Atos Trustcenter. Server Certificates + Codesigning Certificates. Version 1.2
 Atos Trustcenter Server Certificates + Codesigning Certificates Version 1.2 20.11.2015 Content 1 Introduction... 3 2 The Atos Trustcenter Portfolio... 3 3 TrustedRoot PKI... 4 3.1 TrustedRoot Hierarchy...
Xton Access Manager GETTING STARTED GUIDE
 Xton Access Manager GETTING STARTED GUIDE XTON TECHNOLOGIES, LLC PHILADELPHIA Copyright 2017. Xton Technologies LLC. Contents Introduction... 2 Technical Support... 2 What is Xton Access Manager?... 3
S/MIME on Good for Enterprise MS Online Certificate Status Protocol. Installation and Configuration Notes. Updated: November 10, 2011
 S/MIME on Good for Enterprise MS Online Certificate Status Protocol Installation and Configuration Notes Updated: November 10, 2011 Installing the Online Responder service... 1 Preparing the environment...
A Guide to Understand, Install and Use Pie Register WordPress Registration Plugin
 A Guide to Understand, Install and Use Pie Register WordPress Registration Plugin 1 P a g e Contents 1. Introduction... 5 2. Who is it for?... 6 3. Community v/s PRO Version... 7 3.1. Which version is
Trusted Advisor User Guide. inty CASCADE v 2.9.0
 Trusted Advisor User Guide inty CASCADE v 2.9.0 Table of Contents 1. Overview... 2 2. Logging in to inty CASCADE... 2 2.1 Forgotten Password... 4 2.2 Password Complexity... 5 3. Home Page... 7 4. Navigation...
GlobalSign Enterprise Solution epki Administrator guide v1.9. GlobalSign Enterprise Solutions
 GlobalSign Enterprise Solutions epki Quick Start Guide Managing PersonalSign and DocumentSign Certificates Across Your Organization Effectively GlobalSign Enterprise Solution epki Administrator guide v1.9
Sophos Mobile as a Service
 startup guide product version: 8.6 Contents About this guide... 1 What are the key steps?... 2 Change your password... 3 Change your login name... 4 Activate Mobile Advanced licenses... 5 Check your licenses...6
Sophos Mobile. startup guide. Product Version: 8.1
 Sophos Mobile startup guide Product Version: 8.1 Contents About this guide... 1 Sophos Mobile licenses... 2 Trial licenses...2 Upgrade trial licenses to full licenses... 2 Update licenses... 2 What are
Single Sign-On for PCF. User's Guide
 Single Sign-On for PCF Version 1.2 User's Guide 2018 Pivotal Software, Inc. Table of Contents Table of Contents Single Sign-On Overview Installation Getting Started with Single Sign-On Manage Service Plans
NTP Software VFM Administration Web Site
 NTP Software VFM Administration Web Site User Manual Version 7.1 This guide details the method for using NTP Software VFM Administration Web Site, from an administrator s perspective. Upon completion of
Workspace ONE UEM Certificate Authority Integration with Microsoft ADCS Using DCOM. VMware Workspace ONE UEM 1811
 Workspace ONE UEM Certificate Authority Integration with Microsoft ADCS Using DCOM VMware Workspace ONE UEM 1811 You can find the most up-to-date technical documentation on the VMware website at: https://docs.vmware.com/
SIMSme Management Cockpit Documentation
 Introduction SIMSme Management Cockpit Documentation Version 2.1 February 2018 Table of Contents 1 INTRODUCTION... 2 2 USERS... 3 3 LICENSES... 5 4 GROUPS... 7 5 CHANNELS... 8 6 DASHBOARD...10 7 APP SETTINGS...12
Comodo Certificate Manager
 Comodo Certificate Manager Reports Web Services API Comodo CA Limited 3 rd Floor, 26 Office Village, Exchange Quay, Trafford Road, Salford, Greater Manchester M5 3EQ, United Kingdom. Table of Contents