Florida Courts E-Filing Portal. E-Filer User Manual
|
|
|
- Allison Williamson
- 6 years ago
- Views:
Transcription

1 E-Filer User Manual Prepared by: Florida Court Clerks & Comptrollers October 2017
2 Table of Contents Introduction... 5 Video Tutorials... 5 E-Filing Videos... 5 Attorney E-Filing Instructional Videos... 5 Suggested E-Filing How-To s... 5 Clerk E-Filing Videos... 6 Videos for the Judicial User... 6 Videos for the Self-Represented Litigant... 6 Training Manuals... 6 Materials... 6 Manuals... 7 Certified Vendors... 7 Account Registration... 8 Create an Account... 9 Attorney Filer Roles Court Reporter Filer Role Creditor Filer Role Media Filer Role Mediator Filer Role Mental Health Professional Filer Role Process Server Filer Role Self-Represented Litigant Filer Role Notifications Portal Navigation My Account My Profile User Details Change Password Payment Accounts Preferences E-service Favorites Log Manage My E-service Filing Options / Quick Links My Cases Remove from E-service List when Added as Other Attorney/Interested Party Submit Pleading from My Cases version Page 2
3 My Submissions Notification of Electronic Filing My Fees My Alerts Workbench E-Filing Map Submitting a Filing Existing Case Process Case Information Trial Court Case Information Appellate Court Case Parties Documents Trial Court Frequently Filed Documents Documents Appellate Court Frequently Filed Documents Service List Adding Parties to the E-service List Add Other Attorney/Interested Party Add from E-service Favorites My E-service Addresses for this Case Fees and Payments Review and Submit Trial Court Review and Submit Appellate Court Filing to an Existing Case from the My Cases Page File a New Case Case Information Trial Court Case Information Appellate Court Adding / Editing Party Information Trial Court Adding Documents Trial Court Searching for a Document Adding Documents Appellate Court ServiceList Adding Parties to the E-service List Add Other Attorney/Interested Party Add from E-service Favorites My E-service Addresses for this Case version Page 3
4 Fees and Payments Trial Court Review and Submit Trial Court Review and Submit Appellate Court Confirmations of Filing Processing Completed for Filing Notifications Working Filings in the Correction Queue Portal Time Stamp on Resubmitted Documents E-service Page Review and Submit Abandoned Filing Queue Open Multiple Portal Sessions Documents Filed Through the Portal version Page 4
5 Introduction The purpose of this user manual is to provide you, the E-Filer, with the information necessary to electronically file court case documents via the Florida Courts E-Filing Portal commonly referred to as the Portal. This User Manual will step you through the process of registering as a new E-Filer, managing your User Account, filing documents through the Portal, generating reports and making payments for filings submitted via the Portal. As with documentation for any new system being deployed, this document will be revised as necessary to reflect modifications and enhancements to the Portal. Video Tutorials WebEx video tutorials are available on the Florida Courts E-Filing Portal website ( covering all common E-Filing tasks. These videos may be used in conjunction with this manual for maximizing E-Filing orientation and education. E-Filing Videos Attorney E-Filing Instructional Videos The Florida Courts E-Filing Portal - 12 mins (6/2016) Florida Courts E-Filing Portal Documentation - 4 mins (3/17/14) Florida Courts E-Filing Portal - Registration Page - 5 mins (6/23/14) Florida Courts E-Filing Portal - My Profile - 4 mins (6/2016) Florida Courts E-Filing Portal - My Submissions mins (6/2016) Florida Courts E-Filing Portal - My Cases mins (6/2016) Florida Courts E-Filing Portal - E-Filing Map - 4 mins (6/2016) E-Filing to a New Case -Webex video Florida Courts E-Filing Portal Filing to an Existing Case - 15 mins (10/22/14) Florida Courts E-Filing Portal - Fees and Payments - 4 mins (6/5/14) Florida Courts E-Filing Portal File a New Case to Florida Supreme Court - 17 mins (10/23/14) File to the 2nd DCA - 9 mins (3/17/14) Creating the E-Service List - 15 mins (6/20/14) Florida Courts E-Filing Portal Pending Queue - 10 mins (10/22/14) E-Portal Filer Training - 44 mins (3/26/14) Appellate E-Filing Updates - 42 mins (3/27/14) Florida Courts E-Filing Portal News & Information Section - 5 mins (10/9/14) Florida Courts E-Filing Portal Removing Metadata from WORD Documents - 5 mins (5/20/15) Suggested E-Filing How-To s Florida Courts E-Filing Portal Filing Large Documents - 10 mins (10/22/14) Florida Courts E-Filing Portal - The Log - 5 mins (5/21/14) Florida Courts E-Filing Portal - Forgot Password - 1 min (6/26/14) Florida Courts E-Filing Portal - Portal Administrator of Organization- 10 mins (9/29/14) Florida Courts E-Filing Portal Request Support- 2 mins (6/25/2014) Florida Courts E-Filing Portal Appellate Workbench - 6 mins (6/5/2014) Florida Courts E-Filing Portal Organization Filings- 4 mins (6/5/2014) Florida Courts E-Filing Portal Submitting a Proposed Order- 4 mins (6/20/2016) version Page 5
6 Clerk E-Filing Videos The Clerk as a Filer - 11 mins (9/10/14) Florida Courts E-Filing Portal - The Clerk Filing a Notice of Appeal - 7 mins (6/26/14) Videos for the Judicial User Florida Courts E-Filing Portal - The Judicial Filer - 20 mins (6/17/14) Florida Courts E-Filing Portal Judicial Filer - Pending Queue - 10 mins (6/20/14) Florida Courts E-Filing Portal Setting Judicial Preferences - 6 mins (6/20/16) Florida Courts E-Filing Portal Judge Sign and File - 4 mins (6/20/16) Videos for the Self-Represented Litigant Florida Courts E-Filing Portal - Getting Started for the Self-Represented Litigant - 14 mins (8/25/14) Florida Courts E-filing Portal - Existing Case - 13 mins (6/27/14) Florida Courts E-Filing Portal Filing a New Case - 15 mins (6/27/14) A YouTube training video, a link to the User Manual and a FAQ document are also on each page of the Portal. The training video and FAQ document apply only to the page it is on for a quick reference guide. The links are located on the right hand side of the banner as shown below. Quick Links are also found on each page in the upper right hand corner of the banner. Training Manuals Also available on the Florida Courts E-Filing Portal webpage are Training Materials and Manuals. Materials E-Service/E-Filing Powerpoint (Flabar.org) Florida Bar letter to Clerks for pro hac vice process Florida Bar Process for Filing Pro Hac Vice (Flabar.org) version Page 6
7 November Conference E-Filing powerpoint E-Service FAQs Quick Reference Guide to Appellate Drop-Down Options Request for Criminal-Civil Docket Descriptions Florida Courts E-Filing Authority Public Records Requests Policy- October 2014 Letter to Florida Courts E-Filing Authority on Portal Records Retention- April 2016 Process for Disposing of Florida Courts E-Filing Portal Records- April 2016 Florida Courts E-Filing Authority - Portal Records Retention Policy- Apri 2016 Manuals E-Filing Portal Standardization Project - May 7, 2015 e-portal Document Submission Standards Portal Organization Administrator User Manual -April 2016 E-Filing Portal User Manual (includes information for appellate e-filing) Oct Document Binary File Name Standards AOSC Electronic Filing Specifications Florida Supreme Court Standards for Electronic Access to Florida's Courts v adopted August 2017 E-Service User Guide -updated Oct E-Portal/Electronic Service List Web-Service Operations User Guide Replacing Attorneys on E-Service Lists Self-Represented Litigant Oct Clerk Filer User Manual Oct Portal County Administrator User Manual Oct Circuit Administrator User Manual- Oct Judge Filer User Manual- Oct Certified Vendors If you are interested in using a value added certified vendor to provide e-filing capabilities from your CMS directly to the Portal, please go to the Certified Vendors tab on the main Portal web page. We have a list of those vendors that are ceritifed by the Florida Courts E-Filing Authority and link to each of the vendors so that you may contact them to gather further information. version Page 7


8 Account Registration Prior to utilizing the Florida Courts E-Filing Portal E-Filers must create an account. E-Filers can access the Portal s log-in page, by typing the following URL into their web browser: E-Filers will be directed to the Florida Courts E-Filing Portal page. version Page 8

9 Create an Account To begin the account creation process, click on either E-Filing Portal in the Menu Bar or File Now! That will take you to the Welcome Page to the Florida Courts E-Filing Portal. Select your filer role from the drop down and click on the Register button. version Page 9


10 E-Filers will be directed to the Account Registration page based on the filer role you select. Attorney Filer Roles For the Attorney filer role you will see this registration page: version Page 10
11 E-Filers will be prompted to complete all available fields on the page. Required fields are indicated with a red asterisk. 1. A Florida Bar Number is required. 2. E-Filers are required to enter a user name and password and confirm their password selection by retyping it. The requirements for creating a valid password are the Password must be between six and 16 characters with at least one number which also appear above the password field. 3. E-Filers are required to select a security question from the drop down menu and provide an answer to the question. 4. E-Filers are required, at a minimum, to enter their first and last name along with a primary address. To receive a quick automated approval, be sure that the name you register matches the name that you have listed with The Florida Bar. If the name does not match, manual approval will be necessary and a delay in registering may occur. All notifications to the filer are sent via to the address provided in the Account Registration page. The Portal allows for three addresses to be entered. Notifications sent to the filer will be sent to each address listed. Click on Register once all information is entered. version Page 11
12 Court Reporter Filer Role For the Court Reporter filer role you will see the focllowing registration page. Complete the registration information form and click on Register. When filing as a Court Reporter, you will have access to file specific documents to a case. You will not have access to the official court file on the My Submissions page and you will not have access to the My Cases page nor will anyone filing as using the Court Reporter Role be added to the E-service List. version Page 12
13 Creditor Filer Role For the Creditor filer role you will see the following registration page. Complete the registration information form and click on Register. When filing as a Creditor, you will have access to file specific documents to a case. You will not have access to the official court file on the My Submissions page and you will not have access to the My Cases page nor will anyone filing as using the Creditor Role be added to the E-service List. version Page 13
14 Media Filer Role For the Media filer role you will see the following registration page. Complete the registration information form and click on Register. When filing as a Media filer role, you will have access to file specific documents to a case. You will not have access to the official court file on the My Submissions page and you will not have access to the My Cases page nor will anyone filing as using the Media Filer Role be added to the E-service List. version Page 14
15 Mediator Filer Role For the Mediator filer role you will see the following registration page. Complete the registration information form and click on Register. When filing as a Mediator, you will have access to file specific documents to a case. You will not have access to the official court file on the My Submissions and the My Cases page and you will not be added to the E-service List. Mental Health Professional Filer Role For the Mental Health Professional filer role you will see the following registration page. Complete the registration information form and click on Register. version Page 15
16 When filing as a Mental Health Professional, you will have access to file specific documents to a case. You will not have access to the official court file on the My Submissions page and you will not have access to the My Cases page nor be added to the E-service List. Process Server Filer Role For the Process Server filer role you will see the following registration page. Complete the registration information form and click on Register. When filing as a Process Server, you will have access to file specific documents to a case. You will not have access to the official court file on the My Submissions page and you will not have access to the My Cases page nor be added to the E-service List. version Page 16

17 Self-Represented Litigant Filer Role For the Self-Represented Litigant filer role you will see the following registration page. Complete the registration information form and click on Register. Please Note: By electronically filing through the Portal, you are agreeing to receive service of all future court documents submitted on your cases by at the addresses provided in your Account Registration form. Upon successful registration E-Filers will be taken to the Registration Complete page. version Page 17
18 Notifications: E-Filers will receive two (2) separate notifications. 1. The first notification provides the E-Filer with confirmation that the registration process was successful and provides the filer with profile information entered during the registration process. If the registration requires review by Portal Support before approval the notification will indicate that the registration is pending approval. Once approved by Portal Support the E-Filer will receive the s regarding approval and activation. 2. The second notification provides the filer with an activation link which the E-Filer must click on to complete the registration process. version Page 18
19 Clicking the link provided in the takes the filer to the Account Activation page. E-Filers must verify their identity by answering the Security Question shown in the drop down menu that they selected during the registration process. Then click Activate to complete this step. version Page 19


20 The E-Filer is then notified in their provider that their Account Activation is Complete and their account has been successfully activated and they are taken to the log on screen for the Portal where they will type in their user name and password. Then click on Sign In to enter the Portal. Portal Navigation Once the account is activated, users can return to the Portal home / log-in page at E-Filers will enter their User Name and Password and click Sign In to enter the portal. version Page 20
 the My Account menu and (2) the Filing Options menu located on the upper left side of the page.")
21 Once the E-Filer is logged in they are immediately taken to the Home Page selected by you the Filer. The Home Page also has a Menu Bar that has two menu tabs: (1) the My Account menu and (2) the Filing Options menu located on the upper left side of the page. The functionality associated with these two menus allows E-Filers to make changes to their profile / account and move to other pages within the Portal. My Account Menu My Profile Choosing My Profile, from the drop down provides E-Filers with the ability to manage their account information using User Details, Change Password, Payment Accounts, User Preferences and E- service Favorites. version Page 21
22 User Details The User Details option provides E-Filers with the ability to update their profile information. E-Filers are able to update any profile information present with the exception of Organization and Role. When finished updating click on the Update button at the bottom of the page to save changes. The Portal allows for the E-Filer to enter up to three [3] Addresses. Electronic Notifications are sent to all addresses on the account. version Page 22
23 Change Password The Change Password menu option provides E-Filers with the ability to manage / change their password. New passwords must meet the criteria for passwords stated on the page under the New Password input box which is Password must be between 6 and 16 characters, with at least 1 number. Payment Accounts The Payment Accounts tab allows the E-Filer to delete saved payment credit card and/or ACH account information. version Page 23
24 You may remove all accounts by selecting Delete All or you may remove them individually by select the Red x next to Remove next to the Credit Card or ACH Account you wish to delete. To add additional payment accounts, add the payment information on the Fees and Payments tab when you are filing your documents. Be sure to select the check box next to Save Payment Information for Reuse Trial Court Filing Save a Payment Method version Page 24

25 Appellate Court Filing - Save a Payment Method The Payment information is gathered on the Review and Submit screen Please note: The Payment Zip is the billing address zip code. To be sure you receive authorization for the credit card, make sure the zip code entered matches the zip code for the billing address on the credit card account. version Page 25
26 Preferences The Preferences tab allows you the E-Filer to select the Home Page of your choice, the Filing Path and the Jurisdiction that will appear when you log into the Portal unless you have an alert pending. If you have an alert that is unresolved, the Portal will automatically take you to your My Alerts page when you log into the Portal regardless of the Home Page you have designated until you rectify or clear the pending alert. Once the alert has been cleared, you will then land on your designated Home Page when you log into the Portal. Simply make your selections by invoking the drop down and selecting your filing path. You are also able to select the Notifications you wish to receive from the Portal. By default, all notifications will be selected when this new feature is implemented. Home Page Select the page you desire to be used as your Home Page when you log into the Portal version Page 26
27 Filing Path From the Filing Path drop down, select the Filing Path you wish your Portal to default to. Last Jurisdiction Filed To From the drop down, select the Jurisdiction you wish to default to in the Portal. version Page 27
28 If you do not wish to receive an Notification specified below, remove the check mark in the box under the heading Send to Provider and click on Update and from that day on you will not receive those de-selected Notifications in your Provider. version Page 28
29 E-service Favorites As you create E-service Lists in the Portal, you are also able to create your E-service Favorites list. When you add Other Attorney/Interested Party to an E-service List, you will be able to select that person to be added to your E-service Favorites list so that the next time you need to add that person to an E-service List you can use the E-service Favorites link and quickly select them from your list of E- service favorites. version Page 29
30 To remove a person from the E-service Favorites list, remove the check in the Favorite column and click on Update. That will remove that person from your E-service Favorites list. To add a person to your E-service Favorites list, make sure you select Add to E-service Favorites when you add that person to an E-service List using Other Attorney/Interested Party link. Log Any that you the filer receive via your provider will also be logged in the Log. To access the Log go to the Account tab and from the drop down select Log. version Page 30
31 The Log will default to the last seven days however you can adjust the dates to reflect a larger period of time if you are searching for a specific . Either type in the From date or use the calendar fly out to select a date. Then select Refresh. You can also search for the type of by selecting your search criteria from the dropdown. version Page 31
32 Set the number of records to show per page by selecting the number from the drop down and then click on Refresh. To view the results of your search, scroll down the page. To view the contents of the , click on the you wish to view. version Page 32
33 Scroll down the page and you will see the body of the that you also received in your provider [i.e. yahoo, Gmail, outlook, etc.]. version Page 33
34 Manage My E-service The last option on the My Account menu is Manage My E-service. Manage My E-service lets you perform Maintenance Actions on multiple cases at the same time. You may select any of the Search Options to narrow your result set. You may limit your search to a specific County, Service Lists using your profile addresses for E-service, using case specific addresses for E-service, etc. Once you have defined your Search criteria, click on Search to view your result set. version Page 34

35 Once you have your E-service Case List, select a Maintenance Action to perform. You may remove yourself from an E-service List. Update designated Addresses User your Profile addresses for E-service Use case specific addresses for E-service Select the Maintenance Action you wish to perform and then from the list of cases at the bottom of the page, select the cases you wish to have the Maintenance Action performed. In the example shown below, I searched for all of my cases that have received bounce backs on my addresses. Then for the Maintenance Action I have selected Use my Profile addresses for E-service. Then in the list of my cases I have selected the case[s] I wish to have this Maintenance Action performed on. version Page 35
36 Once I click on Update, the Maintenance Action is performed and when I perform my search again using the same criteria as above, the list is now empty. version Page 36
37 The case that was on the list before has now had the E-service List changed to use My Profile addresses for E-service. This feature was added to allow the filer to perform Maintenance Actions to multiple cases at the same time. Filing Options / Quick Links The Portal Filing Management Links are located under the Filing Options Menu. In addition, for ease of use these links are also located in the upper right corner of the page. Each filing option link is discussed below: My Cases To go to the My Cases page, select Filing Options from the menu bar and then highlight and select My Cases or use the My Cases menu in the Quick Links section of the page. version Page 37
38 This will take you to your My Cases page where you have access to the court file and the documents therein by selecting the hyperlinked case number in the Case # column and the E-service List by selecting the hyperlinked case number in the Court Case # column. You can update the E-service List from this page. You do not have to file a document to access the E-service page. You will also see the Case #, Court Case #, Court, Case Title, whether or not you are receiving E- service in the case and the status of the case. This page is customizable in that you may select the number of records to show per page as well as whether to display active, inactive, or all cases. Once you set these preferences, they will be retained until you change them. version Page 38
39 You may use the Search Options available to limit your My Case page display. These Search Options are: Court Court Case # Case Style Service Lists containing case-specific address Service lists using my profile addresses Service lists using case-specific addresses I have removed myself from the Service List Bounce backs received on my addresses Added as Other Attorney/Interested Party Remove from E-service List when Added as Other Attorney/Interested Party If you do a search using Added as Other Attorney/Interested Party as your search criteria, you will get a list of all of the cases in which you have been added as an Other Attorney/Interested Party by someone else. version Page 39
40 You will then be able to update your if you wish to use another address or you may remove/delete yourself from the E-service List of this case. To access the E-service list for a case click on the Court Case # link. If you wish to change the addresses listed for you by the filer that added you to the E-service List, click on you name in the Name/ID column and make any corrections necessary. If you wish to remove yourself from the E-service List, click on the red X next to your name. Once you make your corrections, click on Save at the bottom of the page to save your corrections. Submit Pleading from My Cases Also available from the My Cases page is the Submit button. Once you have electronically filed to a case, it is automatically added to your My Cases page. From then on, you have the option to file directly to that case from the My Cases page by selecting the Submit button. That will eliminate the need to select the county, division, enter the sequence number on the Case Information page and click on Search to pull up your case. The Portal will retrieve that information based on the case you select and take you to the bottom of the Case Information page where you can enter a Matter # or mark your filing as an Emergency and finish the submission. When a County is ready to accept Proposed Orders electronically through the Portal, you will also see a Submit button in the Proposed Order column. Until that time, there will be no way to submit a Proposed Order through the Portal to that county. version Page 40

41 My Submissions The My Submissions page shows all submissions you have made over the past seven days. You may adjust the number of days displayed by selecting the timeframe using the calendar feature. It will also show you the following information; Pleading: You may submit another pleading to the case using the Submit button under the Pleading column. Proposed Order: You may submit a proposed order to this case using the Submit button under the Proposed Order column. Submission/NEF: The portal assigned reference number for your filing and the Notification of Electronic Filing [NEF] that is sent out to provide E-service of the documents you filed in that submission. Case Style/Docket: The abbreviated style of the case which is the first named plaintiff versus the first named defendant. Court Case #: The Case Number assigned to the filing. When the filer submits a new case this column will read NEW CASE until the case number is assigned by the clerk; once the Clerk assigns a Case Number it will display. Status: The status will reflect one of the following: Pending Review, Being Reviewed, Pending Filing, Filed, Pending Queue, or Filed for Judicial Review Court: The name of the jurisdiction the case is filed in. Submission Date: Date the filer submitted the filing on the portal which is the official file stamp date and time. Completion Date/Remarks: Date the filing was processed by the Clerk s office or remarks from the Clerk/Reviewer as to why the filing was moved to the Pending Queue. You may search your My Submissions page using any of the following search criteria: version Page 41
42 Submission # Type Status UCN Court Case # Court Division Submission Date From Submission Date To Completion Date From Completion Date To Case Style Matter # Note: To see more information about a submission, select the next to the Filing #. version Page 42
43 There are four tabs that appear: Filing Information, Documents, Service List and Fee Payment. The Filing Information displays the following information. The Documents tab shows you the documents submitted. version Page 43
44 The Service List displays those selected for E-service and those de-selected for E-service on this submission. The Fee Payment tab shows you the status of the fee and a breakdown as to how the fee was calculated, the payment method used, the MFC Order # and what was entered in the Memo field if anything. You, as the E-Filer, are responsible for all fee payments. If there are any issues with payment processing, you will be contacted by the CiviTek Banking Department. CiviTek is the official payment processing vendor for the E-Filing Portal. If you have been contacted by a member of the CiviTek Banking Department, by , letter or phone call; these are legitimate communications concerning your E-Filing banking information. Please respond to their communications accordingly. Notification of Electronic Filing Upon submission of documents, a Notification of Electronic Filing [NEF] will be sent to the selected E- Service Recipients on the E-service List. Attached to that NEF will be a PDF version of the documents filed in that submission. To view the NEF, select the icon next to the Filing #. version Page 44

45 The NEF will open that will show you the E-service as well as who was electronically notified and who was not electronically notified. The contents of the NEF are also found in your Log. The PDF copy of the document filed however is not found in the Log. The PDF copy of the document is attached to the NEF sent to your specified providers. The My Submissions list defaults to filings within the last seven days. The filer may expand or narrow the list by using the From and To dates. This date range will be utilized to run a report of all filings for the specified date range. Then click Refresh to generate the list for the new date range selected. version Page 45
46 My Fees The My Fees page will allow you to reconcile your credit card statement or bank statement as it relates to statutory filing fees. You may search you My Fees page using the following criteria: Filing Submitted From/To Filing Completed From/To Payment Method Saved Payment Account Memo Matter # Filing ID Court Case # Case Style Fee Status Filter [If you are an Organization Administrator so you can filer by filers in your firm] When you specify your search criteria and then click on Search your result set will appear in the grid below. You may Save or Print this result set. If you Save, it will create an Excel Spreadsheet. version Page 46
47 In the above Search Options, we have specified a time frame, selected a Saved Payment Account Number and performed the Search. To find out more information about the submission, click on the Filing # and it will take you to the My Submissions page where you can expand the view to see the Fee Payment information. version Page 47

48 NOTE: If you are a Law Firm Administrator, you might want to encourage your attorneys to enter the Law Firm Matter # in all of their submissions. That way you will have a corresponding Matter # on your Fee Payment screen and it is also a Search Option field. You will be better able to track your filings as they relate to a Matter # if the E-Filer enters that information on each submission. My Alerts If you have any E-Filer Alerts pending, when you log in to the Portal you will be taken to your My Alerts page and not to the E-Filing Map or if you have designated another Home Page in your Preferences, to that Home Page. The My Alerts page will appear as long as you have outstanding Alerts. Once they have been resolved/cleared, you will then land at either the E-Filing Map or your designated Home Page. An Alert will be created for the following events: Filing Moved to Correction Queue E-Service Delivery Failure Removal from E-Service List Request The Alert will remain in the Active status until the E-Filer clears the Alert at which time the status is changed to Cleared and it is no longer considered Active. To clear an Alert, place a check in the box under the Select column and click on Clear. As long as you have Active Alerts, when you log in to the Portal you will be taken to the Alerts page. Once they have all been cleared, you will then be taken to the E-Filing Map or you designated Home Page upon log in to the Portal. Workbench This link will take you to your Workbench where any submissions you have begun but not completed or saved to the Workbench will be listed. To continue filing the submission, click on the Resume Filling link and complete your filing. version Page 48

49 The submissions will remain on the Workbench for five (5) days from the Date Last Updated. After the five (5) days, they will disappear from the Workbench and you will not be able to recover them. E-Filing Map The E-Filing Map link allows E-Filers to access the Jurisdictional Map which will allow them to select a filing path. Select either the Trial Court or the Appellate Court filing path. To change counties in which you are filing documents, you must return to the E-Filing Map to make a new county selection. version Page 49
50 Submitting a Filing Existing Case If you have not filed to a case that has an existing case number, you must begin the filing from the Jurisdictional or E-Filing Map. Process Trial Court: Appellate Court: Select County from the drop down or click on the county name in the map. Select the District number from the map for a District Court of Appeal [currently only the 2 nd District Court of Appeal is filing through the Portal and only those documents that require a fee payment to be made] or use the drop down list which includes the Florida Supreme Court. Then select either Pleading on Existing Case if the case already exists or Case Initiation if you are submitting a new case for filing. Since we are filing to an already created case, we will select Pleading on Existing Case and then click on File Now. version Page 50
51 Case Information Trial Court To File Subsequent Document(s) into an existing case, the E-Filer must know the case number. Select the Division from the dropdown list provided. Enter the case number and click search. The Portal will search for the case record. If the county s case management system is not linked to the Portal the search for case information will not be initiated and no case information will be displayed to the filer. If the case record is located the Case Type and Title are displayed. Please verify that you have the case for your filing before proceeding. If the case record is not located a message will be presented. Please verify your case number entry. o If entered incorrectly click the Cancel button on the message to reenter the case o number. If entered correctly click the OK button on the message to continue processing. If the case privacy is confidential or higher, case information may not be returned from the county s Case Management System. 1. Select Division 2. Type in Year 3. Sequence number 4. Select Court Type 5. Search The case information will be displayed [unless the case is a confidential case] so that you can verify you are filing to the correct case. If correct, click on Next or click on Case Parties in the Menu Bar. version Page 51

52 Case Information Appellate Court Select the Appellate court Case Year and Case # and then select Search. The Portal will retrieve the Case Information from the District Court of Appeal. version Page 52

53 And present a message that asks you to choose who you who represent and who you are associated with in order to continue. Select OK to continue to the Case Information page where you will designate who you represent and who you are associated with as shown below designated a Required Field as shown by the red asterisks. version Page 53
54 Case Parties NOTE: Not all counties will allow you to add case parties so this screen may not be available to the E-Filer in some counties. Select the Party you are filing on behalf of if listed in the Current Parties section. If your party is not listed and the County allows you to add parties to a case, click on the Add Party link. When adding a party you have 2 options: 1. Selecting the Copy from Current Filer option will add the E-Filer as a Party and fill in the Party information with the E-Filer's Portal profile information. This is used when the attorney is adding himself to the case as counsel on behalf of a party. The attorney would not be a Primary Party. 2. Entering the Party information after selecting the party. Type the party information directly into the available fields. NOTE: The Person Name or Organization is a required field and must be completed in order to submit a new case. version Page 54
55 Click the Save button when the information is complete. The pre-existing parties and the new parties will be displayed. In the listing of the new party records the filer has the option to Edit or Remove a party they have entered on the case. Parties previously existing on the case cannot be edited or removed. Clicking Add Party again allows the filer to add another party to the case so that all parties may be added. version Page 55
56 When the filer has completed adding or editing all necessary parties to the case, click the Next button. If you need to go back to the Case Information page select the Back button or the Case Information tab from the menu bar. Documents Trial Court The Documents Page is next. You can either click on Next at the bottom of the Case Parties tab or click on Documents in the Menu Bar. Click Add to add a document to the case. version Page 56
57 Note: There may or may not be an exact match of the document you are filing to the list of documents available to the E-Filer. This list of docket codes is set up the by clerk of each county. If the exact name of the document you are filing is not available, select the document that most closely matches the document you are submitting. You may search for a document by placing your cursor in the Search field and typing in your search criteria. Type in a unique word of the name of your document, i.e. summary when you are filing a Motion for Summary Judgment. Then either hit your tab or enter key to perform the search. Or you may tab through the pages of document descriptions available by using the page number tabs at the bottom of the screen. version Page 57

58 Frequently Filed Documents We now have a section on the Add/Edit Document page that displays your Frequently Filed Documents. We added this so that you could easily find documents that you file on a regular basis without the need to Search. Select the document you wish to file, type in the number of pages, and upload the document. Then click on Save to add it to the list of documents you will submit. version Page 58
59 To upload your document, browse out on your computer to find your document that you have computer generated, added the electronic signature [s/attorney NAME] and saved as a PDF. version Page 59

60 Your Document will appear on the Documents page with the file size shown in the far right hand column. You may upload as many documents as you need to file with the total file size not to exceed 50MB If your document is larger than 50MB, break your document down into two separate files and then submit them individually. A progress bar will appear when submitting the larger documents to let you know that the upload is in progress. When the file size appears, your document has completely uploaded and you are ready to continue. The speed of the upload depends on your internet connection. NOTE: If you computer generate your document and apply the Electronic Signature of s/attorney NAME to your documents and then Print or Publish or Save them as a PDF/A document you will never hit the 50MB file size. PDF/A makes a very small file and it would take thousands of pages of document to even get close to the 50MB file size. Please DO NOT SCAN your documents just to show a wet ink signature. That is not the preferred way to file document electronically. If you must scan, please set your scanner to 300 DPI and scan in black and white and NOT in color. Scan only what you absolutely must. version Page 60
61 If when you perform your search no documents appear in your result set, click on Clear to clear out the search field and try again or page through the list of documents by using the page number selection box at the bottom of the screen to find what you wish to submit. Once you find the document you are going to submit, select that document, type in the number of pages and browse out on to your computer to locate your computer generated document and attach it to the submission. You may attach either a Word document or a PDF or PDF/A document to the submission. You may attach as many documents as you wish to submit to the same filing provided they will all be filed to the same case. version Page 61
62 The documents will display in the list. The document page also allows the filer to Edit or Remove a document. Clicking Add again allows the filer to add another document to the case. The size of the document added also appears. The aggregate size of the submission is visible in the bottom right hand corner of the screen so the E-Filer knows when they are approaching the submission size maximum of 50MB. When the size appears in the size column, your document has completely uploaded and you may continue. The maximum submission size is 50MB. If you attach too many documents to the submission, and it exceeds the 50MB size limit, an error message will appear as shown below. version Page 62
63 Send of what you have uploaded and use the Submit button on the Filing Received page to submit the remaining document. To file documents that are larger than 50MB, break the document down into two separate files and submit them individually. version Page 63
64 When the E-Filer has completed adding or editing all necessary document information, be sure to read the Confidential Information section. For confidential documents, the filer must attach the Notice of Confidential Information within Court Filing or a Motion to Determine Confidentiality as per Rule Then click the Next button to move on. Documents Appellate Court The Documents Page is next. Click Add to add documents to the case. version Page 64

65 You may search for a document by selecting the Search field and typing in your search criteria or you may search the documents available by using the page numbers at the bottom of the screen. If the document group or type is not listed, select the document that most closely resembles the document you are going to file. version Page 65

66 If you use the search feature, type in the most uncommon word in the title of your document and then use your Tab or Enter key to perform the search. In the below example, we will use the word amicus to limit the result set of our search. version Page 66
67 Select the document you wish to file, type in the number of pages, and upload the document. You may also use the Volume field to further identify the document you are submitting. If your document is larger than 50MB, break your document down into two separate files and then submit them individually using the additional text Volume field to identify the volumes. Then click on Save to add it to the list of documents you will submit. To upload your document, browse out on your computer to find your document that you have computer generated, added the electronic signature and saved as a PDF/A. Click on Open and then Save. version Page 67
68 Your Document will appear on the Documents page with the file size shown in the far right hand column. You may upload as many documents as you need to file by selecting Add and repeating the process explained above as long as the total file size does not to exceed 50MB The documents will display in the list. version Page 68
69 The document page also allows the filer to Replace or Remove a document. The maximum submission size is 50MB. If you attach too many documents to the submission, and it exceeds the 50MB size limit, an error message will appear as shown below. version Page 69
70 To file documents that are larger than 50MB, break the document down into two separate files and submit them individually. When the E-Filer has completed adding or editing all necessary document information, be sure to note the Confidential Information warning section. For confidential documents, the E-Filer must attach the Notice of Confidential Information within Court Filing or a Motion to Determine Confidentiality as per Rule Then click the Next button to move on. Frequently Filed Documents We now have a section on the Add/Edit Document page that displays your Frequently Filed Documents. We added this so that you could easily find documents that you file on a regular basis without the need to Search. For more information please see Documents Trial Court on page 58 of this Manual. version Page 70
71 Service List Next you see the ServiceList page. You must select from the Service Recipient List the parties you wish to serve by placing a check in the box next to the name of the people you wish to serve. You may select the entire list by placing a check in the box next to Serve All? in the column header. Any address that has received a bounced back will be flagged and should not be selected for E-service. Any person added to the E-service List that does not wish to receive E-service on this case and has requested removal will also be flagged and should not be selected for E-service. If you have a bounce back flag on your address, click on the Info link. This will allow you to see how many bounce backs and when they were received at the address in question. You will be able to reset that address if you believe it to be a valid address. The next time that address receives a bounce back, the Info icon will reappear until the issue is resolved. version Page 71
72 You may add anyone that does not appear on the Electronic Service Recipients list to the Service List by using the My Added Attorney/Interested Parties link. Adding Parties to the E-service List To add a person to the E-service List for a case, from the My Added Attorney/Interested Parties tab there are now two ways to do so. Add Other Attorney/Interested Party When you select Add Other Attorney/Interested Party, you will be able to add E-service Recipients to this case four different ways: 1. Search Active E-Filing Portal Users 2. Search Florida Bar 3. Free Text 4. Add from E-service Favorites List version Page 72
73 Search Active Portal Users When you select this link, type in the Last Name or the Bar Number of the person you are searching for to add to this E-service List and then select Search. Place a check in the appropriate box and click on Select. Then select the Case Role that this person fulfills from the drop down. version Page 73
74 If this person is someone that you frequently add to E-service Lists, you may now select to add this person to your E-service Favorites List. To do so, place a check in the box next to Add to E-service Favorites in the upper right hand corner of the screen and then click on Save. That will add this person to the E-service List for this specific case as well as add this person to your E- service Favorites List so that the next time you need to add this person to a case, you can select Add from E-service Favorites which will show all of your E-service Recipients that you have saved to your Favorites List for quick and easy adding to an E-service List. version Page 74
75 To remove participates from your E-service Favorites go to the My Account menu, My Profile and select the E-service Favorites tab. For more information on removing people from your E-service Favorites List, please see Portal Navigation located in the beginning of this User Manual. Search Florida Bar Click on the Search Florida Bar link. Type in The Florida Bar number of the person you are adding to the E-service Recipient List and click on Search. That will pull up the attorney with that Florida Bar number. Place a check in the Select box and then click on Select. That will add this person as an Other Attorney/Interested Party to this E-service List. If you want to add them to your E-service Favorites list place a check in the appropriate box. Be sure to select the Case Role of this E-service Recipient and then click on Save. version Page 75
76 This Florida Bar Attorney has now been added to the E-service List for this case as well as to your E- service Favorites List. Free Text the Information Type in the information into the appropriate required fields. Then click on Save to add this person to the E-service List for this case. They are added to the Electronic Service Recipients list for this case. version Page 76
77 Add from E-service Favorites From the My Added Attorney/Interested Parties tab click on Add from E-service Favorites. That will pull up your E-service Favorites list that you have been creating as you add E-service Participants to E-service Lists in your cases. To manage this list (remove names) please see the Portal Navigation section of this User Manual. Select the name of the person you wish to add to this E-service List from your E-service Favorites list by placing a check in the Favorite column next to the name. Then click on Add Selected. The person you selected from your E-service Favorites list will be added to the E-service List for this case. My E-service Addresses for this Case You may also designate E-service addresses for this specific case if you wish to use addresses that are different from your Profile addresses. To do this, select the My E-service Addresses for this Case link. Then select the appropriate designation and if selecting new E-service addresses to be used for this one case only, type in the new addresses and then click on Next. version Page 77
78 A valid E-service List will have a check in the box next to the name of the people you wish to serve as is shown below. By selecting the person you wish to serve, all addresses linked to that person will receive service of the documents filed in this case. NOTE: Do not serve an address that has received a bounce back until the problem with that address has been corrected. version Page 78
79 Fees and Payments After the ServiceList page you are taken to the Fees and Payments Page. If there are no statutory fees required, select Next. If you need to return to the ServiceList, click Back. There are no fees to file electronically, only the statutory filing fees apply. For most documents that are filed, there will be no fee. For more information on paying a fee through the Portal, see the New Case Filing Path section of this User Manual. Review and Submit Trial Court Review all information carefully, clicking Submit is FINAL. If there are any edits or changes that need to be made, the E-Filer must click back to the Case Information, Case Parties, Documents, ServiceList, and/or Fees and Payments tab(s) to make the changes and re-save the information. If no one has been selected for E-service on the ServiceList page, a notice will appear in the ServiceList section of the Review and Submit page. To add to the E-service List go back to the ServiceList page. version Page 79

80 If no E-service Recipients have been selected from the ServiceList page, and you continue on through the Review and Submit page, an alert will appear advising you one last time of the deficiency and allow you to add E-service Recipients or continue the filing process. Once any edits to information have been made, Click Submit. At any time during the filing process you may select Save to Workbench which will save your steps so far and allow you to submit your document at a later date. Review and Submit Appellate Court Review all information carefully, clicking Submit is FINAL. If there are any edits or changes that need to be made, they will appear in red and the E-Filer may use the Revise button to go back to the location of the error and make any changes that are necessary. Once any edits to information have been made and you are ready to submit your filing, click Confirm and Submit All Now. version Page 80


81 version Page 81

82 The User is then taken to the Filing Received Confirmation page where you can select Submit under the Pleading column to submit another document to the case. It also gives you access to the Notice of Electronic Filing that was sent out to provide E-service of your document. And a Filing Confirmation is sent to the addresses on the E-Filer s profile as well as to the Log in the Portal. version Page 82

83 Filing to an Existing Case from the My Cases Page Once you have filed electronically to a case, the case will be added to your My Cases page. If you want to file to that case again, go to the My Cases page and click the Submit button next to the case you wish to file to. version Page 83

84 You will receive a message to verify that you wish to file to the case. Click OK to continue or Cancel to select a different case. The Portal will retrieve the case information from the county s Case Management System and take you to the bottom of the Case Information page in the Portal where you may mark the filing as an Emergency Filing or enter in a Matter # and then continue to file your submission. At any point during the creation of this submission, you may also Save to Workbench which will allow you to save the submission at any point to your Workbench and file it at a later date. version Page 84
85 Select Emergency Filing if in fact it is a true emergency and provide a Matter # if you wish to do association this submission with a Client Matter number within your firm. Then click on Next to continue the filing process by attaching your documents, selecting your E-service recipients, providing a payment method if necessary and submitting your filing. If you select Save to Workbench you will be able to resume filing this submission at a later date. The submission will remain in the Workbench for five (5) days from the Date Last Updated. version Page 85
86 File a New Case If you are creating a new case with the Clerk, you begin your filing from the Jurisdictional Map. Trial Court Appellate Court Select County from the drop down or click on the county in the map Select the District number for a District Court of Appeal or use the drop down list which includes the Florida Supreme Court. Choose the Case Initiation Link for the appropriate jurisdiction when filing a new case and then click on File Now. The filer is taken to the Case Information page. version Page 86
87 Case Information Trial Court E-Filers can enter new case information. After the case information is reviewed by the county staff and accepted for filing a case number will be assigned. The E-Filer will receive a confirmation regarding the filing and the new case number will be recorded in the . Once the case number is assigned the My Filings list will be populated with the case number in place of the new case text. From the available drop down menus select the following: Division Case Type Sub Type Required data elements put forth by the Florida Courts Technology Committee (FCTC) are required for all divisions. These data element vary from one division to another. Civil: version Page 87
88 Family: Juvenile Dependency: version Page 88
89 Probate: If there are Additional Fees associated with the Case Type, they will automatically be displayed for selection as necessary. The filing fee amount(s) automatically calculates based on the selections made by the E-Filer. When complete, click on the Next button. The E-Filer may move through the process by clicking on the Next button when each page is complete or by clicking on the tabs (Case Information, Parties, Documents, Payments, Review and Submit) on the Menu Bar. version Page 89
. Be sure to complete each piece of information to submit your new case. version 2017.")
90 Note: Emergency Filing flag Each county may handle emergency filings differently. Please contact the county for information regarding the emergency filing processing procedure. Case Information Appellate Court All required fields on this page are marked with a red asterisk (*). Be sure to complete each piece of information to submit your new case. version Page 90

91 At the very bottom of the page, you will need to confirm the reviewing appellate court by selecting the court you are submitting your new case to from the drop down. It must match the Intended reviewing appellate court you selected at the top of that page. Then click on Next to get to the Documents screen. To save this filing to the Workbench to be continued at a later date, click on Save to Workbench. version Page 91
 Primary Party Party with direct connection to the case i.e. Plaintiff, Defendant, Counter- Plaintiff, Counter-Defendant, etc.")
92 Adding / Editing Party Information Trial Court Select Add Party and then Select Role and select either Primary Party and/or Filed On Behalf of. Complete all required fields. Click Save. Role Description of party s involvement in the case (defendant, petitioner, etc.) Primary Party Party with direct connection to the case i.e. Plaintiff, Defendant, Counter- Plaintiff, Counter-Defendant, etc. Filed On Behalf of Identifies the party that the new case is being filed on behalf of and would be credited with the payment of the submitted fee. Party must be identified whenever fees are collected. NOTE: When creating a new case and you select the Plaintiff Role and enter the information, the Filed on Behalf of should also be selected since you the attorney are creating the case on behalf of your client the Plaintiff. If you wish to continue creating this new case to be submitted at a later date, click on Save to Workbench and you will then be able to resume filing at a later date. version Page 92
93 NOTE: The parties you are able to add is based on the County you are filing to. Some Counties do not allow the E-filer to add party information. When adding a party you have 2 options: 1. Pressing on the Copy from Current Filer option will add the E-Filer as a Party and fill in the Party information with the E-Filer's Portal Profile information. It should be used when the attorney information is captured and added to the County s Case Maintenance System. 2. Enter party information directly into the fields available. Add all parties to your case. version Page 93
94 Click the Save button when entries are complete. The party page refreshes and the party that was just added will be displayed in the list. The party page also allows the filer to Replace or Remove a party on a case. Clicking Add Party again allows the filer to add another party to the case. version Page 94
95 When the filer has completed adding or editing all necessary party information, click the Next button. If you need to return to the Case Information page click the Back button or select Case Information from the menu bar. If you wish to save our submission for filing at a later date, click on Save to Workbench and the submission will be save so you can resume filing at a later date from the Workbench. Adding Documents Trial Court The filer is then moved to the Documents page. Click Add to add a document to the case. That takes you to the Add/Edit document screen. version Page 95
96 Searching for a Document Type in a brief description of the document you are going to file and then use the Tab or Enter key. That will narrow the result set shown that matches your search criteria. You may also search for your document by using the page tabs at the bottom of the Add/Edit Document page. Select the document you wish to file, type in the number of pages and then browse out to locate your computer generated document on your computer and upload the document to the submission. Then click on Save. The Portal will then pull add that document to the list. For case initiation, for certain divisions and counties, the Portal will generate your Civil Cover Sheet. You no longer need to computer generate this document and add it to the Portal. However, you should add all the documents you wish to submit with this new case on the Documents page. version Page 96
97 The Document page also allows the E-Filer to Replace or Remove a document. Clicking Add again allows the E-Filer to add another document to the submission. The size of the document added also appears so the E-Filer knows when they are approaching the submission size maximum of 50MB. When the size appears in the size column, your document has completely uploaded and you may continue. If your documents go over the maximum submission file size of 50MB, you will see a message advising you that you have exceeded the maximum submission file size limit of 50MB and advise you to remove documents so that you can submit your filings. Break that large document down into separate files and file them individually. version Page 97
98 When the E-Filer has completed adding or editing all necessary document information, please note the confidentiality warning. For confidential documents, the E-Filer must attach the Notice of Confidential Information within Court Filing as per RJA Adding Documents Appellate Court The Documents page is next. Click Add to add documents to the case. version Page 98

99 The Portal will always display your Frequently Filed Documents in the top section of the Add/Edit Document screen. You may search for a document by selecting the Search field and typing in your search criteria or you may search the list of documents you have the ability to file using the page number tabs at the bottom of the screen. version Page 99
100 If the exact document description is not listed, select the document that most closely matches the document you are going to file. If you use the search feature, type in the most uncommon word in the title of your document and then use your Tab OR Enter key to perform the search. In the below example, we will use the word Petition to limit the result set of our search. Select the document you wish to file, type in the number of pages, and upload the document. You may also use the Volume field to further identify the document you are submitting. If your document is larger than 50MB, break your document down into two separate files and then submit them individually using the additional text Volume field to identify the volumes. Then click on Save to add it to the list of documents you will submit. version Page 100
101 Your Document will appear on the Documents page with the file size shown in the far right hand column. You may upload as many documents as you need to file with the total file size not to exceed 50MB. The documents will display in the list. version Page 101
102 The Document page also allows the filer to Replace or Remove a document. Clicking Add again allows the filer to add another document to the case. The size of the document added also appears so the E-Filer knows when they are approaching the submission size maximum of 50MB. When the size appears in the size column, your document has completely uploaded and you may continue. The maximum submission size is 50MB. If you attach too many documents to the submission, and it exceeds the 50MB size limit, an error message will appear as shown below. version Page 102
103 To file documents that are larger than 50MB, break the document down into two separate files and submit them individually. When the E-Filer has completed adding or editing all necessary document information, be sure to note the Confidential Warning section. For confidential documents, the E-Filer must attach the Notice of Confidential Information within Court Filing or a Motion to Determine Confidentiality as per Rule Then click the Next button to move on. ServiceList As the E-Filer, you will automatically be added to the E-service List for this case. The E-service addresses added will default to your profile addresses. Anyone else that files electronically to this case from this point on will also be added and appear in the E-service List. Adding Parties to the E-service List To add a person to the E-service List for a case, from the My Added Attorney/Interested Parties tab there are now two ways to do so. Add Other Attorney/Interested Party When you select Add Other Attorney/Interested Party, you will be able to add E-service Recipients to this case four different ways: 1. Search Active E-Filing Portal Users 2. Search Florida Bar 3. Free Text 4. Add from E-service Favorites List Search Active Portal Users When you select this link, type in the Last Name or the Bar Number of the person you are searching for to add to this E-service List and then select Search. version Page 103
104 Place a check in the appropriate box and click on Select. Then select the Case Role that this person fulfills from the drop down. version Page 104
105 If this person is someone that you frequently add to E-service Lists, you may now select to add this person to your E-service Favorites List. To do so, place a check in the box next to Add to E-service Favorites in the upper right hand corner of the screen and then click on Save. That will add this person to the E-service List for this specific case as well as add this person to your E- service Favorites List so that the next time you need to add this person to a case, you can select Add from E-service Favorites which will show all of your E-service Recipients that you have saved to your Favorites List for quick and easy adding to an E-service List. To remove participates from your E-service Favorites go to the My Account menu, My Profile and select the E-service Favorites tab. For more information on removing people from your E-service Favorites List, please see Portal Navigation located in the beginning of this User Manual. Search Florida Bar Click on the Search Florida Bar link. Type in The Florida Bar number of the person you are adding to the E-service Recipient List and click on Search. version Page 105
106 That will pull up the attorney with that Florida Bar number. Place a check in the Select box and then click on Select. That will add this person as an Other Attorney/Interested Party to this E-service List. If you want to add them to your E-service Favorites list place a check in the appropriate box. Be sure to select the Case Role of this E-service Recipient and then click on Save. This Florida Bar Attorney has now been added to the E-service List for this case as well as to your E- service Favorites List. version Page 106
107 Free Text the Information Type in the information into the appropriate required fields. Then click on Save to add this person to the E-service List for this case. They are added to the Electronic Service Recipients list for this case. Add from E-service Favorites From the My Added Attorney/Interested Parties tab click on Add from E-service Favorites. That will pull up your E-service Favorites list that you have been creating as you add E-service Participants to E-service Lists in your cases. To manage this list (remove names) please see the Portal Navigation section of this User Manual. Select the name of the person you wish to add to this E-service List from your E-service Favorites list by placing a check in the Favorite column next to the name. Then click on Add Selected. version Page 107
108 The person you selected from your E-service Favorites list will be added to the E-service List for this case. My E-service Addresses for this Case You may also designate E-service addresses for this specific case if you wish to use addresses that are different from your Profile addresses. To do this, select the My E-service Addresses for this Case link. Then select the appropriate designation and if selecting new E-service addresses to be used for this one case only, type in the new addresses and then click on Next. version Page 108
109 A valid E-service List will have a check in the box next to the name of the people you wish to serve as is shown below. By selecting the person you wish to serve, all addresses linked to that person will receive service of the documents filed in this case. NOTE: Do not serve an address that has received a bounce back until the problem with that address has been corrected. version Page 109


110 Fees and Payments Trial Court The filer is directed to the Fees and Payments page. There are two payment options: pay with a credit card or a check or fee waiver. Enter only one form of payment. A breakdown of the filing fees are listed in the Filing Fee Summary portion of the page. version Page 110
111 The filer may elect to use a credit card or e-check. Only one payment method is allowed per submission. Once the E-Filer enters their payment information, the payment information may be stored for future use by checking the Save Payment Information for Reuse box. The Portal accepts the following credit cards for payment: American Express Credit or Debit Cards Discover Credit or Debit Cards MasterCard Credit or Debit Cards Visa Credit or Debit cards are not accepted at this time The filer may request a Waiver of the fees by selecting option two and completing the Waiver Reason and attach the Fee Waiver form. version Page 111
112 Note: An explanation of how the convenience fee is calculated and about Debit block services is provided in red text below the fee total. The Payment Zip Code is the zip code for the billing address of the credit card. When the filer has completed adding all necessary payment information, click the Next button. When the user clicks on the Submit button on the Review and Submit page, the credit card or check routing information is validated by the appropriate institution. Successful verification will place a hold on the funds until the clerk reviews and accepts the filing. Review and Submit Trial Court Review and Submit all information carefully, clicking Submit is FINAL. If there are any edits or changes that need to be made, the E-Filer must click back to the Case Information, Case Parties, Documents, ServiceList and/or Fees and Payments tab(s) to make the changes and re-save the information. Once all edits to information have been made, Click Submit. If no one has been selected for E-service on the ServiceList page, you will see an alert in the ServiceList section of the Review and Submit page. To correct, click on the ServiceList tab and make your service selections. version Page 112
113 Next you see the Documents uploaded, Fees, Payments, Parties and the Filer information as shown below. If the E-Filer has failed to enter required information, they will receive a pop up message notifying which information is missing. version Page 113


114 Review and Submit Appellate Court Review and Submit all information carefully, clicking Submit is FINAL. If there are any edits or changes that need to be made, filer must click Revise to go back to the page and make any corrections necessary. version Page 114

115 Since there is a statutory fee due, the filer must select a payment method. Select one of the Options in the Payments section of the above page and provide the payment information. version Page 115
116 Option One: Provide Payment Information You may pay using either a Credit Card or a Debit Card. Complete the information requested based on your method of payment. If you wish to Save Payment Information for Reuse be sure to place a check in the box next to that statement right above the Clear button. version Page 116


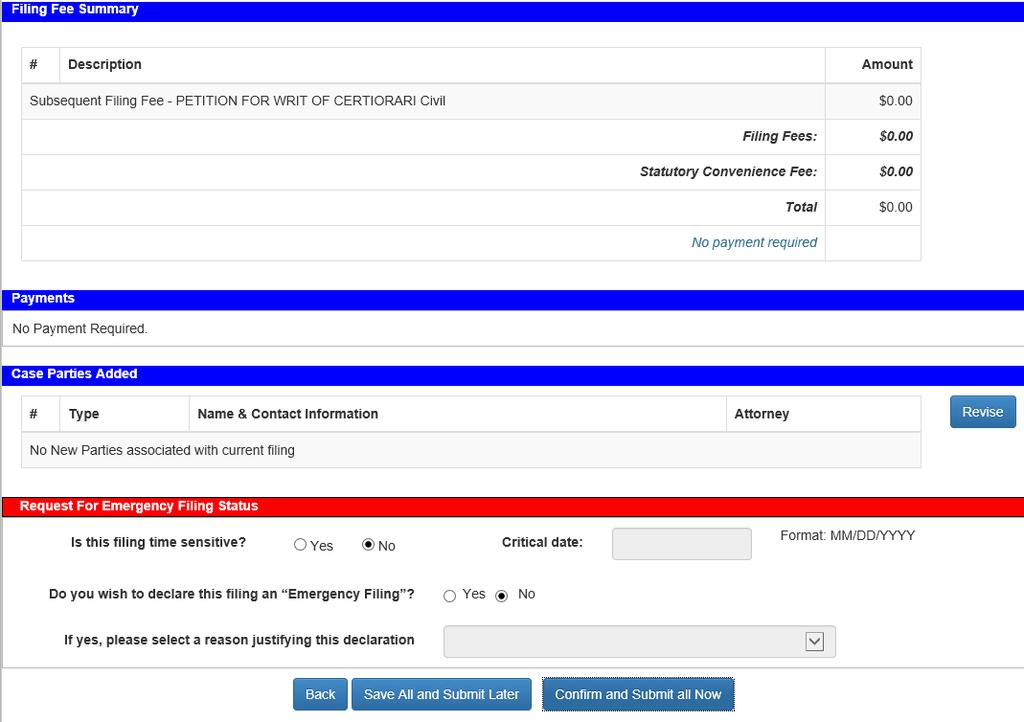
117 Option Two: Request Filing Fee Waiver Option Three: Exempt from Fee Once you have submitted your Payment Method, Request for Emergency Filing Status is available if necessary. Then Save All and Submit Later which places this submission on the Workbench for submission at a later time or Confirm and Submit all Now to file your new case immediately. After the filing has been submitted, the E-Filer will be at the Filing Received Confirmation page. version Page 117

118 Click Refresh to watch the Status of your submission change to Pending Filing. version Page 118
119 Confirmations of Filing In total, the filer receives three (3) Confirmations during the filing process: 1. The Filing Received Confirmation page: Immediately upon submitting the filing the filer will receive a confirmation notice. This notice provides the filing reference number. This number is needed if the filer contacts the county regarding the filing prior to a case number being assigned to the filing. 2. An The filer receives an regarding the filing in their client account based on the addresses in their profile. This is also in the Log in the Portal. From the Florida Supreme Court: version Page 119

120 3. The document displays in My Submissions (notice there is no Completion Date at this time.) When the E-Filer returns to the My Submissions listing the new filing is displayed in the list. Processing Completed for Filing After the Clerk completes the review of the filing, the E-Filer receives another verifying that the filing was processed successfully. version Page 120

121 The document now appears in My Submissions with the Completion Date displayed. Notifications The Log stores a record of all the filer s s sorted in date order. This functionality allows E- Filers to be able to view all their s generated by the portal without requiring the filer to access an client. Notifications sent by Portal include: Initial notification of registration Notification to activate your account Notification of password change Notification of document moved to pending queue Notification of processed filing version Page 121
122 Notification of Moved to Judicial Review Notification that you have been added to an E-Service List Note: If a filer deletes an from their client, the still remains in this Log for 90 days but the PDF document filed is not available in the Log. Working Filings in the Correction Queue When filings require correction by the filer, they are moved to the Correction Queue by the Clerk s office. If a submission is returned to the Correction Queue, an Alert is automatically created in the Portal and when you log into the Portal it will take you immediately to the My Alerts page. You may access the Correction Queue filing path by clicking on the Filing # link as shown below. version Page 122
123 Remarks will be shown on My Submissions page and the filer is notified of the specific issue by notification as well. This same notification goes to everyone on the E-service List as well. When you correct the submission and resubmit, another Notification of Electronic Filing goes out to the E- service Recipient List with a PDF of the document filed. received: version Page 123


124 The reason why the submission was returned to the Correction Queue will also be displayed on the My Alerts page and on the My Submissions page under the Completion Date/Remarks column. A submission can be returned to the Correction Queue for a variety of reasons: document is corrupt, document is unsigned, wrong case number was selected, for case initiation wrong case type was selected, reopen fee is required, etc. The Clerk will explain the problem so that you are aware of what needs to be corrected so that you can make those changes and resubmit the document. The filer will see the Filing # is hyperlinked as shown above. Click the link to open the filing and make corrections. All filings sent to the Correction Queue for correction must be corrected by the E-Filer and resubmitted to the Clerk s office within five (5) business days as specified in AO The Note From Clerk is also displayed advising of the document deficiency. version Page 124
125 Portal Time Stamp on Resubmitted Documents If there is an issue with the document and you remove or add documents to the filing, you will receive a new file stamp date and time for the filing. If you replace the document, the official file stamp date and time will remain the same as when originally submitted. version Page 125
126 If you remove the document and add a new document, the official file stamp date and time will be the current date. E-service Page Next you come to the ServiceList page. Any attorney that has electronically filed at least one document to the case is automatically added to the E-service Recipient List. To provide service of the documents you are filing, select the names from the E-service List. If you do not wish to serve a person listed in the Electronic Service Recipient list, do not check that name. To select the entire list, place a check in the box next to Serve All? in the column header. version Page 126
127 Review and Submit After the ServiceList page you will come to the Review and Submit page. If your filing is a new case you will have to resubmit your payment. Your payment is not reconciled until the submission has been approved and accepted by the Clerk. The prior authorization will be removed when the submission is returned to the Correction Queue as well. After the document has been updated and is ready to be resubmitted, check your filing on the review and submit page. To make any corrections, click on the Revise button which will take you to the corresponding page where you can make the necessary corrections. You may save your work on your corrected filing by selecting Select All and Submit Later. When you are ready to submit, go to your My Submissions page and select the filing ID. The status will remain Correction Queue until it is resubmitted or the Clerk moves it to the Abandoned Filing Queue. version Page 127
 business days, the county has the ability to move the filing to")

128 Abandoned Filing Queue If a document that has been moved to Correction Queue has not been corrected within five (5) business days, the county has the ability to move the filing to the Abandoned Filing Queue. Once a document has been moved to Abandon Filing status, no updates/corrections can be made to that submission on the Portal by the filer. version Page 128

129 Open Multiple Portal Sessions When opening multiple sessions of the Portal do not open them in tabs in the same Internet Browser session. Instead open a new Internet Browser Session. In the open browser window Click on File Click on New Session version Page 129
Florida Courts E-Filing Portal E-Filer User Manual
 E-Filer User Manual May 2018.01 Table of Contents Inroduction... 5 Video Tutorials... 5 E-Filing Videos... 5 Attorney E-Filing Instructional Videos... 5 Suggested E-Filing How-To s... 5 Clerk E-Filing
Florida Courts E-Filing Portal. Judge Filer User Manual
 Judge Filer User Manual Table of Contents Introduction... 4 Video Tutorials... 4 Videos for the Judicial User... 4 Training Manuals & Materials... 4 Materials... 5 Manuals... 5 Account Registration...
Florida Courts E-Filing Portal. Judge Filer User Manual
 Judge Filer User Manual April 2017 Judge Filer User Manual 2017.01 Page 2 Table of Contents Introduction... 5 Video Tutorials... 5 Videos for the Judicial User... 5 Training Manuals & Materials... 5 Materials...
Judge Filer User Manual
 Release 2018.02, December 2018 Table of Contents Introduction... 4 Video Tutorials... 4 Videos for the Judicial User... 4 Training Manuals & Materials... 5 Materials... 5 Manuals... 5 Account Registration...
Florida Court Clerks and Comptrollers (FCCC) Circuit Administrator User Manual
 Circuit Administrator User Manual") Florida Court Clerks and Comptrollers (FCCC) Circuit Administrator User Manual Prepared by: Florida Court Clerks and Comptrollers October 2017 Table of Contents Introduction... 4 Logging in to the Portal...
Florida Court Clerks and Comptrollers (FCCC) Circuit Administrator User Manual Prepared by: Florida Court Clerks and Comptrollers October 2017 Table of Contents Introduction... 4 Logging in to the Portal...
Circuit Administrator User Manual
 Circuit Administrator User Manual December 2018 Table of Contents Introduction... 4 Logging in to the Portal... 4 Account... 5 My Profile... 5 User Details... 5 Preferences... 6 Division Association...
Florida Court Clerks and Comptrollers (FCCC) Organization Administrator User Guide
 Organization Administrator User Guide") Florida Court Clerks and Comptrollers (FCCC) Organization Administrator User Guide Prepared by: Florida Court Clerks and Comptrollers Updated on 12/2016 Table of Contents Introduction... 3 Obtaining an
Florida Court Clerks and Comptrollers (FCCC) Organization Administrator User Guide Prepared by: Florida Court Clerks and Comptrollers Updated on 12/2016 Table of Contents Introduction... 3 Obtaining an
Florida Court Clerks and Comptrollers (FCCC) E-Filing Portal End User Notes
 E-Filing Portal End User Notes") Florida Court Clerks and Comptrollers (FCCC) E-Filing Portal Version: 2.0 Date: 8/21/2015 Document Type: Business Notes Author: E-Filing Portal Projects Background This document provides a list of modifications
Florida Court Clerks and Comptrollers (FCCC) E-Filing Portal Version: 2.0 Date: 8/21/2015 Document Type: Business Notes Author: E-Filing Portal Projects Background This document provides a list of modifications
Florida Court Clerks and Comptrollers (FCCC) E-Filing Portal What s New for Filers
 E-Filing Portal What s New for Filers") Florida Court Clerks and Comptrollers (FCCC) E-Filing Portal 2014.02 What s New for Filers Version: 1.0 Date: 6/4/2014 Document Type: Business Notes Author: E-Filing Portal Projects REVISION HISTORY Version
Florida Court Clerks and Comptrollers (FCCC) E-Filing Portal 2014.02 What s New for Filers Version: 1.0 Date: 6/4/2014 Document Type: Business Notes Author: E-Filing Portal Projects REVISION HISTORY Version
efiletexas.gov Individual Filer User Guide Release
 efiletexas.gov Individual Filer User Guide Release 2017.1 EFS-TF-200-4071 v.1 October 2017 Copyright and Confidentiality Copyright 2017 Tyler Technologies, Inc. All rights reserved Use of these materials
How To efile Criminal Pleadings/Documents:
 How To efile Criminal Pleadings/Documents: Log onto the eportal at www.myflcourtaccess.com o If you do not have an account, please click the register now link o Choose the applicable filer role that relates
Florida Court Clerks and Comptrollers (FCCC) E-Filing Portal End User Notes
 E-Filing Portal End User Notes") Florida Court Clerks and Comptrollers (FCCC) E-Filing Portal Version: 2.0 Date: 8/21/2015 Document Type: Business Notes Author: E-Filing Portal Projects Background This document provides a list of modifications
Florida Court Clerks and Comptrollers (FCCC) E-Filing Portal Version: 2.0 Date: 8/21/2015 Document Type: Business Notes Author: E-Filing Portal Projects Background This document provides a list of modifications
E-FILING AND ATTORNEY PORTAL USER GUIDE
 COURT OF COMMON PLEAS & CLERK OF COURTS 1200 ONTARIO ST. CLEVELAND, OH 44113-1678 E-FILING AND ATTORNEY PORTAL USER GUIDE The information contained herein represents significant creative and analytical
Florida Courts E-Filing Portal E-Filer Manual
 Working Filings in the Pending Queue When filings require correction by the filer, they are moved to a Pending Queue by the Clerk s office. Remarks will be shown in My Filings and the filer is notified
eflex Electronic Filing Filer Interface Second Judicial District Court State of Nevada Washoe County User s Guide for Filers
 eflex Electronic Filing Filer Interface Second Judicial District Court State of Nevada Washoe County User s Guide for Filers 2 Filer Interface User s Guide Introducing e-filing... 6 e-filing Basics...
Attorney Training Manual
 Attorney Training Manual Contact Information Phone Number: -855-264-2237 Email: efilingsupport@judicial.state.co.us Revised May 207 Table of Contents LOGIN / REGISTER ORGANIZATION... 2 NAVIGATION BAR...
eflex Electronic Filing Filer Interface
 eflex Electronic Filing Filer Interface User s Guide for Filers Chester County Prothonotary Electronic Filing Version 1.2 February, 2017 2 Filer Interface User s Guide Introducing e-filing...9 e-filing
Electronic Filing Filer Interface
 Electronic Filing Filer Interface North Carolina AOC - Phase II Interim Solution User s Guide 2 Filer Interface User s Guide 2 June 25, 2010 North Carolina AOC Phase II Interim Solution - Tybera Development
efiletexas.gov Review Queue User Guide Release
 efiletexas.gov Review Queue User Guide Release 2017.1 EFS-TF-200-4075 v.1 October 2017 Copyright and Confidentiality Copyright 2017 Tyler Technologies, Inc. All rights reserved Use of these materials is
Lehigh County, PA Frequently Asked Questions
 Lehigh County, PA Frequently Asked Questions General How do I access the Odyssey File & Serve system? To access the Odyssey File & Serve website, go to the Lehigh website. How do I contact the Lehigh County
The Pennsylvania Unified Judicial System Web Portal. PACFile
 The Pennsylvania Unified Judicial System Web Portal PACFile Materials Updated April 16, 2013 PACFile is available on the UJS Portal (http://ujsportal.pacourts.us) 2 Enter Your Information Enter your Username,
1 efilega Frequently Asked Questions
 1 efilega Frequently Asked Questions Topics Covered in this Chapter General General How do I access the Odyssey File & Serve system? To access the Odyssey File & Serve website, go to efilega (https://efilega.tylerhost.net/).
Probate Court E File System User Guide
 Probate Court E File System User Guide Honorable Anthony J. Russo Presiding Judge Honorable Laura J. Gallagher Judge Introduction This document will assist users in the electronic registration and submission
North Dakota Court System Frequently Asked Questions
 North Dakota Court System Frequently Asked Questions Topics Covered in this Chapter General E-filing Fees E-serving Format Errors General How do I access the Odyssey File & Serve system? To access the
Florida Court Clerks and Comptrollers (FCCC) Organization Administrator User Guide
 Organization Administrator User Guide") Florida Court Clerks and Comptrollers (FCCC) Organization Administrator User Guide Prepared by: Florida Court Clerks and Comptrollers Updated on 09/18/2015 Table of Contents Introduction... 3 Obtaining
Florida Court Clerks and Comptrollers (FCCC) Organization Administrator User Guide Prepared by: Florida Court Clerks and Comptrollers Updated on 09/18/2015 Table of Contents Introduction... 3 Obtaining
Judge Review User Guide
 Judge Review User Guide TABLE OF CONTENTS Judge Review File & ServeXpress Resources 3 Judge Review Overview 4 Reviewing Transactions 8 Removing Transactions 13 Delay Judge Review 16 2017 File & ServeXpress
ecourts Appellate Frequently Asked Questions (FAQs) 1. How do I use ecourts Appellate? 2. What is efiling? 3. Why should I efile my documents?
 1. How do I use ecourts Appellate? 2. What is efiling? 3. Why should I efile my documents?") Frequently Asked Questions (FAQs) 1. How do I use ecourts Appellate? 2. What is efiling? 3. Why should I efile my documents? 4. Who is required to participate in the Appellate efiling program? 5. Is Appellate
Frequently Asked Questions (FAQs) 1. How do I use ecourts Appellate? 2. What is efiling? 3. Why should I efile my documents? 4. Who is required to participate in the Appellate efiling program? 5. Is Appellate
Odyssey File & Serve. Review Queue User Guide Release 3.11
 Odyssey File & Serve Review Queue User Guide Release 3.11 OFS-FS 200 3375 v.1 June 2015 COPYRIGHT AND CONFIDENTIALITY Copyright 2015 Tyler Technologies, Inc. All rights reserved. All documentation, source
User Manual Washington, D.C. Superior Court, Probate Division
 User Manual Washington, D.C. Superior Court, Probate Division Table of Contents Submit a Filing... 2 Step 1: Enter Filing Information... 2 Step 2: Upload Documents... 6 Step 3: Services & Fees... 9 Confirm
Electronic Filing Instructions Lehigh County
 Lehigh County Government Center 17 South 7 th Street Allentown, PA 18101 www.lehighcounty.org Electronic Filing Instructions Lehigh County System Registration: To access the electronic filing system, open
Electronic Filing Instructions Lehigh County
 Lehigh County Government Center 17 South 7 th Street Allentown, PA 18101 www.lehighcounty.org Electronic Filing Instructions Lehigh County System Registration: To access the electronic filing system, open
The Pennsylvania Unified Judicial System Web Portal. PACFile
 The Pennsylvania Unified Judicial System Web Portal Materials Updated April 16, 2013 is available on the UJS Portal (http://ujsportal.pacourts.us) 2 Enter Your Information Enter your Username, Password
17 th Judicial Circuit Smart Forms
 Florida Courts efiling Portal Florida Courts efiling Portal 17 th Judicial Circuit Smart Forms System Requirements User Registration Administrator Management Submitting your filing Notifications Smart
Odyssey File & Serve HTML5. Individual Filer User Guide Release 3.9
 Odyssey File & Serve HTML5 Individual Filer User Guide Release 3.9 OFS-FS-200-3316 v.1 February 2015 Copyright and Confidentiality Copyright 2015 Tyler Technologies, Inc. All rights reserved. All documentation,
Frequently Asked Questions Electronic Filing
 SECOND JUDICIAL DISTRICT COURT WASHOE COUNTY STATE OF NEVADA Frequently Asked Questions Electronic Filing Revised February 17, 2017 Who can efile? Anyone can efile, if they have an account. If you are
Florida Courts E-Filing Portal. Law Firm Administrator Manual
 Prepared by: Florida Court Clerks & Comptrollers 3/8/2013 Table of Contents Introduction... 3 Requesting a Law Firm Account... 3 Fee Waivers for Exempt Agencies... 3 Logging in to the Portal... 4 Account
File & ServeXpress. Clerk Review User Guide
 File & ServeXpress Clerk Review User Guide File & ServeXpress Clerk Review Table of Contents File & Serve Resources... 3 Clerk Review Overview... 4 HOME: Current Activity... 4 Items for Clerk Review...
Odyssey File & Serve Firm Administrator User Guide Release 3.16
 Odyssey File & Serve Firm Administrator User Guide Release 3.16 OFS-FS-220-3911 v.1 May 2017 COPYRIGHT AND CONFIDENTIALITY Copyright 2017 Tyler Technologies, Inc. All rights reserved Use of these materials
Odyssey File & Serve. Firm Administrator User Guide Release 3.14
 Odyssey File & Serve Firm Administrator User Guide Release 3.14 OFS-FS-220-3680 v.1 April 2016 COPYRIGHT AND CONFIDENTIALITY Copyright 2016 Tyler Technologies, Inc. All rights reserved. Use of these materials
TrueFiling User Guide. Release 3.0.3
 TrueFiling User Guide Release 3.0.3 Copyright 2018 ImageSoft, Inc. All rights reserved. If this guide is distributed with software that includes an end user agreement, this guide is furnished under license
FileTime Administrators efiling Guide
 FileTime Administrators efiling Guide In this guide you will find the answer to virtually any question you have about eservice in the efiling Manager system. View to the manage table of contents your firm
Clerk Review User Guide
 Clerk Review User Guide TABLE OF CONTENTS File & ServeXpress Resources 3 Clerk Review Items for Clerk Review 5 Reviewing Transactions 7 Reviewing Subsequent Transactions 7 Reviewing New Case Filings 9
Odyssey File & Serve. Firm Administrator User Guide Release 3.10
 Odyssey File & Serve Firm Administrator User Guide Release 3.10 OFS-FS-220-3324 v.1 April 2015 Copyright and Confidentiality Copyright 2015 Tyler Technologies, Inc. All rights reserved. All documentation,
Search Tab User Guide
 Search Tab User Guide Search Tab TABLE OF CONTENTS File & ServeXpress Resources 3 Search Tab Overview 4 Case History 6 Cases Search 9 Daily Docket 11 Transaction Status 13 Advanced Search 16 Transaction
Portal Subcommittee Agenda Thursday, May 10, :45-11:45. Criminal Case Initiation Workgroup Update Judge Martin Bidwill
 Portal Subcommittee Agenda Thursday, May 10, 2018 10:45-11:45 Hilton Bonnet Creek Conference Center Lower Level Flagler/Gilchrist Room I. Welcome Judge Martin Bidwill, Portal Subcommittee Chair a. Roll
E-FILING. Manual THOMAS A. KLEIN WINNEBAGO COUNTY CLERK OF THE CIRCUIT COURT
 THOMAS A. KLEIN WINNEBAGO COUNTY CLERK OF THE CIRCUIT COURT E-FILING Manual Thank you for your interest in the Winnebago County E-filing Program. Attached is a walk through intended to assist you as you
CJA evoucher. Attorney User Manual Release 5.2 October 2018
 CJA evoucher Attorney User Manual Release 5. October 08 CJA evoucher for Attorneys i Contents Nota Bene: Edit before using!... Introduction... Panel Management... Voucher & Authorization Request Submission...
E-FILING IN PIMA COUNTY SUPERIOR COURT. Subsequent Case Filings
 E-FILING IN PIMA COUNTY SUPERIOR COURT Subsequent Case Filings WELCOME TO E-FILING IN PIMA SUPERIOR COURT! This video training uses the ATTORNEY registrant type. If you are using another registrant type
Main Screen. The different page tabs are listed here: Main page, Calendars, Attorney page, etc.
 http://www.co.pierce.wa.us/cfapps/linx/main.cfm Main Screen The different page tabs are listed here: Main page, Calendars, Attorney page, etc. Click here to log on as a subscriber Check for new LINX Updates
File & Serve Quick-Reference Guide
 Release 3.16 File & Serve Quick-Reference Guide Registering as a User with an Existing Firm You can register as a user if your Firm Administrator has already registered with the system and approved users
Filing & Serving Documents User Guide
 Filing & Serving Documents User Guide Filing & Serving Documents TABLE OF CONTENTS File & ServeXpress Resources 3 Filing and Serving Documents Overview 4 Quick Start Menu 5 Filing & Service Tab/Start A
Batch Filing Washington, D.C. Superior Court
 Batch Filing Washington, D.C. Superior Court CaseFileXpress Tips & Guidelines TIPS & GUIDELINES Login page located at https://dc.casefilexpress.com/login.aspx Know your User-ID and Password case sensitive
User Manual For. EFM I2File.net. September 26, 2017 Version 1.0
 User Manual For EFM I2File.net September 26, 2017 Version 1.0 1 Table of Contents Registration... 3 Register a Firm Account... 3 Register a Self-Represented Account... 5 Login... 8 Forgot Password... 8
File & Serve Quick Reference Guide
 File & Serve Quick Reference Guide Topics Covered in this Document Registering as a User with an Existing Firm Logging in Case Search Filing into an Existing Case Filing a New Case Technical Support Contact
Electronic Appraisal Delivery (EAD) Portal. FHA EAD General User Guide
 Portal. FHA EAD General User Guide") Electronic Appraisal Delivery (EAD) Portal FHA EAD General User Guide Last Updated: October 2015 FHA EAD General User Guide Page 2 of 87 Version 1.3.1 TABLE OF CONTENTS INTRODUCTION... 6 WHAT IS THE ELECTRONIC
Electronic Appraisal Delivery (EAD) Portal FHA EAD General User Guide Last Updated: October 2015 FHA EAD General User Guide Page 2 of 87 Version 1.3.1 TABLE OF CONTENTS INTRODUCTION... 6 WHAT IS THE ELECTRONIC
FINRA DR Portal. User Guide for Arbitration and Mediation Case Participants
 FINRA DR Portal for Arbitration and Mediation Case Participants April 2014 Disclaimer These materials are for training and instructional purposes only. No part of this publication may be reproduced, stored
Pittsburgh Municipal Courts Preliminary Hearing Calendar User Guide and Manual
 Pittsburgh Municipal Courts Preliminary Hearing Calendar User Guide and Manual The manual will describe the procedure necessary to complete the following tasks. Attorney Profile Creation and Login 2 Public
E-FILING IN PIMA COUNTY SUPERIOR COURT. Filing a First Appearance in a Case
 E-FILING IN PIMA COUNTY SUPERIOR COURT Filing a First Appearance in a Case REGISTRATION Tips for Registration Do not register yourself without first deciding on your organization s registration plan. One
IL Madison County: Distinct Sending Parties User Guide
 IL Madison County: Distinct Sending Parties User Guide Distinct Sending Parties TABLE OF CONTENTS File & ServeXpress Resources 3 Distinct Sending Parties (DSP) Overview 4 Using Distinct Sending Parties
User Guide. Welcome to FREEfax. Our online fax filing service that s Fast, Easy and FREE! PLEASE NOTE the following, before accessing our User Guide:
 User Guide Welcome to FREEfax Our online fax filing service that s Fast, Easy and FREE! PLEASE NOTE the following, before accessing our User Guide: FREEfax is available for both Public and Government Entities
USING THE CLOVIS ONCOLOGY IME/IIT PORTAL: FREQUENTLY ASKED QUESTIONS FAQ. Version 1.0
 USING THE CLOVIS ONCOLOGY IME/IIT PORTAL: FREQUENTLY ASKED QUESTIONS FAQ Version 1.0 1. FREQUENTLY ASKED QUESTIONS 1.1. TABLE OF CONTENTS 1. Frequently Asked Questions... 1 1.1. Table of Contents... 1
VISIONTRACKER FREQUENTLY ASKED QUESTIONS FAQ
 VISIONTRACKER FREQUENTLY ASKED QUESTIONS FAQ 1. FREQUENTLY ASKED QUESTIONS 1.1. TABLE OF CONTENTS 1. Frequently Asked Questions... 1 1.1. Table of Contents... 1 1.2. How to Open or Search for a Saved Application...
Electronic Appraisal Delivery (EAD) Portal. FHA EAD Lender Admin Guide
 Portal. FHA EAD Lender Admin Guide") Electronic Appraisal Delivery (EAD) Portal FHA EAD Lender Admin Guide Last Updated: October 2015 FHA EAD Lender Admin Guide Page 2 of 95 Version 1.3.1 TABLE OF CONTENTS INTRODUCTION... 5 WHAT IS THE ELECTRONIC
Electronic Appraisal Delivery (EAD) Portal FHA EAD Lender Admin Guide Last Updated: October 2015 FHA EAD Lender Admin Guide Page 2 of 95 Version 1.3.1 TABLE OF CONTENTS INTRODUCTION... 5 WHAT IS THE ELECTRONIC
Grant Lifecycle Manager Learning Lab Applicant Tutorial
 VIDEO 1: Site Access & Account Creation You will access the system via the log on page. The Foundation may have provided you with a link to this page, or it may be hyperlinked on their Foundation website.
JEFS Judiciary Electronic Filing and Service System User Manual
 JEFS Judiciary Electronic Filing and Service System User Manual Table of Contents JEFS User Manual August 12 INTRODUCTION... 4 PURPOSE... 4 Prerequisite... 4 Process Summary... 5 JEFS LOG ON... 6 STEP1:
ProDoc efiling A Guide to Registering for efiling in Texas State Courts
 ProDoc efiling A Guide to Registering for efiling in Texas State Courts Contents Overview:... 2 Register for efiling... 3 Preparation and Tips... 3 Register Firm and firm efiling Manager... 3 Activate
New Mexico Proposed Orders and Notices of Hearing
 New Mexico Proposed Orders and Notices of Hearing Overview: The purpose of this document is to outline the process for filing Proposed Order or Notice of Hearing within the File and Serve application for
erequest Frequently Asked Questions
 Overview is an application that assists UCB in request life cycle management. UCB has clear guidance in place on what we can support or sponsor. Online requests will go through an internal review and approval
CCIS User Guide. User guide to search and view parties and cases in CCIS FEBRUARY 21, 2017
 2017 CCIS User Guide User guide to search and view parties and cases in CCIS FEBRUARY 21, 2017 Table of Contents Introduction...2 Security Agreement and Password...3 Links to Other Systems...3 Accessing
Portal/CCIS Change Advisory Board Report
 Portal/CCIS Change Advisory Board Report Recommendations to the Florida Court E- Filing Portal Authority Board This document contains a list and supporting documentation of requested Portal/CCIS modifications
COUNTY OF BERKS CIVIL ELECTRONIC FILING SYSTEM FREQUENTLY ASKED QUESTIONS
 1. Can you have more than one email attached to an attorney s name? For example, can an attorney register his/her email address and also register the email address of his/her paralegal and/or secretary?
Vendor Registration and Training
 Vendor Registration and Training Bid Express Registration Guide Bid Express Vendor Guide February 2015 Prepared By Address: 5700 SW 34th Street, Suite 1235, Gainesville, Florida 32608-5371 Web: www.infotechfl.com
IL Madison County Multi-Case Filings User Guide
 IL Madison County Multi-Case Filings User Guide TABLE OF CONTENTS File & ServeXpress Resources 3 IL Madison Multi-Case Filings Multi Case Filings Overview 4 Filing & Service Tab 5 Start A Transaction Queue
File & Serve QUICK GUIDE: SEARCH
 QUICK GUIDE: SEARCH Copyright 2009 LexisNexis, a division of Reed Elsevier Inc. All rights reserved. LexisNexis and the Knowledge Burst logo are registered trademarks of Reed Elsevier Properties Inc.,
Subsequent Filings - User Guide
 - User Guide File & Serve Delaware Subsequent Filings TABLE OF CONTENTS File & Serve Delaware Resources 3 File & Serve Delaware Navigation 4 Subsequent Filing Overview 5 Subsequent Filings 6 Transaction
erequest Frequently Asked Questions
 Which browsers work with? The following browsers are compatible with version 3.5. Internet Explorer version 8 Internet Explorer version 9 Firefox (Mozilla) Chrome (version 28) Safari (prior to version
PROBATE COURT OF CUYAHOGA COUNTY, OHIO
 PROBATE COURT OF CUYAHOGA COUNTY, OHIO NEW CASE GUIDELINES E-FILE SUCCESSOR CUSTODIAN Documents to Submit with Your E-Filing: Application for Appointment of Successor Custodian (Form 16.6) (Application
Portal Change Advisory Board Report. Recommendations Approved by the Florida Courts E- Filing Portal Authority Board for Release 2017.
 Portal Change Advisory Board Report Recommendations Approved by the Florida Courts E- Filing Portal Authority Board for Release 2017.02 5/23/2017 Document Organization and Contents Florida Courts E-Filing
CJA evoucher District of Oregon
 CJA evoucher District of Oregon Technical Attorney Manual CJA evoucher District of Oregon Attorney Technical Manual Release.. Edited September 05 CJA evoucher District of Oregon Technical Attorney Manual
FREQUNETLY ASKED QUESTIONS: REQUESTS FOR MEDICAL EDUCATION GRANTS
 FREQUNETLY ASKED QUESTIONS: REQUESTS FOR MEDICAL EDUCATION GRANTS Guidelines for Requesting Medical Education Grants VIVUS competitively reviews all requests to align resources with the highest quality
I. ATTORNEY ADMINISTRATION OVERVIEW...3. HELP CENTER...4 Documents Web Tutorials Online Seminar Technical Support INVITE A CLIENT TO MYCASEINFO...
 I. ATTORNEY ADMINISTRATION OVERVIEW...3 II. III. IV. HELP CENTER...4 Documents Web Tutorials Online Seminar Technical Support INVITE A CLIENT TO MYCASEINFO...7-8 CLIENT MANAGEMENT Sorting and Viewing Clients...8-9
Instructions for E-filing Applications May 19, 2015
 Instructions for E-filing Applications May 19, 2015 ** New Items Added Separate Upload of Application Index and Adding Titles to Exhibits. Filing an Application electronically To file your Application
Online Banking Quick Reference Guide
 Online Banking Quick Reference Guide Sign-On to Online Banking On the initial Sign-On page, sign on to online banking as follows: 1. Type your ID in the SIGN ON ID field. Note: If you cannot remember your
Community User User Guide
 Community User User Guide User Guide produced by: Laura Perez, Facilities Use Specialist Information provided by: School Dude & My School Bucks Community User A Community User is an Organization Event
INSTRUCTIONS FOR FILING A DOCUMENT IN TRUEFILING THIRD DISTRICT COURT OF APPEAL VERSION
 INSTRUCTIONS FOR FILING A DOCUMENT IN TRUEFILING THIRD DISTRICT COURT OF APPEAL VERSION Introduction... 2 Preliminary Steps... 3 Preliminary Step 1: Sign Up for E-mail Notifications... 3 Preliminary Step
Judicial Automated Workflow System (JAWS) Court Calendar User Documentation for External Users
 Court Calendar User Documentation for External Users") Judicial Automated Workflow System (JAWS) Court Calendar User Documentation for External Users Revision Date: March 16, 2010 Table of Contents Court Calendar Introduction... 3 JAWS basis for External Users...
Judicial Automated Workflow System (JAWS) Court Calendar User Documentation for External Users Revision Date: March 16, 2010 Table of Contents Court Calendar Introduction... 3 JAWS basis for External Users...
Production Assistance for Cellular Therapies (PACT) PACT Application System User s Guide
 PACT Application System User s Guide") Production Assistance for Cellular Therapies (PACT) PACT Application System User s Guide Version 1.0 February 9, 2017 Version 1.0 TABLE OF CONTENTS 1.0 Getting Started... 1 1.1 Access to the Internet...
Production Assistance for Cellular Therapies (PACT) PACT Application System User s Guide Version 1.0 February 9, 2017 Version 1.0 TABLE OF CONTENTS 1.0 Getting Started... 1 1.1 Access to the Internet...
TransUnion Direct User Guide
 Topics Welcome to TransUnion Direct... 2 The First Time You Log Into TransUnion Direct... 4 Individual Services... 5 Portfolio Services... 15 Activity Reports... 17 Your User Profile... 19 Help Resources...
File & ServeXpress. PUBLIC ACCESS TERMINAL (PAT) How to File a Transaction User Guide
 How to File a Transaction User Guide") File & ServeXpress PUBLIC ACCESS TERMINAL (PAT) How to File a Transaction User Guide File & ServeXpress PUBLIC ACCESS TERMINAL (PAT) How to File a Transaction Table of Contents File & Serve Resources...
File & ServeXpress PUBLIC ACCESS TERMINAL (PAT) How to File a Transaction User Guide File & ServeXpress PUBLIC ACCESS TERMINAL (PAT) How to File a Transaction Table of Contents File & Serve Resources...
Manual: Create a Faculty Search Posting Manager/Supervisor
 Manual: Create a Faculty Search Posting Manager/Supervisor Revised: 7-11-2017 Introduction The University of Georgia has implemented a new online faculty applicant tracking system, FacultyJobs@UGA. The
TxEIS txconnect Training Guide August, 2012
 August, 2012 Education Service Center 3001 North Freeway Fort Worth, Texas 76106 Contents Introduction...3 How to Display a Page in another Language..4 How to Display Help 5 How to Contact the Teacher..6
INSTRUCTIONS FOR USING THE LAW CLERK RESUME REPOSITORY
 STEP #1: GETTING STARTED INSTRUCTIONS FOR USING THE LAW CLERK RESUME REPOSITORY 1. Open your internet browser and go to the Florida State Courts Law Clerk Resume Repository Home Page. http://lawclerk.flcourts.org
SCRIBORDER E- TRANSCRIPTS - SENDING TRANSCRIPTS ELECTRONICALLY
 Training Guide BASIC FUNCTIONALITY... 2 LOGGING IN... 2 CHANGING PASSWORD... 3 HEADERS AND TABS... 4 ORDER LIST... 5 PROCESSING REQUESTS... 6 USING FILTERS... 6 COUPON CODES... 7 GRAB VS. GRAB AND PROCESS...
PearsonAccess User Guide PARCC
 PearsonAccess User Guide PARCC Copyright 2013, Pearson Education, Inc. Published December 16, 2013 1.0 Document Revisions... 5 2.0 Getting Started... 6 2.1 Getting Started - Introduction... 7 2.2 Getting
File & Serve Texas New Case Filing- User Guide
 File & Serve Texas New Case Filing- User Guide File & Serve Texas New Case Filings TABLE OF CONTENTS New Case Filing Overview 3 Getting Started 4 Step 1 - Case Type 8 Step 2 - Parties 9 Step 3 - Documents
Table of Contents. Overview of the TEA Login Application Features Roles in Obtaining Application Access Approval Process...
 TEAL Help Table of Contents Overview of the TEA Login Application... 7 Features... 7 Roles in Obtaining Application Access... 7 Approval Process... 8 Processing an Application Request... 9 The Process
Secure Transfer Site (STS) User Manual
 User Manual") Secure Transfer Site (STS) User Manual (Revised 3/1/12) Table of Contents Basic System Display Information... 3 Command Buttons with Text... 3 Data Entry Boxes Required / Enabled... 3 Connecting to the
Secure Transfer Site (STS) User Manual (Revised 3/1/12) Table of Contents Basic System Display Information... 3 Command Buttons with Text... 3 Data Entry Boxes Required / Enabled... 3 Connecting to the
ezbusiness Card Management 7/1/2015
 ezbusiness Card Management 7/1/2015 Table of Contents Logging In........ 3 Out-of-Band Processing.... 5 Navigation.....5 Viewing Pages. 5 Sorting Lists.5 Accessing Online Help...6 Menu Options and Navigation...6
1 Odyssey File & Serve. Registering as a User with an. 6. Click the button to enter your account information; click the
 1 Odyssey File & Serve 6. Click the button to enter your account information; click the button to return to the previous screen; or click the button to cancel the registration process. Topics Covered in
BBVA Compass Spend Net Payables
 User Guide BBVA Compass Spend Net Payables User Guide Vault Services Table of Contents Introduction 2 Technical Requirements 2 Getting started 3 Sign In 3 General Navigation 4 Upload/Create Payment 5