Narrow Band Emergency Messaging System Installation and Setup Guide
|
|
|
- Arnold Nichols
- 5 years ago
- Views:
Transcription
1 Narrow Band Emergency Messaging System Installation and Setup Guide The first thing to do is to install the NBEMS programs. You can find a link to them on the SHARP web site. First go to and click the Member s Area link at the bottom of the first page. Then enter the SHARP member username and password. You ll then get the basic home screen for members. Click the NBEMS link on the menu to get to the NBEMS page. To get to the NBEMS download page, go to
. The blue circles show the choices for a computer with MS Windows.")
2 After you click the link shown above, you ll get the web page shown below. Locate your operating system (Linux, Windows, OS X) and then go down the column and download the programs you need. Locate your operating system at the top and then the files for the programs (shown in red). The blue circles show the choices for a computer with MS Windows. Use the appropriate files for your computer s operating system.

3 Installing these programs on your computer is just like installing any other program you ve downloaded for installation. Download and install the correct version of Fldigi / Flarq, Flwarp and Flmsg for your computer s operating system. Once fldigi is installed, we need to set it up! First thing to do is configure the operator settings. Select Configure and then Operator. I suggest you use this technique to get into configuring anything in fldigi, because it s really the simplest way to get to the configuration settings.

4 Configure your operator information. Fill in the boxes with your information. Don t know your Locator (aka Maidenhead Grid Square)? You can leave it blank for now or find it here. Fill in the boxes and BE SURE TO CLICK Save when you re done. Be sure to click the Save button after you fill in the information.

5 Next, click MODEMS, then click MT-63 and UNCHECK the Allow manual tuning box. This avoids tuning errors on MT- 63. As always, when you change a configuration page, click the Save button! Step 1, click the Modems tab. Step 2, click the MT- 63 tab. Step 3, Uncheck this box if it is checked. Step 4, Always click Save after you make a change.
6 Next, configure the input. THIS IS CRITICAL SO BE CAREFUL! To get started, first, if you are going to be using any kind of cable or hardware interface, CONNECT THE CABLES up to everything and turn it all on. This is necessary so the computer can see any device you are using. (Of course, you do NOT have to have any hardware interface between your radio and computer at all, but it is easier if you have one. I suggest you at least hook a patch cable between the radio s external speaker jack and the computer s line in or microphone jack, although, again, it is NOT absolutely required.) Once you ve got everything hooked up, click the Audio tab, and then click the Devices tab. We will be setting the devices to be used for Capture (which is the audio from the radio to the computer) and for Playback (which is the audio from the computer to the radio). Which set of choices below will you want to use? It depends on the hookup between your radio and computer. There are three different kinds of hookups covered here: 1) Rigblaster interface OR single patch cord between radio s external speaker jack to computer microphone or line in jack (you will hold the radio s mic by the computer s speaker for transmit). 2) No wires at all between computer and radio 3) SignaLink interface The exact choices that will show up on YOUR computer for Capture: and Playback: may differ from those shown below. However, you should see options SIMILAR to those shown. You may need to experiment a little to find the option that works for you. Also, please note that, whatever your setup, the PortAudio box MUST always be checked! Option 1, Rigblaster OR using a single wire between the radio and computer for the radio s audio. The setup shown directly below should work for you. Capture should be Line In and Playback should be Speakers.

7 Step 1, Click the Audio tab Step 2, Click the Devices tab Step 4, for Capture select Line In Step 5, for Playback select Speakers Step 3, Make sure PortAudio is checked Step 6, click Save to save your changes

8 Option 2, not using any wires at all, you would use the setup shown below. Note that the exact language and setup of the drop down lists may vary depending on your computer and devices attached to it. But here for Capture, we are selecting Microphone as shown below. Step 1, Click the Audio tab. Step 2, Click the Devices tab. Step 4, select Microphone for Capture Step 3, make sure, PortAudio is checked! See below for steps 5 and 6.

9 For PLAYBACK we select SPEAKERS. Below is how it looks after you re all done. Step 5, select Speakers for playback. Step 6, click Save to save your changes.
10 Option 3, using a SignaLink device. You will want to select Microphone (USB Audio CODEC) for Capture and Speakers (USB Audio CODEC) for Playback.
11 Step 1, Click the Audio tab. Step 2, Click the Devices tab. Step 4, Set Capture to Microphone (USB Audio CODEC) Step 5, Set Playback to Speakers (USB Audio CODEC) Step 3, make sure PortAudio is checked. Step 6, click Save to save your changes.
12 Another reminder, regardless of which option you went with above, once you ve completed the audio device setup, be sure to click SAVE! Be sure to click the Save button after you finish the settings!
13 The next task is to set up the NBEMS system to work correctly with flmsg. This is a very cool feature that allows your computer to instantly display to you any message sent you by another ham using flmsg. We mustl tell fldigi where flmsg is installed on the computer. Once we do that, whenever you receive a message from another ham using flmsg, fldigi can open your browser and/or flmsg and display the message to you. First click the Misc tab and then the NBEMS tab. Then click the Locate flmsg button. Step 1, click the Misc tab. Step 2, click the NBEMS tab. Step 3, just note on this example where MY flmsg installed. I accepted the defaults. If you also did that, your flmsg might be in the same place. Step 4, click Locate flmsg
14
15 This is the screen that appears when I click Locate flmsg. Yours may look different. Note the folder flmsg in the left hand window. Once you find the flmsg folder, click on it. Then the right hand window will show something like what is shown below. You want to locate the program file flmsg.exe. Note that the exe may not appear on your computer, depending on your settings and operating system. What I would do here is click on flmsg.exe in the right-hand panel to show fldigi the exact location of the flmsg.exe file. Then click the Open button.
 program file in this window and click it once.")
16 Step 1, find the flmsg folder in this window and click it once. Step 2, find the flmsg.exe (or maybe just flmsg ) program file in this window and click it once. Step 3, click the Open button.
17
18 Now that we ve located flmsg, we need to tell fldigi what to do when we receive a message. Always click Enable. Then you can click either or both Open with flmsg and Open in browser. This controls what fldigi will do when it receives a message from another ham using flmsg. It can open flmsg with the fields filled in and/or open your default browser and display the message as an html formatted document. Personally, I suggest you click both of them, because you can always close one of the windows if you don t want it.
19 Step 1: always click Enable Step 2: check either or both of these (I suggest both). Step 3: As always, click Save to save your changes.

20 Another thing you might want to configure is a button to type your name. This is optional, but I recommend it. Look at the buttons just above the waterfall display. You ll see some of them are brown. Point at the brown button most to the right, directly next to the blue T/R button. Next, right click the button be sure to use the RIGHT button on the mouse. You ll see a screen like the one below. Click on the left hand window (labeled Macro Text ). Press the <ENTER> key to create a blank line. Then type your name, a

21 colon and ONE SPACE. Then type the word Name in the space that says Macro Button Label. Then click the Apply button, then the Close button. Step 1, click over here and type <ENTER> to create a blank line, then your name, a colon and one space. Step 2, type the word Name here. Step 3, click the Apply button. Step 4, click the Close but You ve just created a macro! These can be very useful. The macro you made will create a blank line (not a bad way to start a message it will separate your message from a previously received message on the recipient s screen). After it creates a blank line, it will type your name, a colon and then a blank space. This setup makes fldigi messages look a lot like D-RATS messages, which many of us are familiar with. We ll use this button later when we look at how to send a test message. Now that we ve created a macro in fldigi, it would be nice if it would STAY there. However, it will not unless we perform another step that forces fldigi to SAVE THE MACROS. To do this, click File, then Macros, then Save as shown below:

22 Saving macros That way, our new macro will show up the next time you open fldigi. (For those interested in advanced features, you can actually have multiple, different sets of macros and load whichever one you like. For example, you might have a set of macros for VHF/UHF and another set for HF, or whatever you like.) Now, we ve completed all the basic configuration stuff that we only have to do once. We re almost ready to actually SEND A MESSGE! There is one last setting we want to adjust before we actually test transmission, and that is volume on both the radio and computer. On the radio, keep the volume high enough that you could hear it clearly with normal voice transmission but not super loud. We re talking 1/3 to 1/2 full volume generally. That will provide plenty of volume for fldigi to work with. Do

23 NOT crank the volume! As to the computer volume for the radio, start with the volume adjusted about ½ full. Mine is shown below. By the way, if you re using a SignaLink, you should start with all three knobs at about the 9:00 position. Computer volume set halfway up. Last thing before we transmit is to select the op mode, usually just called mode. This determines the type of encoding, or language, if you prefer, that fldigi will use. For our digital tone net on the SHARP repeater, we ll mostly use the MT63 mode. It s very robust and especially good on FM. You ll note there are three flavors of this mode, 500, 1000 and Those are the bandwidth used in Hz. The larger the number, the more bandwidth used and the faster the data transmission. But there is, of course, a tradeoff, which is if band conditions are not good, 2k won t work. With poor band

24 conditions, we will have to use a narrower bandwidth. If the band is especially poor, we may need to use another mode, called Olivia. However, most of the time we will be using MT Now you should be ready to send a test message. Turn on your radio and set it to the appropriate frequency. For test messages, I suggest using a simplex frequency and low power. In fldigi, click the Name button you created before, then type your message. I typed This is a test message. Then, click the FAR RIGHT blue button to send the message. This is the best send button to use because it will send the text in the bottom window and then stop.
25 Step 1, click the Name button we created earlier. Step 3, click the TX > button, on the far-right. Step 2, Type your message here.
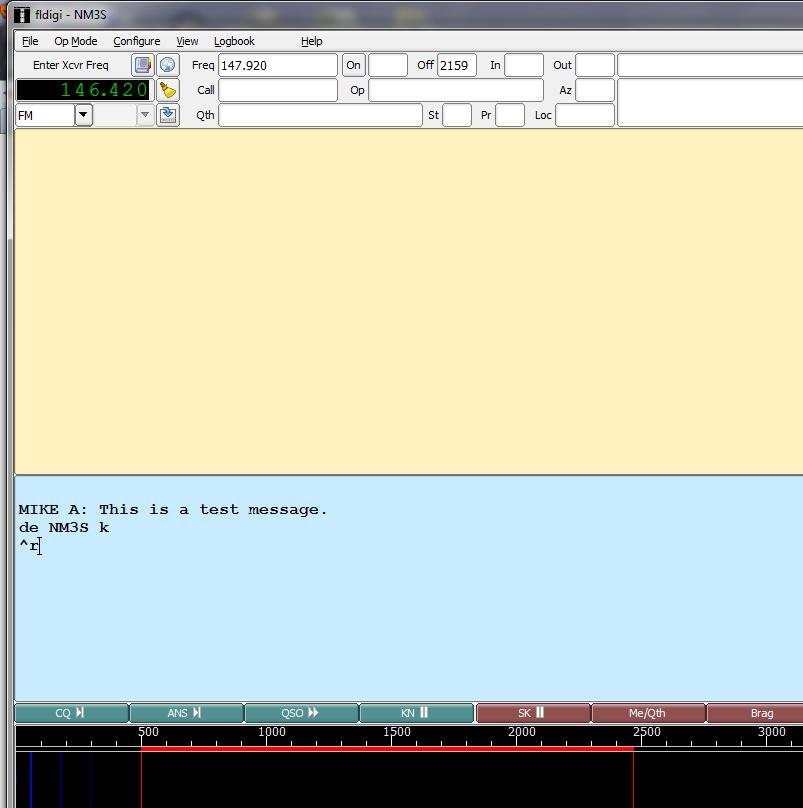
26 Note what happens when we hit the transmit button. The first thing it does is to add some stuff. The de is digital (and CW) shorthand for from, and it adds your call sign automatically, so all messages you send will have your call sign cool! It then adds a k which more shorthand and essentially means over. The ^r won t transmit and just tells fldigi to switch back to receive mode instead of staying in transmit mode. If that wasn t there you d have to stop transmission manually
27
28 Below is a picture something like the way your screen will appear after the test transmission is sent, if everything went well. Anything you receive will also appear in the top window. (That s why we want to start each message with a <return> key because it will make sure our message appears on a new line on the recipient s screen.) By the way, if things go wonky and you want to STOP TRANSMISSION NOW, you can click the T/R button in the lower right corner. This button has a red light icon that appears when it is transmitting. Clicking it will toggle fldigi between transmit and receive mode. That means, if you click it, just click it ONCE. It may take a few seconds to stop transmitting, but it will.

29 ONE LAST IMPORTANT NOTE: before you click the send button, you MUST be sure the cursor is at the END of your message. This is where it normally will be if you just type the message, so it s usually no issue. However, if you make an If you want transmissi STOP NOW, click thi ONCE.

30 error and click back at the beginning or middle of your message to fix the problem, when you are finished typing, you MUST click at the end of the message so the de, callsign and k will appear at the end of the message. If you don t, you ll get a mess on the screen like that shown below. And it will stop transmitting after the ^r, so it won t even send the whole message! Boy will I look dumb! To make this mess, I put the cursor right after the word this and clicked the transmit button. Go ahead and try it while you re testing, and you ll see what I mean. This is an easy problem to avoid once you re aware of it, just remember to always click at the END of the message after you do any corrections and BEFORE you hit the transmit button! Your NBEMS should now be set up and ready to use.
Intallation and setup of Fldigi and NBEMS
 Intallation and setup of Fldigi and NBEMS This covers setting up the NBEMS software only. It does NOT cover setting up a soundcard interface simply because there are too many combinations of rigs and interfaces
Fldigi Configuration Check List
 Fldigi Configuration Check List Check list for fldigi-3.23.17 flarq-4.3.6 (installed along with fldigi) flmsg-4.0.0 flwrap-1.3.4 flamp-2.2.03 Version 2.3-01/19/2017 WA2LBE KC2SKG This check list assumes
Using the SEMA Resource Request Data Input Form. Rev WØKAH
 Using the SEMA Resource Request Data Input Form Rev.11-29-2015 WØKAH SEMA is requiring a Resource Request Form that is compatible with WebEOC. If the internet is not available, Amateur Radio will be the
Platinum Coast Amateur Radio Society Narrow Band Emergency Messaging System (NBEMS) Presentation
 Presentation") Platinum Coast Amateur Radio Society Narrow Band Emergency Messaging System (NBEMS) Presentation Thanks to the Wellington Radio Club for their interest and support of NBEMS implementation and training.
Platinum Coast Amateur Radio Society Narrow Band Emergency Messaging System (NBEMS) Presentation Thanks to the Wellington Radio Club for their interest and support of NBEMS implementation and training.
Fldigi Fast Light Digital. Workshop. January 28, 2011 Toledo, Ohio
 Fldigi Fast Light Digital Workshop January 28, 2011 Toledo, Ohio What we will cover Session 1 (Today) 1. Hardware needed 2. Software needed 3. Hardware installation 4. Software installation 5. Software
Guide to Installing Fldigi and Flmsg with Red Cross Templates
 Guide to Installing Fldigi and Flmsg with Red Cross Templates Unless you already have the latest versions of fldigi and flmsg on your computer, you need to uninstall the old versions. We will then install
Configure RMS Express and Winmor WL2K
 Configure RMS Express and Winmor WL2K Provided by Mike K4MNJ, NNN0IMM Contents Introduction... 1 Download the RMS Express Software... 3 Install RMS Express... 6 Configure RMS Express... 8 Send a Message
Yaesu FTDX3000 Sound card digital modes setup using internal USB interface for Fldigi (part 1)
") Yaesu FTDX3000 Sound card digital modes setup using internal USB interface for Fldigi 3.23.13 (part 1) Getting the FTdx3000 and Fldigi just using the radios built in USB port. "YAESU FTDX3000 SOUND CARD
Yaesu FTDX3000 Sound card digital modes setup using internal USB interface for Fldigi 3.23.13 (part 1) Getting the FTdx3000 and Fldigi just using the radios built in USB port. "YAESU FTDX3000 SOUND CARD
HOW-TO set up the Yaesu FTDX3000 using internal USB interface for Fldigi
 Background HOW-TO set up the Yaesu FTDX3000 using internal USB interface for Fldigi 3.23.13 Operating the FTdx3000 and Fldigi using the radios built in USB port. In my PSK31 travels I have encountered
BUXCOMM RASCAL Mk VII Configuration and setup Guide
 BUXCOMM RASCAL Mk VII Configuration and setup Guide RASCAL VII+ and the RASCAL GLX connections to your PC are: The GREEN, 3.5mm plug connects to the sound card MIC IN, (or line in) jack. The remaining,
Installation guide. A. No, I do not have a router. Choose this option if you have a standard DSL or cable modem and no router.
 Installation guide This installation guide will show you how to get your voip phone service working. First, we need to know which set of instructions to give you. Please choose the option below that describes
R-09HR ReleaseNote. R-09HR Operating System Version 2.00 RO9HRRN200
 R-09HR ReleaseNote R-09HR Operating System Version.00 009 Roland Corporation U.S. All rights reserved. No part of this publication may be reproduced in any form without the written permission of Roland
Advanced NBEMS. ARRL Western Pennsylvania Section. Harry Bloomberg W3YJ Assistant SEC WPA ARRL Section
 Advanced NBEMS ARRL Western Pennsylvania Section Harry Bloomberg W3YJ Assistant SEC WPA ARRL Section w3yj@arrl.net Advanced NBEMS features Flmsg ICS and ARRL Radiogram forms Can have incoming messages
Keeping PPARES Information Flowing if we lose the Internet the 5 s
 Keeping PPARES Information Flowing if we lose the Internet the 5 Emails Subject: Keeping PPARES Information Flowing if we lose the Internet Date: Sun, 10 Nov 2013 20:10:20-0700 To: ppares@mailman.qth.net
Arduino IDE Friday, 26 October 2018
 Arduino IDE Friday, 26 October 2018 12:38 PM Looking Under The Hood Of The Arduino IDE FIND THE ARDUINO IDE DOWNLOAD First, jump on the internet with your favorite browser, and navigate to www.arduino.cc.
Quick Setup Guide for Winlink on VHF/UHF with Signalink on Windows
 Quick Setup Guide for Winlink on VHF/UHF with Signalink on Windows By Oliver K6OLI Last Update 2018-08-12 Thank you, Mike KM6KAQ, Scott KI6FHO, Brian KM6IGY, Lew AC6LS and Keith KD6PYD for testing, for
Setting UP the UMI-1 with True RTA
 Setting UP the UMI-1 with True RTA PC based test gear or single purpose device? Is there an easier way? Sure. There are lots of options for a single purpose device that will allow you to make frequency
Embedding and linking to media
 Embedding and linking to media Dreamweaver makes it incredibly easy to embed and link media files (these include audio files and movie files) into your web site. We ll start with linking. Linking to media
How to set up your wireless network
 How to set up your wireless network There are several steps involved in securing your wireless network. I recommend that you take these steps in order and only change one item at a time. While this may
Using Inbox and Views
 Left Mouse Button Using Inbox and Views In this tutorial, whenever we indicate that you need to click a mouse button, it will mean to click the left mouse button unless we indicate that you should click
Creating Simple Links
 Creating Simple Links Linking to another place is one of the most used features on web pages. Some links are internal within a page. Some links are to pages within the same web site, and yet other links
This Tutorial is for Word 2007 but 2003 instructions are included in [brackets] after of each step.
![This Tutorial is for Word 2007 but 2003 instructions are included in [brackets] after of each step.](/thumbs/72/67280806.jpg "This Tutorial is for Word 2007 but 2003 instructions are included in [brackets] after of each step.") This Tutorial is for Word 2007 but 2003 instructions are included in [brackets] after of each step. Table of Contents Just so you know: Things You Can t Do with Word... 1 Get Organized... 1 Create the
This Tutorial is for Word 2007 but 2003 instructions are included in [brackets] after of each step. Table of Contents Just so you know: Things You Can t Do with Word... 1 Get Organized... 1 Create the
The first thing we ll need is some numbers. I m going to use the set of times and drug concentration levels in a patient s bloodstream given below.
 Graphing in Excel featuring Excel 2007 1 A spreadsheet can be a powerful tool for analyzing and graphing data, but it works completely differently from the graphing calculator that you re used to. If you
-You will need to provide 2 AA batteries and an SD card to use the recorder.
 ZOOM H4N - USER GUIDE SETTING UP: -You will need to provide 2 AA batteries and an SD card to use the recorder. -The batteries go into the compartment on the back of the recorder. If you turn the switch
Exeter Amateur Radio Society
 Exeter Amateur Radio Society Table of Contents Raynet Data Operations Guide Version 3-4 March 2012 Nick Johnson 2E0NRJ 1. PREPARATORY...2 1.1 Computer...2 1.1.1 Choice of hardware...2 1.1.2 Sound...2 1.1.3
TEAMSPEAK3 via INTERNET SET-UP Used for CW NET and BOD Meeting. The TEAMSPEAK Client software is free and can be downloaded at:
 TEAMSPEAK3 via INTERNET SET-UP Used for CW NET and BOD Meeting The TEAMSPEAK Client software is free and can be downloaded at: https://www.teamspeak.com/downloads.html Select the client software appropriate
Quick Setup Guide for VARA FM for Winlink on with Signalink on Windows
 Quick Setup Guide for VARA FM for Winlink on with Signalink on Windows By Oliver K6OLI Last Update 2018-10-21 E Thank you, Scott KI6SC, Martin HB9AUR and Brian KM6IGY for testing, for your suggestions,
Panopto Recording Guide
 Table of Contents Panopto Recorder... 1 Additional Support... 1 Login Steps... 2 Panopto Recording... 3 Naming the Session... 3 Selecting Your Main Video and Audio... 4 Setting Your Secondary Sources...
VoIP Overview. Device Setup The device is configured via the VoIP tab of the devices Device Properties dialog in Integration Designer.
 VoIP Overview DESCRIPTION: RTI devices with VoIP (Voice over IP) support currently support peer-to-peer communication with other RTI devices and 3rd party devices that support the SIP protocol. Audio is
Excel Basics: Working with Spreadsheets
 Excel Basics: Working with Spreadsheets E 890 / 1 Unravel the Mysteries of Cells, Rows, Ranges, Formulas and More Spreadsheets are all about numbers: they help us keep track of figures and make calculations.
Welcome to Introduction to Microsoft Excel 2010
 Welcome to Introduction to Microsoft Excel 2010 2 Introduction to Excel 2010 What is Microsoft Office Excel 2010? Microsoft Office Excel is a powerful and easy-to-use spreadsheet application. If you are
Computer Concepts for Beginners
 Computer Concepts for Beginners Greetings Hi, my name is Tony & we re about to take a big plunge into the computer world! For some of us, this might be the first time we re actually using our computers,
Remodeling Your Office A New Look for the SAS Add-In for Microsoft Office
 Paper SAS1864-2018 Remodeling Your Office A New Look for the SAS Add-In for Microsoft Office ABSTRACT Tim Beese, SAS Institute Inc., Cary, NC Millions of people spend their weekdays in an office. Occasionally
the NXT-G programming environment
 2 the NXT-G programming environment This chapter takes a close look at the NXT-G programming environment and presents a few simple programs. The NXT-G programming environment is fairly complex, with lots
Outlook Web Access. In the next step, enter your address and password to gain access to your Outlook Web Access account.
 Outlook Web Access To access your mail, open Internet Explorer and type in the address http://www.scs.sk.ca/exchange as seen below. (Other browsers will work but there is some loss of functionality) In
S A M P L E C H A P T E R
 SAMPLE CHAPTER Anyone Can Create an App by Wendy L. Wise Chapter 2 Copyright 2017 Manning Publications brief contents PART 1 YOUR VERY FIRST APP...1 1 Getting started 3 2 Building your first app 14 3 Your
How To Upload Your Newsletter
 How To Upload Your Newsletter Using The WS_FTP Client Copyright 2005, DPW Enterprises All Rights Reserved Welcome, Hi, my name is Donna Warren. I m a certified Webmaster and have been teaching web design
Lutheran High North Technology The Finder
 Lutheran High North Technology shanarussell@lutheranhighnorth.org www.lutheranhighnorth.org/technology The Finder Your Mac s filing system is called the finder. In this document, we will explore different
Copyright 2000: PictureTel Corporation Printed in U.S.A. PictureTel Corporation, 100 Minuteman Road, Andover, MA
 Do you have any suggestions or comments on the documentation you received with your system? If so, please send them by e-mail to idesign@pictel.com. Copyright 2000: PictureTel Corporation Printed in U.S.A.
Microcontroller Compatible Audio File Conversion
 Microcontroller Compatible Audio File Conversion Created by Mike Barela Last updated on 2018-06-07 09:10:45 PM UTC Guide Contents Guide Contents Convert Sound Files in Audacity Audacity Download Audacity
This Tutorial is for Word 2007 but 2003 instructions are included in [brackets] after of each step.
![This Tutorial is for Word 2007 but 2003 instructions are included in [brackets] after of each step.](/thumbs/89/98497436.jpg "This Tutorial is for Word 2007 but 2003 instructions are included in [brackets] after of each step.") This Tutorial is for Word 2007 but 2003 instructions are included in [brackets] after of each step. Table of Contents Get Organized... 1 Create the Home Page... 1 Save the Home Page as a Word Document...
This Tutorial is for Word 2007 but 2003 instructions are included in [brackets] after of each step. Table of Contents Get Organized... 1 Create the Home Page... 1 Save the Home Page as a Word Document...
USING AUDACITY: ROBUST, FREE, AND FULL- FEATURED SOFTWARE
 Slide 1 USING AUDACITY: ROBUST, FREE, AND FULL- FEATURED SOFTWARE This presentation contains audio; ensure your speakers are turned up. Click the forward arrow below to proceed to the next slide. Audacity
Getting the DVR Setup for Internet Viewing
 Getting the DVR Setup for Internet Viewing Preface: Getting your DVR setup for the internet is one of the best features that these DVR s have. This guide should help most users get their DVR setup for
Word: Print Address Labels Using Mail Merge
 Word: Print Address Labels Using Mail Merge No Typing! The Quick and Easy Way to Print Sheets of Address Labels Here at PC Knowledge for Seniors we re often asked how to print sticky address labels in
BR-80 Digital Recorder
 Workshop MICRO BR BR-80 Digital Recorder Record 2011 BOSS Corporation U.S. All rights reserved. No part of this publication may be reproduced in any form without the written permission of BOSS Corporation
RIGblaster Plug & Play
 RIGblaster Plug & Play www.westmountainradio.com 1020 Spring City Drive Waukesha, WI 53186 262-522-6503 sales@westmountainradio.com 2013 West Mountain Radio, All rights reserved. All trademarks are the
Term Definition Introduced in: This option, located within the View tab, provides a variety of options to choose when sorting and grouping Arrangement
 60 Minutes of Outlook Secrets Term Definition Introduced in: This option, located within the View tab, provides a variety of options to choose when sorting and grouping Arrangement messages. Module 2 Assign
Frequently Asked Questions
 Serene CL-60A Amplified Talking CID Cordless Phone with Slow-Play, Amplified Answering Machine Frequently Asked Questions Q: Base Charging Indicator is not on when handset is placed on the base. A: Move
Google Drive: Access and organize your files
 Google Drive: Access and organize your files Use Google Drive to store and access your files, folders, and Google Docs anywhere. Change a file on the web, your computer, or your mobile device, and it updates
Your First Windows Form
 Your First Windows Form From now on, we re going to be creating Windows Forms Applications, rather than Console Applications. Windows Forms Applications make use of something called a Form. The Form is
Videolinq. Movi 4.0. Setup and User Guide
 Videolinq Movi 4.0 Setup and User Guide IMPORTANT: Information on EXITING Movi Movi is a corporate centric product developed by Tandberg which does have a cost to TAFE Queensland. Usage of Movi is controlled
GETTING STARTED GUIDE
 SETUP GETTING STARTED GUIDE About Benchmark Email Helping you turn your email list into relationships and sales. Your email list is your most valuable marketing asset. Benchmark Email helps marketers short
flmsg is a simple forms management editor for the amateur radio supported standard message formats. These current include:
 flmsg - quick guide flmsg is a simple forms management editor for the amateur radio supported standard message formats. These current include: ICS-203 - Organization Assignment List ICS-205 - Incident
Recording for the Blind Part One
 With the Handihams Patrick Tice, WAØTDA wa0tda@arrl.net Recording for the Blind Part One Most of us take being able to read a book or an instruction manual for granted. If we take an amateur radio licensing
Creating a Double IK Chain in Lightwave
 Creating a Double IK Chain in Lightwave By: Jake Stewart, Stewart864@live.missouristate.edu Introduction: This tutorial is provide some helpful (hopefully) instructions on creating a double IK chain in
Audacity Stereo Wave Recorder and Editor
 Audacity Stereo Wave Recorder and Editor Here s a brief rundown on First connect the cable from the headphone jack on the boombox to the microphone jack on the front of the computer in your room. Next
SI Training for Online Sessions
 SI Training for Online Sessions WebEx Follow the instructions below to schedule, conduct, and record online SI sessions. Logging In 1. Open a web browser and go to https://tamucc.webex.com, click Log In
INSTRUCTION MANUAL IP REMOTE CONTROL SOFTWARE RS-BA1
 INSTRUCTION MANUAL IP REMOTE CONTROL SOFTWARE RS-BA FOREWORD Thank you for purchasing the RS-BA. The RS-BA is designed to remotely control an Icom radio through a network. This instruction manual contains
TI-8. RigExpert. Software Setup Examples. USB Transceiver Interface
 TI-8 RigExpert USB Transceiver Interface Software Setup Examples . Table of contents DigiPan Audio configuration PTT configuration MixW Audio configuration CAT configuration PTT configuration FSK mode
NFusion Wireless Network Step-by-Step Configuration
 NFusion Wireless Network Step-by-Step Configuration LINKSYS WIRELESS ROUTER CONFIGURATION 3-6 NETGEAR WGPS606 CONFIGURATION 7-16 CONNECT YOUR NETGEAR TO YOUR NFUSION 17-19 Your home network should look
A Document Created By Lisa Diner Table of Contents Western Quebec School Board October, 2007
 Table of Contents A Document Created By Lisa Diner Western Quebec School Board October, 2007 Table of Contents Some Basics... 3 Login Instructions... 4 To change your password... 6 Options As You Login...
NCMail: Microsoft Outlook User s Guide
 NCMail: Microsoft Outlook 2003 Email User s Guide Revision 1.0 11/10/2007 This document covers how to use Microsoft Outlook 2003 for accessing your email with the NCMail Exchange email system. The syntax
EASYTERM TUTORIAL. Purpose of Software:
 EASYTERM TUTORIAL July 2017 Gordon Gibby KX4Z Purpose of Software: EASYTERM ( Term ) is a Windows-based program designed for AX.25 Packet amateur radio communications and distributed free of charge, by
XR2N1C. Owner s Manual
 XR2N1C Owner s Manual Before using, please read these operating instructions carefully. They contain important advice concerning the use and safety of your tablet. Use it for its intended purpose in accordance
NAME EET 2259 Lab 3 The Boolean Data Type
 NAME EET 2259 Lab 3 The Boolean Data Type OBJECTIVES - Understand the differences between numeric data and Boolean data. -Write programs using LabVIEW s Boolean controls and indicators, Boolean constants,
W0EB/W2CTX Firmware for the Micro BITX meter Transceiver for Release V2.00R
 W0EB/W2CTX Firmware for the Micro BITX 80-10 meter Transceiver for Release V2.00R Software running on W0EB s Test Platform. Version 2.00b is final pre-release test. Instructions for ubitx Version 2.00R
Splicing Instructions
 Splicing Instructions When we create our experiments, we need to be able to play individual words as experiment stimuli. In order to get these individual words, we have a native speaker of whatever language
How to Install Winlink Express
 How to Install Winlink Express Winlink Express is the new name for RMS Express. What is Winlink You can find an overview of the Winlink system in these videos: https://www.youtube.com/watch?time_continue=231&v=1v330_1dezw
Introduction. What is Max?
 Introduction What is Max? Max is a graphical music programming environment for people who have hit the limits of the usual sequencer and voicing programs for MIDI equipment. Miller Puckette, Max reference
USER MANUAL. Ava Book 1. Please read the user guide carefully before using
 USER MANUAL Ava Book 1 Please read the user guide carefully before using Windows10 Quick Guide What's new Windows 10 is full of new features and improvements. Take a look at the highlights! Ready, set,
Civil Engineering Computation
 Civil Engineering Computation First Steps in VBA Homework Evaluation 2 1 Homework Evaluation 3 Based on this rubric, you may resubmit Homework 1 and Homework 2 (along with today s homework) by next Monday
MAXIMIZING THE UTILITY OF MICROSOFT OUTLOOK. Presented by: Lisa Hendrickson Deborah Savadra
 MAXIMIZING THE UTILITY OF MICROSOFT OUTLOOK Presented by: Lisa Hendrickson (@callthatgirl) Deborah Savadra (@legalofficeguru) INTRODUCTION: INBOX = MONEY Your inbox equals money, as it does for anyone
MV-8800 Production Studio
 ÂØÒňΠWorkshop MV-8800 Production Studio Auto Chop 2007 Roland Corporation U.S. All rights reserved. No part of this publication may be reproduced in any form without the written permission of Roland
Recording narrated Powerpoint presentations
 Recording narrated Powerpoint presentations You will need a microphone to connect to your computer. There are three types. Most laptops and all Imacs have internal microphones built in. Some microphones
Welcome To VIRTUAL WITHOUT THE VIRTUAL TM. imvp Setup Guide for Mac. imvp Classroom and IBM RDP Lab Setup Guide For Mac 1
 Welcome To VIRTUAL WITHOUT THE VIRTUAL TM imvp Setup Guide for Mac imvp Classroom and IBM RDP Lab Setup Guide For Mac 1 The imvp Team is here for you If you have any questions during the imvp setup process,
Keep Track of Your Passwords Easily
 Keep Track of Your Passwords Easily K 100 / 1 The Useful Free Program that Means You ll Never Forget a Password Again These days, everything you do seems to involve a username, a password or a reference
Quick Guide. Choose It Maker 2. Overview/Introduction. ChooseIt!Maker2 is a motivating program at first because of the visual and musical
 Choose It Maker 2 Quick Guide Created 09/06 Updated SM Overview/Introduction This is a simple to use piece of software that can be tailored for use by children as an alternative to a pencil and paper worksheet,
Frequently Asked Questions
 Serene CL-60 Big Button Amplified Talking CID Cordless Phone W/ Display Screen Frequently Asked Questions Q: How can I turn off the "talking" voice? A: Just set the "talking" selection switch to Off in
Using Dreamweaver. 4 Creating a Template. Logo. Page Heading. Home About Us Gallery Ordering Contact Us Links. Page content in this area
 4 Creating a Template Now that the main page of our website is complete, we need to create the rest of the pages. Each of them will have a layout that follows the plan that is shown below. Logo Page Heading
INSTRUCTOR GUIDEBOOK. Adobe Connect. Table of contents
 Adobe Connect INSTRUCTOR GUIDEBOOK for Continuing and Distance Education instructors at the UNIVERSITY OF NORTHERN IOWA Table of contents System requirements..................... 2 Preparing for class........................
MyLanguageLabs Instructions for St. Olaf Faculty
 World Languages Center St. Olaf College January 2014 MyLanguageLabs Instructions for St. Olaf Faculty DIRECTIONS FOR INTERNET EXPLORER 1. Open Internet Explorer and go to http://www.mylanguagelabs.com.
RECORDING AUDIO ON THE IPAD MINI
 RECORDING AUDIO ON THE IPAD MINI PREPARE THE IPAD MINI Power the unit ON using the small button on the top right side (see image above.) If the screen goes dark, press the HOME button on the bottom once
Instruction Guide. Voice Mail Just press *98 from your home phone to get your messages.
 Instruction Guide Voice Mail Just press 9 from your home phone to get your messages. IMPORTANT You must set up your mailbox before callers can leave messages for you. Standard Greeting start here Our Standard
COMPUTER FOR BEGINNERS
 COMPUTER FOR BEGINNERS INTRODUCTION Class Objective: This class will familiarize you with using computers. By the end of the session you will be familiar with: Starting programs Quitting programs Saving
TABLE OF CONTENTS. Introduction Setting up Your Patriot Voice Controls Starting the System Controls...
 USER MANUAL TABLE OF CONTENTS Introduction... 03 Setting up Your Patriot Voice... 04 Controls... 05 Starting the System... 06 Controls... 06 Additional Keys... 09 Menu Zone... 10 System Settings... 15
Blackboard for Faculty: Grade Center (631) In this document:
 In this document:") 1 Blackboard for Faculty: Grade Center (631) 632-2777 Teaching, Learning + Technology Stony Brook University In this document: blackboard@stonybrook.edu http://it.stonybrook.edu 1. What is the Grade Center?..
1 Blackboard for Faculty: Grade Center (631) 632-2777 Teaching, Learning + Technology Stony Brook University In this document: blackboard@stonybrook.edu http://it.stonybrook.edu 1. What is the Grade Center?..
Installing Dolphin on Your PC
 Installing Dolphin on Your PC Note: When installing Dolphin as a test platform on the PC there are a few things you can overlook. Thus, this installation guide won t help you with installing Dolphin on
QUICK START GUIDE NTS HOSTED PBX CALL MANAGER. Welcome. Getting Oriented
 QUICK START GUIDE NTS HOSTED PBX Welcome Welcome to NTS Hosted PBX! This guide is intended to get you up and running with the basic features associated with the product. For more in-depth information,
How to Make a Book Interior File
 How to Make a Book Interior File These instructions are for paperbacks or ebooks that are supposed to be a duplicate of paperback copies. (Note: This is not for getting a document ready for Kindle or for
Title and Modify Page Properties
 Dreamweaver After cropping out all of the pieces from Photoshop we are ready to begin putting the pieces back together in Dreamweaver. If we were to layout all of the pieces on a table we would have graphics
A Quick-Reference Guide. To access reddot: https://cms.hampshire.edu/cms
 Using RedDot A Quick-Reference Guide To access reddot: https://cms.hampshire.edu/cms For help: email reddot@hampshire.edu or visit http://www.hampshire.edu/computing/6433.htm Where is... Page 6 Page 8
Introduction to Cascade Server (web content management system) Logging in to Cascade Server Remember me Messages Dashboard Home
 Logging in to Cascade Server Remember me Messages Dashboard Home") Introduction to Cascade Server (web content management system) Last Updated on Jul 14th, 2010 The College of Charleston's web site is being produced using a Content Management System (CMS) called Cascade
Introduction to Cascade Server (web content management system) Last Updated on Jul 14th, 2010 The College of Charleston's web site is being produced using a Content Management System (CMS) called Cascade
EXCEL PRACTICE 5: SIMPLE FORMULAS
 EXCEL PRACTICE 5: SIMPLE FORMULAS SKILLS REVIEWED: Simple formulas Printing with and without formulas Footers Widening a column Putting labels and data in Bold. PART 1 - DIRECTIONS 1. Open a new spreadsheet
Interactive Tourist Map
 Adobe Edge Animate Tutorial Mouse Events Interactive Tourist Map Lesson 1 Set up your project This lesson aims to teach you how to: Import images Set up the stage Place and size images Draw shapes Make
How to Register at the AMC Member Center and Select Electronic Delivery
 How to Register at the AMC Member Center and Select Electronic Delivery By Jeff Carden Registering with the AMC s Member Center at http://www.outdoors.org/membership/member-center.cfm provides you with
Blackfin Online Learning & Development
 Presentation Title: Multimedia Starter Kit Presenter Name: George Stephan Chapter 1: Introduction Sub-chapter 1a: Overview Chapter 2: Blackfin Starter Kits Sub-chapter 2a: What is a Starter Kit? Sub-chapter
Blu Ray Burning in MZ280 Step 1 - Set Toast up to burn a Blu-ray Video Disc.
 Blu Ray Burning in MZ280 Step 1 - Set Toast up to burn a Blu-ray Video Disc. Open Toast. On the main screen, click the Video button in the upper-left portion of the screen, and select Blu-ray Video from
Harvard Phone. Introduction to Contact Center CONTACT CENTER CLIENT QUICK REFERENCE QUIDE
 Introduction to Contact Center Interaction Desktop is an interaction and communications manager for desktop or laptop PCs, and offers more functionality than your office telephone. Use it to manage all
Using PowerPoint to Create an Interactive Multimedia Portfolio Ben Johnson
 Using PowerPoint to Create an Interactive Multimedia Portfolio Ben Johnson www.psd.k12.co.us/staff/benj Getting Started 1. Launch PowerPoint from the start button. Select the Design Template radio button.
XMReality 6. User Manual for Windows XMReality AB Teknikringen 10, 8 fl SE Linköping Sweden
 XMReality 6 User Manual for Windows - 6.2 1 XMReality AB Teknikringen 10, 8 fl SE-583 30 Linköping Sweden Introduction This is a user manual for XMReality Remote Guidance Generation 6 for Windows. An account