USER GUIDE BioStation L2 English Version 1.00 EN BSL2 V1.00A
|
|
|
- Ashley Chandler
- 6 years ago
- Views:
Transcription
1 USER GUIDE BioStation L2 English Version 1.00 EN BSL2 V1.00A
2 Contents Safety Instructions... 4 Introduction... 6 Components... 6 Name and function of each part... 7 Cables and connectors... 8 How to enroll a fingerprint correctly Selecting a finger for fingerprint input Fingerprint enroll method Admin Menu All Menus User Registering user information Modifying user information Delete All Users View User Usage Authentication Mode Fingerprint Mode Card Mode ID Mode T&A Mode Fingerprint Server Matching Display & Sound Device Date & Time Relay Device Info Memory Info Restart Device Restore to default Network Network Settings Ethernet Server Serial Settings RS Event Log Search Log Delete All Logs View Log Usage Troubleshooting Checklist before reporting a failure
3 Product Specifications Dimensions FCC compliance information Appendices Escape clause Copyright notice
4 Safety Instructions Safety Instructions Observe the following instructions to use the product safely and prevent any risk of injury or property damage. Warning Noncompliance of instructions could lead to serious injury or death. Installation Do not install the product in a place with direct sunlight, moisture, dust, or soot. A fire or electric shock may occur. Do not install the product in a place with heat from an electric heater. A fire or electric shock may occur due to overheating. Install the product in a dry place. Otherwise, a product damage or electric shock may occur due to moisture. Install the product in a place with no electromagnetic interference. Otherwise, a product damage or electric shock may occur. The user should not install or repair the product independently. A fire, electric shock, or personal injury may occur. If the product has been damaged due to independent installation or repair of the product by the user, free A/S service will not be provided. Usage Do not allow liquids such as water, beverages, or chemicals get into the product. A fire, electric shock, or product damage may occur. Caution Noncompliance of instructions could lead to minor injury or product damage. Installation Do not install the power supply cable in a place where people pass by. Product damage or physical injury may occur. Do not install the product near a highly magnetic object such as a magnet, TV, (especially CRT) monitor, or speaker. A product failure may occur. Use only a power supply adaptor of D.C 12 V and 500 ma or higher. If the proper power is not used, the product may not operate normally. If installing the product outside where the product is completely exposed, it is recommended to install the product together with the enclosure. Use a separate power supply for the Secure I/O 2, electric lock and BioStation L2 respectively. If connecting and using the power supply to these devices together, the devices may malfunction. When installing a number of devices, allow a space between the devices for installation. Otherwise, one device may affect the RF performance of other devices, resulting in malfunction. 4
5 Safety Instructions Operation Do not drop the product or apply an impact to the product. A product failure may occur. Manage the password with care not to disclose it to others and change the password periodically. Otherwise, illegal intrusion may occur. Do not press the buttons on the product forcibly or using a sharp tool. A product failure may occur. Be careful not to contaminate or damage the fingerprint contact unit with a dirty hand or foreign substances. Deterioration in fingerprint authentication performance and a product failure may occur. When cleaning the product, wipe the product with a soft and dry cloth and no water, benzene or alcohol. Otherwise, a product failure may occur. BioStation L2 uses a capacitive screen and buttons. If the environment is moist from wet weather or the product surface is smeared with a lot of water, wipe off the product with a dry towel before using it. RTC battery Replacing the battery with an incorrect type of battery may cause explosion. Discard the battery according to the appropriate regional or international waste regulations. 5
 BioStation L2 Wall")

 120 Ω resistor (1 EA) Drilling")


6 Introduction Introduction Components PVC anchor (2 EA) BioStation L2 Wall bracket Diode (1 EA) Connection cable (2 pins 1 EA, 3 pins 1 EA, 4 pins 4 EA) Ferrite core (1 EA) Fixing screw (2 EA) 120 Ω resistor (1 EA) Drilling template Quick guide Note Components may vary according to the installation environment. For additional content regarding product installation, access the Suprema website ( and view the installation guide. 6
 TTL input (4 pins) Power supply (2 pins) RS-485 (4 pins) Speaker Name Description LCD screen Function button Keypad OK button ESC button Speaker Fingerprint authentication unit")


7 Introduction Name and function of each part LCD screen Function button ESC button Keypad OK button Fingerprint authentication unit RF card authentication unit Ethernet Relay (3 pins) Wiegand input/output (4 pins) TTL input (4 pins) Power supply (2 pins) RS-485 (4 pins) Speaker Name Description LCD screen Function button Keypad OK button ESC button Speaker Fingerprint authentication unit RF card authentication unit TTL input (4 pins) RS-485 (4 pins) Relay (3 pins) Power supply (2 pins) Ethernet (4 pins) Wiegand input and output (4pins) Provides UI for operation. Used for the T&A Key, changing a letter, or entering a space. 0 ~ 9: Used for entering a number or letter.,,, : Used for moving to the desired item. Used for selecting and setting T&A Mode. If a job code is set, you can change the job code of the user by pressing this button long. Used for opening the menu, moving to the previous screen or canceling input. Delivers sound. Part to scan the fingerprint for entrance. Part to scan the card for entrance. Connects the TTL input cable. Connects the RS-485 cable. Connects the relay cable. Connects the power supply cable. Connects the Ethernet cable. Connects the Wiegand input and output cable. 7
8 Introduction Cables and connectors Power Pin Name Color 1 PWR +VDC Red (white stripe) 2 PWR GND Black (white stripe) Relay Pin Name Color 1 RLY NO White 2 RLY COM Blue 3 RLY NC Orange RS-485 Pin Name Color TRXP Blue TRXN Yellow GND Black 4 SH GND Gray TTL input Pin Name Color 1 TTL IN0 Red 2 TTL IN1 Yellow 3 TTL GND Black 4 SH GND Gray Wiegand input and output Pin Name Color 1 WG D0 Green 2 WG D1 White 3 WG GND Black 4 SH GND Gray 8
9 Introduction Ethernet Pin Name Color 1 ENET RXN Yellow 2 ENET RXP Green 3 ENET TXN Red 4 ENET TXP Black 9

10 Introduction How to enroll a fingerprint correctly In order to improve the fingerprint authentication rate, enroll the fingerprint correctly. BioStation L2 can recognize a fingerprint even if the angle and position of a user's fingerprint input change. If you enroll a fingerprint with attention to the following matters, the authentication rate can be improved. Selecting a finger for fingerprint input In preparation for a situation in which the fingerprint of a specific finger cannot be used, for example if the user is lifting a load with one hand or a finger gets hurt, up to 10 fingerprints for each user can be enrolled. In the case of a user whose fingerprint cannot be recognized well, the authentication rate can be improved by enrolling the same finger twice repeatedly. If a finger has a cut or the fingerprint is blurry, select another finger for the fingerprint. It is recommended to use the index finger or the middle finger when scanning the fingerprint. The authentication rate can be reduced if it is difficult to place another finger at the center of fingerprint sensor accurately. Fingerprint enroll method 1 When a message saying Place your finger on the sensor. is displayed on the LCD screen for enrolling the fingerprint, place the finger with the fingerprint you wish to enroll on the fingerprint authentication unit and press the finger gently for better authentication. 2 When the re-input screen is displayed after a beep sound, scan the fingerprint of the enrolled finger again (scan the fingerprint of a finger to be enrolled twice). Note Cautions for enrolling a fingerprint When a fingerprint is recognized, it is compared with the initially registered fingerprint, so the initial fingerprint enroll is the most important. Pay attention to the following matters when enrolling the fingerprint. Place the finger deep enough to contact with the sensor completely. Place the center of the fingerprint in the center of the sensor. If a finger has a cut or the fingerprint is blurry, select another finger for the fingerprint. Scan the fingerprint correctly without moving according to the instruction on the screen. If you make the finger upright so that the contact area with the sensor is decreased or the angle of finger is warped, fingerprint authentication may not be performed. When the fingerprint recognition fails BioStation L2 can recognize a fingerprint regardless of a change in season or finger condition. However, the authentication rate may vary according to the external environment or fingerprint input method. If the fingerprint authentication cannot be done smoothly, it is recommended to take the following measures. If the finger is smeared with water or sweat, dry off the finger and then scan the finger. If the finger is too dry, blow your breath on the fingertips and then scan the finger. If the finger has a cut, register the fingerprint of another finger. The initially enrolled fingerprint often may have not been scanned correctly, so enroll the fingerprint again according to Cautions for enrolling a fingerprint. 10

11 Admin Menu Admin Menu All Menus 2 Select the desired menu. Note If the administrator has not been designated, the menu screen will be displayed when you press ESC. 11
12 User User Registering user information The user information including fingerprints can be registered. 2 Select USER > Add User, then press. 3 Select the desired item, then press and set or. When you press OK, the user information will be registered. User ID: Enter the user ID you wish to register. Enter the desired ID using the number keypad, then press OK. A number between 1 and can be entered for ID. User Name: Enter the user name using the number keypad and the function button. Fingerprint: Enroll a fingerprint for user authentication. Scan the fingerprint of a finger you wish to enroll, and then scan the fingerprint of the same finger again. You can delete the fingerprint by selecting a fingerprint to delete and pressing. You can also scan the fingerprint again by pressing. To add a fingerprint, select + Add Finger, then press. Card: Register a card for user authentication. Scan the card that will be assigned to the user. PIN: Enter the PIN you wish to use. Enter the PIN you wish to use, and then enter the same PIN again for confirmation. Enter a number between 4 and 16 digits to prevent leaking. Operator Level: Select the level you wish to assign to a user. Start Date: Set a start date to use the user account. Expiry Date: Set the expiry date of the user account. 1:1 Security Level: Set the security level for 1:1 authentication. Duress: Select a fingerprint to be used as a duress fingerprint. This can be used only when 2 or more fingerprints have been enrolled. Private Auth Mode: Change the authentication method according to the user. 4 To save settings, press OK. Note Available menus vary according to the set operator level. Normal User: This is the normal user level. Menus cannot be accessed. Administrator: All menus can be accessed. Configuration: AUTHENTICATION, DISPLAY & SOUND, DEVICE, NETWORK menus can be accessed. User Management: USER menu can be accessed. 12
13 User Modifying user information User Management or Administrator can modify the registered user information. A fingerprint or card can be added, and PIN and level can be modified. 2 Select USER > Search User, then press. 3 Select your search terms. You can search for a user by All, User ID, User Name, Fingerprint, or Card. 4 Select the user you wish to modify and press. Modify the information by referring to Registering user information. To delete a user, press, then press OK. Note Access Groups can be registered in BioStar 2. For detailed contents regarding registering an access group, refer to BioStar 2 Administrator's manual. Delete All Users You can delete all registered users at once. 2 Select USER > Delete All Users, then press. 3 When you press OK, all registered users will be deleted. View User Usage You can see the number of registered users, fingerprints and cards at a glance. 2 Select USER > User Usage, then press. 13
14 Authentication Authentication Mode Fingerprint Mode You can set the schedule to be used for each authentication method using a fingerprint. 2 Select AUTHENTICATION > Auth Mode > Fingerprint Mode, then press. 3 Select the desired item and set the schedule by pressing or. : Mode to use a fingerprint only. + : Mode to authenticate with a fingerprint and then enter a PIN. 4 To save settings, press OK. Note A schedule can be set in BioStar 2. If there is no set schedule, only Not Used and Always can be selected. For detailed contents regarding setting a schedule, refer to BioStar 2 Administrator's manual. Card Mode You can set the schedule to be used for each authentication method using a card. 2 Select AUTHENTICATION > Auth Mode > Card Mode, then press. 3 Select the desired item and set the schedule by pressing or. : Mode to use a card only. + : Mode to authenticate with a card and then authenticate with a fingerprint. + : Mode to authenticate with a card and then enter a PIN. + / : Mode to authenticate with a card and then authenticate with a fingerprint or enter a PIN. + + : Mode to authenticate with a card and then use both fingerprint authentication and PIN input. 4 To save settings, press OK. 14

15 Authentication Note A schedule can be set in BioStar 2. If there is no set schedule, only Not Used and Always can be selected. For detailed contents regarding setting a schedule, refer to BioStar 2 Administrator's manual. ID Mode You can set the schedule to be used for each authentication method using ID. 2 Select AUTHENTICATION > Auth Mode > ID Mode, then press. 3 Select the desired item and set the schedule by pressing or. + : Mode to enter ID and then authenticate with a fingerprint. + : Mode to enter ID and then enter a PIN. + / : Mode to enter ID and then authenticate with a fingerprint or enter a PIN. + + : Mode to enter ID and then use both fingerprint authentication and PIN input. 4 To save settings, press OK. Note A schedule can be set in BioStar 2. If there is no set schedule, only Not Used and Always can be selected. For detailed contents regarding setting a schedule, refer to BioStar 2 Administrator's manual. T&A Mode You can set how to register T&A Mode. 2 Select AUTHENTICATION > T&A Mode, then press. 3 Select the desired item and then change the settings by pressing or. T&A Event: View the set T&A event. T&A Mode: Set the method to use T&A mode. T&A Required: Set to require a user to select a T&A event when authenticating. If Use is set, you can set to require a user to select a T&A event when authenticating. T&A Fixed: Set to use only a T&A event selected by the administrator. This option can be used when Fixed is set for T&A Mode. Job Code: Select whether or not to use Job Code. 15
16 Authentication 4 To save settings, press OK. Note When Use is set for Job Code, you can change the user job code. You can select the desired job code by pressing OK long and authenticating. Fingerprint You can change settings regarding the fingerprint authentication. 2 Select AUTHENTICATION > Fingerprint, then press. 3 Select the desired item and then change the settings by pressing or. Security Level: Set the security level for 1:N authentication. Matching Timeout: Set the fingerprint matching timeout. If the authentication is not completed during a set time, the authentication will fail. View Image: Set to view the original image when scanning the fingerprint. Sensor Sensitivity: Set the sensitivity of the fingerprint authentication sensor. To obtain more precise fingerprint information by increasing the sensor sensitivity, set the sensor sensitivity higher. Fake finger detected: Set the fake fingerprint inspection level. If the fake fingerprint inspection level is higher, the rejection rate on actual human fingerprints will increase. 1:N Fast Mode: Set the fingerprint authentication speed. If you select Auto, the authentication speed will be set according to all fingerprint templates enrolled on the device. Template Format: Set the fingerprint template format. SUPREMA is set as the default, and if you change the template format, all fingerprints saved previously cannot be used. Use caution when changing the Template Format. Sensor Mode: When Auto On is set, the fingerprint sensor recognizes a user's fingerprint and turns on. When Always On is set, the sensor is always on. Advanced Enrollment: Inspect the quality of a scanned fingerprint in order to save high quality fingerprint information When Use is set and the quality of the fingerprint is low, it notifies such information to the user and helps the user scan the fingerprint correctly. 4 To save settings, press OK. Note Change the template format after deleting the fingerprint information of all users. If the fingerprint information of a user has been enrolled, the template format cannot be changed. 16
17 Authentication Server Matching When you set Server Matching, the user authentication is not carried out in the device, but rather in BioStar. Server Matching can be useful when there is a large amount of user information in the device or you do not wish to publicly expose the device where user credential information is saved. 2 Select AUTHENTICATION > Server Matching, then press. 3 Change the settings by pressing or. 4 To save settings, press OK.. 17

18 Display & Sound Display & Sound You can change the display and sound settings of the device. 2 Select DISPLAY & SOUND, then press. 3 Select the desired item and then change the settings by pressing or. Home Screen: Change the style of the home screen. Backlight Timeout: Set the time (second) to turn off the lighting of LCD screen. Menu Timeout: Set the time (sec) for the menu screen to disappear automatically. If there is no button input during a set time, the screen will return to the home screen. Message Timeout: Set the time (sec) for a setting complete message or information message to disappear automatically. Language: Set the language you wish to use. Voice Instruction: Set to use the voice instruction instead of alarm sounds. Volume: Set the volume. 4 To save settings, press OK.. 18
19 Device Device Date & Time You can set date and time. Set the date and time accurately in order to collect accurate log data. 2 Select DEVICE > Date & Time, then press. 3 Select the desired item and then change the settings by pressing or. Date: Check the current date. To modify it directly, set Disabled for Time Sync. Time: Check the current time. To modify it directly, set Disabled for Time Sync. Time Zone: Set the time reference of the current location. Time Sync: Synchronize the server and the time. If you wish to synchronize the server and the time, enable Time Sync. Date Format: Set the date format. You can select among YYYY/MM/DD, MM/DD/YYYY and DD/MM/YYYY. Time Format: Set the time format. You can select either 24-Hour or AM/PM. 4 To save settings, press OK.. Relay You can set the open time and the input port of the exit button in the device. option is useful when the device is used as a standalone. 2 Select DEVICE > Relay, then press. Open Time: Set the duration for the door to remain open when standard user authentication has been carried out. Exit Button: Select the input port where the exit button is connected. Switch: Select the relay type (N/O or N/C). 3 To save settings, press OK.. Device Info You can view the model name, firmware version of Device ID and MAC address. 2 Select DEVICE > Device Info, then press. 3 You can view the information including Model Name, Device ID, HW, FW, Kernel and MAC. 4 To return to the previous screen, press ESC. 19
20 Device Memory Info You can view the status of memory usage. 2 Select DEVICE > Device Info, then press. 3 View the memory usage status of the device. 4 To return to the previous screen, press ESC. Restart Device You can restart the device. 2 Select DEVICE > Restart Device, then press. 3 To restart the device, press OK. To cancel, press ESC. Restore to default Device settings, network setting, logs and operator levels will be reset. 2 Select DEVICE > Restore to default, then press. 3 To reset all device settings, press OK. To cancel, press ESC. Note When you reset, the operator level will be reset as well. After resetting, make sure to set the operator level again. Language setting will not change after resetting. 20
21 Network Network Network Settings You can change the network settings of the device. Ethernet 2 Select NETWORK > TCP/IP, then press. 3 Select the desired item and then change the settings by pressing or. Port: Set the device port. DHCP: Set whether or not to use DHCP. If Disabled is set, the user can modify Port, IP Address, Gateway, or Subnet Mask. IP Address: View the IP address of the device. To modify, set DHCP to Disabled. Gateway: View the gateway of the device. To modify, set DHCP to Disabled. Subnet Mask: View the subnet mask of the device. To modify, set DHCP to Disabled. DNS: Set the DNS server address. 4 To save settings, press OK.. Server 2 Select NETWORK > Server, then press. 3 Select the desired item and then change the settings by pressing or. Connection Mode: When you select Device -> Server, you can send a connection signal from the device to a server with the input information directly. When you select Server -> Device, Server IP and Server Port cannot be entered. Server URL: Enter server URL instead of Server IP. Input is accepted only when Device -> Server is set for Connection Mode. Server IP: Enter the IP of the PC where BioStar 2 is installed. Input is accepted only when Device -> Server is set for Connection Mode. Server Port: Enter the port of the PC where BioStar 2 is installed. Input is accepted only when Device -> Server is set for Connection Mode. 4 To save settings, press OK.. 21
22 Network Serial Settings RS Select NETWORK > RS-485, then press. Mode: Select the RS-485 mode. Baud Rate: Select the desired baud rate. 3 To save settings, press OK.. 22
23 Event Log Event Log Search Log You can set a condition and search a log. 2 Select EVENT LOG.> Search, then press. 3 Select the desired item and then change the settings by pressing or. 4 When you press OK, a log that matches the set condition will be displayed on the screen. 5 To return to the previous screen, press ESC. Delete All Logs You can delete all saved logs. 2 Select EVENT LOG > Delete All, then press. 3 To delete all logs, press OK. To cancel, press ESC. View Log Usage You can check the status of log usage. 2 Select EVENT LOG > Log Usage, then press. 3 Check the log usage of the device. 4 To return to the previous screen, press ESC. 23
24 Troubleshooting Troubleshooting Checklist before reporting a failure Category Problem Solution Power PIN Fingerprint Door Lock Time Admin Access The power is being supplied but the device does not operate. I lost my PIN. I entered my PIN and pressed the OK button, but I still cannot open the door. The fingerprint has been enrolled but fingerprint authentication cannot be done smoothly and errors occur frequently. Suddenly fingerprint authentication cannot be done. The door cannot be locked when I close the door. Suddenly the time has become incorrect. I lost my Admin PIN, so I cannot access the Admin mode. If the terminal and the bracket are far away from each other, the device may not operate due to the temper switch. Check the adaptor or the power cable. For a normal user PIN, request it from the administrator and enter it again. If you have lost the Admin PIN, contact the installation company. Check if you have entered the registered PIN correctly. Check if you have changed the PIN recently. If you cannot remember the PIN, request it from the administrator and enter it again. Check How to enroll a fingerprint correctly and enroll the fingerprint again. If your fingerprint has a cut, the device may recognize your fingerprint as someone else's fingerprint. If there are a large number of enrolled fingerprints, change Matching Timeout and try again. The authentication rate may vary for each fingerprint due to different characteristics. Enroll the fingerprint of another finger. Check if the finger or the fingerprint sensor is smeared with sweat, water or dust, and wipe the finger or the fingerprint sensor clean. Wipe your finger and the fingerprint sensor with a dry towel and then try again. If the fingerprint of your finger is too dry, blow on the fingerprint and then try again. The electric lock may be malfunctioning. Have an inspection through the installation company. BioStation L2 is equipped with a built-in battery, but if power is not supplied for an extended period of time, the built-in battery may die, causing the time to become incorrect. For information on correcting the time, referring to Date & Time. Because the administrator grants an access permission in BioStation L2, only the administrator can access the Admin menu. If you need to access the Admin menu, you can issue a PIN through a required procedure. Ask the installation company for the procedure to issue the password. 24
25 Product Specifications Product Specifications Category Feature Specification Credential General Fingerprint Capacity Interface Electrical Biometric RF Option RF read range * CPU Memory LCD type LCD resolution Sound Fingerprint MHz MIFARE/DESFire/DESFire EV1/Felica/NFC MIFARE: 50 mm, DESFire: 50 mm, Felica: 30 mm, ISO15693: 50 mm 1.2 GHz Quad Core 2GB Flash MB RAM 2 color TFT LCD 220 x 176 pixels 16-bit Hi-Fi Operating temperature -20 C ~ 50 C Storage temperature -40 C ~ 70 C Operating humidity Storage humidity Dimension (W x H x D) Weight Certificates Image dimension Image bit depth Resolution 0 % ~ 80 %, non-condensed 0 % ~ 90 %, non-condensed 71 mm x 201 mm x 44 mm (Bottom) / 34 mm (Top) Device: 280 g Bracket: 61 g (including washers and bolts) CE, FCC, KC, RoHS, REACH, WEEE 272 x 320 pixels 8 bits, 256 grayscale 500 dpi Template SUPREMA / ISO / ANSI 378 Extractor / Matcher LFD MINEX certified and compliant Supported Max. User (1:1) 500,000 Max. User (1:N) 100,000 Max. Template (1:1) 1,000,000 Max. Template (1:N) 200,000 Max. Text Log 1,000,000 Ethernet RS-485 Wiegand TTL input Relay Tamper Power Switch input VIH Switch input VIL Switch pull-up resistor Wiegand output VOH Wiegand output VOL Wiegand output pull-up resistor Relay Supported (10/100 Mbps, auto MDI/MDI-X) 1ch Master / Slave (Selectable) 1 ch Input / Output (selectable) 2 ch Input 1 Relay Supported Voltage: 12VDC Current: Max. 600 ma Min. 4 V Max. 5 V Max. 1 V 4.7 kω (The input ports are pulled up with 4.7 kω.) Min. 4 V Max. 5 V Max. 1 V * RF read range will vary depending on the installation environment. Internal pull-up with 1 kω Voltage: Max. 30 VDC Current: 1A, Max. 2A 25

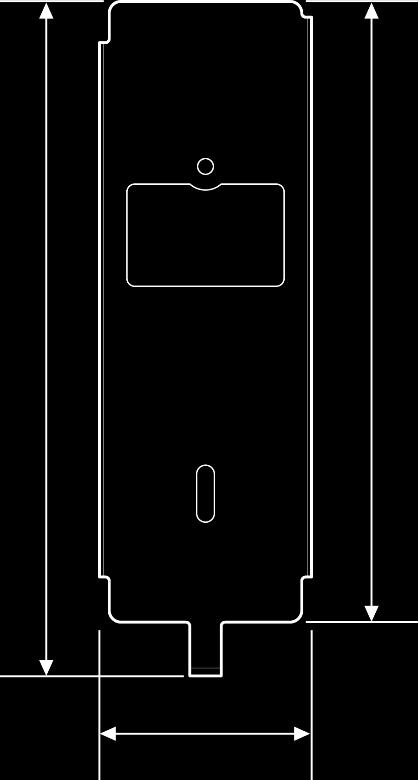

26 Product Specifications Dimensions (Unit: mm)
27
28 Appendices Appendices Escape clause The information in this manual is provided with regard to the Suprema's products. The right to use is acknowledged only for products included in the terms and conditions of the sales agreement guaranteed by Suprema. The right of license to other intellectual property rights not discussed in this manual is not acknowledged. Suprema does not guarantee or hold responsibility for the suitability and commerciality of the product for a specific purpose, or the infringement of patent, copyright, or other intellectual property rights with regard to sales or usage of Suprema's products. Do not use a Suprema product in situations related to medical, rescue of human lives, or maintenance of life, as a person may get injured or lose his/her life due to product malfunction. If an accident occurs while a consumer is using the product under the situations described as examples above, employees, subsidiaries, branches, affiliated companies and distributors of Suprema do not accept responsibility nor will they reimburse for all related direct and indirect expenses or expenditure including attorney fees even if the consumer has discovered any shortcomings in the product design or manufacturing process and claims this as a significant fault. Suprema may modify the product size and specifications at any time without proper notice in order to improve the safety, function and design of the product. Designers must keep in mind that functions or descriptions indicated as "to be implemented" or "undefined" may change at any time. Suprema will implement or define such functions or descriptions in the near future and Suprema accepts no responsibility for compatibility issues and any other problems arising from such compatibility issues. If you wish to obtain the newest specifications before ordering the product, contact Suprema through a Sales Representative or local distributor of Suprema. Copyright notice The copyright of this document is vested in Suprema. The rights of other product names, trademarks and registered trademarks are vested in each individual or organization that owns such rights. 28
29
INSTALLATION GUIDE BioStation L2 English Version 1.00 EN BSL2 V1.00A
 www.supremainc.com INSTALLATION GUIDE English Version 1.00 EN 101.00.BSL2 V1.00A Contents Safety instructions... 3 Introduction... 5 Components... 5 Name and function of each part... 6 Cables and connectors...
INSTALLATION GUIDE BioEntry W2 English Version 1.00 EN BEW2 V1.00A
 www.supremainc.com INSTALLATION GUIDE English Version 1.00 EN 101.00.BEW2 V1.00A Contents Safety Instructions... 3 Introduction... 5 Components... 5 Name and function of each part... 6 Cables and connectors...
USER GUIDE BioStation A2 English Version 1.11 EN BSA2 V1.11A
 www.supremainc.com USER GUIDE BioStation A2 English Version 1.11 EN 102.00.BSA2 V1.11A Contents Safety Instructions... 4 Introduction... 6 Components... 6 Name and function of each part... 7 Cables and
INSTALLATION GUIDE BioLite Net English Version 2.10 EN BLN V2.10A
 www.supremainc.com INSTALLATION GUIDE English Version 2.10 EN 101.00.BLN V2.10A Contents Safety Instructions... 3 Getting Started... 5 Components... 5 Part names and features... 6 Cables and connectors...
INSTALLATION GUIDE DM-20 English Version 1.10 EN DM20 V1.10A
 www.supremainc.com INSTALLATION GUIDE DM-20 English Version 1.10 EN 101.00.DM20 V1.10A Contents Safety Instructions... 3 Components... 4 Front Side... 5 Installation Example... 6 Dimensions... 7 Installation...
INSTALLATION GUIDE Xpass S2 English Version 2.2 EN XPS2 V2.20A
 www.supremainc.com INSTALLATION GUIDE English Version 2.2 EN 101.00.XPS2 V2.20A Contents Safety Instructions... 3 Getting Started... 4 Components... 4 Features... 5 Part names and features... 5 Cables
INSTALLATION GUIDE Xpass English Version 2.00 EN XPS V2.00A
 www.supremainc.com INSTALLATION GUIDE English Version 2.00 EN 101.00.XPS V2.00A Contents Safety Instructions... 3 Getting Started... 4 Components... 4 Features... 5 Part names and features... 5 Cables
USER GUIDE BioStation 2 English Version 1.21 EN BS2 V1.21A
 www.supremainc.com USER GUIDE BioStation 2 English Version 1.21 EN 102.00.BS2 V1.21A Contents Safety Instructions... 4 Getting Started... 6 Components... 6 Parts... 7 Cables and connectors... 9 How to
INSTALLATION GUIDE BioEntry Plus English Version 2.11 EN BEP V2.11A
 www.supremainc.com INSTALLATION GUIDE English Version 2.11 EN 101.00.BEP V2.11A Contents Safety Instructions... 3 Getting Started... 4 Components... 4 Features... 5 Part names and features... 5 Cables
Xpass S2. Installation Guide. Intelligent IP Access Control Reader EN XPS2 V1.11.
 Intelligent IP Access Control Reader Installation Guide EN 101.00.XPS2 V1.11 www.supremainc.com Important Safety Information Carefully review the information within the user manual before installing or
INSTALLATION GUIDE BioEntry W English Version 2.10 EN BEW V2.10A
 www.supremainc.com INSTALLATION GUIDE English Version 2.10 EN 101.00.BEW V2.10A Contents Safety Instructions... 3 Getting Started... 4 Components... 4 Features... 5 Part names and features... 5 Cables
INSTALLATION GUIDE BioStation 2 English Version 1.3 EN BS2 V1.30A
 www.supremainc.com INSTALLATION GUIDE English Version 1.3 EN 101.00.BS2 V1.30A Contents Safety Instructions... 3 Getting Started... 5 Components... 5 Parts... 6 Cables and Connectors... 8 How to Enroll
Contents Safety precautions Product components Optional accessories Names of each parts Product Dimension Cables and Connectors Power Connection
 Contents Safety precautions Product components Optional accessories Names of each parts Product Dimension Cables and Connectors Power Connection LAN Connection RS485 Connection Relay Connection Digital
User Manual. EMC compliance Ltd. FCC TEST REPORT Report No.: EMC-FCC-R0170
 FCC TEST REPORT Report No.: EMC-FCC-R0170 http://www.emc2000.co.kr User Manual EMC compliance Ltd. 65, Sinwon-ro, Yeongtong-gu, Suwon-si, Gyeonggi-do, 443-390, Korea 82-31-336-9919 (Main) 82-505-299-8311
Installation Guide (ver 1.0)
") IP based Fingerprint Access Control Installation Guide (ver 1.0) www.supremainc.com Contents Safety precautions 3 Basics of fingerprint recognition 5 How to place a finger 6 Product Contents 8 Front Side
IP based Fingerprint Access Control Installation Guide (ver 1.0) www.supremainc.com Contents Safety precautions 3 Basics of fingerprint recognition 5 How to place a finger 6 Product Contents 8 Front Side
QUICK START GUIDE. 2.4 Inch TFT Terminal Time Attendance & Access Control
 QUICK START GUIDE 2.4 Inch TFT Terminal Time Attendance & Access Control Safety Precautions The following precautions are to keep user safe and prevent any damage. Please read carefully before installation.
BioEntry W. Installation Guide. Compact Outdoor Fingerprint Reader/Controller EN BEW V1.20.
 Compact Outdoor Fingerprint Reader/Controller Installation Guide EN 101.00.BEW V1.20 www.supremainc.com Important Safety Information Carefully review the information within the user manual before installing/operating
AC-2000.USER GUIDE. Version Eng Copyright 2000 By Union Community Co., LTD.
 AC-2000.USER GUIDE Version Eng-1.00 Copyright 2000 By Union Community Co., LTD. AC-2000 User Guide 2 Version Date Description Firmware Version 1.00 2016-12-06 -Initial Release 10.61.00-000.02
IP based Fingerprint Access Control. Installation Guide.
 IP based Fingerprint Access Control Installation Guide EN 101.00.BEP (ver V1.30 1.2) www.supremainc.com Contents Safety precautions 3 Basics of fingerprint recognition 5 How to place a finger 6 Product
INSTALLATION GUIDE 2.4 Inch TFT Terminal Time Attendance & Access Control
 STALLATION GUIDE.4 Inch TFT Terminal Time Attendance & Access Control Optional accessories Safety Precautions The following precautions are to keep user s safe and prevent any damage. Please read carefully
Safety Precautions How to place the finger Product Contents Product PIN Diagram Product Dimensions Cables and Connectors Installation of Back Plate
 www.zkaccess.com Safety Precautions How to place the finger Product Contents Product PIN Diagram Product Dimensions Cables and Connectors Installation of Back Plate Power Connection Ethernet Connection
User Manual. Before using this device, read and follow all instructions for safety
 User Manual Before using this device, read and follow all instructions for safety Copyrightc 2014 KJTECH Co., Ltd. All rights reserved. It is provided for informational purposes only in this manual. All
CV-945 Stand-Alone Biometric Reader. Installation Instructions
 CV-945 Stand-Alone Biometric Reader Installation Instructions Contents 1.0 Introduction... 03 2.0 Mounting... 03 3.0 Specifications... 04 4.0 Application Diagram... 04 5.0 Wiring... 05 6.0 Recommended
Manual er under oversettelse til norsk.
 Manual er under oversettelse til norsk. Suprema Inc. 16F Parkview Office Tower, Jeongja-dong, Bundang-gu, Seongnam, Gyeonggi, 463-863 Korea E-mail : support@supremainc.com Website : www.supremainc.com
Quick Start Guide. ProBio & ProFAC + ZKBioSecurity 3.0
 Quick Start Guide ProBio & ProFAC + ZKBioSecurity 3.0 CONTENT 1 Safety Precautions...2 On Using Face Recognition Device...3 Device Overview...5 Product Dimensions & Installation...6 Power Connection...7
A-1300 Biometric Access Control System USER'S MANUAL
 A-1300 Biometric Access Control System USER'S MANUAL Table of Contents 1. General Information... 1 1.0 Notification... 2 1.1 System Overview... 2 1.2 Main Features... 2 1.3 Equipment... 3 2. Basic Concepts...
Innovative Fingerprint Terminal Installation Guide
 www.supremainc.com Innovative Fingerprint Terminal Installation Guide EN 101.00.BST (ver V1.31 1.1) Contents Product Contents 3 Connectors for External Interfaces 5 Cable and Connector Pinout 6 Installation
USER GUIDE. Preliminary
 USER GUIDE Preliminary Copyright 2009, NITGEN&COMPANY Co., Ltd. All rights reserved. ` Unauthorized reproduction of part or all of this manual s content in any form is prohibited. Product specifications
INSTALLATION GUIDE. InBio Pro Series Access Control Panels. Date: June, 2016 Version: 1.3
 INSTALLATION GUIDE InBio Pro Series Access Control Panels Date: June, 2016 Version: 1.3 2 What s in the Box 2 Screws & Anchors 2 Screwdriver 4 Diode CONTENT Contents What s in the Box...2 Optional accessories...4
Version Eng Copyright c LG CNS. Copyright c 2011 LG CNS
 XID-300 User Manual Version Eng-0.01 Copyright c LG CNS 2 < Contents > 1. Before Use... 3 1.1. Safety Precautions... 3 1.2. Terminal Description... 5 1.3. Screen Description (During Operation)... 5 1.3.1
Digital Door Lock User S Guide
 Digital Door Lock User S Guide YDM4115 ISL-1591-01 The functions and design of this product can be changed without prior notice for quality improvement. INTRO CONTENTS For peace of mind, you need to secure
Copyright 2009, NITGEN&COMPANY Co., Ltd. All rights reserved.
 Copyright 2009, NITGEN&COMPANY Co., Ltd. All rights reserved. ` Unauthorized reproduction of part or all of this manual s content in any form is prohibited. Product specifications may change without prior
QUICK START GUIDE. 2.4 Inch Finger Vein Terminal Time Attendance & Access Control
 QUICK START GUIDE 2.4 Inch Finger Vein Terminal Time Attendance & Access Control Version: 1.0 Date: Apr., 2017 1 2.4-Inch TFT LCD USB Storage Device Port Keypad& Card Reader Doorbell & LED Indicator Fingerprint
BioStation. Firmware Revision Notes EN BST V1.93. Biometrics & Security. Version 1.93
 BioStation Firmware Revision Notes Version 1.93 Biometrics & Security Firmware Version 1.93 (Build No.1.93_140228) Release: 2014-02-28 1. Save logs when card authentication fails 2. Relay Off log added
Finger Vein Access Control device Quick Start Guide Version: 1.0 Date: June USB slot. USB slot
 Overview Fingerprint & Finger Vein Device Front Left Side: Finger Vein Device Touch screen Card reader Fingerprint reader Finger vein reader Finger vein sensor: During registration, after finger touches
GV-AS Controller. Installation Guide
 GV-AS Controller Installation Guide Before attempting to connect or operate this product, please read these instructions carefully and save this manual for future use. 2011 GeoVision, Inc. All rights reserved.
Two-door Access Controller
 Two-door Access Controller Quick Start Guide V1.0.0 Preface Overview This document elaborates on structure, installation, interface and wiring of two-door access controller. Symbol Definition The following
F18. Fingerprint capacity 3,000 Transaction capacity 100,000 Hardware Platform ZK 6001, 400Mhz 64M Flash, 32MSDRAM. Identification speed
 F18 Features: 1. 2.4 TFT LCD color screen 2. Standard Wiegand Input and Output interfaces are compatible with most all 3 rd party 26 bit Wiegand readers and access control panels. 3. USB HOST port makes
SF200. Installation Guide & Quick Start Guide. 2 TFT AC Terminal Version: 1.0 Date: June 2014
 SF200 Installation Guide & Quick Start Guide 2 TFT AC Terminal Version: 1.0 Date: June 2014 All design and specification declared are subject to change without notice in advance. Contents Safety Precautions
Fingerprint Door Lock OPERATOR S MANUAL
 Fingerprint Door Lock OPERATOR S MANUAL Notes: Please read this manual carefully before operation. 1 Contents Chapter 1: Introduction 03 1.1 Features 03 1.2 Technical Specification 03 1.3 Fingerprint recognition
EX8. User Manual. Ver 1.0
 EX8 User Manual Ver 1.0 EX8 manual ver1.0 Power supply important issue! Use separate power supply when ever is possible, one for EX8 and Reader and another for door lock. This way electrical isolation
Operation manual For NG BIOSINGLE Version 1.1
 Operation manual For NG BIOSINGLE Version 1.1 SMART-I ELECTRONICS SYSTEMS PVT. LTD.(An ISO 9001:2008 certified company) R&D, Training & Customer Support Center: First Floor, Arihant Plaza Phase II, Village-Ovala,
Fingerprint Door Lock User MANUAL
 Fingerprint Door Lock User MANUAL Notes: Please read this manual carefully before operation. 0 User Manual AKME LOCK LLC Contents CHAPTER 1: INTRODUCTION... 2 1.1 FEATURES... 2 1.2 TECHNICAL SPECIFICATION...
3.2 No records found though staff have clocked in/out The machine cannot connect with PC Clock s time works fine, but FP scanner
 1 2 Contents 1 Product Introduction... 2 1.1 Introduction... 2 1.1.1 Product Feature... 2 2 Operation Guide... 5 2.1 Keypad Introduction... 5 2.2 Time attendance status... 5 2.3 User... 5 2.3.1 User enroll...
X-Station. User Manual EN XST V1.21.
 X-Station User Manual EN 102.00.XST V1.21 www.supremainc.com Features X-Station uses RFID card scanner to provide more access control and T&A options. 3.5" color touchscreen LCD provides the X-Station
Portals 14 What is a portal? 14 Hardware 15 RS232 to RS USB to RS TCP/IP to RS Add a Serial Portal 16 Add a Network portal 16
 PROS LITE User Manual Version 2.0.0 www.visual-plus.com Table of Contents Getting Started 5 Starting PROS Lite 5 Create a Portal 5 Adding a control panel 6 Adding a user 7 Upload users to a controller
RFT1000 reader in RACS 5. User Manual
 Roger Access Control System RFT1000 reader in RACS 5 User Manual Firmware version: 1.3 or newer Hardware version: 1.1 Document version: Rev. A 2016 ROGER sp. z o.o. sp.k. All rights reserved. This document
Akcess BioMetrics Corporation. Bio2Touch. Access Control Fingerprint Reader. User's Manual. Akcess BioMetrics Corporation
 Akcess BioMetrics Corporation Bio2Touch Access Control Fingerprint Reader User's Manual Akcess BioMetrics Corporation Notices: Information in this document is subject to change without notice. NO WARRANTY
GV-AS/EV Controller. User s Manual
 GV-AS/EV Controller User s Manual Before attempting to connect or operate this product, please read these instructions carefully and save this manual for future use. AS100.110.120.210.400.410.810-EV48-C
AC-2100.User Guide. Version Eng Copyright 2000 By Union Community Co., LTD.
 AC-2100.User Guide Version Eng-1.03 Copyright 2000 By Union Community Co., LTD. AC-2100 User Guide 2 < Revison History> Version Date Description Firmware Version 1.00 2009-08-20 Initial Release 10.51.00
F6-Fingerprint. Access Control/Reader. User Manual. F6 - Simplified Instruction. (Master Code) # (Factory default:1234) Enter the Programming Mode
 # (Factory default:1234) Enter the Programming Mode") -Fingerprint Access Control/Reader Function Description Enter the Programming Mode - Simplified Instruction Operation (Factory default:1234) Change the Master Code Add Fingerprint User Add Card User Add
-Fingerprint Access Control/Reader Function Description Enter the Programming Mode - Simplified Instruction Operation (Factory default:1234) Change the Master Code Add Fingerprint User Add Card User Add
Innovative Fingerprint Terminal User Guide
 www.supremainc.com Innovative Fingerprint Terminal User Guide User EN Guide 102.00.BST (Ver V1.96 1.7) Innovative Fingerprint Terminal for Access Control and Time Attendance Fingerprint recognition, now
Chapter 1. Product Information Features Terms Safety Tips Fingerprint Recognition Face Recognition...
 Contents Chapter 1. Product Information 4 1.1 Features...4 1.2 Terms...4 1.3 Safety Tips...5 1.4 Fingerprint Recognition...6 Fingerprint Recognition... 6 The Process... 6 Fingerprint Recognition Method...
Fingerprint Access Standalone User s Manual
 Fingerprint Access Standalone User s Manual V1.1.1 1 Table of Contents 1 Overview... 1 2 Device Structure and Installation... 2 2.1 Device Structure... 2 2.2 Device Installation... 3 3 System Structure...
ImproX IXP20 Controller INSTALLATION MANUAL
 MODEL NUMBER: ISC920-0-0-GB-XX ISC921-5-0-GB-XX IXP20 CONTROLLER SPECIFICATIONS Working Environment Plastic Housing... Power ImproX IXP20 Controller INSTALLATION MANUAL Designed to work in an indoor (dry)
Single Door Standalone Access Control User Manual
 Single Door Standalone Access Control User Manual Reading this manual carefully before install and use the device 1. Packing List Name Quantity Remarks Keypad User manual Screw driver Rubber plug Self
AC-115 Compact Networked Single-Door Controller Hardware Installation and Programming
 AC-115 Compact Networked Single- Controller Hardware Installation and Programming Copyright 2013 by Rosslare. All rights reserved. This manual and the information contained herein are proprietary to REL,
GV-AS200 Controller. Hardware Installation Guide
 GV-AS200 Controller Hardware Installation Guide Before attempting to connect or operate this product, please read these instructions carefully and save this manual for future use. 2008 GeoVision, Inc.
smartentry Wireless Video Doorphone User Manual
 smartentry Wireless Video Doorphone User Manual Designed & Engineered Version 1.2 in the United Kingdom Contents Precautions... 3 1. Product Overview... 4 1.1. Product Features... 4 1.2. Contents... 4
eh880 Secure Smart Card Terminal
 eh880 Secure Smart Card Terminal Technical Specifications Subject to change without prior notice Table of Contents 1.0. Introduction... 3 2.0. Features... 4 3.0. Supported Card Types... 5 3.1. MCU Cards...
ISC GB-XX ISC GB-XX ISC GB-XX ISC GB-XX
 ISC910-1-0-GB-XX ISC911-5-0-GB-XX ISC920-0-0-GB-XX ISC921-5-0-GB-XX The ImproX IXP20 is a fully featured, stand-alone Access Control System supporting up to 1 000 Tagholders and 5 000 transactions. Designed
User Manual VIDEO DOOR PHONE CAV-70B,71B
 User Manual VIDEO DOOR PHONE CAV-70B,71B 513-11, Sangdaewon-dong, Jungwon-gu, Seongnam-si, Gyeonggi-do, Korea Int l Business Dept. Tel. : +82-31-7393-540~550 Fax. : +82-31-745-2133 Web site : www.commax.com
QS Series Products Hardware User Guide Company Toll Free: OR Technical Support:
 QS Series Products Hardware User Guide Company Toll Free: 877-998-3440 OR 714-998-3440 Technical Support: 877.998.3440 WWW.Q-SEE.COM 1 Table of Contents I. Introduction 4 1.1 Basic Concepts..5 1.1.1 User
B-33. Hardware and Install Manual. (DC 12V / PoE)
") B-33 Hardware and Install Manual (DC 12V / PoE) Table of Contents Precautions 3 Safety Instructions... 4 Introduction 6 Package Contents... 6 Physical Description... 7 Installation Procedures 9 Step 1:
B-33 Hardware and Install Manual (DC 12V / PoE) Table of Contents Precautions 3 Safety Instructions... 4 Introduction 6 Package Contents... 6 Physical Description... 7 Installation Procedures 9 Step 1:
BIOC3 V1 USER S MANUAL. Biometric Reader v. b1
 BIOC3 V1 EN Biometric Reader USER S MANUAL v. b1 www.xprgroup.com 1 Contents 1. DESCRIPTION 2. SPECIFICATIONS 3. MOUNTING 4. WIRING 5. CONNECTING BIOMETRIC READERS TO EWS CONTROLLER 5.1 CONNECTING BIOMETRIC
c Copyright 2008 Supremainc. All rights reserved.
 EN 102.00.BLN V1.23 This manual is provided for information purpose only. All information included herein is subject to change without notice. Suprema is not responsible for any changes, direct or indirect,
Manual Version: V1.00. Video Decoder User Manual
 Manual Version: V1.00 Video Decoder User Manual Thank you for purchasing our product. If there are any questions, or requests, please do not hesitate to contact the dealer. Copyright Copyright 2016 Zhejiang
BioPointe. User's Manual
 BioPointe User's Manual Getting to know the BioPointe Notices: Information in this document is subject to change without notice. NO WARRANTY OF ANY KIND IS MADE WITH REGARD TO THIS MATERIAL INCLUDING,
B100-SA Standalone Biometric Reader
 EN B100-SA Standalone Biometric Reader User Manual v.b1 Contents 1.0 INTRODUCTION 2.0 MOUNTING 3.0 SPECIFICATIONS......... 3 3 3 4.0 APPLICATION DIAGRAM... 4 5.0 WIRING... 4 6.0 RECOMMENDED SWIPING TECHNIQUE...
AC-5000.User Guide. Version eng Copyright 2000 By Union Community Co., LTD.
 AC-5000.User Guide Version eng-1.00 Copyright 2000 By Union Community Co., LTD. AC-5000 User Guide 2 Version Date Description Firmware Version 1.00 2011-01-10 Initial Release 10.51.00-000.00
Access control panel U-Prox IC E (Elevator control)
") 1.003 Access control panel U-Prox IC E (Elevator control) Installation and programming manual About this document http://u-prox.com This manual covers installation, adjustment and use of U-Prox IC E (hereinafter
1.003 Access control panel U-Prox IC E (Elevator control) Installation and programming manual About this document http://u-prox.com This manual covers installation, adjustment and use of U-Prox IC E (hereinafter
CM E FUJITSU SEMICONDUCTOR CONTROLLER MANUAL F 2 MC-16L/16LX EMULATION POD MB HARDWARE MANUAL
 FUJITSU SEMICONDUCTOR CONTROLLER MANUAL CM42-00411-2E F 2 MC-16L/16LX EMULATION POD MB2145-507 HARDWARE MANUAL F 2 MC-16L/16LX EMULATION POD MB2145-507 HARDWARE MANUAL FUJITSU LIMITED PREFACE Using the
LTK1100 Series Card Reader User Manual
 LTK1100 Series Card Reader User Manual User Manual About this Manual This Manual is applicable to Card Reader. The Manual includes instructions for using and managing the product. Pictures, charts, images
DINB100-SA Standalone Biometric Reader
 a Visual Plus Corporation Company EN DINB100-SA Standalone Biometric Reader User Manual v.a1 Contents 1.0 INTRODUCTION... 2.0 MOUNTING AND DISMOUNTING... 3.0 SPECIFICATIONS... 4.0 APPLICATION DIAGRAM 5.0
FEATURE USA. TI 300MHz USA. New. User. second
 Feature 1 FEATURE USA TI 300MHz high speed processor USA BioNano core fingerprint algorithm of high speed and stability New generationn fully sealed, waterproof and dustproof fingerprint sensor User name
Instruction Manual. Vogue. Security. Technology. Innovation 2013-V01
 Instruction Manual DH16A-60DTE Model 60 with plastic keypad, stand alone access control DH16A-60DTQE Model 60 with plastic keypad, networked access control 2013-V01 Security Technology Vogue Innovation
Camera. Network Bullet Camera. Quick Operation Guide
 Camera Network Bullet Camera Quick Operation Guide 1 Thank you for purchasing our product. If there are any questions, or requests, please do not hesitate to contact the dealer. About This Document This
GV-Card Reader. User s Manual
 GV-Card Reader User s Manual Before attempting to connect or operate this product, please read these instructions carefully and save this manual for future use. READER-B 2016 GeoVision, Inc. All rights
Fingerprint Access Controller. enbioaccess-t1. User Guide
 Fingerprint Access Controller enbioaccess-t1 User Guide 2 Copyright 2013, NITGEN Co., Ltd. All rights reserved. ` This manual may not be reproduced, either wholly or in part, without prior permission.
Network Dome Camera Quick Start Guide
 Thank you for purchasing our product. If there are any questions, or requests, please do not hesitate to contact us. About This Document This manual may contain several technical incorrect places or printing
Quick Installation Guide MAC1000/MAC1000SR STANDALONE BIOMETRIC CONTROLLER
 MAC1000/MAC1000SR STANDALONE BIOMETRIC CONTROLLER Table of contents 1 PRODUCT INTRODUCTION... 2 1.1 NAME AND FUNCTION OF EACH PART... 2 1.2 CABLE COLOR TABLE... 4 1.3 CABLE SELECTION... 6 2 IDENTIFYING
User Manual. Split access control with intelligent secured power supply.
 User Manual Split access control with intelligent secured power supply. Contents. Introduction, features and specifications. Installation and Wiring Diagram 3. Manager Card Operation 4. User Settings 5.
MEEM Memory Ltd. User Guide ios
 MEEM Memory Ltd. User Guide ios 1. MEEM AT A GLANCE Meem Overview This guide describes the features of MEEM and MEEM App. MEEM automatically backs up your phone onto MEEM itself, every time you charge
Fingerprint Access Control F1. User Manual
 Fingerprint Access Control F1 User Manual 1. Introduction F1 is a metal shell standalone fingerprint access control, using the America Atmel s MCU, with precise electron circuit and good productive technology.
DOLXFD1000B. Waterproof Access Control/Reader
 DOLXFD1000B Waterproof Access Control/Reader INTRODUCTION The DOLXFD1000B is a single- entry multi-function Access Controller with integrated keypad and card reader. It is designed and manufactured to
GV-RK1352 and GV-R1352 Card Reader
 GV-RK1352 and GV-R1352 Card Reader The GV-RK1352 and GV-R1352 are card readers designed to recognize identifications cards. GV-RK1352 comes with keypad, allowing it to also recognize PIN codes. Featured
BioStar Lite. User Manual. Version V1.1 EN BSL V1.1A. www. supremainc.com
 BioStar Lite User Manual Version V1.1 EN 102.00.BSL V1.1A www. supremainc.com Quality Assurance Warranty Suprema warrants the performance of the product specified in the specifications within the limitations
AC-7000 User guide 2. <Revison History> Version Date Description Firmware Version Initial Release 0.0.x
 AC7000 User uide AC-7000 User guide 2 Version Date Description Firmware Version 1.00 2014-08-14 Initial Release 0.0.x.51.00-000.06 AC-7000 User guide 3 < Glossary> Admin, Administrator
Pegasus Equipments Export Limited. Local Contact:
 Pegasus Equipments Export Limited Add: #31G, Haiyige, Scienway Palace Science & Technology Industrial Park Shenzhen, China. Tel: +86 755 2658 3464 +86 755 2658 3596 Fax: +86 755 8611 0167 web: www.pegasusexport.com
User Manual COMMAX LOBBY PHONE
 User Manual COMMAX LOBBY PHONE DRC-703S Thank you for purchasing COMMAX products. Please carefully read this User s Guide (in particular, precautions for safety) before using a product and follow instructions
BIOVaULT. Manual. Access Control at the Touch of a Finger
 BIOVaULT Manual Access Control at the Touch of a Finger UNDERSTANDING BIOMETRICS Biometrics are methods of authenticating the identity of person based on physiological or behavioral characteristics. Biometric
enbioaccess-t9.user guide
 enbioaccess-t9.user guide Version Eng-1.00 Copyright 2015 By NITGEN Co., LTD. enbioaccess-t9 User guide 2 Version Date Description Firmware Version 1.00 2015-05-15 Initial Release x.x.x.1.02-000.04
IPS125T. TimeIPS Network Clock and Keypad. Installation Guide
 IPS125T Network Clock and Keypad Installation Guide including instructions for IPS125T-B Touch and IPS125T-O Optical Biometric Fingerprint Reader Options FCC Declaration of Conformity (DoC) Compliance
VIS-3016 Fingerprint Recorder User Manual
 VIS-3016 Fingerprint Recorder User Manual www.visionistech.com User Manual About this Manual This manual is applied for fingerprint recorder. The Manual includes instructions for using and managing the
COLOR VIDEO DOOR PHONE
 www.commax.in.ua COLOR VIDEO DOOR PHONE.in.ua Model No. CDV-72BE a513-11, Sangdaewon-dong, Jungwon-gu, Seongnam-si, Gyeonggi-do, Korea Int l Business Dept. Tel.; : +82-31-7393-540~550 Fax.; +82-31-745-2133
AC-5000.User Guide. Version eng-1.00
 AC-5000.User Guide Version eng-1.00 AC-5000 User Guide 2 Version Date Description Firmware Version 1.00 2011-01-10 Initial Release 10.51.00-000.00 Admin (Administrator) - A
Secrure door control and I/O expansion. Installation Guide. (ver 1.0)
") Secrure door control and I/O expansion Installation Guide (ver 1.0) www.supremainc.com Contents Product Contents 3 Front Panel Description 4 Rear Panel Description 5 Connectors for External Interfaces
Secrure door control and I/O expansion Installation Guide (ver 1.0) www.supremainc.com Contents Product Contents 3 Front Panel Description 4 Rear Panel Description 5 Connectors for External Interfaces
Portable Document & Image Scanner. User s Manual
 Portable Document & Image Scanner User s Manual Table of Contents 1. Precaution. 2 2. Preparation..5 Standard Accessories 5 Part Names & Functions..6 3. key features..... 7 4. Status Icons Explanations.....8
Operation Manual Defender Car vision 5018FullHD Car DVR
 Operation Manual Defender Car vision 5018FullHD Car DVR 1 Thank you for buying Defender Car Vision 5018FullHD car DVR. Before using the device, read attentively this manual and keep it for the whole period