Uconnect. 4.3/4.3S Owner s Manual Supplement
|
|
|
- Gervais Richardson
- 5 years ago
- Views:
Transcription


1 Uconnect 4.3/4.3S Owner s Manual Supplement
2 SECTION TABLE OF CONTENTS PAGE 1 SAFETY GUIDELINES INTRODUCTION RADIO MODE DISC MODE USBMODE AUXMODE BLUETOOTH MODE MORE & SETTINGS
3
4 CONTENTS SAFETY GUIDELINES...4 SAFETY GUIDELINES 1
5 4 SAFETY GUIDELINES SAFETY GUIDELINES Ensure that all persons read this manual carefully before using the radio system. It contains instructions on how to use the system in a safe and effective manner. WARNING! ALWAYS drive safely with your hands on the steering wheel. You have full responsibility and assume all risks related to the use of the Uconnect features and applications in this vehicle. Only use Uconnect when it is safe to do so. Failure to do so may result in an accident involving serious injury or death. Use these features only when safe to do so. If prolonged viewing of the screen is required, park in a safe location and set the parking brake. Stop use immediately if a problem occurs. Failure to do so may cause injury or damage to the product. Return it to your authorized dealer to repair. Make certain the volume level of the system is set to a level that still allows you to hear outside traffic and emergency vehicles. The law in some states prohibits the Front Seat DVD Viewer. As a result, it may be disabled prior to delivery to you. If you move to another state, you should consult your dealer for the proper enable/disable setting for your new state. Currently all states prohibit front seat video viewers except for: Arkansas, Delaware, Georgia, Hawaii, Idaho, Iowa, Kentucky, Mississippi, Missouri, Montana, North Dakota and Ohio.
6 INTRODUCTION CONTENTS Uconnect 4.3 SYSTEM...6 2
7 6 INTRODUCTION Uconnect 4.3 SYSTEM WARNING! ALWAYS drive safely with your hands on the steering wheel. You have full responsibility and assume all risks related to the use of the Uconnect features and applications in this vehicle. Only use Uconnect when it is safe to do so. Failure to do so may result in an accident involving serious injury or death.
8 INTRODUCTION 7 2
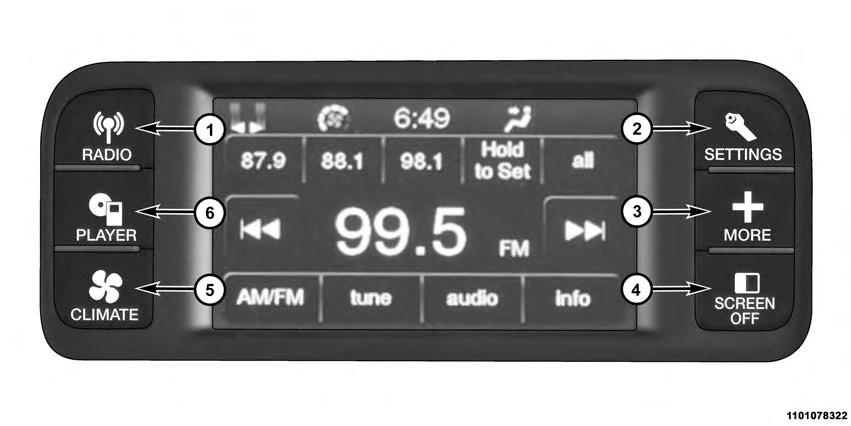
9 8 INTRODUCTION 1 RADIO Push the RADIO button, located on the faceplate, to enter the Radio Mode. The different tuner modes: AM, FM and SAT can be selected by pushing the corresponding buttons in the Radio Mode. 2 SETTINGS Push the SETTINGS button, on the faceplate, to access the Settings list. Clock, Display, Audio, Bluetooth and SiriusXM Settings are described in this manual. See your vehicles Owner s Manual on the DVD for more details. 3 MORE Push the MORE button, located on the faceplate, to access additional options. Options available such as: Uconnect Phone (if equipped) and Compass can be accessed by pushing the corresponding buttons in the More Menu. 4 SCREEN OFF Push the SCREEN OFF button, on the faceplate, to turn the touchscreen OFF. To turn the screen back ON, just press the touchscreen. 5 CLIMATE Push the CLIMATE Control button on the faceplate to access climate controls. Refer to Climate Controls in your vehicles Owner s Manual for further details. 6 PLAYER Push the PLAYER button, located on the faceplate, to access media sources such as: Disc, USB Device and AUX as long as the requested media is present.
10 RADIO MODE CONTENTS RADIO OPERATION...10 Overview...10 Common Radio Functions...10 Seek And Direct Tune Functions...11 Setting Presets Audio...13 SiriusXM Satellite Radio Mode If Equipped..14 3
11 10 RADIO MODE RADIO OPERATION Overview The radio is equipped with the following modes: FM AM SAT SiriusXM Satellite Radio (if equipped) Press the RADIO button, upper left corner, to enter the Radio Mode. The different tuner modes; AM, FM, and SAT, can then be selected by pressing the corresponding buttons on the touchscreen. Common Radio Functions The following operations offer the same functionality across all Radio Modes, and further instructions are provided where differences exist. ON/OFF & Volume Control Push the ON/OFF Volume Control knob to turn on the radio. Push the ON/OFF Volume Control knob a second time to turn off the radio. The Volume control turns continuously (360 degrees) in either direction, without stopping. Turning the ON/OFF Volume Control knob clockwise increases the Volume and counterclockwise decreases it. When the audio system is turned on, the sound will be set at the same Volume level as last played.
12 ENTER/BROWSE & TUNE/SCROLL Control Info Turn the TUNE/SCROLL control knob clockwise to increase or counterclockwise to decrease the radio station frequency. Push the ENTER/BROWSE button to choose a selection. Press the Info button to display channel number/ frequency, song title, genre and artist. This feature is only available in FM and SAT modes. Exit The Exit button provides a means to close the Direct Tune Screen. Go Press the green GO button on the touchscreen to allow you to commit an entry, at which time, the radio will tune RADIO MODE 11 to the entered Channel, and close the Direct Tune Screen. The GO button on the touchscreen is only for SiriusXM Satellite radio mode. Seek And Direct Tune Functions The Seek Up and Down functions are activated by pressing the Double Arrow buttons to the right and left of the radio station display, or by pushing the left Steering Wheel Audio Control (if equipped) up or down. Seek Up Press and release the Seek Up button on the touchscreen to tune the radio to the next listenable station or channel. During a Seek Up function, if the radio reaches the starting station after passing through the entire band two times, the radio will stop at the station where it began. 3

13 12 RADIO MODE Fast Seek Up Press and hold the Seek Up button on the touchscreen to advance the radio through the available stations or channels at a faster rate, the radio stops at the next available station or channel when the button on the touchscreen is released. Seek Down Press and release the Seek Down button on the touchscreen to tune the radio to the next listenable station or channel. During a Seek Down function, if the radio reaches the starting station after passing through the entire band two times, the radio will stop at the station where it began. Fast Seek Down Press and hold the Seek Down button on the touchscreen to advance the radio through the available stations or channel at a faster rate, the radio stops at the next available station or channel when the button is released. Direct Tune The Direct Tune touchscreen is available in AM, FM, and SAT radio modes and can be used to direct tune the radio
14 to a desired station or channel. Press the Tune button located at the bottom of the radio touchscreen. Press the available numbered button to begin selecting a desired station. Once a number has been entered, any numbers that are no longer possible (stations that cannot be reached) will become deactivated/grayed out. If you accidently entered the wrong station number, press the X button to clear the radio station numbers and reenter the correct station number. Once the last digit of a station has been entered, the Direct Tune screen will close and the system will automatically tune to that station. The selected Station or Channel number is displayed in the Direct Tune text box. Setting Presets The Presets are available for all Radio Modes and are activated by pressing any of the four Preset buttons located at the top of the touchscreen. When you are receiving a station that you wish to commit into memory press and hold the desired numbered button for more that two seconds or until you hear a confirmation beep. The Radio stores up to 12 presets in each of the Radio modes. A set of four presets are visible at the top of the radio touchscreen. Audio RADIO MODE Push the SETTINGS button on the right side of the unit. 2. Scroll down and press the Audio button to enter the Audio menu. 3
15 14 RADIO MODE The Audio Menu shows the following options for you to customize your audio settings. Equalizer Press the Equalizer button to adjust the Bass, Mid and Treble. Use the + or buttons to adjust the equalizer to your desired settings. Press the Back Arrow button when done. Balance/Fade Press the Balance/Fade button to adjust the sound from the speakers. Use the Arrow button to adjust the sound level from the front and rear or right and left side speakers. Press the Center C button to reset the balance and fade to the factory setting. Press the Back Arrow button when done. Speed Adjusted Volume Press the Speed Adjusted Volume button to select between OFF, 1, 2 or 3. This will decrease the radio volume relative to a decrease in vehicle speed. Press the Back Arrow button when done. 3. Press the Exit button to exit from the Audio Menu. SiriusXM Satellite Radio Mode If Equipped SiriusXM services require a subscription, sold separately after the 12-month trial period included with the new vehicle purchase. If you decide to continue your service at the end of your trial subscription, the plan you choose will automatically renew and bill at thencurrent rates until you call SiriusXM at to cancel. See SiriusXM Customer Agreement for complete terms at All fees and programming subject to change. Our satellite service is available only to those
16 at least 18 and older in the 48 contiguous USA and D.C. Our Sirius satellite service is also available in PR (with coverage limitations). Our Internet radio service is available throughout our satellite service area and in AK and HI Sirius XM Radio Inc. Sirius, XM and all related marks and logos are trademarks of Sirius XM Radio Inc. This functionality is only available for radios equipped with a Satellite receiver. To receive satellite radio, the vehicle needs to be outside with a clear view to the sky. If the screen shows Acquiring Signal, you might have to change the vehicle s position to receive a signal. In most cases, the satellite radio does not receive a signal in underground parking garages or tunnels. No Subscription Radios equipped with a Satellite receiver, require a subscription to the SiriusXM Service. When the Radio does not have the necessary subscription, the Radio is able to receive the Preview channel only. Acquiring SiriusXM Subscription RADIO MODE 15 To activate the SiriusXM subscription, call the toll free number on the SiriusXM Settings. You will need to provide the Sirius ID (ESN) located on your vehicle s screen. The satellite mode is activated by pressing the AM/SAT button on the touchscreen located at the bottom of the radio screen. Press the AM/SAT button on the touchscreen and then press the SAT button on the touchscreen. When in SiriusXM Satellite mode: The SiriusXM Presets are displayed at the top of the screen. The SiriusXM Channel Number is displayed along with Artist and Song name. The SiriusXM function buttons on the touchscreen are displayed on the bottom. 3
17 16 RADIO MODE In addition to the tuning functions common to all Radio modes, the browse, info, and more button on the faceplate functions are available in SiriusXM Mode. Pressing the more button slides over the additional functions that are on the second level of the bottom bar. This second level stays for 10 seconds and then returns to the main top level of the bottom bar. The second level displays audio, fav, gamezone and replay buttons. Browse Press the Browse button at the bottom left of the screen to enter the Browse screen. The Browse screen in SAT mode provides you the ability to browse by All, Favorites or Genres. You can also access Gamezone, and Traffic and Weather settings in the Browse screen. Favorites Press the More... button and then the Fav button to access the favorites feature. The favorites feature enables you to set a favorite artist, or song. The Radio then uses this information to alert you when either the favorite song, or works by the favorite artist are being played at any time by any of the SiriusXM Channels. Gamezone Press the More... button and then the Gamezone button to access the Gamezone feature. This feature provides you with the ability to Select teams, edit the selection, and set Alerts.
18 Replay The replay function provides a means to store and replay up to 22 minutes of music audio and 48 minutes of talk radio. Once the channel is switched, content in replay memory is lost. Press the Replay button. The Play/Pause, Rewind/ Forward and Live buttons will display at the top of the screen, along with the replay time. You can exit by pressing the Replay button any time during the Replay mode. Play/Pause Press the Pause or Play buttons to pause playing of the content at any time that the content is playing live or rewound content. Play can be resumed again by pressing the Pause/Play button. RADIO MODE 17 Rewind Press the RW button to rewind the content in steps of five seconds. Pressing the RW button for more than two seconds rewinds the content. The Radio begins playing the content when the RW button is released. Forward Each press of the FW button forwards the content in steps of five seconds. Forwarding of the content can only be done when the content is previously rewound, and therefore, can not be done for live content. A continuous press of the FW button also forwards the content. The Radio begins playing the content when the FW button is released. Live Press the Live button to resume playing Live content. 3
19
20 DISC MODE CONTENTS DISC MODE OPERATION...20 Overview...20 Seek Up/Down Browse Source...22 Info...22 Shuffle...22 Audio
21 20 DISC MODE DISC MODE OPERATION Overview Disc Mode is entered by either inserting a Disc or by pressing the PLAYER button located left of the display. Once in Player Mode, press the Source button and select Disc. A No Disc message will be displayed on the screen in the Disc mode when a Disc is not present in the Radio. Inserting Compact Disc Gently insert one Disc into the Disc player with the Disc label facing up. The CD will automatically be pulled into the Disc player and the Disc icon will illuminate on the radio display. If a Disc does not go into the slot more than 1.0 inch (2.5 cm), a disc may already be loaded and must be ejected before a new disc can be loaded. If you insert a disc with the ignition ON and the radio ON, the unit will switch to Disc mode and begin to play the disc. The display will show the track number, and index time in minutes and seconds. Play will begin at the start of track 1. CAUTION! This CD player will accept 4-3/4 inch (12 cm) discs only. The use of other sized discs may damage the CD player mechanism. Do not use adhesive labels. These labels can peel away and jam the player mechanism. Uconnect is a single CD player. Do not attempt to insert a second CD if one is already loaded. Dual-media disc types (one side is a DVD, the other side is a CD) should not be used, and they can cause damage to the player.
22 EJECT Button Ejecting A Disc Push the EJECT button to eject the Disc. If the Disc is not removed, the radio will reinsert the Disc but will not play it. A disc can be ejected with the radio and ignition OFF. Seek Up/Down Press and release the Seek Up button for the next selection on the Disc. Press and release the Seek Down button to return to the beginning of the current selection, or return to the beginning of the previous selection if the Disc is within the first eight seconds of the current selection. Fast Seek Up Press and hold the Seek Up button and the Disc player will begin to fast forward through the current track until the button is released. Fast Seek Down Press and hold the Seek Down button and the Disc player will begin to rewind through the current track until the button is released. Browse DISC MODE 21 Press the browse button on the touchscreen to scroll through and select a desired track on the Disc. Press the exit button on the touchscreen if you wish to cancel the browse function. 4
23 22 DISC MODE Source Press the source button to select the desired audio source: CD, AUX or USB. This screen will time out after a few seconds and return to the main radio screen if no selection is made. Info Press the Info button to display the current track information. Press the X button to cancel this feature. Shuffle Press the more... button on the touchscreen then the shuffle button on the touchscreen to play the selections on the compact disc in random order to provide an interesting change of pace. Press the shuffle button on the touchscreen a second time to turn this feature off. Audio Refer to Operating Instructions Radio Mode for adjusting the audio settings.
24 USB MODE CONTENTS USB OPERATION...24 Overview...24 Seek Up/Down Browse Source...25 Info...25 Shuffle...25 Audio
25 24 USB MODE USB OPERATION Overview USB/iPod Mode is entered by either inserting a USB Jump Drive or an ipod cable into the USB port, or by pushing the PLAYER button located left of the display. Once in Player Mode, press the Sourc button and select USB/iPod. Inserting USB Device Gently insert the USB device into the USB Port. If you insert a USB device into the USB port, with the ignition ON and the radio ON, the unit will switch to USB mode and begin to play. The display will show the track number and index time in minutes and seconds. Play will begin at the start of track 1. Seek Up/Down Press and release the Seek Up button for the next selection on the USB/iPod device. Press and release the Seek Down button to return to the beginning of the current selection, or return to the beginning of the previous selection if the USB/iPod device is within the first eight seconds of the current selection. Fast Seek Up Press and hold the Seek Up button on the touchscreen and the USB/iPod device will begin to fast forward through the current track until the button on the touchscreen is released. Fast Seek Down Press and hold the Seek Down button and the USB/ ipod device will begin to rewind through the current track until the button is released. Browse Press the Browse button on the touchscreen to select Artist, Albums, Genres, Songs, Playlists or Folders from the USB/iPod device. Once the desired selection is made
26 you can chose from the available media by pressing the button on the touchscreen. Press the exit button on the touchscreen if you wish to cancel the browse function. Source Press the source button on the touchscreen to select the desired audio source, CD, AUX or USB/iPod. This screen will time out after a few seconds and return to the main radio screen if no selection is made. Info Press the Info button to display the current track information. Press the X button to cancel this feature. Shuffle Press the More... button then the Shuffle button to play the selections on the USB/iPod device in random order to provide an interesting change of pace. Press the Shuffle button a second time to turn this feature off. Audio USB MODE 25 Refer to Operating Instructions Radio Mode for adjusting the audio settings. 5
27
28 AUX MODE CONTENTS AUX MODE OPERATION...28 Overview...28 Source...28 Audio
29 28 AUX MODE AUX MODE OPERATION Overview AUX Mode is entered by inserting a AUX device using a cable with a 3.5 mm audio jack into the AUX port or by pushing the PLAYER button located left of the display. Once in Player Mode, press the Source button and select AUX. Inserting Auxiliary Device Gently insert the Auxiliary device cable into the AUX Port. If you connect an Auxiliary device with a 3.5 mm stereo cable into the AUX Port, with the ignition ON and the radio ON, the unit will switch to AUX mode and begin to play. Controlling The Auxiliary Device The control of the auxiliary device (e.g., selecting playlists, play, fast forward, etc.) cannot be provided by the radio; use the device controls instead. Adjust the volume with the ON/OFF VOLUME rotary knob, or with the volume of the attached device. NOTE: The vehicle radio unit is acting as the amplifier for audio output from the Auxiliary device. Therefore if the volume control on the Auxiliary device is set too low, there will be insufficient audio signal for the radio unit to play the music on the device. Source Press the source button to select the desired audio source: CD, AUX or USB. This screen will time out after a few seconds and return to the main radio screen if no selection is made. Audio Refer to Operating Instructions Radio Mode for adjusting the audio settings.
30 BLUETOOTH MODE CONTENTS BLUETOOTH OPERATION Overview...30 Seek Up/Down Source...31 Info...31 Audio
31 30 BLUETOOTH MODE BLUETOOTH OPERATION Overview Bluetooth Streaming Audio (BTSA) or Bluetooth Mode is entered by pairing a Bluetooth device, containing music, to the Uconnect System. Before proceeding, the Bluetooth device needs to be paired through Uconnect to communicate with the Uconnect System. NOTE: See the pairing procedure in the Owner s Manual on the DVD for more details. Once the Bluetooth device is paired to the Uconnect System, push the PLAYER button located on the left side of the display. Once in Player Mode, press the Source button and select Bluetooth. Seek Up/Down Press and release the Seek Up button on the touchscreen for the next selection on the Bluetooth device. Press and release the Seek Down button on the touchscreen to return to the beginning of the current selection, or return to the beginning of the previous selection if the Bluetooth device is within the first eight seconds of the current selection. Fast Seek Up Press and hold the Seek Up button and the Bluetooth device will begin to fast forward through the current track until the button is released. Fast Seek Down Press and hold the Seek Down button and the Bluetooth device will begin to rewind through the current track until the button is released.
32 Source Press the Source button on the touchscreen to select the desired audio source; CD, USB/iPod, AUX or Bluetooth. This screen will time out after a few seconds and return to the main radio screen if no selection is made. Info Press the Info button to display the current track information. Press the Info button a second time to cancel this feature. Audio BLUETOOTH MODE 31 Refer to Operating Instructions Radio Mode for adjusting the audio settings. 7
33
34 MORE & SETTINGS CONTENTS MORE BUTTON...34 More Main Menu...34 Clock Setting...34 SETTINGS BUTTON...35 Settings Main Menu...35 Display
35 34 MORE & SETTINGS MORE BUTTON More Main Menu Push the MORE button to display the More Main Menu. The More Main Menu contains the following options: Economy If Equipped Refer to Understanding Your Instrument Panel/ Uconnect System section in your vehicle Owner s Manual on the DVD for details. Phone Refer to Understanding The Features Of Your Vehicle/ Uconnect 4.3 section in your vehicle Owner s Manual on the DVD for details. Outlet If Equipped Refer to Understanding The Features Of Your Vehicle/ Power Inverter section in your vehicle Owner s Manual on the DVD for details. Time Refer to this section for details. Compass Refer to Understanding Your Instrument Panel/ Uconnect System section in your vehicle Owner s Manual on the DVD for details. Clock Setting 1. Push the MORE button on the right side of the display, then press the Time button. Next, press the Set button. Or, Push the SETTINGS button on the right side of the display, then press the Clock button. The Time setting screen is displayed and the clock can be adjusted as described in the following procedure.

36 2. Press the Up or Down arrows to adjust the hours or minutes, next select the AM or PM button. You can also select 12hr or 24hr format by pressing the desired button. Once the time is set press the Done button to exit the time screen. MORE & SETTINGS 35 SETTINGS BUTTON Settings Main Menu Push the SETTINGS button to display the Settings Main Menu. The Settings Main Menu contains the following options: Display Refer to this section for details. Clock Refer to this section for details. Safety/Assistance Refer to Understanding Your Instrument Panel, Uconnect System section in your vehicle Owner s Manual on the DVD for details. 8
37 36 MORE & SETTINGS Lights Refer to Understanding Your Instrument Panel, Uconnect System section in your vehicle Owner s Manual on the DVD for details. Doors & Locks Refer to Understanding Your Instrument Panel, Uconnect System section in your vehicle Owner s Manual on the DVD for details. Heated Seats Refer to Understanding The Features Of Your Vehicle, Seats section in your vehicle Owner s Manual on the DVD for details. Engine Off Options Refer to Understanding Your Instrument Panel, Uconnect System section in your vehicle Owner s Manual on the DVD for details. Compass Settings Refer to Understanding Your Instrument Panel, Uconnect System section in your vehicle Owner s Manual on the DVD for details. Audio Refer to the Operating Instructions Radio section in this manual for details. Phone/Bluetooth Refer to Understanding The Features Of Your Vehicle, Uconnect 4.3 section in your vehicle Owner s Manual on the DVD for details. SiriusXM Setup Refer to the Operating Instructions Radio section in this manual for details.

38 Display Your Uconnect display can be customized by following the steps: 1. Push the SETTINGS button on the right side of the display. MORE & SETTINGS Then press the Display button. The Display Menu shows the following options for you to customize your display: Brightness Press the Brightness button and use the + or buttons to adjust the brightness of the display screen with the headlights on or off. Mode Press the Mode button to adjust the display screen brightness for Day, Night or Auto selection. Language Press the Language button to select between English, French or Spanish. Units Press the Units button to select between U.S. and Metric units of measure. 8
39 38 MORE & SETTINGS Touchscreen Beep Press the Touchscreen Beep button to turn the ON or OFF the sound heard when a screen button is pressed. 3. Press the Exit button to exit from the Display Menu.


40 16UC AA First Edition Uconnect 4.3/4.3S Printed in the USA 2015 FCA US LLC. All Rights Reserved. Chrysler, Dodge, Jeep, Ram and Mopar are registered trademarks of FCA US LLC. FIAT is a registered trademark of Fiat Group Marketing S.p.A., used under license by FCA US LLC.
TABLE OF CONTENTS 1 SAFETY AND GENERAL INFORMATION INTRODUCTION RADIO MODE MEDIA MODE MORE & SETTINGS...
 RADIO 4.3/4.3S SECTION TABLE OF CONTENTS PAGE 1 SAFETY AND GENERAL INFORMATION...3 2 INTRODUCTION...7 3 RADIO MODE...11 4 MEDIA MODE...19 5 MORE & SETTINGS...25 1 2 3 4 5 SAFETY AND GENERAL INFORMATION
uconnect 4.3 Owner s Manual Supplement
 uconnect 4.3 Owner s Manual Supplement SECTION TABLE OF CONTENTS PAGE 1 UCONNECT 4.3 INTRODUCTION...3 2 RADIO MODE...7 3 DISC MODE...19 4 USB/IPOD MODE...23 5 AUXMODE...27 6 BLUETOOTH MODE...29 7 MORE
Uconnect. 8.4/8.4N Owner s Manual Supplement
 Uconnect 8.4/8.4N Owner s Manual Supplement SECTION TABLE OF CONTENTS PAGE 1 SAFETY GUIDELINES...3 2 INTRODUCTION...5 3 RADIO MODE...11 4 DISC MODE...31 5 USB/IPOD MODE...37 6 AUXMODE...45 7 SD CARD MODE...49
Radio 8.4/8.4 NAV Owner s Manual Supplement
 Radio 8.4/8.4 NAV Owner s Manual Supplement SECTION TABLE OF CONTENTS PAGE 1 SAFETY GUIDELINES...3 2 INTRODUCTION...7 3 RADIO MODE...13 4 DISC MODE...33 5 USB OPERATION...39 6 AUXMODE...47 7 SD CARD MODE...51
RADIO 8.4/8.4 NAV OWNER S MANUAL SUPPLEMENT
 RADIO 8.4/8.4 NAV OWNER S MANUAL SUPPLEMENT SECTION TABLE OF CONTENTS PAGE 1 SAFETY GUIDELINES...3 2 INTRODUCTION...7 3 RADIO MODE...13 4 DISC MODE...29 5 USB OPERATION...33 6 AUXMODE...39 7 SD CARD MODE...41
UCONNECT 3/3 NAV WITH 8.4 DISPLAY
 UCONNECT 3/3 NAV WITH 8.4 DISPLAY SECTION TABLE OF CONTENTS PAGE 1 SAFETY AND GENERAL INFORMATION...3 2 INTRODUCTION...7 3 RADIO MODE...11 4 MEDIA MODE...27 5 NAVIGATION MODE IF EQUIPPED... 45 6 MOREMODE...83
UCONNECT 3/3 NAV WITH 8.4 DISPLAY
 UCONNECT 3/3 NAV WITH 8.4 DISPLAY SECTION TABLE OF CONTENTS PAGE 1 SAFETY AND GENERAL INFORMATION...3 2 INTRODUCTION...7 3 RADIO MODE...13 4 MEDIA MODE...29 5 NAVIGATION MODE...47 6 MOREMODE...85 1 2 3
Owner s Manual Supplement
 Uconnect 5.0 15UC5-526-AC Third Edition Uconnect 5.0 Chrysler Group LLC Printed in the USA Owner s Manual Supplement SECTION TABLE OF CONTENTS PAGE 1 IDENTIFYING YOUR RADIO...3 2 RADIO MODE...9 3 MEDIA
Uconnect. 5.0 Owner s Manual Supplement
 Uconnect 5.0 Owner s Manual Supplement SECTION TABLE OF CONTENTS PAGE 1 IDENTIFYING YOUR RADIO...3 2 RADIO MODE...7 3 MEDIA MODE...13 4 UCONNECT PHONE...19 5 UCONNECT VOICE COMMAND...25 6 SETTINGS MAIN
RADIO 3.0 / UCONNECT 3.0
 RADIO 3.0 / UCONNECT 3.0 SECTION TABLE OF CONTENTS PAGE 1 SAFETY AND GENERAL INFORMATION...3 2 INTRODUCTION...9 3 RADIO MODE...21 4 MEDIA MODE...25 5 PHONE MODE...29 6 VOICE RECOGNITION QUICK TIPS...35
Uconnect 5.0 Owner s Manual Supplement
 Uconnect 5.0 Owner s Manual Supplement SECTION TABLE OF CONTENTS PAGE 1 IDENTIFYING YOUR RADIO...3 2 RADIO MODE...9 3 MEDIA MODE.............................................................. 17 4 UCONNECT
UCONNECT 3 WITH 5 INCH DISPLAY
 UCONNECT 3 WITH 5 INCH DISPLAY SECTION TABLE OF CONTENTS PAGE 1 SAFETY AND GENERAL INFORMATION...3 2 INTRODUCTION...9 3 RADIO MODE...13 4 MEDIA MODE...19 5 PHONE MODE...25 6 VOICE RECOGNITION QUICK TIPS...35
UCONNECT 3 WITH 5 INCH DISPLAY
 UCONNECT 3 WITH 5 INCH DISPLAY SECTION TABLE OF CONTENTS PAGE 1 SAFETY AND GENERAL INFORMATION...3 2 INTRODUCTION...7 3 RADIO MODE...11 4 MEDIA MODE...17 5 PHONE MODE...23 6 VOICE RECOGNITION QUICK TIPS...33
RADIO 3C/3C NAV WITH 8.4 INCH DISPLAY
 RADIO 3C/3C NAV WITH 8.4 INCH DISPLAY SECTION TABLE OF CONTENTS PAGE 1 SAFETY AND GENERAL INFORMATION...3 2 INTRODUCTION...13 3 RADIO MODE...17 4 MEDIA MODE...31 5 PHONE MODE...39 6 NAVIGATION MODE IF
Uconnect. 5.0/5.0N Owner s Manual Supplement
 Uconnect 5.0/5.0N Owner s Manual Supplement SECTION TABLE OF CONTENTS PAGE 1 INTRODUCTION...3 2 RADIO MODE...11 3 MEDIA MODE...19 4 UCONNECT PHONE...27 5 UCONNECT 5.0 VOICE RECOGNITION QUICK TIPS...35
UCONNECT 4C/4C NAV WITH 8.4 INCH SCREEN
 UCONNECT 4C/4C NAV WITH 8.4 INCH SCREEN SECTION TABLE OF CONTENTS PAGE 1 SAFETY AND GENERAL INFORMATION...3 2 INTRODUCTION...13 3 RADIO MODE...21 4 MEDIA MODE...35 5 PHONE MODE...53 6 NAVIGATION MODE IF
UCONNECT 6.5 OWNER S MANUAL SUPPLEMENT
 UCONNECT 6.5 OWNER S MANUAL SUPPLEMENT SECTION TABLE OF CONTENTS PAGE 1 SAFETY GUIDELINES...3 2 INTRODUCTION...9 3 RADIO MODE...13 4 MEDIA MODE...27 5 UCONNECT 6.5 NAV VOICE RECOGNITION QUICK TIPS...33
AUDIO AND CONNECTIVITY
 Learn how to operate the vehicle s audio system. Basic Audio Operation Connect audio devices and operate buttons and displays for the audio system. USB Port 1. Open one of the USB covers under the front
AUDIO AND CONNECTIVITY
 AUDIO AND CONNECTIVITY Learn how to operate the vehicle s audio system. Basic Audio Operation Connect audio devices and operate buttons and displays for the audio system. USB Connection Connect a USB flash
UCONNECT 7.0 OWNER S MANUAL SUPPLEMENT
 UCONNECT 7.0 OWNER S MANUAL SUPPLEMENT SECTION TABLE OF CONTENTS PAGE 1 SAFETY GUIDELINES...3 2 IDENTIFYING YOUR RADIO...7 3 UCONNECT 7.0...11 4 UCONNECT SETTINGS...55 5 VOICE RECOGNITION QUICK TIPS...57
Owner s Manual Supplement
 Uconnect 5.0/5.0N Owner s Manual Supplement SECTION TABLE OF CONTENTS PAGE 1 UCONNECT 5.0...3 2 SAFETY GUIDELINES...101 1 2 Uconnect 5.0 CONTENTS Uconnect 5.0 System...4 Navigation (Uconnect 5.0N Only)...36
Uconnect. 5.0 Owner s Manual Supplement
 Uconnect 5.0 Owner s Manual Supplement TABLE OF CONTENTS 1 2 UCONNECT 5.0...3 SAFETY GUIDELINES...33 1 2 1 UCONNECT 5.0 Uconnect 5.0 System...4 Radio Mode...5 Media Mode...9 Uconnect Phone Mode....12 More
AUDIO AND CONNECTIVITY
 AUDIO AND CONNECTIVITY Learn how to operate the vehicle s audio system. Basic Audio Operation Connect audio devices and operate buttons and displays for the audio system. USBPorts The center console has
AUDIO AND CONNECTIVITY
 Learn how to operate the vehicle s audio system. Basic Audio Operation Connect audio devices and operate buttons and displays for the audio system. USB Port Connect a USB flash drive or other audio device,
AUDIO AND CONNECTIVITY
 AUDIO AND CONNECTIVITY Learn how to operate the vehicle s audio system. Basic Audio Operation Connect audio devices and operate buttons and displays for the audio system. USB Port Connect a USB device,
AUDIO AND CONNECTIVITY
 AUDIO AND CONNECTIVITY Learn how to operate the vehicle s audio system. Basic Audio Operation Connect audio devices and operate buttons and displays for the audio system. USB Port 1. Open one of the USB
AUDIO AND CONNECTIVITY
 Learn how to operate the vehicle s audio system. Basic Audio Operation Connect audio devices and operate buttons and displays for the audio system. USB Port Connect a USB flash drive or other audio device,
UVO SYSTEM USER'S MANUAL
 UVO SYSTEM USER'S MANUAL Congratulations on the Purchase of your new UVO system! Your new UVO system allows you to enjoy various audio and multimedia features through the main audio system. For the latest
Uconnect 5.0/5.0 NAV Owner s Manual Supplement
 Uconnect 5.0/5.0 NAV Owner s Manual Supplement SECTION TABLE OF CONTENTS PAGE 1 SAFETY GUIDELINES...3 2 INTRODUCTION...9 3 ALL ABOUT UCONNECT...17 4 RADIO MODE...21 5 MEDIA MODE...29 6 VOICE RECOGNITION
UCONNECT 4 WITH 8.4 INCH DISPLAY
 UCONNECT 4 WITH 8.4 INCH DISPLAY SECTION TABLE OF CONTENTS PAGE 1 SAFETY AND GENERAL INFORMATION...3 2 INTRODUCTION...9 3 RADIO MODE...15 4 MEDIA MODE...29 5 PHONE MODE...45 6 VOICE RECOGNITION QUICK TIPS...63
UCONNECT 4 WITH 7 INCH DISPLAY
 UCONNECT 4 WITH 7 INCH DISPLAY SECTION TABLE OF CONTENTS PAGE 1 SAFETY AND GENERAL INFORMATION...3 2 INTRODUCTION...7 3 RADIO MODE...11 4 MEDIA MODE...25 5 PHONE MODE...39 6 VOICE RECOGNITION QUICK TIPS...57
Uconnect. 5.0 Owner s Manual Supplement
 Uconnect 5.0 Owner s Manual Supplement SECTION TABLE OF CONTENTS PAGE 1 SAFETY GUIDELINES...3 2 IDENTIFYING YOUR RADIO...7 3 RADIO MODE...13 4 MEDIA MODE...21 5 UCONNECT PHONE...29 6 UCONNECT 5.0 VOICE
UCONNECT 5.0 OWNER S MANUAL SUPPLEMENT
 UCONNECT 5.0 OWNER S MANUAL SUPPLEMENT SECTION TABLE OF CONTENTS PAGE 1 SAFETY GUIDELINES...3 2 IDENTIFYING YOUR RADIO...9 3 RADIO MODE...15 4 MEDIA MODE...23 5 UCONNECT PHONE...31 6 UCONNECT 5.0 VOICE
AUDIO AND CONNECTIVITY
 AUDIO AND CONNECTIVITY AUDIO AND CONNECTIVITY Learn how to operate the vehicle s audio system. Basic Audio Operation Connect audio devices and operate buttons and displays for the audio system. USB Port
OPERATION MANUAL MM1C25 DIGITAL AUDIO PLAYER AM/FM STEREO USB BLUETOOTH CAPABLE HEADPHONE OUTPUT
 OPERATION MANUAL MM1C25 DIGITAL AUDIO PLAYER AM/FM STEREO USB BLUETOOTH CAPABLE HEADPHONE OUTPUT CONTENTS CONTENTS. 1 CONTROL PANEL ILLUSTRATION 2 WIRE DIAGRAM 3 INSTALLATION.. 4 BASIC OPERATION... 5 RADIO
UCONNECT 5.0/5.0 NAV OWNER S MANUAL SUPPLEMENT
 UCONNECT 5.0/5.0 NAV OWNER S MANUAL SUPPLEMENT SECTION TABLE OF CONTENTS TABLE OF CONTENTS PAGE 1 SAFETY GUIDELINES...3 2 INTRODUCTION...9 3 RADIO MODE...13 4 MEDIA MODE...21 5 UCONNECT 5.0/5.0 NAV VOICE
UCONNECT 3/3 NAV WITH 5 DISPLAY
 UCONNECT 3/3 NAV WITH 5 DISPLAY SECTION TABLE OF CONTENTS PAGE 1 SAFETY AND GENERAL INFORMATION...3 2 INTRODUCTION...7 3 RADIO MODE...17 4 MEDIA MODE...23 5 PHONE MODE...27 6 NAVIGATION MODE IF EQUIPPED...
UCONNECT 3/3 NAV WITH 5 INCH DISPLAY
 UCONNECT 3/3 NAV WITH 5 INCH DISPLAY SECTION TABLE OF CONTENTS PAGE 1 SAFETY AND GENERAL INFORMATION...3 2 INTRODUCTION...7 3 RADIO MODE...15 4 MEDIA MODE...23 5 PHONE MODE...27 6 NAVIGATION MODE IF EQUIPPED...
Models with Touchscreen Touchscreen Operation
 Models with Touchscreen Touchscreen Operation Use simple gestures including touching, swiping, and scrolling to operate certain audio functions. Some items may be grayed out during driving to reduce the
Models with touchscreen Touchscreen Operation*
 Touchscreen Operation* Use simple gestures including touching, swiping, and scrolling to operate certain audio functions. Some items may be grayed out during driving to reduce the potential for distraction.
VOLVO AUDIO SYSTEM. Operating Instructions. Radio AM/FM/CD MP3/USB/iPod Delphi part number
 VOLVO AUDIO SYSTEM Operating Instructions Radio AM/FM/CD MP3/USB/iPod Delphi part number 2823960 Radio AM/FM/CD MP3/USB/iPod/Bluetooth Delphi part numbers 2823962, 2823964 2 Table of Contents Table of
Interface Module. for selected Toyota/Lexus/Scion vehicles. Installation & Operation
 for selected Toyota/Lexus/Scion vehicles Installation & Operation Serial Number: Date of Purchase: Contents Introduction and Precautions... 2 Supported ipod Models... 3 Vehicle Identification and Pre-System
PA15-HON3. PA15-HON3 ipod to HONDA / ACURA car stereo interface with song title display PRELIMINARY OWNER'S MANUAL
 PA15-HON3 ipod to HONDA / ACURA car stereo interface with song title display PA15-HON3 ipod to HONDA / ACURA car stereo interface with song title display KEY FEATURES This adaptor connects an ipod, iphone,
Audio System. Audio System (without navigaton)* CD Button. CDSlot. CD Eject Button. XM Button. AM/FM Button. Auxiliary Button.
* CD Button. CDSlot. CD Eject Button. XM Button. AM/FM Button. Auxiliary Button.") Audio System Audio System (without navigaton)* CD Load Button Audio Display CD Button CDSlot XM Button CD Eject Button AM/FM Button Auxiliary Button Volume/Power Button Title Button Category Bar Skip Bar
Audio System Audio System (without navigaton)* CD Load Button Audio Display CD Button CDSlot XM Button CD Eject Button AM/FM Button Auxiliary Button Volume/Power Button Title Button Category Bar Skip Bar
Play DVDs, Audio CDs, MP3 Discs. Supports steering wheel controls. Customizable backgrounds. Bluetooth Phonebook and favorites
 Multimedia Navigation System Quick Start Guide GM Series Navigation Bluetooth Hands-Free ipod and MP3 compatible Back-up camera ready Play DVDs, Audio CDs, MP3 Discs Supports steering wheel controls Customizable
Models with Display Audio Display Audio Operation
 Display Audio Operation Use simple gestures including touching, swiping, and scrolling to operate certain audio functions. Some items may be grayed out during driving to reduce the potential for distraction.
AUDIO AND CONNECTIVITY
 Learn how to operate the vehicle s audio system. Basic Audio Operation Connect audio devices and operate buttons and displays for the audio system. USB Port 1. Open the USB cover in the front console.
Expand Your Factory Radio. add. ipod PXAMG. Owner s Manual. Neo Gateway ENJOY THE MUSIC
 Expand Your Factory Radio add ipod PXAMG GM Owner s Manual Neo Gateway ENJOY THE MUSIC Table of Contents Pages 1. Introduction 2 2. Precautions 2 3. Compatibility 3 4. Dipswitch Settings 3 5. Installation
USER GUIDE WITH OPTIONAL NAVIGATION SYSTEM
 SYNC 3 USER GUIDE WITH OPTIONAL NAVIGATION SYSTEM SYNC 3 is new, responsive and innovative with easyto-use design, interface and features. Just say the word and discover how SYNC 3 delivers next-level
FUSION MS-NRX300 ENGLISH
 FUSION MS-NRX300 MARINE WIRED REMOTE OWNER S MANUAL ENGLISH FUSIONENTERTAINMENT.COM 2016 2017 Garmin Ltd. or its subsidiaries All rights reserved. Under the copyright laws, this manual may not be copied,
AM/FM/USB CD/MP3 PLAYER WITH BLUETOOTH
 INSTALLATION NOTES AM/FM/USB CD/MP3 PLAYER WITH BLUETOOTH 1. Please read these installation and operation instructions before installation. 2. Make sure to connect all other wires before power connection.
Honda Toyota Accord Venza Quick Start Guide
 Multimedia Navigation System Honda Pilot Quick Start Guide In-Dash Multi-Media / Navigation System Honda Toyota Accord Venza Quick Start Guide G System Features: Navigation Bluetooth Hands-Free ipod and
Navigation capabilities. EXISTENCE OF NAVIGATION CAPABILITIES Existence of navigation capabilities can be confirmed by performing the following:
 Introduction CONFIRMING DISPLAY AUDIO MODEL This manual is made up of 2 sections. The first describing available functions for models without navigation capabilities (WITHOUT NAVIGATION) such as audio
Owner s Manual. Interface Kit for ipod
 Owner s Manual Interface Kit for ipod December 2007 This device complies with Part 15 of the FCC Rules. Operation is subject to the following two conditions: (1) This device may not cause harmful interference,
Read the following pages to become familiar with the infotainment system features.
 xtooltipelement Service Information 2015 GMC Truck Terrain Chevrolet/GMC Equinox/Terrain/Terrain Denali Infotainment System GMNA-Localizing-U.S./Canada-7639744 Infotainment System Radio General Information
Contents. Precaution. Before installing this product. Precaution... Main Menu... Radio... Play DVD... USB/SD Important safety information
 USER MANUAL Thank you for buying this XTRONS product. Please read through these instructions so you will know how to operate this unit properly. After you have finished reading the instructions, keep this
2007 GMC Acadia Navigation System M
 2007 GMC Acadia Navigation System M Overview... 3 Overview... 4 Features and Controls... 15 Features and Controls... 16 Navigation Audio System... 57 Navigation Audio System... 58 Voice Recognition...
PA15-HON2. ipod to HONDA and ACURA Car Stereo Interface. Owner's Manual. (Preliminary Version)
") PA15-HON2 ipod to HONDA and ACURA Car Stereo Interface Owner's Manual (Preliminary Version) 2008.10.20 9AM to 5PM (Pacific Time) Tech Support Hot Lines 626-3363836 626-8906410 Quick Guide. If the radio
PA15-HON2 ipod to HONDA and ACURA Car Stereo Interface Owner's Manual (Preliminary Version) 2008.10.20 9AM to 5PM (Pacific Time) Tech Support Hot Lines 626-3363836 626-8906410 Quick Guide. If the radio
FUSION MS-BB100 B L A C K B O X E N T E R T A I N M E N T S Y S T E M O W N E R S M A N U A L ENGLISH
 FUSION MS-BB100 B L A C K B O X E N T E R T A I N M E N T S Y S T E M O W N E R S M A N U A L ENGLISH FUSIONENTERTAINMENT.COM 2015 2016 Garmin Ltd. or its subsidiaries All rights reserved. Under the copyright
USER S MANUAL MEDIA CENTER 430/430N (RBZ/RHB)
") USER S MANUAL MEDIA CENTER 430/430N (RBZ/RHB) CONTENTS MEDIA CENTER 430/430N (RBZ/RHB) 1 Safety Guidelines... 4 Introduction... 5 Warnings... 5 Safety References... 5 Intended Use... 5 System Care... 5
USER S MANUAL MEDIA CENTER 430/430N (RBZ/RHB) CONTENTS MEDIA CENTER 430/430N (RBZ/RHB) 1 Safety Guidelines... 4 Introduction... 5 Warnings... 5 Safety References... 5 Intended Use... 5 System Care... 5
SUBARU STARLINK. Quick Reference Guide. your subaru connected. Love. It s what makes a Subaru, a Subaru.
 SUBARU STARLINK your subaru connected Quick Reference Guide 2017 Love. It s what makes a Subaru, a Subaru. Table of Contents 2 Controls 3 Bluetooth Basics 4 8 Hands-free Calling SUBARU STARLINK 6.2" Multimedia
Multimedia. Navigation. System Quick Start Guide Toyota. Navigation. Bluetooth Hands-Free. ipod and MP3 compatible. Back-up camera ready
 Multimedia Navigation System Quick Start Guide Toyota Navigation Bluetooth Hands-Free ipod and MP3 compatible Back-up camera ready Play DVDs, Audio CDs, MP3 Discs Supports steering wheel controls Customizable
All rights reserved. Under the copyright laws, this manual may not be copied, in whole or in part, without the written consent of Garmin.
 All rights reserved. Under the copyright laws, this manual may not be copied, in whole or in part, without the written consent of Garmin. Garmin reserves the right to change or improve its products and
Owner s Manual AWM910 JENSEN AWM910 COMPACT DISC PLAYER RADIO CD COMPACT MUSIC SYSTEM MUTE AUX BAND AUX IN PUSH PUSH PWR VOL ALARM T/F AUD SPK A SPK B
 AWM910 Owner s Manual COMPACT DISC PLAYER PUSH 1 2 3 4 5 6 RPT SCAN RDM H M PUSH PWR VOL ALARM SET ON/OFF EQ T/F AUD RADIO CD COMPACT MUSIC SYSTEM MUTE AUX BAND CD AUX IN A B A+B JENSEN AWM910 Thank You!
User Manual. Premium Satellite-Ready AM/FM Stereo In-Dash Six-CD Radio
 User Manual Premium Satellite-Ready AM/FM Stereo In-Dash Six-CD Radio Attention Recommended CD usage for the in-dash CD player: CD units are designed to play commercially pressed 12cm (4.75 in. dia.) audio
2007 Chevrolet Equinox and Pontiac Torrent Navigation System M
 2007 Chevrolet Equinox and Pontiac Torrent Navigation System M Overview... 3 Overview... 4 Features and Controls... 15 Features and Controls... 16 Navigation Audio System... 55 Navigation Audio System...
AUDIO AND CONNECTIVITY. You can operate certain functions of the audio system using the steering wheel controls. Audio Remote Controls *1
 Audio Remote Controls *1 You can operate certain functions of the audio system using the steering wheel controls. *1 - If equipped VOL +/ VOL - (Volume) Switch Press Up: To increase the volume. Press Down:
2007 HUMMER H3 Navigation System M
 2007 HUMMER H3 Navigation System M Overview... 3 Overview... 4 Features and Controls... 15 Features and Controls... 16 Navigation Audio System... 57 Navigation Audio System... 58 Index... 69 1 GENERAL
Models with Display Audio Display Audio Operation
 AUDIO AND CONNECTIVITY Models with Display Audio Display Audio Operation Use simple gestures including touching, swiping, and scrolling to operate certain audio functions. Some items may be grayed out
TOCMR-OE100. Quick Start Guide
 TOCMR-OE100 Quick Start Guide Introduction Congratulations on your purchase of the TOCMR-OE100 Mobile Multimedia Receiver. Please read the instruction manual for this product before using. The documentation
OVERHEAD AUDIO UNIT Model A10049
 R R R OVERHEAD AUDIO UNIT Model 2879459 21A10049 R NOTES APPENDICES TROUBLESHOOTING Resetting the unit Should the overhead unit become unresponsive: Remove power for 5minutes and then reconnect. CONTENTS
UVO SYSTEM USER'S MANUAL
 UVO SYSTEM USER'S MANUAL Preface Congratulations on the Purchase of your new UVO system! Your new UVO system allows you to enjoy various audio and multimedia features through the main audio system. For
OVERHEAD AUDIO UNIT Model A10117
 R R R OVERHEAD AUDIO UNIT Model 2879703 21A10117 R NOTES APPENDICES TROUBLESHOOTING Resetting the unit Should the overhead unit become unresponsive: Remove power for 5minutes and then reconnect. CONTENTS
Display Audio Operation
 Display Audio Operation Use simple gestures including touching, swiping, and scrolling to operate certain audio functions. Some items may be grayed out during driving to reduce the potential for distraction.
Touchscreen Operation
 Touchscreen Operation Use simple gestures including touching, swiping, and scrolling to operate certain audio functions. Some items may be grayed out during driving to reduce the potential for distraction.
AUDIO AND CONNECTIVITY
 Learn how to operate the vehicle s audio system. Basic Audio Operation Connect audio devices and operate buttons and displays for the audio system. USB Port Connect a USB flash drive or other audio device,
KIV-BT901 KIV-701 DIGITAL MEDIA RECEIVER INSTRUCTION MANUAL. Register Online Register your Kenwood product at
 KIV-BT901 KIV-701 DIGITAL MEDIA RECEIVER INSTRUCTION MANUAL Before reading this manual, click the button below to check the latest edition and the modified pages. Take the time to read through this instruction
FREQUENTLY ASKED QUESTIONS
 TITLE: Over-the-Air Software Update DOCUMENT DATE: 10-March-2017 BACKGROUND: Just like your smartphone, the Uconnect systems in FCA vehicles work best when they have the latest software available from
Contents. Precaution. Before installing this product. Precaution... Main Menu... Radio... Play DVD... Important safety information USB/SD...
 USER MANUAL Thank you for buying this XTRONS product. Please read through these instructions so you will know how to operate this unit properly. After you have finished reading the instructions, keep this
INSTRUCTION MANUAL K101R
 INSTRUCTION MANUAL K101R MP3/USB/AUX/BLUETOOTH/iPod CD PLAYER WITH AM/FM RADIO BEFORE USE Before operating the unit, please read this manual thoroughly and retain it for future reference 1. OPERATING INSTRUCTIONS
2007 Cadillac SRX Navigation System M
 2007 Cadillac SRX Navigation System M Overview... 3 Overview... 4 Features and Controls... 15 Features and Controls... 16 Navigation Audio System... 57 Navigation Audio System... 58 Voice Recognition...
Interface Module. for selected BMW/Mini Cooper vehicles. Installation & Operation
 Interface Module for selected BMW/Mini Cooper vehicles Installation & Operation Serial Number: Date of Purchase: Contents Introduction and Precautions... 2 Supported ipod Models... 3 Pre-System Setup...
Installation Table of Contents
 1 Installation Table of Contents Pages 1. Introduction 4 2. Precautions 4 3. Compatibility 5 4. Dipswitch Settings 5 5. Installation 6-7 6. Operation 8-16 2 Neo Gateway 2.0 & Optional Add-ons Neo Gateway
AUDIO AND CONNECTIVITY
 AUDIO AND CONNECTIVITY Learn how to operate the vehicle s audio system. Basic Audio Operation Connect audio devices and operate buttons and displays for the audio system. USB Port Connect a USB flash drive
IF ADDITIONAL INSTALLATION COMPONENTS ARE NECESSARY, CONTACT YOUR REI SALES REP FOR:
 50W X 4 R-9 05 Thank you for purchasing this AM/FM/CD/MP3 Weather Band Receiver from REI. This product is designed and tested to withstand temperature and vibration extremes. Please read the owner's manual
ipod Expand Your Factory Radio PGHGM1 Owner s Manual Media Gateway add PXAMG
 Expand Your Factory Radio Harness Connection add ipod Dip Switches Port 1 Port 2 (See Manual) USB GM Owner s Manual Media Gateway PXAMG PGHGM1 isimple A Division of AAMP of America 13190 56th Court Clearwater,
Remote Touch (if equipped)
") Remote Touch (if equipped) The Remote Touch can be used to operate the navigation screens and configure settings. Basic operation Remote Touch knob Use this knob to move the cursor and select items on
Remote Touch (if equipped) The Remote Touch can be used to operate the navigation screens and configure settings. Basic operation Remote Touch knob Use this knob to move the cursor and select items on
AUDIO AND CONNECTIVITY
 Learn how to operate the vehicle s audio system. Basic Audio Operation Connect audio devices and operate buttons and displays for the audio system. USB Port Connect a USB flash drive or other audio device,
The roof antenna is installed in the center at the rear part of the roof. It is possible to remove the antenna rod by unscrewing it from its base.
 Audio Antenna system... 5-2 Roof antenna... 5-2 FM reception... 5-2 XM TM satellite radio reception (if equipped)... 5-2 Installation of accessories... 5-4 Audio set... 5-5 Type A audio set (if equipped)...
2014 Cadillac Escalade Rear Seat Entertainment M
 2014 Cadillac Escalade Rear Seat Entertainment M Infotainment System...... 3 Rear Seat Infotainment.... 3 Rear Seat Entertainment (RSE) System....................... 3 Index..................... i-1 Rear
SiriusXM Satellite Radio interface
 www.vaistech.com Owner s Manual SiriusXM Satellite Radio interface (SXV300 SiriusXM Tuner required) UNIVERSAL Copyright 2003-2018 VAIS Technology Published Jan 10, 2018 VAIS Technology, 8811 American Way,
2006 HUMMER H3 Navigation System M
 2006 HUMMER H3 Navigation System M Overview... 1-1 Overview... 1-2 Features and Controls... 2-1 Features and Controls... 2-2 Navigation Audio System... 3-1 Navigation Audio System... 3-2 Index... 1 GENERAL
UCONNECT 430/430N 19R430N-526-AA 2018 FCA US LLC.
 UCONNECT 430/430N SECTION TABLE OF CONTENTS PAGE 1 SAFETY GUIDELINES...3 2 INTRODUCTION...7 3 GENERAL HANDLING...13 4 GETTING STARTED...19 5 RADIO MODE...23 6 MEDIA MODE...35 7 REMOTE DEVICES...59 8 NAVIGATION
Owner s Manual Supplement
 Uconnect 430/430N Owner s Manual Supplement SECTION TABLE OF CONTENTS PAGE 1 SAFETY GUIDELINES...3 2 INTRODUCTION...5 3 GENERAL HANDLING...13 4 GETTING STARTED...21 5 UCONNECT MULTIMEDIA (RADIO)... 29
2011 Cadillac DTS Navigation System M
 2011 Cadillac DTS Navigation System M Infotainment System...... 3 Introduction.................. 3 Overview....................... 4 Radio....................... 12 AM-FM Radio................. 12 Satellite
OWNER S MANUAL ELECTRONICALLY TUNED AM/FM/MPX RADIO WITH AUTO-REVERSE CASSETTE PLAYER, CD PLAYER, CD CHANGER CONTROLS AND QUARTZ CLOCK.
 OWNER S MANUAL ELECTRONICALLY TUNED AM/FM/MPX RADIO WITH AUTO-REVERSE CASSETTE PLAYER, CD PLAYER, CD CHANGER CONTROLS AND QUARTZ CLOCK Model GC-600 Operating Instructions 1) ON/OFF POWER BUTTON Press this
Quickstart Guide (English)
") Quickstart Guide (English) Introduction 1. Make sure all items listed in the Box Contents are included in the box. Look in the box under the foam sheet for the speaker stand rubber feet, speaker stand
Quickstart Guide (English) Introduction 1. Make sure all items listed in the Box Contents are included in the box. Look in the box under the foam sheet for the speaker stand rubber feet, speaker stand
LH1. Home Kit LH1 QUICK START GUIDE. Listen to your Lynx Radio through your home stereo or powered speakers
 Home Kit LH1 Listen to your Lynx Radio through your home stereo or powered speakers QUICK START GUIDE LH1 What s in the Box? ch - ch + Lynx Home Dock Remote Control Indoor/Outdoor Home Antenna Home Power
The guide for the replacement of a factory stock radio. Installation may vary if stock radio has been replaced.
 1_ INSTALLATION The guide for the replacement of a factory stock radio. Installation may vary if stock radio has been replaced. Included in Kit: Handle-Bar Control Module [HCM] Radio Conrtrol Module [RCM]