Active Vision SX-340 User's Manual
|
|
|
- Margery Jackson
- 6 years ago
- Views:
Transcription
1 Active Vision SX-340 Real Time Triplex Stand Alone DVR Active Vision SX-340 User's Manual Real Time Triplex Stand Alone DVR [ 4 / 8 / 16 Channel DVR ] V
2 Active Vision SX-340 Real Time Triplex Stand Alone DVR Contents SAFETY WARNING AND CAUTION CHAP 1. INTRODUCTION Overview Common Features Specifications Contents Front Panel Rear Panel Remote Controller.. 17 CHAP 2. INSTALLATION HDD Installation System Diagram PTZF camera & Sensor Connection Diagram Network Connection Using Static IP Address Using Dynamic IP Address Router Configuration CHAP 3. SETUP MENU Getting Started 30 System Setup Menu Language System Setup HDD Setup Password Setup Channel Name Setup Date/Time Setup Beep & PTZF Setup System Reset Display Setup Blank Channel Setup PIP Channel Setup Adjust Channel Setup Video Signal Type
3 Contents 3.5 Sequence Boundary Background VGA Setup Event Setup Record Time Sensor In Event Action Motion Setup Record Setup Record Type Record Speed Record Quality Record Format PB Speed Channel Enable Audio Setup Schedule Setup Network Setup IP Address Subnet mask Gateway Bypass Network ID Password.. 52 CHAP 4. DISPLAY MODE Live Mode PIP Mode Auto Mode PTZF Camera Control Digital Zoom Panorama. 58 CHAP 5. RECORDING MODE 59 CHAP 6. PLAYBACK SEARCH MODE
4 Contents CHAP 7. PLAYBACK TRIPLEX FUNCTION CHAP 8. PLAYBACK TRICKPLAY & MULTI CH. DISPLAY.. 62 CHAP 9. CD/USB BACKUP MODE CHAP 10. NETWORK VIEWER System Requirement Network Environment Network Viewer Installation Functions and Network Setup Operation Live Video Mode Playback Mode Drive Scan Mode File / USB Back-up Playback Mode CD Playback Mode. 75 CHAP 11. WEB VIEWER System Requirement Network Environment Connect DVR via Web Browser Web Browser setup to enable Web Viewer Functions and Network Setup Log In Playback.. 80 CHAP 12. SYSTEM INFORMATION. 81 CHAP 13. Q & A 82 4
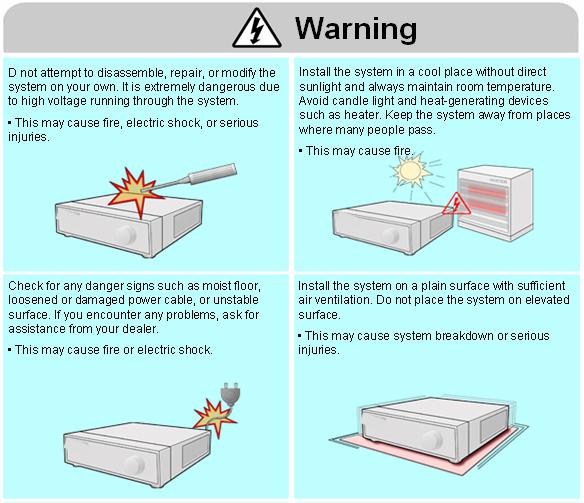
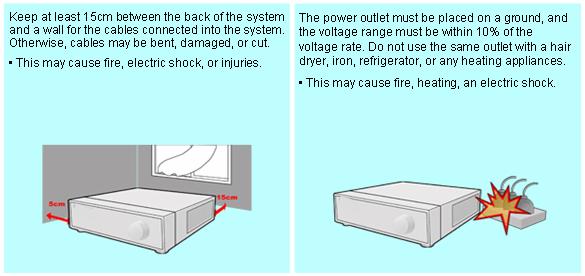
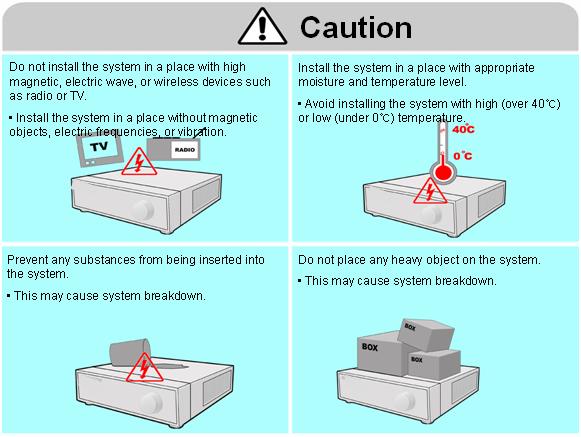
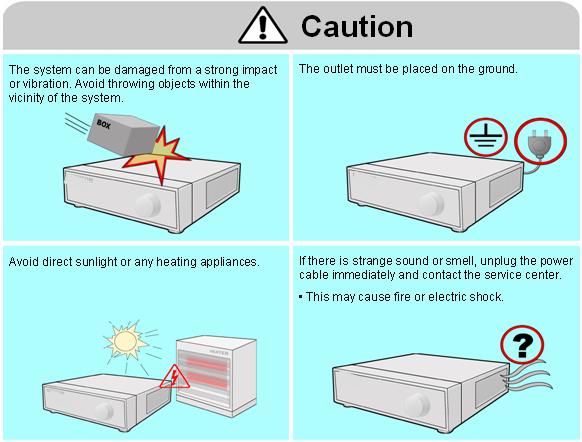
5 SAFETY WARNING AND CAUTION TO REDUCE THE RISK OF ELECTRICAL SHOCK, DO NOT OPEN COVERS. NO USER SERVICEABLE PARTS INSIDE. REFER SERVICING TO QUALIFIED SERVICE S PERSONNEL. Please be aware of the following precautions before installing the DVR. Avoid any place with moisture, dust, or soot. Avoid any place with direct sunlight or heating appliances. Keep the product away from electric shock or magnetic substances. Avoid high or low temperature. (Recommended operation temperature is between 0 C ~ 40 C). Do not place any conductive material through the ventilation. Turn off the system before installation. Ensure enough space for cable connections. Place the system on a solid surface with sufficient air ventilation. Avoid any surface that vibrates. Placing the system near electronic devices such as radio or TV may cause breakdown to the product. Do not disassemble the product without an assistance from the manufacturer. Do not place any heavy object on the system. Note This equipment has been tested and found to comply with the limits for a CLASS A digital device, pursuant to Part 15 of FCC Rules. These limits are designed to provide reasonable protection against harmful interference when the equipment is operated in a commercial environment. PLEASE READ THIS MANUAL THOROUGHLY FOR EFFECTIVE AND SAFE USAGE OF THE DEVICE. 5


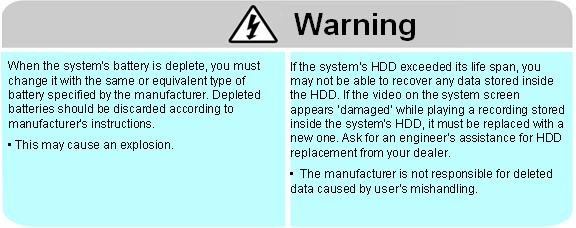
6 SAFETY WARNING AND CAUTION The following are warning and caution statements for the safety of the users and for the prevention of any property damage. Please read below thoroughly. Warning and Caution signs Warning If you are not aware of this warning, you may be injured or be killed. Caution If you are not aware of this warning, you may be injured or cause property loss. 6
7 7
8 8

9 9
10 10
11 CHAP 1. INTRODUCTION 1. Overview Digital Video Recorder (DVR) is the latest in surveillance technology that offers full digital recording, remote surveillance access, remote device control and more. The DVR system is a computerized surveillance system that combines all the features of a traditional videotape system by integrating a color quad processor, motion sensors, multiplexer, pan & tilt controls, time-lapse recorder and accessories to one unit. DVR images are stored on a Hard Disk Drive (HDD). This not only preserves the picture quality in its original state, but also allows fast data retrieval and larger storage capacity. Unlike time-laps VCRs and low-end DVRs, Triplex DVRs allow playback of recorded video footage and remote access through internet while in recording mode simultaneously. DVRs are used in mission critical environments where security systems are on and it would be dangerous for the security officer to turn off recording just to view recorded data. Our new Triplex DVRs can meet any required request from the industry and the customers with high quality and reliability, which will satisfy all of you and bring a big smile to you. 2. Common features Real-time 480/240/120 (16CH/8CH/4CH) fps live display & 120 fps recording / playback Triplex function : simultaneous recording, playback, backup and network transmission Dynamic IP and Web browser based remote monitoring support CD Back up available Composite Video, S-Video and VGA output available Alarm notification to registered address Real time single or multi-screen display 1 CH audio recording / playback function 720 x 480 digital video recordings and clear video quality in MJPEG Live camera viewing; no delay Various types of display modes such as Full, CIF, PIP, Zoom and Auto-Switch Independent color adjustment of each camera Hidden camera function Multiple language OSD supported Stores large amounts of video on Hard Disk Drive (HDD). Motion and event recording supported Easy retrieval of recordings organized by date, time and event Search by date/time list, event list, date/time. Multi-screen playback Pan/ Tilt/ Zoom camera control by RS-485 communication port IR remote control Loop-through connections User-friendly GUI (Graphic User Interface) & easy to operation Remote control through any PC with internet (The network viewer program provided) Self-diagnose system : error checking and restoring function Little or no maintenance 11
12 CHAP 1. INTRODUCTION 3. Specifications Category Video Input Signal Output Input / Output Audio Recording Mode Display FPS (NTSC/PAL) Display Resolution Display Screen Split Mode Zoom Mode Triplex Mode Video Compression Video Resolution Recording Ways Recording Recording FPS Image File Size Internal Hard Drives Remote access through Internet Playback Mode Playback Screen Mode Playback Searching Ways Zoom Mode External Alarm Input Alarm Alarm Output Control Alarm Setup Period Protocol Resolution Network Remote Control Browser Recording Data Backup Auto Screen Switching Signal Loss Detection Display Hidden Function Remote Control Others Power Supply Dimension N. Weight Approval 4CH DVR 8CH DVR 16CH DVR NTSC/PAL, 1V 75 Ohm, BNC (4, 8 and 16CH), Auto-loop throughout CVBS, S-Video, VGA 2 X RCA (1CH Input, 1CH Output) Mono PCB 8KB / sec 120 / 100 FPS 240 /200 FPS 480 / 400 FPS 720 X 480 (NTSC) / 720 X 576 (PAL) Full, Quad, Split and 3 PIPs 2 X 2 Digital Zoom Simultaneous Recording / Playback / Live / Network Real-time full duplex M-JPEG codec core 720 (360) X 240 (NTSC) / 720 (360) X 288 (PAL) Continuous, Scheduled, Event (internal motion, external sensor) NTSC : 120 FPS / PAL : 100 FPS NTSC : 3 ~ 25 KB / PAL : 4 ~ 27 KB EIDE, ATA-100, MAX 2 HDs supported, Unlimited HDD Capacity Dynamic IP and Web Browser based remote monitoring Live & Playback, Playback, Panorama Full, Quad, PIP, Zoom, Split, Panorama Searching by Date / Time, Motion & Sensor Digital 2 x 2 Zoom ; Playback available in Zoom Mode Alarm Input : NO, NC Type Internal Buzzer, OSD, Internal Relay (Combined with External Device) 30 sec ~ 30 min TCP / IP ; RJ , 360 Mode Functional remote client software Web Browser and Own Application provided Moving Picture Recording, Still Image Capturing Ethernet, CD-Burner Switching Period : 1 ~ 60 sec Automatic Alarm Display Hidden Function by Each Channel ; Recording Available IR Remote Control, RS V 5A DC Adaptor (AC 100V 240VAC 50~60Hz Input) 17.0 X 14.1 X lbs 10.4 lbs 10.6 lbs FCC, CE 12
13 CHAP 1. INTRODUCTION 4. Contents Please make sure the following parts are included with the main DVR when you open the product package. Parts DVR DC Power Adaptor Power Cable Remote Controller Batteries User s Manual and Install CD LAN Cable 1 unit 1 pc 1 pc 1 pc 2 pcs 1 pc 1 pc Quantity DVR Batteries Remote Controller DC Adaptor LAN Cable Install CD Power Cable We strongly recommend you to fully understand this user s manual before installation. Note This equipment has been tested and found to comply with the limits for a CLASS A digital device, pursuant to Part 15 of FCC Rules. These limits are designed to provide reasonable protection against harmful interference when the equipment is operated in a commercial environment. PLEASE READ THIS GUIDE BOOK THOROUGHLY FOR EFFECTIVE AND SAFE USAGE OF THE DEVICE. 13
 / Down(2) / Left(3) / Right(4). 2 ~ 5.")
14 CHAP 1. INTRODUCTION 5. Front Panel to 16 Channel Selection / Direction Button To select a channel to be viewed as full-size screen during live display or playback. To navigate, press Up(1) / Down(2) / Left(3) / Right(4). 2 ~ 5. LED Signs There are four LED signs that indicate current status. 2. POWER : DVR power status 3. NET : ON means connection status via network. If someone accesses the DVR via network, LED light turns on. 4. PLAY : ON means the DVR is in playback mode. 5. REC : ON means the DVR is recording mode. 6. Remote Controller Sensor 7. Multi Button It converts to live display mode directly. To surf various live display modes like 16CH, 13CH, 9CH, 8CH, 6CH and 4 CH display by pressing the button repeatedly. 8. PIP Button To convert to PIP mode (Picture in Picture ). To surf various PIP modes like 1PIP, 2PIPs and 3PIPs by pressing the button repeatedly. 9. AUTO Button To convert to auto switch mode. If you press AUTO on the front panel, channels will be automatically switched as follows. - Ch1 -> Ch2 -> Ch3 ->.-> Ch14 -> Ch15 -> Ch16 -> 16Ch in CIF -> Ch1 -> Ch2 keeping this order until you press Auto button again to release the function. 14
15 CHAP 1. INTRODUCTION 10. TRI Button To convert to triplex function like 8 channel live display and 8 channel playback in the screen simultaneously. Press the button first, you will have CH1 ~ CH 8 live displays and playbacks and press it again, you will do other channels like CH9 ~ CH16 live displays and playbacks. - When you press the button in live display mode, you will see 8 channel live displays and 8 channel playbacks with no video. To retrieve video from hard drive, press Playback button. - When you press the button in playback mode, you will see 8 channel live displays and 8 channel playbacks that have selected. 11. INFO (information) Button / BACKUP Button To show system information of DVR During Playback mode, it works as USB / CD backup button 12. CD-Burner To burn CD for data back-up 13. Rewind ( ) Button It supports REW1, REW2, REW3 and REW Play ( ) and Pause (II) Button To play and pause the recorded videos 15. Faster Forward ( ) Button It supports FF1, FF2, FF3, FF4 and FF5 16. Stop ( ) Button To stop playback 17. Record Button To start and stop recording. 18. Search Button To access recordings from HDD 19. Enter Button To enter a selection 20. Menu Button To access System Setup Menu. 15
16 CHAP 1. INTRODUCTION 6. Rear Panel [ 16CH DVR ] Cooling Fan 2. Power Switch 3. AC Power Switch BNC connectors for camera input BNC connectors for monitor output These are mainly for monitors. And also you can use these for VCR recorder backup. 6. Audio In / Out Port 7. USB Port 8. RS-232 Port (9 Pin D-Sub Connector) It is for factory use. 9. Alarm In / Out and RS-485 Port (25 Pin D-Sub Connector) It is to communicate with external sensors, alarm and PTZ camera to control. 10. S-Video Output 11. LAN Terminal It is to connect to LAN or Internet. 12. BNC connectors for monitor output These are mainly for monitors. And also you can use these for VCR recorder backup. 13. VGA Output Port This is mainly for PC monitors. 16
 6. Multi 7. PIP 8. AUTO 9.Zoom ( 2 x digital zoom) 10 Left (CD Backup Start in Playback mode) 11 Up 12 Right (CD Backup Stop in Playback mode) 13 Down 14. ENTER 15.")
17 CHAP 1. INTRODUCTION 7. Remote Controller REC (Record) 2. Mute 3. CH1~CH10 (Channel selection) 4. MENU 5. INFO (Information) 6. Multi 7. PIP 8. AUTO 9.Zoom ( 2 x digital zoom) 10 Left (CD Backup Start in Playback mode) 11 Up 12 Right (CD Backup Stop in Playback mode) 13 Down 14. ENTER 15. All (Search menu) 16. Time (Search by date/time) 17. List (Search by date/time list) 18 Stop 19. REW (REW1, 2, 3 and 4) 20. FF (FF1, 2, 3, 4, and 5) 21 Play 22. II Pause 23. P.B (Playback) 24. TRI (Triplex) 25. Panorama 26. P/T (Pan/Tilt) 27. Z/F (Zoom/Focus) 28. CD Backup 29. USB Backup 1. Open the battery container by sliding down the cover. 2. Insert two batteries according to directions provided. 3. Close the container by sliding up the cover. 17


18 CHAP 2. INSTALLATION 1. HDD Installation 1 Unscrew the sides, rear of the DVR and remove the top cover. 2 Fix HDDs to rack mount by screwing as left. 3 Install the HDDs on the HDD plate and screw as left. HDD Jumper Setting Information Before install the Hard Disk Drives, please read the jumper setting information on the label. If the jumper is not set properly, the system will be disordered. 4 Make sure that the HDDs are set to Master & Slave properly and then connect the power cable and IDE cable as left. Check if HDD has no problem after HDD installation because record function may not work well due to HDD problem. It may reboot automatically when HDD has problems or it doesn t detect HDD. Contact your local distributor and exchange with new one when you find your HDD has a problem. 5 Close the top cover and screw and turn on the power. 18


19 CHAP 2. INSTALLATION 2. System Diagram. 16 Cameras. 16 Sensor Inputs 1 Alarm Out BACKUP DISPLAY CD-RW Monitor Camcorder VCR NETWORK PC Monitor Internet Web Browser WebViewer PC Client Program NetViewer Note You can use general home TV or PC Monitor as CCTV monitor. 19
20 CHAP 2. INSTALLATION 3. PTZF Camera & Sensor Connection Diagram 1) RS-232 (9 Pin D-Sub Connector) 1) RS-232 2) Alarm In/Out & RS-485 3) VGA No Description N/C TX 232C RX 232C N/C GND 6 ~ 9 N/C * N/C : Connection Not Required 20
21 CHAP 2. INSTALLATION 2) Alarm In/Out & RS-485 (25 Pin D-Sub Connector) Description 16CH DVR 8CH DVR 4CH DVR Sensor Input 1~16 1,3,5,7,9,11,13,15 1~4 GND 17~20 2,8,10,12,14,17,19,21,23,25 5~13,14,17~20 Alarm Out COM Alarm Out NC Alarm Out NO B A RS232C Rx RS232C Tx ) VGA (15 Pin D-Sub Connector) No ~ Description RED (Red Video [75ohm, 0.7Vp-p]) GREEN (Green Video [75ohm, 0.7Vp-p]) BLUE (Blue Video [75ohm, 0.7Vp-p]) Reserved HSYNC or CSYNC (Horizontal or Composite Sync.) VSYNC (Vertical Sync.) Reserved 21
 IP Address You can use one of Static IP addresses, Subnet Mask and Gateway provided by your ISP (Internet Service Provider) for network connection between DVR and Net / Web")
22 CHAP 2. INSTALLATION 4. Network Connection 4.1 Using Static (Public) IP Address You can use one of Static IP addresses, Subnet Mask and Gateway provided by your ISP (Internet Service Provider) for network connection between DVR and Net / Web Viewer. And you can connect DVR to your multi-port Broadband Modem directly. BROADBAND MODEM 4.2 Using Dynamic IP Address You can use Router with your Dynamic IP broadband modem. In this case, you should set the configuration of Router properly for network connection between DVR and Net / Web Viewer. Please follow the instruction in next section to configure your Router correctly. BROADBAND MODEM ROUTER If your Broadband Modem does not support internal loop back (port forwarding) function, and if you want to monitor DVR using a PC located in same Intranet, you should use Direct IP instead of DDVRLS in the connection menu of Net Viewer. If your PC is located out of Intranet, you can use both DDVRLS and Direct IP to connect to DVR even though your Broadband Modem has limited features. You will know about DDVRLS and Direct IP in Chapter 9, Network Viewer. 22

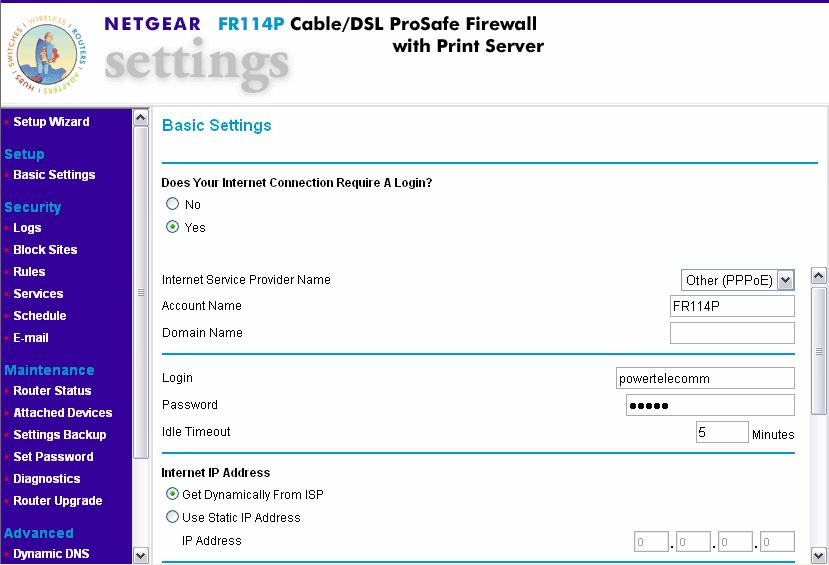
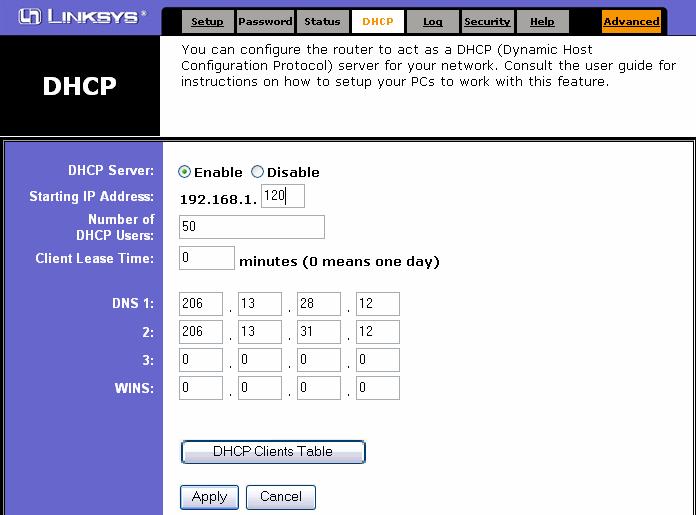
23 CHAP 2. INSTALLATION 4.3 Router Configuration If your DVR is connected to network through Router, you should configure Router properly. There are 3 steps as follows. 1. WAN Setting 2. DHCP Setting 3. Virtual Server Setting And 3 Routers from D-Link, Net Gear and Linksys are quoted as examples in this manual WAN Setting When you connect to your Router, you can find menu for Wan setting. Please confirm the WAN setting. If you are using DSL service, you should select PPPoE, and you will see sub-menu to type in DSL user name and password. 23

24 CHAP 2. INSTALLATION 24

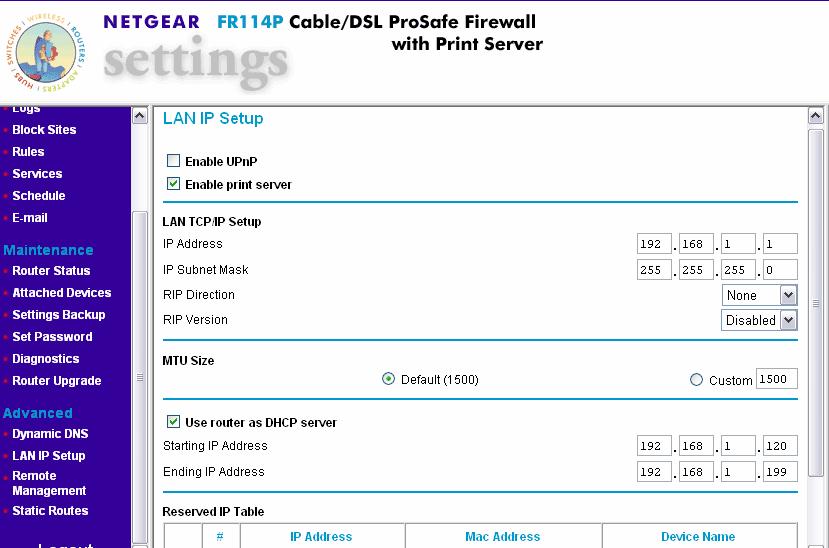
25 CHAP 2. INSTALLATION DHCP Setting To assign DVR an unique private IP address in your intranet environment, please check the Starting and Ending IP address used by DHCP server. You can assign any private IP address to your DVR, if it is out of the DHCP range. 25
26 CHAP 2. INSTALLATION 26
 Protocol Type is TCP, and Private/Public Port numbers should be same with the Port numbers in DVR.")
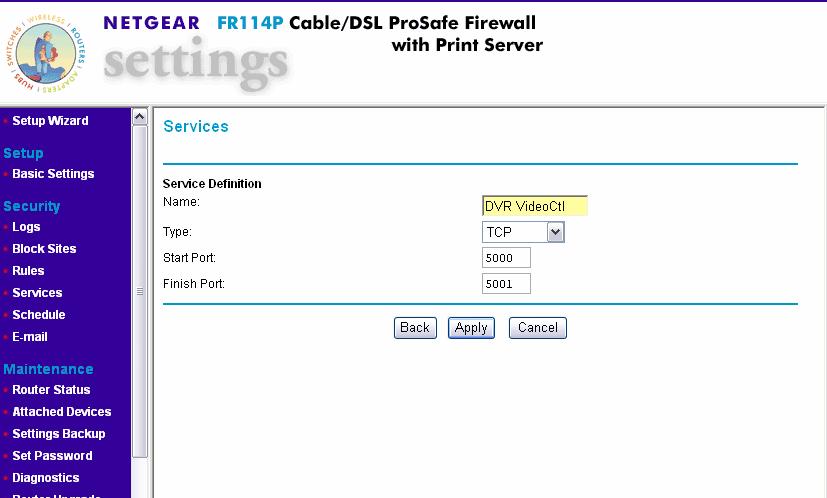
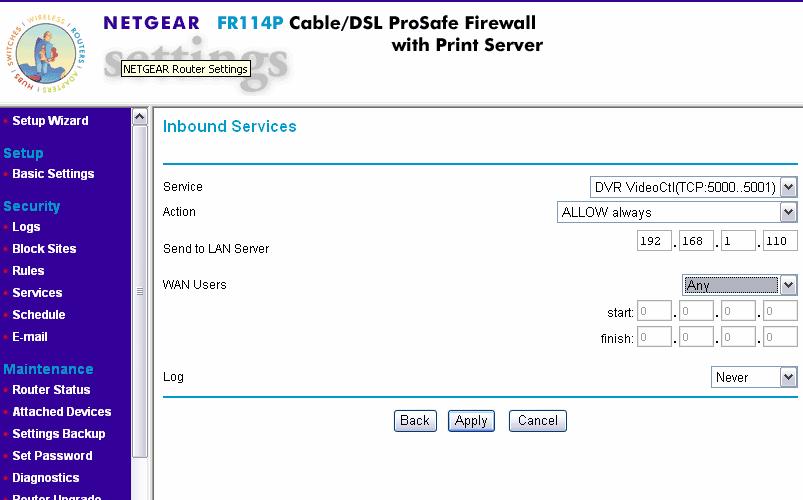
27 CHAP 2. INSTALLATION Virtual Server Setting You should register your DVR as a virtual server to Router. Please type in the private IP address of DVR to IP address field. (e.g ) Protocol Type is TCP, and Private/Public Port numbers should be same with the Port numbers in DVR. And you can change the Video signal Port number in Network Setup menu to avoid the conflict with other network servers. The default Port number in DVR is (It is for Video signal, and the Port number for Control signal is generated automatically as 9311, Video Port number + 1.) You need to register both DVR Video Port and Control Port to Router as Network servers. And please make sure that your Router dose not block the control / data to / from the DVR with filter and firewall features
28 CHAP 2. INSTALLATION

29 CHAP 2. INSTALLATION


30 CHAP 3. SETUP MENU Getting Started First, it is important to make sure that the DVR power is off before connecting all the necessary video, monitor and power cables to the DVR. [ System initializing ] [ HDD detected properly ] You will see the above screen when you power on the DVR system properly. It shows that the DVR starts and succeeds in detecting HDDs as master and slave. 1. Check if HDD has no problem after HDD installation because record function may not work well due to HDD problem. 2. Contact your local distributor and exchange with new one when you find your HDD has a problem. You will see information of current available hard drives and CD burner, USB memory stick as well as firmware version, when you press Info button. To exit to normal display, press Info button again. 30
31 CHAP 3. SETUP MENU System Setup Menu Before starting full operation of the DVR system, you have to set the desired system configuration using the Setup Menu. Press MENU button to access the Setup Menu. You can navigate through the 6 options up and down by pressing channel selection buttons ( CH1 : Up, CH2 : Down. CH3 : Left, CH4 : Right ) on the front panel of DVR or the direction buttons of the IR remote controller unit. To get into a sub menu, press ENTER button where the pointer is located. To exit the main menu, press MENU button. If you are in a sub menu, you can always return to main menu by pressing MENU button. 31

32 CHAP 3. SETUP MENU 1. Language When you first call the main menu using the MENU button, you ll see that the current language is highlighted (see screen shot above). Currently it supports English only. To exit main menu, press MENU button. 32
 Record OSD ON/OFF To show REC in green in the right bottom of screen during recording mode. Note - MA-REC shows videos are recorded in master hard disk.")
33 CHAP 3. SETUP MENU 2. System Setup 2.1 HDD Setup This menu enables HDD setup. 1) Overwrite ON/OFF To enable (ON) or disable (OFF) to overwrite HDD. 2) Record OSD ON/OFF To show REC in green in the right bottom of screen during recording mode. Note - MA-REC shows videos are recorded in master hard disk. - SL-REC shows videos are recorded in slave hard disk. 3) Format To format the HDD, press ENTER button and then select YES. You have to make sure of it before HDD format. Once HDD formatted, you will not be able to retrieve any video that has been recorded previously. To return to main menu, press MENU button. 33


34 CHAP 3. SETUP MENU 2.2 Password Setup This menu allows to set system passwords. It supports both Admin and User level passwords. Admin can access and control all information and User can access limited info without the ability to change the setup configuration. 1) Select ON/OFF To enable (ON) or disable (OFF) a password. 2) Registration of Passwords To set your desired 4 letter password among 0~9, press ENTER & direction button. To use both remote controller and buttons on front panel, you can use only 1~4 or 1~8 buttons if you have 4 or 8 channel DVR. To return to the sub menu, press MENU button after completing password input. To return to main menu, press MENU button. 34

35 CHAP 3. SETUP MENU 3) Input of Passwords To input your 4 letter password among 0~9, press numeric buttons of remote control unit or front panel. The cursor moves to right when DVR receives each number. Recording start and Playback functions do not require password even though DVR is Password On condition. To return to main menu, press MENU button. Note Remember that the Admin password was set to 1111 in factory mode. And 2222, 3333, 4444 are the default passwords for User1, 2, and 3. If you forgot the password and can not control DVR, please contact to whom sold DVR to you. He/She might be able to restore the default password. 35

36 CHAP 3. SETUP MENU 2.3 Channel Name Setup To make camera names easy to remember, you can assign names to individual channels up to 8 characters per channel. For example, if your one external camera is located in a factory, you can name it as factory. You can see videos with this name on the screen during operation. 1) Live ON/OFF 2) PB ON/OFF - When turned ON, it enables display of camera names. - When turned OFF, it disables display of camera names. 3) CH 1 ~ CH 16 CH 1/2/ /16 - When the pointer is located next to CAMERA1/2/3/4 /14/15/16, 1. Press ENTER button 2. See the active cursor on the first letter of which means a blank. 3. Surf along letters by pressing Up/Down button. 4. When you find your desired letter, press Right/Left button to move the active cursor to the next letter. 5. After the naming process is complete, press ENTER button and then press Up/Down button to move to other cameras. To exit main menu, press MENU button. 36
37 CHAP 3. SETUP MENU 2.4 Date/ Time Setup Everybody agrees that surveillance digital video recorders must indicate the exact date and time information in which an event took place in order to be used as evidence. Therefore, configuring the DVR to correct time and date is very important.. 1) Live ON/OFF 2) PB ON/OFF - When turned ON, it enables Display of camera names. - When turned OFF, it disables Display of camera names. 3) Type YY/MM/DD, DD/MM/YY, MM/DD/YY 4) Date 2005/09/24 5) Time 19:44:00 - When the pointer is located next to Date or Time, 1. Press ENTER button 2. Set Date or Time - Select it by pressing Up/Down button - Move to the next by pressing Left/Right button 3. When you finish setting Date/ Time, press MENU button and then press Up/Down button to move to other sub menu. To return to main menu, press MENU button. 37
 PAN/ TILT Pelco-D / Pelco-P / LG / Hitron / Dongyang Select a desired protocol which is used for communication between the external Pan/ Tilt camera and the DVR set.")
38 CHAP 3. SETUP MENU 2.5 Beep & PTZ Setup This menu enables recording beep and external Pan/ Tilt & Zoom/ Focus cameras setup to communicate with. 1) PAN/ TILT Pelco-D / Pelco-P / LG / Hitron / Dongyang Select a desired protocol which is used for communication between the external Pan/ Tilt camera and the DVR set. Note Compatible Pan/ Tilt camera list - Pelco-D, Pelco-P, LG, Hitron, Dongyang protocol. 2) Rec Beep ON/OFF To enable recording beep when pressing REC button to start and release the function. 3) HDD Fail ON/OFF To enable to beep when the DVR detects a bad sector of HDD in recording mode or playback mode. It skips the bad sector that detected and records videos or plays recorded videos in the next sector of HDD automatically. HDD is logically divided to a large amount of sectors. It may have some bad sectors out of a large amount of it. When this function is on, you are recommended to exchange with new one in order to preventing from any potential problems caused by the HDD with bad sectors. To return to main menu, press MENU button. 38


39 CHAP 3. SETUP MENU 2.6 System Reset ON/OFF To reset the system, press Enter button and select YES. Then system parameters go back to default values. To return to main menu, press MENU button. You have to make sure of it before system reset. Once system reset, all data that you have selected previously, such as password, are converted to the factory default settings. 39
40 CHAP 3. SETUP MENU 3. Display Setup 3.1 Blank Channel Setup To enable to make channels hidden on the screen during live display mode as below. CH 1 ~ CH 16 ON/OFF To hide the channels on the monitor even though it is recorded, you can set ON for each channels. To return to main menu, press MENU button. Note Even though some channels are hidden in the screen during live display mode, the DVR has been recording them in HDD. 40
41 CHAP 3. SETUP MENU 3.2 PIP Channel Setup You can select PIP ( Picture In Picture ) options. PIP mode offers a convenient way of monitoring multiple channels while focusing more attention on a specific channel. It has a main video channel and up to 3 sub video channels on the screen. Main CH 1 ~ CH 16 Sub 1 CH 1 ~ CH 16 Sub 2 CH 1 ~ CH 16 Sub 3 CH 1 ~ CH 16 To define which channel is the main channel for full screen or sub channel among 16 channels. To return to main menu, press MENU button 41
 CON (Contrast) 50 - To control light and shade of video display. 3) HUE 50 - To control color tone of video display. 4) BRI (Brightness) 50 - To control brightness of video display.")
42 CHAP 3. SETUP MENU 3.3 Adjust Channel Setup This menu allows video adjustment options for individual cameras. 1) Channel CH1 ~ CH 16 - To select your desired channel to adjust video display. 2) CON (Contrast) 50 - To control light and shade of video display. 3) HUE 50 - To control color tone of video display. 4) BRI (Brightness) 50 - To control brightness of video display. 5) COL (Color) 50 - To control saturation of color of video display. To return to main menu, press MENU button. Note Default factory mode was set to 50. Remember that the values range from 01 to


43 CHAP 3. SETUP MENU 3.4 Video Signal Type NTSC/PAL To select your local video signal type between NTSC and PAL, press Enter button and select it. It reboots the system automatically after your selection. It reboots the system automatically after your selection. Once it reboots, all data that you have selected previously is set to factory default. 3.5 Sequence 1 sec ~ 1 min To select interval time of Auto Switch. With the Auto Switch feature, a range of interval time among some different views can be selected. To return to menu, press MENU button. 43
44 CHAP 3. SETUP MENU 3.6 Boundary White/Black/OFF To select the boundary color that is divided into each channel. 3.7 Background Blue/Black To select the background color of no video channels between two colors. To return to menu, press MENU button. 44

45 CHAP 3. SETUP MENU 3.8 VGA Setup It supports 3 output resolutions, 800x600, 1024x768 and 1280x1024. Output Contrast, Brightness and Color can be adjusted. To return to menu, press MENU button. 45

46 CHAP 3. SETUP MENU 4. Event Setup This screen enables simple set up of DVR motion detection, alarm and external sensor configurations 4.1 REC Time 30 sec ~ 30 min Once event recording is triggered, that channel is recorded for that period. Each channels works independently. 4.2 Sensor In N.O/N.C The Sensor-in terminals of the DVR are used to connect external motion sensors or door/window contacts. There are two types of general sensors in the market. The one is "normal mode-open, N.O, which means two sensor lines are not connected (open) in the normal mode but the lines are to be connected (close) in the activation mode. The other is "normal mode-close, N.C, which means two sensor lines are connected (close) in the normal mode but the lines are to be disconnected (open) in the activation mode. To return to menu, press Menu button. You have to make sure of sensor type between N.O and N.C before installation. Otherwise, it may not work properly. - N.O : Normal Open type sensor - N.C : Normal Close type sensor 46
 Alarm Out ON/OFF You can set to enable (ON) or disable (OFF) the outbound signal from the DVR.")
47 CHAP 3. SETUP MENU 4.3 Event Action To select notice method in order to make users get more attention when event recording occurs. 1) Alarm Out ON/OFF You can set to enable (ON) or disable (OFF) the outbound signal from the DVR. 2) Sensor ON/OFF When DVR detects signals from external sensors, DVR will beep or OSD to get your attention. - BEEP + OSD : Beeps and shows A letter together. DVR records channels which are activated by sensor. - OSD : On-Screen-Display only. DVR records channels which are activated by sensor. - OFF : Disables to activate the alarm action * 4 CH model records all 4 channels, when any one or more sensors are activated with BEEP+OSD or OSD option. But 8/16 CH models record each channel activated by sensor. 3) Video Loss BEEP+OSD/ OSD/ OFF If video signal from the cameras does not reach the DVR, a beep will sound to get your attention. - BEEP+OSD : Beeps and shows L letter together. No recording. - OSD : On-Screen-Display only. No recording. - OFF : Disables to activate the alarm action 4) Motion BEEP+OSD/ OSD/ OFF When DVR detects motion on certain part of the screen, DVR will beep or OSD to get your attention. - BEEP + OSD : Beeps and shows M letter together. DVR records channels which are activated by motion. - OSD : On-Screen-Display only. DVR records channels which are activated by motion. - OFF : Disables to activate the alarm action * 4 CH model records all 4 channels, when any one or more video motion are activated with BEEP+OSD or OSD option. But 8/16 CH models record each channel activated by video motion. To return to main menu, press MENU button 47
 Sensitivity 1~15 It offers 1 to 15 level of sensitivity. Remember that the higher level is more sensitive to detect motions.")
 Position - Press Enter button and surf areas in the desired channel by pressing direction button and then press ENTER button to select, press it again to release.")
48 CHAP 3. SETUP MENU 4.4 Motion Setup This menu enables users to set motion functions. 1) Channel CH1~CH16 You must manually set each channel for the motion detection area. Select a channel for this motion detection. 2) Sensitivity 1~15 It offers 1 to 15 level of sensitivity. Remember that the higher level is more sensitive to detect motions. 3) Area OFF/FULL/SET - OFF : Disable to select motion areas. - FULL : Select full area as motion area. - SET : To select the area as you desire, move to POSITON menu. 4) Position - Press Enter button and surf areas in the desired channel by pressing direction button and then press ENTER button to select, press it again to release. - Once you select the areas, you don t need to select them again when you get back from other modes like OFF or FULL. It gives you easy-operation. To return to main menu, press MENU button 48


49 CHAP 3. SETUP MENU 5. Record Setup Here you can set recording options. 5.1 Record Type 720 / 360 There are two recording modes: 720x240 and 360x240. If you set it to 720 mode, DVR records the full size videos of 16 different channels. If you set it to 360 mode, DVR records the half size videos of 16 different channels. 5.2 Record Speed 1~60 F/S, 120F/S (only available in 360 mode) You can select various recording speed in field per second (F/S). 60 F/S in 720 mode means that it records 60 images per second. Higher field per second requires more HDD space. Depending on NTSC or PAL mode, range of fps available varies. NTSC and PAL have the following fps available: - NTSC : 1~120 F/S - PAL : 1~100 F/S 5.3 Quality Level 1~6 It is to set video recording quality of level 1~6. 6 is the highest quality. Higher video quality, more HDD space required. 49

 means that it plays videos at the same rate of recording speed.")
 - ON : Enable to record the channels - OFF : Disenable")
50 CHAP 3. SETUP MENU 5.4 Color Enrich ON / OFF You can select color recording format. ON supports better color, but OFF supports less HDD space for recording. 5.5 PB Speed AUTO, 1~60 F/S, 120F/S (Only available in 360 mode) You can select various playback speed in field per second (F/S). AUTO (Default) means that it plays videos at the same rate of recording speed. 60 F/S in each mode means that it plays 60 images per second even though the video was recorded in different recoding speed. 5.6 Channel Enables CH1 ~ CH16 / Group 1~Group 4 (120 F/S recording in 360 mode) - ON : Enable to record the channels - OFF : Disenable to record the channels - Each group indicates each 4 channels. (For example, group 1 shows CH1 ~ CH4) * 4CH model does not support Record Channel Enable function. All 4 CHs are enabled. 50
 Icon Display ON/OFF To enable icon of audio function in right top of screen as below. 5.")
 Time When you finish to set Day, press ENTER button to go into the Timeline.")
51 CHAP 3. SETUP MENU 5.7 Audio Setup 1) Channel CH1~CH16 It is to select one audio channel among 16 channels. 2) Icon Display ON/OFF To enable icon of audio function in right top of screen as below. 5.8 Schedule Setup 1) Schedule ON/OFF To disable (OFF) or enable (ON) Schedule recording feature. 2) Day Daily/ SUN~SAT Select the desired day for schedule recording. - Daily, Sun, Mon, Tue, Wed, Thu, Fri, Sat 3) Time When you finish to set Day, press ENTER button to go into the Timeline. Surf left or right in the timeline by pressing Left or Right button. If the cursor is on the desired time for schedule recording, press Up button to set or Down button to release. 51

52 CHAP 3. SETUP MENU 6. Network Setup To monitor and control videos remotely through network, you need to input the correct values. 6.1 IP Address * Set IP address of your DVR using arrow buttons. To move to other sub-menu, move cursor to then press up or down button. 6.2 Subnet Mask * Set Subnet Mask of your DVR using arrow buttons. To move to other sub-menu, move cursor to first, then press up or down button. position first, position 6.3 Gateway * Set Gateway of your DVR using arrow buttons. To move to other sub-menu, move cursor to then press up or down button. position first, 6.4 Type INTERNET / INTRANET - Internet : It is recommended in Internet connection. And its display speed is slower than INTRANET, but it guaranties no crashed video at any network traffic condition. - Intranet : It is recommended in Intranet connection. Its display speed is faster than INTERNET. But the video will be crashed, if the network condition is not fast enough. Set INTERNET/INTRANET using Left/right button. 6.5 Sequence ON / OFF - ON : It is recommended in Internet connection. It sends each channels sequentially, so Client can receive each channels at same speed. But if network traffic is low, it will cause lower speed of transmission. - OFF : It is recommended in Intranet connection. Some channels will be updated slowly comparing others. 6.6 Network ID ******** ( up to 8 letters) 6.7 Password ******** ( up to 8 letters) You Must Register Your Network ID using Network Viewer first. Press Enter button and set Network ID & Password using direction button. To access DVR through Network Viewer program, you need to set same Network ID & Password to DVR. To return to main menu, press MENU button. (All setting is effective after you exit the menu.) 52

53 CHAP 3. SETUP MENU 1. we would like to recommend you to check your local Firewall or personal network security programs. Sometimes they block certain ports for network security purpose. 2. If you don t have right information about network configuration, please contact your network administrator. Note To check and change Mac. Address, Network Server IP and Port number of your DVR, press CH6 button in network setup mode. The main reason of hidden menu of Mac. Address, Network Server IP and Port number is to prevent accidental changes by the user. 53


54 CHAP 4. DISPLAY MODE You can enjoy this live mode functions in display mode. 1. Live Mode It converts to 16 channel live display on the screen as below by pressing Multi button. You can surf 13 CH / 9 CH / 8 CH / 6 CH / 4 CH / 1 CH display by pressing Multi button repeatedly. [ 13 CH display Mode] [ 9 CH display Mode] [ 8 CH display Mode] [ 6 CH display Mode] 54
![CHAP 4. DISPLAY MODE [ 4 CH display Mode] [ 1 CH display Mode] 2. PIP Mode You can select PIP ( Picture In Picture ) options by pressing PIP button repeatedly.](/docs-images/80/81162850/images/55-0.jpg "PIP mode offers a convenient way of monitoring multiple channels while focusing more attention on a particular channel.")


55 CHAP 4. DISPLAY MODE [ 4 CH display Mode] [ 1 CH display Mode] 2. PIP Mode You can select PIP ( Picture In Picture ) options by pressing PIP button repeatedly. PIP mode offers a convenient way of monitoring multiple channels while focusing more attention on a particular channel. It has a main video channel view and up to 3 small video channel views on the screen. You can surf 1 PIP/ 2 PIPs/ 3 PIPs mode with 4 positions by pressing PIP button repeatedly. To release this mode, press other function button on the front panel. 3. Auto Mode If you select Auto Mode, channels will be switched automatically among 17 types of display in the order of CH 1-CH 2-CH3- - CH 15- CH channel Mode and keep the order until you press other function button. The DVR skips channels with no video. You can find that the DVR indicates Auto Mode in the upper left of the screen in this mode. To release this mode, press other function button on the front panel. 55
. 4.")
56 CHAP 4. DISPLAY MODE 4. Pan/ Tilt/ Zoom/Focus Camera Control Controlling an external Pan/ Tilt/ Zoom/Focus camera 4.1 Pan/ Tilt Function Indicates Pan/Tilt function. 1) 16 channel display mode 1. First press P/ T button in the remote controller. 2. Select your desired channel by pressing P/T button repeatedly. 3. Control the camera with the direction buttons (Up/ Down/ Right/ Left). 4. To release this function, press P/T button repeatedly until P/T disappears on the screen. 2) One channel Mode 1. First select your desired channel installed Pan/Tilt camera by pressing channel selection button. 2. And then you will see a full-size screen. 3. Press P/T button in the remote controller. 4. Control the camera with the direction buttons (Up/ Down/ Right/ Left). 5. To release this function, press P/T button again in the remote controller. 56
. 4.")
57 CHAP 4. DISPLAY MODE 4.2 Zoom/ Focus Function 1) 16 channel display mode Indicates Zoom Focus function. 1. First press Z/ F button in the remote controller. 2. Select your desired channel by pressing Z/F button repeatedly. 3. Control the camera with the direction buttons (Up/ Down/ Right/ Left). 4. To release this function, press Z/F button repeatedly until Z/F disappears on the screen. 2) One channel Mode 1. First select your desired channel installed Zoom/Focus camera by pressing channel selection button. 2. And then you will see a the full-size screen. 3. Press Z/F button in the remote controller. 4. Control the camera with the direction buttons (Up/ Down/ Right/ Left). 5. To release this function, press Z/F button again in the remote controller. 57


58 CHAP 4. DISPLAY MODE 5. Digital Zoom You can magnify a certain part of the full size screen two times digitally when you use this function as described below. This function can be applied to all display and search modes. You can operate this function with only remote controller. 1. Select the desired channel among 16 channels. 2. Press Zoom button in the remote controller. 3. Select the area by pressing Left/Right/Up/Down button in the remote controller. And then press Zoom button again. 4. You can see the video that is magnified two times digitally. 5. To exit this mode, push Zoom button again in the remote controller. 6. Panorama This function enables you to monitor each channel with 16 split-channel panorama mode in the screen. It can be applied in playback modes. 1. Play your desired video in the recording list first. 2. Press Panorama button in the remote controller. 3. Select your desired channel by pressing Panorama button repeatedly. 4. To exit this function, press Multi button. 58
59 CHAP 5. RECORDING MODE If you press REC button, you will see REC in green on the right bottom of the screen. It means the DVR is in the recording process. - MA-REC : It records videos in Master HDD. -SL-REC : It records videos in Slave HDD. To release REC function, press REC button again. 2. It indicates that playback function is on in live display mode, which is one of our main features, that is simultaneous multi-function operation in one screen. -MA-PLAY :It plays videos that have been stored in Master HDD. -SL-PLAY :It plays videos that have been stored in Slave HDD. You will know how to initiate Playback mode in following 2 sections, Search Mode and Triplex Function. 3. It means that audio function is set to channel 1. 59
![CHAP 6. PLAYBACK - SEARCH MODE [ Search Menu ] With Triplex function, you can enter search mode while the DVR is in live or recording mode.](/docs-images/80/81162850/images/60-1.jpg "So you don t need to stop recording to initiate Playback mode. Press SEARCH button and move to one option to retrieve video using Up/Down button.")

60 CHAP 6. PLAYBACK - SEARCH MODE [ Search Menu ] With Triplex function, you can enter search mode while the DVR is in live or recording mode. So you don t need to stop recording to initiate Playback mode. Press SEARCH button and move to one option to retrieve video using Up/Down button. Then press ENTER button to enter the selected search option. To watch a desired recorded video, press ENTER button at the event highlighted. Then DVR replay the video. Also you can designate exact date and time to retrieve video using DATE/TIME SEARCH option. You can stop the video at any time by pressing STOP button. Also FF, REW, PAUSE are available in Playback mode. 1. Date / Time List Search Select Master or Slave using SER button. It shows a list of recordings triggered by Manual or Schedule Recording. DVR generates separate event list at every hours, even though you record for long time for easy operation. It supports up to 1,000 recordings. You can select your desired date/ time in each recording list. To return to search menu, press MENU button again. And press MENU button in search menu, to exit to live display mode. 2. Event List Search Select Master or Slave using SER button. It shows a list of recordings triggered by the motion and external event. It supports up to 1,000 recordings. You can select your desired date/ time in each recording list. To return to search mode, press MENU button again. And press MENU button in search menu, to exit to live display mode. 3. Date / Time Search Select Master or Slave using SER button. You can designate a specific date and time to retrieve video. If you input Invalid date/time, DVR will display the closest video. To return to search mode, press MENU button. And press MENU button in search menu, to exit to live display mode. 60

61 CHAP 7. PLAYBACK - TRIPLEX FUNCTION You can now experience triplex function (simultaneous recording, playback and network transmission) with our new line of Digital Video Recorders. - Press TRI button in live or recording mode, then you will see 1~8 live channels and 1~8 PB channels. To start playback, press PLAY button, then PB channels will display continuing last retrieved video. - To see 9~16 channels live display and playback, press Up/Down button. - To distinguish live and playback channels in one screen, channel names of playback are displayed as PB 1~16. Date/Time in white means current real-time. Date/Time in green means playback date/time. -If you press channel button in this mode, you can see the full channel video of playback mode in the screen. - To see all 16 channels playback, press PB button, and to go back to Triplex mode, press TRI button. - To exit to live display mode, press Multi button. Note To switch the hard drive between Master and Slave, press All button (remote control unit) or SER (front panel) in one of three sub-search menu. 61

62 CHAP 8. PLAYBACK TRICKPLAY & MULTI CH. DISPLAY You can get FF, REW and Pause during Playback mode. It supports 5 steps of FF and 4 steps of REW. To change the FF/REW speeds, press FF/REW buttons repeatedly. In Playback mode, there are two display mode. The one is single channel mode and the other is multi channels mode. To see one channel full screen display, press channel number buttons. And to go back to multi channels display mode, press current single channel button again, then you will see multiple channels on the screen. To change the split mode, press Up/Down buttons to find your favorite multi channels display mode. 62

63 CHAP 9. CD / USB BACKUP MODE You can copy video stored in DVR into CD or USB memory stick in Playback mode. During CD/USB backup, all other operation are prohibited. You can retrieve video from CD/USB memory stick using our Net Viewer easily. You can burn whole blank CD / USB memory stick or stop burning in the middle of burning process. 1. Insert blank CD into CD-Burner or insert USB memory stick to USB port. 2. Press SER button and select your desired video in the list. 3. Play the selected video. 63


64 CHAP 9. CD / USB BACKUP MODE 4. Press Info button of Front panel, then you will see menu to select either CD or USB backup. Or press CD Backup / USB Backup button of Remote Controller, then you can get in its Backup mode. 5. To backup to USB memory stick, select USB using Left ( ) button, and press Select button on the Remote Control Unit. Then it starts writing playback video/audio to USB memory stick. When it completes burning, it goes into Pause mode. Also you can stop USB backup using Left ( ) button on Remote Control Unit. 6. To backup to CD, select CD and press Select button on the Remote Control Unit. Then DVR checks the CD burner and blank CD available. 7. If DVR is ready to burn CD, you will see the READY condition. - Ready : shows that it is ready for CD backup. 64


65 CHAP 9. CD / USB BACKUP MODE 8. Press ENTER button, then it starts CD backup showing the status at bottom of screen as below. - Burning : shows that it is in the process. 9. When it completes burning, it shows CLOSE during its closing procedure. Also you can stop CD burning using button (Remote control unit). - Close : shows that it finishes the process. Note Some CD-R or CD-RW can not be burnt fully or has compatibility problem. In this case, DVR can not burn full 730MB data into CD and we recommend to use USB backup. 10. Take out the CD or USB memory stick from DVR. If you want to see the video stored in CD / USB memory stick, put CD into PC or insert USB memory stick to PC which Net Viewer is installed in. You can retrieve backup data from USB memory stick or CD using File playback or CD Playback functions of Net Viewer. 11. To return to live display mode, press MENU button. 65
66 CHAP 10. NETWORK VIEWER 1. System Requirement - Pentium III or above recommended - O/S : Microsoft Windows XP, MB RAM or above recommended - Super VGA 16M or above recommended - 10/100 Base T network card for LAN operation 2. Network Environment Minimum Recommend Client PC More than 128 Kbps More than 3 Mbps DVR More than 128 Kbps More than 3 Mbps 3. Network Viewer Installation To start network viewer installation, 1. Start Microsoft Windows. 2. Insert installation CD into the CD-ROM drive. 3. Execute Setup.exe, then it installs NetViewer automatically and generates Icon on the Desk Top screen. 4. Click the NetViewer Icon, then network viewer will appear on the screen as below. 66
67 CHAP 10. NETWORK VIEWER 4. Functions and Network Setup No Names Description 1 Play (Get Video) Get video after connection to DVR or change operation mode 2 Reverse Step Play Reverse frame Advance 3 Forward Step Play Forward frame advance 4 Go to Start Move to the start point of video 5 Go to End Move to the end point of video 6 Channel Selection Select a channel 7 Operation Mode Select operation mode 8 Log In (Connect) Connect to DVR with network IP & Password or DVR IP address 9 Record Make remote DVR start or stop recording 10 Display Mode Select display mode 67
68 CHAP 10. NETWORK VIEWER 11 LED DVR Show that the DVR is controlled by Network viewer AVI Show that video is stored in by AVI file format Local Show that video is stored in MJPEG format Connect Show that Network viewer is connected Disconnect Show that Network viewer is not connected Read Show Network viewer is reading data from the CD or HDD local PC 12 Close Close the network viewer 13 Local Store the video in MJPEG format to local PC 14 AVI Store the video in AVI format to local PC 15 Setup Select AVI codec in local PC Note How to record video in AVI or MJPEG format You can enjoy this function in all mode. 1. Record in AVI format To start recording, press AVI button and to stop it, press the button again. When you press Setup button to select AVI codec resided in your PC, you might see several AVI codec. During the installation of the Network Viewer, please try to use those codec one by one to figure out which one works fine. Some of AVI codec in the list might not work properly. And please remember the AVI codec which you selected to use continuously. You should register proper codec, before running NetViewer. 2. Record by Local (MJPEG) format To start recording, press Local button and to stop it, press the button again. All videos are recorded in the default directory. And also each LED (AVI or Local) is activated when the function is on. Note Default directory is as below. 1. AVI file - C:\DVR 2. Local (MJPEG) file C:\DVR Note You should setup network configuration during installation of DVR and Network Viewer for remote control and monitoring through Network. 1. Click Log In (Connect) button and register your own network ID, Password and address for Dynamic IP Support and Event Notification. It is required only for the first connection during installation of DVR and Network Setup. If you use more than one DVR in a intranet, you should set different Port numbers to each DVRs. 2. ID and Password are composed of 8 letters. You should get your own unique ID through authentication process first. Then you can type in your own Password and address. 3. You should type same ID and Password into Network Setup menu of DVR. 4. If you want to use static IP address for DVR, please type DVR IP address into IP address field. 68


69 CHAP 10. NETWORK VIEWER Note NETWOK ID Registration When you press Log In button, you will see Connect Manager. If you are installing DVR and Network Viewer now, please press Setting. Press Create NETWORK ID and type in your desired Network ID and address. Ann Click Register button. Then Network Viewer will check the availability and ask you to try different ID if it is registered already by other DVR users. To receive Alarm notification from DVR when events are happened, select Receive Notification Mail option. Then DVR will send an to you address when it detects events triggered by sensors and/or video motions. And you can use Update Account Information to change your address. 69


70 CHAP 10. NETWORK VIEWER Note 3. Dynamic IP Connection Our DDVRLS (Dynamic DVR Locator Service) enables you connecting to DVR only with your registered Network ID and password 4. Direct (Static) IP Connection Also you can use Direct IP connection with type in DVR IP address and Password. Note Address Book You can manage and access multiple DVRs easily using Address Book. After when you register each DVRs to DDVRLS, you can register IDs of each DVR into Address Book. Then you can connect each DVR and switch one to another using this function. If you try to add ID which is not registered, you will see error message. 70
71 CHAP 10. NETWORK VIEWER 5. Operation This network viewer program has 5 types of operation modes. [ Live View / Playback / Drive Scan / File Play / CD Play ] Each operation mode is designed for its own purpose. Please refer to the details for your use. If you want to disconnect Remote access connected from unknown client, press INFO button then press STOP button at DVR side. No Mode Description 1 Live View To monitor live display 2 Playback To playback videos in the HDD of DVR 3 Drive Scan To search videos that are stored in local PC HDD 4 File Play To play videos that are stored in local PC HDD 5 CD Play To play videos stored in CD 5.1 Live View Mode To connect to DVR, 1. Press Setup button and select AVI codec and other options. 2. Press Log In (Connect) button and type in your ID and password. * DVR sends only channels which are displayed on NetViewer. If you choose only one channel, it sends only that channel to increase frame rate over the network. 71


72 CHAP 10. NETWORK VIEWER 5.2 Playback Mode This mode enables you to access the recording list in the remote DVR. When this function is on, DVR LED below is activated No Names Description 1 HDD Selection Select HDD between master and slave 2 Event List Access event list in the remote DVR 3 Record List Access all recording list in the remote DVR 4 Date/Time Search Search the video upon your specific date/time in the remote DVR To connect to Playback mode, 1. Press Setup button and select AVI codec and other options. 2. Press Log In button and type in your ID and password. 3. Press Play button and then you will get live display. 4. Click operation mode and select playback mode. To access event list or all recording list, 1. Select a HDD between master and slave in the HDD selection menu. 2. Press Get button first and then press Select button to see the list. 3. Event or all recording list will be shown in the screen. 4. Select your desired one from the list. 5. Press Play button and you will get playback of the video. To pause the video, press Play button again. 72

73 CHAP 10. NETWORK VIEWER 5.3 Drive Scan Mode You can take out HDD from DVR and plug it into your PC. And you can see the video from that HDD using this function. 1 2 No Names Description 1 Playback Speed Select playback speed 2 HDD Selection Select the HDD To connect to Drive Scan mode, 1. Click operation mode and select Drive Scan mode. 2. Select playback speed and select HDD used in DVR. 3. Press Play button. 4. You will get the videos from the HDD. 73

74 CHAP 10. NETWORK VIEWER 5.4 File / USB Back-up Playback Mode This mode enables you to retrieve date stored in local PC or USB memory stick. 1 2 No Names Description 1 Track Bar Click and drag to go to any point of the file 2 File open and time Click Open button to select file to retrieve. To connect to File / USB Back-up Playback mode, 1. Click operation mode and select FILE PLAY mode. 2. Select the file from hard drive or USB memory stick using OPEN button. 3. Press Play button to start Playback and to Pause, press same button. 74
75 CHAP 10. NETWORK VIEWER 5.5 CD Playback Mode This mode enables you to play video back up CD. 1 2 No Names Description 1 Track Bar Click and drag to go to any point of the file 2 Start / Stop Start/Stop of file copy from CD to local hard drive (c:\) To connect to CD Play mode, 1. Click operation mode and select CD Play mode. 2. Select the drive that CD-ROM is installed in the Drive Selection menu. 3. To play video from CD, press Play button and to Pause, press same button. 4. To save the video from CD to your local hard drive, use Start and Stop buttons. 75
76 CHAP 11. WEB VIEWER - CONNECT DVR VIA WEB BROWSER 1. System Requirement - Pentium III or above recommended - O/S : Microsoft Windows XP, MB RAM or above recommended - Super VGA 16M or above recommended - 10/100 Base T network card for LAN operation 2. Network Environment Minimum Recommend Client PC More than 128 Kbps More than 3 Mbps DVR More than 128 Kbps More than 3 Mbps 3. Connect DVR via Web Browser 1. Confirm the registration of Network ID and Password using Network Viewer during installation of DVR. 2. Confirm Network ID and Password in Network Setup Menu of DVR during installation of DVR.. 3. You should register Network ID and Password before connecting DVR via web browser. 4. Launch Web Browser. 5. Go to then you will get the screen below. (If your computer system blocks ActiveX control, please see next section, 4. Web Browser setup to enable Web Viewer, to enable this function.) 76


77 CHAP 11. WEB VIEWER - CONNECT DVR VIA WEB BROWSER 4. Web Browser setup to enable Web Viewer Note If you experience that your web browser protect Web Viewer, 1. Enable all option regarding ActiveX controls. 2. Open web browser, select Tools / Internet Options /Security /Custom Level, and select Enable following to the example below. 3. Go to again. 77
78 CHAP 11. WEB VIEWER - CONNECT DVR VIA WEB BROWSER 5. Functions and Network Setup No Names Description 1 Log In Connect to DVR 2 Record Start DVR record start 3 Record Stop DVR record stop 4 Record into PC Record coming video from DVR, Record Start/Stop toggle 5 Image Capture Still image capture in JPEG format 6 Playback Playback videos in DVR and local PC 7 Channel Selection Select channel for each video window 8 Video Adjustment Adjust Brightness, Contrast, Hue and Saturation for each channel 9 Display Mode Select display mode 78


79 CHAP 11. WEB VIEWER - CONNECT DVR VIA WEB BROWSER 6. Log In To connect to DVR, 1. Press Log In button and type in your Network ID and password or IP address of DVR. Please remember that Network ID and Password should be authenticated during installation of DVR and Network Viewer. 2. Press OK button and then you will get live display. 79

80 CHAP 11. WEB VIEWER - CONNECT DVR VIA WEB BROWSER 7. Playback To retrieve video from DVR or local PC, 1. Press Playback button, then you will see sub window. 2. You can retrieve video from DVR in 3 different ways. - Select master or slave HDD of DVR. - Press Event List button, to get sensor, motion and network driven recording list. - Press Record List button, to get schedule and manual recording list. - Set Calendar and time, to get recording list of a specific time period. - Press Play and Stop button to start and stop playback. 3. You can retrieve video from local PC. - Press directory button, to designate the video file in your PC. - Use 6 buttons for Go-to-start, Reverse frame advance, Playback, Stop, Forward frame advance and Go-to-end. 80
Real Time Triplex Stand Alone DVR. User's Manual. Real Time Triplex Stand Alone DVR. [ TITAN 4 / 8 / 16 Channel DVR ] V 1.19
![Real Time Triplex Stand Alone DVR. User's Manual. Real Time Triplex Stand Alone DVR. [ TITAN 4 / 8 / 16 Channel DVR ] V 1.19](/thumbs/74/70354128.jpg "Real Time Triplex Stand Alone DVR. User's Manual. Real Time Triplex Stand Alone DVR. [ TITAN 4 / 8 / 16 Channel DVR ] V 1.19") User's Manual Real Time Triplex Stand Alone DVR [ TITAN 4 / 8 / 16 Channel DVR ] V 1.19 1 Contents SAFETY WARNING AND CAUTION.... 5 CHAP 1. INTRODUCTION.. 11 1. Overview..... 11 2. Common Features... 11
User's Manual Real Time Triplex Stand Alone DVR [ TITAN 4 / 8 / 16 Channel DVR ] V 1.19 1 Contents SAFETY WARNING AND CAUTION.... 5 CHAP 1. INTRODUCTION.. 11 1. Overview..... 11 2. Common Features... 11
MPEG4 Pentaplex Standalone DVR
 MPEG4 Pentaplex Standalone DVR [ 4 / 8 / 16 Channel DVR ] V 2.36 1 Contents SAFETY WARNING AND CAUTION.... 5 CHAP 1. INTRODUCTION.. 11 1. Overview..... 11 2. Common Features... 11 3. Specifications....
USER GUIDE STAND-ALONE. 4 channel MPEG-4 Triplex DVR V Stand-Alone DVR User Guide
 USER GUIDE STAND-ALONE 4 channel MPEG-4 Triplex DVR V. 1.4 This document contains preliminary information and subject to change without notice. SAFETY PRECAUTIONS EXPLANATION OF SYMBOLS This symbol is
4CH Real Time DVR. User Guide INFORMATION MAY CHANGE WITHOUT NOTICE. Digital Video Recorder
 User Guide INFORMATION MAY CHANGE WITHOUT NOTICE. Table of Contents Caution... 4 Package Contents... 4 Introduction... 5 1. Product Overview...5 2. Front Panel...5 3. Rear Panel...6 4. IR Remote Controller
CONTENTS Chapter 1: DVR Features... 4 Chapter 2: Overview... 5 Chapter 3: Starting the DVR... 8
 1 CONTENTS Chapter 1: DVR Features... 4 Chapter 2: Overview... 5 2.1 Front Panel... 5 2.2 Rear Panel... 6 2.3 Remote Control... 7 Chapter 3: Starting the DVR... 8 3.1 Firmware Version... 8 3.2 Detecting
4Ch Real time / Triplex / Mux Stand Alone DVR
 4Ch Real time / Triplex / Mux Stand Alone DVR User s Manual VER 1.2 VSD-31 4 Channel Stand Alone DVR USB Backup available The most stable and reliable real stand alone Digital Video Multiplex Recorder
9/16CH Triplex MPEG-4 DVR
 DVR 9CH User Guide 9/16CH Triplex MPEG-4 DVR Release Version : 1.4 This document contains preliminary information and subject to change without notice. 目录. THE LIST OF CONTENTS DVR SET CLIENT SOFTWARE
Chapter 1 Features FEATURES
 Chapter 1 Features Operation Playback, recording and network transmission simultaneously Real time full screen or quad screen display 2X digital zoom and Picture-in-picture display Easy operations by shuttle
USER GUIDE VCT-STDDVR9-1 = /16 channel MPEG-4 Triplex DVR V. 1.0
 USER GUIDE VCT-STDDVR9-1 = 16-1 9/16 channel MPEG-4 Triplex DVR V. 1.0 This document contains preliminary information and subject to change without notice. 2 SAFETY PRECAUTIONS EXPLANATION OF SYMBOLS This
Digital Video Surveillance System Engineering Service Manual
 Digital Video Surveillance System Engineering Service Manual The picture might differ according to the specification and model. Contents of this manual are protected under copyrights and computer program
DVR-Q4 DVR-Q4/80 DVR-Q4/120. Operating Instructions. Four Camera DVR System
 DVR-Q4 DVR-Q4/80 DVR-Q4/120 Operating Instructions Four Camera DVR System Speco Technologies 200 New Highway Amityville. NY 11701 Tel. 631-957-8700 Fax. 631-957-9142 www.specotech.com Contents 1. Features
User s Manual. 4 Channel Digital Video Recorder
 Thank you for purchasing our product. Please read this User s Manual before using the product. Change without Notice 4 Channel Digital Video Recorder User s Manual 1 Safety Precautions CAUTION RISK OF
4CH/ 8CH/ 16CH Digital Video Recorder
 4CH/ 8CH/ 16CH Digital Video Recorder DVR204B/ 208B/ 216B INSTRUCTION MANUAL DIRECTORY CHAPTER 1 Hard Disk Installing (Standard shipping products include neither HDD or R/W)...2 CHAPTER 2 Panel Appearance...4
Downloaded from manuals search engine
 INDEX 1. DVR Features...1 2. Layout 2.1 Front Panel...1 2.2 Rear Panel...2 2.3 Remote Control...2 3. Installation 3.1 Installing the Hard Drive...3 3.2 Connecting Camera and Monitor...3 3.3 Connecting
User s Guide. Combo DVR. Thank you for purchasing our product. Please read this User s Manual before using the product. Change without Notice
 Thank you for purchasing our product. Please read this User s Manual before using the product. Change without Notice Combo DVR User s Guide User please operate according to the DVR model that you purchased
H.264 4/8/10/16-Channel High-Definition DVR Quick Start Guide
 H.264 4/8/10/16-Channel High-Definition DVR Quick Start Guide Products: BLK-HD4D, BLK-HD4E, BLK-HD8D, BLK-HD10D, BLK-HD16D BLK-HD4E (upper) BLK-HD4D and BLK-HD8D (middle) BLK-HD10D and BLK-HD16D (lower)
User s Manual. 8 Channel Digital Video Recorder
 Thank you for purchasing our product. Please read this User s Manual before using the product. Change without Notice 8 Channel Digital Video Recorder User s Manual Safety Precautions CAUTION RISK OF ELECTRICAL
HLong Asia Industrial
 SDI DVR Stand alone digital video recorder HLong Asia Industrial Thank you for using the company's products! This manual describes only the host functions basic operation. Product design and specification
Analog High Definition DVR. Stand alone digital video recorder. User Manual H.264 AHD DVR
 Analog High Definition DVR Stand alone digital video recorder User Manual H.264 AHD DVR WARNING To reduce the risk of fire or electric shock, do not expose this appliance to rain or moisture. All the safety
Digital Video Surveillance System
 Digital Video Surveillance System Engineering Manual The picture might differ according to the specification and model. Contents of this user manual are protected under copyrights and computer program
USER GUIDE. EST9120/EST /16 channel MPEG-4 Triplex DVR V. 1.5
 EST9120/EST16120 User Guide USER GUIDE EST9120/EST16120 9/16 channel MPEG-4 Triplex DVR V. 1.5 This document contains preliminary information and subject to change without notice. EST9120/EST16120 User
Installation And User Guide DVR-EZ. 4 Channel Digital Video Recorder
 Installation And User Guide DVR-EZ 4 Channel Digital Video Recorder Regulatory FCC Certification This equipment has been tested and found to comply with the limits for a class A digital device, pursuant
CCTV42 System2 DVR Quick Start Guide 4/8/16-Ch DVR
 CCTV42 System2 DVR Quick Start Guide 4/8/16-Ch DVR If you have purchased a DVR / Hard drive package from us then we will have already installed the hard drive(s) and configured the basic settings on your
DVR CH Digital Video Recorder SW242-LP4 / SW242-LPN
 DVR4-1100 4CH Digital Video Recorder SW242-LP4 / SW242-LPN User Manual INDEX 1. DVR Features... 1 2. Layout 2.1 Front Panel...1 2.2 Rear Panel...2 2.3 Remote Controller...2 3. Installation 3.1 Installing
SE Series DVR Manual
 2 Table of Contents General Safety Precautions 4 About This Manual 5 Front Panel Layout 7 Rear Panel Layout 8 Main Screen Layout 9 Mouse Control 10 Operation using Front Panel Buttons/IR Remote Control
DVR DVR VENEZIA series
 DVR DVR VENEZIA series Main features - Real Esaplex (Recording, Live, Play, Control, Backup, Network) - Quick connection by mobile/ PDA phone without using any software - H264 compression - Real time Recording,
NVR&IPCAM USER MANUAL V1.0 (USER MANUAL) V1.0. Thanks for choosing our products, please read this manual carefully before use!
 V1.0. Thanks for choosing our products, please read this manual carefully before use!") NVR&IPCAM (USER MANUAL) V1.0 Thanks for choosing our products, please read this manual carefully before use! NOTICE Installation condition 1) In order to ensure your rights, please read this manual carefully
NVR&IPCAM (USER MANUAL) V1.0 Thanks for choosing our products, please read this manual carefully before use! NOTICE Installation condition 1) In order to ensure your rights, please read this manual carefully
TCD channel H.264 Video Encoder Hardware User s Manual (DC 12V) Ver. 2010/10/29
 Ver. 2010/10/29") TCD-2100 1-channel H.264 Video Encoder Hardware User s Manual (DC 12V) Ver. 2010/10/29 Table of Contents 0. Precautions 3 1. Introduction 4 Package Contents... 4 Features and Benefits... 5 Safety Instructions...
TCD-2100 1-channel H.264 Video Encoder Hardware User s Manual (DC 12V) Ver. 2010/10/29 Table of Contents 0. Precautions 3 1. Introduction 4 Package Contents... 4 Features and Benefits... 5 Safety Instructions...
DVR SYSTEM User s Manual
 DVR SYSTEM User s Manual Manual Revision : Version 5.3 above Release Date : July 1. 2004 INDEX Chapter. Main Screen -1. Explanation of Main Screen A ~ N Functions per button -2. Pan/Tilt Control O Pan/Tilt
User s Manual. 8 Channel Digital Video Recorder. User Manual
 Thank you for purchasing our product. Please read this User s Manual before using the product. Change without Notice 8 Channel Digital Video Recorder User s Manual Safety Precautions CAUTION RISK OF ELECTRICAL
261Z. DR040_Quick_V1.0 PLAY RE C
 261Z MPEG4 4CH DVR Quick Guide REC PLAY PA USE ST OP REW FF HDD HD D Fu ll ALAR M TIMER PLAY RE C MENU ENTER LIST SLOW ZOOM SEQ Please read instructions thoroughly before operation and retain it for future
Appendix A. esync DVR Manual Appendix A. FCC Compliance Statement WARNING. Revision A esync Manual esync
 Appendix A Appendix A FCC Compliance Statement Model Name: esync Series (SSA-1648e, SSA-0824e, SSA-0424e). This device complies with Part 15 of the FCC Rules. Operation is Subject to the following two
VIDEO WEB SERVER. User s Manual. Please read instructions thoroughly before operation and retain it for future reference. PATENT 732 V1.
 VIDEO WEB SERVER PATENT User s Manual Please read instructions thoroughly before operation and retain it for future reference. 732 V1.0 WARNING The apparatus shall not be exposed to dripping or splashing
Video Web Server. User s s Manual MPEG-4 VIDEO WEB SERVER. Please read instructions thoroughly before operation and retain it for future reference.
 13 Video Web Server MPEG-4 VIDEO WEB SERVER User s s Manual Please read instructions thoroughly before operation and retain it for future reference. 733_V0.95 Thank-You Note Before You Get Start First
9 Channel Multiplex Digital Video Recorder
 9 Channel Multiplex Digital Video Recorder Model: DGN209 Installation / User Manual Digimerge Technologies Inc. Under the copyright laws, this documentation may not be copied, photocopied, reproduced,
4 Channel Digital Video Recorder / Camera Kit. Model No QV-3024 USER S MANUAL
 4 Channel Digital Video Recorder / Camera Kit Model No QV-3024 USER S MANUAL 1 Important Note: Please keep this manual in a safe location in case you need to refer to it at a later date. 1 INDEX CHAPTER
Quick Start Guide 4/8/16-CH DVR.
 Quick Start Guide 4/8/16-CH DVR 1. Install Hard Drive &DVD Writer 1.1 Install Hard Drive Notice: 1. Support two SATA hard drives. Please use the hard drive the manufacturers recommend specially for security
SmartWatch Eco/Eco Compact
 SmartWatch Eco/Eco Compact Digital Video Recorders SmartWatch Eco SmartWatch Eco Compact Quick User Guide Index Box Contents...3 Front Panel Controls...4-5 SmartWatch Eco Compact...4 SmartWatch Eco...5
Triplex MPEG-4 DVR. OSD Setup Guide
 Triplex MPEG-4 DVR OSD Setup Guide 00940A01 Version 1.1 00940A01 Table of Content Menu System Overview...5 ...5 Key Usage in OSD Menu...5 Key Usage in Virtual Keyboard...6 System Setup...8 ...8
DVR4/9-SecuraNet USER MANUAL SW242-4SN / SW242-9SN / SW243-4MB / SW243-9MB
 DVR4/9-SecuraNet USER MANUAL SW242-4SN / SW242-9SN / SW243-4MB / SW243-9MB Getting Started FCC WARNING STATEMENT This device complies with Part 15 of FCC Rules. Operation is subject to the following two
4CH H.264 Multiplex DVR
 4CH H.264 Multiplex DVR User Manual VER.:1.0, P/N: R040199A This symbol is intended to alert the user to the presence of unprotected Dangerous voltage" within the product's enclosure that may be strong
8Channel Stand Alone DVR Audio, USB Backup available VER1.0
 8Channel Stand Alone DVR Audio, USB Backup available VER1.0 Installation & Safeguards INSTALLATION & SAFEGUARDS All the safety and operating instructions should be read before the unit is operated. Environment
MPEG-4 DVR User s Manual (Model: 4/8/16CH MPEG-4 DVR)
") MPEG-4 DVR User s Manual (Model: 4/8/16CH MPEG-4 DVR) This user s manual is subject to change without any previous notice by function upgrade or addition. Version_1.4 Feb. 2008 SAFETY PRECAUTIONS CAUTION
MPEG-4 DVR User s Manual (Model: 4/8/16CH MPEG-4 DVR) This user s manual is subject to change without any previous notice by function upgrade or addition. Version_1.4 Feb. 2008 SAFETY PRECAUTIONS CAUTION
User s Manual November 2004 V 1.1
 User s Manual Please read instructions thoroughly before operation and retain it for future reference. November 2004 V 1.1 WS2 WARNING The apparatus shall not be exposed to dripping or splashing and that
Introduction to Digital Video Recorder
 1 CONTENTS Introduction to Digital Video Recorder-----------------------------------------------------------------3 Front panel buttons-----------------------------------------------------------------------------------------4
Quick Start. H.264 Network DVR 303Z
 303Z H.264 Network DVR Quick Start Please read instructions thoroughly before operation and retain it for future reference. The image shown above may differ from the actual product appearance. 792_Quick_V0.9
USER MENU Chapter 1: Features...4 Chapter 2: Layout...5 Chapter 3: DVR Installation...7 Chapter 4: DVR Boot up...8 Chapter 5 DVR Menu...
 + USER MENU 0 CONTENTS 1 USER MENU Chapter 1: Features...4 DVR Features...4 Chapter 2: Layout...5 2.1 Front Panel (Details please refer to the real product)...5 2.2 Rear Panel (Details please refer to
H.264 Network DVR. Quick Start
 341Z H.264 Network DVR Quick Start GUI Display with USB Mouse Control Please read instructions thoroughly before operation and retain it for future reference. For the actual display & operation, please
USER S MANUAL GV-DVR1042. Real Time DVR System. Stand Alone 4 Channel.
 USER S MANUAL GV-DVR1042 Stand Alone 4 Channel Real Time DVR System www.gviss.com 1 B E F O R E I N S T A L L A T I O N - - - - - - - - - - - - - - - - - - - - - - - - - - - - - - - - - - - - - - - - -
LE3100D Series LE3116D LE3108D
 LE3100D Series LE3116D LE3108D LG High Performance Embedded DVR DVRs that you can rely on www.lge.com DVR LE3100D Series The LE3100D Series is a user-friendly designed embedded DVR providing high-quality
Lorex Client 7.0 & Lorex Message Master
 Lorex Client 7.0 & Lorex Message Master Software Manual English Version 1.0 MODELS: L19WD Series www.lorexcctv.com Includes L19WD800 & L19WD1600 Copyright 2008 Lorex Technology Inc. Table of Contents Table
User s Manual. Combo DVR. Thank you for purchasing our product. Please read this User s Manual before using the product. Change without Notice
 Thank you for purchasing our product. Please read this User s Manual before using the product. Change without Notice Combo DVR User s Manual User please operate according to the DVR model that you purchased
Quick Reference Guide. For IL6000HB Series NetDVR
 Quick Reference Guide For IL6000HB Series NetDVR Directory 1. Features and Specifications.1 2. Physical Interface 2 2.1 Front Panel and Interior of Product 2 2.2 Rear Panel of Product..3 3. Software Main
16Channel Stand-alone DVMR
 VER1.02 VER1.0 16Channel Stand-alone DVMR Installation & Safeguards INSTALLATION & SAFEGUARDS All the safety and operating instructions should be read before the unit is operated. Environment Condition
LOREX CLIENT 3.0 SOFTWARE MANUAL IRMS Integrated Remote Management Software
 LOREX CLIENT 3.0 SOFTWARE MANUAL IRMS Integrated Remote Management Software Instruction Manual English Version 2.0 Copyright 2007 Lorex Technology Inc. www.lorexcctv.com Table of Contents Overview... -
Digital Video Recorder DVR-400. User s manual
 Digital Video Recorder DVR-400 User s manual 1 Copyright Copyright (C) 2005 PLANET Technology Corp. All rights reserved. The products and programs described in this User s Manual are licensed products
Quick Start Guide 4/8/16-Ch DVR
 Quick Start Guide 4/8/16-Ch DVR 1 1. Install Hard Drive &DVD Writer 1.1Install Hard Drive Notice: 1. Support two SATA hard drives. Please use the hard drive the manufacturers recommend specially for security
LOREX CLIENT Remote Agent Software
 LOREX CLIENT Remote Agent Software Instruction Manual English Version 1.0 MODEL: L500 Series www.lorexcctv.com Copyright 2006 LOREX Technology Inc. Table of Contents Table of Contents About the Lorex Client...
User Manual. H.264 Pentaplex DVR. V1.0 [ 4 / 8 / 16 Channel DVR ] DVR4 8 16DVD
![User Manual. H.264 Pentaplex DVR. V1.0 [ 4 / 8 / 16 Channel DVR ] DVR4 8 16DVD](/thumbs/96/128039484.jpg "User Manual. H.264 Pentaplex DVR. V1.0 [ 4 / 8 / 16 Channel DVR ] DVR4 8 16DVD") DVR4 8 16DVD 512-756-1678 User Manual V1.0 [ 4 / 8 / 16 Channel DVR ] Notice: The information in this manual was current when published. The manufacturer reserves the right to revise and improve its products.
DVR4 8 16DVD 512-756-1678 User Manual V1.0 [ 4 / 8 / 16 Channel DVR ] Notice: The information in this manual was current when published. The manufacturer reserves the right to revise and improve its products.
DVR RANGE ENGINEER MANUAL
 INSPIRE DVR RANGE ENGINEER MANUAL Contents Hardware Inspire DVR range Connections Connecting a mouse Connecting keyboard Connecting PTZ cameras Connecting Keyboard/PTZ Alarm connections Using front panel
AVE DR16X / AVE DR8X Quick Installation Guide
 AVE DR16X / AVE DR8X Quick Installation Guide Package Content Inspect the packaging carton. Make sure your AVE DR16X / AVE DR8X is properly delivered. Remove all items from the box and make sure the box
VWS2E 2-CHANNEL VIDEO WEB SERVER
 VWS2E 2-CHANNEL VIDEO WEB SERVER 1. Introduction To all residents of the European Union Important environmental information about this product This symbol on the device or the package indicates that disposal
20.1 Wide LCD Screen All in One System Built-in 8Ch DVR
 INSTRUCTION MANUAL 20.1 Wide LCD Screen All in One System Built-in 8Ch DVR MODEL: LCD2084, LCD2088 Ver. 051309, 061009 Copyright 2009 Clover Electronics U.S.A. All Rights Reserved. 1 2 CONTENTS Contents
& Full Screen Recording Qualities
 16 CHANNEL DVR Functionality Simplex Video Compression MJPEG File Format AJP Live Resolution NTSC: 704 X 480 / PAL: 704 X 576 Recording Frame Rate 30FPS Recording Time 750 Days (0.5 Frames Per Second)
Lite H.264 DVR Setup Guide
 Package Content Lite H.264 DVR Setup Guide Inspect the packaging carton. Make sure the Lite H.264 DVR is properly delivered. Remove all items from the box and make sure the box contains the following items.
Quick Start Guide 4/8-CH DVR
 Quick Start Guide 4/8-CH DVR 1 1. Install Hard Drive &DVD Writer 1.1 Install Hard Drive Notice: 1. this series support one SATA hard drives. Please use the hard drive the manufacturers recommend specially
User Manual CONTENTS Chapter 1: DVR Features...1 Chapter 2: Overview...1 Chapter 3: Installation...4 Chapter 4: Starting the DVR...
 0 User Manual CONTENTS Chapter 1: DVR Features...1 DVR Feature...1 Chapter 2: Overview...1 2.1 Front Panel...1 2.2 Rear Panel...2 2.3 Remote Control...3 Chapter 3: Installation...4 3.1 Install Hard Disk...4
H.264 Network DVR. Quick Start. GUI Display with USB Mouse Control 336Z
 336Z H.264 Network DVR Quick Start GUI Display with USB Mouse Control Please read instructions thoroughly before operation and retain it for future reference. For the actual display & operation, please
4-CH STANDALONE DVR PDR-400/400IP INSTRUCTION MANUAL
 4-CH STANDALONE DVR PDR-400/400IP INSTRUCTION MANUAL CAUTION RISK OF ELECTRIC SHOCK CAUTION TO REDUCE THE RISK OF ELECTRIC SHOCK, DO NOT OPEN COVER. NO USER SERVICEABLE PARTS INSIDE. REFER SERVICING TO
Trouble Free DDNS Setup
 H.264 Compression Technology, Up to 120fps 1080P for 4CH Real Time 4CH HD-SDI H.264 Stand Alone Video Recorder CMS (Central Management So ware) supports Mul ple DVR for free Mobile Surveillance: iphone,
4CH 19 LCD All-in-one DVR
 4CH 19 LCD All-in-one DVR User Manual SW244-DRC EN190908 FCC WARNING STATEMENT This device complies with Part 15 of FCC Rules. Operation is subject to the following two conditions: (1) This device may
ESS1104 NET Real-time Security DVR. Operation Manual
 ESS1104 NET Real-time Security DVR Operation Manual FCC NOTICE This device has been tested and found to comply with the limits for a Class A digital device, pursuant to Part 15 of the FCC Rules. These
Quick Start Guide 4/8/16-Ch DVR
 Quick Start Guide 4/8/16-Ch DVR 1 1. Install Hard Drive &DVD Writer 1.1Install Hard Drive Notice: 1.This series support one SATA hard drive. Please use the hard drive the manufacturers recommend specially
Real-time NETWORK VIDEO RECORDER User s Manual Ford Road, Suite 110, Dallas, Texas Tel: Fax:
 Real-time NETWORK VIDEO RECORDER User s Manual 12000 Ford Road, Suite 110, Dallas, Texas 75234 Tel: 972-247-1203 Fax: 972-247-1291 www.idview.com 1 Regulatory Information FCC compliance: This equipment
Contents Chapter 1: DVR Features...2 Chapter 2: Overview...2 Chapter 3: Installation...5 Chapter 4: Starting the DVR...5
 Contents Chapter 1: DVR Features...2 DVR Feature...2 Chapter 2: Overview...2 2.1 Front Panel...2 2.2 Rear Panel...3 2.3 Remote Control...5 Chapter 3: Installation...5 3.1 Install Hard Disk...5 3.2 Connecting
RX Series. Video Recording Server. Quick Start Guide. RX324v3 / RX328v3 / RX3216v3 RX364v3 / RX368v3 / RX3616v3. Version 1.04
 RX Series Video Recording Server RX324v3 / RX328v3 / RX3216v3 RX364v3 / RX368v3 / RX3616v3 Quick Start Guide Version 1.04 Contents 1.Introduction...1 1.1.Packages Contents...1 1.2.Hardware Features...2
Quick Guide Manual. DVR-4xxx
 Quick Guide Manual DVR-4xxx 1 Front panel view REC LOCK FRZ SEARCH UP R.PLAY PTZ ZOOM MISC/SH REW FF STOP MULTI MENU SEQ LEFT OK RIGHT PLAY PAUSE DOWN POWER REC 1 2 3 4 8 6 10/0 5 7 9 11 12 13 14 15 16
SPY-DVR4HYB & SPY-DVR8HYB SPY-DVR4HYB2ND & SPY-DVR8HYB2ND
 SPY-DVR4HYB & SPY-DVR8HYB SPY-DVR4HYB2ND & SPY-DVR8HYB2ND Instructions 1.0 INTRODUCTION 1.1 Main menu 2.0 SPLIT SCREEN 3.0 SYSTEM SETUP 3.1 General Setup 3.2 Time Setup 3.3 HDD Setup 3.4 Screen Setup 3.5
HIGH STORAGE MODELS WITH CD-RW DRIVE
 209 HIGH STORAGE MODELS WITH CD-RW DRIVE The image shown above may differ from the actual product appearance. 505HC_507HC_V1.1 IMPORTANT SAFEGUARD CAUTION RISK OF ELECTRIC SHOCK CAUTION: To reduce the
MOSS-DVR-810 Mobile Digital SD Recorder User Manual
 MOSS-DVR-810 Mobile Digital SD Recorder User Manual Before installing and using, be sure to read this Manual for best performance. ATTENTION This product is to be used within the vehicle interior. In order
Before using the product, please read this manual carefully. TeleEye RM134
 Before using the product, please read this manual carefully. TeleEye RM134 Notice: Signal Communications Limited reserves the right to make improvements to the product described in this manual at any time
User s s Manual 4CH 16CH / 8CH / 4CH. 16CH / 8CH / 4CH Built-in in DVD-RW Writer or CD-RW Writer 150Z
 150Z 4CH 16CH / 8CH / 4CH 16CH / 8CH / 4CH Built-in in DVD-RW Writer or CD-RW Writer User s s Manual Please read instructions thoroughly before operation and retain it for future reference. MPEG4 DVR SERIES_Z_V1.1
NUBIX H.264 DVR Setup Guide
 Package Content NUBIX H.264 DVR Setup Guide Inspect the packaging carton. Make sure the NUBIX H.264 DVR is properly delivered. Remove all items from the box and make sure the box contains the following
411ZA/811ZA/611Z/611ZA (N04) Quick Start Guide
 Quick Start Guide") 411ZA/811ZA/611Z/611ZA (N04) Quick Start Guide 1. Packing...P2 2. Hard Disk Installation...P3 3. DVD-RW Installation...P4 3. Front Panel Controls...P5 4. Rear Panel Connectors...P6 5. Live Operations...P8
411ZA/811ZA/611Z/611ZA (N04) Quick Start Guide 1. Packing...P2 2. Hard Disk Installation...P3 3. DVD-RW Installation...P4 3. Front Panel Controls...P5 4. Rear Panel Connectors...P6 5. Live Operations...P8
Stand Alone Type. Digital Video Recorder USER S MANUAL. XRS 1000 Series. This manual is written based on 1016
 Stand Alone Type Digital Video Recorder USER S MANUAL XRS 1000 Series This manual is written based on 1016 Index CHAPTER 1 Specification & System organization 1. Product Contents List --------------------------------------------------------
R4, R8, R16 Digital Video Recorders Quick Setup Guide
 R4, R8, R16 Digital Video Recorders Quick Setup Guide This guide provides instructions to initially setup the R16 (16 channel) digital video recorders (DVR). The DVR supports these advanced features: 2
USER S MANUAL ENGLISH 782, 781, 760, 761, 782A / 502, 501, 560, 561, 502A_V1.5
 205 USER S MANUAL Please read instructions thoroughly before operation and retain it for future reference. The image shown above may differ from the actual product appearance. ENGLISH 782, 781, 760, 761,
follow BLK-D20xx00D RQ 2011 DIGIOP, Inc.
 H.264 4/8/16 Channel DVR Quick Start Guide Products: BLK-DH2004 400D, BLK-DH200800D, BLK-DH201600D PLEASE READ THIS GUIDE BEFORE USING YOUR RECORDER, and always the instructions for safety and proper use.
DDR-08 DDR-16 Full D1 Realtime H.264 DVR 8 / 16 CH. Quick Setup Guide
 DDR-08 DDR-16 Full D1 Realtime H.264 DVR 8 / 16 CH. Quick Setup Guide PACKAGE CONTENTS A. One (1) DDR-08 / DDR-16 DVR B. One (1) Remote Controller C. Two (2) AAA Battery for Remote Controller D. One (1)
H.264 Network DVR. Quick Start
 H.264 Network DVR Quick Start GUI Display with USB Mouse Control Please read instructions thoroughly before operation and retain it for future reference. For the actual display & operation, please refer
Digital Video Recorder User Manual. DVR User Manual. For H channe/ 8-channel/16-channel Digital Video Recorder All rights reserved
 DVR User Manual For H.264-4-channe/ 8-channel/16-channel Digital Video Recorder All rights reserved i CAUTION Please read this user manual carefully to ensure that you can use the device correctly and
DHE-04 DHE-08 DHE H H.264 DVR 4 / 8 / 16 CH. Quick Setup Guide PACKAGE CONTENTS A. B. C. D. E. F. G. H. Inside the DVR I.
 960H H.264 DVR 4 / 8 / 16 CH. Quick Setup Guide DHE-04 DHE-08 DHE-16 PACKAGE CONTENTS A. One (1) DHE-04 / DHE-08 / DHE-16 DVR B. One (1) Remote Controller C. Two (2) AAA Battery for Remote Controller D.
DVR SAMSUNG Digital Security Systems
 Your source for Advanced Digital Security Solutions SAMSUNG Digital Security Systems SELECTION SVR-5116 SVR-1650E SVR-1640E Image OS Windows XP Embedded Linux Embedded Linux Live / Record Rate 480fps/120fps(N),
209Z. The image shown above may differ from the actual product appearance. CPD505ZHC_507ZHC / 507ZHD_505ZHD_V1.4
 209Z The image shown above may differ from the actual product appearance. CPD505ZHC_507ZHC / 507ZHD_505ZHD_V1.4 CAUTION RISK OF ELECTRIC SHOCK CAUTION: To reduce the risk of electric shock, do not expose
QSD2308L/QSD2316L DVR User s Manual
 QSD2308L/QSD2316L DVR User s Manual NOTE: We use two different front panel designs on these models. They have the same function buttons but they are arranged differently. Please match the front panel on
HIGH STORAGE MODELS WITH CD-RW DRIVE
 207Z HIGH STORAGE MODELS WITH CD-RW DRIVE The image shown above may differ from the actual product appearance. 715ZC_717ZC_V1.3 IMPORTANT SAFEGUARD CAUTION RISK OF ELECTRIC SHOCK CAUTION: To reduce the
4CH CAR D.V.R. USER'S MANUAL - Eng
 4CH CAR D.V.R USER'S MANUAL - Eng WARNIG AND CAUTIONS CAUTION : TO REDUCE THE RISK OF FIRE OR ELECTRONISC SHOCK, DO NOT EXPOSE THIS PRODUCT TO RAIN OR MOIS-TURE. DO NET INSERT ANY METALLIC OBJECT THROUGH
Digital Video Recorder
 http://www.cpcamcctv.com Digital Video Recorder User s s Manual Please read instructions thoroughly before operation and retain it for future reference. 1 CPD507, 505_V0.985 Thank-You Note Before You Get
Quick Start Guide 4/8/16/24-Ch DVR
 Quick Start Guide 4/8/16/24-Ch DVR 1.1 Install Hard Drive 4/8/16/24-CH DVR Quick Start Guide Notice: 1.4/3/16-ch DVR supports one SATA hard drive. 24-ch DVR supports three SATA hard drives. Please use
ACUMEN int. corp. 7 LCD triplex DVR User s Manual
 ACUMEN int. corp. 7 LCD triplex DVR User s Manual Please read this user s manual carefully before you use this system. Please keep a user s manual handy when needed. Declaration: All the specification