HAV-TT25USB. MANUAL (p. 2) USB turntable
|
|
|
- Preston Hoover
- 5 years ago
- Views:
Transcription
 USB")
1 HAV-TT25USB MANUAL (p. 2) USB turntable

2 ENGLISH IMPORTANT SAFETY INSTRUCTIONS FOR AUDIO PRODUCTS -READ THOROUGHLY When using electrical products, basic precautions should always be followed including: 1. Read Instructions - All the safety and operating instructions should be read before the product is operated. 2. Retain Instructions - The safety and operating instructions should be retained for future reference. 3. Heed Instructions - All warnings on the product and in the operating instructions should be adhered to. 4. Follow Instructions - All operating and user instructions should be followed. 5. Cleaning - Unplug this product from the wall outlet before cleaning. Do not use liquid cleaners or aerosol cleaners. Use a damp cloth for cleaning. 6. Attachments - Do not use attachments not recommended by the product manufacturer as they may cause hazards. 7. Water and Moisture - Do not use this product near water-for example, near a bath tub, wash bowl, kitchen sink, or laundry tub, in a wet basement, or near a swimming pool, Etc. 8. Accessories - Do not place this product on an unsteady surface. The product may fall, causing serious injury to a child or an adult and serious damage to the product. Use only with a stand, bracket, or table recommended by the manufacturer, or sold with the product. Any mounting of the product should follow the manufacturer s instructions, and should use a mounting accessory recommended by the manufacturer. 9. Transporting - This product should be moved with care to avoid damage or injury. 10. Ventilation - Slots and openings in the cabinet are provided for ventilation, to ensure reliable operation of the product and to protect it from overheating. These openings must not be blocked or covered. The openings should never be blocked by placing the product on a bed, sofa, rug, or similar surface. This product should not be placed in a built-in installation such as a bookcase or rack unless proper ventilation is provided or the manufacturer s instructions have been adhered to. 11. Power Sources - This product should be operated only from the type of power source indicated on the marking label. If you are not sure of the type of power supply to your home, consult your product dealer or local power company. For products intended to operate from battery power, or other sources, refer to the operation instructions. 12. Power - Cord Protection - Power-supply cords should be routed so that they are not likely to be trapped in any way. 13. Main plug - The main plug is used as the disconnect device, the disconnect device shall remain readily operable. 14. Lightning - For added protection for this product during a lightning storm, or when it is left unattended and unused for long periods of time, unplug it from the wall outlet and disconnect the antenna or cable system. This will prevent damage to the product due to lightning and power-line surges. 15. Power Lines - An outside antenna system should not be located in the vicinity of overhead power lines or other electric light or power circuits, or where it can fall into such power lines or circuits. When installing an outside antenna system, extreme care should be taken to keep from touching such power lines or circuits as contact with them might be fatal. 16. Overloading - Do not overload wall outlets, extension cords, or integral convenience receptacles as this can result in a risk of fire or electric shock. 17. Object and Liquid Entry - Never push objects of any kind into this product through openings as they may touch dangerous voltage points or short-out parts that could result in a fire or electric shock. Never spill liquid of any kind on the product. The apparatus shall not be exposed to dripping or splashing and no object filled with liquids, such as vases, shall be placed on the apparatus. 18. Servicing - Do not attempt to service this product yourself as opening or removing covers may expose you to dangerous voltage or other hazards. Refer all servicing to qualified service personnel. 19. Damage Requiring Service - Unplug this product from the wall outlet and refer servicing to qualified service personnel under the following conditions: 2
3 a. If the power-supply cord or plug is damaged. b. If liquid has spilled, or objects have fallen into the product. c. If the product has been exposed to rain or water. d. If the product does not operate normally by following the operating instructions. Adjust only those controls that are covered by the operating instructions, as an improper adjustment of other controls may result in damage and will often require extensive work by a qualified technician to restore the product to its normal operation. e. If the product has been dropped or damaged in any way, and the product exhibits a distinct change in performance-this indicates a need for service. 20. Replacement Parts - When replacement parts are required, be sure the service technician has used replacement parts specified by the manufacturer or have the same characteristics as the original part. Unauthorized substitutions may result in fire, electric shock, or other hazards. 21. Safety Check - Upon completion of any service or repairs to this product, ask the service technician to perform safety checks to determine that the product is in proper operating condition. 22. Heat - The product should be situated away from heat sources such as radiators, heat registers, stoves or other products (including amplifiers) that produce heat. BEFORE USE 1. Before use, please remove and dispose of all the packaging. Remember to keep the packaging away from children and pets. 2. Choose the location of the unit installation carefully. Avoid placing it in direct sunlight or close to a source of heat. Also avoid locations subject to vibrations and excessive dust, cold or moisture. Keep away from sources that hum, such as transformers or motors. 3. Do not open the cabinet as this might result in damage to the circuitry or electrical shock, if a foreign object should get into the set, contact your dealer. 4. Be sure not to handle a record with dirty fingers. Never insert a record that has a crack on the surface. 5. When removing the power plug from the wall outlet, always pull directly on the plug, never pull the cord. 6. Do not attempt to clean the unit with chemical solvents as this might damage the finish. Use a clean, dry cloth. 7. In order to completely shut off the power to this product -, unplug the power cord from the wall outlet. Be sure to unplug the unit if you do not intend to use it for an extended period of time, such as a vacation. 8. Keep this manual in a safe place for future reference. Care and maintenance To prevent fire or shock hazard, disconnect your unit from the AC power source when cleaning. If the cabinet becomes dusty, wipe it with a soft dry cloth. Do not use any wax or polish sprays on the cabinet. This product is not intended for commercial use. Household use only. Never allow any water or other liquids to get inside the unit while cleaning. FUNCTION DESCRIPTIONS CONNECTIONS 3

4 Caution: Switch off the power to all equipment before making connections. Read the instructions of each component you intend to use with this unit. Be sure to insert each plug securely. To prevent hum and noise, avoid bundling the signal interconnection cables together with the AC power cord. A USB Host Socket Connect one end of the USB cable to the USB host socket on the unit and the other end to the USB host socket on your computer. B LINE OUT Socket Connect one end of the RCA LINE OUT cable into the LINE OUT socket, and the other end into the auxiliary input (AUX) socket on your home amplifier device, matching the colors to the proper plug and socket. C AC Power Cord Plug this power cord into an AC wall socket. D FM ANTENNA Extend and relocate the antenna when listening to a radio in FM mode. PARTS OF THE TURNTABLE A TURNTABLE B 45 RPM ADAPTOR Use the adaptor when playing a 45-rpm record. C TONEARM CONTROL INDICATOR The indicator lights are switched on when the tone arm is activated. D DECORATION (NOT FOR TONEARM ADJUSMENT) E TONE ARM F TONE ARM REST Place the tone arm back to the tone arm rest when playback stops. G SPEED SELECTOR Select a proper speed for your record before playing. H STYLUS I NEEDLE COVER 4
5 UNIT FUNCTIONS 1. PLAY/PAUSE ]I Use to start playback/pause in USB/CARD mode; Press to listen to a preset radio station in TUNER mode. 2. STOP/BAND Use to stop playback or end recording to USB/CARD. Use to cycle alternately from AM and FM. 3. Fast forward In USB/CARD mode, press to go to the start of the next track. In FM/AM mode, press to search for a station on step frequency; hold to search for the nearest station. 4. Fast reverse In USB/CARD mode, press once to go back to the start of the current track; press twice to go back to the start of the previous track. In FM/AM mode, press to search for a station on step frequency; hold to search for the nearest station. 5. STANDBY BUTTON Press to switch on the appliance or put it on standby. 6. DELETE BUTTON In stop mode, hold to access delete mode. 7. MEMORY/MODE BUTTON In TUNER mode, press to store your tune-in station. In USB/CARD mode, press to select a mode: repeat 1, repeat album, repeat all, shuffle, intro and cancel. In STANDBY mode, hold to enter time setting function. 8. FUNCTION BUTTON Press repeatedly to select functions: PHONO, TUNER, USB, CARD. 9. BIT/REC BUTTON Hold to select recording quality: 64 kbps, 128 kbps, 192 kbps. Press briefly to confirm bit-rate setting or begin recording. 10. VOLUME KNOB Rotate to adjust the volume level. 11. POWER LED INDICATOR When the unit is powered on, the power indicator will light up. 12. DISPLAY 13. RECORD LED INDICATOR When it is recording, the record indicator will light up. 14. USB SLOT Connect your USB device to the USB slot. 15. SD SLOT Connect your SD/MMC card into the CARD slot. 16. DUST COVER Close the dust cover when playing a vinyl record to keep dust away. Do not place any heavy objects on top of the cover especially when playing a record. 5

6 BASIC OPERATION 1. Connect the AC power cord to the AC outlet and the power indicator will illuminate. 2. Press the STANDBY button to turn the unit on. 3. Press the FUNCTION button repeatedly to select your desired source: PHONO, TUNER, USB or CARD. 4. Rotate the VOLUME knob to adjust the sound level. 5. Press the STANDBY button again to put the appliance on standby. 6. To completely switch off the appliance, you need to disconnect the power plug from the electrical outlet. HOW TO SET THE TIME Switch on the appliance first, and then press the STANDBY button to switch to standby mode. 1. Hold the MEMORY/MODE button, 24 HOUR will appear on the display. Press the or button to switch between 12 and 24 hour mode. Then press the MEMORY/MODE button to confirm the setting. NOTE: If no operation is performed within approximately 10 seconds after you hold the MEMORY/MODE button, the appliance will exit the time setting mode automatically and the setting is not memorized. 2. After you have set the 12/24 hour mode, hour digits will flash on the screen. Press the or button to set the hour. Press the MEMORY/MODE button again to confirm the setting, then minute digits will flash on the screen. Press the or button to adjust the minutes. After the minutes have been adjusted, press the MEMORY/MODE button again to confirm the setting and exit the time setting mode. NOTE: When setting in the 12 hour mode, AM or PM will also flash with the hour digits. Make sure the time has been set correctly with an AM or PM indicator. LINE OUT OPERATION 1. Plug one end of the LINE OUT cable (included) into the LINE OUT socket at the back of the unit. 2. Plug the other end of the cable into the LINE IN socket of your home amplifier device. 3. Switch on the unit. 4. Turn on the volume control if available. LISTENING TO A RECORD Cartridge Stylus assembly Getting started Your turntable player can play 33, 45 & 78-RPM records -- Remove the stylus protector first. -- Turn the volume knob, which is located at the front of the unit, to adjust to your desired volume level. -- Place a record (the record is not included) on the platter. Be sure not to handle the record with dirty fingers. Never play a record that has a crack on the surface. PLAYING A RECORD Press the FUNCTION button to select PHONO (normally PHONO is the default function) and PHONO will appear on the display. 6


7 Slide the speed selector (33/45/78) to the proper position depending on the record to be played. Place a record on the turntable platter (remember to use the 45RPM spindle adaptor if required when playing a 45RPM record). Lift the tone arm from the rest and slowly move it above the side of the record. TONE ARM CONTROL INDICATOR will light up. The turntable will begin to rotate. Place the tone arm to the desired position of the record. Adjust the volume knob to the desired level. To pause or stop playing, you need to lift and move the tone arm back to the tone arm rest stand manually. ADAPTOR At the end of the record, the turntable will automatically stop rotating. Lift the tone arm from the center of the record and return it to the desired position. To stop it manually, lift the tone arm and return it to the arm rest. NOTE: To play a 45-rpm record which has the center clip missing, first place the 45-rpm adaptor (the record is not included) located at top right hand of the apparatus onto the spindle. It is strongly recommended to play records with the transparent dust cover closed. Also please do not place anything on top of the dust cover especially when playing a record. If you hear a distorted sound please check whether the stylus is worn out. (Please refer to How to replace the Turntable Stylus (Needle) ) How to replace the Turntable Stylus (Needle) Guide Pins (inside) 7

8 Removing the old stylus 1. Set a screwdriver at the tip of the stylus and push down in the direction A. 2. Remove the stylus by pulling it forward and down. Installing a new stylus 1. Hold the tip of the stylus and insert the other edge by pressing in the direction B. 2. Push up in the direction C until it locks at the tip. LISTENING TO THE RADIO 1. Press the FUNCTION button repeatedly until it switches to TUNER function. 2. Press the STOP/BAND button repeatedly to select either FM or AM. 3. Press the skip button ( or ) repeatedly to search for a radio station at a certain step frequency. Or, hold the skip button until the frequency starts to change then release the button, the appliance will stop searching when the nearest radio station is found. 4. For your convenience, store your desired station in memory so that you can enjoy your favourite station immediately. NOTE: You can store up to 20 stations on the appliance. Simply press the MEMORY/MODE button, 01 will flash and press the MEMORY/MODE button again to memorize the radio station. HOW TO LISTEN TO A PRESET STATION In TUNER mode, press the PLAY/PAUSE button (]I) repeatedly to select a preset station in an increased sequence. The ST indicator will appear on the display when the radio is broadcasting in stereo, while the MONO indicator will appear when the signal becomes weak. If the reception is poor in the following bands: AM: Turn the unit around to find the best position for AM stations. FM: Extend and turn the FM antenna around so that you can receive the station clearly. MEDIA SOURCE CONNECT YOUR AUDIO DEVICE USB FLASH DEVICE: Connect your USB flash device through the USB host socket in front of the appliance. CARD: Insert your card into the card slot with the printed label facing up. SD card inserted correctly SD card inserted incorrectly CARD MAINTENANCE: * If the card becomes dirty, wipe the surface with a soft, dry cloth. * Cards should be returned to their cases after use to avoid dust. * Do not expose the card to direct sunlight or high humidity and temperatures for extended periods. IMPORTANT: Switch to another function before you remove your USB flash device. CAUTION: It takes some time for the appliance to read the media devices (card and the USB device) in accordance with their capability especially in recording mode. Wait patiently until REC appears on the display. During recording mode, if both the USB flash device and CARD are connected to the appliance, press the BIT/REC button and then press the or button to switch between USB and card. Press the BIT/REC button again to confirm and start recording. 8
9 PLAY THE USB HOST 1. Press the FUNCTION button repeatedly until the USB function is selected. 2. Insert an external audio source (i.e. MP3 player) into the USB slot and the display will show USB and soon after will show READING. Note: If the USB device is not detected, NO USB will appear on the display. 3. Normally, tracks will be played automatically. 4. Press the PLAY/PAUSE (]I) button to interrupt/resume the playback. 5. Stop the playback by pressing the stop (*) button. ADVANCED FEATURES 6. Press the button to go the start of the next track. 7. Press the button once to go back to the start of the current track. Press the button twice to skip to the previous track. 8. Playback mode During playback, press the MEMORY/MODE button repeatedly to cycle from repeat 1, repeat album, repeat all, shuffle, intro and cancel. REPEAT 1: The current track will be repeated continuously. REPEAT ALBUM: The current folder will be played continuously. REPEAT ALL: All tracks will be played continuously. SHUFFLE: Tracks will be played in a random sequence. INTRO: Tracks will be played for 12 seconds in sequence. CANCEL: Press the MEMORY/MODE button again to cancel playback mode. TIP: Press the STOP button and the playback mode will be cancelled. 9. Program functions A. Press the STOP button and then press the MEMORY/MODE button to enter program mode. B. 00 will flash on the screen. Press the skip button to select a folder and press the MEMORY/MODE button to confirm. C. Then 00 will flash to prompt you to select a track. Press the skip button to select a track then press the MEMORY/MODE button to add the track to the program list. D. Follow step A and B to keep programming. You can add up to 20 tracks to the program list. E. If you need to clear a programmed track during programming, simply press the DELETE button. You can only delete from the last track. During playback mode, press the STOP button and then press the MEMORY/MODE button to enter program mode. Then press the DELETE button to start clearing from the last track. F. After you finish programming, press the PLAY/PAUSE button to start playing. G. To stop playback, press the STOP button. The PROGRAM indicator will remain on the display. H. To view the tracks in the program list, press the STOP button to enter the stop state in program mode, then keep pressing the MEMORY/MODE button. I. To cancel the program function, press the STOP button twice and the PROGRAM indicator at the bottom of the display will disappear. 10. Delete function Press the STOP button and then hold the DELETE button. Press the or button to select DELETE ONE, DELETE DIR, DELETE ALL. 9
10 DELETE ONE: Press the or button to select a track, or press the or button until the desired folder is reached. Then press the DELETE button once, DEL ONE will appear on the display, press this button again to start deleting the current track. DELETE DIR: If you wish to delete a certain folder in your device, press the or button until your desired folder has been reached. Then hold the DELETE button and press the or button to select DEL DIR. Press the DELETE button again to delete the current folder. DELETE ALL: Hold the DELETE button and press the or button to select DEL ALL. Press the DELETE button again to delete all files in your USB device. NOTE: All delete features are PERMANENT and CANNOT BE UNDONE. Before you press the DELETE button again to start the deleting process, press the STOP button to quit the delete function. RECORD TO USB 1. Insert an external audio source (i.e. MP3 Player) into the USB slot. 2. Press the FUNCTION button repeatedly to select your desired recording source (PHONO or FM). 3. Set your recording bit rate. Hold the BIT/REC button for more than 2 seconds and wait until 128KBPS appears on the display. Press the or button to select 64KB, 128KB or 192KB. Then press the BIT/REC button to confirm the setting. Then press the BIT/REC button again to start recording. Or, you can just press the REC button briefly to record tracks at 128 KB (default bit rate) into the USB device. NOTE: When both the USB flash device and CARD are connected to the appliance, press the BIT/REC button and then press the or button to switch to USB. Press the BIT/REC button again to confirm and start recording. It takes some time for the appliance to read the media devices (card and the USB device) in accordance with their capability. During the entire recording, the RECORD INDICATOR will light up in red. Recording will not begin until REC appears on the display. 4. Press the STOP button again to complete the recording and the RECORD INDICATOR will fade out. NOTE: 1. The bit rate must be set if you do not use the default bit rate for recording. 2. When REC ERR appears, check if your media device is loosened. 3. No song title will be recorded during encoding mode. 4. Some USB drives may not be supported for recording if they are not formatted in a supported parameter. 5. The unit cannot play music files directly from your PC. MP3 s must be stored on a portable memory device, such as a SD/MMC CARD, and inserted into the unit s USB or SD/MMC SLOT. PLAY THE MMC/SD CARD 1. Press the FUNCTION button repeatedly until the CARD function is selected. 2. Insert a SD/MMC card into the SD/MMC slot and the display will show USB, and soon after will show READING. Note: If the card is not detected, NO CARD will appear on the display. 10
11 3. Normally, tracks will be played automatically. 4. Press the PLAY/PAUSE (]I) button to interrupt/resume the playback. 5. Stop the playback by pressing the stop (*) button. ADVANCED FEATURES 6. Press the button to go the start of the next track. 7. Press the button once to go back to the start of the current track. Press the button twice to skip to the previous track. 8. Playback mode Press the MEMORY/MODE button repeatedly to cycle from repeat 1, repeat album, repeat all, shuffle, intro and cancel. REPEAT 1: The current track will be repeated continuously. REPEAT ALBUM: The current folder will be played continuously. REPEAT ALL: All tracks will be played continuously. SHUFFLE: Tracks will be played in a random sequence. INTRO: Tracks will be played for 12 seconds in sequence. CANCEL: Press the MEMORY/MODE button again to cancel playback mode. TIP: Press the STOP button and the playback mode will be cancelled. 9. Program functions A. Press the STOP button and then press the MEMORY/MODE button to enter program mode. B. 00 will flash on the screen. Press the skip button to select a folder and press the MEMORY/MODE button to confirm. C. Then 00 will flash to prompt you to select a track. Press the skip button to select a track then press the MEMORY/MODE button to add the track to the program list. D. Follow step A and B to keep programming. You can add up to 20 tracks to the program list. E. If you need to clear a programmed track during programming, simply press the DELETE button. You can only delete from the last track. During playback mode, press the STOP button and then press the MEMORY/MODE button to enter program mode. Then press the DELETE button to start clearing from the last track. F. After you finish programming, press the PLAY/PAUSE button to start playing. G. To stop playback, press the STOP button. The PROGRAM indicator will remain on the display. H. To view the tracks in the program list, press the STOP button to enter the stop state in program mode, then keep pressing the MEMORY/MODE button. I. To cancel the program function, press the STOP button twice and the PROGRAM indicator at the bottom of the display will disappear. 10. Delete function Press the STOP button and then hold the DELETE button. Press the or button to select DELETE ONE, DELETE DIR, DELETE ALL. DELETE ONE: Press the or button to select a track, or press the or button until the desired folder is reached. Then press the DELETE button for once, DEL ONE will appear on the display, press this button again to start deleting the current track. 11

12 DELETE DIR: If you wish to delete a certain folder in your device, press the or button until your desired folder has been reached. Then hold the DELETE button and press the or button to select DEL DIR. Press th DELETE button again to delete the current folder. DELETE ALL: Hold the DELETE button and press the or button to select DEL ALL. Press the DELETE button again to delete all files in your card. NOTE: All delete features are PERMANENT and CANNOT BE UNDONE. Before you press the DELETE button again to start the deleting process, press the STOP button to quit the delete function. RECORD TO SD/MMC CARD 1. Insert a SD/MMC card into the SD/MMC slot. 2. Press the FUNCTION button repeatedly to select your desired recording source (PHONO or FM). 3. Set your recording bit rate. Hold the BIT/REC button for more than 2 seconds and wait until 128 KBPS appears on the display. Press the or button to select 64KB, 128KB or 192KB. Then press the BIT/REC button to confirm the setting. Then press the BIT/REC button again to start recording. Or, you can just press the REC button briefly to record tracks at 128 KB into the USB device. NOTE: When both the USB flash device and CARD are connected to the appliance, press the BIT/REC button and then press the or button to switch to CARD. Press the BIT/REC button again to confirm and start recording. It takes some time for the appliance to read the media devices (card and the USB device) in accordance with their capability. When recording, the RECORD INDICATOR will light up in red. Recording will not begin until REC appears on the display. 4. Press the STOP button again to complete the recording. NOTE: 1. When REC ERR appears, check if your media device is loosened. 2. No song title will be recorded during encoding mode. 3. Some USB drives may not be supported for recording if they are not formatted in a supported parameter. 4. The unit cannot play music files directly from your PC. MP3 s must be stored on a portable memory device, such as a SD/MMC CARD, and inserted into the unit s USB or SD/MMC SLOT. USB AND SD/MMC CARD (RECORD WITH EACH OTHER) RECORD TO SD/MMC CARD FROM USB 1. Insert the USB and CARD at the same time. 2. Press the FUNCTION button repeatedly until the USB function is selected. If you want to record tracks to the card in a fast speed, press the STOP button to stop the playback. 3. Press the or button to select a track, or press the or button until the desired folder is reached. 4. Press the BIT/REC button and press the or button to select the record mode: REC ONE, REC DIR, REC ALL, and then press the REC button to copy tracks into the SD/MMC card. NOTE: In playback mode, press the BIT/REC button briefly, a track will be copied and played from the very beginning. In stop mode, press BIT/REC button briefly, a track will be copied much faster with the percentage shown on the right hand side. 12

13 The CARD indicator at the top of the display will flash to indicate to the user that it is copying to the CARD. RECORD TO USB FROM MMC/SD 1. Insert the USB and CARD at the same time. 2. Press the FUNCTION button repeatedly until the CARD function is selected. If you want to record tracks to the USB device in a fast speed, press the STOP button to stop the playback. 3. Press the or button to select a track, or press the or button until the desired folder is reached. 4. Press the BIT/REC button and press the or button to select the record mode: REC ONE, REC DIR, REC ALL, and then press the REC button to copy tracks into the USB device. NOTE: In playback mode, press BIT/REC button briefly, a track will be copied and played from the very beginning. In stop mode, press BIT/REC button briefly, a track will be copied much faster with the percentage shown on the right hand side. The USB indicator at the top of the display will flash to indicate to the user that it is copying to the USB. NOTE: When REC FULL is shown on the display during recording, the USB or SD CARD is full, without enough space to continue recording. If you want to proceed with the recording, please delete tracks on the USB device or CARD, or change to a new USB device or CARD. AUDACITY SOFTWARE Audio from PHONO, RADIO, USB and SD card can be recorded onto the computer. Press the FUNCTION button repeatedly until the PHONO function is selected. Place a record onto the platter, and select a speed to prepare for playback. Press the FUNCTION button repeatedly until the TUNER function is selected, then press the STOP/BAND button to select FM (or AM if desired). The recording quality may be affected by the poor AM reception. Tune to your desired station. Press the FUNCTION button repeatedly until the USB function is selected. Press the FUNCTION button repeatedly until the CARD function is selected. The CD provided contains the following software: (1) audacity-src for source codes (2) Audacity_for_MAC For Macintosh (3) Audacity_for_WIN For Windows (4) AUTORUN.INF (5) The GNU General Public License.html The software is compatible with Windows 98, 2000, ME, XP, VISTA, 7 and Macintosh. 13


14 AUDACITY INSTALLATION AND USB CONNECTION Connect one end of USB cable to the appliance and the other end to your computer. Then connect the AC power cord of the appliance. Press the STANDBY button to switch the appliance on. NOTE: If you wish to listen while downloading to your computer, turn the VOLUME knob and adjust to your desired volume level. However, the playback volume level on the unit doesn t affect the downloading volume level. AUDACITY FOR WINDOWS Installing the Audacity Software 1. Please insert the Audacity Software disk that comes with your unit. Go to My Computer and double click the CD ROM Drive. 2. There are five folders in the Audacity disk. Select Audacity_for_WIN for Windows system, and select Audacity_for_MAC for Macintosh system. 3. Double click the Audacity_for_WIN for Windows system, and double click the audacity-win to install the Audacity Software. 14


15 4. The Audacity Setup Wizard will appear. Click Next to install the software. 5. Click on I accept the agreement and click Next. 6. Continue to click on the Next buttons. 15


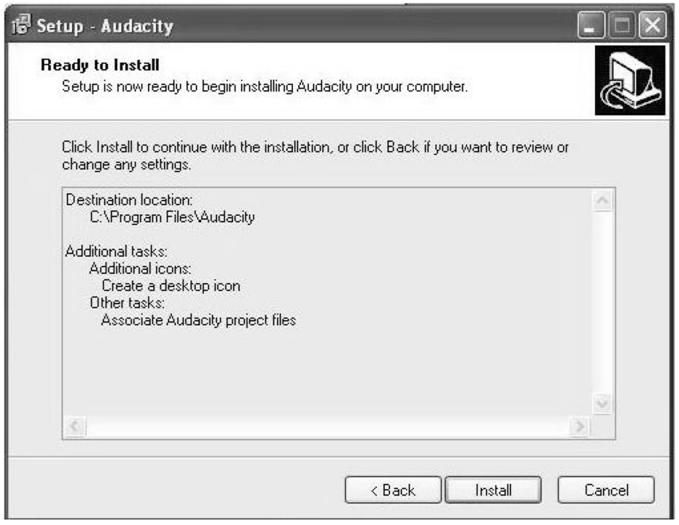
16 7. Click the Install button to start installation. 16

17 8. Click Finish to complete installation. 9. You can now open the Audacity Software and start recording your files. NOTE: Once you set up Audacity, you do not need to re-set it with each use. (For additional information regarding Audacity features & applications, please visit the Audacity website at 17

 button to play; 4. Click the ( ) button to record; 5. Click the ( ) button to pause the recording; 6.")
18 CONFIGURING AUDACITY FOR MICROSOFT WINDOWS Audacity Interface Audacity Control Buttons Use the attribute controls button at the top of the screen to go to beginning, Play, Record, Pause, Stop and End. Use the File, Edit, View, Project, Generate, Effect and Analyze menus to Save, Export, and edit the music. 1. Click the ( ) button to skip to start; 2. Adjust the output volume; 3. Click the ( ) button to play; 4. Click the ( ) button to record; 5. Click the ( ) button to pause the recording; 6. Click the ( ) button to stop the recording; 7. Adjust the input volume; 8. Click the ( ) button to skip to end; 18

. Tick the checkboxes below Channels. Click OK.")
19 AUDACITY PREFERENCES 1. Click Edit on the Audacity interface, select Preferences. The screen will show the Audacity Preferences. You can see Audio I/O, Quality, File Formats, Spectrograms, Directories, Interface, Keyboard and Mouse in the Audacity preference interface. 2. Select the recording device: microphone (USB Audio CODEC) Click Audio I/O in the Audacity Preferences interface. Click Device and select microphone (USB Audio CODEC). Click Channels and select 2 (stereo). Tick the checkboxes below Channels. Click OK. Note: If you cannot find the microphone (USB Audio CODEC) from the Device list, close the Audacity Software, re-open it, then try again. 19


20 3. Adjust the output and input volume. Output Volume Input Volume NOTE: Because of the variations in the different operating systems, the input volume control may not work on some individual Windows versions. Windows Vista is recommended to ensure the input volume control is working properly. For further details regarding Audacity recording and editing details for PC, Audacity s home page offers a series of references. To access these materials go to click on the Help & Contact Us tabs and refer to the items highlighted as Tutorial, Tips and Wiki. RECORDING OPERATION To download music from PHONO to your computer: 1. Select the PHONO function and place the record on the turntable. 2. Move the tone arm over the record to start playing. 3. Click the Record ( ) button to start recording. The waves (left and right tracks) will appear on the interface. 4. At the end of the song, click the Pause ( ) button on Audacity, then lift and move the tone arm to the tone arm rest. For the next song, replace the album or move the tone arm to another desired song. Immediately press the Pause ( ) button on Audacity and downloading will continue. 5. Repeat steps 3 and 4 until you have finished downloading. NOTE: Do not click the Stop button on the computer while continuously downloading songs. Remember to click the Pause button in between your desired songs. Press the Stop button on the computer only when all your desired songs have been downloaded. After your have finished downloading, you may play back the songs through your computer. In Stop mode, simply click the ( ) SKIP TO START button then the ( ) PLAY button. 20
21 To download music from Radio (FM) to your computer: 1. Press the FUNCTION button repeatedly until the TUNER function is selected, then press the STOP/BAND button to select FM. You may select the AM band, but the recording quality may be affected by the poor AM reception. Tune to your desired station. 2. Press the or button to tune to a radio station. 3. Click the Record ( ) button to start recording. The waves (left and right tracks) will appear on the interface. 4. At the end of the program, click the Pause ( ) button on Audacity. 5. To tune to a different station, press the or button on the appliance to tune to another station. Immediately press the Pause ( ) button on Audacity and downloading will continue. 6. Repeat steps 4 and 5 until you have finished downloading. NOTE: Do not click the stop button on the computer while continuously downloading songs. Remember to click the pause button in between your desired songs. Press the stop button on the computer only when all your desired songs have been downloaded. After your have finished downloading, you may play back the songs through your computer. In stop mode, simply click the ( ) SKIP TO START button then the ( ) PLAY button. To download music from a USB device or CARD to your computer: 1. Press the FUNCTION button to select USB (or CARD if desired). 2. Press the PLAY button to play the music. 3. Click the Record ( ) button to start recording. The waves (left and right tracks) will appear on the interface. 4. At the end of the song, click the Pause ( ) button on Audacity. Press the or button on the appliance to skip to the next song, immediately press the Pause ( ) button on Audacity and downloading will continue. 5. Repeat steps 3 and 4 until you have finished downloading. NOTE: Do not click the stop button on the computer while continuously downloading songs. Remember to click the pause button in between your desired songs. Press the stop button on the computer only when all your desired songs have been downloaded. After your have finished downloading, you may play back the songs through your computer. In stop mode, simply click the ( ) SKIP TO START button then the ( ) PLAY button. 21

 Other versions (e.g.: Windows XP): (Other versions) - You may click Start and find Programs, Accessories, Entertainment: and click Sound Recorder.")
22 GENERAL PROBLEMS FOR ALL WINDOWS VERSIONS 1. When the turntable is connected, you cannot hear any sound if you want to listen to video or music. It is because the default playback device has been changed to USB Audio CODEC once the turntable connects to the PC. Solution1: Remove the USB cable from the PC. Solution2: Vista and Windows 7: Click Start and go to the Control Panel. Find and click the Sound icon. Click the Playback tab and change the playback device. Click ok. (Vista and Windows 7) Other versions (e.g.: Windows XP): (Other versions) - You may click Start and find Programs, Accessories, Entertainment: and click Sound Recorder. Then in the Sound Recorder, click the Edit tab and select Audio Properties. - OR, find and click Control Panel. Find and select Sound and audio device and choose the Audio tab. In Sound playback, change the default device by clicking on the dropdown list. Select your playback device and click OK. Then the sound should come out. Please note that if you select solution 2, you need to change the setting manually every time you connect the USB cable with the PC. 22


23 2. If you want to hear the music while downloading to the computer, follow steps below: Go to the Audacity interface. Click Edit and select Preference. Then click the Audio I/O tab. Follow the setting below. Click OK to confirm. Deselect the check box to disable the function. ADJUSTMENT FOR WINDOWS 7 AND SOME VISTA SYSTEMS ONLY If you do not have the fluctuant wave on the Audacity interface or if the sound is distorted when recording, adjust the recording level as follows: Click Start at the lower left corner, go to the Control Panel. 23


24 In Classic View, double click the Sound icon. Or in Control Panel Home view, click Hardware and Sound. Then click Sound. 24


25 In the Sound interface, select the Recording tab. Then, choose a recording device. Herein we recommend you to select Microphone of USB Audio CODEC which is highlighted in the picture and click Properties. Select Levels and adjust the Volume Reading. The reading is from 0 to 100. Normally it should be 3-6. However, you may refer to the Input Level Indicator from the Audacity panel that doesn t exceed 0. Then click OK on the Microphone properties interface and Sound interface. Close the Control Panel. (Please note that there is no Levels tab in the Sound panel in some operating systems, such as Windows For Windows 7 users and Vista users, the Levels tab in the Sound panel is available.) 25

 button to play then turn on your computer speaker NOTE: You may visit the Audacity")

26 Input Level indicator You are downloading music on your computer now. But the music needs to be saved and converted to WAV, Ogg, or MP3 formats before exporting. You may play back the song through your computer. Simply click the ( ) button to play then turn on your computer speaker NOTE: You may visit the Audacity office website for more detailed information and operation, etc. PREPARING TO EXPORT AND SAVE FOR MP3 FORMAT Prepare for MP3 Export--- (Additional software lame_enc.dll needs to be installed.) 1. Please make sure that the Audacity disc is still inserted in your computer. 2. Click the Edit tab on the Audacity interface, select Preferences. 26


27 3. Select the File Formats tab and click on the Find Library button. 4. A dialog box will appear. Click Yes. 5. Another box appears to locate the CD ROM. You will find the lame_enc.dll software. Click on the software then click Open. 27
 button to return to the beginning of the first song. 2. Move the cursor to the wave graphic area, left click the mouse and hold then drag from left to right.")
, where you want to save it ( Save in ), and the file format ( Save as type ). 5.")
28 6. Click on the OK button. Now the MP3 software set up is complete and you may proceed with exporting to MP3 format. DIVIDING TRACKS 1. Press the ( ) button to return to the beginning of the first song. 2. Move the cursor to the wave graphic area, left click the mouse and hold then drag from left to right. Release the mouse when the highlight reaches the end of the first song. Highlight 3. Click the File tab then select EXPORT SELECTION AS MP3. 4. The window will pop up in a dialog box for you to provide the song title ( File name ), where you want to save it ( Save in ), and the file format ( Save as type ). 5. Click Save and the first song is saved on the computer. See the interface example below, saved as MP3 format: 28

29 Completed box below: Second song to be divided and saved: 1. Move the cursor to the wave graphic at the beginning of the second song. Left click the mouse, hold and drag from left to right until you reach the end of the second song. 2. Click the File tab then select EXPORT SELECTION as MP3. 3. Follow the steps above to divide the songs one-by-one. TO CHANGE THE TITLES (FOR MP3 FORMAT ONLY) DURING EXPORT SELECTION AS MP3: the software only provides one chance to give a title to the song being saved. All subsequent songs being divided from the same track will have the same title. 1. To change the titles, follow the steps below: 1. Right click on the Music file which will show all its contents. 2. Select Properties, then click on Summary. 3. Click on Title, and then change it to your desired title. 4. Select OK. 5. Do all these steps until you have given a title to each song. 29

30 EXPORT AND SAVE FOR WAV AND OGG FORMATS (AFTER RECORDING IS COMPLETE) When the song is finished, click the ( ) button on Audacity. Then lift and move the tone arm to the tone arm rest. 1. Highlight the song which you want to save, and then click the File tab on the Audacity interface. 2. Select Export Selection as WAV or Export Selection as Ogg. To Export Selection as WAV To Export Selection as Ogg 30

31 3. Once you have chosen which file format recording should be exported to, the interface below appears. Here you may provide the file name and the location where it will be saved, i.e. on the desktop. Then click Save. Save as WAV Save as Ogg Note: You have an option to save all the songs into one file all at once. After the download is completed, click the File tab and select Export as MP3, Export as WAV or Export as OGG. COPYING THE MUSIC FILE TO AN MP3 PLAYER 1. Connect the MP3 player to your computer via a USB cable. 2. Turn on your computer. 3. Double click on MY COMPUTER. 4. Locate the drive named REMOVABLE DISK or MP3 PLAYER This is your MP3 player. 5. Double click REMOVABLE DISK/MP3 PLAYER This opens the folder. It will show all files that are currently on your player. 6. Next, locate the music files on your computer. Most people store them in their MY MUSIC folder. 7. Once your music folder/mp3 file folder is open, click once to highlight the song you want to send to your MP3 player. One of the following steps will copy the MP3 file: A. Right click on the highlighted song and a box will appear. Move the cursor to SEND TO and another box will appear. If you have the option REMOVABLE DISK, click on it. This will send a copy of the MP3 file to the MP3 player. B. If you do not have REMOVABLE DISK listed, click on COPY. Go back and repeat steps 3, 4 & 5 (above). Right click in the middle of the window and a box will appear. Select PASTE and the MP3 file that will be sent to the MP3 player. 31

, please enter the PPC folder to install the Audacity Software. 3.")
. 4.")
32 AUDACITY FOR MAC 1. Please insert the Audacity Software disk that comes with your unit. Click on the Audacity disk on the desktop. 2. There are five folders in the Audacity disk. Select Audacity_for_MAC for Macintosh system, and select Audacity_for_WIN for Windows system. If your computer is Mac OS X system (Intel CPU), please enter the Intel folder to install the Audacity Software; If your computer is Mac OS 9 system, please enter the Mac OS 9 folder to install the Audacity Software; If your computer is Mac OS X system (Power PC CPU), please enter the PPC folder to install the Audacity Software. 3. Double click on the setup file according to your supported system, for instance, the audacity.dmg icon in the software files will now open in a folder. Select all the files in the folder and drag them to a suitable location on the hard drive (Applications, etc.). 4. Double click on the Audacity icon to start running the software, alternatively, drag the orange ball wearing headphones icon down to the desktop toolbar. Click on this icon to run Audacity. CONFIGURING AUDACITY FOR MAC Audacity Interface for Mac 32

 Audacity Control Buttons Use the attribute controls button at the top of the screen to go to the beginning, Play, Record, Pause, Stop and End.")
 button to record; 4. Click the ( ) button to pause the recording; 5. Click the ( ) button to stop the recording; 6. Click the ( ) button to skip to end; 7. Adjust the output volume. 8.")
33 Audacity Interface---Settings and controls. At the top of the main Audacity window, to the right of the play control buttons, you will see the input and output level meters (labeled L and R). Under the output level meter is an icon that looks like a microphone. Next to the microphone is a black arrow that points downwards. Click this arrow and select Start Monitor. (If you don t see the input and output level meters, open your Preferences again as described above.) Audacity Control Buttons Use the attribute controls button at the top of the screen to go to the beginning, Play, Record, Pause, Stop and End. Use the File, Edit, View, Project, Generate, Effect and Analyze menus to Save, Export, and edit the music. 1. Click the ( ) button to skip to start; 2. Click the ( ) button to play; 3. Click the ( ) button to record; 4. Click the ( ) button to pause the recording; 5. Click the ( ) button to stop the recording; 6. Click the ( ) button to skip to end; 7. Adjust the output volume. 8. Adjust the input volume. AUDACITY PREFERENCES 1. Click Audacity on the Audacity interface, select Preferences. The screen will show the Audacity Preferences. You can see Audio I/O, Quality, Import/Export, Interface, Spectrograms, Directories, Smart Recording, Theme, Keyboard and Mouse. 33
.")
 from the Device list, close the Audacity")
34 2. Select the recording device: Core Audio (USB Audio CODEC) Click Audio I/O in the Audacity Preferences interface. Click Device and select Core Audio (USB Audio CODEC). Click Channels and select 2 (stereo). Click OK. Note: If you cannot find the Core Audio (USB Audio CODEC) from the Device list, close the Audacity Software, re-open it, then try again, or ensure the turntable is connected to the computer. 34
 to -36 and then click OK. 2.")


35 3. Under the Quality tab, set the Default Sample Format to 16 bit. Select OK to save your setting and close the preferences window. TO SET THE SMART RECORDING 1. To select the Smart Recording in the Audacity Preferences interface, set the Sound Activation Level (db) to -36 and then click OK. 2. At the top of the main Audacity window, to the right of the input and output level meters (labeled L and R), you will see the input and output volume. To the left of the input and output volume, there is a volume icon. Adjust the output and input volume to maximum. Output volume Input volume NOTE: Because of the variations in the different operating systems, the input volume control may not work on some individual Windows versions. Windows Vista is recommended to ensure the input volume control is working properly. For further details regarding Audacity recording and editing details for Mac, Audacity s home page offers a series of references. To access these materials go to click on the Help & Contact Us tabs and refer to the items highlighted as Tutorial, Tips and Wiki. 35
36 RECORDING OPERATION To download music from PHONO to your computer: 1. Place the record on the turntable. 2. Move the tone arm over the record to start playing. 3. Click the Record ( ) button to start recording. The waves (top and bottom) will appear on the interface. 4. At the end of the song, click the Pause ( ) button on Audacity, then lift and move the tone arm to the tone arm rest. For the next song, replace the album or move the tone arm to another desired song. Immediately press the Pause ( ) button on Audacity and downloading will continue. 5. Repeat steps 3 and 4 until you have finished downloading. NOTE: Do not click the Stop button on Audacity while continuously downloading songs. Remember to click Pause in between your desired songs. Press Stop on Audacity only when all your desired songs have been downloaded. 6. After you have finished downloading, you may play back the songs through your computer. In Stop mode, simply click the ( ) button. To download music from Radio (FM) to your computer: 1. Press the FUNCTION button repeatedly until the TUNER function is selected, then press the STOP/BAND button to select FM. You may select the AM band, but the recording quality may be affected by the poor AM reception. Tune to your desired station. 2. Press the or button to tune to a radio station. 3. Click the Record ( ) button to start recording. The waves (left and right tracks) will appear on the interface. 4. At the end of the program, click the Pause ( ) button on Audacity. 5. To tune to a different station, press the or button on the appliance to tune to another station. Immediately press the Pause ( ) button on Audacity and downloading will continue. 6. Repeat steps 4 and 5 until you have finished downloading. NOTE: Do not click the stop button on the computer while continuously downloading songs. Remember to click the pause button in between your desired songs. Press the stop button on the computer only when all your desired songs have been downloaded. 36
. 2. Press the PLAY button to play the music. 3.")
37 After your have finished downloading, you may play back the songs through your computer. In stop mode, simply click the ( ) PLAY button. To download music from a USB device or CARD to your computer: 1. Press the FUNCTION button to select USB (or CARD if desired). 2. Press the PLAY button to play the music. 3. Click the Record ( ) button to start recording. The waves (left and right tracks) will appear on the interface. 4. At the end of the song, click the Pause ( ) button on Audacity. Press the or button on the appliance to skip to the next song, immediately press the Pause ( ) button on Audacity and downloading will continue. 5. Repeat steps 3 and 4 until you have finished downloading. NOTE: Do not click the stop button on the computer while continuously downloading songs. Remember to click the pause button in between your desired songs. Press the stop button on the computer only when all your desired songs have been downloaded. After your have finished downloading, you may play back the songs through your computer. In stop mode, simply click the ( ) PLAY button. 37


38 DIVIDING TRACKS When your downloading is complete: 1. Press the ( ) button to return to the beginning of the first song. 2. Move the cursor to the wave graphic area, left click the mouse, hold and drag from left to right. Release the mouse when your desired section in the time bar is highlighted. 3. Click the File tab then select EXPORT SELECTION. 4. The window will pop up in a dialog box for you to complete the Metadata. Click the OK button after you type it in. 5. Then a window appears. Select your music file location and format, and type in your file name. Click Save and the song is saved on the computer. EXPORT AND SAVE FILES (AFTER RECORDING IS COMPLETE) When the song is finished, click the ( ) button on Audacity. Then lift and move the tone arm to the tone arm rest. You are downloading music on your computer now. You may play back the song through your computer. Simply click the ( ) button to play. NOTE: You may visit the Audacity office website for more detailed information and operation, etc. 38


39 1. Click on the File tab in the Audacity interface. Select Export to save the file. 2. The window below will pop up after clicking Export. It will default to MP3 format, but you also can select other formats, you only need to click the arrow located at the right of the MP3 Files. TROUBLESHOOTING GUIDE/AUDACITY In case you have trouble with the unit, please look through the list below and see if you can solve the problem by yourself first before calling your dealer. NO SOUND: If you are not getting any sound in the software application, go back to the preferences as shown above and make sure you have selected the USB input for the recording device. Power Cycle: Close Audacity, turn off the turntable, unplug the USB Cable. Then plug in the USB Cable, turn on the turntable, and reopen Audacity. If you are not able to hear any audio as you play the record, please click on the microphone drop-down arrow and select Monitor Input. This will enable you to hear the audio from the turntable, even if you have not record-enabled the Audacity application. If you are not seeing the microphone slider, please go to the Preferences menu in Audacity, click on the Interface tab and make sure that the Enable Mixer Toolbar and Enable Meter Toolbar options are checked. If they are not, please check them and then press OK. 39

40 Check the microphone slider to make sure that it is at full volume, all the way to the right as shown below: If you are not seeing the microphone slider, please go to the Preferences menu in Audacity, click on the Interface tab and make sure that the Enable Mixer Toolbar and Enable Meter Toolbar options are checked. If they are not, please check them and then press OK. POOR SOUND QUALITY: Check your stylus connection to make sure it is secured to the tone arm. The stylus must be connected to the tone arm whenever you are using the turntable. Make sure that your RCA plugs are plugged into a source or not touching bare metal. If you are experiencing noise through the USB, you may have interference from the RCA plugs. Ensure the USB cable is not touching or near any other cables. If you experience any odd sounds coming from the recording, try closing all applications and restart them. Make sure that you have properly installed and calibrated the tone arm of the turntable. Problem Cause Solution The unit does not power up when the power switch is pressed. Unit is unplugged. Connect the unit to the AC power supply. THE WHOLE UNIT The sound is noisy. The unit is too close to a TV set or another similar appliance. Turn off the TV or other appliance, and relocate the unit. The unit has no response or could not be reset. External factors such as ESD (Electro-static discharge) affect the unit. Remove the power cord and all power supply devices, then re-plug in the unit after one minute. PHONO PLAYER The sound is noisy when playing the record. The sound is noisy when used for a period of time. The stylus is not placed in the center. The stylus is damaged. Place the stylus in the center. Please change to a new stylus. USB DEVICE/CARD NO USB or NO CARD appears. USB flash device or CARD has not been inserted. The format is incorrect. Connect a USB flash device or a card into the corresponding slot. Backup all the files in your computer and format the USB/ CARD and try again. TUNER UNIT Cannot listen to any station, or signal appears weak. The station is not tuned-in properly. A TV set is being used nearby and is interfering with the radio reception. Properly tune-in to the desired station. Turn off the interfering TV set. The sound is distorted. The antenna is not oriented properly. Re-orient the antenna until reception improves. 40
41 SPECIFICATIONS AMPLIFIER section Output Power: 0.8W + 0.8W Frequency Response: TUNER section FM Section Frequency Range: Step: AM Section Frequency Range: Step: RECORD PLAYER section Motor: Drive System: Speeds: Wow &Flutter: S/N Ratio: Cartridge Type: Stylus: SPEAKER SYSTEM section Type: Impedance: Input Power: GENERAL Power Requirements: Power Consumption: Dimensions (W x H x D): Weight: Standard Accessories: 60 TO 20,000 Hz 87.5 TO 108 MHz 0.05 MHz 522 TO 1620 KHz 9 KHz DC servo motor Belt Driver 33-1/3 rpm, 45 rpm and 78 rpm Less than 0.35% (WTD) More than 50 db Ceramic Stereo Cartridge 402-M way 8 ohm Max. 2 W AC 230 V ~ 50 Hz 15W 390 x 160 x 355 mm (approx.) 3.6KGS (approx.) Operation Instruction Booklet, 45 rpm Adaptor, USB Cable, RCA LINE OUT Cable. NOTE: AS A RESULT OF CONTINUAL IMPROVEMENTS, THE DESIGN AND SPECIFICATIONS OF THE PRODUCT WITHIN MAY DIFFER SLIGHTLY TO THE UNIT ILLUSTRATED ON THE PACKAGING. 41

42 Safety precautions: CAUTION RISK OF ELECTRIC SHOCK DO NOT OPEN To reduce risk of electric shock, this product should ONLY be opened by an authorized technician when service is required. Disconnect the product from mains and other equipment if a problem should occur. Do not expose the product to water or moisture. Maintenance: Clean only with a dry cloth. Do not use cleaning solvents or abrasives. Warranty: No guarantee or liability can be accepted for any changes and modifications of the product or damage caused due to incorrect use of this product. General: Designs and specifications are subject to change without notice. All logos brands and product names are trademarks or registered trademarks of their respective holders and are hereby recognized as such. Keep this manual and packaging for future reference. Attention: This product is marked with this symbol. It means that used electrical and electronic products should not be mixed with general household waste. There is a separate collections system for these products. Declaration of conformity We, Nedis B.V., De Tweeling 28, 5215MC, s-hertogenbosch The Netherlands Tel.: info@nedis.com Declare that product: Brand: KÖNIG ELECTRONIC Model: HAV-TT25USB Description: USB turntable Is in conformity with the following standards: EN 5501 EN :2002+A1 :2006+A11 :2008 EN :2001+A1 :2003+A2 :2006 EN :2007 EN :2006+A1 :2007 EN :1998+A1 :2001+A2 :2003 EN :2006+A2 :2009 EN :2008 EU Directive(s): 2006/95/EC & 2004/108/EC s-hertogenbosch, Mrs.: J. Gilad Purchase Director Copyright 42
i360 CLASSIC TURNTABLE WITH STEREO RADIO RECEIVER AND PC ENCODING
 i360 CLASSIC TURNTABLE WITH STEREO RADIO RECEIVER AND PC ENCODING TT-283PC INSTRUCTION MANUAL 1 IMPORTANT SAFETY INSTRUCTIONS: 1. Read the instructions. All uses guidelines must be read before starting
Model: PTTC4U. Multifunction Turntable With MP3 Recording, USB-to-PC, Cassette Playback
 Model: PTTC4U Multifunction Turntable With MP3 Recording, USB-to-PC, Cassette Playback Read instructions carefully before use and store in a safe place for future reference. IMPORTANT SAFETY INSTRUCTIONS
OPERATING INSTRUCTIONS
 GPO EMPIRE OPERATING INSTRUCTIONS PLEASE READ THIS USER MANUAL COMPLETELY BEFORE OPERATING THIS UNIT AND RETAIN THIS BOOKLET FOR FUTURE REFERENCE. CONTENT CONTENT.2 IMPORTANT SAFETY INSTRUCTION FOR AUDIO
CONTENTS IMPORTANT SAFETY INSTRUCTIONS.. 3 PRECAUTIONS.. 4 BEFORE USE.. 5 TURNTABLE PARTS. 5 LISTENING TO A RECORD. 5
 1 CONTENTS IMPORTANT SAFETY INSTRUCTIONS.. 3 PRECAUTIONS.. 4 BEFORE USE.. 5 TURNTABLE PARTS. 5 LISTENING TO A RECORD. 5 HOW to REPLACE the TURNTABLE STYLUS (NEEDLE)... 6 RECORD YOUR VINYL to PC using WINDOWS
USB Turntable & Cassette Converter
 EP409/ JW-41UBE05 USER MANUAL USB Turntable & Cassette Converter 230V~ 50Hz 10W Read instructions carefully before use and store in a safe place for future reference. 2 IMPORTANT SAFETY INSTRUCTIONS When
IMPORTANT SAFETY INSTRUCTIONS Please read this owner s guide
 Model no: CD418JN IMPORTANT SAFETY INSTRUCTIONS Please read this owner s guide Please take the time to follow the instructions in this owner s guide carefully. It will help you set up and operate your
RTT98 VINTAGE TURNTABLE
 RTT98 VINTAGE TURNTABLE WARNING: TO PREVENT FIRE OR SHOCK HAZARD, DO NOT EXPOSE THIS APPLIANCE TO RAIN OR MOISTURE. DO NOT REMOVE COVER. PILOT LAMPS SOLDERED IN PLACE. NO USER SERVICEABLE PARTS INSIDE.
Turntable player with USB/SD/PC recording function. Model no: TT620 User s Manual
 Turntable player with USB/SD/PC recording function Model no: TT620 User s Manual READ THIS INSTRUCTION CAREFULLY BEFORE USE AND STORE IN A SAFE PLACE FOR FUTURE REFERENCE 1 Features Two-built-in stereo
USB Turntable. Installation & User's Guide. Item number All brand names and trademarks are the property of their respective owners.
 USB Turntable Item number 62904201 Installation & User's Guide All brand names and trademarks are the property of their respective owners. R R 1 Precautions Safety Information CAUTION 1.In order to shut
IMPORTANT SAFETY INSTRUCTIONS
 SAFETY INSTRUCTIONS WARNING: TO PREVENT FIRE OR SHOCK HAZARD, DO NOT EXPOSE THIS APPLIANCE TO RAIN OR MOISTURE. IMPORTANT SAFETY INSTRUCTIONS 1. Read instructions - All the safety and operating instructions
With USB/SD and Radio
 Turntable/Cassette Player With USB/SD and Radio Model Number BT-17DJS INSTRUCTION MANUAL General Safety Instructions Read this manual thoroughly before first use and keep it in a safe place for future
QIT600F1 USER'S GUIDE
 QIT600F1 USER'S GUIDE 1 IMPORTANT SAFEGUARDS Warnings: 1. Read all of these instructions. Save these instructions for later use, please. 2. Unplug this monitor from the wall outlet before cleaning. Do
IMPORTANT! USER MANUAL. LPU192CD Hi-Fi Turntable Stereo System WARRANTY INFORMATION INSIDE. PLEASE READ.
 LPU192CD Hi-Fi Turntable Stereo System USER MANUAL IMPORTANT! WARRANTY INFORMATION INSIDE. PLEASE READ Trademark of TEAC Corporation JAPAN www.teac.com.au 1 1 Read these Instructions. 2 Keep these Instructions.
Multi Player with GPS User Manual MMP-401
 Multi Player with GPS User Manual MMP-401 Thank you for purchasing this HITACHI product. To obtain the best performance and safety, please read this manual carefully. Please keep this manual for future
MP3/ CD/ Radio/Bluetooth Porta ble Pl a ye r With Remote Control
 GV-PS913 MP3/ CD/ Radio/Bluetooth Porta ble Pl a ye r With Remote Control R I N S T R U C T I O N MANU A L WARNING TO PREVENT FIRE OR SHOCK HAZARD DO NOT EXPOSE THIS APPLIANCE TO RAIN OR MOISTURE. CAUTION
VOICE-ACTIVATED INTERCOM SYSTEM
 VOICE-ACTIVATED INTERCOM SYSTEM Owner s Manual For Wireless Intercom Model WHI-4CUPG EXPLANATION OF GRAPHIC WARNING SYMBOLS This symbol is intended to alert the user to the presence of un-insulated dangerous
Turntable/Cassette Player/CD. Player/Radio/USB/SD Audio System. With Speakers & Bluetooth
 Turntable/Cassette Player/CD Player/Radio/USB/SD Audio System With Speakers & Bluetooth Model Number BT-24DJB INSTRUCTION MANUAL General Safety Instructions Read this manual thoroughly before first use
IMPORTANT SAFETY INSTRUCTIONS
 SAFETY INSTRUCTIONS WARNING: TO PREVENT FIRE OR SHOCK HAZARD, DO NOT EXPOSE THIS APPLIANCE TO RAIN OR MOISTURE. IMPORTANT SAFETY INSTRUCTIONS 1. Read instructions - All the safety and operating instructions
CANTEEN 6000 Portable Battery Pack NAP-30. Instruction Manual Please read carefully before use and keep for future reference.
 CANTEEN 6000 Portable Battery Pack NAP-30 Instruction Manual Please read carefully before use and keep for future reference. Thank You We know you have many choices when it comes to technology; thank you
7-Port Fast Charging Station NAP Instruction Manual Please read carefully before use and keep for future reference.
 7-Port Fast Charging Station NAP-7000 Instruction Manual Please read carefully before use and keep for future reference. Thank You We know you have many choices when it comes to technology; thank you for
SUBWOOFER SYSTEM YST-MSW10
 ACTIVE SERVO PROCESSING SUBWOOFER SYSTEM YST-MSW10 Active Servo SUBWOOFER SYSTEM YST-MSW10 Active Servo HIGH CUT HIGH LOW OWNER S MANUAL MANUAL DE INSTRUCCIONES CAUTION RISK OF ELECTRIC SHOCK DO NPT OPEN
CD DAB+ RADIO WITH BLUETOOTH MUSIC SYSTEM BT-9000
 CD DAB+ RADIO WITH BLUETOOTH MUSIC SYSTEM BT-9000 Instruction Manual For information and support www.lenco.eu Important Safety Instructions When used in the directed manner, this unit has been designed
Pyle Vintage - Classic Style Turntable Systems Layout & Controls: Precautions for use - Installation Connection
 Layout & Controls: 1) Dust cover 2) Dial pointer 3) Left speaker 4) Play/Pause/Stop button 5) Skip down button 6) Source button 7) Record button 8) Power off / Functions selector 9) Volume knob 10) 3.5
USB CASSETTE PLAYER MODEL NO. : GE USER MANUAL -
 USB CASSETTE PLAYER MODEL NO. : GE4140 - USER MANUAL - CAUTION RISK OF ELECTRIC SHOCK DO NOT OPEN CAUTION : TO REDUCE THE RISK OF ELECTRIC SHOCK, DO NOT REMOVE COVER ( OR BACK ). NO USER SERVICEABLE PARTS
CD/Radio Portable Player
 GV-PS713 CD/Radio Portable Player I N S T R U C T I O N MANU A L WARNING TO PREVENT FIRE OR SHOCK HAZARD DO NOT EXPOSE THIS APPLIANCE TO RAIN OR MOISTURE. CAUTION RISK OF ELECTRIC SHOCK DO NOT OPEN WARNING
PLTT21BT CLASSICAL TURNTABLE WITH USB PLAYER, BLUETOOTH INSTRUCTIONS MANUAL
 PLTT21BT CLASSICAL TURNTABLE WITH USB PLAYER, BLUETOOTH INSTRUCTIONS MANUAL CAUTION TO PREVENT FIRE OR SHOCK HAZARD, DO NOT USE THIS PLUG WITH AN EXTENSION CORD, RECEPTACLE OR OTHER OUTLET UNLESS THE BLADES
FRANÇAIS PORTUGUÊS MCD 850USB
 DEUTSCH ENGLISH FRANÇAIS NEDERLANDS ESPAÑOL PORTUGUÊS MCD 850USB WARNING 1. WARNING:Please refer the information on exterior bottom enclosure for electrical and safety information before installing or
YST-SW20 SUBWOOFER SYSTEM OWNER S MANUAL. Active Servo Technology
 CAUTION SUBWOOFER SYSTEM Active Servo RISK OF ELECTRIC SHOCK DO NOT OPEN CAUTION: TO REDUCE THE RISK OF ELECTRIC SHOCK DO NOT REMOVE COVER (OR BACK). NO USER-SERVICEABLE PARTS SIDE. REFER SERVICG TO QUALIFIED
AXESS Products Corp. All rights reserved 2012 AXESS Products Corp. All rights reserved
 1 2 3 4 1 6 7 8 9 26 10 12 14 11 13 15 16 18 17 20 22 24 19 21 23 25 27 28 29 5 LOCATION OF CONTROLS 1. SPEAKERS 2. USB PORT 3. LCD DISPLAY 4. SD/MMC CARD SLOT 5. AC SOCKET 6. AUX IN JACK 7. FM TELESCOPIC
1/4 Guitar / Mic input
 1/4 Guitar / Mic input Important Safety Instructions 1) Read these instructions All the safety and operating instructions should be read before this product is operated. 2) Keep these instructions The
DP-152. Digital Picture Viewer. Instruction Manual. Please read this manual carefully before operation 152SX
 DP-152 Digital Picture Viewer Instruction Manual Please read this manual carefully before operation 152SX Precautions For Customer Use: Enter below the serial number that is located on the bottom of the
Turntable/Cassette /CD Player/Radio/USB/SD Audio System with Speakers
 Turntable/Cassette /CD Player/Radio/USB/SD Audio System with Speakers Bluetooth In & OUT BT-22-B INSTRUCTION MANUAL Parts List 1) Dust cover 2) Revolving shaft 3) Turntable 4) Mode(USB/SD) /BT IN 5) Function
DSS Console and DSS Console for Attendant for Digital Super Hybrid Systems. Reference Guide ANSWER RELEASE
 ANSWER RELEASE PSQX1526ZA 98.8.5 7:32 PM Page 1 DSS Console and DSS Console for Attendant for Digital Super Hybrid Systems Reference Guide Model KX-T7440/KX-T7441 8 16 24 32 40 48 7 15 23 31 39 47 6 14
Analog Tuning Radio AM/FM/PHONO/CD/AUX IN/BLUETOOTH/TAPE PTCD4BT
 Analog Tuning Radio AM/FM/PHONO/CD/AUX IN/BLUETOOTH/TAPE PTCD4BT CONTENT IMPORTANT SAFETY INSTRUCTIONS... 3 PRECAUTIONS... 5 BEFORE USE... 6 HANDLING RECORDS... 6 HOW TO REPLACE THE STYLUS (NEEDLE)...
BLUETOOTH CLOCK RADIO
 BLUETOOTH CLOCK RADIO SCR1989BT OPERATING INSTRUCTIONS Please read and follow this instruction manual carefully before using the unit and retain it for future reference SYLVANIA is a registered trademark
Industrial Worksite Outdoor Rechargeable Bluetooth Speaker with FM radio and USB/SD Flash Drive PWPBT250 INSTRUCTION MANU
 Industrial Worksite Outdoor Rechargeable Bluetooth Speaker with FM radio and USB/SD Flash Drive PWPBT250 INSTRUCTION MANU IMPORTANT SAFETY INSTRUCTIONS: 1. Read the instructions. All uses guidelines must
Bluetooth Portable Speaker Slate MODEL:CAB PLEASE READ CAREFULLY BEFORE OPERATING THIS EQUIPMENT
 Bluetooth Portable Speaker Slate MODEL:CAB-31653 PLEASE READ CAREFULLY BEFORE OPERATING THIS EQUIPMENT Important Safety Instructions CAUTION RISK OF ELECTRIC SHOCK DO NOT OPEN CAUTION: TO REDUCE THE ELECTRIC
OWNER S INSTRUCTION MANUAL
 OWNER S INSTRUCTION MANUAL CALLER ID TYPE II MULTI-FEATURE TELEPHONE MODEL 2730 1 IMPORTANT SAFETY INSTRUCTIONS Always follow basic safety precautions when using your telephone equipment to reduce the
MultiPlex 15 Touch Screen. User s Manual
 MultiPlex 5 Touch Screen User s Manual Preface Precautions. READ INSTRUCTIONS: All the safety and operating instructions should be read before the LCD monitor is operated.. RETAIN INSTRUCTIONS: The safety
Qi Wireless & USB Charger with Bluetooth Speaker NAP-52. Instruction Manual Please read carefully before use and keep for future reference.
 Qi Wireless & USB Charger with Bluetooth Speaker NAP-52 Instruction Manual Please read carefully before use and keep for future reference. Thank You We know you have many choices when it comes to technology;
CD Boombox mit Uhrenradio B 5
 CD Boombox mit Uhrenradio B 5 2 3 4 5 6 7 8 CLASS 1 LASER PRODUCT KLASS 1 LASER APPARAT LUOKEN 1 LAISERLAITE KLASSE 1 LASER PRODUKT 9 10 11 12 13 14 15 16 17 18 19 20 21 22 23 24 25 26 27 28 29 30 WARNING
PR-D14USB / PR-D14. Version 1
 PR-D14USB / PR-D14 中文 GB Version 1 Table of contents Important safety instructions... 2-4 Controls... 5-6 Using the radio for the first time... 7 Operating your radio Searching tuning AM / FM... 7 Setting
Bluetooth Headphone FCC ID:OR8-T1
 Bluetooth Headphone T1 FCC ID:OR8-T1 Important Safety Instructions 1 Caution: To reduce the risk of electric shock, do not dismantle the product and do not expose the apparatus to rain or moisture. No
Portable CD/Cassette Player
 Portable CD/Cassette Player MODEL NO: CD815, CD815R Batch no:pr3626 I N S T R U C T I O N M A N U A L Please read and retain these instructions for future reference. Product Description: Take your music
DEUTSCH ENGLISH MCD4850
 DEUTSCH ENGLISH MCD4850 BATTERY INSTALLATION The battery compartment is located on the back of the remote control. 1. Remove the battery compartment door by pressing in on the tab and lifting it off. 2.
WARRANTY ATTN: RETURNS DEP'T 2001 PRODUCTION DRIVE BAY 2 & 3 LOUISVILLE, KY 40299
 WARRANTY Crosley Radio Products are warranted against defects in material and workmanship for a period of 90 days beginning from the date of sale to the original purchaser. Should the unit fail under normal
DUAL CHARGER WIRELESS SPEAKER SYSTEM WITH RECHARGEABLE "Li-Ion" BATTERY
 DUAL CHARGER WIRELESS SPEAKER SYSTEM WITH RECHARGEABLE "Li-Ion" BATTERY User s Guide CR13 Smart Device not included. Wireless Speaker System with Bluetooth Technology for "Hands Free" Answering Dual Charger
Thank you for your purchase of Carot One PACOLO USB/DAC preamplifier.
 1. Introduction Thank you for your purchase of Carot One PACOLO USB/DAC preamplifier. Carot One introduces the mini-size USB/DAC preamplifier, PACOLO, providing high quality amplification of your digital
DEUTSCH ITALIANO ENGLISH DANSK FRANÇAIS NORSK NEDERLANDS SVENSK PORTUGUÊS ČEŠTINA Hersteller PL550BR
 DEUTSCH ENGLISH FRANÇAIS NEDERLANDS PORTUGUÊS ITALIANO DANSK NORSK SVENSK ČEŠTINA Hersteller Wörlein GmbH Tel.: +49 9103/71670 Gewerbestrasse 12 Fax.: +49 9103/716712 D 90556 Cadolzburg Email. info@woerlein.com
User Guide. BB-111 Cassette Boombox
 User Guide BB-111 Cassette Boombox IMPORTANT SAFETY INFORMATION CAUTION! RISK OF ELECTRIC SHOCK DO NOT OPEN TO REDUCE THE RISK OF ELECTRIC SHOCK DO NOT REMOVE COVER (OR BACK) This symbol indicates that
CR73-3 / CR703. Instruction Manual DISC SKIP+ F.SKIP B.SKIP REPEAT OPEN/ AM FM DOW UP DISC 1 DISC 2 EARPHONE DISC 3 CD PHONO TAPE RADIO
 F.SKIP DOW UP CR73-3 / CR703 Instruction Manual DISC SKIP+ PLAY/ PAUSE STOP B.SKIP REPEAT CD PHONO TAPE RADIO OPEN/ CLOSE VOLUME AM FM POWER ON OFF TUNING DISC 1 DISC 2 DISC 3 EARPHONE 910-261000-002 WARRANTY
RIO R22 & R44. Quick Start Guide for all variants
 RIO R22 & R44 Quick Start Guide for all variants Important Safety Information 1. READ THESE INSTRUCTIONS All the safety and operating instructions should be read before the product is operated. 2. KEEP
Please Read First. CAUTION: Please read these important safety instructions carefully
 Please Read First The lightning flash with arrowhead, within an equilateral triangle, is intended to alert the user to the presence of uninsulated dangerous voltage within the product s enclosure that
DPR-34+ GB Revision 2
 DPR-34+ GB Revision 2 1. 2. 3. 4. 5. 6. 7. 8. 9. Important Safety Instructions Read these instructions. Keep these instructions. Heed all warnings. Follow all instructions. Do not use this apparatus near
PCM60A 100W MAX P.A. AMPLIFIER.
 PCM60A 100W MAX P.A. AMPLIFIER www.pyleaudio.com IMPORTANT SAFETY INSTRUCTIONS 1. Read Instructions All the safety and operating instructions should be read before the appliance is operated. 2. Retain
Additional Camera Unit for Angelcare Monitors AC-CAM Compatible with models: AC517 - AC510 AC417 AC315 AC310
 OWNER S MANUAL Additional Camera Unit for Angelcare Monitors AC-CAM Compatible with models: AC517 - AC510 AC417 AC15 AC10 TABLE OF CONTENTS WARNINGS... SETUP REQUIREMENTS... Setting up the Camera... Instructions
CR2404A WARRANTY. Analog Songwriter. Instruction Manual
 WARRANTY Crosley Radio Products are warranted against defects in material and workmanship for a period of 90 days beginning from the date of sale to the original purchaser. Should the unit fail under normal
CD RADIO CLOCK MODEL NRC-175
 CD RADIO CLOCK MODEL NRC-175 PLEASE READ THIS USER MANUAL COMPLETELY BEFORE OPERATING THIS UNIT AND RETAIN THIS BOOKLET FOR FUTURE REFERENCE. LASER SAFETY: This unit employs a laser. Only qualified service
BLUETOOTH SOUND TOWER DOCKING STATION REF.: HP24 BTH
 BLUETOOTH SOUND TOWER DOCKING STATION REF.: HP24 BTH OPERATING INSTRUCTION TABLE OF CONTENTS IMPORTANT SAFETY INSTRUCTIONS BEFORE USE LOCATION OF CONTROLS REMOTE CONTROL REMOTE CONTROL UNIT BATTERY INSTALLATION
FUTURE CALL. Future Call Model FC-1204 Totally Hands Free Voice Activated Dialing and Answering Telephone OWNER S MANUAL AND OPERATING INSTRUCTIONS
 FUTURE CALL Future Call Model FC-1204 Totally Hands Free Voice Activated Dialing and Answering Telephone OWNER S MANUAL AND OPERATING INSTRUCTIONS Welcome to your new Totally Hands Free Voice Activated
AC OPERATION BATTERY OPERATION RADIO OPERATION Note : FM STEREO INDICATOR ANTENNAS BASS BOOST AUXILIARY (AUX) MODE
 MODE") 1. FUNCTION SWITCH AUX/CD/TAPE (OFF)/RADIO 2. BAND SWITCH 3. FM ANTENNA 4. CD DOOR 5. TUNING KNOB 6. BASS BOOST BUTTON 7. CD SKIP/SEARCH FORWARD BUTTON 8. CD SKIP/SEARCH BACKWARD BUTTON 9. CD PROGRAM BUTTON
1. FUNCTION SWITCH AUX/CD/TAPE (OFF)/RADIO 2. BAND SWITCH 3. FM ANTENNA 4. CD DOOR 5. TUNING KNOB 6. BASS BOOST BUTTON 7. CD SKIP/SEARCH FORWARD BUTTON 8. CD SKIP/SEARCH BACKWARD BUTTON 9. CD PROGRAM BUTTON
WELCOME SAFETY INSTRUCTIONS
 IMPORTANT ANNOUNCEMENT FOR A HIGH PERFORMANCE OF THE QUALITY AND USEFUL LIFE OF THE SOUND, WE RECOMMEND NOT TO TOUCH THE MEMBRANES OF THE SPEAKERS, DUE TO THE RISK OF CRUSHING AND DEFORMATION. THE WARRANTY
Instruction Manual CTT939
 Instruction Manual CTT939 Table of contents Disposal information... 2 Accessories included... 3 Overview of controls... 3 Preparation for use... 4 Installing the counter weight... 4 Connections... 4 Further
Portable Robust Easy to use. CD / MP3 player with 6 built-in headphone sockets USER GUIDE. Primary ICT Ltd -
 TM CD / MP3 player with 6 built-in headphone sockets Portable Robust Easy to use USER GUIDE Contents Important Information...3 Easi-Listener Features...4 CD operation...6 Playing a Compact Disc...6 Play/Pause
User`s Guide SBAR-51. Sound Bar and Docking Station
 User`s Guide SBAR-51 Sound Bar and Docking Station Please read the following instructions carefully before connecting, operating or adjusting this product. Please keep this manual in a convenient place
English Manual.
 English Manual tech@vestax.com CONGRATULATIONS Thank you for purchasing the Vestax VCI-100. Please read through the users manual thoroughly to use the VCI-100 safely and at its best performance. Features
THE BULLET. Bluetooth Speaker with NFC Technology. Instruction Manual
 Bluetooth Speaker with NFC Technology Instruction Manual Dear Customer, Thank you for purchasing an IRC product. We are pleased that you have chosen one of our products. At the same time, we are confident
PORTABLE HOME SECURITY VIDEO CAMERA
 PORTABLE HOME SECURITY VIDEO CAMERA Instruction Manual English Version1.0 MODEL: SG6227 www.lorexcctv.com Copyright 2007 Lorex Technology Inc. CAUTION RISK OF ELECTRIC SHOCK. DO NOT OPEN.! CAUTION: TO
Instruction Manual Please read carefully before use and keep for future reference.
 Portable Bluetooth Speaker with Colored Lights NAS-3096 Instruction Manual Please read carefully before use and keep for future reference. Important Safety Information CAUTION RISK OF ELECTRIC SHOCK DO
Turntable Speaker System User Manual PPTCM80BTGR
 Vintage Bluetooth Turntable Speaker System User Manual PPTCM80BTGR CAUTION RISK OF ELECTRIC SHOCK DO NOT OPEN CAUTION: TO REDUCE THE RISK OF ELECTRIC SHOCK, DO NOT REMOVE THE COVER (OR BACK). NO USER-SERVICEABLE
BIG BUTTON PHONE WITH ONE TOUCH DIALING AND
 FUTURE CALL LLC BIG BUTTON PHONE WITH ONE TOUCH DIALING AND 40db HANDSET VOLUME MODEL: FC-1507 USER MANUAL Please follow instructions for repairing if any otherwise do not alter or repair any parts of
MODEL NPB-251 PORTABLE CD RADIO PLAYER
 MODEL NPB-251 PORTABLE CD RADIO PLAYER PLEASE READ THIS USER MANUAL COMPLETELY BEFORE OPERATING THIS UNIT AND RETAIN THIS BOOKLET FOR FUTURE REFERENCE. WARNING TO PREVENT FIRE OR ELECTRIC SHOCK, DO NOT
CD7400 & CD7400B STEREO 3CD MINI HI-FI SYSTEM WITH PLL RADIO, CASSETTE AND TURNTABLE INSTRUCTION MANUAL
 CD7400 & CD7400B STEREO 3CD MINI HI-FI SYSTEM WITH PLL RADIO, CASSETTE AND TURNTABLE INSTRUCTION MANUAL CAUTION: TO REDUCE THE RISK OF ELECTRIC SHOCK, DO NOT REMOVE COVER OR BACK. NO USER-SERVICE- ABLE
PORTABLE WIRELESS PA SYSTEM WITH LITHIUM -ION RECHARGEABLE BATTERY AWP6042 OWNER S MANUAL. Handheld Microphone Headset Transmitter
 PORTABLE WIRELESS PA SYSTEM WITH LITHIUM -ION RECHARGEABLE BATTERY AWP6042 OWNER S MANUAL X1 Headset Microphone AWX6042H VHF Wireless Headset Transmitter Handheld Microphone Headset Transmitter Thank you
CR2401A WARRANTY. Memory Master. Instruction Manual
 WARRANTY Crosley Radio Products are warranted against defects in material and workmanship for a period of 90 days beginning from the date of sale to the original purchaser. Should the unit fail under normal
Bluetooth CD tower speaker
 Bluetooth CD tower speaker TCD600BT INSTRUCTION MANUAL Contents 2 Safety instructions 3 Description of parts 4 Remote control & Installation 5 General operation 6 Bluetooth / NFC/ USB operation 7 Audio/
On AC Voltage Before use, check that the rated voltage of your unit matches your local voltage.
 PRECAUTIONS Follow the advice below for safe and appropriate operations. Placement Do not use the unit in places which are extremely hot, cold, dusty, or humid. Place the unit on a flat and even surface.
CR1701A. ijuke. Instruction Manual. extras. albums MUTE VOL + VOL -
 CR1701A ijuke Instruction Manual MUTE VOL + albums VOL - extras www.crosleyradio.com IMPORTANT SAFETY INSTRUCTION PLEASE READ CAREFULLY ALL THE FOLLOWING IMPORTANT SAFEGUARDS THAT ARE APPLICABLE TO YOUR
XEMIO-950 MP5 PLAYER / 4GB MEMORY / TOUCH SCREEN. For information and support,
 XEMIO-950 MP5 PLAYER / 4GB MEMORY / TOUCH SCREEN For information and support, www.lenco.eu To the customer: Thank you for purchasing this MP5 player. When opening the box for the first time, please check
NEUPANEL SERIES. User Manual for Neutrino/Uno/Rio
 NEUPANEL SERIES User Manual for Neutrino/Uno/Rio 1 Important Safety Information 1. READ THESE INSTRUCTIONS All the safety and operating instructions should be read before the product is operated. 2. KEEP
Kogan Bluetooth Karaoke System with Dual Microphones KAKAR2MICA
 Kogan Bluetooth Karaoke System with Dual Microphones KAKAR2MICA K TABLE OF CONTENTS SAFETY & WARNINGS...1 IMPORTANT SAFETY INSTRUCTIONS...1 AC CONNECTION...2 LOCATION OF CONTROLS...3 ASSEMBLY AND CONNECTIONS...4
MP-C582 INSTRUCTION MANUAL. Micro-Clip MP3 Player. Please read this manual carefully before operation
 MP-C582 Micro-Clip MP3 Player INSTRUCTION MANUAL Please read this manual carefully before operation PRECAUTIONS The lightning flash with arrowhead symbol within an equilateral triangle is intended to alert
Ares. Modular Audiophile System. by Thrax Audio. Operating Manual. Manual issued 15/03/2018 CAUTION
 Ares Modular Audiophile System by Thrax Audio Operating Manual Manual issued 15/03/2018 CAUTION THE UNIT CONTAINS NO USER SERVICEABLE PARTS. DO NOT REMOVE THE COVERS. LETHAL VOLTAGES ARE PRESENT WITHIN
VTXsound Active Noise Cancelling Headphones. User Manual
 VTXsound Active Noise Cancelling Headphones Don t throw away the battery with general house waste, dispose of it correctly as chemical waste. NL Disposal of Old Electrical & Electronic Equipment (Applicable
Portable Digital & FM Radio
 LITTLE SHELFORD Portable Digital & FM Radio LSH-DAB-CRM Instructions Guide Contents Box Contents... 1 Controls And Functions...2 Support... 4 Instructions Guide...5 Basic Operation... 5 DAB/DAB+ Radio...
MODEL GE4138 DIGITAL CD/MP3/USB/SD ENCODING WITH PLL AM/FM ALARM CLOCK STEREO RADIO - USER MANUAL -
 MODEL GE4138 DIGITAL CD/MP3/USB/SD ENCODING WITH PLL AM/FM ALARM CLOCK STEREO RADIO - USER MANUAL - CAUTION RISK OF ELECTRIC SHOCK DO NOT OPEN CAUTION: TO REDUCE THE RISK OF ELECTRIC SHOCK, DO NOT REMOVE
C ookie User Manual BC
 Cookie User Manual BC Cookie Please follow the instruction in this guide to enjoy the best sound. Cookie User Manual Hold "O" button to power on and off Press "O" button to play/pause music (for compatible
Stereo Turntable System
 3-866-873-15(1) Stereo Turntable System Operating Instructions OWNER S RECORD The model and serial numbers are located at the rear. Record the serial number in the space provided below. Refer to them whenever
MODEL: CH196B/R. 3-Speed Stereo Turntable With Built-in Speakers
 MODEL: CH196B/R 3-Speed Stereo Turntable With Built-in Speakers WARNINGS To reduce the risk of fire or electric shock, do not expose this appliance to rain or moisture. To reduce the risk of electric shock,
Contents 1. PREFACE INTRODUCTION PRODUCT FEATURES STARTING TO USE HEADPHONE Package Contents 4.
 Contents 1. PREFACE 01 2. INTRODUCTION 01 3. PRODUCT FEATURES 02 4. STARTING TO USE HEADPHONE 02 4.1 Package Contents 4.2 Product View 03 5. PREPARING THE BLUETOOTH MP3 HEADPHONE 03 5.1 Charging Battery
AZATOM iflute 2. Portable Lightning Docking Station. User Manual. This manual is available to download online at
 AZATOM iflute 2 Portable Lightning Docking Station User Manual This manual is available to download online at www.azatom.com Thank you for shopping with AZATOM Please read this manual carefully before
Hospitality Telephones User Guide
 Hospitality Telephones User Guide Fuego1000 SlimStation Wall-Mount Telephone FG1066-A (1S) FG1066-A(1S) Face Drawing Features 1-line Analog Surface mount technology Message waiting indicator lamp 1 programmable
E100 User Guide. Built-in DAB+, FM & Bluetooth Hi-Fi sound system SE0120 SE0150
 E100 User Guide Built-in DAB+, FM & Bluetooth Hi-Fi sound system SE0120 SE0150 1.0 Important Safety Instructions CAUTION: To reduce the risk of electric shock, do not remove the cover. No user-serviceable
Always there to help you Register your product and get support at SBT300/12. Question? Contact Philips.
 Always there to help you Register your product and get support at www.philips.com/welcome Question? Contact Philips SBT300/12 User manual Contents 1 Important 3 Safety 3 Notice 3 2 Your Bluetooth Speaker
Soundship Micro Bluetooth Micro Dock. User Manual
 Soundship Micro Bluetooth Micro Dock CAUTION RISK OF ELECTRIC SHOCK DO NOT OPEN PLEASE READ FIRST CAUTION: To reduce the risk of electric shock, do not remove the cover. No user serviceable parts inside.
Universal Docking Station with 2.4GHz Wireless Speakers for iphone/ipod
 IMPORTANT SAFETY INSTRUCTIONS When used in the directed manner, this unit has been designed and manufactured to ensure your personal safety. However, improper use can result in potential electrical shock
WARNING! CAUTION: TO REDUCE THE RISK OF ELECTRIC SHOCK, DO NOT REMOVE THE COVER OF THIS UNIT. THERE ARE NO USER
 PTA44BT 4 Channel Audio Amplifier Multi-Source 1/4 Audio/Microphone inputs MP3/USB/SD Readers/ FM radio, Built-in Wireless BT Audio Streaming (500 Watts) WARNING! CAUTION: TO REDUCE THE RISK OF ELECTRIC
1.Installation 2.Channel 3. Setting 4.Service 5.Information
 7 8 1.Installation 2.Channel 3. Setting 4.Service 5.Information 8 9 12 13 15 17 This user's guide covers the installation Skyworth C3600B set-top box which includes step by step configuration of all features
TIBO ST-105-3HG-SB Owner s manual
 TIBO ST-105-3HG-SB Owner s manual Please read this manual carefully before using this product and then retain for future reference. CONTENTS What s in the box 4 Safety 5 Safety precautions 5 Important
Always there to help you. Register your product and get support at SBM130. Question? Contact Philips.
 Always there to help you Register your product and get support at www.philips.com/welcome Question? Contact Philips SBM130 User Manual Contents 1 Important 3 2 Your Portable Speaker 4 Introduction 4 What's