MarkMagic 6 Bar Code Labels, RFID Tags, and Electronic Forms Software for IBM System i
|
|
|
- Dustin Park
- 5 years ago
- Views:
Transcription


1 MarkMagic 6 Bar Code Labels, RFID Tags, and Electronic Forms Software for IBM System i Tutorial 3: Version 6 Graphic Concepts Tutorial 3: Graphics Concepts Pg. 1
2 Welcome Welcome to Part 3 of the MarkMagic 6 and JMagic 6 combined tutorials! This tutorial will teach you everything you need to know about adding graphics to your formats. As with the previous tutorials, the steps are in different colors so you can focus only on the MarkMagic 6 or JMagic 6 steps separately. Before we begin we are assuming that: 1. You have completed and understand what was introduced in the Basic Concepts tutorial as well as the Intermediate Concepts tutorials. 2. You have a printer available at your location (thermal label or a laser printer) that is configured for printing on the System i server. (If not, you can use our PDF option to produce your output.) In this tutorial, you will learn: 1. What a user library is and why you would want to use them. 2. What source and target graphics are and how to create them. 3. How to add a static graphic to your format. 4. How variable graphics work and how to add a variable graphic field to your format. Tutorial 3: Graphics Concepts Pg. 2

3 User Libraries The MarkMagic 6 User Libraries feature lets users organize labels and forms by department, or customer, or application. If you have multiple groups of users responsible for different applications, it is advantageous to organize formats, jobs, label files, and graphic images by User Library for the following reasons: 1. It will be easier for multiple MarkMagic 6 users to find and work with the formats they are responsible for maintaining. 2. Security is improved by the ability to grant different authorities to different User libraries. 3. Customers supporting multiple sites (and software vendors supporting their customers) can distribute User libraries of customized objects without needing to redistribute the entire MarkMagic 6 product library. 4. Application Software Vendor customers can modify labels without damaging the software vendor s base libraries. In each of the tutorials thus far, we have used the default user library which is named MRKMAGDTA. You might recognize this name because it is shown in various places throughout the windows and screens. Also, for any parameter anywhere in MarkMagic that requests a user library name, *NONE is the same as MRKMAGDTA. Even though you can create formats and label files within MRKMAGDTA, we recommend the use of your own custom user libraries. There are a few ways to create a MarkMagic user library. MarkMagic can automatically create the library for you. All you would have to do is type the name of the library in the space found on the MarkMagic main menu and press ENTER. If the library is not found, it will ask if you want to create it. If it finds a library with that name already, it will ask if you want to convert it to a user library. This does nothing detrimental to the library; all of the existing objects will still be intact. It just creates special MarkMagic database files within the library. For this tutorial you will continue to use MRKMAGDTA as the user library. We simply wanted to introduce custom user libraries because the topic will be brought up throughout this tutorial. Tutorial 3: Graphics Concepts Pg. 3
 source files. The source graphic is converted, using tools within MarkMagic and JMagic, to a target graphic.")

4 Source Graphics and Target Graphics To print graphics in MarkMagic, on any type of printer, you first need a source graphic. This is the actual graphic file as it exists on your PC. MarkMagic and JMagic support GIF and JPG (JPEG) source files. The source graphic is converted, using tools within MarkMagic and JMagic, to a target graphic. A target graphic is a copy of the source graphic, but formatted to be compatible with your target printer type (Zebra, Monarch, Laser, Intermec). Let s jump right into adding a graphic to a format. Uploading the Source Graphic JMagic 6 is going to be used to do all of the graphics work for us, so start JMagic and get to the main screen. You should notice along the way, the option for user library. Leave it at *NONE to start JMagic in MRKMAGDTA. The source graphic must be uploaded to the System i, first, before you can convert it to print on your printer. At the very top, click Utilities, Graphics and then Load. The Load Image into Graphics Gallery window is displayed. It is a familiar select a file window that you see on your PC in many other applications. It defaults to your My Documents folder. Use the pull down menu and the folder listings to navigate your PC for graphic files. Find the CYBRA.gif sample graphic file that was included with this tutorial. For simplicity, we are assuming the graphic is stored on your desktop. Pull the menu down and select Desktop. Tutorial 3: Graphics Concepts Pg. 4


5 You will be shown a list of JPG and/or GIF files that are found on your desktop. Select CYBRA.gif and click OPEN. Doing this simply unlocks the Name and Description fields below. This data will be used for the source image once it is uploaded to the System i. JMagic will provide a name for you based on the actual graphic name. You can overwrite this with whatever you wish, making sure the name is uppercase and no longer than 10 characters. Once you are satisfied with your graphic selection and its source name, click OK. JMagic will upload the file to your System i and you will eventually receive a notice that the image is loaded into the Graphics Gallery. Click OK and you will automatically be brought to the most important screen in this whole tutorial. The Image Converter. Tutorial 3: Graphics Concepts Pg. 5
 It is now time to start thinking about your target printer. MarkMagic supports many printers and each make requires graphics to be in a certain form.")

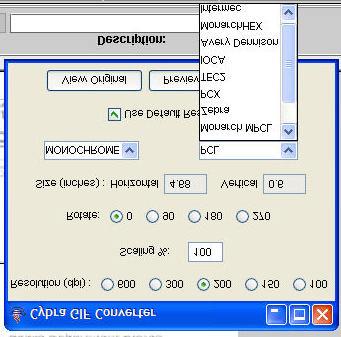
6 The Target Graphic Up until now, the tutorials did not mention anything about designing for specific printer types. You created a format using the standard laser PCL driver. (HPPCL5) It is now time to start thinking about your target printer. MarkMagic supports many printers and each make requires graphics to be in a certain form. That is why we must convert the now uploaded source image file to the correct format. This new file is the target graphic. The most popular printer types are Zebra, Monarch, Intermec and any kind of laser printer. If you have a Zebra printer, choose Zebra. If you are printing labels on a Monarch printer, choose Monarch MPCL. If you own an Intermec printer, scroll down and choose Intermec. If you are going to continue to use your laser printer in this tutorial, choose PCL. Also, Printronix printers use PCX. For this tutorial, we have picked Zebra, but as you know, yours can be different. The next characteristic of your target printer to think about is its resolution measured in DPI. (Dots Per Inch.) You will want to choose the dpi that matches your printer. For this tutorial, we have picked 200, but yours can be different. Tutorial 3: Graphics Concepts Pg. 6

7 Notice the values for size. These are actual height and width values for the graphic as it will be printed. You can change the percentage of scaling to make the printed target graphic bigger or smaller and that size change will be reflected here. The graphic can also be rotated. Some printers can not rotate a graphic at print time, so you must rotate when you create the target graphic. The pull down menu on the left lists the different methods used to convert the image. If your source graphics is in color, then you will want to choose something other than MONOCHROME. Some selections can provide better results than others depending on the quality of your source image. Once you are satisfied with the target image settings, you can click on Preview to see what the image will look like once printed. You can also click on View Original and compare the two. If it looks good to you, click Convert. The Set Target Graphic Properties window is displayed. Here is where you can set the name and description of the converted target graphic. Leave the name CYBRA and set the description to whatever you like. Leave the number set to 0. MarkMagic sorts graphics by graphic number and a 0 tells JMagic to use the next available number. Tutorial 3: Graphics Concepts Pg. 7
8 Click OK to convert the graphic. JMagic will pause while it is working and then you will eventually be returned to the previous Image Converter window. It does this so you can create more target graphics, if you wish, from the same source graphic. Since you only use this single graphic for now, close this window. Congratulations on converting your first graphic. Now it s time to add it to a format. Tutorial 3: Graphics Concepts Pg. 8

9 Adding a Graphic to a Format In this tutorial you are going to create a new format to work with. If you are not comfortable with creating a new format, please see the first tutorial: Basic Concepts of MarkMagic and JMagic. It explains, in detail, how to create new formats in MarkMagic and JMagic. Now that you have converted a graphic to print on your specific printer, you need to make a format that uses the correct Device type designed to print on your printer. You couldn t simply direct the print job from the previous tutorials to a Zebra printer because Zebra printers use a different language than laser printers. If your copy of MarkMagic is already configured to print to your target printer, please ignore the following step. The first thing you must do before making specific formats is to configure MarkMagic so it supports all printers. At a command line, type MRKMAG60/SETMMPRM and press Enter. Type *ALL in the first spot for Printer Device types (overwriting whatever might already be there) and press ENTER twice. Now, MarkMagic will allow you to create formats for all sorts of printers! Tutorial 3: Graphics Concepts Pg. 9

10 MarkMagic 6- Start MarkMagic and create a new format but this time, prompt (F4) the Device parameter. You will be shown the full list of supported printers. Since MarkMagic supports almost every printer available, your printer make and model should be listed. Place your cursor on your preferred device and press ENTER. This tutorial will use the Zebra device ZTS500, but your selection will most likely be different. Tutorial 3: Graphics Concepts Pg. 10

11 Name your new format anything you like, but for this tutorial, GRAPHIC was chosen as a name. Press ENTER to get to the Work With Format Definition screen. When you create your format, make sure it is sized correctly. Most thermal label printers use 6 inch length and 4 inch width labels. Once again, yours may vary. After creating the format, you will eventually be brought to the familiar design view. Add a *HEADING text field towards the top-middle of your format with Graphics Tutorial typed in the Description line. Leave every other parameter at the default. This will create a simple text field at the top. Next, a few inches below that, press F6 to add a new field, but this time press G for Graph field. Notice that it also has a name of *HEADING. Tutorial 3: Graphics Concepts Pg. 11
12 Just like text fields, graphic fields can be *HEADING fields. Except the description field doesn t matter here. The way you tell MarkMagic what graphic to print is by specifying the graphic number in the Stored graphic parameter. Place your cursor there and prompt the field. You will be shown a list of graphics that are compatible with the device you chose. (Example: Zebra graphics will not show if you are working with a Monarch format, etc.) Tutorial 3: Graphics Concepts Pg. 12

13 There may be more than one graphic in the library you are working in that is compatible with your device. Place a 1 next to the graphic you made earlier and press ENTER. MarkMagic will put the graphic name in the description line for visual purposes. All you need to do is type in the actual graphic Length and Width values. In most cases, these values do not need to be exact. Type 1.00 for each value. Tutorial 3: Graphics Concepts Pg. 13
14 Press ENTER twice to add your new graphic field! You should see it added to the design view as a box. Tutorial 3: Graphics Concepts Pg. 14

15 Congratulations on adding your first graphic to a MarkMagic format. Yes, it is that easy. When this format prints, the graphic will show up in the same spot on every label or form. This is because it is a *HEADING field. If you want different graphics to print based on specific data, then you will want to see the section describing the use of Variable Graphics later in this tutorial. At this time, you can print your format if you wish. Since there is no variable data on this format, so you can print it just like you did the format in the Basic Concepts tutorial. Please reference that section if you need help printing from MarkMagic. Tutorial 3: Graphics Concepts Pg. 15


16 JMagic 6- When starting MarkMagic, make sure to leave the selection for User Library as *NONE. This way, JMagic will look in the MRKMAGDTA library for formats and graphics. Create a new format. You will be presented with a large list of Device Types. Since MarkMagic supports almost every printer available, your printer model should be listed. Click on your printer type and then type. This tutorial will choose ZTS500, but yours will most likely be different. Provide a name for your new format. This tutorial will name the format GRAPHIC, but yours can be different. Click OK to go to the Create a Format screen. When you create your format, make sure it is sized correctly. Most thermal label printers use 6 inch length and 4 inch width labels. Once again, yours may vary. After creating the format, you will eventually be brought to the familiar design view. Add a *HEADING text field towards the top middle of your format with Graphics Tutorial typed in the Description field. Leave every other parameter at the default. This will create a simple text field at the top. Now, it is time to add the graphic. At the top, click the Create a Graphic Field button. Just like any other field, the cursor will turn into a +, so click a few inches below the text field you added and the Create a New Graphic Field window will appear. Tutorial 3: Graphics Concepts Pg. 16

17 Just like text fields, graphic fields can be *HEADING fields. So, name the field *HEADING. For graphic fields, the description doesn t matter. The way you tell JMagic what graphic to print is by selecting the graphic from the pull down menu at the bottom. You will be shown a list of graphics that are compatible with the device you chose. (Example: Zebra graphics will not show if you are working with a Monarch format, etc.) JMagic will automatically fill in the Length and Width values of the graphic. This is all you need to do to add a static graphic to a format, so click OK. You should see the actual graphic now placed on the JMagic design canvas. Tutorial 3: Graphics Concepts Pg. 17
18 Congratulations on adding your first graphic to a JMagic format. Yes, it is that easy. When this format prints, the graphic will show up in the same spot on every label or form. This is because it is a *HEADING field. If you want different graphics to print based on specific data, then you will want to see the section describing the use of Variable Graphics later in this tutorial. At this time, you can save the format and print it. Since there is no variable data on this format, so you can print it just like you did the format in the Basic Concepts tutorial. (Using *LAYOUT as the label file name.) Please reference that section if you are having trouble printing from JMagic. Tutorial 3: Graphics Concepts Pg. 18
19 Working With Variable Graphics It is highly recommended that you understand the information covered in the Intermediate Concepts tutorials before working on this section of the graphics tutorial. Many of the methods introduced by those tutorials will be used here without much explanation. Just like a text field, graphics can be either static or variable. With a variable text or barcode field, you provide the text to be printed or encoded via a MarkMagic label file or mapped from different pages in a spooled file. A graphic field can be linked to a variable data field in much the same way as text field can be. However, you do not provide an actual graphic file when you want to print the graphic; you would provide data that matches an existing graphic s name, description or number. For instance, if you wanted to print a graphic that has the name LOGO, you would pass LOGO as the variable data. This is only if you have it setup to reference the graphic name. You can also have it setup to reference the graphic number. In that case, if you wanted to print graphic number 39, you would pass 39 as the data and that specific graphic would print. Lastly, if it is setup to reference the graphic s description and wanted to print a graphic that has a description of Company Logo 2, you would have to pass Company Logo 2 as the variable data. Each record can pass different data and therefore a different logo can be printed on each label or form. A good example is a company printing a picture of each of their products by referencing the description of the graphic field. In each description is the products UPC number. They link a graphic field to their UPC barcode and, in doing so, the UPC number is passed to the graphic field. The graphic with the matching numbers in the description field will then print. How can you change the number, name and description of your graphics to match your data? What is referencing? What happens if data is sent that does not match any graphic in the gallery? Read on for the answers and a quick guide to variable graphics. Tutorial 3: Graphics Concepts Pg. 19


20 Uploading / Converting More Graphics All of the graphics that you plan on using as variable graphics must be uploaded and converted correctly prior to printing them. Follow the steps described earlier in this tutorial to upload and convert any new graphics you will use. If at any point you want to convert an already uploaded source image (remember you just need to upload the source one time) in JMagic, click on Utilities, then Graphics and then Convert to bypass the uploading step. The Choose a Source Graphic window will appear. Click the expander button next to the type of graphic and then click the source graphic that you want to re-convert and then click OK. The familiar Image Converter will then be shown. The last step of the conversion process is the most import step when implementing variable graphics. It is the screen where you provide a unique graphic name, description and/or number. One of these three details will need to be matched exactly with your data when printing. There is a way, within green screen MarkMagic, to change the name, description and number of an already converted graphic, so don t worry if you make a mistake here. Tutorial 3: Graphics Concepts Pg. 20

21 If you need to make changes to the graphic s name/description/number, you can do this in MarkMagic. Go to Utilities (U), Graphics (G), Open (O). You will be presented with a list of graphics sorted by printer type and graphic number. Here is a sample screenshot. (Yours will be different.) If you type a 2 next to the graphic that you want to change and press ENTER, you can change the name and description. Also, if you type a 7 and press ENTER, you can renumber the graphic. Tutorial 3: Graphics Concepts Pg. 21

22 Creating a Variable Graphic MarkMagic 6- Open your existing format that you made earlier in this tutorial. Find the graphic that you made and place your cursor on it and press F8 to delete it. Now create a new one in the same spot. Currently, it is a *HEADING field, but to make it variable you can either give it a unique name or link it to a variable field. You can also map a graphic field directly to spooled file data. For this tutorial, just give it the name GRAPHIC. The most important parameter here is the Reference type. If the data you are passing is going to match up with the target graphic s number, select 0. If it is the target graphic s name, select N. Or if it is the target graphic s description, select D. Make sure Stored graphic is blanked out. Lastly, depending on the Reference type the field must be the correct length. For graphic name the Length must be 10 alpha, for graphic number, the Length must be 5 and 00 decimal, and for description, the Length must be 30 alpha. This tutorial chose to reference the graphic s full 10 character name. If you chose to link it to another field, you must make sure to link the appropriate amount of characters or you will not be able to create the variable graphic. If you chose to map it to a spooled file, make sure you map the correct length. Once everything is set, press ENTER twice to create your variable graphic field. Tutorial 3: Graphics Concepts Pg. 22

23 JMagic 6- Open your existing format that made earlier in this tutorial. Find the graphic that you made, click on it and press DELETE on your keyboard to delete the static graphic. Now, create a new one in the same spot. Before, you created it as a *HEADING field. Now, to make it variable, you will have to link it to a variable field already on your format. You can also map a graphic field directly to data in a spooled file. The most important parameter here is the Reference type. If the data you are passing is going to match up with the target graphic s number, type 0. If it is the target graphic s name, type N. Or if it is the target graphic s description, type D. You must make sure to link the appropriate amount of characters or you will not be able to create the variable graphic. For graphic name, the Length must be equal to 10, for graphic number, the Length must be 5 and 00 decimal and for description, the Length must be 30. Once these settings are made, click OK to create your variable graphic. Tutorial 3: Graphics Concepts Pg. 23
 graphics.")

24 MarkMagic Variable Graphics Example Notice in the screen shot below, the Reference type is N and the Field name is SKU. Note there is no Stored graphic number the graphic number only applies to *HEADING (static) graphics. In the Graphics Gallery, the Graphic Name contains the actual SKU numbers that match the items. For example, the Shower Head graphic will print when SKU appears in the Label File record, the Pipe Fitting graphic will print when SKU appears in the Label File record, etc. Tutorial 3: Graphics Concepts Pg. 24


25 Test the function by printing a label file that has a different SKU associated with each graphic. As the SKU changes, the graphic image printed will change. Tutorial 3: Graphics Concepts Pg. 25
MarkMagic 7 Bar Code Label, RFID Tag, and Forms Software for IBM System i
 MarkMagic 7 Bar Code Label, RFID Tag, and SM@RT Forms Software for IBM System i Version 7 Add-on Options FormWeaver CYBRA Knows Bar Code help@cybra.com Welcome Welcome, this tutorial will introduce you
MarkMagic Tutorial. Add-on option: PrintTransformer
 MarkMagic Tutorial Add-on option: PrintTransformer Contents Welcome... 3 Why Use PrintTransformer?... 4 Using JMagic to Add Conditions to a Format... 5 Attaching a RuleSet to a Print Job... 33 PrintTransformer
MarkMagic. Tutorial: MarkMagic PDF / / Fax Add-on Option. CYBRA Knows Bar Code
 MarkMagic Bar Code Label, RFID Tag, and SM@RT Forms Software for IBM System i Tutorial: MarkMagic PDF / Email / Fax Add-on Option CYBRA Knows Bar Code help@cybra.com Welcome Welcome to Part 5 of the CYBRA
CYBRA Corporation. MarkMagic V5.1 Installation Instructions. Modification Level
 CYBRA Corporation MarkMagic V5.1 Installation Instructions Modification Level 060310 Support : 914-963-6600 x 201 Fax: 716-712-0666 help@cybra.com A. INSTALLATION / UPDATE ROADMAP...- 1 - B. INTRODUCTION...-
EXCEL BASICS: MICROSOFT OFFICE 2007
 EXCEL BASICS: MICROSOFT OFFICE 2007 GETTING STARTED PAGE 02 Prerequisites What You Will Learn USING MICROSOFT EXCEL PAGE 03 Opening Microsoft Excel Microsoft Excel Features Keyboard Review Pointer Shapes
DOING MORE WITH POWERPOINT: MICROSOFT OFFICE 2013
 DOING MORE WITH POWERPOINT: MICROSOFT OFFICE 2013 GETTING STARTED PAGE 02 Prerequisites What You Will Learn USING MICROSOFT POWERPOINT PAGE 03 Slide Views MORE TASKS IN MICROSOFT POWERPOINT PAGE 05 Formatting
New, standard features of DesignMerge Pro!
 Layout & Imposition Options New, standard features of DesignMerge Pro! The latest release of DesignMerge Pro now includes a new set of Layout and Imposition features that can be used to streamline your
DOING MORE WITH EXCEL: MICROSOFT OFFICE 2010
 DOING MORE WITH EXCEL: MICROSOFT OFFICE 2010 GETTING STARTED PAGE 02 Prerequisites What You Will Learn MORE TASKS IN MICROSOFT EXCEL PAGE 03 Cutting, Copying, and Pasting Data Filling Data Across Columns
This Tutorial is for Word 2007 but 2003 instructions are included in [brackets] after of each step.
![This Tutorial is for Word 2007 but 2003 instructions are included in [brackets] after of each step.](/thumbs/89/98497436.jpg "This Tutorial is for Word 2007 but 2003 instructions are included in [brackets] after of each step.") This Tutorial is for Word 2007 but 2003 instructions are included in [brackets] after of each step. Table of Contents Get Organized... 1 Create the Home Page... 1 Save the Home Page as a Word Document...
This Tutorial is for Word 2007 but 2003 instructions are included in [brackets] after of each step. Table of Contents Get Organized... 1 Create the Home Page... 1 Save the Home Page as a Word Document...
Photoshop tutorial: Final Product in Photoshop:
 Disclaimer: There are many, many ways to approach web design. This tutorial is neither the most cutting-edge nor most efficient. Instead, this tutorial is set-up to show you as many functions in Photoshop
EXCEL BASICS: MICROSOFT OFFICE 2010
 EXCEL BASICS: MICROSOFT OFFICE 2010 GETTING STARTED PAGE 02 Prerequisites What You Will Learn USING MICROSOFT EXCEL PAGE 03 Opening Microsoft Excel Microsoft Excel Features Keyboard Review Pointer Shapes
ADOBE DREAMWEAVER CS4 BASICS
 ADOBE DREAMWEAVER CS4 BASICS Dreamweaver CS4 2 This tutorial focuses on the basic steps involved in creating an attractive, functional website. In using this tutorial you will learn to design a site layout,
Word: Print Address Labels Using Mail Merge
 Word: Print Address Labels Using Mail Merge No Typing! The Quick and Easy Way to Print Sheets of Address Labels Here at PC Knowledge for Seniors we re often asked how to print sticky address labels in
FormSprint Quick Start. Welcome to FormSprint!
 FormSprint Quick Start Welcome to FormSprint! The ICS FormSprint software will enable you to take data from any spool file on the iseries and print it to any PCL laser printer in any format you need, or
Welcome to CreateSpace. Please log in, or if you're a new user, create a new account.
 1 of 6 Welcome to CreateSpace. Please log in, or if you're a new user, create a new account. Book Help > Black & White Submission Requirements This guide is for ready to publish (print-ready) PDF file
Assignment 0. Nothing here to hand in
 Assignment 0 Nothing here to hand in The questions here have solutions attached. Follow the solutions to see what to do, if you cannot otherwise guess. Though there is nothing here to hand in, it is very
Creating a Template in WordPerfect
 1. File a. New From Project Creating a Template in WordPerfect b. Go to Options 2. Create A Category 1 3. Name it Family History (or a title of your choice) 4. Find Family History in the Drop down list
How To Do It: Software LabelDirect
 How To Do It: Software LabelDirect NOTE: These instructions are all based on LabelDirect version.3. Later versions of the software may differ in detail. Design a die cut label Q. How do I design a die
DOING MORE WITH EXCEL: MICROSOFT OFFICE 2013
 DOING MORE WITH EXCEL: MICROSOFT OFFICE 2013 GETTING STARTED PAGE 02 Prerequisites What You Will Learn MORE TASKS IN MICROSOFT EXCEL PAGE 03 Cutting, Copying, and Pasting Data Basic Formulas Filling Data
Creating Interactive PDF Forms
 Creating Interactive PDF Forms Using Adobe Acrobat X Pro for the Mac University Information Technology Services Training, Outreach, Learning Technologies and Video Production Copyright 2012 KSU Department
LinkMotion and CorelDraw 9, 10, 11, 12, X3, X4, X5, X6, X7 and X8:
 LinkMotion and CorelDraw 9, 10, 11, 12, X3, X4, X5, X6, X7 and X8: After you install LinkMotion software and set up all settings launch CorelDraw software. Important notes: Solustan s LinkMotion driver
STAROFFICE 8 SUMMARY PROJECT
 STAROFFICE 8 SUMMARY PROJECT Putting It All Together In the previous three guides you have learned an incredible amount about publishing information with StarOffice 8 Writer, Draw, and Calc. You can create,
Microsoft Office Word. Part1
 Microsoft Office 2010 - Word Part1 1 Table of Contents What is Microsoft Word?... 4 Creating a document... 5 Toolbar... 6 Typing in MS Word Text Area... 7 Cut, Copy and Paste Text... 9 Paste Preview...
How to use: TMA Live
 How to use: TMA Live Page 1 of 17 Contents Welcome to TMA Live... 3 Getting to TMA Live... 3 From Your Desktop PC... 3 From Your Mobile Device... 3 Logging in to TMA Live... 4 TMA Live Home Screen... 5
Designer Reference 1
 Designer Reference 1 Table of Contents USE OF THE DESIGNER...4 KEYBOARD SHORTCUTS...5 Shortcuts...5 Keyboard Hints...5 MENUS...7 File Menu...7 Edit Menu...8 Favorites Menu...9 Document Menu...10 Item Menu...12
Importing source database objects from a database
 Importing source database objects from a database We are now at the point where we can finally import our source database objects, source database objects. We ll walk through the process of importing from
Table of Contents. How to use this document. How to use the template. Page 1 of 9
 Table of Contents How to use this document... 1 How to use the template... 1 Template Sections... 2 Blank Section... 2 Signature Sheet... 2 Title Page... 2 Roman Numerals Section (i, ii, iii, iv )... 3
Adobe Dreamweaver CS5 Tutorial
 Adobe Dreamweaver CS5 Tutorial GETTING STARTED This tutorial focuses on the basic steps involved in creating an attractive, functional website. In using this tutorial you will learn to design a site layout,
My First iphone App (for Xcode version 6.4)
") My First iphone App (for Xcode version 6.4) 1. Tutorial Overview In this tutorial, you re going to create a very simple application on the iphone or ipod Touch. It has a text field, a label, and a button
My First iphone App (for Xcode version 6.4) 1. Tutorial Overview In this tutorial, you re going to create a very simple application on the iphone or ipod Touch. It has a text field, a label, and a button
Delegate Notes. Title: Creating Interactive Exercises using Hot Potatoes Software
 Delegate Notes Title: Creating Interactive Exercises using Hot Potatoes Software Session objectives: To put together a short cycle of exercises linked together based on the topic of animals. Examples here
Getting Started Guide
 SnagIt Getting Started Guide Welcome to SnagIt Thank you for your purchase of SnagIt. SnagIt is the premier application to use for all of your screen capturing needs. Whatever you can see on your screen,
Adobe Dreamweaver CC 17 Tutorial
 Adobe Dreamweaver CC 17 Tutorial GETTING STARTED This tutorial focuses on the basic steps involved in creating an attractive, functional website. In using this tutorial you will learn to design a site
SIMPLE TEXT LAYOUT FOR COREL DRAW. When you start Corel Draw, you will see the following welcome screen.
 SIMPLE TEXT LAYOUT FOR COREL DRAW When you start Corel Draw, you will see the following welcome screen. A. Start a new job by left clicking New Graphic. B. Place your mouse cursor over the page width box.
What will you learn: A better understanding of 3 D space How to use keyframes Designing and planning an animation How to render animations
 Intro to Blender Introductory Animation Shane Trautsch Crestwood High School Welcome Back! Blender can also be used for animation. In this tutorial, you will learn how to create simple animations using
Microsoft Expression Web Quickstart Guide
 Microsoft Expression Web Quickstart Guide MS-Expression Web Quickstart Guide Page 1 of 24 Expression Web Quickstart Guide (20-Minute Training) Welcome to Expression Web. When you first launch the program,
Using Dreamweaver. 4 Creating a Template. Logo. Page Heading. Home About Us Gallery Ordering Contact Us Links. Page content in this area
 4 Creating a Template Now that the main page of our website is complete, we need to create the rest of the pages. Each of them will have a layout that follows the plan that is shown below. Logo Page Heading
Bucknell University Digital Collections. LUNA Insight User Guide February 2006
 Bucknell University Digital Collections LUNA Insight User Guide February 2006 User Guide - Table of Contents Topic Page Number Installing Insight. 2-4 Connecting to Insight 5 Opening Collections. 6 Main
MarkMagic7 and JMagic7 Installation Instructions
 MarkMagic7 and JMagic7 Installation Instructions Version 7 Release 2 & Version 7 Release 7 Modification Level: 110324 Support : 914-963-6600 Option 4 Fax: 716-712-0666 help@cybra.com A. INSTALLATION /
A Step-by-Step Guide to getting started with Hot Potatoes
 A Step-by-Step Guide to getting started with Hot Potatoes Hot Potatoes Software: http://web.uvic.ca/hrd/hotpot/ Andrew Balaam Objectives: To put together a short cycle of exercises linked together based
ACADEMIC TECHNOLOGY SUPPORT Advanced OU Campus: 2014 Template Asset Image Gallery using Photoshop
 ACADEMIC TECHNOLOGY SUPPORT Advanced OU Campus: 2014 Template Asset Image Gallery using Photoshop ats@etsu.edu 439-8611 ATS Website Table of Contents: Select a Gallery Type... 1 Select and Resize Images...
DOING MORE WITH WORD: MICROSOFT OFFICE 2013
 DOING MORE WITH WORD: MICROSOFT OFFICE 2013 GETTING STARTED PAGE 02 Prerequisites What You Will Learn USING MICROSOFT WORD PAGE 03 Viewing Toolbars Adding and Removing Buttons MORE TASKS IN MICROSOFT WORD
DOING MORE WITH WORD: MICROSOFT OFFICE 2010
 DOING MORE WITH WORD: MICROSOFT OFFICE 2010 GETTING STARTED PAGE 02 Prerequisites What You Will Learn USING MICROSOFT WORD PAGE 03 Viewing Toolbars Adding and Removing Buttons MORE TASKS IN MICROSOFT WORD
Adobe Flash CS3 Reference Flash CS3 Application Window
 Adobe Flash CS3 Reference Flash CS3 Application Window When you load up Flash CS3 and choose to create a new Flash document, the application window should look something like the screenshot below. Layers
Version 2 Users Manual
 Version 2 Users Manual Copyright 1999-2002 Thermopatch Corporation Syracuse, NY Overview 1 Overview 3 Printer Modes 3 Concepts 3 Selecting the Printer Mode 4 Printer Settings 4 Barcodes 5 Counter 5 Label
This Tutorial is for Word 2007 but 2003 instructions are included in [brackets] after of each step.
![This Tutorial is for Word 2007 but 2003 instructions are included in [brackets] after of each step.](/thumbs/72/67280806.jpg "This Tutorial is for Word 2007 but 2003 instructions are included in [brackets] after of each step.") This Tutorial is for Word 2007 but 2003 instructions are included in [brackets] after of each step. Table of Contents Just so you know: Things You Can t Do with Word... 1 Get Organized... 1 Create the
This Tutorial is for Word 2007 but 2003 instructions are included in [brackets] after of each step. Table of Contents Just so you know: Things You Can t Do with Word... 1 Get Organized... 1 Create the
Fast Scout. Desktop User Guide
 Fast Scout Desktop User Guide Contents Getting Started - FastScout Video Resources..3 Getting Started - FastScout Terminology...3 Getting Started - Setting Up a Report...3 The Preview Tab...3 Reports.5
LABEL MATRIX TEKLYNX V E R S I O N 8 Q U I C K S T A R T G U I D E
 TEKLYNX LABEL MATRIX V E R S I O N 8 Q U I C K S T A R T G U I D E Note Quick Start Guide The information in this manual is not binding and may be modified without prior notice. Supply of the software
Copyright 2004, Mighty Computer Services
 EZ-GRAPH DATABASE PROGRAM MANUAL Copyright 2004, Mighty Computer Services The Table of Contents is located at the end of this document. I. Purpose EZ-Graph Database makes it easy to draw and maintain basic
Step-By-Step Instructions for Using InDesign
 Step-By-Step Instructions for Using InDesign Before you even start a new document in InDesign, you will need to think about the size of your book as well as the number of pages you want to include (not
DOING MORE WITH WORD: MICROSOFT OFFICE 2007
 DOING MORE WITH WORD: MICROSOFT OFFICE 2007 GETTING STARTED PAGE 02 Prerequisites What You Will Learn USING MICROSOFT WORD PAGE 03 Viewing Toolbars Adding and Removing Buttons MORE TASKS IN MICROSOFT WORD
Joomla! 2.5.x Training Manual
 Joomla! 2.5.x Training Manual 1 Joomla is an online content management system that keeps track of all content on your website including text, images, links, and documents. This manual includes several
How to Make a Book Interior File
 How to Make a Book Interior File These instructions are for paperbacks or ebooks that are supposed to be a duplicate of paperback copies. (Note: This is not for getting a document ready for Kindle or for
ORB Education Quality Teaching Resources
 These basic resources aim to keep things simple and avoid HTML and CSS completely, whilst helping familiarise students with what can be a daunting interface. The final websites will not demonstrate best
Outlook Web Access. In the next step, enter your address and password to gain access to your Outlook Web Access account.
 Outlook Web Access To access your mail, open Internet Explorer and type in the address http://www.scs.sk.ca/exchange as seen below. (Other browsers will work but there is some loss of functionality) In
IMPORTANT!! WHEN YOU FIRST POWER-UP YOUR INTERMEC PM4i PRINTER, YOU WILL NEED TO SELECT IPL COMMAND LANGUAGE (SEE BELOW).
.") Setting up a bar code printer with 7.21 InterDrivers or newer IMPORTANT!! WHEN YOU FIRST POWER-UP YOUR INTERMEC PM4i PRINTER, YOU WILL NEED TO SELECT IPL COMMAND LANGUAGE (SEE BELOW). Page 1 of 22 #CF-PM4iGUIDE(6/11)/INFORMS
Setting up a bar code printer with 7.21 InterDrivers or newer IMPORTANT!! WHEN YOU FIRST POWER-UP YOUR INTERMEC PM4i PRINTER, YOU WILL NEED TO SELECT IPL COMMAND LANGUAGE (SEE BELOW). Page 1 of 22 #CF-PM4iGUIDE(6/11)/INFORMS
Adding Modules.. 4 Editing a Rich Text Module Publishing a Module Adding Media (Picture, Audio, Video, and PDF) Adding Media from the web (Videos)
 Adding Media from the web (Videos)") The Digication Environment Creating a Section Adding and Editing Sections Changing the Order of Sections Adding Pages to a Section Adding Modules 4 Editing a Rich Text Module Publishing a Module Adding
The Digication Environment Creating a Section Adding and Editing Sections Changing the Order of Sections Adding Pages to a Section Adding Modules 4 Editing a Rich Text Module Publishing a Module Adding
The first time you open Word
 Microsoft Word 2010 The first time you open Word When you open Word, you see two things, or main parts: The ribbon, which sits above the document, and includes a set of buttons and commands that you use
1.0 Overview For content management, Joomla divides into some basic components: the Article
 Joomla! 3.4.x Training Manual Joomla is an online content management system that keeps track of all content on your website including text, images, links, and documents. This manual includes several tutorials
How to Create Custom Name Badge Inserts with a Mail Merge in Microsoft Word 2007
 Many people know that you can use the Mail Merge feature in Microsoft Word 2007 to easily create mailing labels, but did you know you can use it to quickly create custom name badge inserts? Here, you will
CROMWELLSTUDIOS. Content Management System Instruction Manual V1. Content Management System. V1
 Content Management System Instruction Manual V1 www.cromwellstudios.co.uk Cromwell Studios Web Services Content Management System Manual Part 1 Content Management is the system by which you can change
Document Imaging User Guide
 Release 4.9 IMAGING TECHNOLOGY GROUP Document Imaging Systems Document Imaging User Guide IMAGING TECHNOLOGY GROUP IMIGIT tm Document Imaging User Guide Release 4.91 March 2007 Imaging Technology Group
AGENT123. Full Q&A and Tutorials Table of Contents. Website IDX Agent Gallery Step-by-Step Tutorials
 AGENT123 Full Q&A and Tutorials Table of Contents Website IDX Agent Gallery Step-by-Step Tutorials WEBSITE General 1. How do I log into my website? 2. How do I change the Meta Tags on my website? 3. How
SharePoint 2010 Site Owner s Manual by Yvonne M. Harryman
 SharePoint 2010 Site Owner s Manual by Yvonne M. Harryman Chapter 9 Copyright 2012 Manning Publications Brief contents PART 1 GETTING STARTED WITH SHAREPOINT 1 1 Leveraging the power of SharePoint 3 2
EDGE, MICROSOFT S BROWSER
 EDGE, MICROSOFT S BROWSER To launch Microsoft Edge, click the Microsoft Edge button (it s the solid blue E) on the Windows Taskbar. Edge Replaces Internet Explorer Internet Explorer is no longer the default
WELCOME TO GOOGLE DRIVE!
 WELCOME TO GOOGLE DRIVE! Google Drive is a free service from Google that allows you to store files from your computer online and access them anywhere using the cloud. Google Drive also gives you access
Mail Merge Quick Reference Guide
 Mail Merge Letters To mail merge letters two documents are needed: 1. The letter, including all text that does not change. 2. Recipient names and addresses (a) The document containing recipient names and
Electronic Estimation Program
 Electronic Estimation Program User Guide DISTRIBUTOR VERSION Release: 3.3 1/3/2005 Table of Contents:!" #$ " %& $' (!!) ( *!( ) +, -. /. "!/.,. 0 &, 123&!"3 4#5 %6! & 7. 0* 8-9732:1 * 7-327 7-!- 7-2!'(
USING DRUPAL. Hampshire College Website Editors Guide https://drupal.hampshire.edu
 USING DRUPAL Hampshire College Website Editors Guide 2014 https://drupal.hampshire.edu Asha Kinney Hampshire College Information Technology - 2014 HOW TO GET HELP Your best bet is ALWAYS going to be to
Faculty Pages on the RCC Website
 Faculty Pages on the RCC Website Full-time faculty members will have an official RCC contact page on the Richland Community College Web Site. Part-Time Faculty members will have a link to their e- mail
Session 7 MS Word. Graphics. Inserting Clipart, and Graphics Modify graphics Position graphics
 Session 7 MS Word Graphics Inserting Clipart, and Graphics Modify graphics Position graphics Table of Contents Session 7 Working with Graphics... 1 The Toolbar... 1 Drawing Toolbar... 1 Picture Toolbar...
POWERPOINT BASICS: MICROSOFT OFFICE 2010
 POWERPOINT BASICS: MICROSOFT OFFICE 2010 GETTING STARTED PAGE 02 Prerequisites What You Will Learn USING MICROSOFT POWERPOINT PAGE 03 Microsoft PowerPoint Components SIMPLE TASKS IN MICROSOFT POWERPOINT
Imagery International website manual
 Imagery International website manual Prepared for: Imagery International Prepared by: Jenn de la Fuente Rosebud Designs http://www.jrosebud.com/designs designs@jrosebud.com 916.538.2133 A brief introduction
CAL 9-2: Café Soylent Green Chapter 12
 CAL 9-2: Café Soylent Green Chapter 12 This version is for those students who are using Dreamweaver CC. You will be completing the Forms Tutorial from your textbook, Chapter 12 however, you will be skipping
How to Prepare Your Cards for Press Using Scribus
 How to Prepare Your Cards for Press Using Scribus This Tutorial is Divided into Sections: 1. What is Scribus? 2. What Do I Need to Get Started? 3. Setting Up Your Scribus Document 4. Creating Master Pages
Introduction to Microsoft Excel 2007
 Introduction to Microsoft Excel 2007 Microsoft Excel is a very powerful tool for you to use for numeric computations and analysis. Excel can also function as a simple database but that is another class.
Microsoft Word Introduction
 Academic Computing Services www.ku.edu/acs Abstract: This document introduces users to basic Microsoft Word 2000 tasks, such as creating a new document, formatting that document, using the toolbars, setting
Microsoft FrontPage Practical Session
 Ministry of manpower Higher college of technology Department of Information Technology QA Umbrella Workshop 30 th August- 3 rd September 2008 IT Skills Microsoft FrontPage Practical Session Copyright of
Sending Ads to Production Through ViewYourAds.com
 Sending Ads to Production Through ViewYourAds.com 1. Go to ViewYourAds.com in your browser. (NOTE: Do not use Internet Explorer) 2. Please log in with the user name and password provided by your local
A Document Created By Lisa Diner Table of Contents Western Quebec School Board October, 2007
 Table of Contents A Document Created By Lisa Diner Western Quebec School Board October, 2007 Table of Contents Some Basics... 3 Login Instructions... 4 To change your password... 6 Options As You Login...
User Guide 701P Wide Format Solution Wide Format Scan Service
 User Guide 701P44865 6204 Wide Format Solution Wide Format Scan Service Xerox Corporation Global Knowledge & Language Services 800 Phillips Road Bldg. 845-17S Webster, NY 14580 Copyright 2006 Xerox Corporation.
Creating an ArborCAD filter from Excel.
 ArborCAD Help File Windows systems only Creating an ArborCAD filter from Excel. This help file assumes you have your tree survey data in an Excel sheet. The ArborCAD filter is a special file which holds
edoc Builder Templates SPECIFIC CARD TUTORIAL
 edoc Builder Templates SPECIFIC CARD TUTORIAL 1. The files you need are located: J:\Customers Files\D\DocketManager\Templates\MOSH_Tutorial 2. Open the Corel File. If you need to install the fonts on your
PROFESSIONAL TUTORIAL. Trinity Innovations 2010 All Rights Reserved.
 PROFESSIONAL TUTORIAL Trinity Innovations 2010 All Rights Reserved www.3dissue.com PART ONE Converting PDFs into the correct JPEG format To create a new digital edition from a PDF we are going to use the
One of the most important forum skills you will need to master is that of copying and posting of images into the forum.
 Image Posting One of the most important forum skills you will need to master is that of copying and posting of images into the forum. At the bottom of each posting you make there is the option to upload
Comfort Optimizer Installation Instructions
 Congratulations on choosing the best all around load calculation program available. Along with this instruction manual should be the installation CD. Before we can install the Comfort Optimizer, we have
Using MS Publisher. Launch MS Publisher: Start > All Programs > Microsoft Office > Publisher. Setting up Document Size and Orientation
 Designing and Creating your GIS Poster Revised by Carolyn Talmadge 1/20/2015 First think about your audience and purpose then design your poster! Here are instructions for setting up your poster using
dbdos PRO 2 Quick Start Guide dbase, LLC 2013 All rights reserved.
 dbdos PRO 2 Quick Start Guide 1 dbase, LLC 2013 All rights reserved. dbase, LLC may have patents and/or pending patent applications covering subject matter in this document. The furnishing of this document
LSSP Corporation 1 PinPoint Document Management Initial Setup Guide - Advanced
 INTRODUCTION This guide will go over some of the more advanced topics involved with setting up your database. Every topic discussed in this guide is completely optional for your database none of the following
SharpSchool Website Training Guide
 SharpSchool Website Training Guide This is a guide to help you get started on your SharpSchool website. SharpSchool sites will take the place of MyTeacherZone sites beginning July 1, 2013. Contents of
PDF Splitter User Guide. PDF Splitter. User Guide. CoolUtils.com. CoolUtils.com Page 2
 USER GUIDE PDF Splitter User Guide CoolUtils.com CoolUtils.com Page 2 Table of Contents 1. Introduction to PDF Splitter... 5 2. How to Get Help... 6 3. How to Install PDF Splitter... 7 4. PDF Splitter
WideQuick Remote WideQuick Designer
 FLIR ThermoVision CM training This manual is starting off with a quick instruction on how to start the system and after that there are instructions on how to make your own software and modify the FLIR
Microsoft Word 2010 Introduction to Mail Merge
 Microsoft Word 2010 Introduction to Mail Merge Elizabeth Wells February 2012 Copyright 2012 ElizabethWells All rights reserved. Except as permitted under current legislation, no part of this work may be
DecisionPoint For Excel
 DecisionPoint For Excel Getting Started Guide 2015 Antivia Group Ltd Notation used in this workbook Indicates where you need to click with your mouse Indicates a drag and drop path State >= N Indicates
CPM-200 User Guide For Lighthouse for MAX
 CPM-200 User Guide For Lighthouse for MAX Contents Page Number Opening the software 2 Altering the page size & Orientation 3-4 Inserting Text 5 Editing Text 6 Inserting Graphics 7-8 Changing the Colour
XP: Backup Your Important Files for Safety
 XP: Backup Your Important Files for Safety X 380 / 1 Protect Your Personal Files Against Accidental Loss with XP s Backup Wizard Your computer contains a great many important files, but when it comes to
Using Mail Merge in Microsoft Word 2003
 Using Mail Merge in Microsoft Word 2003 Mail Merge Created: 12 April 2005 Note: You should be competent in Microsoft Word before you attempt this Tutorial. Open Microsoft Word 2003 Beginning the Merge
Title and Modify Page Properties
 Dreamweaver After cropping out all of the pieces from Photoshop we are ready to begin putting the pieces back together in Dreamweaver. If we were to layout all of the pieces on a table we would have graphics
Introduction to Microsoft Office 2016: Word
 Introduction to Microsoft Office 2016: Word Last Updated: September 2018 Cost: $2.00 Microsoft Word is a word processing software. You can use it to type letters, reports, and other documents. This class
Create Reflections with Images
 Create Reflections with Images Adding reflections to your images can spice up your presentation add zest to your message. Plus, it s quite nice to look at too So, how will it look? Here s an example You
Microsoft Excel 2007
 Learning computers is Show ezy Microsoft Excel 2007 301 Excel screen, toolbars, views, sheets, and uses for Excel 2005-8 Steve Slisar 2005-8 COPYRIGHT: The copyright for this publication is owned by Steve